oldcarfan
-
Posts
2,828 -
Joined
-
Last visited
Content Type
Profiles
Forums
Events
Gallery
Everything posted by oldcarfan
-
Revell 1940 Ford Pickup
oldcarfan replied to Nova-ss's topic in WIP: Model Trucks: Pickups, Vans, SUVs, Light Commercial
You're making a good start, have fun! -
Heller 1/24 Citroën Méhari - Now with actual review!
oldcarfan replied to Junkman's topic in Car Kit News & Reviews
Great, another weird kit I have to buy! I haven't even decided when to start the Renault R-5s yet! -
Now if Ford would offer one like this as well!
-
Love your ideas. You have a great....

-
I use eBay as a quick reference tool to judge the value of a kit. I always look at what people are paying for them, not what sellers are asking for them. Those two things can be waaayyy different!!! Lol
-
Retro Review ESCI Renault R-5 Rally Car
oldcarfan replied to oldcarfan's topic in Car Kit News & Reviews
I haven't found one yet. Someone made a stock version in 1/20th scale a long time ago. it may have been ESCI, not sure. I got one as a teenager and was very disappointed that it was the "wrong" scale. I still have the wheels from it. -
Retro Review ESCI Renault R-5 Rally Car
oldcarfan replied to oldcarfan's topic in Car Kit News & Reviews
I just found this neat video with some sweet R5 action in it. https://www.youtube.com/watch?v=aLrPlFRTzOw -
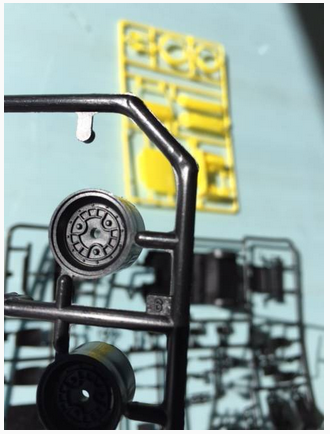
This retro-review covers ESCI's long out of production 1/24 scale Renault 5 Rally car. I love offbeat and unusual subjects and Renault's 5, known as the Le Car here in the states, hits both of those marks. It is only a quick shoot and post as I don't have a photo backdrop or decent lighting. I just thought there might be some others who enjoy weird little cars as much as I do. I actually have two of these kits, the Gitanes and the Calberson versions. For the purposes of this post, I am picturing the Calberson version as the only difference in the kits is the decal sheets and the colors the bodies are molded in. I bought these kits in Naples, Italy at the fleet-landing gift shop over twenty years ago and just came across them in storage last weekend at my Mother In Law's.(She Who Must Not Be Named) I also found an unbuilt ESCI Gelandewagen Paris-Dakar, which I plan to start as soon as I actually get room on the table, and a Volkswagen Golf Rally car, so all in all it was a good Thanksgiving for me! I seem to remember buying the ESCI Series 1 Ford Escort rally car, the Audi Quattro rally car and a Range Rover as well. Can you guess what subject I was into back then? Maybe I'll come across them someday. I don't have any history to relay on this kit, (maybe there are some ESCI experts out there?) but I'm pretty sure ESCI produced it in other variants as well. I seem to recall seeing a red and possibly a green one in US hobby shops back in the day.All ESCI kits I have seen are packaged in large format boxes about the size of the special edition kits AMT does. There is no printed production date on these two boxes, but the cool box art paintings are helpfully signed by the artists. The Gitane's artwork was done by someone named Giglioli in 1980, while the Calberson's artwork was done by R. Cappello in 1984. The body is very good proportionally, looking better than a lot of new-tool kits I have bought. All parts are crisply detailed, with very little flash and only faint parting lines. It should require little in the way of clean up. The Calberson kit's body parts are well molded in a bright yellow, the Gitanes car's body is in a blue close to Grabber blue. The body is molded in one piece except for the hood and rear hatch which are separate. The chassis, engine and interior bits are molded in black and are on one large sprue. The only real issue with this is that the sprue containing these parts is slightly too wide for the box, meaning the guy who packed the kits had to sort of bend it to get it in. Luckily it doesn't appear to have warped the parts themselves. The interior is platform style with decent detail on the separate side panels and dash. It includes two nice racing seats for the driver and navigator. The engine is pretty simple but should respond well to detailing. The way it is designed reminds me of AMT's Volkswagen Rabbit kit of the 70s. The wheels, roll-cage and rally lights are also black and are on a separate sprue. I really like these rally lights and may have to mold them so I can put some on other kits.The windows and all lenses are on a clear sprue. Of course this sprue was not wrapped, so the windshield is a bit scratched, but it should polish out.The taillights are molded on this sprue as well, so they will have to be painted transparent red. The tires are wide, low-profiles with only a faint pebbly finish on the tread. I didn't scale them out but they fit an AMT wheel, so I'm guessing 15 inch. They also have raised outline type lettering on both sides. One side has Goodyear, the other Dunlop. The tires are fitted to three-lug Campagnolo(?) mag-style rally wheels. The decals seem in very good shape for so old a kit I think they will still be usable. The ones on the Calberson car are printed by Cartograf and represent the car as raced at the 1978 Monte Carlo Rally, and the Gitane car's were by a company called "G.Decal, Italy" The sheets in both kits are nicely done and quite thorough. For the Calberson, the only thing not included is the red stripe around the bottom of the body which will have to be painted. I don't know where ESCI's molds ended up, but I would sure love to see some of their kits back on the shelves. This is my mini-review such as it is, the pictures are not great, but I hope you enjoy it. Let me know what you think.
-
AMT/MPC Dodge Deora
oldcarfan replied to Musclecar Mike's topic in Model Trucks: Pickups, Vans, SUVs, Light Commercial
Great build! -
I would love to see them. I've been working on this one for a long time. It's a 67 AMT with the 65 roof section.
-
Nice! I've always had a soft spot for the 67-68 coupes. My dad had one when I was little. He called it a notchback mustang.
-
I'm pretty sure this Mustang kit started off as a Palmer offering back in the day. I think the Challenger kit that Lindberg put out a while ago was one of Palmer's old molds too. Palmer's kits were more miss and miss than hit and miss, quality-wise.The Chevelle and the 53 Ford were later from Lindberg's renaissance a few years back. Much better kits.
-
You are doing some amazing work on a poor kit. It's going to look great! Keep it up and have fun with it.
-
Whats your work area like?
oldcarfan replied to Dann Tier's topic in General Automotive Talk (Trucks and Cars)
I don't have a picture of my work area, but here is an approximation:
-
Was this modified from AMTs fastback kit? If so I may have to get one and try to use the roofline with one of their notch backs.
-
The first I remember was my dad's 1965 Mustand 2+2. It was light metallic blue with the sport wheels. It had the fold down rear seat. He loved that car.
-
Your First Ride
oldcarfan replied to MrObsessive's topic in General Automotive Talk (Trucks and Cars)
Sadly I don't have any pictures of the first vehicle I bought, but Revell's releasing of the 1982 F150 has made it possible for me to start on a model of it. -
Ford Van
oldcarfan replied to Stroker Ace's topic in Model Trucks: Pickups, Vans, SUVs, Light Commercial
In Texas we always called them a panel van or panel delivery. You've done an awesome job on this. I have one I painted blue that is on the get-to-it list. You've inspired me. I'm gonna have to move it up in line! -
Scratchbuilt Welder
oldcarfan replied to SlotDaddy1963's topic in WIP: Model Trucks: Pickups, Vans, SUVs, Light Commercial
Just amazing. Good build and the weathering looks just right too! -
Looks good to me. Just needs a little music player singing over the river and through the woods!
-
Painting in an apartment
oldcarfan replied to njcarguy's topic in General Automotive Talk (Trucks and Cars)
What he says. Proper preparation prevents P-poor product. Get rid of seams and irregularities on everything. Prime everything it helps see mold lines, I use a Dupli-Color sandable spray can type then sand it smooth. #4 is great, the only thing I would add is to make a stand for the parts and buy some of those resealable plastic shoebox type bins. As soon as you are through painting, put the parts in one to dry. It helps keep dust off the fresh paint and minimizes the fumes when you bring the parts in to dry. -
Right now Modelhaus would be your best bet on those.
-
So true!
-
Thanks for the responses one and all. I have bought many a kit for that one particular part that I just had to have for a build. Usually it is tires and wheels. It just bothers some part of me to have a kit sitting around waiting to have its missing parts returned to it. It's like it is calling out to me! Lol. I just pictured those Rat Rod sets and the ones from the Midget racers and all the other cool ones Revell makes being a neat add on for the guy who goes in to buy a kit that he wants to do something different with.
-
With it inverted it looks like some kind of custom track nose! Great idea. It might look good like that on the 29 roadster as well.