Rockford
-
Posts
1,944 -
Joined
-
Last visited
Content Type
Profiles
Forums
Events
Gallery
Everything posted by Rockford
-

1/32 Freightliner cabover
Rockford replied to Rockford's topic in WIP: Model Trucks: Big Rigs and Heavy Equipment
Thanks Jurgen I'm happy with it so far. Still stuck on clours. -
1/32 Freightliner cabover
Rockford replied to Rockford's topic in WIP: Model Trucks: Big Rigs and Heavy Equipment
Thanks Jeff. Thanks for the memories of the Daytons. I don't think we had actual Daytons but there were some spoked wheel setups over here in UK but only for really heavy work, they were more common on the continent though. I can well imagine them being tricky to work with. When I started in the workshop we still had an awful lot of cast iron split-ring rims around and LH and RH taper seat wheel nuts. Air guns were rare and we would often find ourselves with an 'L' bar supported by an axle stand with a 6ft tube slid over it. We'd then have to climb onto the tube and walk up it to the end where our weight would be most effective and start gently bouncing on it until the nut cracked off. I still feel the shockwaves going through my frame as it broke free, ankles right up to skull. One thing I'll never understand is the Budd system for tandem wheels where you have one wheelstud sleeved inside another, absolutely nonsensical. -
1/32 Freightliner cabover
Rockford replied to Rockford's topic in WIP: Model Trucks: Big Rigs and Heavy Equipment
It rained all day yesterday, we've got flooding around the area and in Liverpool that's really unusual because everything just runs into the Mersey, it will take anything, so, bad times. We're fine, we're on the 2nd floor so if we get wet a lot of people are in trouble. Thanks for the kind words. Can't wait to see your Macks finished. -
M-9 45 Ton Trailer Build
Rockford replied to Chariots of Fire's topic in WIP: Model Trucks: Big Rigs and Heavy Equipment
Absolutely fantastic stuff. -
Great engineering solution. Going to look excellent.
-
Service Truck Kitbash
Rockford replied to PHPaul's topic in WIP: Model Trucks: Big Rigs and Heavy Equipment
Sorry for sending you down a blind alley. Charles is more attuned to this stuff than myself. He'll do you proud. -
Tigercat 880E longer 1/48 scale
Rockford replied to François's topic in WIP: Model Trucks: Big Rigs and Heavy Equipment
Jürgen will be prolific with a printer like that, we won't be able to keep up! -
The Same but “ a little “ Different
Rockford replied to Biggu's topic in WIP: Model Trucks: Big Rigs and Heavy Equipment
The company history is very interesting, thank you for compiling that so well. Sadly Hayes fell victim to the ruthlessness of Paccar. I do love their trucks but I have no illusions about their sharp business practices. -
Service Truck Kitbash
Rockford replied to PHPaul's topic in WIP: Model Trucks: Big Rigs and Heavy Equipment
The piano hinges do work but I can imagine it would be a tremendous task with all the doors you have there. -
Ford LN 8000 abd Tank Trailer
Rockford replied to OldTrucker's topic in Model Trucks: Big Rigs and Heavy Equipment
Been there, or put it in a box and shelve it because just to look at the thing gives you a nosebleed! You didn't give up though and look at the results. Great looking combination. -
Pete 352 day cab
Rockford replied to Jürgen M.'s topic in WIP: Model Trucks: Big Rigs and Heavy Equipment
By the way, I look at my models and am disappointed, we all see the flaws, not the good bits. -
Pete 352 day cab
Rockford replied to Jürgen M.'s topic in WIP: Model Trucks: Big Rigs and Heavy Equipment
I'm pretty much a blank sheet on 3D printing so I have nothing to offer other than I suppose you need to start with the best surface finish you can get. I know there's different media you can use, each with their pros and cons. I really admire your work Jurgen [almost to the point of envy!], your Peterbilt looks like a Peterbilt! You created it yourself and you can go pretty much anywhere you want within the hobby, all I can do is butcher someone else's work to make a variation on their theme so you're miles ahead of me. Keep going, you add more to each build you do. -
Ford LN 8000 abd Tank Trailer
Rockford replied to OldTrucker's topic in Model Trucks: Big Rigs and Heavy Equipment
Impressive work! Great looking company rig. I can only imagine the stress and struggle you had to get it looking that straight and clean. -
Tigercat 880E longer 1/48 scale
Rockford replied to François's topic in WIP: Model Trucks: Big Rigs and Heavy Equipment
They look excellent quality, ready to paint right from printer! Is there masses of clean up to do to get to that stage? -
Pete 352 day cab
Rockford replied to Jürgen M.'s topic in WIP: Model Trucks: Big Rigs and Heavy Equipment
Looking great, keep up the good work. -
The Same but “ a little “ Different
Rockford replied to Biggu's topic in WIP: Model Trucks: Big Rigs and Heavy Equipment
Very good idea, making the conversion. Looking at your previous job it will be a clean looking Job. Twinsticks on YouTube loves Hayes rigs and Mike the Truck Nut on YT, his dad had one doing logging in BC. I'll read the history on the company later. I have family in BC so I always like the connection. -
1/32 Freightliner cabover
Rockford replied to Rockford's topic in WIP: Model Trucks: Big Rigs and Heavy Equipment
On a separate note, use Tamiya masking tape! I've just gone to put new socks on and look what was stuck on the bottom of one of them, a piece of Tamiya masking tape! It survived the washing machine so it will easily cope with keeping paint at bay.
-
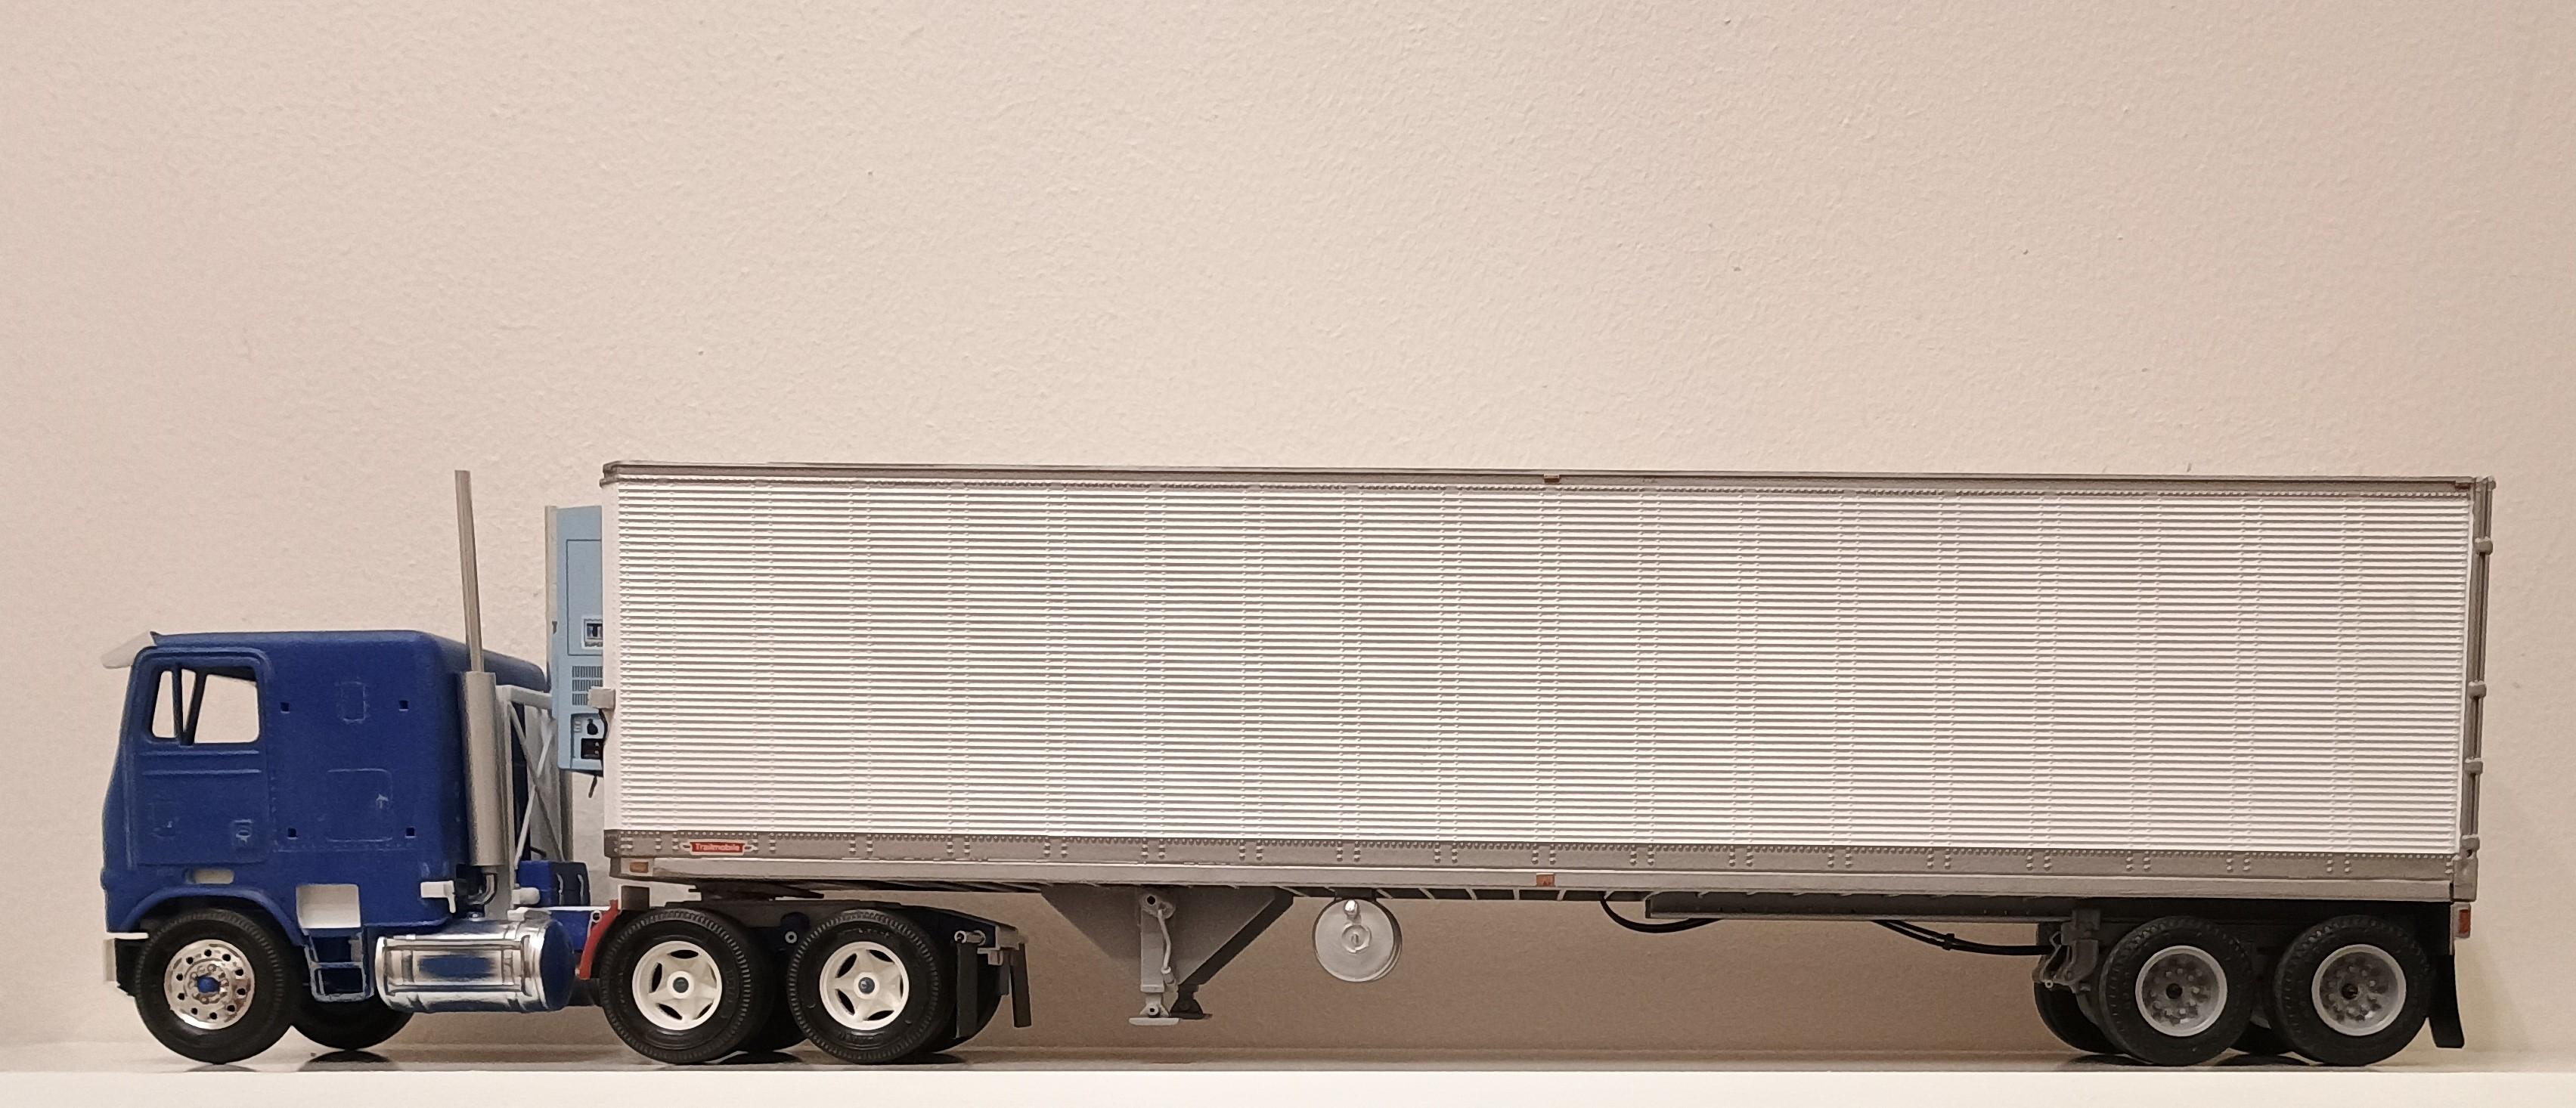
1/32 Freightliner cabover
Rockford replied to Rockford's topic in WIP: Model Trucks: Big Rigs and Heavy Equipment
I think it looks the business with the AMT Trailmobile reefer behind it.
-
1/32 Freightliner cabover
Rockford replied to Rockford's topic in WIP: Model Trucks: Big Rigs and Heavy Equipment
Right, I've got this to the point of paint, so I'll have to firstly, work out what colour I'm going to paint it and then wait for suitable conditions. At the moment it's very damp and cold here in Blighty. This kit is quite poor in rendering the Freightliner cab, but with the mods I've done it is much better, still not right but definitely looking more like a Freightliner. I reversed the cab lock handles because every truck I've seen has them pointing down when locked and I'm beginning to think that the only one that has them pointing up is the AMT kit and that's where I must have seen it. The linkages are very fragile so I'll attach them immediately before I paint. Also made a visor out of ali sheet. Roughed up the tyres removed the mould separation line in the tread. Started painting the interior with a Humbrol Matt colour and it is awful stuff. Stirred it for ages and it's still watery and refusing to dry. I'll just have to be patient and recoat a few times. If the weather stays garbage I'll have to think of something else to start. ?
-
Pete 352 day cab
Rockford replied to Jürgen M.'s topic in WIP: Model Trucks: Big Rigs and Heavy Equipment
Nice little touch! -
Pete 352 day cab
Rockford replied to Jürgen M.'s topic in WIP: Model Trucks: Big Rigs and Heavy Equipment
Your builds always put a smile on my face! You're so inventive and fearless. The chrome does look really good. I've used it over grey primer with fairly good results but I may add that coat of black in future and see what it does. Are you thinking of a trailer for this? -
Kenworth T600 snap tite
Rockford replied to Thedragsterdude's topic in Model Trucks: Big Rigs and Heavy Equipment
Grand little kit is this. Going to look good. -
The small block turns 70
Rockford replied to Richard Bartrop's topic in General Automotive Talk (Trucks and Cars)
Wow. It's such a brilliant design it's not going away soon. Ed Cole used his experience from Cadillac to improve the design of the Chevy V8 and look what happened! It's a beautiful piece of engineering. I am fortunate here in the UK to own one and I often look at it and in awe, what a design. -
Good idea.
-
AMT Autocar DC9965B Truck 1972 rebuild
Rockford replied to Pete68's topic in WIP: Model Trucks: Big Rigs and Heavy Equipment
Brilliant paint finish. Are you making it a daycab tractor?