TimKustom
-
Posts
366 -
Joined
-
Last visited
Content Type
Profiles
Forums
Events
Gallery
Everything posted by TimKustom
-
I'm not Bernard, but a see-thru image like that typically involves a tripod and being careful not to move the camera or model. Put hood on, take pic. Take hood off, take pic. Put both images in editing software (i.e. photoshop) and layer them with the hood on pic on top. Adjust the transparency of the hood on pic to the level you would like to "see though" it. Magic! HTH, and looking forward to seeing what you come up with!
-

The EXCLUSIVELY '32 Roadster/Cabriolet ONLY thread. Show us what you got!!!
TimKustom replied to mrm's topic in Model Cars
Built this one several years ago, the second in my roadster series. -
I REALLY like this. Very creative and kool build!
-
Awesome pair. Nice photos too!
-
2020 ACME Southern Nationals NNL – UPDATE
TimKustom replied to OutaFocus's topic in Contests and Shows
Congrats Claude! That is an awesome model that is dripping with detail. Very well deserved! -
He frequented the GSL's for many years. I believe he placed every time he went except maybe once. He typically build factory stock or box plus. I have a few more of his models that I will share in the future. Thanks for all the wonderful comments. Glad you all enjoyed story as well.
-
I recently finished this model and thought I would share the story behind it. It was started by my good friend Eric Hight. He passed away in 2017 and those that knew him would likely remember him and wouldn’t forget him. I remember him telling me about all the detail he was putting into it, every line, hoses with clamps, etc. all researched as he would do. This model was to be his entry into the 2003 GSL common kit class for the AMT 1962 Thunderbird. He spent a ton of time working on the interior using all of the photo etch that is included in the Model Car Garage detail set. He went so far as casting the dash, door panels and console to have several copies “just in case.” He went even further by opening up the grille to fit the photo etch grille and casting that as well. All chrome on the model was sent out to be replated during that time. He also told me he had the Rangoon Red lacquer made for it and it was polished to perfection. Shortly before GSL-18 he was doing final assembly, and hit a road block. The chassis, interior, windshield, and body assemblies would not “snap” in place how they should (step 5 in the instructions if you have the kit). He tried cramming it, but that slightly chipped the paint and other parts started breaking loose. I remember him calling me about it, cussing the model. He was an expert modeler and he told me this model got the best of him. So he threw it in a box to never be seen until after he passed. When I received the box, it was in pretty rough shape. Serious dirt accumulation and many parts were missing. The engine he told me about all with the detail was gone as was the rear axle, and the front suspension was all busted up. The good news was the interior was mostly complete (only missing the front seats) and the body was still in good shape just needing a throughout cleaning, polish, foil touch up and some missing photo etch bits replaced. I got a donor kit for the missing pieces and got to work building an new engine and worked to match the level of detail with the donor parts. The rear seat had to be repainted to match the replacement front seats but I chose a finish that was close to what was there. While rebuilding the chassis, I made the front wheels poseable. An extra detail I think he would appreciate that I don't think he had originally plan to include. I also think he would have approved of swapping the original tires for the narrow white walls now available in the AMT tire packs. Much like him, it tested my skills to get it finished. But there's another story behind this model… About the same time Eric started his build, my wife and I were at a show and she picked up an AMT 62 Thunderbird only this one was the pre-painted example. I thought that would be a great “first model” for her since it had a lot of pieces and it would get her accustomed to handing and glueing a variety of small parts. If she could get through this one, she would be prepared to paint a simpler model next. She managed to get it together without too much trouble and it still looks pretty good today. Eric and my wife got along great and enjoyed sharing discussions about building their T-Birds, even though Eric had to admit defeat with his. I think he would approve of them they sitting side by side today.
-
Nice job with that cool kit. I have a '65. Hope to move it up the building cue line soon...
-
Thanks for the comment. There isn’t really anything special about the metal finishes on the model. All are from Alclad and I used their Chrome, Dull Aluminum, White Aluminum, Polished Aluminum and Magnesium to various degrees. All are applied per the instructed on the bottles. Surface prep is key using their products, I try to finish all parts with 6000 grit polishing cloths to make sure they are smooth. I’ll go into more detail about how the wheels are painted since it was a somewhat complex process. First they were airbrushed Alclad Dull Aluminum. Then I applied AK Interactive’s Engine Wash to the centers and stippled it in with a Q-tip. Next Uschi Chrome Powder was applied to the outer rims to simulate that part being polished. The separate 6-pin hubs were painted Alclad Polished Aluminum and the knockoffs (sourced from a Accurate Miniatures Grand Sport Corvette) still have their satin plating. The tires are painted Tamiya TS-82 Rubber Black then shaded with crushed oil pastels and a wash for the tread. Hope that gives some insight your question and thanks again for everyones humbling comments.
-
Just love this build. The record player is too much!
-
Awesome modern take on a vintage Charger. Spoiler works well with the rear stripe.
-
Nice build! The fender trick is certainly an improvement. Great details all around too.
-
That's cool. I like the swirl-a-delis finish on the boards. Nice touch!
-
Wow! Thanks for all the comments! I am humbled by the words said from so many highly respected builders in our hobby. I started this model in November of 2015, and it was going pretty good until the middle of 2016 when life got in the way for a few of years. A few other projects pushed it to the side of the bench as well but it was always there taunting me to make it the best I could. I don’t build very linearly, and I don't apply any timeframes or deadlines to my models. I work on each one when I feel the time is right to work on that one. That's the biggest reason I’m not comfortable posting WIP threads. Here are a few behind the scenes of how this model transformed over the years. It’s not really all that spectacular IMO, but thought some of you might enjoy them. This car had a hood early in it's design. Ed "Big Daddy" Roth always hated the Orbitron because he covered the engine up. I took his advice and it was gone by the time it was ready for paint. I also decided early that there wasn't really any point in opening the doors or the trunk. The truck would only feature a fuel tank, oil tank and a battery. Those are not all that interesting and it had the possibility to mess up the aesthetics of what I working to accomplish. Very early chassis mockup. I think the '40 Ford center section adds a sense of strength to the chassis that complements the powerful Offenhauser engine. Starting to take on its final form. Exhaust is scratch built from plastic and aluminum tubing. Etched metal would wrap the tubing later. Radiator is scratch built with photo etch screen. It produces a realistic effect behind the etched grille. Note pins for grill shell. Nearly every part of the model was pinned so it could be assembled and reassembled to ensure proper fit. Engine components are finally coming together. As Alan pointed out, the headlights must be in the correct area. I bent quite a few pieces of silver wire making stanchions for the Parts by Parks aluminum headlights before settling on the final pieces. Finer chassis details coming together. Brake master cylinder and clutch linkage. Oil lines are ran to ensure they run securely though the chassis. The metal finishes were painted first. I had just finished adding the ignition system when I took this image. I was considering an off white interior at the as well, but went back to my original idea of the two tone gray. This was taken the day after I painted the lavender. I had already started the interior finishes as well. A special note about the wheels here. I was never happy with how they came out. I discussed this problem with Norm Veber and he agreed to machine them into separate pieces making them much easier to paint. The finished model has that set and they make a major difference. Just one part of the tedious final assembly: Adding the brake lines. I used Detail Master line, it is the best material I've found to work with. Not to hard, not to soft. Brackets are made from Litho plate metal. I cut very small pieces, drill two holes in it, fold them around small tweezers and thread on the brake lines to secure them to the frame. This is the third roadster I have built. They are quite different but share a few qualities. All are supercharged (it's a model why wouldn't you supercharge it? LOL), all have Vee'd windshield frames and all are built to be period correct hot rods. My next one is not a roadster but shares some of the qualities... stay tuned.
-
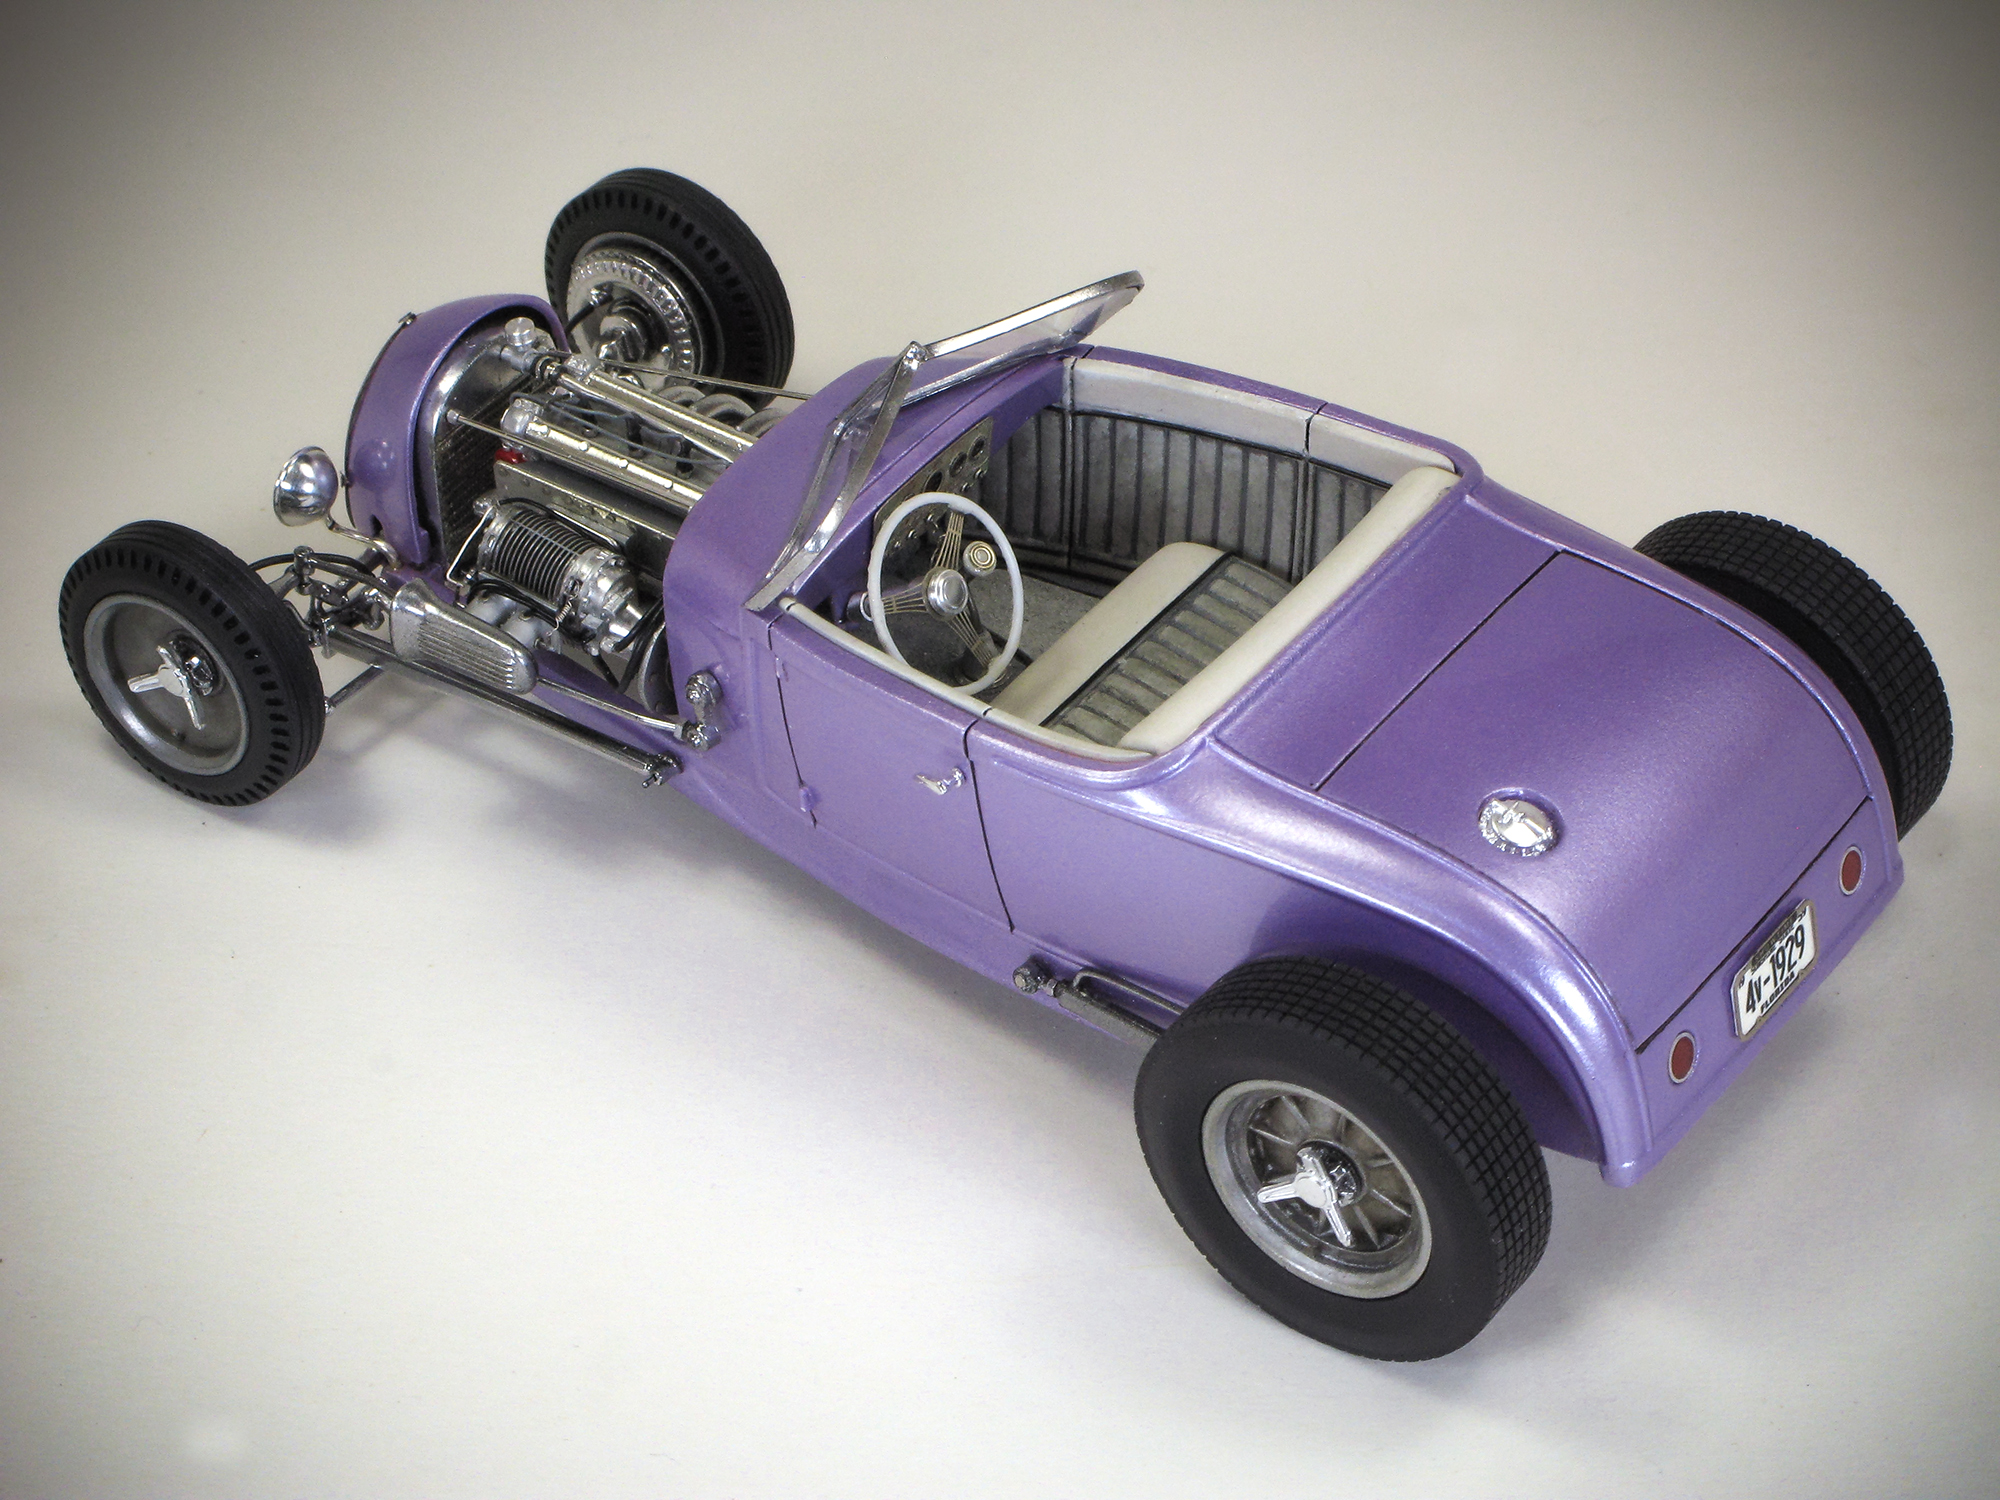
I recently finished this 1929 Model A roadster. Built as a period correct hot rod with a nod to late ’50’s Indy Roadsters. Paint is custom mixed using lavender and silver pearl pigments in U-Pol 2k clear. Various Alclad metal finishes and AK Interactive washes. Custom mixed light and dark gray enamel for interior. Smoothed out with Replica Miniatures of Maryland Hallock windshield frame. Model Car Garage track nose with photo etched grille. Parts by Parks head light bezels with Czech Truck Models headlights on scratch built stands. Scratch built tail lights with bezels. Custom photo reduced license plate with photo etch frame. Frenched flip top fuel filler. Engine: Ezell’s 270 cubic inch Offenhauser modified for street use with electric starter, generator and scratch built Drake style supercharger drive. Replica Miniatures of Maryland super charger with parts box injectors. All appropriate electrical, cooling and fuel plumbing were added along with a complete dry sump oil system. RB Motion spark plugs and boots. Scratch built exhaust and muffler. Injector scoop from AMT Surf Woody with foam filter. Many machined or photo etched nuts and bolts added. Transmission is a Ford 3 speed from a Revell ’40 Ford with clutch linkage added. Scratch built radiator. Interior: Replica Miniatures of Maryland Auburn dash insert with custom “abalone” pearl insert with separate gauges, bezels, buttons and ignition key with chain. Model Car Garage Banjo steering wheel with machined horn button attached to sprint car style steering box mounted under dash. Scratch built pedal assemblies, shifter and floor mats. Revell seat and door panels painted in two tone gray to simulate lambskin leather trimmed with black piping. Chassis: 10” zee’d frame. ’40 Ford center section and rear spring crossmember for extra strength. Replica Miniatures of Maryland Quick Change rear axle and buggy spring attached to modified rear split wishbones with reinforcement bars. Front axle from ’29 Ford with friction shocks. Wheels are remastered Eztel with separate tires, wheels, pressure plate and knockoffs. Replica Miniatures of Maryland Kinmont brakes on front. All brake lines added with fittings and brackets. Thanks for looking. Tim

-
Nice job!
-
NNL Nats #40 In-Depth Coverage with all builders identified....
TimKustom replied to tim boyd's topic in Contests and Shows
Awesome coverage as expected! Good to chat with you. Hope we can do it again sooner than later! -
Way kool stuff Tim and I'm looking forward to attending all the festivities around #40. Models are getting packed this weekend for a little ride from SWFL.
-
Awesome video. Thanks for posting!
-
Awesome build. One of AMT nicest underrated kits!
-
AMT Cartoon Gasser Series - how many were there?
TimKustom replied to TimKustom's topic in Car Kit News & Reviews
Way kool. Hadn't seen that one. That makes six. Is that a complete set? -
I've found images of the 57 Chevy, 56 Ford, 40 Willys, 37 Chevy, and 36 Ford. Were there any others? Example of the 37 Chevy box art.
-
Moebius /Model king 65'Mercury Cyclone A/FX
TimKustom replied to Mr mopar's topic in Car Kit News & Reviews
I modified them from the covers in the T-rantula kit with custom photoetched tops. -
Nice build! I have a '57 Bird AM/SP car in the works. This one gives me inspiration to get it finished.
-
Moebius /Model king 65'Mercury Cyclone A/FX
TimKustom replied to Mr mopar's topic in Car Kit News & Reviews
I had really high hopes for the SOHC in this kit. Better than AMT/MPC but still not there. I just hope those breathers aren't molded in. That would not be cool. But I have these so I can't really complain.