Codi
-
Posts
2,675 -
Joined
-
Last visited
Content Type
Profiles
Forums
Events
Gallery
Everything posted by Codi
-
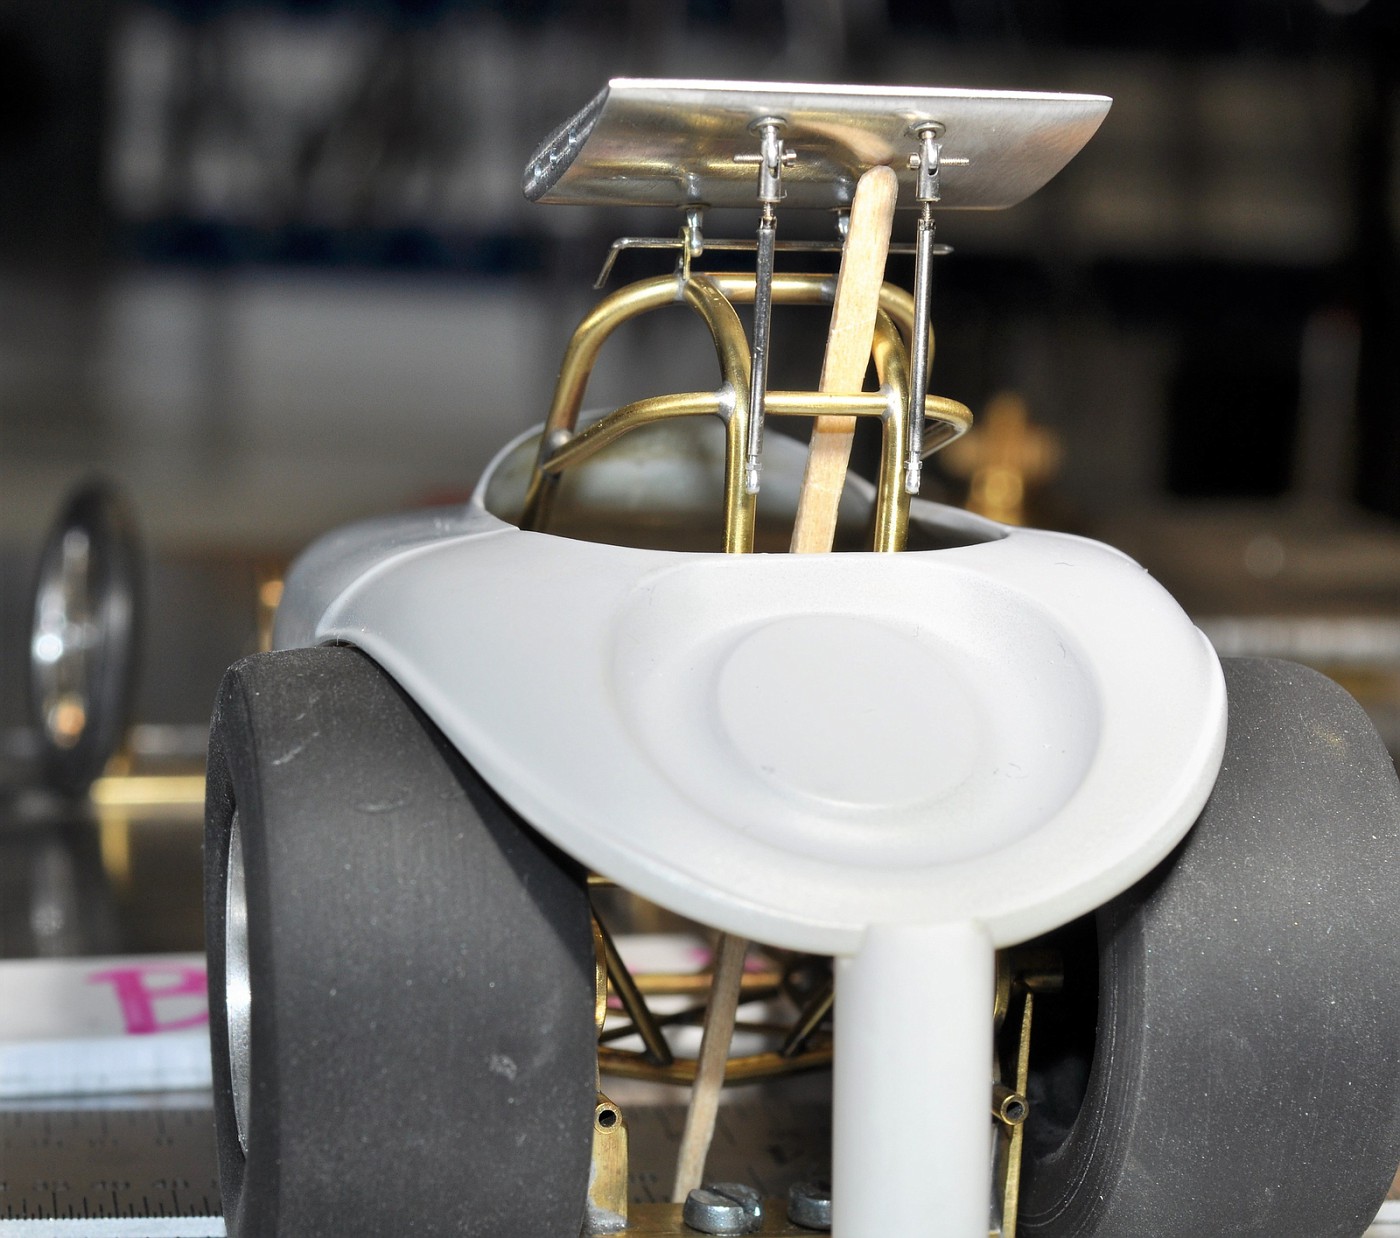
For those that observe Christmas, Hope you had a Merry one and to everyone else, a belated Happy Holidays! Well, took more time to make the necessary brackets and get them on the car than it took to fab the wing itself. I just have the 2 tab brackets to solder on the rear of the hoop to attach the rear wing supports to. The adjustable wing supports have 1.1mm s/steel tube that I made clevis brackets out of, a .5mm threaded portion which slips into the .8mm s/steel tube. Drilling / slicing the clevis brackets was pretty straightforward actually. The wing will be attached with .5mm threaded bolts. I'll add the 2 brackets and spill plates and share some final pics next week. Happy New Years TOO!!! Cheers to all, tim The body in these pics is the actual body I'll be putting on the car and I'm inclined to do the gold wheel inserts on the rear wheels..........just foolin' around to see what they might look like.

-
 Nice Christmas present there John. Thanks for sharing the pics, the outdoor shots REALLY do justice to your builds. WOW! cheers, tim
 -
Stunning model Steve. The quality of the build is top notch. cheers, tim
-
Can't see any of the pic's John..........dreaded photobucket issues? tim
-
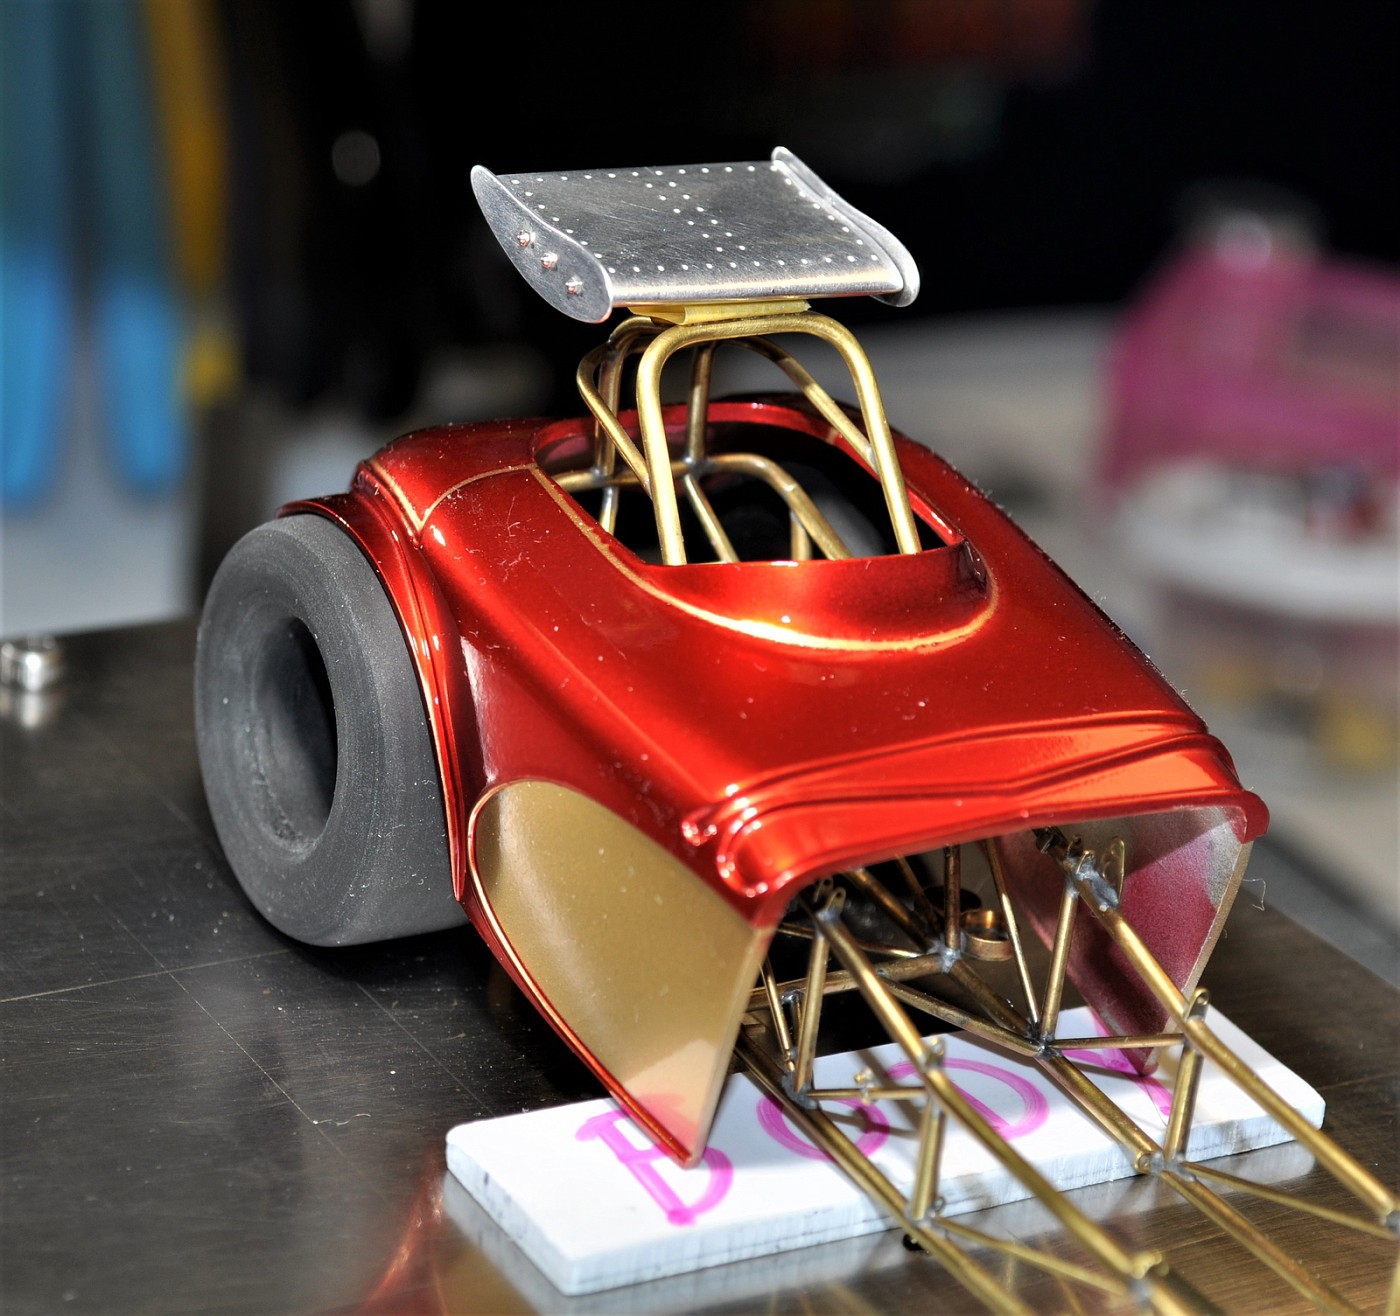
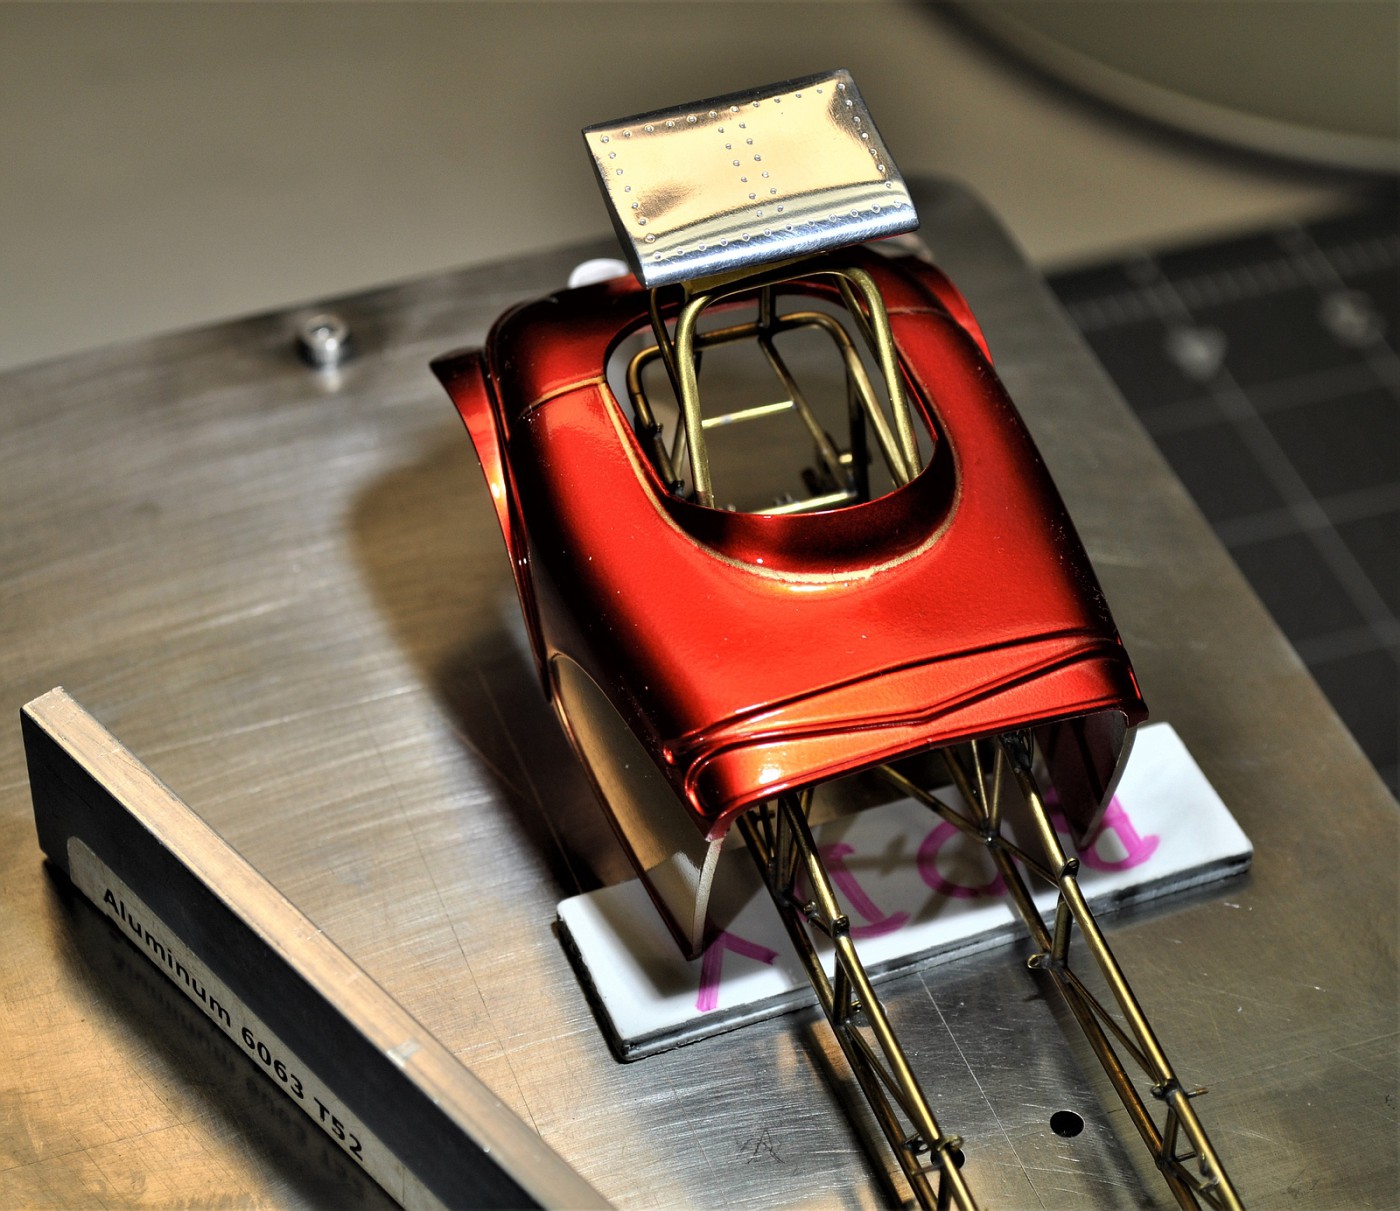
Thanks for the posts guys. Paul, that's the plan but I didn't get far beyond coming up with some ideas on some of the bracket designs, positioning etc. of the wing. The next pics I post will be of the wing on the car and the actual body for the car. It's been quite some time but the red body I've posted in these pics is/was a practice body for paint. The actual body is noticeably narrower and better looking in it's profile. I'll put it on for the next mock-up pics so you can get a better idea of what it will look like. Again, thanks guys!! Cheers, tim
-
Just went through the entire thread Greg and it is so impressive what you've done with this. You deserve all the credit in the world for even having the vision of what it MIGHT / COULD be. I doubt anyone could have done what you have with it. Your choice of color is fantastic especially after seeing what you did to the interior and how nicely detailed it is. Just fantastic sir. cheers, tim
-
I'm in awe John. ALL of it. More please! cheers, tim
-
Thanks John & Jason...yup, it'll be a keeper, especially if I can make the strut assembly the way I've imagined it. Chris, no machining on this part. Just files, dremel & jewelers drill press along with some steel dowels & a bunch of sandpaper. I spent the morning making a pair of spill plates. The pics vary as I'm considering height and angle when I make the supports for it. I'm going to take the wing apart as I stumbled across some smaller profile and more appropriate bolts on the sides. The current ones you see now stick up too far. I bought some T2M allen head rivets before they went out of business and I'll sub them instead. Looks more like a proper wing now. About 20 hours total time in this piece. I'm figuring on a similar amount of time to do the support / bracket structure for it yet. Cheers, tim
-
Looks nice Jim. Clean clean build. cheers, tim
-
Jason, thanks for the note and following along with the thread. Bob, thanks too for the comment about the solder joints, I've had PLENTY of practice by now so I'm glad that you noticed. The Henry build taught me a lot. Dave, Goatguy, appreciated sir and your comment put a smile on my face. Thanks! Chris, I don't know about 3D, I have enough trouble with 2D.............I don't know how you guys that have mastered CAD do it. Hope to see a post soon on the Vega, I know you're working hard on it! Randy, ALWAYS good to hear from you man. Any chance you've had some bench time at all lately? If so, don't make us beg, just post away please. After fussing around with plumbing and before I started the body bracing etc. I have thought of adding a wing to the car, so the last couple days I massaged a piece of alum. bar stock (no machining this time, even though I gave it plenty of thought) and I think I'm going to add it to the car. I have to do the necessary brackets to mount it and the twin spill plates on the sides, but I like the look with the test body so I'm pretty sure it's going on the car as well. The alum. bar stock you see in the foreground is what I started with as an fyi. The wing is stuck on the chassis with some Tamiya tape so I could check out how it might look. cheers, tim
-
That's an impressive looking duo Tim. Congrats on the pair. cheers, tim
-
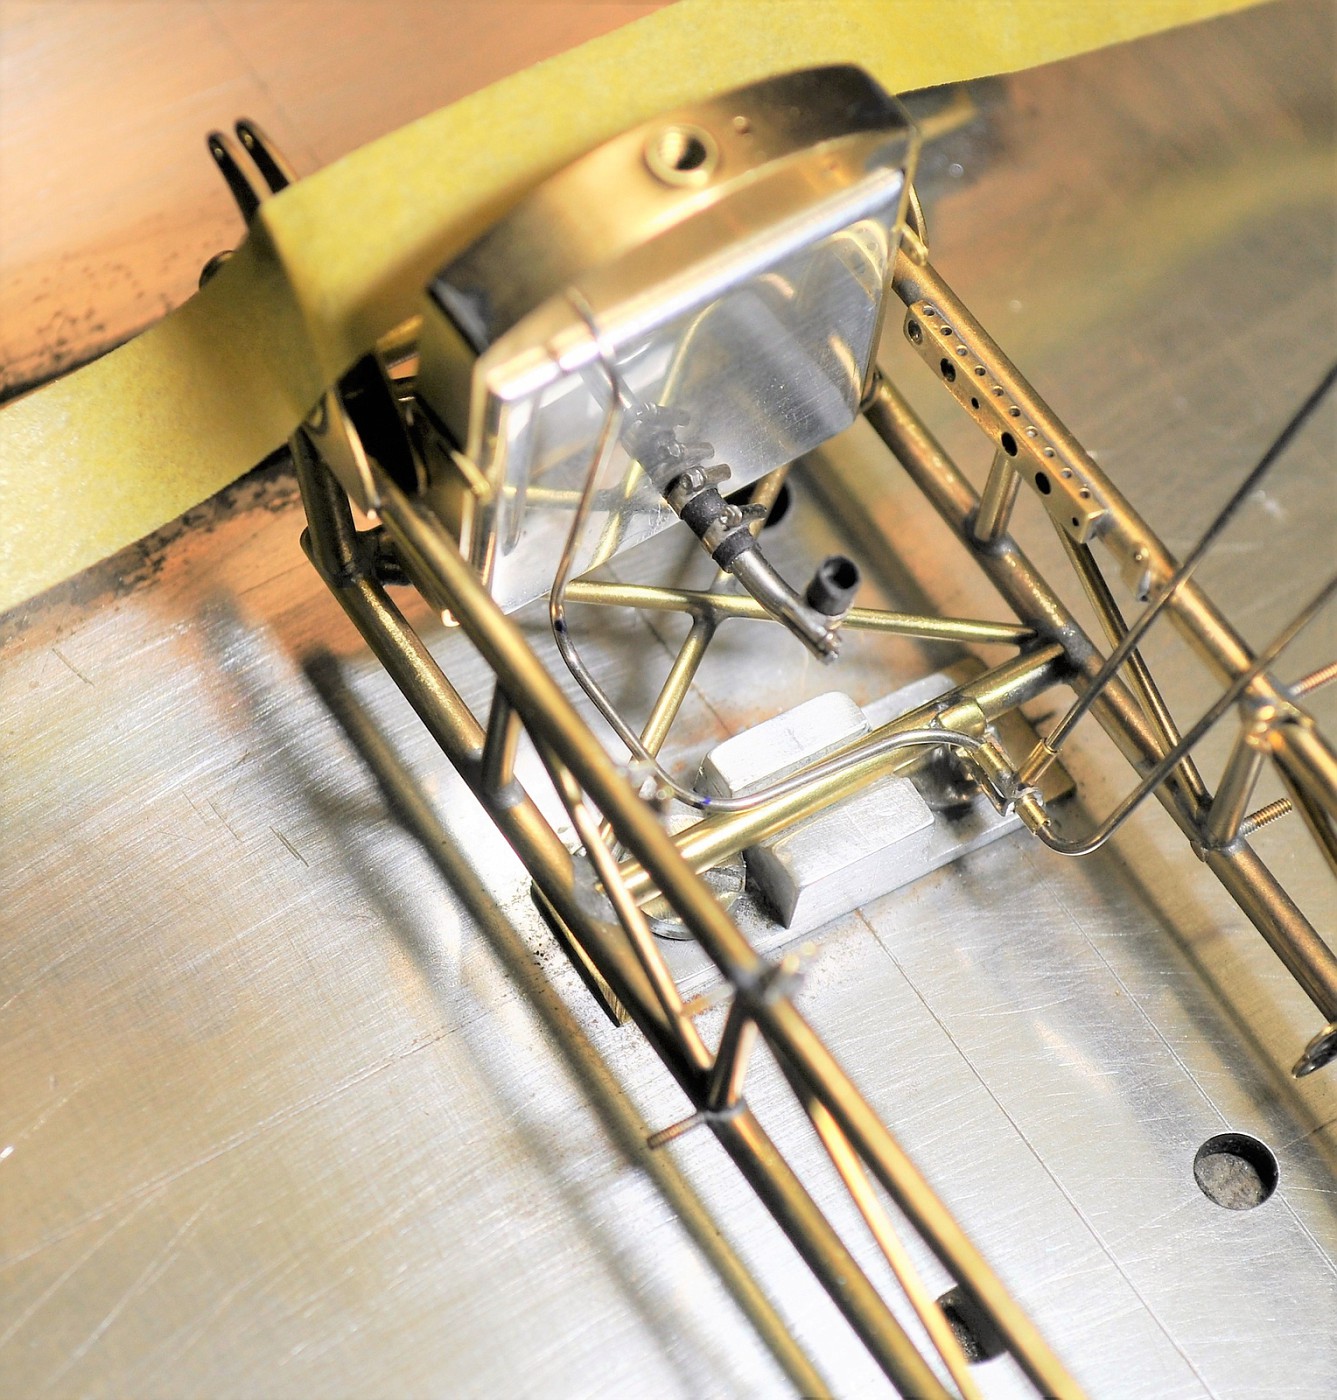
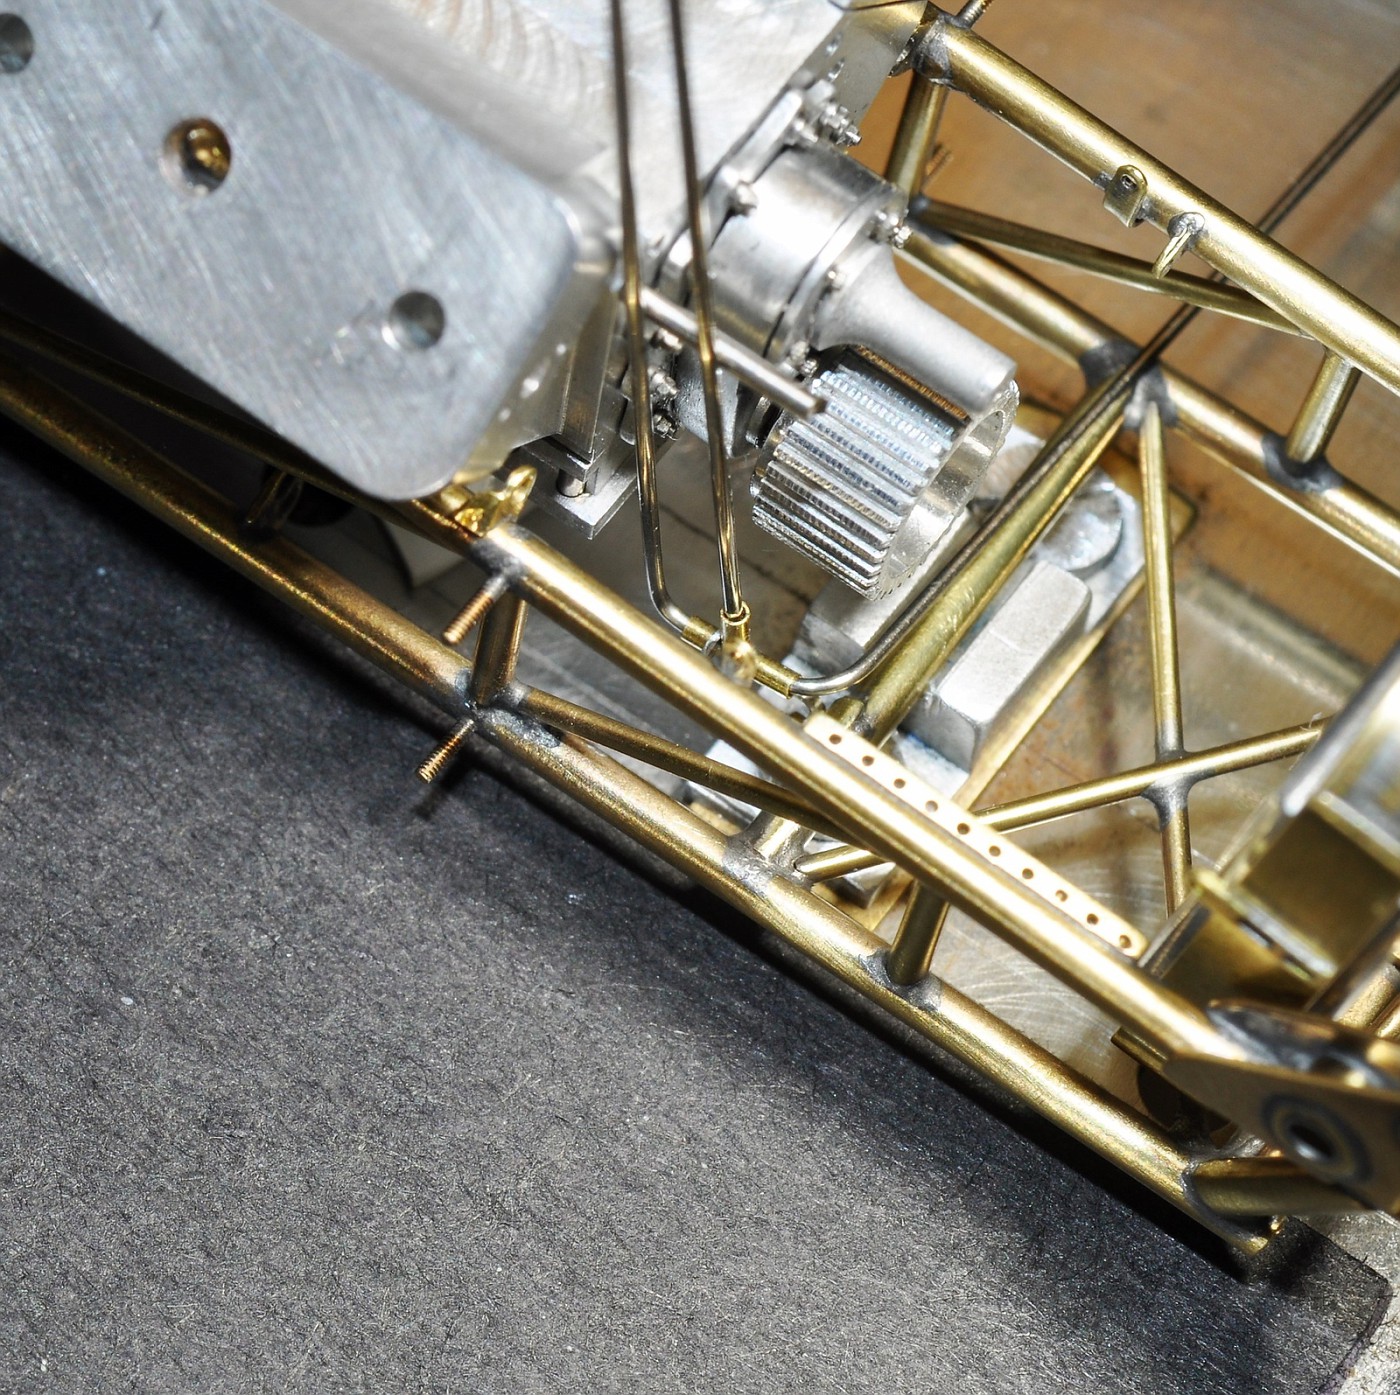
Appreciate the acknowledgements Dave & Chris. There's about 3/4" between the frame rails as a point of reference. Here's 2 more quick mock-up picks of what I've been wrestling with. I'm holding the oil filters and imagine the fuel pump in the middle of it all. Yup, as I said, it's TIGHT. Cheers, tim
-
One pic of the t fitting for the hard lines. I saw a pic of an early Garlits Swamp Rat rear engine car and he did it this way. My desire to do all hard fuel lines for the car makes it challenging as every point & bend has to be absolutely 100% specific. Making a bracket to support the t-fitting was a nuisance in it's own right. It all fits now so I'm moving onto the body & it's supports finally. cheers everyone!
-
1/16 Scale Army Vega Funny Car - Finished 10/14/2018
Codi replied to Mooneyzs's topic in WIP: Drag Racing Models
Good morning Chris, the fuel lines look perfect and the engine / trans jig idea was pure genius. I'm going to borrow some of those ideas (again) at some point I'm sure. So far as the "bad news" part of the post, I have no words for you except to encourage you so you can overcome it too. I'm hopeful the damage wasn't too severe. Best regards, Tim -
69 pro mod chevelle, chassis started mock ups
Codi replied to mr68gts's topic in WIP: Drag Racing Models
Paul, I don't know how you guys like you and Dave juggle all of this. Amazing and always look forward to your updates too. cheers, Tim -
You've got great taste Dave. Visners intakes are just gorgeous, am I to suppose that there is one planned for your 37' someday? Maybe on top of that new monster engine you're building out? Cheers sir, tim
-
Thanks fellas, and in light of the recent Thanksgiving Holiday I had to reply to Randy's "feast for the eyes" comment. Saw what you did there sir...........nice one. No other updates currently as I'm going through the order of assembly planning. Still working inside that imaginary 3/4" "box" where fuel lines etc. are all jammed together. At this point, 1/32" of an inch seems like a mile when getting everything to fit. I've discovered what could have been some issues that I've addressed so it's time been time well spent even if it doesn't seem like much progress. Very close to the next phase which is getting the body mounted and firewall made. Cheers to all, Tim
-
Nice looking build and for someone that is new to air brushing, your efforts paid off handsomely. cheers, tim
-
Now those are cool Jeff. I really like how you did those and know the bit of effort that it took to make them even more so considering their size. VERY nice. Cheers, Tim
-
Moebius Comet... Wild Bubbletop Show Rod- Done! 3-17
Codi replied to Impalow's topic in WIP: Model Cars
Just stumbled across this Eric, count me as a fan too. Between you and John Teresi, I couldn't say who has more imagination and can execute the vision. Cheers, Tim -
Always been a fan of your work Bill. Nicely done. cheers, tim
-
Thank you Chris, hope you post your updates soon on the Vega, been a while and that punch list IS getting shorter. Dave, thanks but you'd fire me as I'm too slow as you've seen. Let us know how YOU made out btw..........that's got to be super exciting at this juncture. I forgot though, how much are you charging for rides again? Davewilly, thanks too and to each of you that follows this thread, I'd like to wish you a HAPPY THANKSGIVING with your friends and family!!!
-
Thanks Greg, thought I'd post a couple pics of whats been taking me so long. Making the tank support struts & fuel line from the tank to the pump was the better part of a day. Getting a radius to work for the fuel line was a pain. Finally I inserted .6mm into .9mm and inserted that into 1.2mm s/steel tube, heated it in the middle with a torch and got the necessary radius to make it work without crimping. A LOT of experimenting went into that to make it work out. The spring inside the tube trick didn't work as it's too tight there. Picture a 3/4" square cube inside the frame rails and then jamming the fuel & oil lines, oil filters and the pump all within a centimeter of the tank. Ugh is all I can say but it all works now & I've got the assembly ordered figured out. cheers, tim The clamps etc. on the fuel line are not in place yet, this is just a fitment mock-up as an fyi.
-
Sorry for the late reply guys. I did want to acknowledge everyone for the sentiments expressed. No pics today. I've been going back and tweaking parts and brackets in anticipation of assembly. There is no wasted space and even 1/32' of an inch makes all the difference in many instances in what goes where etc. and the order of assembly will be critical as some pieces MUST go on/in before others or it just won't happen. Next week I'll start the body & chassis bracing / brackets so I can begin assembly shortly afterwards. A lot of plating and parts detailing has to happen first. I'll take some pics of all the pieces for the car in one shot and then do a final order of assembly list. Again, thank you! Tim
-
With regard to the "rumble" this car makes, I can happily verify it is one NASTY sounding BEAST. To shamelessly quote the old ad, "It isn't your fathers Oldsmobile".......... The list of pieces and components machined or fabricated himself on this car is testimony to Dave's all around talent as a fabricator/builder. Congrats Dave, looks fantastic.