Codi
-
Posts
2,675 -
Joined
-
Last visited
Content Type
Profiles
Forums
Events
Gallery
Everything posted by Codi
-
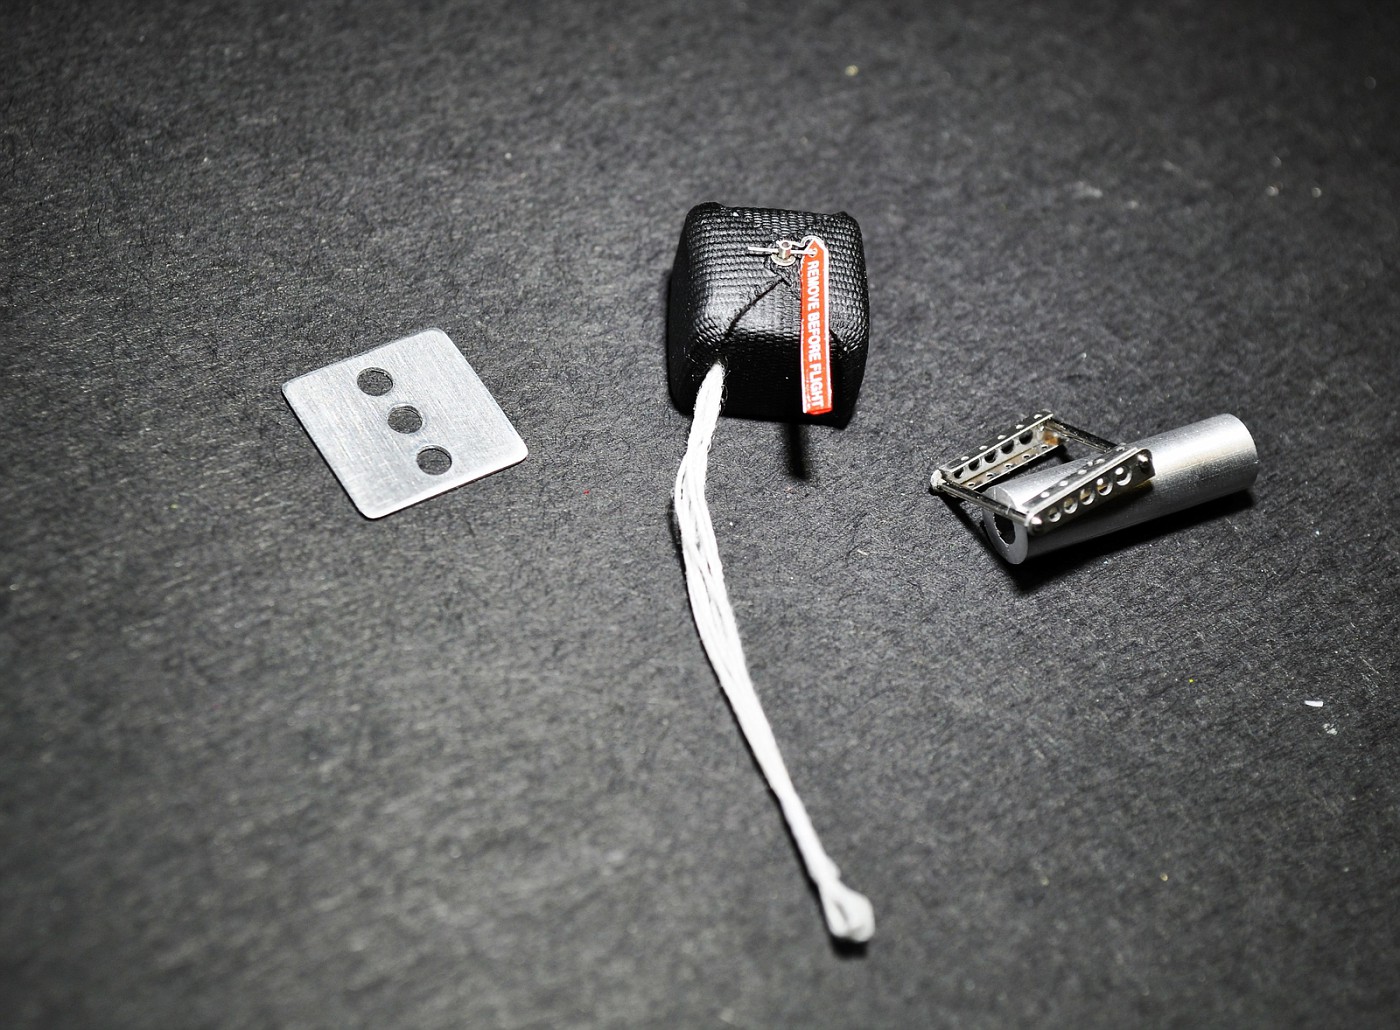
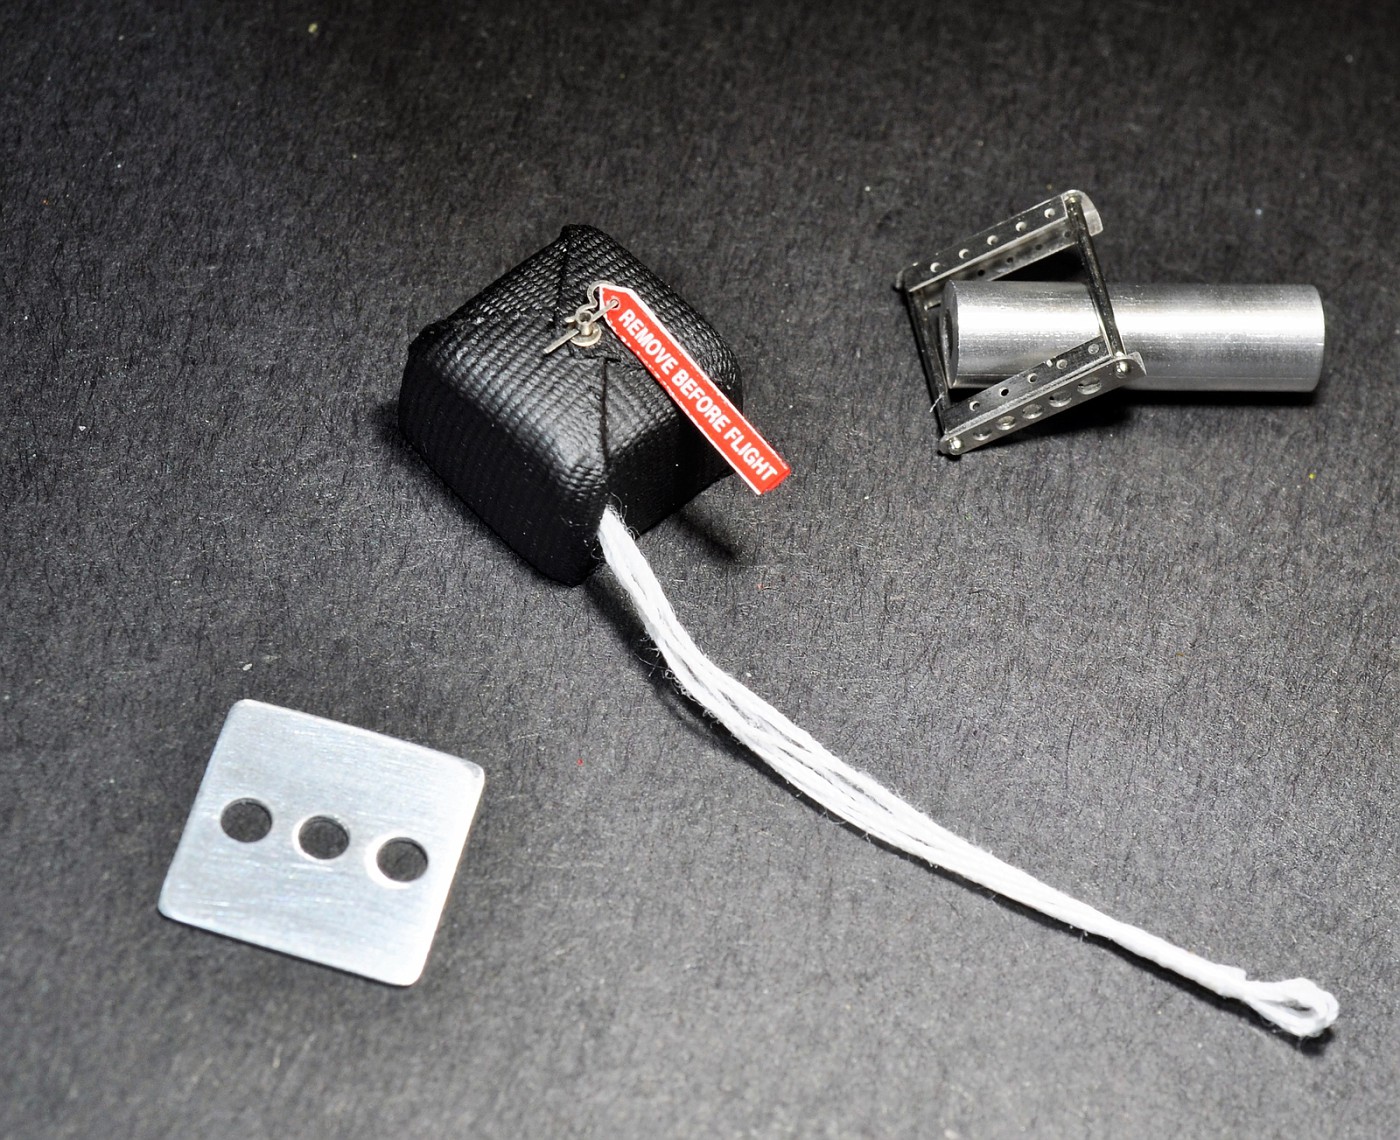
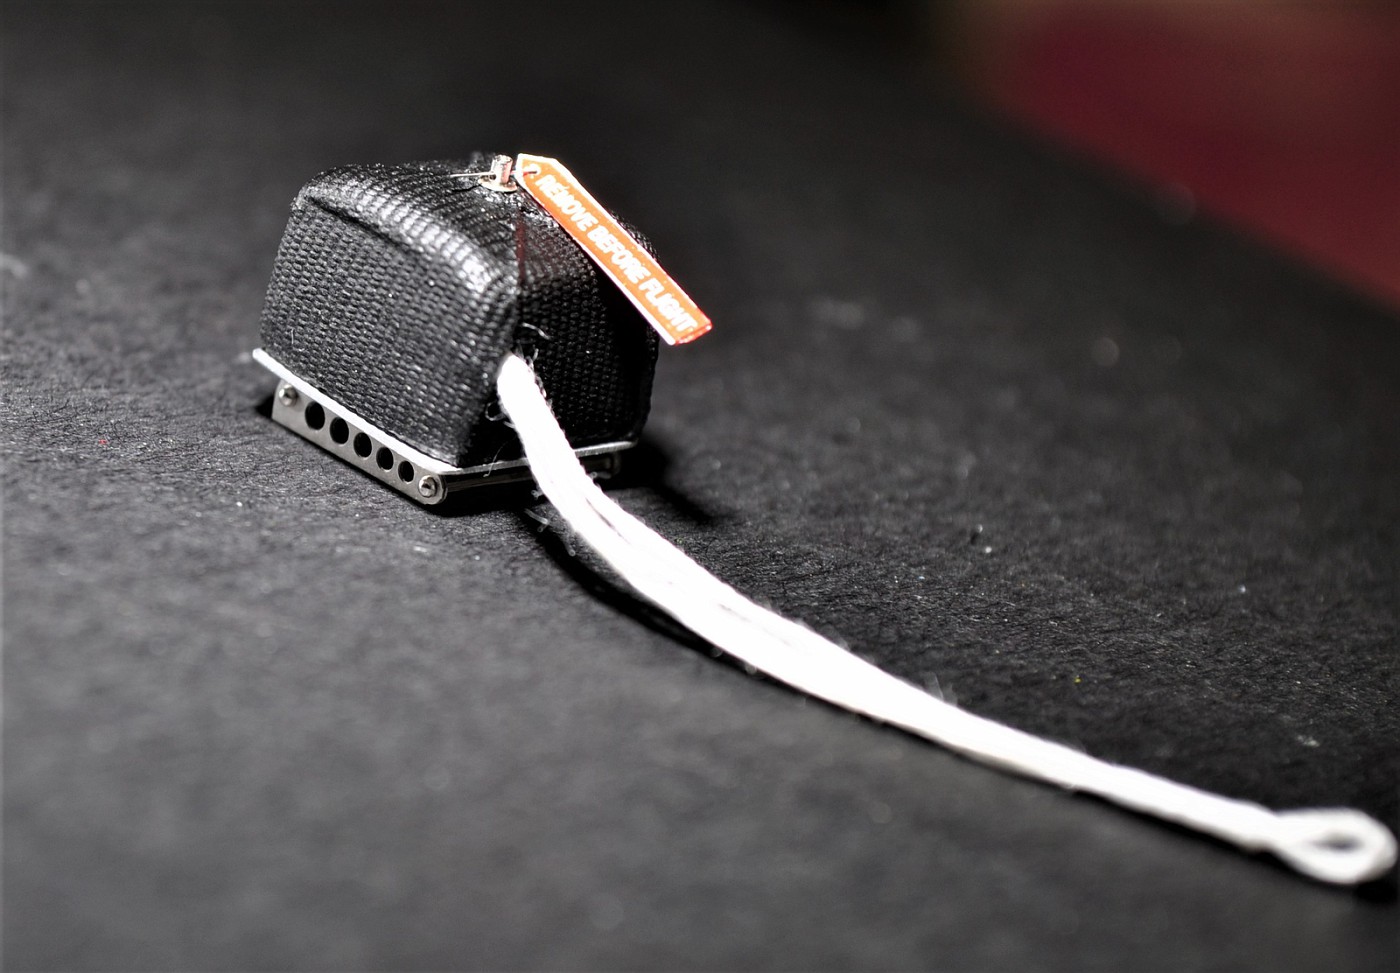
Hey Pete, I had to laugh when you pointed out the bonehead I made...............thank you for the comment, I don't know about being a Master Modeler or anything, but I will say I'm one of the slowest. Dave, the chute cord is white thread that I wrapped around several times between two mandrels then I took flat white dental floss and wrapped the end where the loop for the chute bar is. The chute that I wrapped it around was from my parts box, I don't know where I got it but it was resin. Chris, I used the thin as it doesn't fill in or lose the texture in the fabric which is also the reason I didn't primer it. No need to do that right?! I'll keep on the lookout for your updates !! Cheers everyone!
-
John, Dave & Brad, appreciated as always. I've just gotta get some more meaningful bench time soon so I can show some real progress and get her done. Thanks again! Chris, thanks.......chute material, I use a roll of Johnson & Johnson surgical tape that I bought at Rite-Aid a few years ago. It's a fairly lightweight tape that stretches minimally while flattening and sticking on the corners. I love working with it. Stuff is still tacky and stays in place with little or no fraying when I cut it. No part number on the roll unfortunately. It only said "Made in Brazil"in red on the inside of the roll and it's 1" wide. The overall roll was a bit more than 2" when I bought it btw. After I put it down and have it in position, I swab the entire chute lightly with some Zap A Gap Thin glue (the pink bottle) over it just to be sure it's secured. No primer, just Testors flat black over it & done. Sorry I couldn't give you a particular part number........btw, I read the post on the Vega. EXCELLENT and I'll be watching for it. cheers, tim
-
Very beautiful build Guy. The details you put into the interior match are just phenomenal as well. The assembly and execution are particularly clean throughout. Congratulations! cheers, tim
-
What a gorgeous car Ken. That's perfection sir. cheers, tim
-
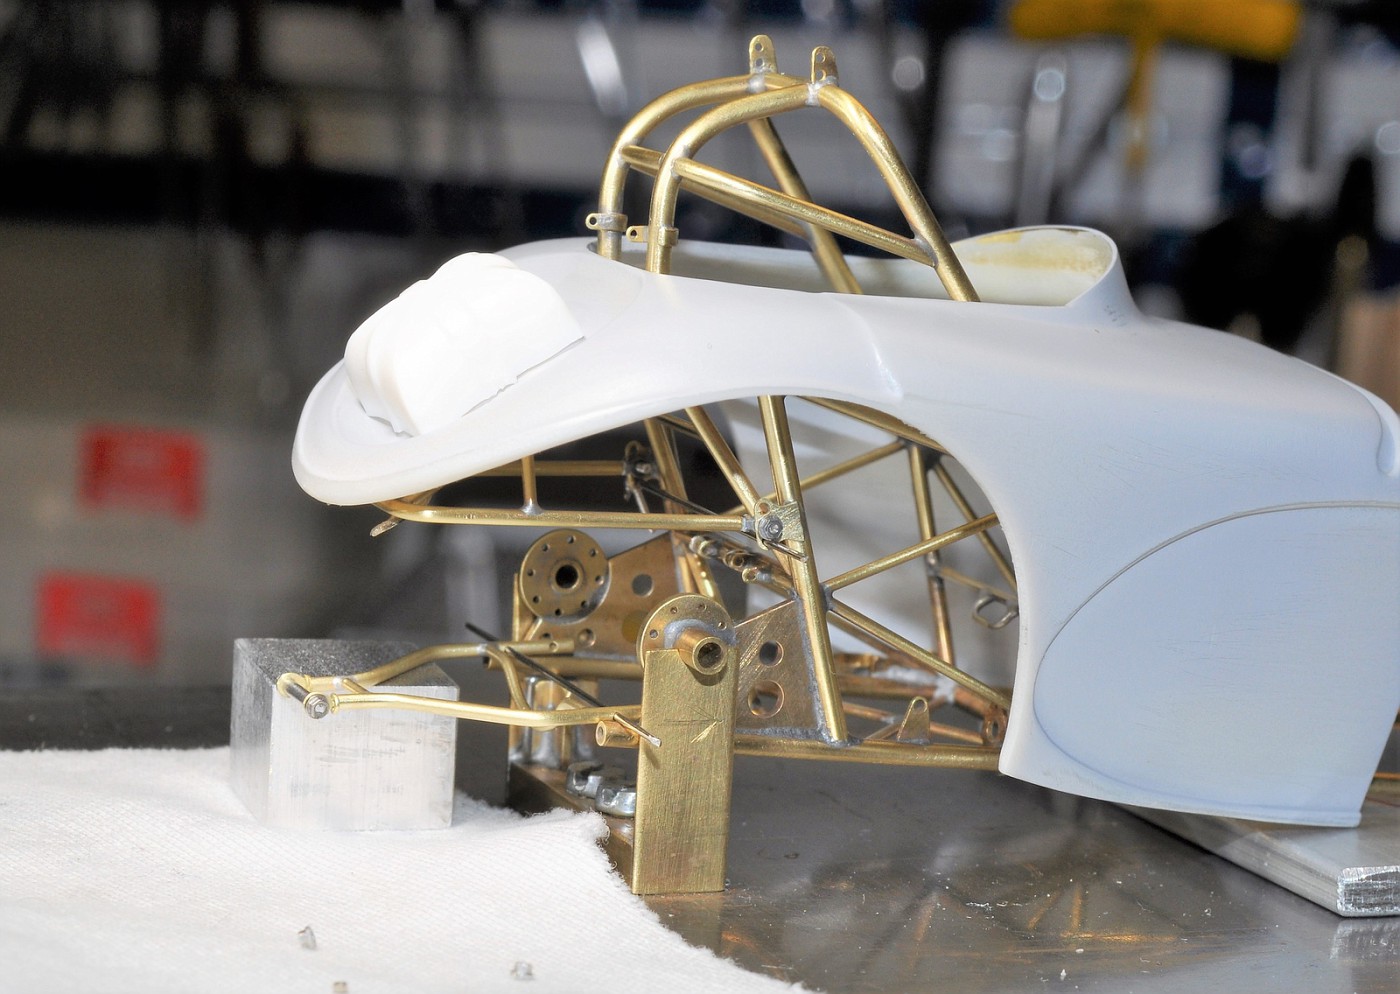
Thank you Brian & Joseph for the kind comments and for following my progress on it. Chutes done. The bracket is a combination of MCG hood hinges and some s/steel tubing. I'll secure the parachute base to the rear deck / spare tire spot. Firewall is finally on deck. cheers, tim

-

Jet Powered Train / Dragster : On The Workbench 2/8/18
Codi replied to John Teresi's topic in WIP: Drag Racing Models
SMH John. What WILL you think of next? Your range of topics is simply incomparable. cheers, tim -
"Berlin Buick" ...."Outside" finished pictures 2/7/18
Codi replied to John Teresi's topic in Model Cars
I knew it was only a matter of patience and we'd get to see this one outside. Stunning John. Just curious, will you offer it to the guys that built/own the real 1:1 car? I'm sure they'd be proud to showcase your build along with the real one. Great job again John! cheers, tim -
Ahhhhh, waiting on the Superbowl to start....... Chris, thanks for the reply and please let me know your progress on those wrenches. I'd buy em' in a heartbeat. Dave (Goatguy) appreciated man, just gotta get some free time in the future to get together. Like the build you're currently working on btw. Thank you Brad, don't know about a "tour" but a few shows will be on the calendar. I'll be sure to provide a heads-up and it would be fun to meet you finally. I just won't be traveling west of the Mississippi though. Bob, and????????? otherwise known as hijacking a thread. I won't mind if you delete your post. Cheers, Tim
-
Hi Chris, thanks and regarding the micro wrenches for the tiny bolts, when ScaleHardware was still in business he sold those super small hex wrenches from 1.0 down to .6. I'm glad I bought them when I did. On the important .5mm sizes that I use a lot of I had to make my own. I tried putting R.B. Motion socket type hardware on the end of 1/16" rods but the alum. was too soft. I took brass stock and drill out the centers and cross cut them for a poor rendition of a wrench. They do work though. I also found some micro sized pin vices that will grip rather well the heads and turn them but because of their overall head size, I'm limited to where I can get to on a build with them. Your idea of 3D printed ones is a great one and I'd buy a bunch of them if you ever did make them. My only concern would be how durable them would be due to the materials. Hope that helps a bit. John, yeah I was thinking the same thing of your build when I saw the Berlin Buick. What the heck can you come up with next? Can't wait to see it whatever you choose. Brad, thanks so much for THOSE positive words. You have to admit though that it's going to be time to get on with this one so I can move onto the next build. I'm more than ready now! Dave & Mike, thanks too guys. Obviously I'm getting a bit bogged down in some details right now but every part that comes up next it seems that I just do what I've been doing and it's taking a LONG time. Appreciate your interest in the car after all this time. Randy, thanks sir. Always nice to hear from you. I'll give you a call soon to touch base, it's been a while since we spoke. cheers Dave(comp) Yeah, I'm looking forward to that as well. I've never been to a manufacturing place such as that one so it will be fun & educational. Bring your wallet, those puppies are expensive. I'll buy lunch. Cheers to one and all!
-
Took me a while to respond John but it's only because it took me this long to soak in all the details. Just one of the points of interest is the twin small "buttons" on the door panels on the tartan fabric. Subtle but you can't miss them. Great eye and execution as always! cheers, tim
-
Moebius Comet... Wild Bubbletop Show Rod- Done! 3-17
Codi replied to Impalow's topic in WIP: Model Cars
That is SO over the top that I can't wait to see the rest of this car. You sir have one of the best imaginations around. cheers, tim -
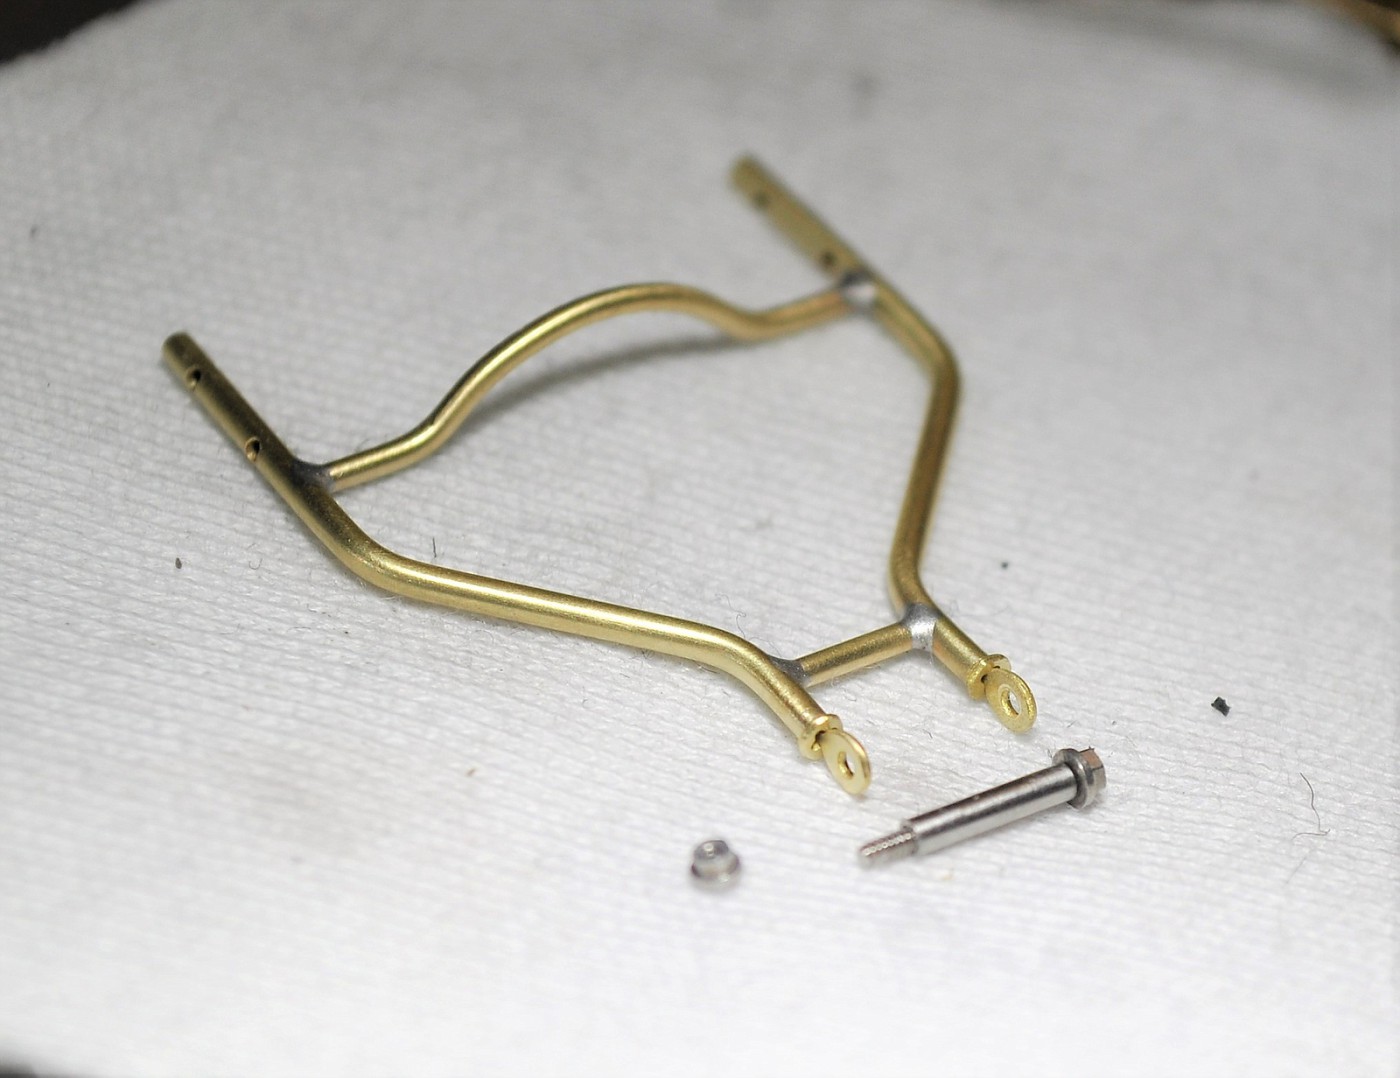
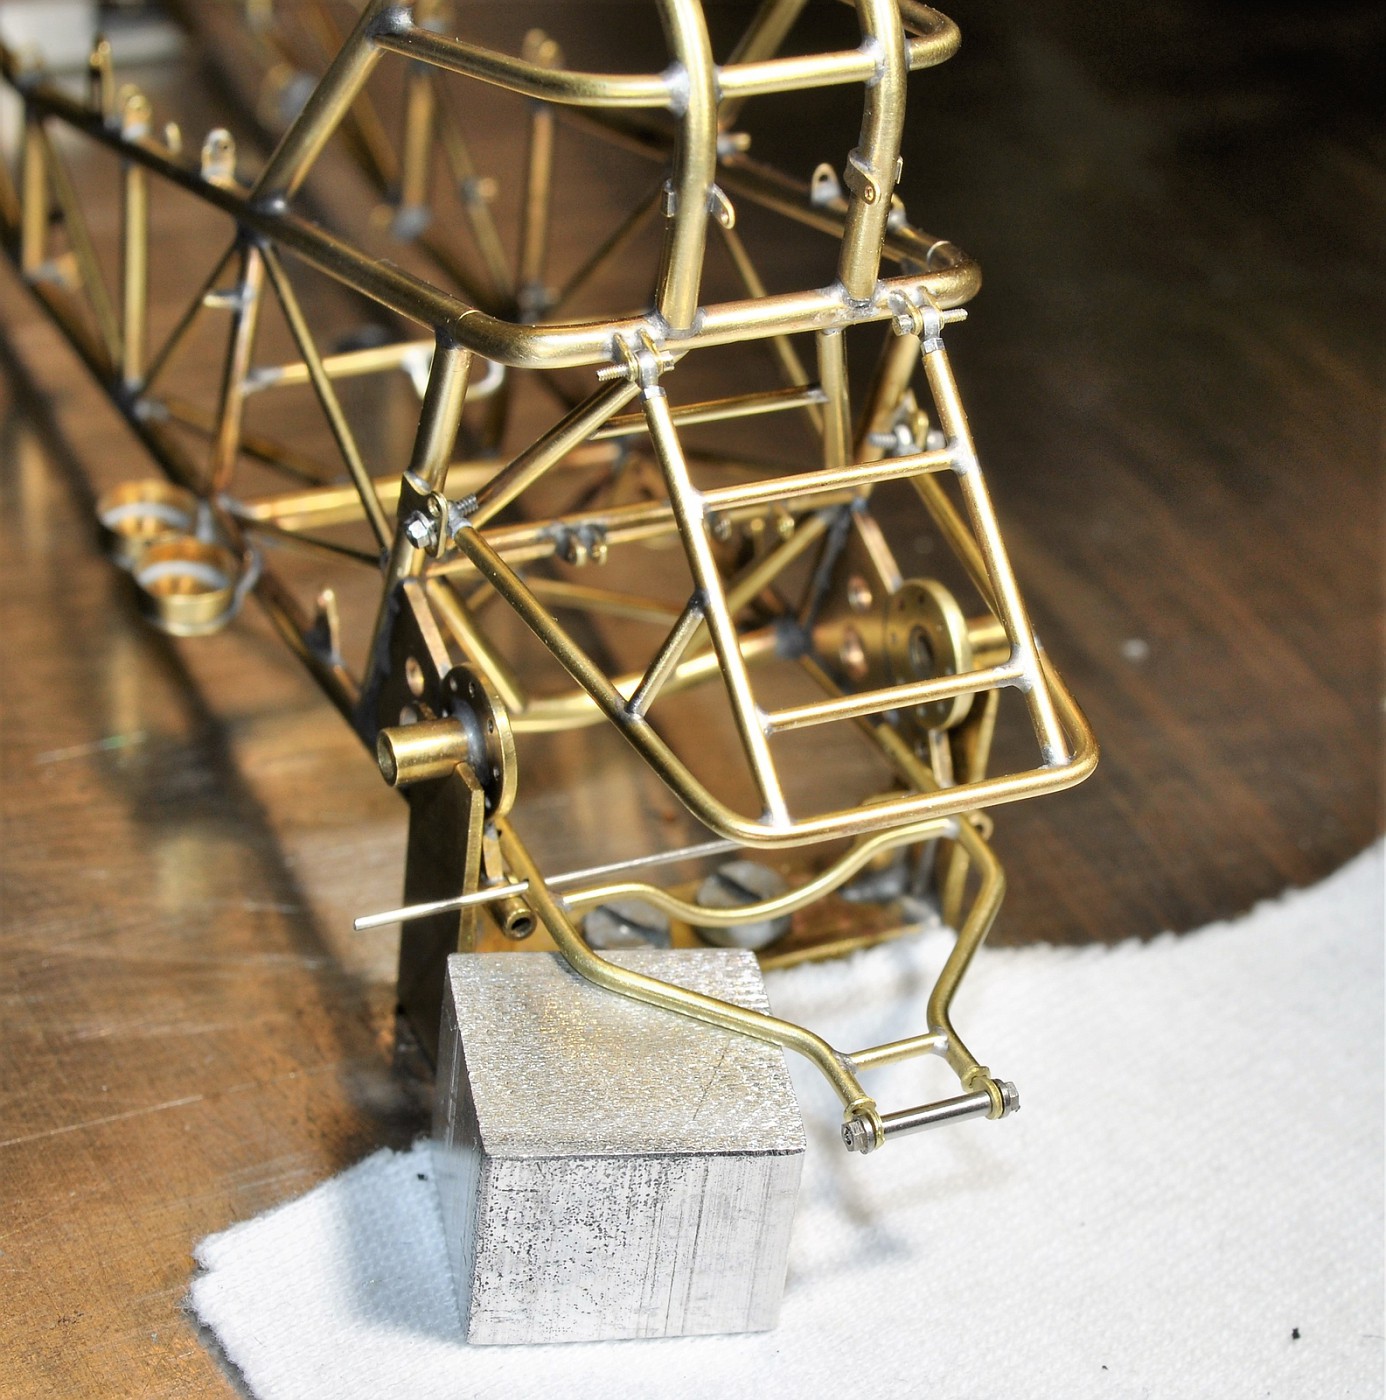
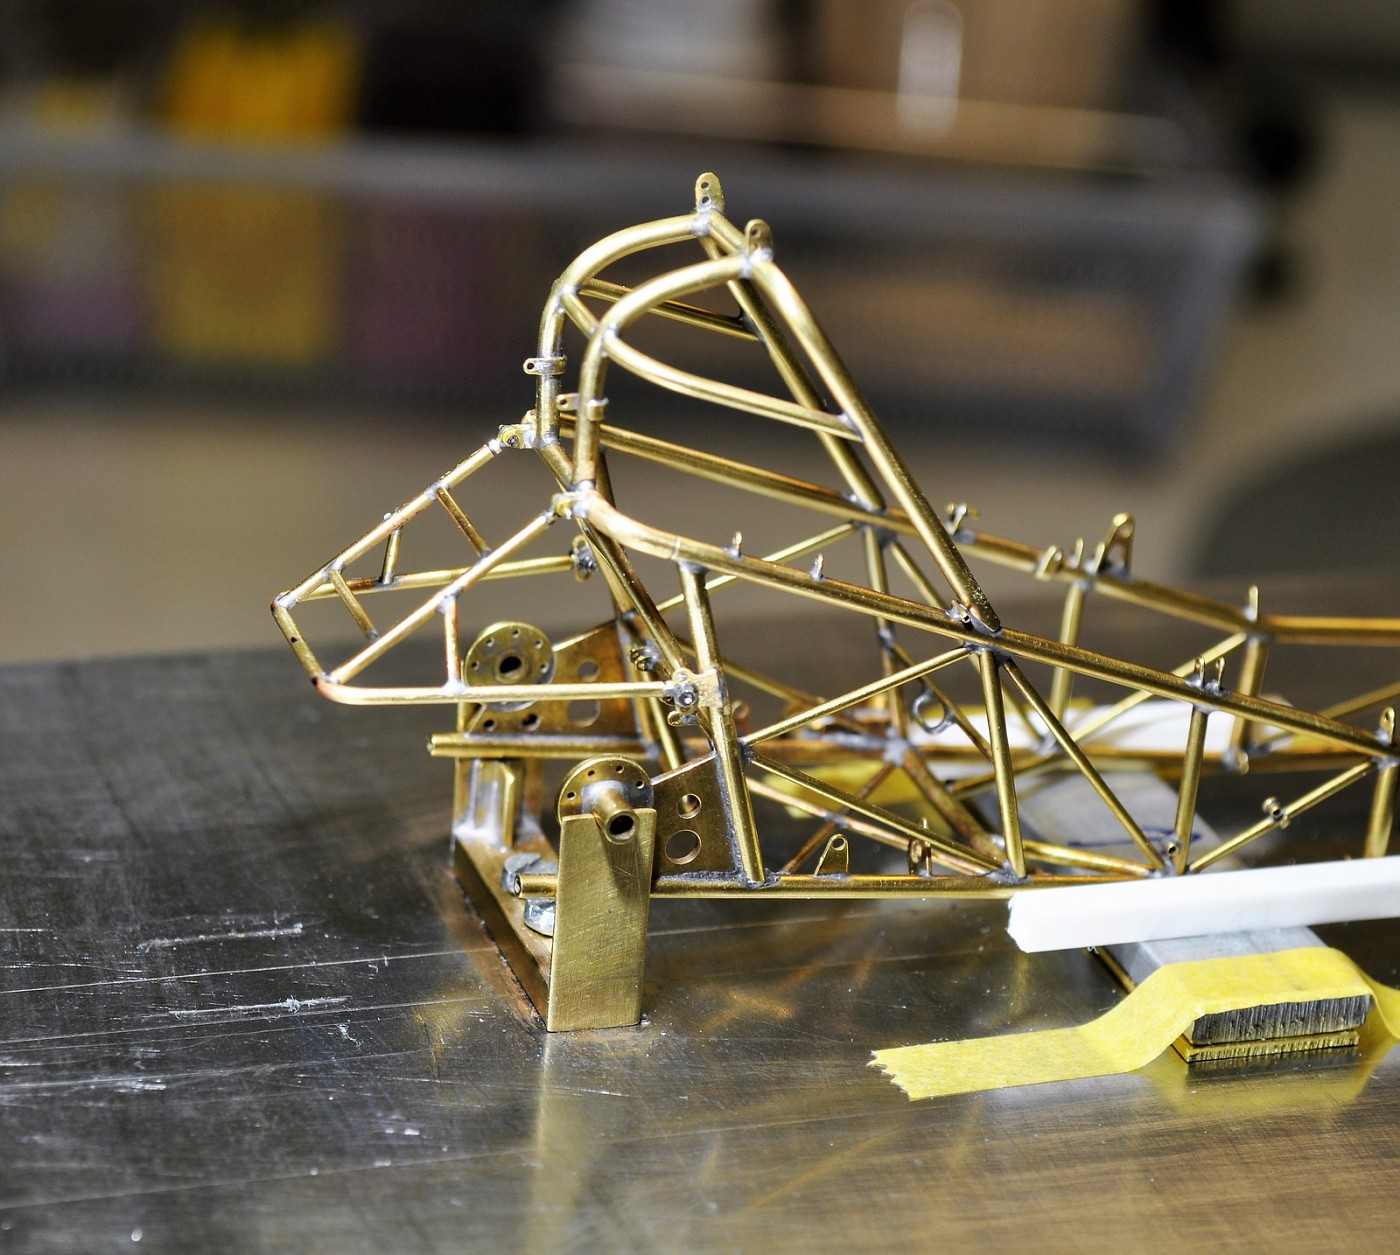
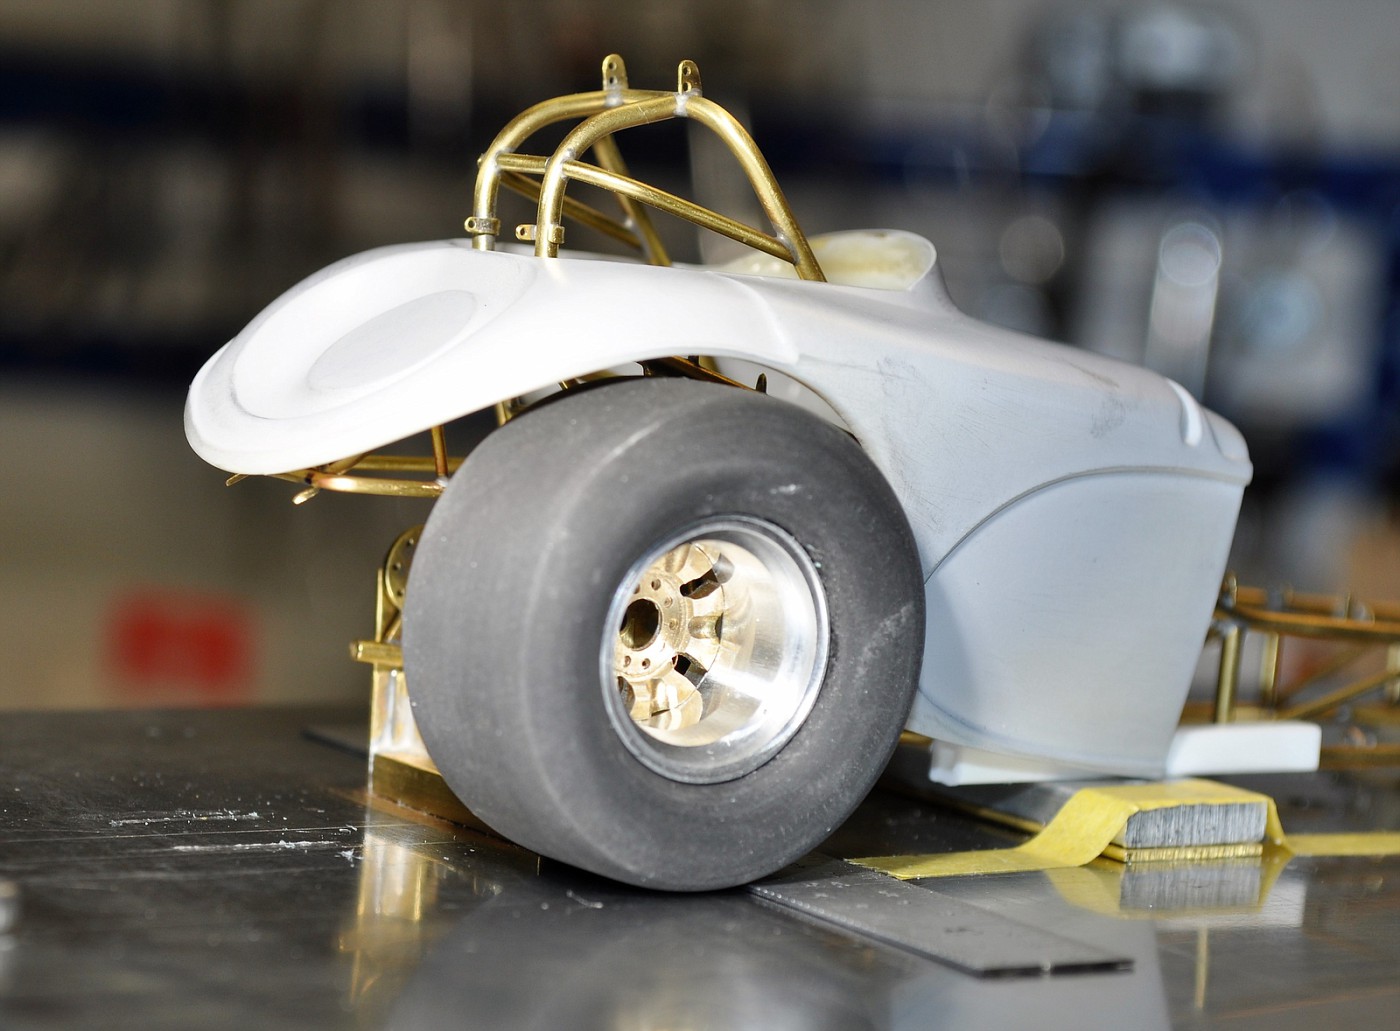
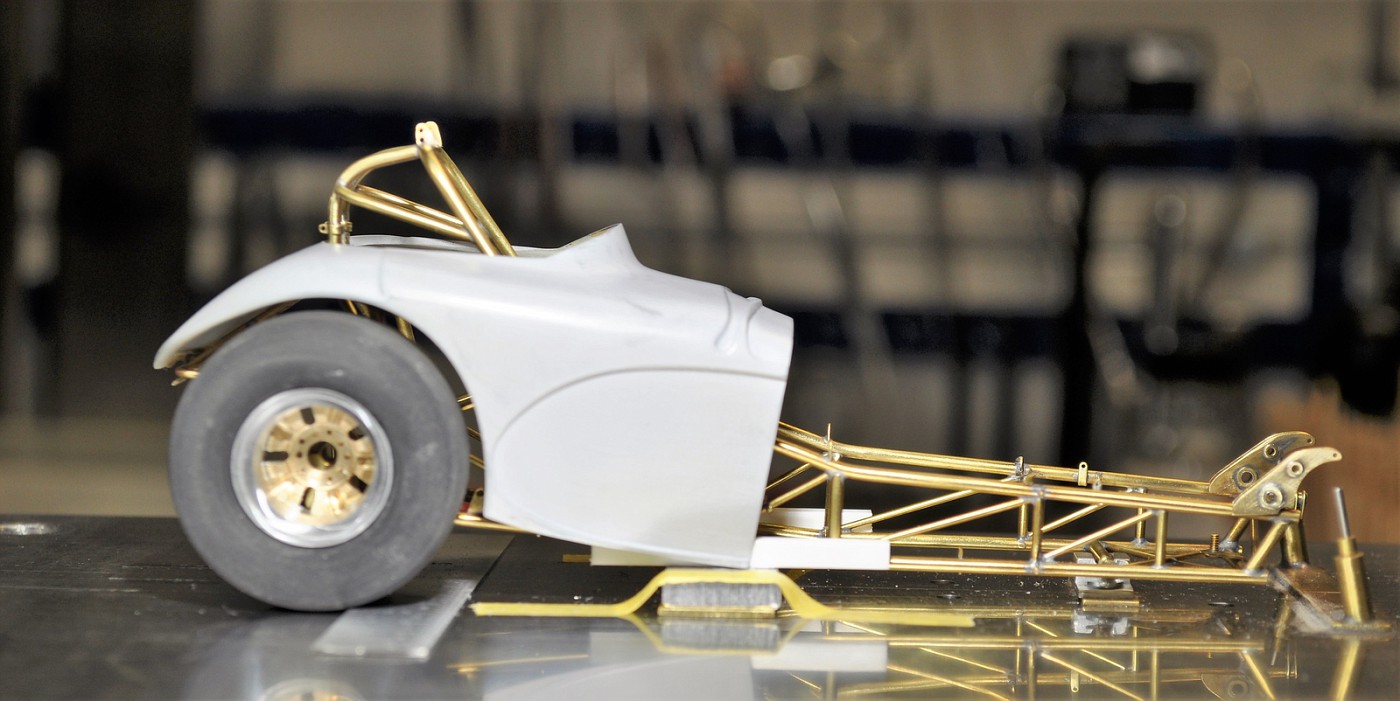
Dennis, John, Dave, Art & Dave Jr., glad that you like where I"m at so far. I did work on a removable parachute bar as well, just have to get the tabs on the chassis to secure it yet. I'm still contemplating adding wheelie bars to it.........in my research on altereds during the mid 70's, at least half of the cars didn't bother running them. I found that kind of interesting as I assumed they all used them around that time. Not so. Dave (comp1839) looking forward to Friday's get together should be an interesting factory visit! cheers ALL!!! btw, the dip you see in the connecting support bar is to clear the bottom of the rear end as an fyi. The tube is 1.0mm brass with .8mm bracing between the pieces. I drilled .5mm holes on each side to secure it to the chassis tabs/brackets.
-
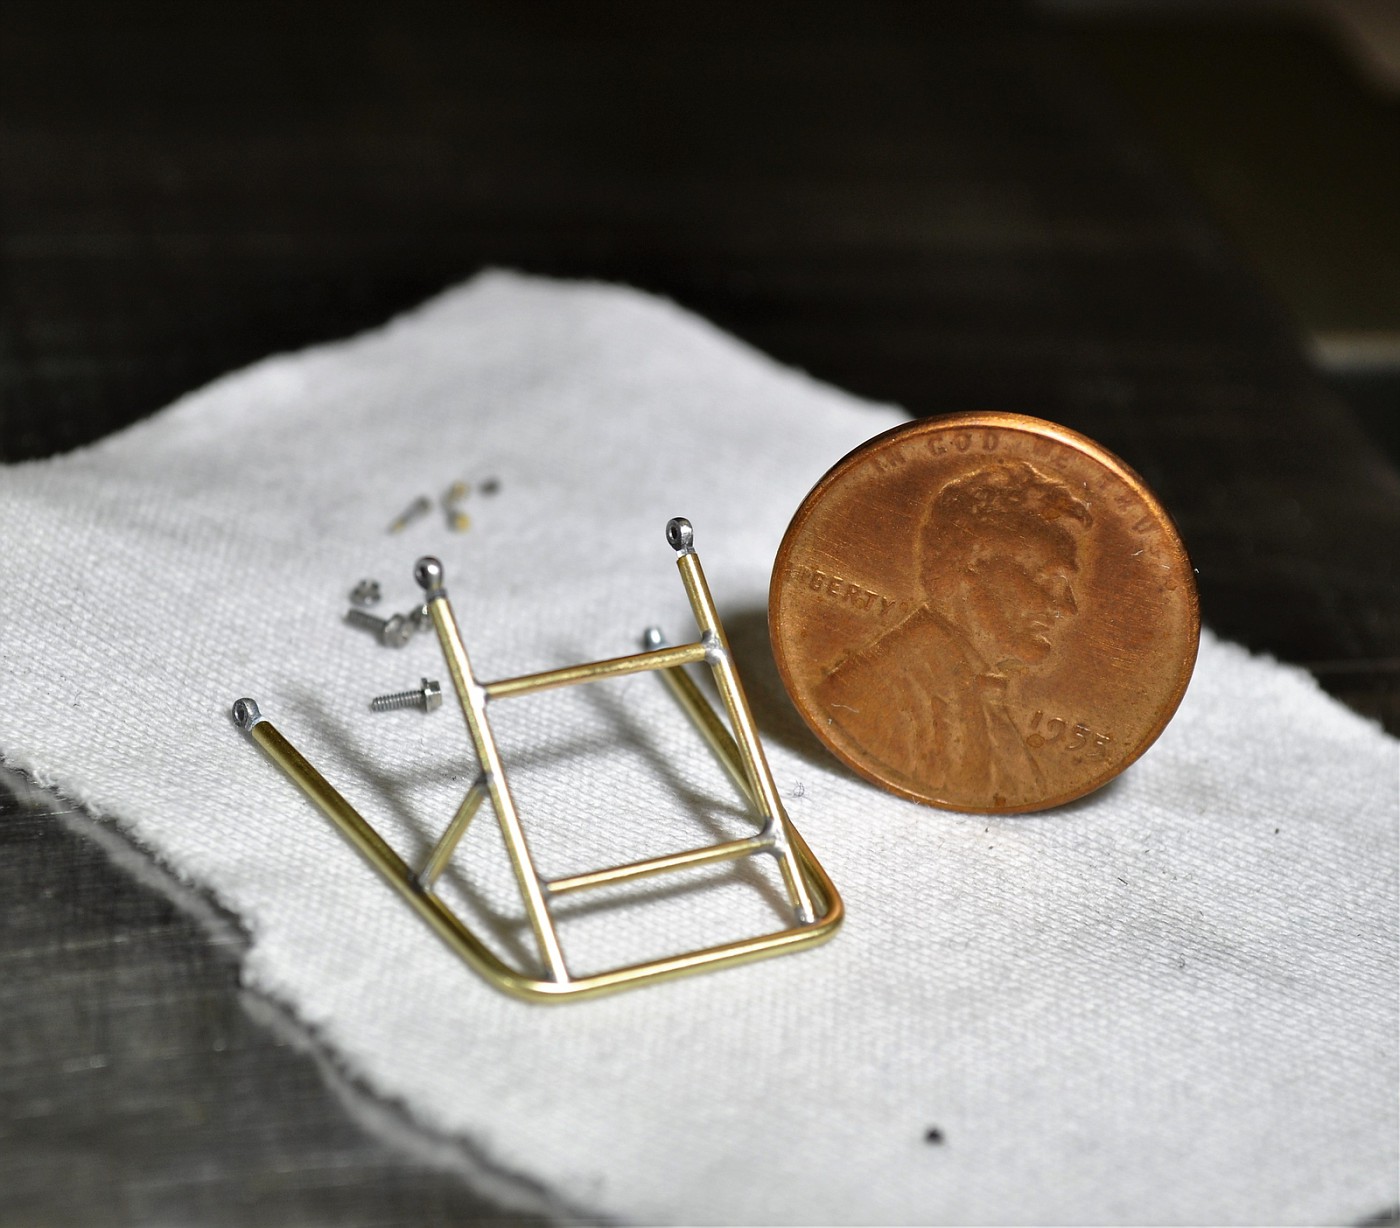
Many many thanks everyone for the comments AND for following this thread. 6+ hours today soldering this silly thing together, can't believe I just admitted that. BUT, it was on the mark and does everything I wanted it to do so I'll chalk this one up as a small win. Next is the removable parachute bar and possibly adding some wheelie bars which will then complete the back half of the chassis work. Firewall and front mounts to follow. Gratuitous penny shot of course. Cheers and THANKS again for your patience as this build moves on. cheers, tim Too many tabs and brackets hanging off the back end of this one. Just a few more..............
-
Hi everyone, well, it might not look like much but here's 2 pics of the rear body work "tree" support. I could have had this on the car by now if I had just soldered it directly to the chassis but I had my heart set on making it removable for the sake of final assembly and an added "cool" factor. Have to add some horizontal brace bars to it and solder it the tabs to the chassis. Getting the exact location of the tree to do a flip type body on it was a bit tedious and you'll see a weird looking aluminum block of metal I machined to square everything up properly. I should know in a day or so how it turned out and then I'll get to the front bracing and firewall. cheers, tim
-
Moebius Comet... Wild Bubbletop Show Rod- Done! 3-17
Codi replied to Impalow's topic in WIP: Model Cars
That's just NUTS Eric. In the best sort of way of course. Just spectacular as always. cheers, tim -
Chris, thanks man. Appreciated the recent back & forth we had too and that things are working out for you! cheers Thanks Dave. I cheated on them. The rivets in scale would be so small that I used a center drill to make the rivet detail on the mill. Can't see it myself, so I doubt anyone else would notice by and large. Oops, I just know Brad's going to call me out on that one. Joe, thanks for following along too. Yeah, I hear ya' on that one. I want so badly to get this build done in the next 6 months so I can get back to another Pro Mod. I've got a vision for the new car and have been doing research and gathering info for some time now. I might even post a pic or 2 of the destroyed Henry chassis. I've kept it to "part off" bits and pieces for the next chassis. There are so many tabs and brackets etc. that can be used & it will save time on the new chassis. cheers Dave & Dave, thanks guys. Spending time on the body mounting now. Got some things resolved that will now let me finish the rear tree to secure the body. Coming along, slowly for sure, but still moving. KenC, thank you for the very kind words and sentiments. I'll count you as a fan of the build & hope you'll continue to follow along as it nears completion. Should have an update early next week! Cheers, Tim
-
Great looking car, that paint really pops on it. cheers, tim
-
THERE he is! Nice to hear from you Dave and looking forward to your next post/update. I can only imagine what you've had percolating in that head of yours for your salt flats car. Talk to you soon! cheers, tim
-
Gotta love this one Wayne. Great project and your body design is fantastic. cheers, tim
-
For just getting into trucks, I'd say you nailed them. nicely done sir! cheers, tim
-
Really like your car Dave. Great stance too! cheers, tim
-
Well Kerry, you took the leap so I can't wait to see how you blend in the front fenders. It's fun to visualize it at this point, hope it works out for you as it has a ton of potential. I think it's an epiphany. cheers, tim
-
Moebius Comet... Wild Bubbletop Show Rod- Done! 3-17
Codi replied to Impalow's topic in WIP: Model Cars
Nice progress Eric. Clean & Crisp as always. cheers, tim -
Gotta agree with Slotto on this one, it is "slick" and "sick" at the same time Ken. Like it a lot! cheers, tim
-
Hey Bruce, thanks man, same to you and your family! Chris, and I LOVE your work............can we get a post soon sir? I know you're working on that recent engine setback, but I've NO doubt it will look BETTER than new. RANDY, see the comment I just put above for Chris...............how about one from you too man? Your work is ALWAYS exceptional. Brad, thanks too. No cyborg here because I make way too many mistakes and take WAY too long to do something anymore. What should have been an 18 month build will likely stretch to 28.....or something like that. John, you know by now how much I appreciate what YOU do, thanks for taking the time to check out what I'm doing here. To each and everyone of you that visits this thread, I wish you the best that the New Year has to offer!!! Cheers, Tim