gasser59
-
Posts
3,794 -
Joined
-
Last visited
Content Type
Profiles
Forums
Events
Gallery
Everything posted by gasser59
-

AMT '70s Short Body R.E. Dragster (05/22/2022)
gasser59 replied to Straightliner59's topic in WIP: Drag Racing Models
This will be fun to watch. If you had come to DSC, you could have bought some of Mr. Raitz’s wheels from him yourself. ? -
Hi Bob - thanks for checking in and your comments. I remember the tires came from my tire stash so I couldn't say where they originally came from. Sorry, the rears are similar to the smaller sprint car tires but the tread is different.
-
The teacher has returned from the break room and class will now resume. So glad you're back Dave and it appears you haven't missed a beat and your working at an incredible pace. Keep it going, I'm in the front row with my notebook.
-
Again, thanks for your comments fellas. Trying to decide which already started build is next. There's so many to choose from.
-
Thank you all for your comments. This 'T' will be on the judging tables at DSC come this Saturday. If you're in the Valley, come visit us.
-
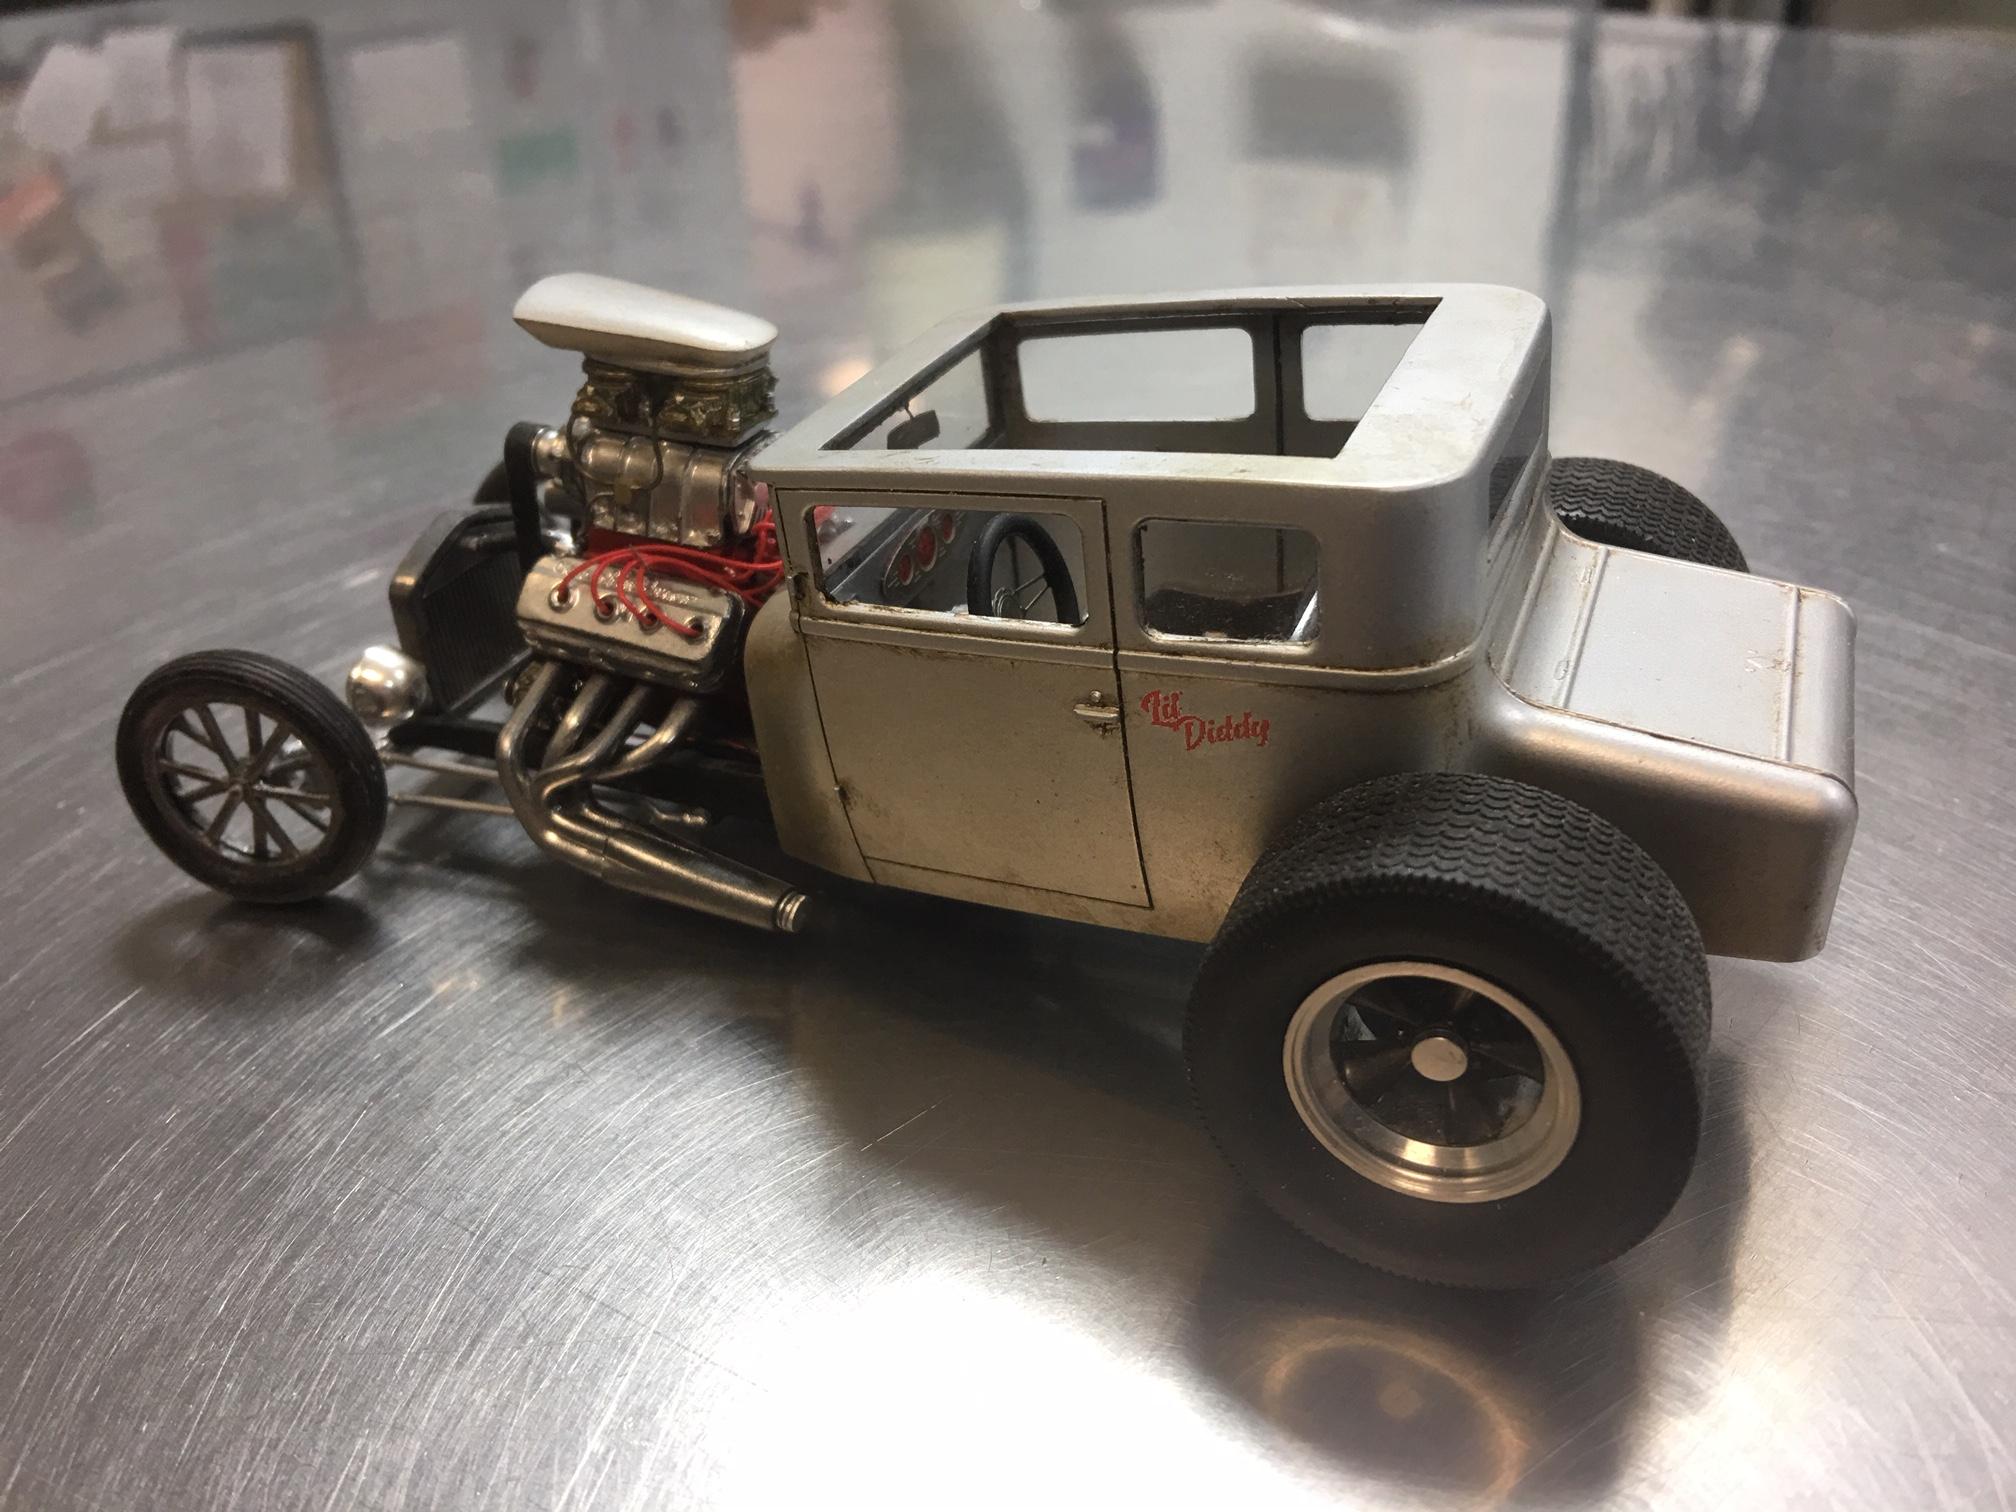
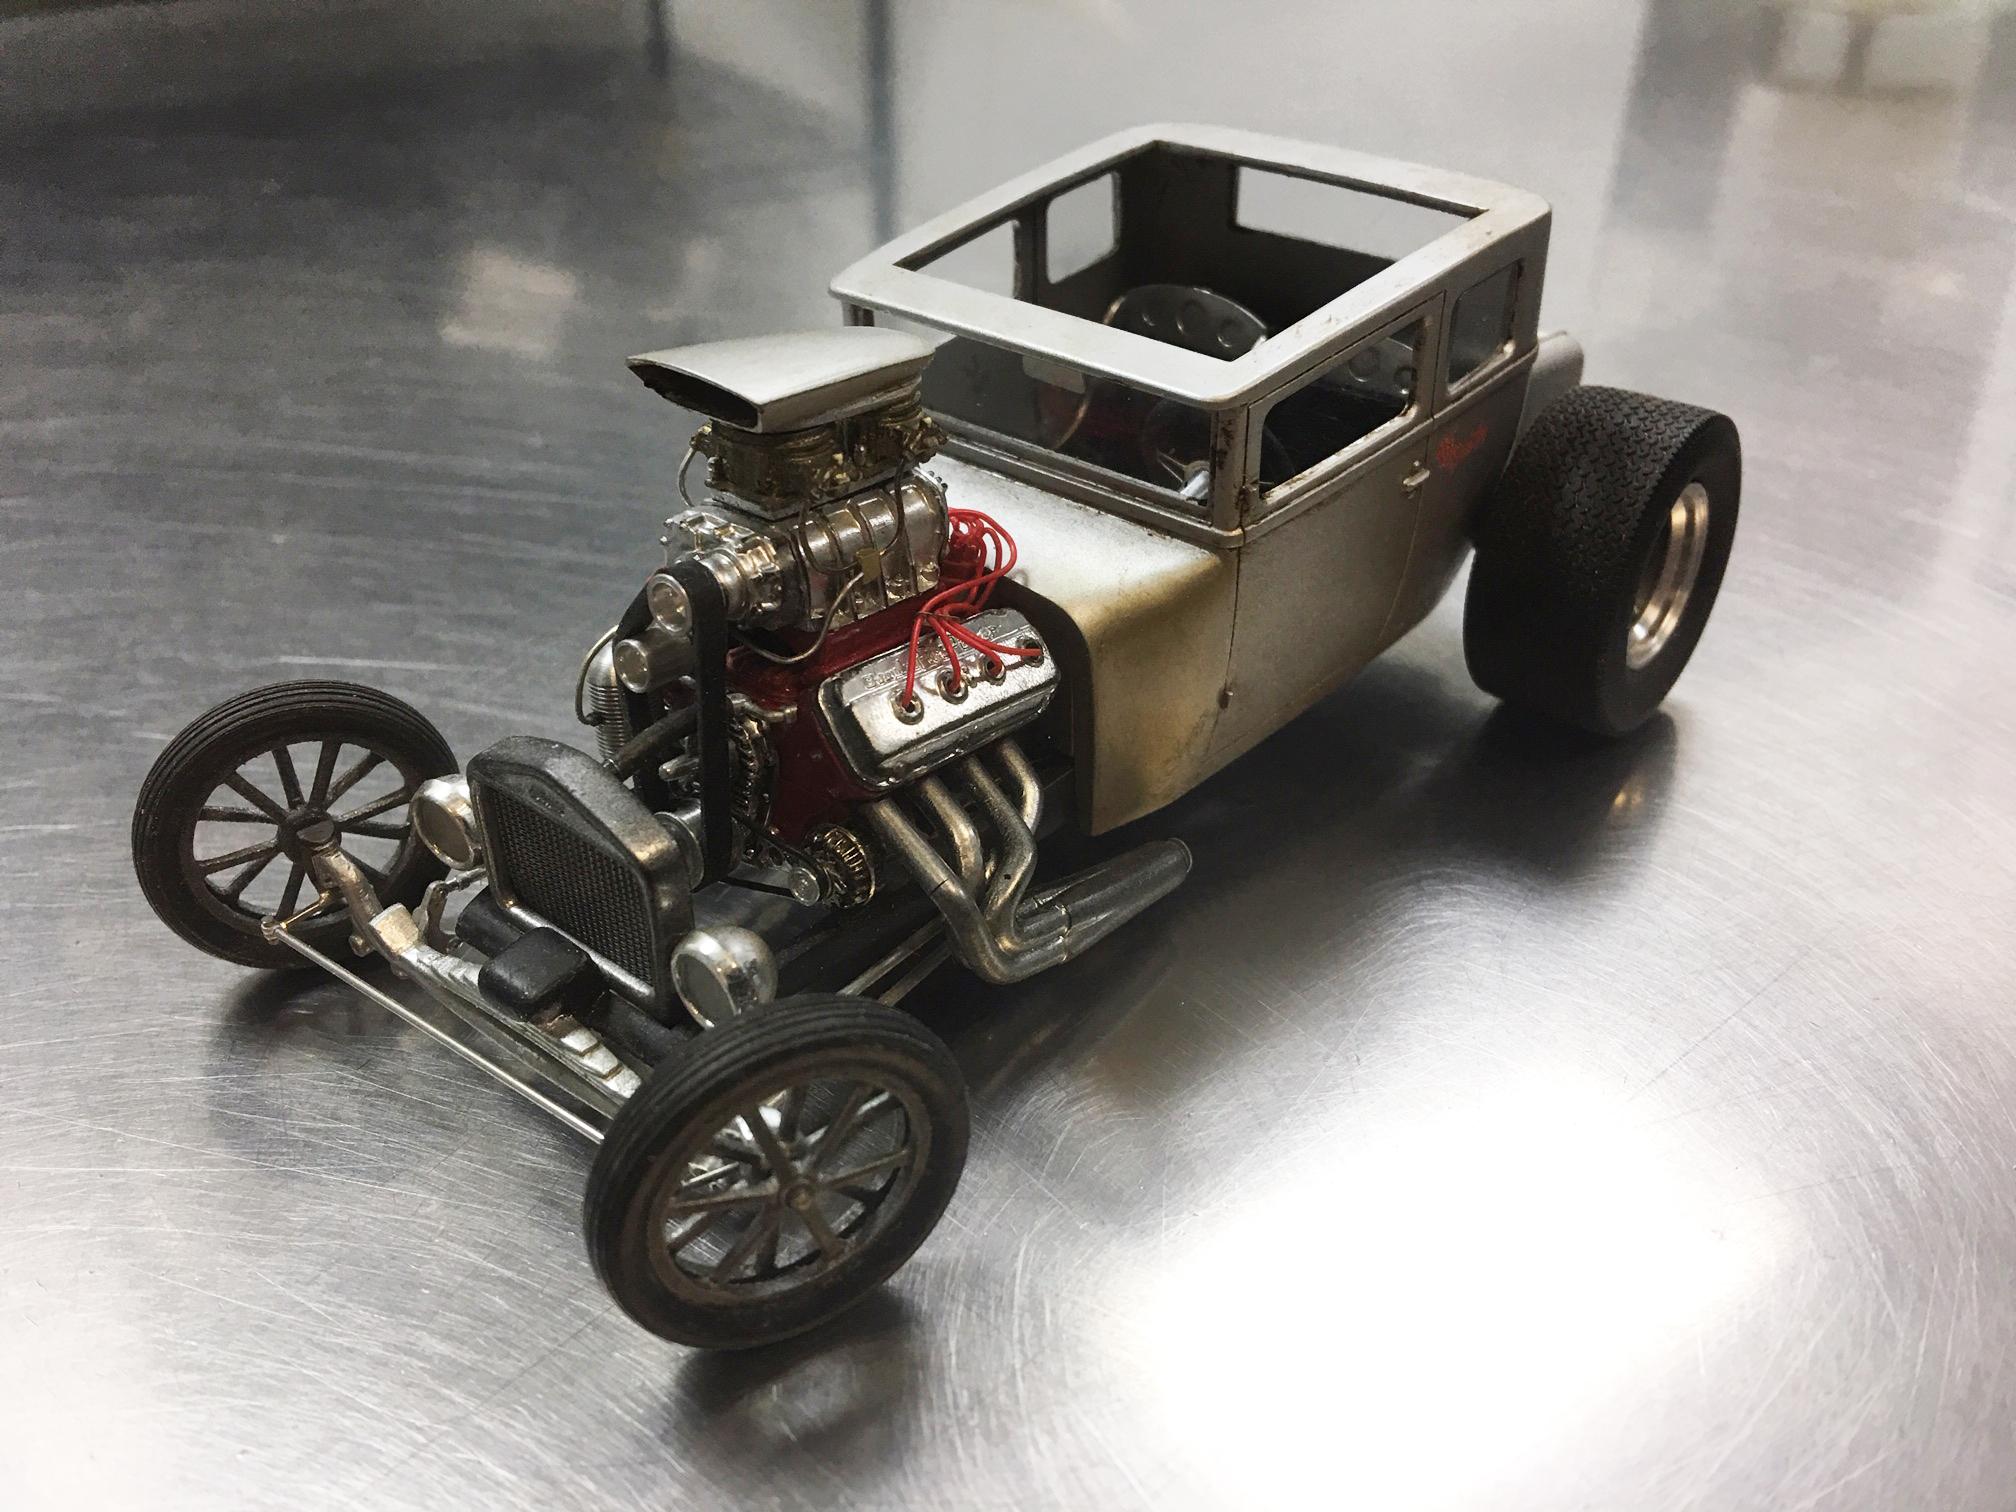
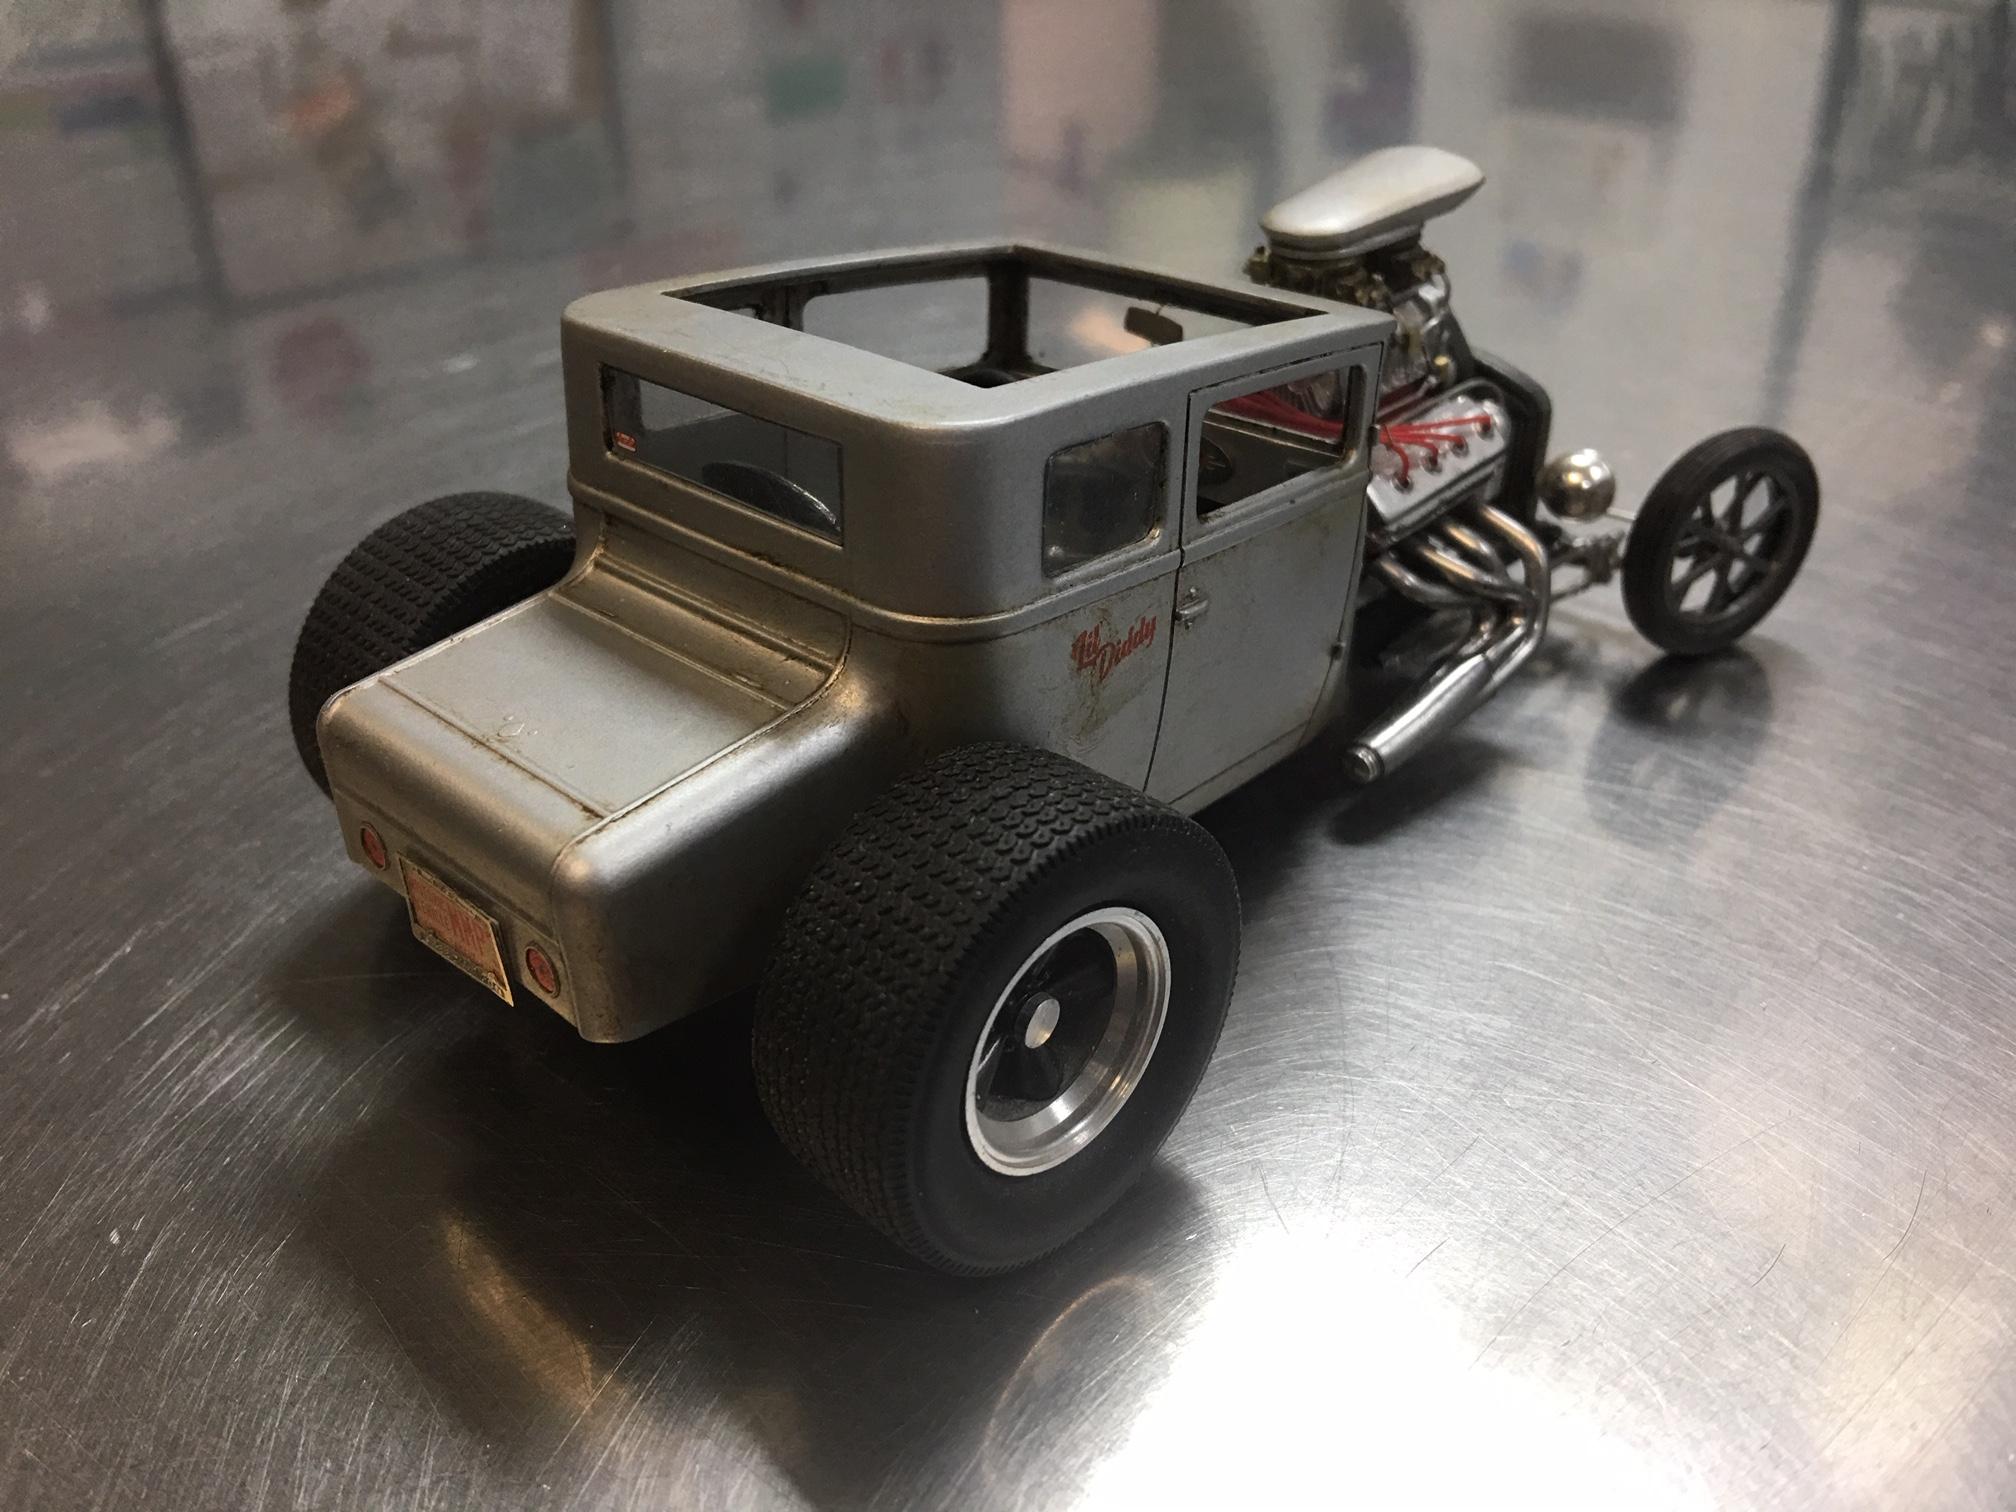
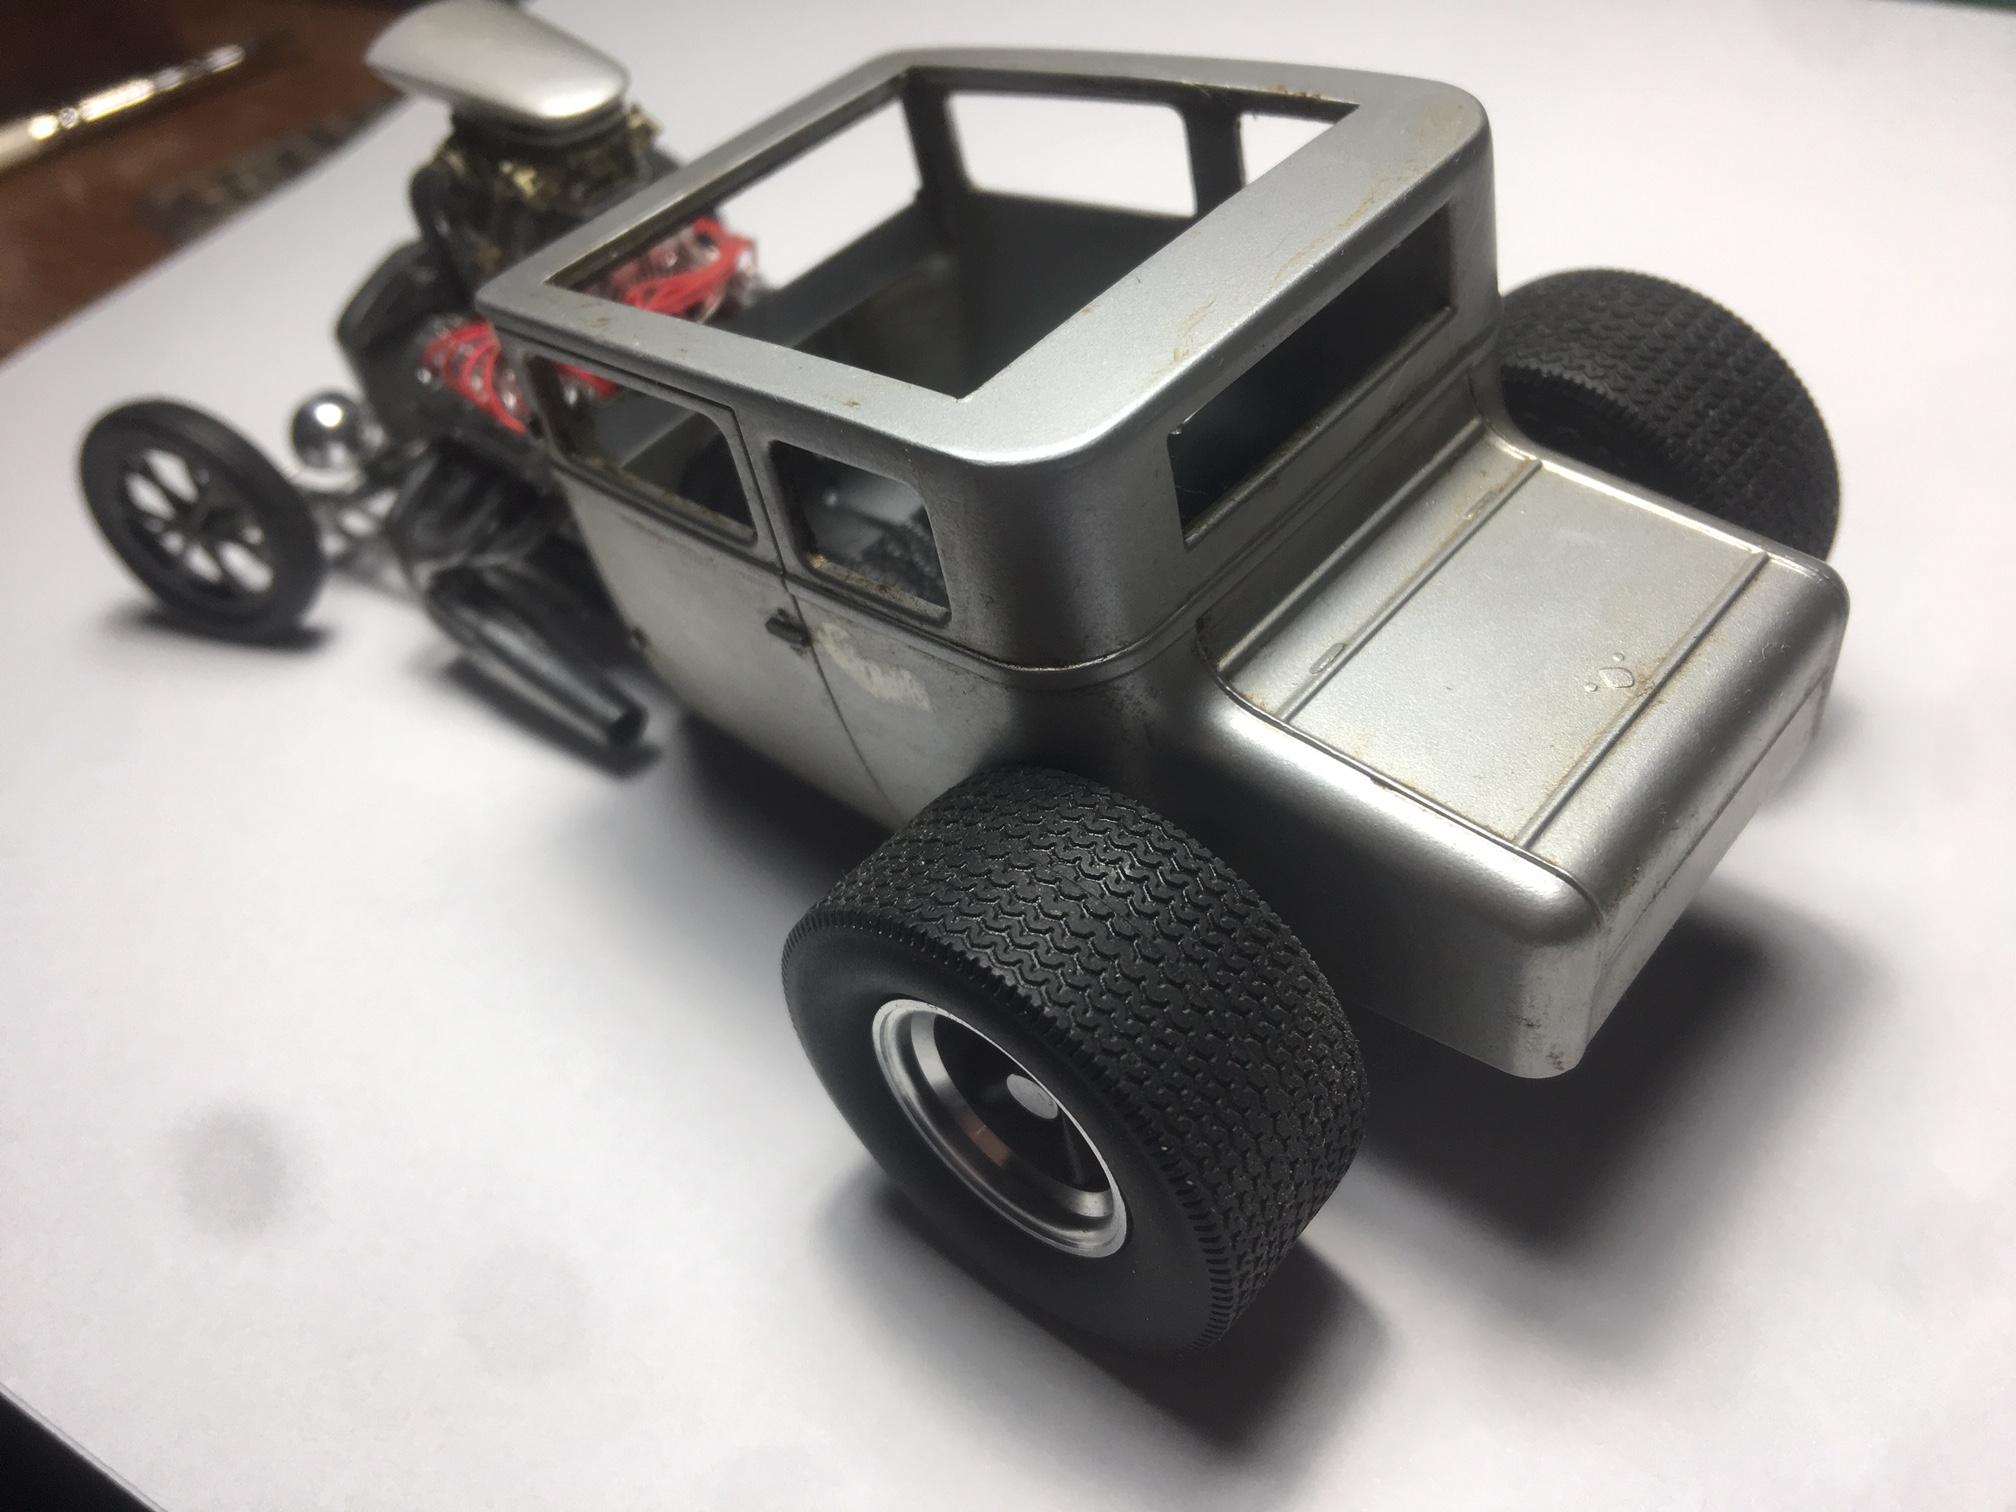
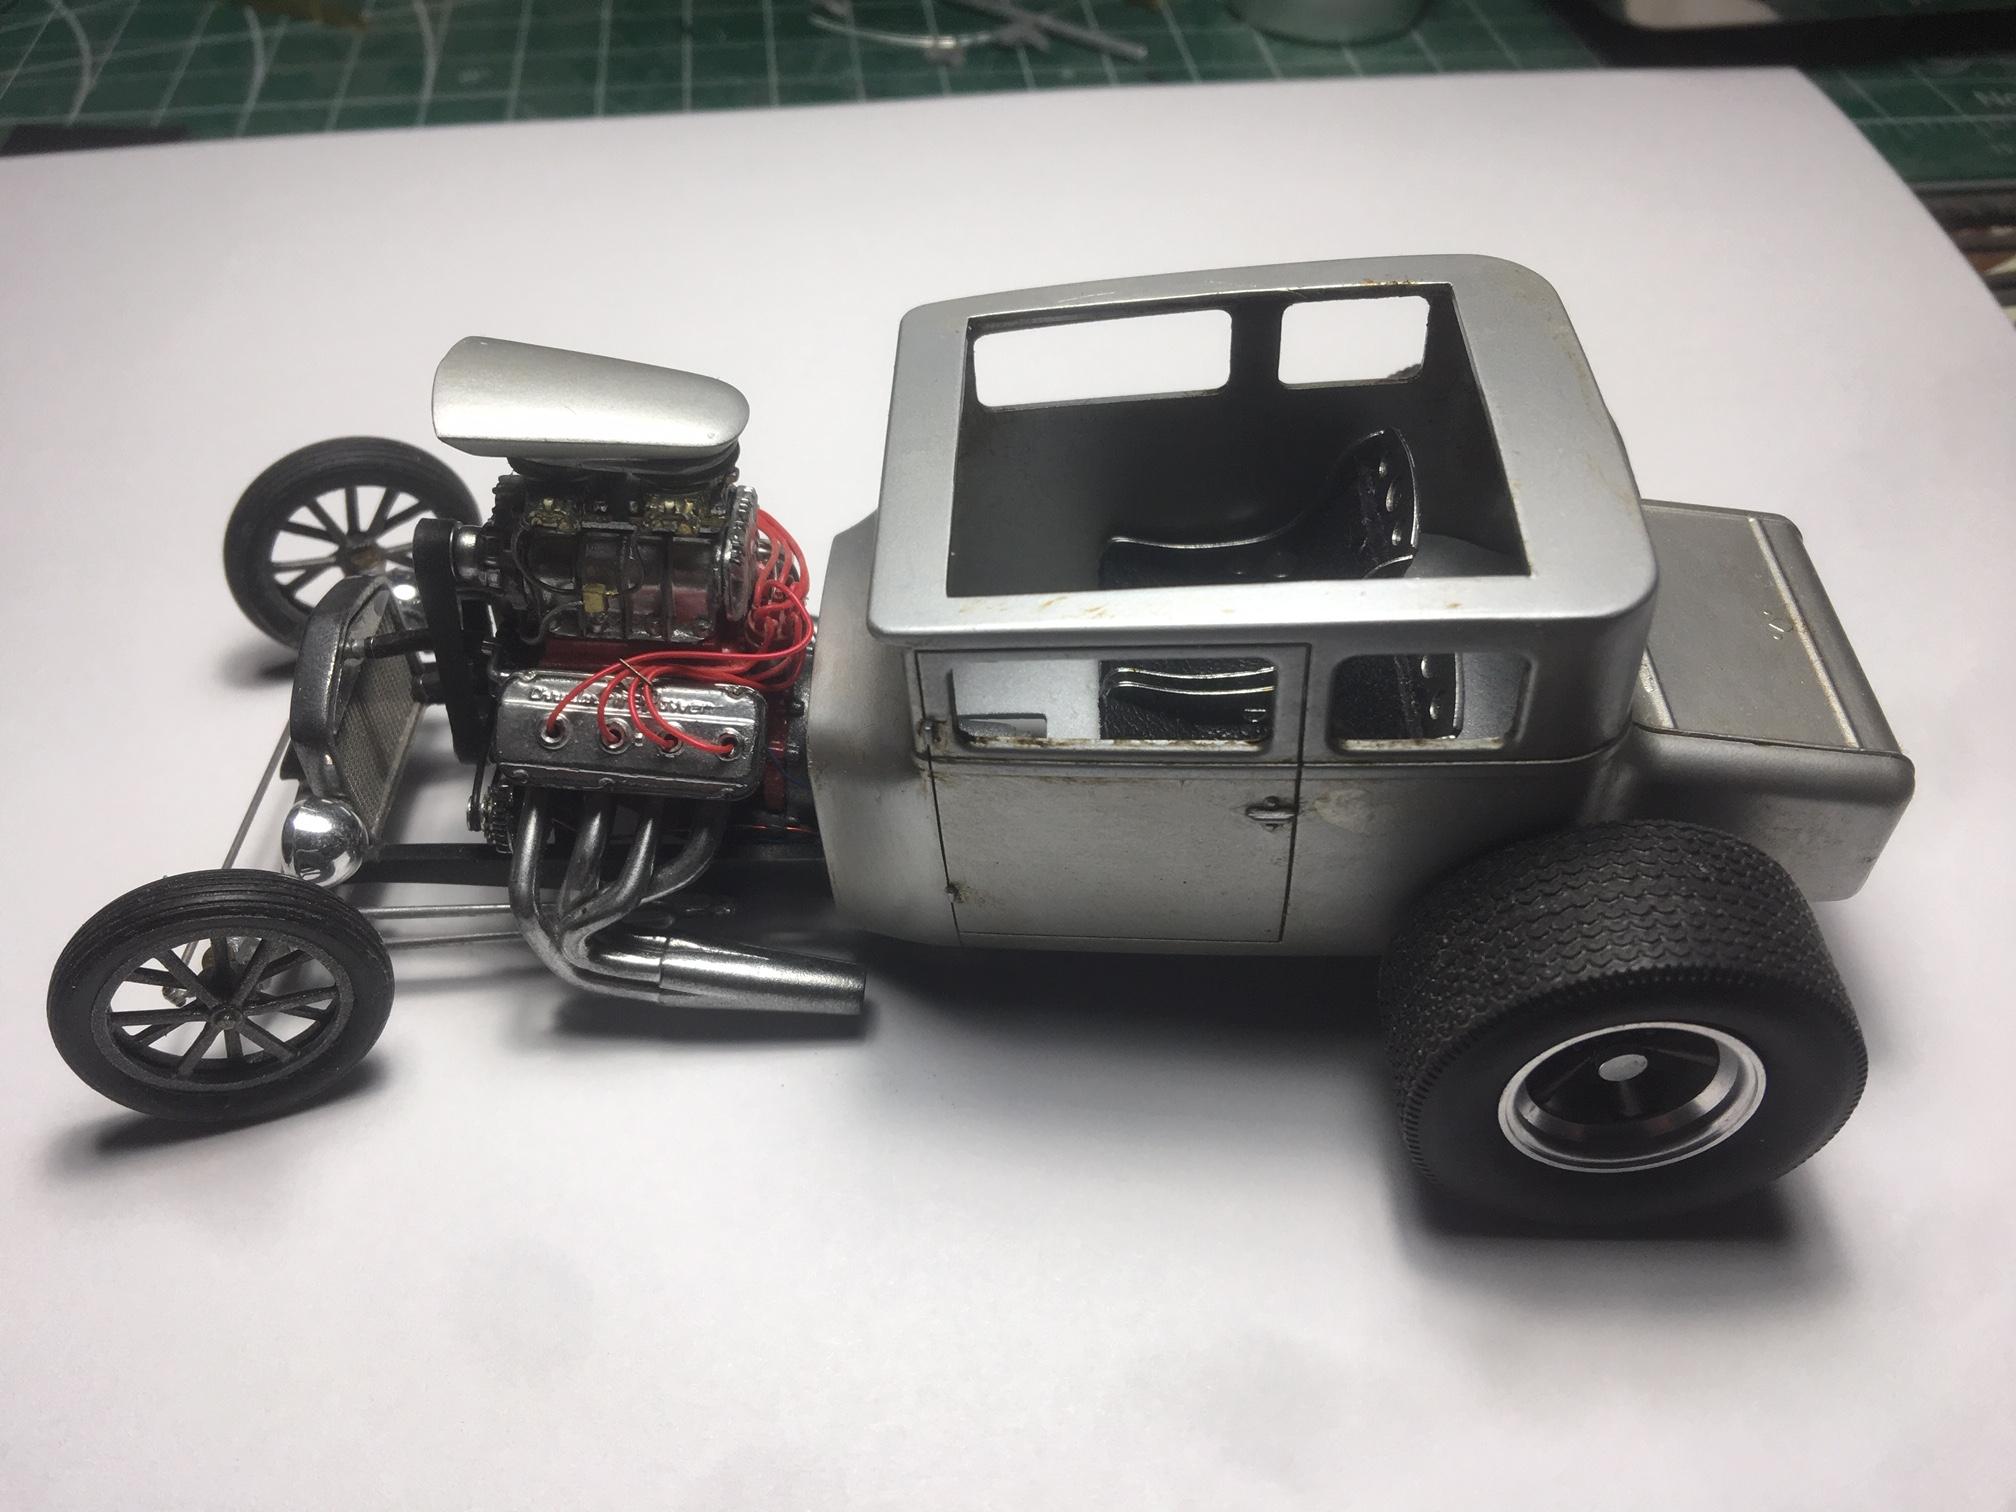
After many years, and I mean years, of working on this and putting it back in the box because of obstacles, I'm happy to report this one is finally done. AMT body, Wild Willy engine, 'Z'ed frame, printing plate floor boards, PE aircraft-style seats from Wild Hare, plumbed, wired and almost everything else. Comments always welcome. There's also a build thread under WIP if you want to see the process.

-
You need to do it Rob. Thanks for checking in. Well, I think this one's done. Here's a few pictures and then I'll go and start a thread on the Under Glass section. Many thanks to everyone for following along and commenting, this was a really fun build.
-
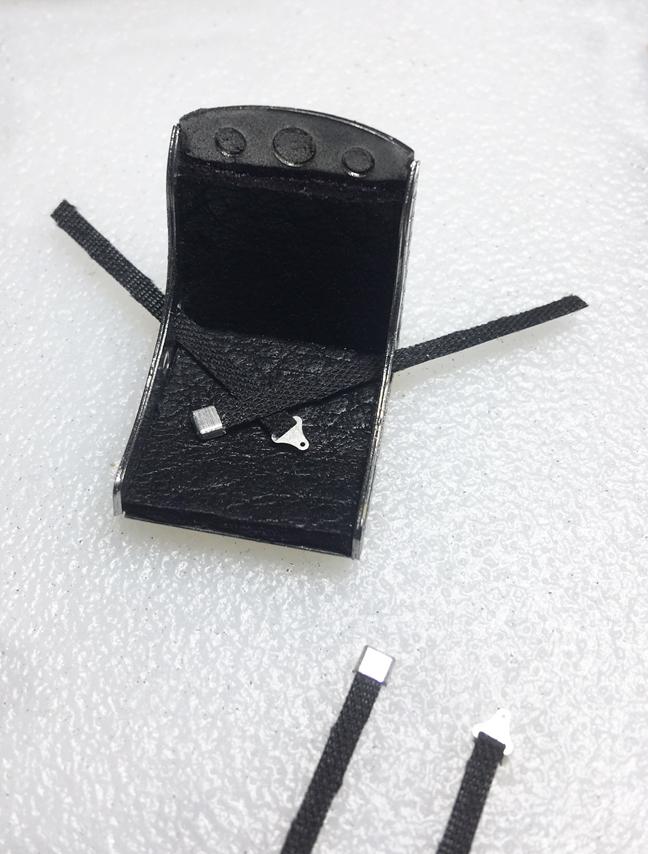
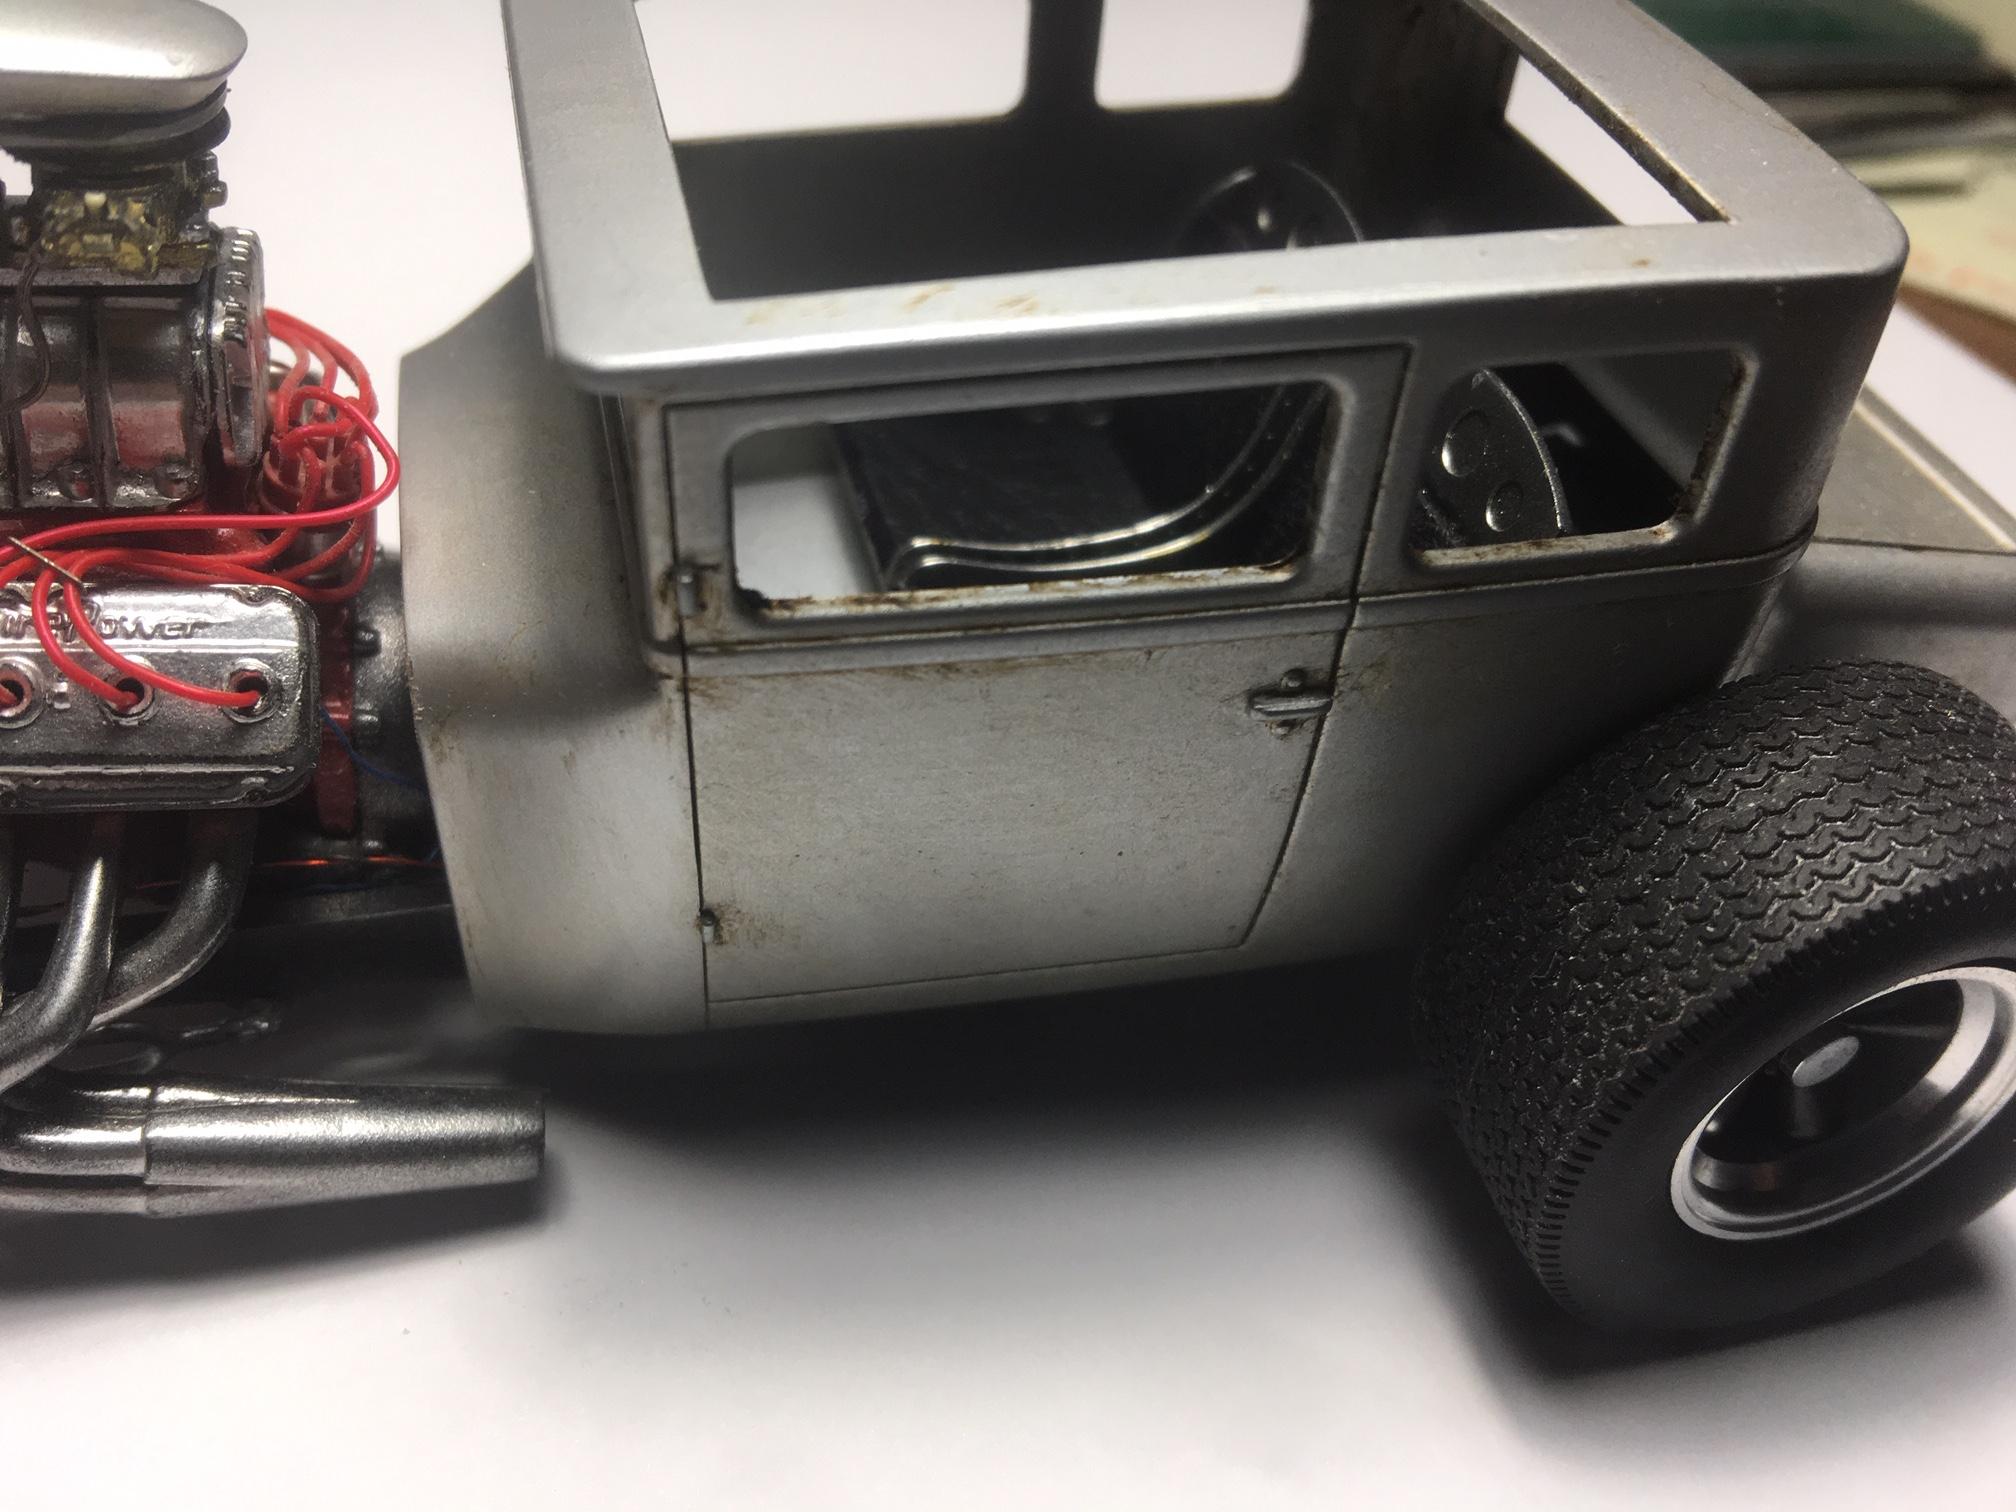
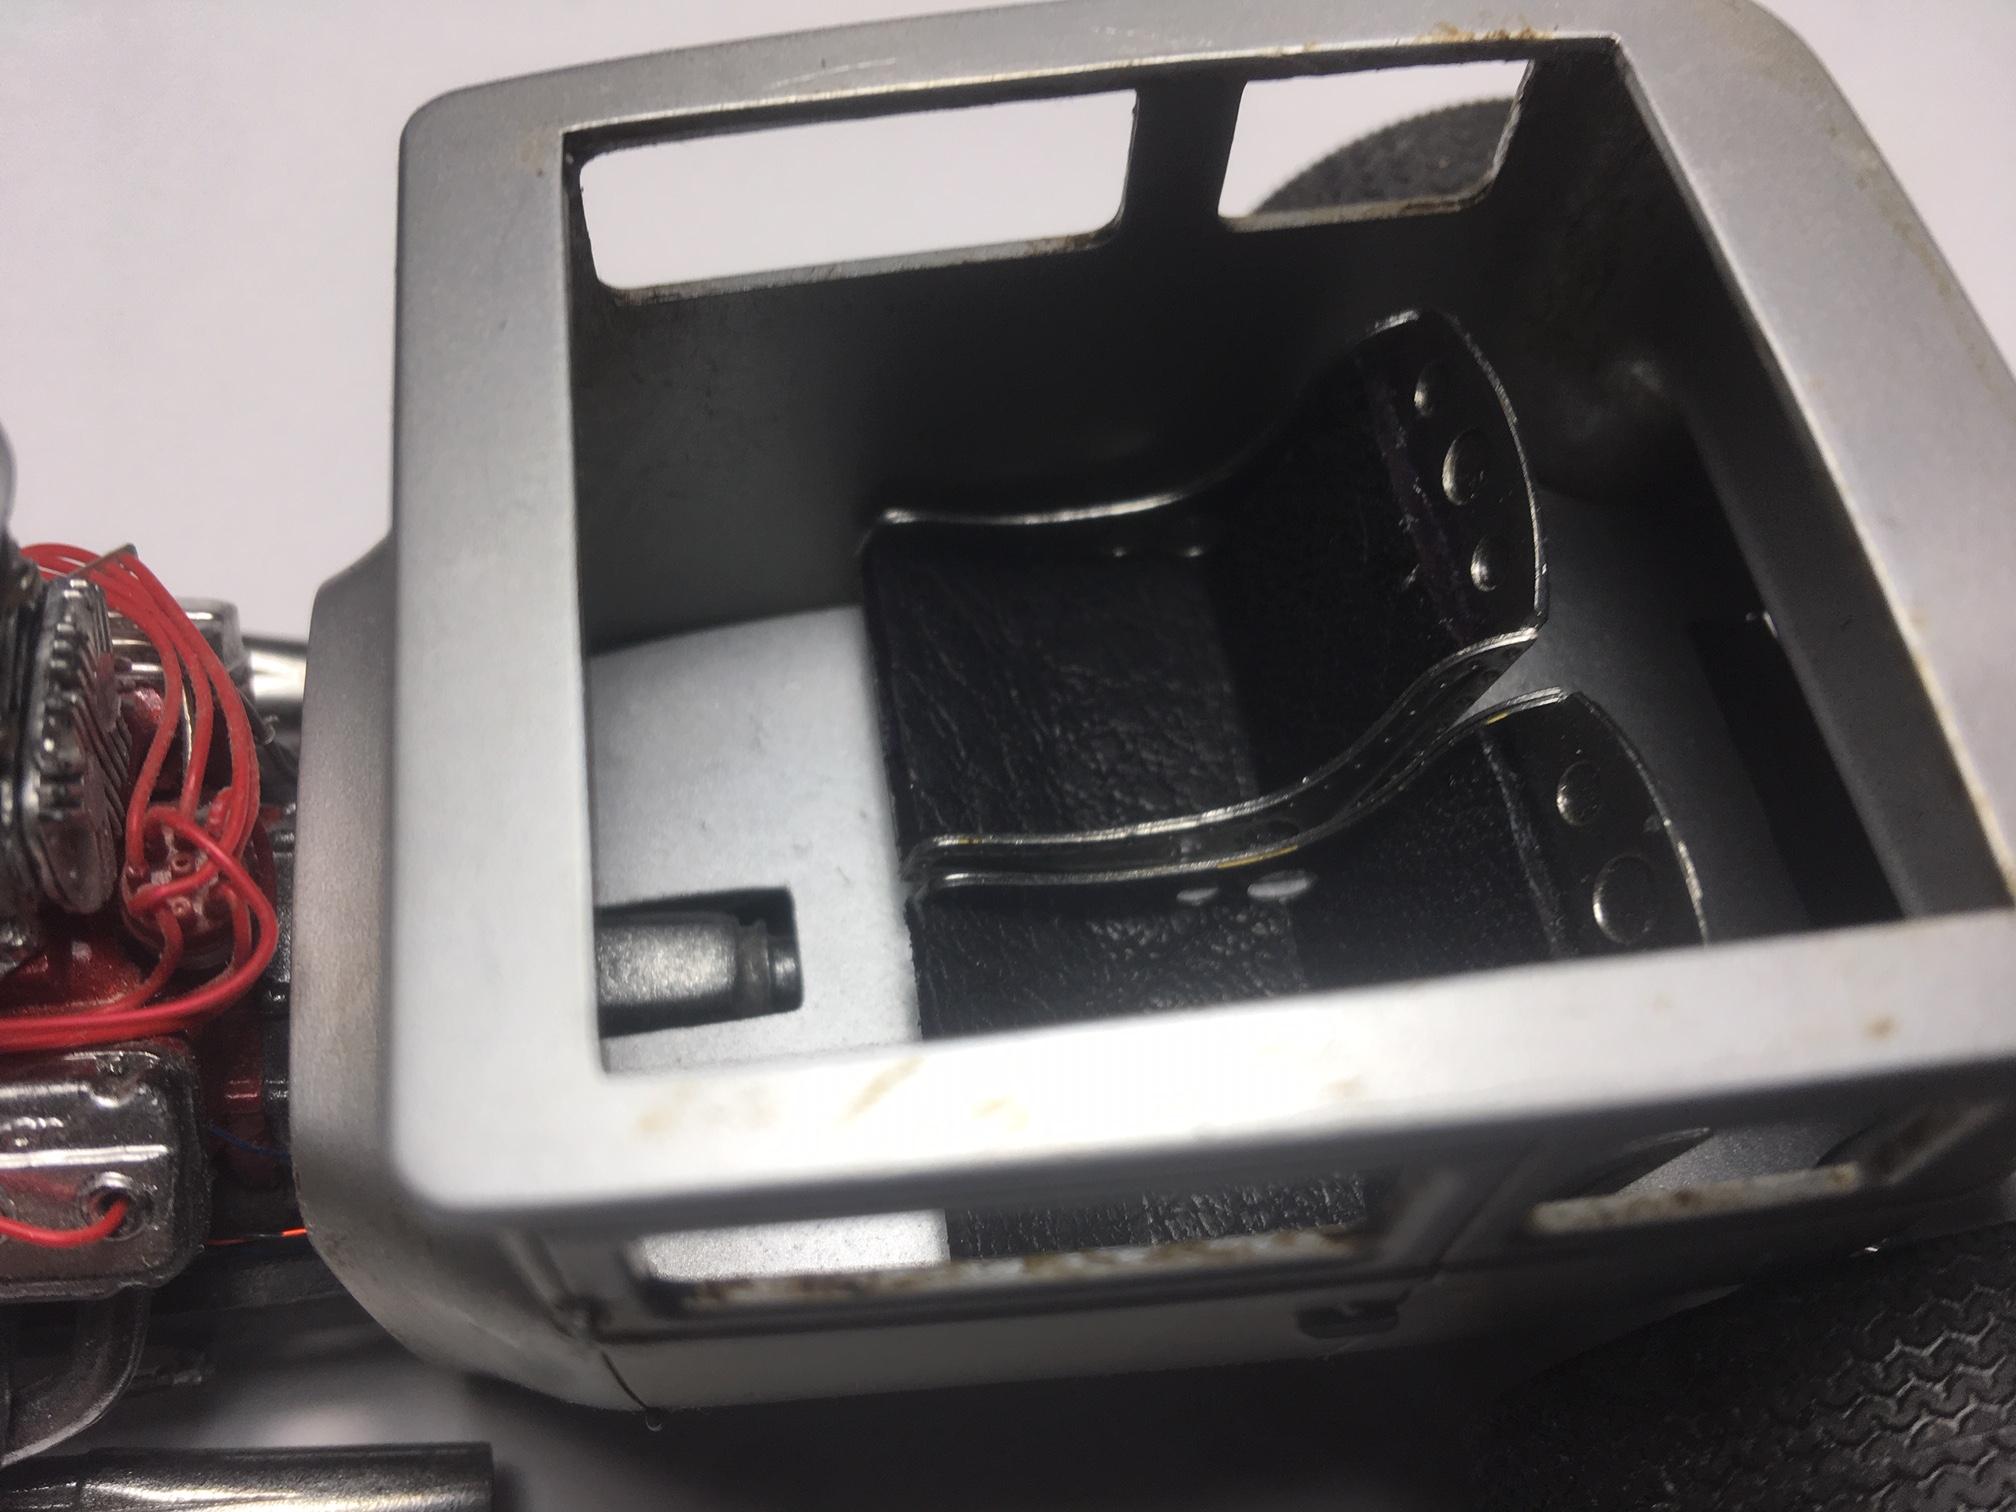
Worked on the seat belts last night and this morning. Using PE inserts and made the clasping part out of printing plate. The fabric was taken from the wife's sewing kit. It was iron on patch material. I used the fabric side and not the shiny adhesive side. It's not glued in at this point but will be later tonight.
-
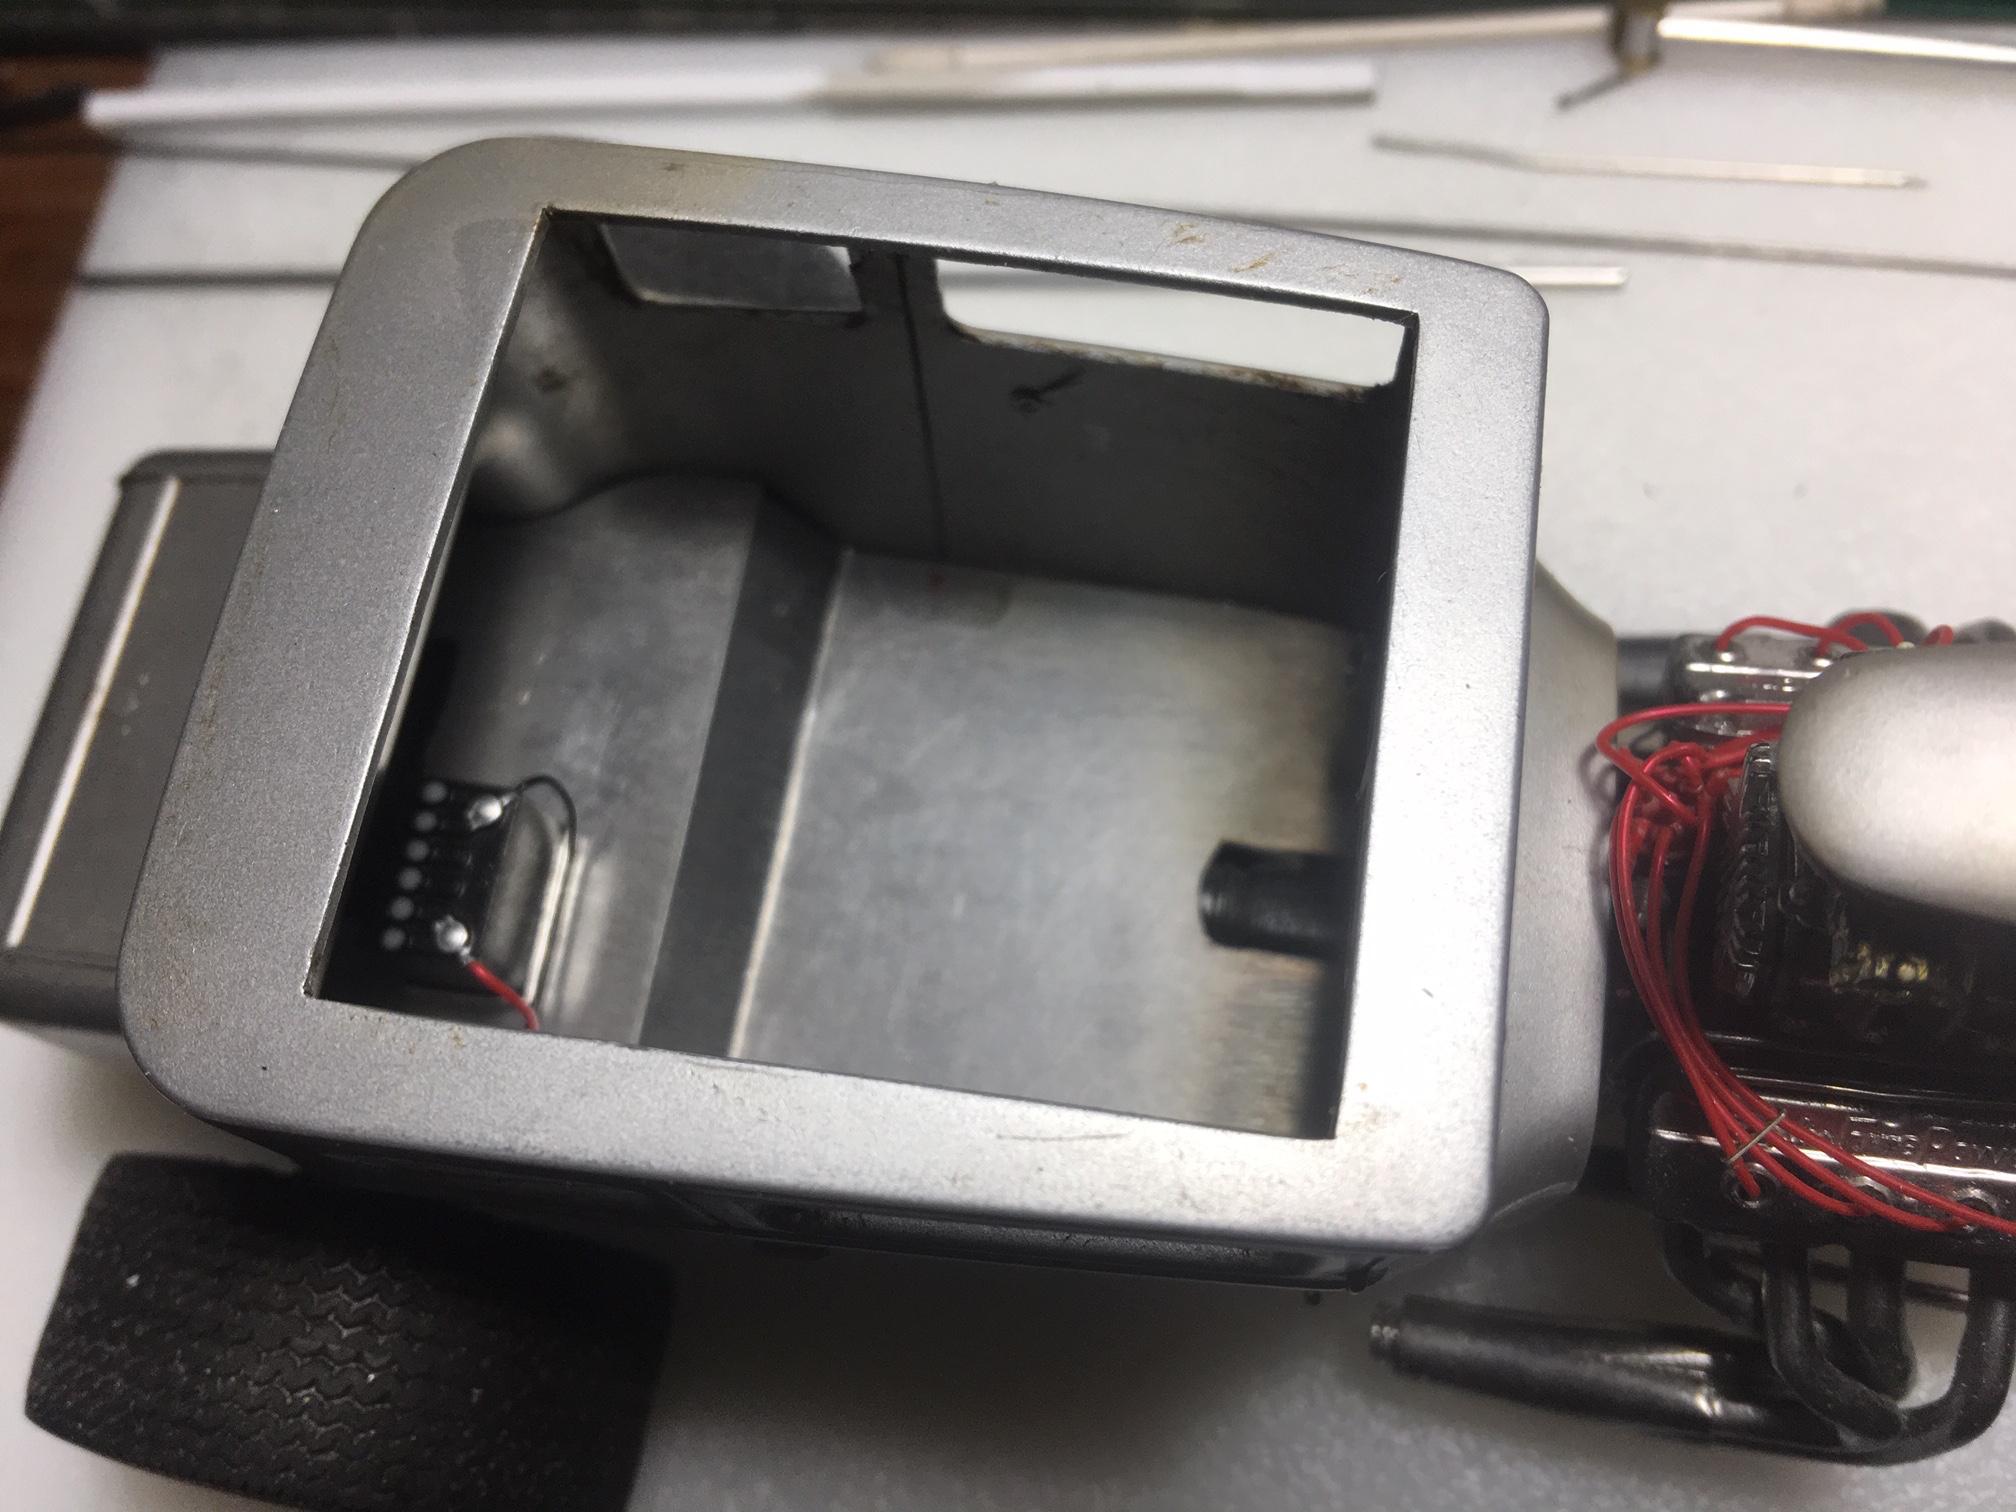
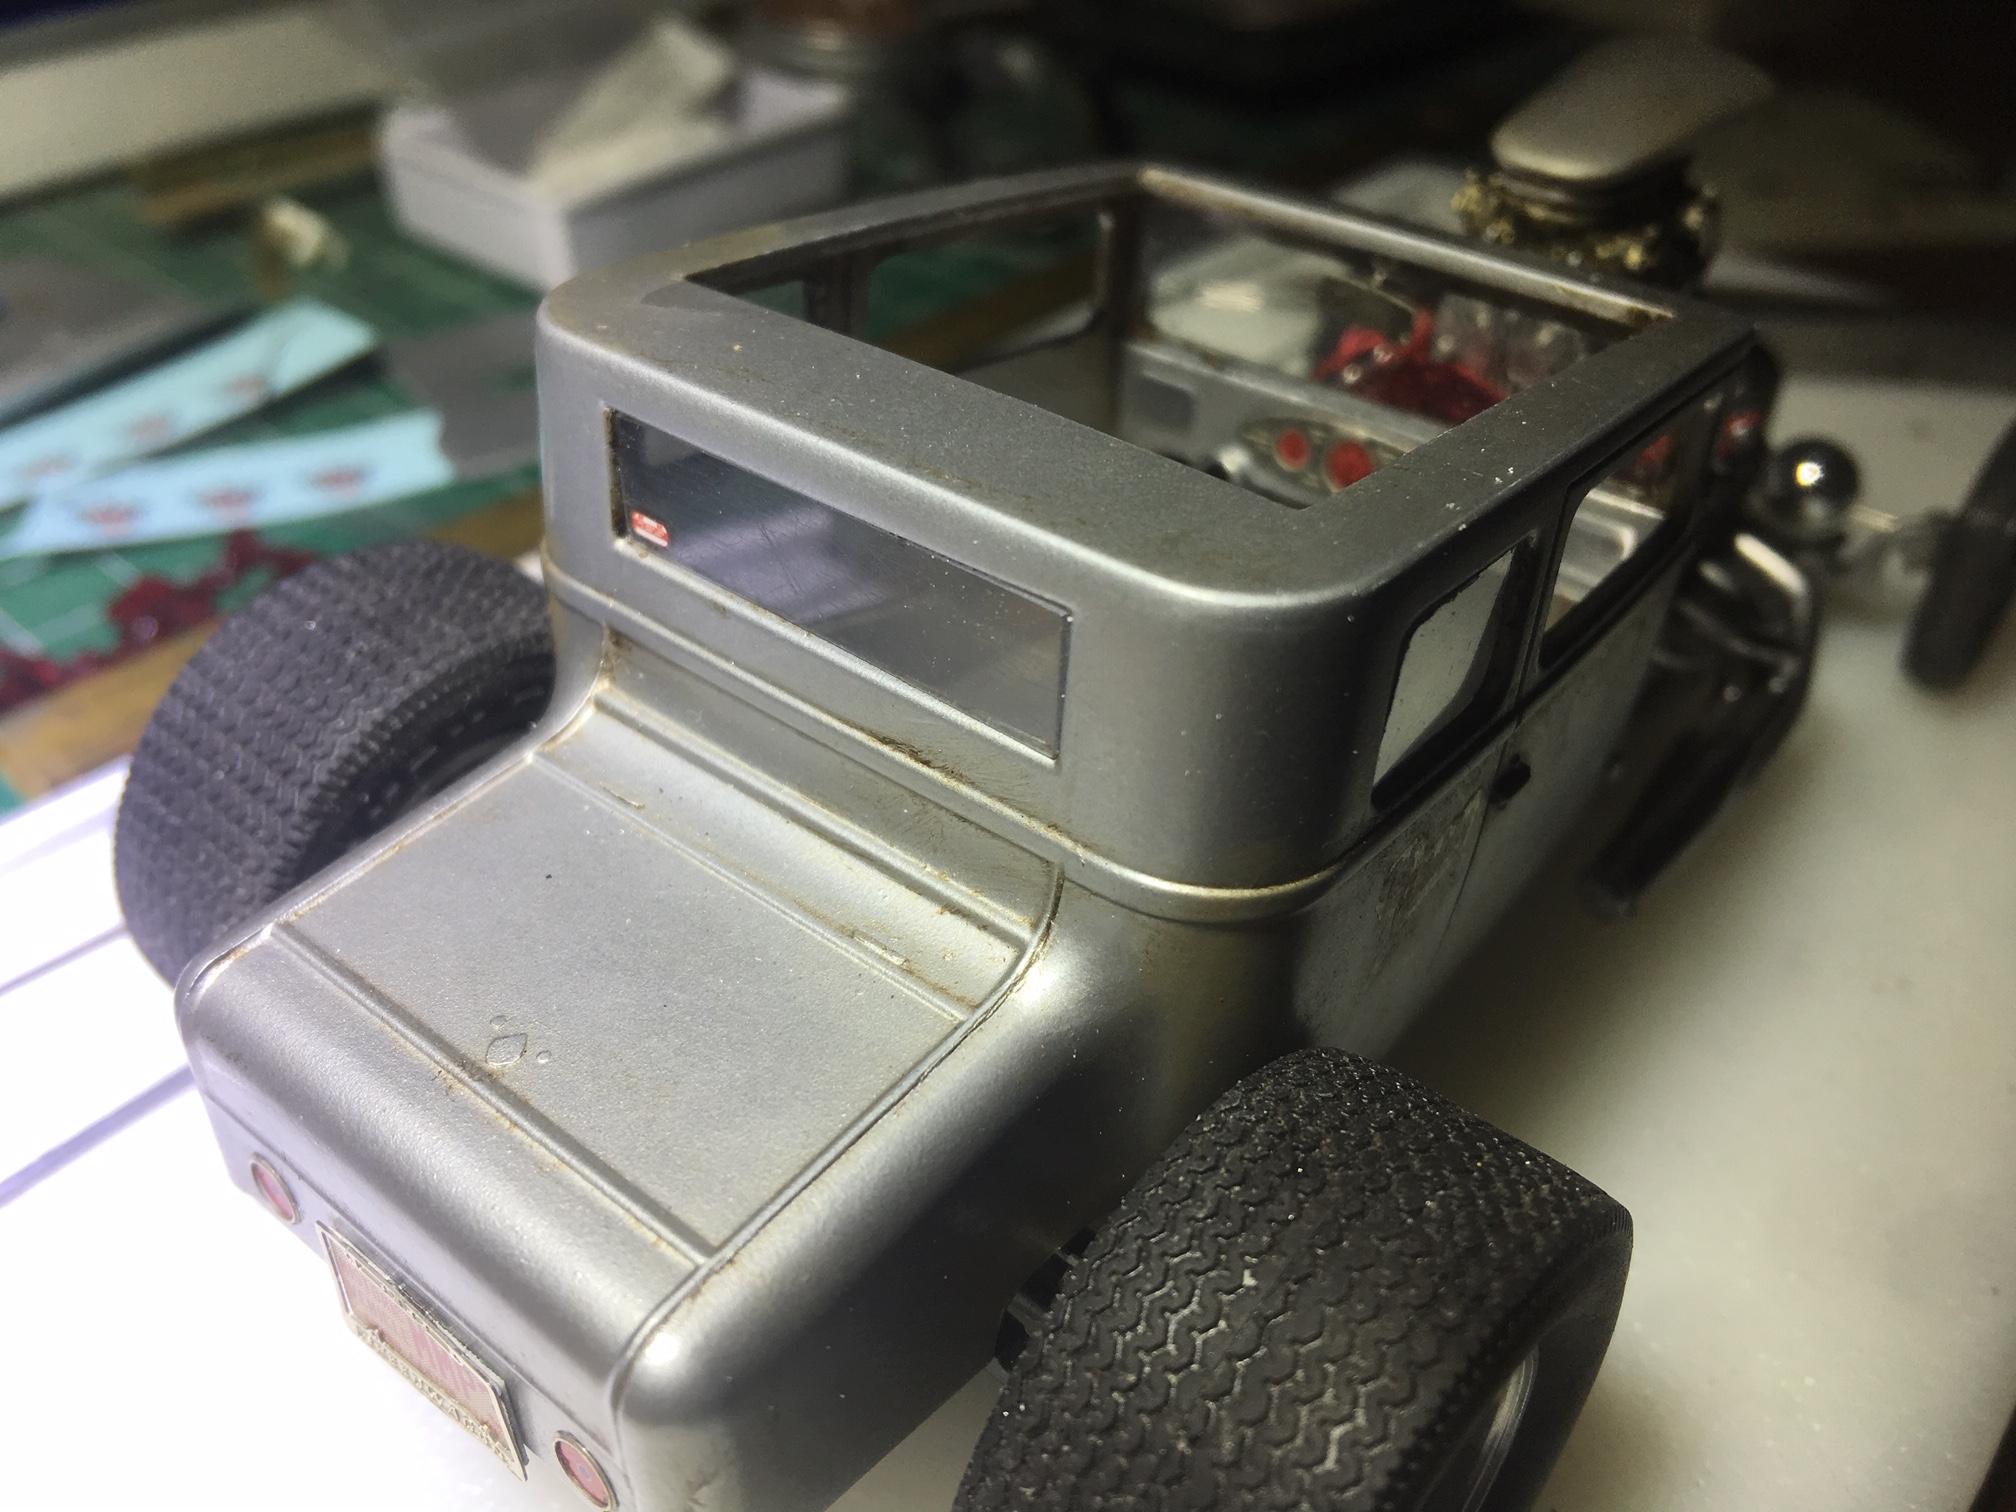
A bit more done and I'm glad to report the two floor boards are glued in now. If you recall, I was having serious issues with the interior having to be put in through the open roof and that included the floor boards. I originally fabricated them from sheet styrene and with many trials and errors along with a ton of putting them in and taking them out and adjusting the sizes. Once they were to size, I made them from aluminum printing plate. I also got the wind shield and the three back windows put in. Since you can see both sides of the windows, I made them to fit the openings so they look so much cleaner. Before gluing in the rear floor board, I made up the battery with cables and a printing plate tray and glued it in place. I also found another 'Lil' Diddy' decal and put it on the passenger side. I also added a tiny decal in the back window. Next up is to install the tranny hump and then the seats once seat belts are made. Then its time to put in the steering wheel which is already done. I'm going to have this done in a few more bench sessions and definitely in time for DSC on April 23rd. Here's couple pictures.
-
I've been wanting to. If there's much interest, I will. I started about 6 months ago just 'cause its so cool.
-
DSC is back, live and in person. Get those builds polished up and join us. We're in a new location with a lot more room for the contest as well as the vendor area.
-
That is so beautiful and I swear, it looks like it will fully function.
-
Each one of those is a work of art in its own right Steve. Beautiful stuff.
-
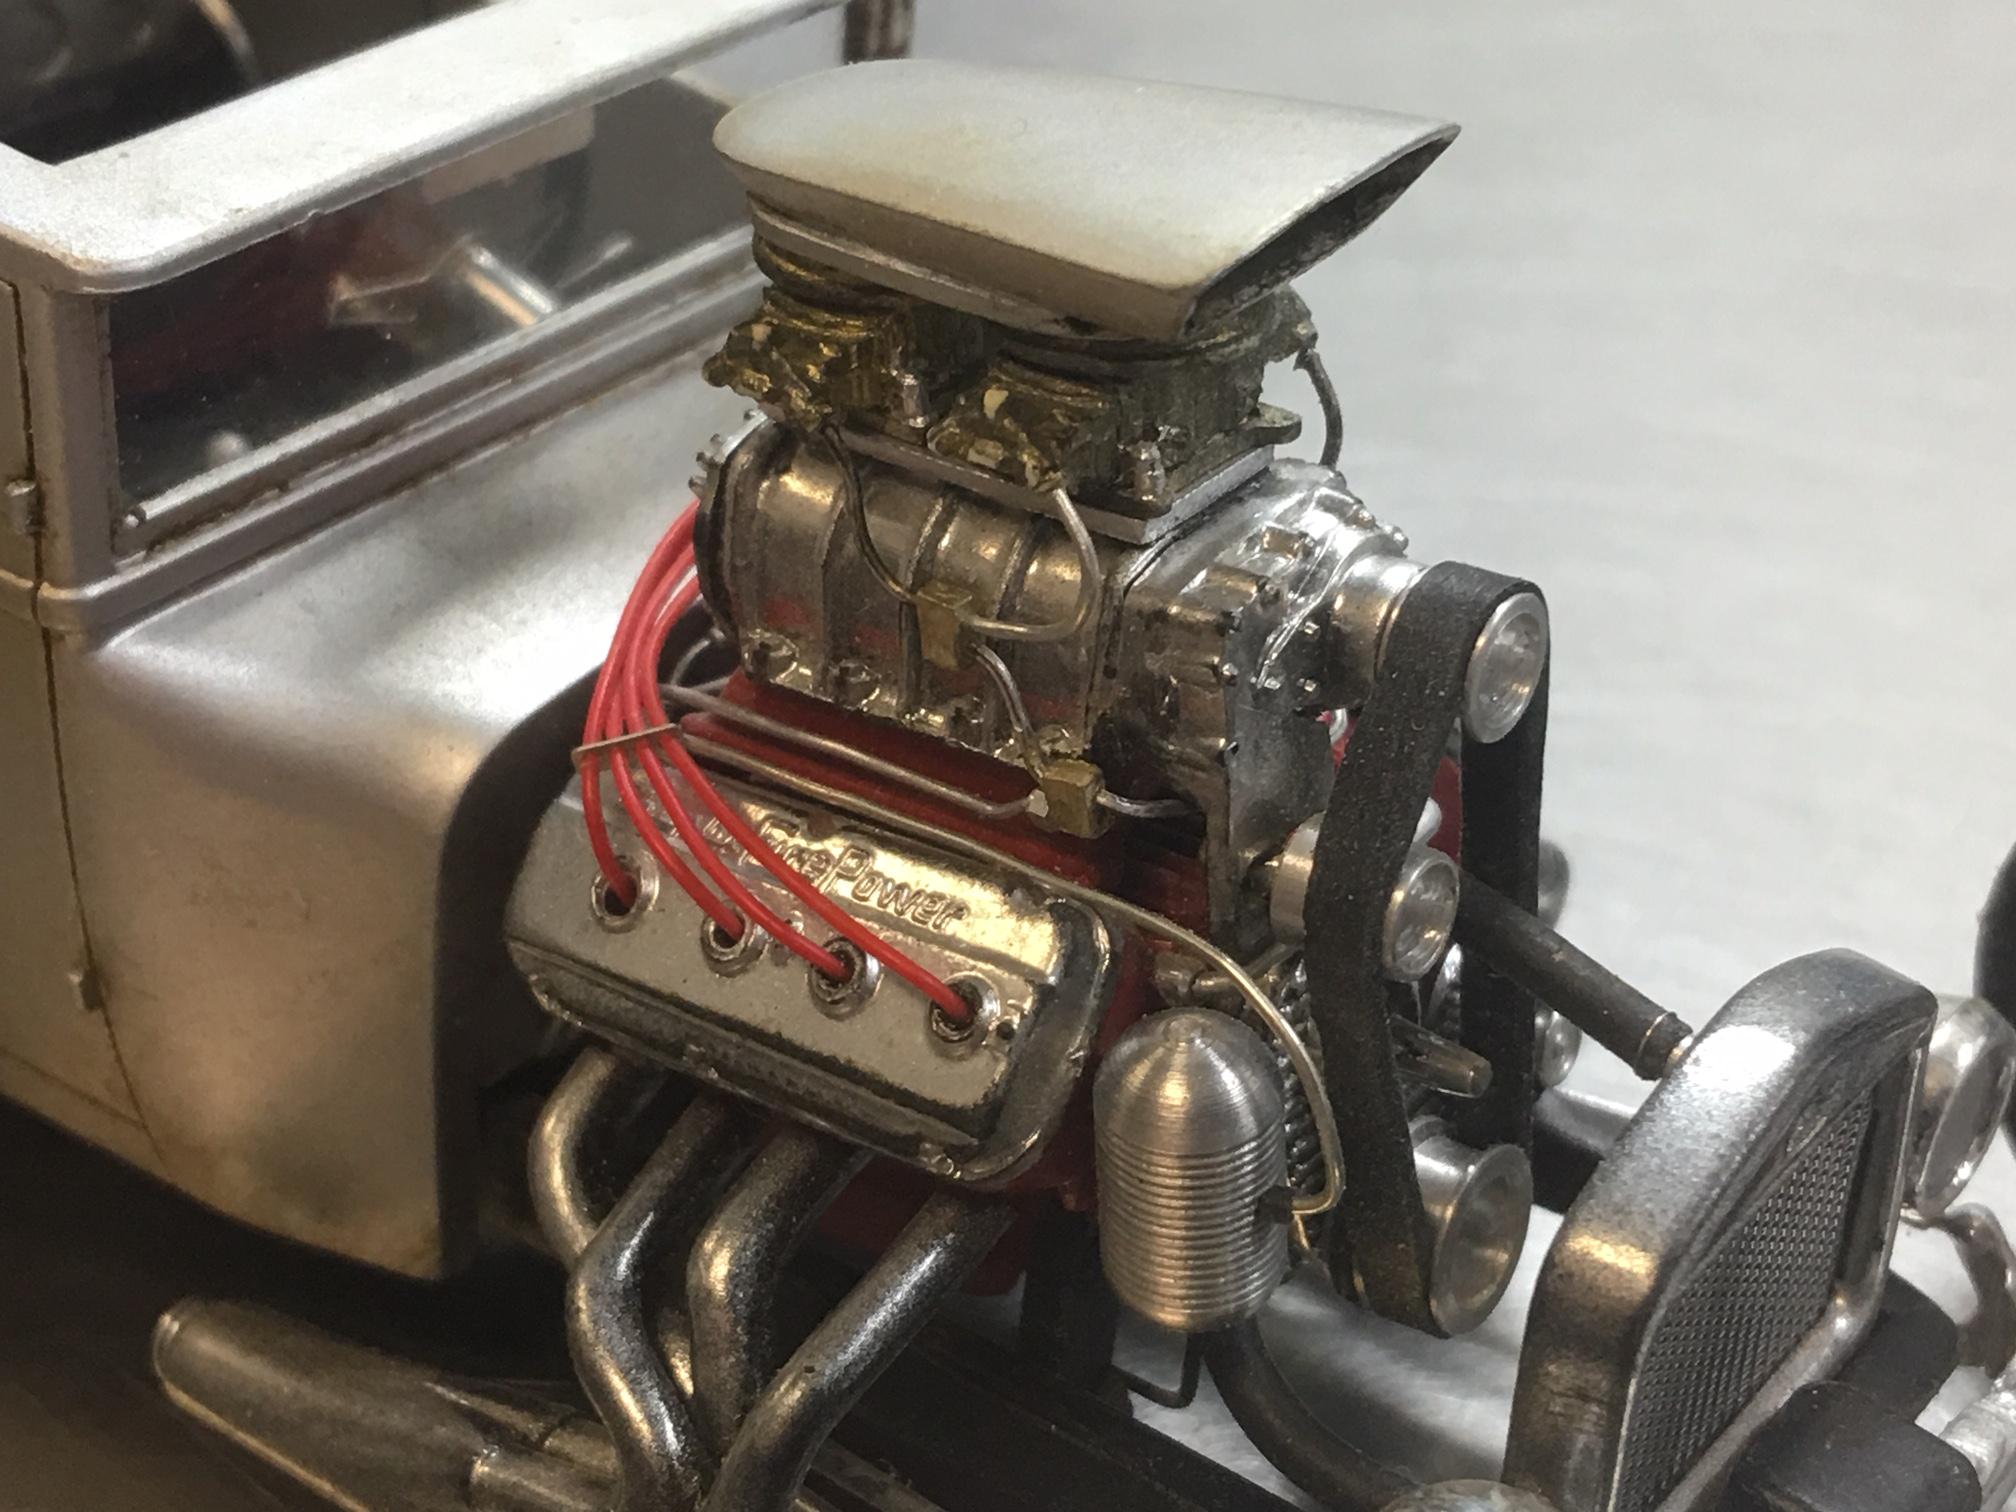
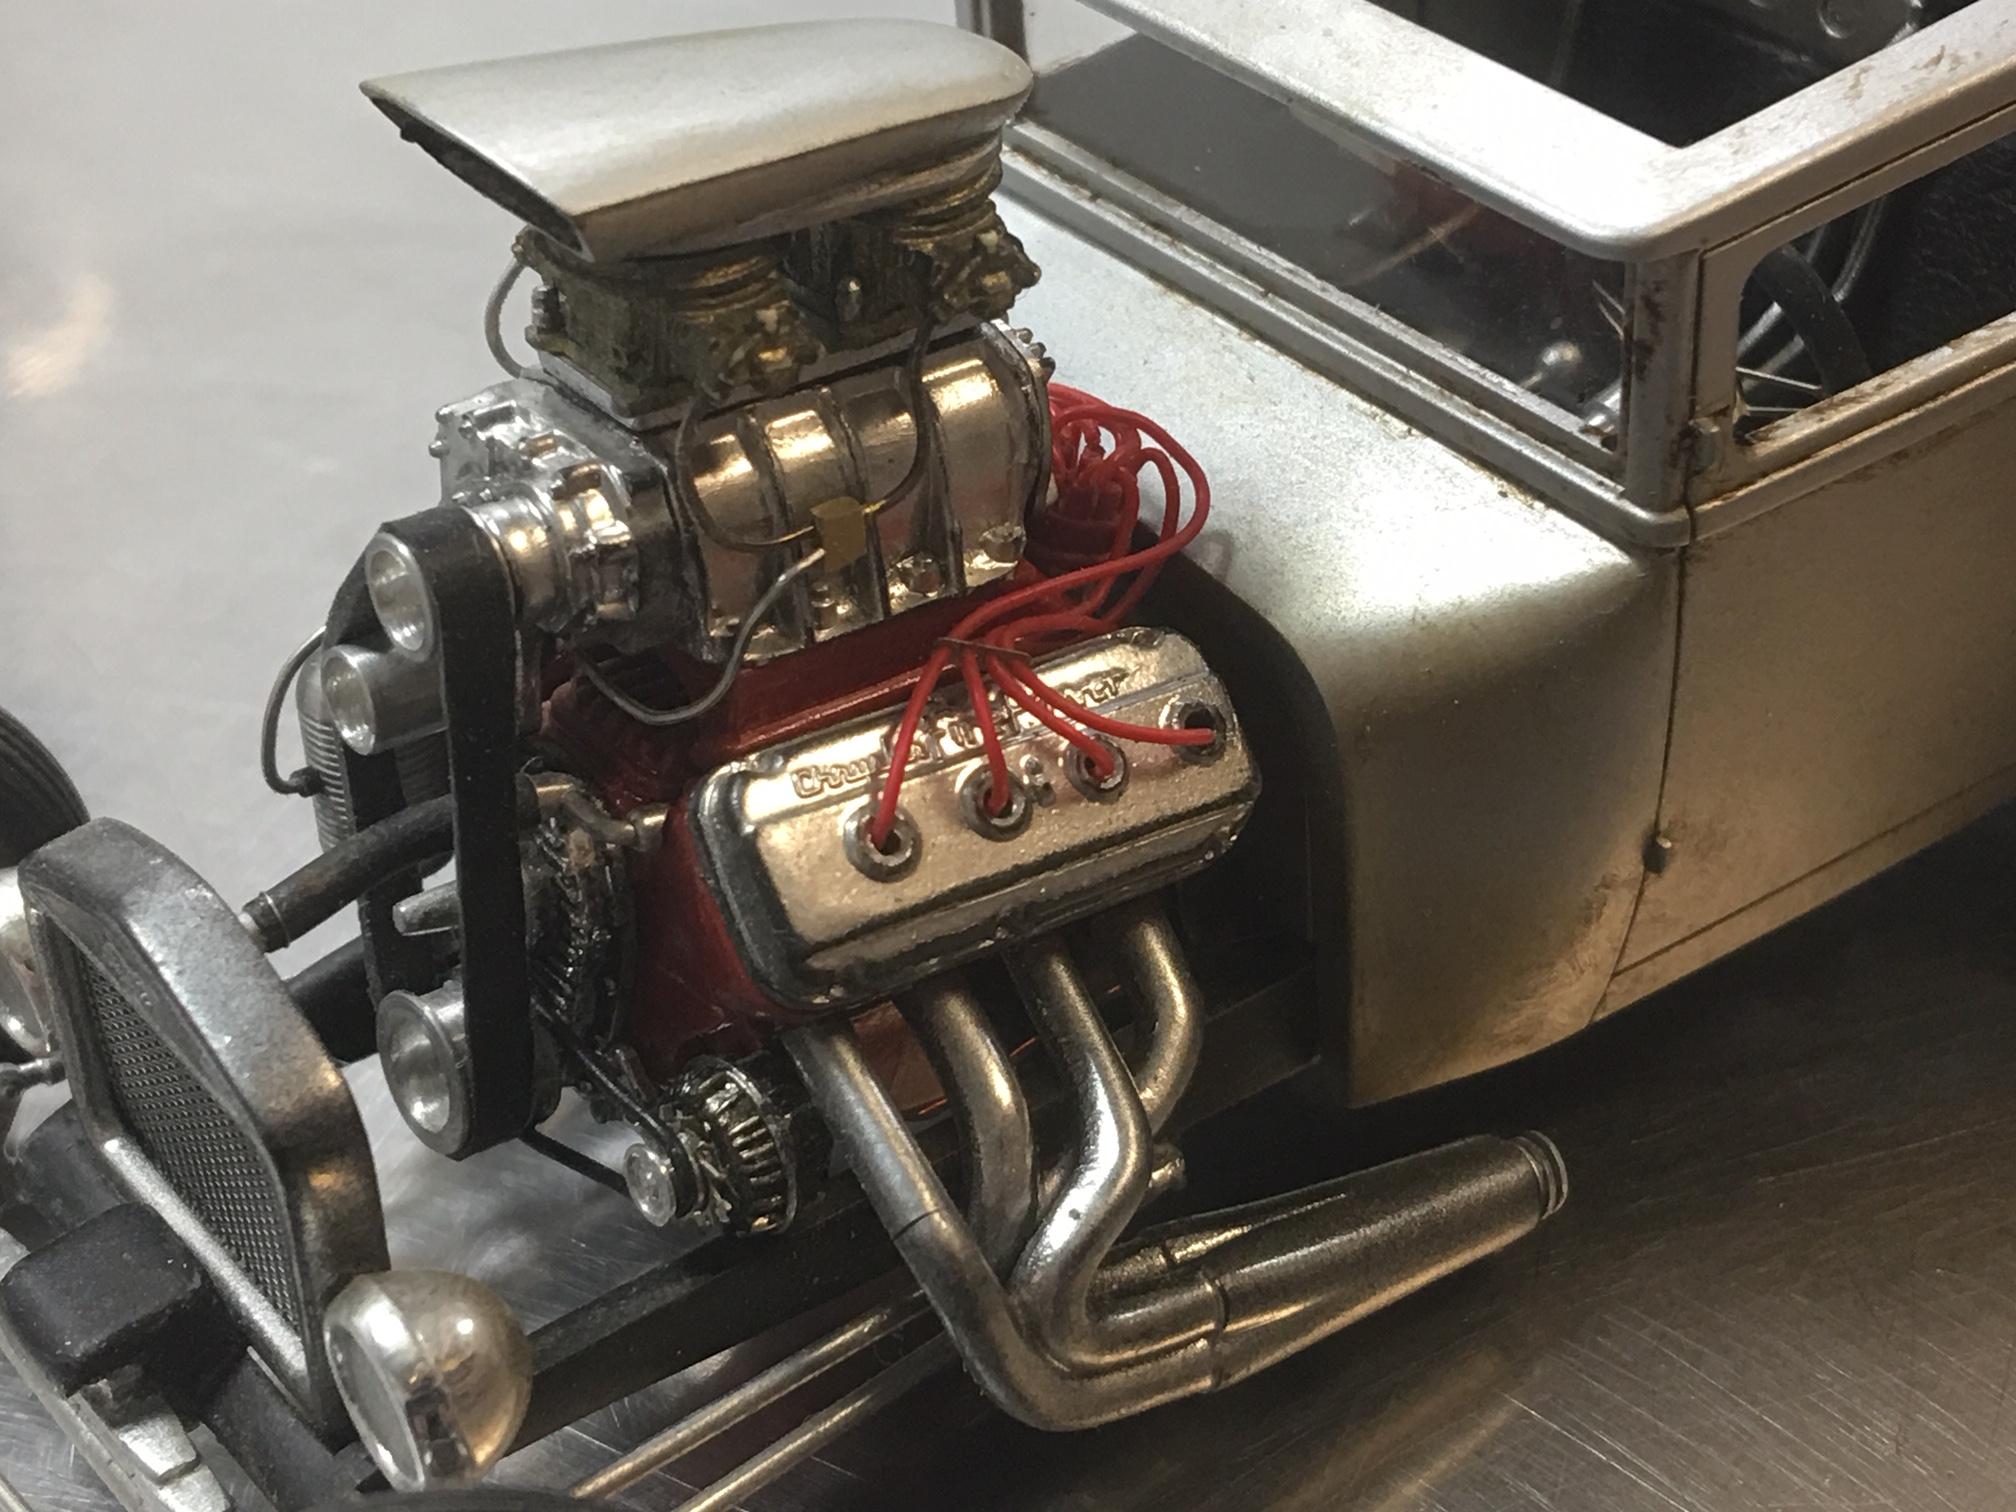
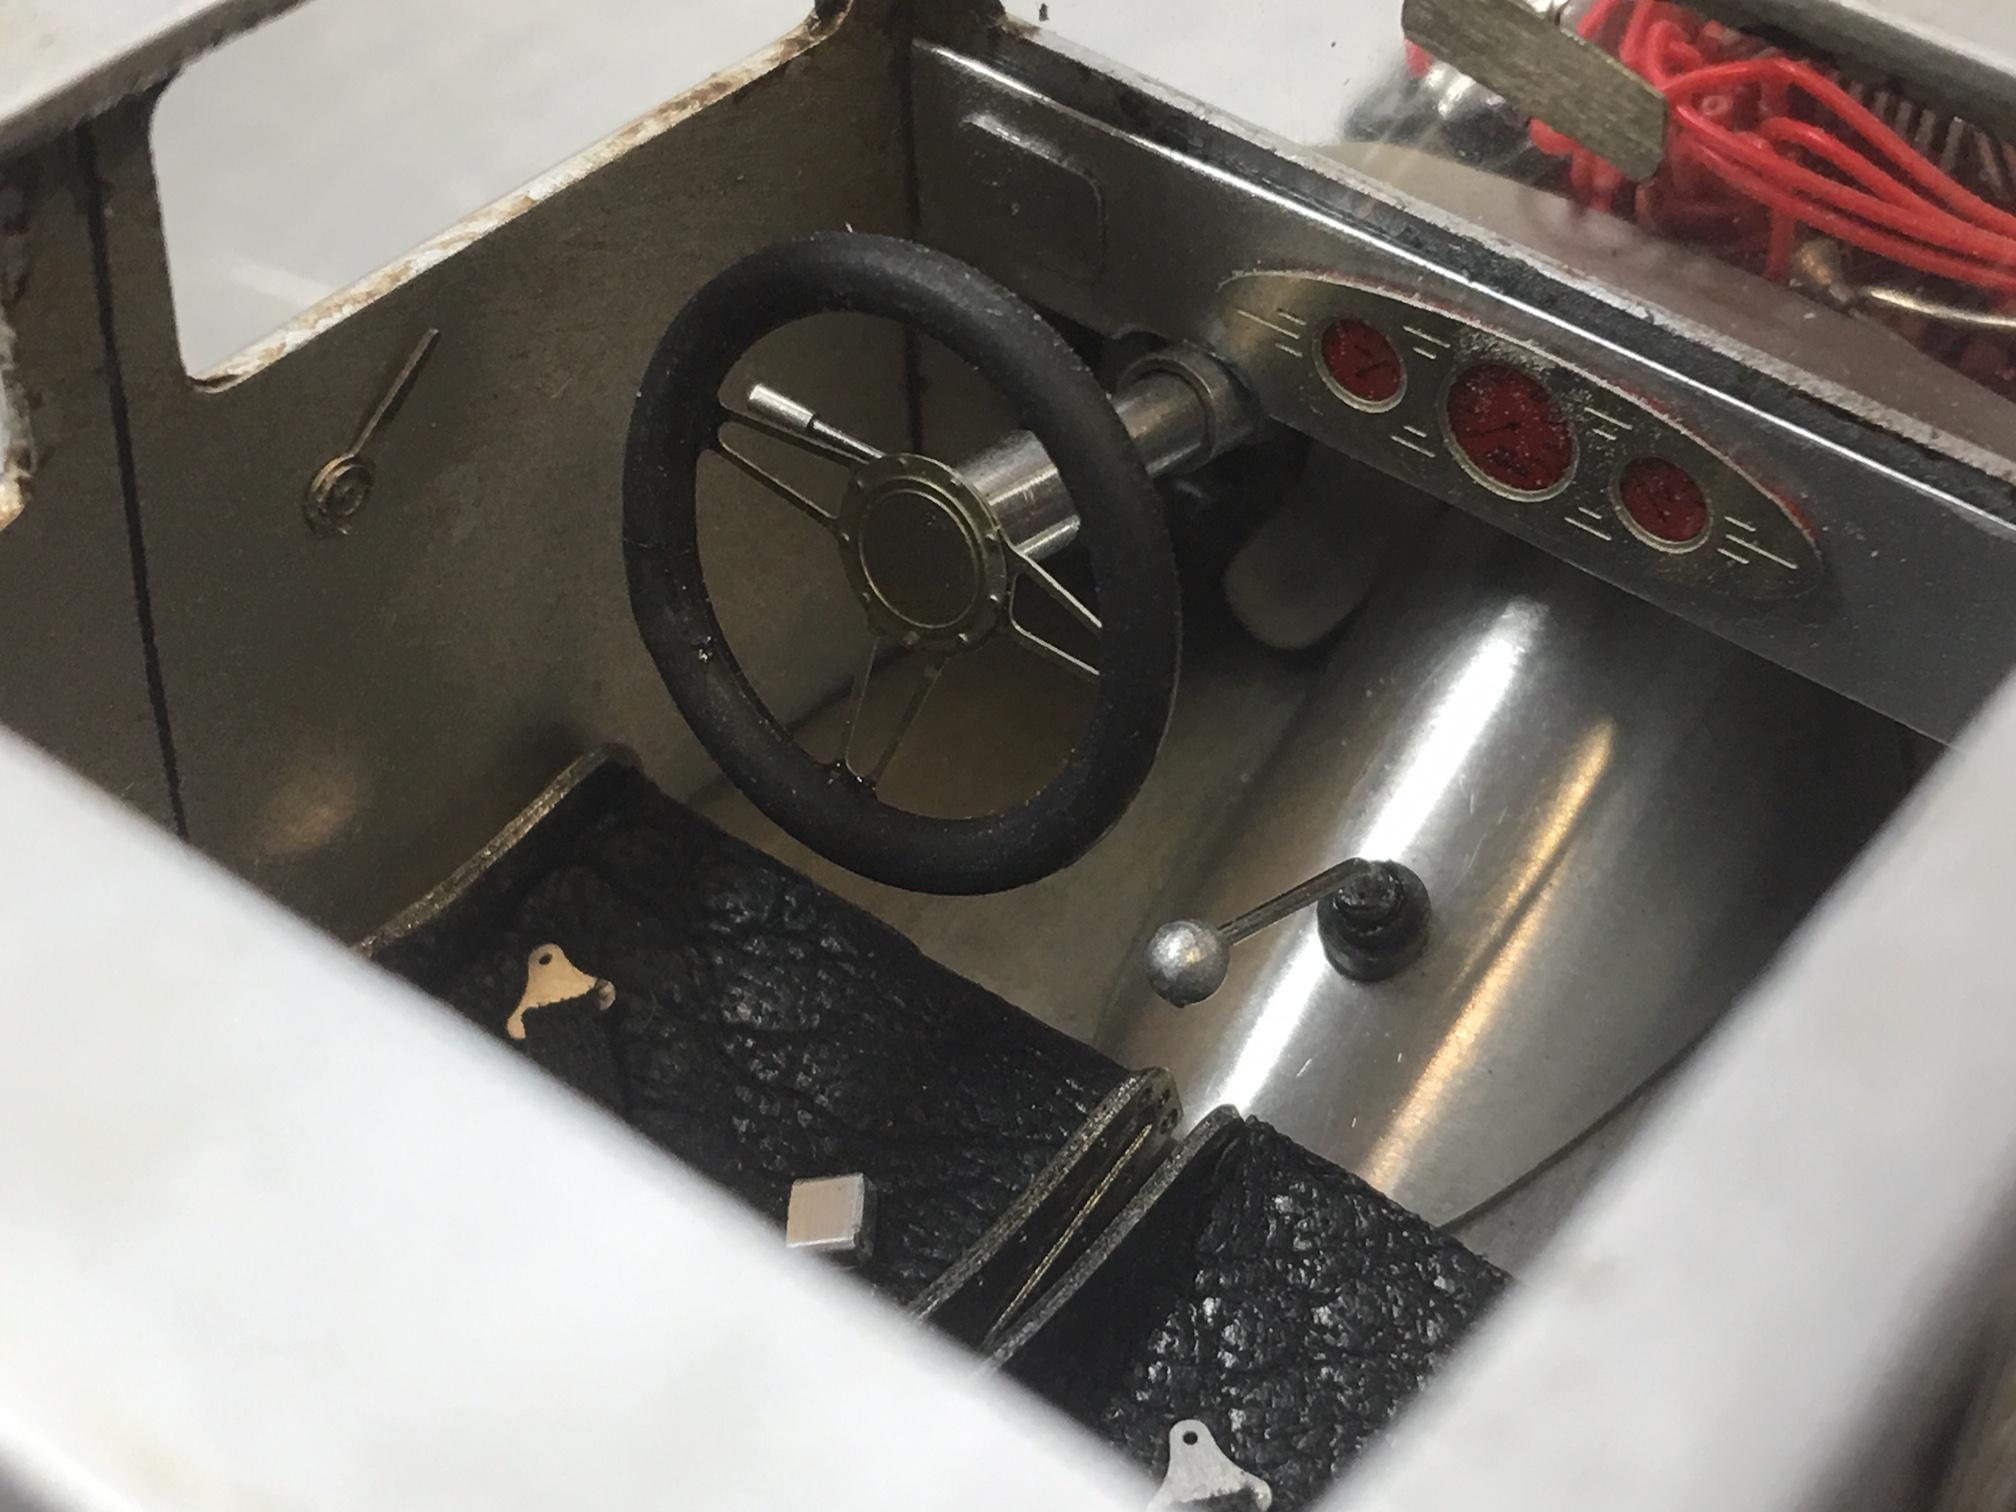
Thanks for your comments Kit and Scott and for following along. I'm on the home stretch after a bunch of different bench sessions this weekend. The dash was made from printing plate and added a Model Car Garage PE gauge cluster that came with clear gauge faces which you're suppose to paint from the back so the black image comes through. I ended up using red electrical tape which worked quite well. Its glued in but nothing else is at this point. The steering wheel center is also a Model Car Garage item and the round grip is actually an 'O' ring that I had to cut to make a smaller diameter. I used a small pin and Zap-a-Gap to put it back together. Fabricated a foot shaped go pedal but you can't see it in this photo. It attached to the printing plate trans hump. I also had to make some type of muffler system since the category at DSC requires this. I fabricated some baffles from two different size punches from aluminum printing plate and glued them together. Once dry, I sanded them with a 1000 grit sanding stick. They are removable because I'm not sure I want them after the contest. I can always glue them in later if I want. These need a bit more detail on the ends. I can't decide if I should add a battery behind the seats, still pondering that one. A few small details to finish up, some floor mats to make and then its glue it all together. I want to weather the body a bit more but I'll do that once its all glued together. Desert Scale Classic is the 23rd of this month and it WILL be on the table. Stay tuned, more to come.
-
Back at the bench a bit over the weekend. I need to get this done for DSC next month and I'm so close to the finish line. A couple of weeks ago I painted the body and floor panels a flat silver and yesterday I did a small amount of weathering to the inside and outside of the body. The weathering took off the Lil' Diddy decal on the driver's side so I'll add another later, after I'm done handling the body so much. This morning, I added some black, real suede to the aircraft-style seats. Fabricating a dash is next. Here's a few pictures.
-
Engine suggestions please.....
gasser59 replied to iBorg's topic in Model Building Questions and Answers
Personally, I think the Revell Miss Deal kit has the best hemi. I don't care for the injection system so I switch that out with the Willy Borsch. The time period seems right for your build. -
64 Dodge D100 Pickup Pro Street
gasser59 replied to AmericanMuscleFan's topic in WIP: Drag Racing Models
Eeeegadds Francis, what a beauty! Completely insane the quality of your assembled work. -
ROYAL CANADIAN 1/16 SCALE TOP FUEL DRAGSTER
gasser59 replied to Ian McLaren's topic in WIP: Drag Racing Models
I can see the video and it’s awesome!! -
So glad you've made a reappearance Tim and you haven't missed a beat. Hope you being back is an indication you're feeling much better. Mighty nice work there.
-
ROYAL CANADIAN 1/16 SCALE TOP FUEL DRAGSTER
gasser59 replied to Ian McLaren's topic in WIP: Drag Racing Models
Very nicely done Ian. How did you get the texture on the pedal? That frame color is a perfect match to the original. -
'50 Ford 3100 COE Wrecker
gasser59 replied to gasser59's topic in WIP: Model Trucks: Pickups, Vans, SUVs, Light Commercial
No progress I'm sad to report. -
64 Dodge D100 Pickup Pro Street
gasser59 replied to AmericanMuscleFan's topic in WIP: Drag Racing Models
Model Motor Cars bought the inventory of Scale Hardware so that's where you can find these small nuts, bolts and other minute pieces. -
ROYAL CANADIAN 1/16 SCALE TOP FUEL DRAGSTER
gasser59 replied to Ian McLaren's topic in WIP: Drag Racing Models
They are only on FB and you need to PM Wayde Leslie to place an order. Check out their FB page for offerings and prices. -
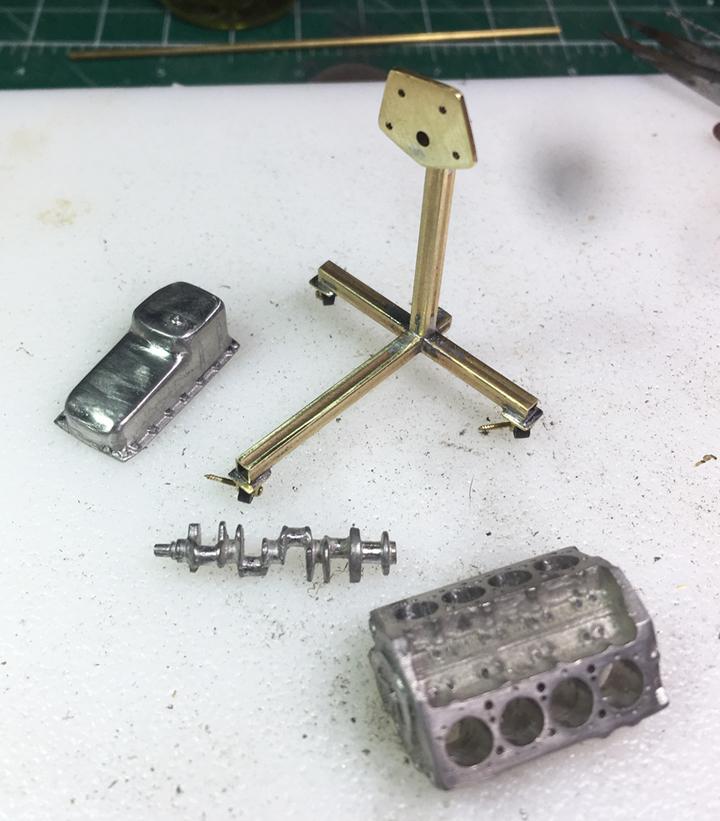
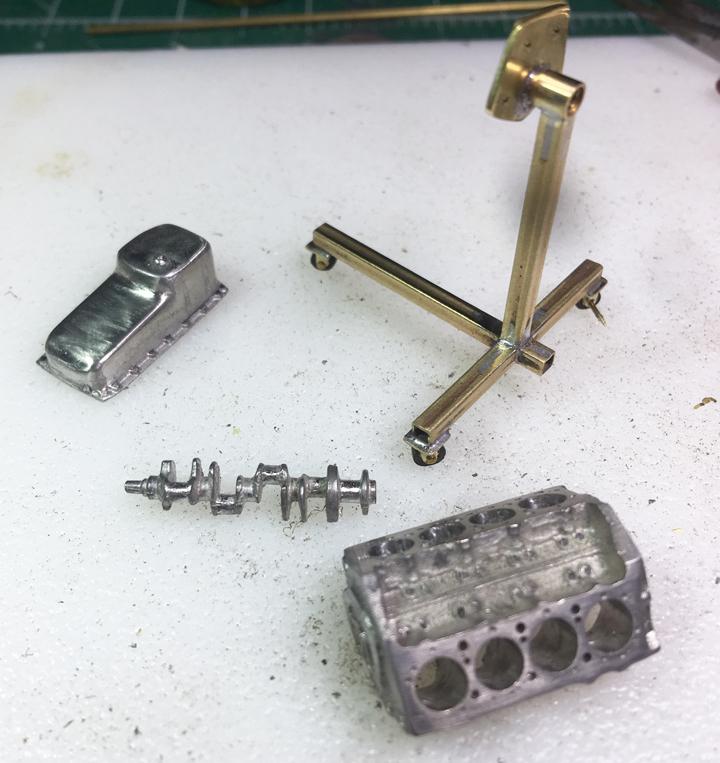
For some time now, I've wanted to update the engine and stand that are in the dio. Since its right there in the front, it is really visible so I decided to make stand out of brass and use the soft metal block and other engine parts from Curbside Dioramics that I've had for probably 40 years. Here's a few pictures of my progress so far. I need to order some longer bolts from Model Motorcars in FLA before I can finish this.
-
All of the descriptive words I'd like to say about these wonderful works of art I can't say here. Just know I'm thinking them out loud to my screen.