-
Posts
39,269 -
Joined
-
Last visited
Content Type
Profiles
Forums
Events
Gallery
Everything posted by Ace-Garageguy
-

So, guess I don’t have to wash my wife’s car this weekend
Ace-Garageguy replied to OldNYJim's topic in The Off-Topic Lounge
I can tell both frame rails are "swung" to the right just from the position of the bumper reinforcement. The LH apron is toast too (that's what the suspension strut hangs on), the "core support" (supports the radiator, AC condenser, hood, lights, etc) is history, and on and on. You can't just "pull" the structural damage out. You pull it first, then drill out dozens of spot-welds, remove the damaged parts, and build the structure back up from new parts, all spot-welded back together like the factory did it (which it never really is). It's major surgery, and has to be done right, or the car's occupant safety "crush" impact energy management won't be there if it gets hit again. -

So, guess I don’t have to wash my wife’s car this weekend
Ace-Garageguy replied to OldNYJim's topic in The Off-Topic Lounge
1) Really glad your wife's OK. If she'd been punched in the door that hard, it would be another story. 2) It'll total. There's almost certainly heavy structural damage when there's that much suspension damage. I look at this stuff every day, and I'm 99.98273% sure it's a goner. (The "total" dollar threshold is typically around 70% of the market value of the car; when the estimated repair cost goes over that, you're done.) 3) I'd be pretty mad about the mindless destruction of a perfectly good little car. -
Considering this was built in pretty primitive conditions with the most basic tools required to do the work, it's of astoundingly good quality. "Inspirational" doesn't begin to describe what a bunch of Vietnamese kids accomplished here. Some of it's a little crude, but the amount of good seat-of-the-pants engineering and craftsmanship that went into this thing, especially the building of the body and interior panel clay "plugs", good enough to splash molds from to make fiberglass panels...it just blows my mind. EDIT: In the YT comments under the Rolling Bones vid I posted a coupla days back, there were a bunch of haters ragging on "old rich boomers" who had hot-rods. OK dwerbles...build something cool yourself like these young guys did, and quit your whining about " boomers bad ".
-
Lacquer is generally not recoat-window time-sensitive. You can recoat it at any time...usually. But if I'm going to shoot over lacquer that's been sitting for a while, I'll scrub it with Comet or Soft Scrub and a toothbrush to give it a little tooth. I'll also final-wipe it with 70% isopropyl alcohol, because believe it or not, fisheye-causing contaminants can get on the surface of a model in just a few days. 70% iso will clean them off without harming the paint. Sadly, some products labeled "lacquer" behave like enamels when recoated even years later. I discovered this when I tried to shoot Duplicolor black lacquer over old Ace Hardware-store black "lacquer", only to have the old stuff (that had been on the model for almost 10 years) crack and wrinkle. I rarely use enamels, and would most likely strip an old enamel job simply because there's always a chance solvents in the new paint will attack and wrinkle the old paint.
-
Visit exotic locations, or friends and family, and spend your time in the room building models?
-
"Sealers" for real cars are intended to discourage solvent penetration from color coats into primers, which in turn reduces sand-scratch swelling and gloss "die-back" as the color shrinks. They can also help prevent "feather edge" lifting, which can be a real nightmare when painting real cars over some unknown substrate. This is why, in general, real-car "sealers" are not supposed to be sanded, as sanding tends to diminish the barrier effect.
-
It's been around forever, but none of them are universally available all the time. Besides the light gray, there's dark gray "hot rod primer", red oxide, black, and white in the "sandable" line. They can all be too "hot" for some of today's garbage soft styrene formulations, causing surface crazing if shot too wet. The "self etching" primers are generally hotter still. The "scratch filling" line of primers are also sandable, but build quite high, possibly obscuring fine surface details.
-
Assembled kits can often be bought for a small fraction of what unmolested ones bring.
-
Manners are dependent on one's culture of origin; for instance, belching after a meal is OK in some.
-
Off or on...make up your mind.
-
"Is" doesn't necessarily mean what you usually think it means. https://www.merriam-webster.com/dictionary/is
-
I'd rather paint a clear insulator on every electrical plug, including ethernet and USB, and lightbulb sockets and bases.
-
-
It was derived from this set of designs... http://www.madle.org/exjspy.htm http://www.madle.org/exjspynx.htm http://www.madle.org/exjimp.htm http://www.madle.org/exjaero.htm http://www.madle.org/exjxspynx.htm ...etc.
-

“Barn Find” C-cab street rod from Australia
Ace-Garageguy replied to LDO's topic in General Automotive Talk (Trucks and Cars)
All the first generation Olds OHV V8 engines (303-324-371-394) are very similar visually, because they're all just different displacements of the same basic design. The '50 Olds 303 has siamesed center exhaust ports, IIRC, while later engines have them split. Later (324 on up) engines have a 3-bolt center exhaust port flange instead of 2...but nobody is going to notice in 1/25 scale. -

“Barn Find” C-cab street rod from Australia
Ace-Garageguy replied to LDO's topic in General Automotive Talk (Trucks and Cars)
Looks to have Jag-based independent rear suspension, judging from the dual coilovers. Jag hubs, halfshafts, fabricated tubular lower and trailing links, probably a Jag diff. -
Yes, that will work fine. I'd recommend an epoxy resin that's rated at least "30 minutes". The 5-minute stuff really doesn't wet out the cloth or adhere well enough in my experience. And thanks.
-
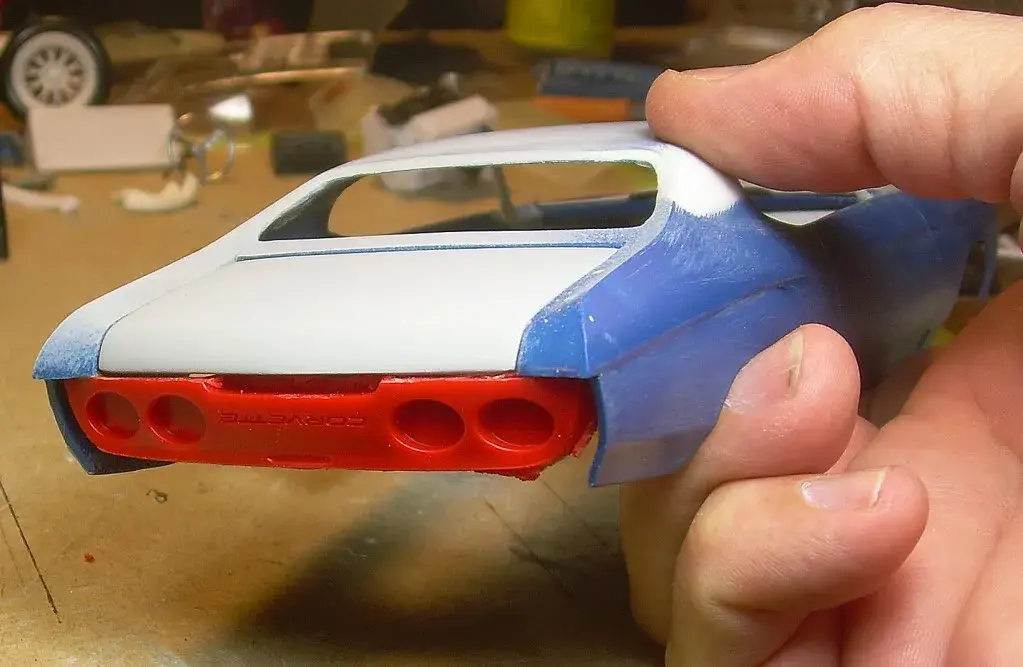
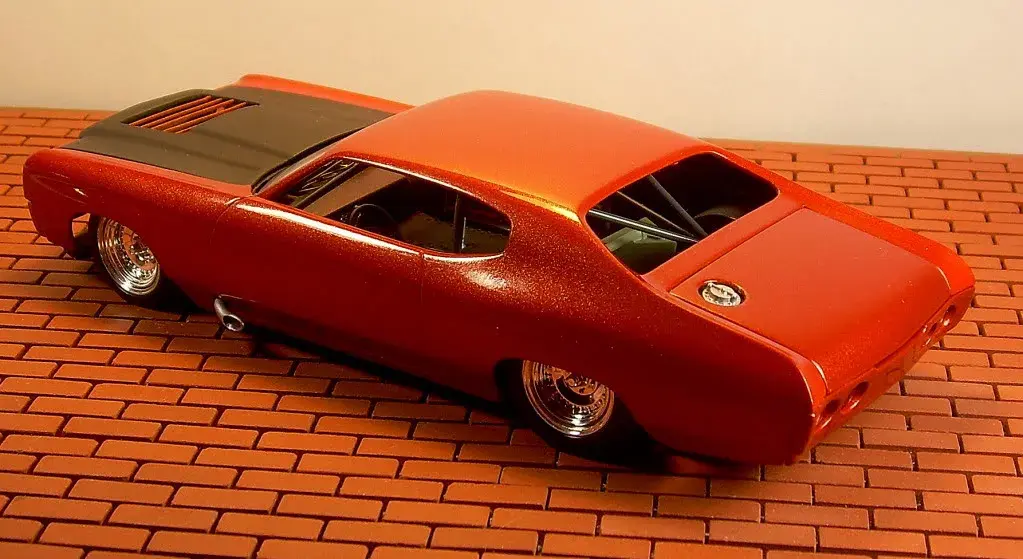
I haven't done a Nova, but the '70 Chevelle I did is the identical procedure. Carefully make your cut measurements, keep your cut lines square and parallel. Come straight down with the top panel. And you don't want to lengthen the roof on these, as some think is necessary. It ruins the proportions and makes the car look squashed. You can lean the A-pillars to line up again fairly easily, but I made new ones from styrene stock. Stronger and cleaner. Because of the inward tilt of the sail panels (C-pillars), they won't line up at all, but if you haven't taken out too much material, there will be enough contact area to glue them back together...and let them dry thoroughly. Reinforce the inside of the C-pillar joint. I use very fine fiberglass cloth and epoxy. Then reshape the rear window and quarter window openings into smooth curves. This may require adding styrene stock to the openings. The outer surfaces of the C-pillars will need to be smoothed. I accomplished it by adding styrene sheet to the area above the step between the upper and lower cut areas, letting it set hard, then filing/sanding to shape. This method ends up requiring almost zero filler. The shape of the trailing edges of the sail panels will need to be addressed, and each one shaped into a smooth curve as well. Make sure both sides match. The original clear styrene windows can be carefully reshaped to fit the modified openings, or clear PET or styrene sheet replacements are easily made using paper templates traced from the openings. Prime and paint as usual. The only progress shot of mine I could find quickly: And done:
-

CCKW
Ace-Garageguy replied to Chariots of Fire's topic in WIP: Model Trucks: Big Rigs and Heavy Equipment
Having researched these things for a build of my own, I know. Beautiful work, as always.


