Ace-Garageguy
-
Posts
38,188 -
Joined
-
Last visited
Content Type
Profiles
Forums
Events
Gallery
Everything posted by Ace-Garageguy
-
 Some of the mockups were so odd looking, it's almost hard to believe they got as far as full-scale clays. Of course, it's relatively easy to heavily modify a clay, but still, it's a LOT of effort for something that really had no hope of production, and little carryover into anything eventually built. This thing, for instance. GM never used anything other than part of the roofline (excluding the tapered C-pillar)... ...and the front fender blisters, which eventually found a home on the C2 Corvette (which appears to have inherited the peaked hood / nose as well) ... ...and remarkably, over at Chrysler, on the '61 Dodge Dart...
 -
Drilling holes in styrene rod
Ace-Garageguy replied to Evil Appetite's topic in Model Building Questions and Answers
Perfect illustration of suggestion #1 in my post above. VERY helpful. -
Drilling holes in styrene rod
Ace-Garageguy replied to Evil Appetite's topic in Model Building Questions and Answers
1) Depending on the size of hole you need, and the size of your stock, it's EASY to make up an end-drilling-jig from pieces of concentric slip-fit tubing. Arrange everything so that the OUTER tube is longer than the rest, and slips nicely over your stock. The INNER tube should be a loose slip-fit with your drill bit. 2) Similar to Joe's method: file the end of your stock as square as you can get it by eyeball. Under magnification (if you need it) make a pilot hole in the eyeball-center with a common pin. Start drilling with a drill chucked up in a pin-vise; as you start to drill, it's very easy to lean the drill one way or another to get it on-center if you missed getting the pilot hole dead-on. 3) If you have a drill press, this should help: the first part of the vid shows how to get a center-end-hole in rod stock, and the second part shows how to use that as a jig to drill centered holes in the SIDE of rod stock. -
Drilling holes in styrene rod
Ace-Garageguy replied to Evil Appetite's topic in Model Building Questions and Answers
In the end or the side? -
AutoQuiz 392 FINISHED
Ace-Garageguy replied to matthijsgrit's topic in Real or Model? / Auto ID Quiz
Only reason I knew it is 'cause I used to avidly follow limited-production cars (based on mass-produced platforms) with fiberglass bodies...and this little guy always reminded me of the Geo Metro convertible. -
There are guys getting pretty good results with some of the vaping chemicals, but the way the plume disperses in air is still a problem in the smaller scales. It's getting decent in G scale though...
-
Yup...I meant "Donovan". Thanks for setting that straight.
-
Model Train Show - offending the purists
Ace-Garageguy replied to iamsuperdan's topic in The Off-Topic Lounge
Here's some pretty fine 3-rail O-scale modeling... -
Looks like the inside of my house towards the end of summer.
-
The scale layout of Howard Zane, representing the transition period from steam to diesel, speaks for itself; there's a short interview with him towards the end.
-
How aluminum airplanes are built...
Ace-Garageguy replied to Ace-Garageguy's topic in The Off-Topic Lounge
Glad some of you guys are enjoying it. -
If you want to text and drive, You just might not get home alive. Social media may be great, But not while driving in THIS state!
-
Great stuff. A tremendous amount of talent, skill, and just plain hard work went into building full-scale mockups. I had really wanted to compete in the old Fisher Body Craftsman's Guild design contest, but I had neither the skills nor the tools in time to get in before the end. Here's an interesting article about the disappearance of most of the models that were entered. http://www.deansgarage.com/2015/mystery-of-the-missing-models/
-
Sweet deal. I'm a sucker for the Johan Mopars too.
-
Yeah, I'd about given up on finding one unmolested, and just about resigned myself to overpaying for a glooey mess. Then this one showed up for a reasonable price, 100% complete, unstarted and almost every part still on the trees...but in a nasty water-stained box (not the one in the photo). Still searching for the blown Keith Black sister unit, as I need the blower to use on this engine in a period rail-job.
-
That's quite the spectacular save. Very cool. It's funny how we sometimes get involved with things like this, and put effort into them that's all out of proportion to the "value" of the piece we're starting with (I do it too ). It's good to see work like this, especially when a lot of folks complain about the high price of new kits. For a challenge and the opportunity to feel a remarkable sense of accomplishment when you're done, restoring horrible old messes can't be beat.
-
Looks very good. Gives the impression of a well-used but well cared-for car with weathered wood, that's been treated to a recent enamel paint job. Very convincing if that's the effect you were going for.
-
No. The Mercedes R107, which is the platform ALL the 450SL- 560SL cars were built on from 1971-1989, had essentially the same headlights and bumpers through all the years of production (though the air dam under the front bumper, wheels, and some trim and engines varied through the years). YOURS can be any EUROPEAN spec car from 1971-1989. Round headlights and heavy crash bumpers were on the USA spec cars.
-
Agreed.
-
Beautiful work, as always.
-
VERY NICE !! Love the shop shots, and the duct tape is absolutely perfect.
-
Round headlights were required in USA cars. The lights this kit represents, as well as the smaller bumpers, are the European version. Very nice save, by the way.
-
What non-auto model did you get today?
Ace-Garageguy replied to chunkypeanutbutter's topic in The Off-Topic Lounge
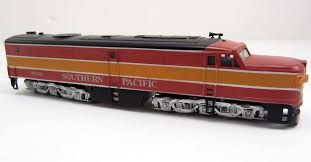
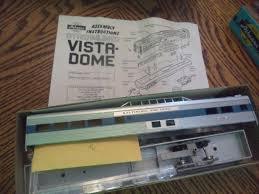
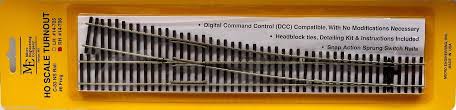
Just arrived: a Kinetic P-47D bubbletop in 1/24 scale. The word "spectacular" doesn't do this thing justice. And though there are complainers on the web saying it's a difficult build, it looks to me like it will make a show-stopping model with some effort. All I need to complete my 1/24 warbird (WW II) collection now is a Focke-wulf Fw190D (already have the radial-engined Fw 190A). Still amassing cheapish vintage HO-scale train stuff as it comes up as well. Athearn SP PA1 needing minor mechanical repair: Athearn Vista-Dome coach in B&O livery, NOS, NIB: Athearn NOS, NIB SP tapered-end observation car: A stack of RH and LH Micro Engineering code-83 #6 turnouts: A Mehano 250 ton crane, needing minor repair: Several bulk packs of various Kadee couplers and pockets for upgrading the older rolling stock: And a well underpriced lot of HO locomotives and cars, including a powered RDC that's perfectly functional, just needed drive belts:
-
How to Remove "Ghost Trim"
Ace-Garageguy replied to diymirage's topic in Model Building Questions and Answers
As with most things in life, the "best" and the "easiest" tend to be mutually exclusive. Repeatedly priming and sanding is the only really effective way to do it with rattlecans, and eventually, the ghosting will stay down. It is, however, necessary to take precautions to prevent excessive film build in surrounding areas. Backtaping is strongly recommended. As usual, I speak from experience. This Olds hood was ghosting badly where the ornament had been removed. Multiple primer / sand / primer cycles cured it 100%, enough to be shot with hot Duplicolor color over soft late-model Revell plastic. If you have access to spray equipment, another sure-fire way is to shoot your work with a two-part catalyzed primer. It WILL kill any tendency for work to bleed through...but because of its extremely high-build characteristic, care must also be taken to avoid getting it on way too thick. This is a Nason urethane primer shot over extensive bodywork. Years later, zero ghosting.