Search the Community
Showing results for tags 'moebius'.
-
I really enjoyed building this race car. The kit goes together flawlessly (as do all Moebius kits I've built). Built OOB, body mods included cutting off the headlight trim rings to use the kit-supplied block-off plates, carefully filed and sanded off the side trim without losing the body lines, and I drilled small holes to depict the side trim attachment points. Decals went on without a hitch and responded well to setting solution. Overall one of my favorite Cup cars of one of NASCAR's past champions. Comments welcome, thanks for looking!

-
Here's the completed build up for Moebius, while I was putting this together I discovered a few small things that needed tweaked. I believe Dave has it all resolved now and it should be ready for production very soon. I have my fingers crossed that they'll be shipping these before the Holidays. In the future I would like to see some more appropriate all terrain tires added to the kit. Regardless, I think ‘70 Ford F-100 4x4 pickup is a welcome addition to the Moebius Truck line up. I can’t wait to see what other modelers will do with it. -Steve
-
Changed this inquiry into a poll . Feel free to add your choice(s) to the list ( example : I'd like to see a 1971 GMC Sprint SP-1 or How about a Toyota Stout ! ) . Have fun !
-
 A quick look at the fit of parts and all the cool stuff in the box! https://www.youtube.com/watch?v=c4ocPzKExSY
 -
 Hello, here is another of my latest builds.. Brush paintjob and some details added..
 -
Hello I ran across this blog and I'm hoping for some help here. I just got the Moebius 300 kit and it looks terrific except for the hood/grill there is no decal with the "300" and the checkerboard... I'm hoping for some help with creating my own decal, but I've never done that before... Other than that, I have not done a whole lot of car models. I'm hoping to start a small collection in my spare time sort of thing. The cars from the 1950's are my favorite! 49-51 Mercs Mid 50s Cadillacs Anything really from the 1950's. Thanks and I hope to hear from you guys soon.
-
 Hallo, I just finished this bike. It's a nice kit, I had no problems during the build. Some wires and hoses were added, I also drilled the cannon barrels and closed the inner sides of munition clusters. I headed for a slightly used look and I'm sure that the Dark Knight will wash it as soon as possible...
 -
I recently picked up one of Moebius' '65 Comet Cyclone kits, and I've started collecting parts to build it up into a street/strip car. I'm thinking a high-reving 289 terror that sees the streets on Friday nights, and the strip on the weekends. Since I'm shooting for what would pass tech as a late '60s D/MP drag car, I'm on the hunt for a dual quad or tunnel ram intake for a small block Ford. The only one that I remember clearly is the unit from the MPC Mustang II kit, but I'm sure that there must be others. I suppose the cross-ram Cobra manifold from the AMT '66 Mustang kit could also be a contender, but that makes for some funky staggered hood scoops. Anyway, I'll be back with pics soon, but I thought I might pick some of your brains for sources for speed parts, and maybe a good set of skinny slicks that I can cut a couple of cheater grooves into.
-
Take one Moebius 65 Plymouth Belvedere kit, swap a few parts from the Moebius Satellite and Johan Police Car kits, add a few aftermarket parts along with a few minor modifications and you can make this ... You can see all the build photos in the on the workbench section, just follow the link below. -Steve
-
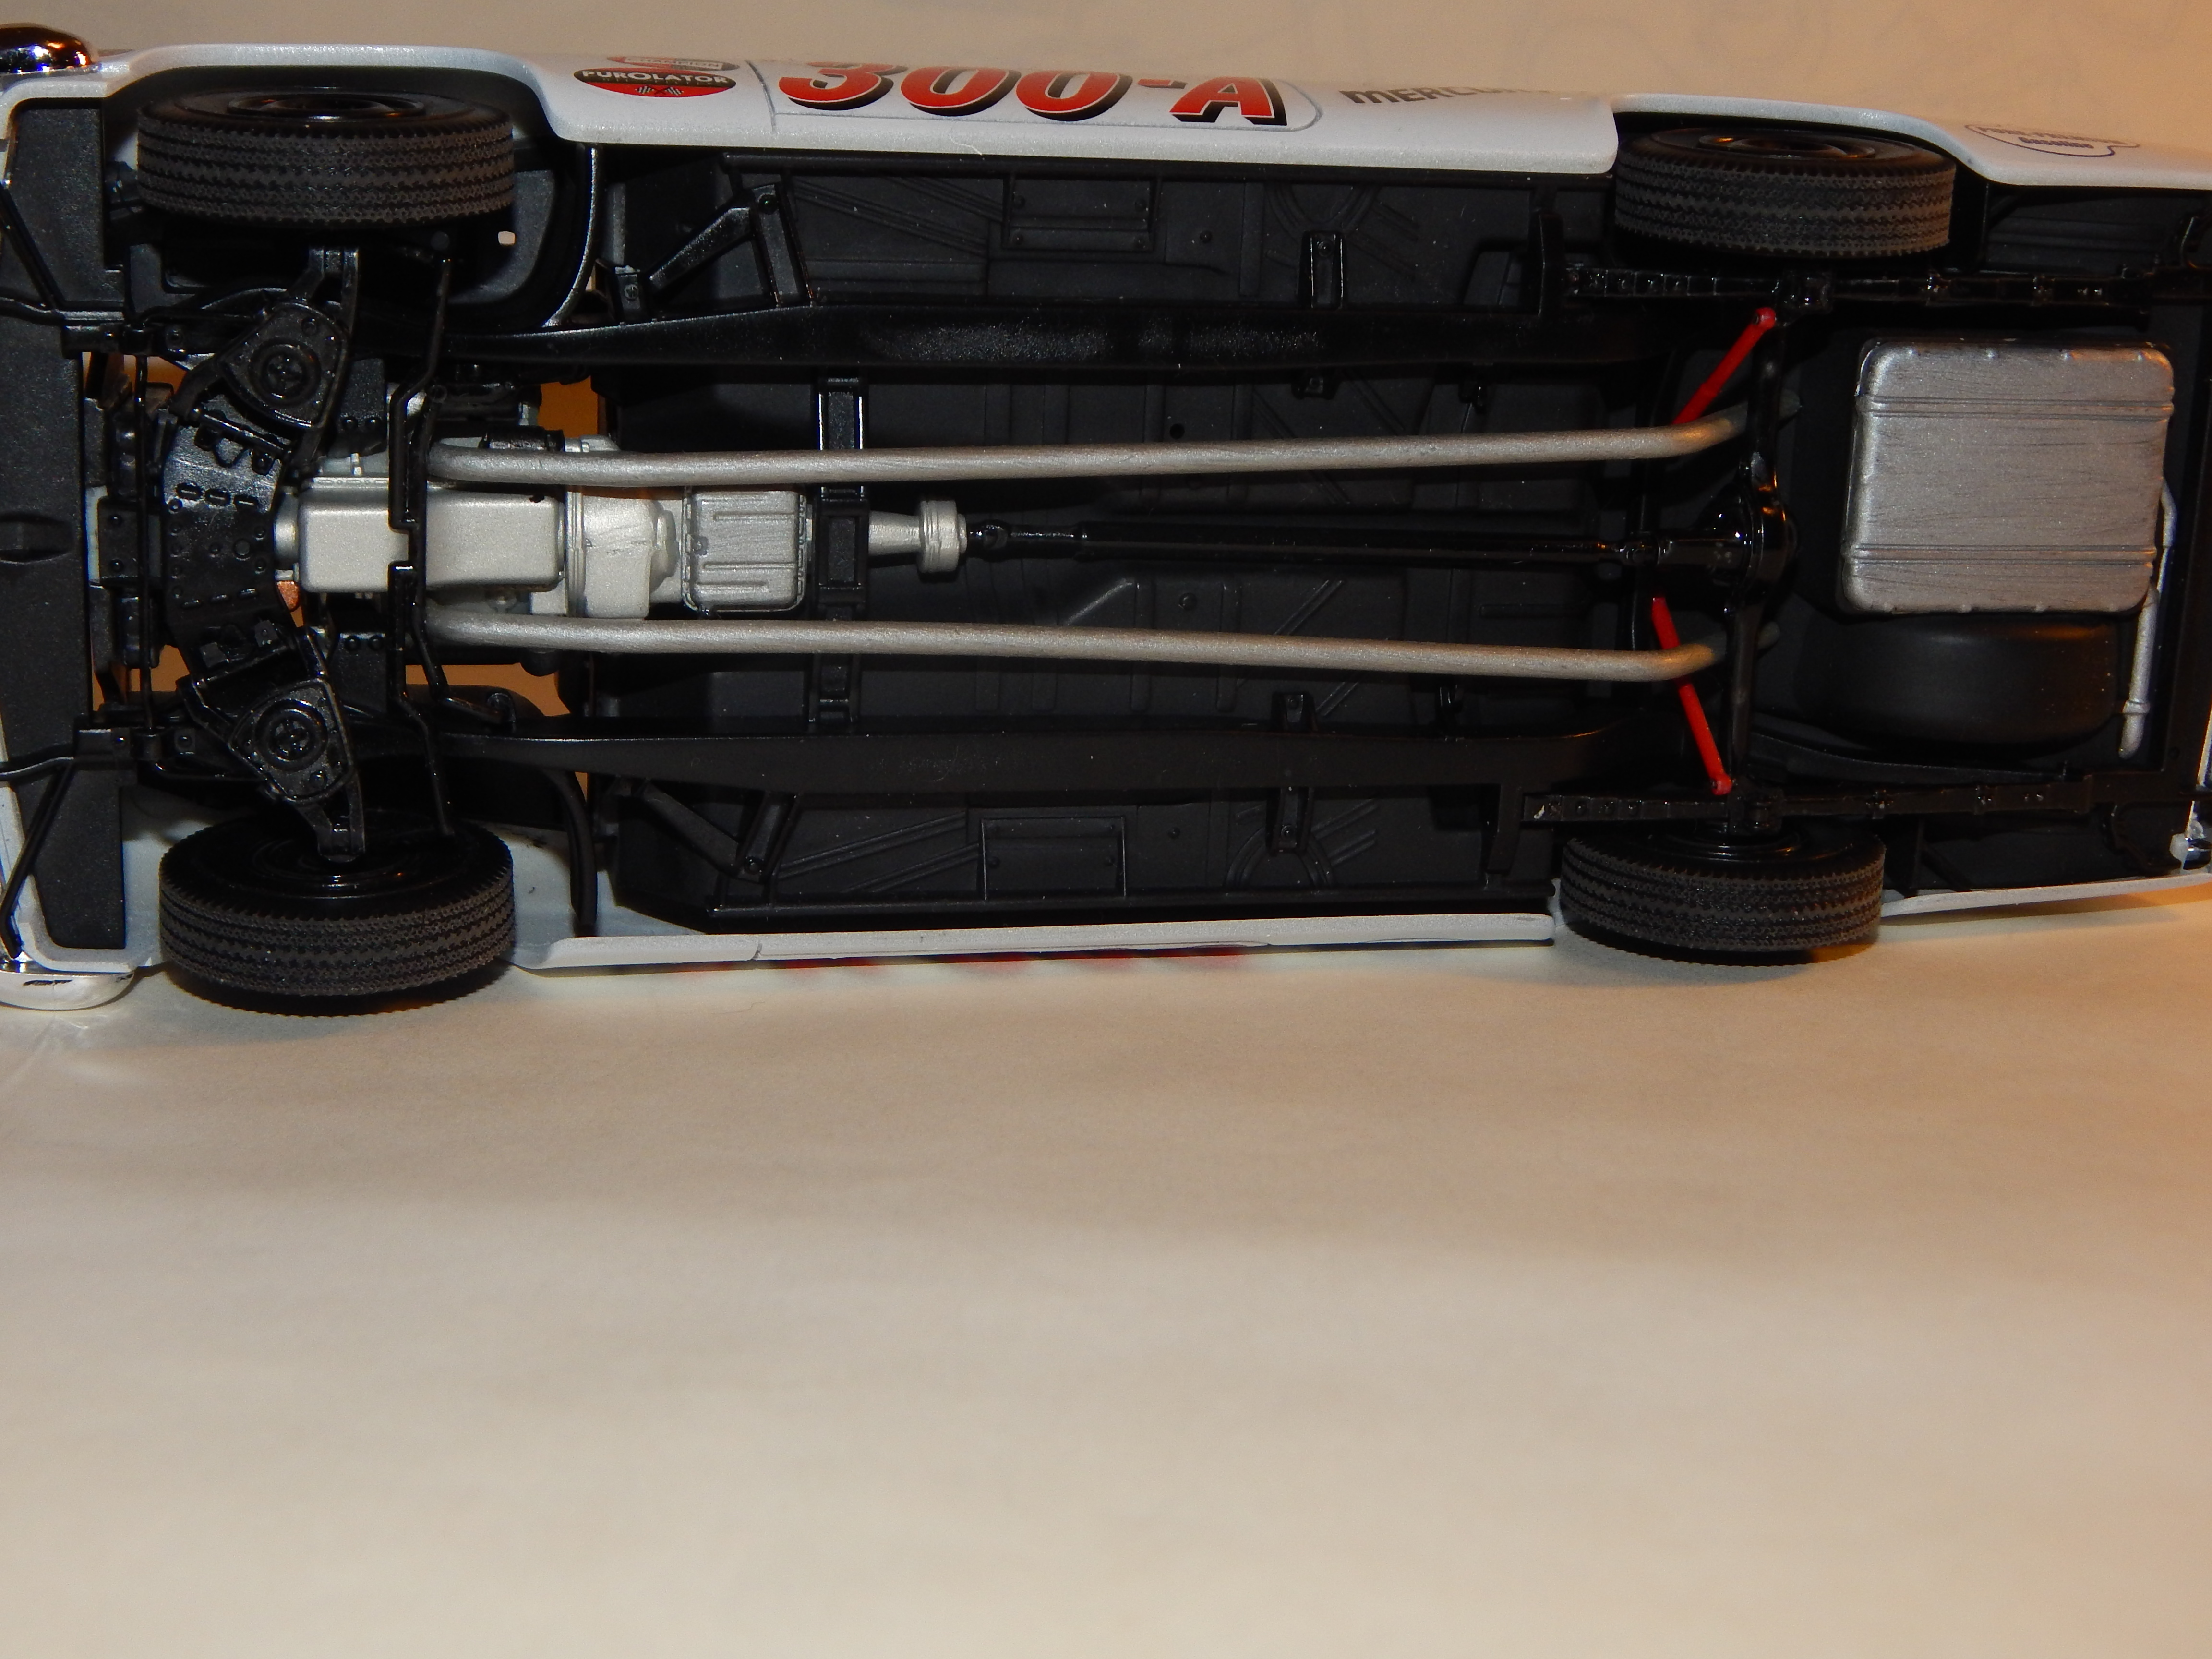
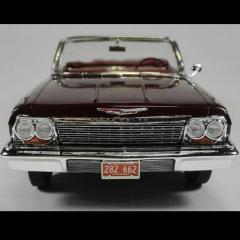
This is a model of a car ordered by Jack Ashley and driven by Ronnie Sox in 1961. As far as I can find out, this car was ordered and taken over to Ray Nichels to prep for racing. It went up for auction back in November 2013 and sold for $182,500. I took the Moebius body and worked on the window channels to get the windows to fit better after reading what Mr. Obessive had wrote up for tips on this kit. Filled a couple of low spots in the quarters around the trim and prepped body for primer and paint. I used Tamiya White Primer and ordered Pontiac Richelieu Blue from Scale Finishes, same paint code as Chevrolet Silver Blue Met. Srayed the body and cleared with Testors Ultra Gloss Clear. I used Testors Silver Blue Met and Nassau Blue Met from there Lacquer line of paints for the interior after I sprayed to white seat inserts with Tamiya White primer. I will go back and cover all the interior with Tamiya Semi-Gloss clear. I need to come up with some reference pictures of the engine yet. I appears that the car had dual carbs and not the triple carb set-up on it but need to see if I can clarify that.
-
Right from the box the Moebius Belvedere Sedan kit it very close to the factory Police Package so I figured why not build one. I went with the Kansas State Patrol because they used two door patrol cars in the 60's, I liked the paint scheme and the decals are available. So with a few parts from the Moebius Satellite and Johan Police Car kits, some aftermarket parts and a few minor modifications I think I can make an accurate replica. I always start with the basic chassis and unibody front structure on these Mopar kits. I'm going for a factory stock, first day in service look so the floor pans got the typical Mopar overspray treatment. The top side is painted to resemble the black vinyl floor covering still used in todays Police Cars. The dual exhaust is from the Satellite kit, both kits share the same suspension parts. The bucket style seats were available on both the two and four sedan Mopar Police Packages by '64 and maybe even earlier based on documented survivors. A dummy plate covering the radio opening was added to an early test shot dash panel without the detail engraving of the production kits. Here's the basic chassis and suspension completed, The front end assembly is only dry fitted, it will be glued in at the same time as the engine as it needs to go in first. I'm going to call this part 1, stay tuned for more soon ..... -Steve
-
Finally getting a chance to show this 4dr conversion for the Moebius 65 Belvedere that I picked up at the recent Toledo NNL. The 4dr body has corrected vent widow openings, and the interior includes the proper bench seats, Belvedere I style door trim, low trim level dash and the 4dr package shelf. As you can see the body fits my in progress KSP Plymouth build up chassis and interior perfectly ! Here's a close up of the interior parts. I'm hoping they will offer the Dash separately and that I can talk them into doing a proper 2dr Belvedere I bench seats and door trim down the road. Some more photos of the 4dr body on my built up chassis ... Although tempted to keep going, I'm going to save the 4Dr body for a another project and I'm going to finish my KSP Plymouth 2Dr. I'll have an update on that project sooner or later ... -Steve
-
Here ianother one that I got painted between the rain falling this week. It's the Moebius 1954 Hudson Hornet Club Coupe. This is the thrid good around at trying to paint this one. First I had it a Dark Metallic Red with a Black roof but that just wasn't doing it for me. So I stripped it and went another direction. Testors Tropical Turquoise and Tamita Racing White. I'm digging this more. Just do not know what to do for interior though. I am looking at the dash possibly being Model Master Interior Metallic Blue but then I don't know what to do for the rest of it. Want to try and stay stock looking with it. Here's the colors together.
-
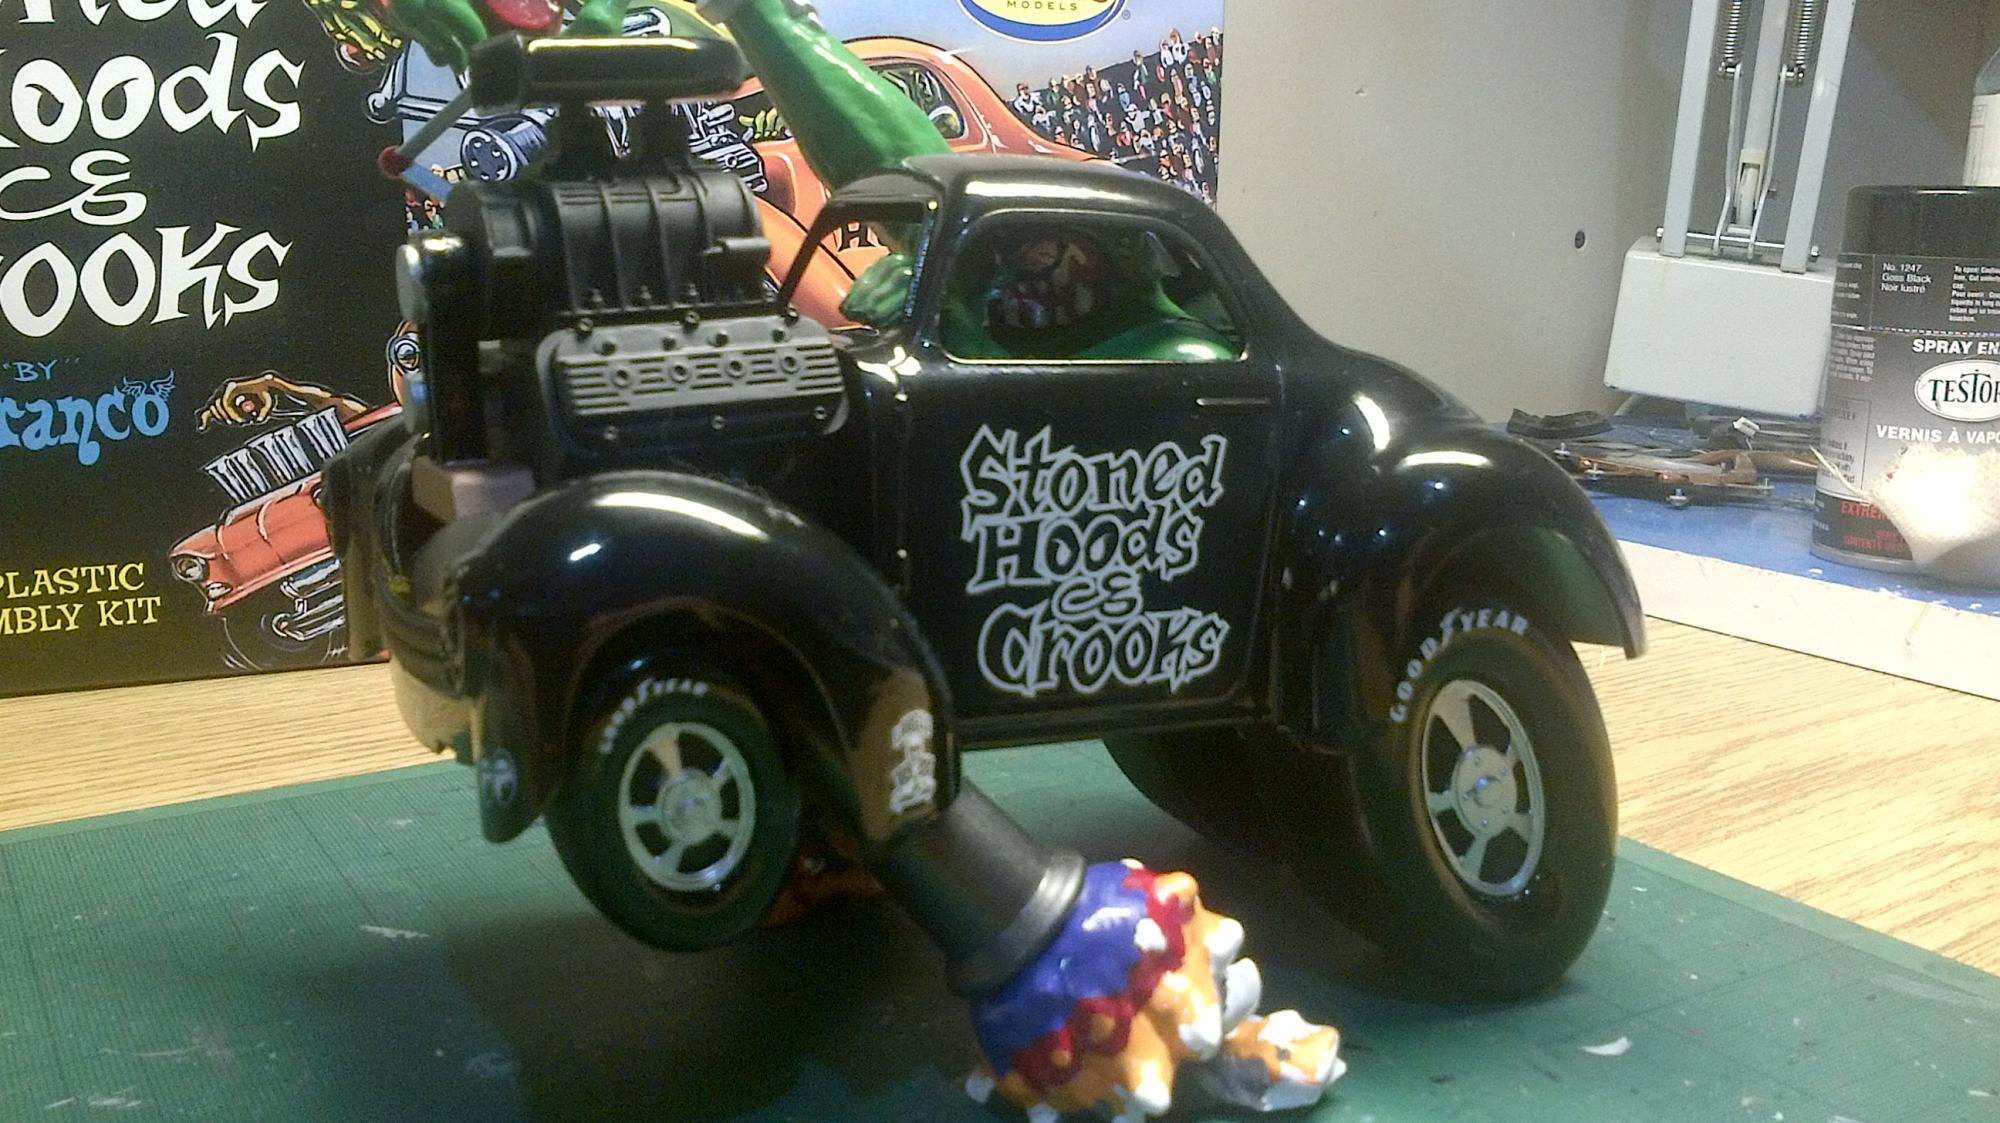
 So, it's been a while since the last post, here is one I have finished not long ago. Freightliner FLC with some mild changes from the box, decals from Modeltruckin', photo etch parts like nameplates, flap weights, chicken lights and supports from KFS, drive tires from Auslowe, exhaust stand pipes from the Australian Western Star and sleeper from the FLD kit. The wheels of the Moebius trailer swtched to bigger Italeri rims and tires to better match the truck. most decals on the trailer also from Jerry Reeter. Spread axle with scratch built tool boxes, same flap weights as the freight. Color is Tamya pure white and Duplicolor Ford dark green.
 -
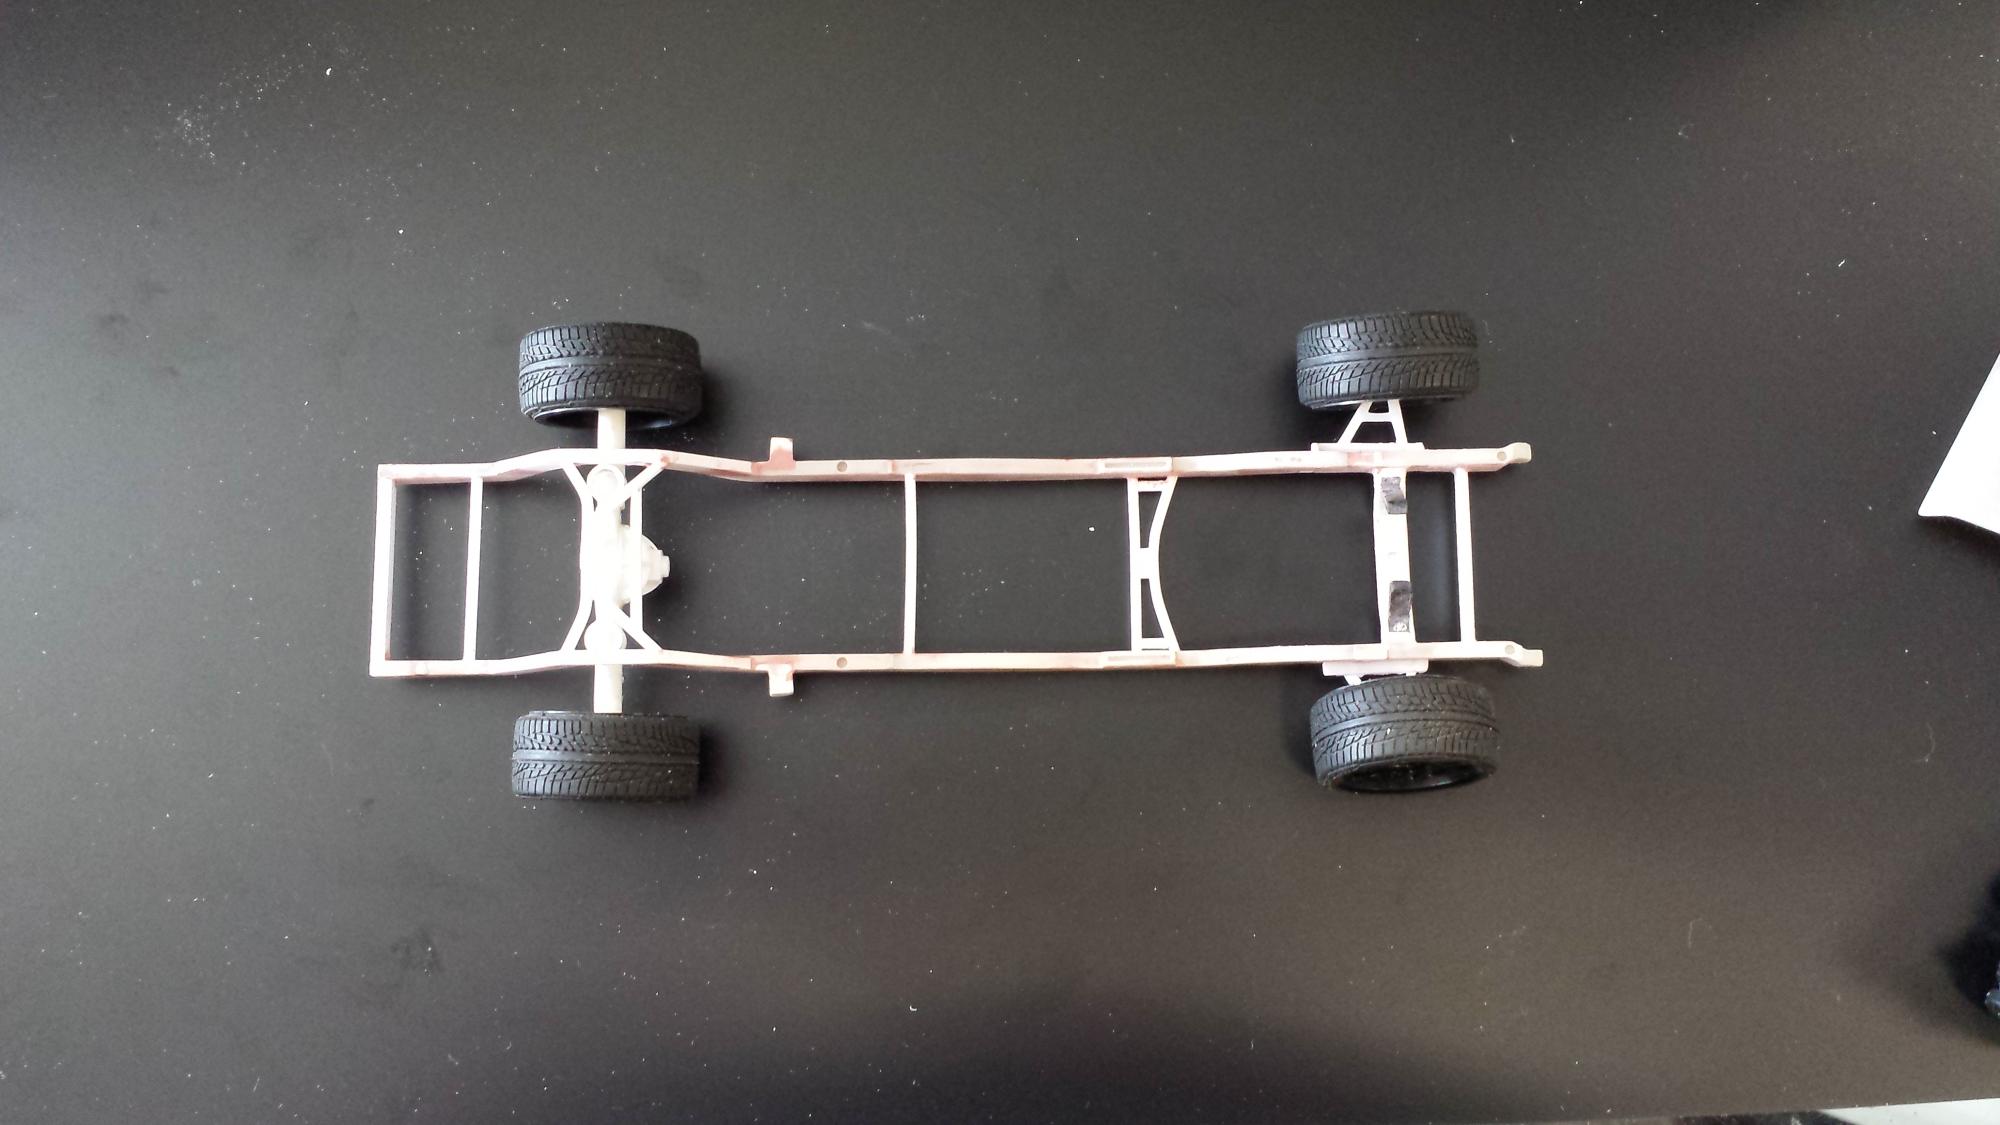
 Here's a quick look at the 65 Plymouth Belvedere Production contents that I just got. Look for the kit to be available in about 4 weeks from now. These photos were taken with my iPad, some are not by best work but it was handy for today. The body is highly polished, even smoother then the Satellite. Here's the chrome tree with multiple wheel options. Note the Hemi valve cover for a later version. Here's the new seats and the Super stock style exhaust pipes .... And here's the steel wheels that go with the dog dish hub caps .... Here's the big and little street radials .... The decal sheet .... These are just the highlight of the kit, the full photos are on my Fotki page, just follow the link below. http://public.fotki.com/SteveG26/moebius-projects/page2.html -Steve
 -
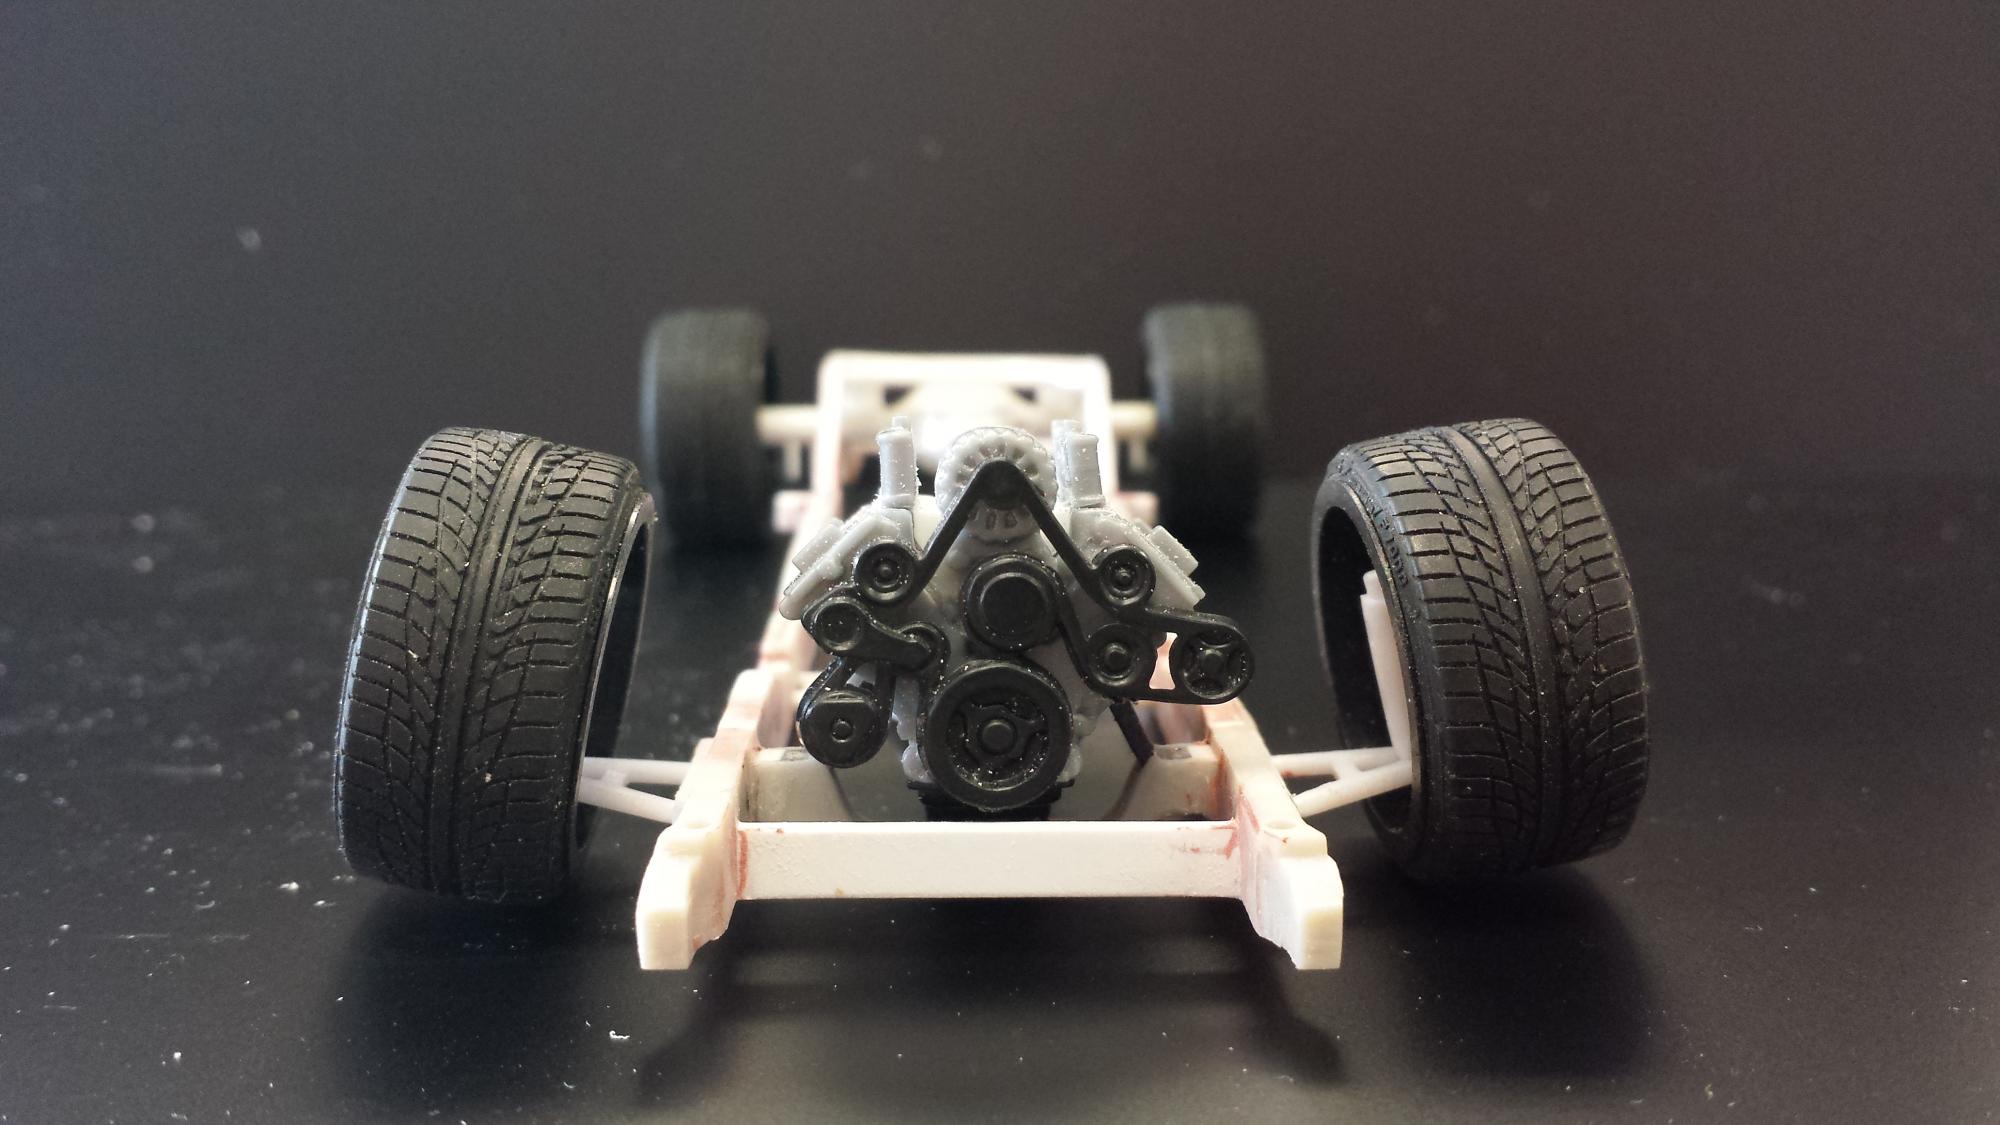
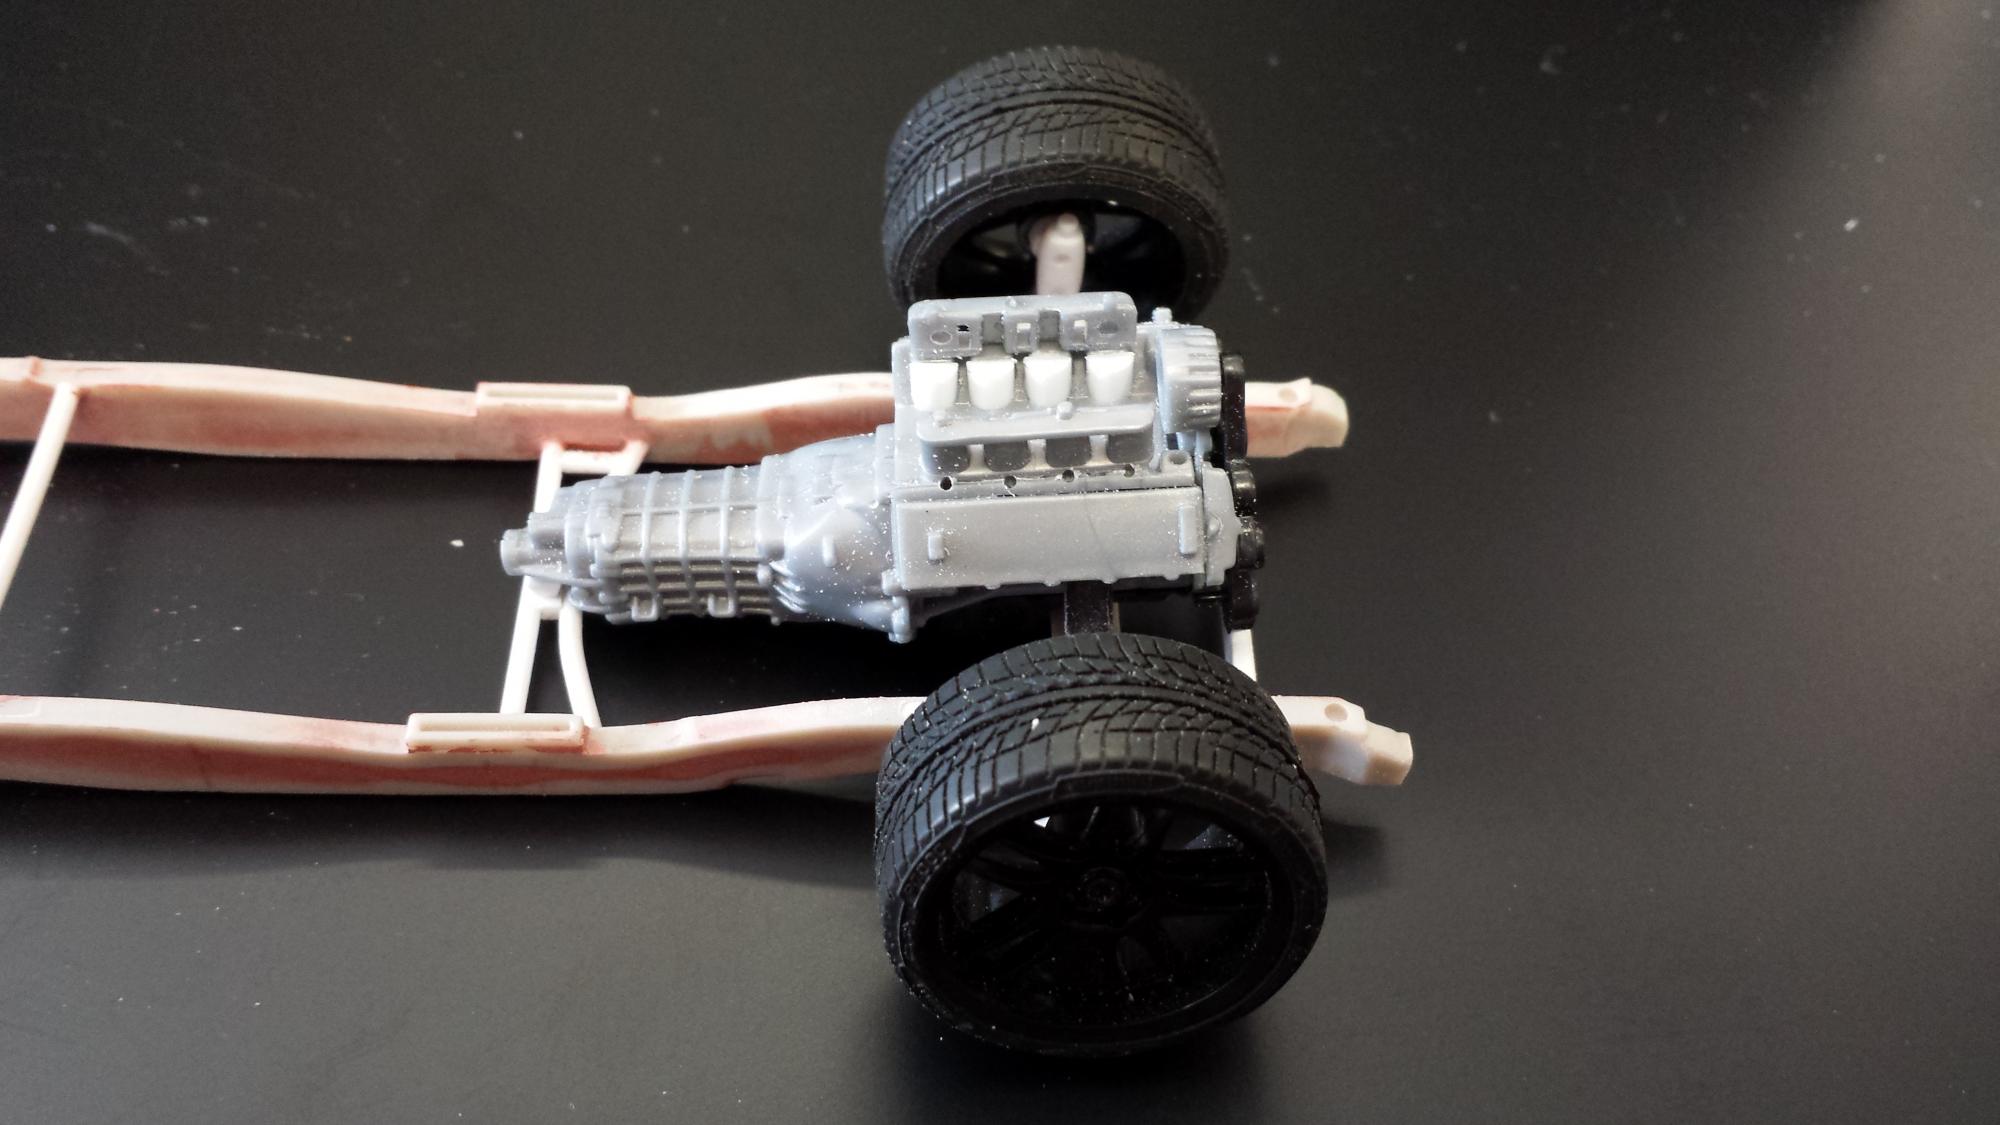
 Started work on the new Moebius/Modelking 1969 F100 the day it hit the store. I am kit bashing it with the 2006 Mustang GT H kit from revell. I am using the motor , trans & seats from the Mustang kit as well as part of the door panels. The door panels are other wise scratch built using evergreen sheet stock. It has some Corvette parts from a revell kit as well but only 5. At the moment I am using the upper & lower control arm's from the C5 R kit (this setup may change) & the master cylinder from another corvette kit. I have modified the frame & the suspension to add airbags front & rear. It sites on the frame!!! It has a custom Ford 9 inch out back. Rear roll pan made from evergreen stock. It will have a 4 link in the rear that will be made from evergreen rod. The bridge is made from evergreen stock as well. I cut the gas tank out of the cab & filled the hole with evergreen sheet stock. I have shaved the fire wall & cut a hole for the radiator to mount in. The front bumper will be left off & I filled in the holes for the front bumper with evergreen. Any questions about the build just ask.
-
-
I finally finished it..... I started this one back in May with an early production sample courtesy of Moebius Models. Other then some kits bashed whitewall and battery decals, it's an out of the box build. Everything else was done with paint and foil trim. You can see the build up in the "On the workbench" section. I'll let the photos do the rest of the talking. If you missed the build up you can see it step by step here ...71 Ford XLT Pickup build up Thanks for looking and for following along !!! -Steve
-
 While searching for AMT whitewalls on eBay, I came across this listing: http://www.ebay.com/itm/141777755144?_trksid=p2055119.m1438.l2649&ssPageName=STRK%3AMEBIDX%3AIT Seems like the seller has obtained a large supply (64 sets sold so far) of tires from the Moebius '65 Plymouth kit. Could the seller have gotten them from their outside supplier, or is this a back-door deal with Moebius?
 -
Moebius 1969 Ford SWB converted to 4x4 using the AMT '78 Ford kit for all 4wd parts as well as lights, tires, and roll bar. I still have to make or buy front locking hubs.
-
My friend Dave at Moebius Models was kind enough to send me an advanced copy of the 71 Ford Ranger kit. So lets take a look at doing a basic build up. Regardless of the subject matter car, truck or otherwise. I follow the same three rules .... or lets call them guidelines. Rules sound kind of harsh for a hobby. First, every parts is as important as the next one. Second, test fit everything. Last but not least, assemble as much as I can before painting. That last one has backfired on me a few times, I've built myself into a proverbial corner more then once. As you can see I've attached most of the suspension parts to the frame. Glued up the major drive line parts and even put the brake booster halves together. I'm going to hold off attaching the rear axle until after painting and the exhaust is ready to go in. As the interior will require a lot of detail painting I've only attached the steering wheel to the column and rear interior wall to the floor. To keep the interior square the I attached the interior sides with tape while the glue dried on the rear panel. Since the firewall will be body color I went ahead and attached it the cab. This is great time to check the hood fit. Mine had the slightest twist to it. Nothing that some hot tap water and some counter twisting could fix. I went ahead and attached the inner side panels and the rear panel to the bed floor. I also attached the inner panel to the tail gate. This is one area where the engineering of this kit really shines. The bed parts all fit like a glove, better then any other pickup I ever built. My sample has some pretty good sink marks on the transmission pan but it was nothing I could take care of with a quick swipe of some catalyzed glazing putty. After I took a quick break the putty was ready to sand. A few minutes with some sanding sticks finished it off. Next time up I'll break out the Duplicolor primer. Now I just need to decide on a color scheme ..... Stay tuned ..... -Steve
-
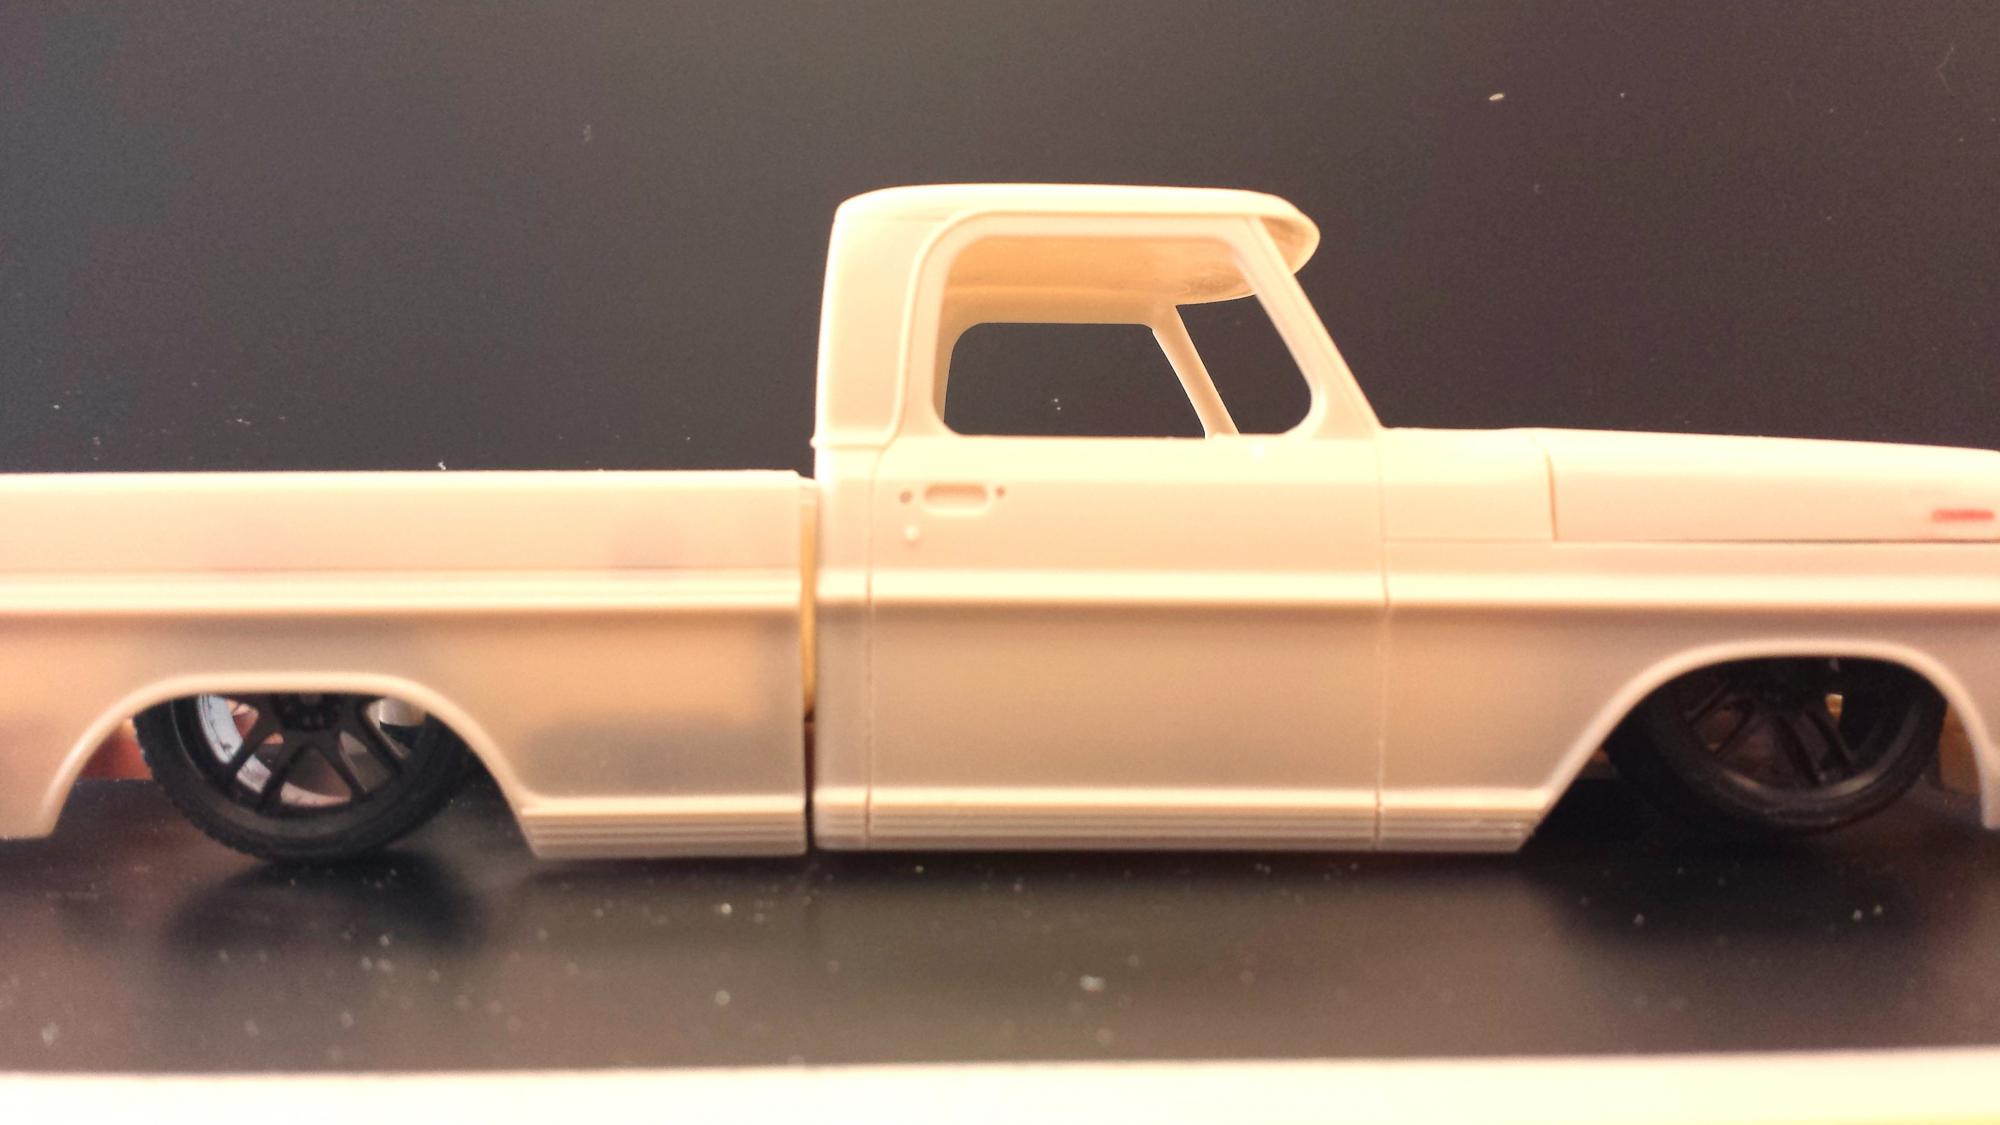
 Here is my finished prototype build of the upcoming Model King/Moebius '69 Ford F-100 short bed. I say it's a prototype because it was built from a 2nd round test shot. After review, Moebius decided it needed further adjustment to make it more accurate before production starts. (Probably in early 2015.) I don't think these photos have been posted before. I had originally built this model with chrome bumpers and grill, but I recently stripped the chrome and repainted them white to represent the base model trim level. You'll also notice that the glass tooling had not recieved a final polish on the tooling yet, so the windows in my example are a little hazy. Also, some of these photos were used on the box, so I photoshopped in the license plates, cab emblems and tailgate lettering (which all will be included on the decal sheet) on those pics. You can see more pics on my website. http://www.svensworldofwheels.com/69_ford_f100_Pickup_page.html
 -
Just completed this kit box stock and overall went together well. Cleaning mold lines was tiresome, but the fit of the interior parts and body/chassis mating was excellent, as was mounting of bumpers and other chrome parts . Paint is Tamiya Forest Green metallic, which appears to be a close match for the Surf Green colour available in 1956. Interior is Tamiya Wooden Deck Tan. A good time was had by all - on to the pics....
-
Fantastic kit -- I can't recommend it highly enough. The engineering is brilliantly thought through, the fit is exemplary, and the detail is great. Finished in Tamiya TS-8 Italian Red straight out of the can. Vallejo acrylics for the inside. bestest, M.
-
A bit of a departure from my normal European exotics, but I heard so many good things about this kit that I had to give it a try. I don't generally like chrome-laden barges, but this is a genuinely cool car, IMHO... The parts, detail and engineering in this kit are superb, as many have mentioned before me. I had the body painted in Tamiya Italian Red already, just waiting a final polish. The rest makes speedy progress easy. No clear coat, just polished paint. I think it gives a nicely realistic sheen. Lots of work to do on BMFing the chrome, and then some more clean-up to get rid of the glue residue that always seems to be left behind! When people say in reviews "The engine is almost a kit in itself", I usually say "yeah, right..." to myself. But in this case it really is. I'm not sure why it was necessary to add detailed valve rockers inside the heads, but I'm not complaining. There are a few areas where the fit is not entirely clear (why ARE there eight holes in the joining surface of the two parts of the carburettor?), and the instructions would really benefit from a couple more angles on the pictures of the engine... The seats benefit from a gentle wash and drybrush -- they really are benches! The dash with some detail painting, BMF and decals. Looks OK, even at this range. Nicely moulded wheels, with a wash to pop the wires out. The printed whitewalls on mine were off centre and shiny, so I matt varnished them and filled them out with some Vallejo Off White. Maybe the white shouldn't go all the way to the raised lip, but at least two of the tyres had the printing nearly touching it at one side, so absent a way of removing the paint, I just chose the easy way out and filled the whole sunken section. The completed cabin. The steering wheel is a little chunky (and seems a bit over-large. I can't believe any 1/24th scale guy could get his legs under it... and it's way back in his belly, too...) But it does have nice, and accurate detail, which responds well to painting. The interior is probably a bit over-contrasty in this light, but once its all in side, I think it'll look nicely complex. By the way, if anyone knows what that thing on the rear "parcel shelf" is, and whether it should be silver or not, or have something in the recesses, I'd really love to know. Now on to building the chassis. bestest, M.