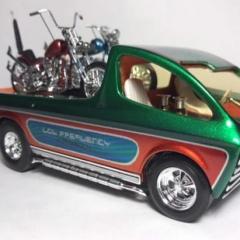
gseeds Posted April 20, 2009 Posted April 20, 2009 heres a easy fast why to get a low rider, show car or custom interior,and i hope im not steping on anyones toes here,but a few guys have said they would like a how to on interiors and i know what works for me, im working on my c cab project,doing the interior panels,and since its a show rod it has to have a cool show rod interior right?,and since im doing it i may as well take a few shots of it and share it with the guys here on the site,this is an easy way and cost effective way to get that show car interior look. first take a foam plate,cut out the flat area,then mark out your patten or grid useing a ruler and pen, then scribe the tuff or tuck lines useing the back side of a plastic knife,then cut out the shapes of your interiors panels with a #11 blade,try the fit and trim as needed,apply a base color as close to the fuzzy fur your going to use,you can also make pipping useing colored electical wire,any q's just ask,have fun, i ll put more photos of mine once i chose a color,i may go with two shades of pink,im thinking pie wagon.ive added a few photos of done cars.
gseeds Posted April 20, 2009 Author Posted April 20, 2009 so more cars ive done this way, hope this is of some help.
george 53 Posted April 20, 2009 Posted April 20, 2009 WOW, not only didja bring some nice models, ya got some GREAT tips! This one's TOO cool. This'll make a nice tuck an roll, it looks GREAT in your lil C-cab! Man Gary, you sure know how ta make an entrance! You Go Dude!
Smart-Resins Posted April 21, 2009 Posted April 21, 2009 Thats a very cool idea. I know that PW looked different, but could quite figure out why. Now I know why, because its a home made body as well! great stuff. Jody
gseeds Posted April 21, 2009 Author Posted April 21, 2009 Looks great, and looks like it'd be a fairly easy technique to master. I was wondering what type of paint and adhesive you use on the panels, seeing as how styrofoam a notoriously finicky material where paints and glues are concerned. Thanks for sharing! thanks guys,i hope some one trys this and post some pics, Khart as for paint and glue i just testors bottle paint as close to the color of fuzzy fur im useing,and just glue in panels with CA glue,i dont know the name off hand, but its the normal glue sold in all the hobbie stores,i use the one in the purple bottle,hope this helps.
RodneyBad Posted April 21, 2009 Posted April 21, 2009 thanks guys,i hope some one trys this and post some pics, Khart as for paint and glue i just testors bottle paint as close to the color of fuzzy fur im useing,and just glue in panels with CA glue,i dont know the name off hand, but its the normal glue sold in all the hobbie stores,i use the one in the purple bottle,hope this helps. Gap Filling Insta-cure+? Great tips I really wondered how you got such great interiors.
84vanagon Posted April 21, 2009 Posted April 21, 2009 Thanks for the cool tip! I was faced with doing the door panels on a current project. You have just solved my problem. I was wondering how you did the biscuit tuck on your cool C-cab. Who'd of thought of picnic plates. How Cool! THANKS!
roadhawg Posted April 21, 2009 Posted April 21, 2009 Great tip! I've been putting off a 56 Chevy project for years because I couldn't figure out how to make a Diamond-Pleat interior......now I know! Thanks!
Eshaver Posted April 24, 2009 Posted April 24, 2009 Gseeds, somethimg tells me ya mighta been into the " Custom Van " scene back in the early seventies. Biscut Tufting was all the Rage then and from the looks of the French curve couch in the Paddy wagon , well ya give yerself away. Very handy tip there ! However let me warn everyone that "Foam plates are sensitive as to what adhesives you use and what Paints to use as well. Generally using White or Testors White glue is safe as well as epoxies . Paints are yet another area where you are better off using acrylics on if you're not sure what to use . Nowiffini yer bent and determined to use " Hot paints", seal with a coat of Elmers glue and then Paint over top ............ That will work as I have had to do much the same thing when I'm building my service stations .......... Ed Shaver
gseeds Posted April 28, 2009 Author Posted April 28, 2009 Gseeds, somethimg tells me ya mighta been into the " Custom Van " scene back in the early seventies. Biscut Tufting was all the Rage then and from the looks of the French curve couch in the Paddy wagon , well ya give yerself away. Very handy tip there ! However let me warn everyone that "Foam plates are sensitive as to what adhesives you use and what Paints to use as well. Generally using White or Testors White glue is safe as well as epoxies . Paints are yet another area where you are better off using acrylics on if you're not sure what to use . Nowiffini yer bent and determined to use " Hot paints", seal with a coat of Elmers glue and then Paint over top ............ That will work as I have had to do much the same thing when I'm building my service stations .......... Ed Shaver we have a winner !! yes i was arould when custom vans were the thing, in 1976 when i was 16 i worked after school in a custom paint shop in california,we painted lots of vans and mini truckss back then, and there was lots of eye candy to curpt my young mind.
gseeds Posted September 11, 2020 Author Posted September 11, 2020 Hey guys I put up this how too, many years ago, I was wondering if anyone took a try at it ?? If you have post up a pic , I’d love to see it, I posted this over 10 years ago so maybe this technique for custom car show interiors is out dated now , thanks!
OldNYJim Posted September 11, 2020 Posted September 11, 2020 Actually, I’ve seen a bunch of cars on Instagram done using this exact technique - often with foam sheet from the craft store instead of a plate, but same technique. I can’t recall which people in my list of builders on there have used this trick...but soon as I stumble upon some examples I’ll post them up!
gseeds Posted September 11, 2020 Author Posted September 11, 2020 7 minutes ago, CabDriver said: Actually, I’ve seen a bunch of cars on Instagram done using this exact technique - often with foam sheet from the craft store instead of a plate, but same technique. I can’t recall which people in my list of builders on there have used this trick...but soon as I stumble upon some examples I’ll post them up! Thanks cabdriver , But I’ve seen lots of models with this style interiors on Facebook or on other sites , not really looking for pics of of those , I was only interested in seeing if anyone here on this site that saw this how too over the past years and found it helpful to them and tried it , cause to tell the truth I’m kinda thinking of doing a how too on custom paint but i don’t really want to do that if no one is going to try it .
OldNYJim Posted September 11, 2020 Posted September 11, 2020 Ahh, gotcha Well, that paint looks great and I’d be interested to see it come together!
stitchdup Posted September 11, 2020 Posted September 11, 2020 I hadn't seen this before but I'll be trying it soon cos I gotta model a thats stalled out on the interior and this looks like a good way to sort that out.
Slotto Posted September 11, 2020 Posted September 11, 2020 Great tip! Gonna use it very soon! Thanks my friend!
JollySipper Posted September 11, 2020 Posted September 11, 2020 I just gave this a try! Definitely want to make some tuck 'n roll for my next project...... I guess the best thing to paint it with would be craft paints?
gseeds Posted September 11, 2020 Author Posted September 11, 2020 32 minutes ago, JollySipper said: I just gave this a try! Definitely want to make some tuck 'n roll for my next project...... I guess the best thing to paint it with would be craft paints? Jollysipper I would imagine that craft paints would work well , I had always use testors or any model brand paint from the bottle and added fuzzy fur to it before the paint dryed , good luck!
gman Posted September 11, 2020 Posted September 11, 2020 20 hours ago, gseeds said: Thanks cabdriver , But I’ve seen lots of models with this style interiors on Facebook or on other sites , not really looking for pics of of those , I was only interested in seeing if anyone here on this site that saw this how too over the past years and found it helpful to them and tried it , cause to tell the truth I’m kinda thinking of doing a how too on custom paint but i don’t really want to do that if no one is going to try it . I would love to see some tutorials on how you get those paint jobs- you do excellent paint work, and anything you are willing to share would offer value for your fellow modellers/forum members.
misterNNL Posted September 17, 2020 Posted September 17, 2020 I have used this same idea for creating brick walls for dioramas. I use flat finish craft paints for color and weathering. I sand sidewalk chalk into cracks for mortar and seal with flat clear rattle can. For large areas of concrete or paved surfaces I recommend the paper covered stuff from Hobby Lobby. Be sure to remove the paper backing from Both Sides or it Will warp for you.
crazyjim Posted September 17, 2020 Posted September 17, 2020 Pretty good tip. I figure the panels you're glueing to must be flat?
gseeds Posted March 18, 2021 Author Posted March 18, 2021 On 9/17/2020 at 9:26 AM, misterNNL said: I have used this same idea for creating brick walls for dioramas. I use flat finish craft paints for color and weathering. I sand sidewalk chalk into cracks for mortar and seal with flat clear rattle can. For large areas of concrete or paved surfaces I recommend the paper covered stuff from Hobby Lobby. Be sure to remove the paper backing from Both Sides or it Will warp for you. Thanks for the tips! Awesome!!
Recommended Posts
Create an account or sign in to comment
You need to be a member in order to leave a comment
Create an account
Sign up for a new account in our community. It's easy!
Register a new accountSign in
Already have an account? Sign in here.
Sign In Now