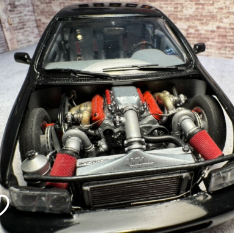
Mattilacken Posted February 28 Posted February 28 (edited) Welcome to another of my build threads! I am much better in starting them than closing them! 😁 So here goes an other build thread, but I felt that I am flooding the CBR thread with my details so I thought I separate it. For those of you that haven’t seen the group build thread this year the theme is Cannonball run 1975 so everything available in 1975 or before is ok to use even though it might not have been combined yet in 1975. So I decided first to build a Cuda that I already had since long, I got started band came quite far but something was missing for me and the thought of a Elephant motor on a long distance race felt wrong. I read in mag that when the Gurney Cuda was sold to Europe in 1971 it was motor swapped to a Hemi, and when they later ran a 24h race at SPA, which is a long track, they had to refuel every 9 laps or so. So gas consumption on one of those is ridiculous in high speed. That got me thinking of diesel engines which usually have great MPH. When reading up on diesel engines I found out that there wasn’t much around in 1975 for cars but Mercedes had them in their 300D. So I read up more on them and stumbled across the Mercedes 1968 300SLE AMG Red Pig which has a great stance. Found files for the body but no chassis So I ordered a Italeri 1971(I think) Mercedes 500 SLE as a donor and planed to print a body. After more discussions with my MB enthusiast friend and struggling with making a printable body of the Red Pig I decided to do a flared 500 SLE instead inspired by the Mampe race car. And later I also found the later König and some other that have inspiered me. The stock body has been modified with printed flares that was secured with CA and then reshaped and adopted with CA and baking soda, and to Finnish it of I used Tamiya fine putty. I did remove all the side moldings and such to give it a more sleek look. I also ended up removing the aluminum gills in the rear side windows since that felt more like my style. I wanted that race look like Mampe and I saw that a front and rear spoiler from a 1970 Camaro Baldwin motion would fit with minor mods. I wanted the diesel engine, the biggest diesel they had back then was the OM617 which is a 5cyl diesel with SOHC. There are no such engines in kits or any engine that are close on files, except for maybe the 300SL engine that come closer but it’s a much older design, I bought that file to se if I could use it but I ended up going a different route. I used a couple of different engines from my parts box, mostly Japanese 6cyl that I cut down to resemble the 5cyl MB OM617. Then I scrambled and cut and modified parts to look similar to what a OM617 would look regarding intake and exhaust. And actually the valve cover come from the MB V8 that came in the kit, but yes it’s modified. I also modified a diesel pump in Cad and printed it. First plan was to make a single Turbo Intercooler since that was done at Porsches at the time. But when looking at it and thinking about it I figured that it would have been super laggy with the turbo tech of 1975. And compound turbos had been done since the 50’s on airplanes so I went that route instead. Wheels are same as Red pig uses and a classic wheel on Mercedes of all years. They are 15x10 and 15x12 with big meat, fun fact is that Red Pig actually had super wide tires it ran 285/40R15 in the front and 335 in the rear. I had some tires that looks the part from various kits, rears are from AMT 454SS. Interior was planed to stay mostly stock but the Italeri kit is so basic so I could not leave the interior like that. So I added the piping to the leather seats front and back. Scratched up an armrest for the driver seat as well as knobs for adjusting the seat angle. I also removed the lower part of the seat since it was to straight and long, I reshaped the lower part of the seats and redid the upper and back part of the upholstery to smooth style instead of the more fabric looking pattern that it came with. I also made the armrest and handle for that in the otherwise rather plain back seat. The dash also got a treatment with removing the gauges, adding in brass grosses to the vents and a brass piece to the light knob. I left the middle vent out since I will be placing a gauge there, Boooost. I also added detail in the center console where it was al flat and empty. I cast a radio from an other Tamiya kit and installed it as it should have been. Then I crafted the vent adjusters and glued in the adjuster it self. I also removed the automatic shifter and made a custom from two others I had. the chassi has also gotten allot of work.. it was a simple chassi with very little detail, so I removed the molded in rear end and such and replaced them with a Tamiya 635 CSI unit since it looks very similar. I also remade the front suspension brace since I wanted the engine to come rearward. And it actually came to look more Like The 1:1. The front uprights have also seen some modifications with removal of the molded in disc brake, this so I can adjust the track better. Paint will be black and gold with JPS sponsor decals since I decided that this will be a tribute to Ronny Pettersson the most successful Swedish F1 driver that was active in late 60’s until 1978 when he crashed at Monza and passed away. He drove most of his F1 career for Lotus with the classic JPS livery of Black and gold. I will have a red interior since that’s the best combo I know. I will ad some depth to it so it will be several types of red as shown below. I also added in 2 sections with darker red in the doors to give it more depth as this is some thing g I found at some 1:1. o, and this is all that came in the kit, it’s like one three with black parts a chrome three and a glass three. Thanks for watching and please leave a comment and give some feedback. Edited February 28 by Mattilacken 9
jaymcminn Posted February 28 Posted February 28 Looking excellent so far, Anton. Those monster Penta wheels with the flares are fantastic! 1
dwc43 Posted February 28 Posted February 28 Looks good. I like the black paint job and the JPS idea. Always loved that JPS car anyways. I have one in the stash to build one day. 1
Mattilacken Posted February 28 Author Posted February 28 Thanks guys! made more progress on the interior. The gauges are in, they only one from the kit is the one to the left but I colored the needles to try to get a similar look on al of them. I also took a tach from the stash and made the red zone way lower around 3500rpm instead of 6000. Since I drilled the molded gauges I added a sheet of styrene and glued the gauges to that and then put a clear piece of plastic in front. center gauge is boost and the one low in front of the shifter is a clock with timing capability. Also added a CB with a aluminum holder for the mic. 2
Mattilacken Posted February 28 Author Posted February 28 I was thinking of making these with diamond cut but they look bad as in chrome I think. 1
oldcarfan Posted February 28 Posted February 28 Making great progress. That paint is super shiny and the interior color really looks the part.
Bullybeef Posted February 28 Posted February 28 The red pig is an icon in the racing world, would have loved to see a scale rendition of that one.
89AKurt Posted March 1 Posted March 1 Digging the subject, and what your vision is. Yes the seats of such kits need piping, been doing it more myself. Will be lurking. 👀
Mattilacken Posted March 1 Author Posted March 1 12 hours ago, oldcarfan said: Making great progress. That paint is super shiny and the interior color really looks the part. Yes it was good, almost felt bad going over it with wet sanding yesterday but now it’s smooth as I want it so some minor touchup and then clear. 11 hours ago, Bullybeef said: The red pig is an icon in the racing world, would have loved to see a scale rendition of that one. For sure is, but I leave the thickening of car bodies to some one else. 🙂 9 hours ago, slusher said: Great work Anton, I really like your interior! Thanks Carl! I still have more to add to it so keep looking 6 hours ago, 89AKurt said: Digging the subject, and what your vision is. Yes the seats of such kits need piping, been doing it more myself. Will be lurking. 👀 Thanks Kurt! Yes it needed some modifications and it went quite smoothly actually. 1
Pierre Rivard Posted March 1 Posted March 1 This car looks superb with your mods and wearing black. 1
Mattilacken Posted March 1 Author Posted March 1 Got some work done on the rear end and front suspension, made coils out of 0,6mm red wire and installed everything. Took a steering linkage from a 635 bmw and shortened the track of it. I think I have to do a simple lowering in front by gluing the front discs and hub onto the upright in the height I want. i also managed to shorten the drive shaft and install a swaybar and links. 1
Mattilacken Posted March 2 Author Posted March 2 I managed to get some motor work done, pump drive have been modified and added a driveshaft for it. The hen aded nuts so I can start doing the piping. Also groved all the pulleys so I can make new belts later. 1
Ace-Garageguy Posted March 2 Posted March 2 Love this build. I have a full-scale 450SL theft-recovery that's too far gone to make a straight restoration really feasible, so it's slated to get a supercharged 351C Ford I have lying around from a long-ago project. Oddball Merc hot-rods are cool.
Mattilacken Posted March 2 Author Posted March 2 9 hours ago, Ace-Garageguy said: Love this build. I have a full-scale 450SL theft-recovery that's too far gone to make a straight restoration really feasible, so it's slated to get a supercharged 351C Ford I have lying around from a long-ago project. Oddball Merc hot-rods are cool. Man that sounds really cool! I like your plan for it! And original restorations is ok but it takes guts and vision to make a good hot rod! Go for it!
Mattilacken Posted March 2 Author Posted March 2 Have been doing work on the fuel system plumbing and it’s coming along I think. 5
Mattilacken Posted March 4 Author Posted March 4 I have started on the trottle linkage.. and 1h later i have a movable link. I used stretched sprue for al bolts and also the rod. Mr hobby links where used. 4
beeRS Posted March 6 Posted March 6 Great project and idea. You have done an amazing job on that engine. Fantastic detail. 1
Mattilacken Posted March 13 Author Posted March 13 I have had this project boxed up for a while and brought it out today again. And I got some minor work done. Redid the oil filter canister and aded mb star and mb text to the engine. I also noticed that the interior interferes with how the chassi and body mates. So some thing have to be done about that. I also noticed that the hood does not sit right so I have to address that. I was thinking of leaving it un hinged but I might rethink that since it makes more sense to have it hinged. i did get my decals for the JPS livery and the set made for the lotus 78 was not what I expected. They were more yellow than gold, and looking at reference pictures of the 78 that year they did not have a livery that looks like real gold . Glad I ordered the BMW Jps decals as well, they were more of a chrome gold. Thinking on how I do with the livery. Any ideas and recommendations on gold paint? 1
Recommended Posts
Create an account or sign in to comment
You need to be a member in order to leave a comment
Create an account
Sign up for a new account in our community. It's easy!
Register a new accountSign in
Already have an account? Sign in here.
Sign In Now