Bluzboy66 Posted December 2, 2010 Posted December 2, 2010 I finally finished my '66 Impala. Hope you all dig it! Mike
Harry P. Posted December 2, 2010 Posted December 2, 2010 That is really, REALLY nice! You nailed it. Congratulations on a fantastic model
Bluzboy66 Posted December 2, 2010 Author Posted December 2, 2010 That is really, REALLY nice! You nailed it. Congratulations on a fantastic model Thanks Harry. Took a while, but i love the way it turned out. What a nice kit. I'm already looking forward to building another one! Mike
carrucha Posted December 2, 2010 Posted December 2, 2010 Cool Impala. Nice color. Well finished. Good job.
Bluzboy66 Posted December 2, 2010 Author Posted December 2, 2010 Cool Impala. Nice color. Well finished. Good job. Thanks. That's Pure Ice brand nail polish ($2 a bottle @ Wal-Mart)....I think the color is called 'First Time'. Topcoat is 2-part urethane clear. Mike
charlie8575 Posted December 2, 2010 Posted December 2, 2010 Looks like GM green. Very nice job on this. Charlie Larkin
Bluzboy66 Posted December 2, 2010 Author Posted December 2, 2010 Looks like GM green. Very nice job on this. Charlie Larkin Charlie, Funny thing is, I had two bottles of the nail polish in my cabinet for quite some time. When I bought the newly released '66 Impala, I just KNEW that the color would look great on this car! Mike
crowe-t Posted December 2, 2010 Posted December 2, 2010 (edited) WOW! Mike, this is a perfect build! That shot of the interior looks real. What did you use for the carpeting? Can you post a chassis picture? Are those the kit's emblems or are they photoetched? Edited December 2, 2010 by crowe-t
W-409 Posted December 2, 2010 Posted December 2, 2010 Wow, perfect! Impala is one of my favorite subjects and this one is very very nice! Paintjob looks very good on it and I like that foiling, it looks very nice, just like in 1:1! Engne detailing is very nice also, that 396'' Big Block is perfect to this one. It's very clean build all the way! Is this the new Revell "StreetBurner" kit? Very nice!
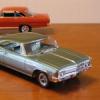
Bluzboy66 Posted December 2, 2010 Author Posted December 2, 2010 (edited) WOW! Mike, this is a perfect build! That shot of the interior looks real. What did you use for the carpeting? Can you post a chassis picture? Are those the kit's emblems or are they photoetched? Thanks! The carpet was done with perfectly matched flocking.....couldn't believe that I found flocking that matched the paint! The emblems are all Bare-Metal Foil, with kit decals applied overtop where applicable. I'll try and snap a pic of the chassis when I get a minute....it's color-matched as well, with some detail painting. Here's a pic of it in-process..... Edited December 2, 2010 by Bluzboy66
Bluzboy66 Posted December 2, 2010 Author Posted December 2, 2010 (edited) Wow, perfect! Impala is one of my favorite subjects and this one is very very nice! Paintjob looks very good on it and I like that foiling, it looks very nice, just like in 1:1! Engne detailing is very nice also, that 396'' Big Block is perfect to this one. It's very clean build all the way! Is this the new Revell "StreetBurner" kit? Very nice! Thanks Niko. And yes, it's the new Street Burner kit. NICE kit....can't wait to build another. I'll do a few things differently this time, like removing the 'Revell' and 'Copyright' text from the chassis. I'll also build the rear suspension up as a separate unit, as opposed to building it ON the car. That was a real trick! Mike Edited December 2, 2010 by Bluzboy66
crowe-t Posted December 2, 2010 Posted December 2, 2010 (edited) Mike, The paint(nail Polish) looks perfect on the chassis. I didn't even notice the raised Revell and Copyright on the chassis. What did you thin the nail polish with? I never thought to use nail polish but I guess it's basically acrylic paint. The color really does look like GM green. Edited December 2, 2010 by crowe-t
davyou5 Posted December 2, 2010 Posted December 2, 2010 Wow ! That looks so Real! Exceptional Job! B) .
Bluzboy66 Posted December 2, 2010 Author Posted December 2, 2010 (edited) Mike, The paint(nail Polish) looks perfect on the chassis. I didn't even notice the raised Revell and Copyright on the chassis. What did you thin the nail polish with? I never thought to use nail polish but I guess it's basically acrylic paint. The color really does look like a GM green. Nail polishes vary, but most of them are either nitrocellulose or acrylic lacquer. Don't use anything that has an additive in it, like any type of nutrients, vitamins, or 'nourishing oils'. The Wal-Mart 'Pure Ice' brand is definitely plain old nitrocellulose lacquer, and I thin it approximately 50/50 with DuPont mid-temp acrylic lacquer thinner, sprayed through my Badger Anthem airbrush at 20-30psi or so (that varies as well). The mid-temp acrylic lacquer thinner allows the paint to flow out real nice, and dry hard and level. Nail polishes sometimes tend to be quite translucent, and light metallic colors, like the green I used, look best sprayed over a basecoat of white, silver, or gold. I typically use a thin coat of Tamiya silver under light-colored metallics. The topcoats then look deep and dimensional. By the way, the chassis and most of the interior are shot with the same nail polish, but WITHOUT the clearcoat. I did mist a very thin coat of clear on the face of the dash and the steering wheel though, for some contrast in sheen. Mike Edited December 2, 2010 by Bluzboy66
impcon Posted December 2, 2010 Posted December 2, 2010 You did a VERY nice job on this one!!!!!! AAAAA++ - a definite 10 on a scaLE OF 1-10 IMHO!!! The colour as said, looks pretty close to a stock colour - wow!! I do like it! It's one of those colours that when you see it faded and bleached out on a 1:1 car, you think YUK!! But when it is fresh and shines, it is not difficult to see why someone would have chosen that colour on the showroom floor back in late '65 or 1966 when these were new! Sure is pretty... and the wheels look period correct too! Nice build!!
David G. Posted December 2, 2010 Posted December 2, 2010 Color, paint, detail, you've nailed all three with excellent results!
oldscool Posted December 2, 2010 Posted December 2, 2010 That is one of the most perfect model cars I have ever seen! Outstanding!
cruz Posted December 2, 2010 Posted December 2, 2010 Great build my friend, pictures just don't do it any kind of justice......
Bluzboy66 Posted December 2, 2010 Author Posted December 2, 2010 (edited) You guys are too kind. I was just happy to get it FINISHED. I've got a few more in the works that I'm praying I'll get finished in 2010. I didn't make my "one kit a month" quota in '10, but it's been a productive year none the less. Mike Edited December 2, 2010 by Bluzboy66
Recommended Posts
Create an account or sign in to comment
You need to be a member in order to leave a comment
Create an account
Sign up for a new account in our community. It's easy!
Register a new accountSign in
Already have an account? Sign in here.
Sign In Now