

tim boyd
-
Posts
5,821 -
Joined
-
Last visited


.thumb.jpg.e12e5df0ccf757b78eedbb1abdd7fb95.jpg)


Recent Profile Visitors
39,214 profile views


tim boyd's Achievements
MCM Ohana (6/6)
-
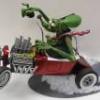
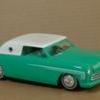
Greetings all. This post covers a hot rod built during early 2025. Those (I suspect) few of you who read Fine Scale Modeler will recognize this project from the detailed full build article in the September/October 2025 issue) but for most of you, this will be new information. There were several inspirations for this project. The first was that I wanted to take a second whack at the basic vision of a post WW-II themed hot rod project based on the Round 2 "Mod Rod" Model A double kit release from 2015. This was the most recent reissue of the old AMT 1929 Model A Roadster Double Kit circa 1973 that now restored most (though not quite all) of the parts for Barris' Ala Kart showcar that was part of the original 1962 AMT kit tooling. Those of you who do read Model Cars magazine will remember the build article on the first attempt of this idea from issue #226. I also posted a recap of that build here on the forum earlier this year. For this "second whack" project there were two other inspirations aka build goals. The first was to build a model featuring the new 1935-39 "Wide Five" wheels from Norm Veber at Replicas and Miniatures of Maryland Company. As had been occasionally noted here on the MCM forum, these wheels were molded in full complete detail with the first several production runs of the AMT 1936 Ford Trophy Series kit starting in 1961. Unfortunately, AMT had ongoing issues with the tool correctly molding the fully depressed outer rim holes in the Wide Five wheels, and as a result they soon modified the tooling to fill these holes. Correctly molded originals are very scarce, but I was able to find a few and provided them to Norm, who now offers the original tooled wheels in his aftermarket product range. To the best of my knowledge, these are the only 1/24th/25th model company offerings to correctly reflect all the details of this Wide Five design. (There may be other aftermarket offerings, but whether they include all the correct details should be assured before hitting the "buy" button.) The second goal was to build a model with the Model A "Banger" four cylinder, but to build it with the all-new Engine tooling from the ICM 1930 Model A Phaeton kit. The fine detail and quality of this new kit blows away the old Revell Model A banger engines. But since it is provided in factory stock form only, some aftermarket type mods would be needed to add the hot rod flavor. There were a number of other changes for the "second whack", including a bare-bones interior setup, a body moved a little farther forward on the frame than the original build (to allow the factory hood to fit), a similar but still different dark green paint color, and so forth. I am not going into details on all the steps that were needed to bring this project to the display table (you'll need to reference the FSM article for that), but I will provide a general overview and imagery below. Some additional build notes - the front suspension is from the current Revell Model A Hot Rod kits, while the QuickChange rear and transverse spring setup is from Replicas and Miniatures of Maryland. Note the inside door panels which replicate the 1/1 car before door "card" upholstery is added. The instrument panel is from the Revell '30A Hot Rod Coupe, as are the seats with real leather bottom pads added. Stained, real wood lines the bed. The (over carbureted for a Banger!) Strombergs and Frog Mouth scoops are from VCG Resins by Reese, while the exhaust headers were formed from parts from two of the Mod Rod kits. The tranny is a Ford manual from the Revell l1940-48 Ford kits paired with the crossmember from the Mod Rod/Ala Kart (thanks to Dennis Lacy for that idea; it worked great). Paint is Tamiya TS-9 (without clearcoat, which would be unrealistic for this build era) gloss British Racing Green. The gas tank was harvested from a parts box junker, exact vintage unknown. As i did with the first project shown in the MCM article, I retained the fender aprons this time as well. The "11" door panel decals were a late add after I thought the finished car needed a little bit more eyeball. Thanks in advance for taking the time to review the text above and check out the imagery below. Happy to answer any questions you may have, as well. Very best holiday wishes to you all....Cheers....TIM And here I am showing a couple of comparo images so you can see how this one differs from the original Model Cars Magazine feature build..... *****
- 9 replies
-
- 10
-

-
John...and Tom....now done, here: Thanks for asking! And yes, the SS396 was the 375 hp version....Cheers....TIM
-
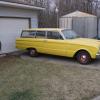
These two 1970 1-2 AMT-Ertl kit Camaro models represent my all-time favorite 1/1 scale Camaros. The yellow Z-28 was constructed as a late 1970 model year factory build, with the COPO 9796 large rear spoiler which became available for special order in April, 1970. The paint was also a late model year addition, in effect a pull-ahead of 1971 Code 52 Sunflower Yellow. It replaced Code 51 Daytona Yellow late in the production run (compare it the color to the 1969 Vette painted in Daytona Yellow). Other than those tweaks, and some more accurate tires, the model was built from AMT-Ertl's 1970 1/2 Z-28 kit first introduced around 2000. The orange SS 396 was a kitbash conversion of the above-referenced AMT-Ertl kit. The 1970 1/2 SS 396 was mostly overshadowed by the Z-28 that year, but that makes the SS 396 an even more interesting model car topic. The model was painted with Code 65 Hugger Orange, paired with a Sandalwood interior. Both of these were covered in two in-depth articles in Scale Auto magazine back in the day; the applicable back issues are June 2005 and August 2007). By the way, yes, the Z-28 hood doesn't fit exactly right; it warped after the model was completed. A bit of after the fact advice is that when using real automotive paints on styrene models with thinly molded hoods, be sure to paint the body color on both sides of the hood or you risk the same sort of warping seen here. Many pix below! Thanks for looking! Cheers....TIM
- 9 replies
-
- 19
-
-
Camaro 70 Z car first muscle car since 1964
tim boyd replied to Stanward VonDiederichs's topic in WIP: Model Cars
Stanword....nice work! Yes, I agree with you that the kit carb is incorrect. Believe it or not, the factory correct Z-28 carb for 1970 1/2 is found in the AMT-Ertl 1970 1/2 Baldwin Motion Camaro kit. And the three barrel in the Z-28 kit....yep, it is the correct carb for the Baldwin Motion kit car. AMT Ertl's product development team switched the carbs in the tooling and this has never been corrected. IIRC I also had the issue with the interior IP conflicting with the windshield. On my second build, I filed the front edge of the instrument panel pretty significantly until the interior seated in the body correctly. The AMT-Ertl 1968 El Camino SS 396 also had this same problem. Best....TIM -
Without going to my storage site, I believe this particular kit revision dates to the late 1980s or early 1990s. I remember looking at it when it came out and thinking "oh well"....
-
Like many of you, I had a strong desire to see the Styline parts restored when I bought my first sample of this kit series....the blue/yellow box art version from around 1972. A few years later I bought several of the earlier 1960's releases that were issued before the Styline parts were dropped. Itch satisfied, sort of. The Achilles heel of the Styline parts (beyond overall fit issues), of course, was that they added to the front and rear overhangs and resulted in a really odd proportion (varied to a dgree depending on which parts you used). So, practically speaking, they really weren't all that usable, unless you wanted to do major body mods (like revisions to the base body to reduce the increased front and rear overhang, et al.) Still, I fully understand the curiosity and desire for those parts to resurface.......as I was in the exact same boat many decades ago....TIM
-
The AMT-Ertl 1970 1/2 Z-28 and Baldwin-Motion Camaro kits introduced around the turn of the century were all new tooling. No comparison with the earlier kits in terms of interior/chassis/interior/powertrain detail. While I am not a fan of ScaleMates in terms of achieving high degree of accuracy on kit history, apparently, they called this one correctly. I can post detailed images of two builds from this kit (a 1970 1/2 SS396 kitbash and a late 1970 1/2 (with pull ahead 1971 paint and late year front and rear spoilers) mild kitbash) if anyone wants to see more details on the subject kit.... for now, here's an overall shot. This is the same kit tooling that was reissued just a few years back with the alternative (base non-RS) 1970 1/2-1973 full front bumper/front end treatment....TIM
-
Urs...the model is masterful and the pics are terrific. You set a very, very high bar for the rest of us to reach for. Great work and thanks for sharing! TIM
-
Bill....way, way cool in my eye. Excellent creativity and especially with the engine choice. too. In my mind's eye I'm seeing yours and my Model A 5WCs (both with unchopped tops, Gasser stance, two-tone paint with black fenders, etc.) lined up together at an NNL meet somewhere.... Cool! TB
-
Personally, I really, really like models like the one Dennis has completed here. Nothing outrageous, just a scale rod that could be built in 1/1. with fine craftsmanship, and tasteful yet eye-catching presence. Creative kitbashing and paint choices only add to the effect. There's plenty of room for all kinds of model car building styles and skills, and I personally like them all, but it is especially refreshing to me to see a model completed like this one. Big congrats, Dennis. And FWIW, just as Dennis did here, my view is that anyone building any of the Revell hot rod Deuce kits in a highboy format should source the frame from the recent Highboy Roadster reissue based on the Rat Roaster tool. It is much better in several ways than the highboy frame in all the previous Revell Street Rod Deuce kits, which dates back to the 1996 original and has some quality issues that are well resolved in the new tool frame. TIM
-
I think it would be a pretty safe assumption that Round 2 has any number of future kit derivatives in mind for this tool. I can say with a pretty high degree of certainty that how that will play out depends on how well the first kit release sells....so as usual, to a considerable degree we have our own future in our hands....TB
-
Thumbs up! TB
-
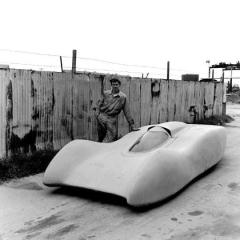
MPC Howmet TX Turbine Road Racer 1:25 scale
tim boyd replied to ea0863's topic in Other Racing: Road Racing, Salt Flat Racers
EMRE,,,,Other than the cover image back in the 1968/69 Car Model Mag era, don't recall having ever seen one of the actually built up. It is great to see one built with your skill and perseverance. And I just love the Comparo photos, too. -
Man oh man,,,,that is such an ambitious project, and the result came out so well.....big congrats! TIM
-
Great to see this one finished! TB
