Chariots of Fire
-
Posts
2,466 -
Joined
-
Last visited
Content Type
Profiles
Forums
Events
Gallery
Everything posted by Chariots of Fire
-
 Your tire fix is spot on. I did the same thing with some of the 1/32 scale trucks as well, shaving off the back of a spare Monogram tire and glueing it to the open part of the plastic tire. Worked like a charm.
 -
1944 Autocar U-7144T
Chariots of Fire replied to Chariots of Fire's topic in WIP: Model Trucks: Big Rigs and Heavy Equipment
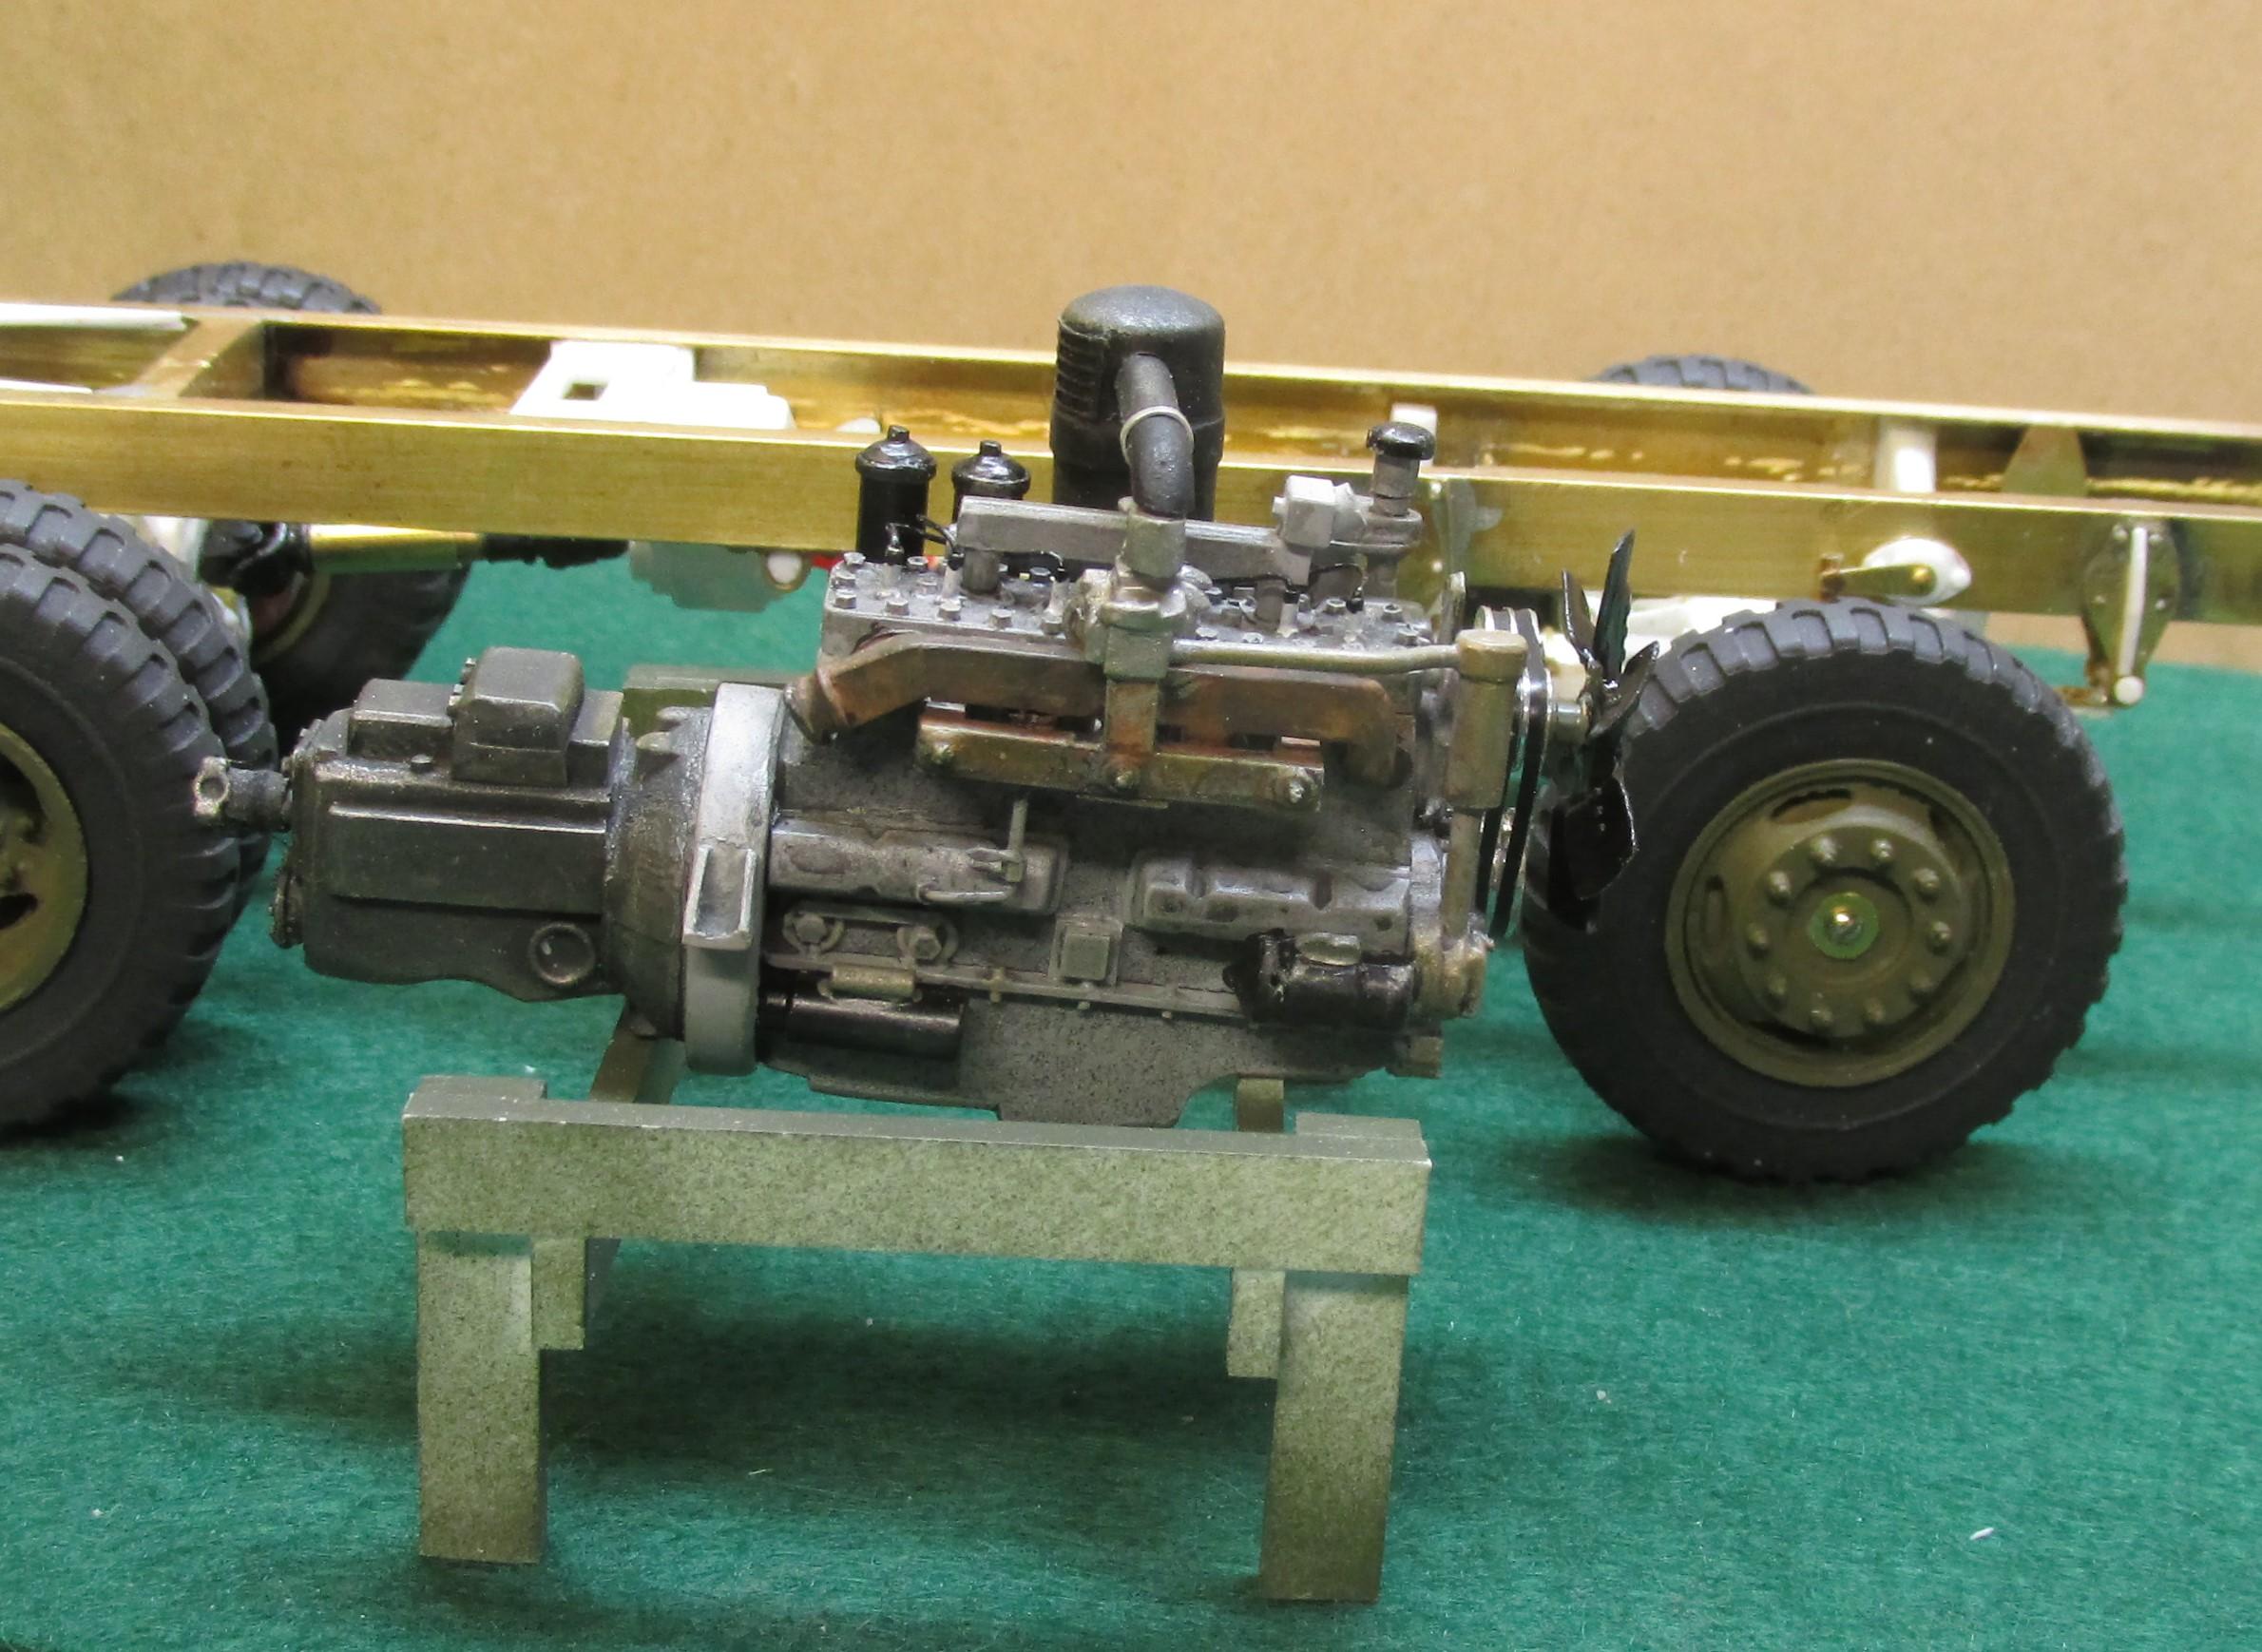
Springs are now mounted on the frame and the rear axle is set at the proper height. Still work on the front axle to do in order to get the right location and wheel track. Here is where we are now.
-
Been so long since I did the work I don't remember. Going back and looking at your resin casting, it may be a re-pop by someone else. My headlights don't look anything like yours and the hood on mine has a small rectangular cutout in the front of the center ridge. The ridge is about 6 mm wide. Mine also does not have the vertical marker lights on the front of the fenders. The headlight lenses on mine have yellowed with time so they probably were clear resin.
-
1944 Autocar U-7144T
Chariots of Fire replied to Chariots of Fire's topic in WIP: Model Trucks: Big Rigs and Heavy Equipment
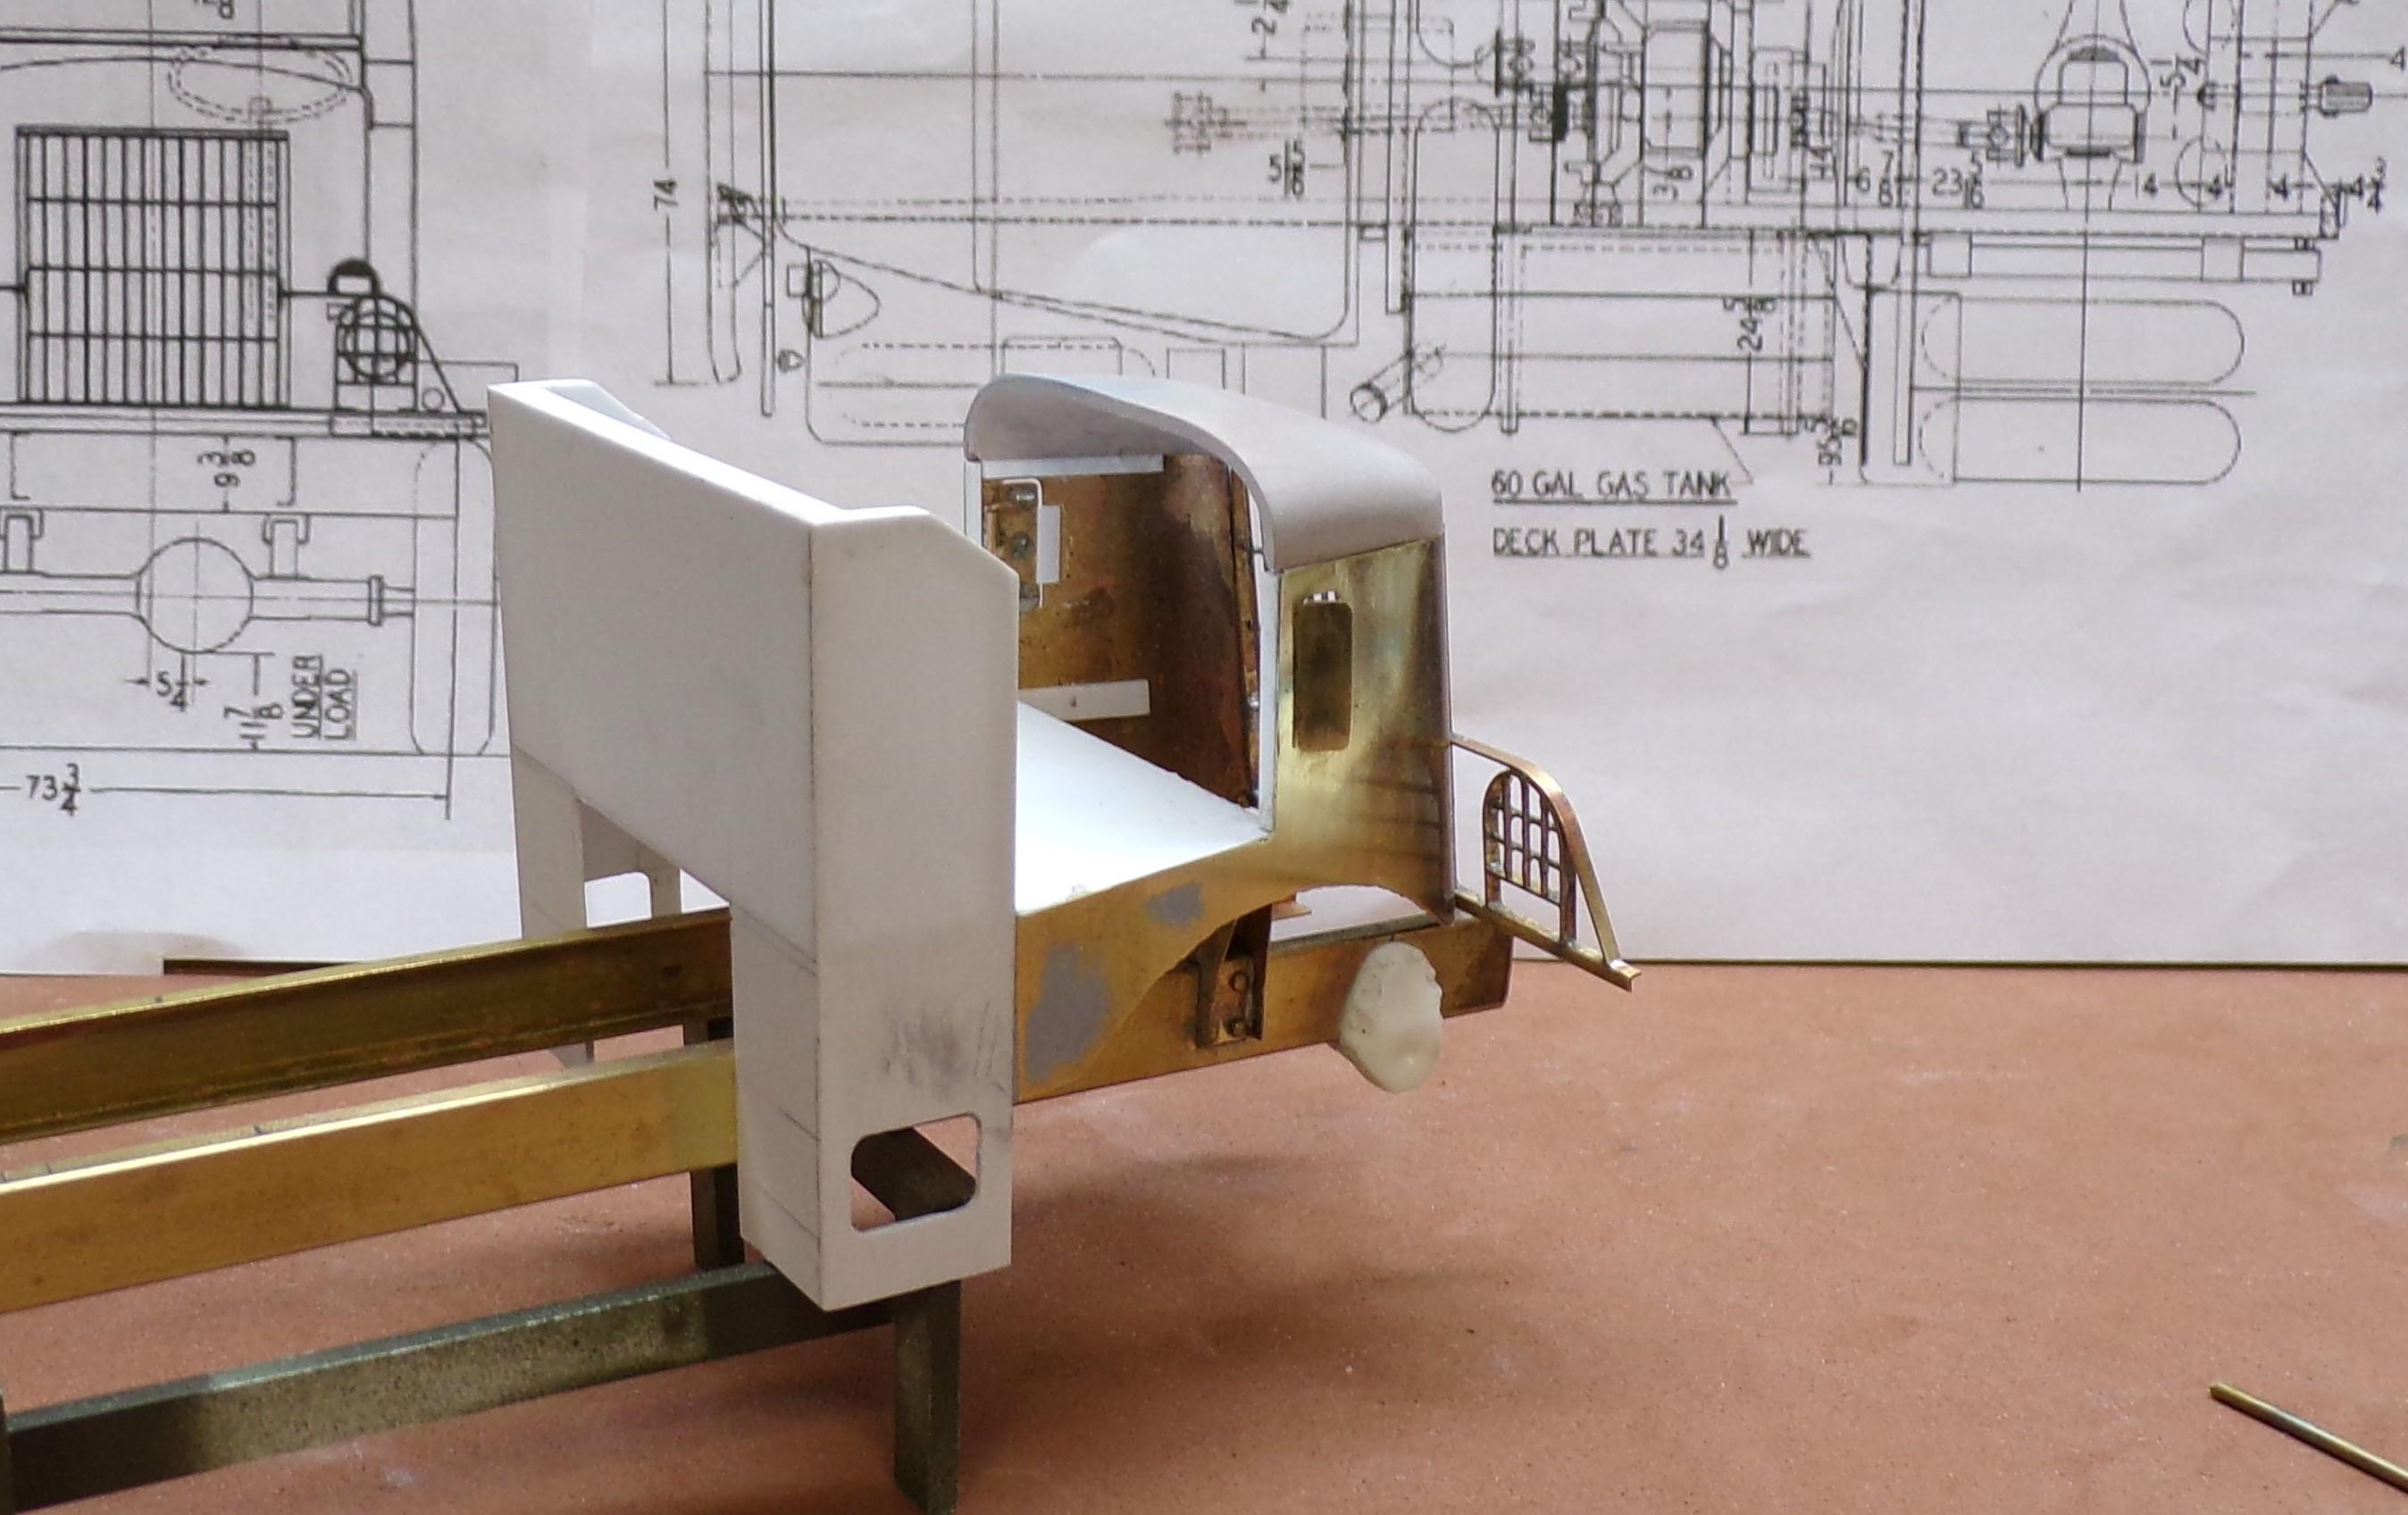
That's why I made the cover but I'm thinking that I might find a way to remove the whole cab for viewing of the engine. We'll see. -
Pretty sure Pinecrest Miniatures from Jamestown, PA cast that a number of years ago. I had one that I turned into a mid sized pumper. I only used the front hood and fenders, however and blended them to a kit cab.
-
1944 Autocar U-7144T
Chariots of Fire replied to Chariots of Fire's topic in WIP: Model Trucks: Big Rigs and Heavy Equipment
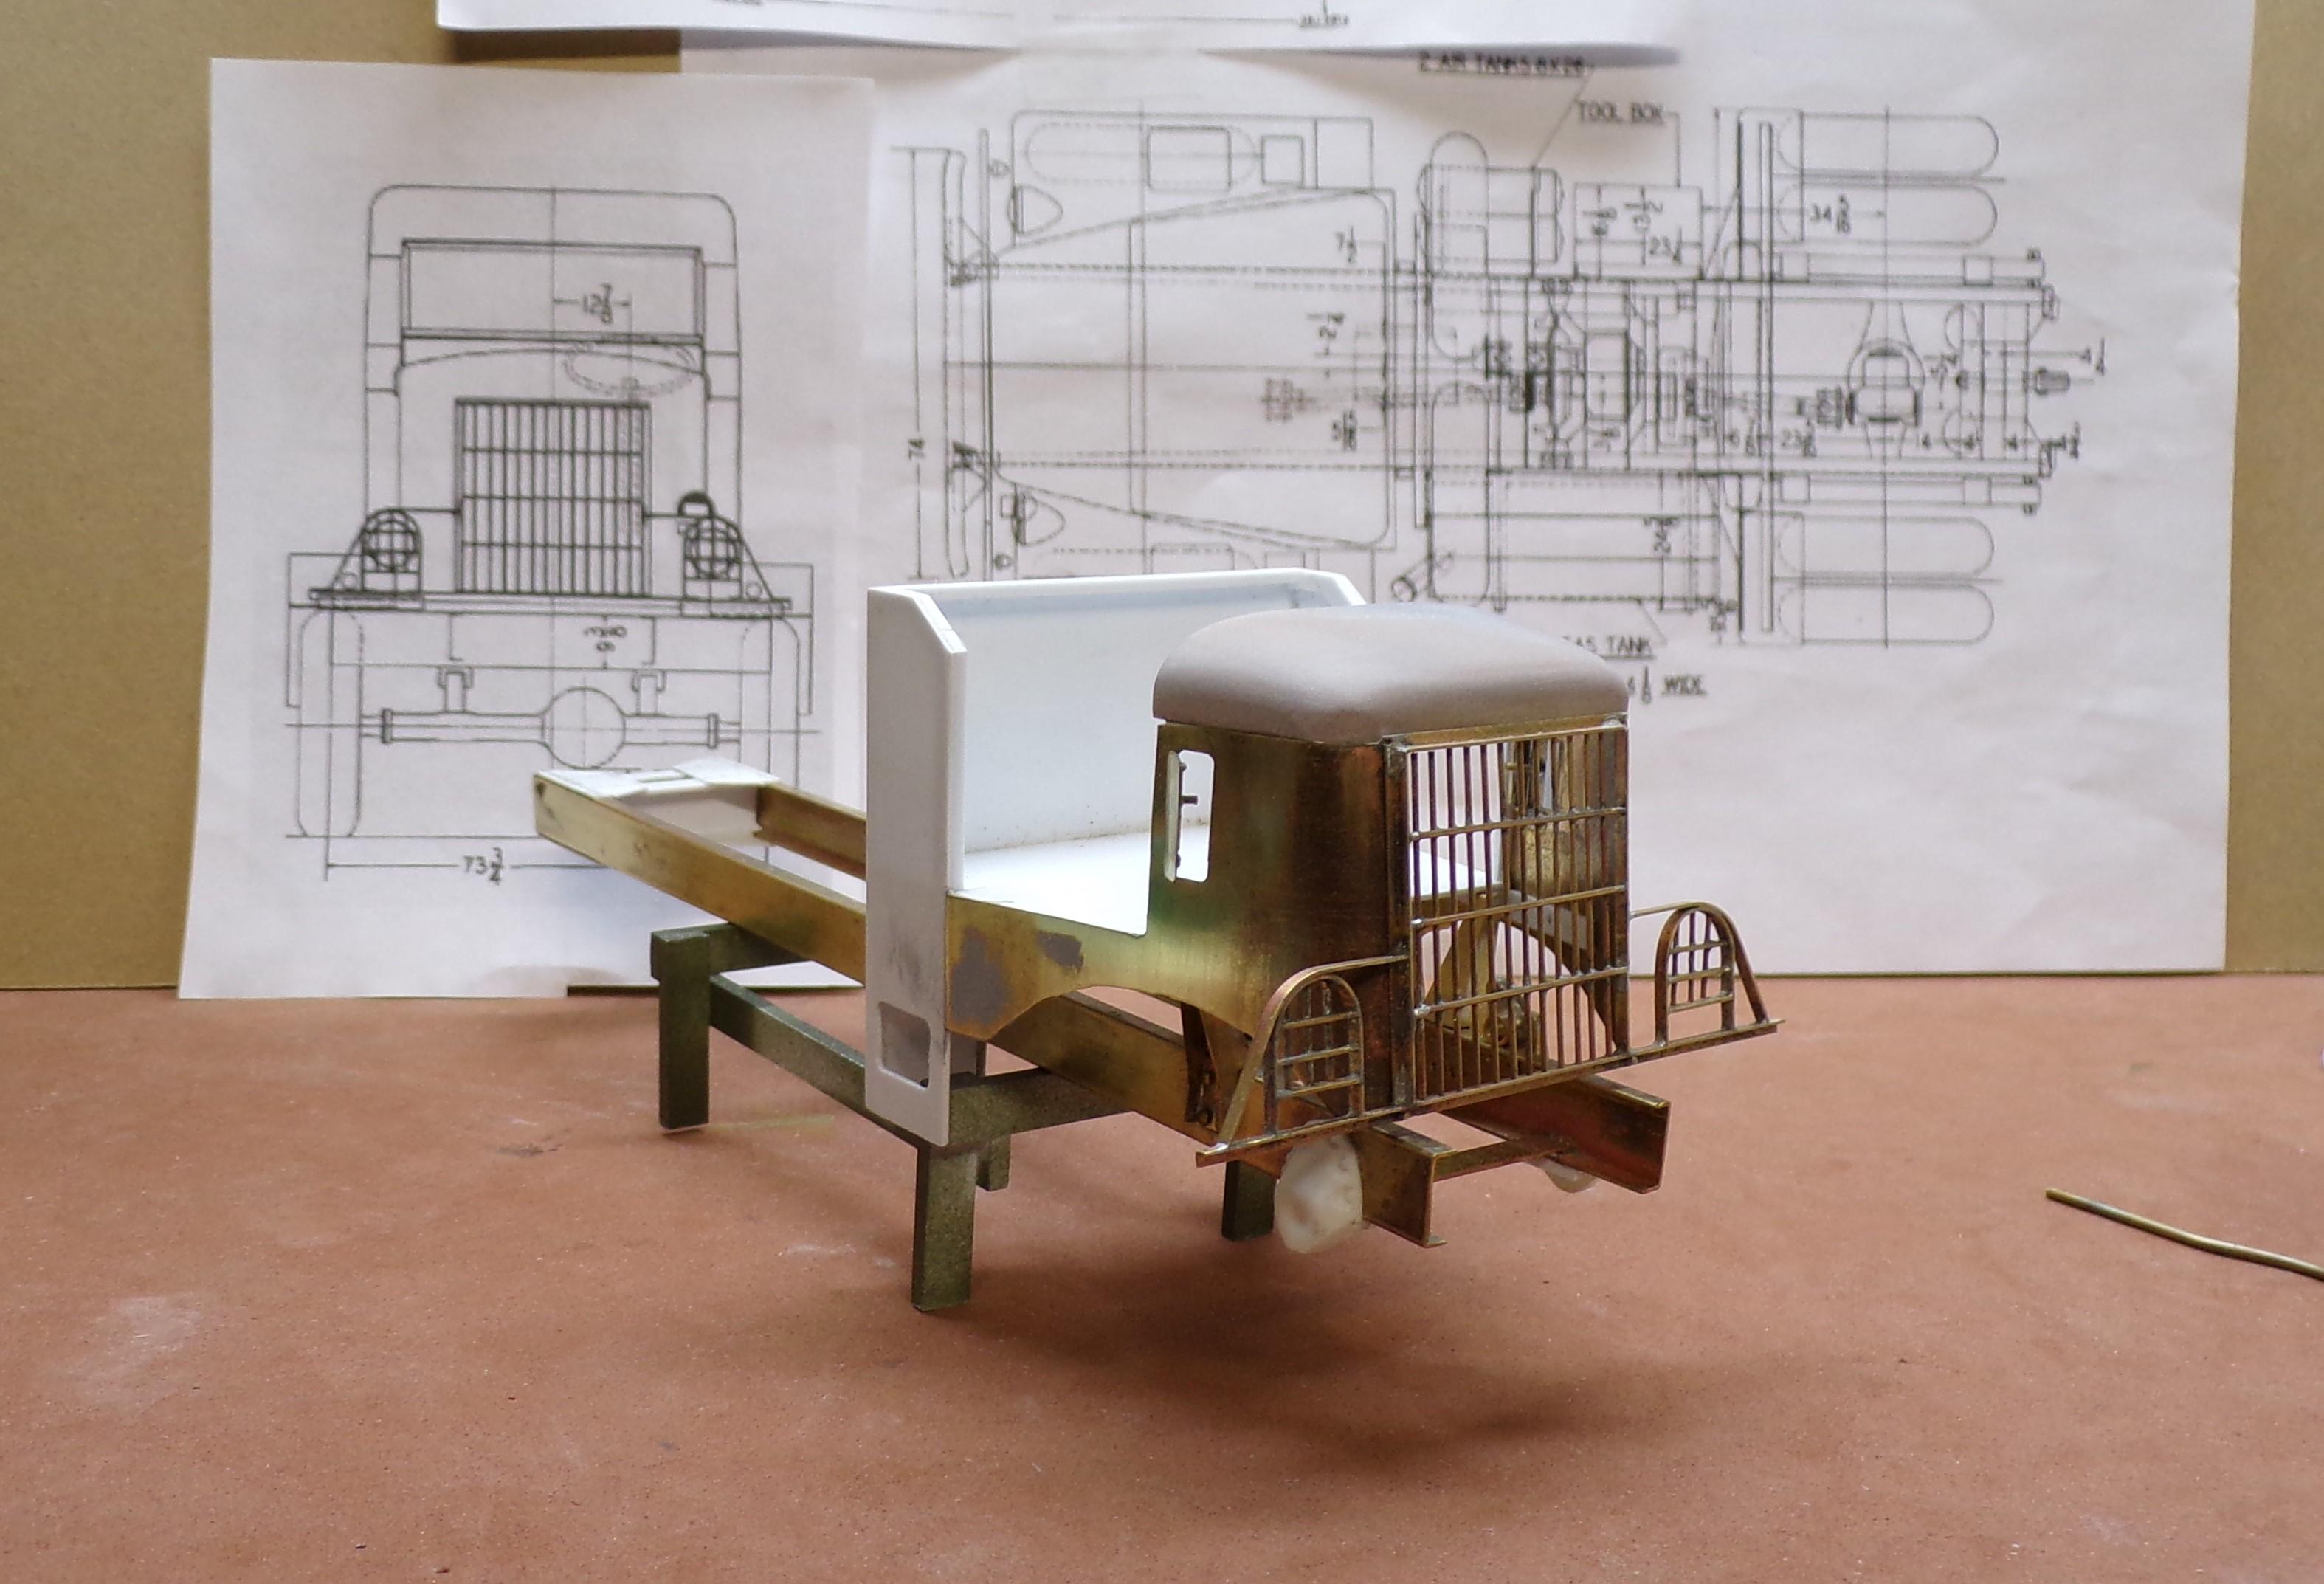
Got one more pic. Did some work on the cab, building the doors and the covers for the engine.
-
1944 Autocar U-7144T
Chariots of Fire replied to Chariots of Fire's topic in WIP: Model Trucks: Big Rigs and Heavy Equipment
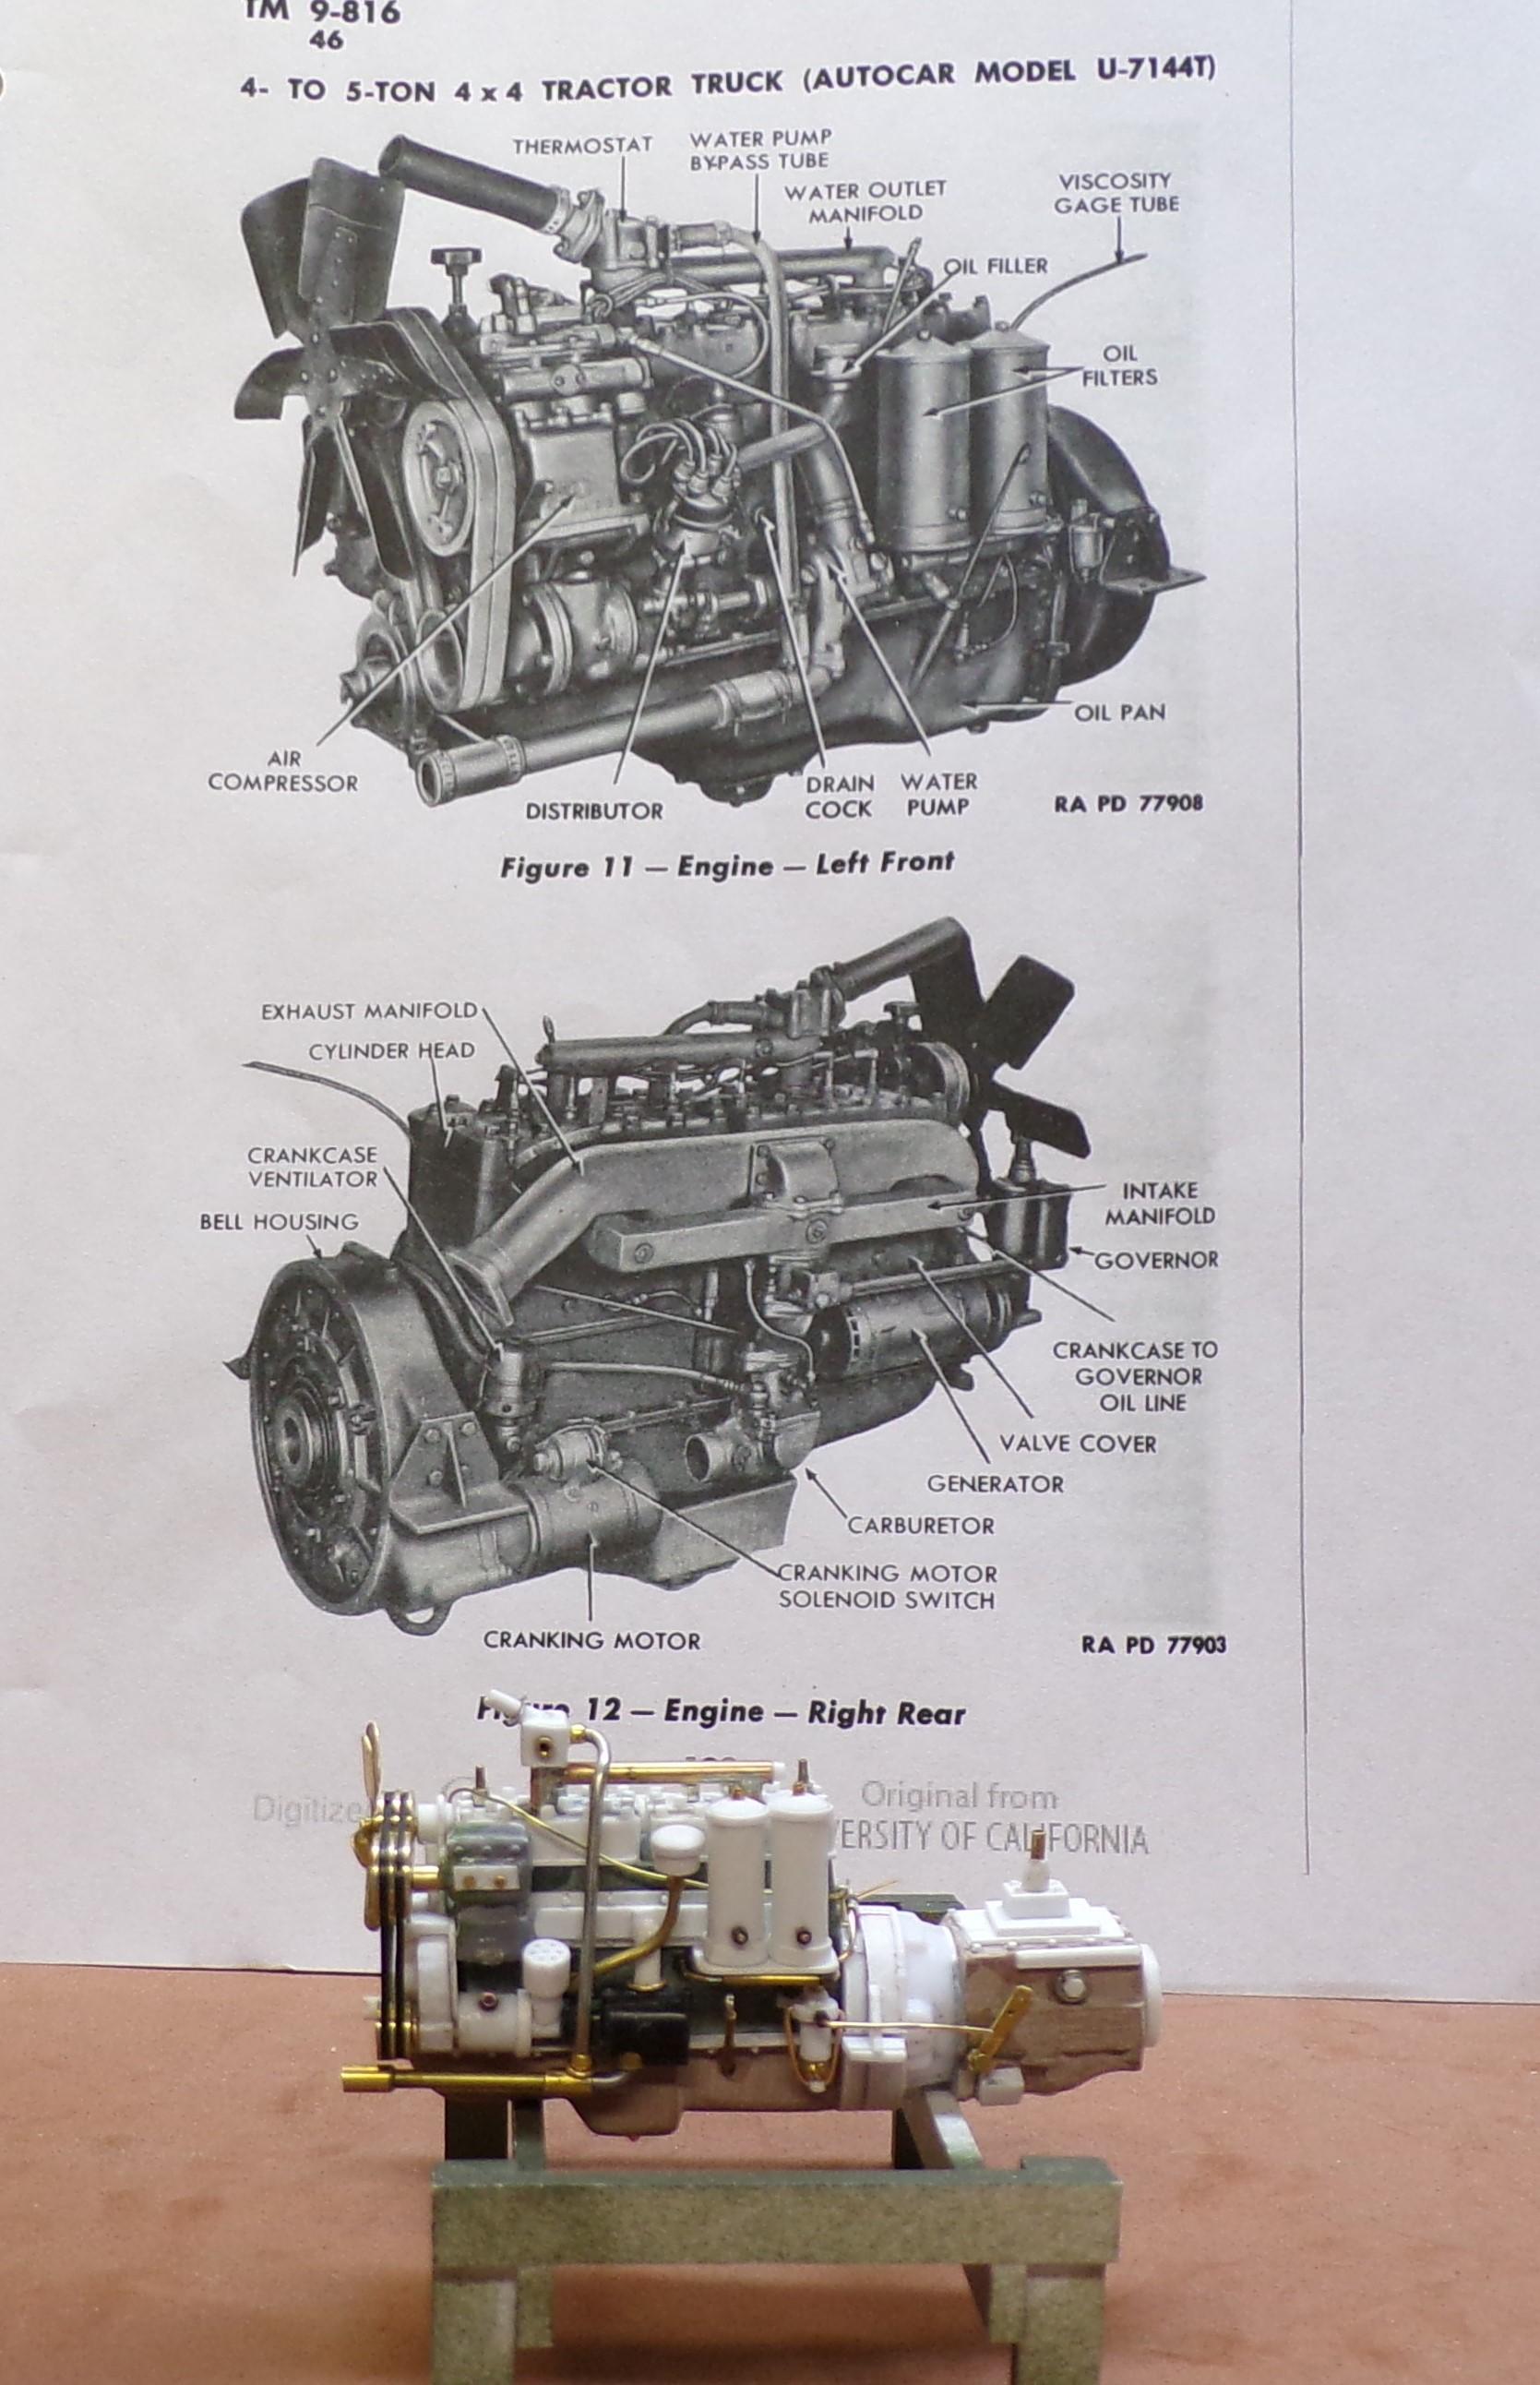
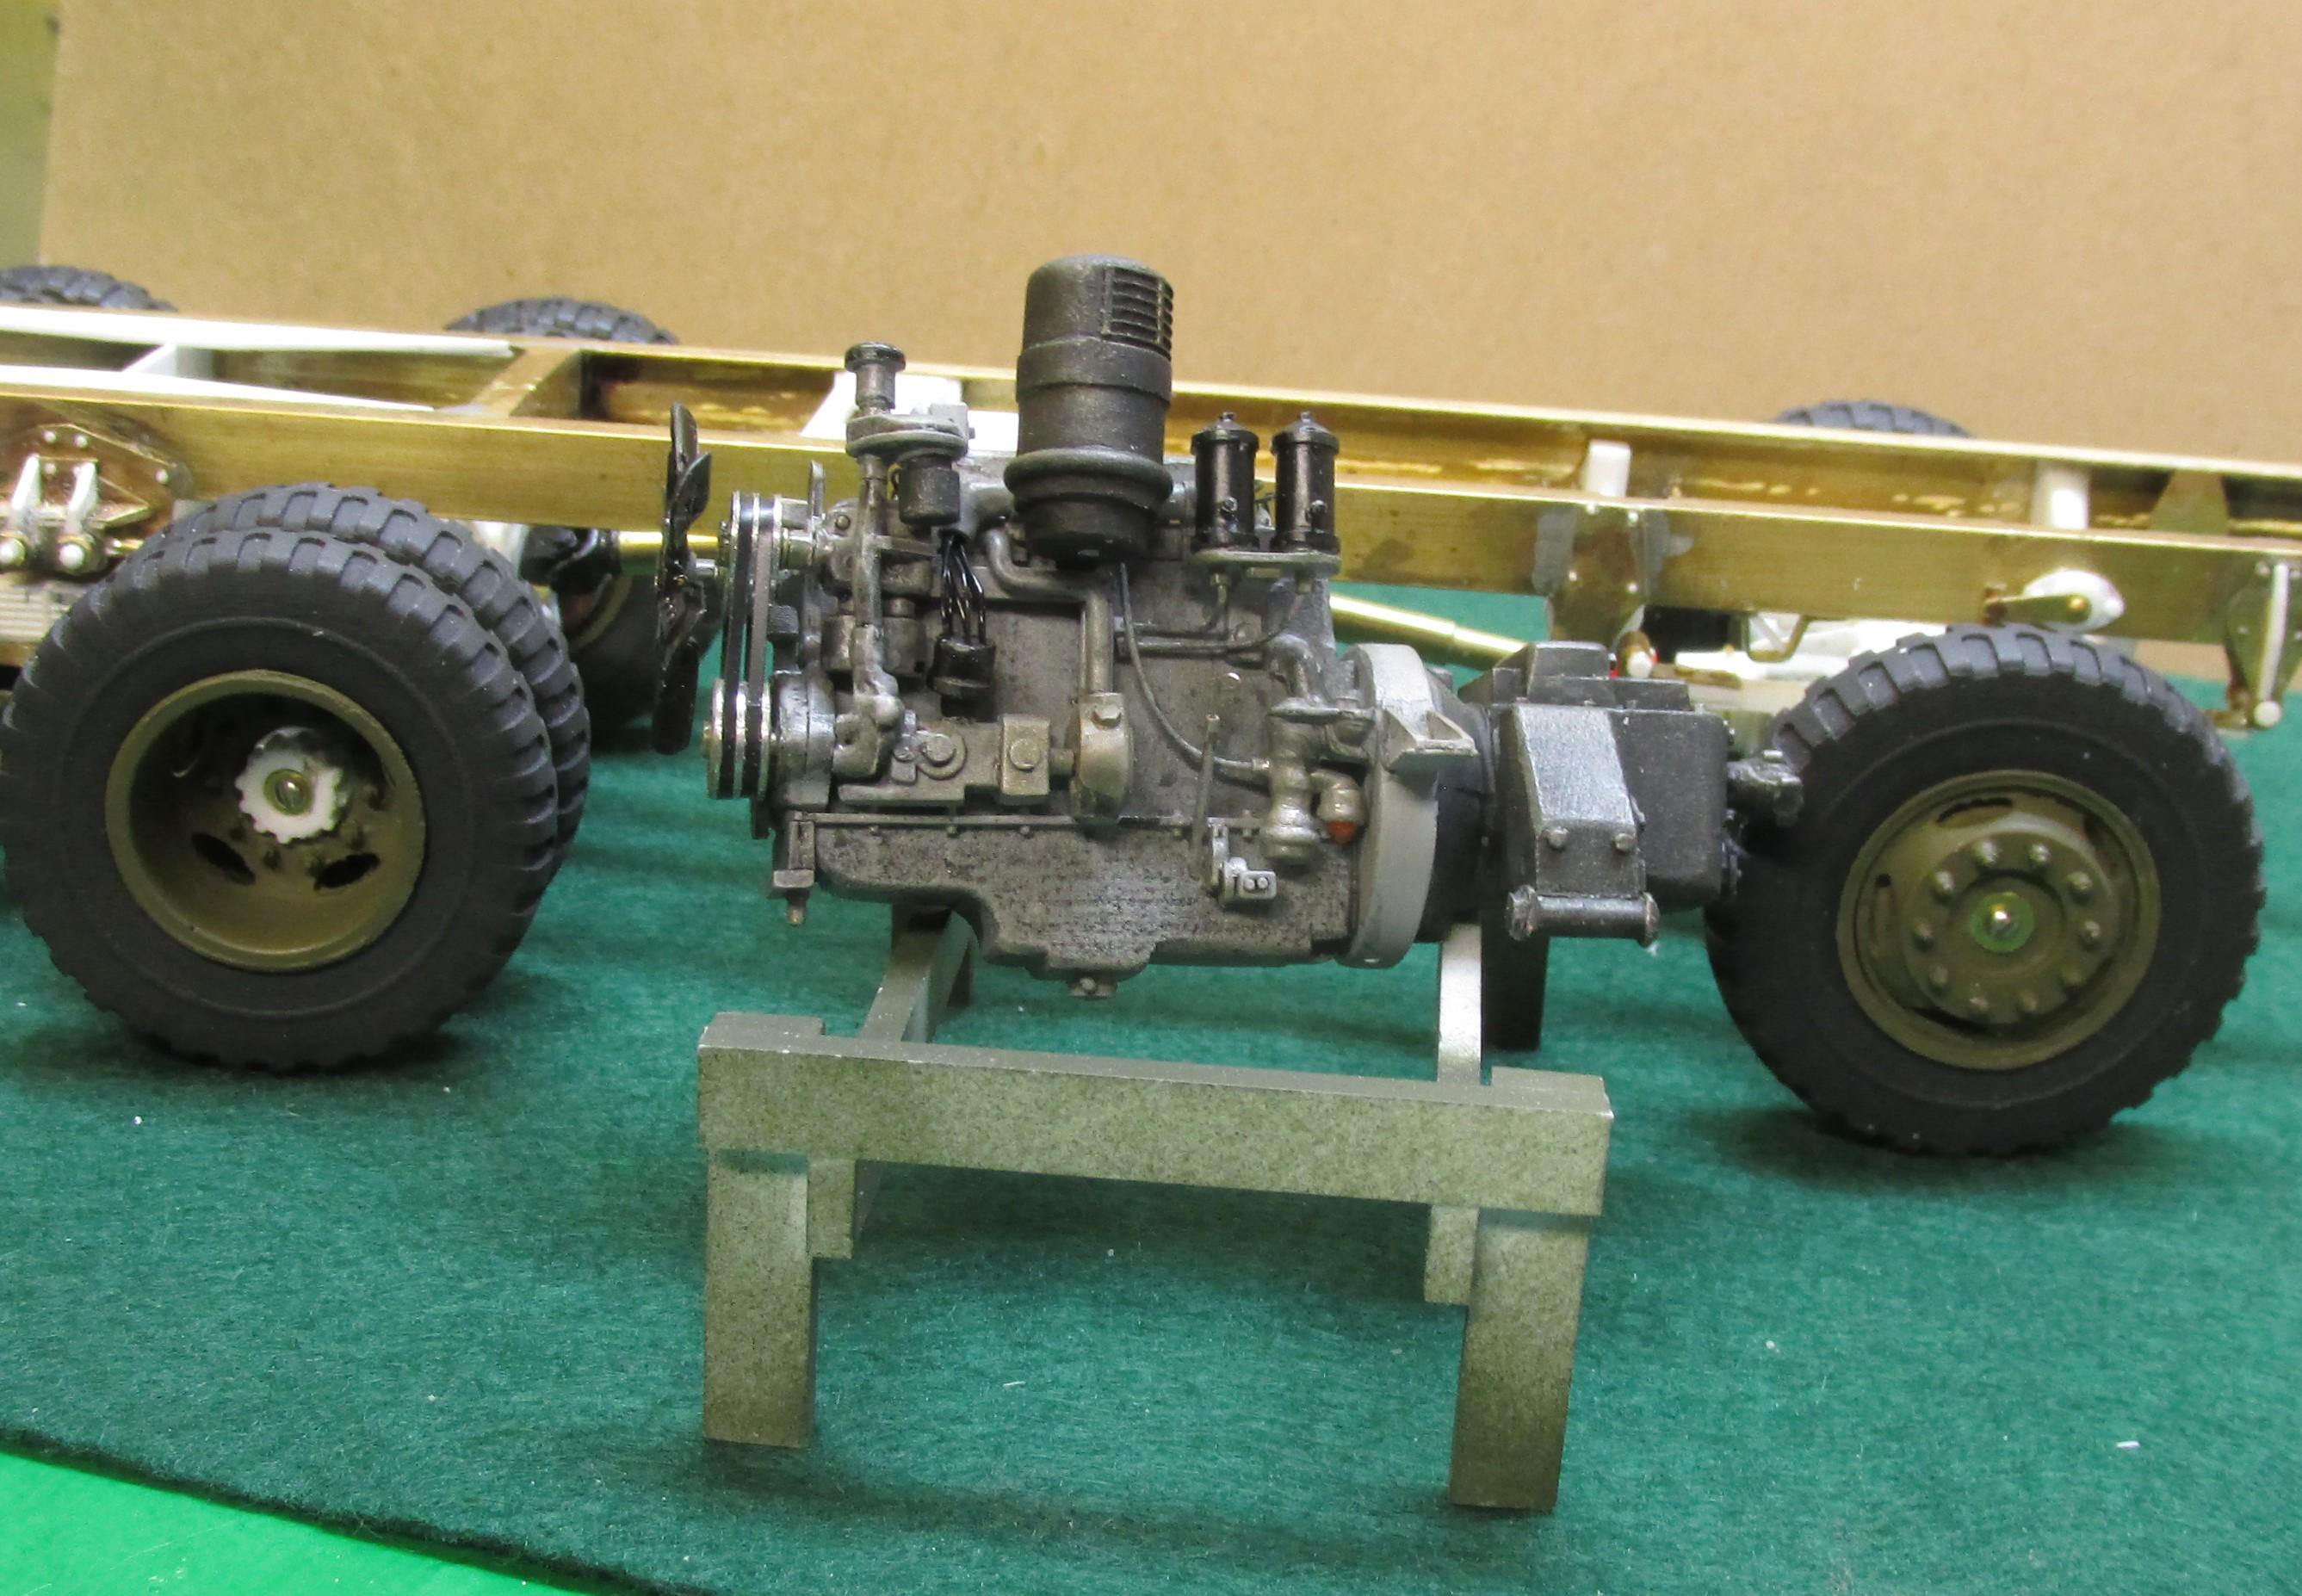
More pics of the engine. The details are beginning to get a bit in the way of each other! Paint will be next with some Duplicolor etching primer and then gray as a final color. Picking out various details will be done in flat and satin black. Ignition wiring will be done after the painting is finished. Additional details will be added once the engine is installed in the frame.
-
Changing Gears
Chariots of Fire replied to J.B. Customs's topic in WIP: Model Trucks: Big Rigs and Heavy Equipment
Don't see a lot of difference in the color. Did you give the cab more coats than the body? I've had that happen to me on occasion. Forgot how many coats I gave one piece and then went on to paint other parts and found slight differences in shade. -
1944 Autocar U-7144T
Chariots of Fire replied to Chariots of Fire's topic in WIP: Model Trucks: Big Rigs and Heavy Equipment
Here's an update of the work done so far. The windshield frame is done and the glass is fitted. Protective sheeting is still on it until final installation. The Hercules RXC engine is coming along. Still a lot to go on it.
-
ongoing oilfield project
Chariots of Fire replied to cdntrucking's topic in WIP: Model Trucks: Big Rigs and Heavy Equipment
Decals look pretty nice. I like the scratch building project! Keep it going! -
Another Duplicolor Question
Chariots of Fire replied to jacko's topic in Model Building Questions and Answers
Depending on the color you are using you may be able to sand it out but in doing so I would sand most of the paint away so that the spot will blend. Otherwise with Duplicolor being so finely pigmented the spot may not cover well when you reapply the final coat. Duplicolor dries quickly and quite hard so you should be able to sand within a few hours. I've used Duplicolor for a long time with great results. -
1944 Autocar U-7144T
Chariots of Fire replied to Chariots of Fire's topic in WIP: Model Trucks: Big Rigs and Heavy Equipment
Top speed is noted in the tech manual as 41 mph! Vents are shown both in the same direction, either open forward or open backward. -
1944 Autocar U-7144T
Chariots of Fire replied to Chariots of Fire's topic in WIP: Model Trucks: Big Rigs and Heavy Equipment
Thanks, Greg. In the meantime the study of the cab and frame for the windshield has cleared up some issues so it's on to that part of the build. And some details for the back of the cab. -
1944 Autocar U-7144T
Chariots of Fire replied to Chariots of Fire's topic in WIP: Model Trucks: Big Rigs and Heavy Equipment
Now if I can just get the springs! Got to figure out the placement of the windshield and the rear cab mount brackets. Got some studying to do!😆 -
1944 Autocar U-7144T
Chariots of Fire replied to Chariots of Fire's topic in WIP: Model Trucks: Big Rigs and Heavy Equipment
Got the top of the cowl done last night. Side vents were made up and hinged to open. The top is Renshape again, thinned out underneath. It will be glued in place permanently as the hood does not open on this rig. Access to the engine is either from inside the cab or behind it. Some photos of the truck show the side vents opening the other way. I didn't even think about it when they were soldered in place. Not sure why they would open to the rear. Other photos in the refrence book show them open as done here.
-
1944 Autocar U-7144T
Chariots of Fire replied to Chariots of Fire's topic in WIP: Model Trucks: Big Rigs and Heavy Equipment
Still awaiting the springs but in the meantime I received the Tankograd publication I had ordered and it is a treasure trove of information for the project. Reproductions of Autocar drawings are included that show top, side, front and rear views with many great dimensions. With that information I started on the grill guard after it was re-scaled to 1/25 size and the cab sides and back quickly followed. The floorboard location is critical to positioning everything else and the mounting points on the frame set it where it is supposed to be. Here's where we are at so far. Wheels and tires are resin castings based on 3D masters done by the spring guy. Wheel hubs came from the AMT ALF kit. (what doesn't!!) Axles are a combination of the ALF rear axle for the front and a Mack axle and differential for the rear. The grill guard is 3/32 brass angle and strip stock along with small brass wire. Cab sides are 0.010" sheet brass. Cab rear and floorboard is 0.030" Evergreen. The grill guard is pinned to the front of the rolled brass. Access to the engine is either through the cab or from the rear of the cab. The hood will not tilt.
-
1944 Autocar U-7144T
Chariots of Fire replied to Chariots of Fire's topic in WIP: Model Trucks: Big Rigs and Heavy Equipment
IN a bit of a holding pattern. 3D printed springs are in progress from the designer (not me). So I've concentrated on a few other things. Drawings of the cab have been done to 1/25 scale and I just finished the grill guard in brass angle, strip and rod stock. When I get a chance I'll post pics of the work so far. -
Pretty cool! Lots of wasted filliment for the build?? Just asking.
-
Steve: You did an outstanding job. I've seen a lot of attempts at weathering with gobs of dirt 2" round sticking to things! It has to be subtle and it has to be done with some knowledge of how things wear and where the grease and oil accumulate to be done right. You obviously know how to get it done.
-
You did good, Jeff! Thanks for posting your build for us to see along the way.
-
Steven G: You do some fantastic work! Absolutely the way a well used but well taken care of ride should look like.
-
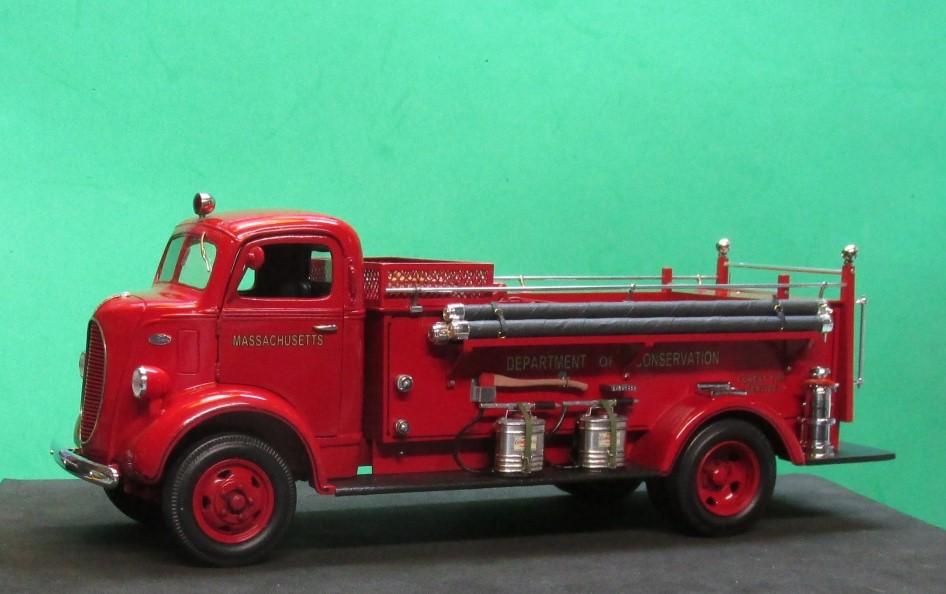
Agree with above. Black or dark gray washes are best. A little oil drip where it would typically happen, rusty exhaust manifold where it gets hot, things like that. Here's a Hercules RXC engine that was done for a Diamond T truck.
-
Changing Gears
Chariots of Fire replied to J.B. Customs's topic in WIP: Model Trucks: Big Rigs and Heavy Equipment
Ladders look good as well and you didn't forget the lanyard! Good work! -
Changing Gears
Chariots of Fire replied to J.B. Customs's topic in WIP: Model Trucks: Big Rigs and Heavy Equipment
Wrap the hard suction hoses in masking tape; either 1/2" or 3/4" wide. Do it on a diagonal. This will represent the reinforcement that was used on the hard suction. Paint them flat black. Here's what they should look like when they are done. If you look close at the photo you can see the diagonal lines of the masking tape wrap. They are the same hard suction pieces you are using. Here's another pic that shows the hard suction a little better. Smaller tubing but same masking tape covering. This model was not finished at the time but you get the idea.
-
Scratchbuilding-Where to begin?
Chariots of Fire replied to olschoolkid's topic in Model Building Questions and Answers
I do the same thing, John. I save every little piece. It glues up so nice; if I make a mistake I take a scrap, glue it on and reshape what ever I messed up. Fenders, engine blocks and details, cowls; comes in handy for all sorts of things. I was fortunate enough a few years back to get a 4"x2"x24" piece of it and it has been a wonderful medium to use.