Search the Community
Showing results for tags 'hemi'.
-
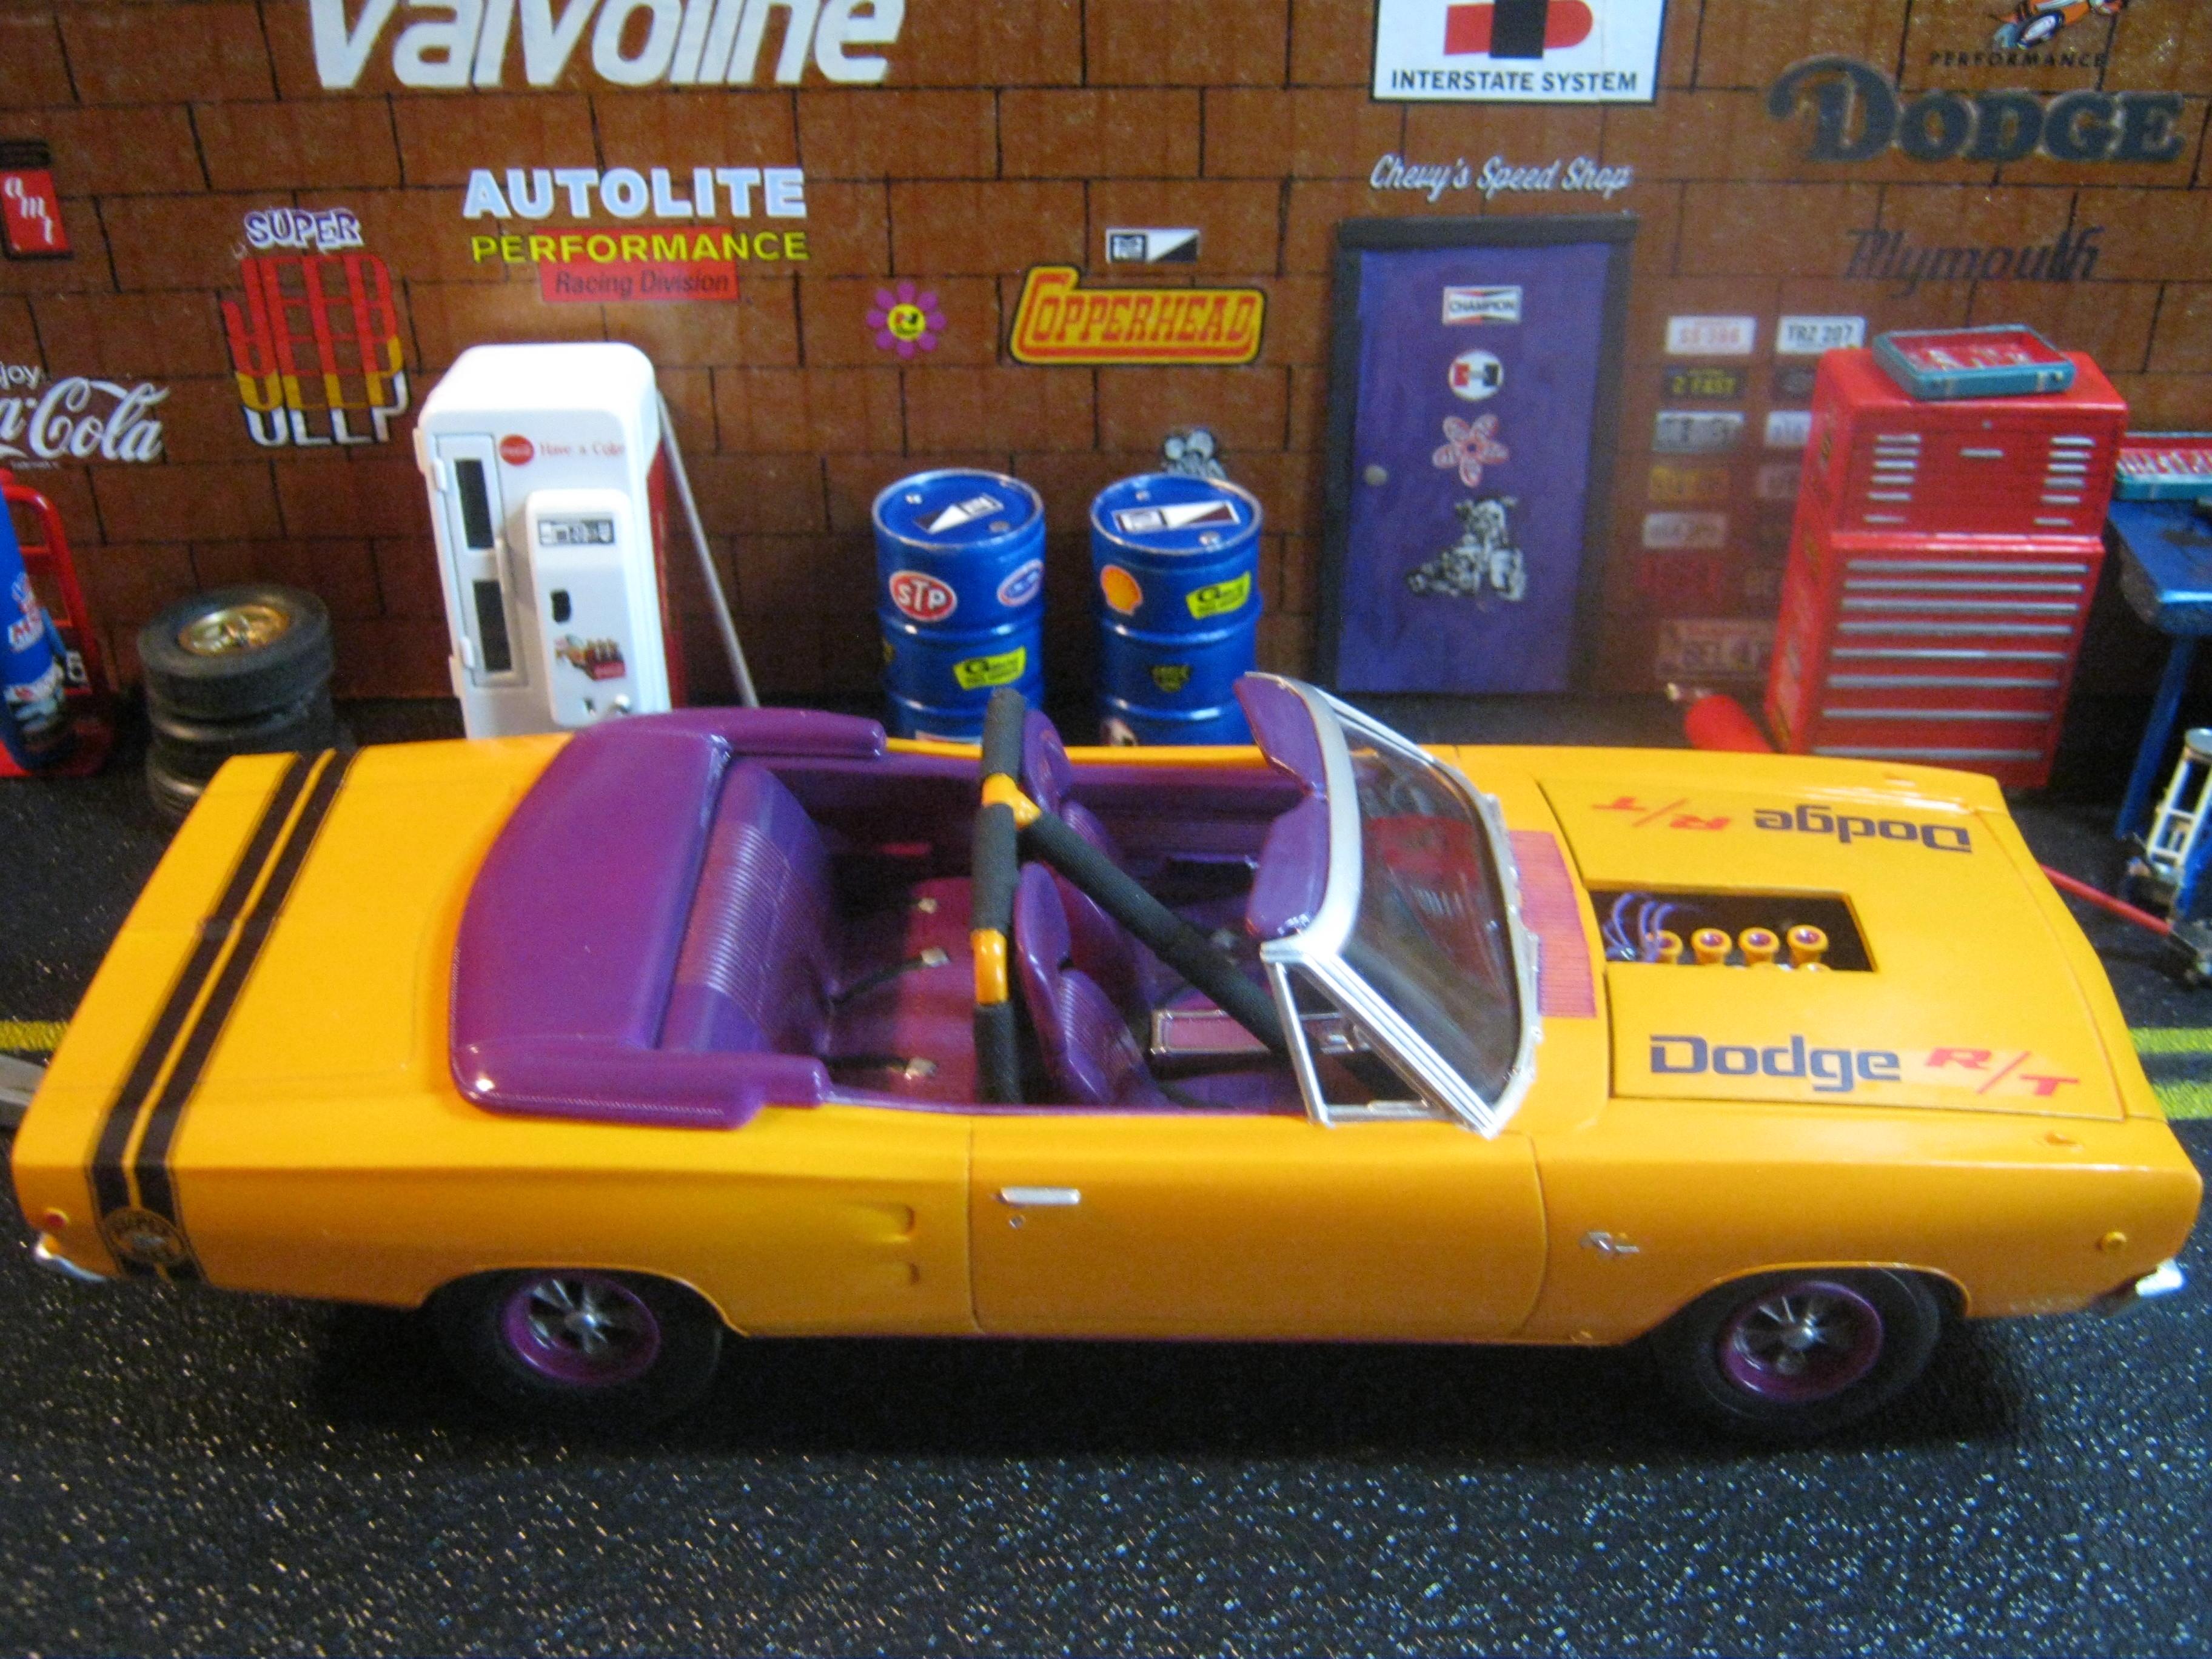
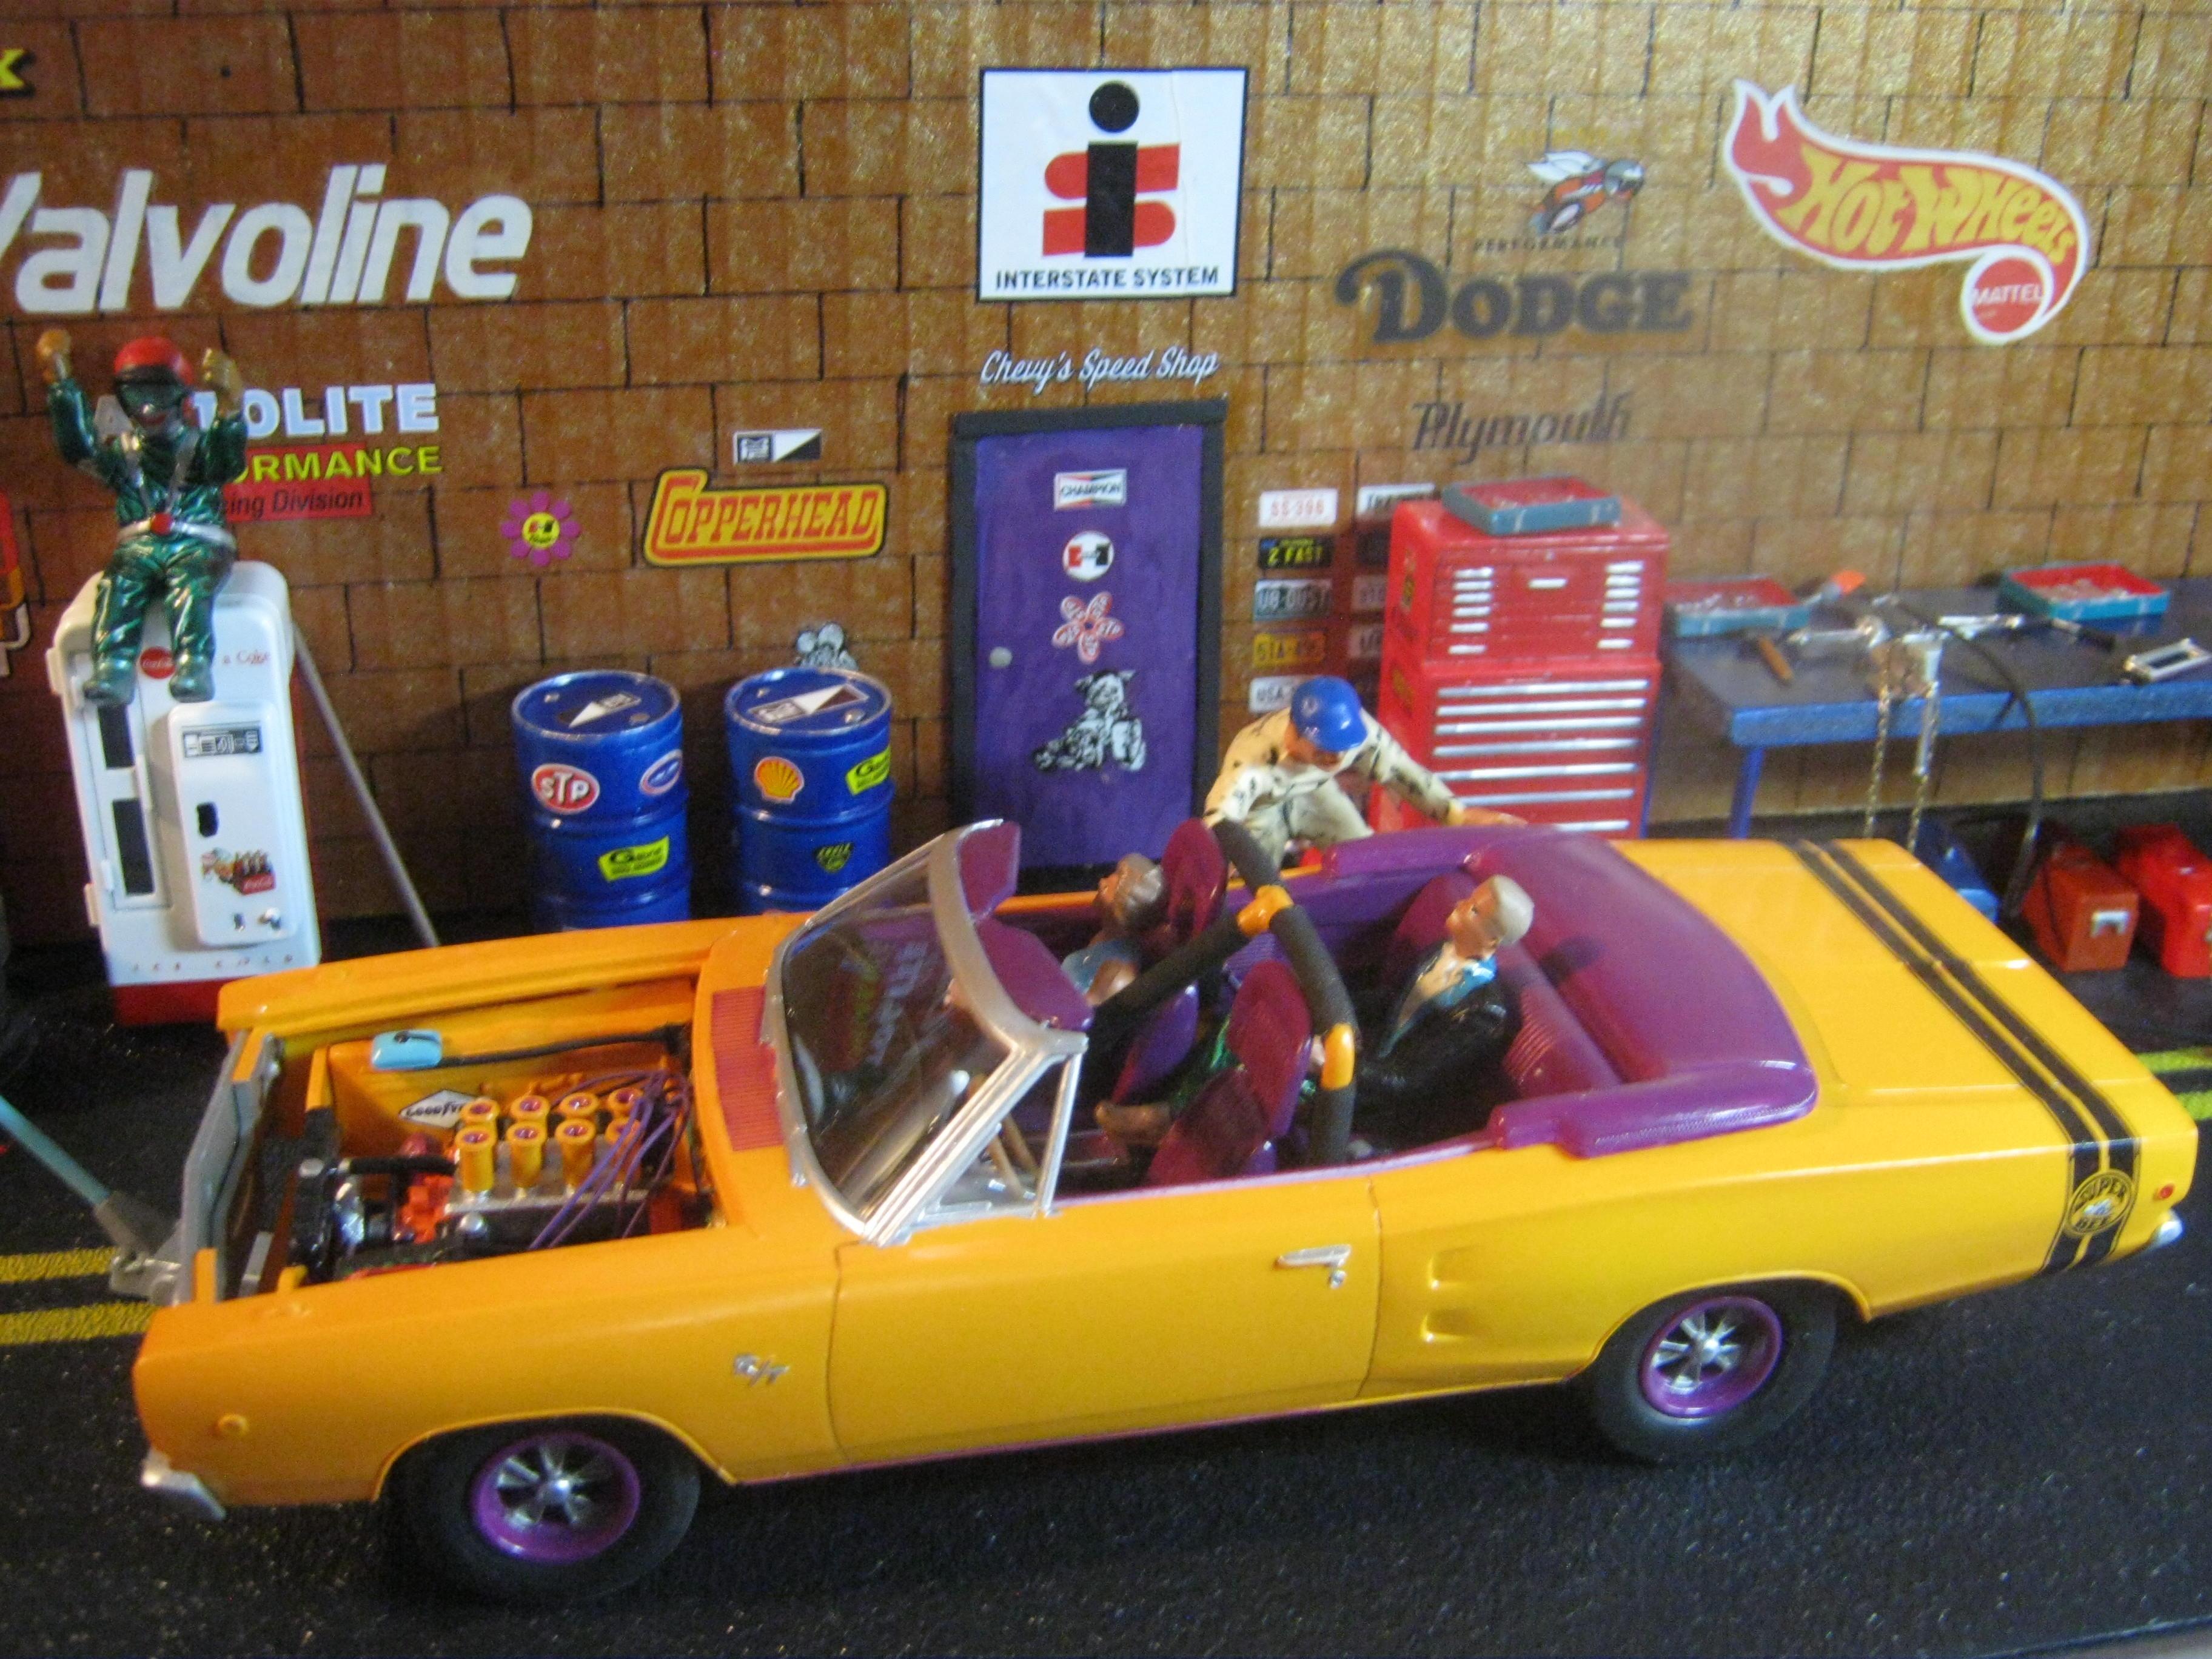
Greetings all,,hey its almost spring,,yeeehaaa! So,,this MPC 68 Coronet is a great kit,,I added some x-tras,,headrests,,x-tra roll bar pc w/ padding,,minor wiring/plumbing. Also my 1st try at a garage scene diorama type deal. All it is ,,sprayed cardboard,,drew bricklines and put signage on walls. Turned out ok. Sprayed car with Tamiya rattle can,,and interior as well. I like the multi pc interior,,easy to detail. A fun little project ,,I may have to do a larger diorama soon. Enjoy the builds here,,,thanks for lookin. S

-
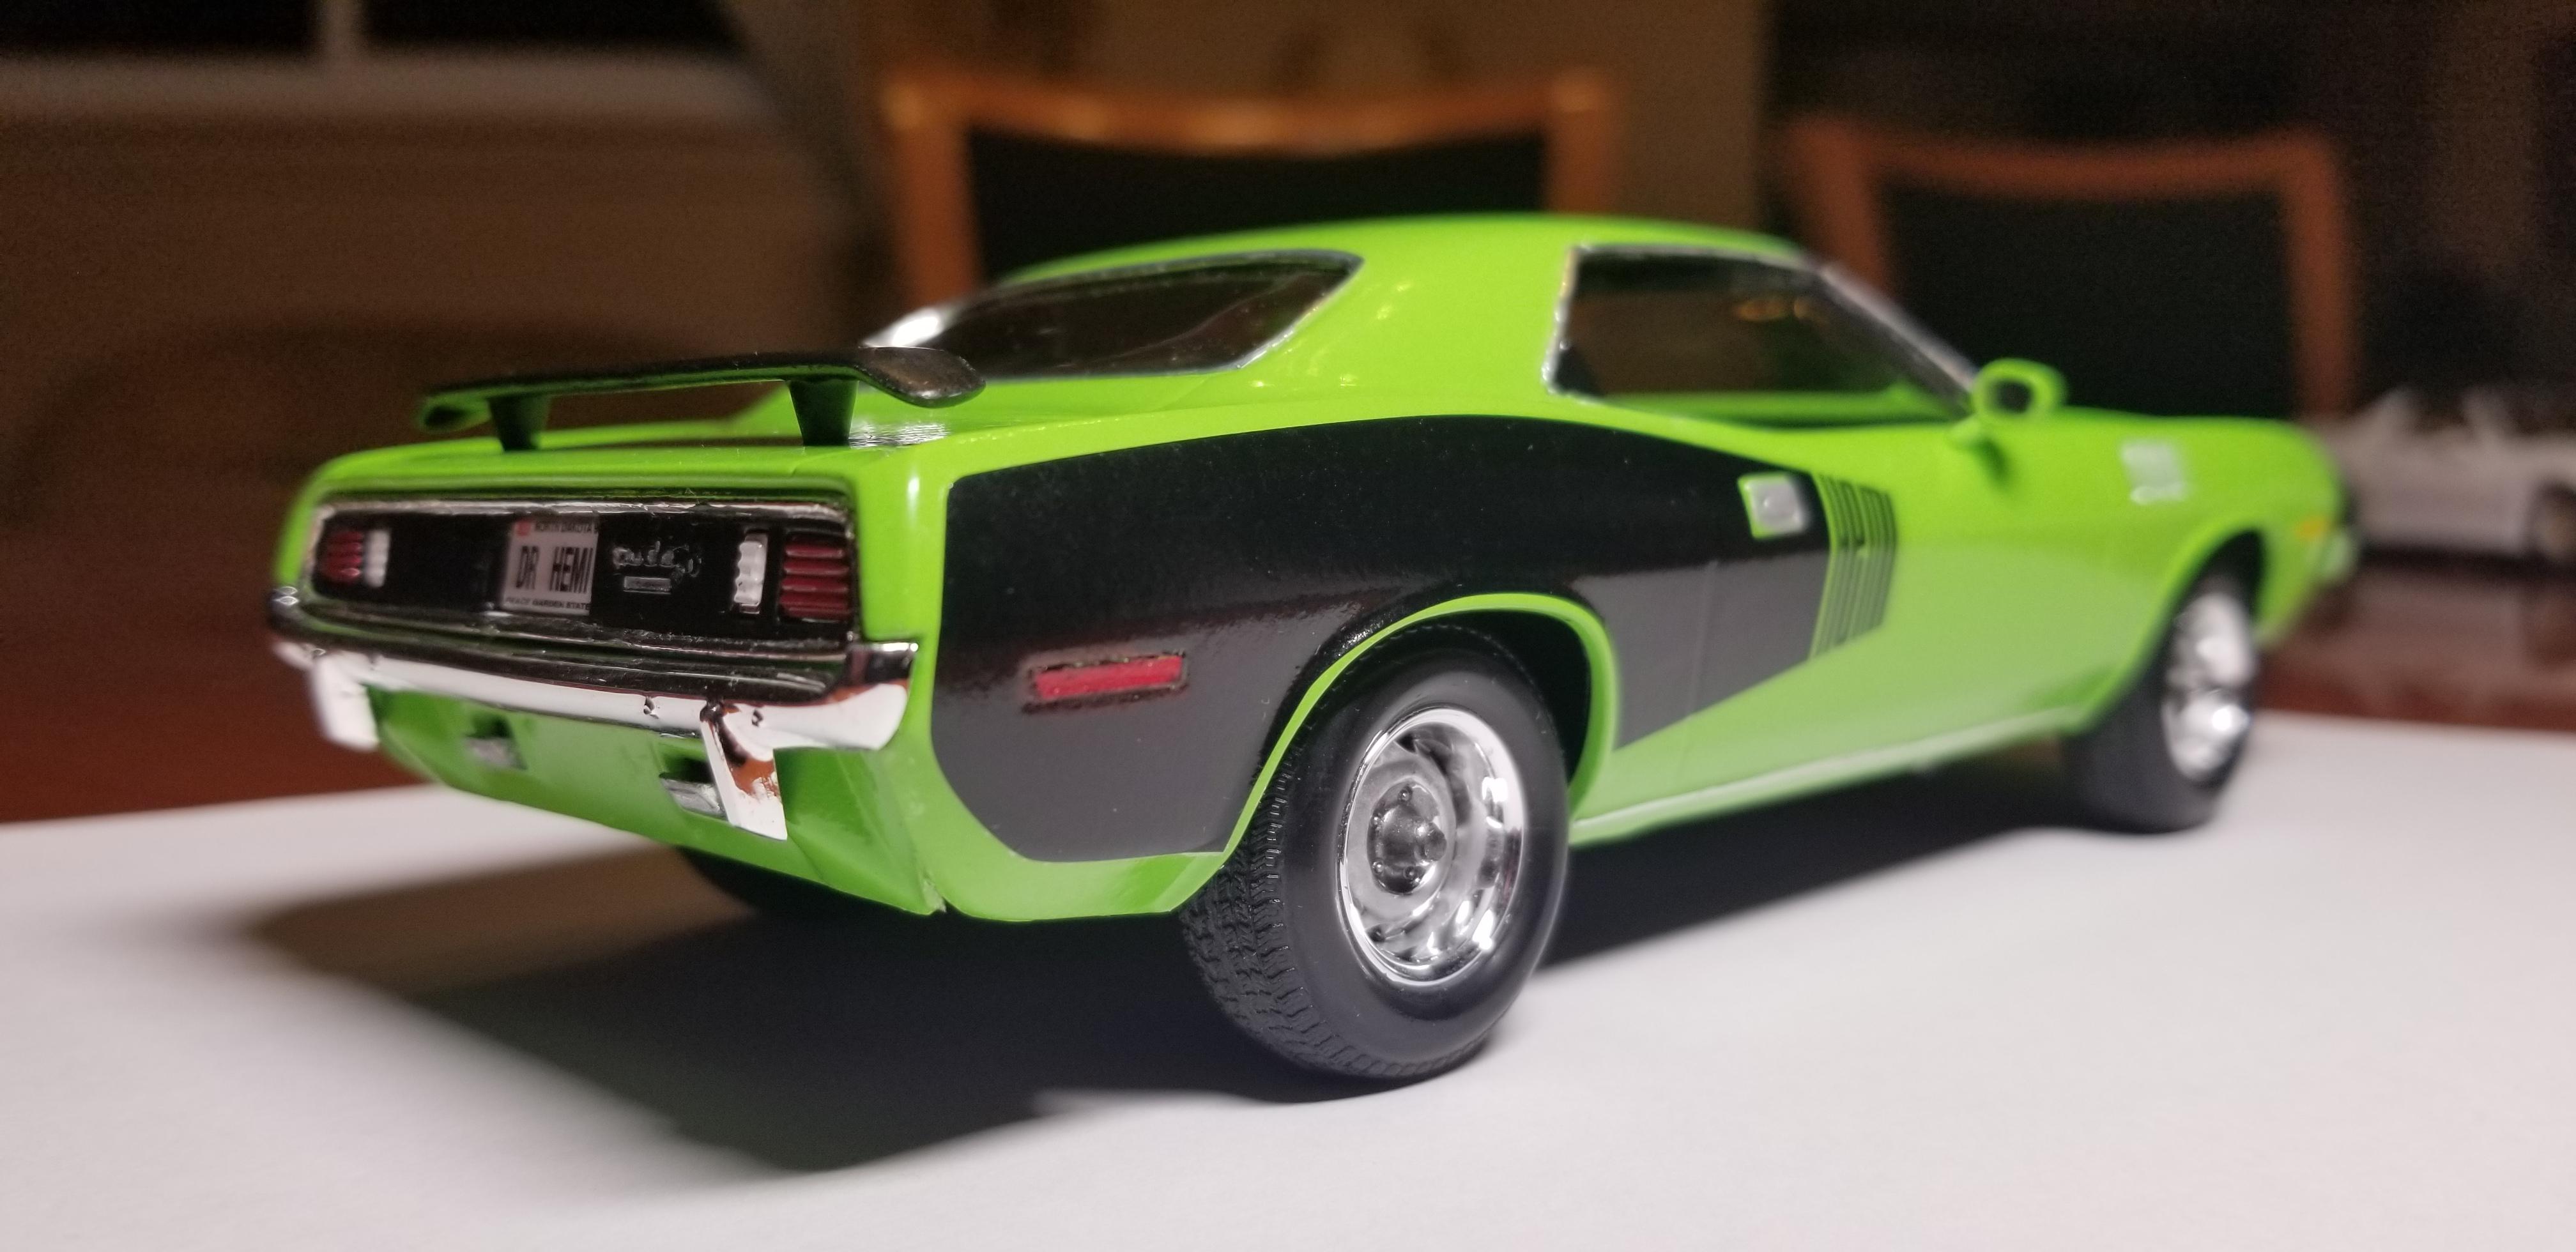
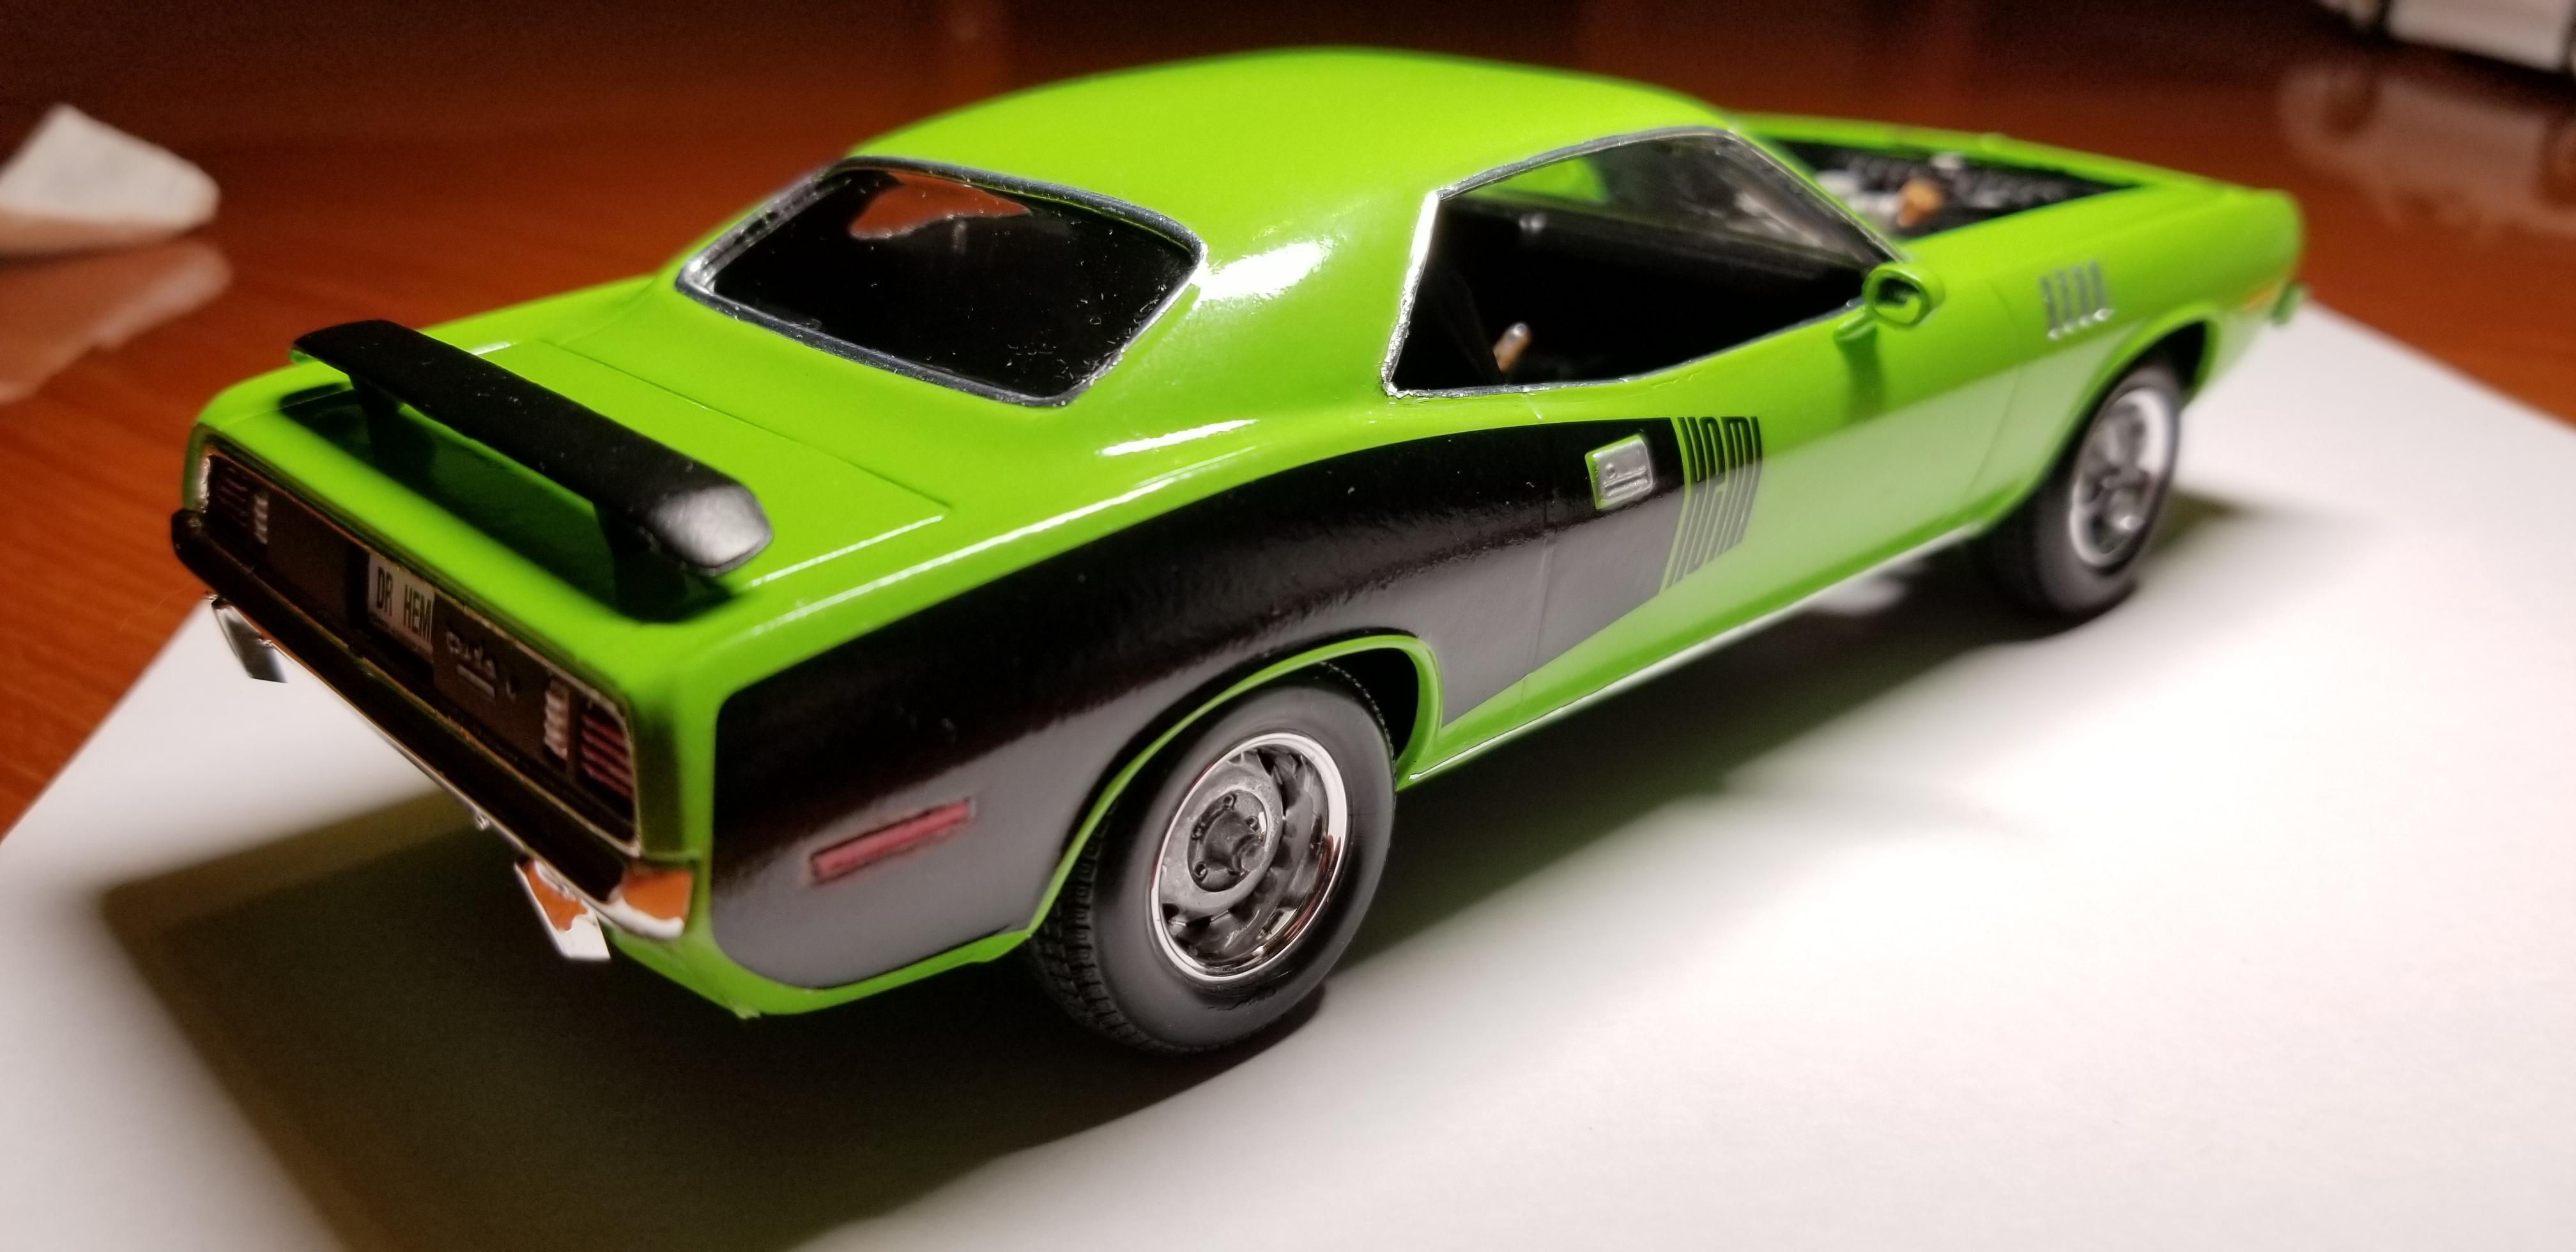
I was excited that they added the C stripes to the kit. I really wanted a color that would show off the stripes. I decided that dark green color from my Dart build would be perfect. The kit is a great build and everything goes together nicely. Bit of a head scratcher; the C stripes are in the decals, but the hood stripes are not. The Charger R/T decal for the rear is also not on the sheet. There is also mention of three different decals being decal 29. The radiator belt decal, part of the wood grain decals for the center console (actually 30 something), and the rear R/T badge (not there) are all marked decal 29 in the instructions. SAM_1895 by Eric Lucas, on Flickr SAM_1899 by Eric Lucas, on Flickr SAM_1900 by Eric Lucas, on Flickr SAM_1901 by Eric Lucas, on Flickr SAM_1902 by Eric Lucas, on Flickr SAM_1905 by Eric Lucas, on Flickr
- 16 replies
-
- 12
-

-
- charger r/t
- c stripe
- (and 2 more)
-
This started out as the mpc Dyno don kit painted with tamyia white topped with their clear pearl . I found these decals from a eBay seller. The hemi , and wheels came from my parts box. This is a kit that builds into a nice replica, and the chassis lends itself to a lot of resin bodies. Until next time thanks for looking ?, Mike
-
G'day all, here is my Revell 1:24 1971 Plymouth HEMI Cuda' in plum crazy completed in August 2019. Paint is Tamiya ts24 purple with kit blackout decals. I built this box stock and with not much attention to detail under the hood or the interior as it was just a quick build. This kit goes together nicely although I did have some issues with the hood fitment. I hope you like it and thanks for looking. All feedback is welcomed and appreciated. Cheers, David. ??
-
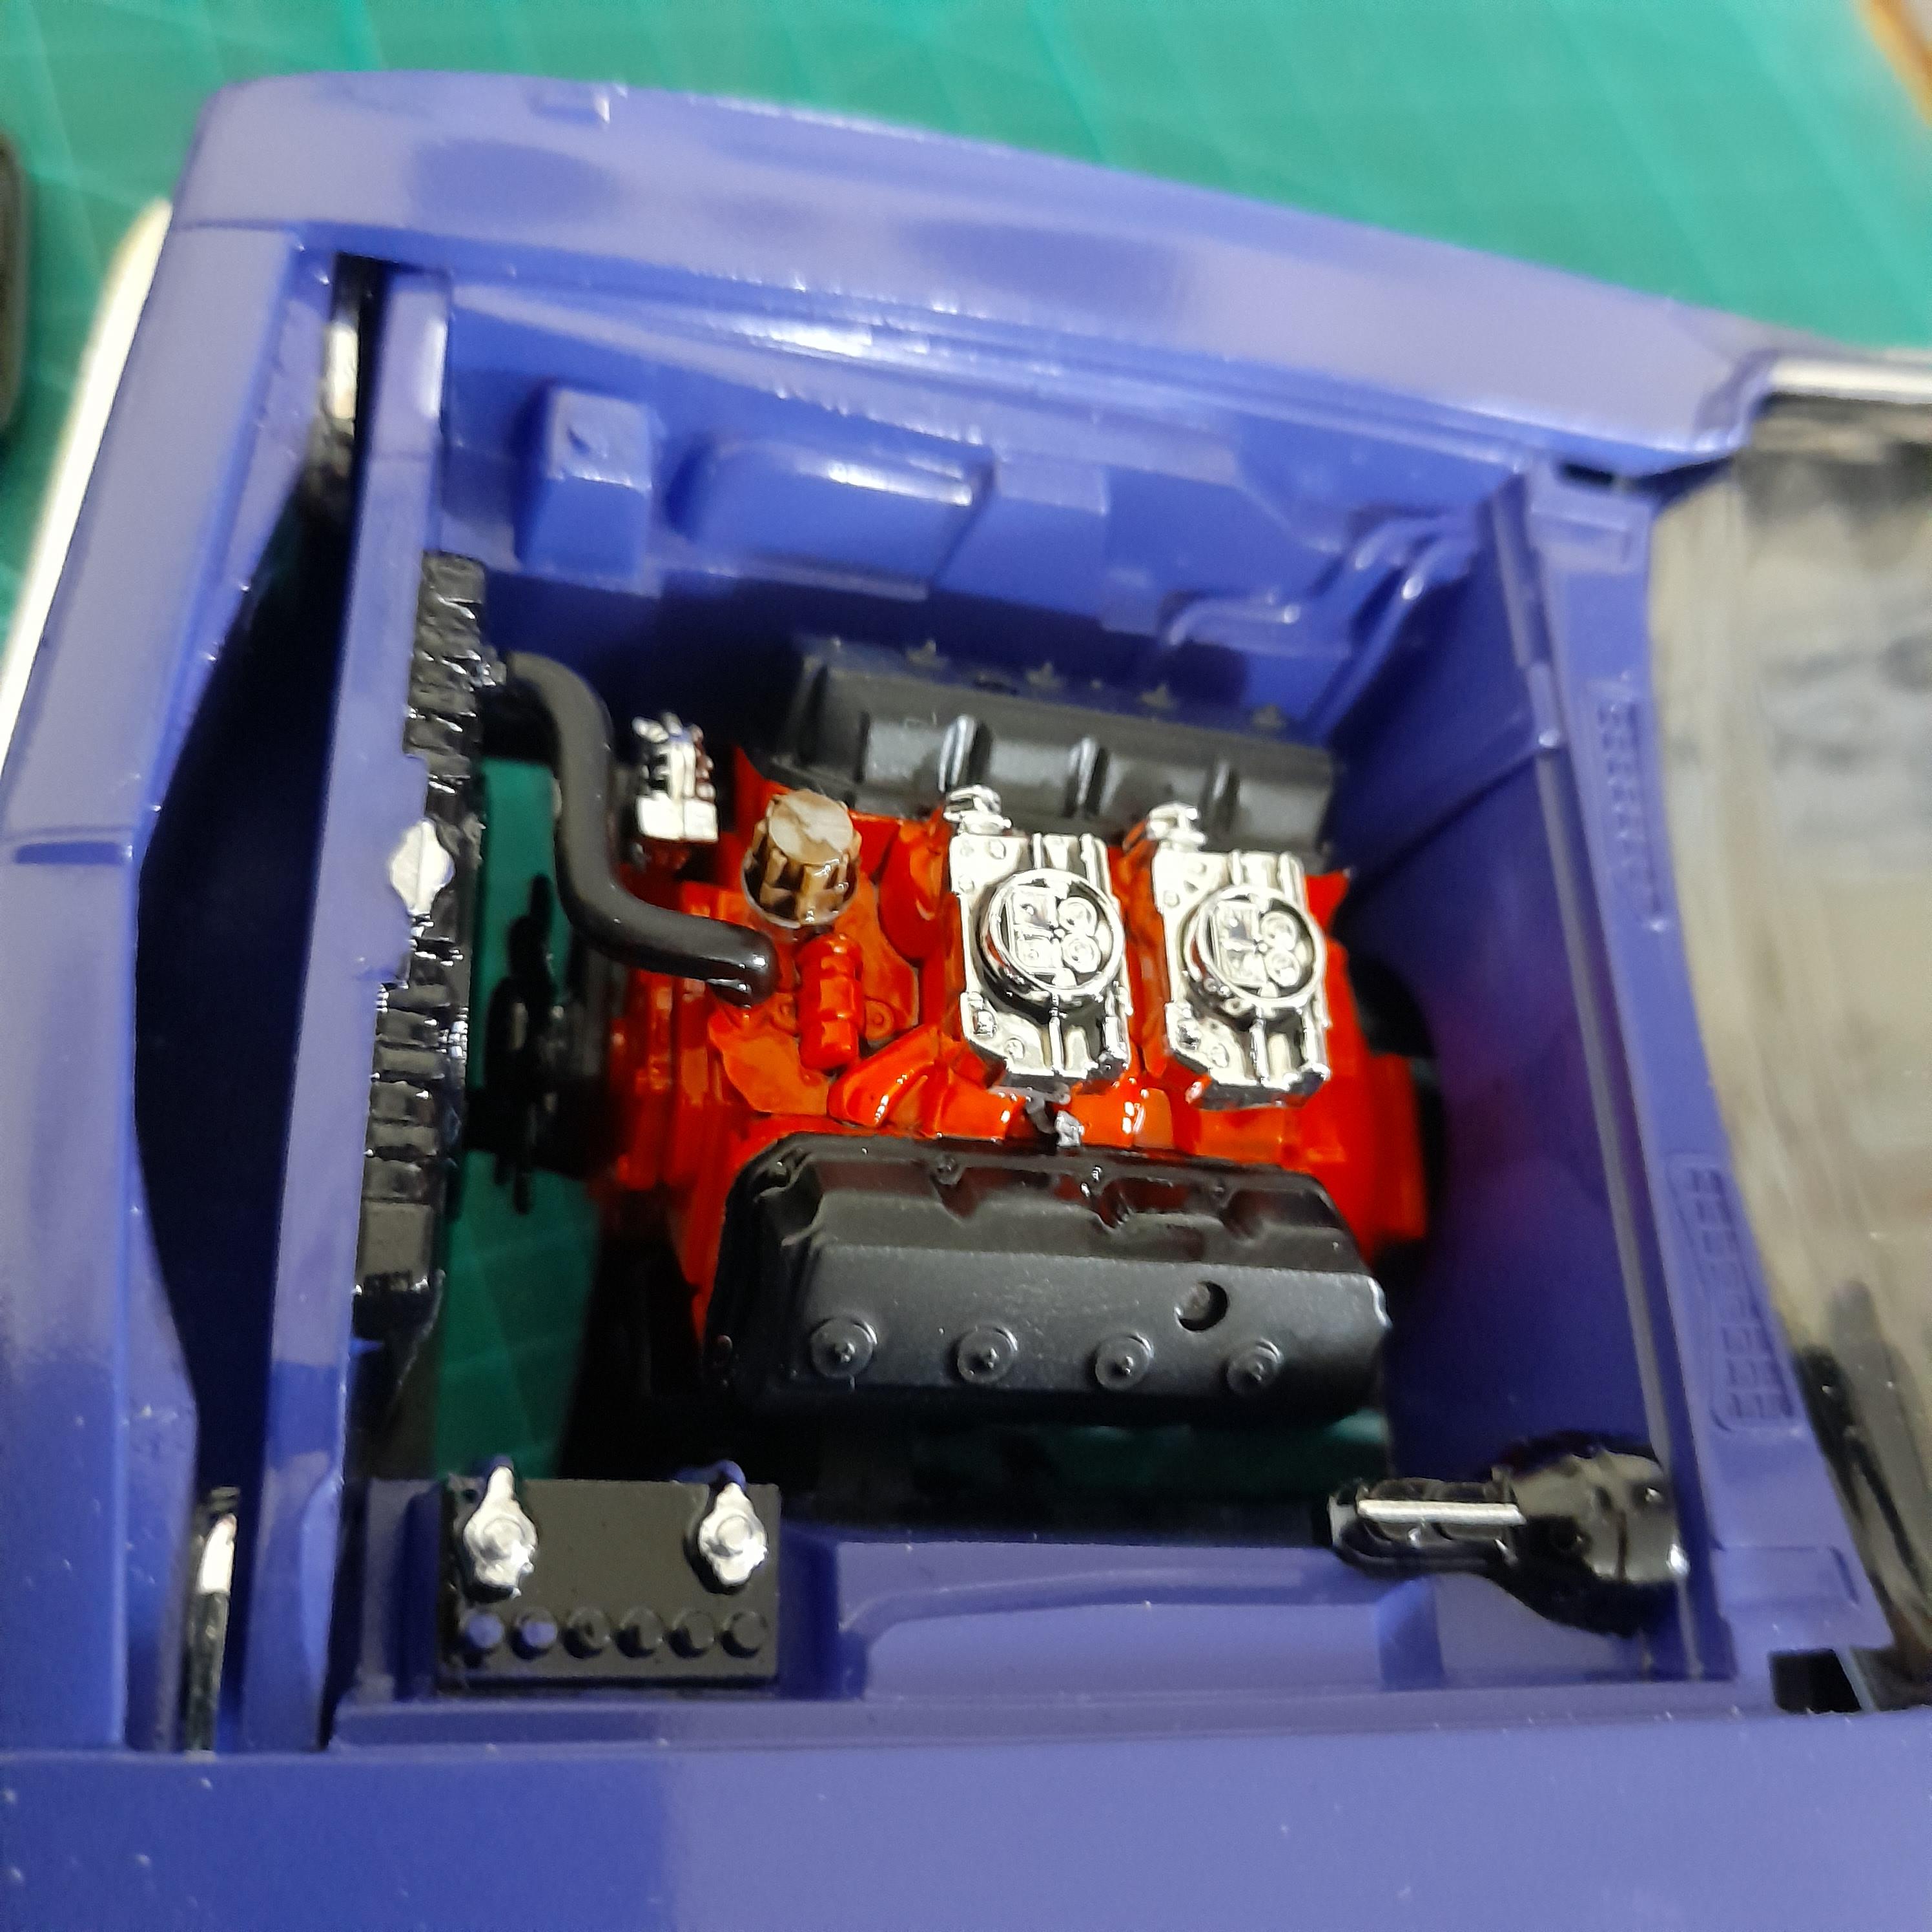
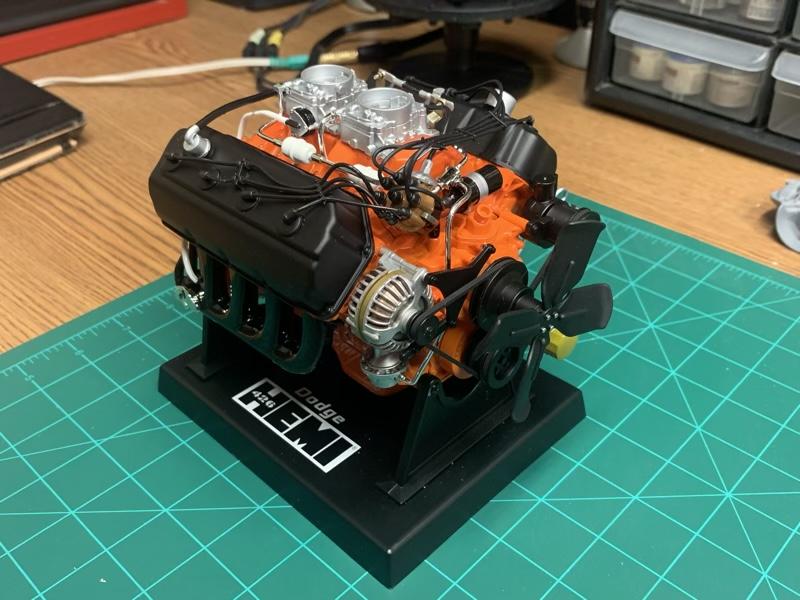
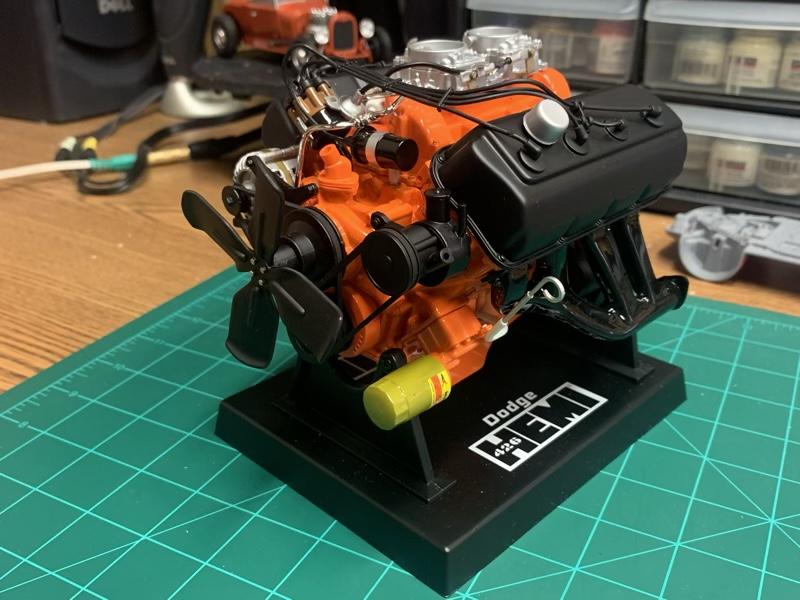
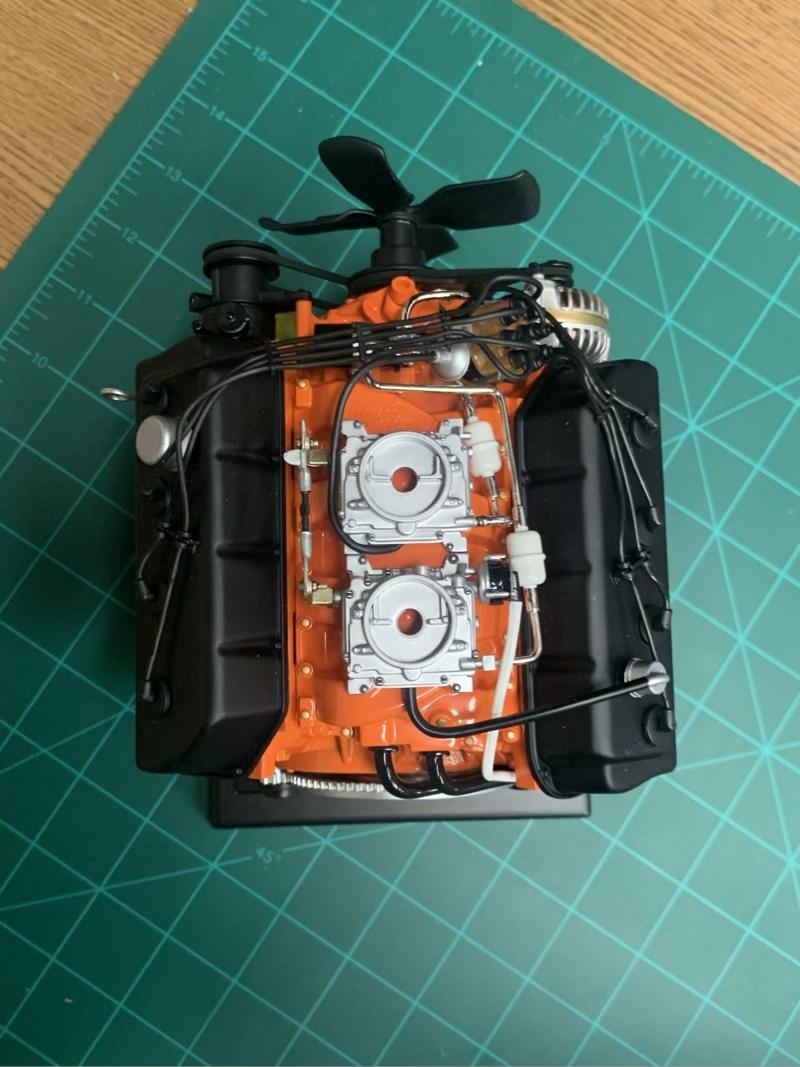
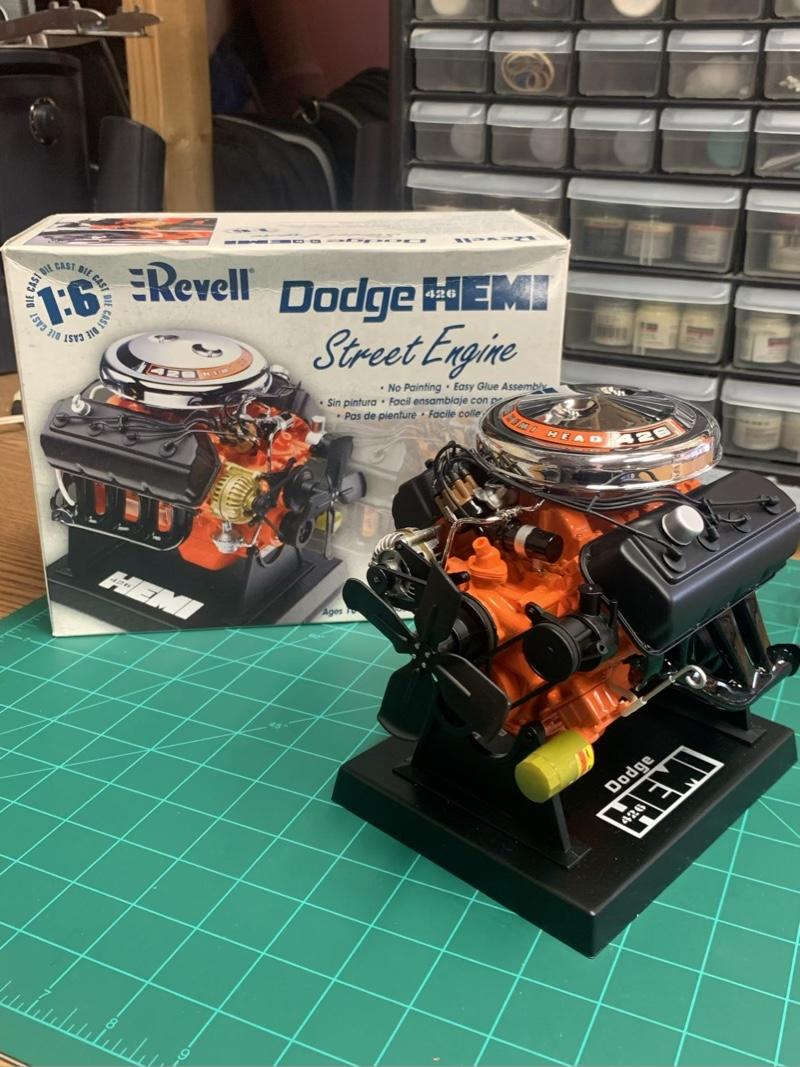
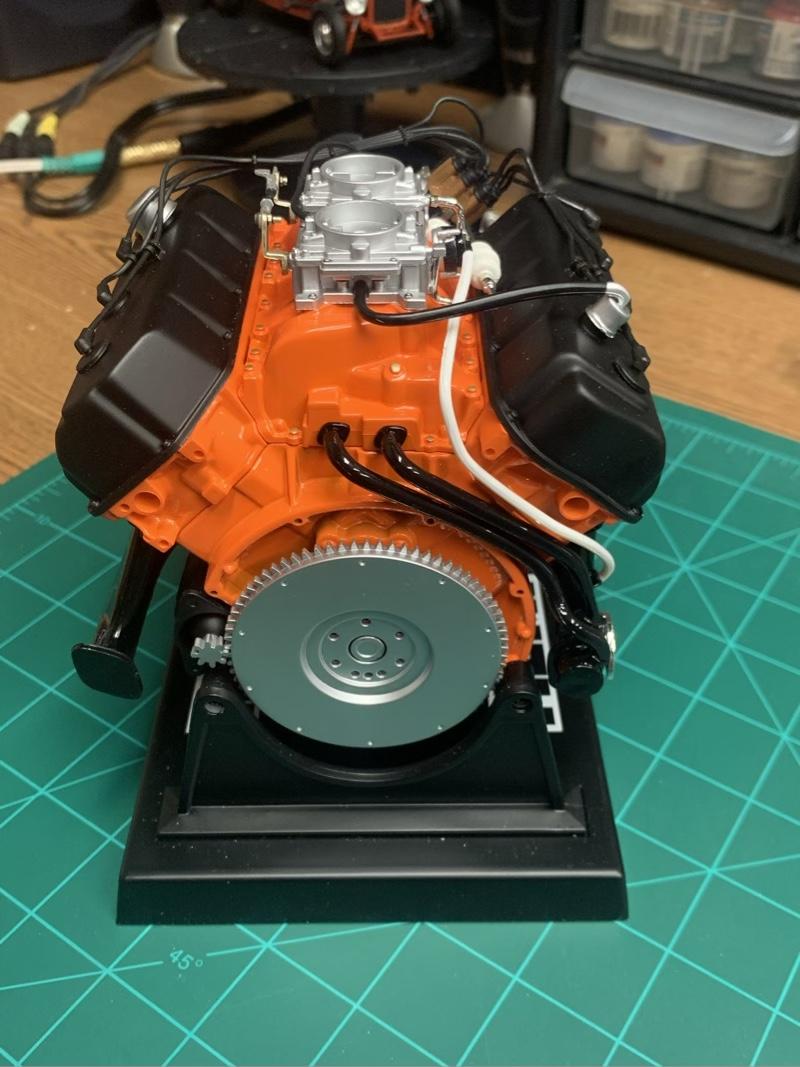
 Mods- not sure if I posted this in the right place, so feel free to move it if it’s not. Thanks! This was a side project I put together while other projects were drying. It’s the Revell 1:6 Hemi street engine kit. Pretty simple, low stress kit just built for fun. It comes pre painted, and I left most of it alone, but I did change the color of a few components to match reference pics I found online. Also did a bit of detail painting and used Tamiya panel line accent in a few places to add some subtle depth. Two issues I found while building- a) the plastic parts are pretty brittle. I had a couple parts crack while scraping paint off to create a better surface for gluing. b) the gas lines don’t line up as pictured on the box or instructions. Mainly the line to the front carb. It hits the bottom of the distributor. Overall it’s a fun kit though. I liked it enough that I plan to build the Ford 427 sometime. Enjoy!
-
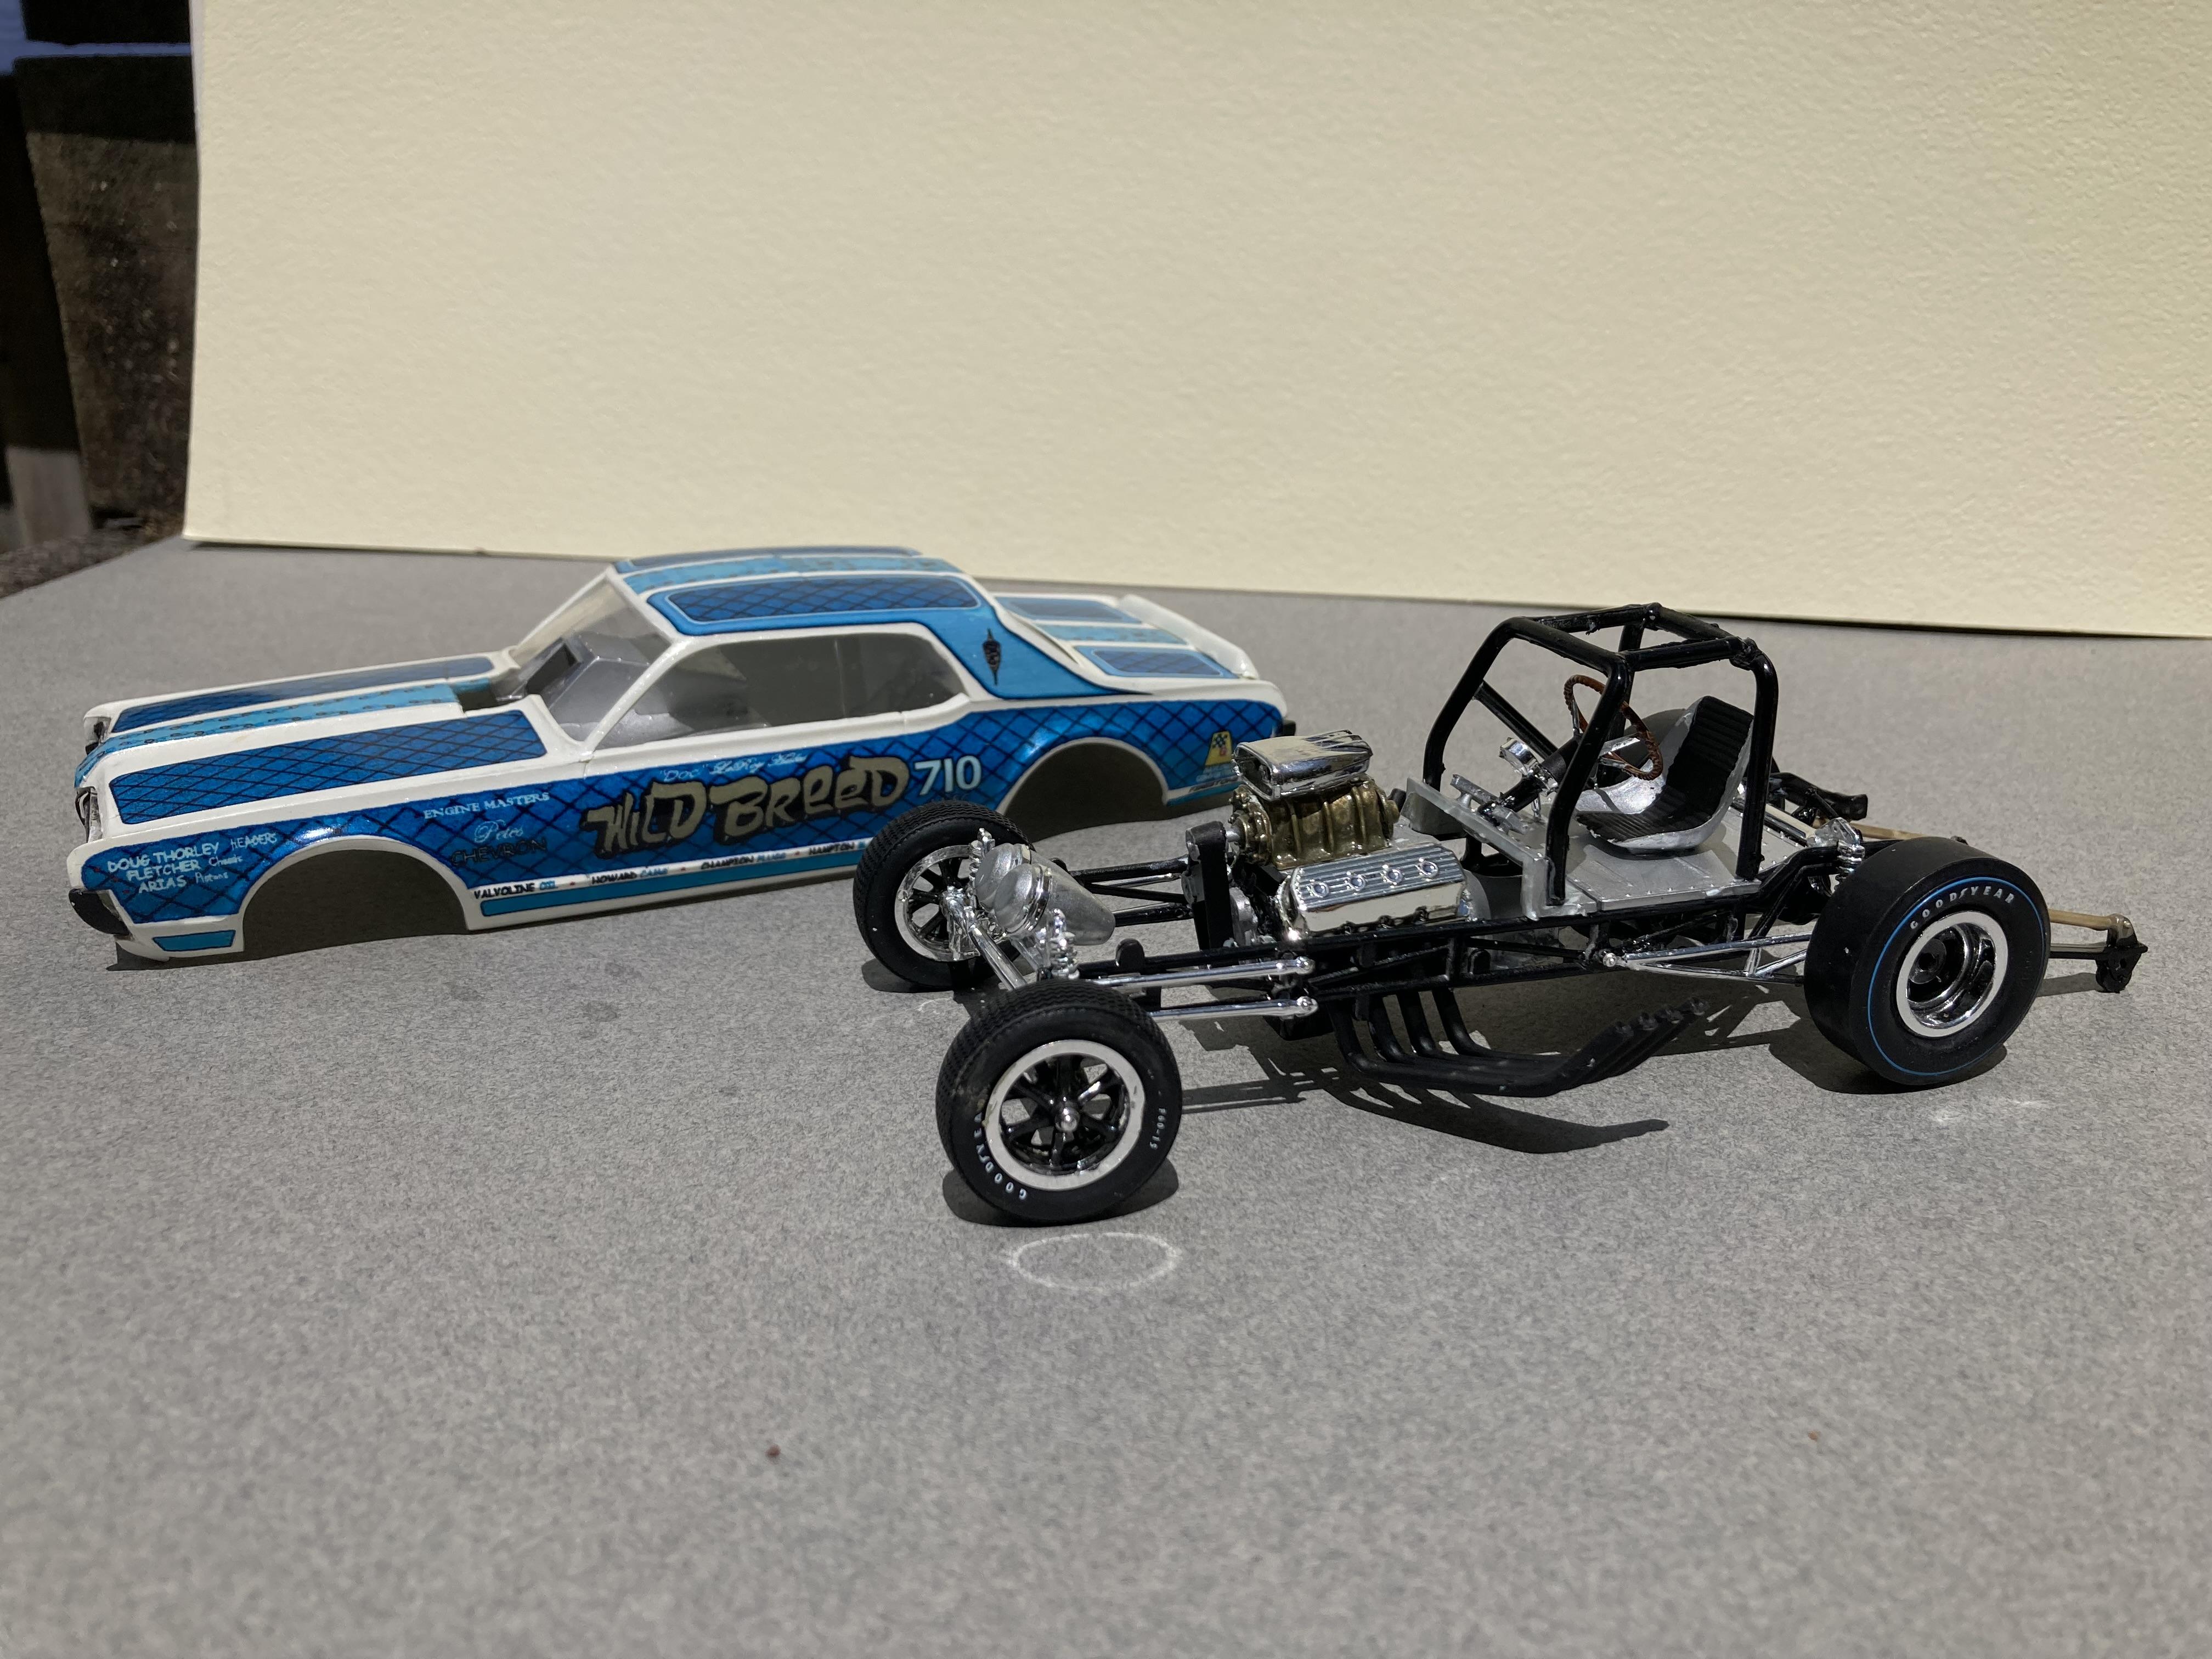
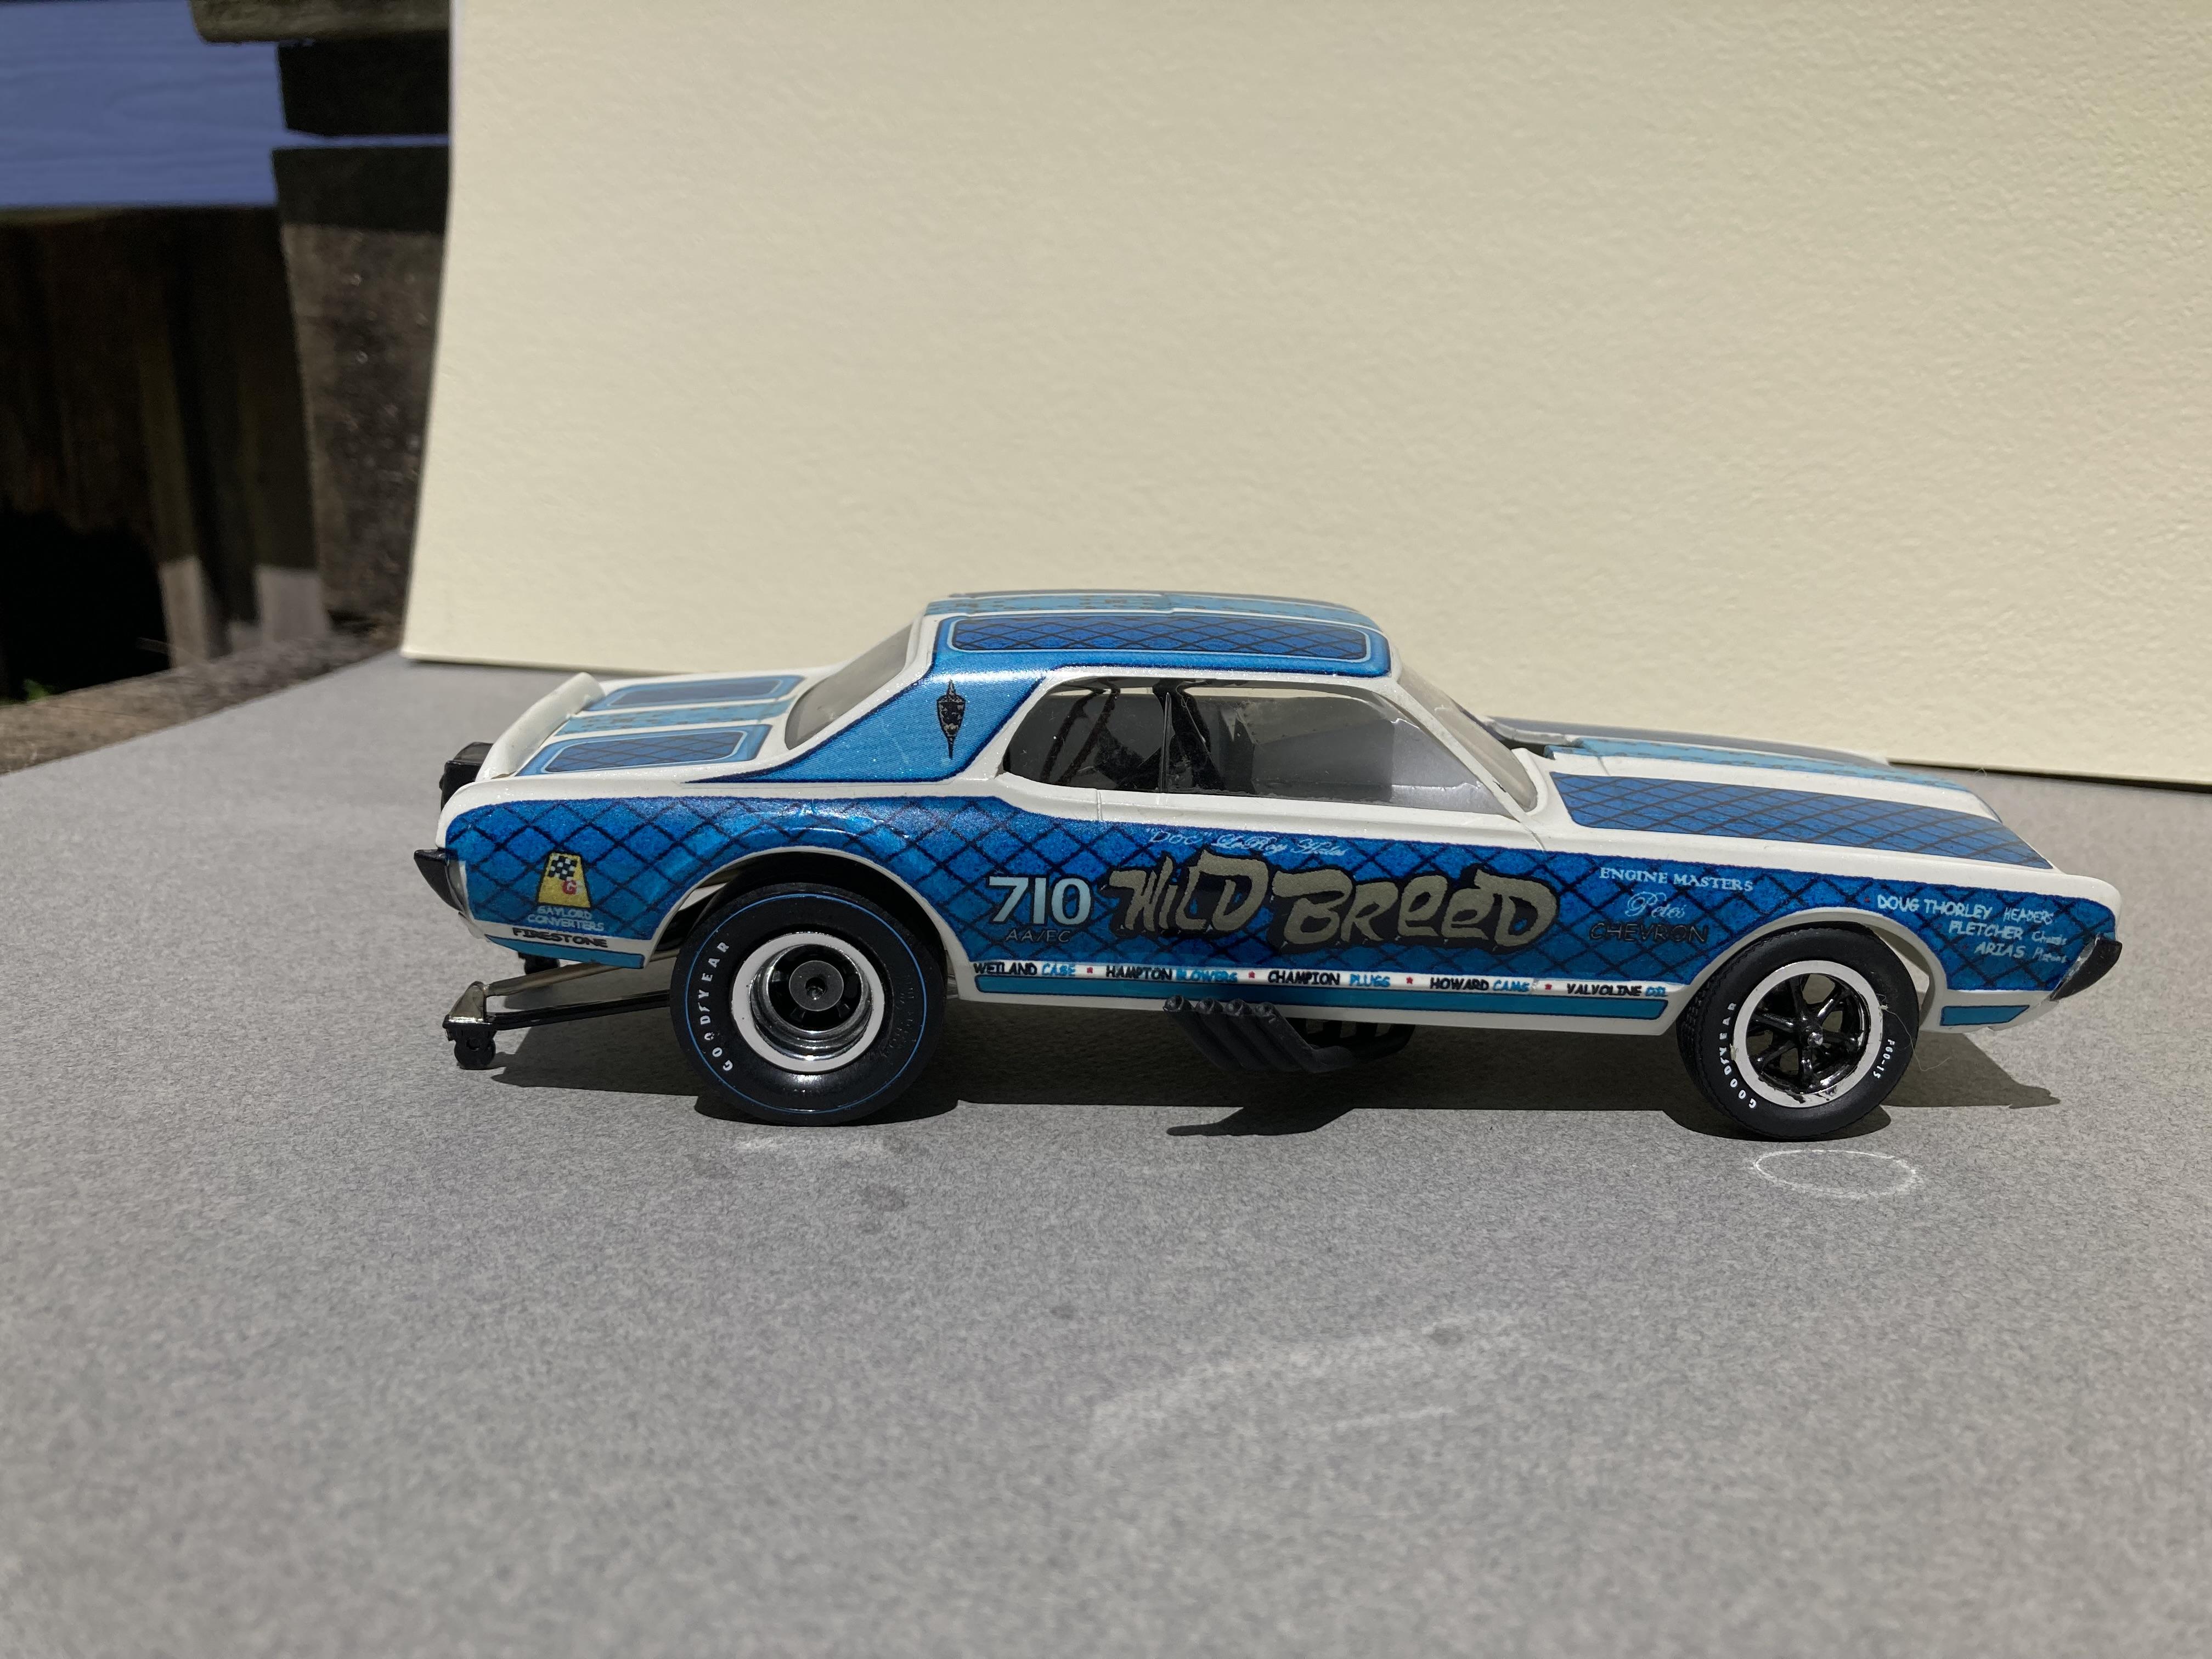
My version of the famous wheel stand car.
-
 After watching it collect dust on the shelf at the local hobby store for several years, I finally bought the Hemicuda. The Dodge 426 I built a little while ago. (These are die-cast and plastic kits.) The fuel linkages from the fuel pump to the carbs required a lot of work. I used hot water baths and a hair dryer to bend them and shape them so they would fit around the other components and meet up properly. Each is a little different in that regard. The spark plug wiring on the Dodge 426 is correct, but I took some liberties on the Hemicuda as some of the wires were just not long enough to fit on the distributor properly. The Hemicuda’s power steering pump didn’t fit very snugly, so I glued a thin strip of sheet plastic around the mounting post and then sanded that down until the fit was snug. On the Dodge 426, I didn’t really get the angle and fit of the choke control body correct, as I had to fudge it in order to get the choke control tube to line up. I fixed that issue on the Hemicuda by extending the attachment post on the choke by gluing on a piece of styrene rod of the same diameter. There were four types of screws (which I believe were self-tapping) supplied to join the die-cast parts, and most of them proved very difficult to get in. Overall though, very neat looking (and heavy) kits when finished!
-
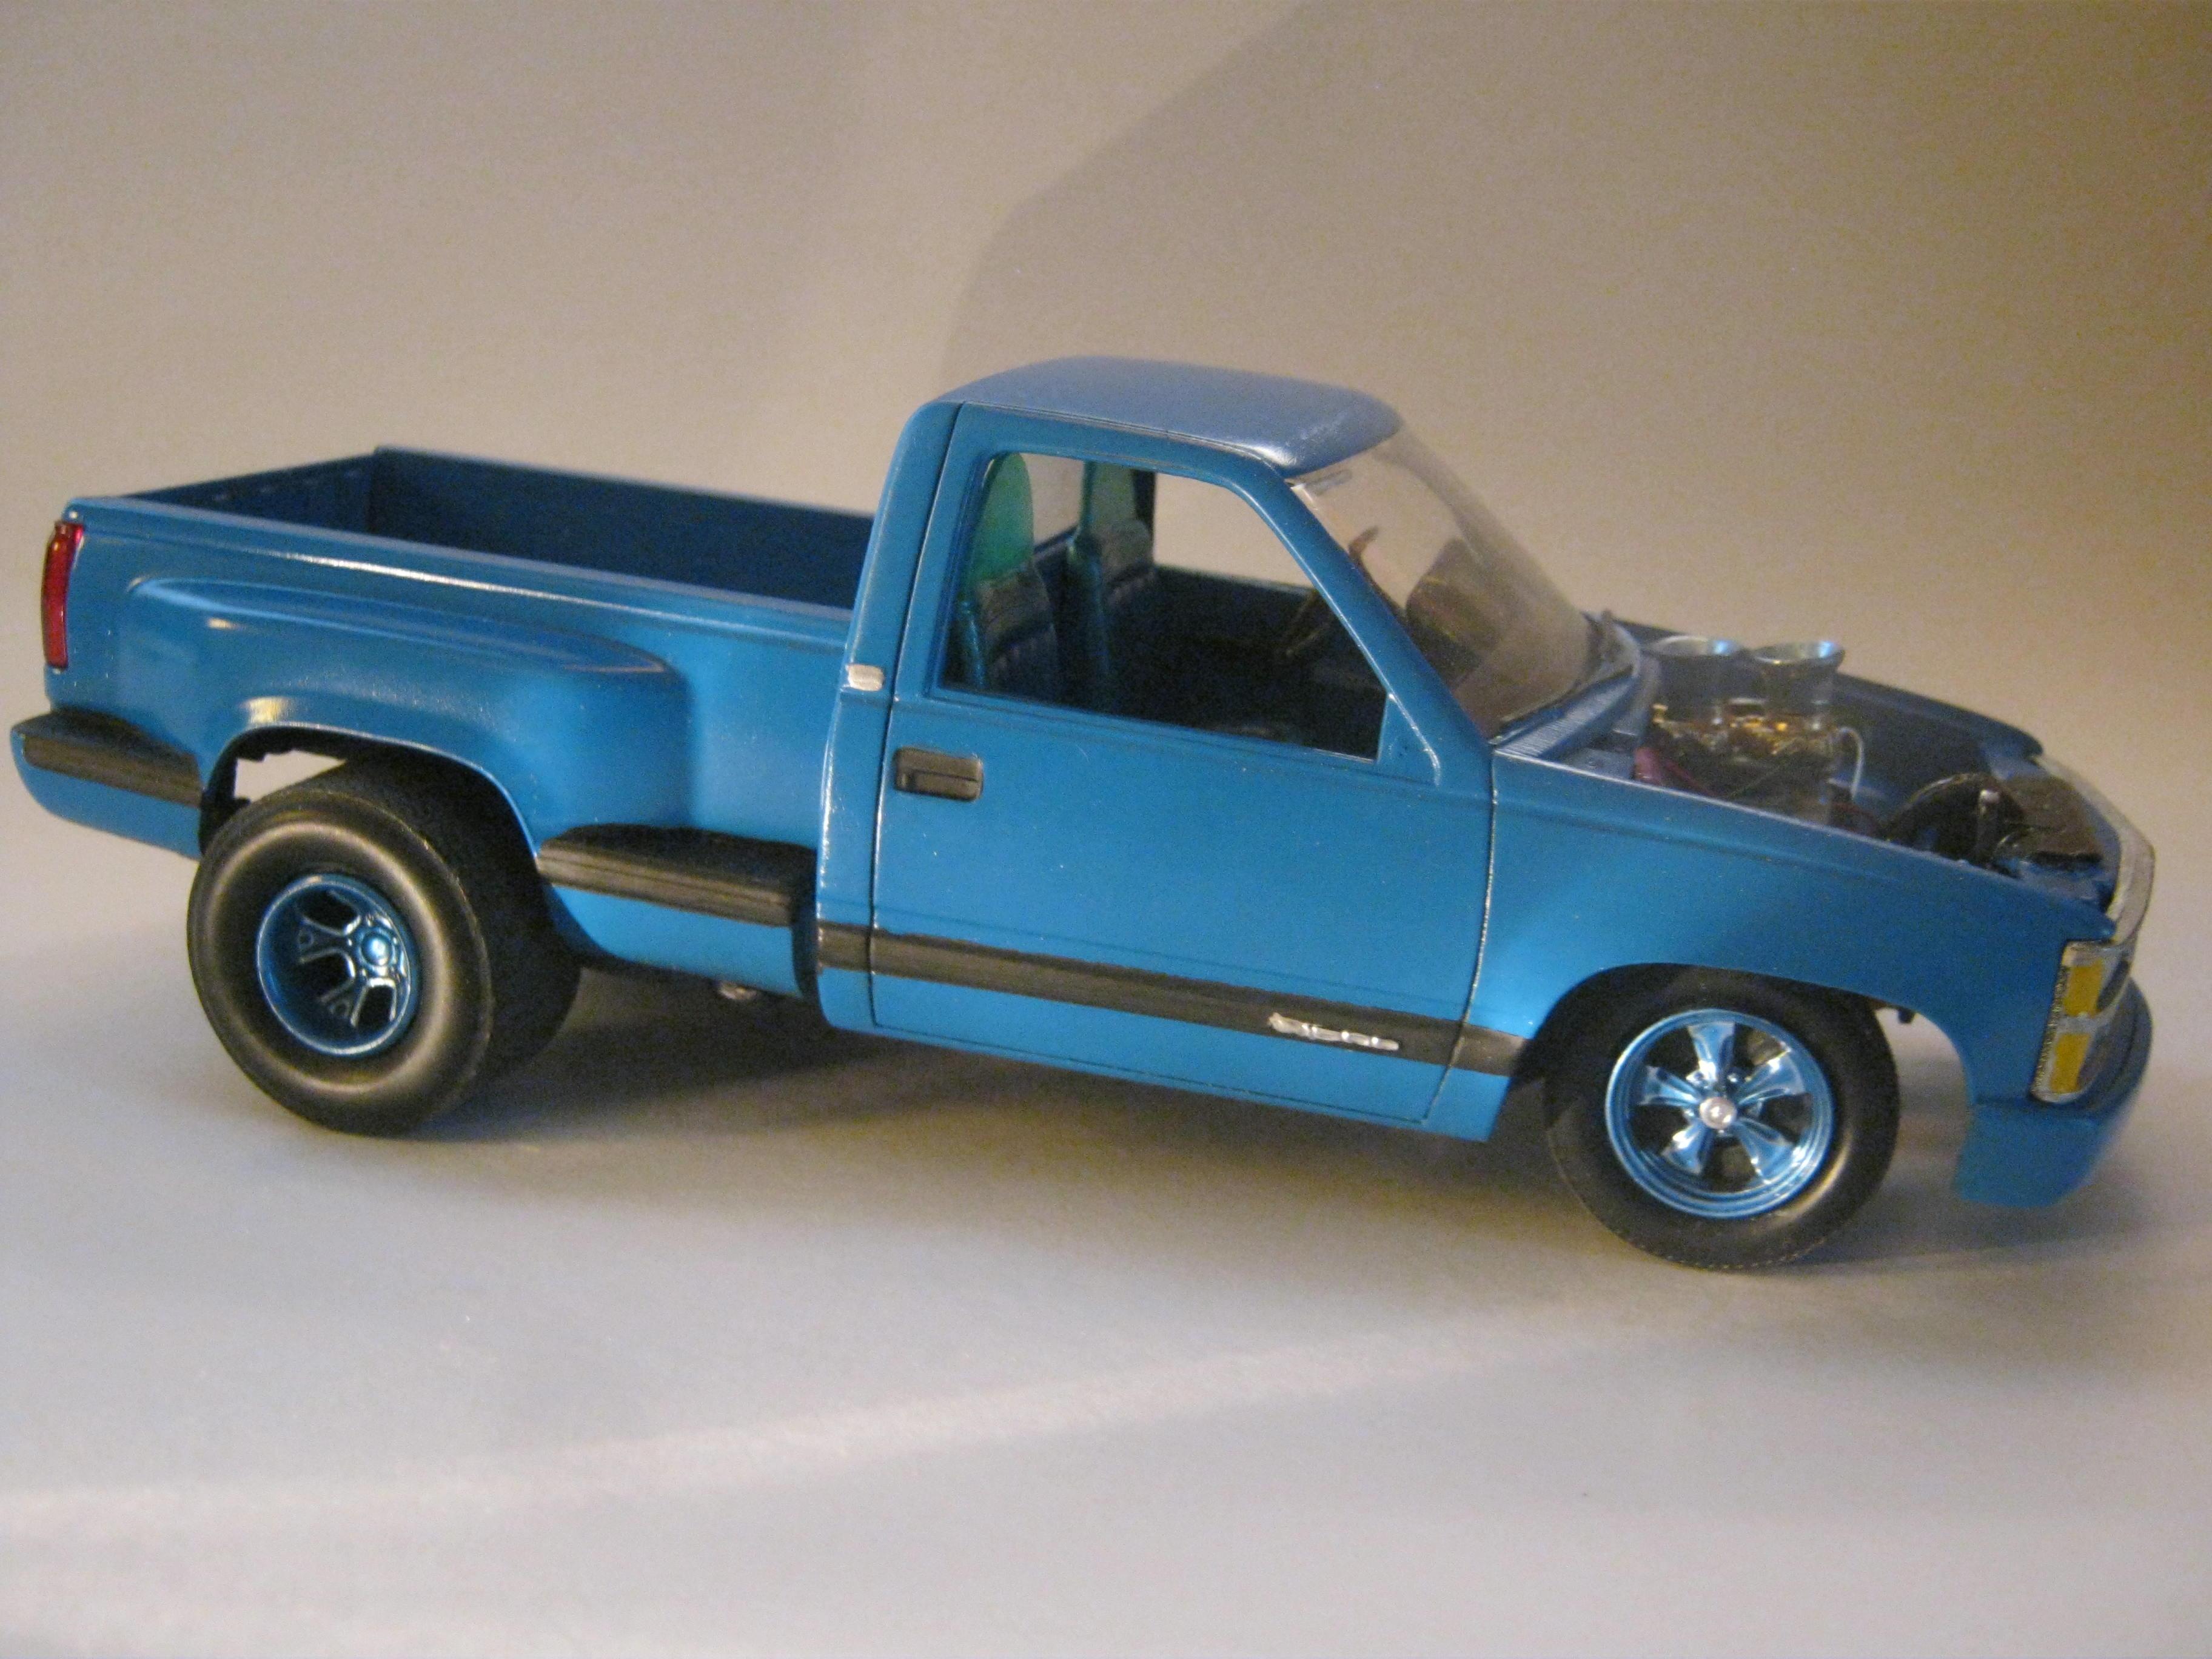
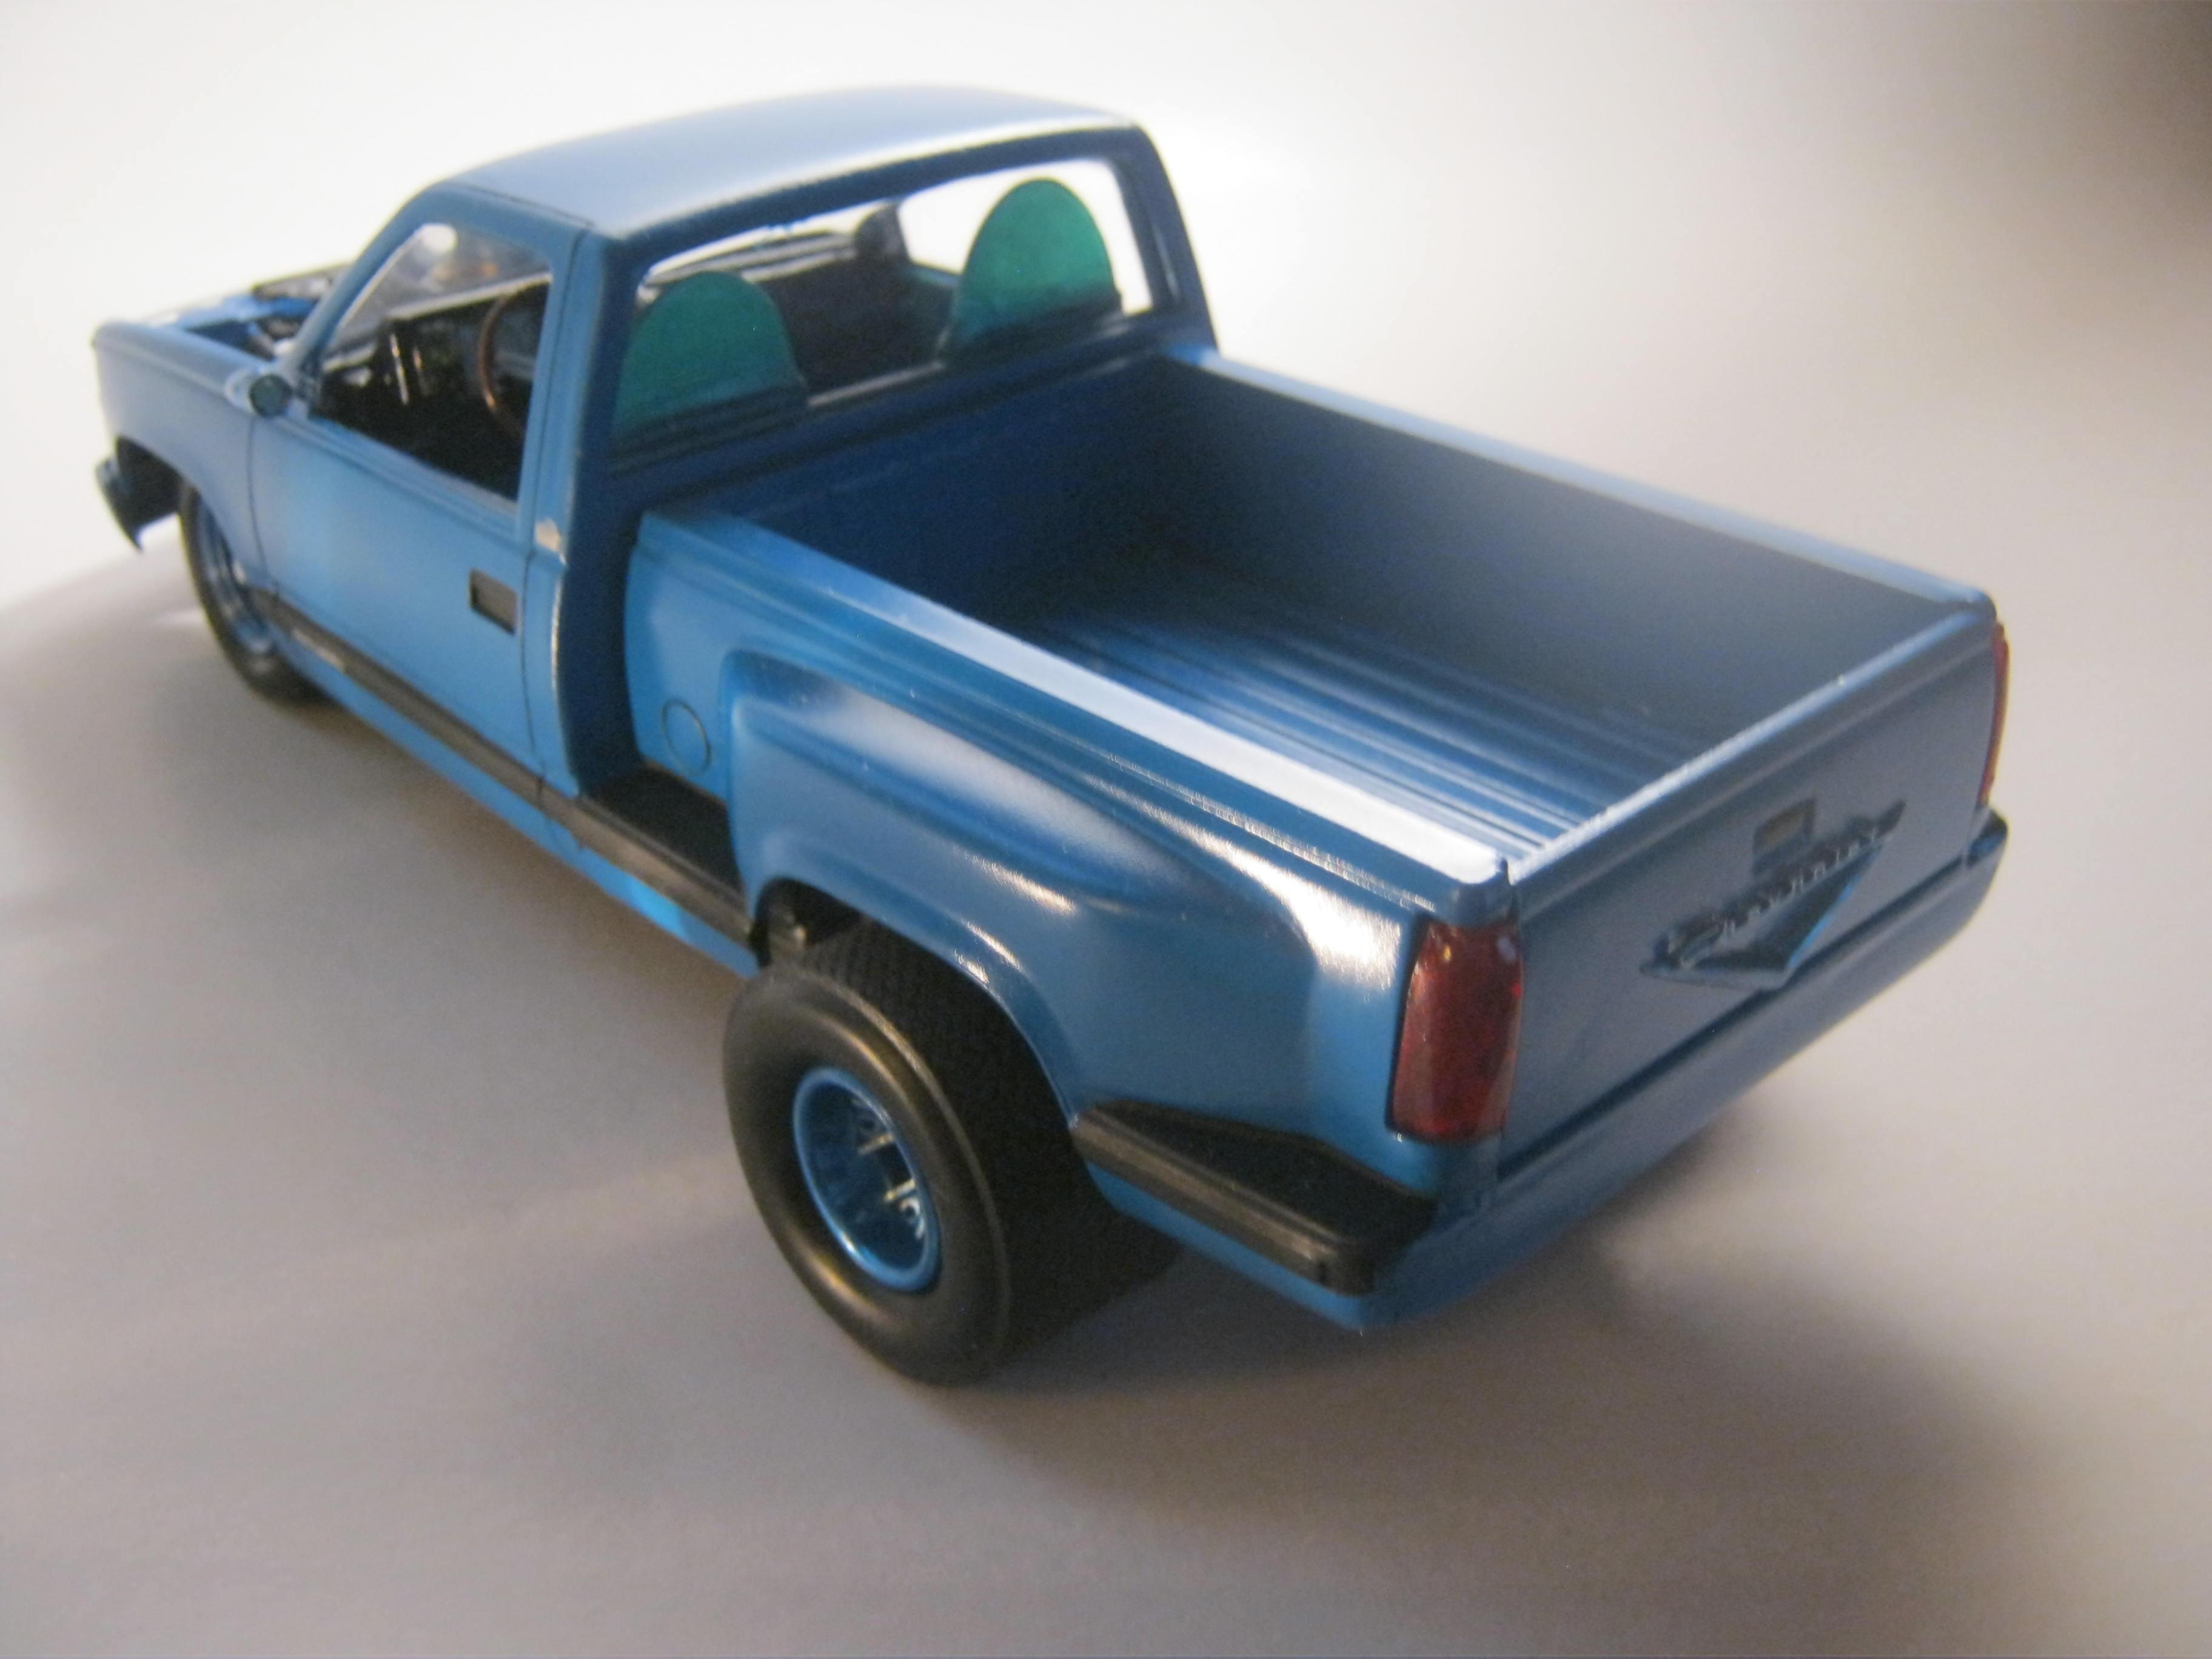
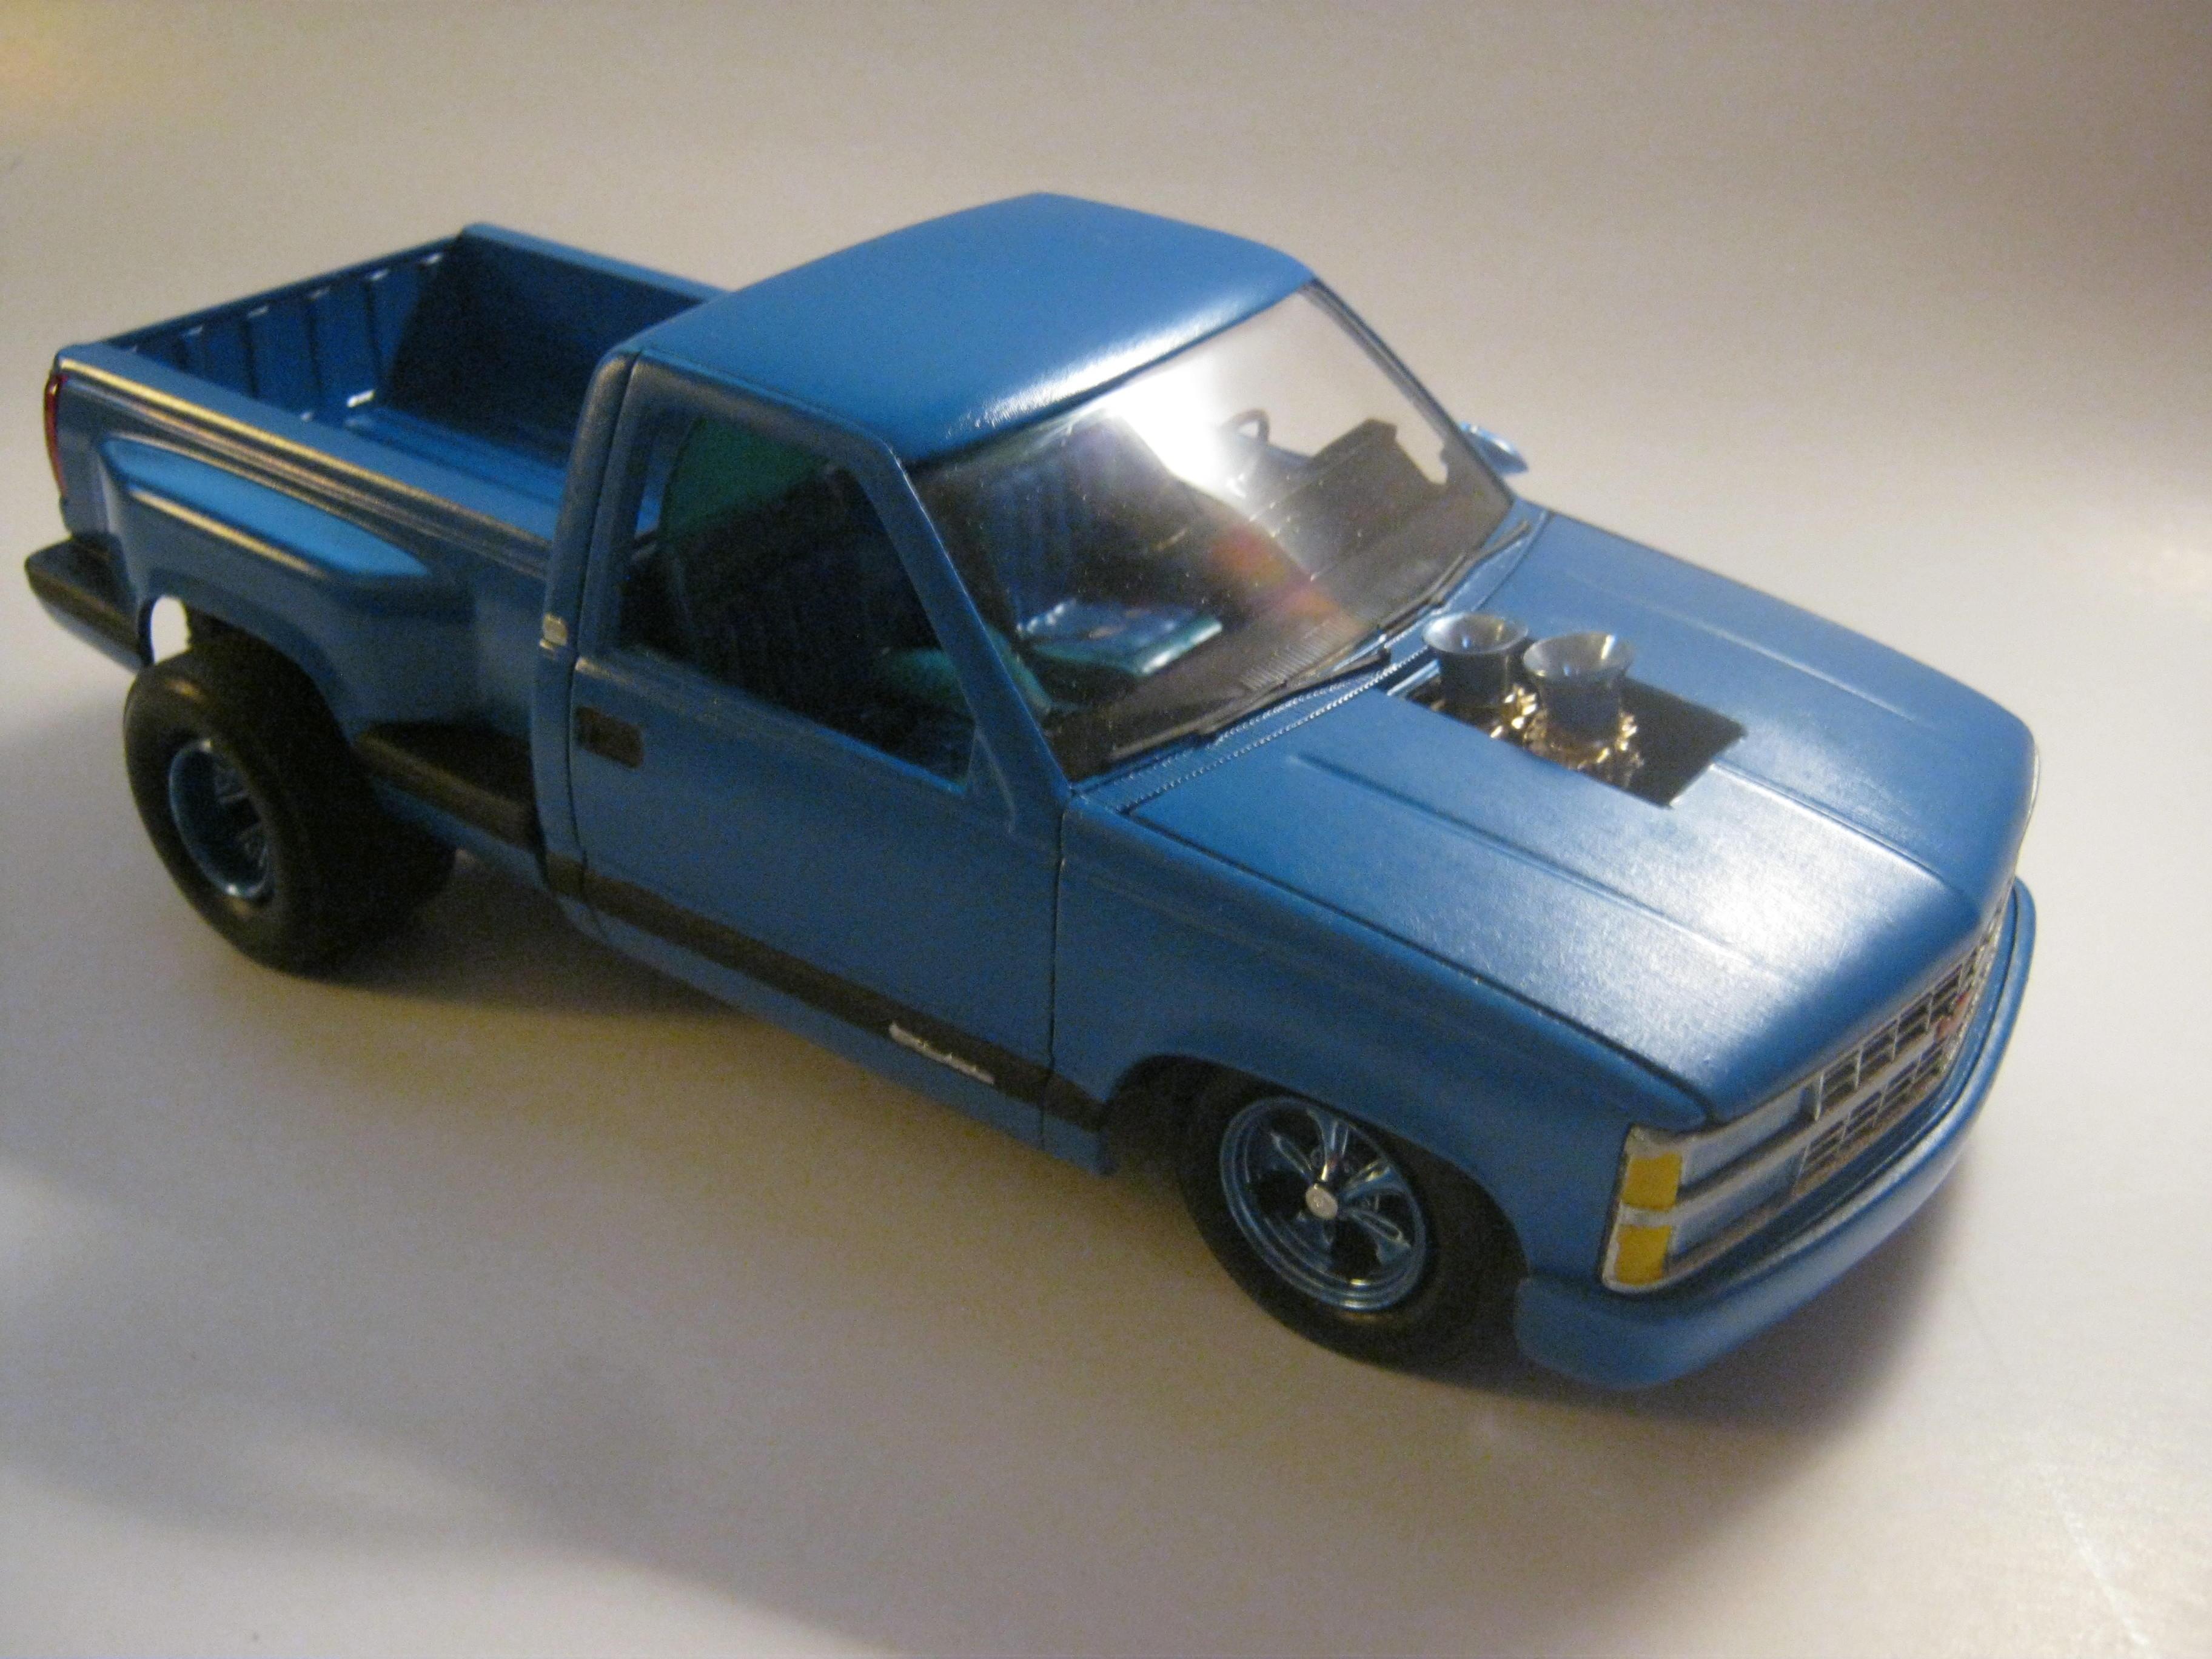
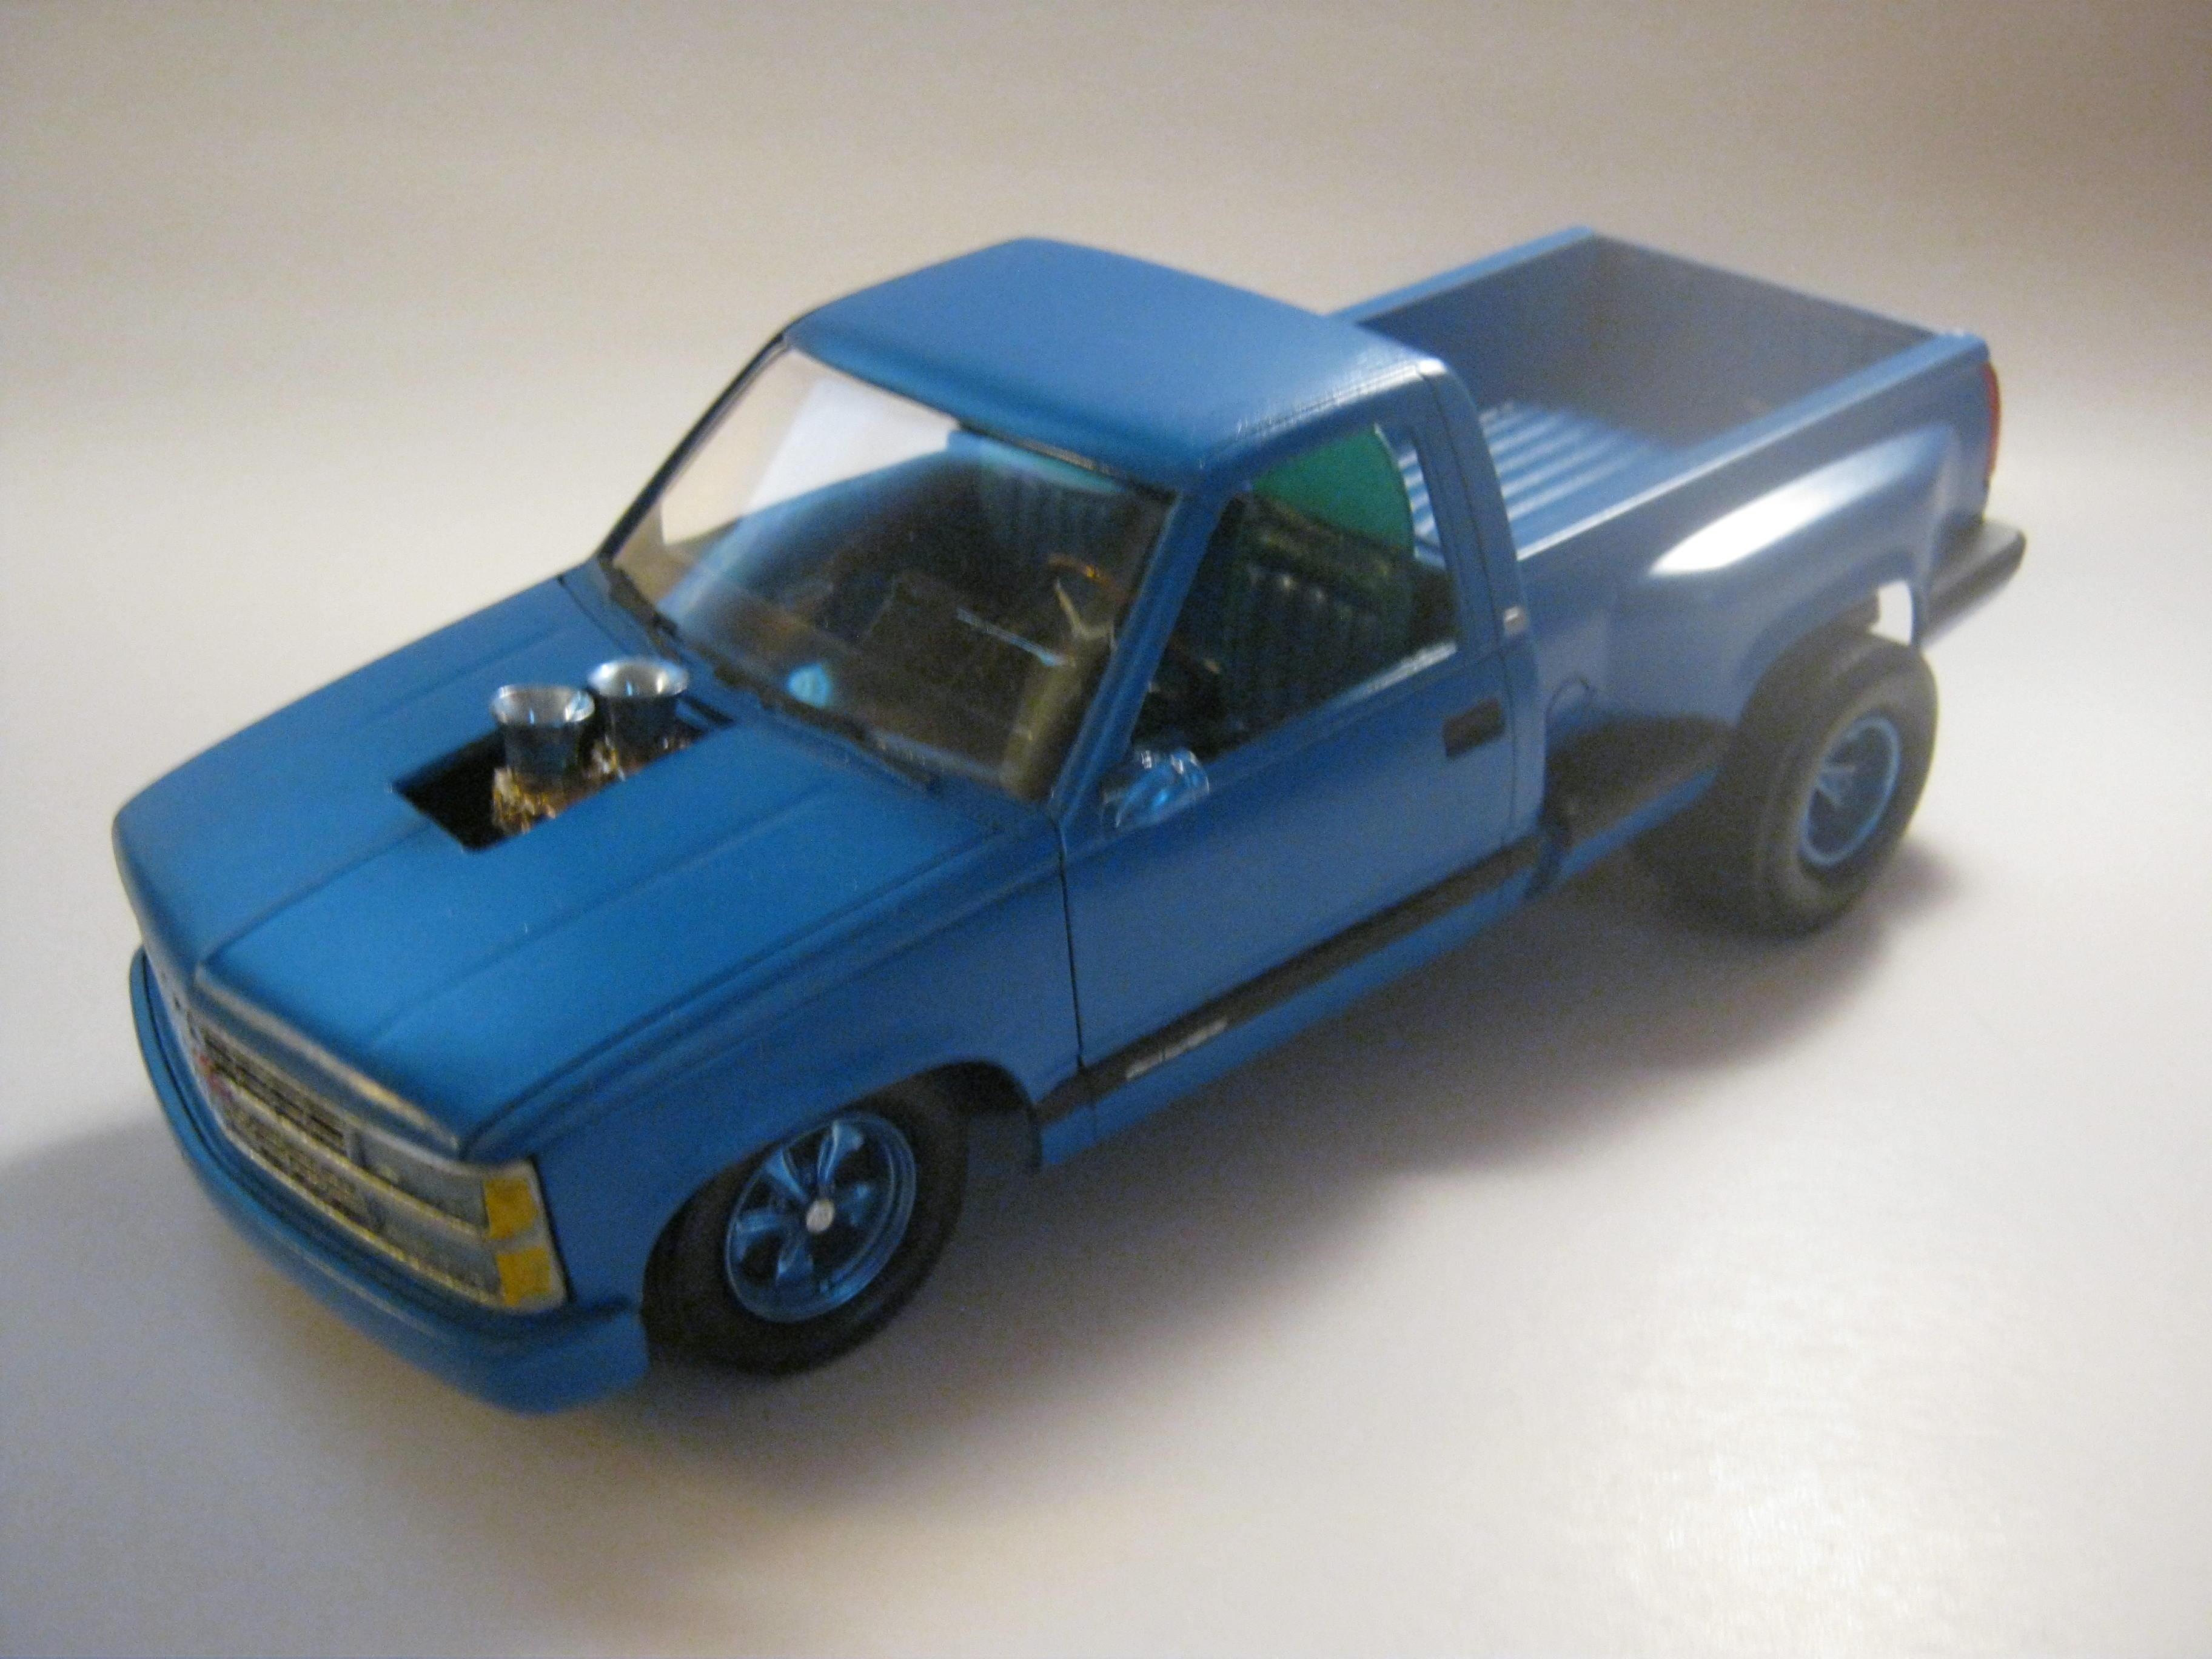
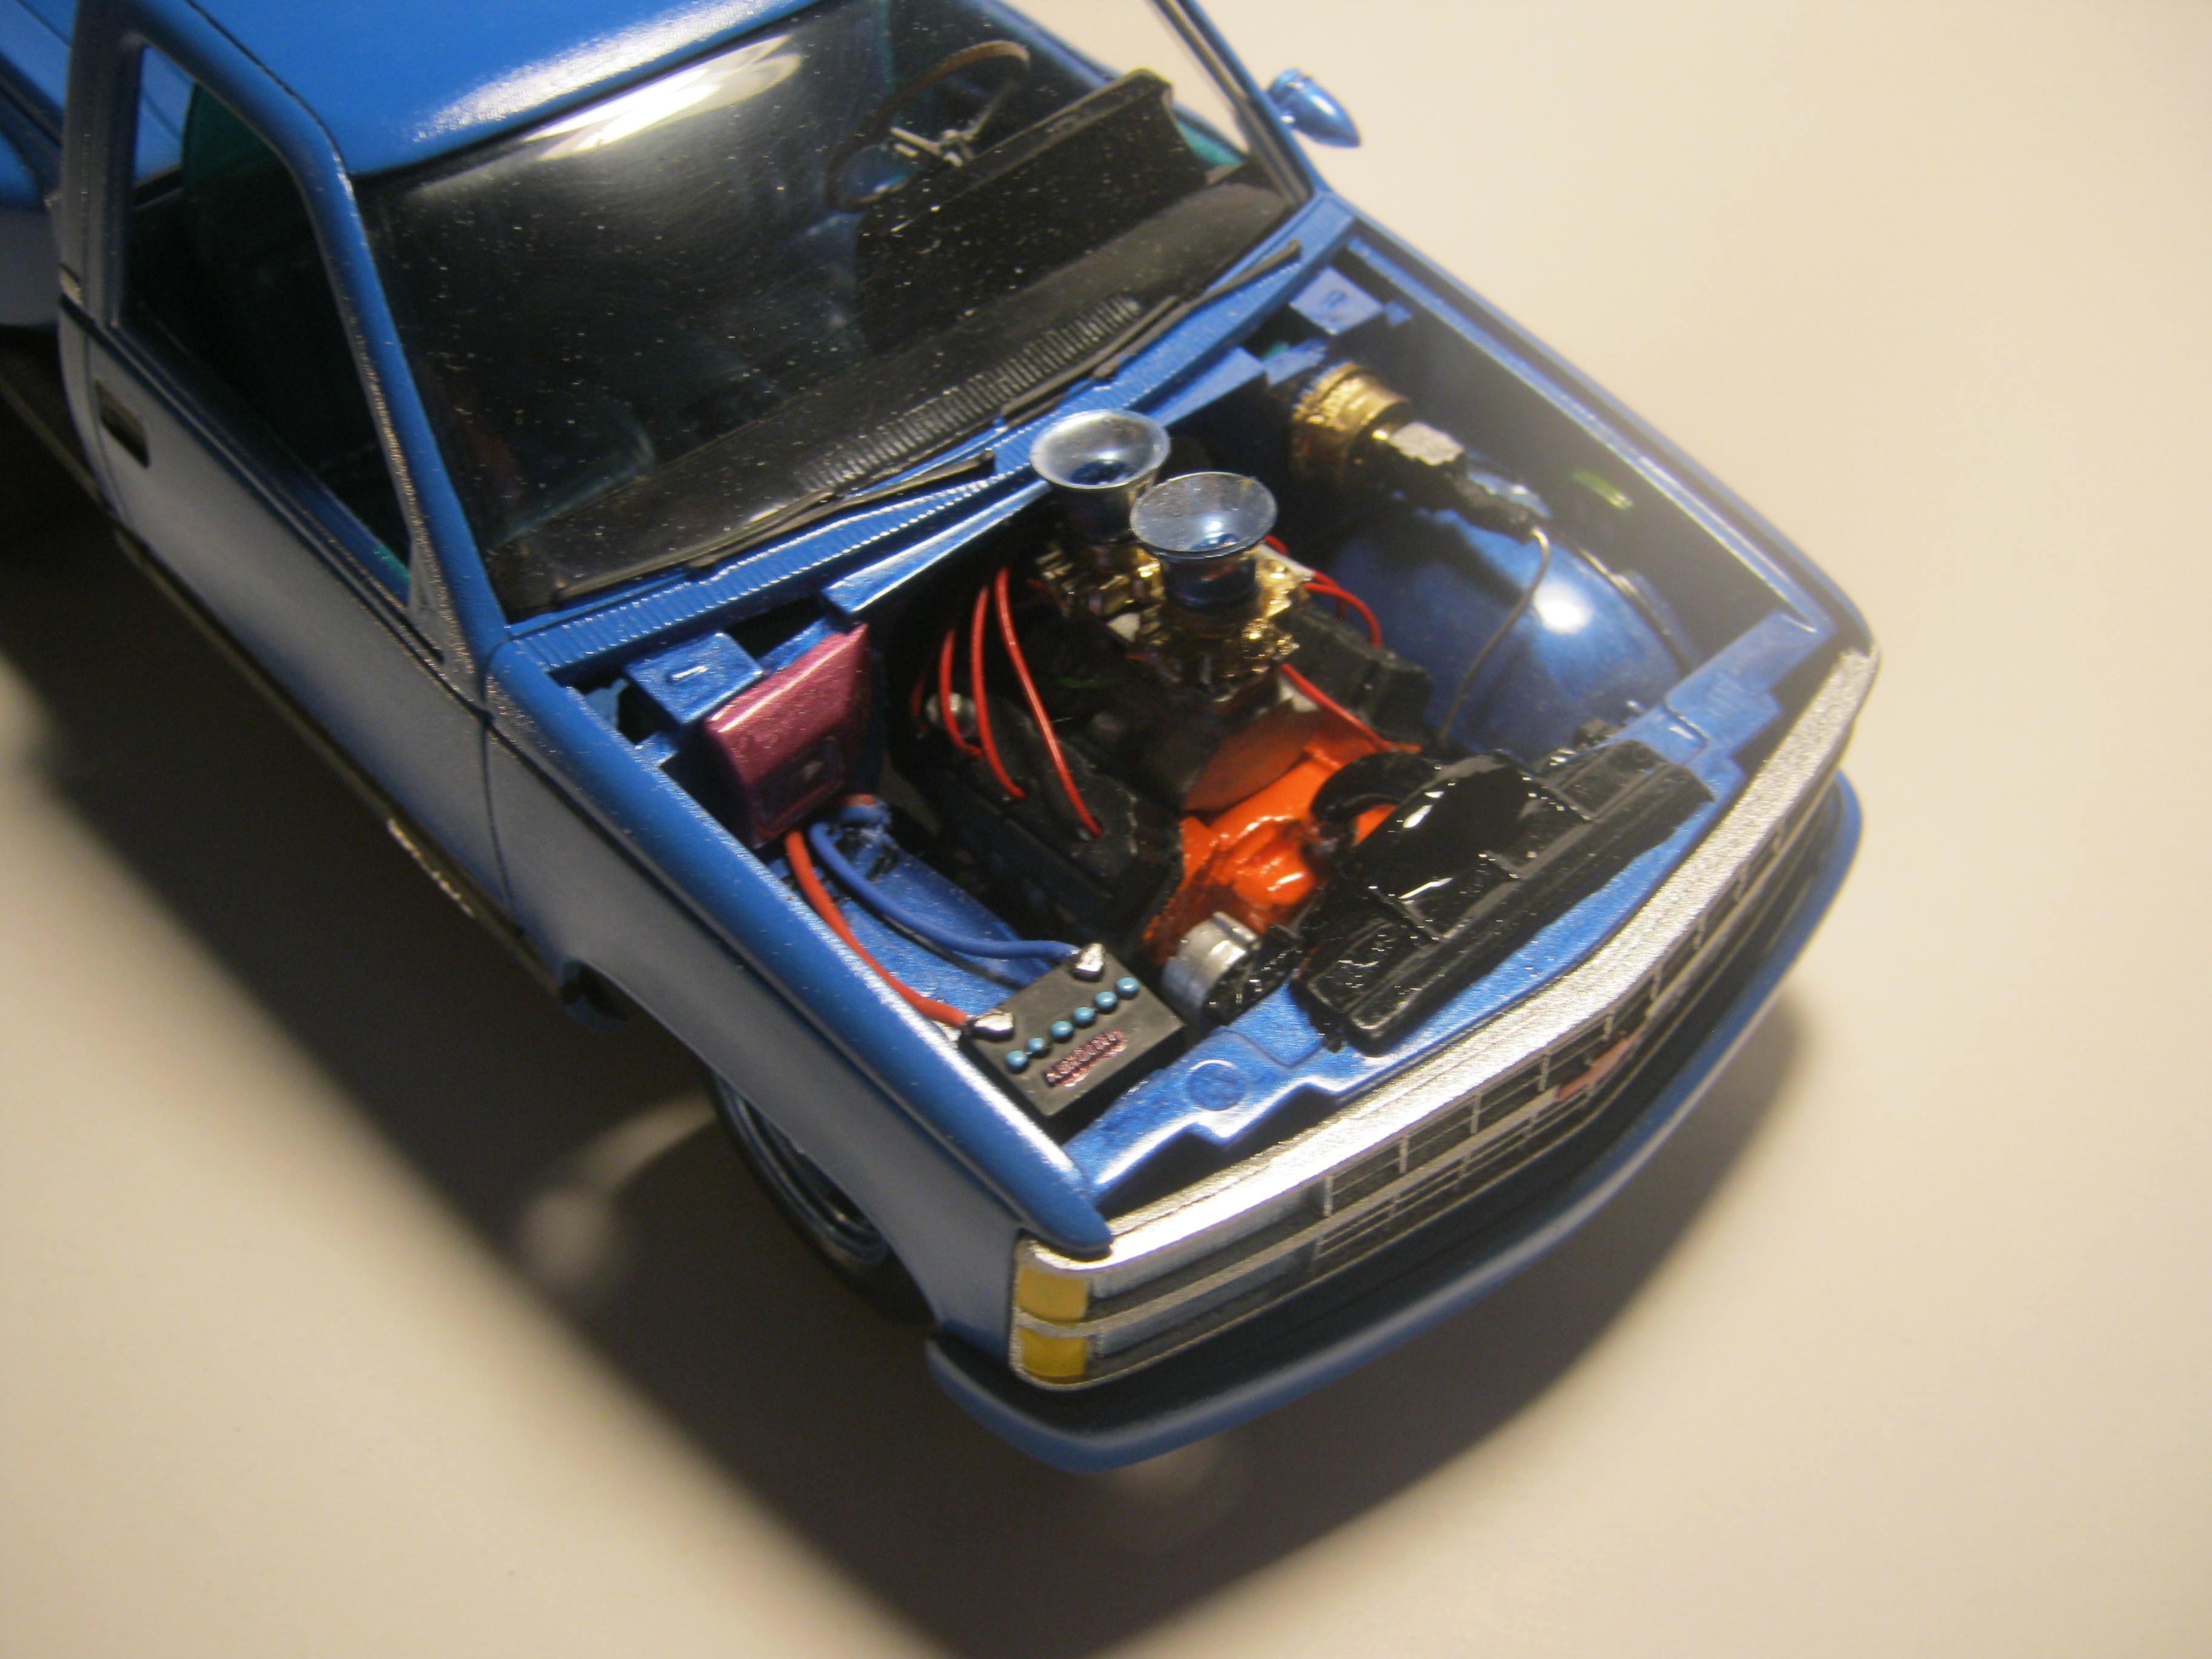
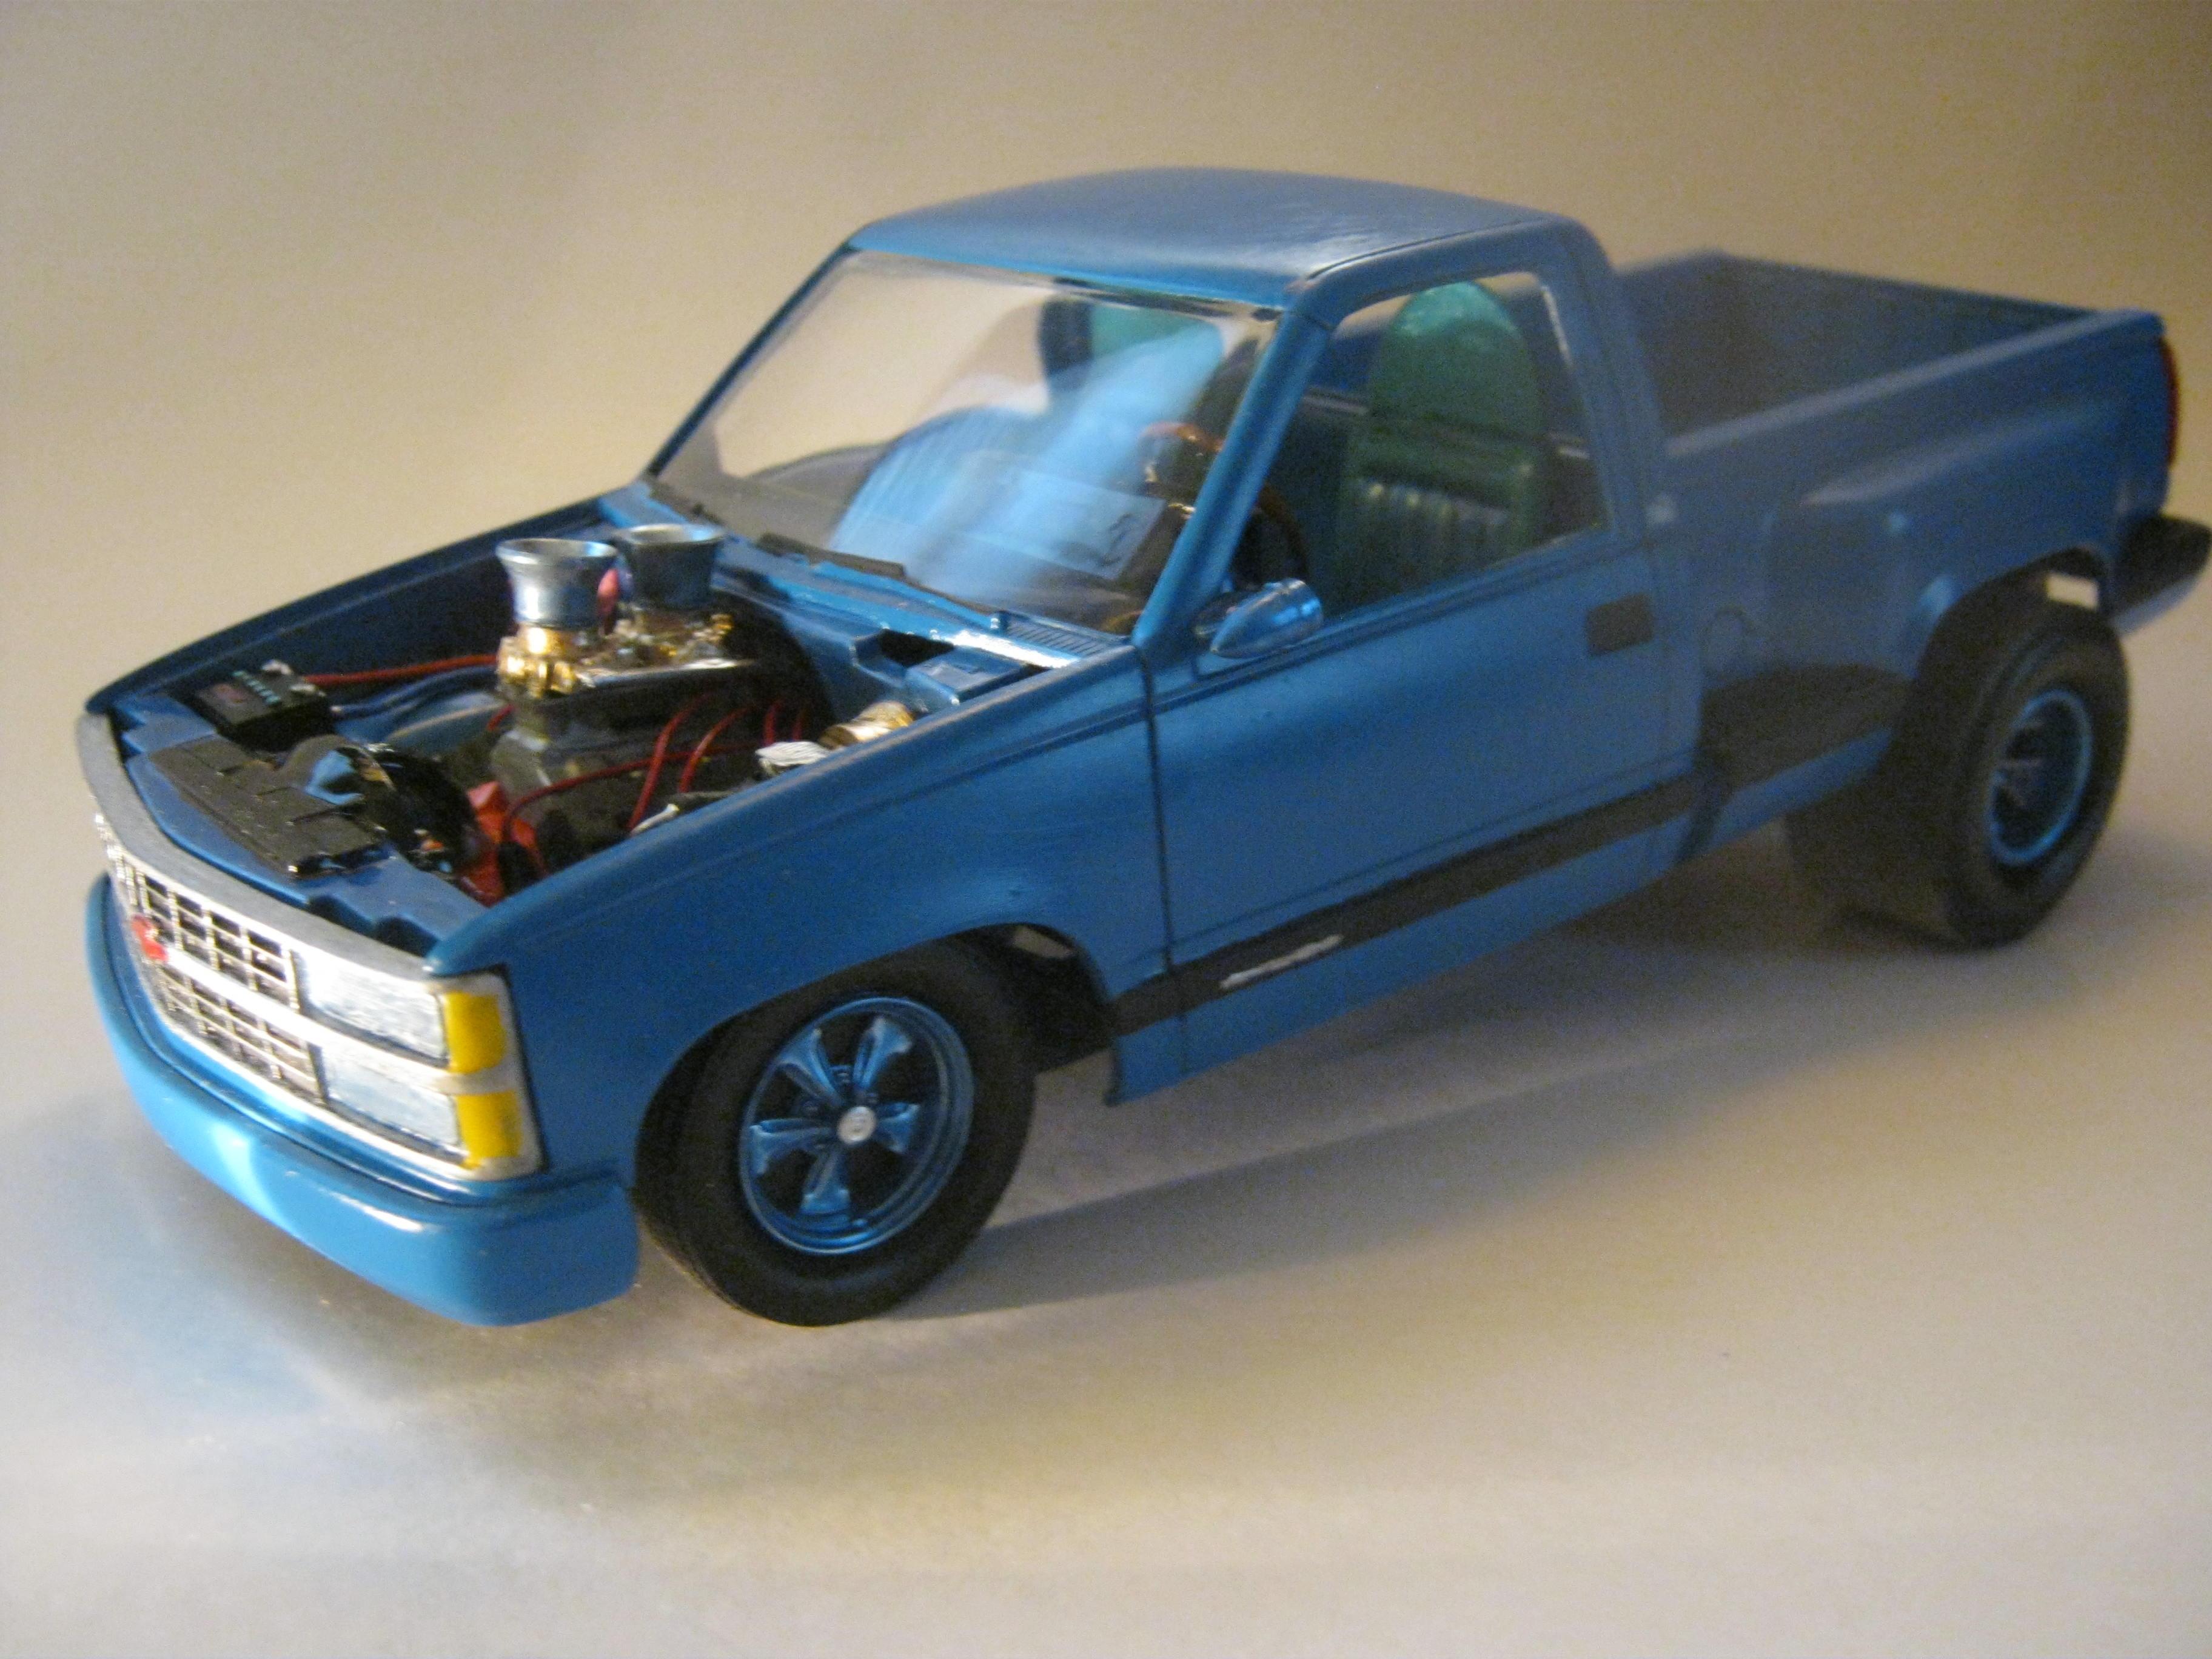
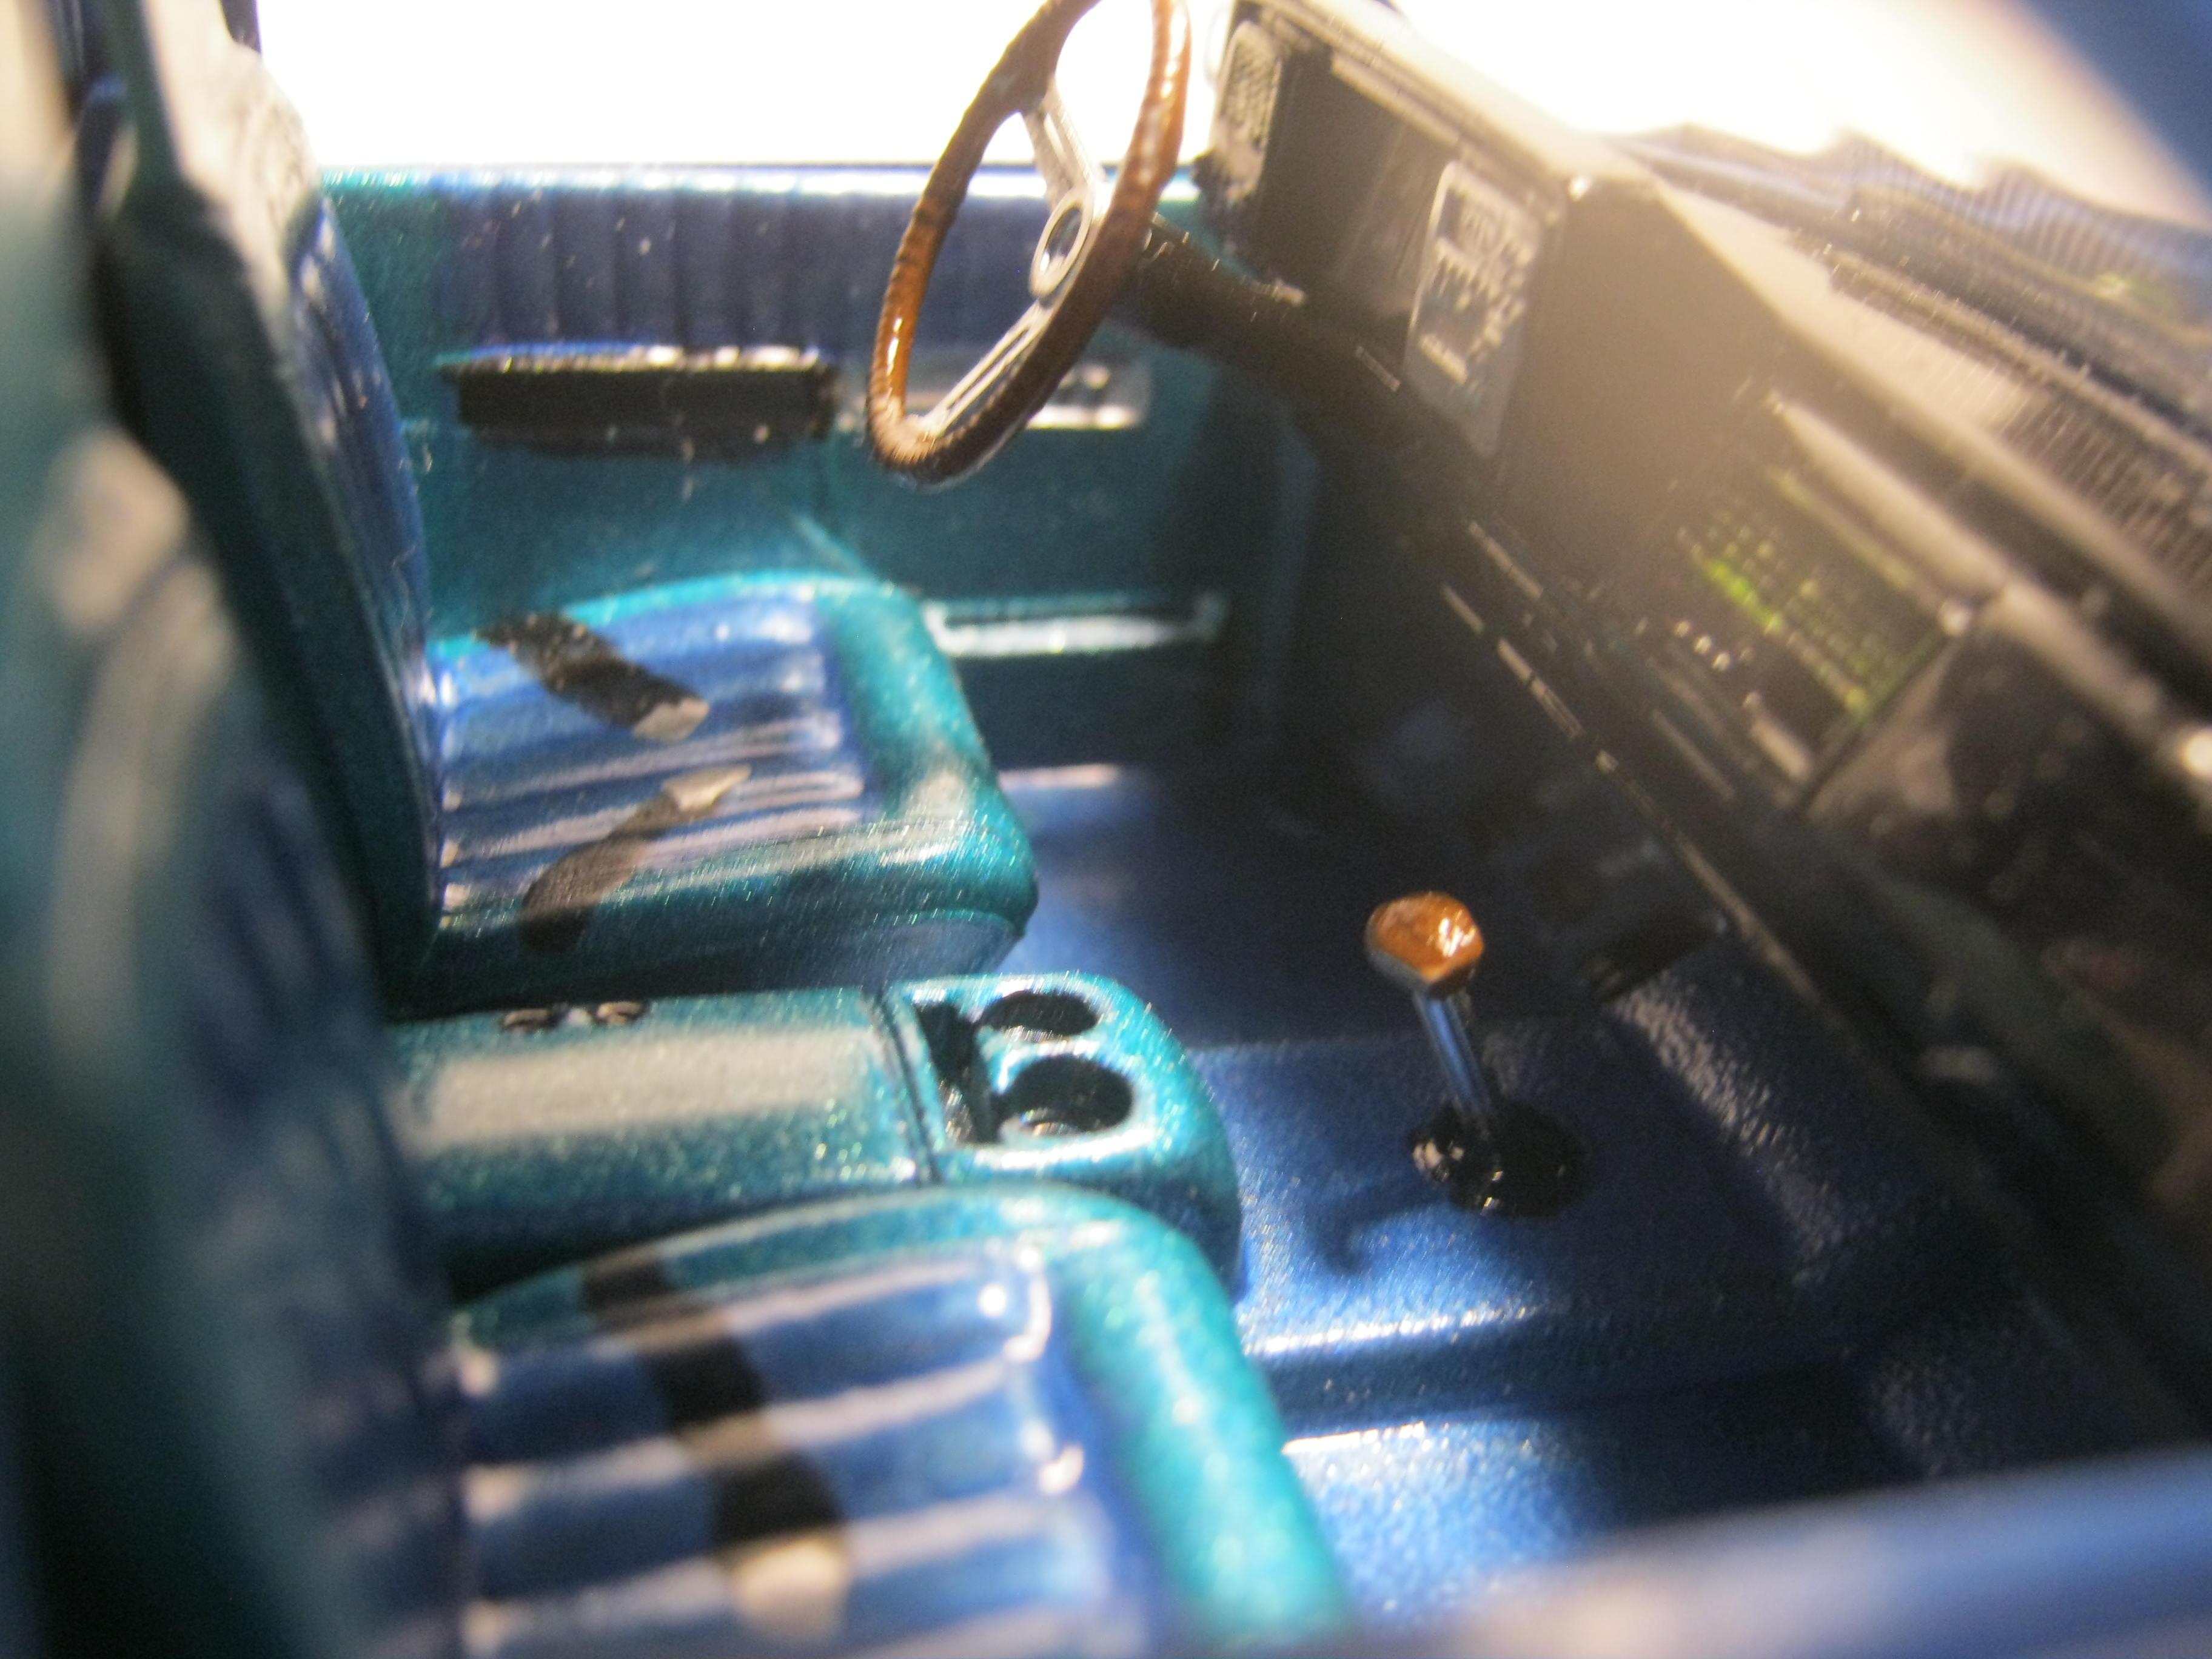
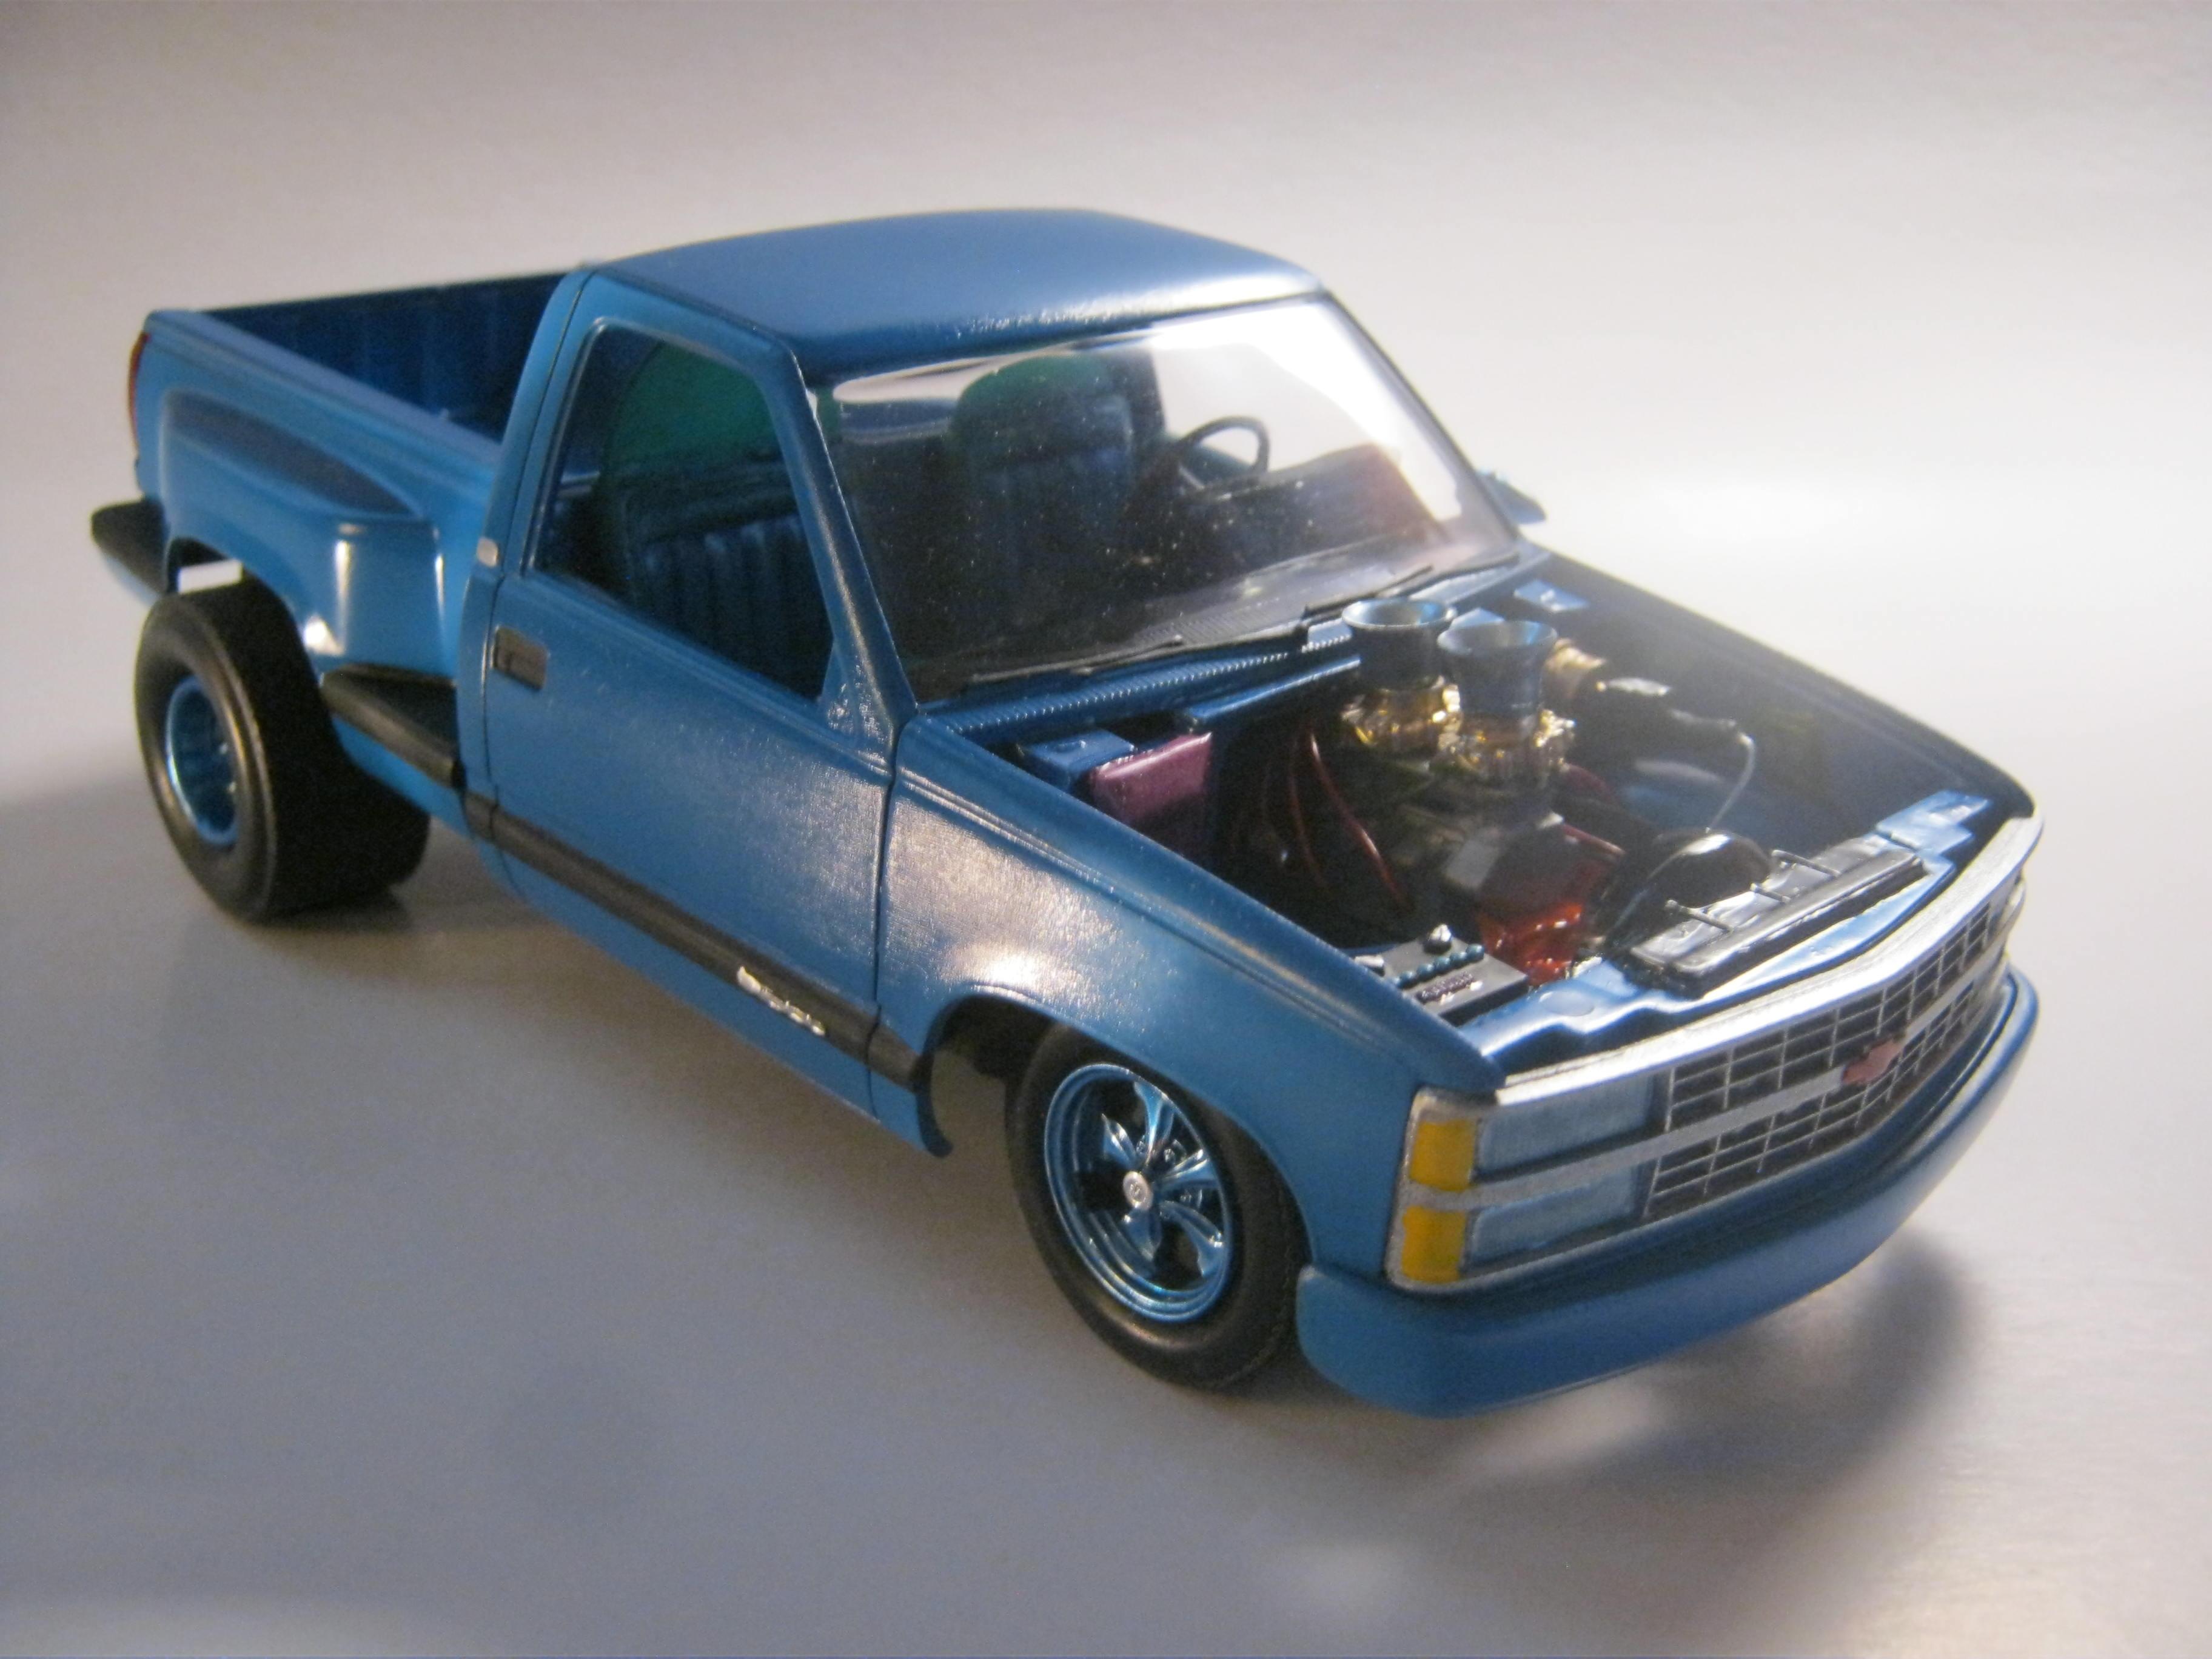
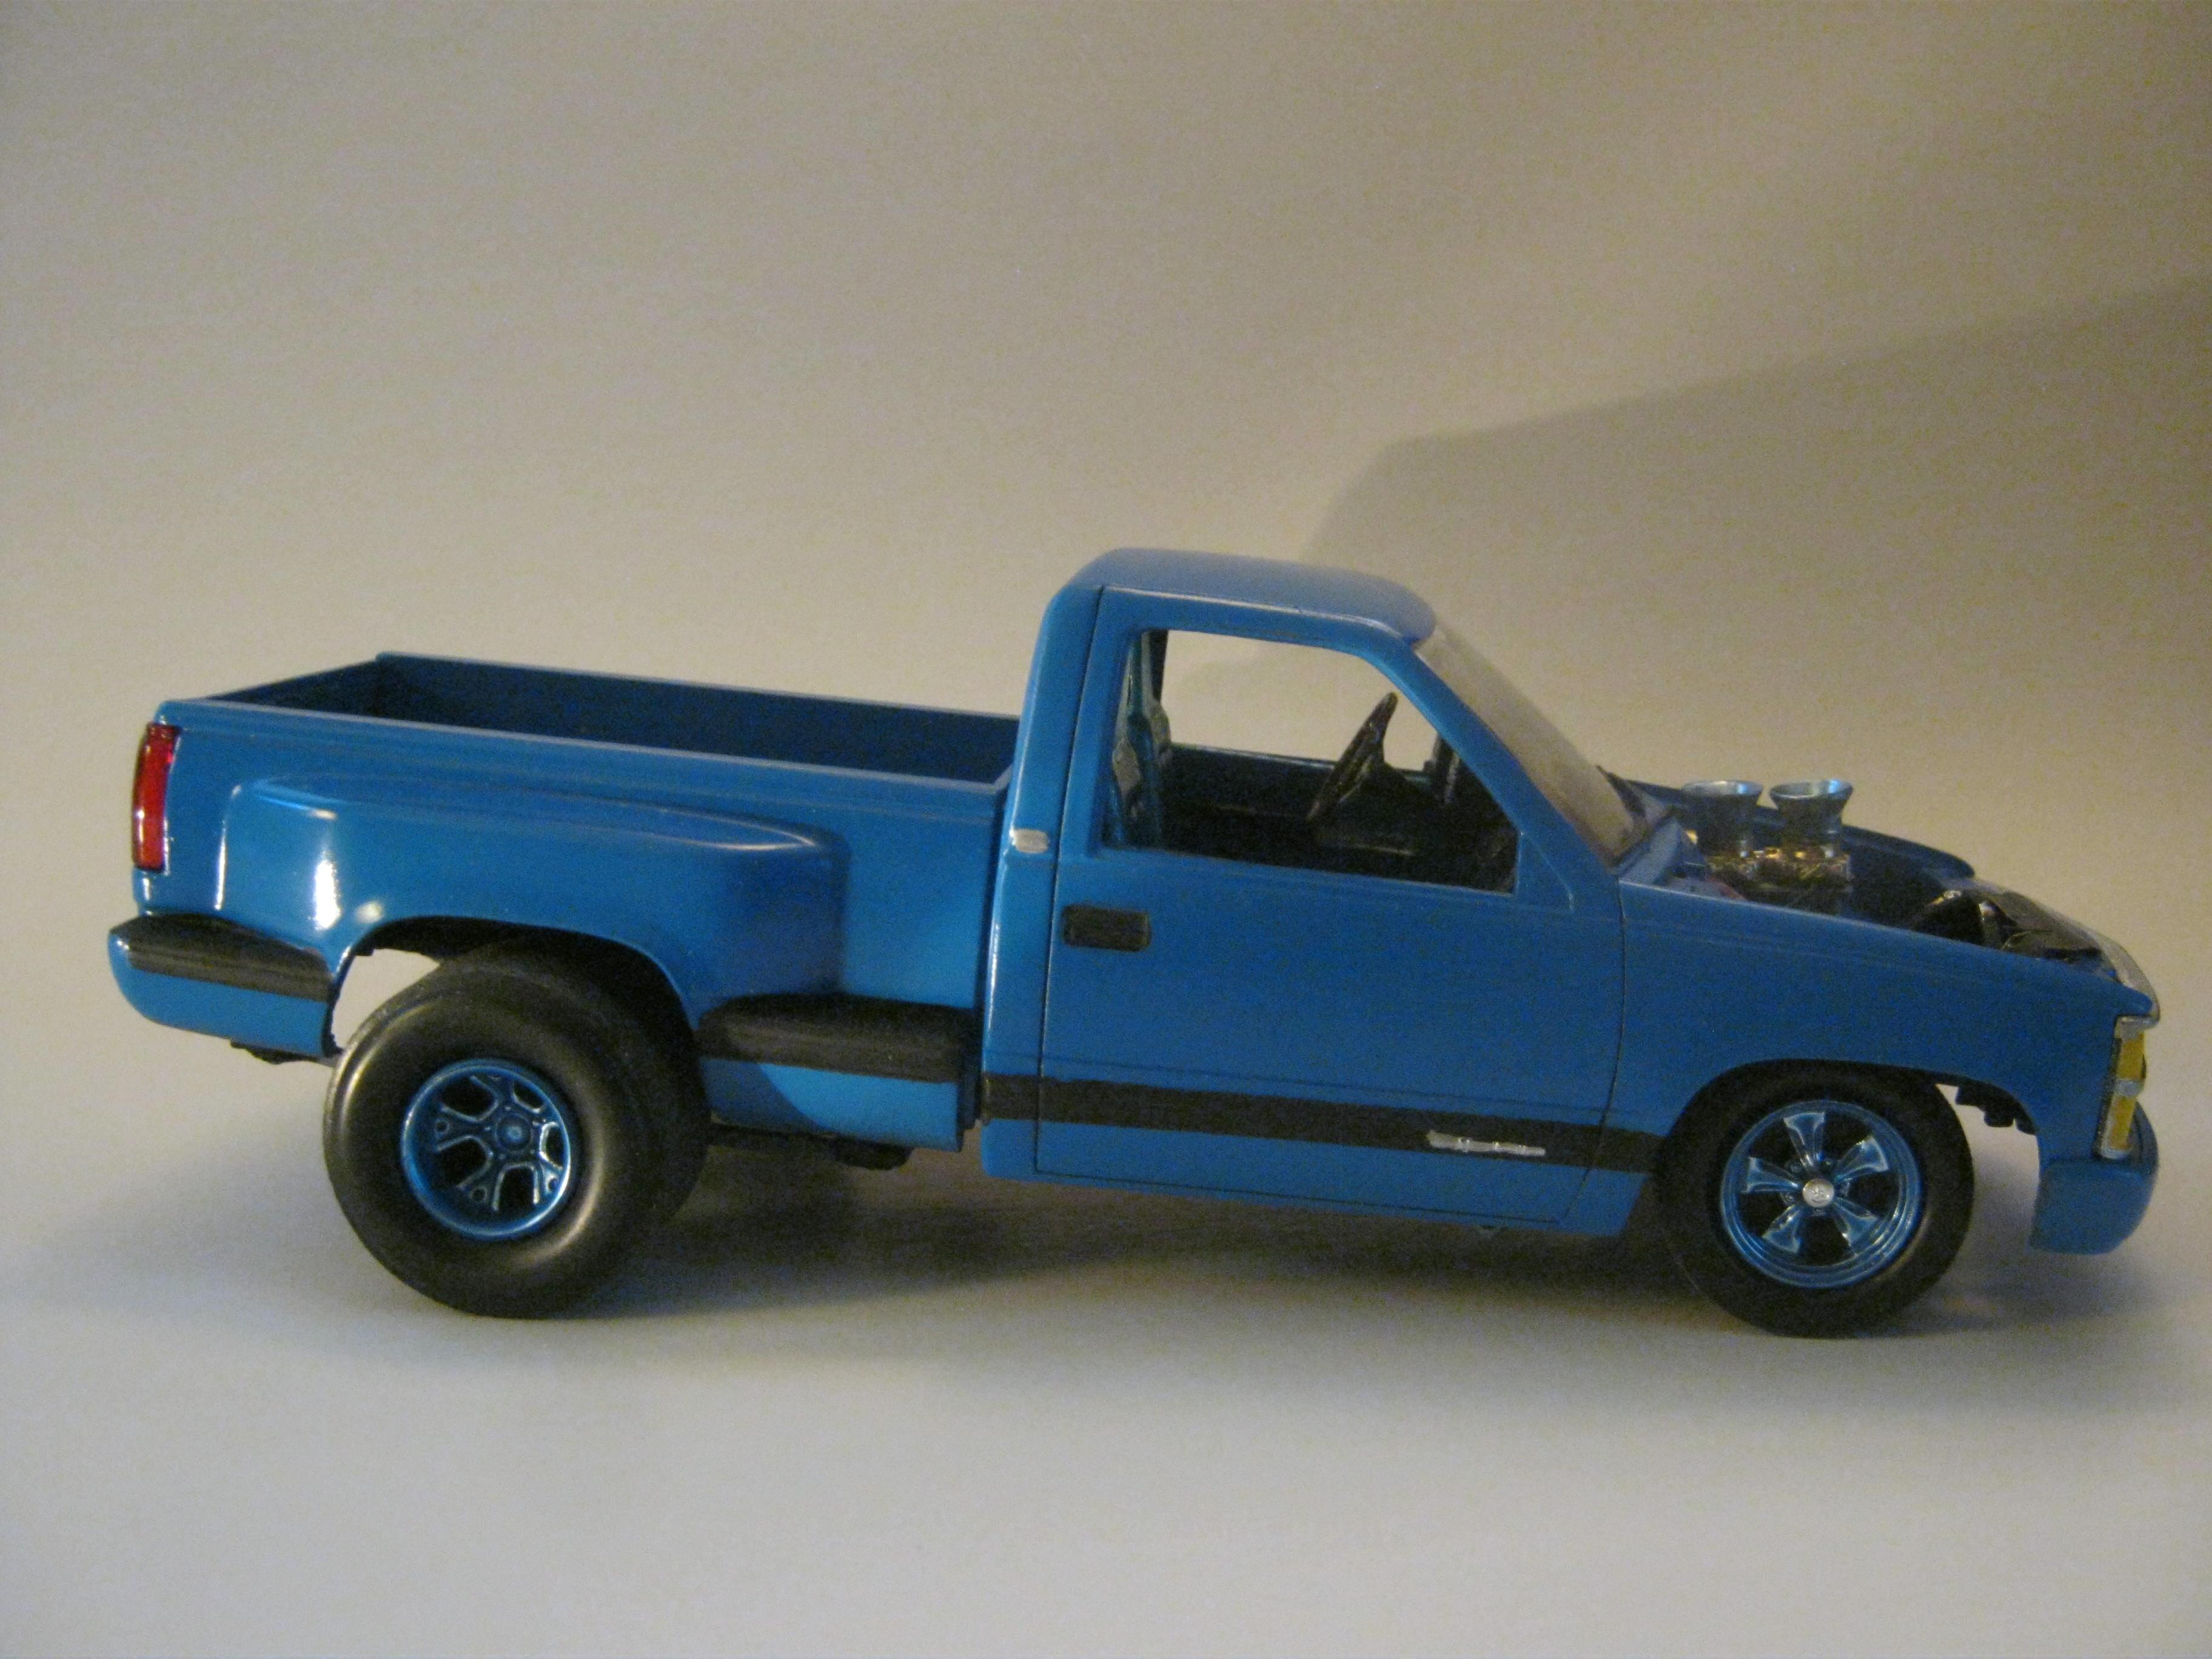
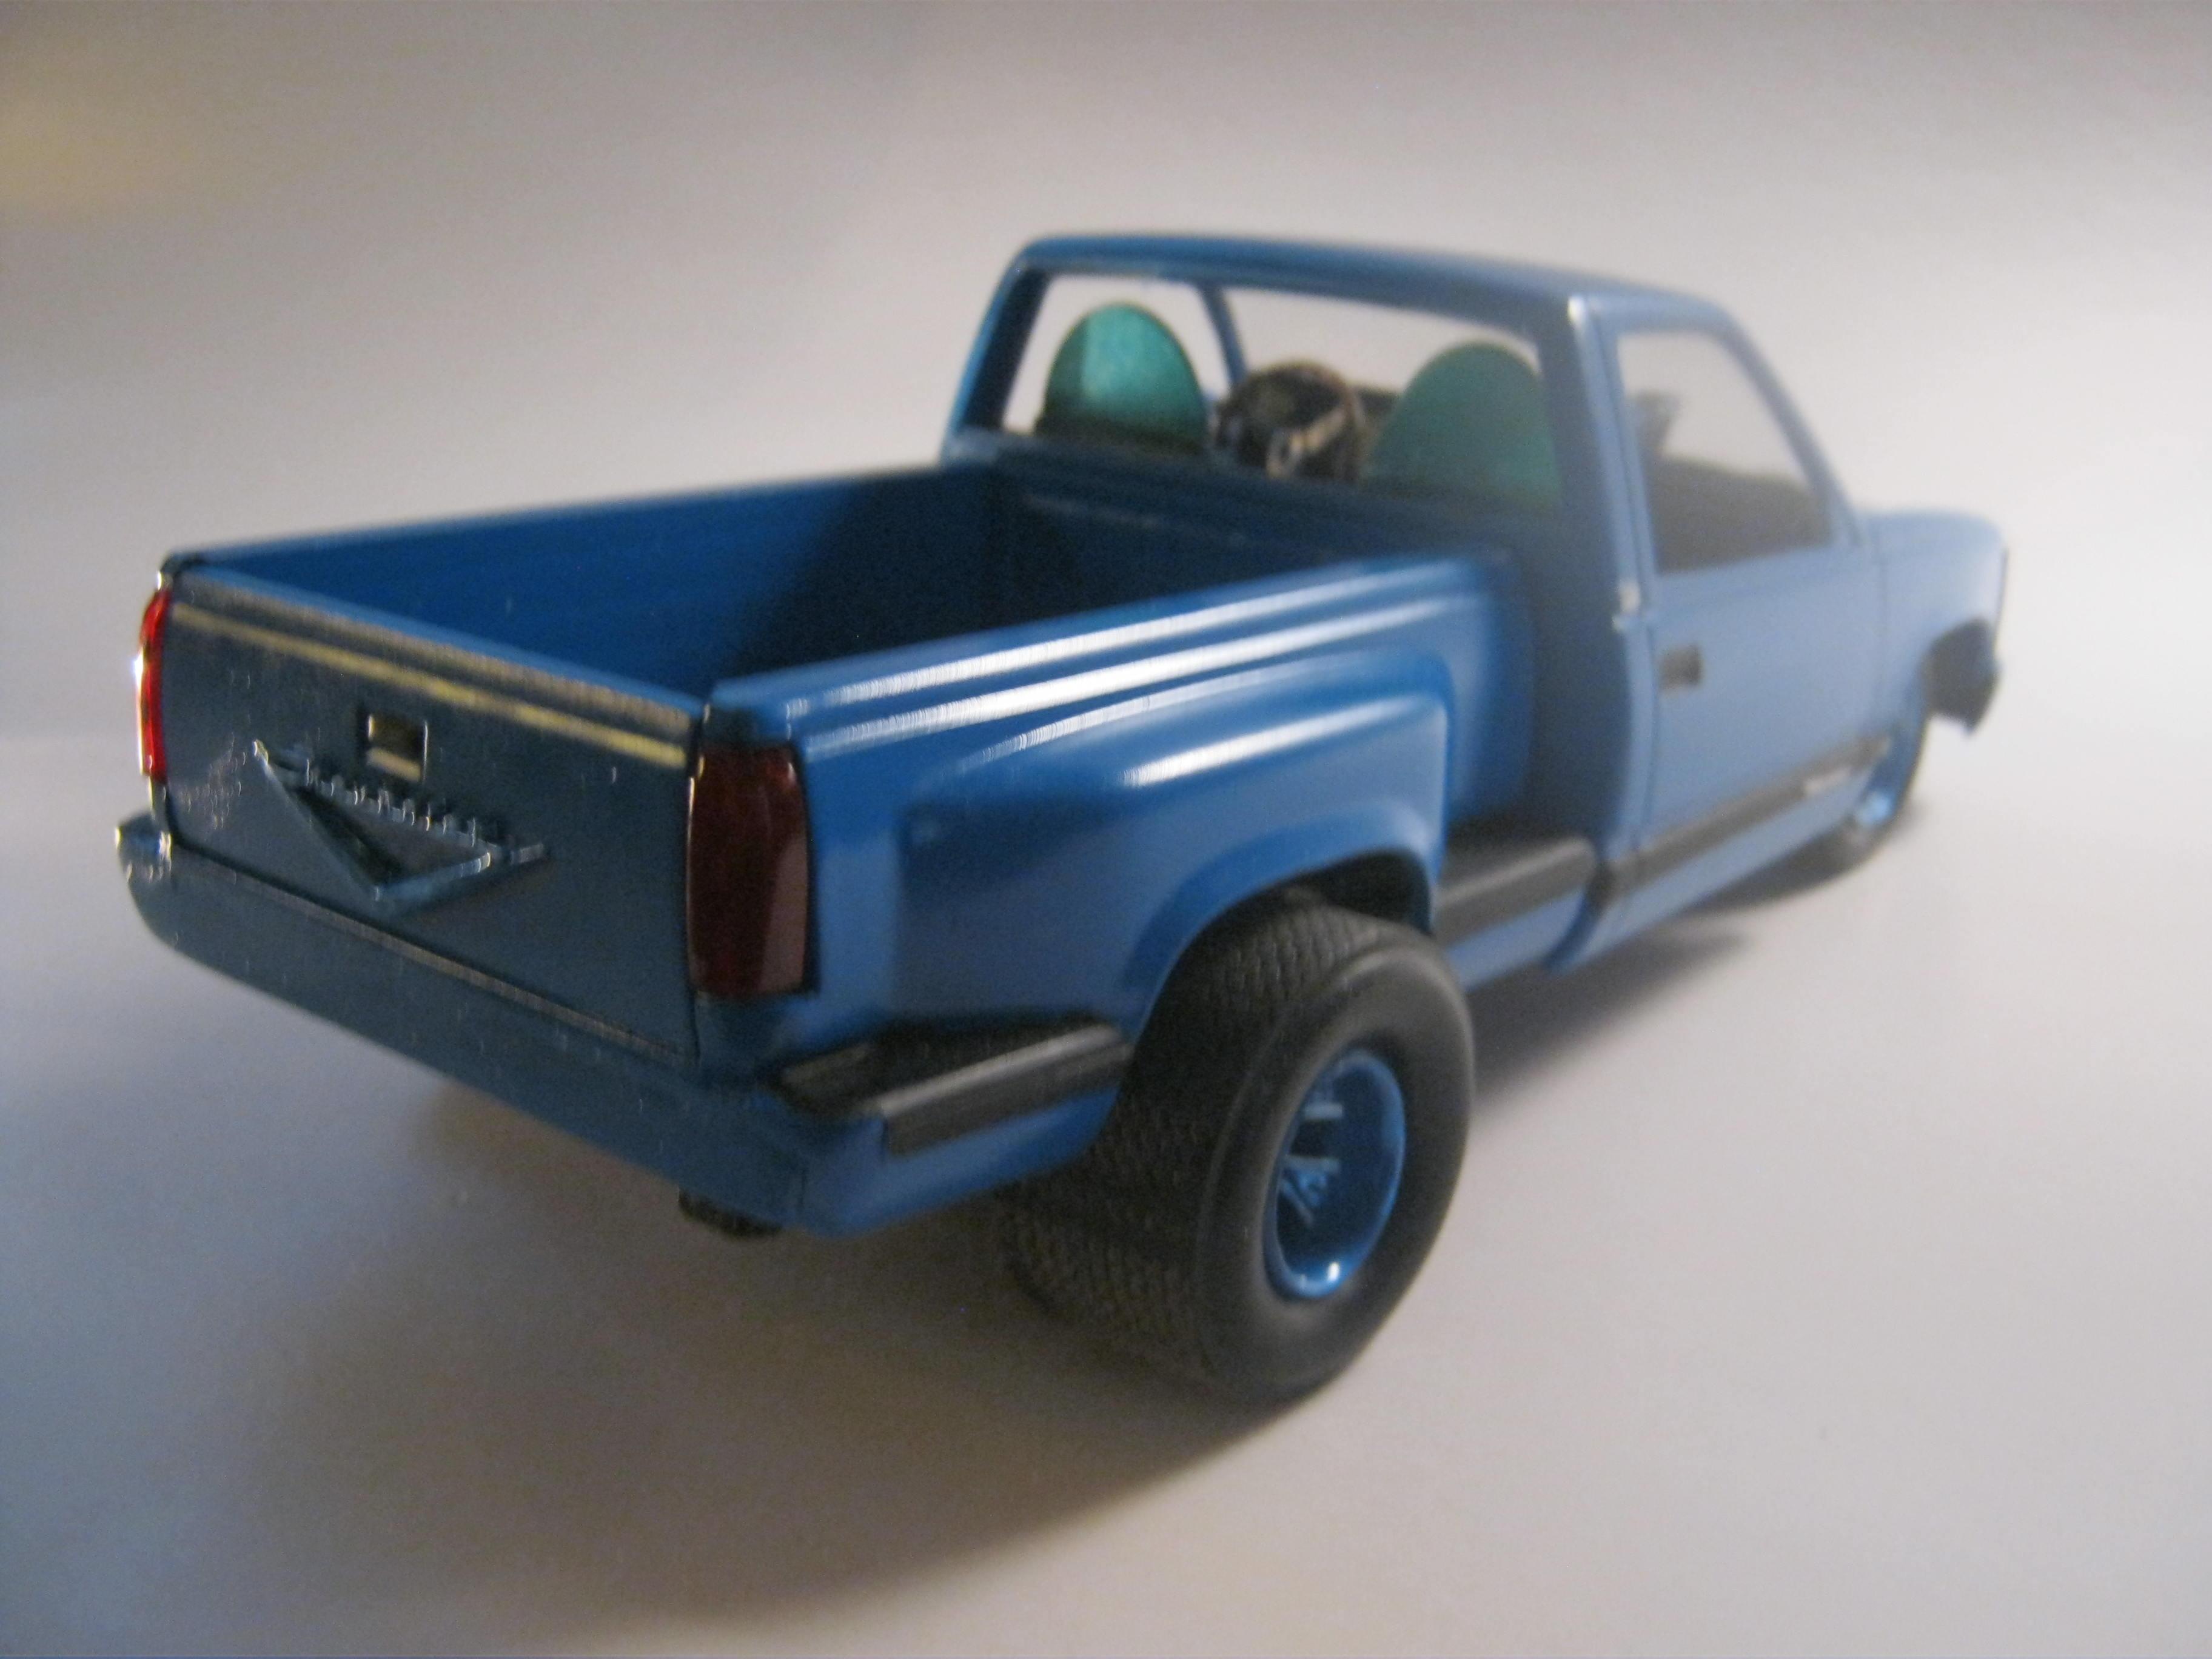
 Happy spring all,,finally getting warmer so just gettin a few things off the bench. This is I believe a 1990's early 2000's Chevy kit from the AMT Hot Trucks 3 pack kit. But he wanted a Hemi,,so,,let it be. Got this at a swap meet years ago,,5$ glue blob in a ziplock bag,,1/2 built and painted. I added some different tires+ rims, Put A HEMI Hi-rise duel carb from the junk leftovers bx,,,made it kindof a street/strip truck. Would also make a good pulling truck if I ran the headers upright thru the hood. Painted w/hardware store paint,,and hand painted rest. One thing for sure,,the back tires would last about 3 days on this,,lol Cheers S
-
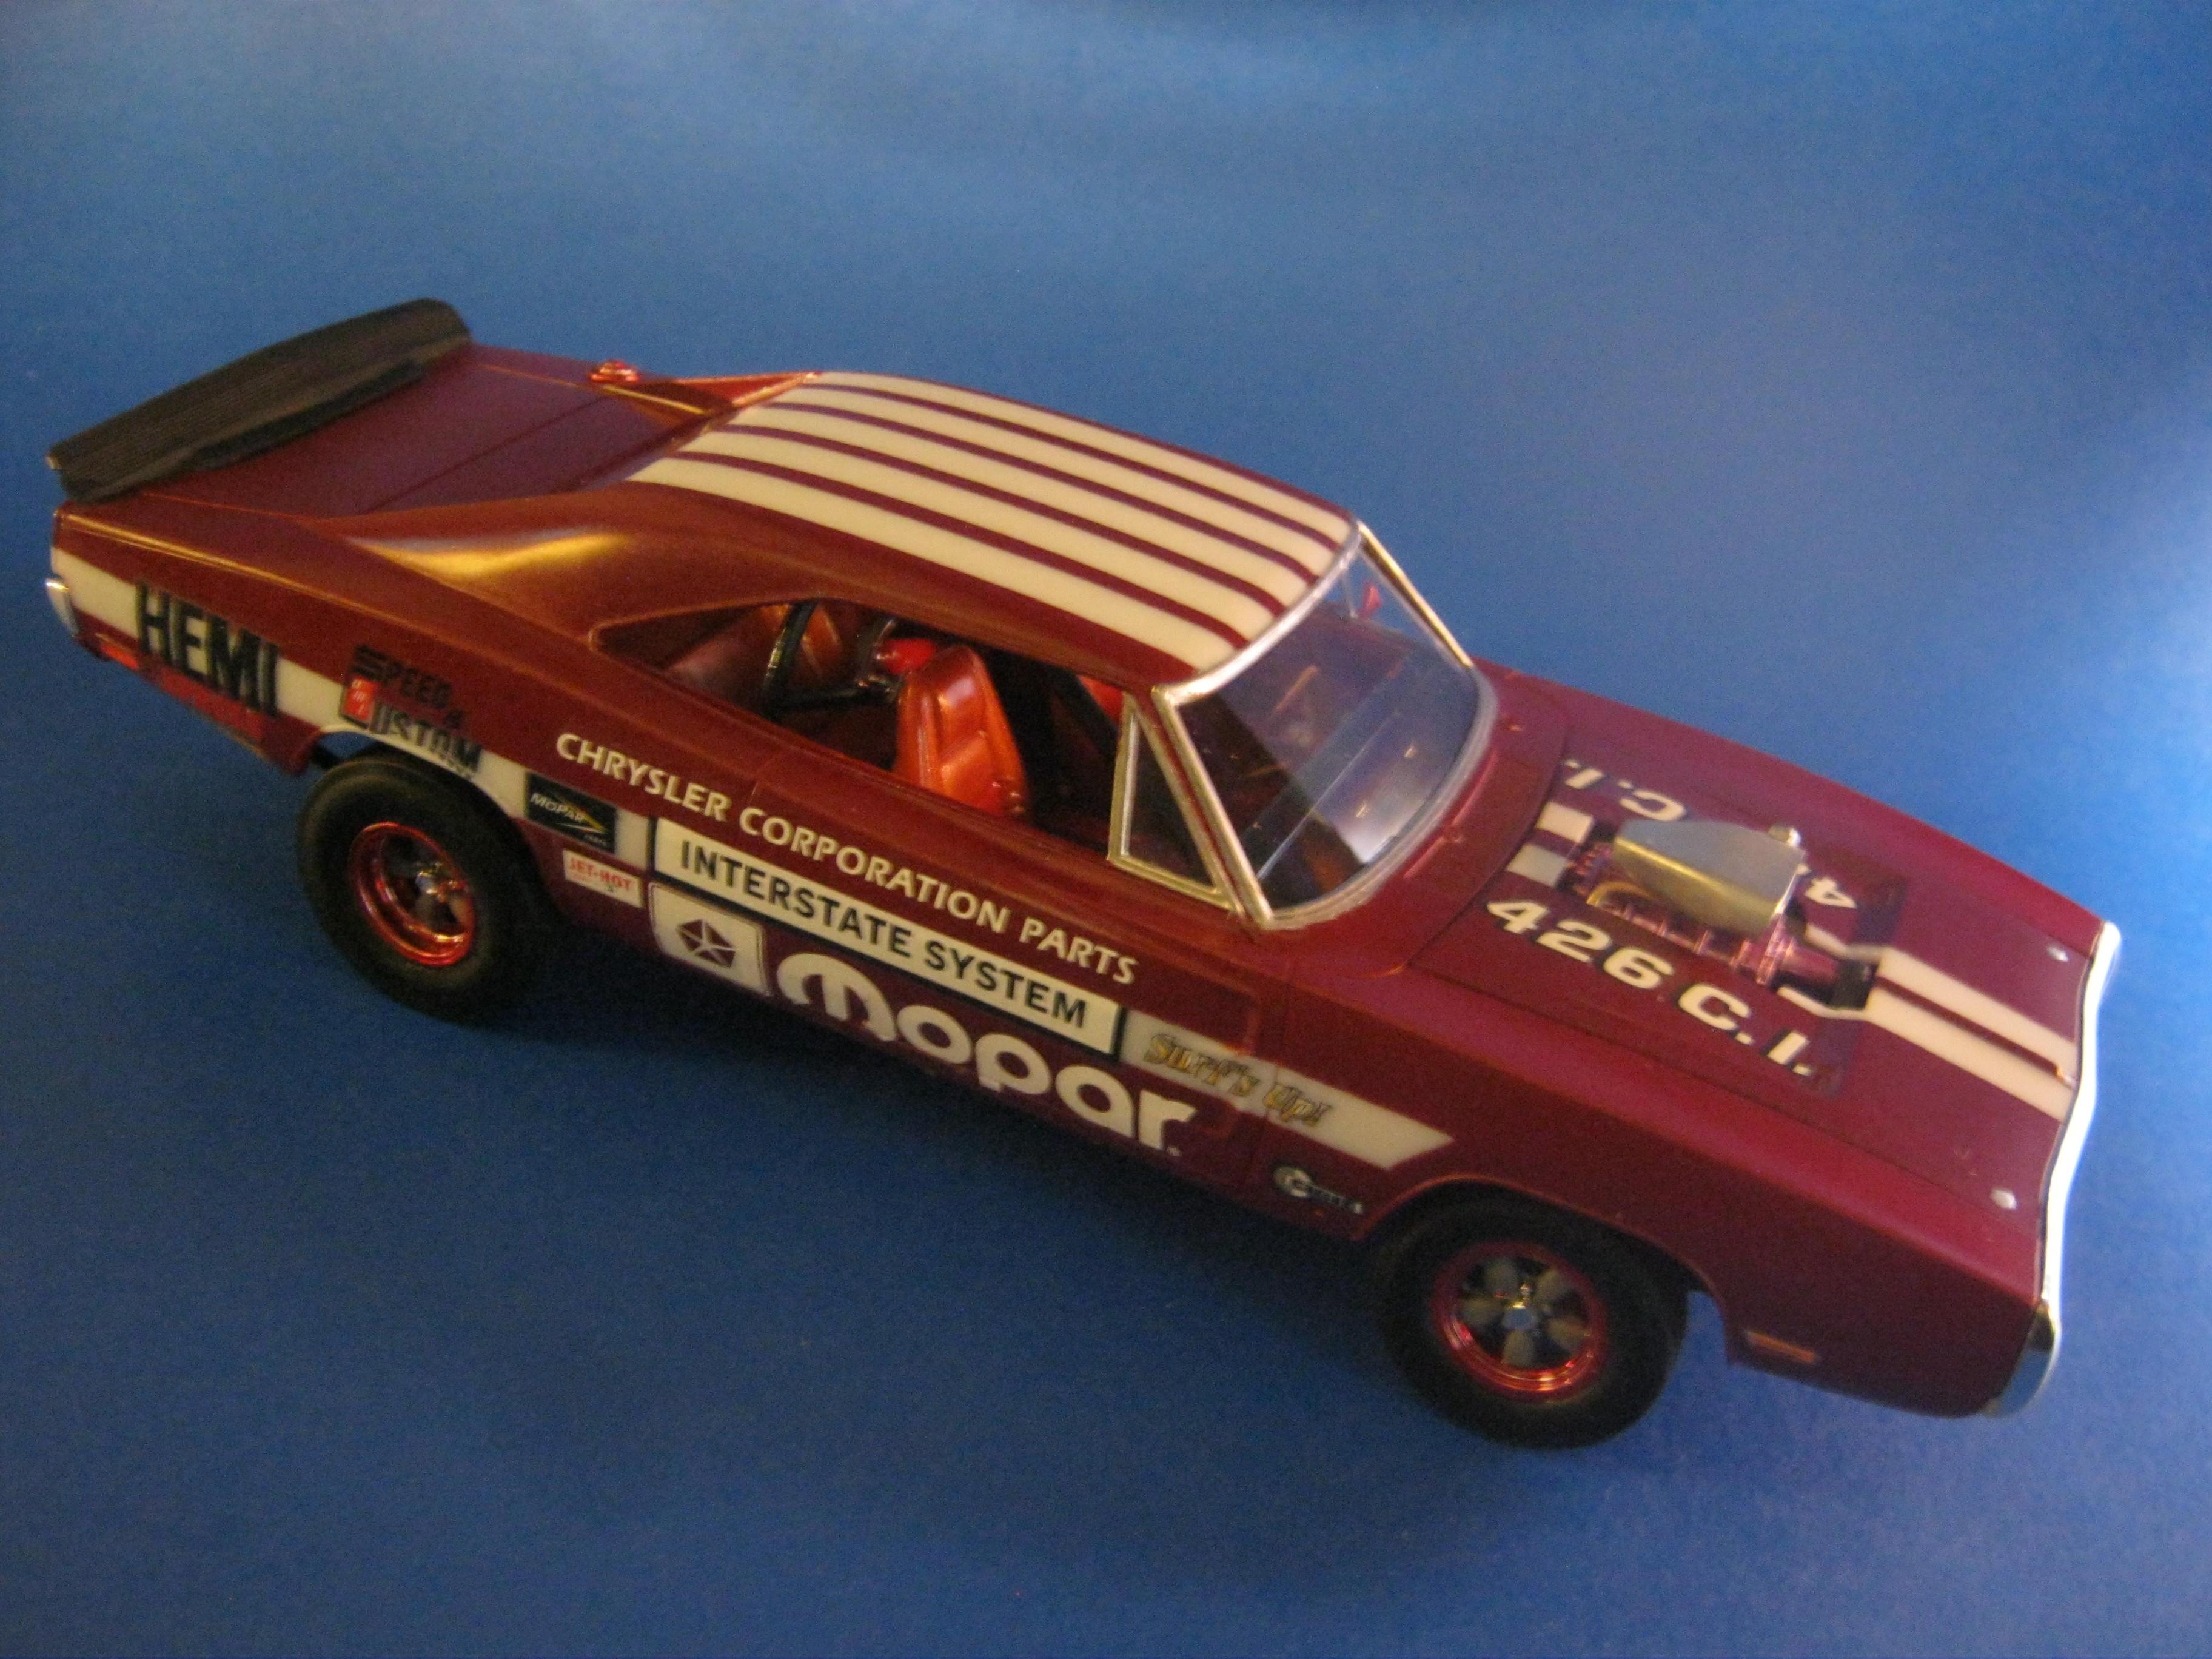
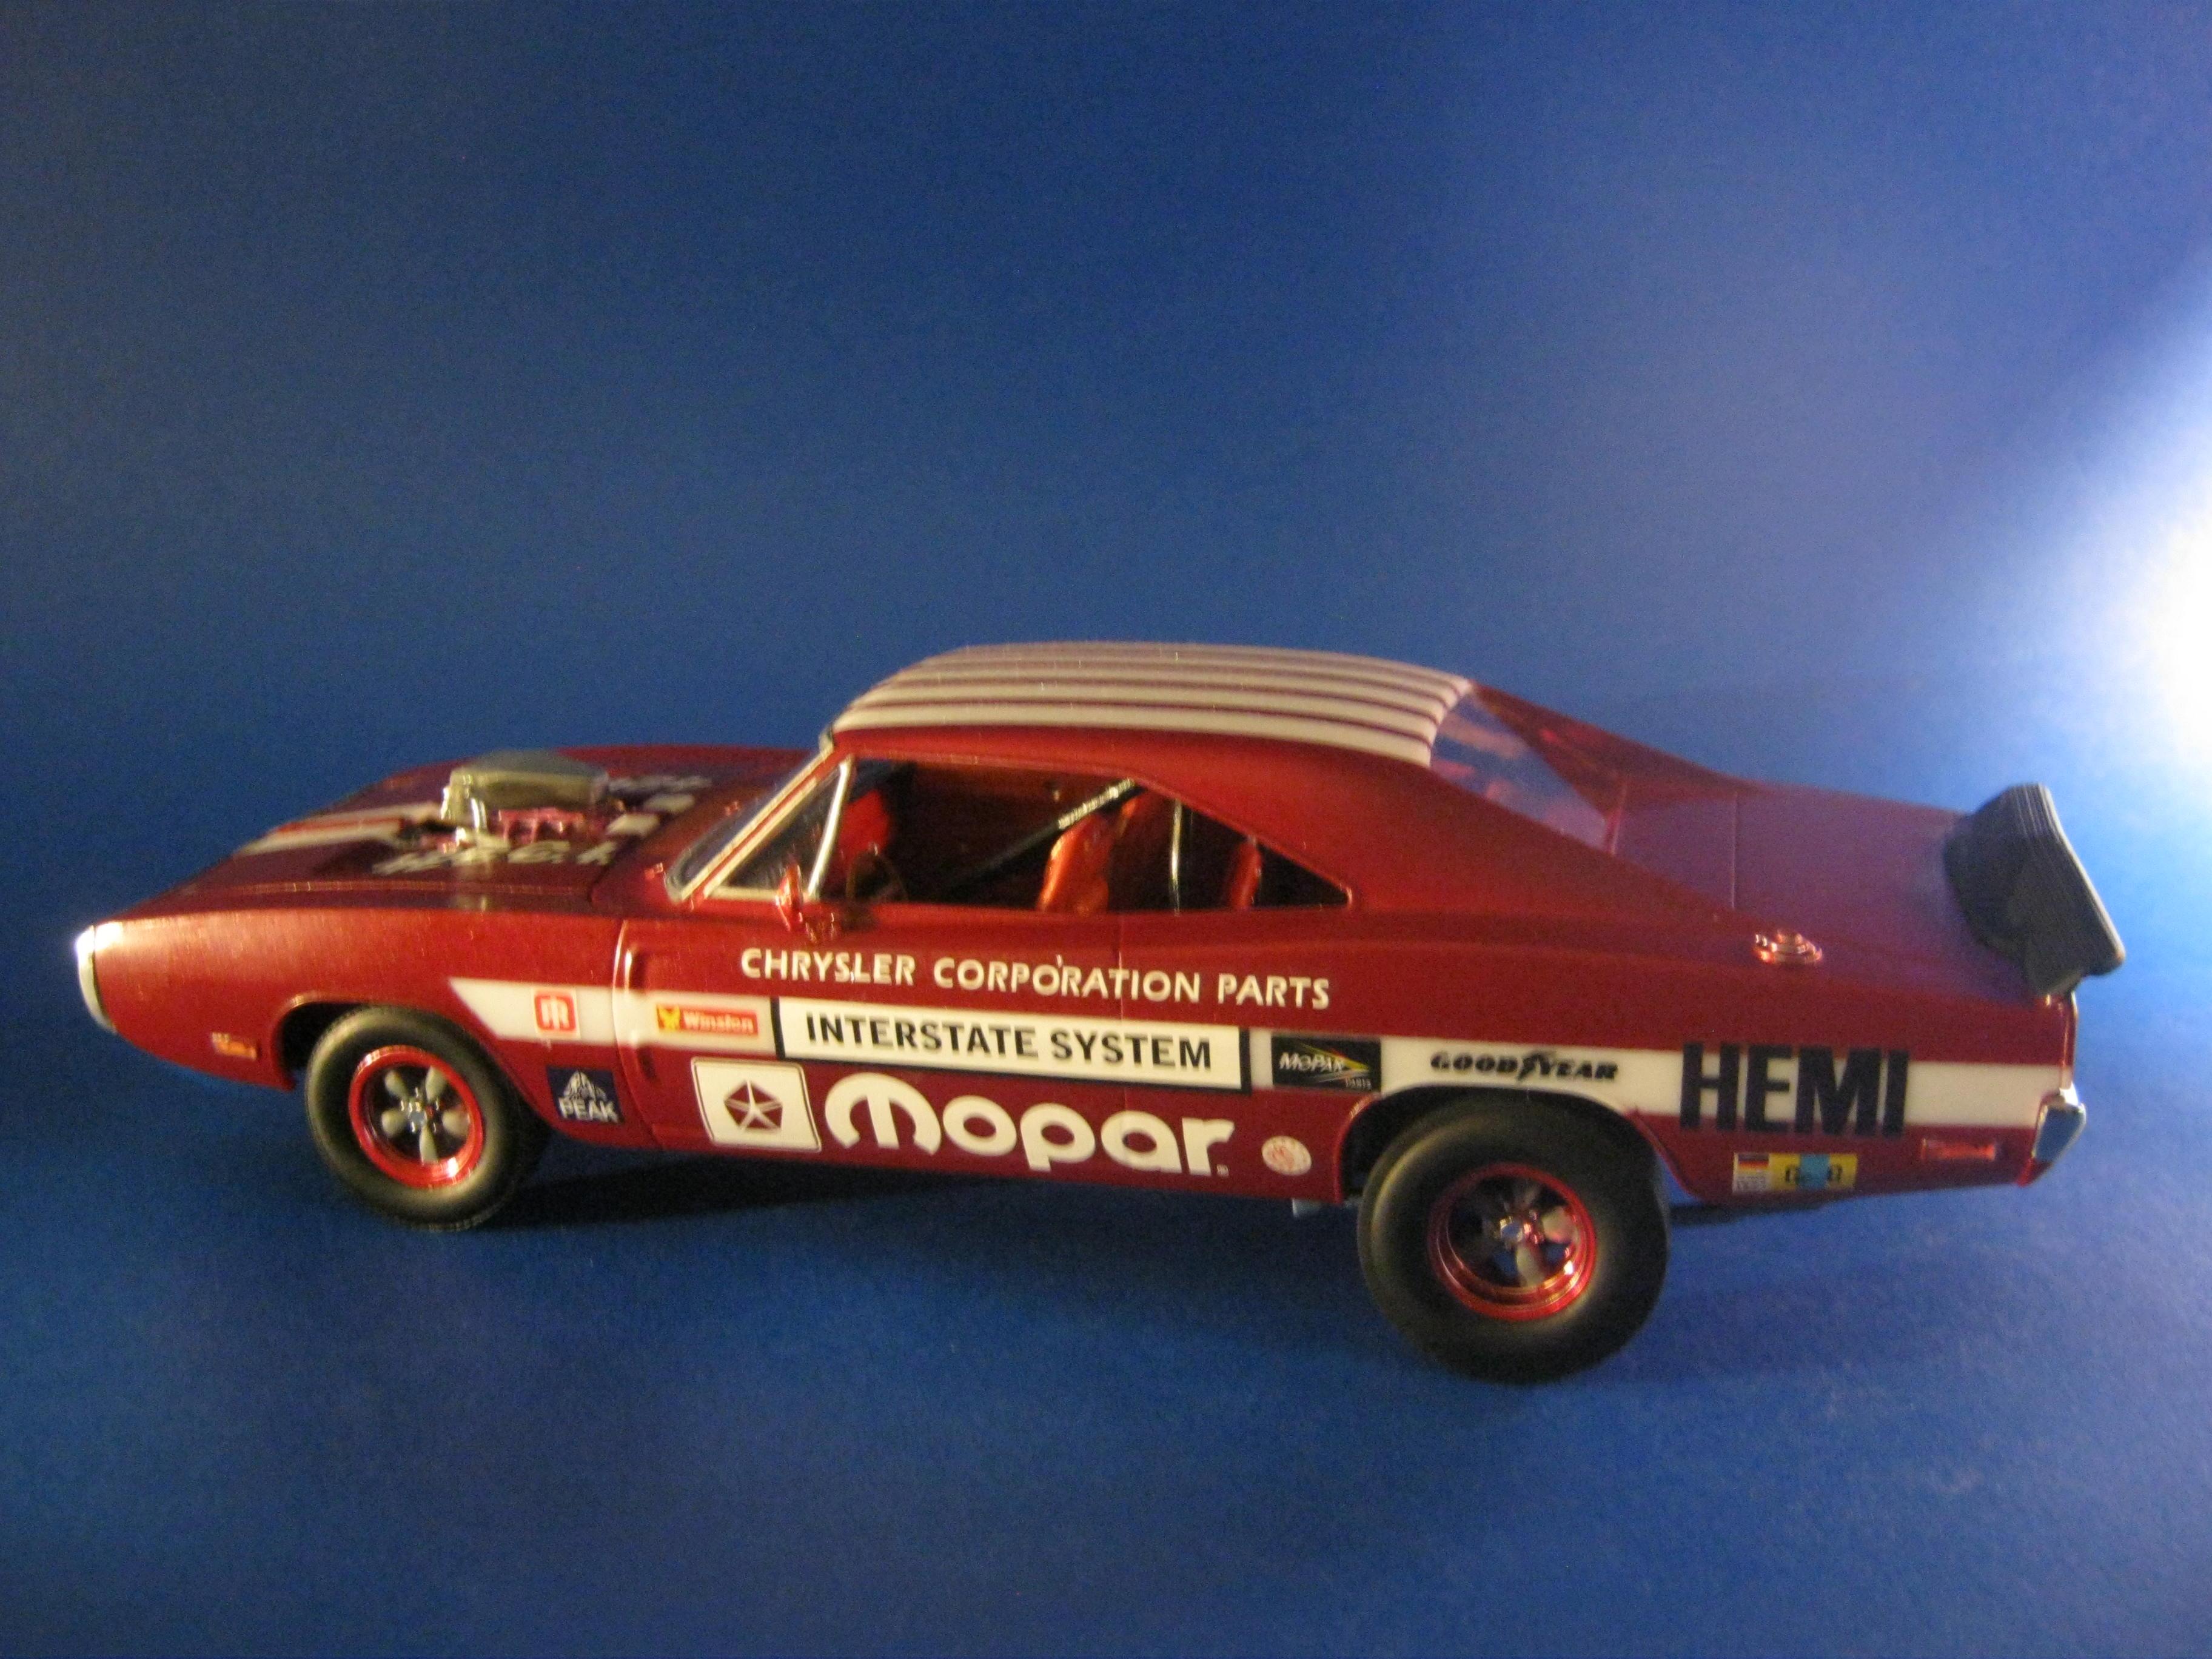
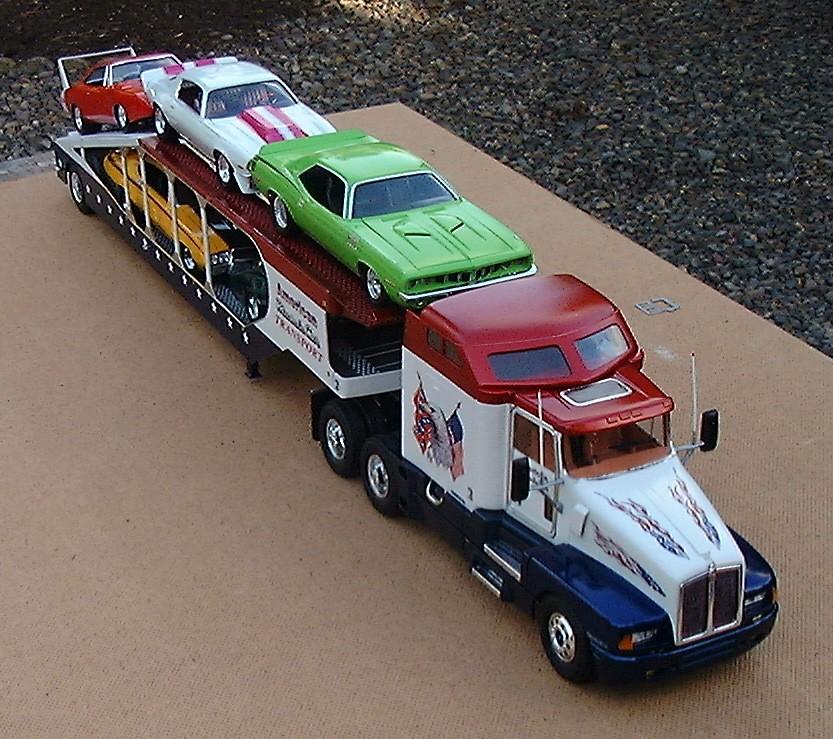
Revells Fast + Furious Charger,,from HL fun kit to do,,the kit had drag racer written all over it,,so I grabbed some leftovers from the decals bx,,add some basic wiring. and away I went,,,,, Sprayed from the can testors maroon qkdry. hand painted the rest. Only thing I wish the kit had came with would be some wheelie bars for the back. Revells hemi mtr for this is awsome,,alot of options you can do w/it. And I made a rear spoiler,,as all cars should have a wing or spoiler,lol. {kidding of course} Happy new year to all !
-
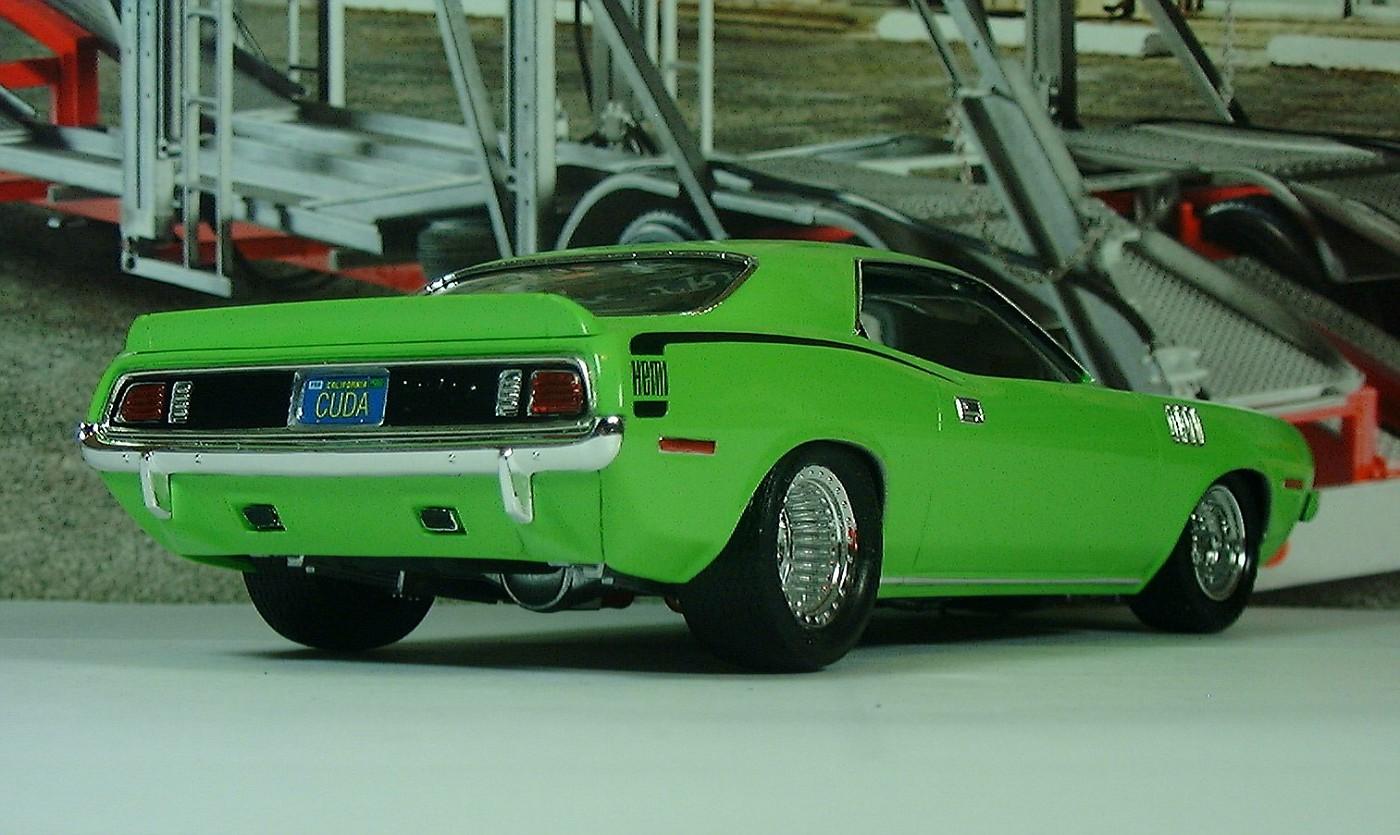
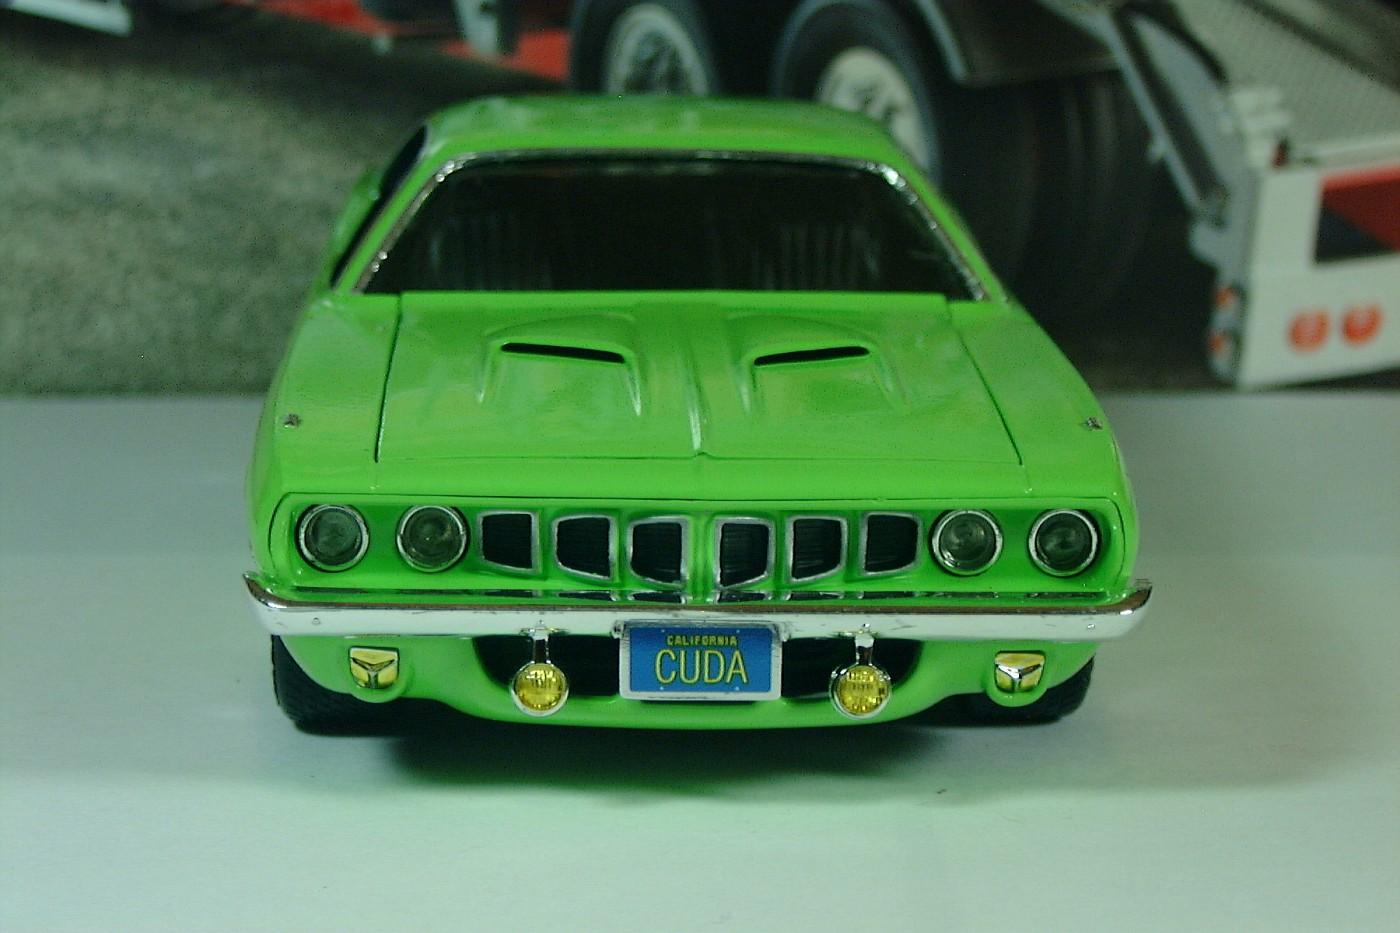
The first model car I ever tried to make when I began building as an adult was the Revell 1971 Cuda kit. I made it in Plum Crazy Purple, not really knowing what I was doing yet. It came out alright, but I always felt like I could have done better. I got this kit as a Christmas present and set out to make a good looking build. I think it looks great in Sublime. [url=https://flic.kr/p/2kYQFwc][img]https://live.staticflickr.com/65535/51182693235_7c4d03386a_k.jpg[/img][/url][url=https://flic.kr/p/2kYQFwc]SAM_0491[/url] by [url=https://www.flickr.com/photos/152855016@N06/]Eric Lucas[/url], on Flickr [url=https://flic.kr/p/2kYQFvL][img]https://live.staticflickr.com/65535/51182693210_5c91030a6a_k.jpg[/img][/url][url=https://flic.kr/p/2kYQFvL]SAM_0492[/url] by [url=https://www.flickr.com/photos/152855016@N06/]Eric Lucas[/url], on Flickr [url=https://flic.kr/p/2kYFACE][img]https://live.staticflickr.com/65535/51180920782_54bf2bfa06_k.jpg[/img][/url][url=https://flic.kr/p/2kYFACE]SAM_0493[/url] by [url=https://www.flickr.com/photos/152855016@N06/]Eric Lucas[/url], on Flickr [url=https://flic.kr/p/2kYFAC9][img]https://live.staticflickr.com/65535/51180920752_b475ef94c2_k.jpg[/img][/url][url=https://flic.kr/p/2kYFAC9]SAM_0494[/url] by [url=https://www.flickr.com/photos/152855016@N06/]Eric Lucas[/url], on Flickr [url=https://flic.kr/p/2kYFABc][img]https://live.staticflickr.com/65535/51180920697_6b0d4e744f_k.jpg[/img][/url][url=https://flic.kr/p/2kYFABc]SAM_0495[/url] by [url=https://www.flickr.com/photos/152855016@N06/]Eric Lucas[/url], on Flickr [url=https://flic.kr/p/2kYFAG2][img]https://live.staticflickr.com/65535/51180920977_59a584ca0a_k.jpg[/img][/url][url=https://flic.kr/p/2kYFAG2]SAM_0489[/url] by [url=https://www.flickr.com/photos/152855016@N06/]Eric Lucas[/url], on Flickr [url=https://flic.kr/p/2kYFAEZ][img]https://live.staticflickr.com/65535/51180920917_6fdbdc7145_k.jpg[/img][/url][url=https://flic.kr/p/2kYFAEZ]SAM_0490[/url] by [url=https://www.flickr.com/photos/152855016@N06/]Eric Lucas[/url], on Flickr Having trouble with the links, so I had to attach a few photos.
-
 I’m building a 1969 pro modeler dodge Daytona with two 426 HEMI’s put together as a 852ci V16 backed up by a 4speed and Dana 60. It will be biult as a land speed/dodge prototype mythical monster that could probably make close to 1000hp and 1000ft/lbs of torque (my hp-torque figures are only mythic and my not be correct)
-
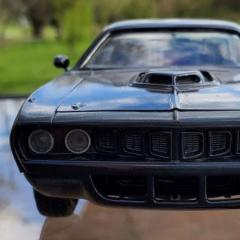
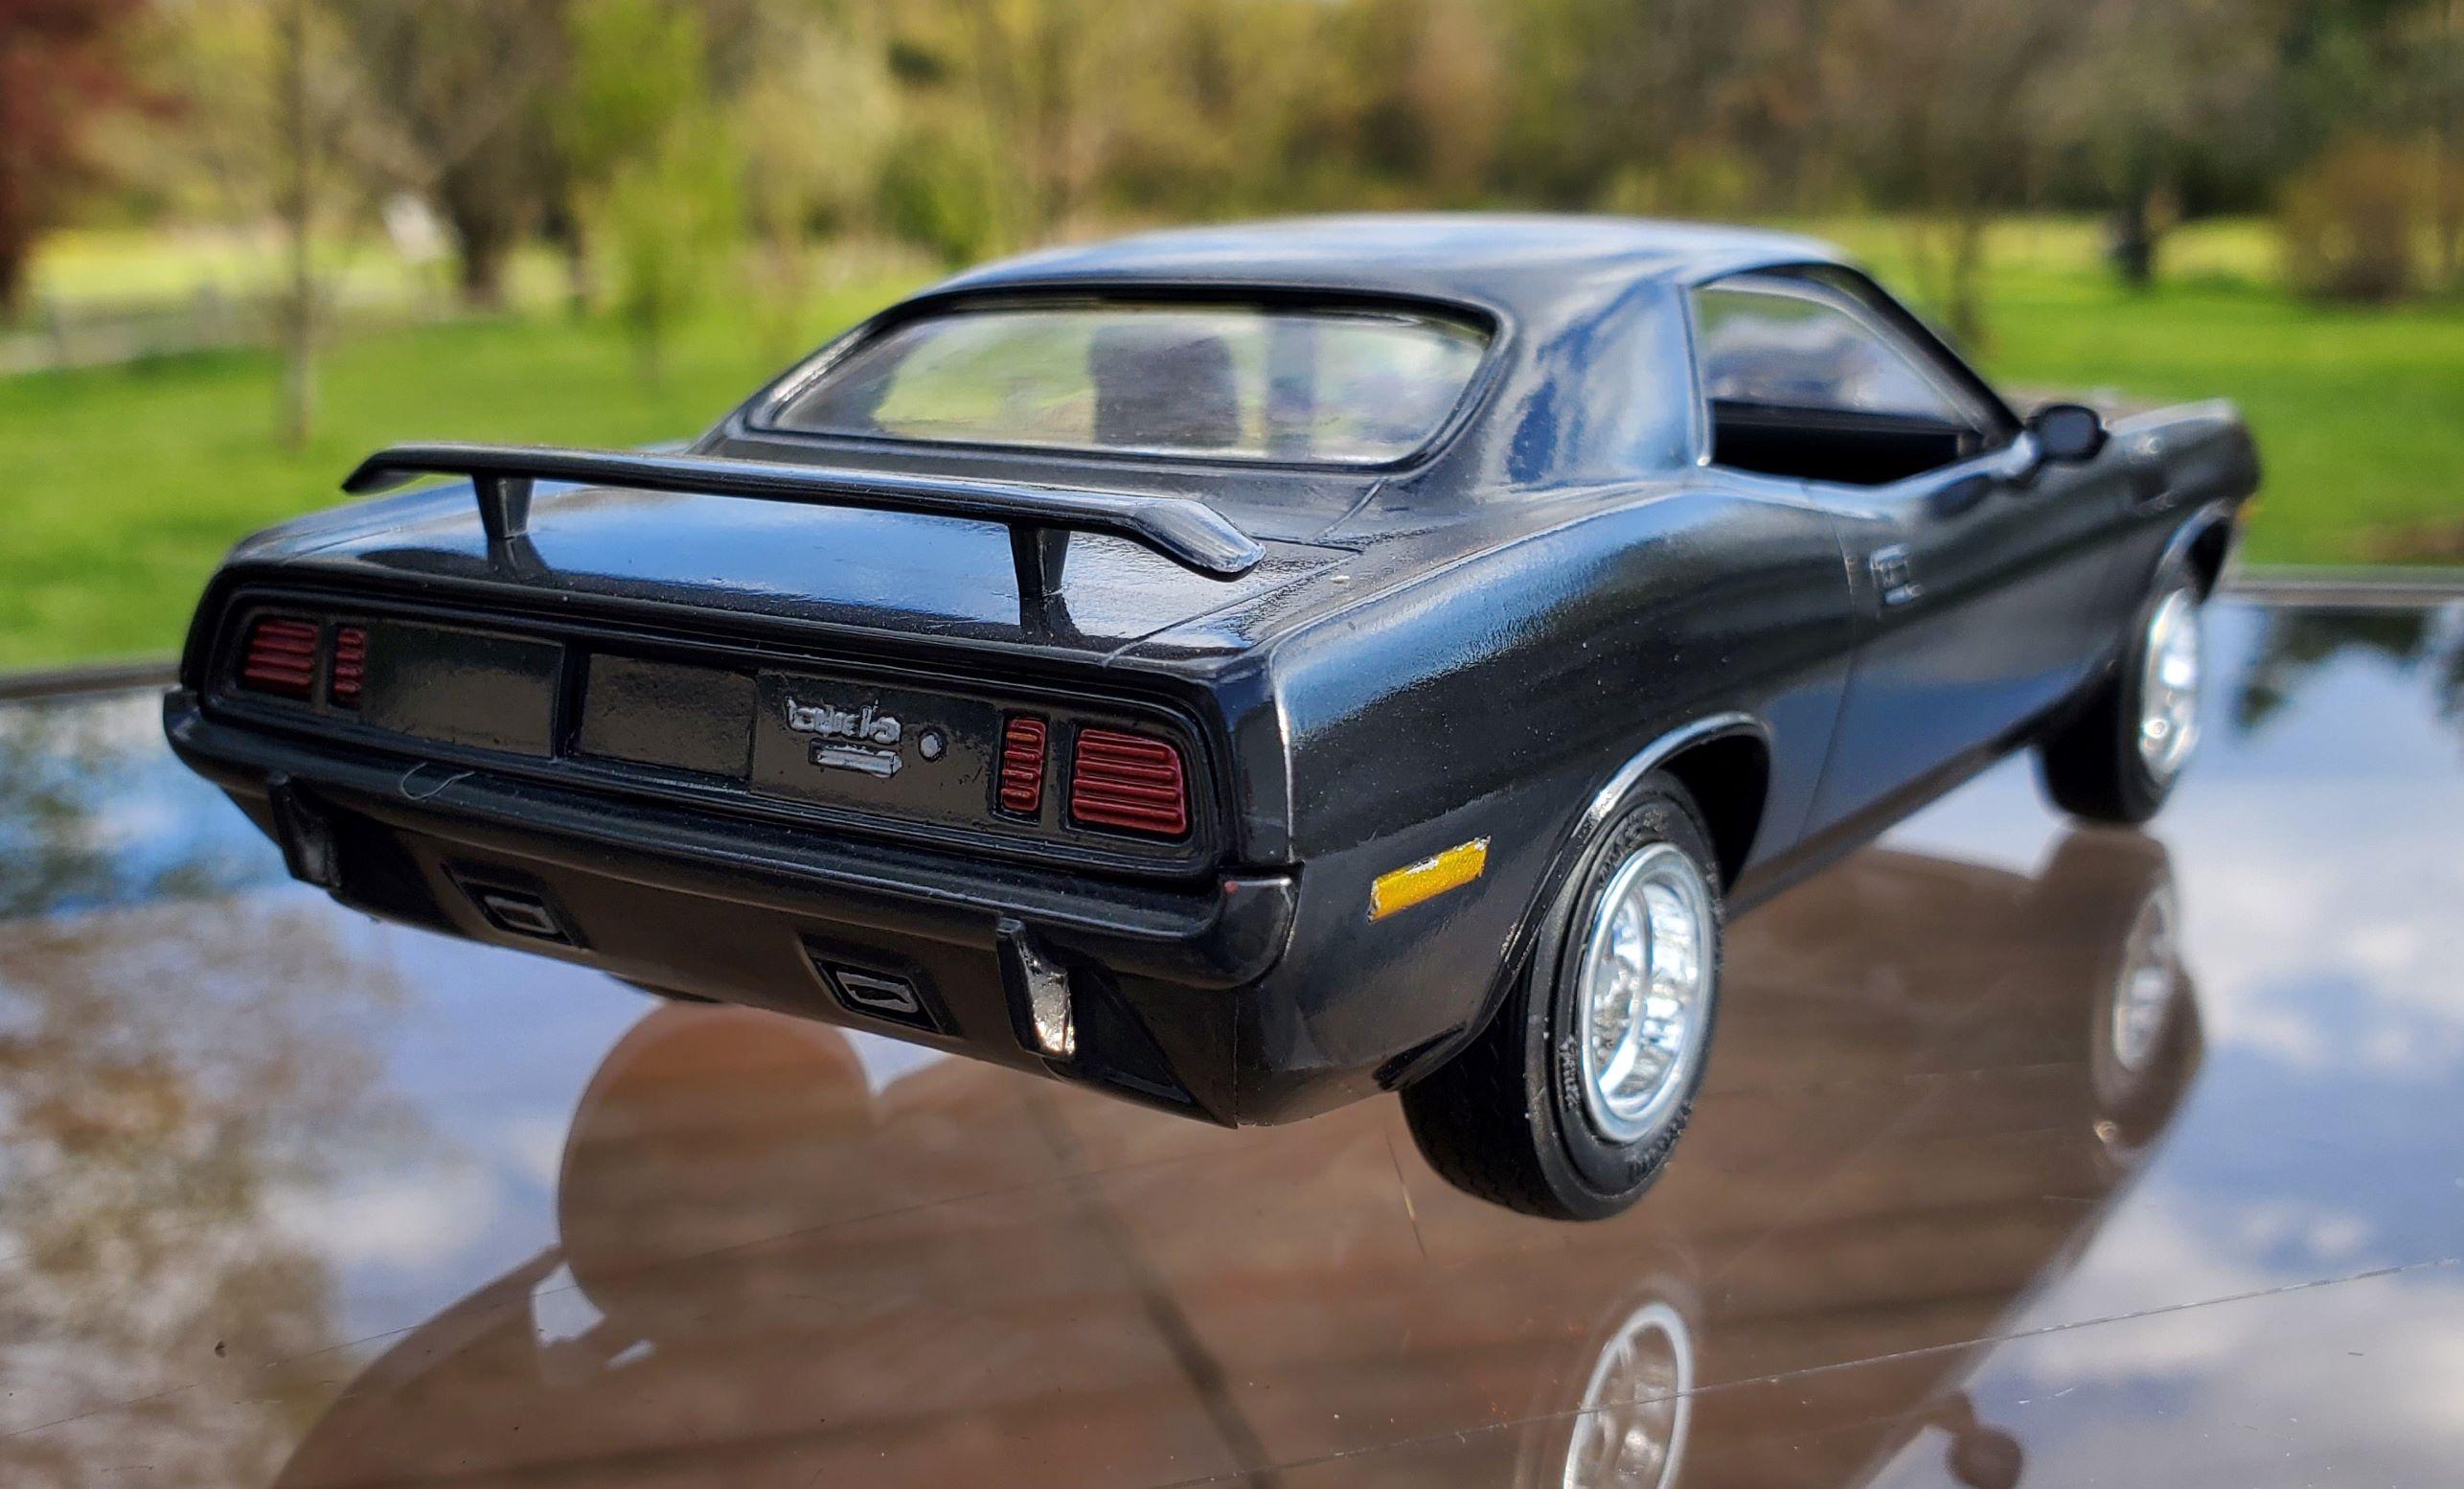
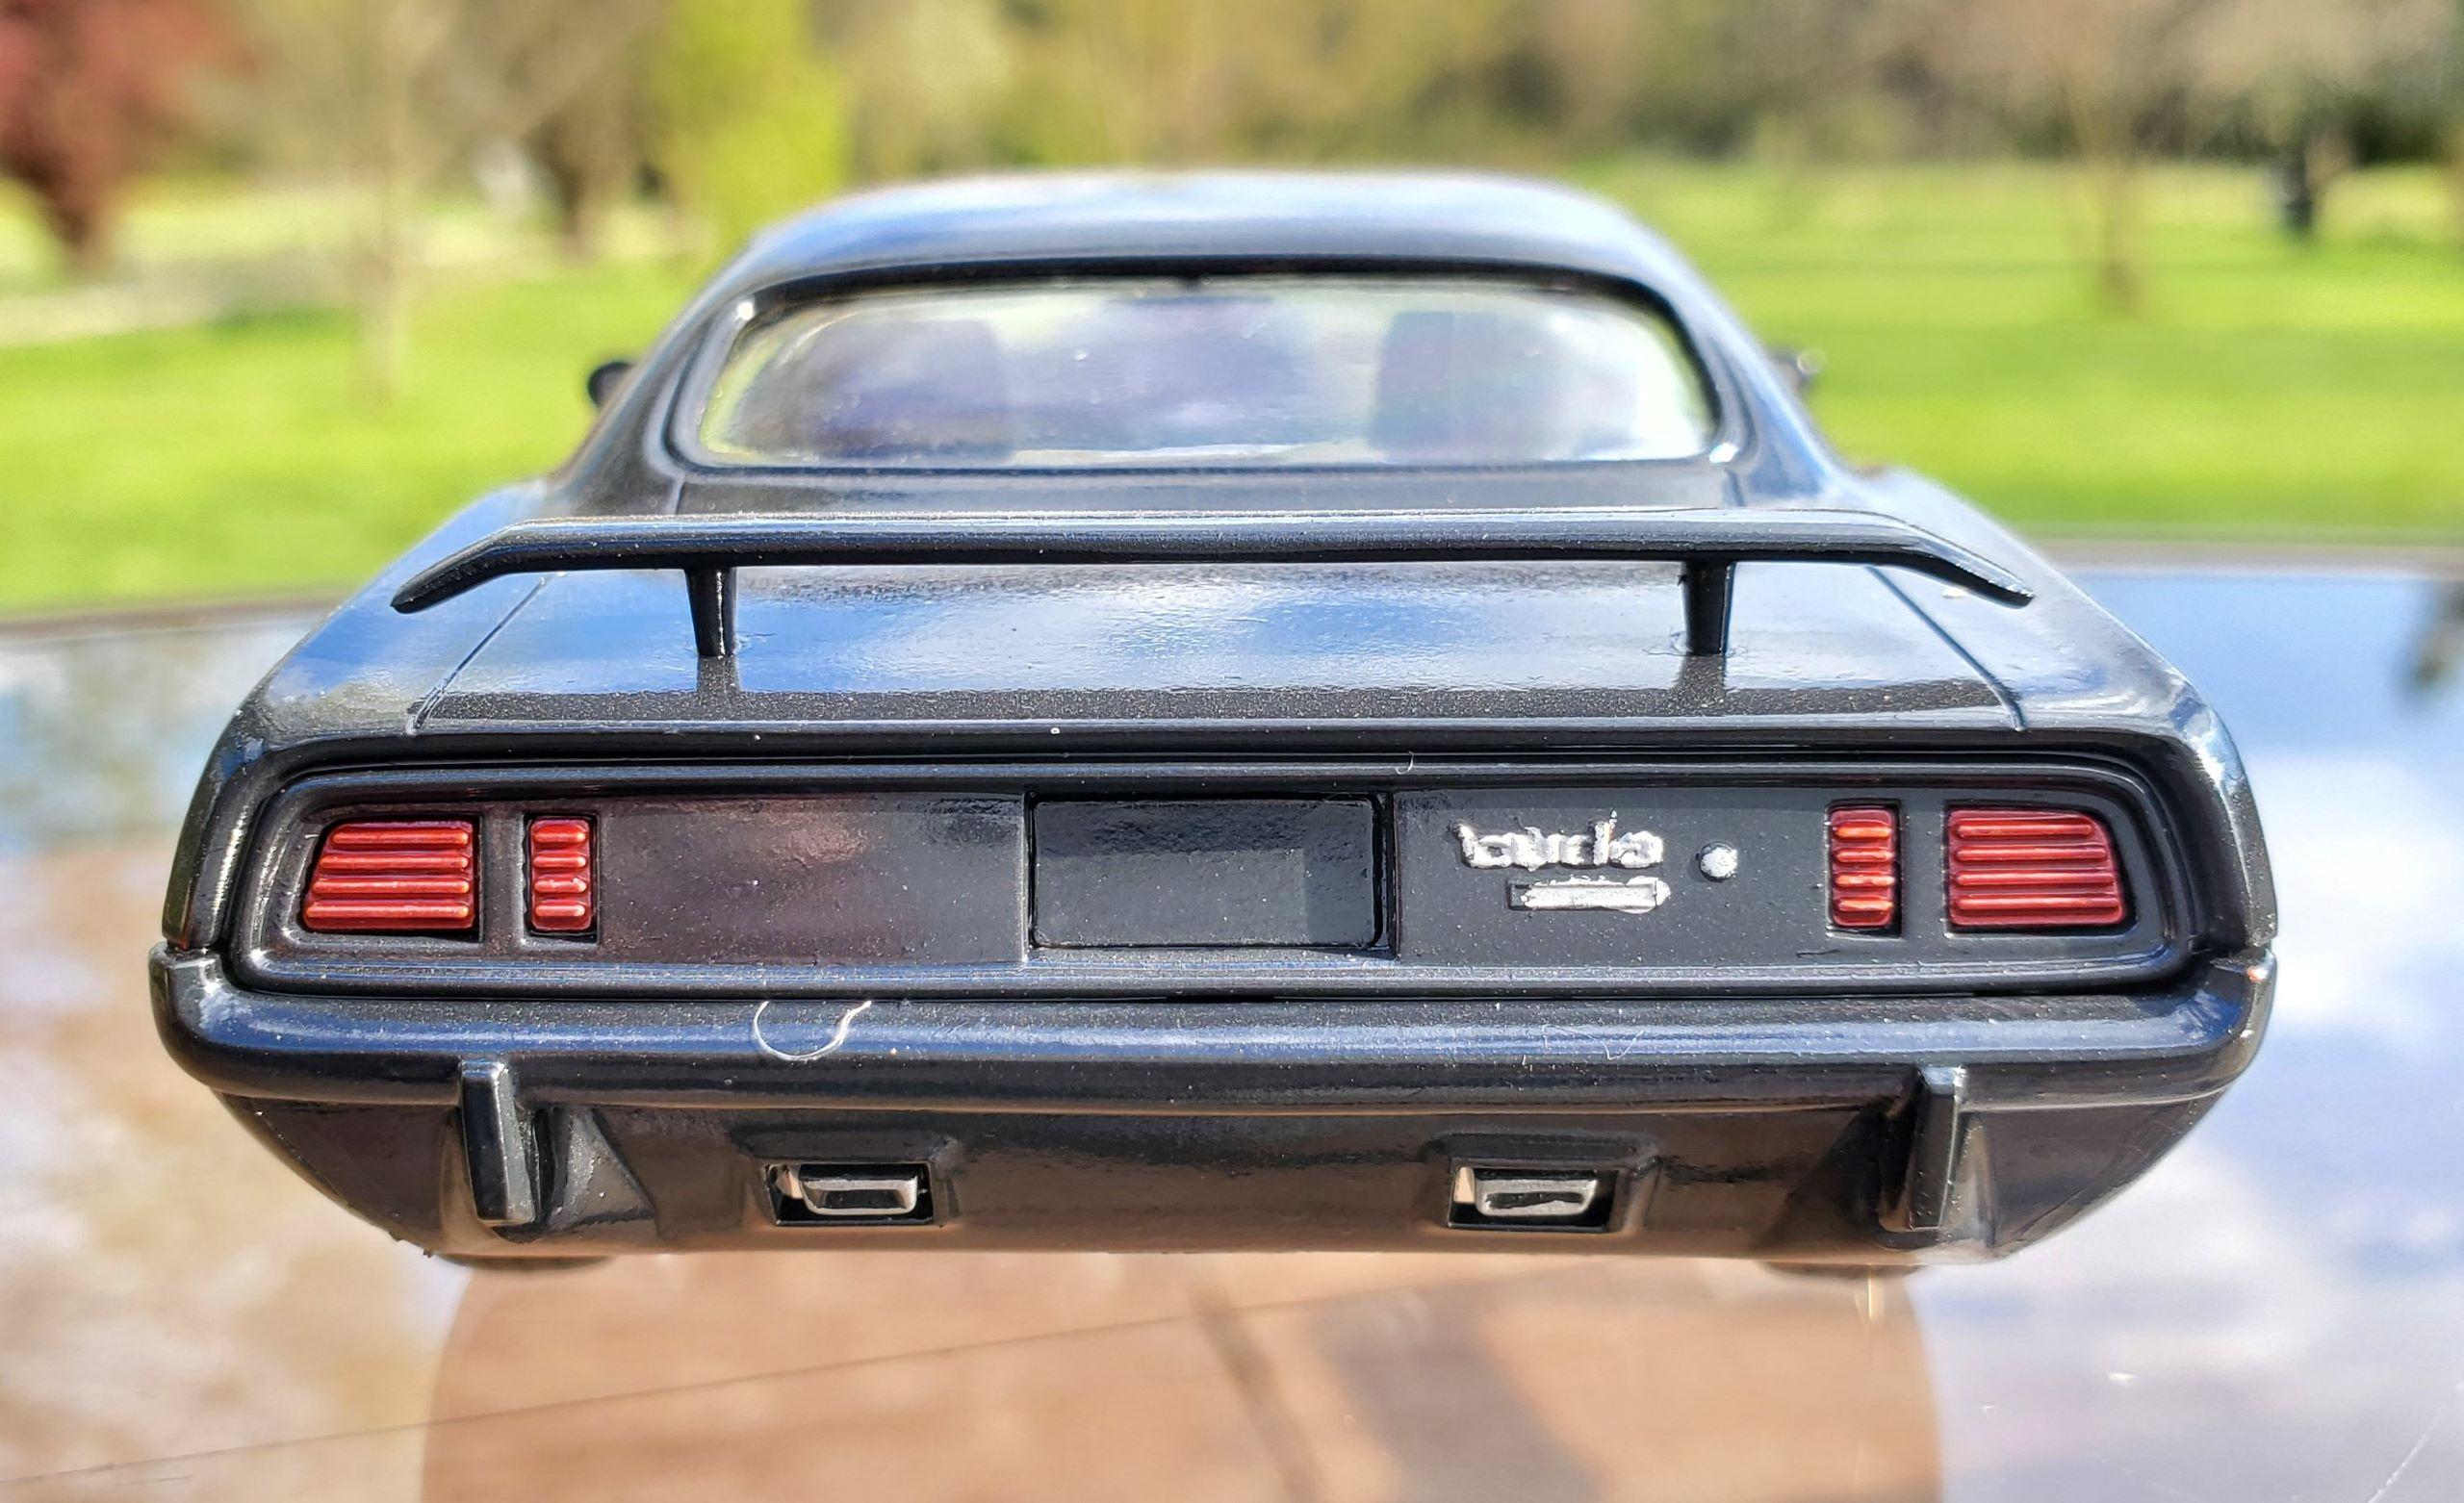
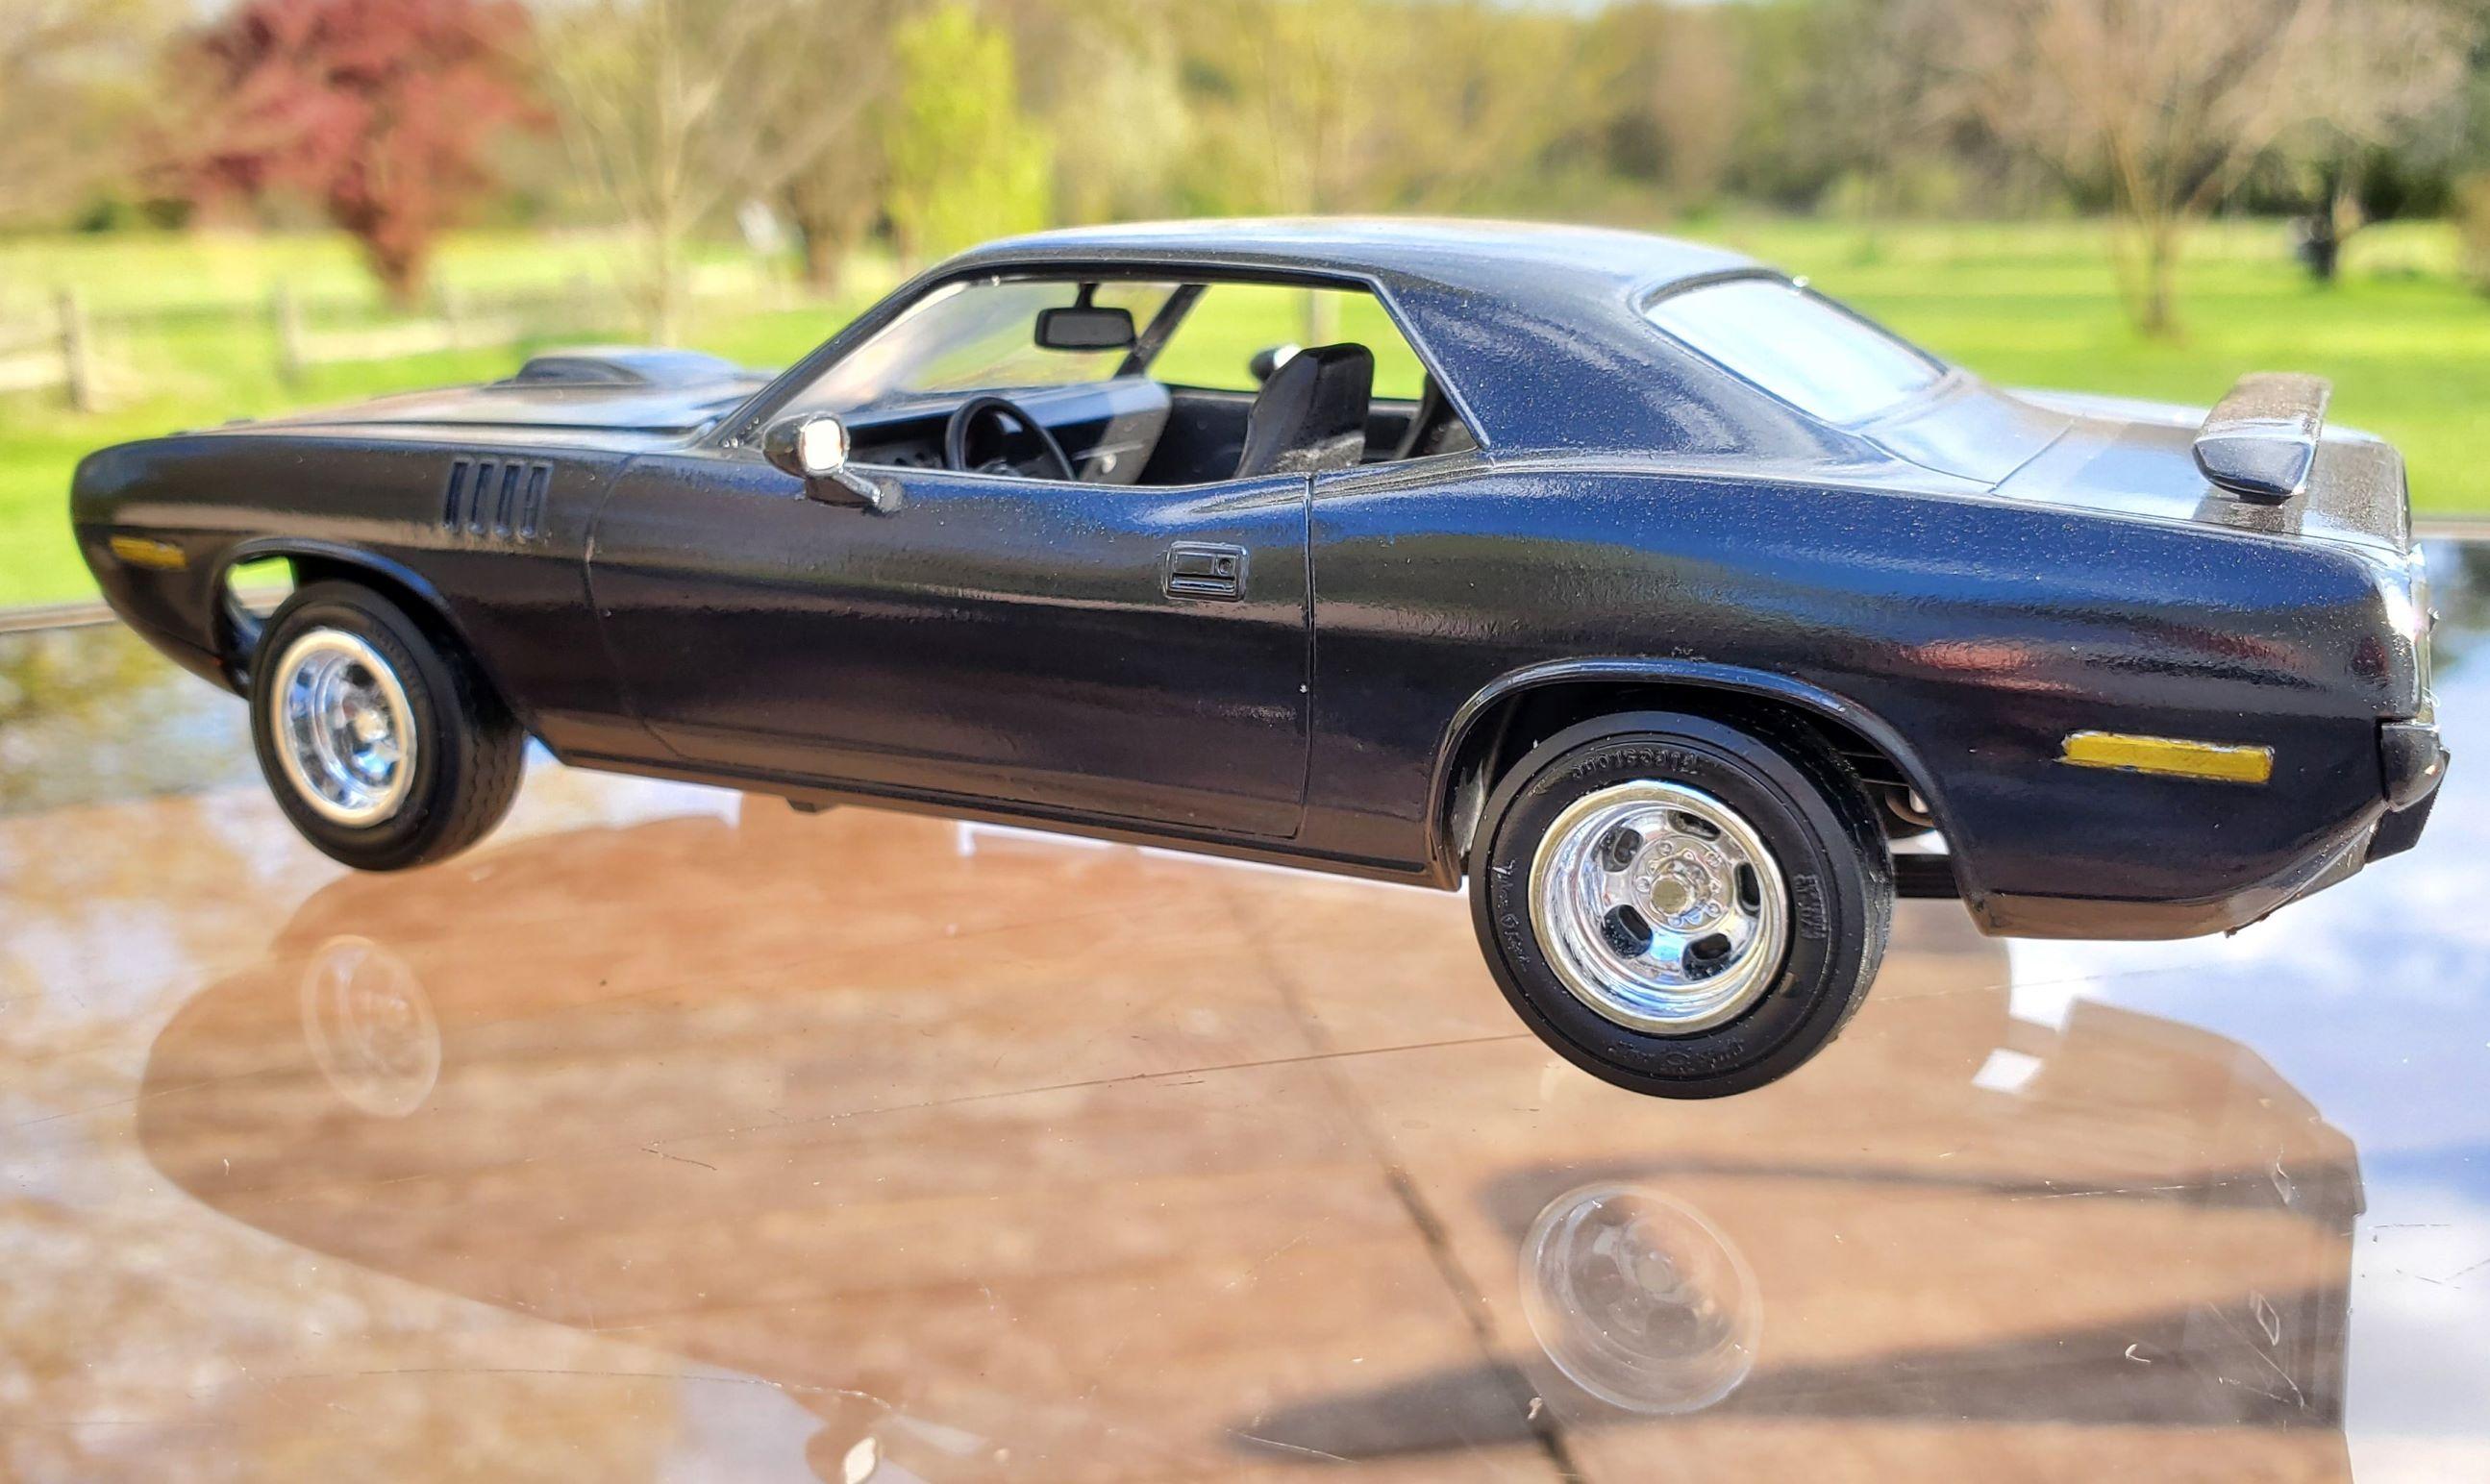
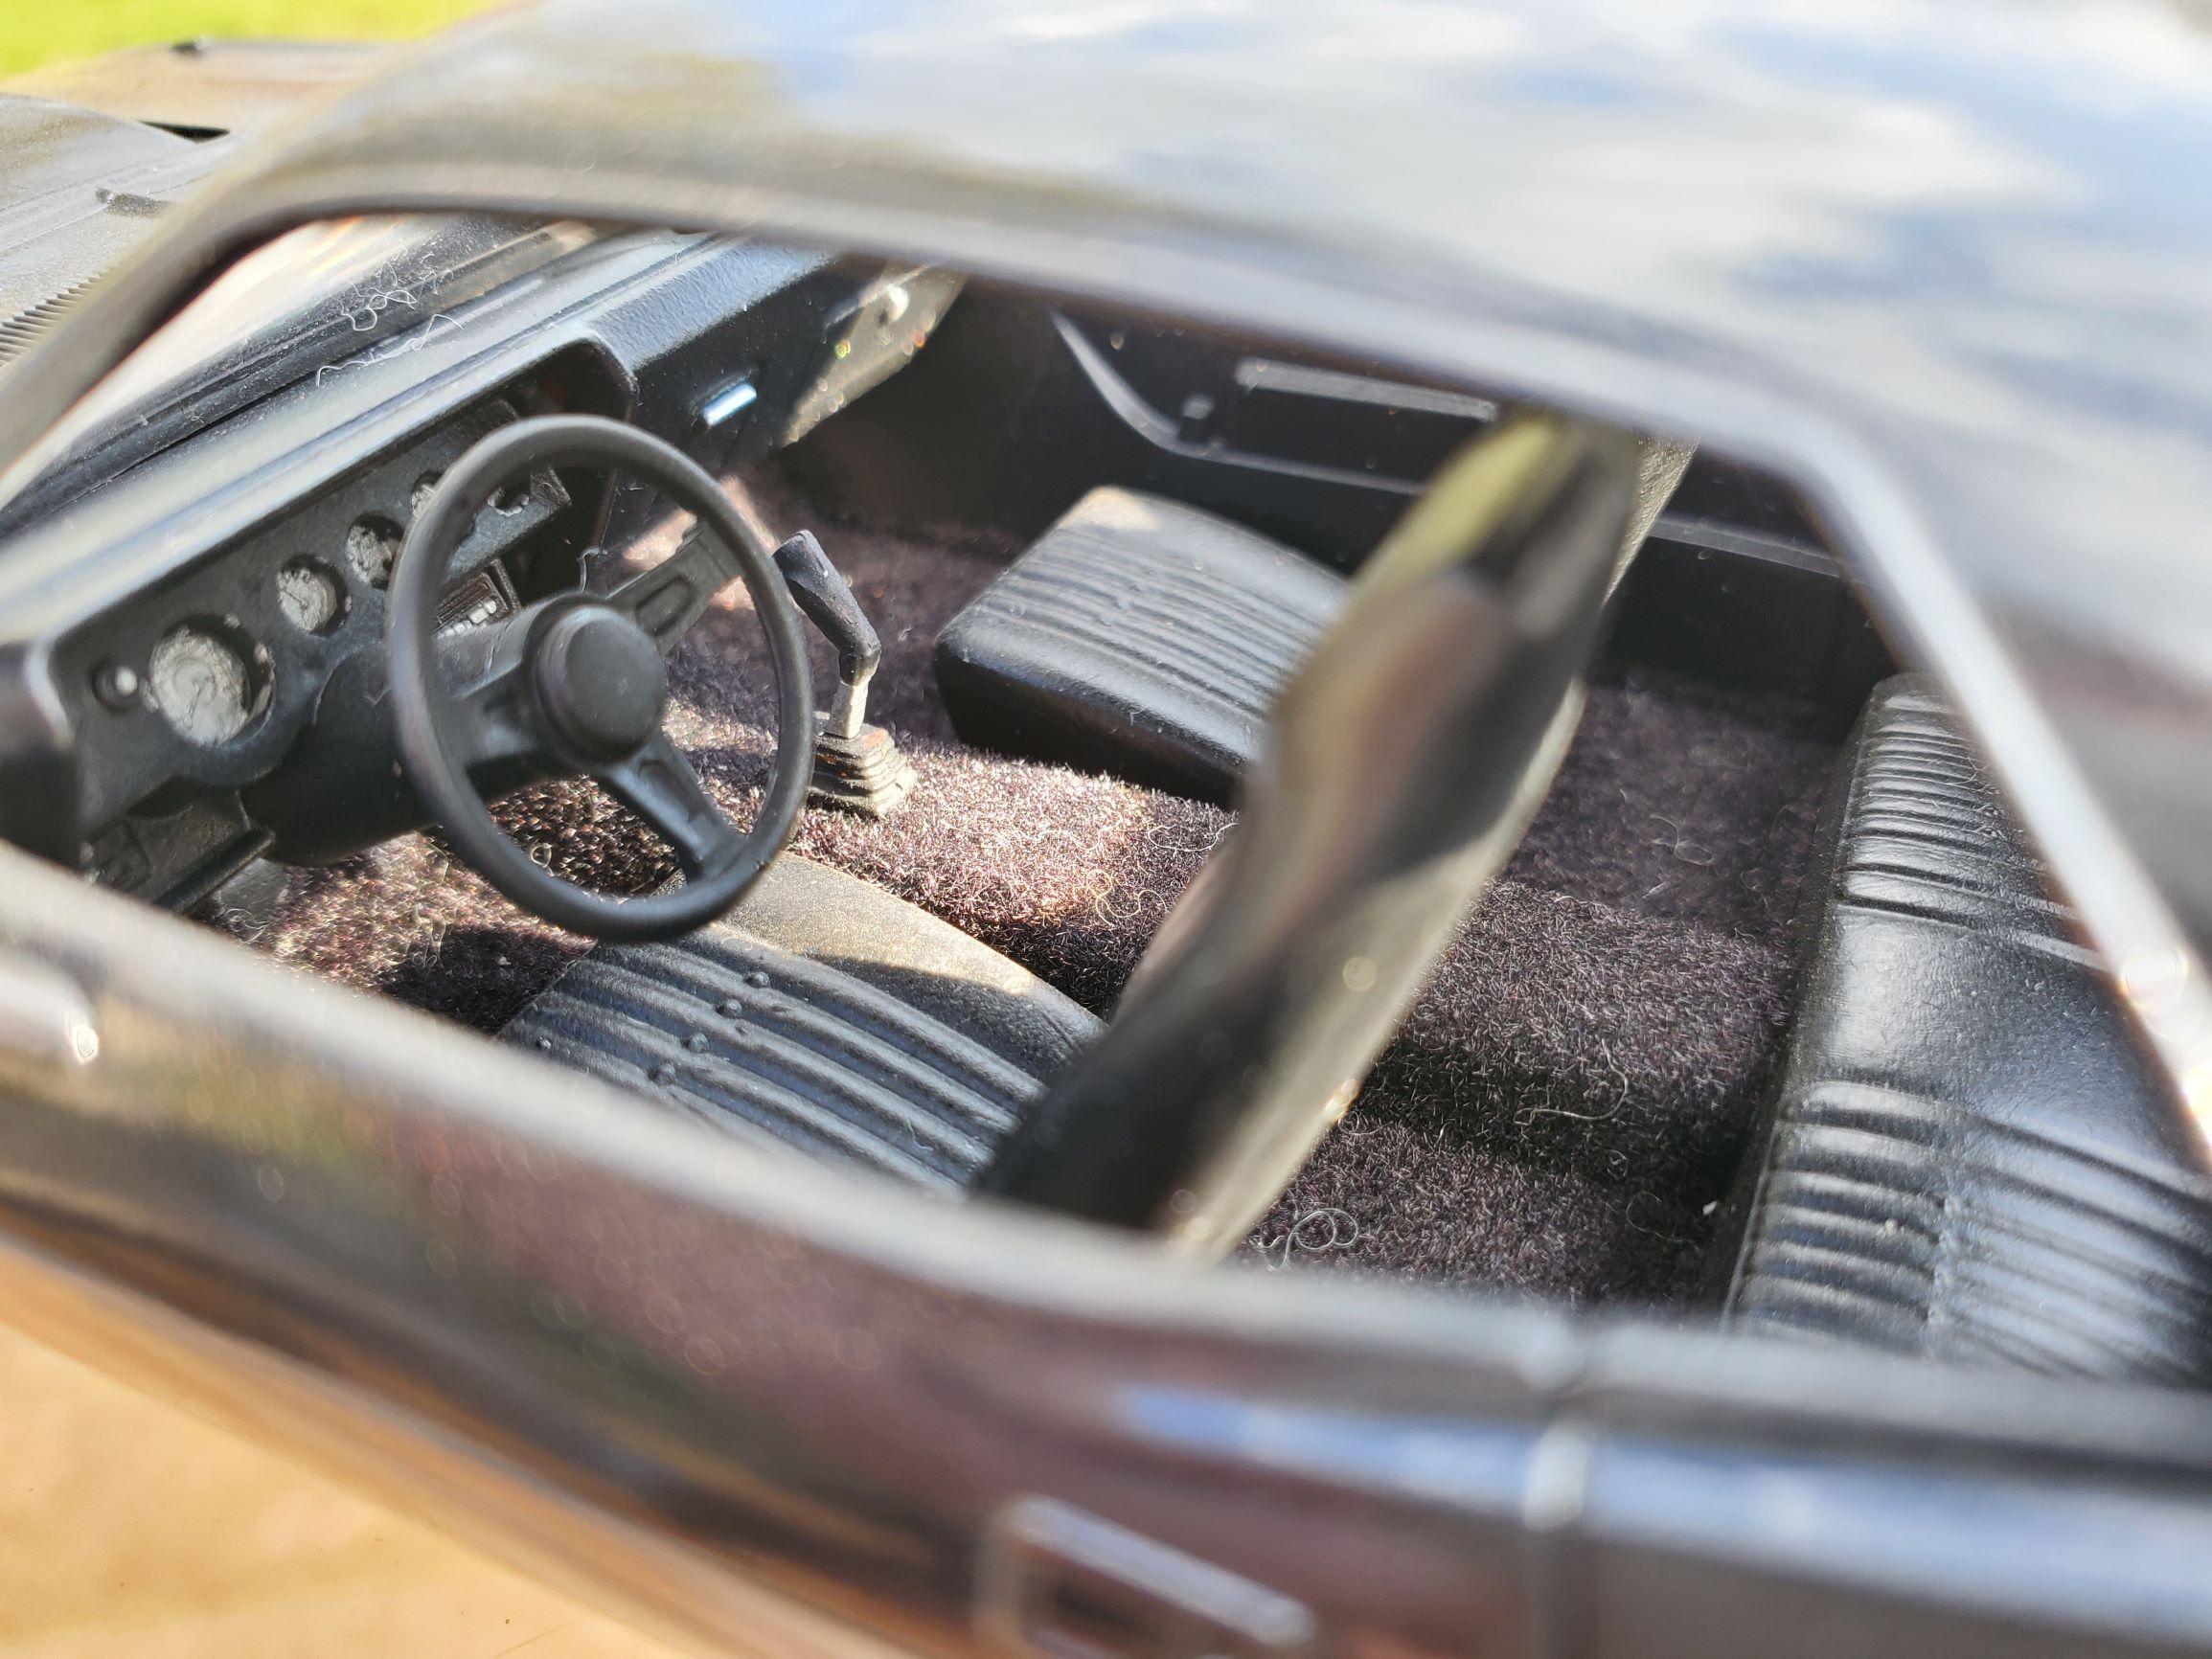
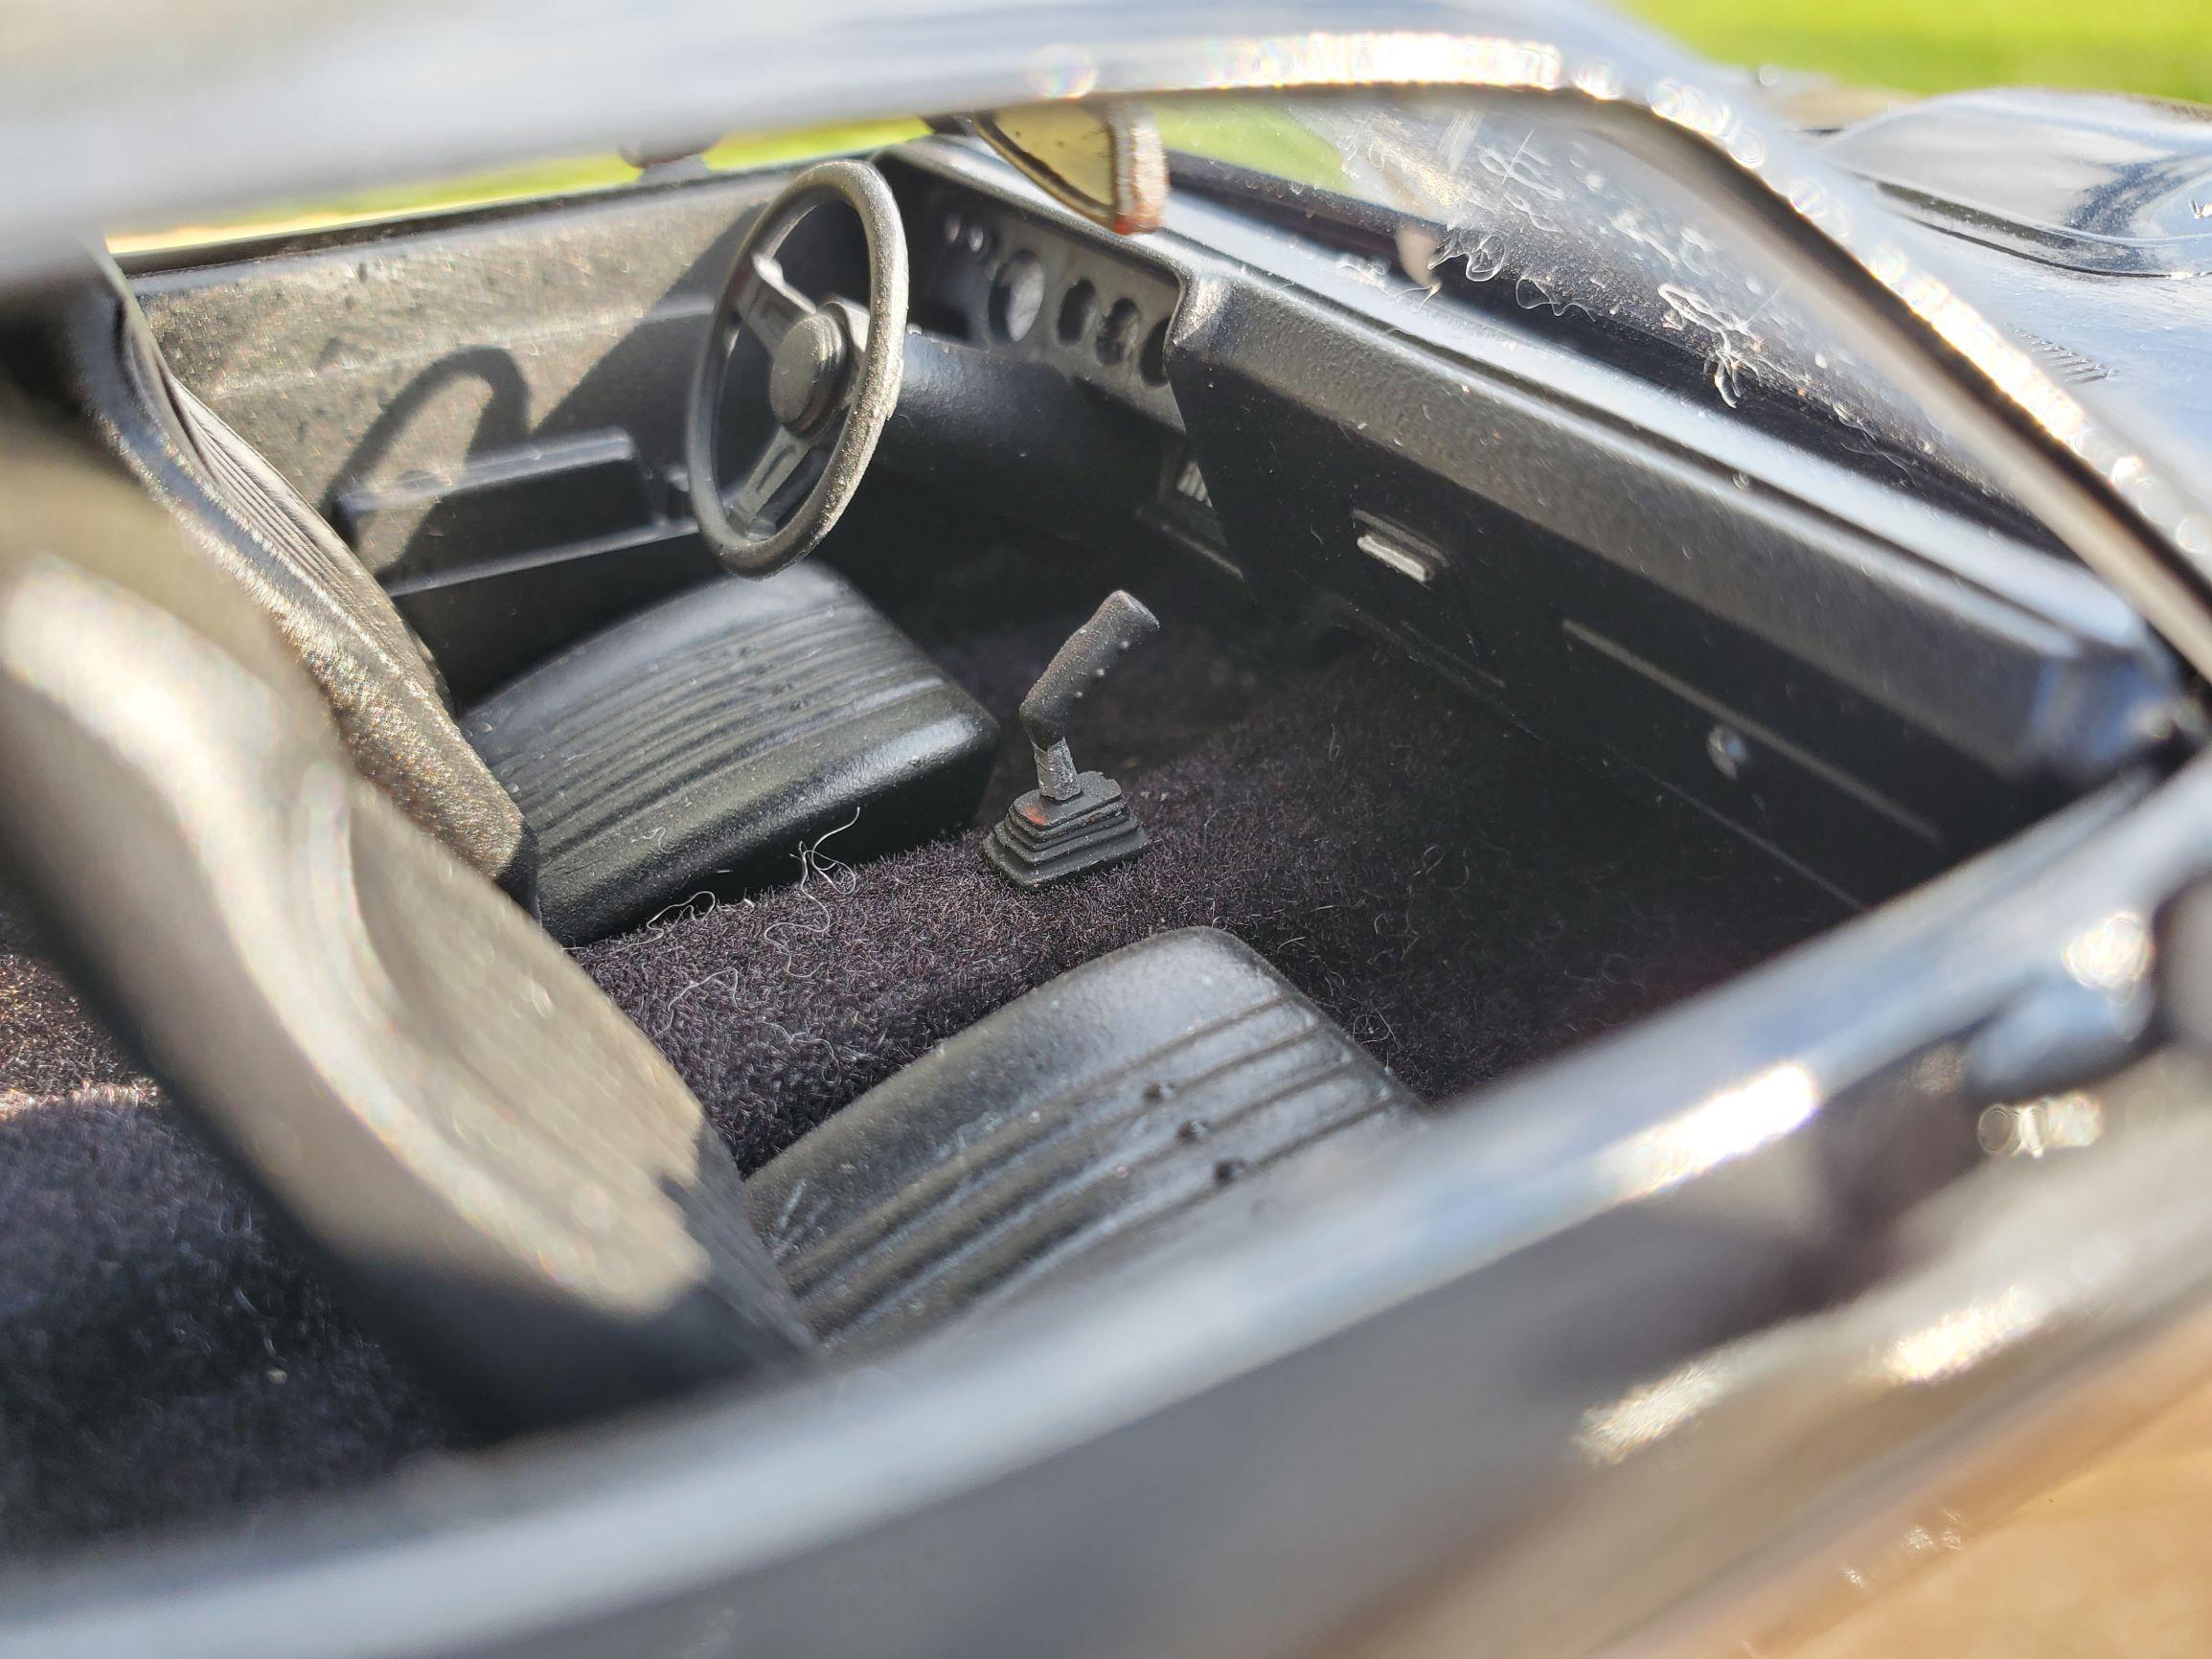
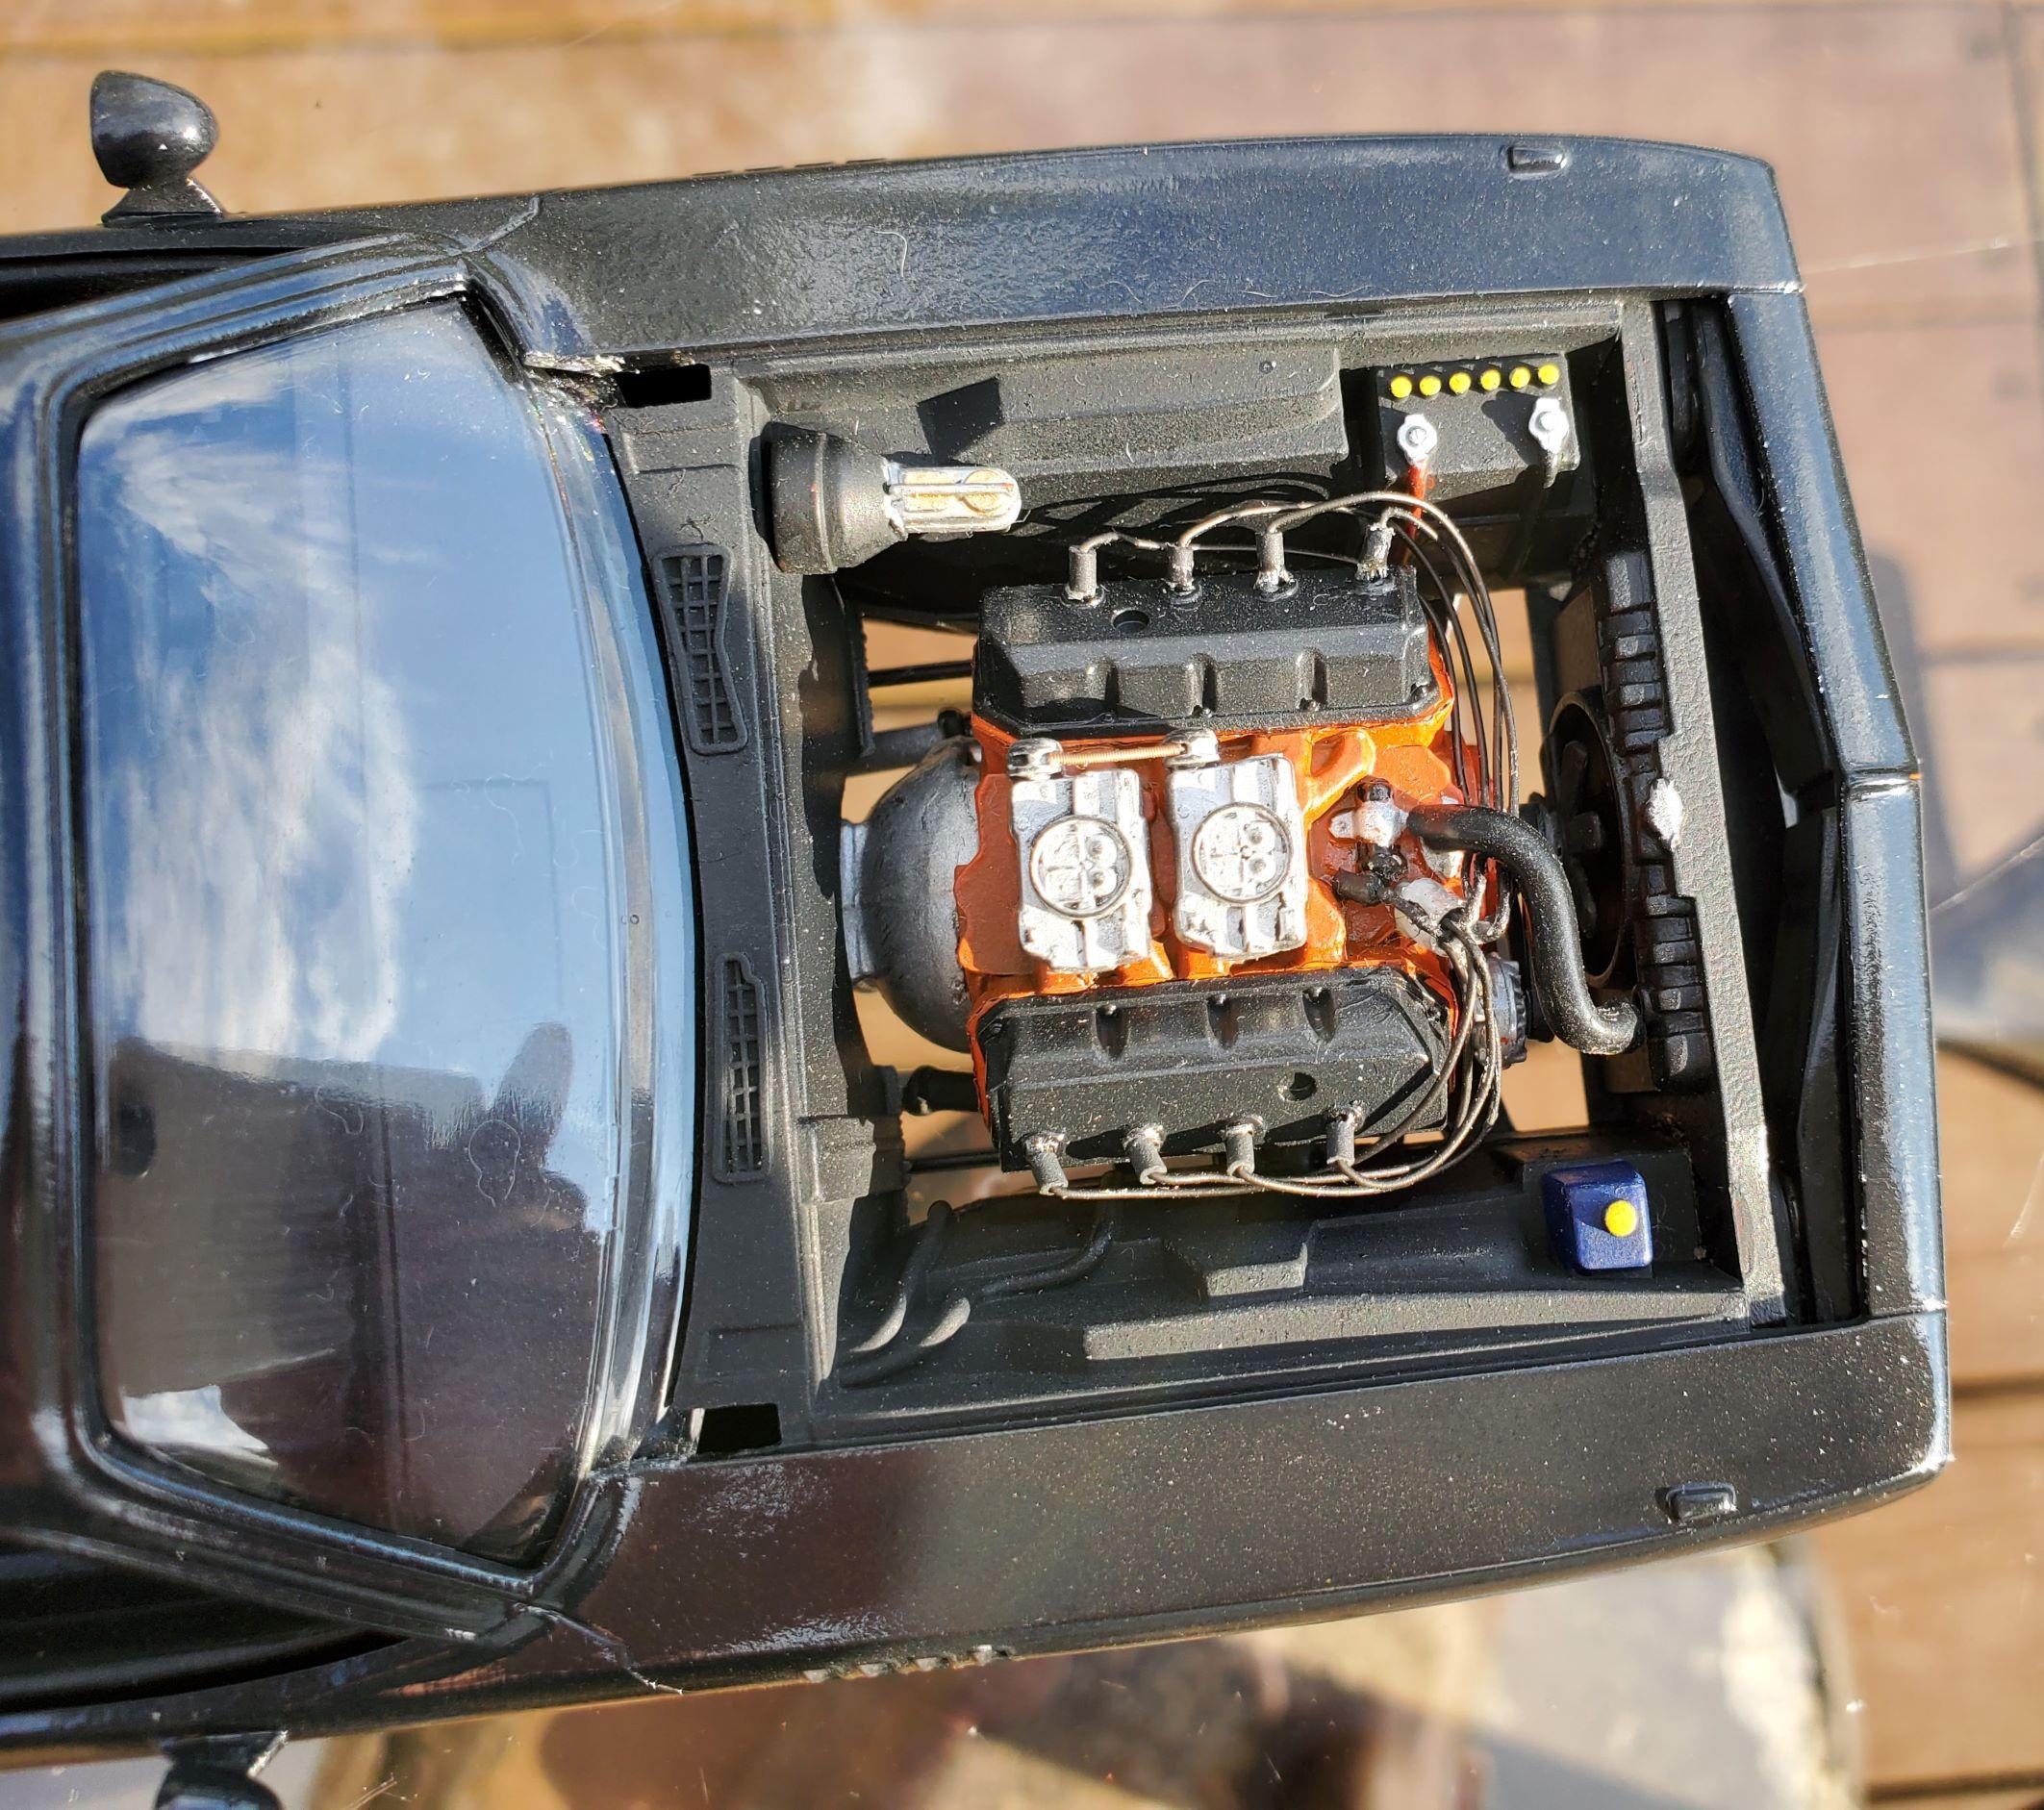
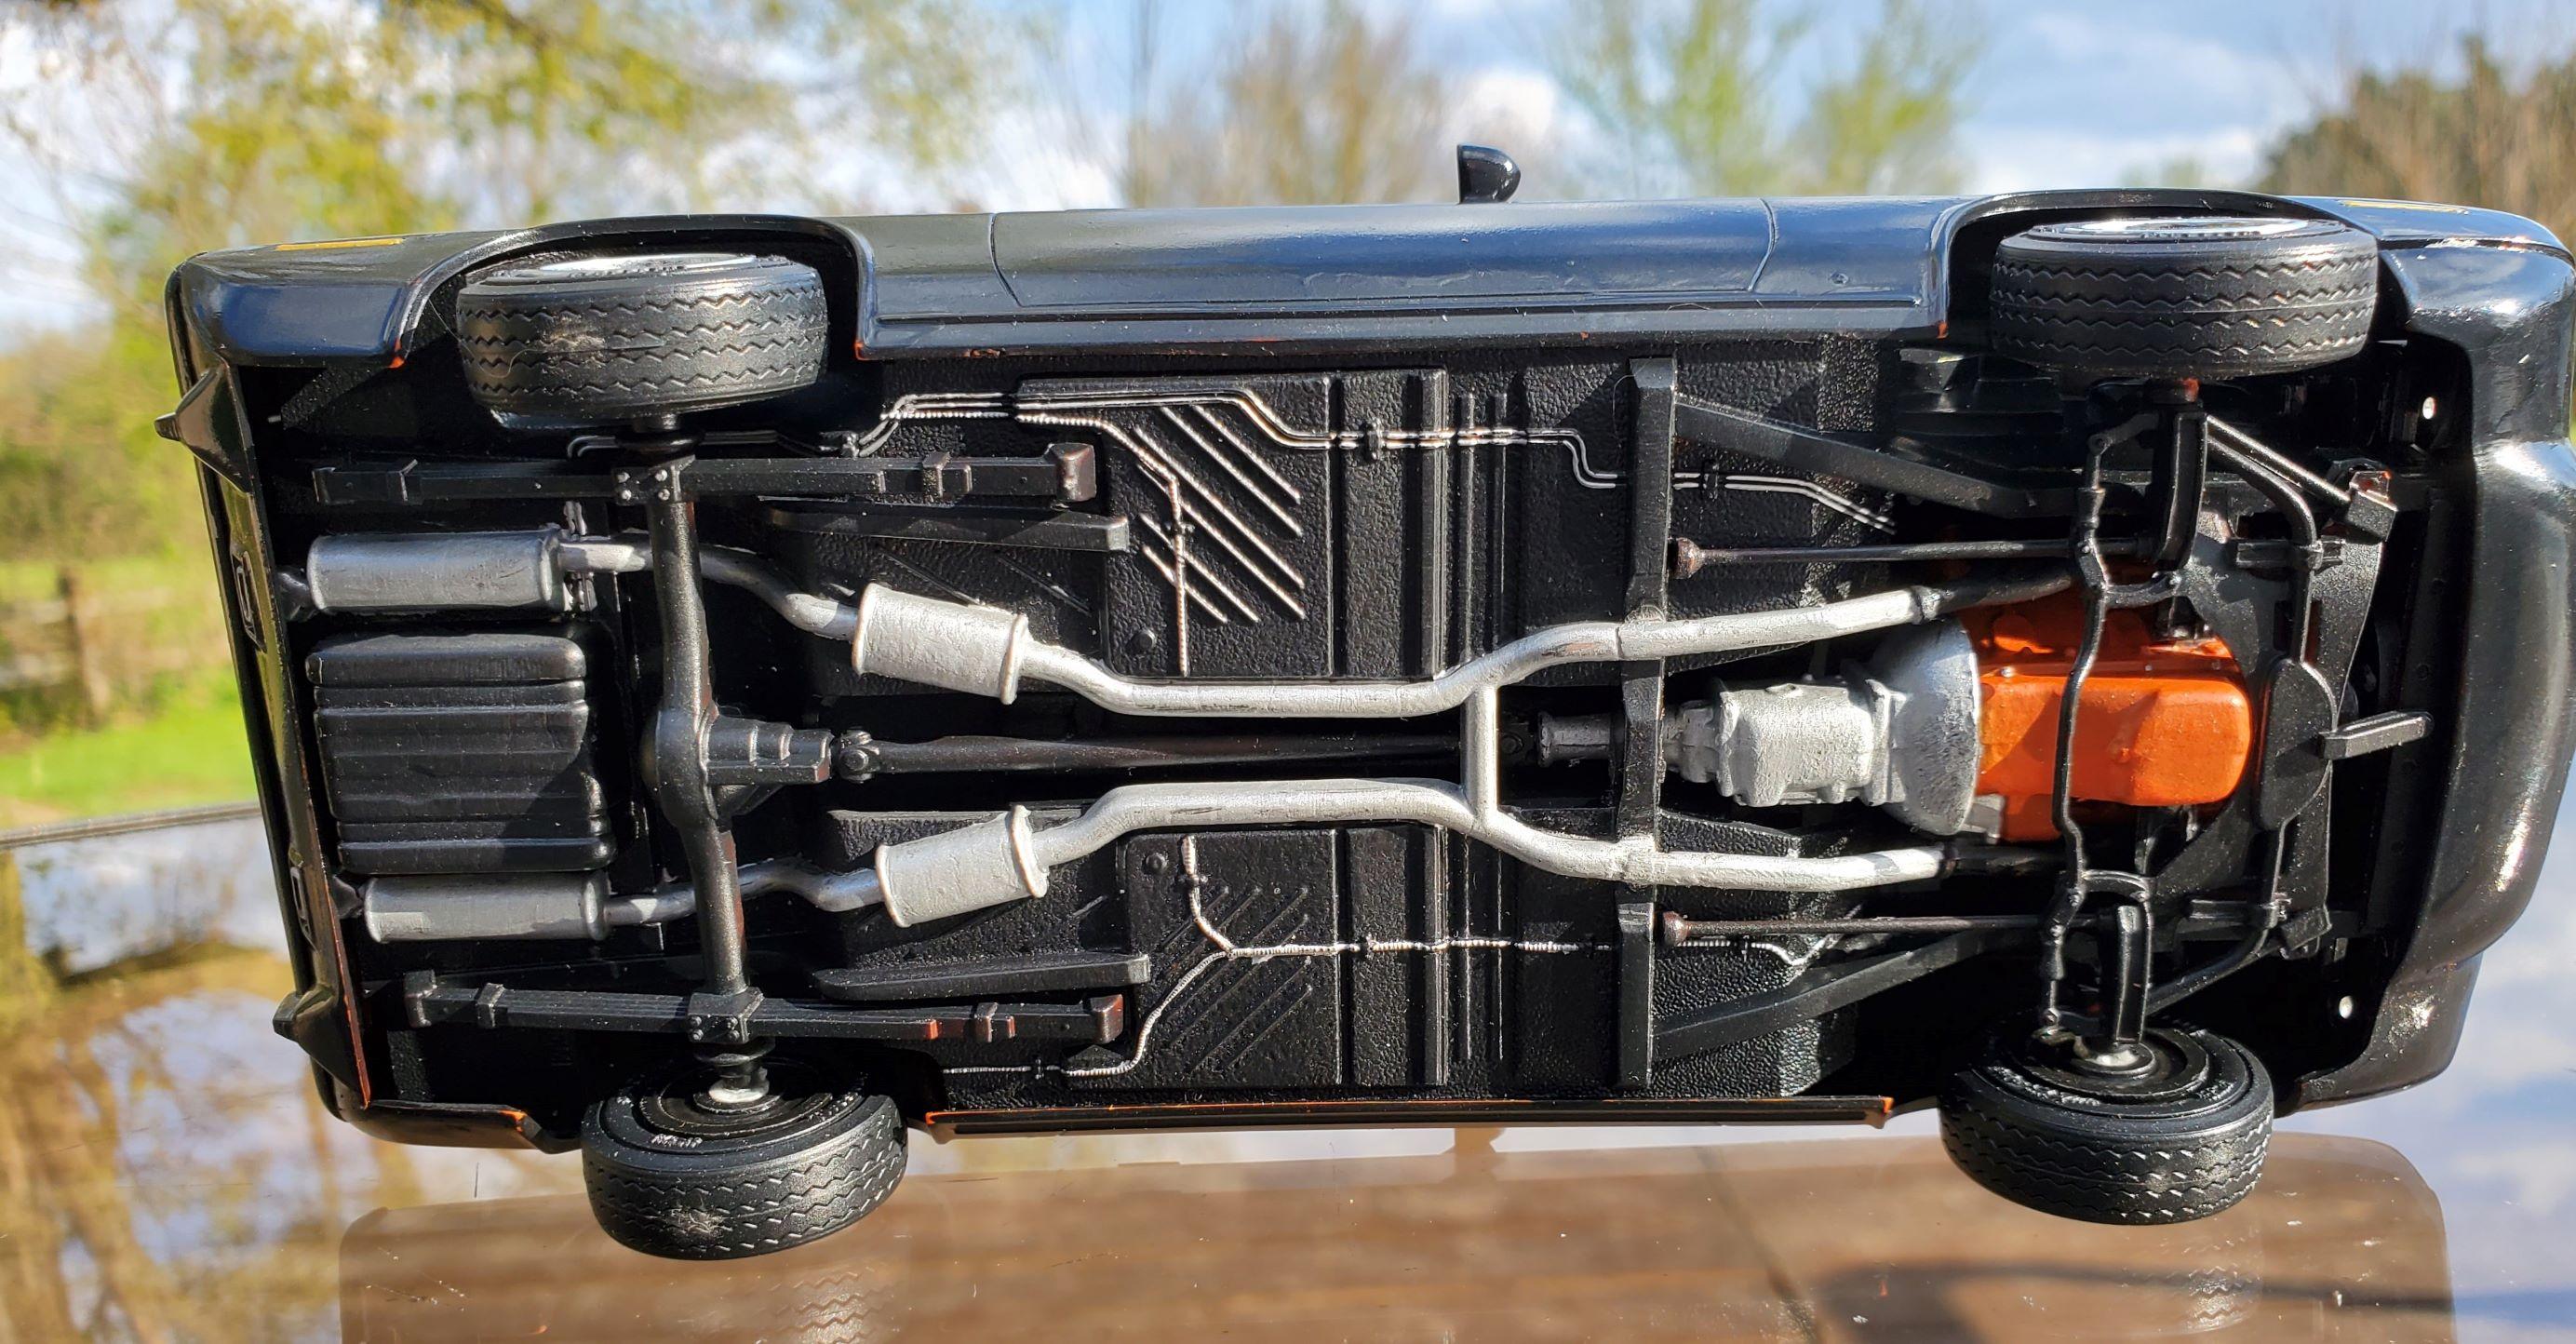
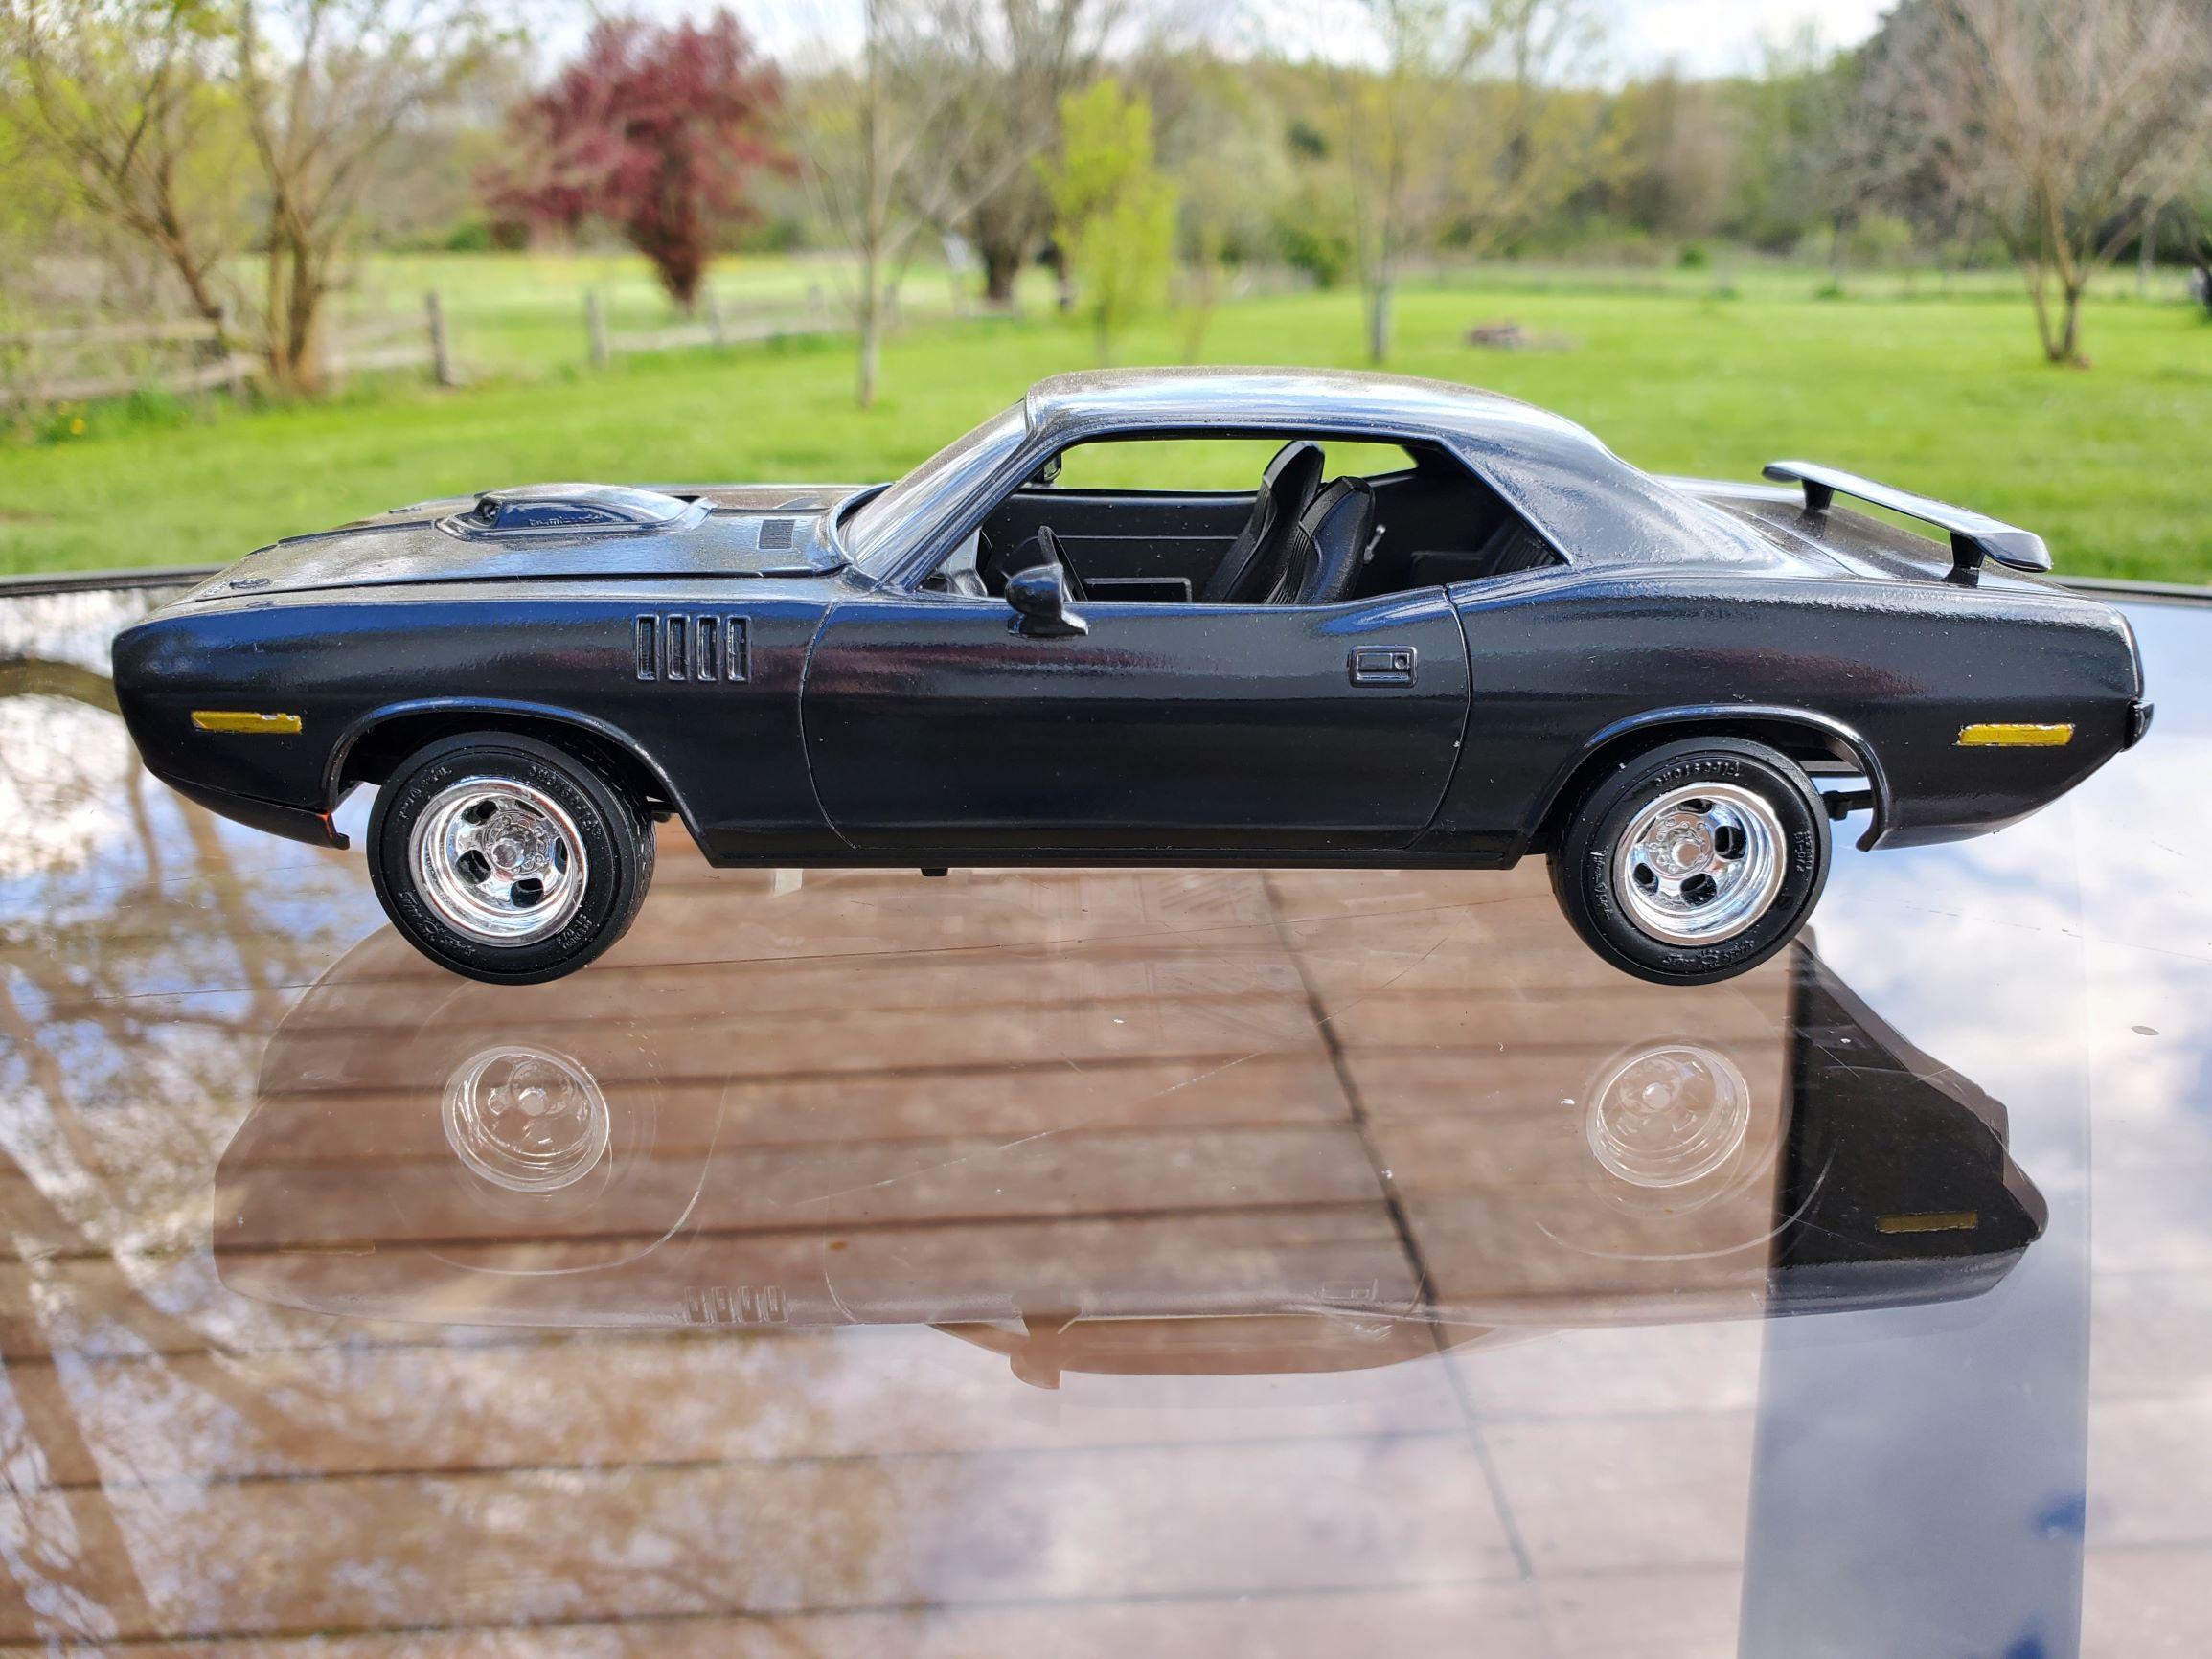
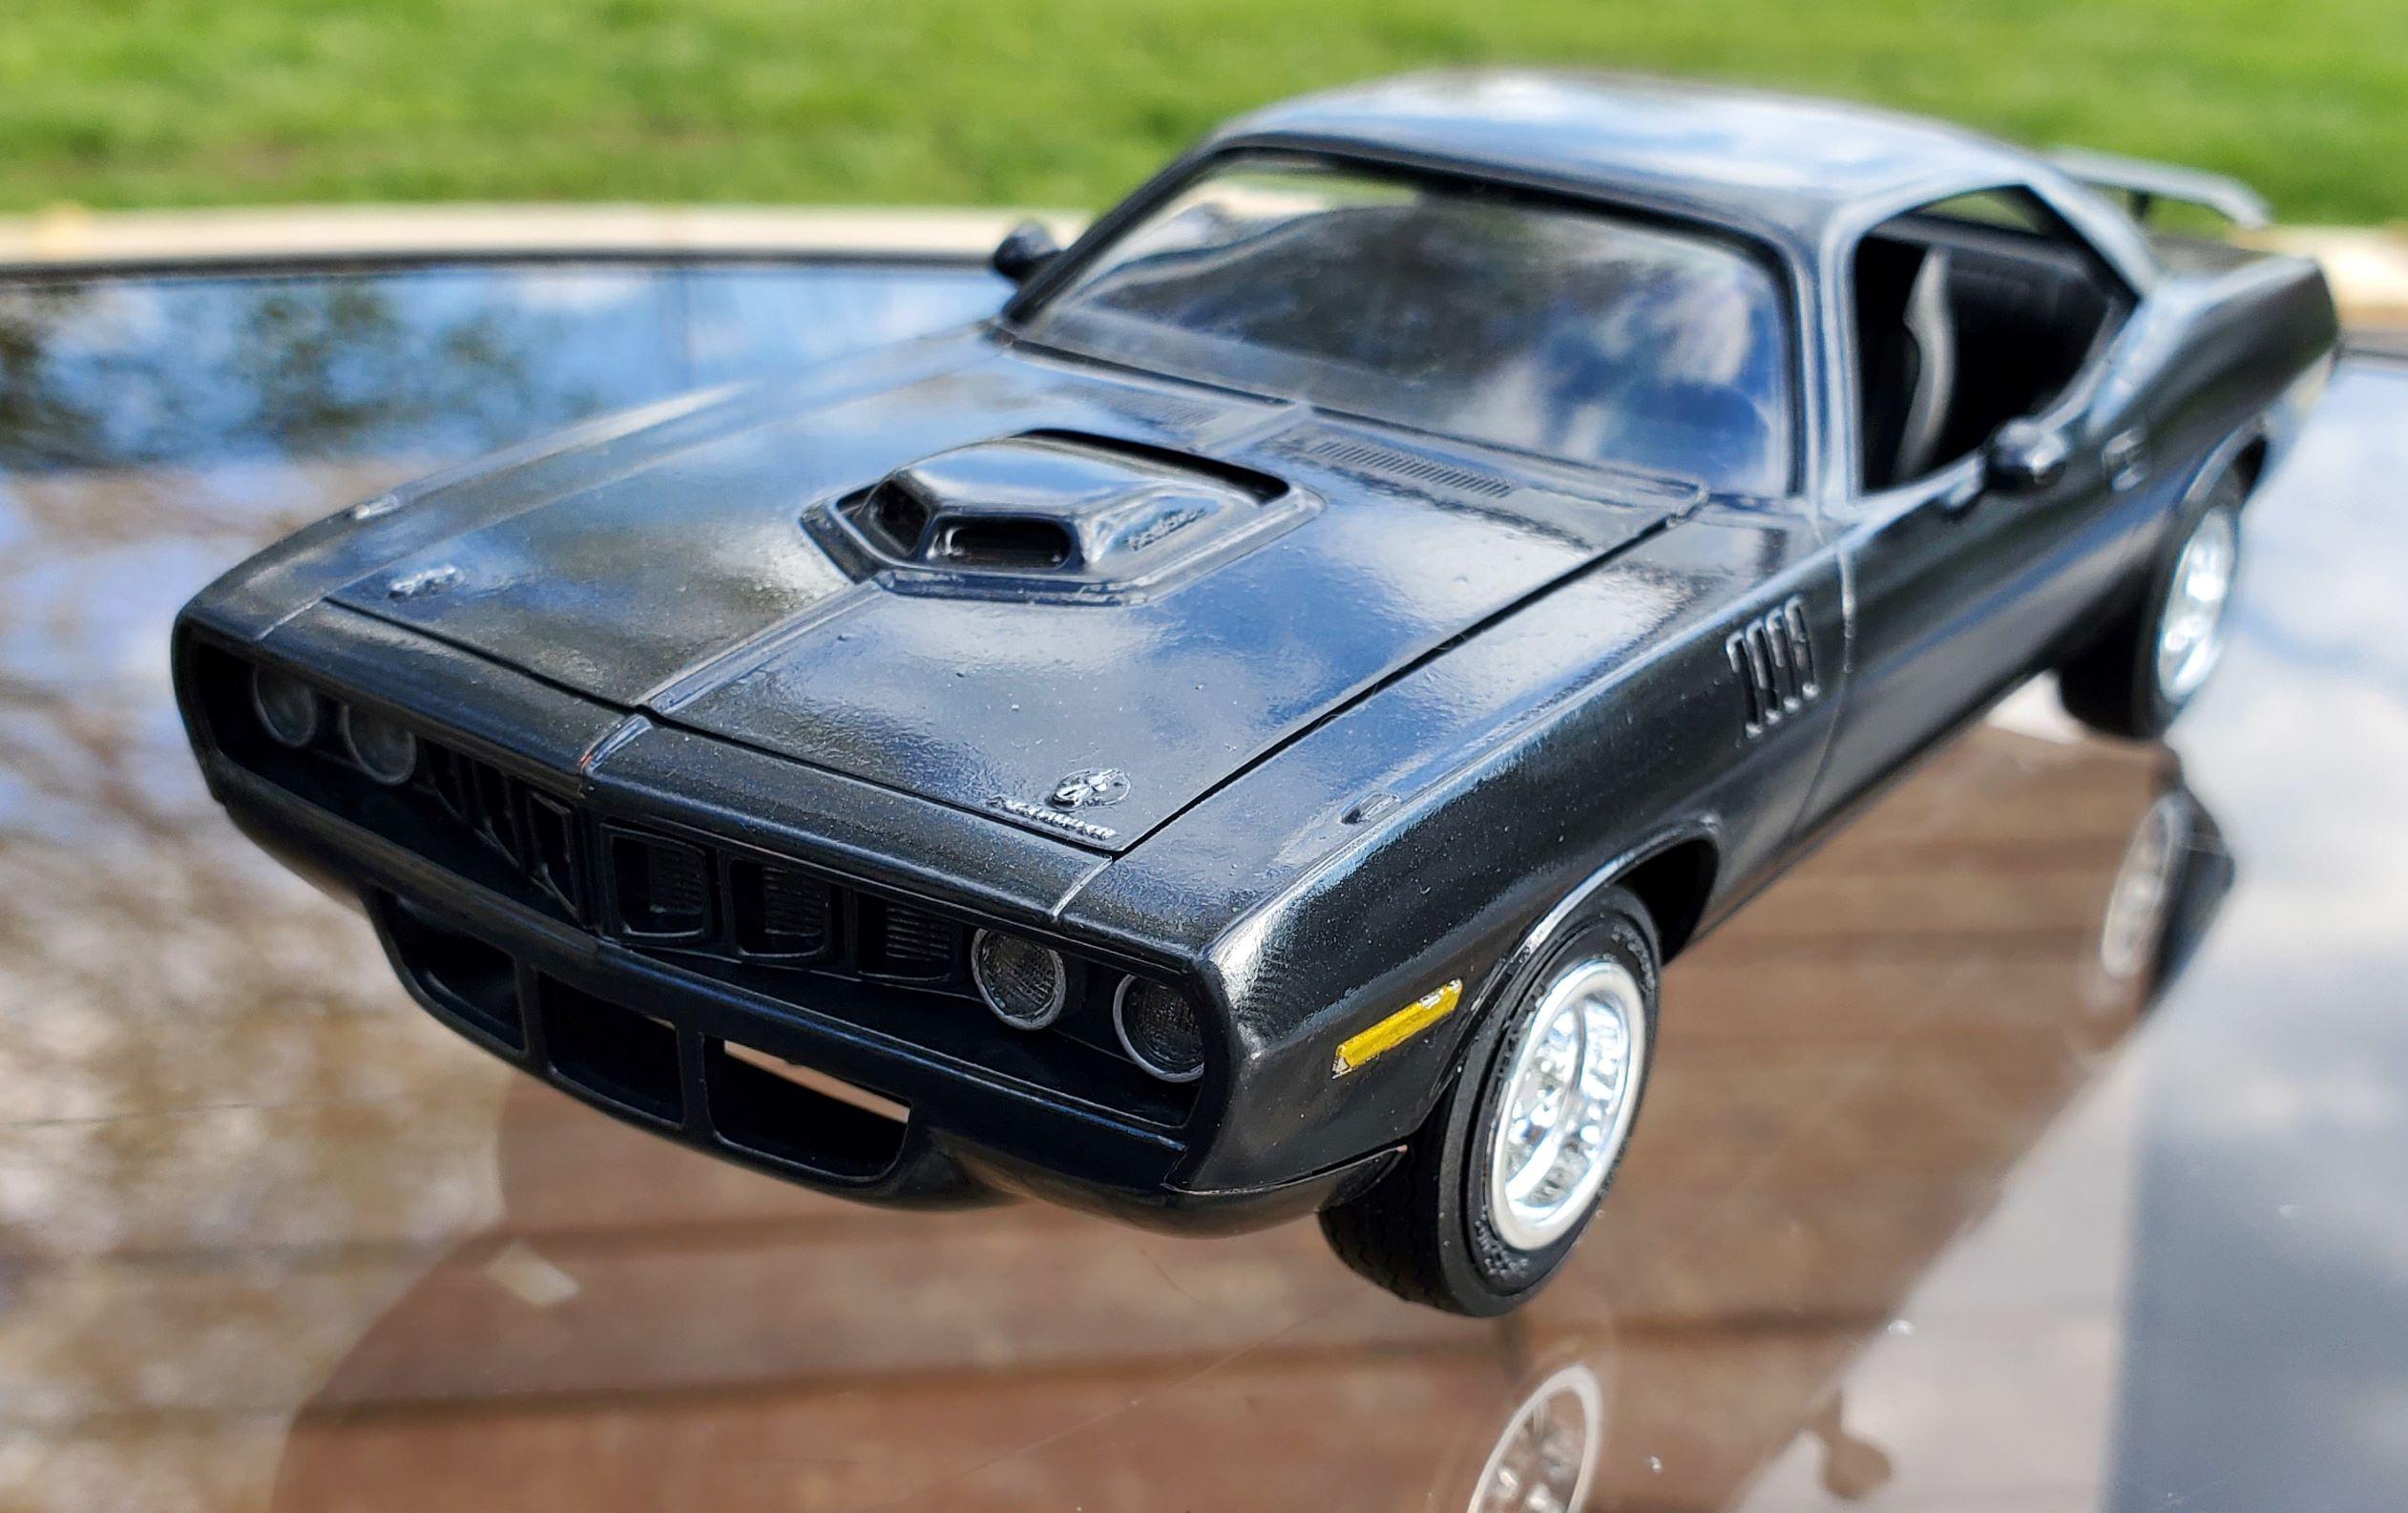
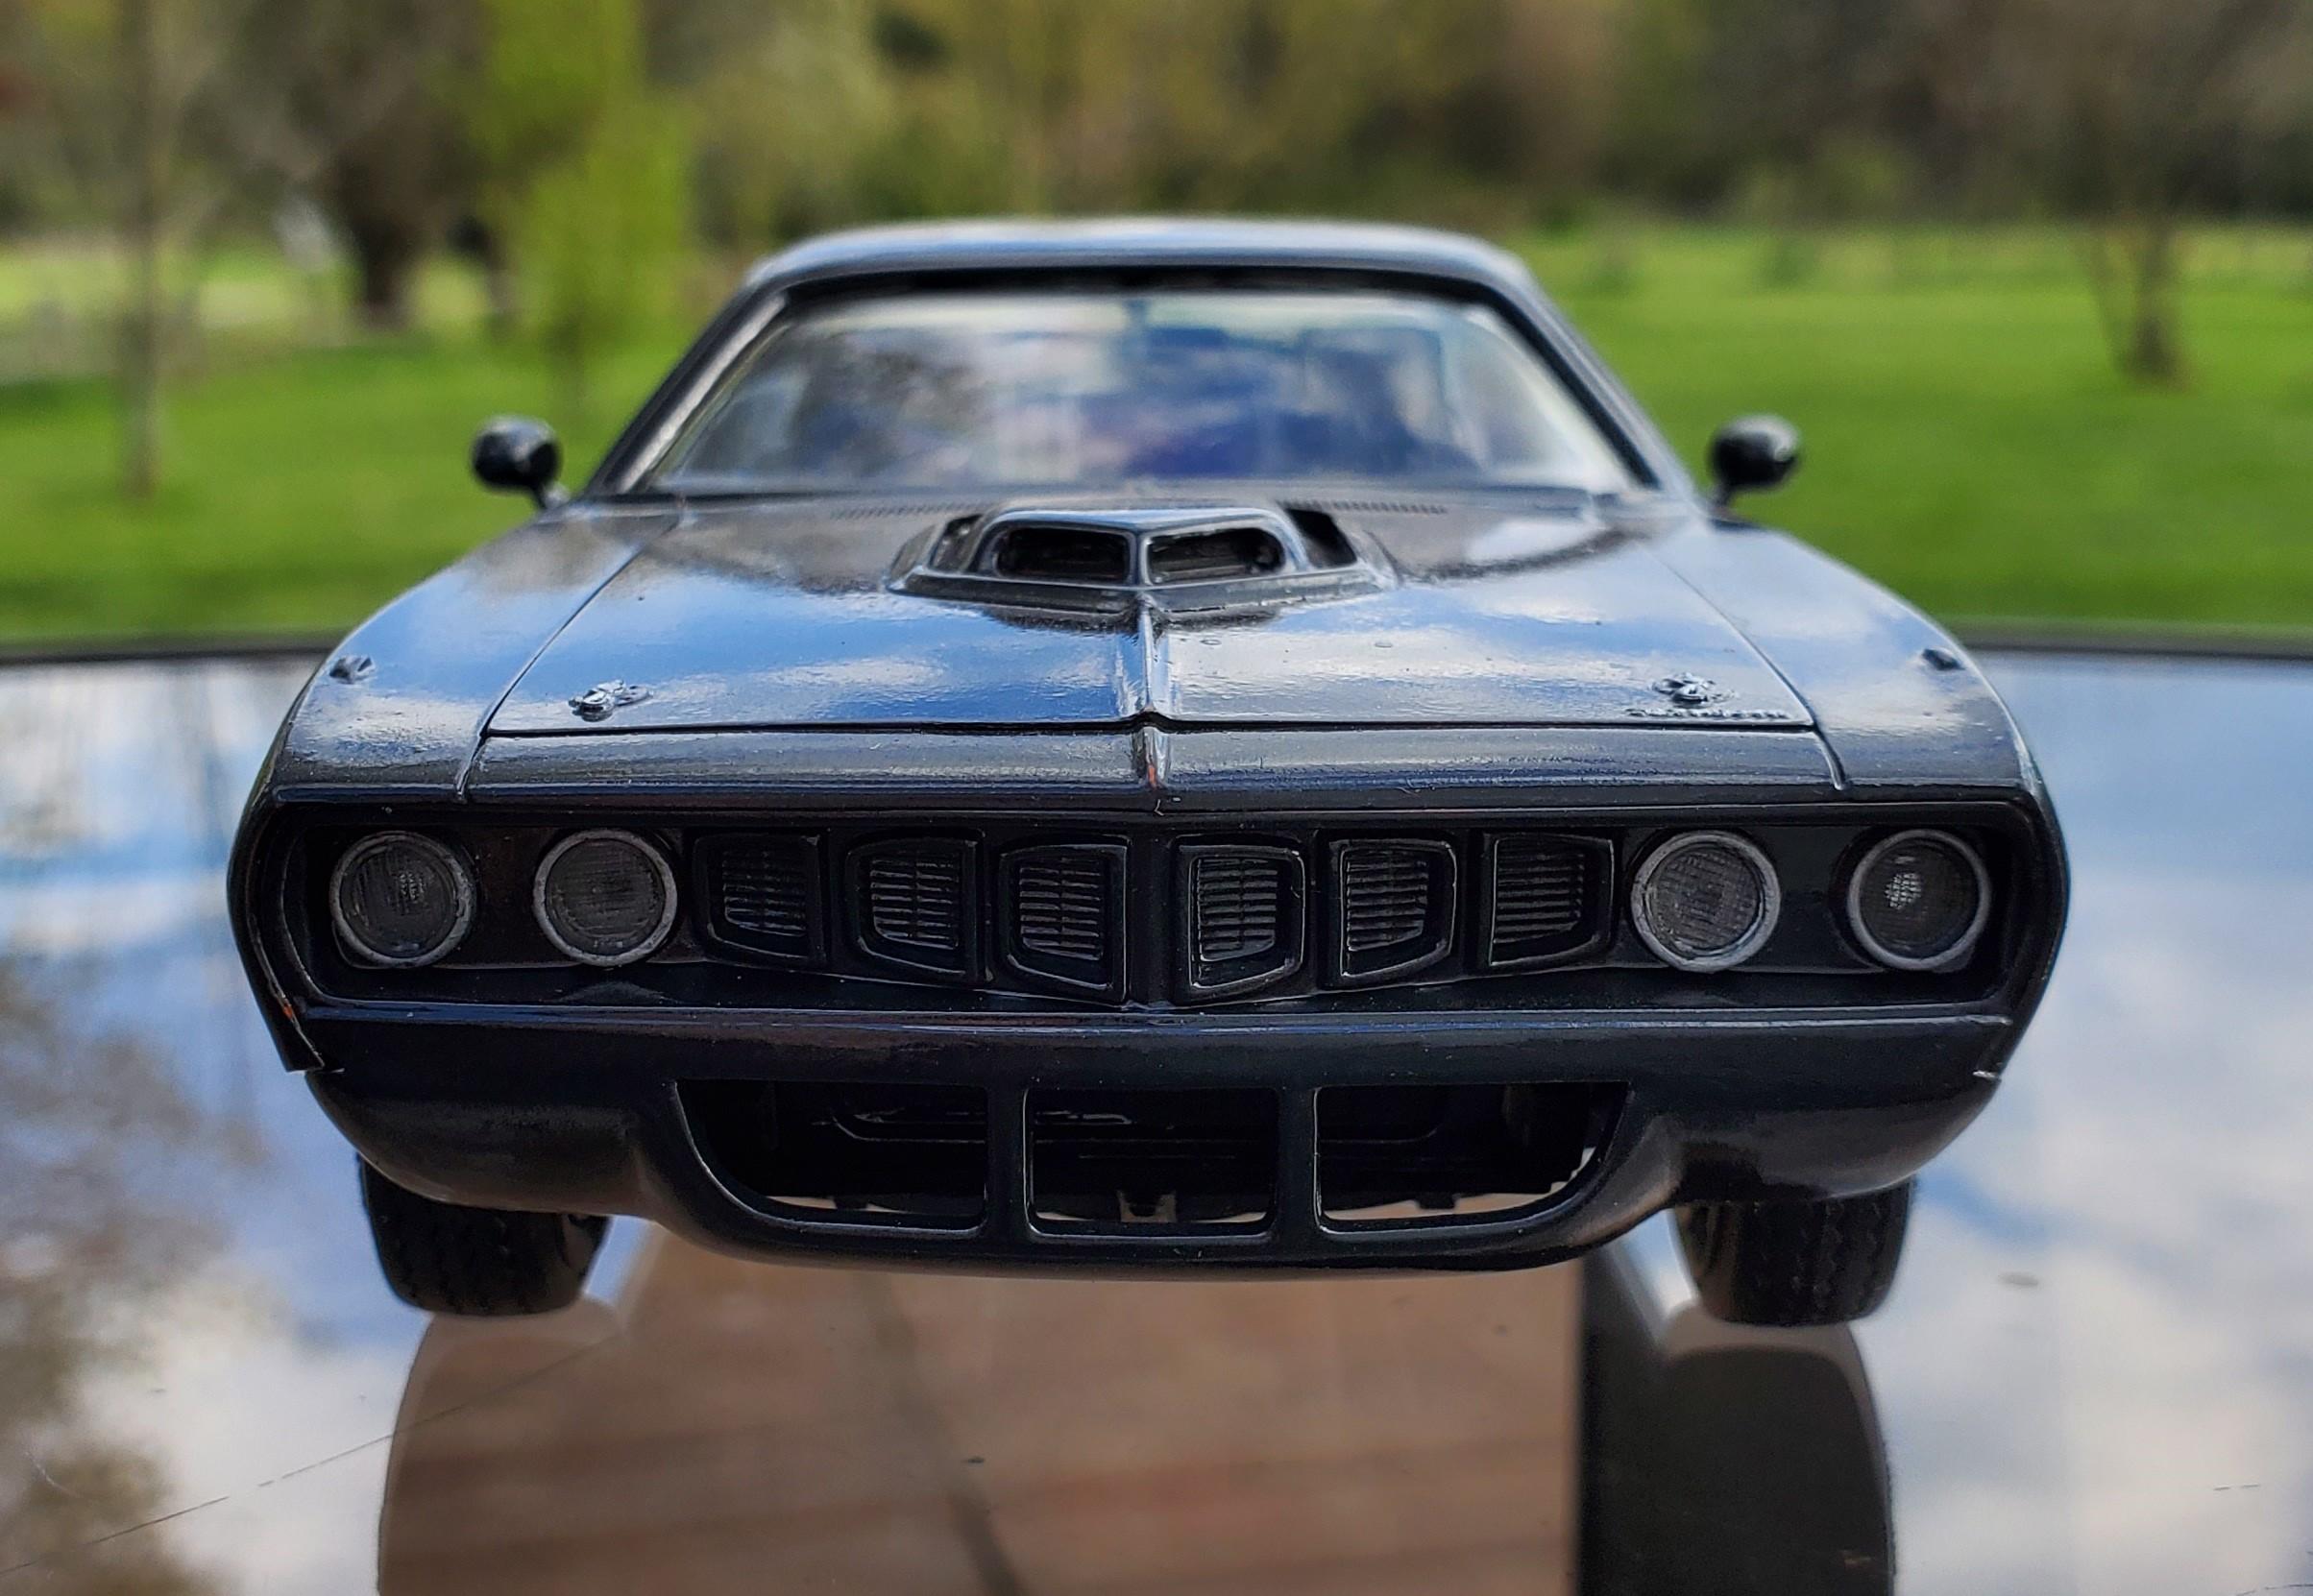
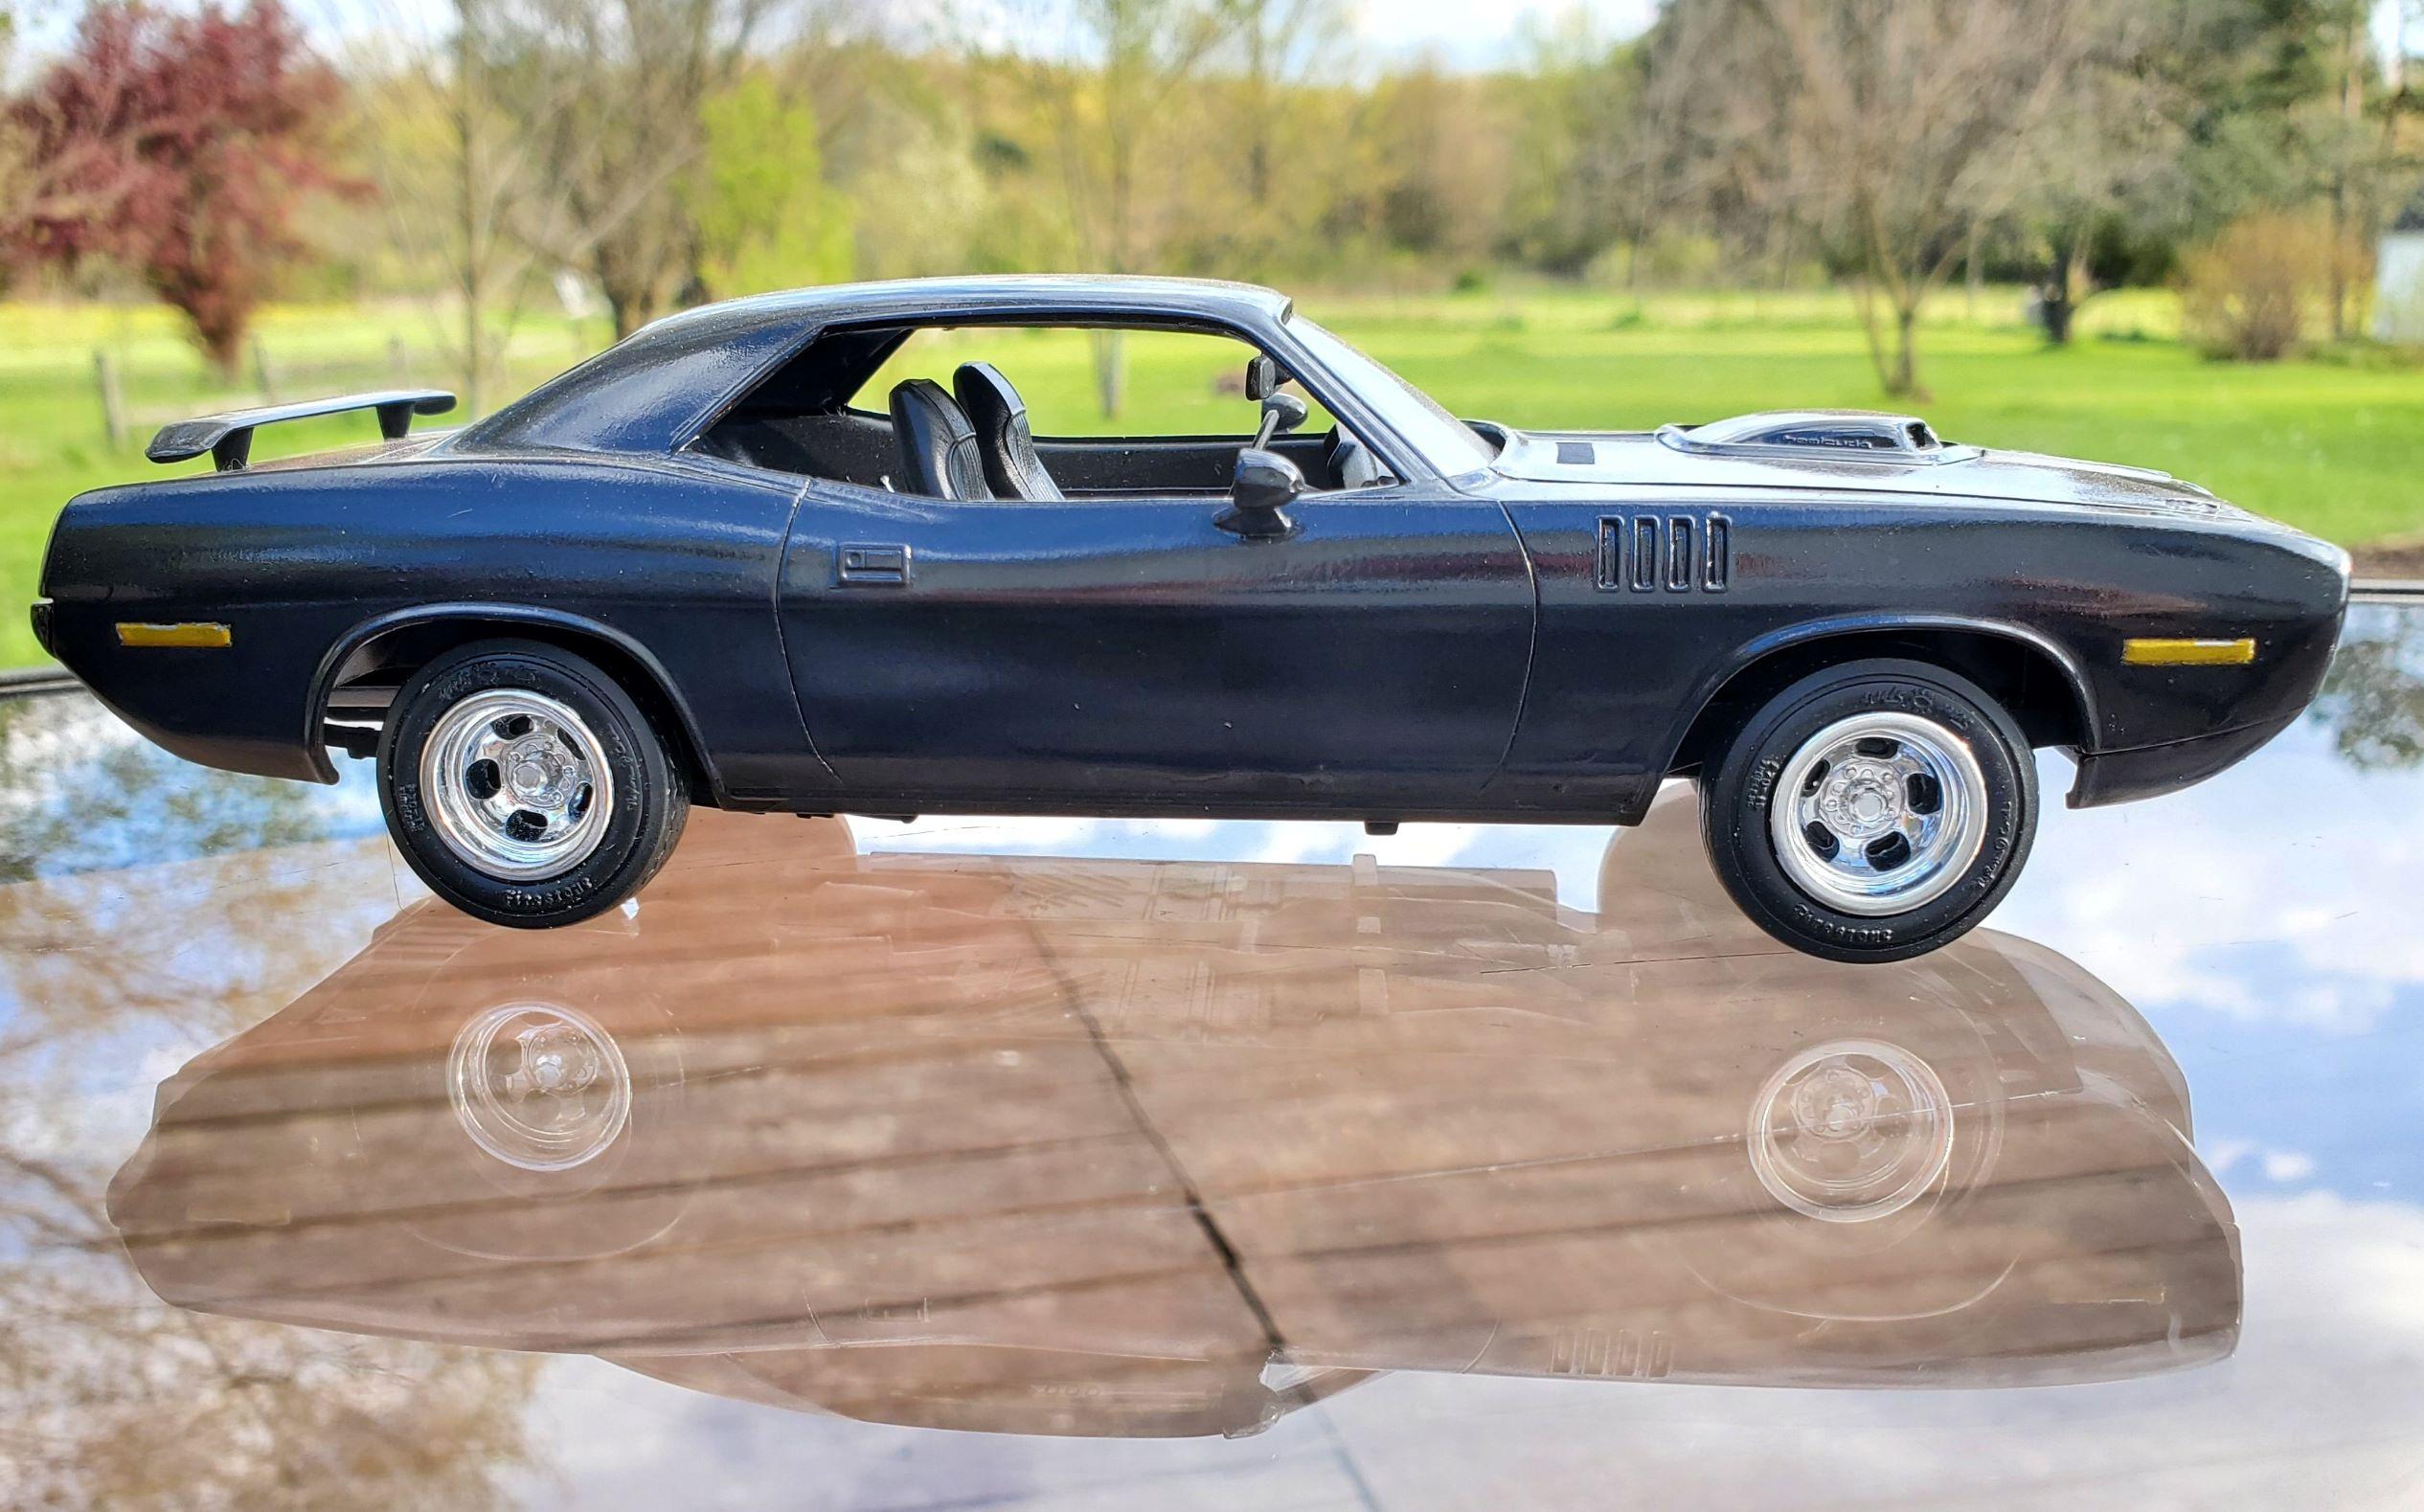
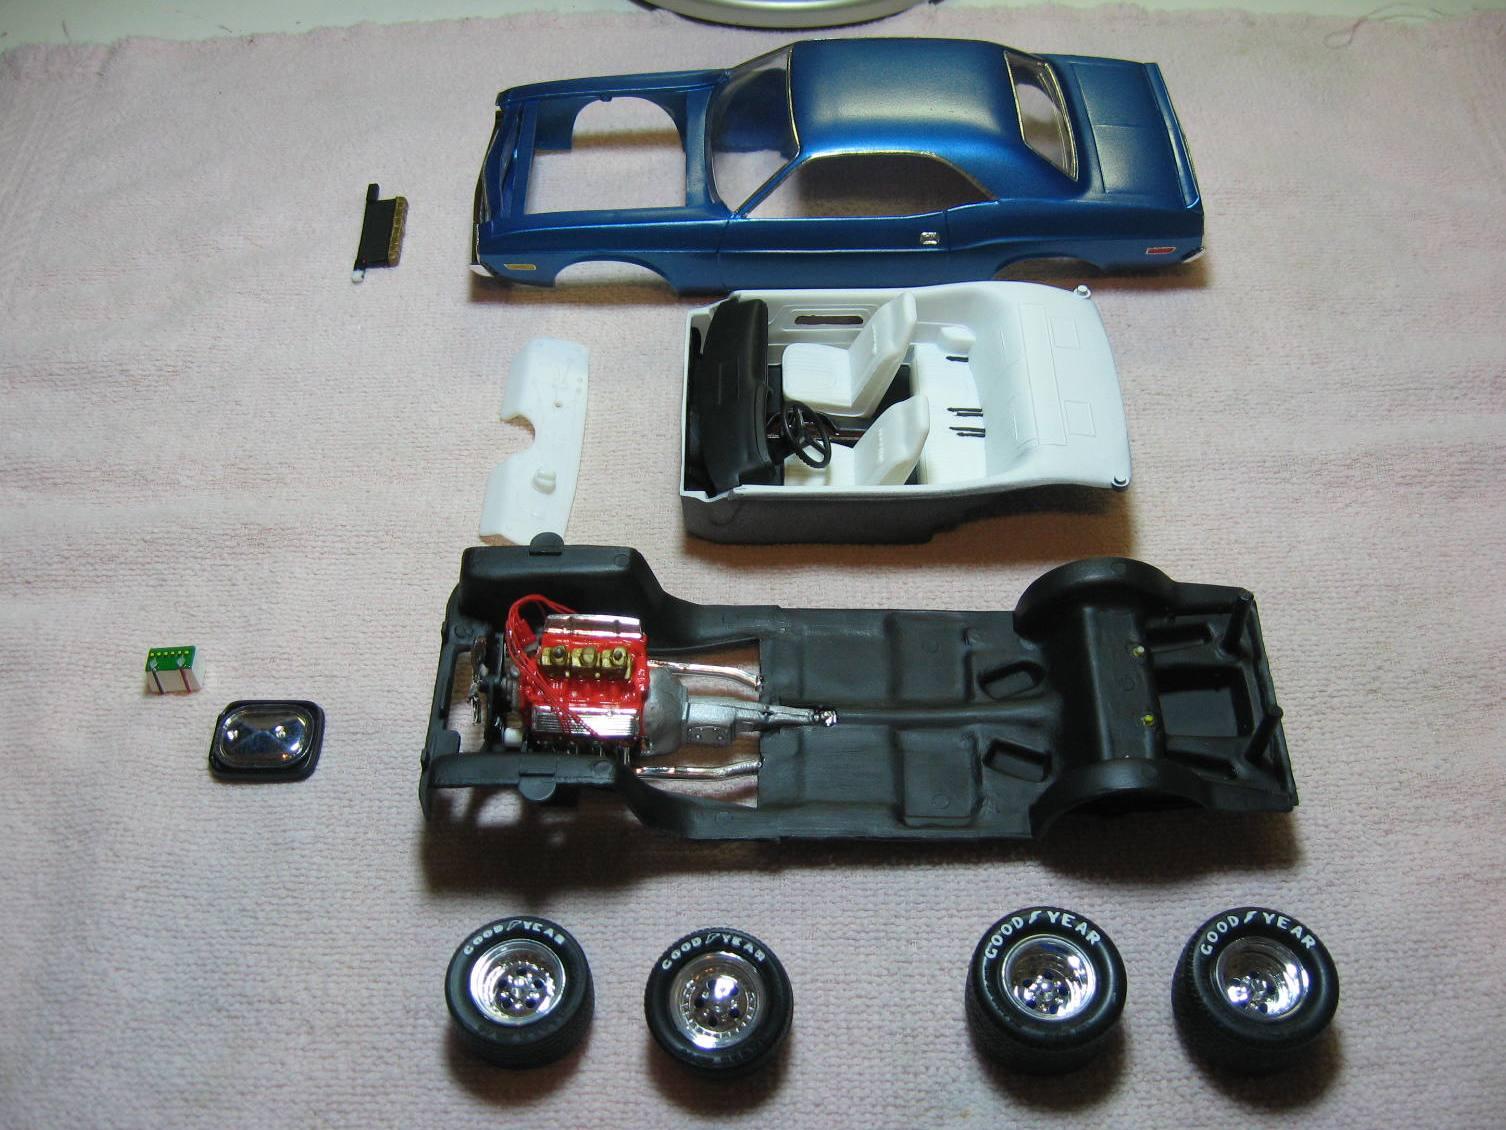
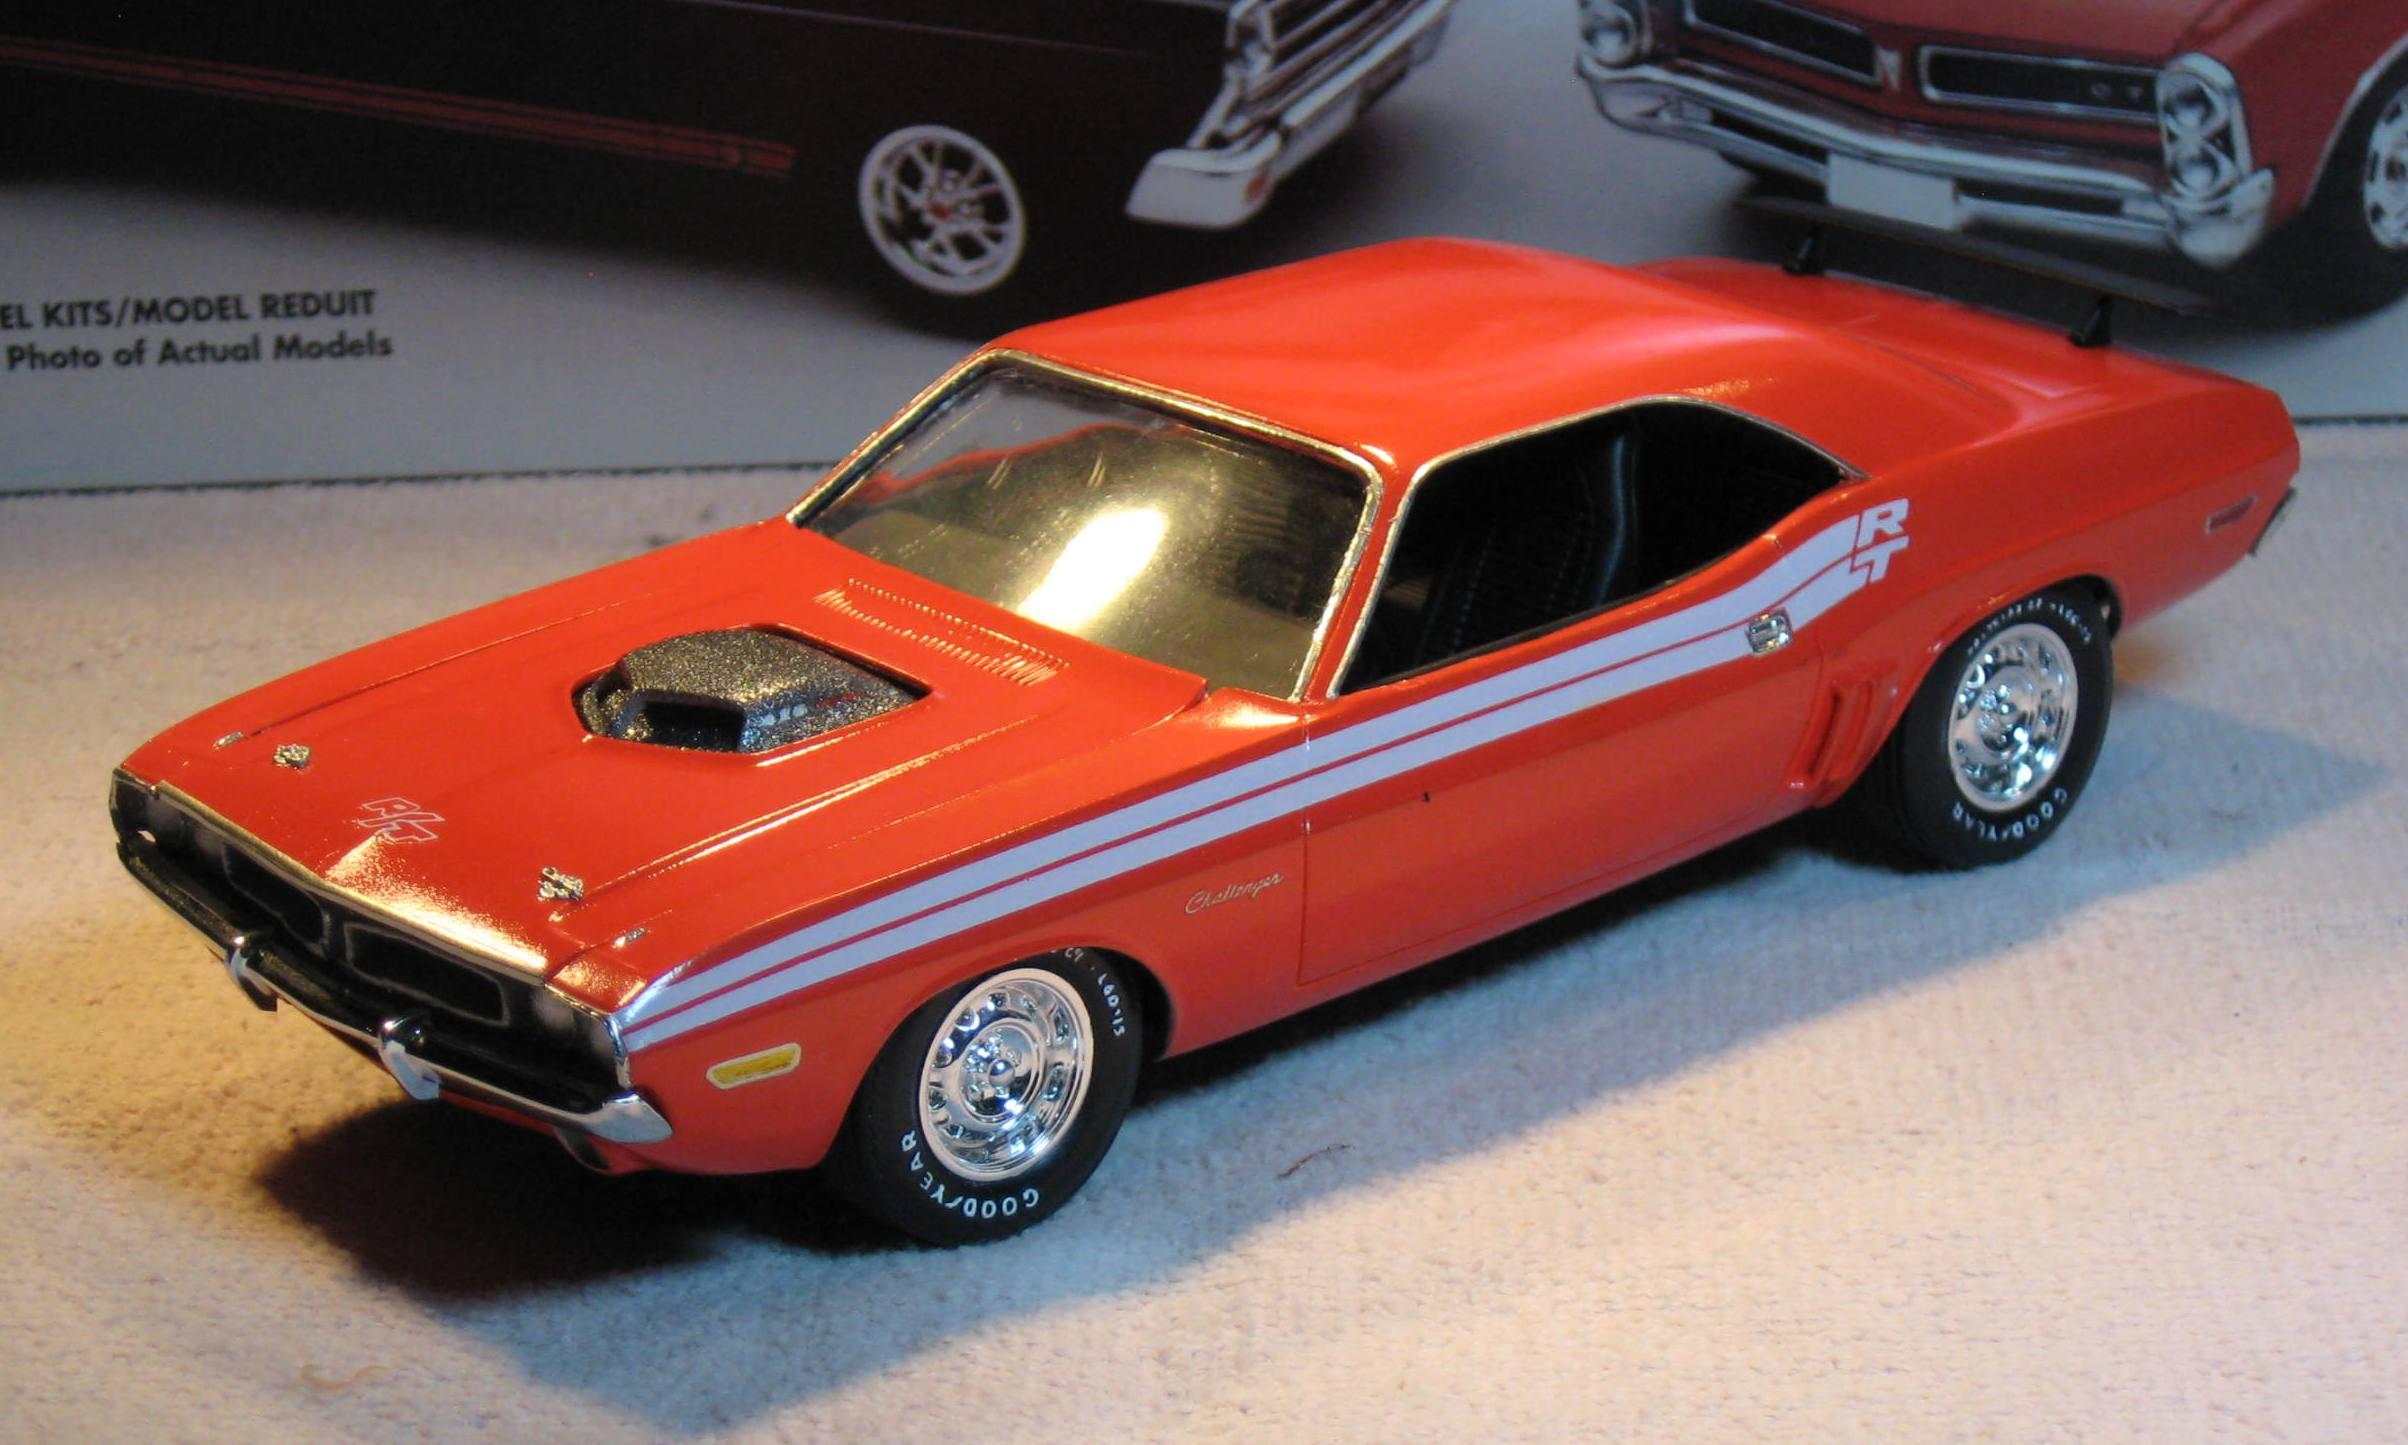
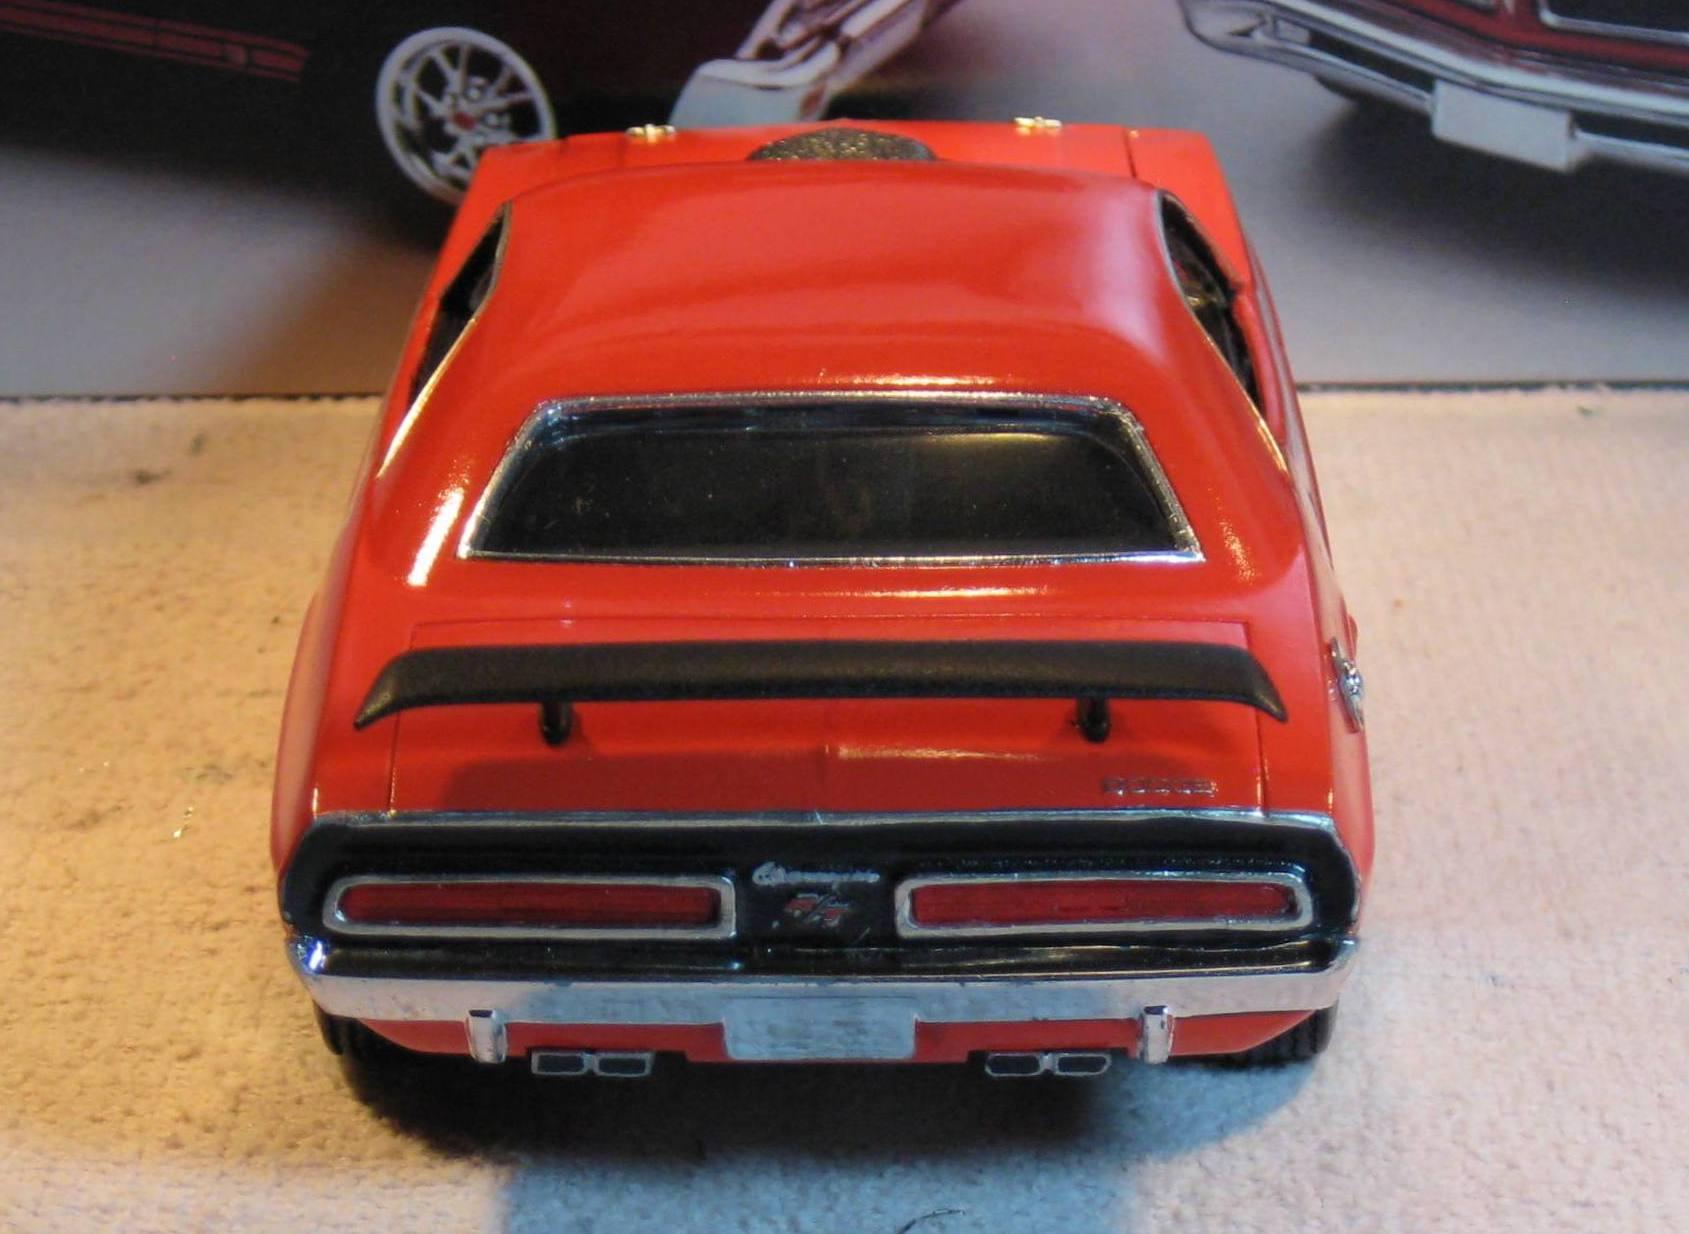
I picked this kit up at an estate sale a while back and decided to put it together. I had plans of doing the car in a dark red exterior with a black interior, however when I put the first layer of primer down I liked the black and decided to go black on black. The plating had come off of one of the bumpers pretty bad, so while deciding what to do with that i was looking at the body partially assembled I thought with a bit of modifications I could make it look just like my 1:1 2018 Dodge Challenger. I went to work removing the things below the front bumper to make it a bit smoother. I left the rear chrome bumper off and added a wired distributor. The rims went through 4-5 modifications will I finally settled on the extra ones that came out of the custom 32 Ford Vicky I recently did (Link). Sorry about the lint in some of the pictures, did not notice till I was editing them for this post and it is raining outside, so taking new ones was not possible.
-
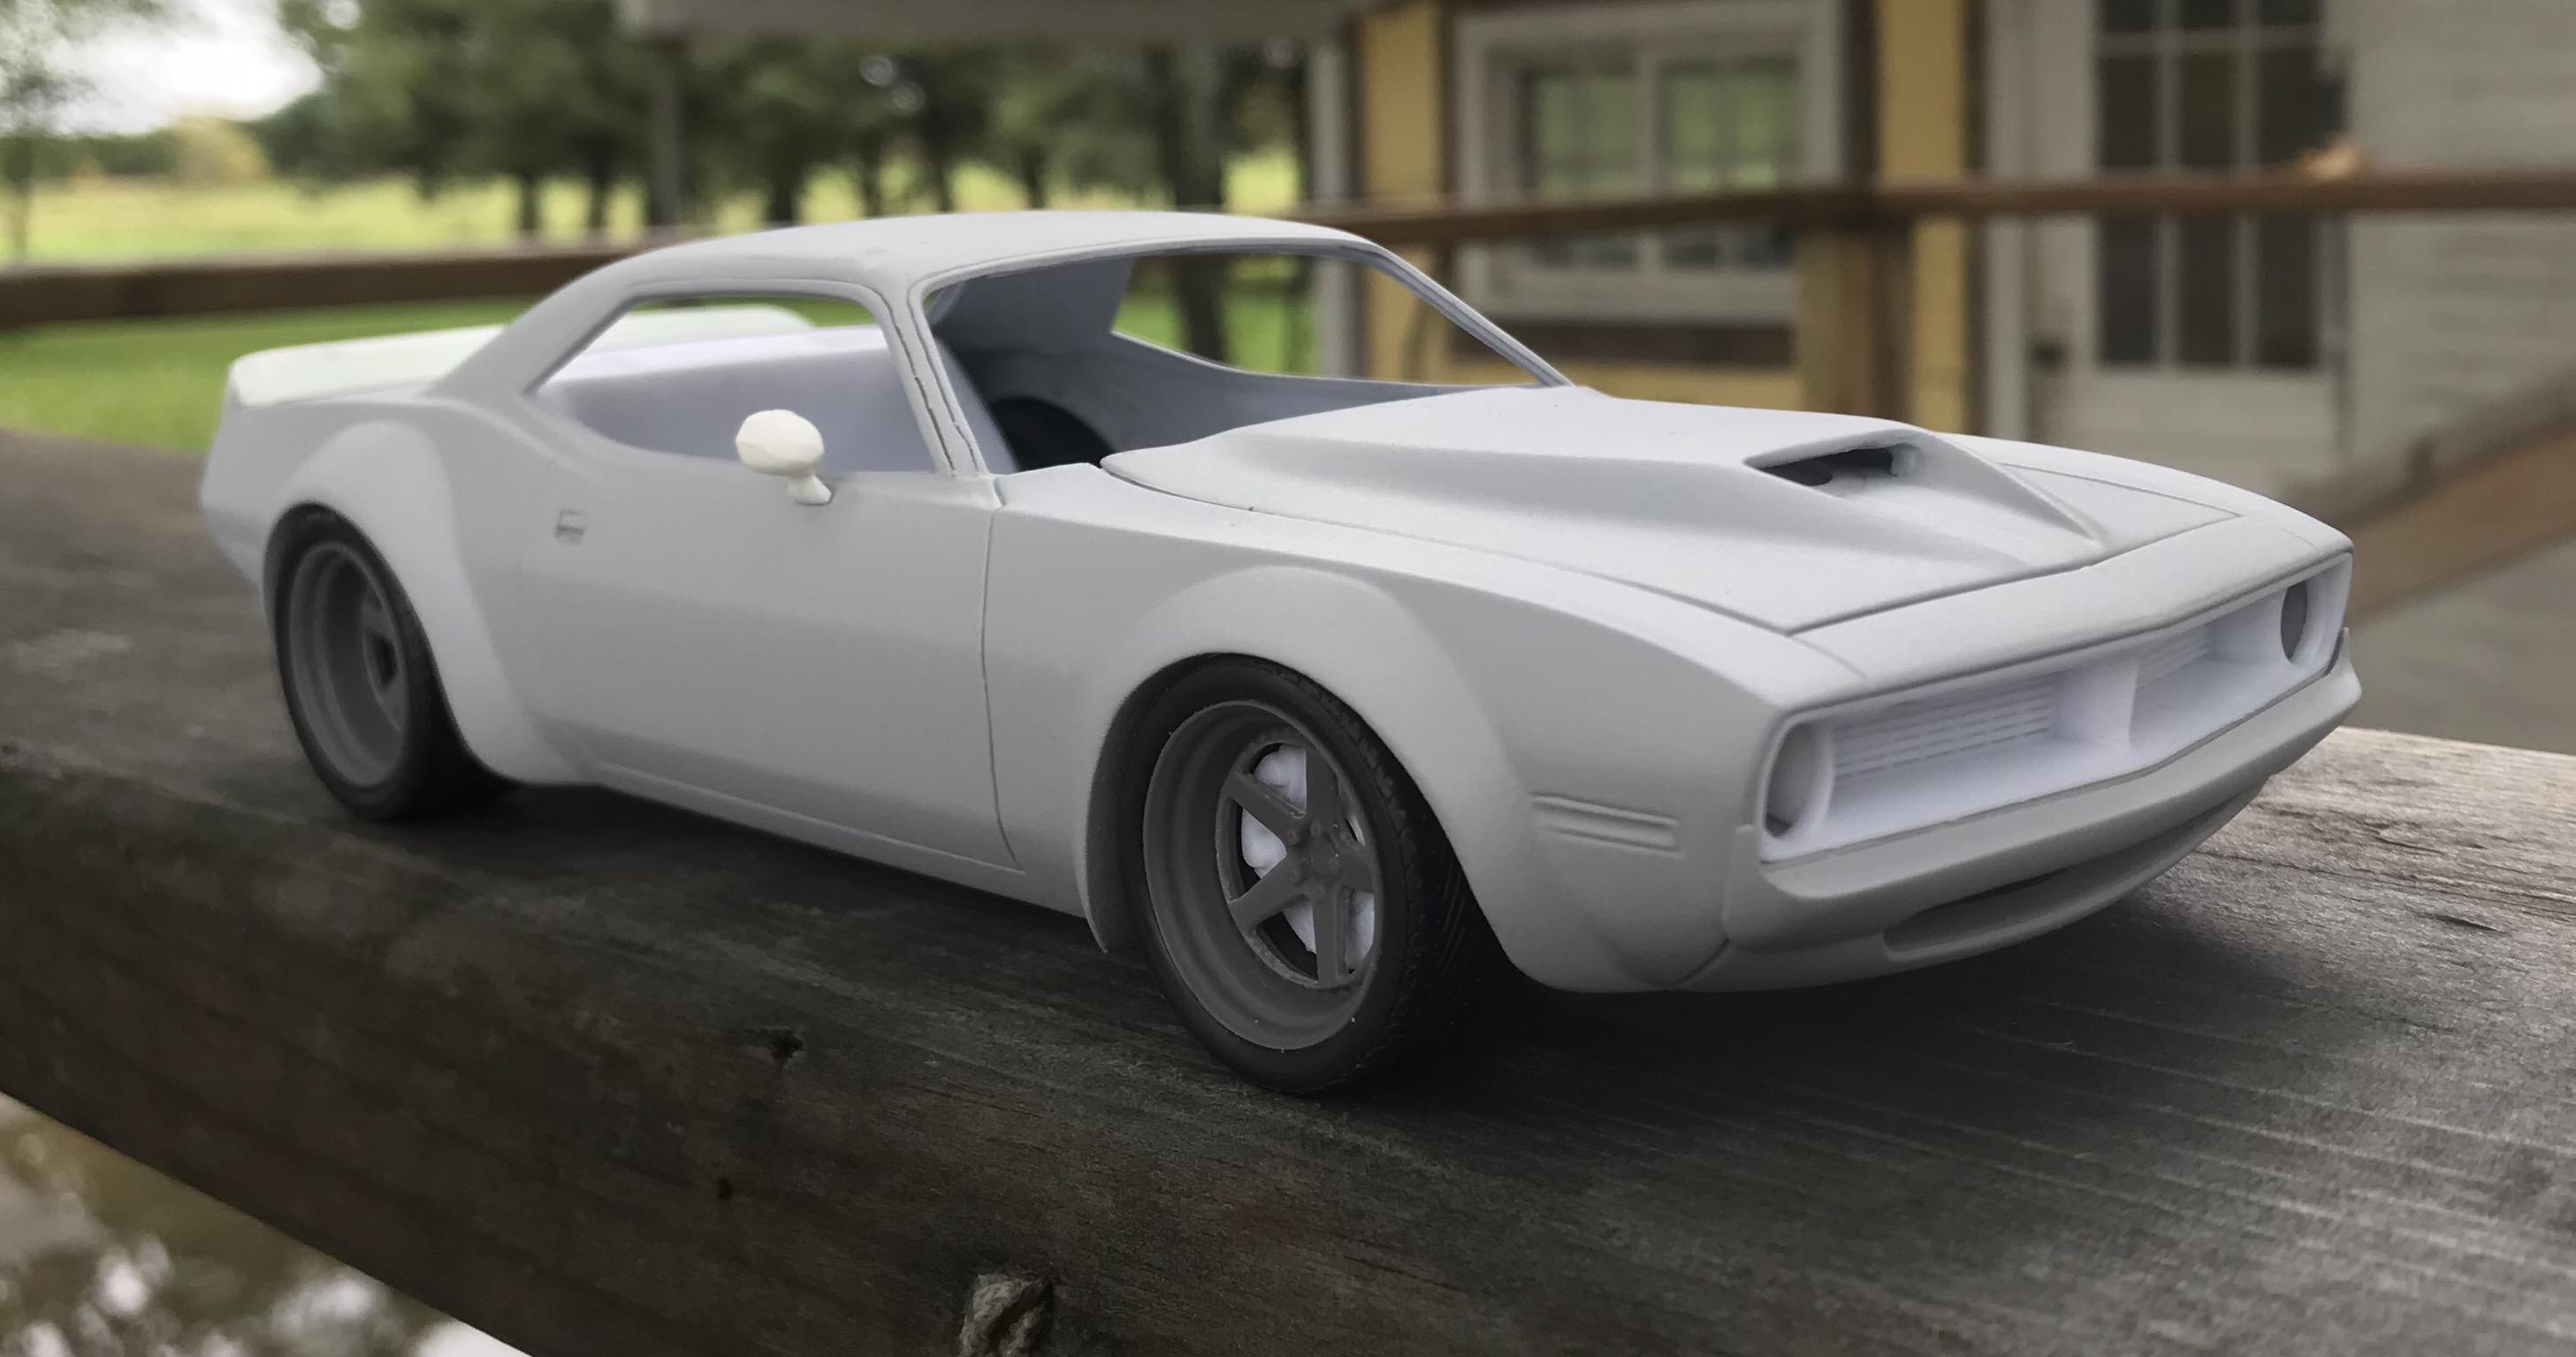
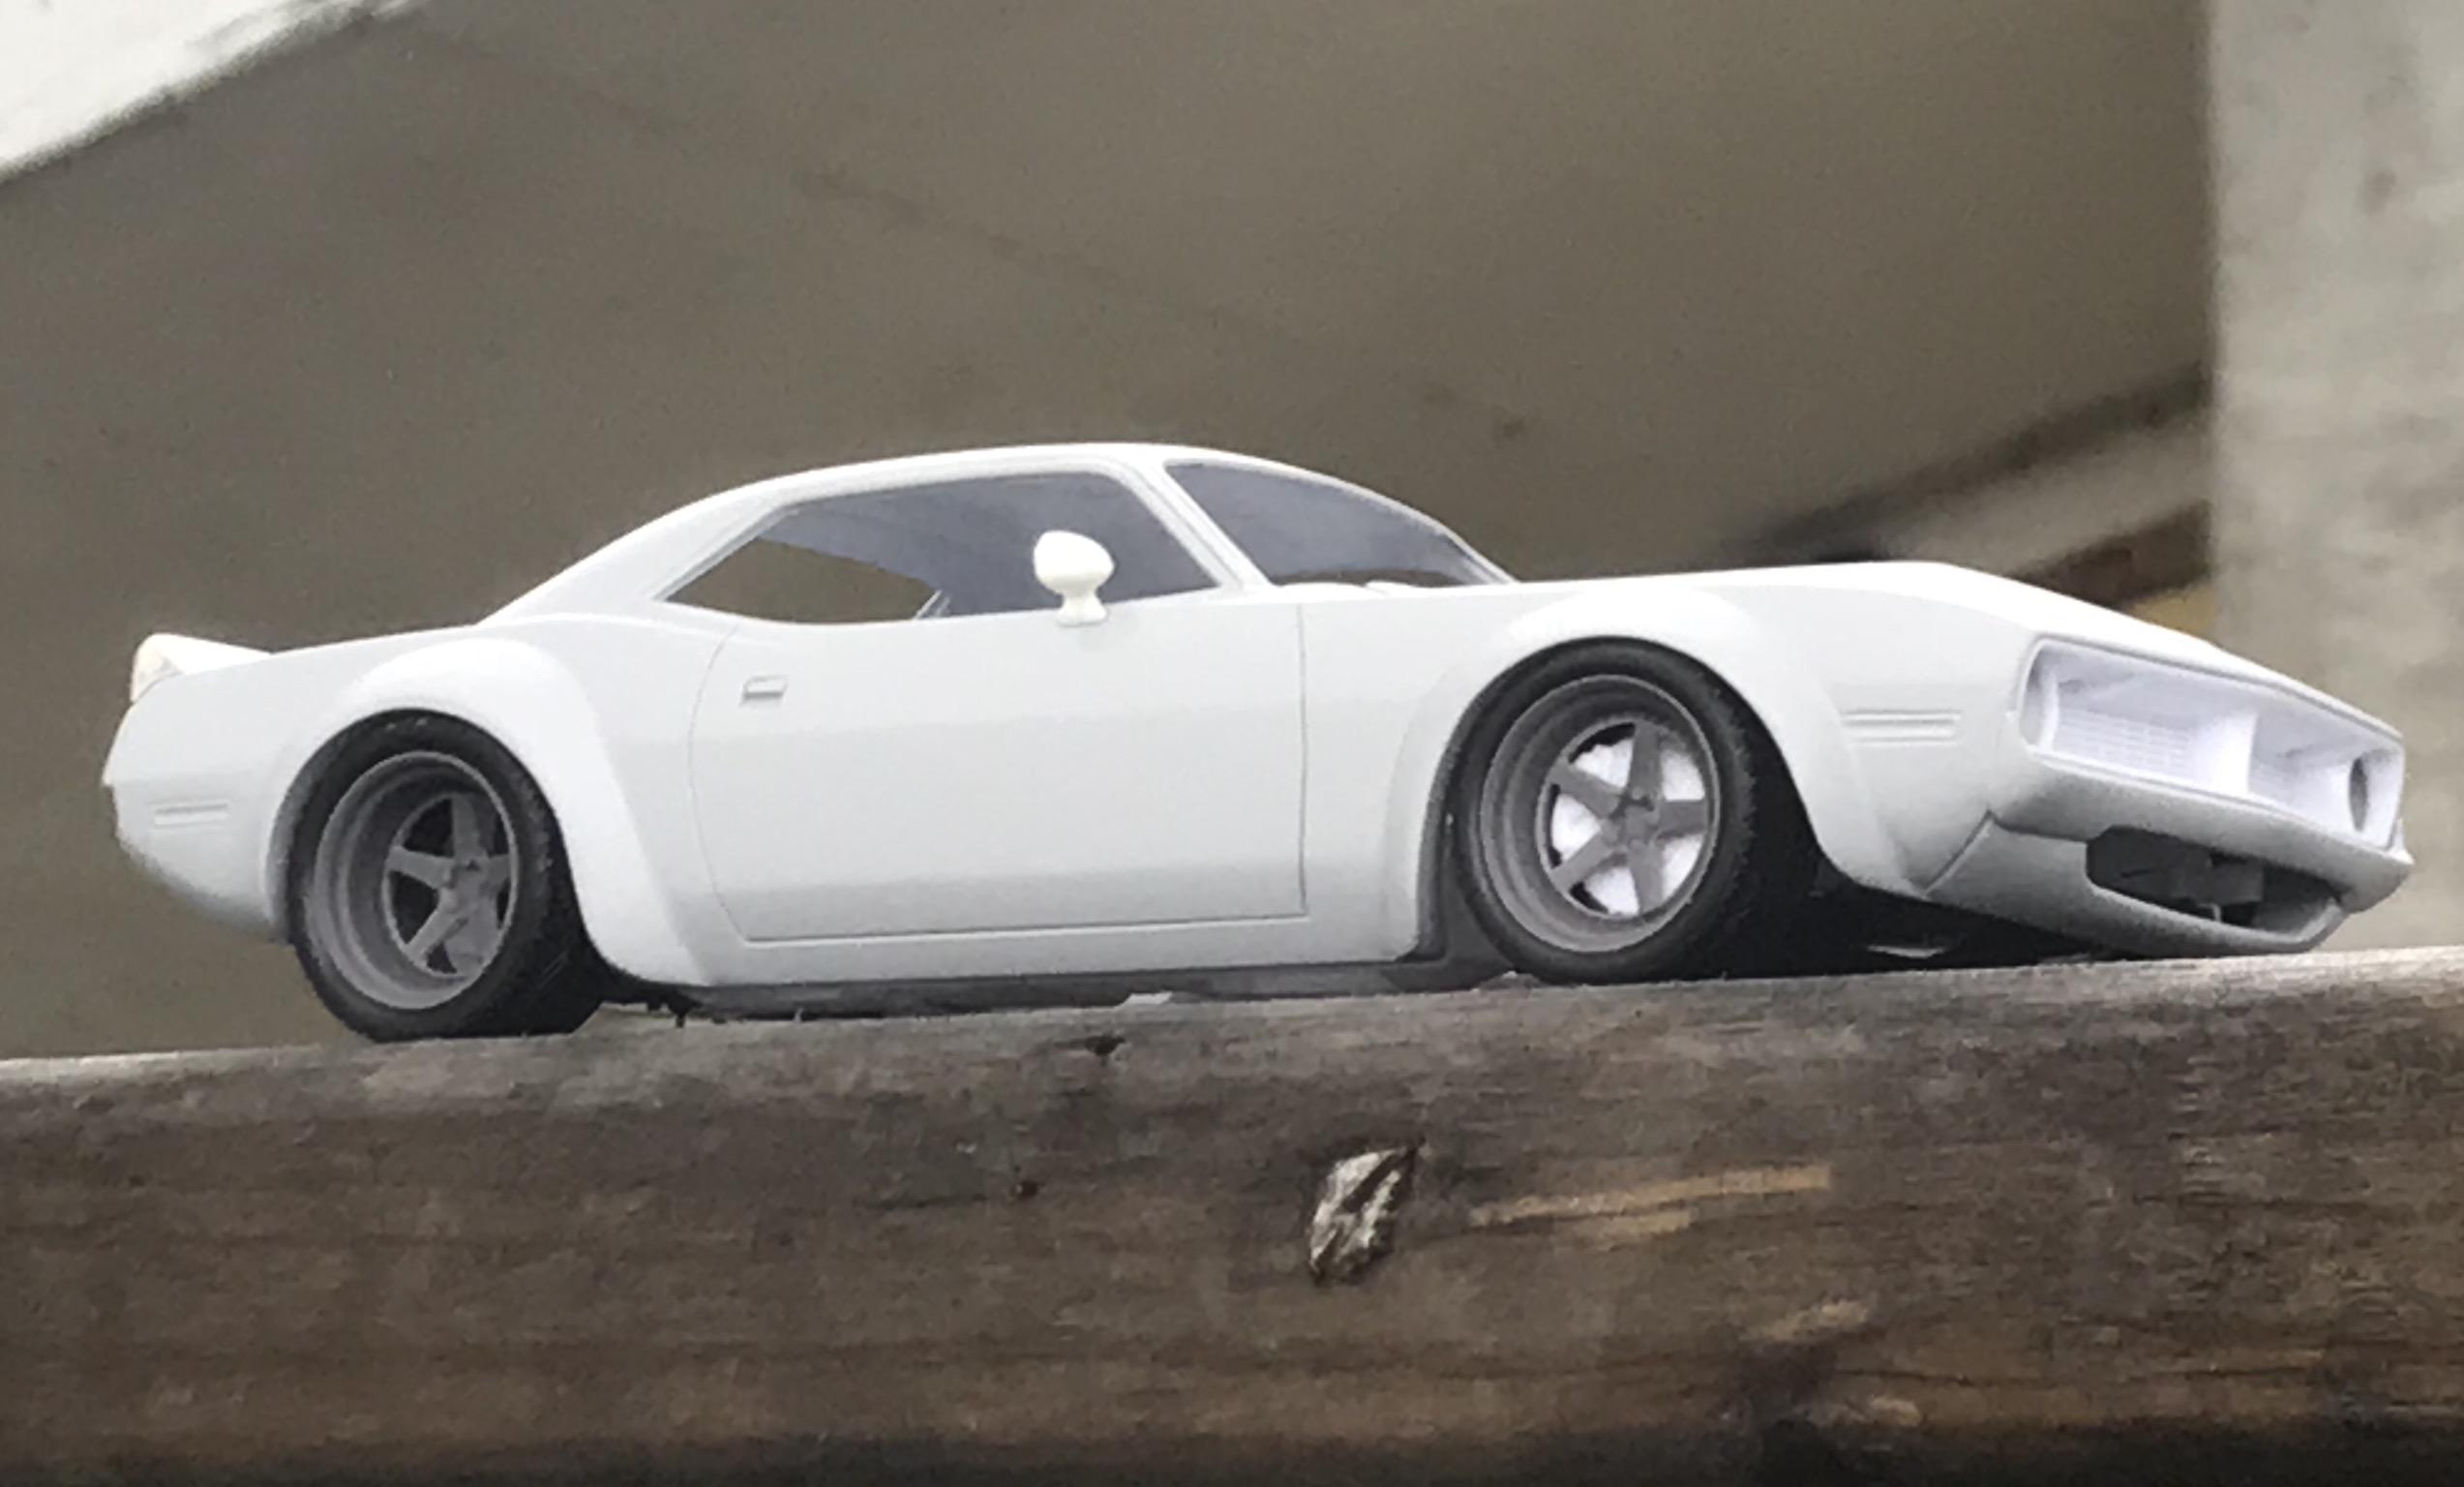
Hi, everybody just posting a build I've been working on for a while. It's revell's 1/25 hemi cuda, I know some people aren't going to like it and thats okay. But with this kit I wanted to sit low, with wide tire and most importantly keep the rear seat. I've never built one with 4 seats, plus I like flared fenders. This was inspired by a rendering by Andreas Wennevold and the Srt Demon. The engine is the hellcreate demon from Iceman Collections the suspension is revell viper acr. The body still needs to be touch up, and straightened a little but I should get to it within 2 weeks.
-
Another thread, two nights in a row. Kind of hard to ignore. My build of a '71 Cuda 426. The paint is model master Sublime green. I started and painted this car in January 2018. My first model build with bare metal foil!!! No looking back now. The pictures do not do it justice. The shaker hood scoop needs to be trimmed down. I just painted it and notice it won't let the hood sit flat. What do you think??
-
Hello All, Philippe, Scott, Luke, Wayne, Anton, Craig, Mark: Many thanks for your kind comments for this build, they are very appreciated and keeps me motivated for my current build!!! Following the good suggestion from an experienced member Dragonhawk1066 I deceided to move this thread in the "Under Glass" category. This make plenty of senses since the car is not WIP but finished. I took a last picture today to create a last post in the hope that it will be linked to the original thread listed in the "Drag Racing Models". I found the hint (I would say) by searching in the "How To Use This Board" so I realy hope it's the right way to do this. In the future I will post all my others completed models in Under Glass (when I'll be ready to do so). Cheers, Francis
-
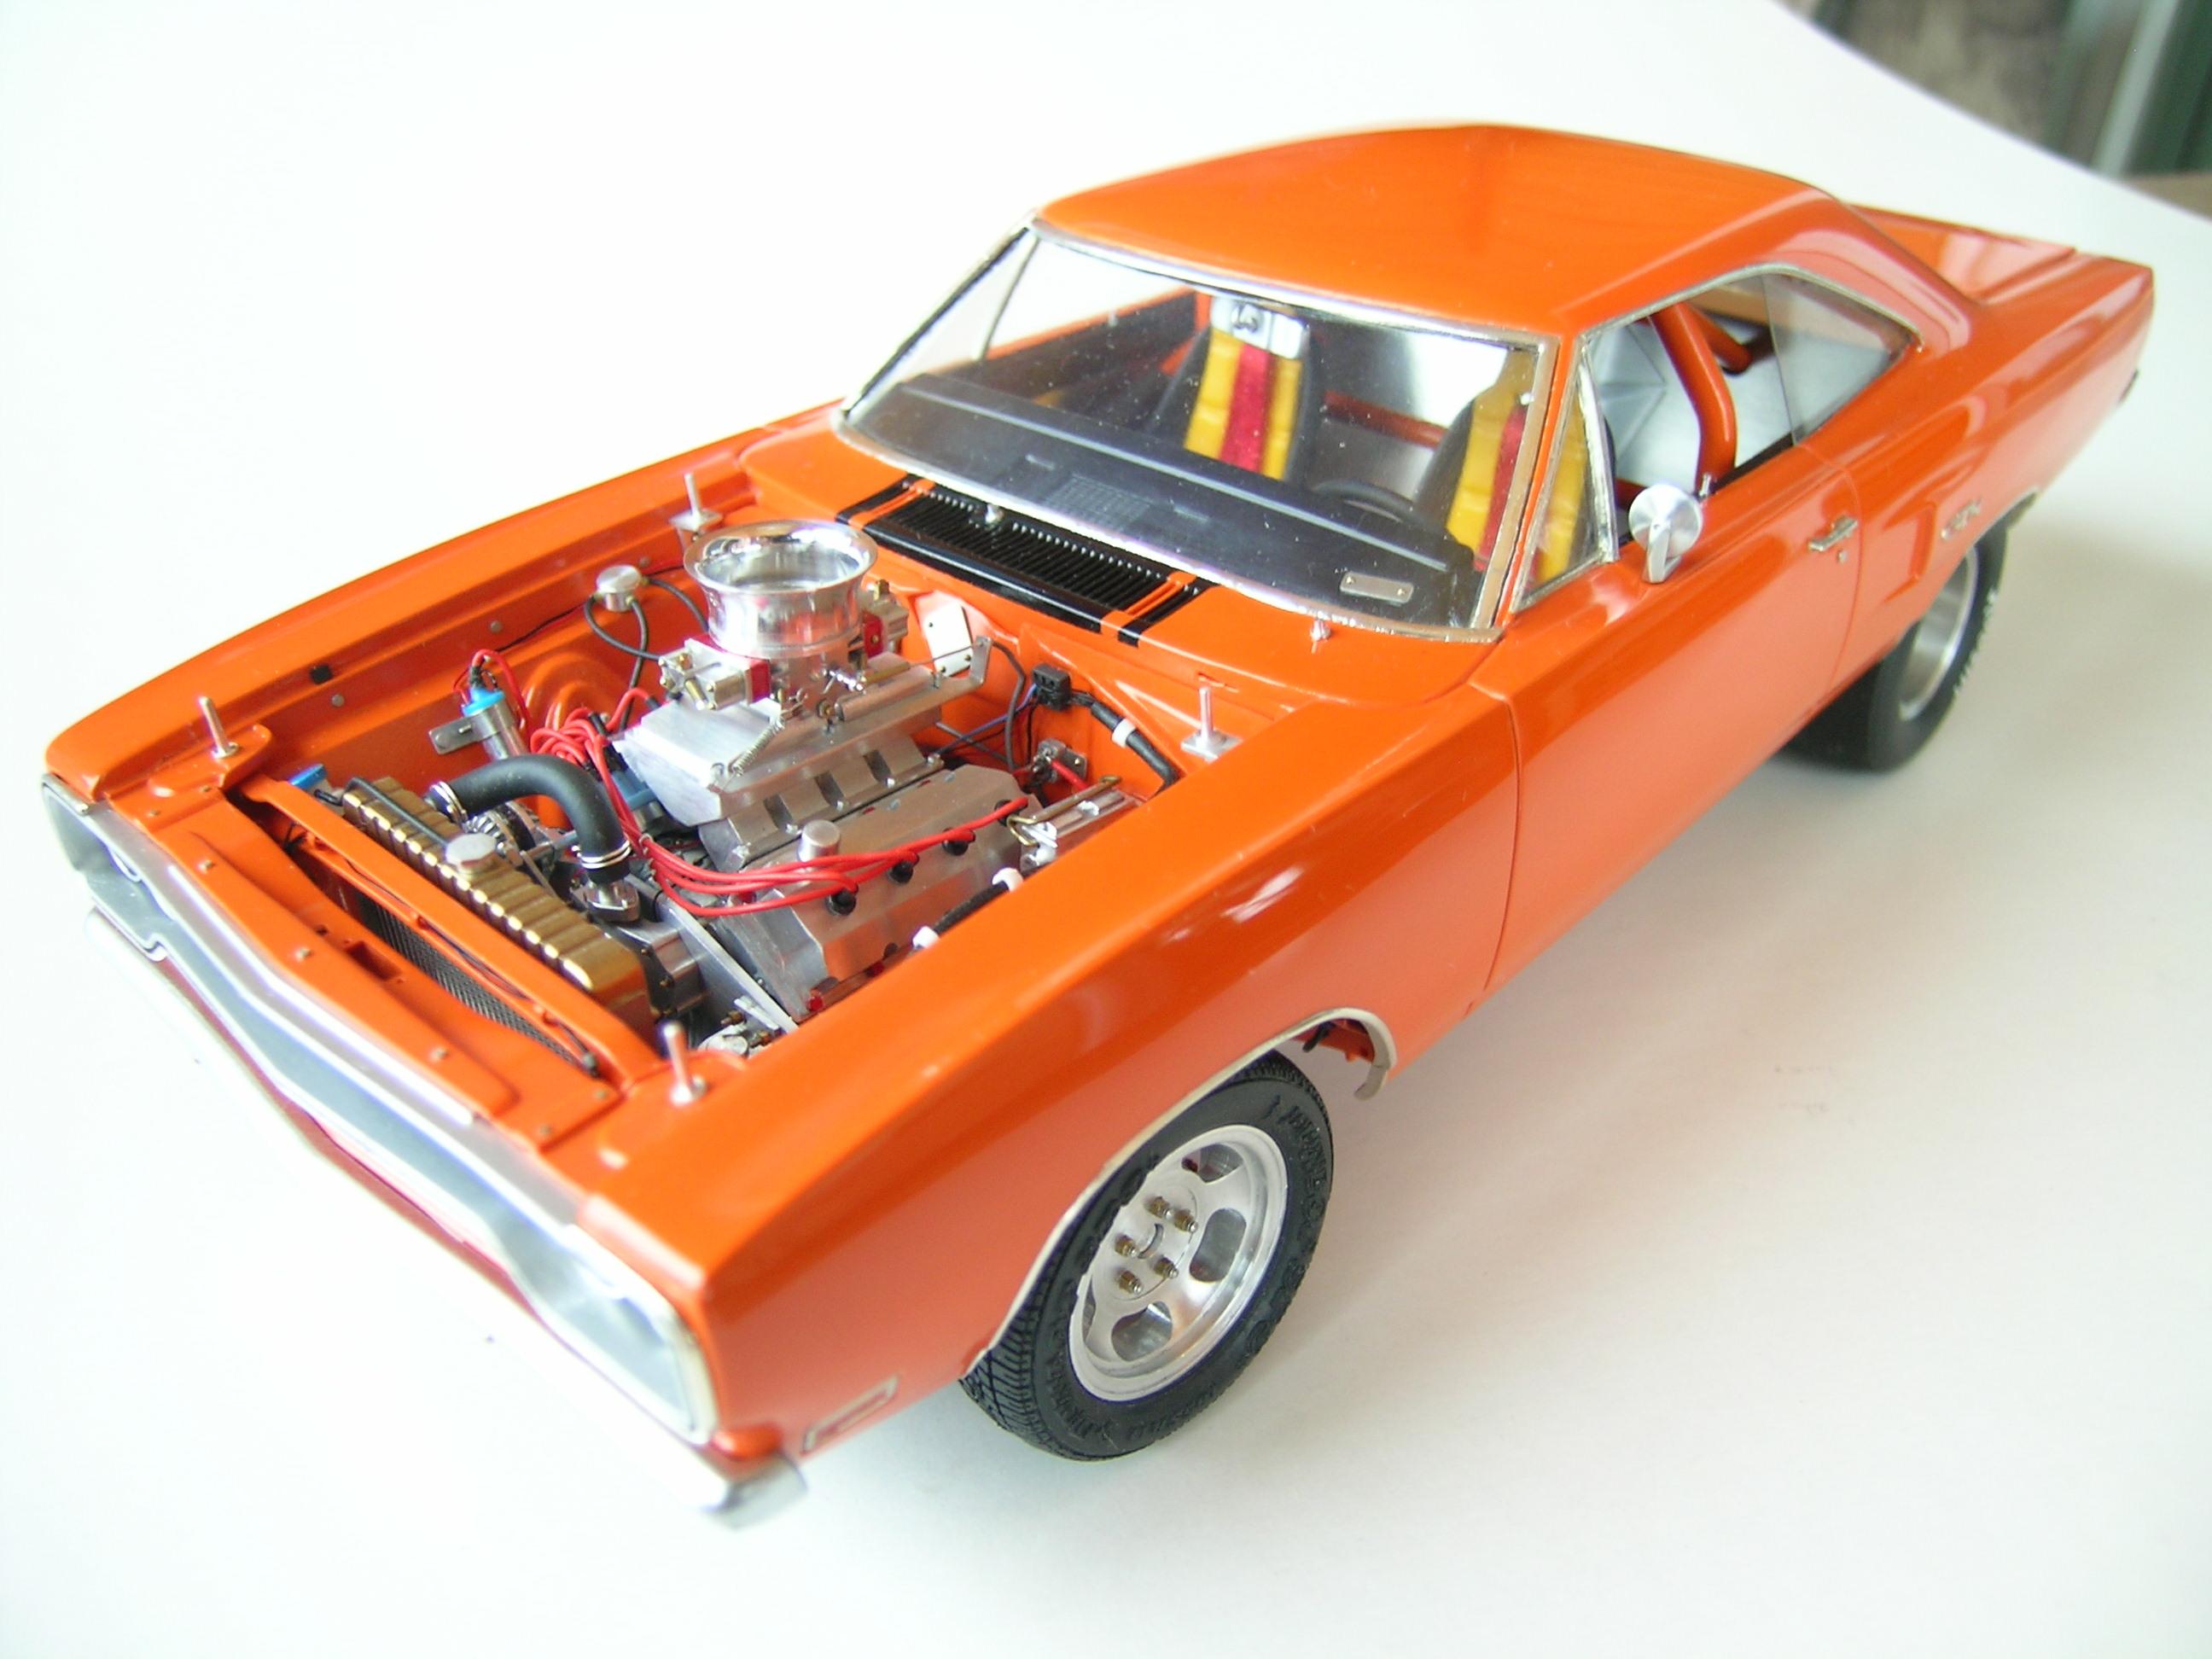
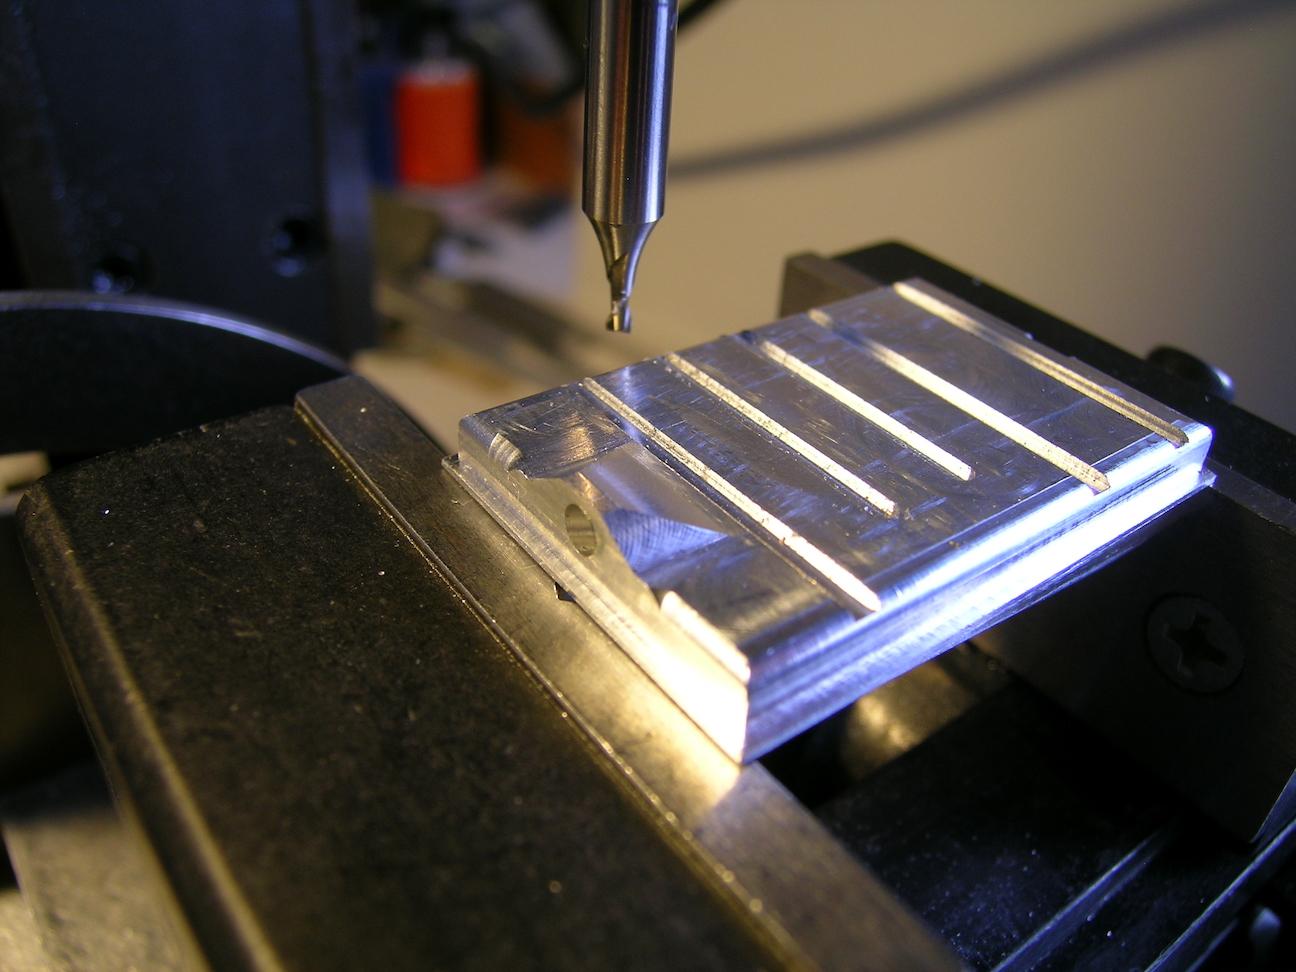
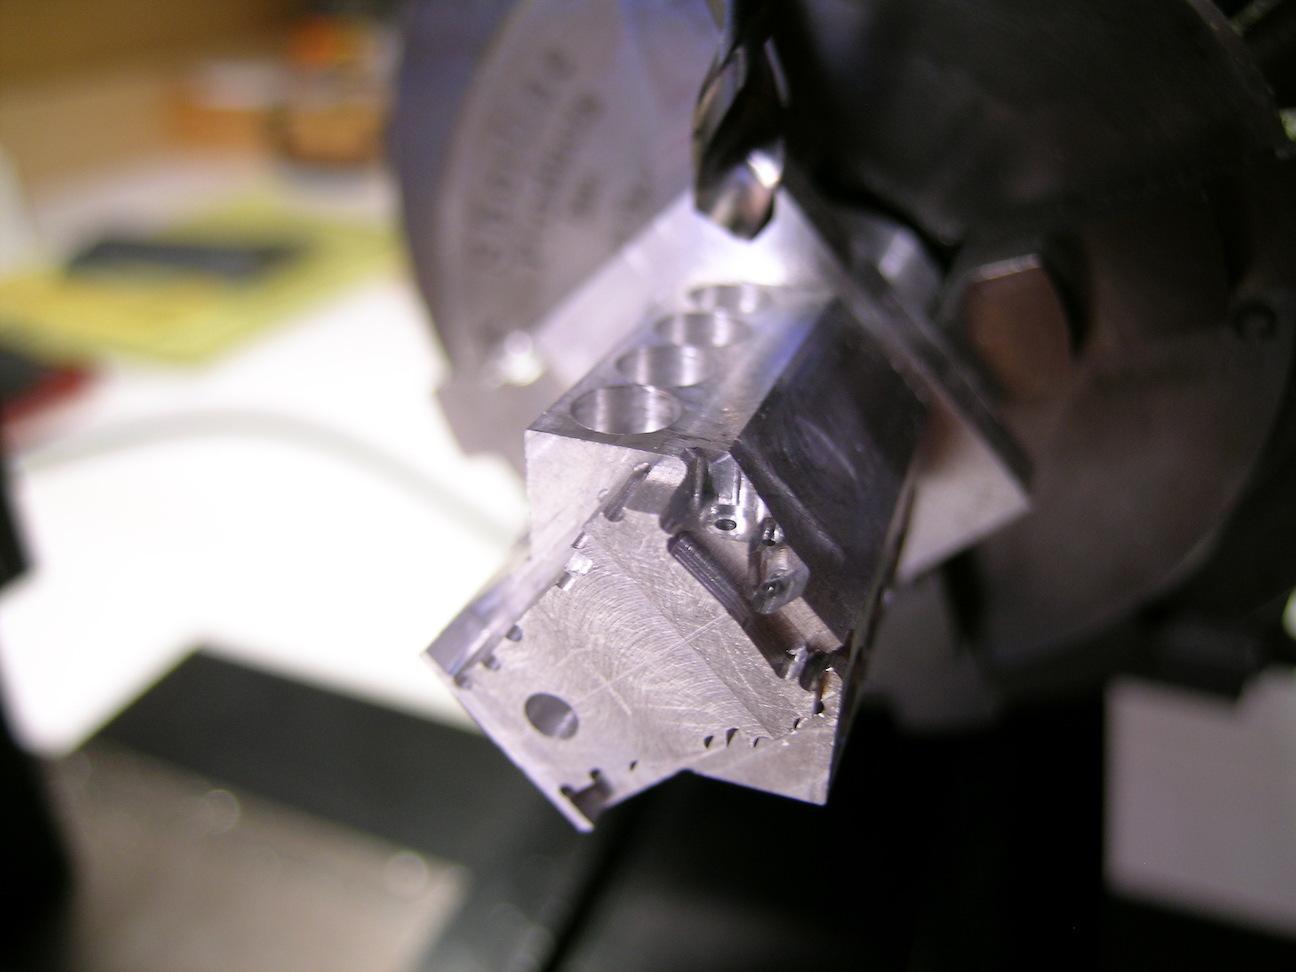
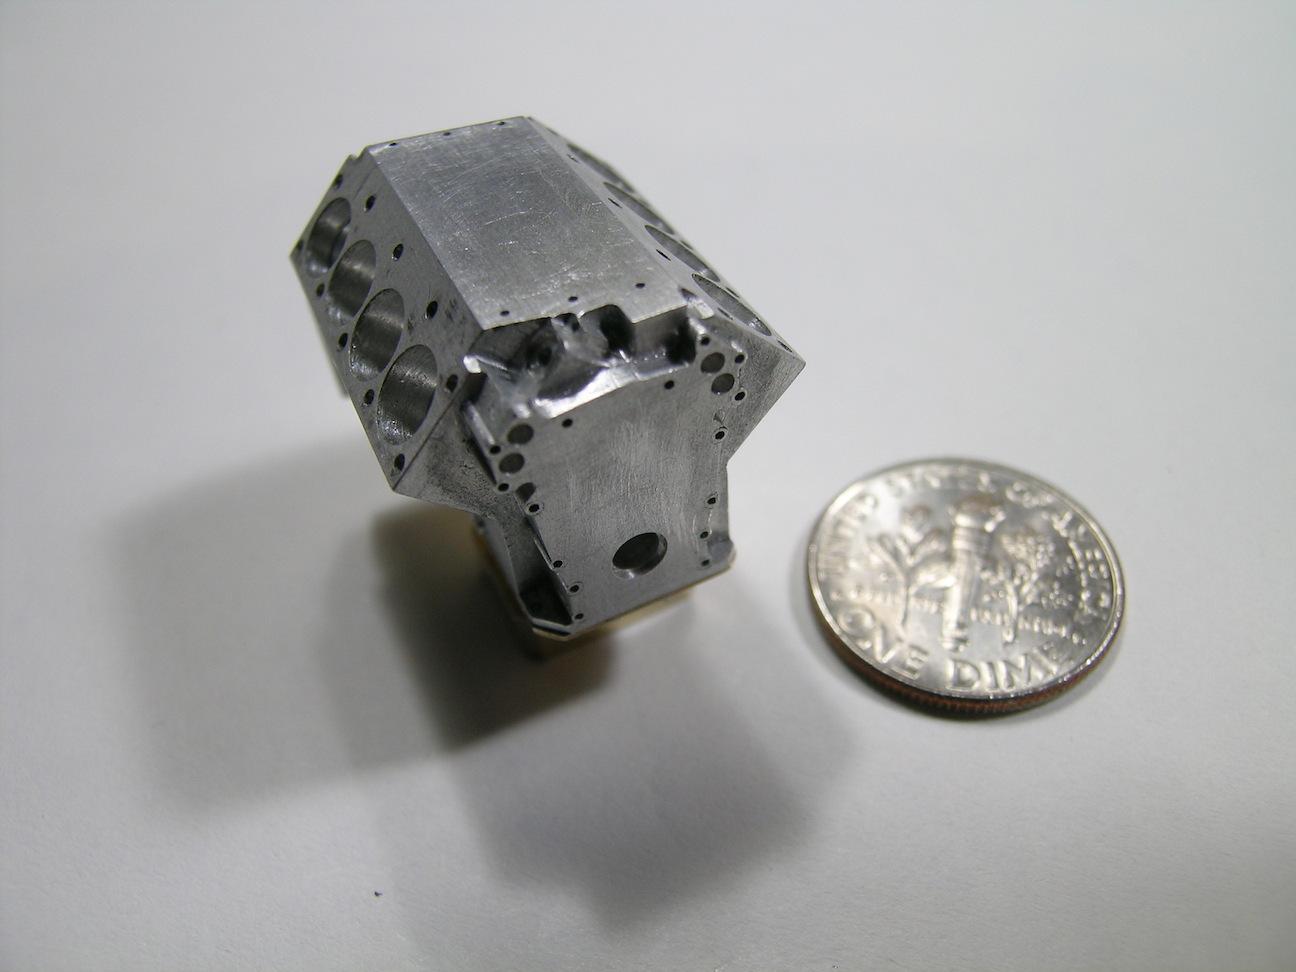
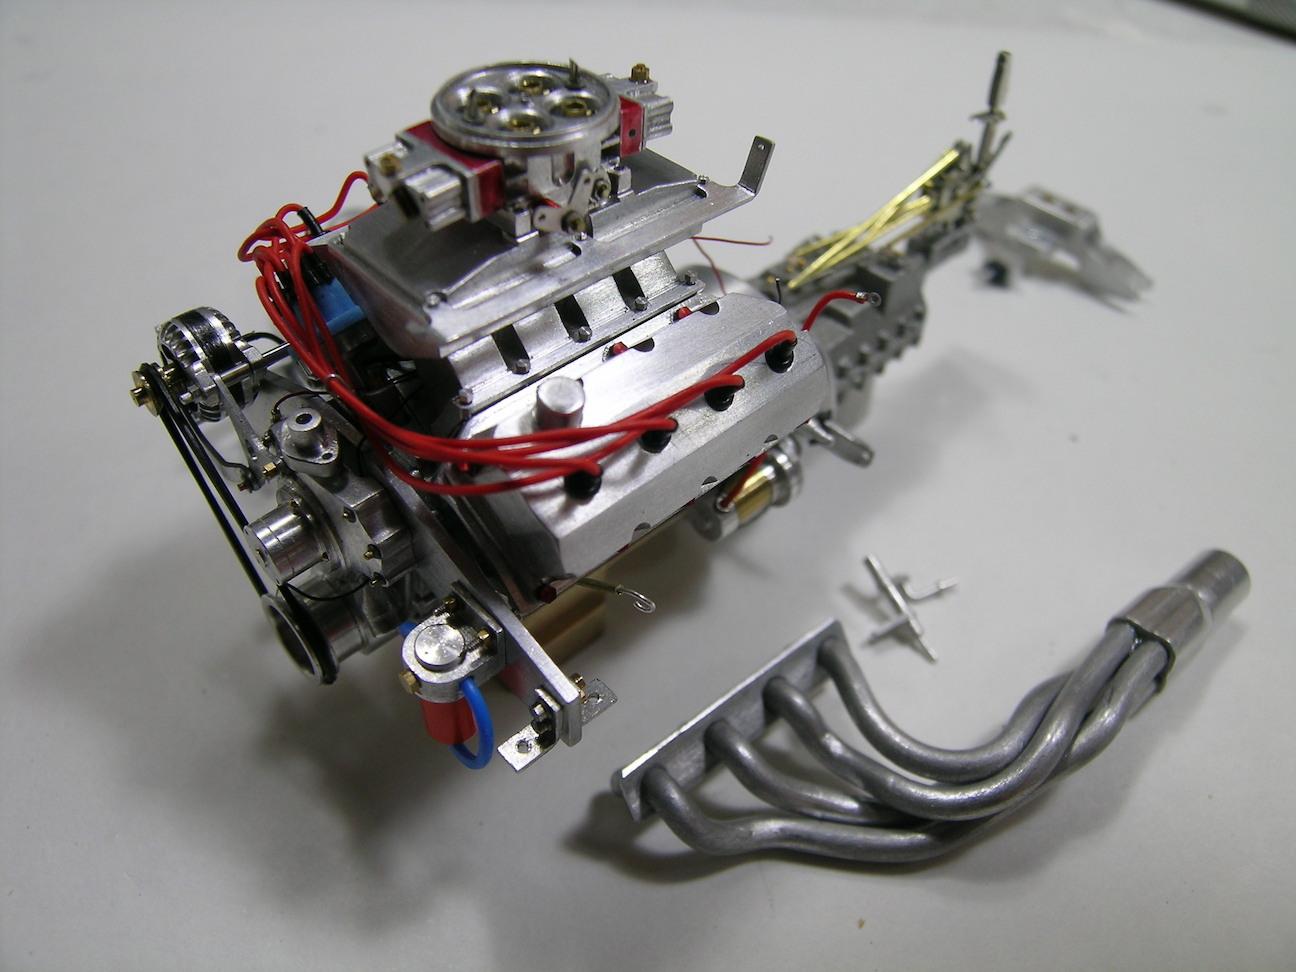
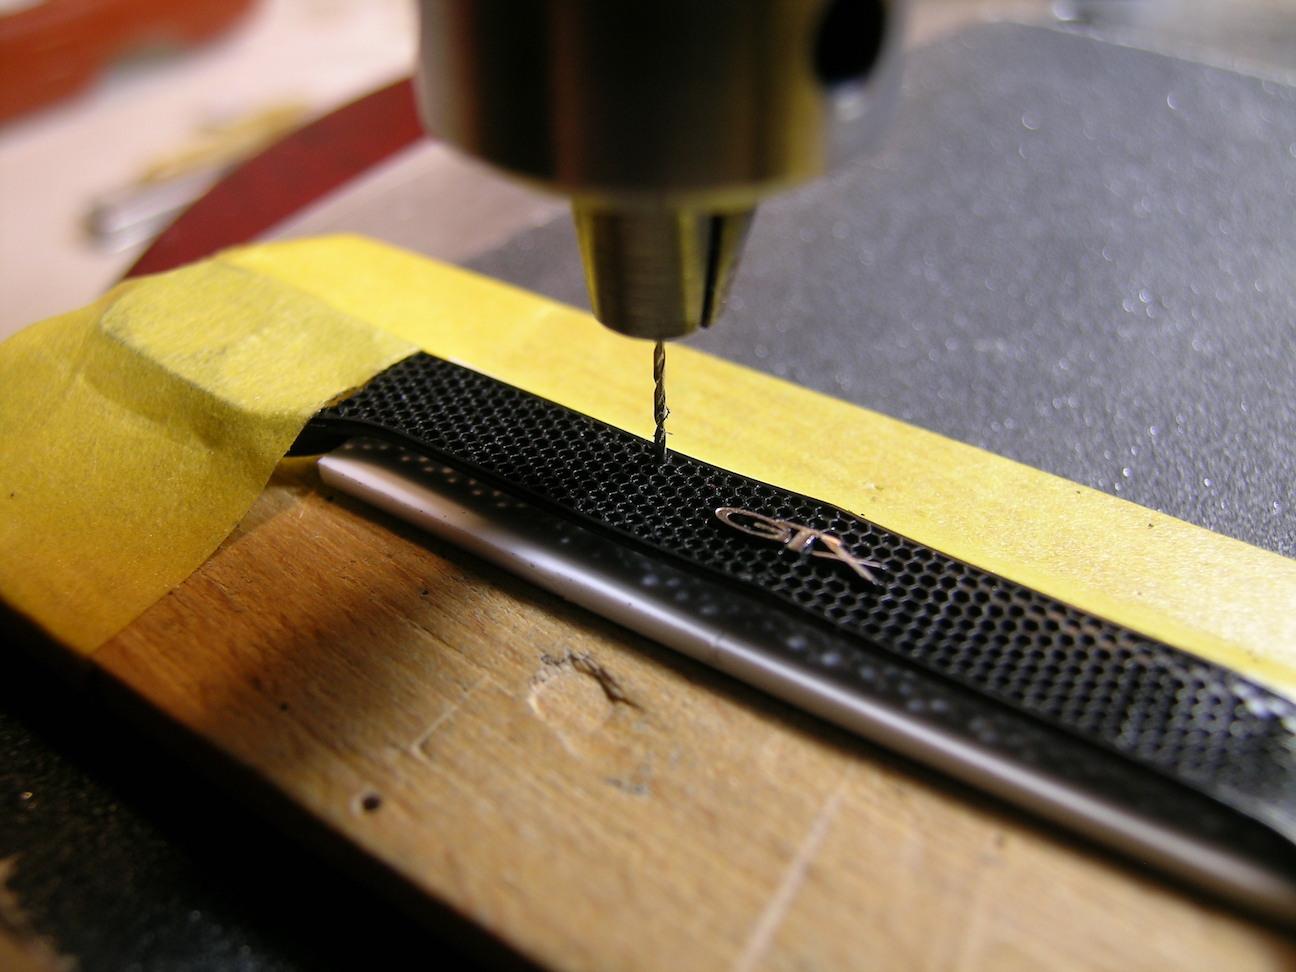
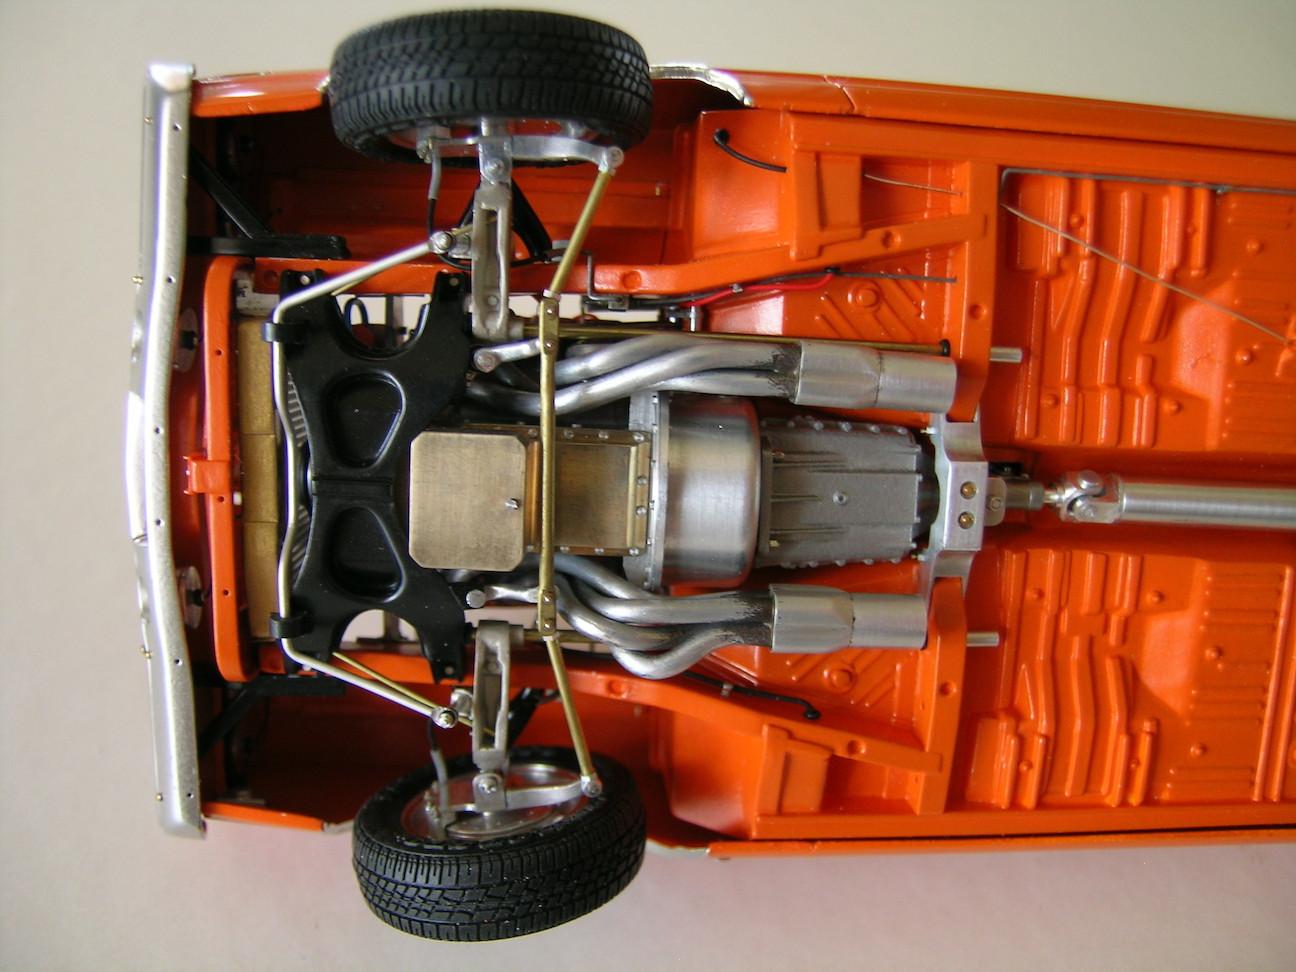
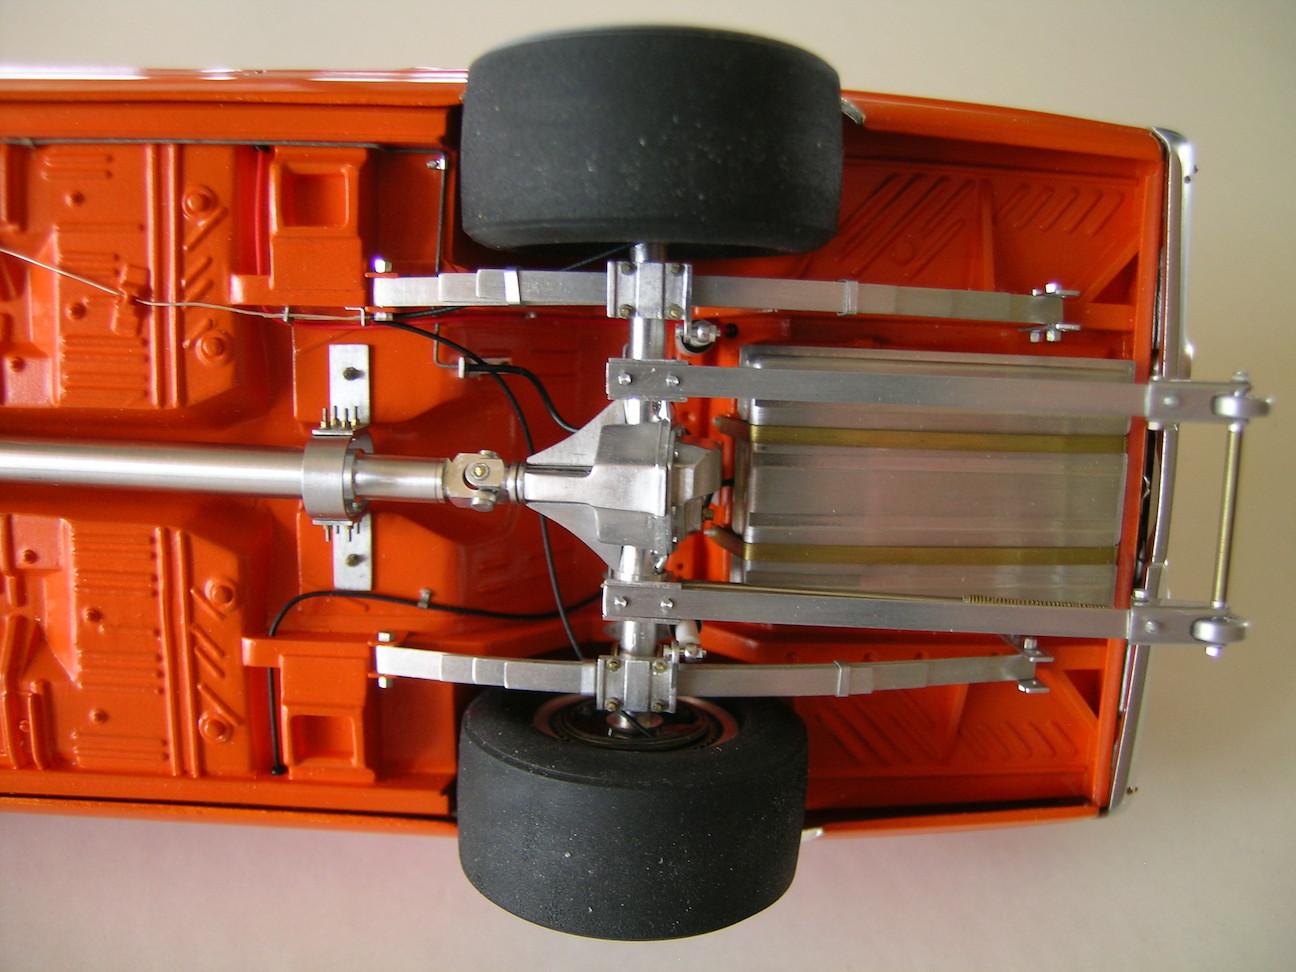
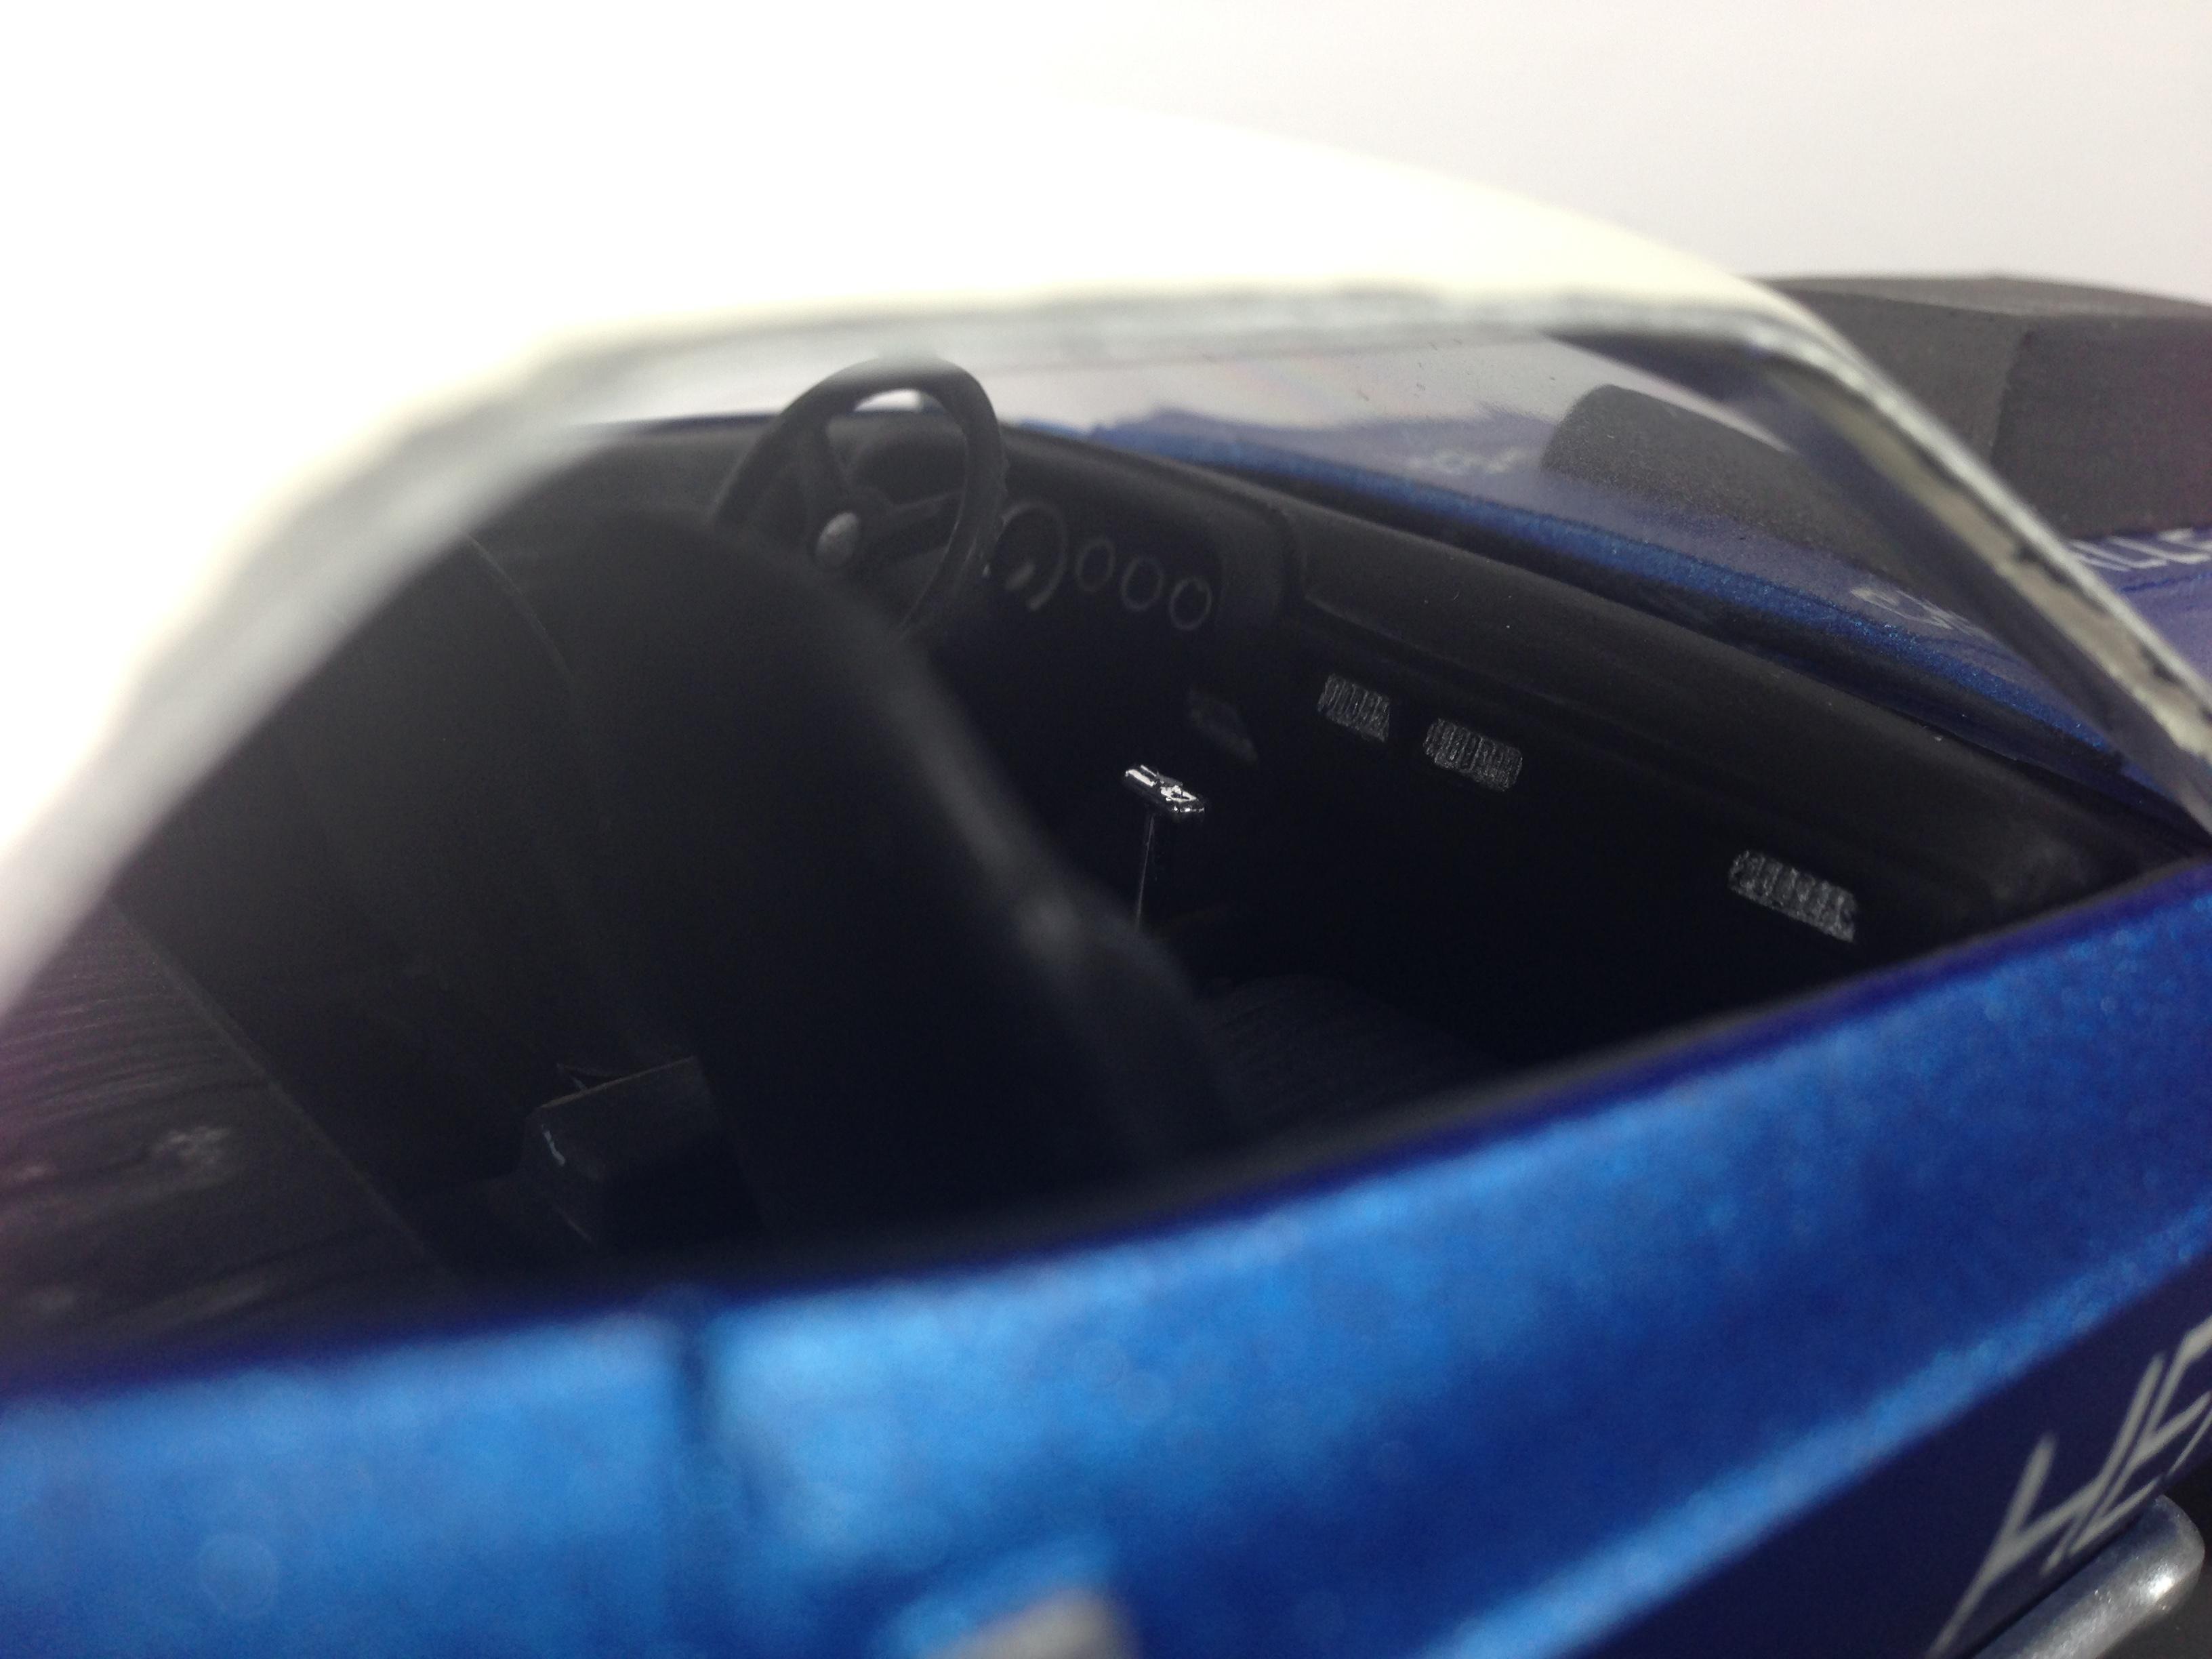
Hello All! Following the requests of some fellow members I will start a new threads of some of my completed models starting by the most recent. On this thread I will present my drag version of a ’70 Plymouth Hemi GTX 1/25 scale. I started making plastic models as a youngster in the mid seventies so I just build 1/25 scale and not 1/24 since they were not existing back then. I also want to be able to put my models side by side and don’t want to see any unrealistic proportions between them (I’m kind of purist…). I will go in outline because there are too many details to list and must save my time for my current project (remaining pictures should speak by them self). Using a promo JoHan body, I open-up the hood and trunk with a panel scriber and the back of an Xacto blade. I reproduced all the shapes and reinforcements with various thickness of styrene strips based on pictures found on internet. I also thinned the hood on my milling to make it more realistic. It was roughly 0.080’’ thick without detail since it was molded shut on the promo body. I grafted the underhood section of a newer Revell ’69 Charger Pro Modeler body since it was a perfect match for this project. I also used the floor pan because the JoHan original one was not acceptable for this kind of build. I removed the molded in gas tank and reconstructed the trunk floor with Evergreen styrene sheets. I also tried to recreate all the trunk’s details and embossings of the real car using references found on internet. On the interior, I salvaged the dash of the Charger but I was forced to create all the door panels using styrene (the cup style of the GTX promo was useless and the Charger was too different). I also used thin aluminum sheets to create a drag car interior. I pushed the realism by recreating the instrument cluster gauges with a professional drawing software (Adobe Illustrator). I found pictures of the gauges on internet and used them as template on my computer to exactly recreate them and print in high resolution (2400 DPI) on negative film (pretty crazy…). I also machined all bezels around the gauges, all dash knobs and a radio delete plate (a lot of hours spent in the interior). I machined all the engine components including the block mostly with 6061-T6 aluminum and some brass parts including the oil pan. The Dominator carb itself took me probably 80 hours to build and counts more than 50 parts including the bolts from RB Motion and Scale Hardware. The transmission is a Liberty 4 speed from Futurattraction and I machined a mounting plate for the shifter. I also machined the rear end housing, the Dana 60 cover and a full functional drive shaft including the yokes. I machined my own set of American Racing slot mag wheels with aluminum and they are mounted on wheel hubs with threaded studs and nuts from Scale Hardware. I made all direction components and rods with brass tubes, aluminum rods and RB Motion rod ends. I made the radiator including upper and lower tanks (machined) and photo etch mesh grille (we can see through). Plumbing and wiring as well plus a mirror finish EK2 Go Mango paint job with black accents. Hand made front grille support and machined headlight bezels along with front flashers and rear backup lights bezels. All glasses are made with 0.010’’ clear Evergreen styrene and embedded to the body shell for a more in scale look. Bare Metal done on all body trims including the GTX logo on the side rear fenders. The list can go on and on for hours so take the time to check every pics and judge by yourself… I surprise myself by finding details that I forgot when I look at it after some time on the shelf! I spent around 2000 hours (I’m slower than a turtle…) on a 5 years span working on and off from early 2013 to May 2018 on this build. Unfortunately, I lost most of the construction pictures after a computer crash during an OS update but you should have a good idea with the remaining pics posted. I just taken new pics of the completed model but I really think that they can’t do justice like seen in person. I will be more precautious in the future with frequent backup on USB key as I currently do for the ’64 D100 Pickup I’m building. Dana rear housing in progress Gas tank in milling vise Gas tank final Valve covers unpolished Engine block in progress Engine block front view details Intake in progress Water pump in progress Oil pan installed Spinles and brake calipers Engine exploded view Engine final. The blurry part near the headers is the clutch linkage Engine front details Alternator and brackets closer view. Resin Liberty transmission, aluminum support and aluminum Bellhousing I hand drilled all the holes (around 1000) in the honeycomb pattern promo grille using a 0.018’’ drill bit (I know I’m crazy…). Fuel pump, brass straps for gas tank and hand made housing stoppers Cool can, electric gaz pump, Optima battery and kill switch (you can see some of the trunk floor details) Dash bezels and knobs Cluster gauges installed (I put a flashlight behind to show all the gauges details) Interior in progress Interior with dash and panels in place (hand made Tuff steering wheel) Interior back panel details (all aluminum) Front bumper details including brackets Final view Final view showing mag wheels and wheelie bar Under view front Under view back Front grill details Engine bay final Trunk view final Front bumper closer view
-
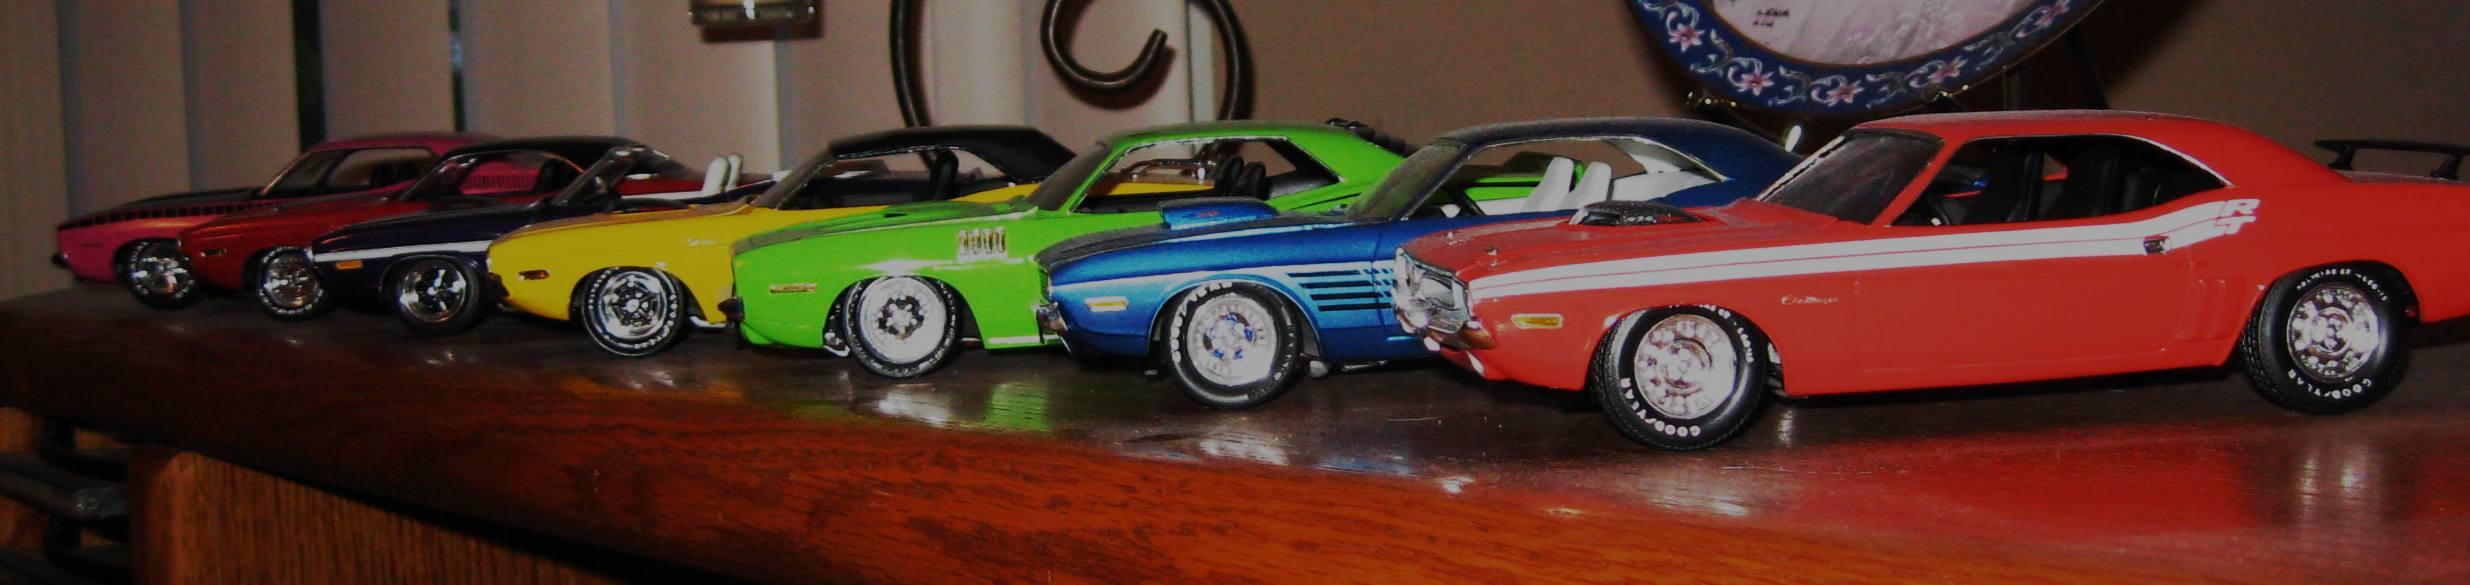
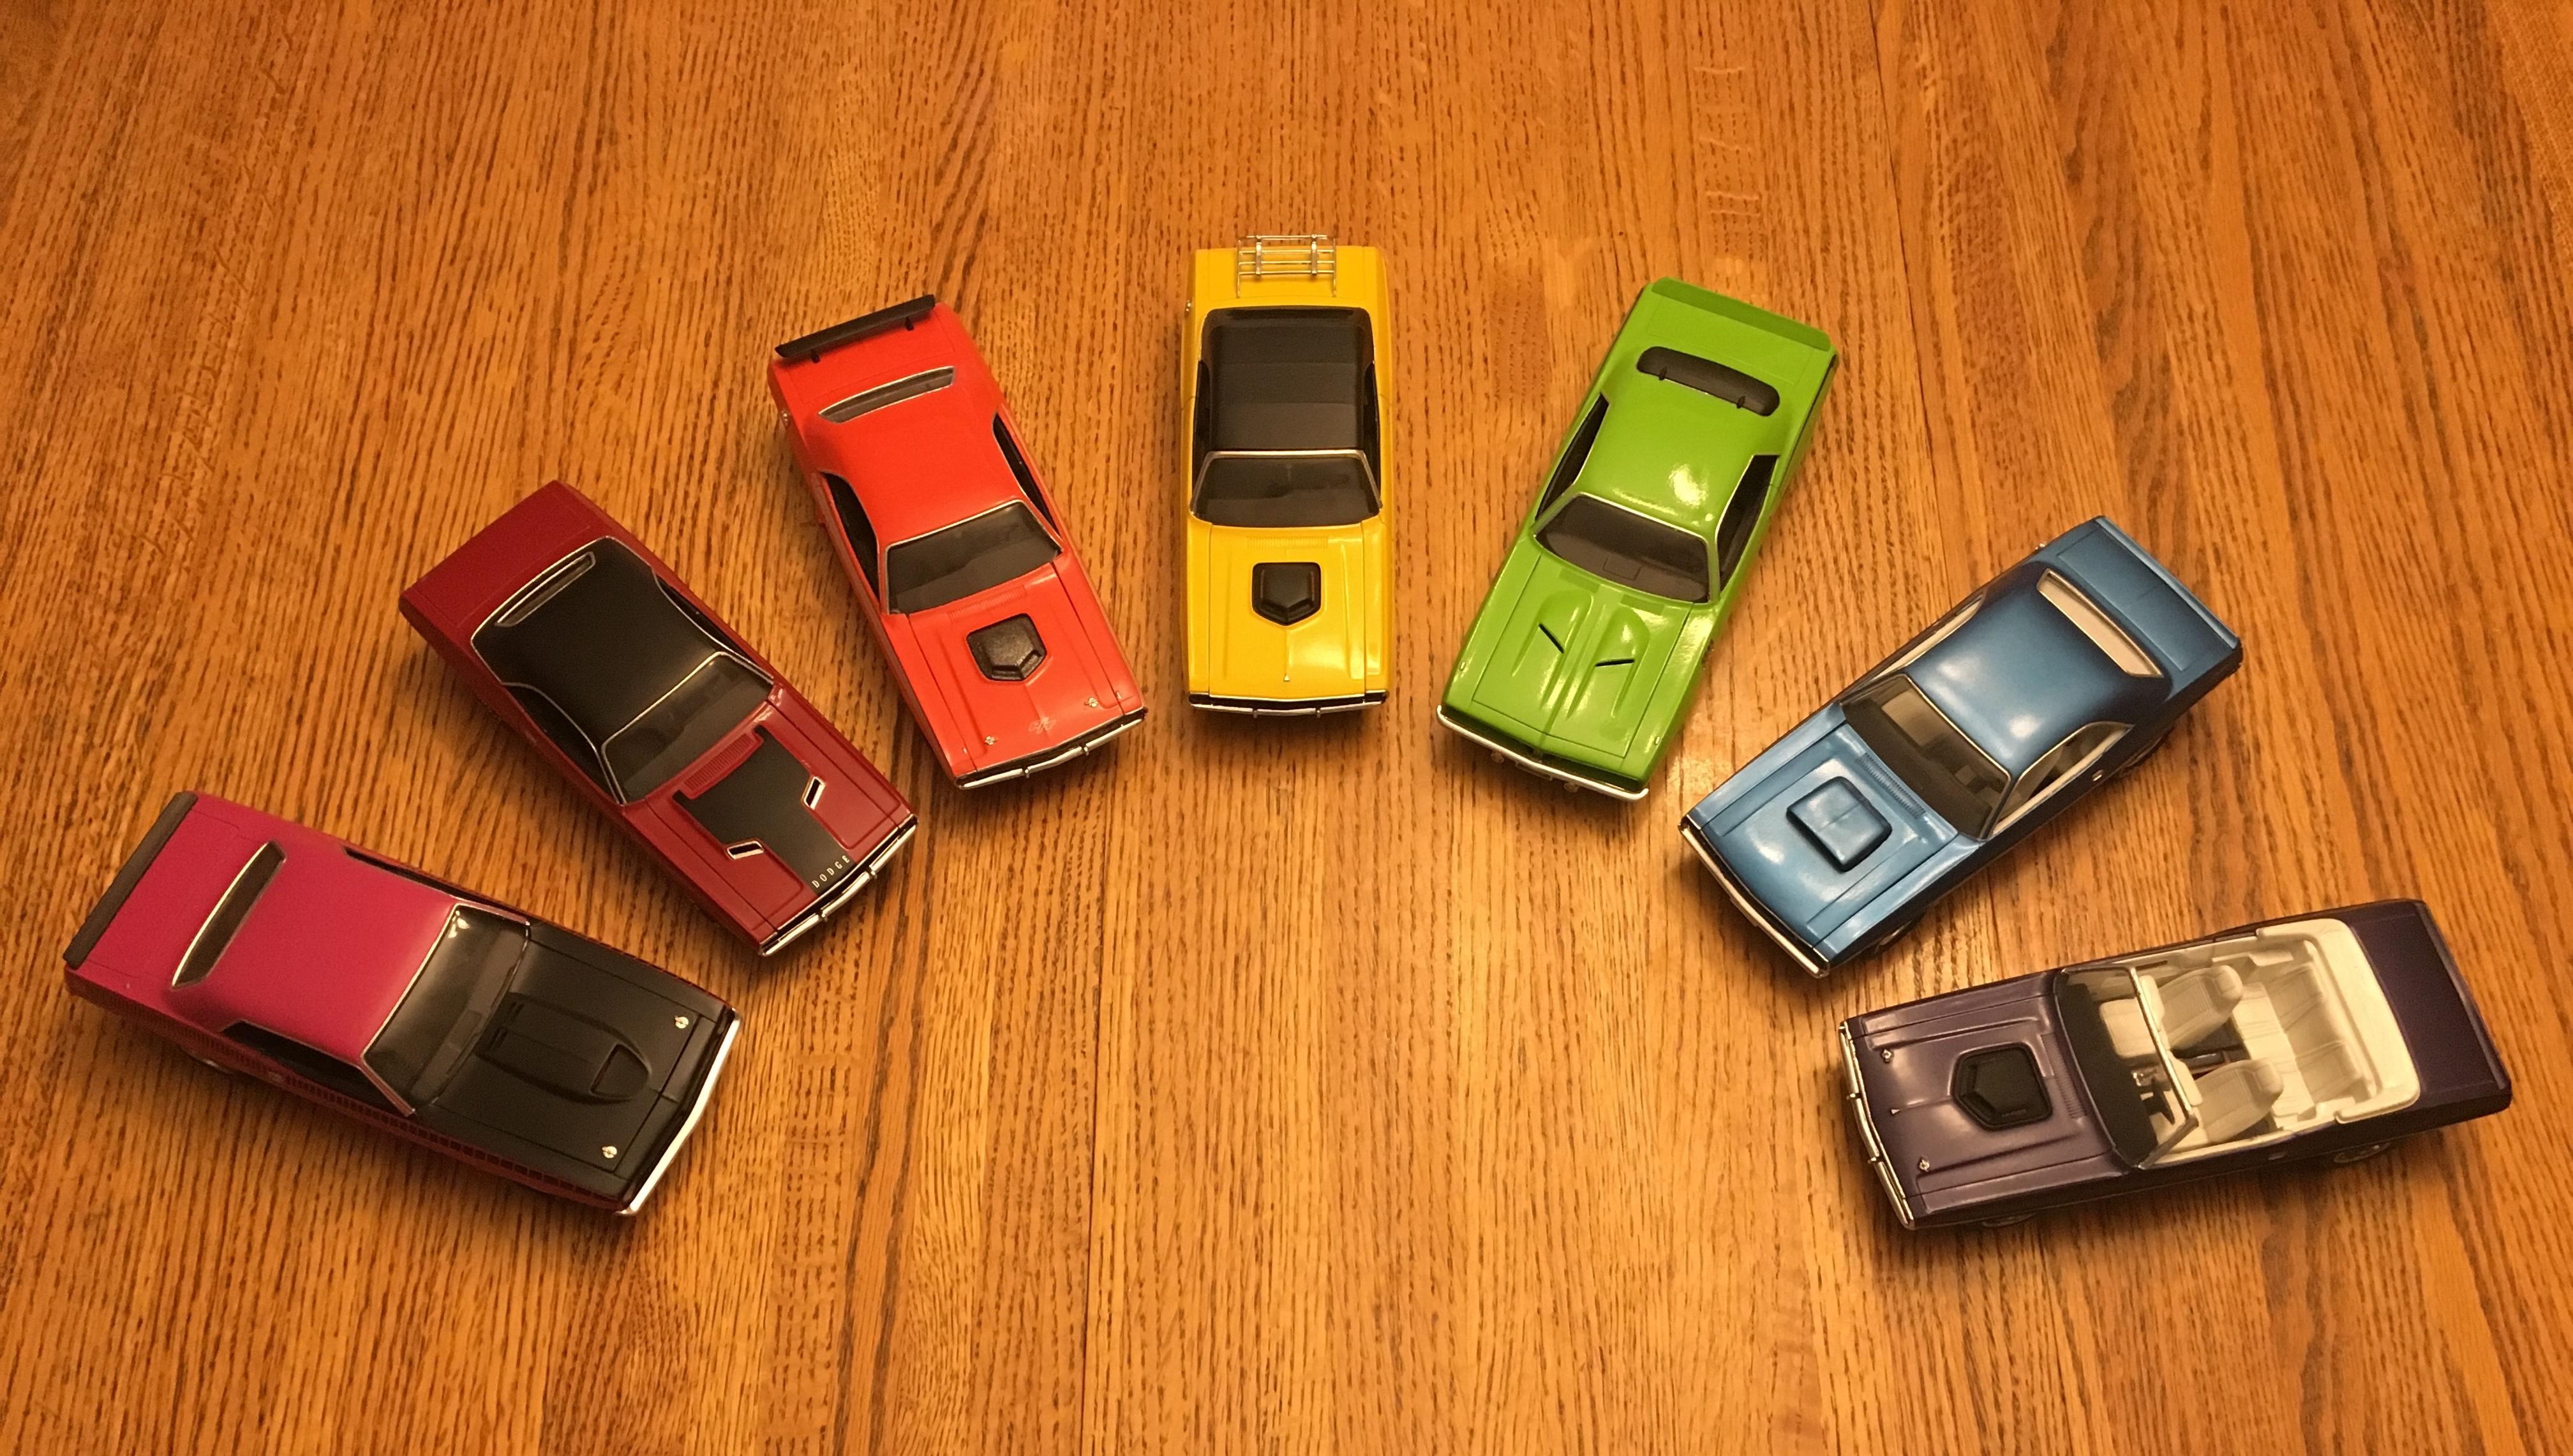
I built all of these Challengers, previously posted, in one batch. It allowed me to mix and match parts for the options desired on each. They were all painted in the same week. Having so many at once allowed me to build efficiently and gave freshly glued or painted parts time to dry before being handled again. Their completion resulted in a rainbow of E-bodies.
-
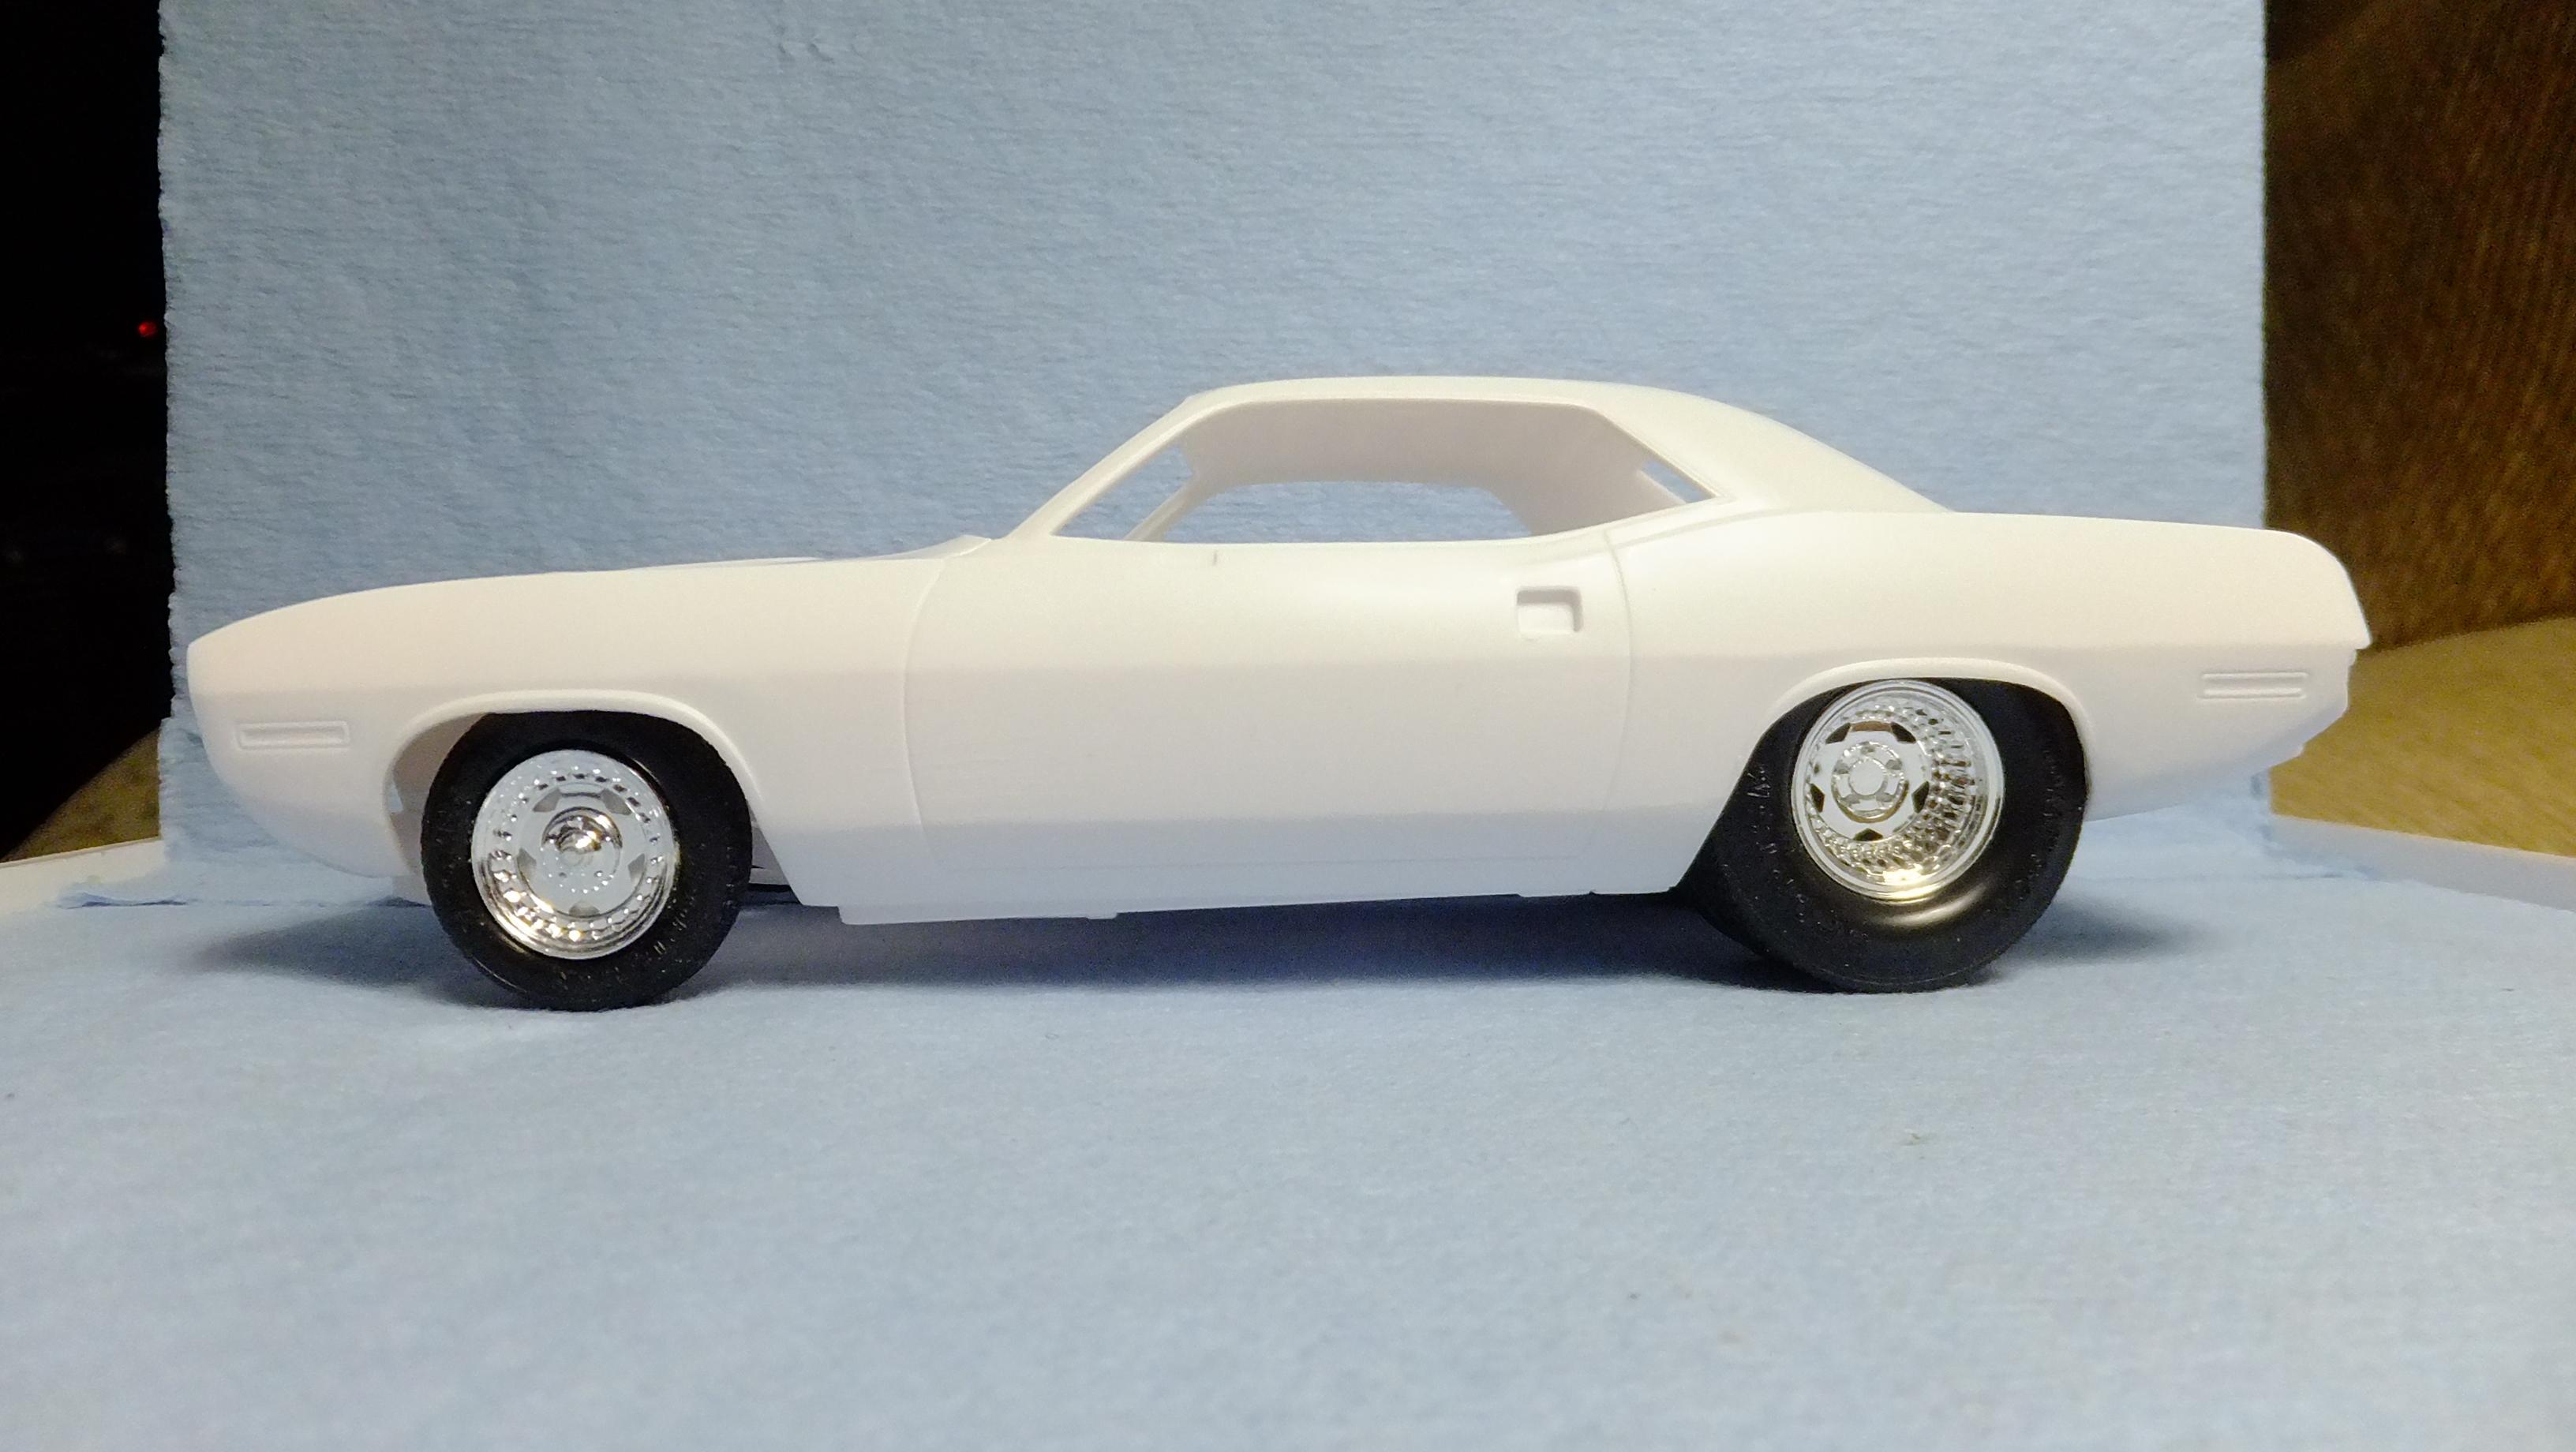
Hey, everyone! here is another kit that i had started a few years ago....hopefully posting it will help me get it done! I have as many Muscle car kits as i do exotics, and the 1970 Hemi 'cuda is my favorite one of ALL time! I have a book that my wife, Tina got me, and it had a photo of the one i had to build. Since i already had a super detailed example of a 426 Hemi in my 67 GTX, iwas just gonna build it as a curbside. Since i've gifted away that GTX, i need another example of that engine.......so this will be it. Its gonna be a "modified" curbside, meaning; i'm not concerned about detail of the chassis. The body, engine bay, and interior will all be my usual level of detail. -Photo 2&3; Since MCG wasnt gonna make a detail set for this kit, i got lucky, and found that Hobby Design made!....and boy what a set!!! -it WONT tarnish either! Even though i will use very little of it, its nice to know that its out there for others. The main reasons i got it was for the scripts, and front grills. -Photo 4; This is the kolor it will be, with a white interior, and black trim/ hockey stick stripe. -Photo 5; The stance is set!... -Photo 6&7; heres the starting of the Tub-Job.
-
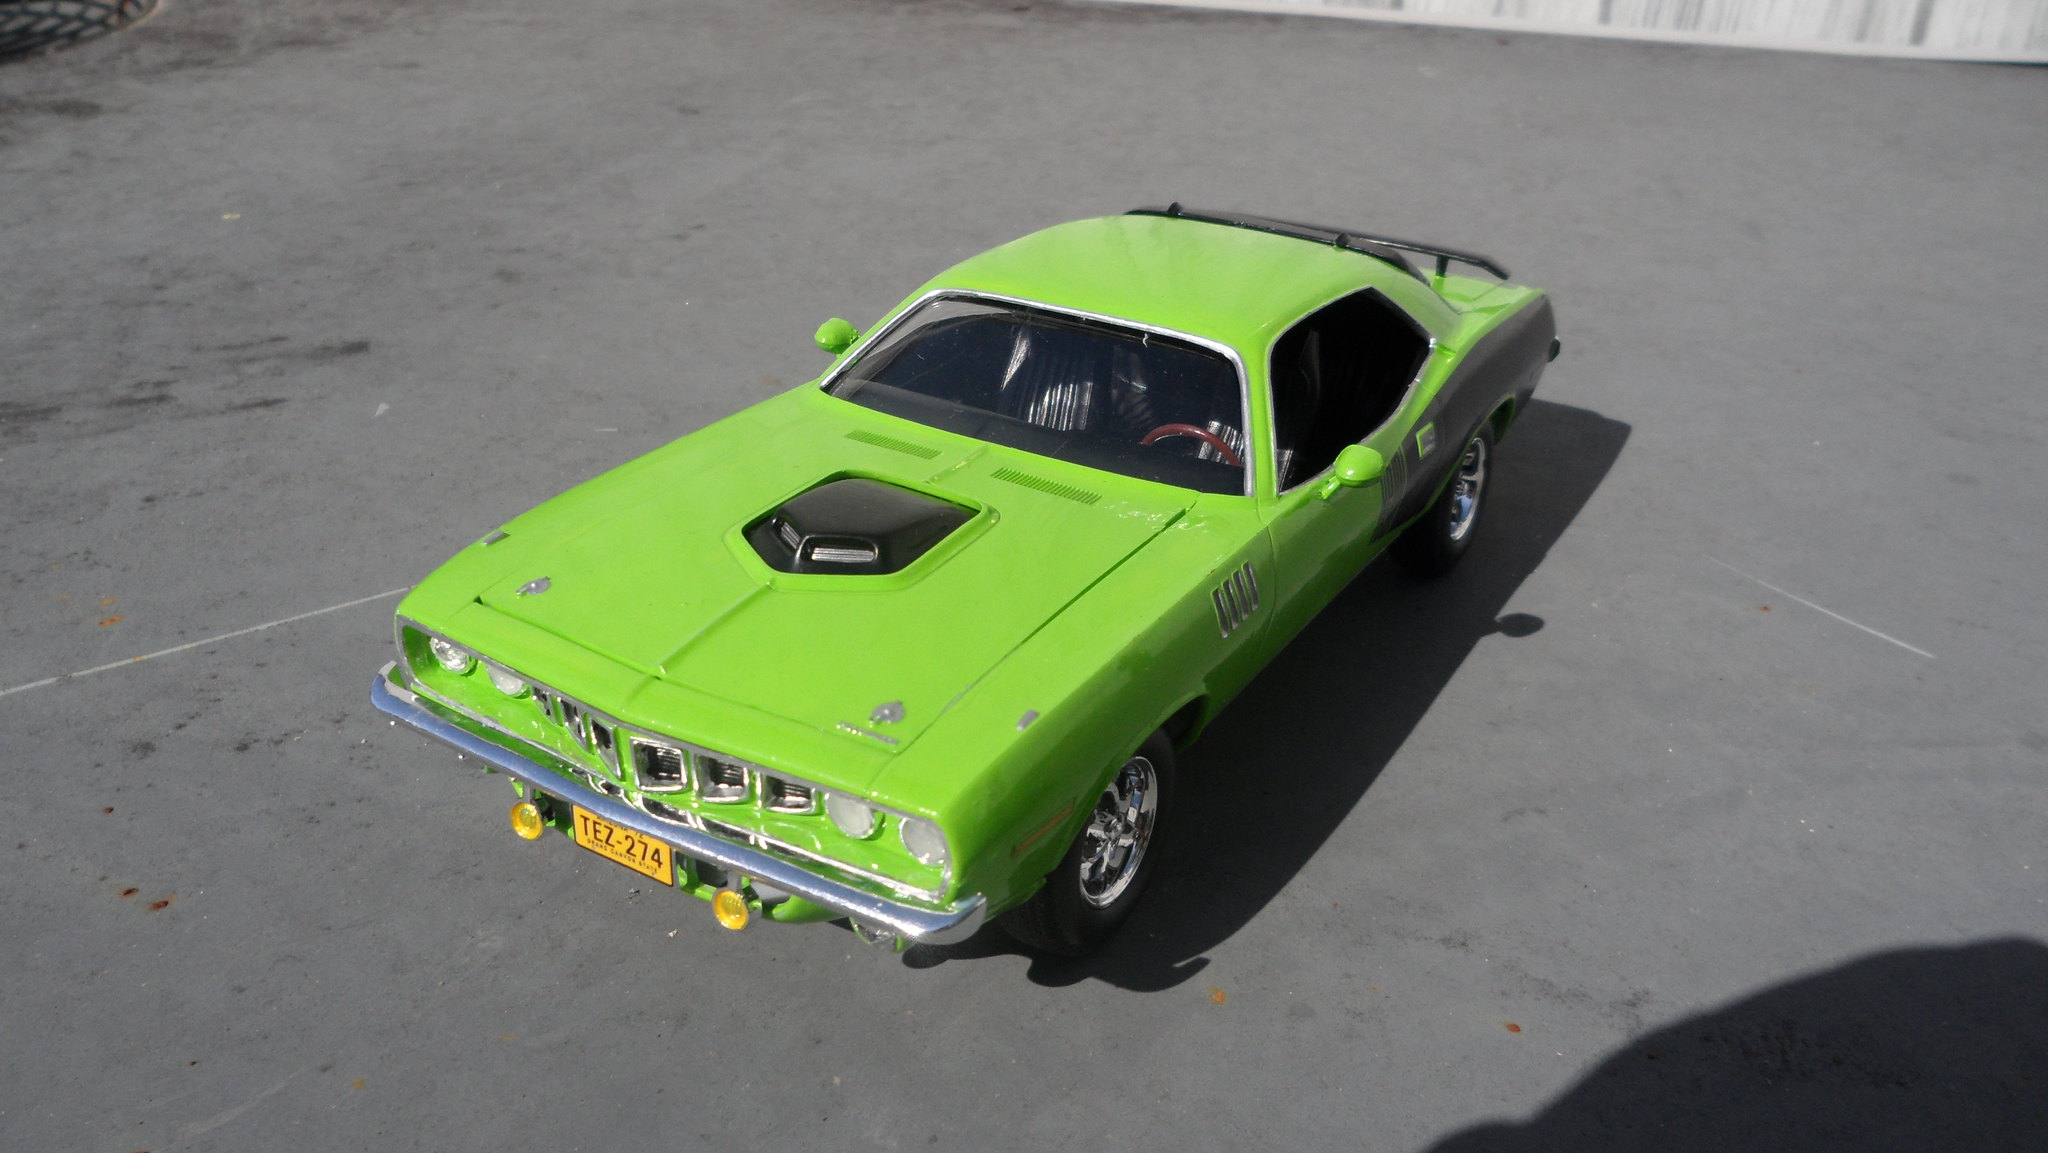
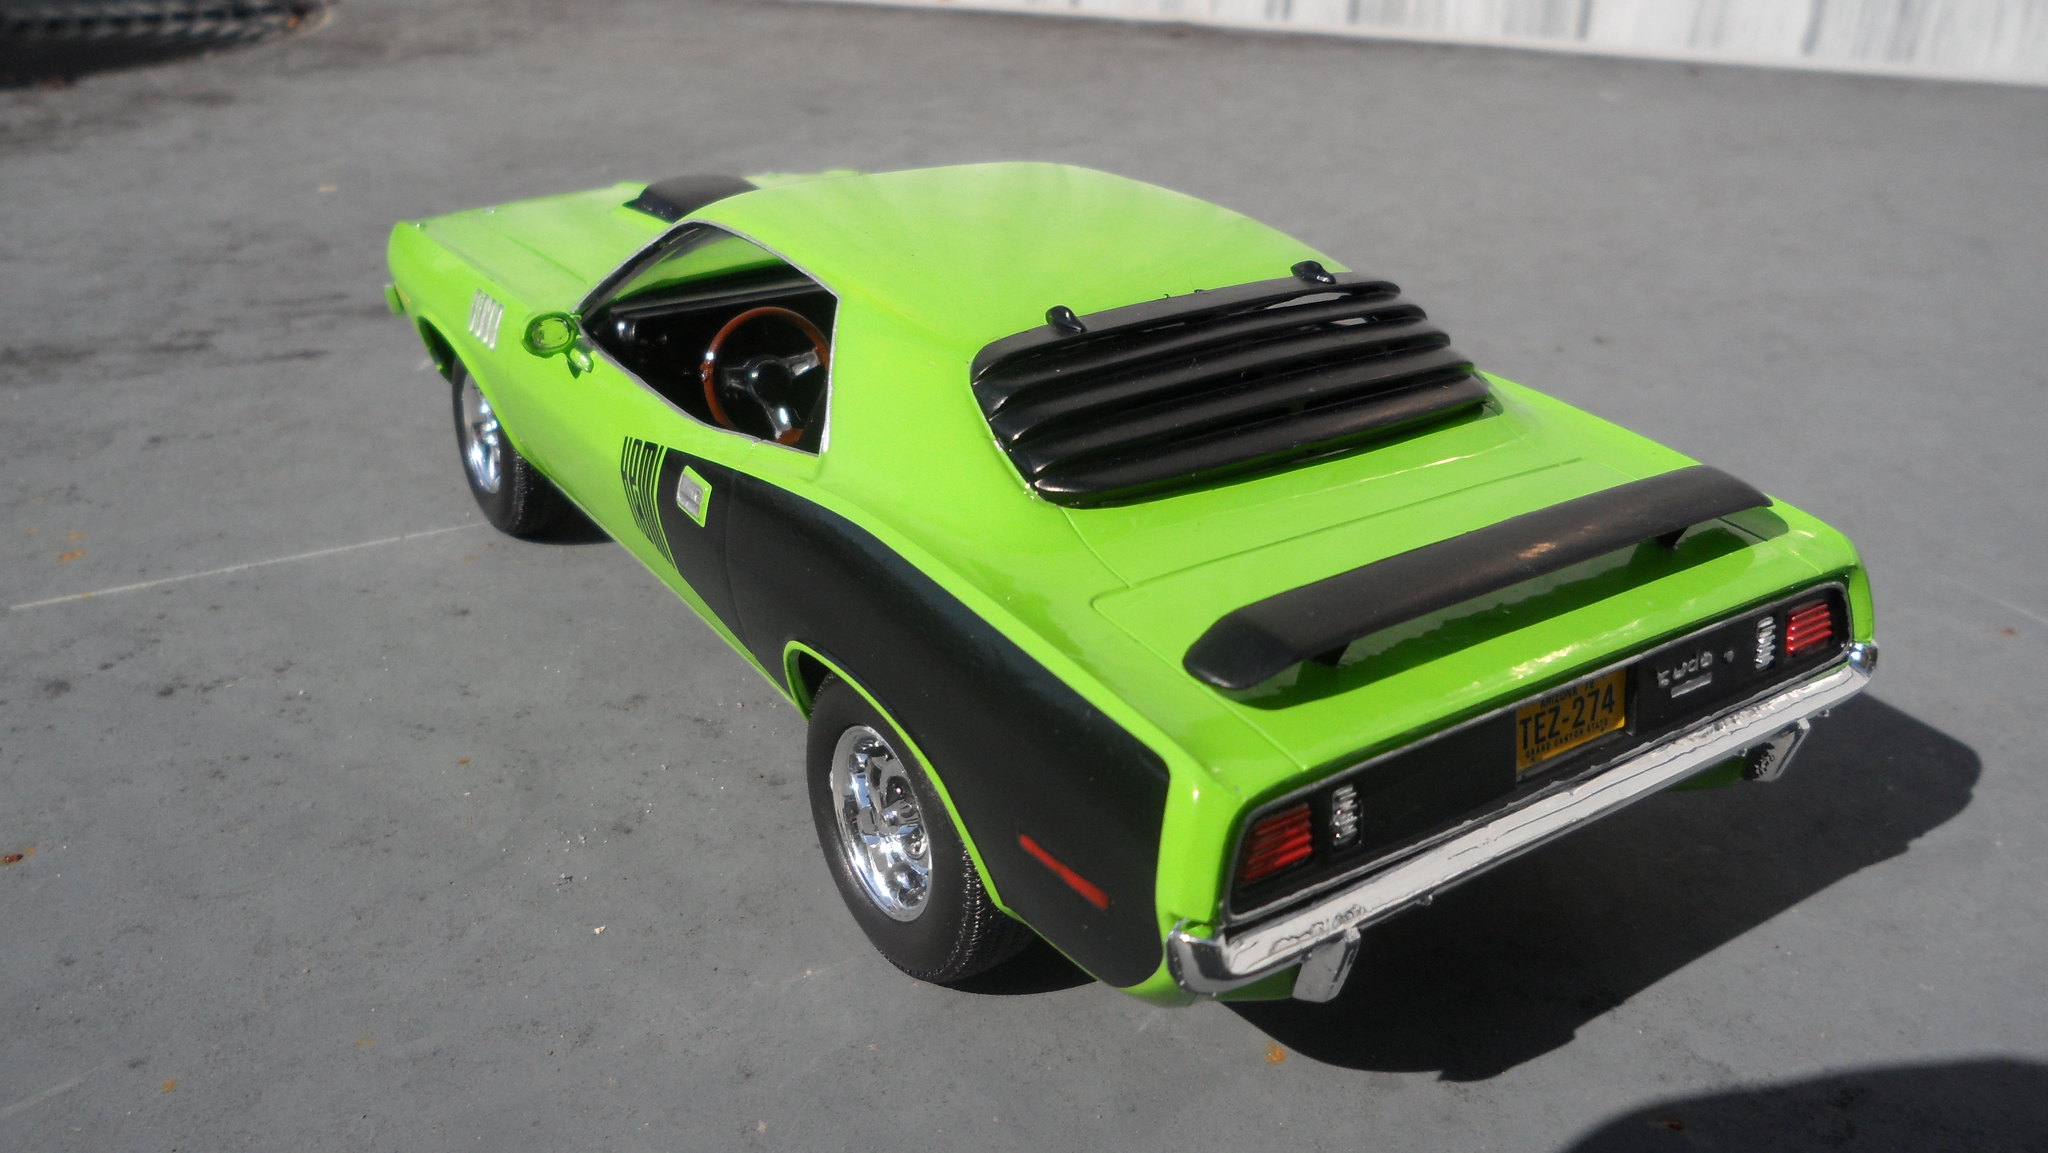
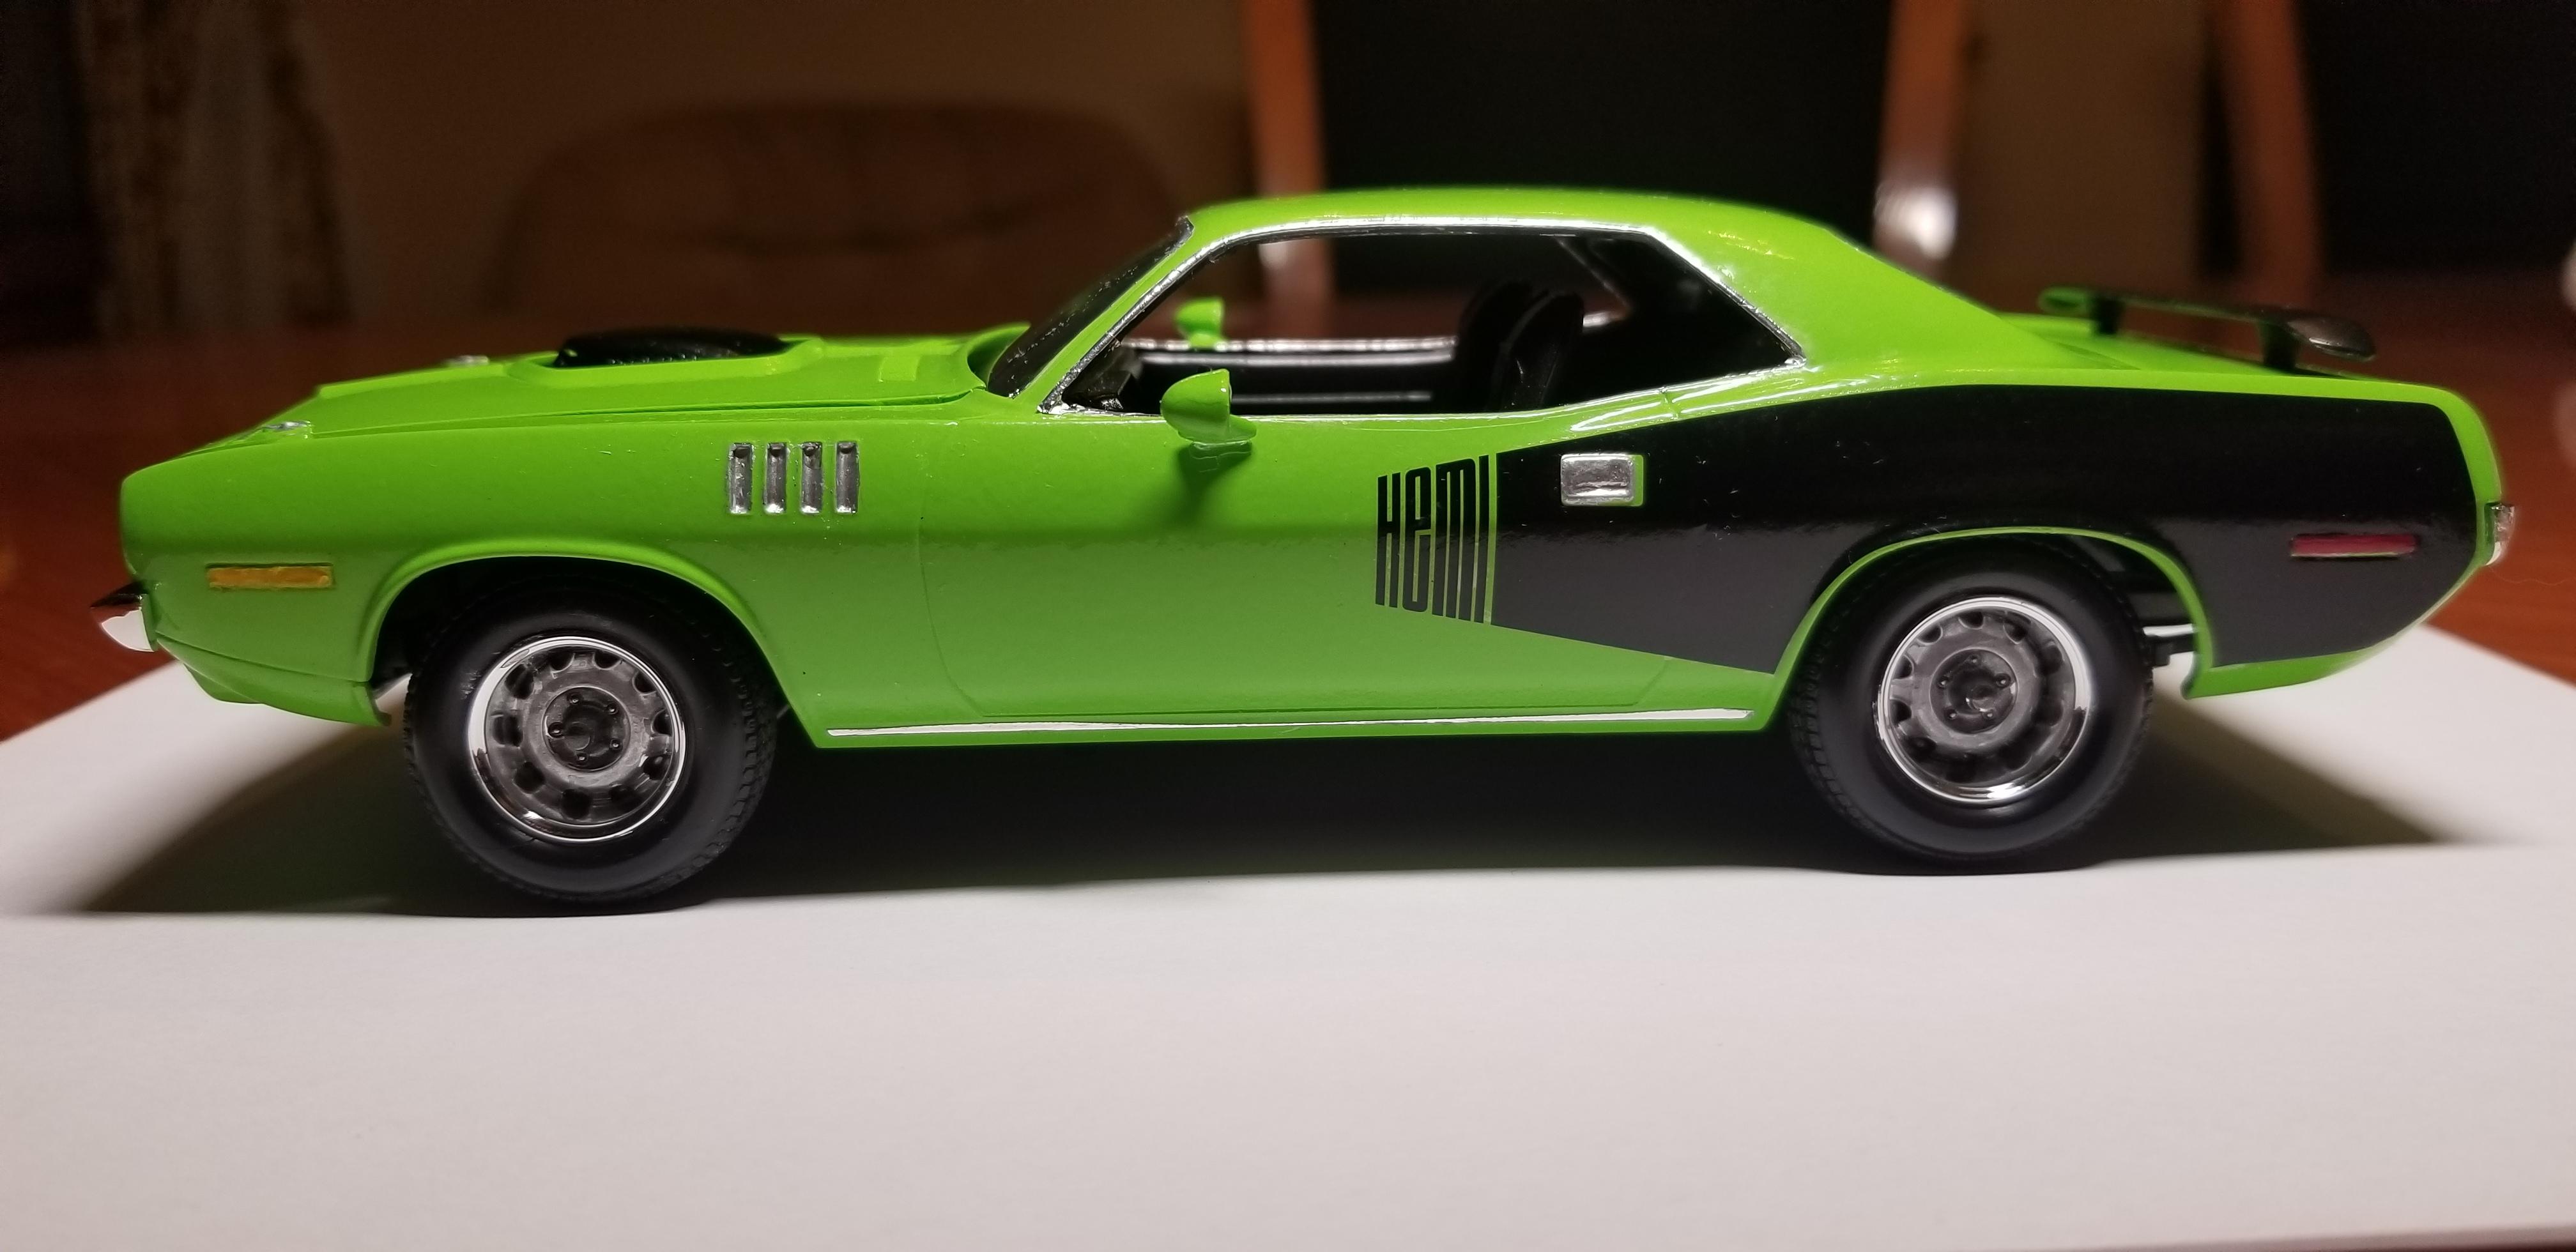
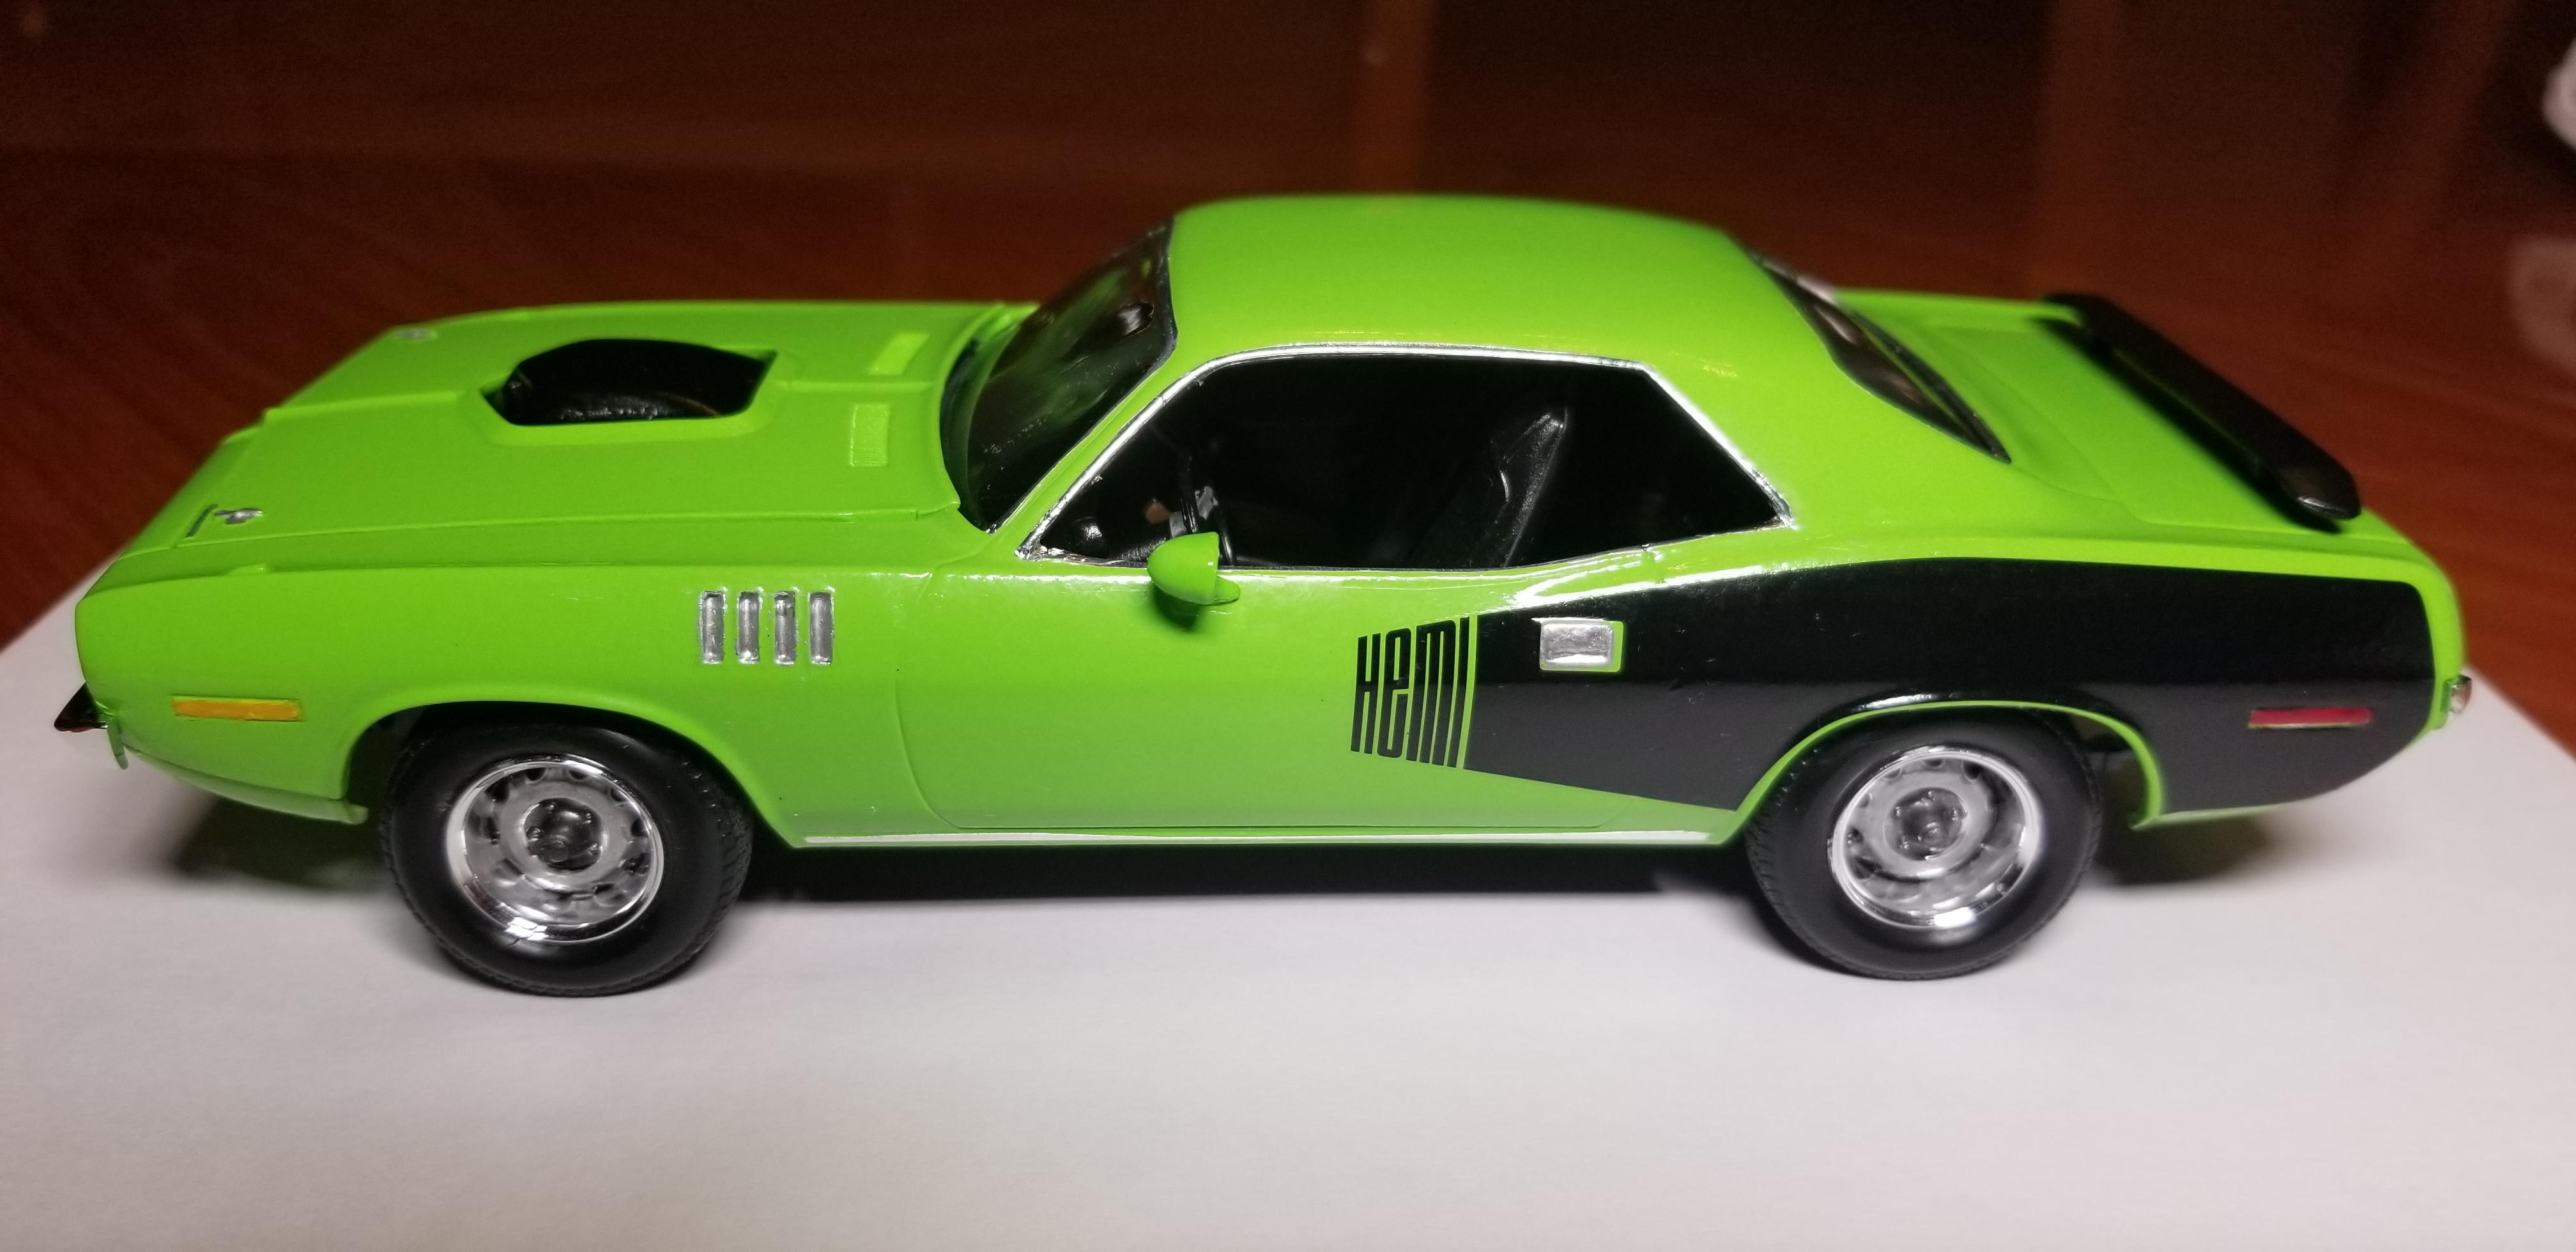
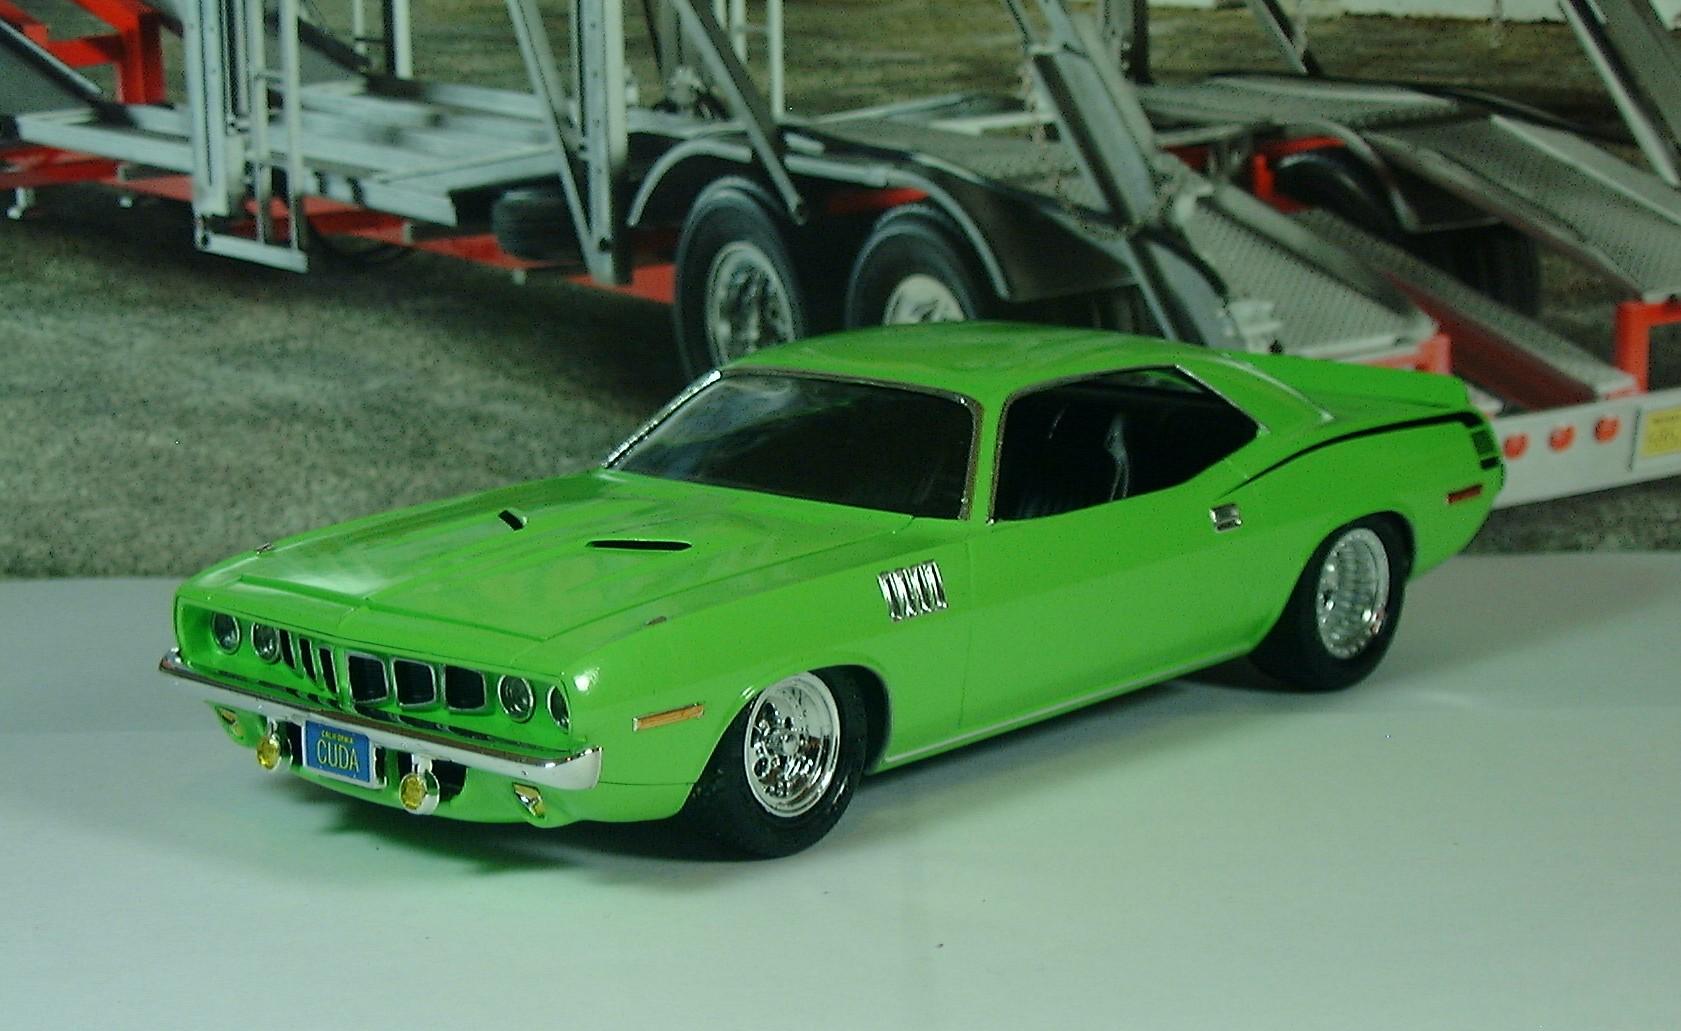
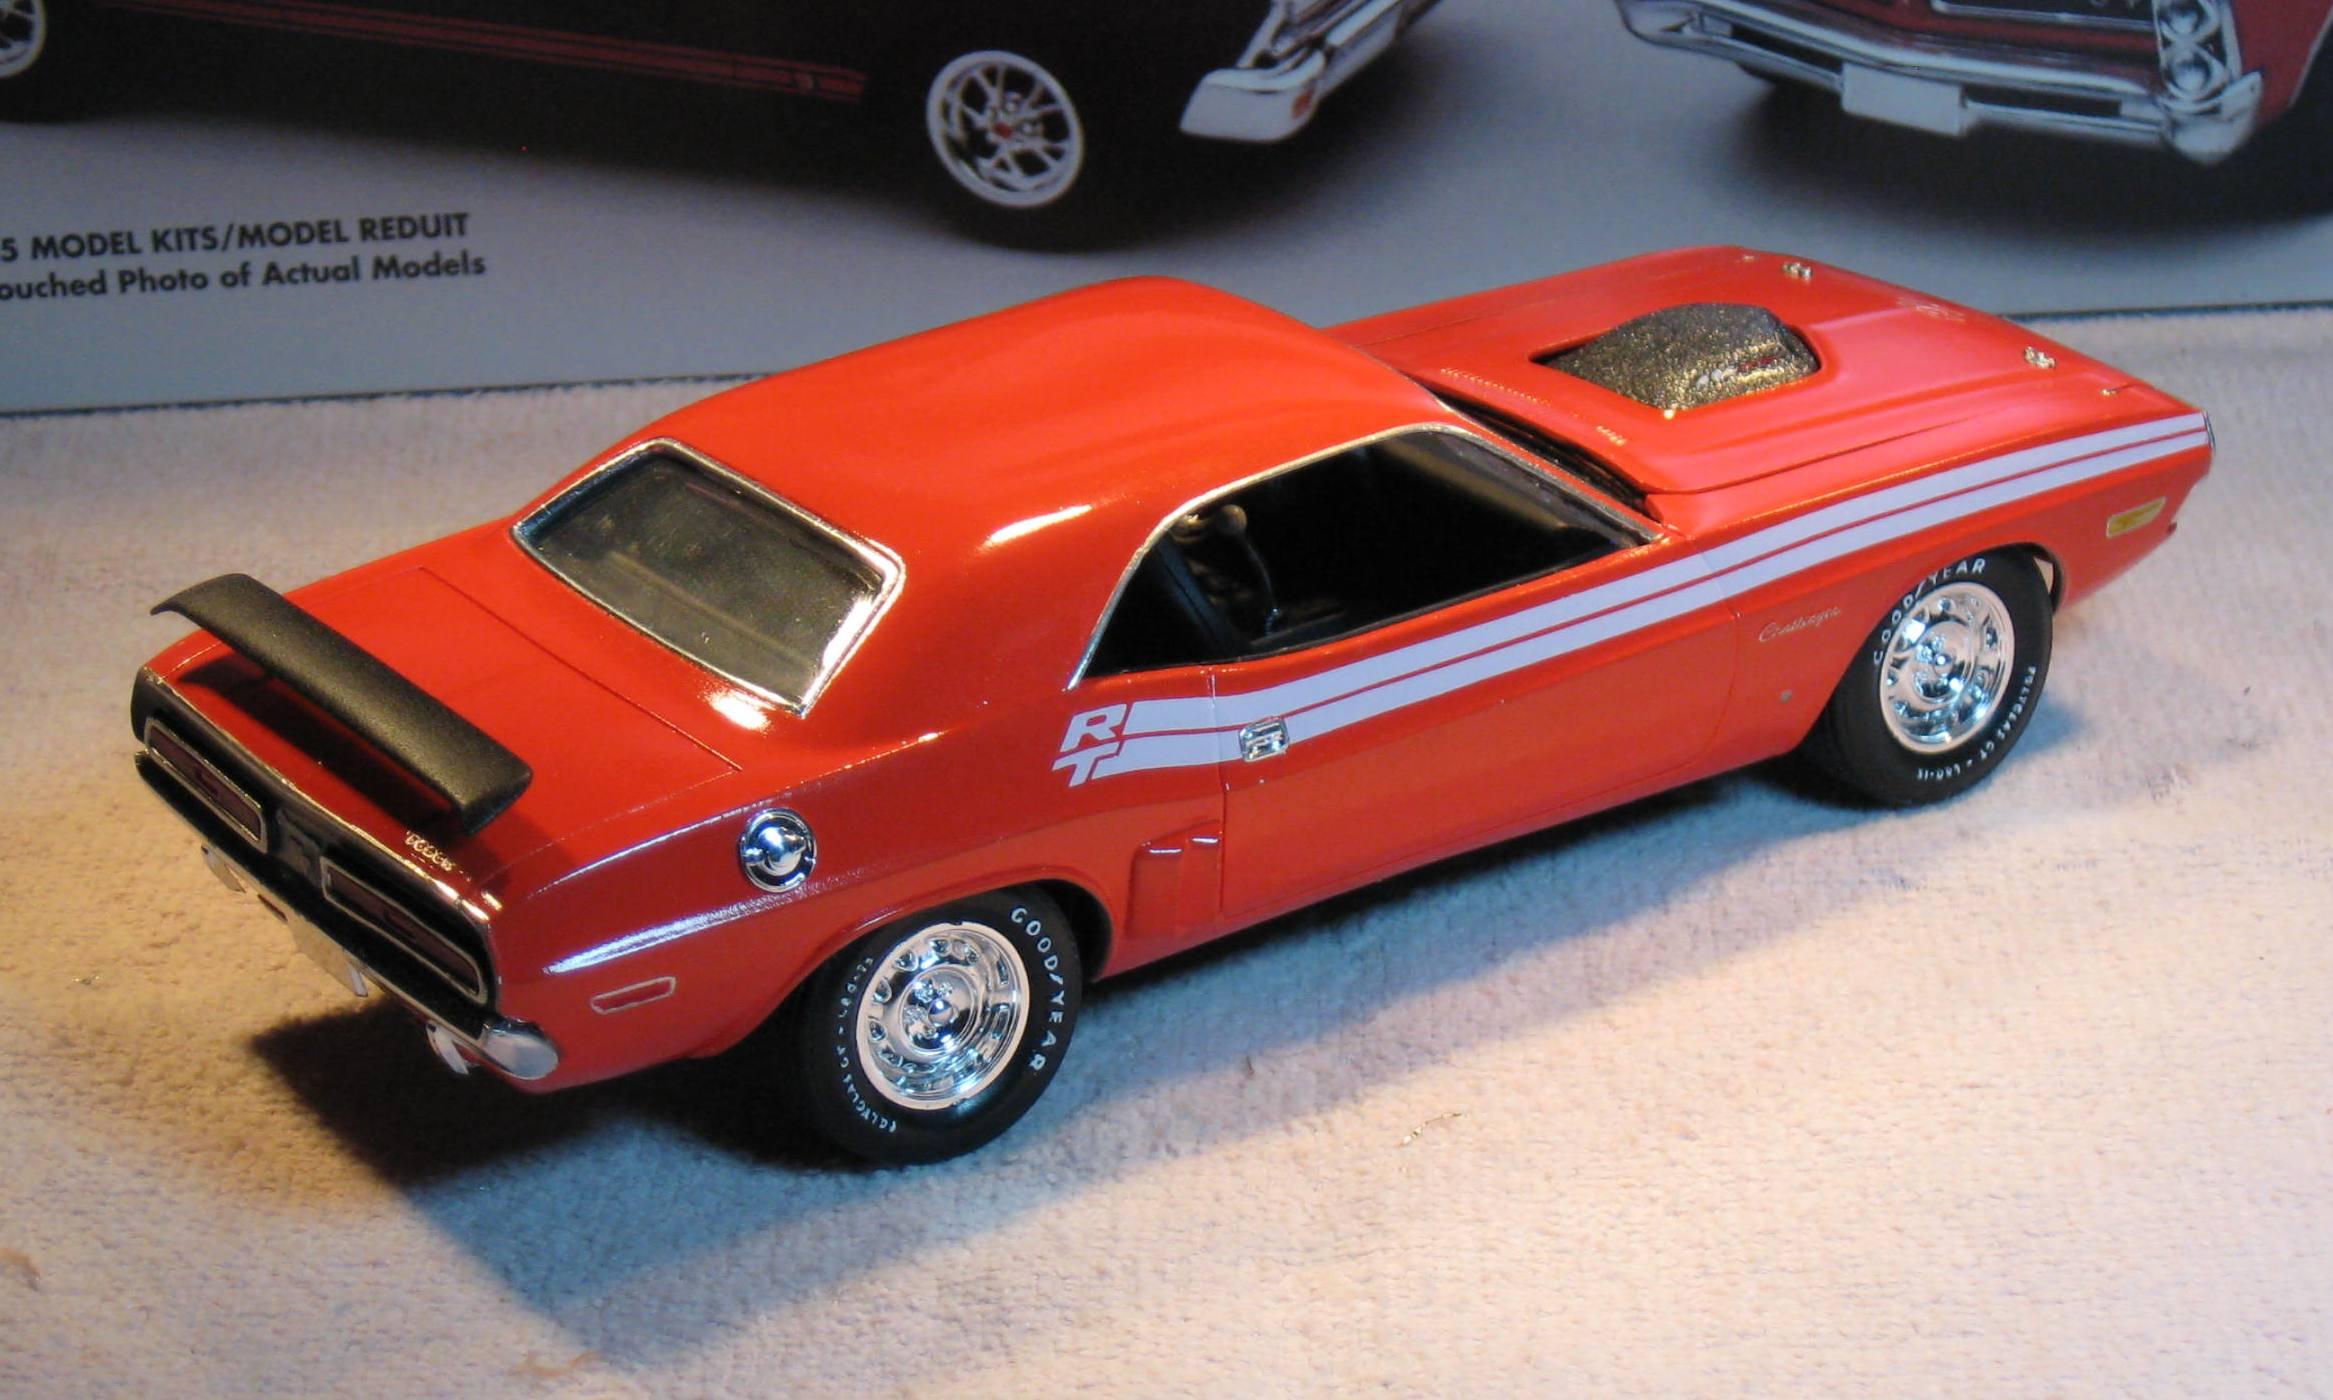
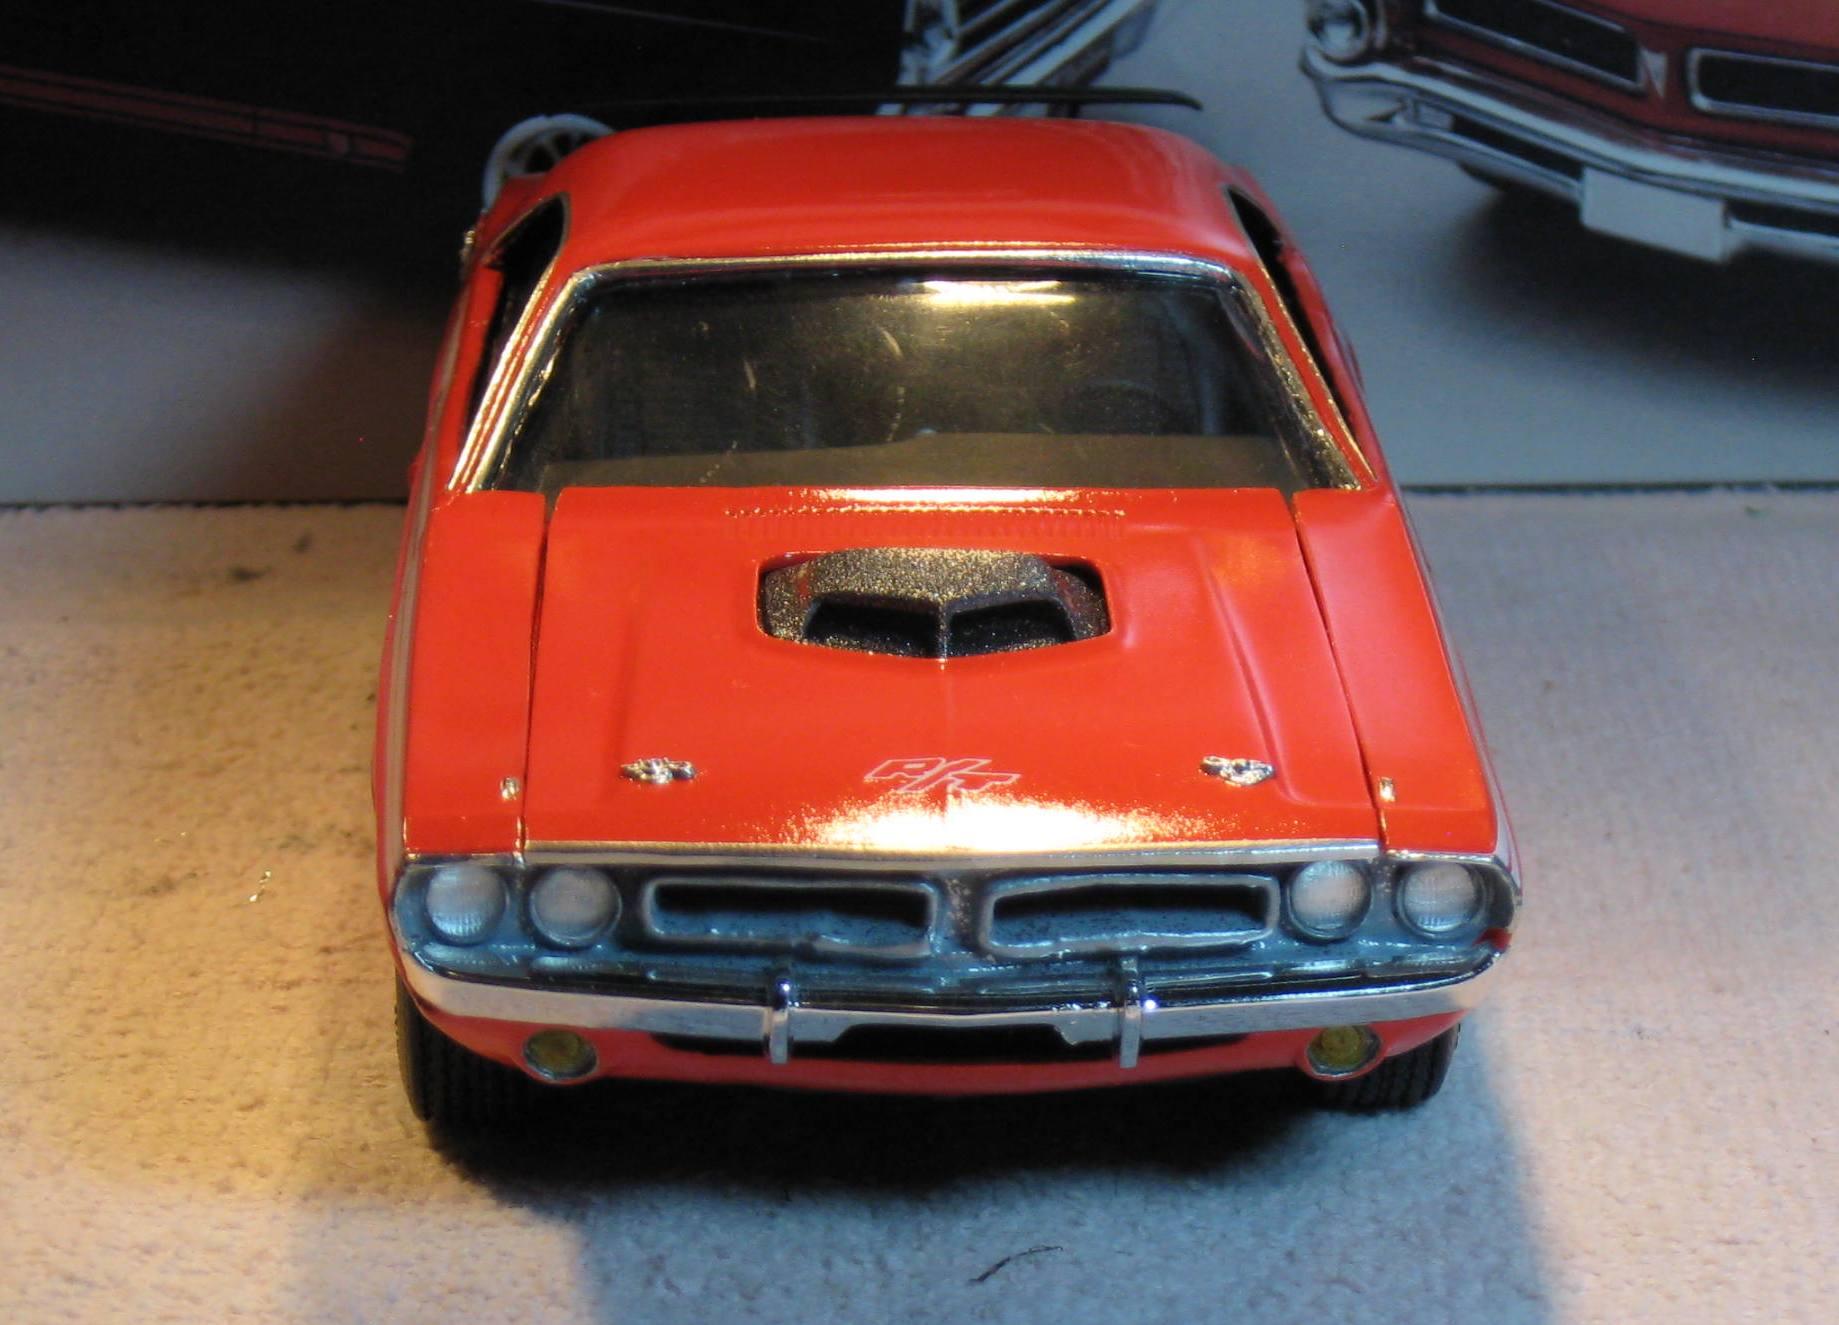
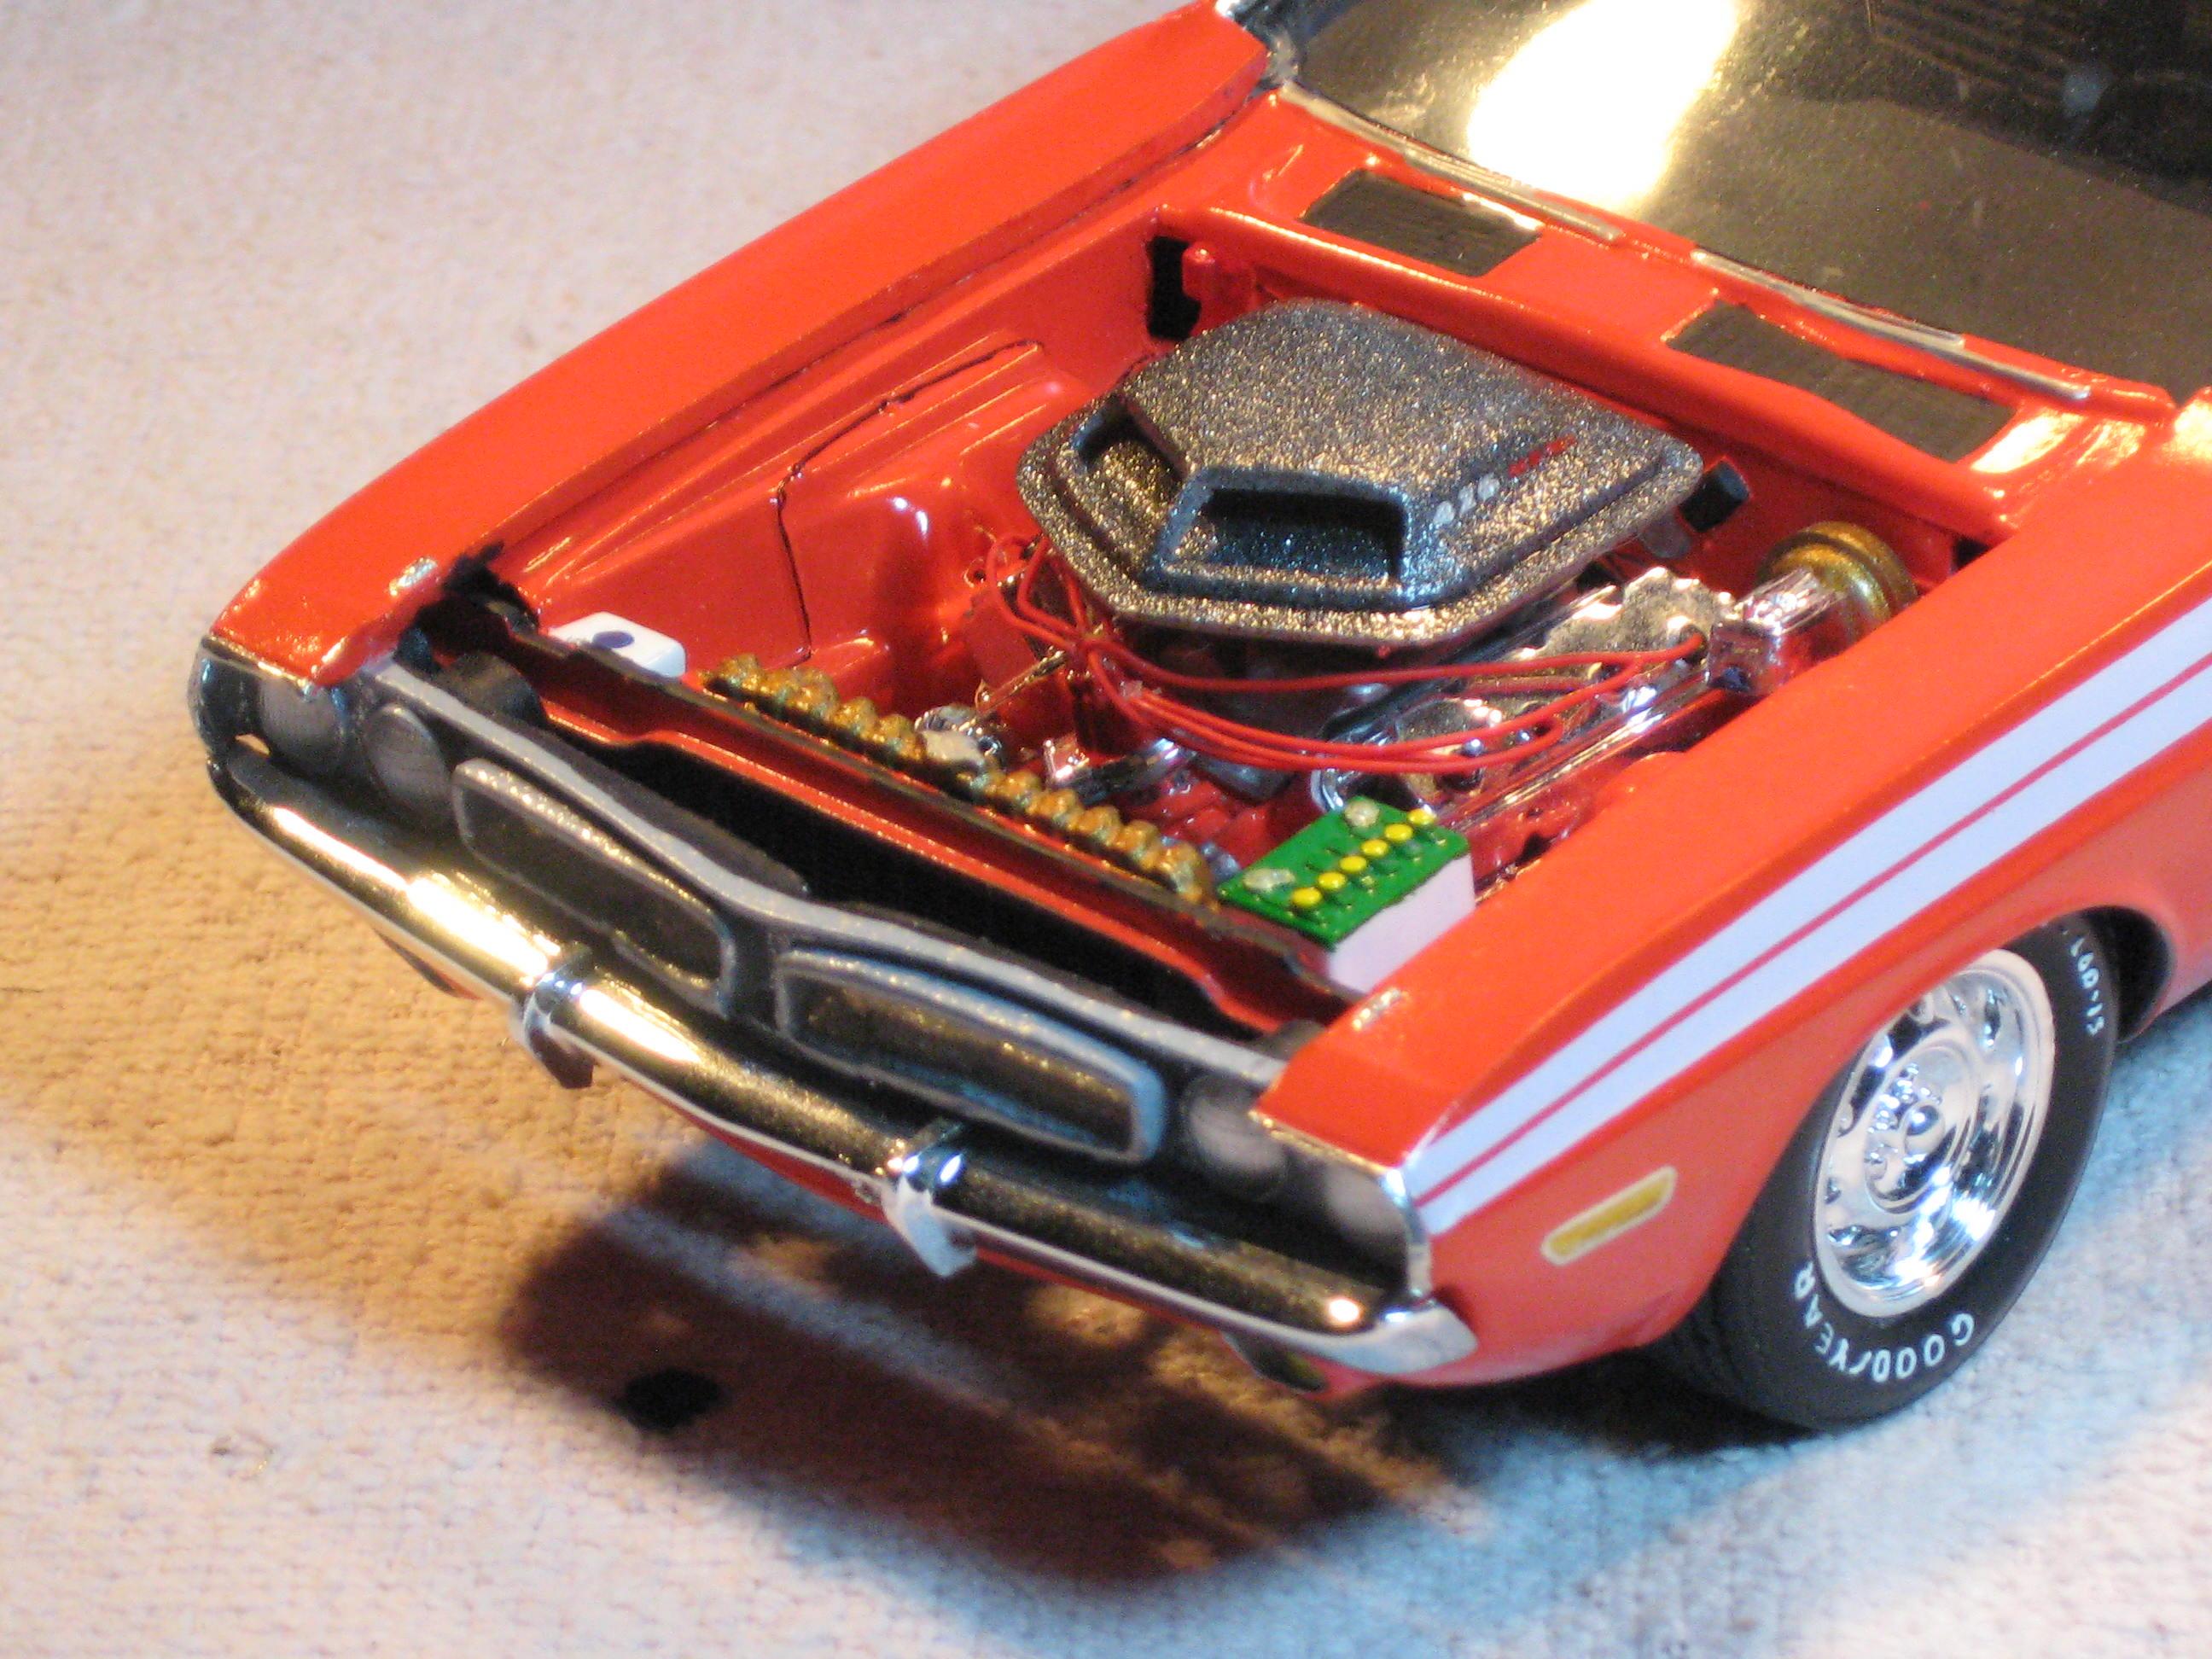
This model I am very proud of. I absolutely love the Sub-Lime green paint. It says MOPAR, all the way. The rims are from the kit but I used the 5-holers, intended for the rear, on the front. I widened the rear rims by sanding out the centers of a set of ConvoPros and adding them to the original front rims to make them deep dish. I actually had to narrow the rear tires slightly to get them to fit in the quarter panels. What I like the most is I nailed the stance perfectly. The grille was meticulously hand painted and this is the second model I have ever BMF’d. I tried using the black, Hemi “billboard” decals from the kit which are correct for 1971, but I did not like them the minute they were laid. Instead I had Keith Marks make me up a set of 1/24th 1970 “hockey stick” stripes which I think looks a whole lot better. The interior was painted semi-gloss by spraying Testors Glosscoat over Testors flat black. I duplicates the texture and sheen of vinyl. When the head lights were installed, they looked like binoculars. I ended up setting back a tad to get them to look correct. If I ever win the lottery, I would buy a real one.
-
This model was a difficult endeavor. The body was a resin copy that had a few of resin's typical issues, namely warping and thickness variances. It also was cast without an engine compartment or cowl. I used an AMT Yankee Challenge kit as a donor. With a lot of trimming, most all of the parts fit together. One of the challenges was having no grille or headlight frames. The 1970 parts are way too different to use so, I made them from scratch. The "floating" grille sections turned out so-so, but they do make it look like a 71 at least. The tail lights were drop in with minor trimming. (I think) the fake side scoops were sourced from Drag City Casting. The rear "Go Wing" came from an AMT 71 Duster Kit. The Hemi came from one of my Challenger kits or parts box (it has been a long time). The R/T stripes came from an ebay vendor. Too bad the artwork for the letters was slanted WRONG on the drivers side. (no way to fix it either). I would normally detail paint the rally wheels but after all the other battles, I just wasn't up to it. The first shaker hood I painted and decaled was warped so I tried to fix it with heat. BAD move. I turned it into a potato chip. Fortunately Will, from DPMCC, came to my rescue and sent me a replacement. THANKS WILL!
-
Never built a Lindberg kit until this one. Screwed up the first paint job on it and hid it in a box for months if not years. Then it became a bit of an experimental subject for scratch built engine parts that didn't make it into the final build. Later, I found a 1972-74 Matchbox Challenger that I absolutely love so I went ahead and replicated it pretty accurately, with some creative freedoms that I took due to the lack of detail on a 1/64 scale Matchbox. Lettering is done by hand, stripes are decals from the '68 Charger kit by Revell. The build itself is pretty far from box stock, with a totally modified front suspension and scratch built rear, carbs and side pipes. Anyways here it is alongside its ''mini-me''. Comments are welcome!
-
Here is a tribute build for my father in law who passed away a few years ago. Lime Green, was his favorite color. And when asked what his favorite muscle car was.... 71' Cuda was his reply. Theses are wheels that I thought looked like a modern version of the stock Mopar wheels. Although, there is a guy named Steve Zimmerman (Steve Z) who makes custom wheels and he has a stock version that are in scale to a 19' front 21" rear, I believe. They look smokin' hot, but in the end, I went with the Mr. Model ones above from Brazil. More to come.... TCB, Adam
-
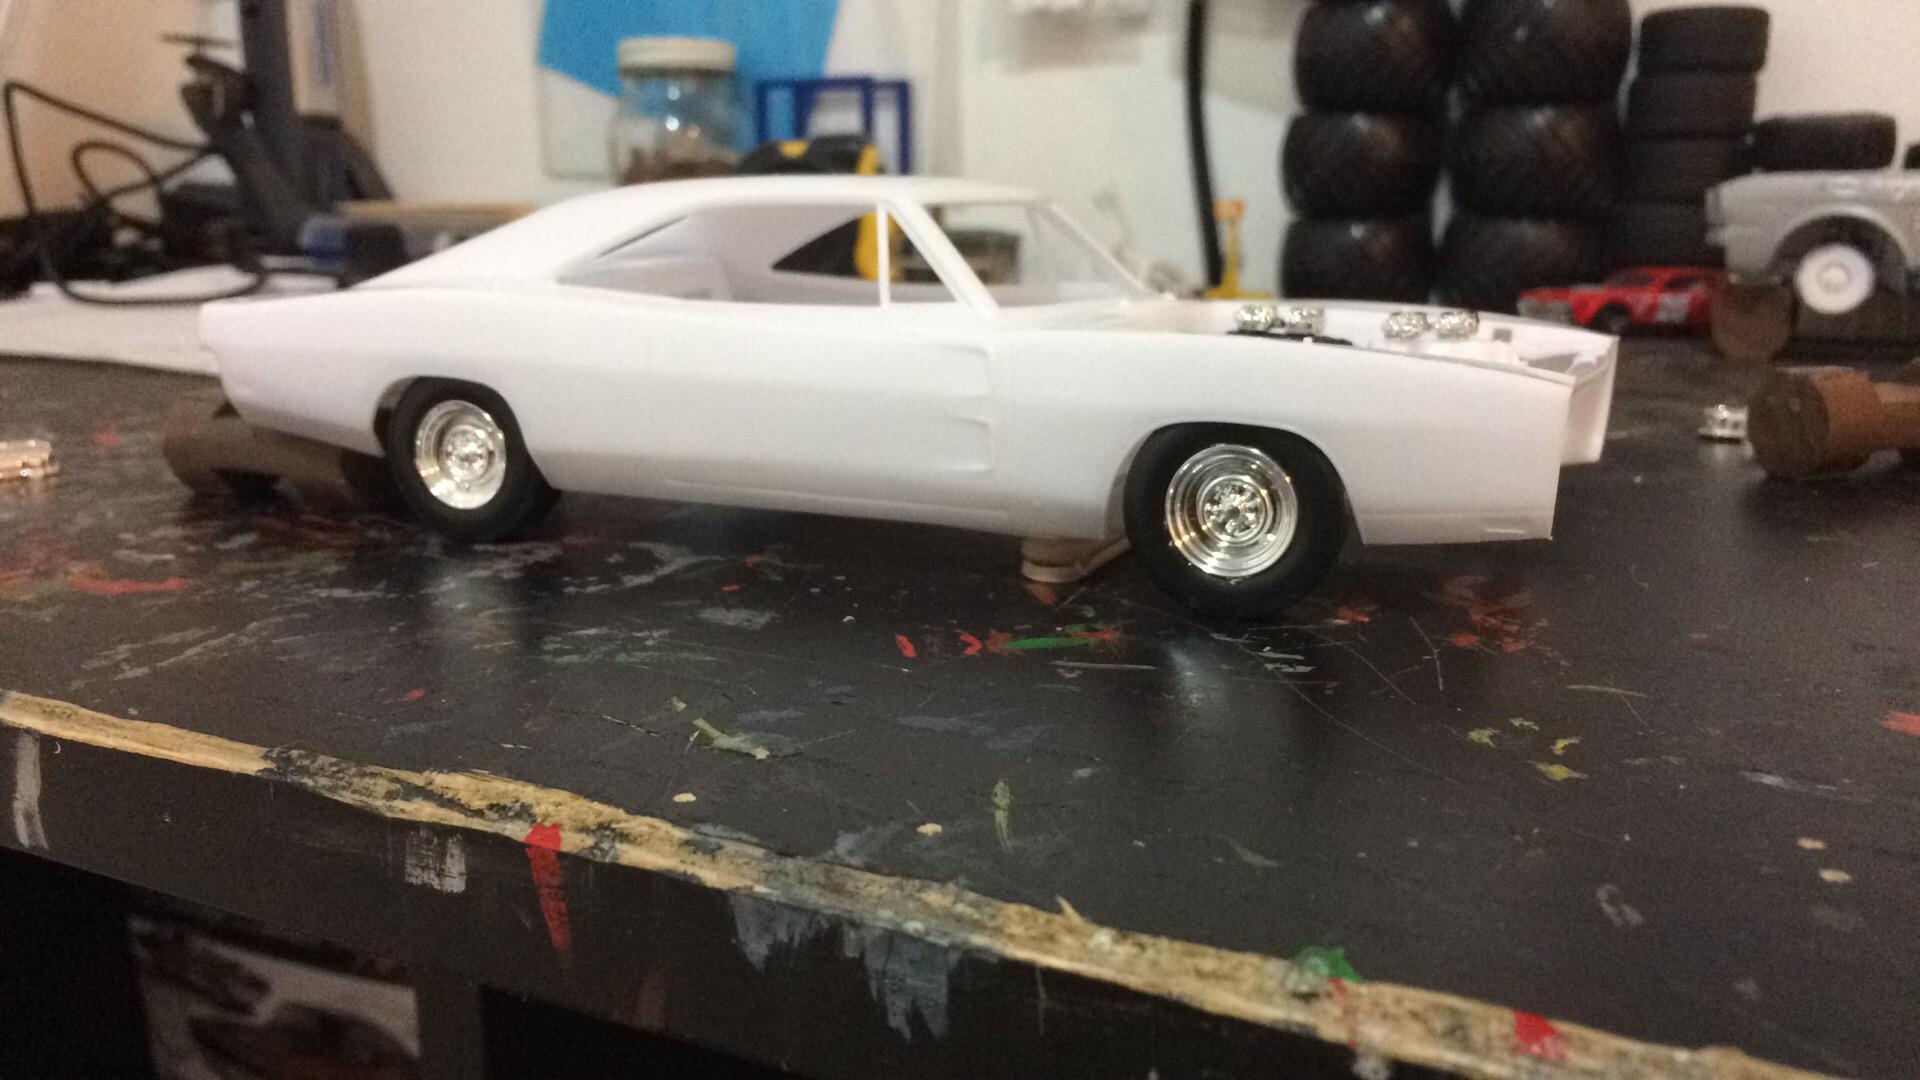
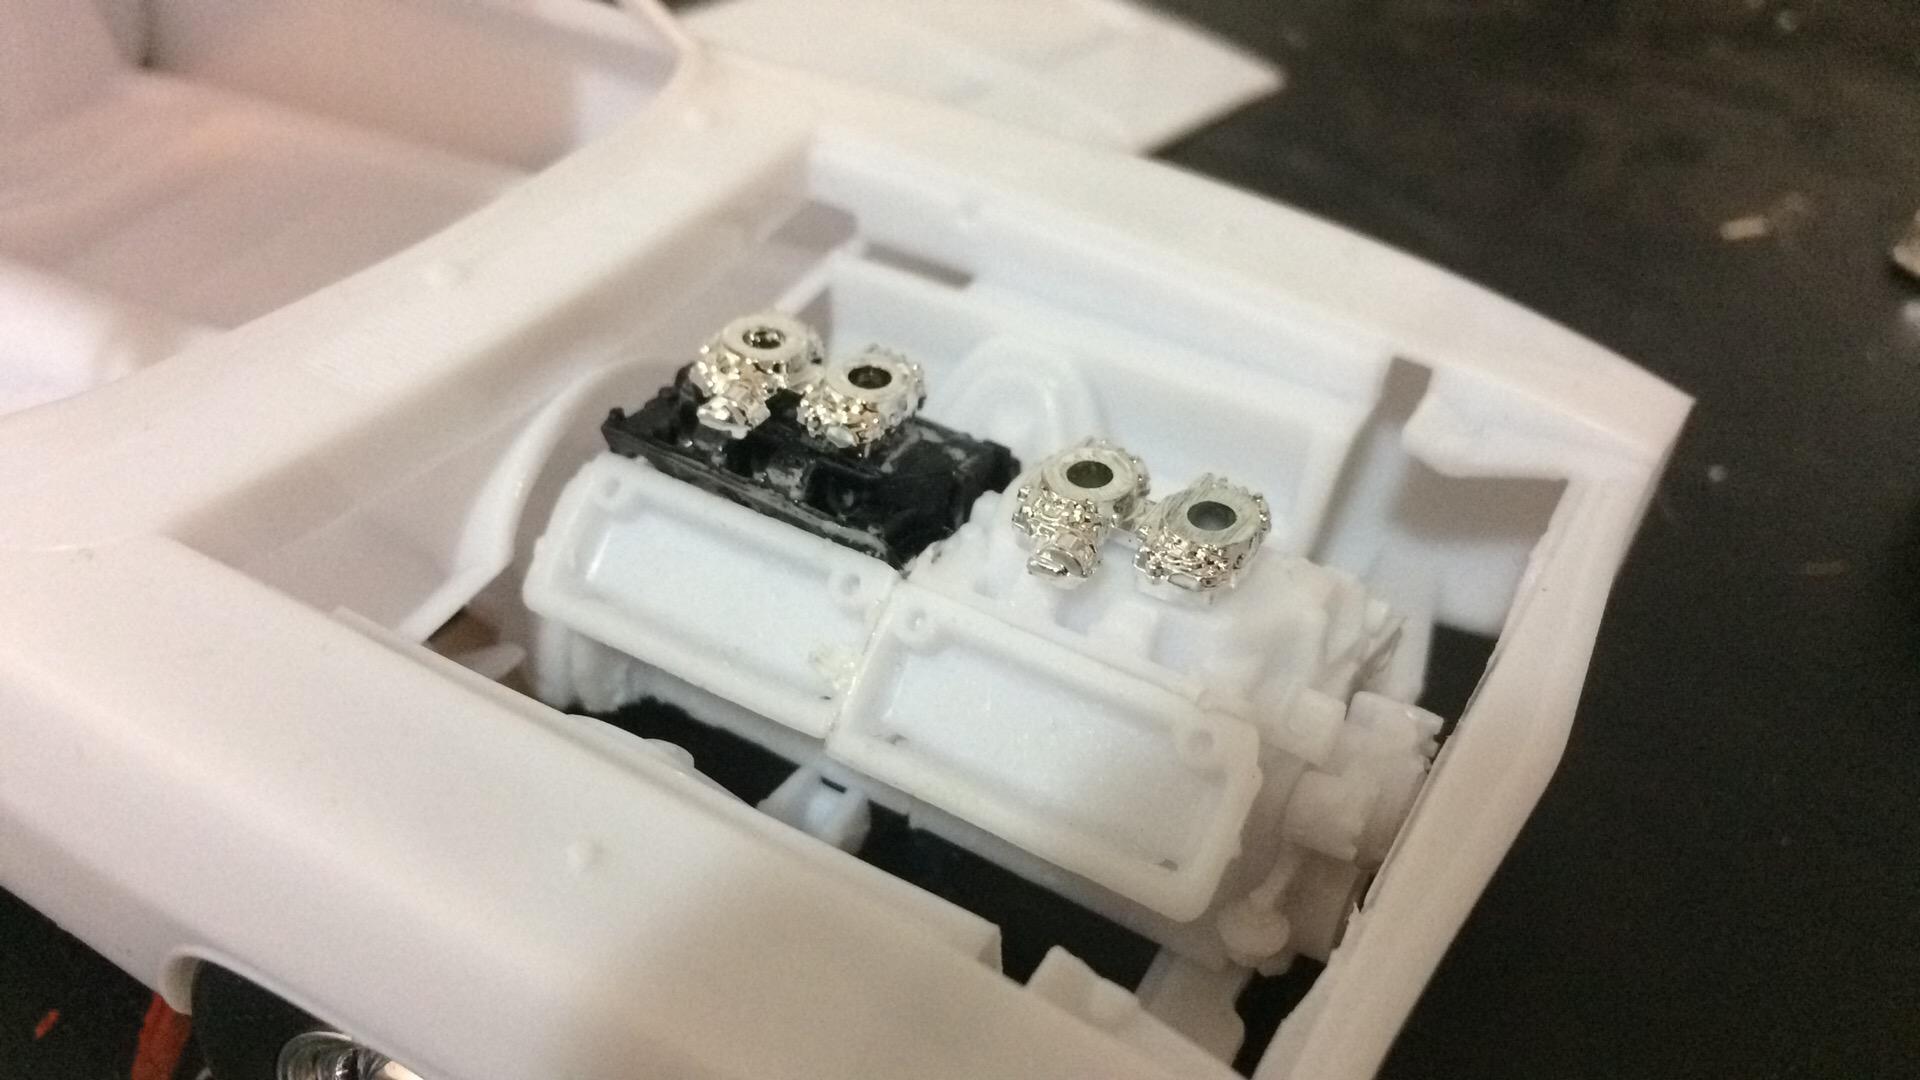
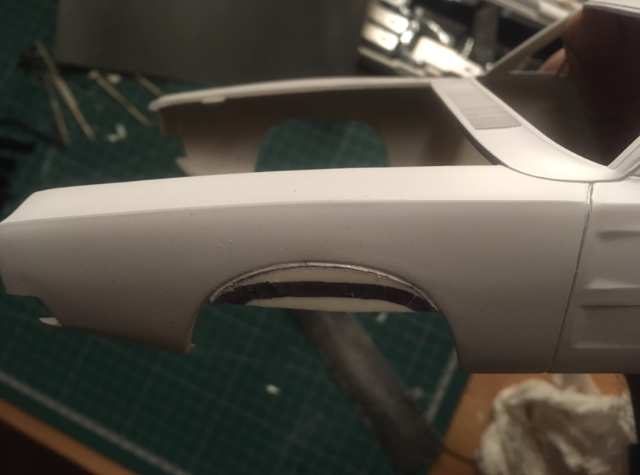
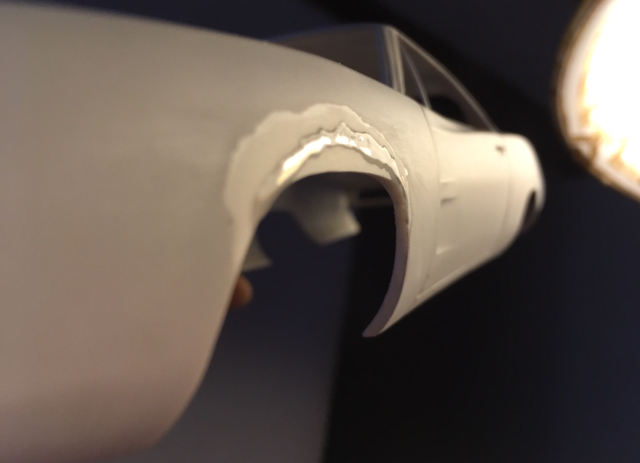
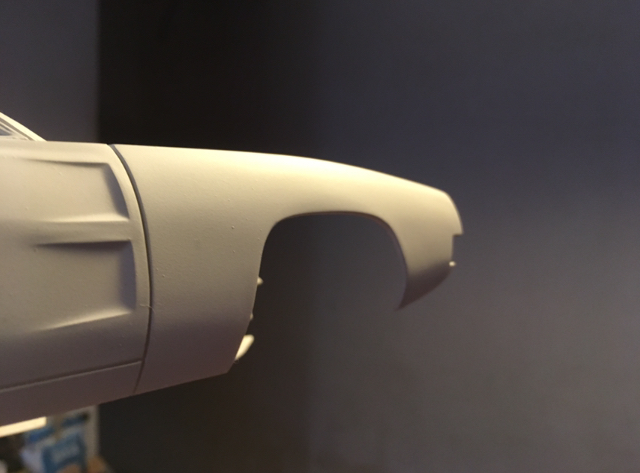
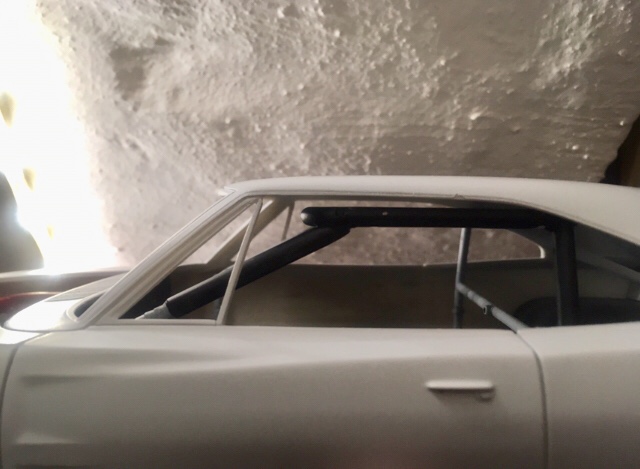
I have not done much over the xmas period, but I did start to fiddle with the MPC Dukes of Hazzard Charger.... I do not plan to build it in Dukes trim, it is a hash up of a few different models; Petty’s ‘73 Nascar charger, amongst others. There is no rear seat, no inner front wings (fenders) apparently the engine is not correct, tires way too fat etc etc so I ‘m going to build my own dream race-prepped street charger mash up. so far I have the 426 cu in hemi painted and built, and I am working on the body at the moment, adding front wheel arch tops as the kit comes with nascar style round-topped arches- I have replaced tbe missing plastic with the bonnet (hood) gap sprue so as to have exactly the same plastic as the front fenders for material integrity. Stock round-topped arch closest to camera, the repaired flat-top at rear: That piece of flat sprue was shaped and welded in place. It even has the correct curvature, so hopefully no stress or strain to crack in the future: Arch is shaped in situ, small gaps are filled with tamiya styrene cement: Righthand arch shaped and primed, lots of wet sanding to do still before the paint goes on, but a seamless repair: Nicely detailed hemi v8, but the manifold headers come with no exhaust pipes to empty into... go figure. I’ll have to make my own from scratch. Other little niggles appear whilst test fitting; such as the roll cage which is designed for the 73 Charger just does not work in this earlier 69 body- more chopping and bending to be done then... All in all not a bad model, but to build it box-stock would be somewhat disappointing for me. There is also a cubic tonne of flash on many parts, everything needs a good clean up, though the detail is more than acceptable. Even the engine block has molded in cylinders and pistons, the heads have the combustion chambers and valves, and even the camshaft and rocker assemblies are supplied. There is a clutch, also never to be seen once assembled.... Obviously some thought was put in to the simple enjoyment of the build, rather than the show of the final result!
-
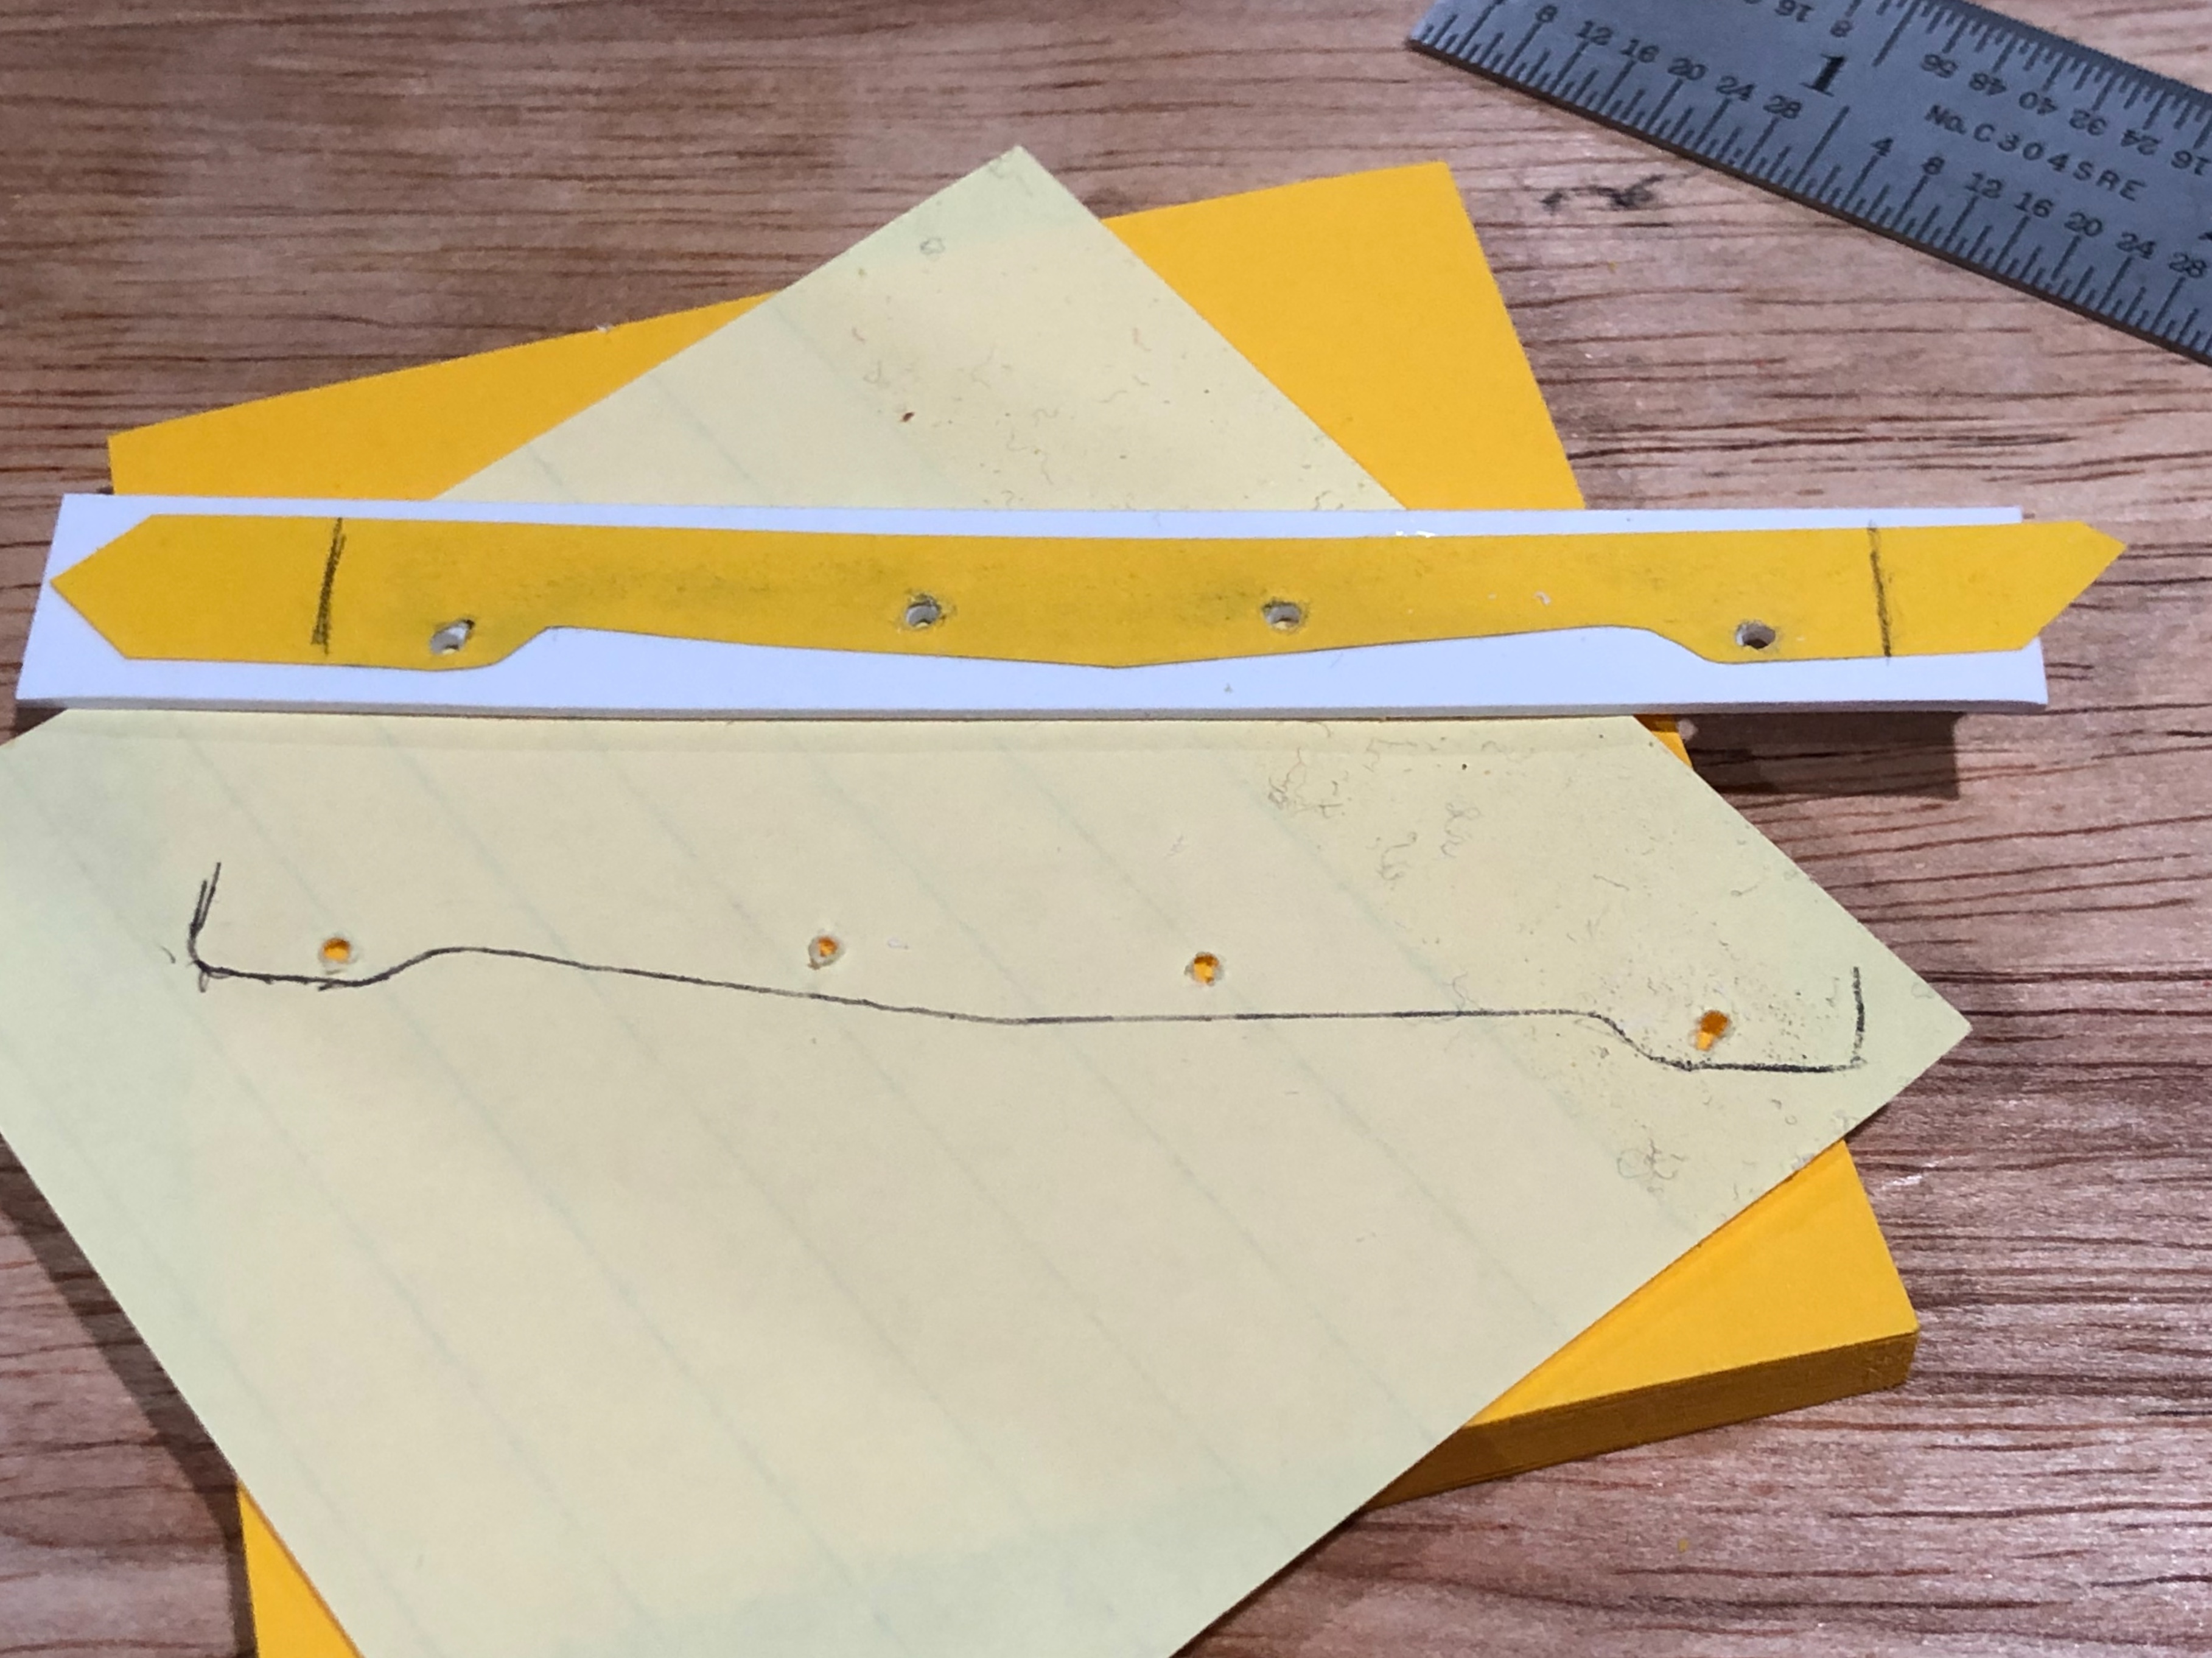
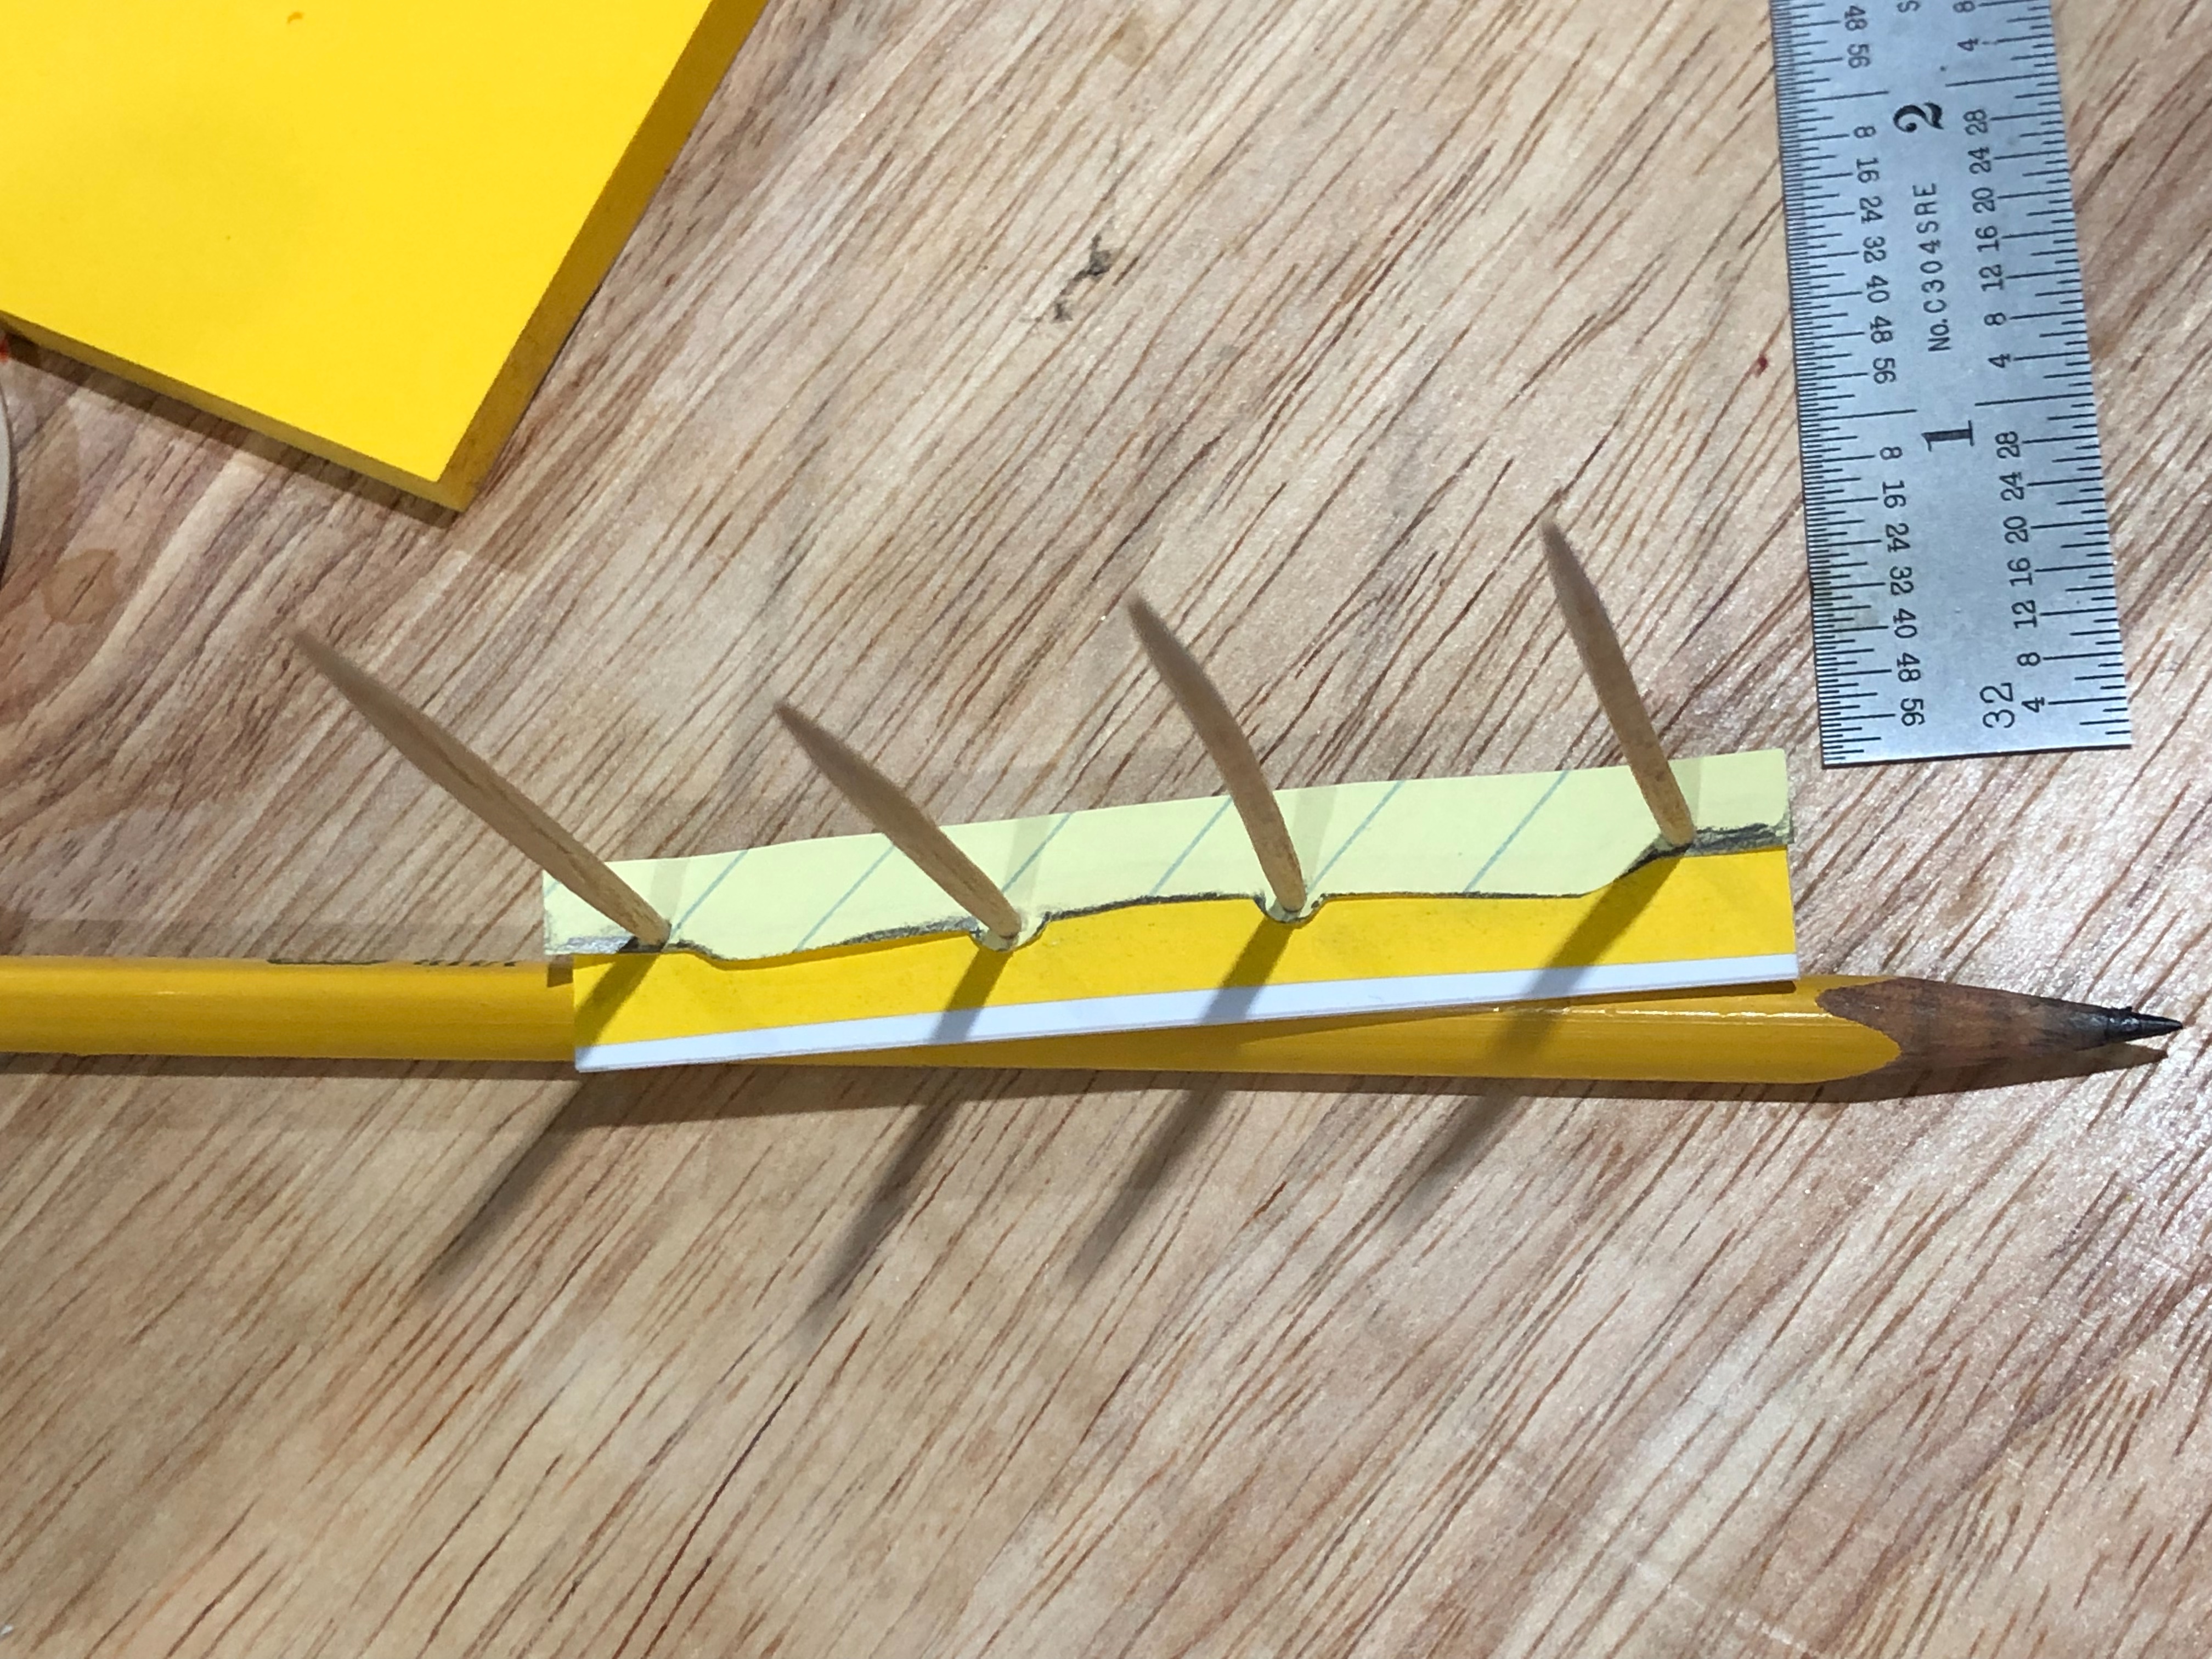
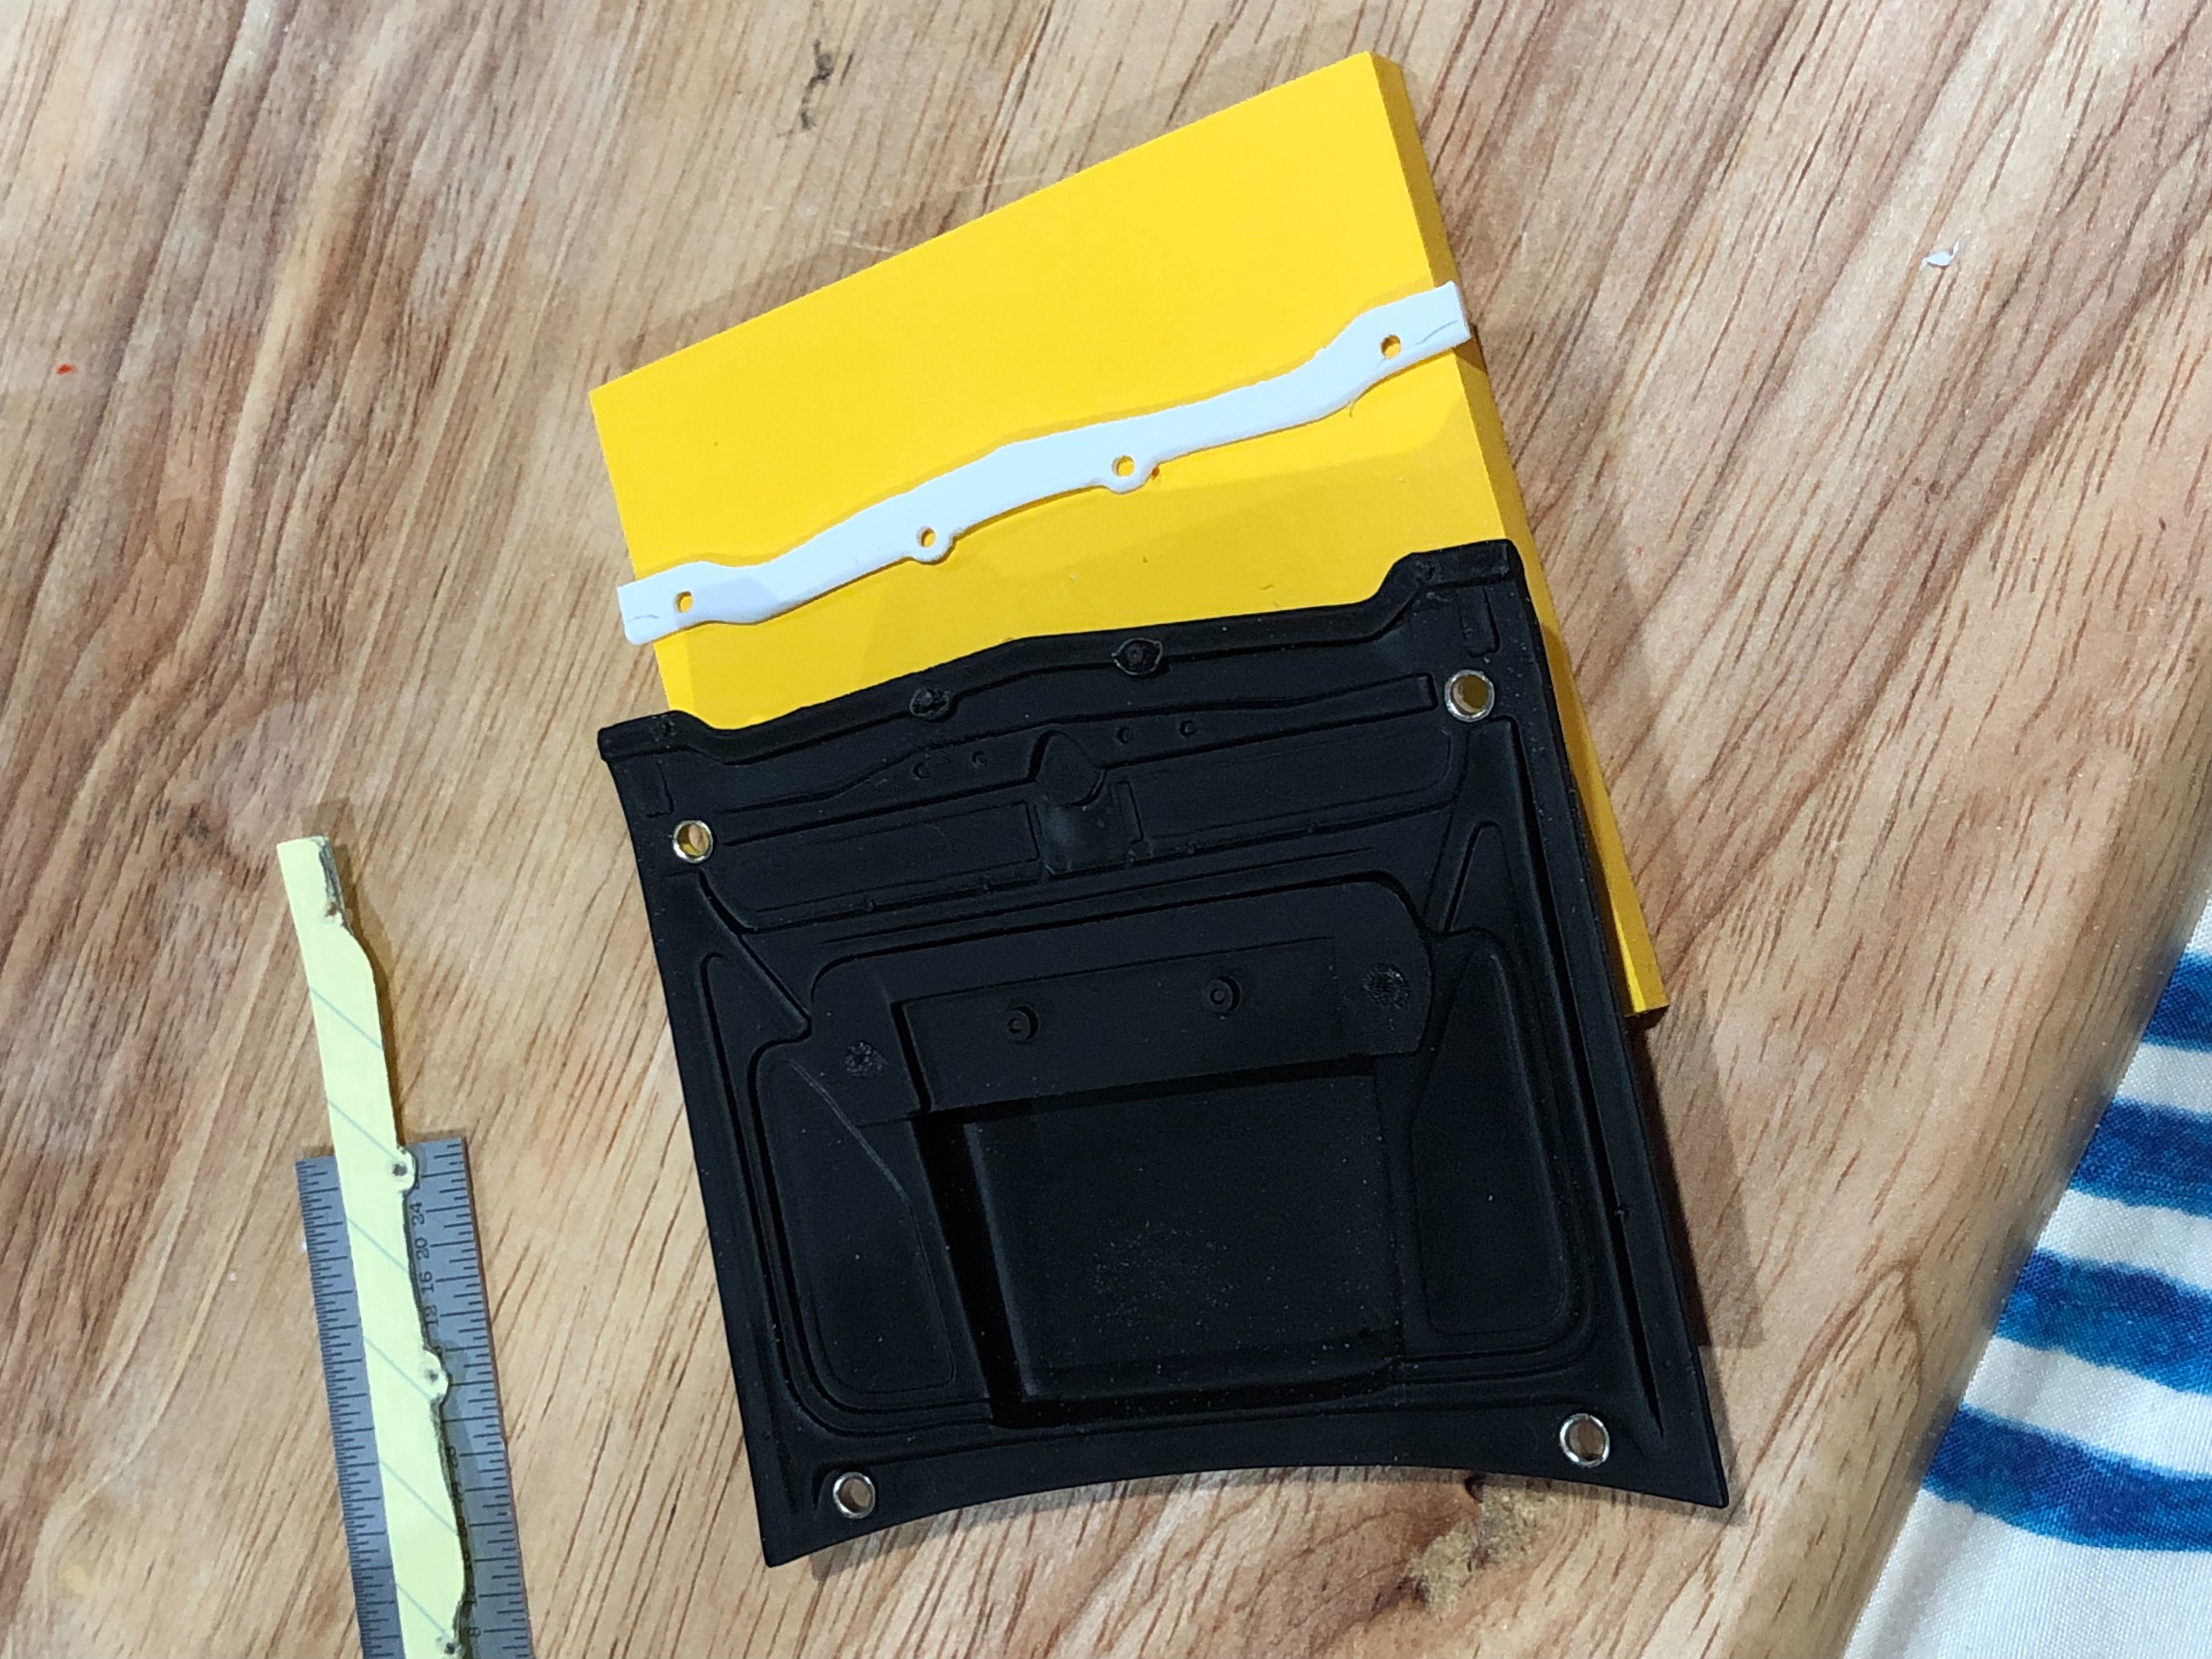
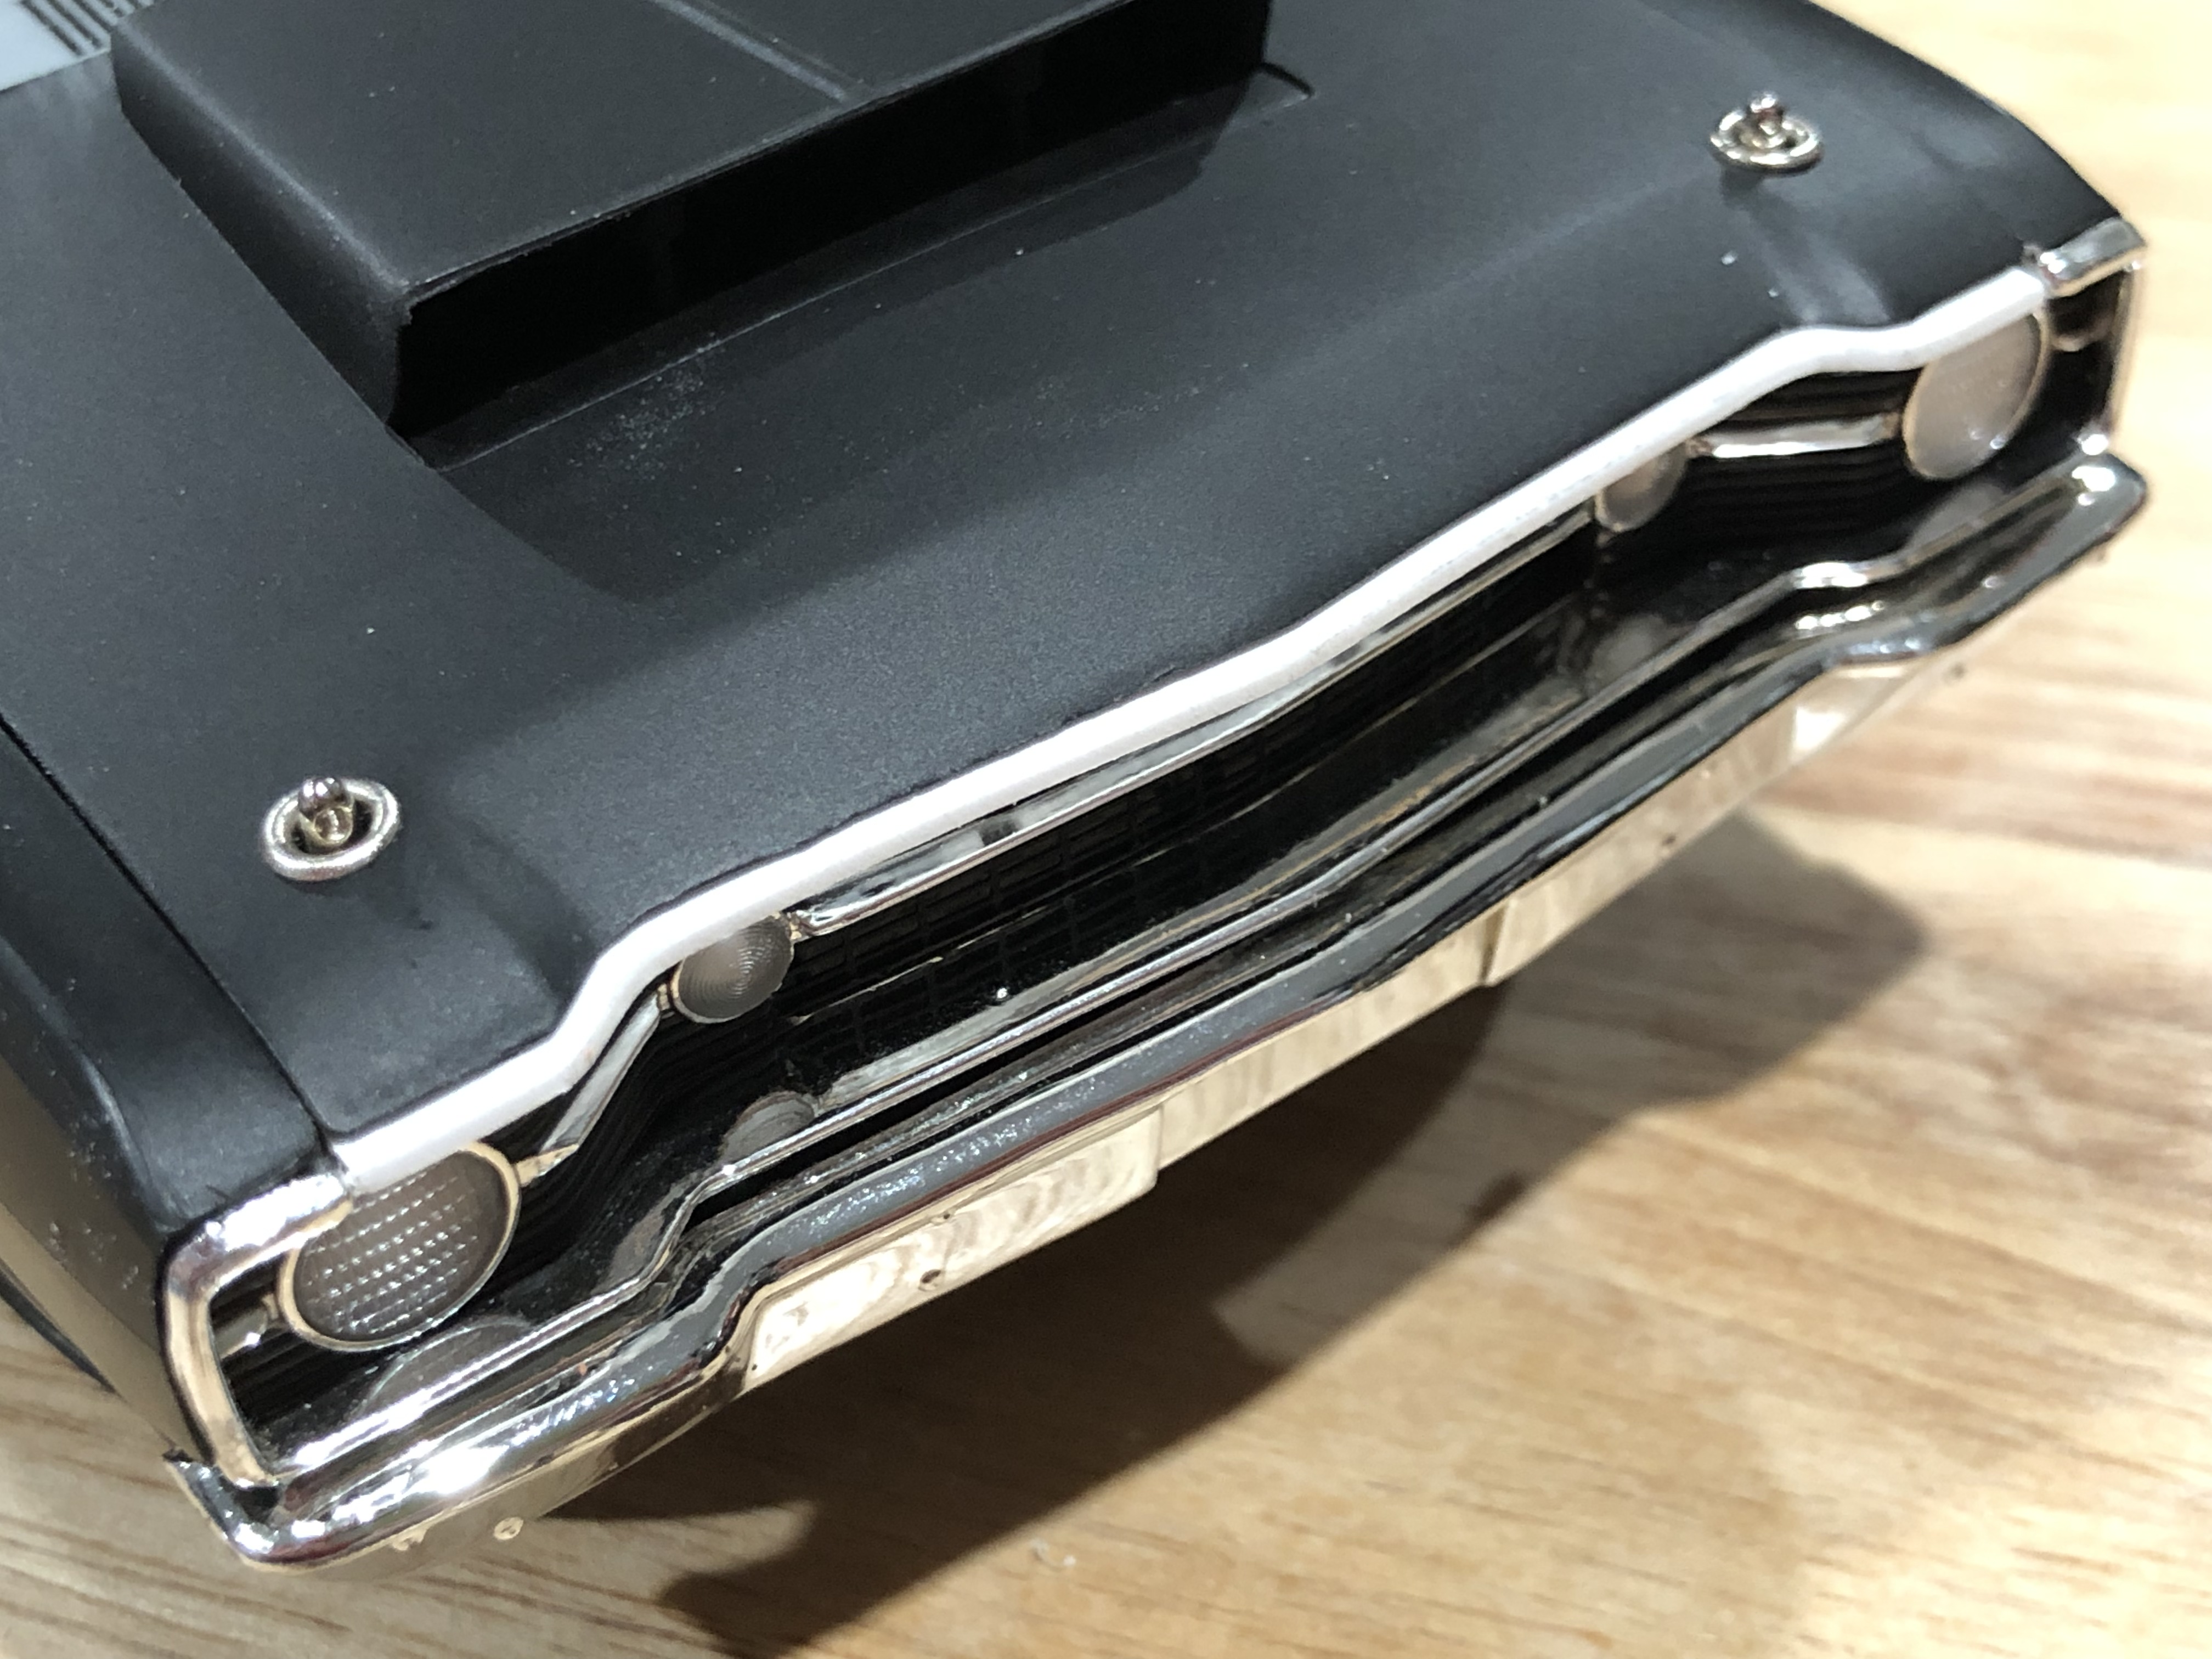
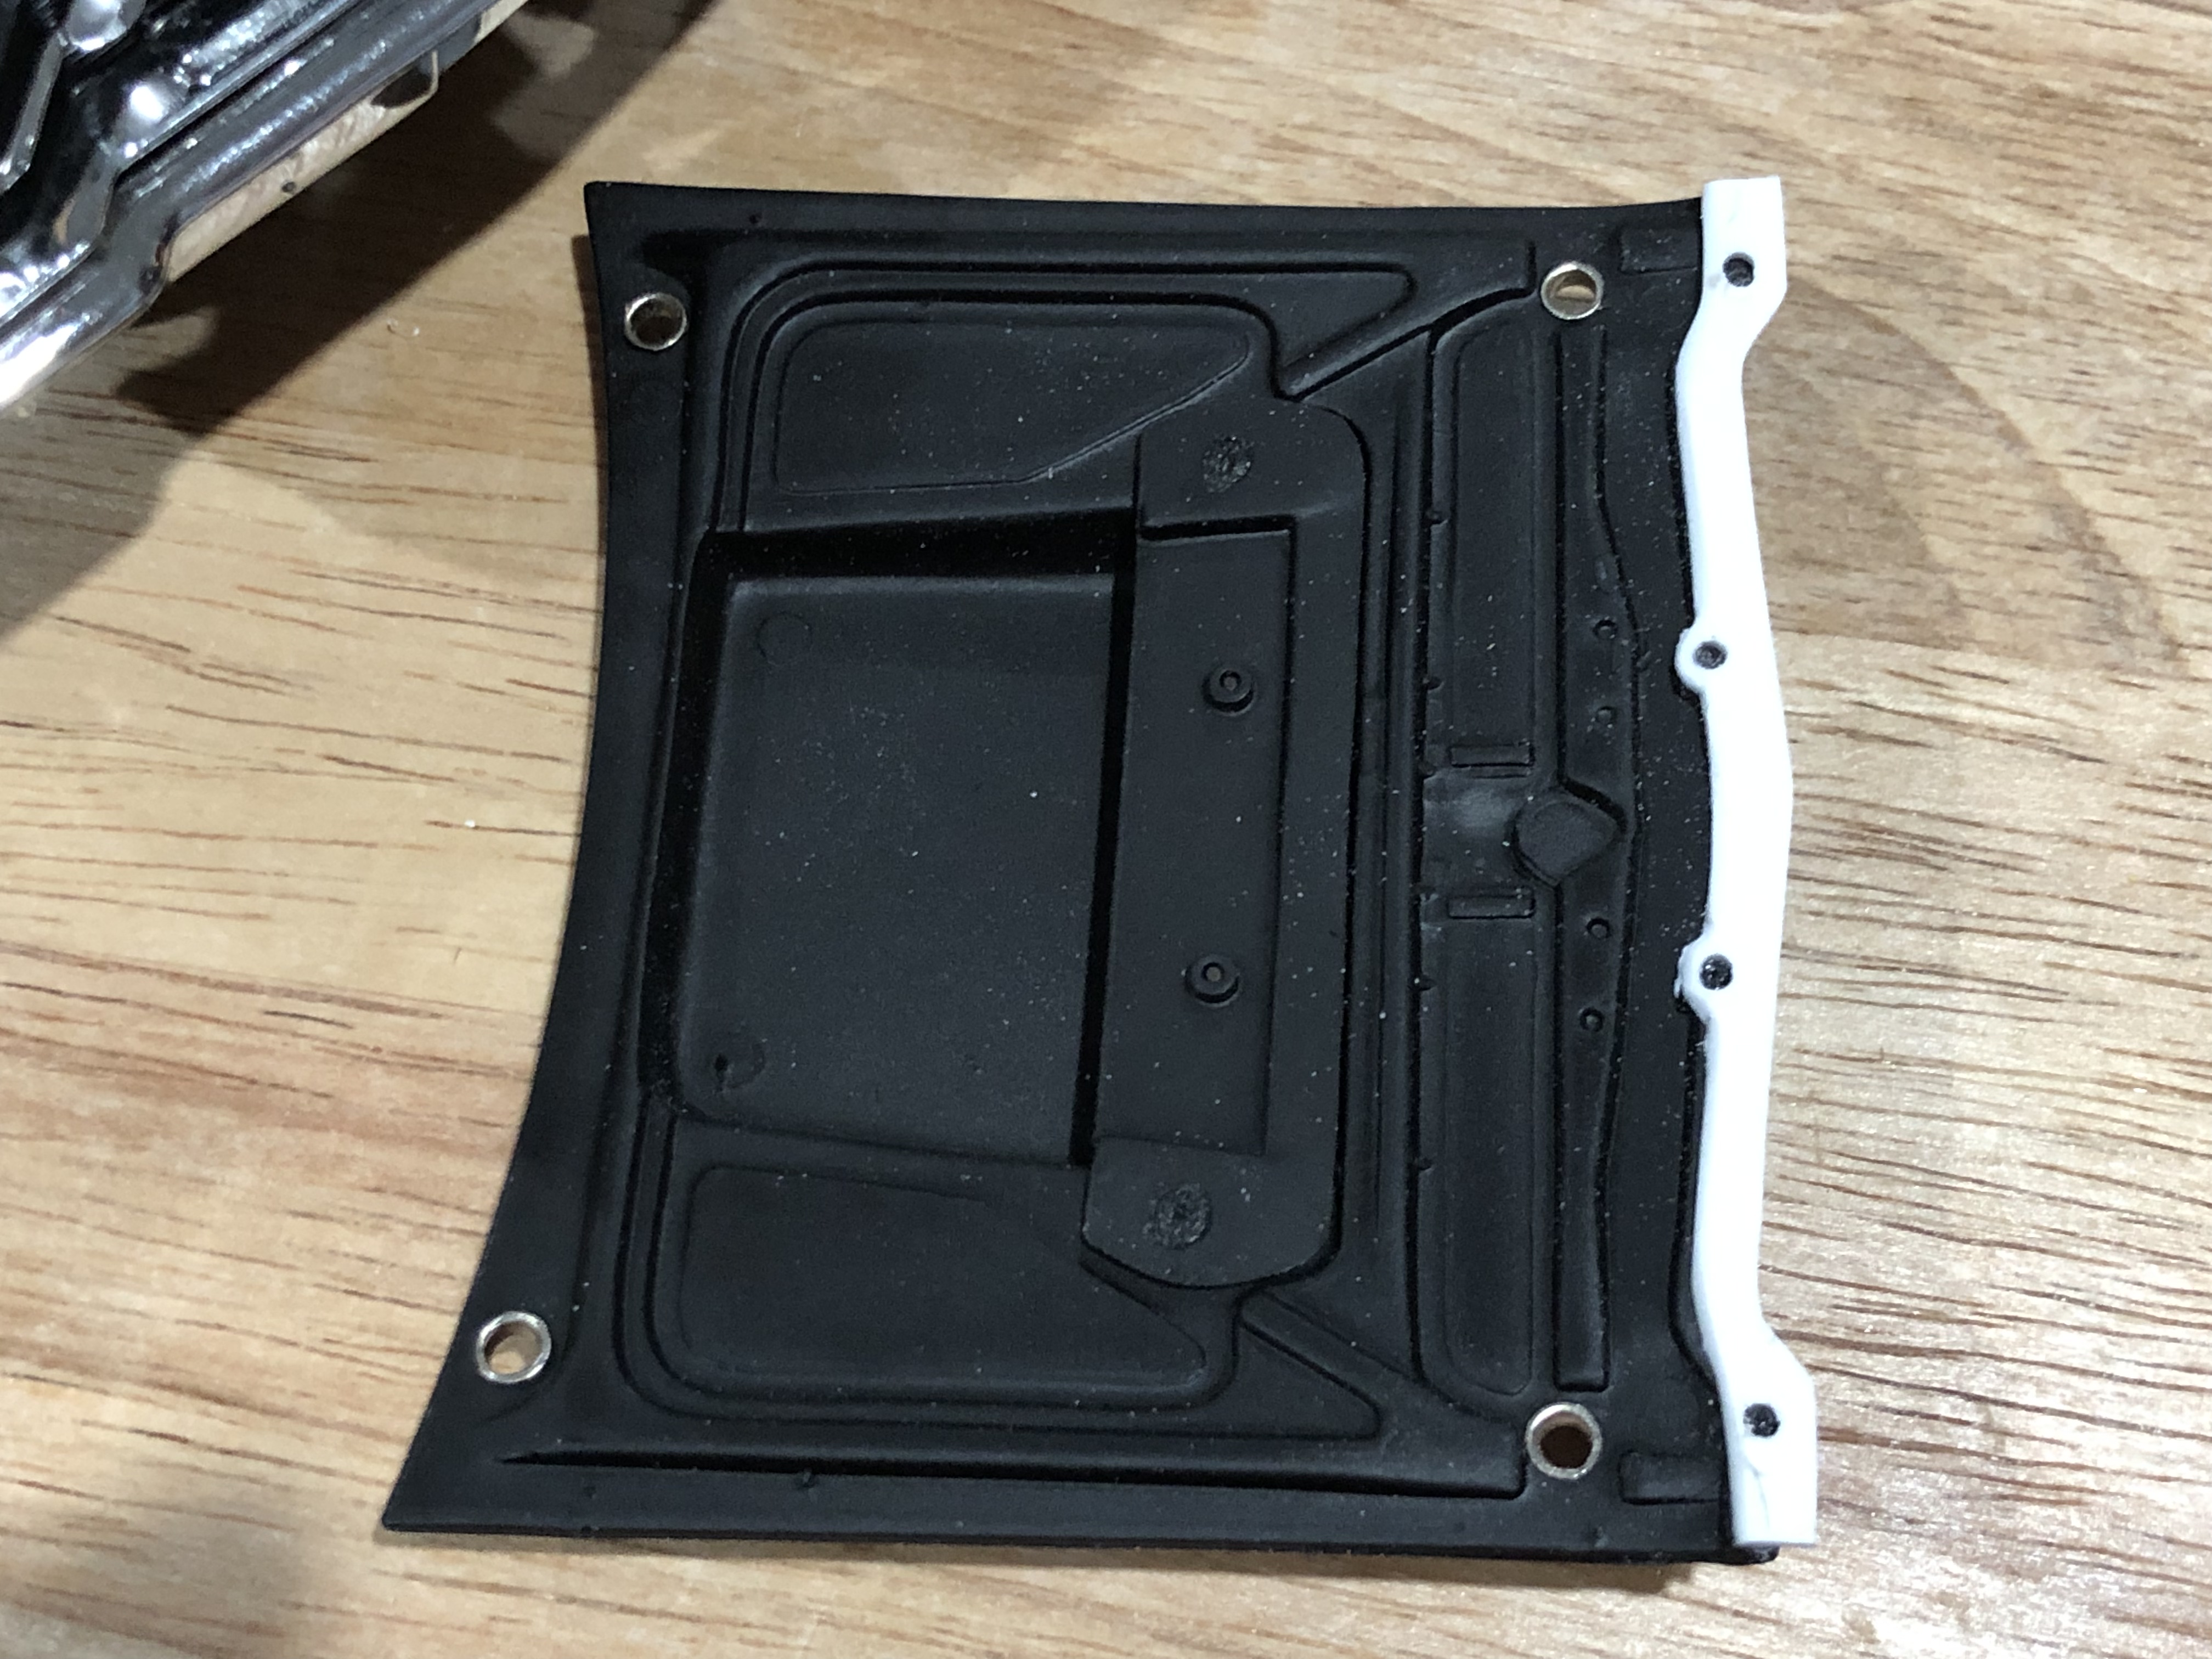
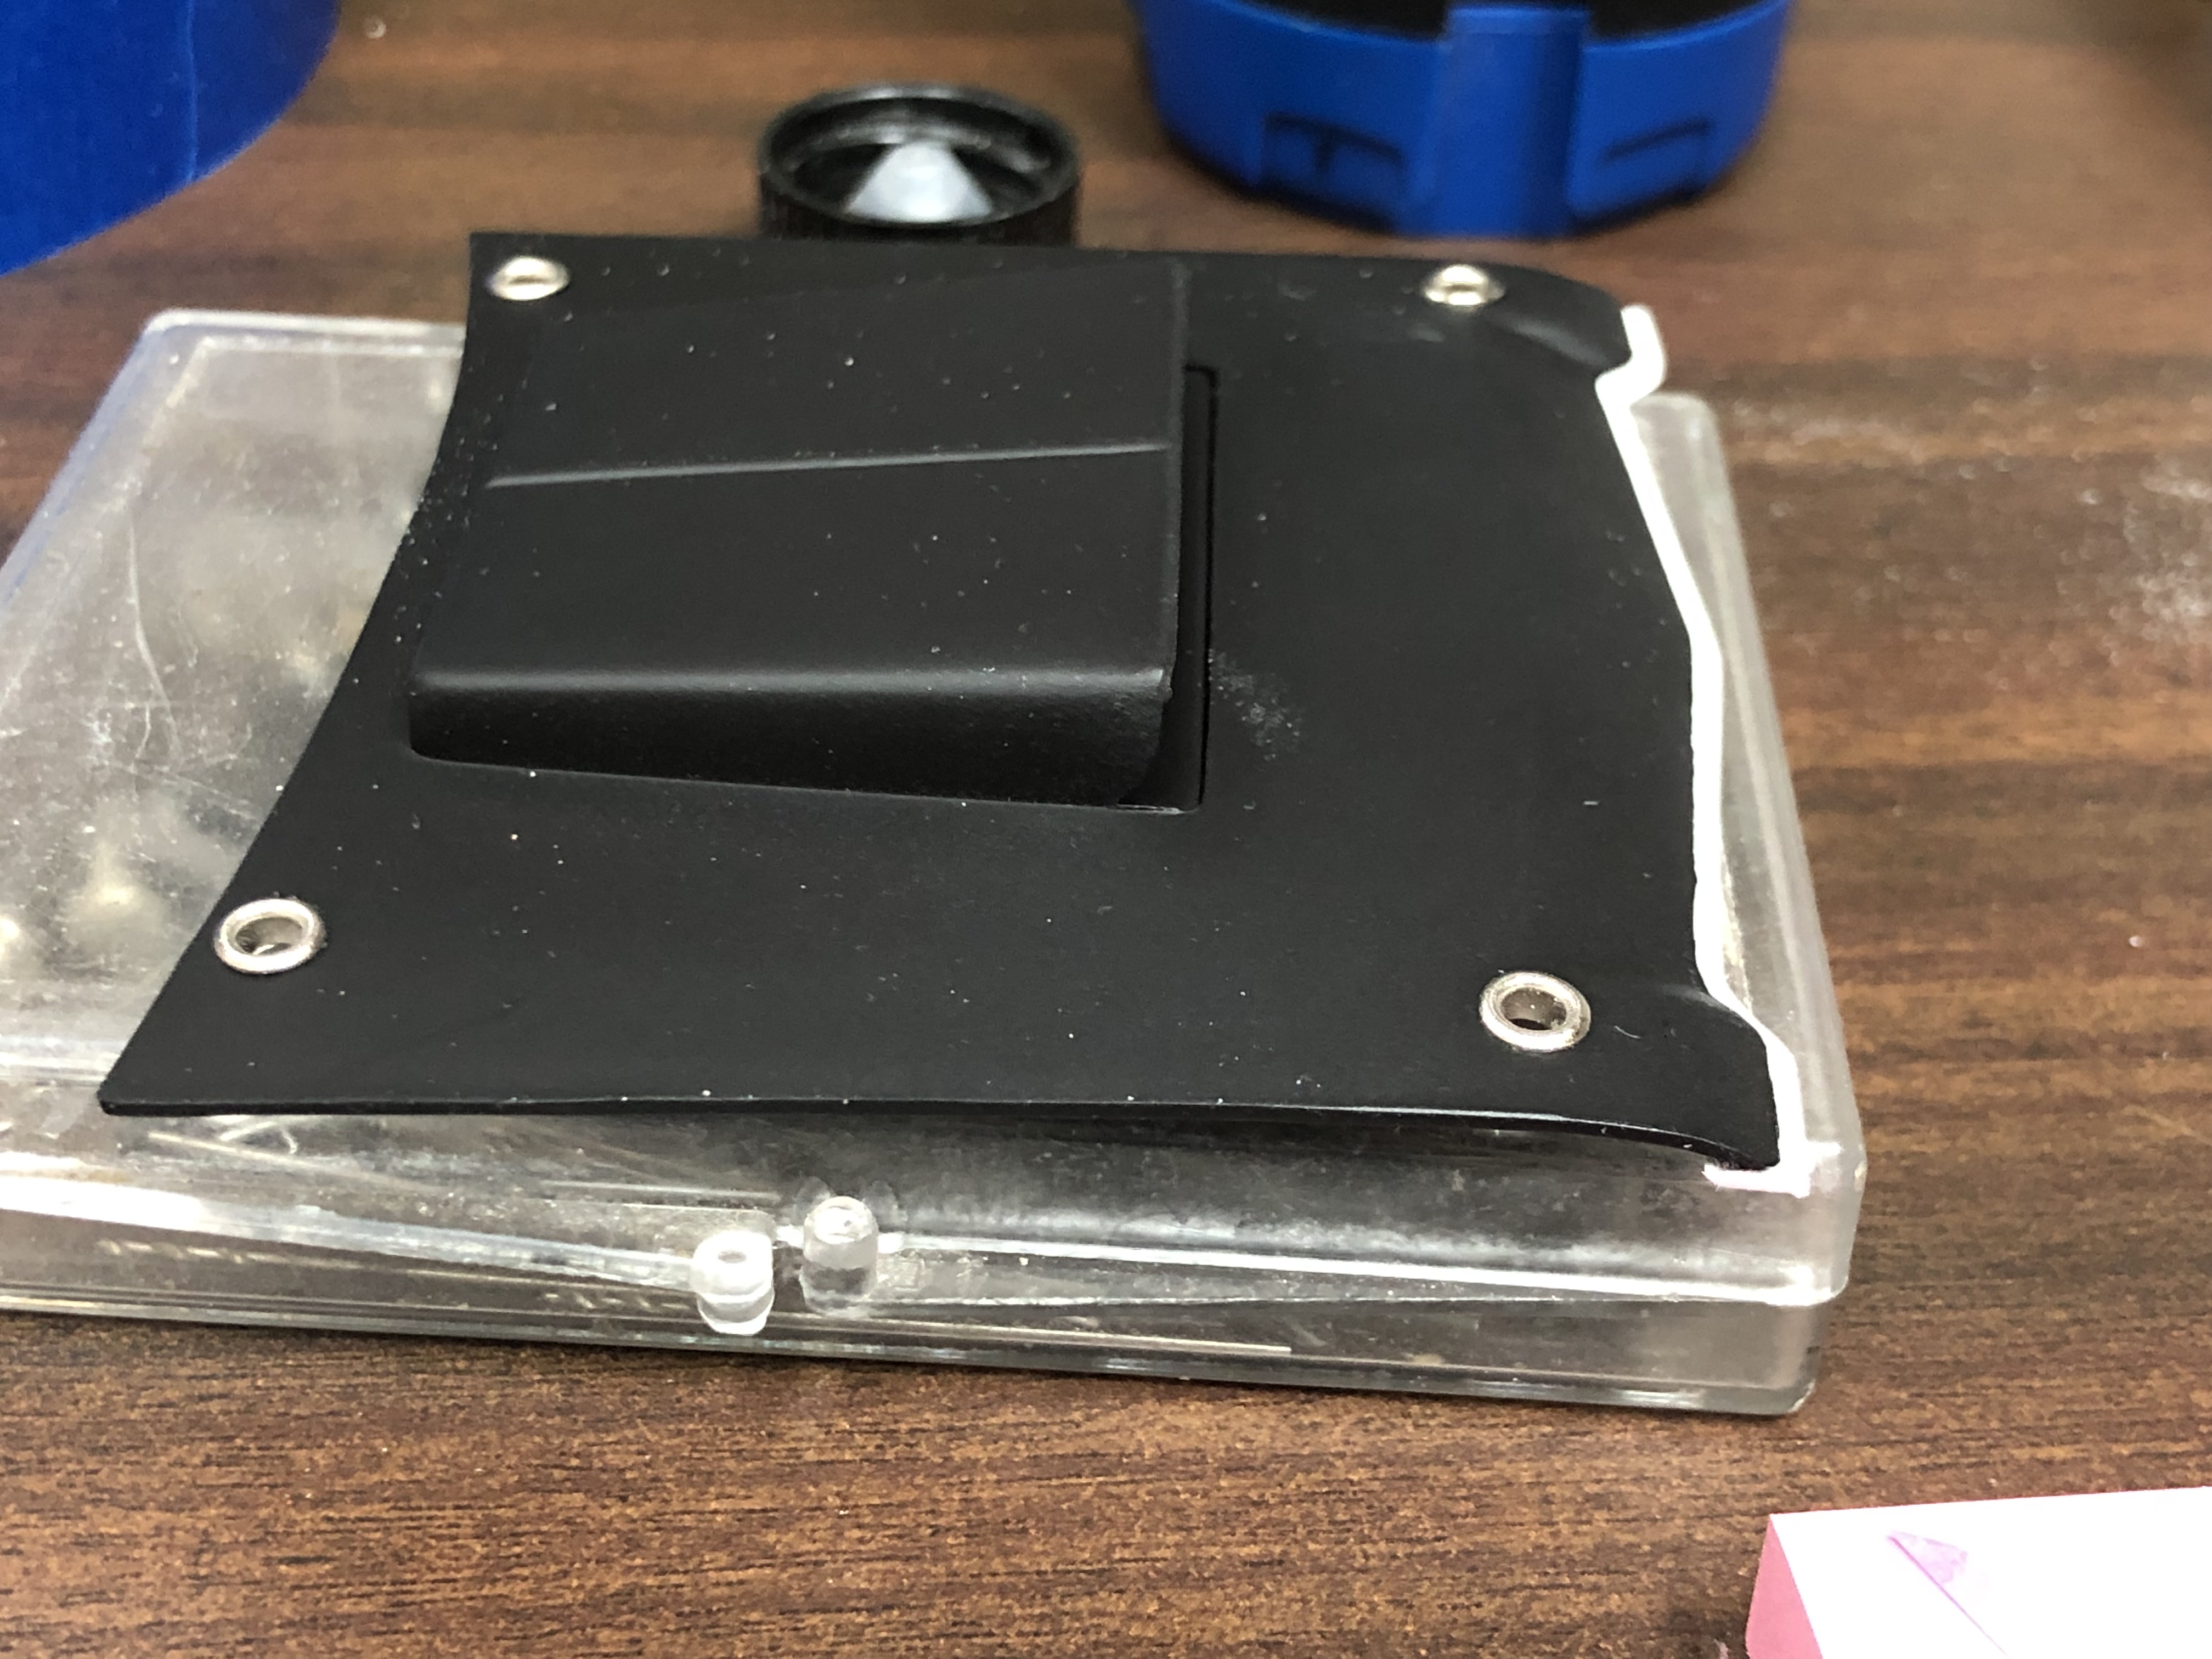
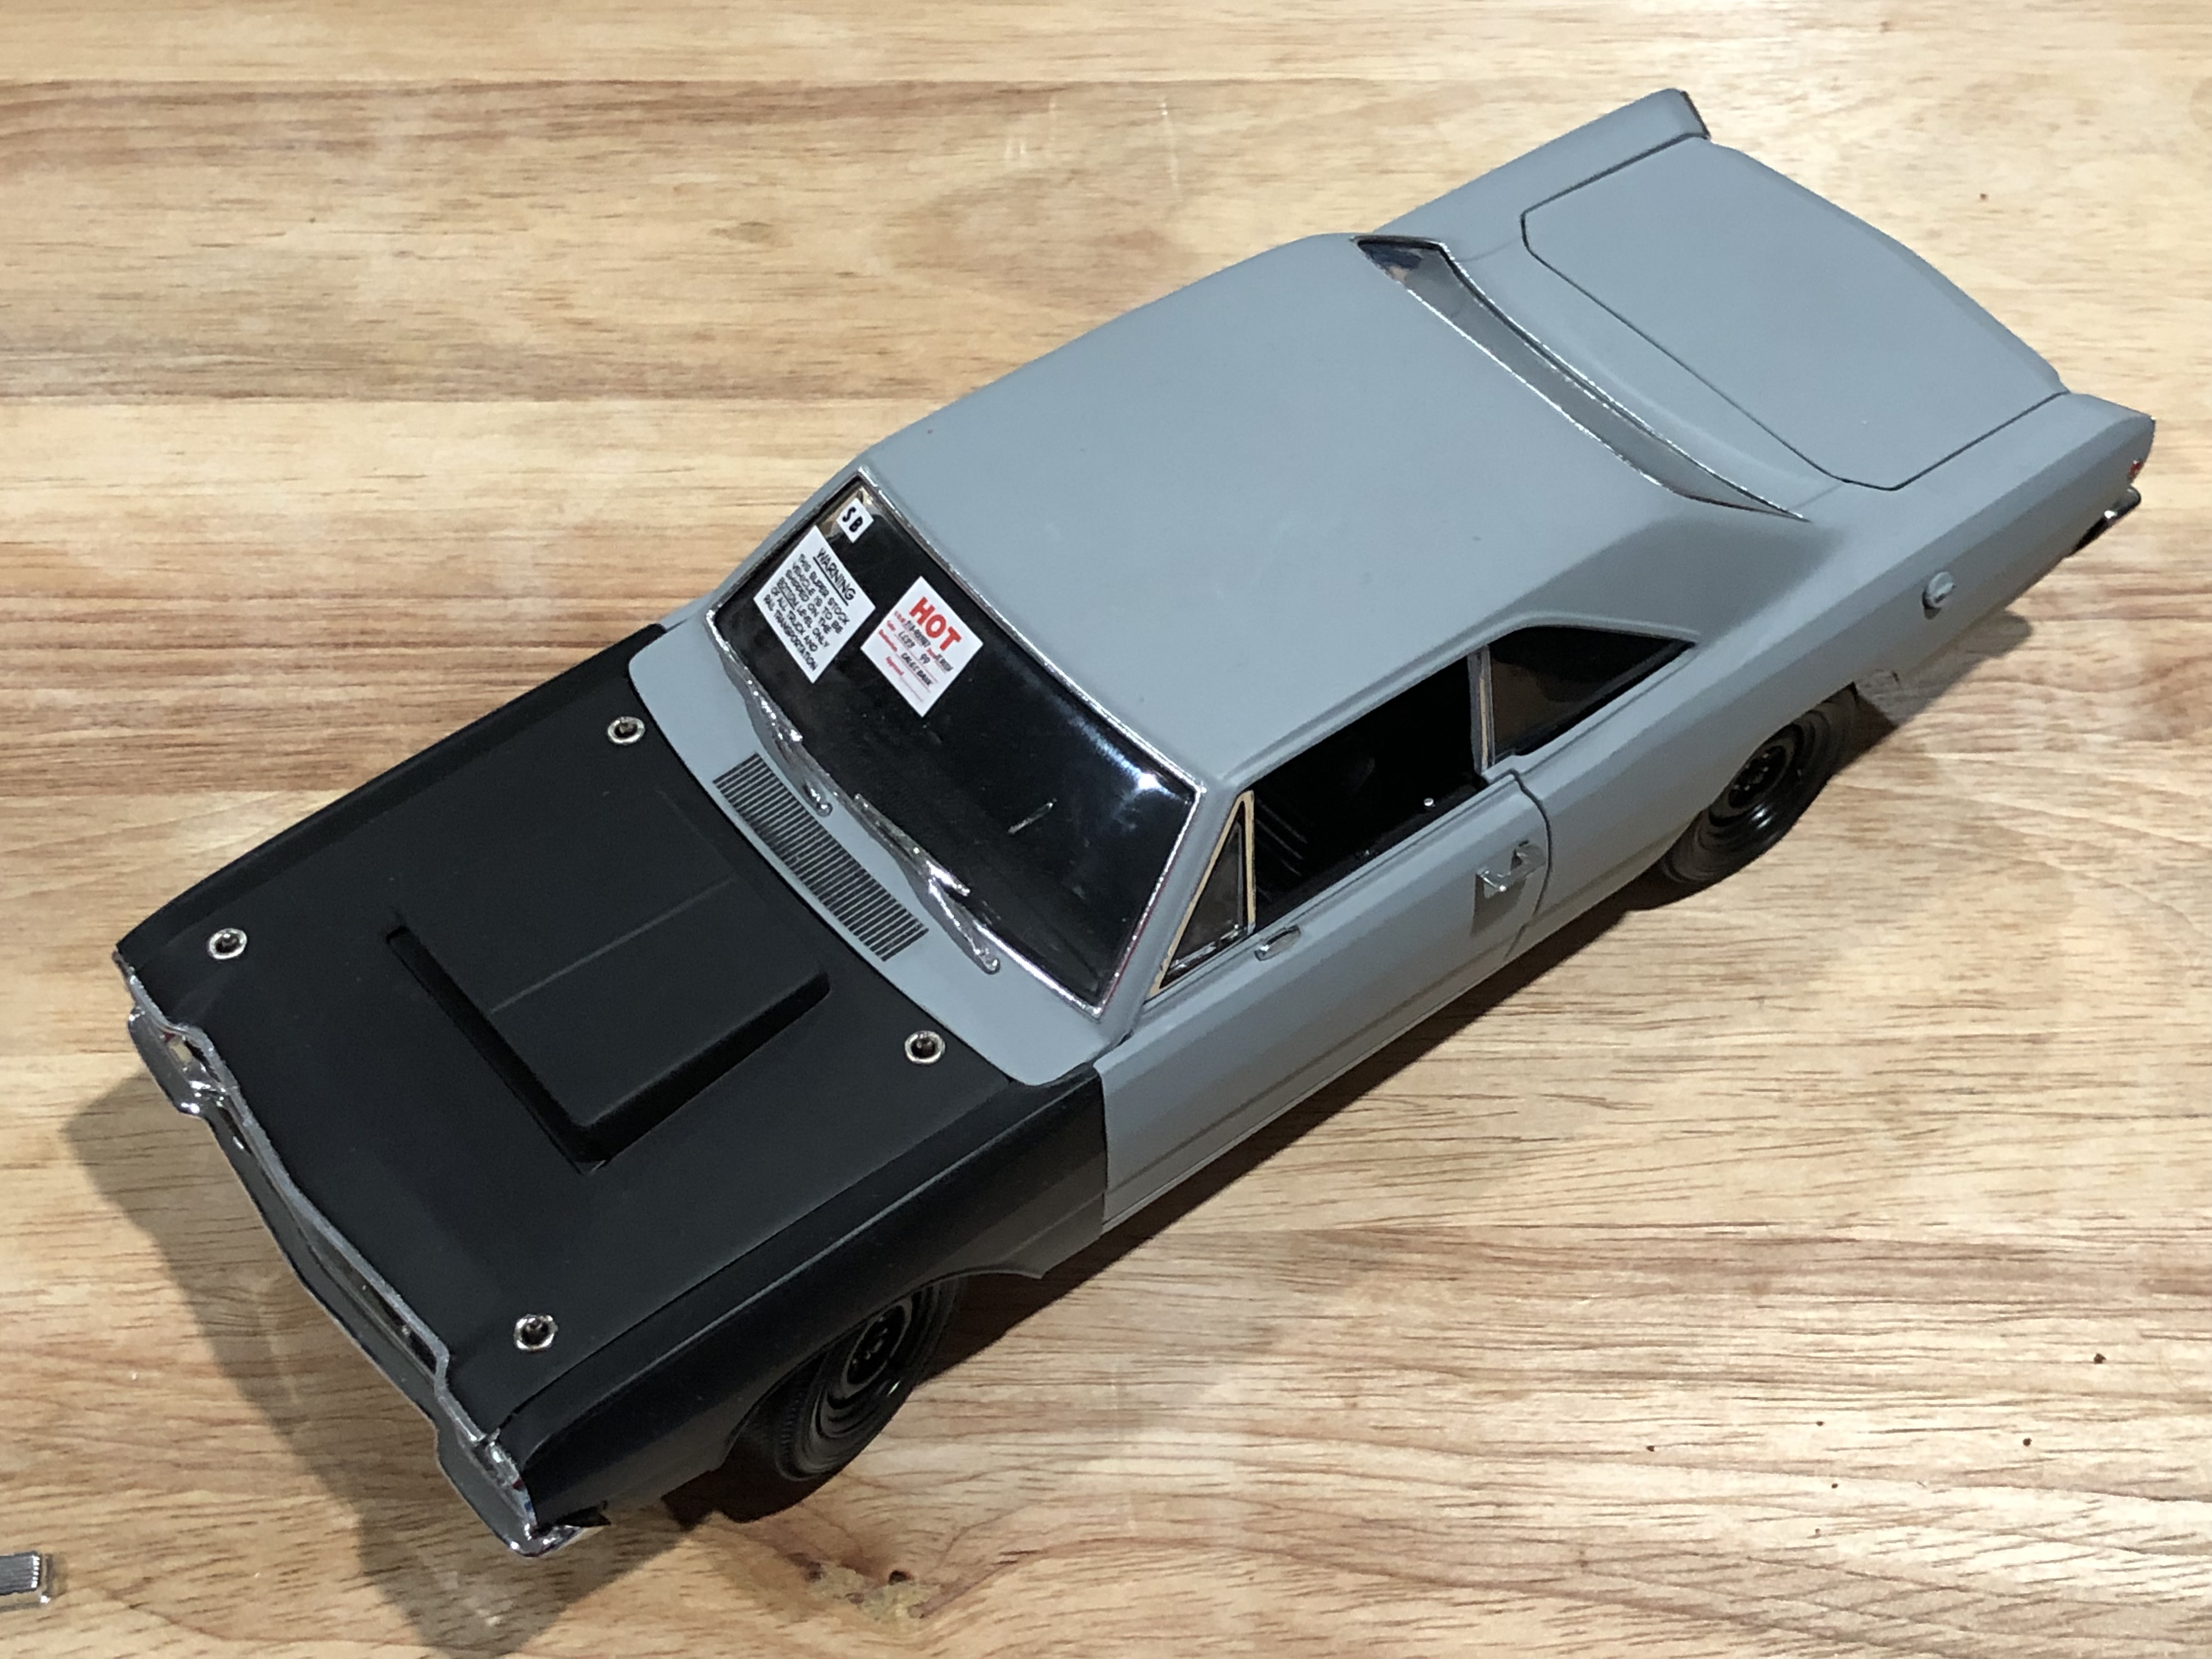
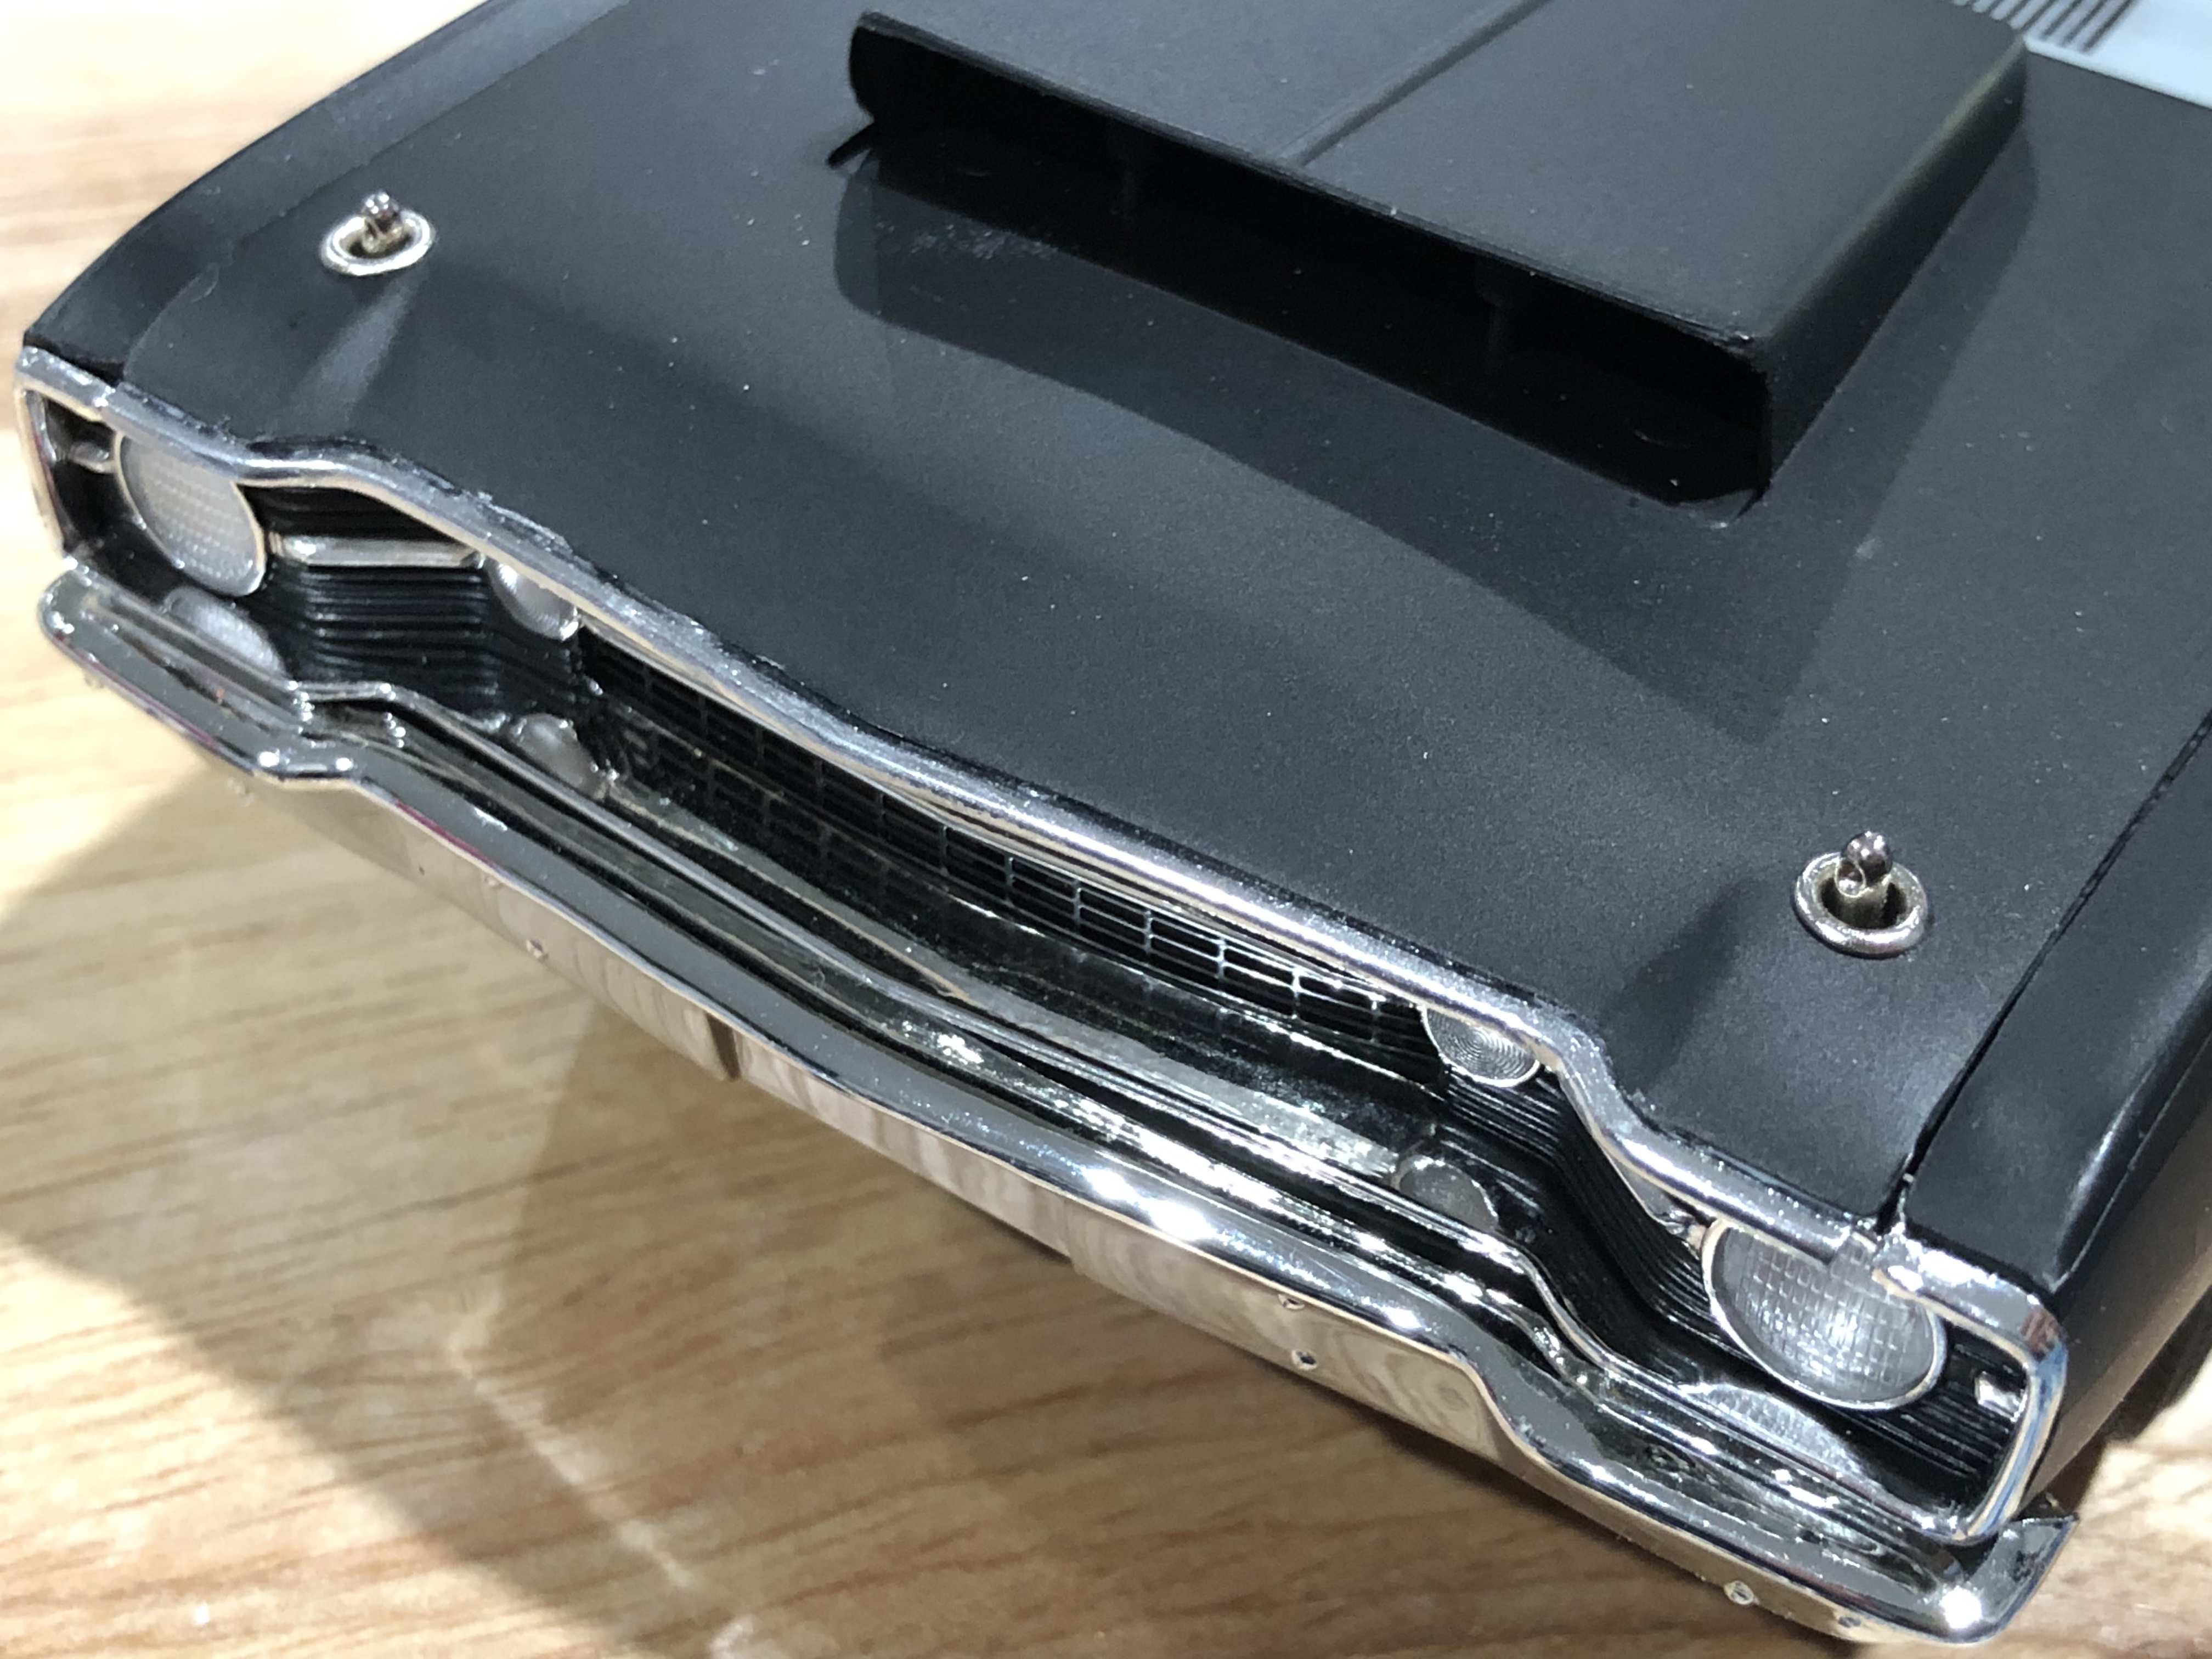
I picked up this diecats Hemi Dart a month ago or so. These are selling on EBay for $200+! When one showed up damaged for less than half that, I jumped on it! It has broken attachment points for the base on the underside (which doesn’t bother me) and the hood trim is missing. It’s been sitting on my deathbed since I got it. I figured I would fabricate the missing trim. Here is a little photo selection from the process.
-
Decided to do a base hood version of the Cuda. Blue Angels Yellow paint. SAM_0355 by Eric Lucas, on Flickr SAM_0360 by Eric Lucas, on Flickr SAM_0367 by Eric Lucas, on Flickr SAM_0368 by Eric Lucas, on Flickr