1959scudetto
-
Posts
3,319 -
Joined
-
Last visited
Content Type
Profiles
Forums
Events
Gallery
Everything posted by 1959scudetto
-
 Wahnsinn, Manfred - einfach super !
 -
Excellent - simply excellent !
-
3rd gen Camaro
1959scudetto replied to MarkJ's topic in WIP: Other Racing: Road Racing, Land Speed Racers
Extraordinary work with the roll cage and chassis tubing, Mark. In contrast to that, a repaint of the body will be an easy task for you. -
Alfa 33 Stradale Chassis No.75033.111
1959scudetto replied to Dave B's topic in Other Racing: Road Racing, Salt Flat Racers
Exactly my thoughts - more Phils would be needed ! -
Alfa 33 Stradale Chassis No.75033.111
1959scudetto replied to Dave B's topic in Other Racing: Road Racing, Salt Flat Racers
Once again you turned one of Phil's printed bodies into an excellent model, Dave - very nice (you must have an awesome collection)! Interesting history of this unique piece, too - I had no idea that it was specially built for Conte Agusta with helicopter seats. I only knew that there had been once upon a time a blue version... I will repaint one of my diecasts to match this one... -
3rd gen Camaro
1959scudetto replied to MarkJ's topic in WIP: Other Racing: Road Racing, Land Speed Racers
A thing of the past... -
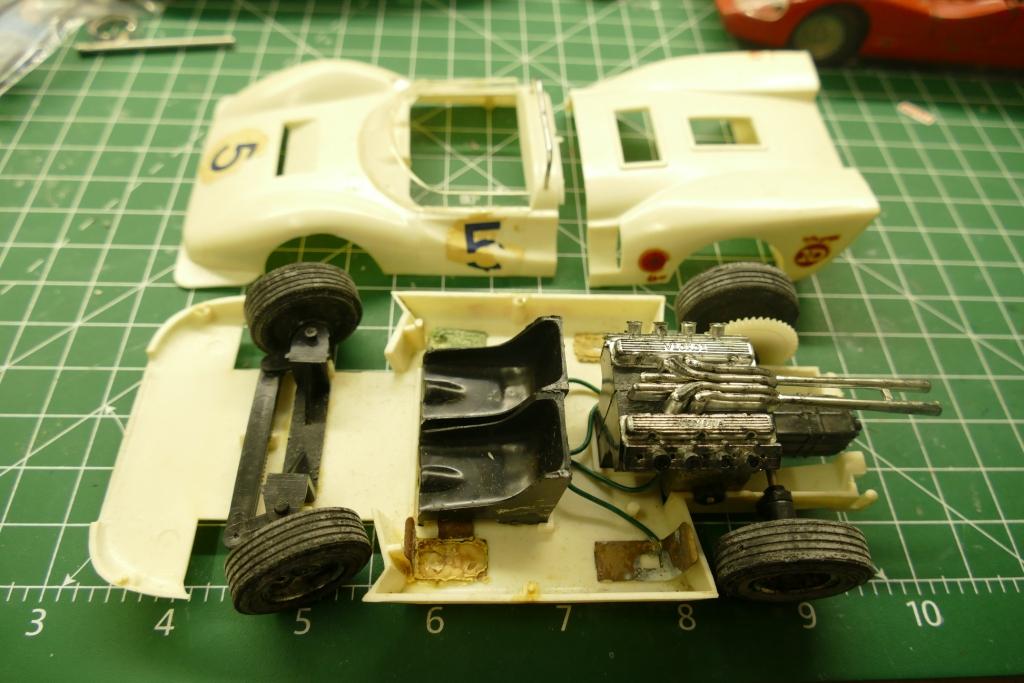
I have found 2 pics of this very car in the internet (developed and built by Yamaha in 1967/68, Yamaha engine 3 l V8 for the first race):

- 39,233 replies
-
- 1
-

-
- johan
- glue bombs
- (and 1 more)
-
Got a bunch of 3 (very) old junkers/built-ups today: though I was only interested in the Heller Lotus 49 (need the drivetrain and wheels for another racer), I took all 3 for 25 € including postage: 1/24 Otaki Toyota 7 and Otaki 1/20 Ferrari 275 GTB: As they are mostly complete, I will build the 2 Otakis in the future (both are motorized toys): the Ferrari will be stock/curbside : - I have it already disassembled. The Toyota seems to be the very first version with a different tail than shown on the boxlid and consists only of the body shell with seats and engine, so I will build up kind of aluminium chassis : The Lotus will be butchered:
- 39,233 replies
-
- 5
-

-
- johan
- glue bombs
- (and 1 more)
-
Thanks for your comments, Tony - highly appreciated.
-
Chris, this is an outstanding model - if it was presented on a racing (and not a modelling) website, everybody would take it for real! F1 in the 70's had the greatest diversity : the variety of cars in that decade was special and will never be seen again - each car looked different from the others. - - - Today ? ....
-
Can't wait to see them , Jürgen - I have them all as 1/24 die-cast models.
-
Thank you, Anders - glad you like it.
-
You gave new life to this old kit, Bart - very nice! The first series Riviera are without doubt some of the best-looking American cars ever.
-
Back to the bench after surgery. chevy 57
1959scudetto replied to happy grumpy's topic in Model Cars
Very nice models, Mario - I wish you a speedy recovery ! -
Looks perfect to me !
-
Very nice model of a genuine sleeper, Mario - sleeping beneath a street lamp ! Thanks for the info on the necessity of widenening the track!
-
Fantastic build, Ken - these are the wheels that should have been included in the kit (those low-profile tires are totally wrong). The color choice similar to primrose yellow is also excellent !
-
White Road Commander 2
1959scudetto replied to DRIPTROIT 71's topic in Model Trucks: Big Rigs and Heavy Equipment
Excellent truck, Brian - very well done ! -
Fantastic looking truck - the 2nd picture can easily be taken for real !
-
Beautiful model, Anders just beautiful ! I have never seen these colors on a kit, but they fit perfectly !
-
After a long break you finally come back to the board and present us again a marvellous model, Jürgen ! You have outdone yourself with this superb Alfa Romeo!
-
I have a few obskure/rare kits in my stash: Bandai 1/20 Lamborghini Marzal, Frog 1/24 Lola T70 Spyder, Nakamura 1/24 Abarth 2000 Pininfarina Prototipo, mpc 1/20 McLaren M8B but the rarest of them all is probably the Sentraru 1/24 Ford P68/3L (it is not even listed by Scalemates) = the only of these that I have built recently (see under glass racing cars):
-
Very impressive diorama, Jürgen - so much to see here !
-
Excellent, Pierre - if this model was available as a kit, I would immediately buy at least 2 - I followed your WIP and watched this marvellous racer come together.
-
Batmobile
1959scudetto replied to Pierre Rivard's topic in WIP: Other Racing: Road Racing, Land Speed Racers
Pierre, you did it again - you created a superb model of Dieter Quester's Le Mans racer with finesse and your usual attention to detail - simply excellent ! For me, the best looking touring sportscar ever !
.jpg.a0969afa8a8f152a6aa7441db13fa672.jpg)
2.jpg.dcae76d9e3e5ce7b070c708254abd295.jpg)