Nacho Z
-
Posts
2,933 -
Joined
-
Last visited
Content Type
Profiles
Forums
Events
Gallery
Everything posted by Nacho Z
-

1/20 Ferrari F1 90
Nacho Z replied to Rich Chernosky's topic in Other Racing: Road Racing, Salt Flat Racers
I, unfortunately, started following F1 after this era of cars ran, but boy do I like them! That is a great looking Ferrari! Overall, it sounds like you are pleased with Fujimi’s kit. Is that correct? You did a masterful job of it! -
How cool is that?!?! Your additions made this already cool model that much better!
-
Cyberpunk Toyota MR2
Nacho Z replied to StokeModels's topic in Other Racing: Road Racing, Salt Flat Racers
Simply amazing! -
Perhaps ScaleMates.com?
-
That is one fine looking Camaro!
-
I really like this one. Great looking livery. Nice job, Damien! I have this one in my stash and definitely want to build it.
-
Penthouse / Rizla / Super Cad Porsche 962C
Nacho Z replied to Nacho Z's topic in Other Racing: Road Racing, Salt Flat Racers
Thank you, Dave! -
Revell Corvette C5.R Decal Placement
Nacho Z replied to Jim B's topic in Model Building Questions and Answers
I’ll be following along on this one, Jim. I’m looking forward to seeing your work on this one. Personally, I like it when things like the decal errors are pointed out. You may save some poor soul a lot of headaches in the future with information like this. Good luck on the rest of this build! -
Penthouse / Rizla / Super Cad Porsche 962C
Nacho Z replied to Nacho Z's topic in Other Racing: Road Racing, Salt Flat Racers
Much appreciated, Larry! Thank you, Damien! I really enjoy these kits and love the real ones! I hope you do build another one and I look forward to seeing it! -
The simplicity of the design of these “cigar” cars is what makes them so elegant! You do these MFH models justice, Paul! Drop dead gorgeous!
-
Tamiya Ford Focus WRC 2001
Nacho Z replied to galaxyg's topic in Other Racing: Road Racing, Salt Flat Racers
Another fantastic model, Michael! I really enjoy the photography, too. What's next on the bench? -
Hasegawa Toyota 88C "Taka-Q"
Nacho Z replied to galaxyg's topic in Other Racing: Road Racing, Salt Flat Racers
Love it, love it, love it!!! Fantastic looking model and the photography is just as good! I really like that Minolta car as well. -
Revell RM Chopper
Nacho Z replied to TonyR's topic in All The Rest: Motorcycles, Aviation, Military, Sci-Fi, Figures
I really, really like this, Tony! All of the colors and finishes work very well together. Great job! -
Penthouse / Rizla / Super Cad Porsche 962C
Nacho Z replied to Nacho Z's topic in Other Racing: Road Racing, Salt Flat Racers
-
Penthouse / Rizla / Super Cad Porsche 962C
Nacho Z replied to Nacho Z's topic in Other Racing: Road Racing, Salt Flat Racers
Thank you, Phil! Was your 24 hour build part of the large FB group Annual 24 Hour Model Build? I looked in this year's page and didn't see your name. I seem to recall you being in that group build. I wouldn't mind seeing yours. Feel free to post it here if you want to! Cheers, Bruce! I appreciate it! -
Penthouse / Rizla / Super Cad Porsche 962C
Nacho Z replied to Nacho Z's topic in Other Racing: Road Racing, Salt Flat Racers
Thanks, Roger! Thank you, Chris! I appreciate that, Pierre! It is simply an acrylic sheet for the base and a black poster board for the background. The key ingredient is lots of natural light. -
Alan Mann Racing Ford F3L/P68
Nacho Z replied to Dave B's topic in Other Racing: Road Racing, Salt Flat Racers
A beautiful model of a beautiful race car! -
Penthouse / Rizla / Super Cad Porsche 962C
Nacho Z replied to Nacho Z's topic in Other Racing: Road Racing, Salt Flat Racers
Thanks, Bob, I appreciate it! You just can’t go wrong with these Hasegawa Porsches. The decals were very trying around that huge compound curve of the front fenders and cockpit area. That is where my only boo-boo was. Well, that and I had one single pinstripe decal go a little astray on me. While I was trying to position it, it locked into place. Any further attempts by me to move it would have resulted in a torn up decal. Anyhow, thanks for the kind words, my friend! -
Penthouse / Rizla / Super Cad Porsche 962C
Nacho Z replied to Nacho Z's topic in Other Racing: Road Racing, Salt Flat Racers
Thank you, Terry! Thank you, Jim! I do like these 956 & 962s! -
Jimmy Spencer’s Winston T-Bird
Nacho Z replied to Horrorshow's topic in Stock Cars (NASCAR, Super Stock, Late Model, etc.)
I remember when Jimmy ran this car and his Camel cars. Nice job on this! It is a shame about the decals. -
Hasegawa's Penthouse Porsche 962C
Nacho Z replied to Nacho Z's topic in WIP: Other Racing: Road Racing, Land Speed Racers
Thanks, Mark. It was my first time using it. I was pleasantly surprised with it. Honestly, I haven’t heard a bad thing about any of the Mr. Hobby line of paint. -
Hasegawa's Penthouse Porsche 962C
Nacho Z replied to Nacho Z's topic in WIP: Other Racing: Road Racing, Land Speed Racers
Hi Steve. I have definitely read about the exact thing that you have mentioned. On this model, only the interior of the body, the dash, and the cockpit were painted with Tamiya, and that was with their LP (lacquer) line of paints. The only exception is the top of the dash which was shot with Tamiya XF paint. Even that did not do what you mentioned. I did mask them, but I had no problems with the tape imprinting on them. The exterior was shot in Zero Paints and cleared with Mr Top Coat which is GSI Creos. If you do a search on my posted models, you will see that I do use TS-13 on a number of them and then mask them off to shoot window trim, etc. I pretty much only use Tamiya tape for this. I wonder if the fact that I have polished out the paint before masking makes a difference? Or if the type / brand of tape would matter? The only other thing that I can think of is I pull my masking off as soon as I can. Hope this helps. Let me know if you have other questions or if I didn’t answer the one you had. I sometimes go off on tangents…lol. -
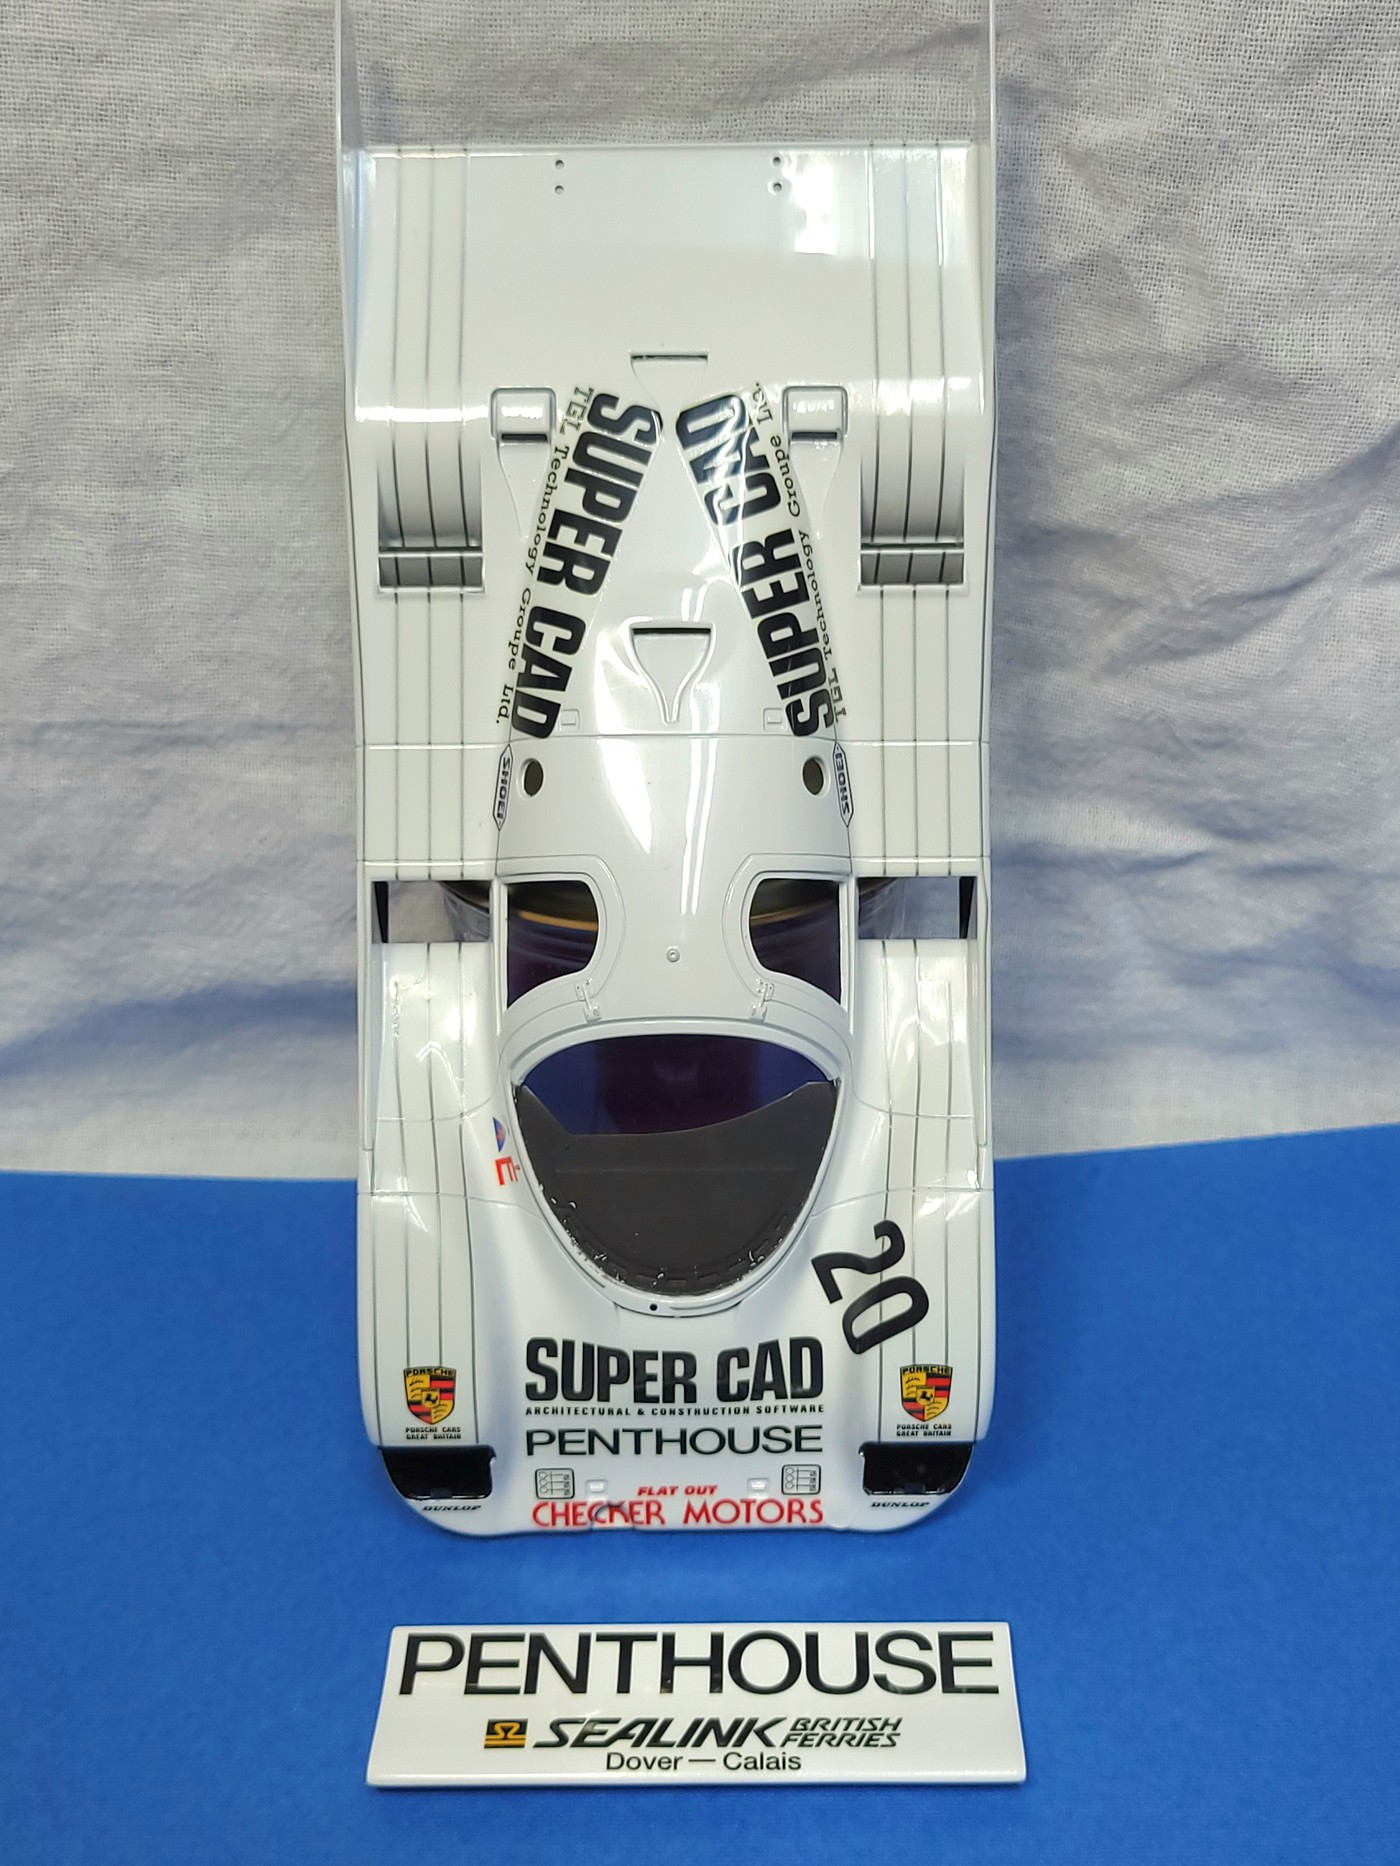
I am sharing my just finished Hasegawa Porsche 962C. I have added a link to the WIP. As I always say about these Hasegawa Porsche 962Cs, they are a nice, well fitting, hassle-free kit that look good on the shelf. There is no engine and the part count is minimal. If you like doing decals, these are right up your alley. However, if you don't like doing decals, you may want to pass on these. I will hit the high points of the model. Most information is in the WIP thread. * Primed in Gravity Colors Light Gray Primer. * Painted in Zero Paints Pure Brilliant White. * Clear coat is Mr Top Coat * Wheel chrome is Green Stuff World Chrome Metal, airbrushed. * Panel liner is Tamiya Dark Gray. I think it is still too stark and will use their Gray or Light Gray next time. * Body was buffed out with Micro-Mesh cloths, 3600 - 12000. It was then polished with Tamiya Fine and Finish compounds. Thanks for looking! Let me know what you think.

-
Hasegawa's Penthouse Porsche 962C
Nacho Z replied to Nacho Z's topic in WIP: Other Racing: Road Racing, Land Speed Racers
My clear coat order came in a little sooner than I expected. I tried Mr Top Coat for the first time. It is "water based" which I assume would be safe for decals. Hasegawa tells you to clear coat their decals at your own risk, or something close to that. I played it safe and did some light coats, letting them flash off, before putting down a few heavier coats. I had no issues. This will be the last update. I will post the finished model in the Under Glass section. Thank you all who followed along and thank you to those of you who commented! It was hard to capture the brightness, whiteness, and shine of the finish. The picture below is the body after being polished out with Micro-Mesh clothes. After this picture was taken, I used Tamiya Fine and Finish compounds on it.