Plastheniker
-
Posts
880 -
Joined
-
Last visited
Content Type
Profiles
Forums
Events
Gallery
Everything posted by Plastheniker
-
Nice work, spot-on colour combination!
-
Hi, today kit manufacturers treat modelers with a particular interest in 1/24 and 1/25 European pre-war cars as an orphan. ICM's Opel Admiral is the only corresponding new release of the last years that I remember. Admittedly this is a very nice kit, but I doubt that modelers missed just an Opel kit most. Finally there is no other choice than adhering to the well-known and often obsolete kits from the sixties, seventies and eighties - unless you are lucky to find an inexpensive diecast that can be converted into a model that meets the standards of today's kit modeling. One of those numberless iconic European pre-war cars that have never been (and most probably will never be) kitted is Alfa Romeo's 8C 2900. Alfa Romeo made only the chassis with drivetrain and running gear derived from their 1935 8C 35 Grand Prix (!) racer, and Italy's most renowned coachbuilders, mostly Touring, supplied various ravishing bodies for it. Some years ago I found an inexpensive diecast replicating an 8C 2900B with Berlinetta coachwork by Touring. There are several very similar surviving 1:1 Touring cars, the best-known is displayed at the Museo Storico Alfa Romeo. This diecast was made by Leo Models of Italy and seems to be OOP by this time. Considering its low price (appr. € 20.00 ≈ $ 24.00) it offered a pretty good value for money, much better f. e. than the poor Bburago models: 1937 Bugatti Atlantic 57 S - Mother of all Sports Cars? http://www.modelcarsmag.com/forums/index.php?showtopic=80287 Most important all proportions were perfect and after stripping the paintwork the casting quality was not bad. Moreover as far as plastic was used all plastic parts were workable (probably ABS, opposite to the strange tough Bburago plastic). Nevertheless there was a lot of work to do. I still remember some of the major issues: As most inexpensive diecast models this one featured opening bonnet, doors and bootlid with visible huge cast hinges, varying gaps and unsatisfactory fit. Maybe the model's rather unattractive black paintwork was intended to make these shortcomings less conspicuous The interior, particularly the dashboard, was extremely simplified All glass parts if at all provided were unusable The cast frames around the lateral windows were completely out of scale The plastic wire wheels were extremely crude Conspicuously there were only incomplete or even (I am not sure) no wheel wells at all The characteristic ventilation slots around the radiator grille were missing The 1:1 Berlinetta Touring coachwork (this one is the museum car) looks like this: The reworked model is still one of my favourite car models:
-
Nice work on the best-looking C3 Corvette, beautiful engine bay!
-
Super clean, great colour combo!
-
Once again a really perfect result!
-
Beautiful!
-
As expected another fantastic build of yours. Craftmanship, colour choice and photography - perfect in every respect!
-
Very clean work, great paintwork, nice engine bay!
-
Very clean, perfect paintwork, very nice colour.
-
Unusual and very attractive model!
-
EXCELLENT!
-
Super clean! ( ... and you are not afraid of posting close-up pictures)
-
 Thanks for all replies! My detailed wire wheel tutorial can be found here: Making real wire wheels in all scales http://www.modelcarsmag.com/forums/index.php?showtopic=77554
 -
Perfect work, great pictures!
-
Nice work & good colour choice!
-
Great craftmanship, nice colour combo!
-
Super clean, great interior!
-
VI. Making the Tread Strip There are three ways to make the tread strip: For the fast and easy way visit the model RR department of your LHS. Look for injection moulded N-gauge or Z-gauge styrene brickwork sheets. Cut off strips (after buying the sheets of course) and use them as the new tire tread. These are two examples Scribe any tread pattern into 1.0 mm styrene sheet using a steel ruler and a steel needle/reversed #11 blade. The result will always be more or less spotty but on the finished tire this is tolerable. The scribing procedure , however, is extremely painstaking and after several hours you wonder which part of your back hurts most. Again two examples A faster and much more accurate way of making individual tread patterns is the use of a full-size X-Y-table. This is my usual setup with a slowly-running electric drill and a slitting cutter. The treads of the Mercedes 540 K shown at the beginning of this thread was made this way. VII. Assembly Test fit before any gluing! If you are satisfied glue the tread strip onto the spacer ring. Instead of gluing this sub-assembly directly to the tire flanks and filling the two gaps consider to glue two additional very thin (0.5 or even 0.3mm thick) spacer rings with a significant smaller outside diameter between the tire flanks and the sub-assembly. This makes two nice additional grooves as seen on the pictures of the Mercedes 540 K and of the Auburn. Since I never saw an adjustable circle cutter usable for very thin sheet I built my own many years ago. I works perfectly. VIII. Painting the Finished Tires A realistic painting is crucial. First spray the complete tire flat anthracite. Trim the bristles of a wide brush (medium quality is sufficient) to max. 3mm. Drybrush the tire with a lighter anthracite mixture except the area close to the rim. Finally drybrush only the tread with a dark dirt colour. Don't overdo! Usually drybrushing makes the tire shiny, then spray a final coat of flat clear. IX. Inserting the Rim Two-piece rims make inserting and applying glue easy. For inserting one-piece rims cut off the inside rim flange, apply some glue, insert the rim and glue the rim flange back to the rim. * * * As said at the beginning: If anything is not understandable or seems incomplete , please ask!

-
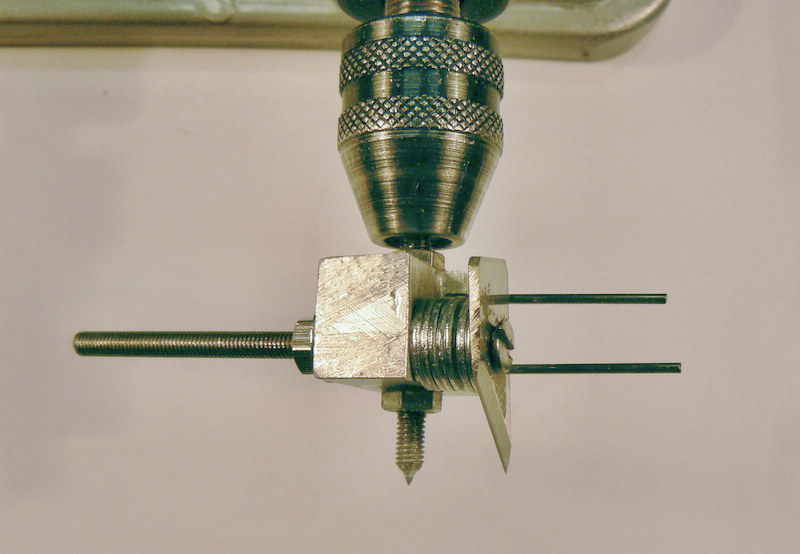
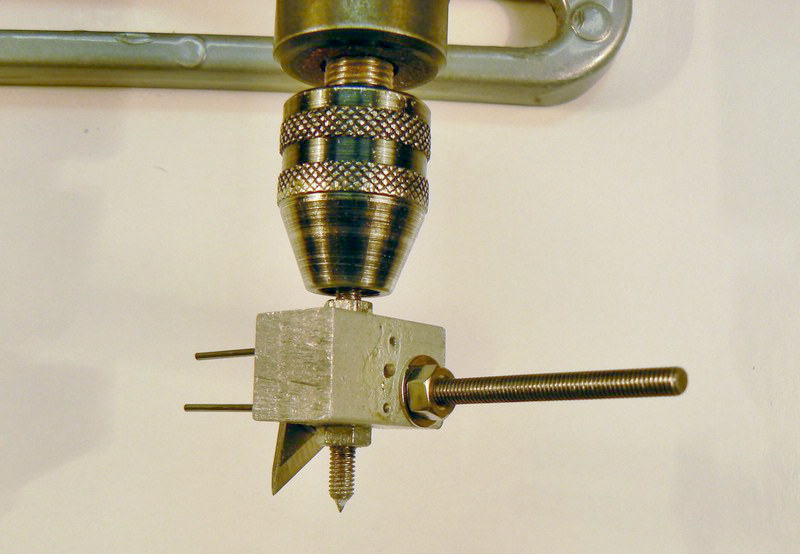
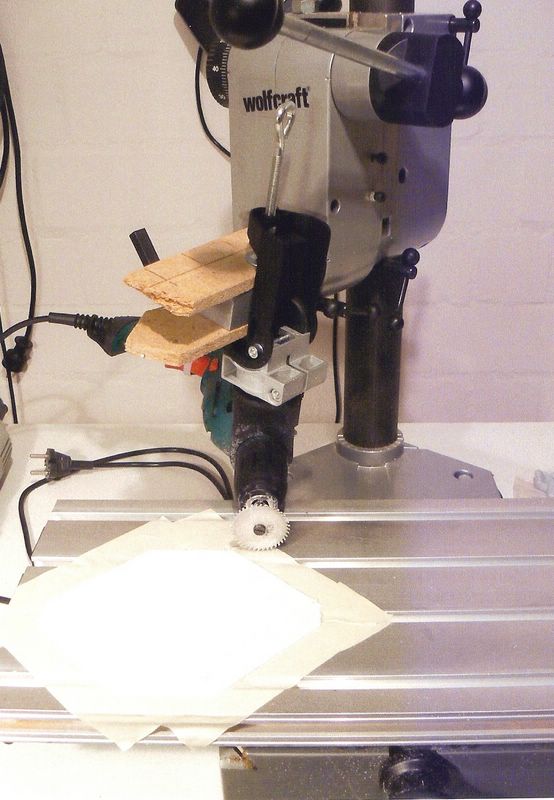
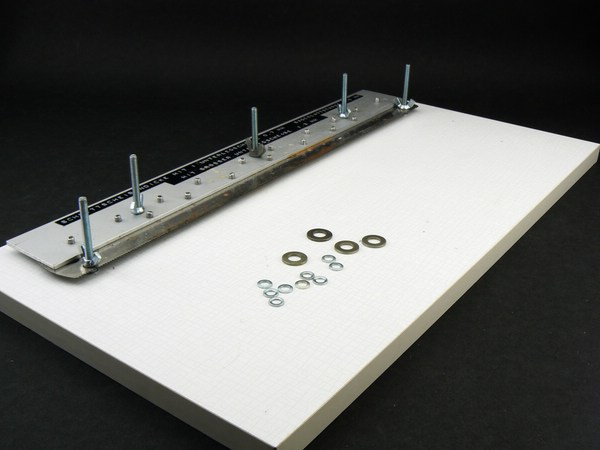
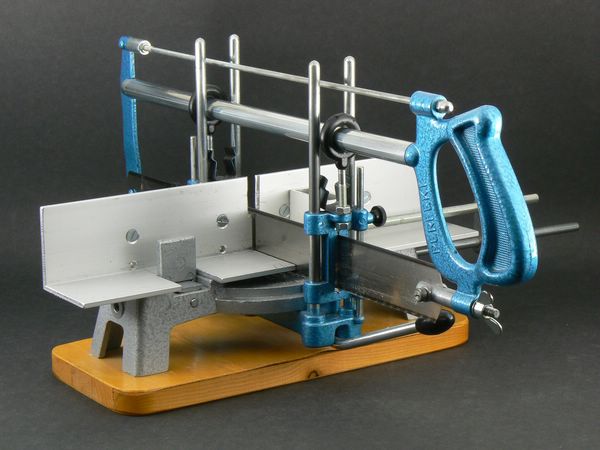
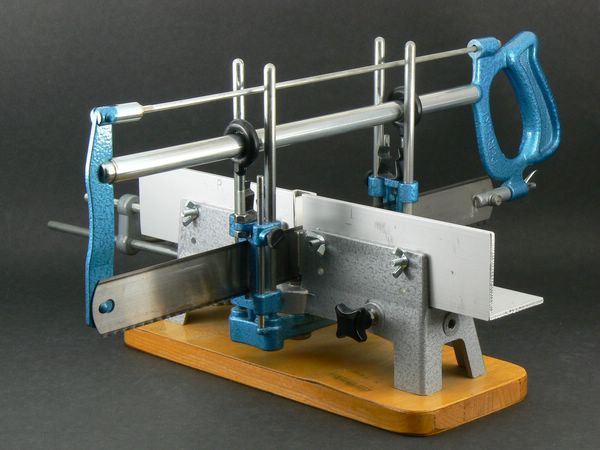
Here comes the requested tutorial. Please give me an early response if anything is not understandable. Thanks! I. The Problem Today modelers expect vinyl or rubber tires in every car or truck kit. Nevertheless there are still kits with two-piece styrene tires. These kits are mostly (re-)releases from the fifties or sixties, but even Italeri (Testors) car and truck kits from the eighties and nineties had and sometimes still have styrene tires. Most modelers hate styrene tires because for casting reasons these tires have no or only very faint treads. Moreover most of such treads gets lost after filling and sanding the gap between the two tire halves. As a consequence modelers usually try to replace styrene tires by vinyl/rubber tires from other kits. IMO there are some very good reasons, however, to use styrene tires - provided you can give them acceptable treads: Sometimes there is a chemical reaction between vinyl/rubber tires and styrene rims that softens and finally destroys the rims (a notorious Italeri problem when they included vinyl tires in some kits in the eighties). After years or decades some hollow vinyl/rubber tires prove to be too flimsy to sustain the weight of the model. The tires become flat and never regain their original shape (a former RoG problem concerning some truck kits) . Some rubber compounds cannot sustain decades of exposure to daylight. While all four tires on one of my models came from the same cluster one tire dissolved completely while the other three tires, more or less covered, were not attacked (Casadio-Revival). A few vinyl tires keep their appearance but release an oily liquid, others stain cabinet boards irreversibly . Even if you have ample stocks of vinyl/rubber replacement tires very often the size required is missing. If this is the case there is no other choice than using the kit styrene tires. When converting or scratch building sometimes really exotic tire dimensions are needed. Opposite to vinyl/rubber tires styrene tires can be modified regarding width and rim diameter. And in case you have to scratch build tires completely from styrene there remains the problem of how to make the tread. II. My Solution Actually my approach is rather obvious. Basically I cut off the unusable tread from both halves of the two-piece styrene tire. I glue a styrene spacer ring between the two remaining tire flanks to restore the original tire width. The gap between the two tire flanks and the spacer ring is filled with a styrene strip from scribed styrene sheet. This may seem quick and easy but unfortunately it isn't. Working accurately is essential and if you tend to miscalculate ... III. Necessary Tools Besides the basic tools owned by every modelers only a dial (or digital) caliper is indispensable because, as already said, precision makes or breaks the finished tire. All other tools and devices mentioned below make it much easier and much faster to achieve a convincing result, but if necessary you can do without them. IV. Preparing the Two Tire Halves All remaining tire flanks must have the same thickness all around, otherwise more than slight differences make the finished tires look wobbly and problems when inserting the rim might occur. Therefore cutting with a rotary tool without support should be avoided, but if you prefer to rely on your steady hands mark the line on which you intend to cut with a narrow strip of tape Better results are achieved with a self-made construction that could be called "lying fretsaw" You saw here by moving the tire half and not the saw. You determine the height of the cut by adding or removing those plastic sheets seen on the right side. A similar self-made construction you could call " lying saw blade" works slightly faster. Here you determine the height of the cut by shimming the saw blade up with more or less washers. A converted small drill press with rotary tool and circular saw blade is the fastest and most exact way. By turning the vertical wing screw you can adjust the level of the saw blade by fractions of a millimeter. Watch out, you have only ten fingers! V. Making the Spacer Ring This is rather laborious because the spacer ring must have an exact outside diameter (remember the drawing above) and an exact inside diameter (= the rim diameter). In most cases I use rings cut from telescoping tubes. Usually it is necessary to shim the rings up with strips of styrene. The best way for cutting absolutely vertical rings of equal width from tubes is a manual full-size miter saw (stay away from the flimsy small plastic Dobson Miter Rite). Originally meant for large pieces of material the surface of the "table" is often ribbed. Simply bolt on a piece of angle as I did. You will have to spend about 50 $, but you get a most versatile tool. I use mine almost daily. For large tires, f. e. truck tires, a full-size adjustable circle cutter can cut one-piece rings from thick styrene sheet. This one works perfectly. To be continued: VI. Making the Tread Strip VII. Assembly VIII. Painting the Finished Tires IX. Inserting the Rim
-
Thanks again! You can find most of the information in German here: http://www.wettringer-modellbauforum.de/forum/index.php?page=Thread&threadID=44033&highlight=
-
I will try to start a tutorial here probably on Friday.
-
Thanks for the latest comments! Skip, on the 1:1 grille every tenth horizontal and every tenth vertical bar is slightly wider. This generates the effect of the larger grid pattern. Each bar of my PE fret was only 0.2mm wide. All attempts of applying anything halfway evenly in order to make some bars wider failed. Finally the solution was rather simple: The etched fret had a rather flat light grey surface on one side. With a needle I scribed every tenth bar. These scribed bars reflect the light and give the impression of being wider than the non-scribed bars. Because of the almost microscopic dimensions, however, it was not easy to hit all bars exactly, so I needed more than one fret segment.
-
Thanks for the response! I think modeling vehicles of the era before WWII is most appealing. This is true particularly for European cars where technically everything was still in a state of flux, while in America there was early a certain technical standardization. IMO it is very sad to see that since say 1980 or 1990 the interest of most modelers and thus kit manufacturers in pre-WWII European cars is decreasing constantly.
-
Perfect craftmanship as always!
-
Beautiful model, perfect paintwork!