Plastheniker
-
Posts
880 -
Joined
-
Last visited
Content Type
Profiles
Forums
Events
Gallery
Everything posted by Plastheniker
-
 Hi, speaking of the Mercedes 540 K many people think that the spectacular Spezial-Roadster body was her typical bodywork. In fact quite the reverse is true. Totally 419 (29 delivered chassis included) 540 K were made. Not more than 25 were Spezial-Roadsters. Most buyers by far (190) preferred the Cabriolet B, one of several less flamboyant works bodies. To my knowledge Italeri released its Cabriolet B kit (later re-boxed by Testors) in 1981. Even by today's standards this kit offers good quality at a very reasonable price. Proportions are perfect, casting quality and fit are very good. Nevertheless a few issues require some effort: The two-part styrene tires have almost no tread. The two lateral spare wheels make this toylike appearance most salient. Giving the tires a new tread is indispensable. Another striking shortcoming of the kit are its rims. Mercedes wire wheels had very large hubs. Thereby corresponding plastic wires look particularly crude. Here even more than usual lacing realistic wires makes or breaks the model. All kits with classic Mercedes radiator masks, no matter which scale, have completely unconvincing grilles. Real Mercedes grilles were rather bright cast parts and neither painted nor chromed. Note the faint additional large grid pattern . In 1/24 kits such Mercedes grilles are always an integral, unperforated part of the chromed radiator mask. Leaving the grille chromed looks terrible, painting it dark with a brighter drybrush looks better but still unrealistic. On this model I replaced the grille by a piece from a matching generic PE fret - rather painstaking but for the very first time I found a classic Mercedes grille convincing. The 1:1 car has some exterior chrome mouldings that Italeri omitted, f. e. on the soft top, above the lateral bonnet air vents or below the side windows. The interior is correct but leaves much room for detailing, f. e. there aren't even instrument decals. Fixing these issues plus a period-correct discreet paintwork and (IMO) the beautiful top closed can make an exceptionally realistic model. I would really recommend this kit to experienced and patient modelers.
 -
Nice work & good colour choice!
-
Perfect work & great colour combination!
-
Super clean, VERY convincing wood parts!
-
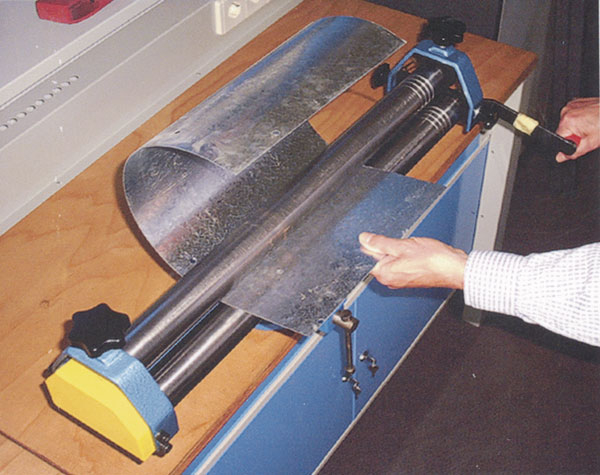
The kit exhaust parts (if any) were wrong. Making the flexible heat protection tubes was rather simple: First I bent the cores of the four flex tubes (so to speak the four exhaust manifolds) from 3(?)mm soldering wire. Then I rolled 0.5 or 0.8mm soldering wire and wrapped this flattened wire round the four manifolds. After aligning these rolled wires I secured them with liquid super glue at the ends and inside the bends. Last I polished the visible surfaces. BTW I used te same technique here http://www.modelcarsmag.com/forums/index.php?showtopic=76128 on a Mercedes SSKL and on a Mercedes 540K I am going to show next. There are two ways to roll soldering wire: You can improvise an inexpensive rolling device usable for rather thin soldering wire by fixing a small, hard wheel (hard plastic or metal, available at hardware/house improvement stores) under a piece of wood. With the weight of your body roll over the soldering wire on a hard and smooth surface and you get a thin, bright, very flexible strip of metal that can be glued easily with super glue. Rolled wires of any kind, i. e. also thicker soldering wire, brass, aluminum and copper wire, so-called silver wire, even hypodermic needles, are extremely useful for numberless purposes when detailing, converting and scratch building. I used them on virtually all models during the past 20 years. For making such rolled wires of exact thicknesses/widths the fast and easy way I made one of the best investments of my modeling life: a bending machine. Bending machines are actually meant for making equal, kink-free curves in sheet and strip stock. Usually they look similar to this one: When I bought mine I was not sure if the considerable amount of money would pay off. It really did.

-
Thanks for the recent replies! When rescaling, reshaping or scratch building such non-geometric shapes I never rely on eyeballing. Using contour gauges (= negative templates) is the key to success IMO: I glue some additional copies of my 1:25 drawing onto cardboard. When I want to rework a part, f. e. a front fender, I cut out this particular part from the cardboard. Inserting the plastic fender into this opening shows what has (still) to be done. I apply this as far as possible to all parts, sub-assemblies and even the complete bodyshell. Side views and topviews are particularly useful.
-
I love the first picture, your paintwork looks perfect!
-
Looks great, I would really like to see some more pictures.
-
Looks incredibly realistic, the colour is spot-on!
-
Perfect craftmanship by all accounts!
-
Well done, particularly the interior and the engine bay!
-
Thanks again for all replies! I am very happy that you find my result convincing. I made the tyres from styrene with separate whitewall insets which made painting easier. I modified suitable rims from my parts box and laced the spokes as shown here: http://www.modelcarsmag.com/forums/index.php?showtopic=77554
-
Perfect! I love the (drybrushed?) chassis.
-
Again nice work in this small scale! These old 1/32 matchbox kits were really attractive, unfortunately the scale was too odd for most car modelers. I remember the Citroen and the Mercedes very well.
-
Customized 1940 Ford sedan - more Trophy Series fun
Plastheniker replied to mr moto's topic in Model Cars
Beatifully done, great craftmanship! -
Super clean work!
-
I found the source of a similar drawing I used for my project: Line drawings of the Auburn 851 speedster made by Gordon Buerig in 1968 from original data in his files dated July 1934. It is larger and shows some chassis details. It is obviously the template for the mirror-inverted The-Blueprints.com drawing.
-
Nice first wheathering attempt, you are on the right track.
-
Perfect model, perfect photography!
-
I used the new Molotow chrome paint. Spraying the Molotow paint from the refill bottles gives even better results than using the pens, the larger the area to be painted the more obvious the difference: - Spray the paint directly from the refill bottle without any thinning - Use the same air pressure as always when spraying any other paint with your airbrush - Opposite to Alclad there is neither a primed nor a polished surface necessary, Molotow even fills tiny scratches (600 grit or smaller) - Spray generously until a shiny and smooth coat appears - Clean your airbrush with water, if necessary with alcohol - In order to avoid finger prints do not touch the sprayed parts for at least one week The refill bottles contain 30 ml and cost € 19.95 here in Germany (appr. $ 23.00). 30 ml is a rather large amount sufficient for many kits even if building chrome loaded vintage road cars. Try it, I am sure you will be delighted!
-
Beautiful model, the colour combo is perfect!
-
Your colour choice is spot-on, very nice paintwork!
-
Nice work, you don't see a built a BB very often.
-
V E R Y different - I like it!
-
Thanks again! I use to build almost all my models as curbsides because IMO not perfectly aligned bonnet parts or varying gaps spoil otherwise nice models. When I want to show a detailed drivetrain I display it separately or build an additional detailed chassis. Here, however, that question didn't arise at all. As shown on the WIP pictures I made the body shell separated from the chassis. A shut bonnet was essential for the stability of the whole body shell. Moreover I needed the engine bay for some massive (invisible) reinforcements. Because the kit's floor pan was no longer usable due to the new proportions of the body I was compelled to make a new chassis. As in 1:1 it is very simple (rigid axles and leaf springs front and ear) and IMO not very interesting. That is why I didn't dare to turn the model upside down and possibly damage anyting, particularly the fragile windscreen frame. I hope you are not disappointed.