10thumbs
-
Posts
2,983 -
Joined
-
Last visited
Content Type
Profiles
Forums
Events
Gallery
Everything posted by 10thumbs
-
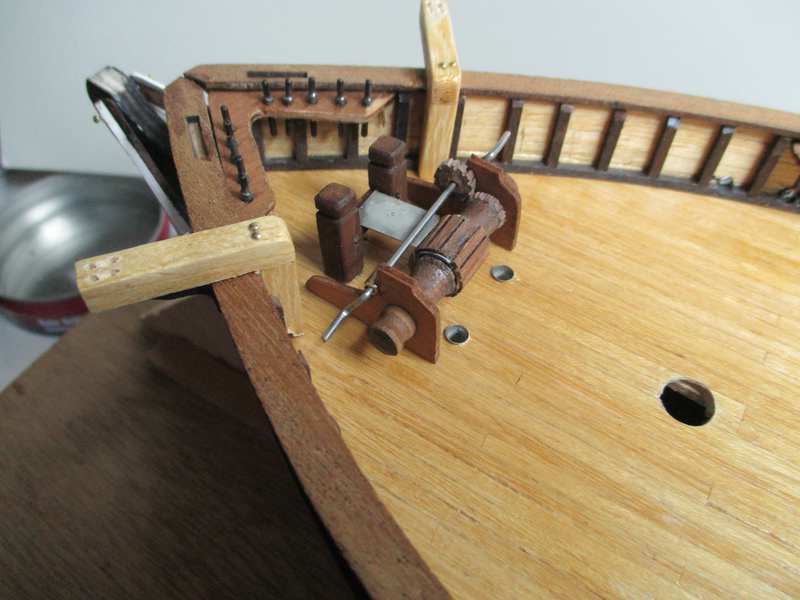
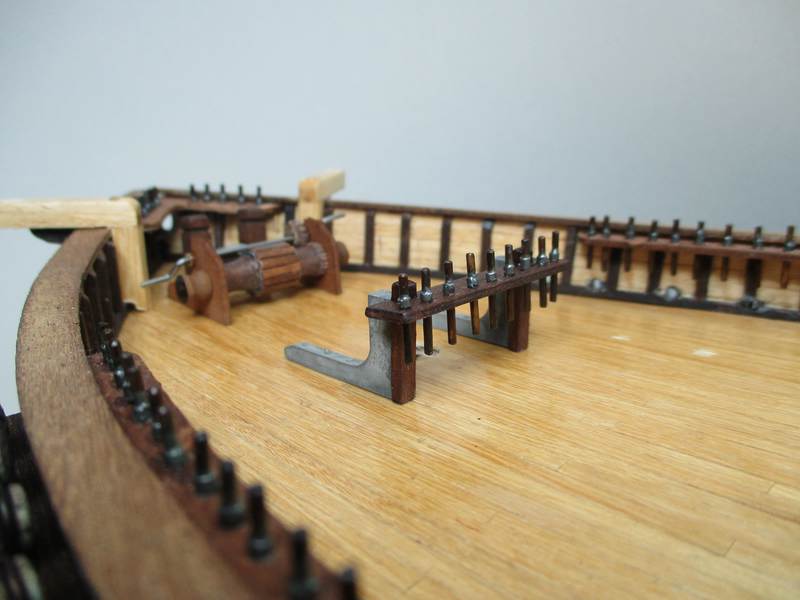
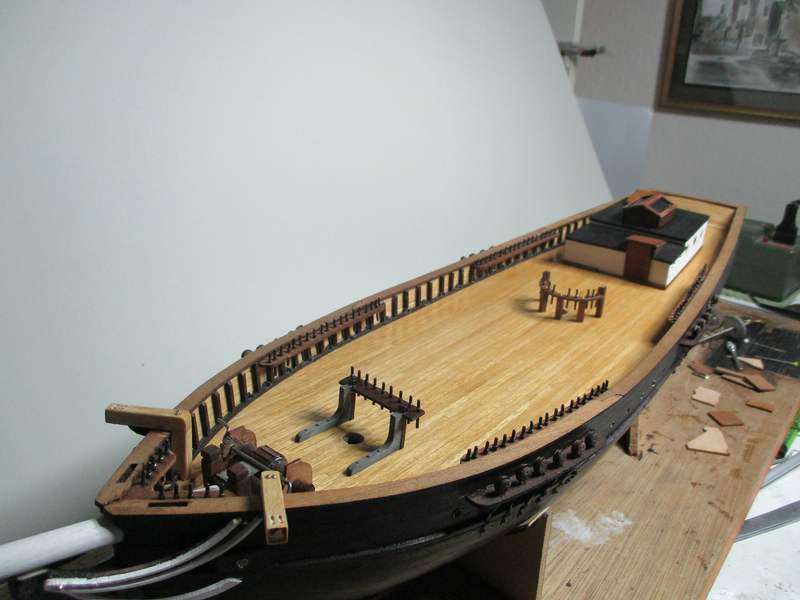
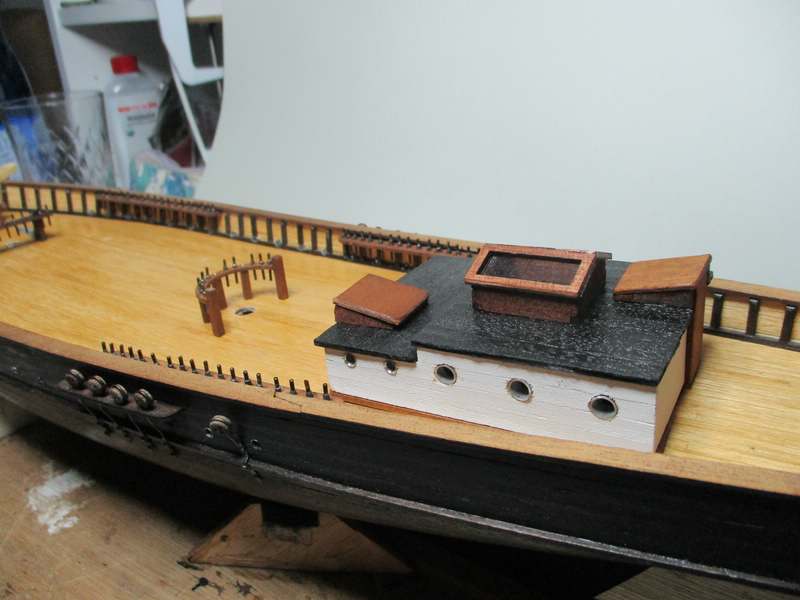
 UDPATE: Meantime, this is starting to get a working deck, lots done now. The brass has been blackened /grayed, here a scratch built winch for the anchors and heavy lines of the masts and used also for raising the big yards when the ship was in port. The yardarms were also lowered when a sailing ship was in port for a longer period. Another rack for the belaying pins. I think I have them all now, 106 for the deck alone; Here the last rack, plus the deckhouse. Deckhouse has been bashed, it doesn't look like this in the kit. The white will be yellowed somewhat, it looks too clean and the cabin gets a handrail today; The build is progressing well, I'm happy with it. Still no plans though for the masts and yards though, they were missing in the kit. I've contacted Occre in Spain, still no reply. Plans are not really needed, I have books that describe how the masts were built, just the plans are consolidated and I wouldn't have to look up every single part. There are lots of parts and individual hardware for the yards! I want the sails too work on this model. Thanks for looking.
-
Excellent! Thanks John. The new pics shows the stance that I remember and loved about these cars. Really, what's better than a post door Mopar with a nasty motor? With today's torque converter tech, and the motor from back then....well let's add spark and carb performance upgrades, let the motor be the same....what kind of performance would you think achievable? Granted, the Mopar of old can still be built, and still is built, newer heads, Max Wedge knock offs, and old cam grinds. Still, they run strong. What would a 3400 car with the same motor, but newer tech about the hit, reach? By the way, I always thought the Dodges looked better in race trim than the Plyms.
-
Speed shifting that beast...can we say that took a lot of stones? I couldn't imagine how it was to experience the clutch carnage. I had a 442 Olds powered 57 Bel Air back in 1970 that had the rear U-joint break, that was kind of frightening on the 1-2 shift. Loud too, scared me too. But a clutch....nightmare! I remember well the sensation of riding in those cars, not as nasty as yours of course, but actually a second or so difference in a 1/4 mile is really not all that discernible while riding in one, at least they're fairly similar. Just I know gaining a second takes a lot or power. Kind of surprised too you had a wasted 8 3/4 with an automatic, but I really don't know much about those B&M deals, I had a fuel altered pilot get grayer than usual hair trying to explain to me how they worked. I wanted one for a fuel altered model. JRass was a very helpful member. Another question: Did you have a dealership that helped out with parts? I imagine they were all over-the-counter in '64-'65. Maybe at least reduced prices, or a buddy that worked the counter? I had an Olds guy that was very helpful with parts. I appreciate your insight, as I can imagine for others this is kind of interesting to read about. Thanks John! Michael
-
Well I'm a Florida boy and been watching CNN here in Germany all weekend. They're trying to make a lot of drama, my opinion. There is no light hurricane, they all suck and make for a disaster. Good though, that CNN makes it clear the water is the biggest problem, not if winds are 85 or 130, which are terrible enough! My father found land that was higher up and built our home and surroundings there, we never had a problem, luckily. Just surrounding coastal areas were always hit hard, disgusting the damage and hardship. I'm kind of surprised too, they have this bitch going up through Georgia and further inland, northwards. WTF? Best wishes to those folks, and I truly hope for minimal damages. I'm a long way away, but still scared.
-
Wow. 1963, with a rag top, running solid 12's. Gotta love it. What about the '3speed'? 3 speed manual?
-
Hi Roger, maybe you've just hit a difficult area, or one that you can't decide which way to go. Been there. This current build was started in '09. I was stumped with a small detail about planking at the front of the bow....the stem. By the way, the torpedo tubes look like real aluminum. Lots of potential with that model, looks like you have the worst behind you. You'll know when the time is right, you just can't force it, won't work. That's plastic? Boats and ships are just different than other models, my opinion. But I'm prejudiced.
-
Great model John! I'm impressed, and since you really did pilot a Mopar that all of us fans love, let me ask a couple of questions, OK? First of all, the Bucron cheater slicks shown on the real car just above, were they not too wide? Did you have to cut the inner lip of the fender to make them fit? My brother-in-law bought a new 64 Sport Fury with a 426, but a 4 speed. The car would never hook, we all laughed every time he attempted a launch....lol. Bucron cheater slicks and a 4 speed...didn't work with him. Also, that's a tall front tire, and it's difficult to get that front tire/fender deal to look right on the Lindberg '64 Dodge models. The real car, did it have 15" wheels? Further....sorry, just thrilled that we have an expert to talk to, your model shows the battery missing up front. I've never found exact pics of the way Mopar ran the cables from the trunk to under the hood. I can only assume, the battery cables ran through the back panel at the rear seat and then under the door tunnel, driver side. Or where the cables actually just under the carpets? I do think the cables reached the motor under the steering gear through the firewall. Any insight? Again, the way your car sits in the real pic, is the look that killed me and many others from back in the day! Luckily, I watched lots of these cars, they sounded good too! Thanks John. Michael
-
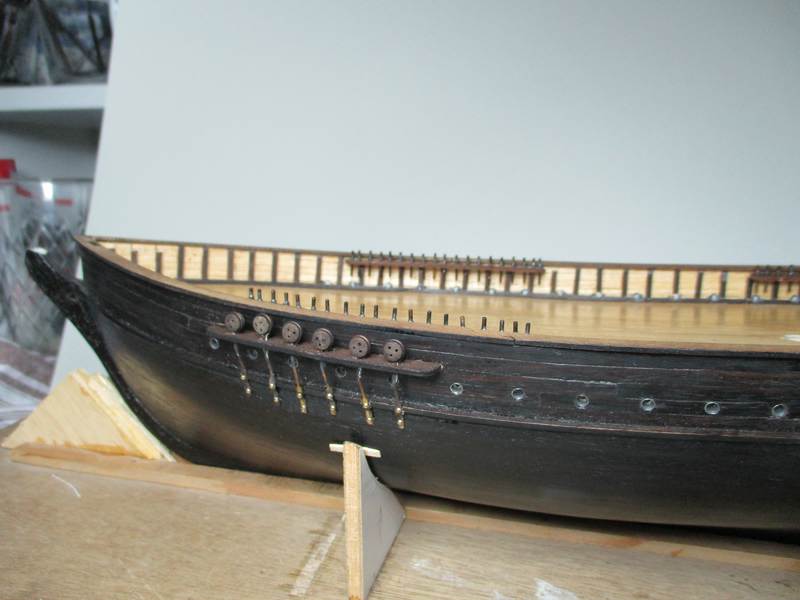
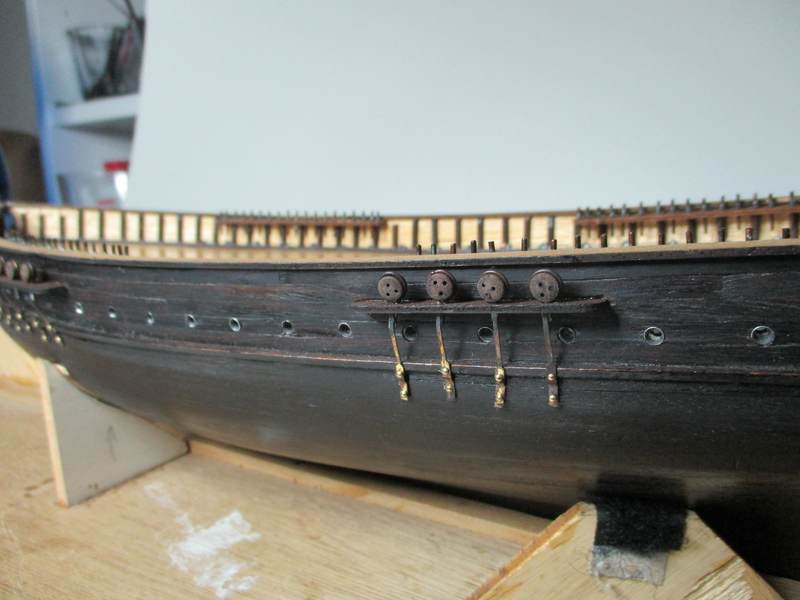
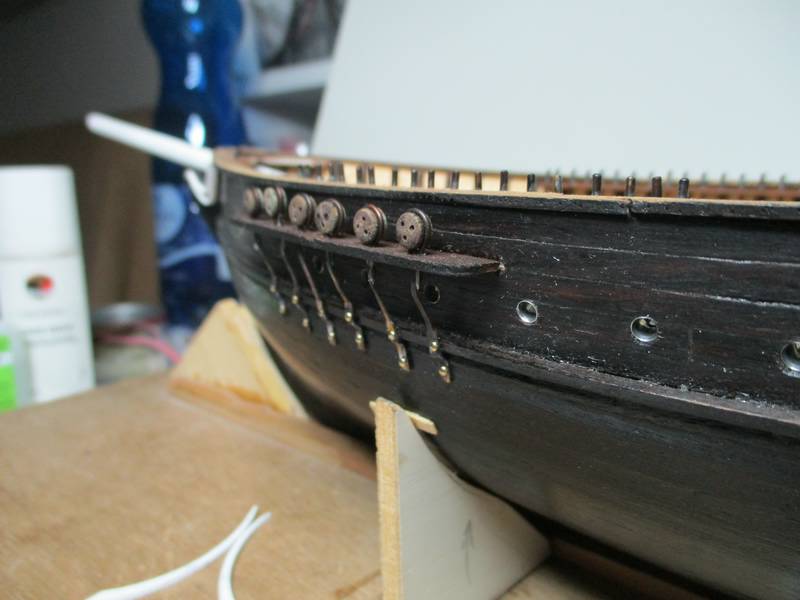
UPDATE: Further on with the rigging hardware now and a little work on the bow. The racks on the sides of the bow are holding the 'dead eyes', wooden blocks that will be a major support of the masts to maintain lateral integrity. These will be the support for the 'ratlines' ladders that let the crew climb up into the masts and yards to attend the sails. Here the beginnings of a little decoration on the bow. I kind of like black hulls of this period, with white trim. Like the 'Constitution', that has also white lower masts. I don't think I'll go this far with the white trim, as this type of ship was not a major player, just a newcomer, a fast merchant vessel, made for speed and profit. The white wood was stained with liquid white shoe polish, about 3 applications and the wood is white as snow. Dries fast too. Thanks for looking, comments and/or questions appreciated. More later on. Michael
-
Hi Roger, this is always the biggest decision with a historical sailing ship. To do or not. This time around, I'm going with sails, but the best of both worlds. All sails will be attached, they'll be functional as well. Just I'll set them up as a 'storm rigging'. Furled on the tops completely to get them out of the wind. The two lower main sails will be furled a lot, and the mids fairly full. This will allow a good view later on too of the rigging and the mast hardware, which will be considerable with this ship. Good question, thanks for your interest. Hi Bob, really happy you like it Bob. These wooden kits are a thrill, and after the initial awe, I think you'll find they are absolutely 'buildable' for entry level ship modelers. They're of a new material, and a different type of model. Good kit companies have excellent entry level models, that definitely do not look like beginners kits when finished. My 1st wooden ship is a wonderful kit and the gal sits beautifully on the shelf and does not look anything like an easy model. Do not attempt a large and complicated model your first time around. The intermediate and advanced kits, for the most part are basically still the same kits as the entry level. Just the plans are more lacking of information as they suspect you already have a master's degree! This kit is an intermediate level. I do miss the better instruction sheets of the entry level models! Thanks guys for your interest.
-
@Roger, I hear that. Wooden ship models are a trip, every single thing needs attention. Every single part of a unit needs hand's on manipulation. But you know what, I haven't ever experienced anything as gratifying in our modeling world as when the wooden ship project goes up on the shelf as a finished model. By the way, thanks for the music link, I have a new music to listen to.
-
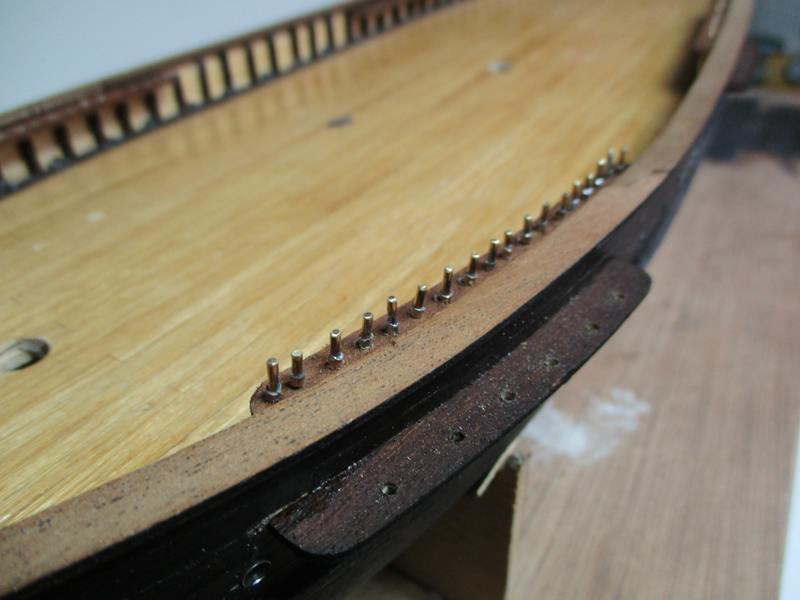
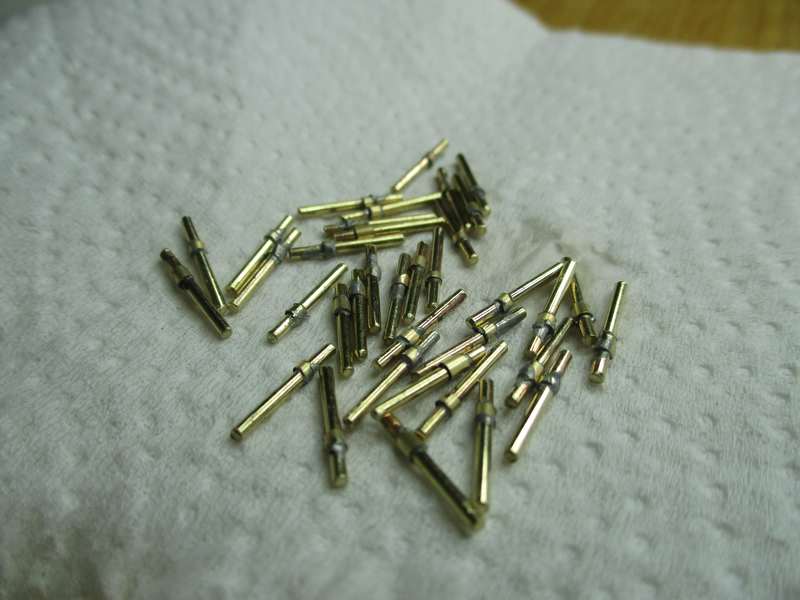
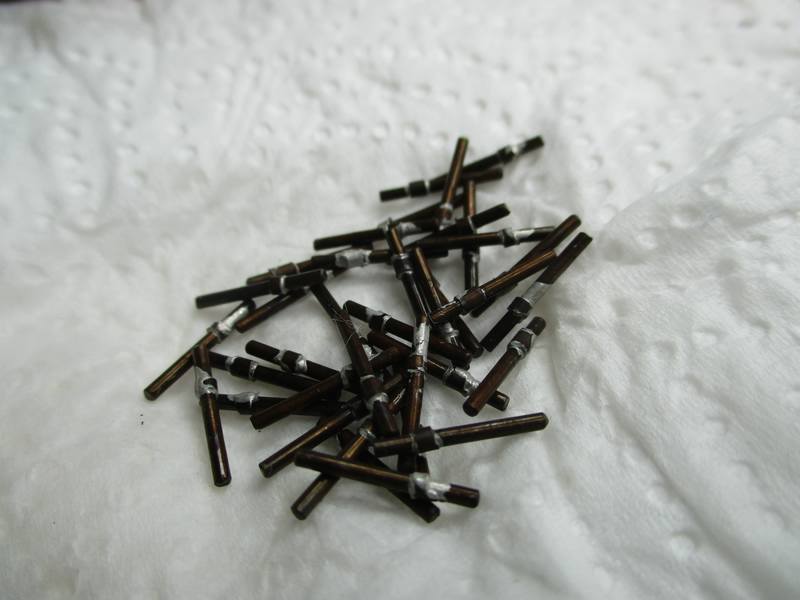
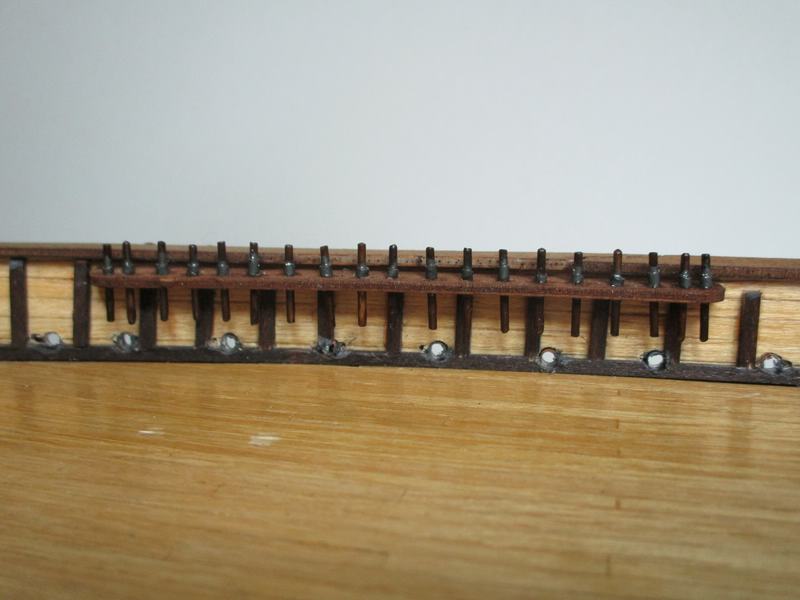
UPDATE: Hi Roger, this is the easy part and goes fairly quick. The hull needed another coat of oil and after it dried completely out it lost it's shininess, which is good. Moving on to the deck, I made a mistake with the belaying pins. The ones from the kit are brass, and too short, plus there's a seam on both sides that would have to be removed. So I ordered new ones out of wood, but they're too short too and too thick. So, I made new pins. Just the holes in the racks are too big and the new pins would fall through. I decided to solder on a small collar so the pins won't fall through the holes in the racks. Then then the pins had to be blackened some how. First off a look at the hull, with scuppers added to the bulwarks. On real ships, these outlets allow the water flooded onto the deck to drain back off. Here's a look at things; I like the wood contrast between the ebony and the blackened mahogany. The ebony will be dulled somewhat by wiping down with 0000 steel wool. Here the pins from 1mm brass rod, with a collar of 1.4mm brass tube soldered on. These pins will allowing tying off the sail rigging later on; Here a look at a couple mounted; This is the 1st batch. There at last count 106 pins to be mounted on the deck. Ugh! Here a blackening solution for brass, after about 30 minutes they became dark enough, just the solder was not affected; Done for now, I'll add some metalizer paint to the solder on the collars. Later on they'll be covered with ropes, so they should be OK; Here the pins attached to one rack on the deck, cemented on with Zap-a-Gap; This way the pins are long enough to be able to wrap thread around them, and far enough apart to not go crazy doing it. The fun of a wooden sailing ship has begun, but already some headaches on the horizon. When the rigging starts, my nerves have to be in good shape. 106 pins. Thanks for looking, more to come.
-
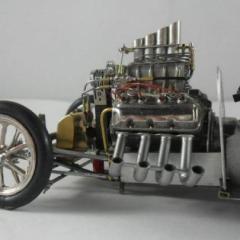
Tasca Ford Thunderbolt. Playing with our new camera
10thumbs replied to gtx6970's topic in WIP: Drag Racing Models
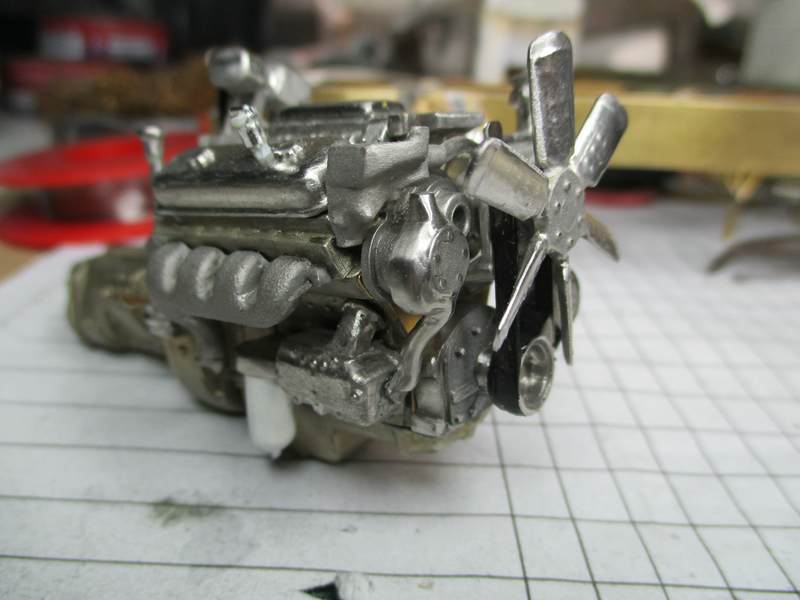
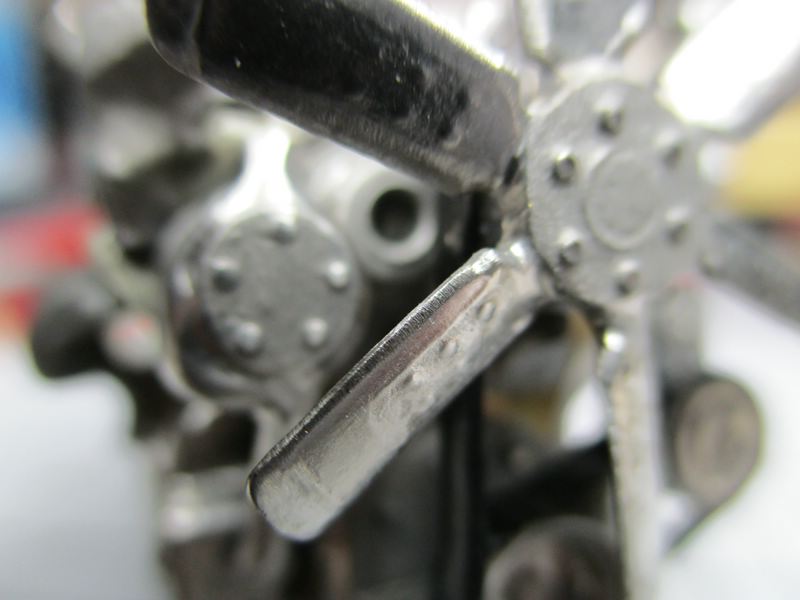
Hi John, great choice with the Canon. My opinion, the Canon does best when close range is required. Just I don't have an expensive model. These are from a digital pocket type cheapo, I like the closeups, they're OK for forum use. A 1:25 truck diesel motor; No lightbox, just using the overhead lamp directly on the bench. Good luck and have fun with your new photo endeavors. Great, really great T-Bolt! I love 'em.
-
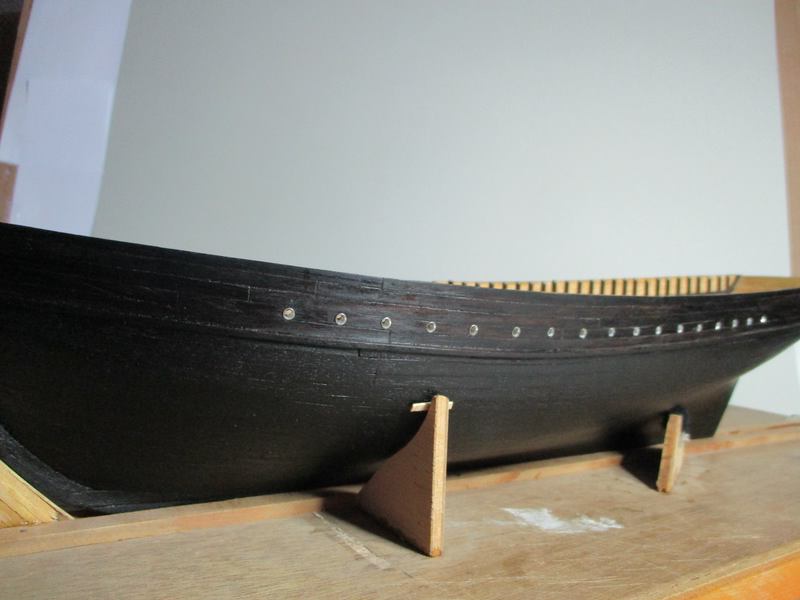
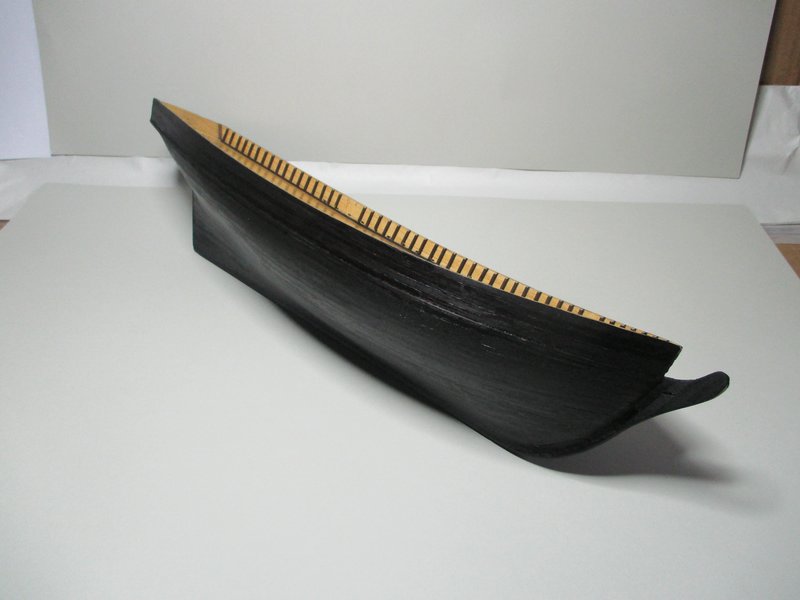
UPDATE: Now the hull is planked in black and sanded smooth, a final finish is needed. The old ships that had blackened hulls had a shiny appearing finish. Tar in the paints was the reason. These surfaces were not smooth though, the stuff was probably more like a goop that was slabbed on with a mop of some sort, and probably appeared to be knobby and very structured. The blackened hulls were not meant to be some kind of stealth look, but only intentioned to protect the wood from the salt water and elements. My problem is, after several wooden ship builds, I just can't do it. Ships with a beautiful walnut veneer planking....and slapping some thick black junk on the wood? This hurts. I've chosen a hard oil finish for this hull. It will shine and be protected (hardened). Here a few pics of the 1st oiling; The surface is not quite dry yet, somewhat tacky. Unfortunately the weather here is warm and very humid. Not good for curing, this will take a good day or two. What I like is the degree of blackness, and that the wood grain is clearly visible. More coming up.
-
UPDATE: The racks for the belaying pins have been mounted to the hull and bulwarks, and the hand rail has been attached. I'll leave the hand rail as is out of the box, I like the contrast to let the wood look like real wood. Here the progress; Lots of holes needed to be drilled, but that's fun. Next up will be attaching the pins to the banks. This is where the rigging for the sails will be tied off. The racks on the hull will be for the ratlines later on. Thanks for looking.
-
Hello Charles! Thanks for dropping in. Guys, if you don't already know, Charles is a fantastic scratch builder, his brass work is breathtaking, I learned a lot just looking at his work. Check out the Truck Forum, like this one; The Bluenose is a fantastic schooner, maybe the most famous of all. The POB (plank on bulkhead) is a great way for modeling wooden ships, from beginner to advanced, the best way to go unless you want to assemble every single piece of wood as per original plans. Nothing for me, that's for sure. Here a look at the two planks used for the hull of a ship model. The thicker strips shown is a softer wood, you can soak the strips in water to make any really tight bends that might be necessary. The black strip on top is the veneer strip, regardless of the type of wood, these are generally 5mm wide, and about 0.5 thin. Here; The thicker, 1st planks are attached by either pressing small brads through the boards into the bulkheads, or just add a drop of CA while holding the plank in place. The wood is porous and soft, so it either glues super quick with CA, or a quick drying wood glue, or nail it into place. Either way works great. Also, this 1st wood layer doesn't have to be laid with any great deal of patience or even perfection as it only acts as a solid and firm background for the final planking. Once the 1st layer is on the hull, then the fun begins. Get at with coarse sandpaper, and fill in the cracks between the planks and the dents and imperfections with a quick drying wood putty. I like stuff in a tube, it can just be squeezed out directly onto the hull. I'll even apply the junk to a big knife and smear it on, then with a wet finger smooth it out more. I like acrylic based putties for this. After maybe 10 to 20 minutes, get sanding again till the hull is smooth and without any depressions or cracks. There are always imperfections to be filled and sanded, Always! Not to worry. Here a look at the hull of this model, you can see the white filler. I did practice staining already, so this the reason for the blackness. Here; For the the final planking, lay a thin bead of wood glue along the veneer strip while holding it in your fingers, then with a finger spread it out along the whole length and width of the strip, then apply to the hull. Since the glue has a lot of moisture, it will allow the strips to be bent slightly according to the curvature of the hull. I like using an instrument or such to push the new plank right up against it's neighbor. Also, keep a slightly moist cloth handy. When the plank is pushed up and actually forcefully pressed against the adjoining strip, press the plank down onto the hull with a dull and flat instrument. Push it on, and press it down. Glue will bulge out everywhere, scrape off immediately with a sharper tool (like a dull #11 scalpel).....then rub smooth with the moist rag to rid the wood of excess wood glue. We want a wood that is free of glue rests, or else the wood will not take kindly to later staining! Very important! Every ship involves a learning curve. The kits for the most part provide an excellent platform, most of the guys get along with everything, most of the guys complain though about the quality of wood in the kits. Several aftermarket specialists offer really great wood at a fair price. Charles, also at your modeling skill level, you'll have to acquire some literature concerning rigging, deck furniture and planking techniques. I truly believe you'll become absolutely hooked with your new adventure! Good luck and I'm thrilled to have you around with this build. Michael
-
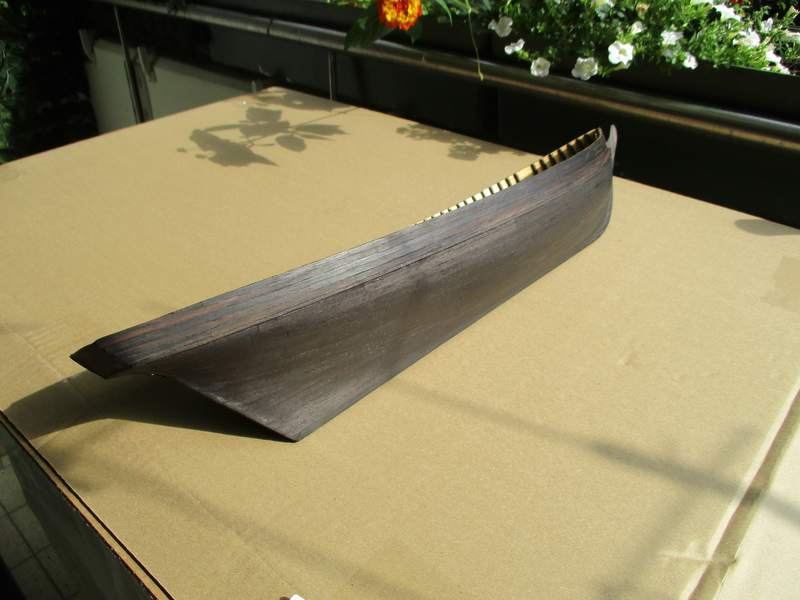
UPDATE: The 2nd and final hull planking is finished, this is black stained mahogany veneer strips, 5mm wide. The number of wood strips can be determined before you get started. You measure at the widest part of the hull, from the keel way up on the deck. This ship has a little more than 9cm, which rounded off makes 10cm = 20 strips of 5mm wide. Yep. Got it. Up on the bow though, it's smaller. Here the distance is a little over 6cm. This means 2/3 of the widest area. Now we can't make any crummy cuts, and needle ended boards. But we can cut every single plank to 2/3 size as it moves to the front, or bow. The boards were never cut to less than half of their width. Done that. It comes out exactly as measured. 20 planks at the fat hull, 20 planks at the bow. The stern line though is a little bit longer because of the hull design. 3 'cheaters' were need to compensate for the longer area, as well as the rake. This hull is kind of extreme. Love it though. These ships were the sports cars of their genre! Fast and sleek, they ran away from the opponents of the old days. These small and aggressive hull designs were the forerunners of the famous Tea Clippers, read Cutty Sark and all of the famous ships from the mid 1800's to the early 1900's. American made, American design, and truly American history here guys. Made in Baltimore. The ships were very low in the water, the masts were tilted radically back and the ships had way more sail than ever shown before on any ship type. Radical design, and my favorite. So, moving on now, here a few pics of the new black hull planking. Raw wood now, it'll be smoothed out next step. Note the ebony wood on the top railing area. Great stuff, and makes for a fine and slight contrast; Next up will be the sanding of the hull, and adding a finishing coat to protect the finish. This will make the wood darker. More later. Michael
-
@samdiego, Sam, that's a fine model, I hope you can get it back on the bench. I agree, a wooden ship is a wonderful change from styrene. As soon as I re-started this model, already the hobby room smelled different. Wood! Varnish! Hey, even the dust is a pita. But I love it, if you're halfway through, you know well what it's about. Good luck to you, love to see here someday soon a project about your ship. Hi Ray, man with your experience you could tackle one of the beauties. I understand they can be intimidating, but starting off with a single mast ship, with a scale of 1:50 is a great size to get started, this will be a little over 2', and make a great model. You'll have room to work, lots of detailing will come out, it will have great lines and be fairly easy to handle for starters. Please, do not get a 3 masted ship for your 1st one, it will whip you. I pass on these big boys, too tedious and tiring. I like the 2 masted ships, with a schooner type sail plan, the ships with yard arms get difficult. the schooners have wonderful lines and look fantastic when finished! You can handle one easily. Thanks guys for your interest. Updated pics coming soon.
-
My take on engineers is that I have absolute respect for their academic achievements. I'm a master technician in Germany. The most respected profession in this country is that of an engineer. second is the master tech/craftsman. Fact. I know several, and have had numerous opportunities to deal with them job and privately. A cool group my opinion. Humble, knowledgeable and quite open, and always ready for ideas and talk. Maybe that's the difference between here and US?
-
REAR ENGINE DUSTER F/C - Beginnings - 8/27/17
10thumbs replied to Nytrozilla's topic in WIP: Drag Racing Models
Joe, man you have a good project going on here, good stuff. I'm envious too of your buddy Jabba, I remember well my comrades being around when I was at the bench and I miss them dearly. By the way, that's a real snobby looking showroom turntable you show there, now if you get that sucker turning when the car's finished, you might reach YouTube VIP Lounge status. I'll be looking.... Greetings, Michael -
Ha, in a year or two....I hear that! Hey, I'm retired now so no more time schedules anymore. I do like the pace with this one though, it's going well. Thanks bud.
-
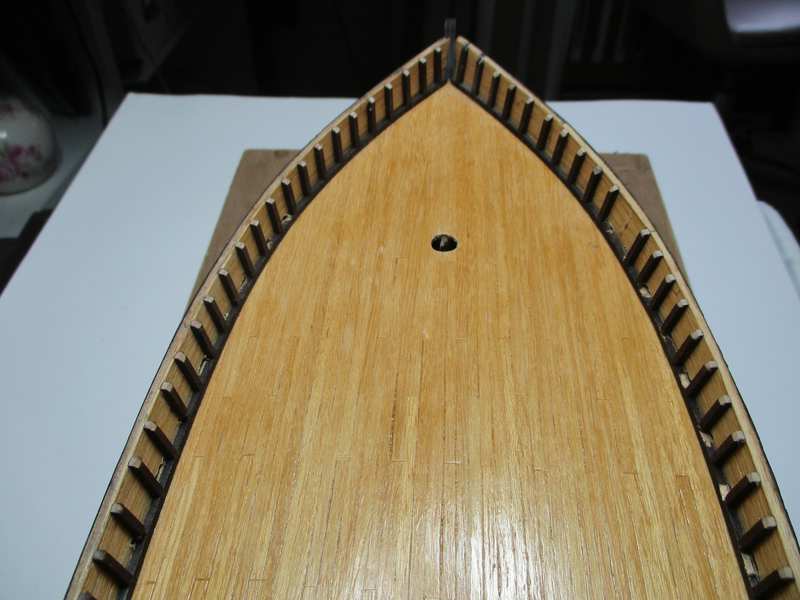
Hi Roger, the deck planks are individual strips of wood that are cut to the proper scale length, then glued individually to the construction deck, which is a single sheet of quality plywood supplied with the kit. You can see a bit the plywood deck at the hole prepared for the foremast. The wood is similar to teak, yes. Here a shot of the planking veneer strips, they're generally about 30" long in most cases. You can see the deck finish is just these strips that have been sanded smooth then a coat or two of clear varnish; Back in the day, the planks of wood used for ships were generally about 30' to 35' long, and were placed in a staggered layout so that the shortest plank would not be less than 5 feet long. So you use about 4 plank lengths for the entire ship. Lets say 30', 20', 10' and 5'. You can see the staggered layout in the pic above, the longest planks return every four layers, or runs, of the planking plan. I really appreciate your interest, ships aren't a big deal on this forum, and I'm surprised and pleased. Thanks for looking. Michael
-
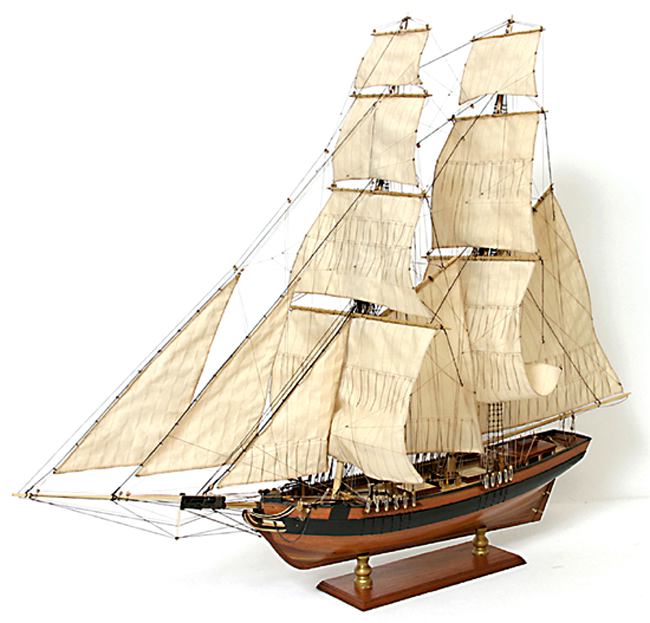
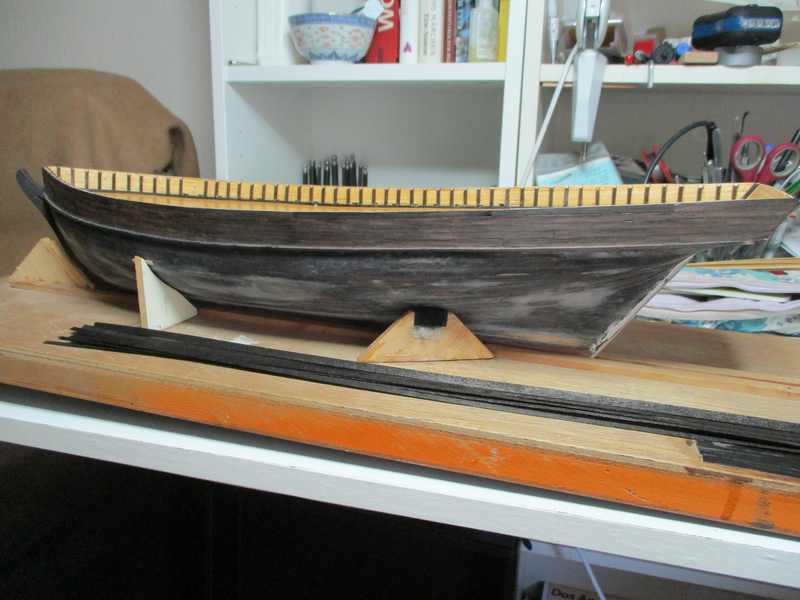
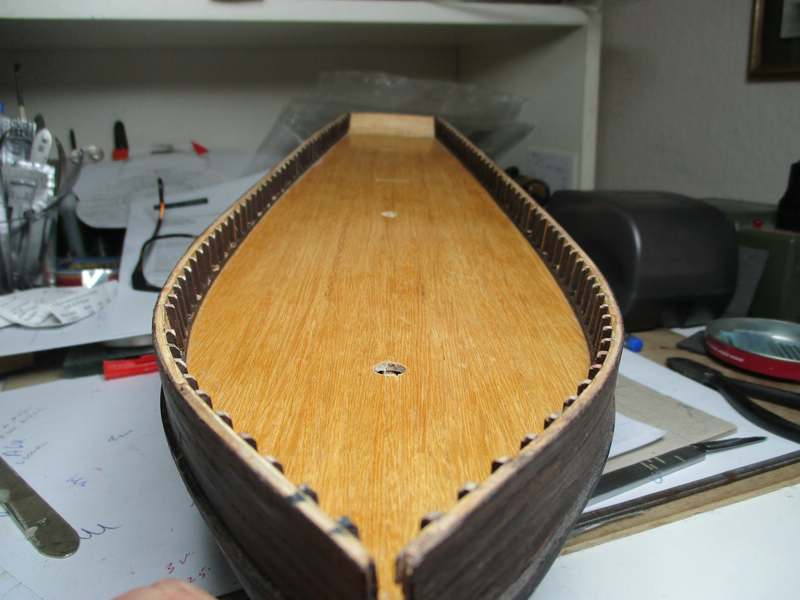
Hello guys, It's been a while, maybe a wooden ship model might be of interest to you. This is a wooden kit from Occre in 1:53 scale, she'll be 3 ft. long when finished. This is a double frame on bulkhead type of construction. The hull preliminaries have been done, I'm with the 2nd and final planking now. The bulwarks, that the ship sides above the deck, have been planked using real ebony veneer wood strips. The stuff is nasty, very hard and brittle, but it sure looks nice. I wanted something special this time around, and black hulls on old ships strike my fancy. The planks below the deck, or the rest of the hull, is being done with mahogany veneer strips that I've darkened by using black wood stain. This way the hull will be black, but the grain of the wood is highly visible. No paint to be used on this ship, I'm staining everything. 1st off a view of the model as it appears out of the box; I'd like a different look, so here's what's up so far. The bulwarks in ebony, and starting the hull. You can see the black stained strips in the foreground, all cut and ready to apply; Starting at the keel and working upwards; Here a few shots of the finished deck planking. This is a Japanese wood, I think it's called Kyta or similar. The width is a little small, but that's OK. What I wanted was the color and shade, a nice contrast to the black, and the grain is really a winner; Actually, wooden historical model ships are my 1st love in modeling, after a long time fuel altered race cars come up. Done those recently, it's time again for a big ole ship, a great task for the autumn and winter months coming up. Thanks for looking, comments or questions welcome. Michael
-
Nope. Just another "big tire" in an unfinished model. Guys, the list is long. We would all love to see a finished model from this member. Hey Ron, gonna have to do some frame and body preps for that big tire, am I right? Looking forward to your updates on this one. Ultra cool. Love the look.
-
Hello Dean, I understand what you're feeling. He'll go through it and do well. Be proud. I have a hope too, that he's able to learn in a free environment.
-
OK, I have one here. Maybe someone can relate. I love watching this, my home is located near a day clinic in a quiet zoned area, so not much street action otherwise. So I've had a lot of opportunities to watch this stuff. Parking procedures of women drivers. Women drivers will without a doubt successfully use up 3 parking spaces for their own use while parallel parking. Love it. A parking place long enough to almost allow a semi truck to pull in without backing up, and a woman driver will park the car right smack dab in the middle. She gets out and checks too if there's enough room (or whatever). Recently as I took the garbage out, I had an opportunity to watch an action like this live, first hand. She even backed up into a 3 car space! Well, I just had to ask how come she needs 3 car spaces to park her car. I get a F-U answer. Love it. She was an overly proportioned and not a model-type looking person, her clothes were not very neat either, her toenail polish had also seen better days, so I was easily able to relay my disdain. I did laugh afterwards, but still I was irked.