Straightliner59
-
Posts
5,809 -
Joined
-
Last visited
Content Type
Profiles
Forums
Events
Gallery
Everything posted by Straightliner59
-
 Thanks, Brad! This baby's gonna' get finished!
 -
Thank you, kind sir. I have a selection of plastic RR bolts, but the Tichy offerings look much cleaner. I'll be adding them to my "want list".
-
The body panels are mounted! The car's right slick is also mounted. This is a big step!

-
It's just odd, when a project "ages" on both ends!
-
Early Funny Car Reference
Straightliner59 replied to afx's topic in Model Building Questions and Answers
All the credit goes to the late Tom West. He sent them for the website, and he was generous with his knowledge. -
Thanks, JC. I think I may have bought some wire, from them. I'll have to check.
-
Javelin`s AMC
Straightliner59 replied to 69NovaYenko's topic in General Automotive Talk (Trucks and Cars)
I don't know what to say, other than, there are very few new tool announcements that would excite me as much as a '69 or '70 AMX/Javelin would! -
Or, maybe, sometimes it's just best to hold your "tongue"!
-
I have the body fitted. I have a couple of quick things to finish, that will require pulling it off, one last time, then, I can mount it, for good! I am hoping to have the rear wheels mounted, before I go to bed, tomorrow morning! Then, it's on to finishing the front wheels... Meanwhile, I found what I believe to be the earliest-ever photo of this project. It's dated 10/06/2000!
-
"Bring Out Your Dead" Completion Build--ROUND 2 Is On!
Straightliner59 replied to Snake45's topic in WIP: Model Cars
I have the body fitted. I have a couple of quick things to finish, that will require pulling it off, one last time, then, I can mount it, for good! I am hoping to have the rear wheels mounted, before I go to bed, tomorrow morning! Then, it's on to finishing the front wheels... -
Resistance Soldering On A Budget!
Straightliner59 replied to Straightliner59's topic in Tips, Tricks, and Tutorials
Well, what do you know? I guess I'd never seen an engineer's scale, before. I've seen plenty of architect's scales. Cool! -
Bill, do you recall who makes these bolts? They look like cleaner castings than those I have, which are either Detail Associates or Grandt Line. I don't recall which.
-
Resistance Soldering On A Budget!
Straightliner59 replied to Straightliner59's topic in Tips, Tricks, and Tutorials
You know how it is: You have to expend cash, to make do, before what you really needed comes on the market. What I am saying, is that we all owe you a debt of gratitude for making this happen! -
Bantam Fuel Altered - New pics 1-7
Straightliner59 replied to Codi's topic in WIP: Drag Racing Models
Hey! It looks like a fuel altered! Very cool, Tim! Not sure how stuff that's fit, all along, suddenly doesn't. It's happened several times with my dragster. It's pretty confounding! -
Resistance Soldering On A Budget!
Straightliner59 replied to Straightliner59's topic in Tips, Tricks, and Tutorials
Not anymore! Just found this on Ebay. Free shipping, even. https://www.ebay.com/itm/1-20-1-25-1-50-1-75-1-100-1-125-Plastic-Triangular-Scale-Ruler-Measurement-Hv/273851752232?hash=item3fc2d61f28:g:Ai8AAOSwOVpXUBmE -
Once you've seen Joseph's stuff, you want to order everything he has! Absolutely gorgeous work!
-
Resistance Soldering On A Budget!
Straightliner59 replied to Straightliner59's topic in Tips, Tricks, and Tutorials
That's not a bad idea, at all! -
Resistance Soldering On A Budget!
Straightliner59 replied to Straightliner59's topic in Tips, Tricks, and Tutorials
I want to acquire something to solder on, and the ceramic has been recommended before. I will look to pick one up, soon. I have been using balsa to solder on, since the mid-'80s, and, so far, have avoided fire! Obviously, that doesn't mean it's the safest practice! I run the exhaust fan to evacuate smoke/fumes. All that said, thanks for the reminder, Pete. I will move one of the ceramic boards to near the top of my "to get" list. -
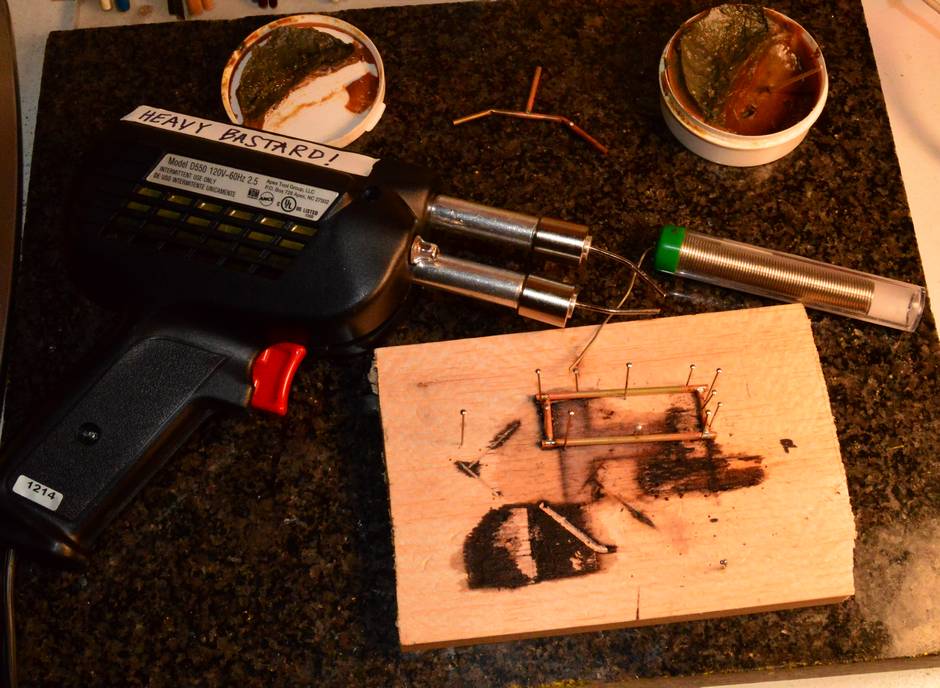
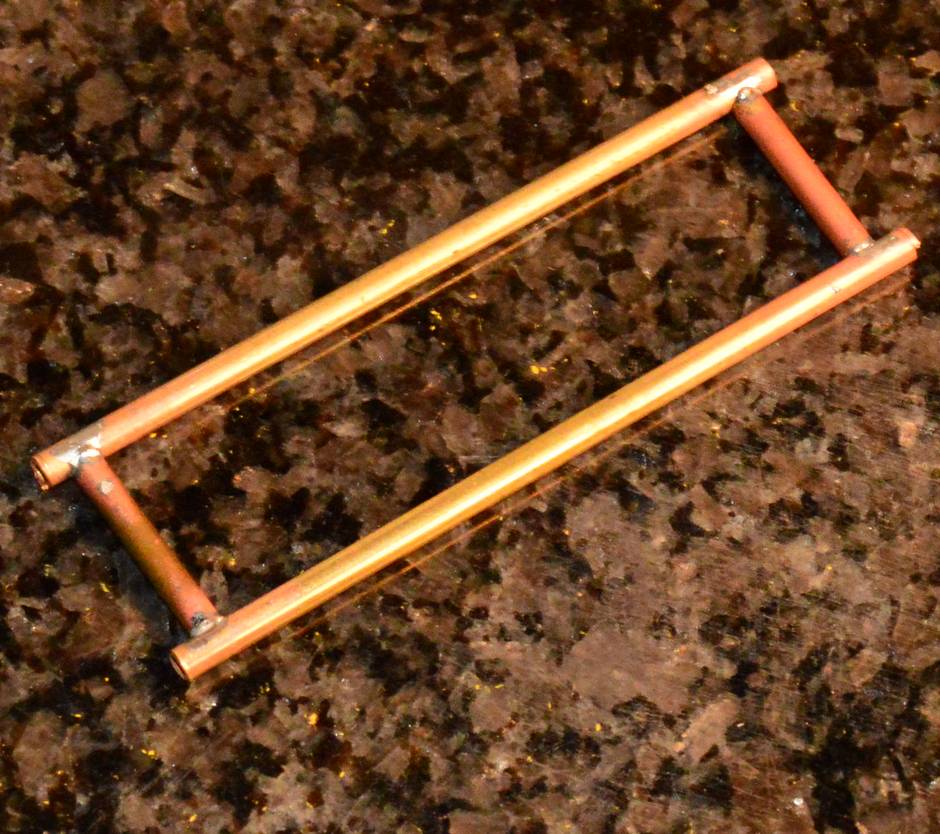
I think this qualifies as a tip, at this point. It's well worth sharing. I had inquired about resistance soldering on another thread, as I was looking to put together a system for a little less than an American Beauty setup. That mission is mostly accomplished--I'm still collecting pieces to build the probe handpiece, but, I am up and running with tweezers. I digress. In replies to that thread, someone mentioned simply using a standard soldering gun, and cutting the wire tip, to create two "leads", thus creating the resistance/heating. Until it was mentioned, I'd never considered that. Once it was, clearly, it's the same process as created by the commercial units. It also costs much less, and takes up less space. I received a 200/250W Weller gun in the mail today, that I purchased for less than $40. I quickly made the modification, and gave it a shot. It works beautifully! Heats quickly, and provides the ability to maintain contact with the parts, and kill the power, to let the joint set, before moving anything. I like that! I think a 100W unit will work fine for tubing, etc., that anyone who builds1/24-1/25 scale chassis would use. Below are the results.
-
Oh, man! That is absolutely brilliant! So well put!
-
Stuff that's come in over the last couple of days. The copper clad carbon gouging rods are for the resistance soldering probe I am going to build. The soldering gun is also for a resistance soldering experiment (That's why I cut the tip). Got the Pinto for just under $50, including shipping, which is pretty good for a Johan kit, at this point. Thanks to whomever gave us the heads-up on this set of tweezers. These are very nice, and they are inexpensive! AND they got here in two days! They come in a cloth pouch, but, I tossed that! The steel plate is a vertical mount for my mill's rotary table. I have ordered aluminum plate to make the upright support. Between that support and the soldering probe, I am excited to try my hand at fabrication.
-
Early Funny Car Reference
Straightliner59 replied to afx's topic in Model Building Questions and Answers
Okay!
-
Early Funny Car Reference
Straightliner59 replied to afx's topic in Model Building Questions and Answers
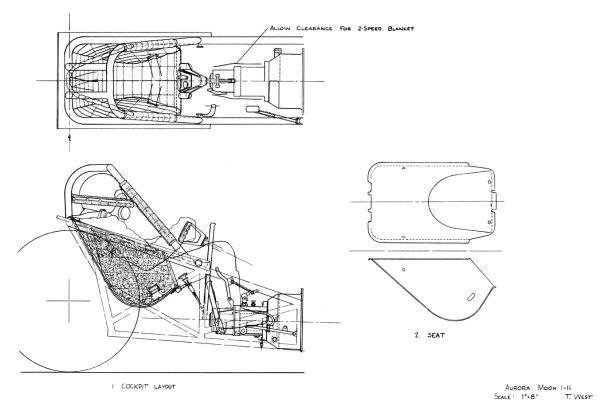
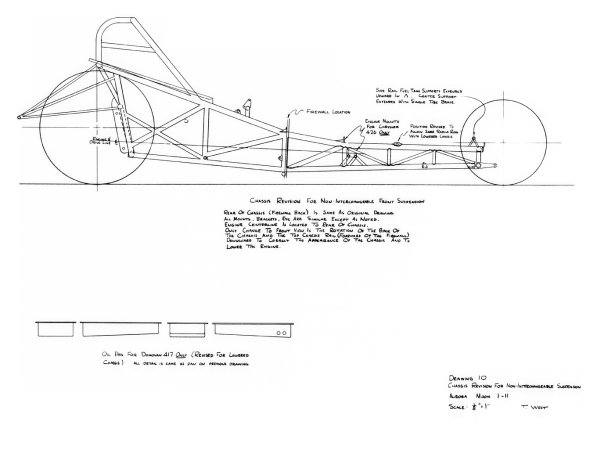
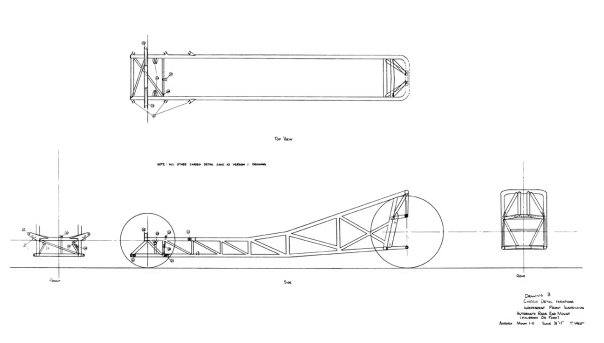
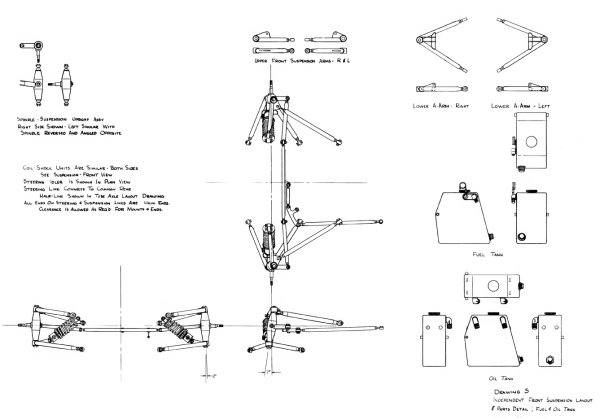
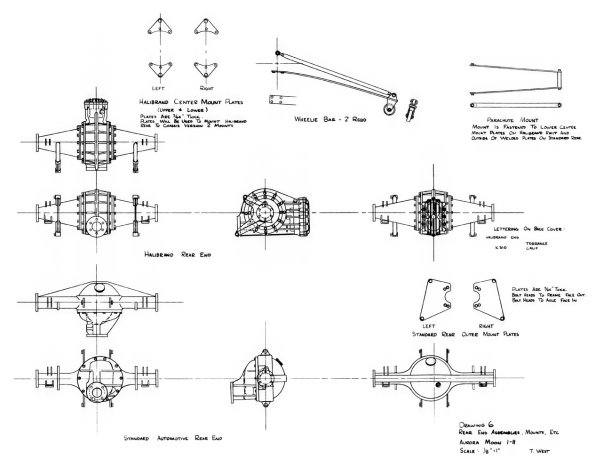
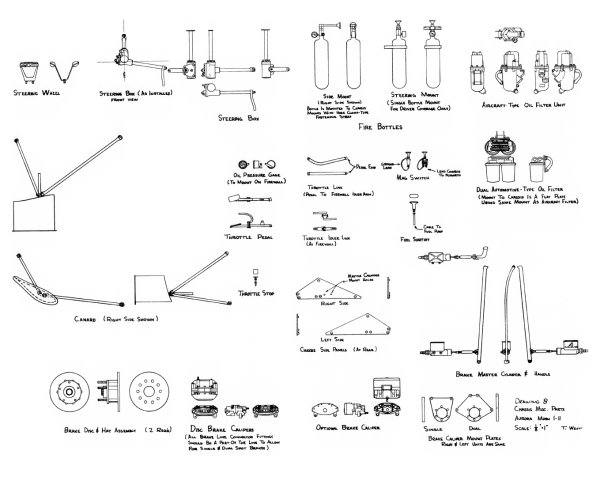
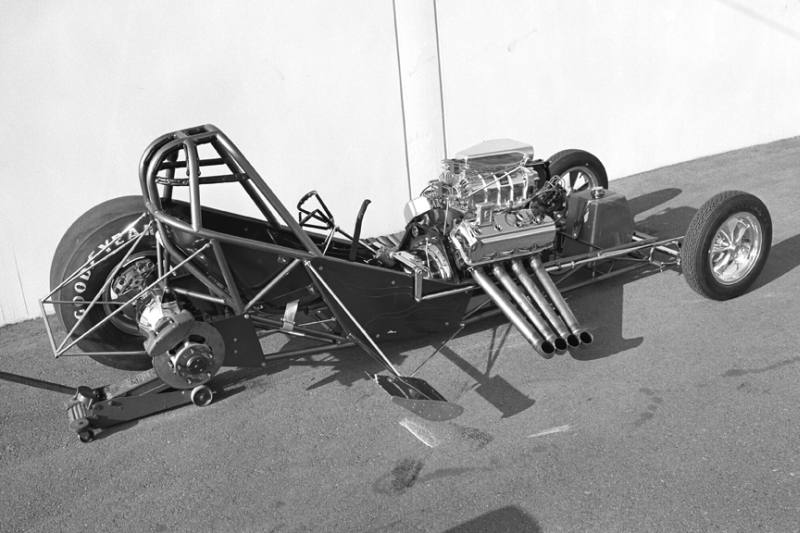
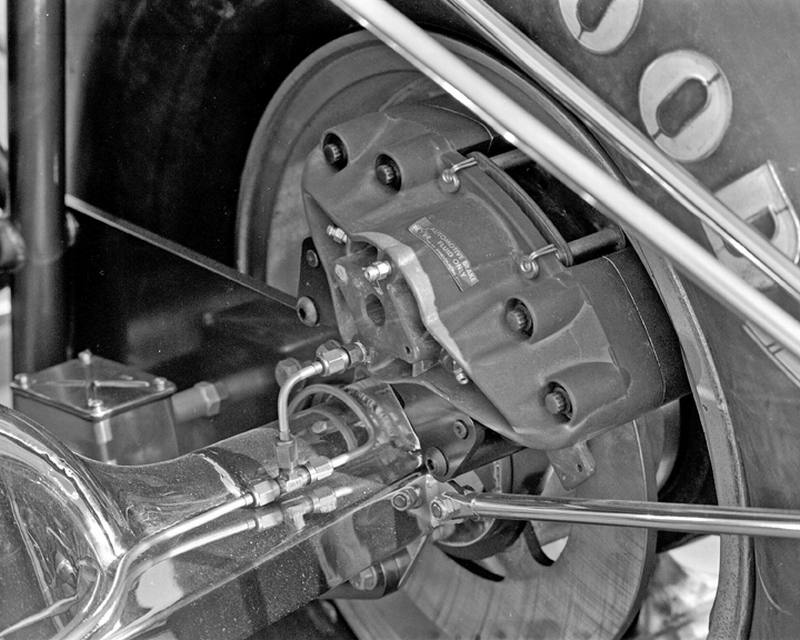
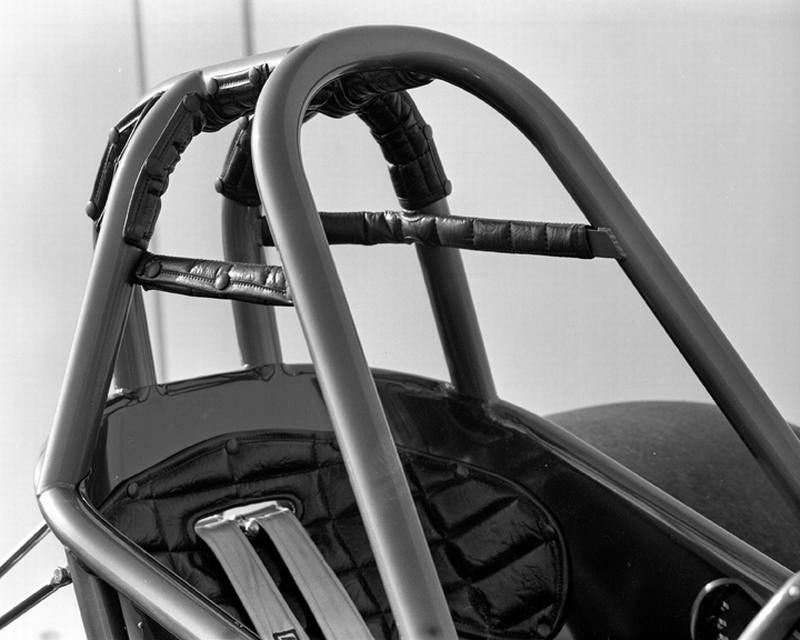
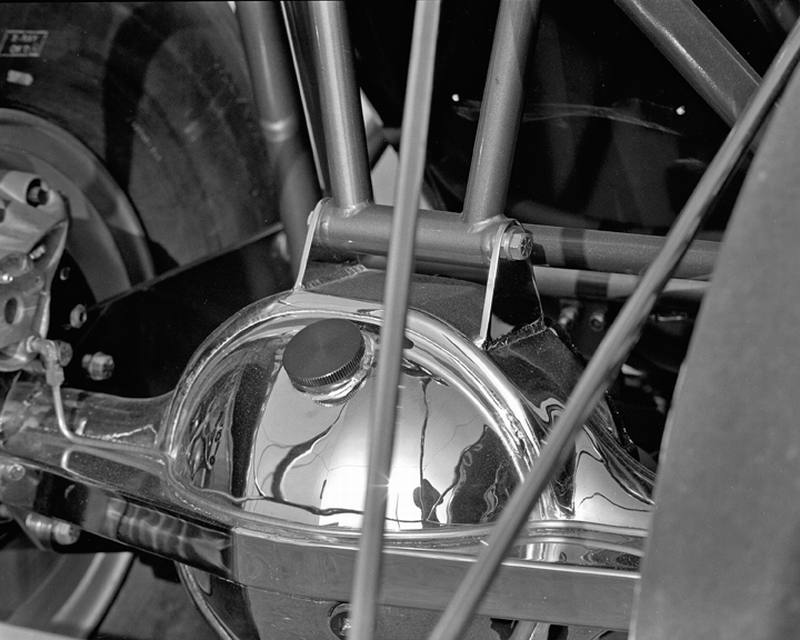
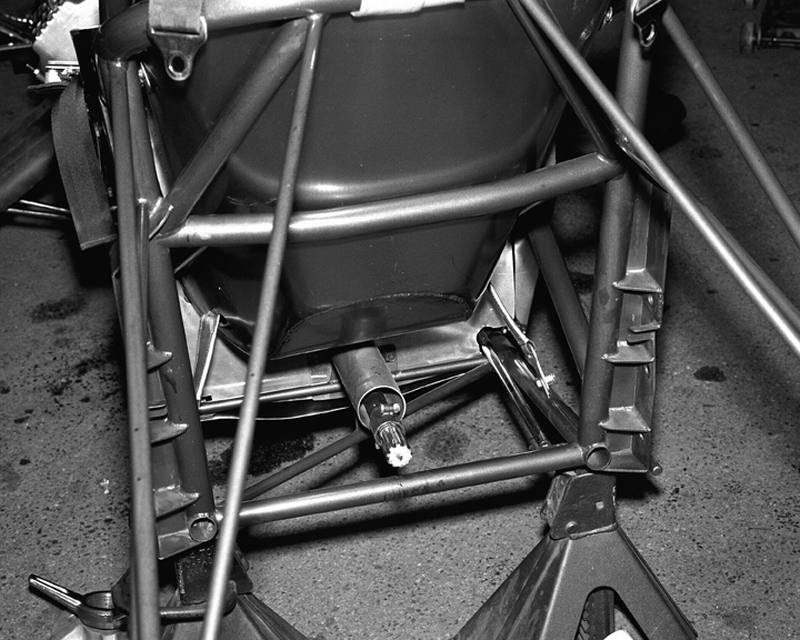
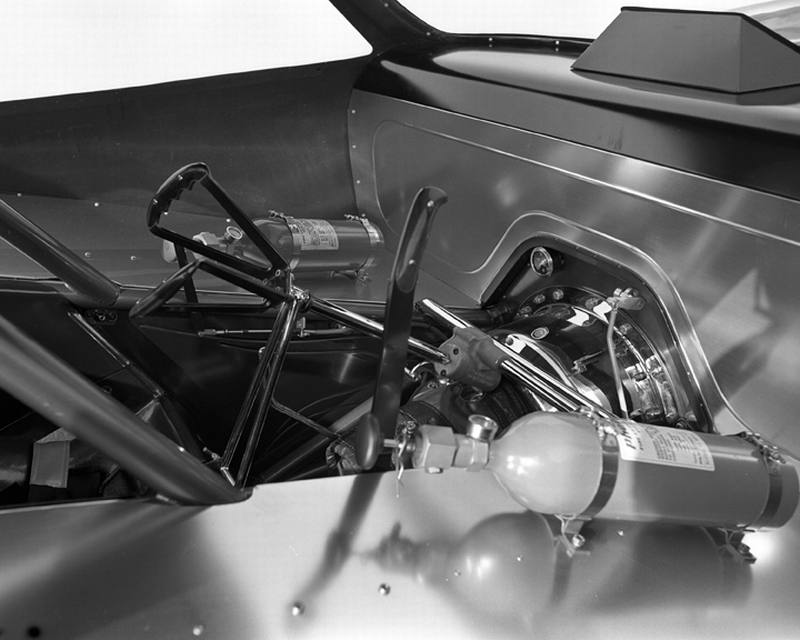
Here are some more of Tom West's photos. These are reference photos he took of the Radici and Wise Vega, for use in the development of the Aurora Racing Scenes kits. I also have some of his design drawings. He sent all this stuff to me, to accompany an article on the StraightLineModeler website, in which he told the story of those kits, from his perspective. Anyhoo...since he sent them for publication on the web, I am sure he'd be fine with me sharing them, here. Tom was a great guy, and was always willing to help out modelers, however he could. He's sorely missed.
-
Early Funny Car Reference
Straightliner59 replied to afx's topic in Model Building Questions and Answers
That is a certainty, as well! I just got one of the Johan Pinto FCs in the mail, yesterday. For a good price, for a Johan kit! -
Early Funny Car Reference
Straightliner59 replied to afx's topic in Model Building Questions and Answers
The Aurora chassis is most definitely a Woody. That, straight out of Tom West's mouth(fingers): " The second day we went down to Anaheim to Nelson Carter's place. I had done quite a few projects with Nelson, and he said he would be happy to help us out. We got there and the entire car, except for the rear end, was disassembled on the lawn. I think Keeler thought he had gone "Through the Looking Glass," as it was like driving up to a full shop scene. I guess that was part of the reaction from Jim, although I wasn't to know about it until much later. We did everything on the 426 and the Woody Gilmore Funny Car Chassis there." I am not sure about whether that Johan FC chassis is a replication of a one-off, or not. I'll keep digging around, and see what I can find.