Straightliner59
-
Posts
5,803 -
Joined
-
Last visited
Content Type
Profiles
Forums
Events
Gallery
Everything posted by Straightliner59
-

"Bring Out Your Dead" Completion Build--ROUND 2 Is On!
Straightliner59 replied to Snake45's topic in WIP: Model Cars
I'm in with the junior fueler. -
"Bring Out Your Dead" Completion Build--ROUND 2 Is On!
Straightliner59 replied to Snake45's topic in WIP: Model Cars
Quarterly would be good. I'll play! What do I have, until the end of March? :-) -
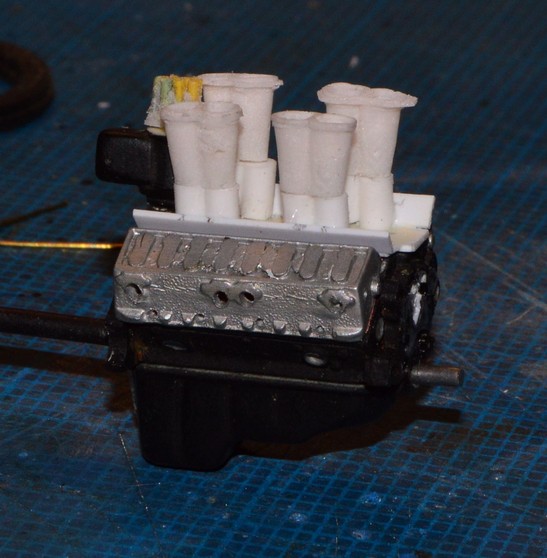
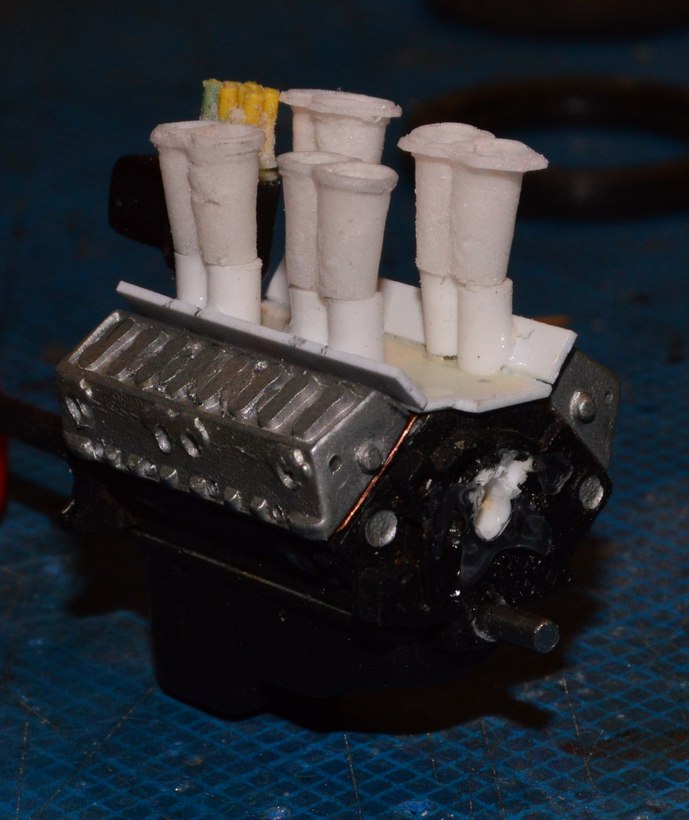
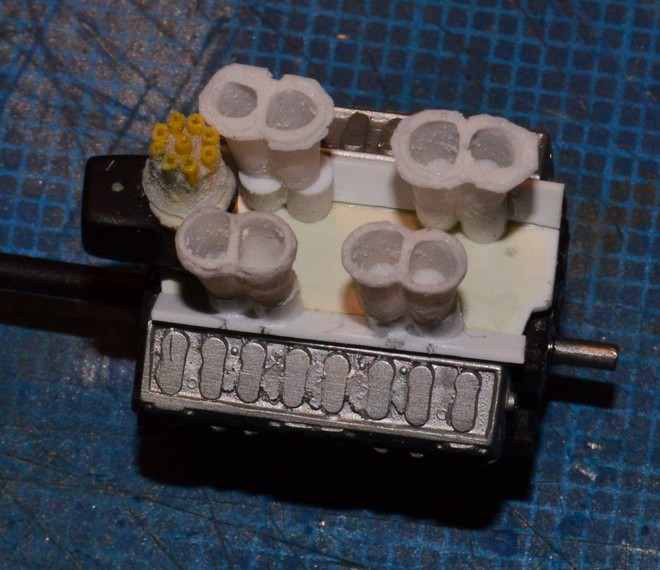
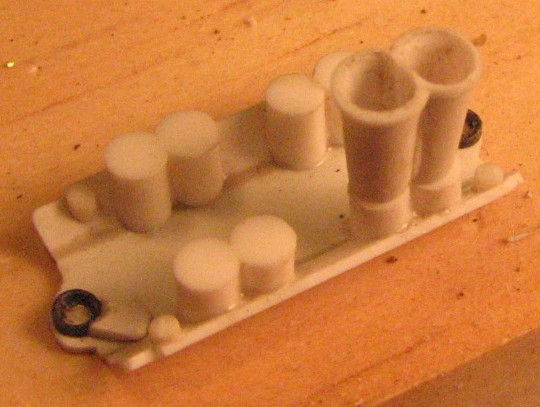
Thanks, GoatGuy! I finally have four sets of stacks that are usable, after some clean up. I'm very happy with their shape. I've also begun working on the manifold, since I cannot find the first one I made, for the life of me! Long way to go, on that piece. I also made a cap for the magneto. As always comments and questions are welcome. I also made a cap for the magneto.

-
Looks beauty, Bernard! Good luck with your entries!
-
Cool, Bernard! I like this scheme, better. It looks more period.
-
Excellent, Bernard! So happy you were able to save it. Now, go get 'em!
-
The Oddest Thing...
Straightliner59 replied to Straightliner59's topic in Model Building Questions and Answers
That would be my guess, too. I was being a smart arse! -
The Oddest Thing...
Straightliner59 replied to Straightliner59's topic in Model Building Questions and Answers
Wait, what?! Gold doesn't tarnish! :-D By the way, I grew up not too far south of Calgary, just south of the border, in Browning, MT. -
Yep, Snake, I just need to take a little off the bottom! I'll bet you're right about that Chevy digger, in the background! Pretty funny! Actually, Bernard, the one you can see in the foreground in a couple of those pics are from Speed City, and you are correct, they lacked the detail (that thin lip) I am looking for. You are also correct in that that thin lip is the major pain, here! At least I'm closer, now! Thanks so much, Tim! And thanks for stopping by! I'm a huge fan of your fuel altered, as well. I'd be interested in any ideas you may have, regarding making those things, because I haven't dubbed them complete, just yet!
-
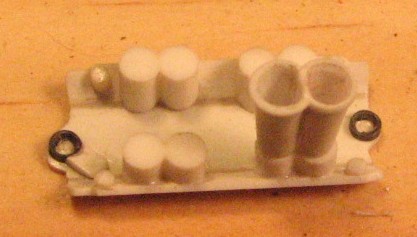
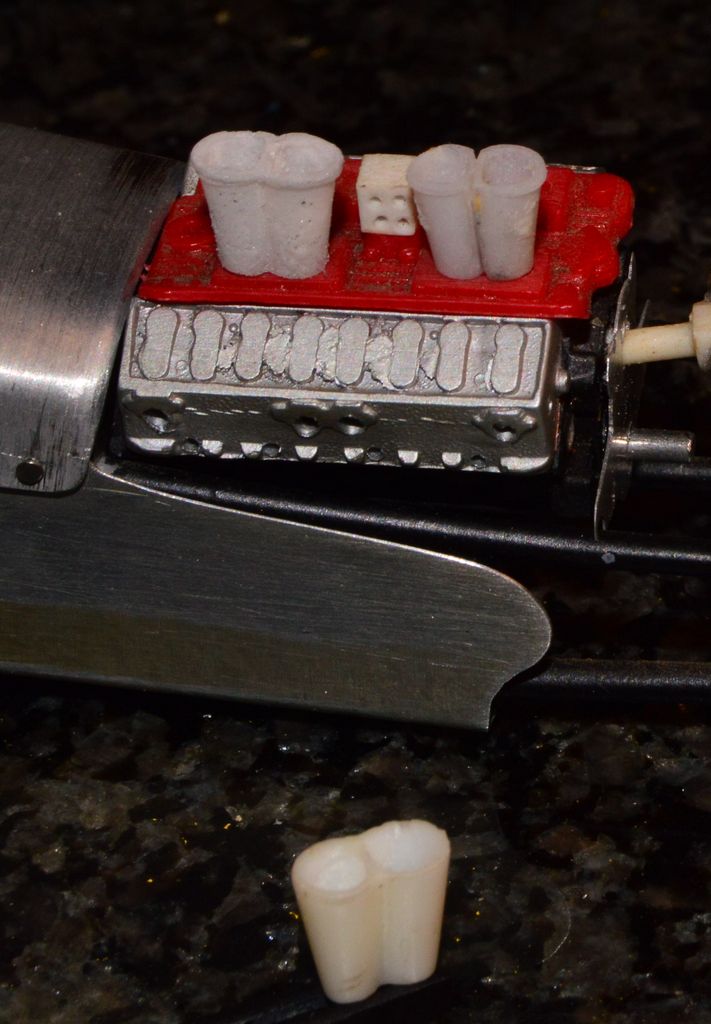
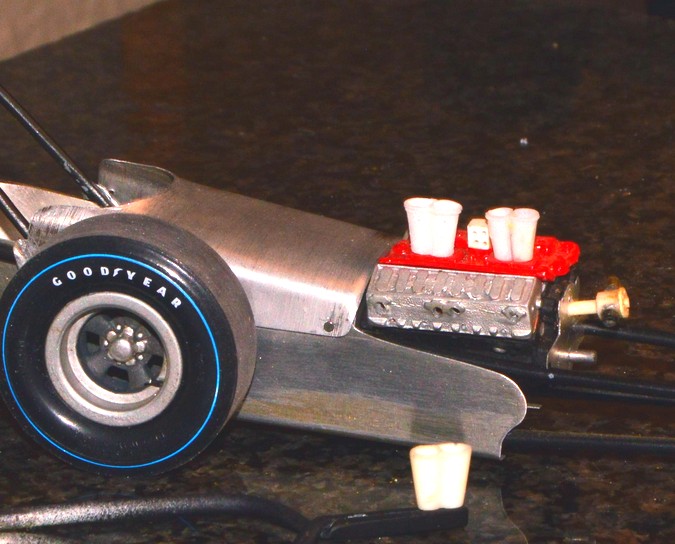
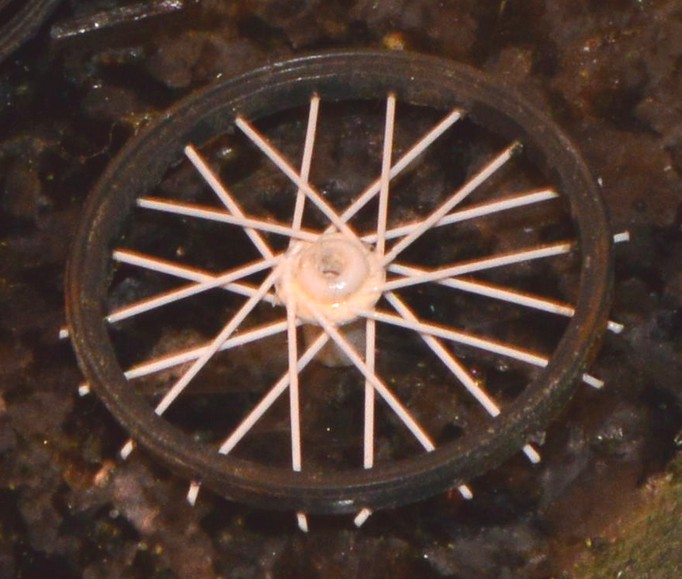
I am falling in love with this project, all over, again. Here's the thing that stalled it, so many years ago: fuel injection. My inspiration for this model originally came from an article in HRM's Yearbook No. 8 (I think) entitled "Junior Isn't A Bad Word". The article features three or four different cars, and a few action shots of some of the real "hitters". It seems that the majority of the small block Chevy cars ran these rather squat Enderle stacks. Enderle also made sets that were taller, yet still tapered. Hilborn's stacks were simply straight tubes, siamesed. The stacks I wanted to use had never been kitted until the Slingster--and those aren't any good (I'd begun my quest several years before then, anyway.). In the opening post to this thread, you can see that I had thrown some stacks together, that were some bastardized version of the taller Enderles and the Hilborns. Below, are photos of Enderle's short stacks (pancakes, anyone?), and where mine stand, as of now.Casting them has been hit-and-miss, but, I should have four usable sets, before too long. I'm using acrylic nail powder and liquid to cast them, as it's excellent for casting small parts. The "hit-and-miss" is due to my questionable mold-making skills, although in my defense, this is my first try at two-piece molds. The manifold in the photos of the model isn't the one I'll be using. I'll use the one in the other two photos, provided I can find it! I've seen it in the past few months, so, I know it's not gone, altogether. I also tacked on another shot of the first wire wheel I made for it, using the refined technique. The new method of construction not only looks better, it creates a much sturdier wheel.
-
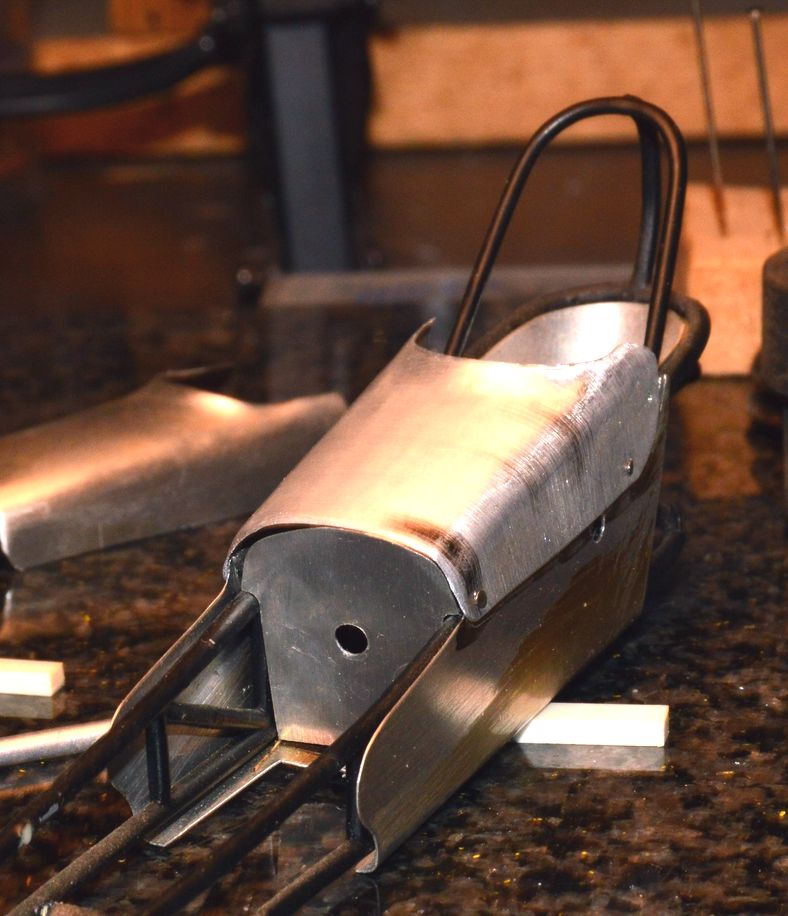
Yessir, Roger. I annealed this. In the attached photo, you can see the discoloration left behind, from the burnt coating on the flashing. After that time, I've sanded it off, first! Thank you for your kind words. I'm glad you like it! Thank you, as well, Ed. Your comments are much appreciated! Here's the body I'm attempting to replicate. I will probably just scribe the lines for the axle panels, since I've no need for removable anything, beyond the cowl.
-
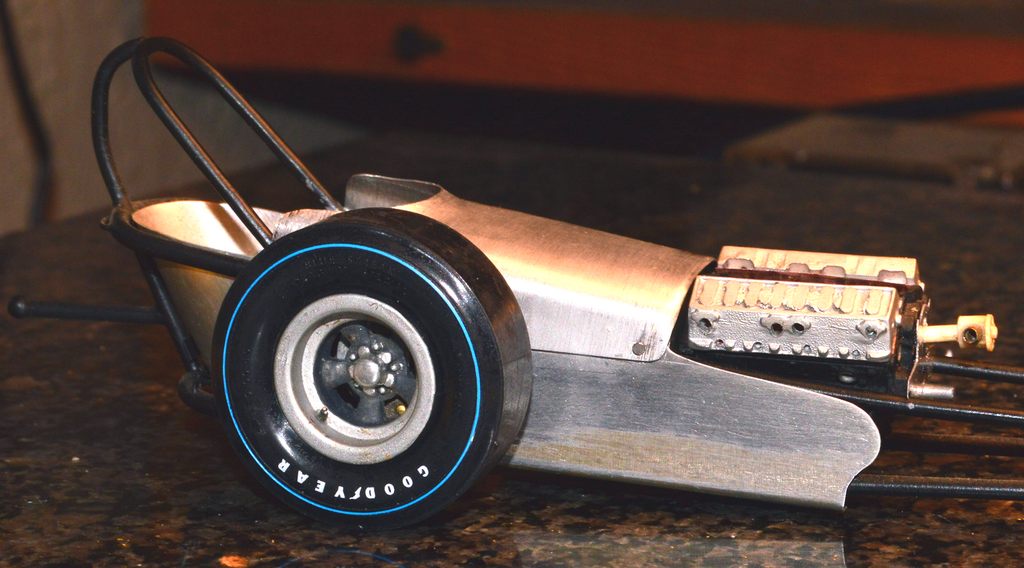
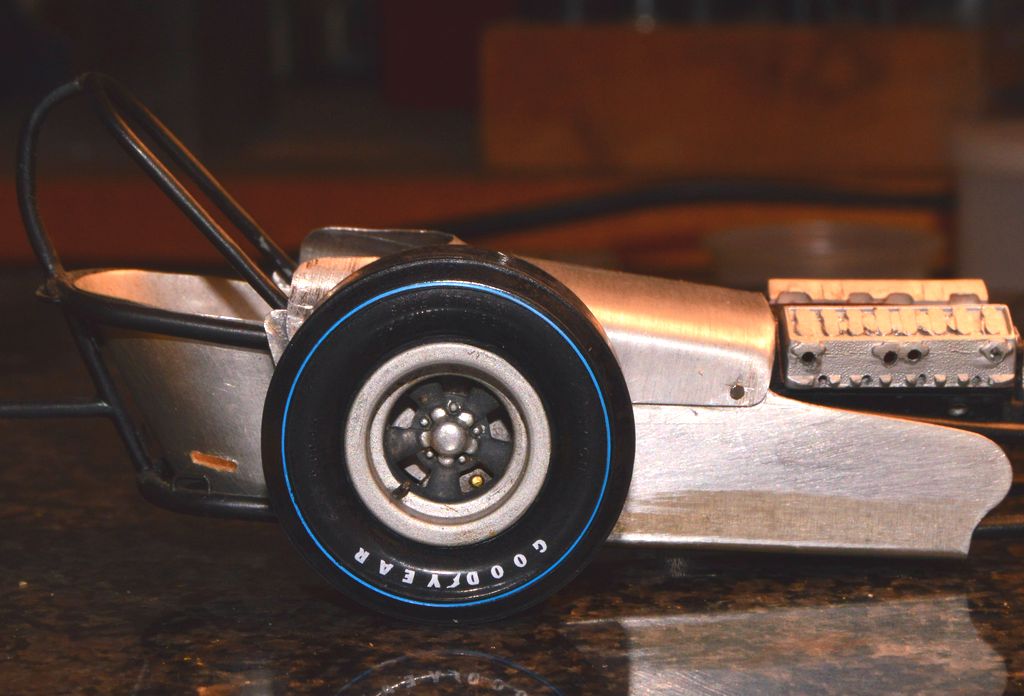
At the time I started building this car, the AMT Blue Streak slicks didn't exist. Since I put it on the bench again, it hadn't dawned on me, until tonight, that I had the tires in my stash. It may result in having to do a complete new pair of wheels, but it'll be worth it. Anyway, once these babies have the treads sanded and they're flat-coated, they are going to be beautiful. I can't begin to say how fond I am of those AMT tire sets. They're just fantastic! I am going to install a pair of tabs for the front motor plate, and cut the plate, so that I can get a little of that "Tampa Dump" on the engine. It's been so long since I built an engine, that, I hope I can remember how!
-
The Oddest Thing...
Straightliner59 replied to Straightliner59's topic in Model Building Questions and Answers
That P-47 looks great! You can never have too many ways to simulate/replicate metal finishes. I bookmarked that. It's going into my bag of tricks! Same goes for the grey-black spectrum--the more options you can create texturally, and tonally, the better. Thanks for the link. -
Hmmm...
-
Which one was that? The Sacketts or The Shadow Riders?
-
The Oddest Thing...
Straightliner59 replied to Straightliner59's topic in Model Building Questions and Answers
-
"There are two kinds of people in this world. Those with loaded guns, and those who dig...You dig."
-
The Oddest Thing...
Straightliner59 replied to Straightliner59's topic in Model Building Questions and Answers
You might be onto something! -
The Oddest Thing...
Straightliner59 replied to Straightliner59's topic in Model Building Questions and Answers
I'm pretty sure I sprayed it with Testors semi-gloss clear. That metalizer is way too frail to be handled, without some sealer coat. I knew the red was iron oxide, I just wasn't sure what the yellow was. Oh, well, it's taken a purple bath, and rinsed off, now! -
I had Tamiya clear do that on a Bug I did, back in the '80s. Chevelle looks good!
-
The Oddest Thing...
Straightliner59 replied to Straightliner59's topic in Model Building Questions and Answers
Hahaha! It does! -
Looking at the engine for my junior fueler, I noticed this on the front cover...it's corrosion/rust! I didn't put it there (obviously, the cover would be aluminum, so, why would I? ). I sprayed the part with Testors metalizer, many years ago. I'm not sure what the yellow is, but, the reddish-brown is rust. Therefore, I have concluded that some of the pigment was iron. Anybody ever seen this, before?
-
I am kind of thinking what Ray said. If you could sand/polish it, just through the decals, it would be an awesome effect. Change the name to "Cacklin' Rose", and you're off to the races, so to speak. It would be a dadgum shame to have to start over, given what a beauty she is!
-
Thanks, Gordon. I got the near side of the body drilled and pinned. Made one of the front wheels and leaned it against the spindle. It looks pretty cool!
-
Here are some shots of the new cowl, more in place. As soon as I've drilled and pinned the other side (as you can see, it's askew, here), it snugs down against the firewall. Danged if it doesn't look almost like a real dragster body! Also included is the beginning of one of the front wheels (I've never cared for the flat faces of photoetched spokes), and a comparison shot of the old and new cowls (old on top). The difference is subtle, but, the new one looks better, to me. Thank you, Stu, Phil and Steve, I appreciate the kind words. I'm on it, Snake!