Straightliner59
-
Posts
5,808 -
Joined
-
Last visited
Content Type
Profiles
Forums
Events
Gallery
Everything posted by Straightliner59
-

1975 Monza--Completed 12/25/2018
Straightliner59 replied to Straightliner59's topic in WIP: Model Cars
Thanks, Steve! For me, it's getting better, because it is almost finished! ;-) -
1975 Monza--Completed 12/25/2018
Straightliner59 replied to Straightliner59's topic in WIP: Model Cars
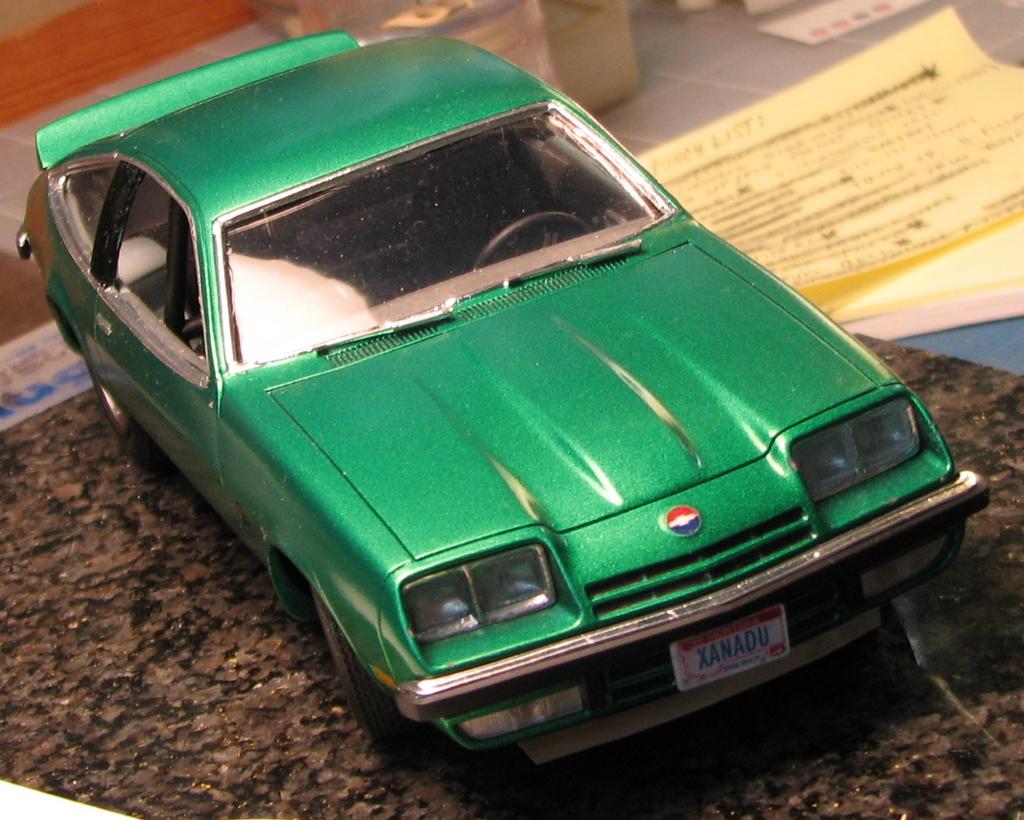
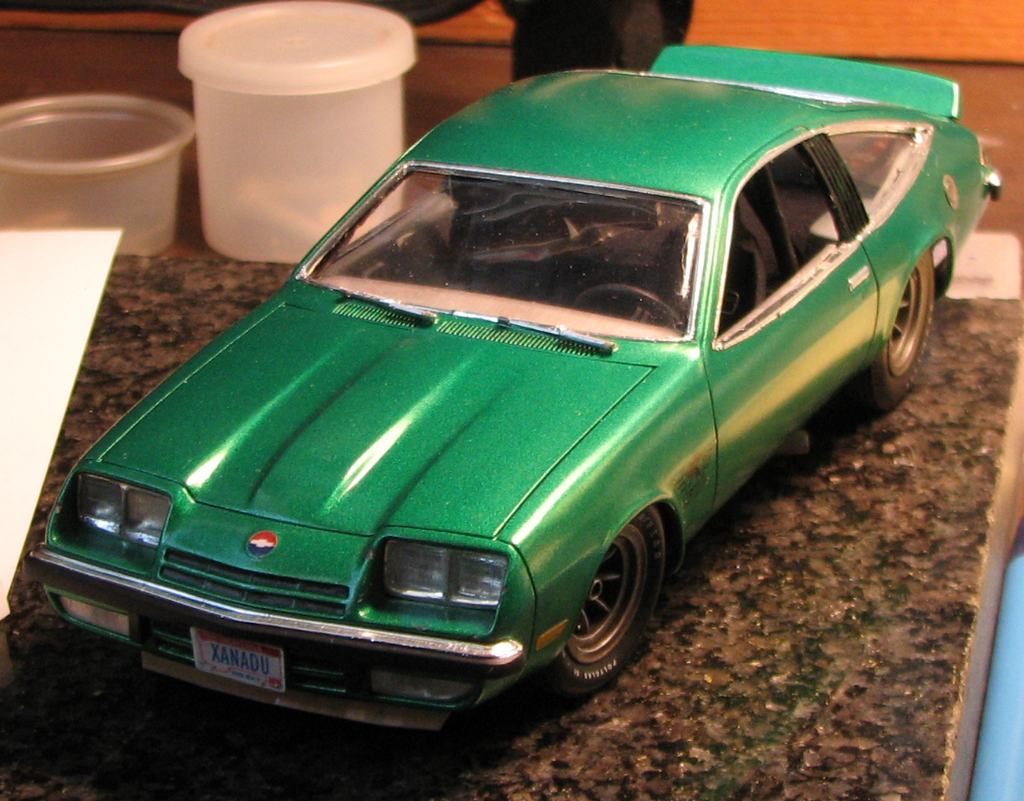
Hahaha! Wrong Xanadu! But, I'm happy if she's happy! -
1975 Monza--Completed 12/25/2018
Straightliner59 replied to Straightliner59's topic in WIP: Model Cars
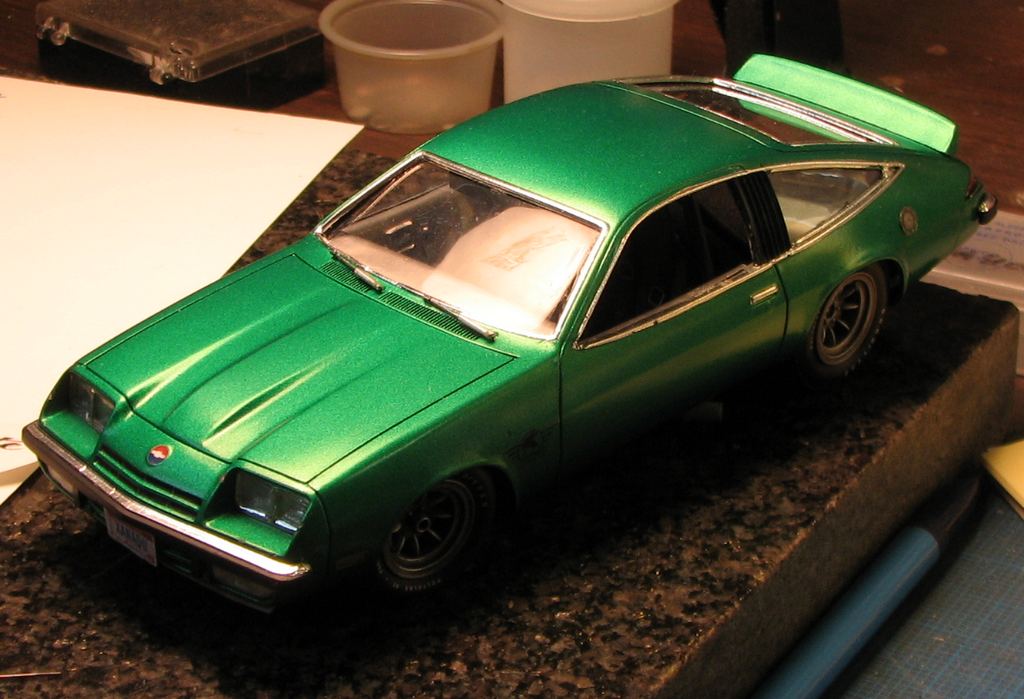
Here are some better photos of the wiper assemblies. I dug around in my various drawers/boxes of materials, and found a small piece of rubber membrane,which is essentially inner tube rubber, but flat. I cut some strips as thinly as possible, and added them to the wipers, to create the squeegees. They might be a tad too large, but, I think I can live with them...
-
1975 Monza--Completed 12/25/2018
Straightliner59 replied to Straightliner59's topic in WIP: Model Cars
Thank you, Dann! I appreciate that. I'm pretty dang happy with it. It took a while to find side mirrors that I liked, but, I've decided on those from the AMT '67 GT 350. I wanted to use small, rectangular ones, and, it seemed like everything in my parts boxes, and most of the models I was going through, only had round, or the teardrop aero looking ones. It should be done within a week. Then I can try my hand at taking "sexy" car model photos! -
1975 Monza--Completed 12/25/2018
Straightliner59 replied to Straightliner59's topic in WIP: Model Cars
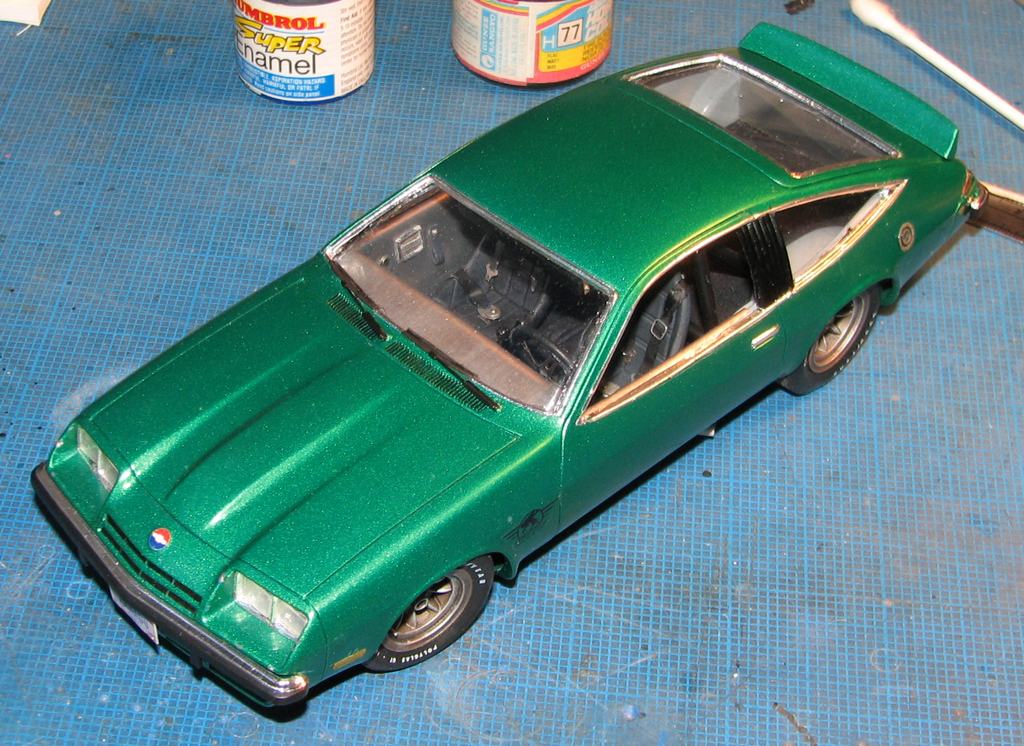
Thank you, Tommy! I really appreciate your kind words. The promos were made by MPC. The AMT Monza has always looked a little off, to me. That hasn't kept me from buying one, but, I think the MPC version is far superior. Thanks again, Rick! It's not perfect, but, I am pretty happy with it. I have a four-day weekend, the next two weeks, so, I am hoping to finish it up, before the new year! -
1975 Monza--Completed 12/25/2018
Straightliner59 replied to Straightliner59's topic in WIP: Model Cars
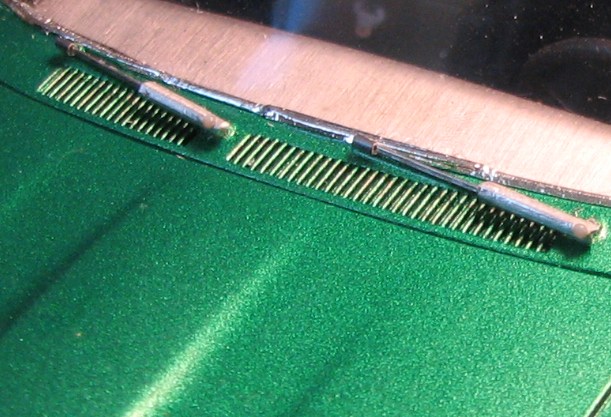
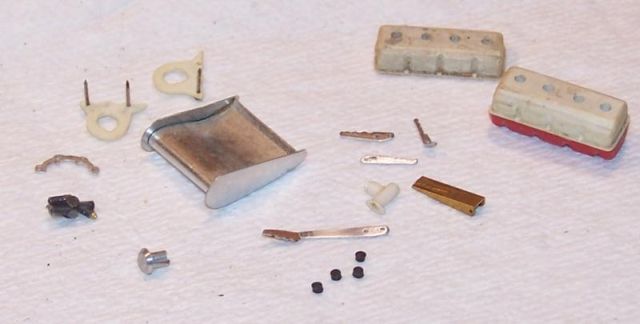
Thank you, Dave. That's much appreciated! I can almost smell completion, from here! Hahaha, Mike! It does seem that way! Thank you for your kind words! I got some black ink down in the cowl vent louvers, and touched up the B-pillars, as well.The wiper arms are a cheat--I made them to cover the fact that I didn't remove the molded-in arms. :-) I need to trim the BMF along the bottom of the driver's side window, and find a set of mirrors that I like. I also need to foil the door locks and highlight the lug nuts...again. I have some chips in the paint, mostly around the headlights. I am considering leaving those, if I can find some properly-sized mesh, since this car would be built to be driven, hard, and there are a lot of cool gravel roads, in Montana, so, broken headlights, and dinged paint are quite plausible. But, maybe I'll just fix them. A couple of new shots, wipers completed and installed...
-
1975 Monza--Completed 12/25/2018
Straightliner59 replied to Straightliner59's topic in WIP: Model Cars
I finally got the wipers built. T shot them with Krylon Semi-Flat Black, but haven't got pics of them, painted, yet. I will paint the molded-on wiper blade assemblies with flat black, and another color to represent the squeegee. Man, I hope to finally have this thing finished, soon!
-
Wire Wheels--One More Way To Make Them
Straightliner59 replied to Straightliner59's topic in Tips, Tricks, and Tutorials
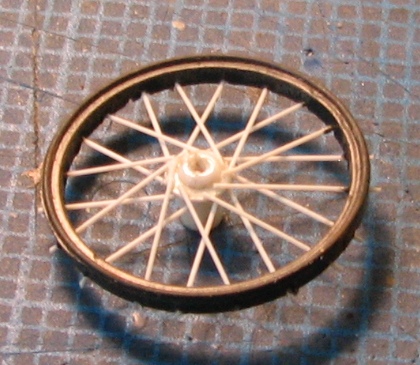
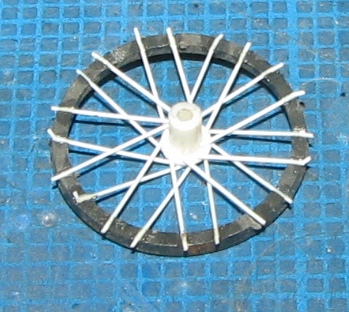
I looked around the web at other similar methods of making wire wheels, and did some refining, incorporating some of those ideas into this technique. First, I found one variation that cut slits into the inside of the wheel rim halves. This is an excellent idea, as it creates a more positive way to hold the spokes in place, which facilitates the second change I made. This time, as I laid the spokes in the opposite direction (The second lap around the rim), I slipped them to the outer side of the hub flange. Align them as closely as you can to the hub "cap" (also new), so that, after they are all laid in place, you can flip the wheel half over, and align and cement the outer spokes to the flange, with no, to minimal distortion. Mounting the spokes to both sides of the flange provides more "depth" within the pattern of spokes, and , a more prototypical look. The earlier edition of this tip also left the spokes atop the inner face of the rim, rather than nestled in it, which led to a slight gap, between the rim halves. All that said, here are a few shots of the outer half of a new wheel. I haven't done the inner wheel half, yet.
-
Looks great! Nice job with the Zolatone!
-
Glad you did, Dave. What a cool freaking model!
-
Bantam Fuel Altered - New pics 1-7
Straightliner59 replied to Codi's topic in WIP: Drag Racing Models
One of the very best builders I have ever known, Dave Abell, built cross-legged, on his living room floor. He drilled holes with an Xacto knife, and painted virtually everything with those cheap water based craft paints, from Walmart. He built a Caterpillar that nearly won Salt Lake, in 1990. The hard-facing he did on the blade, and the ripper was astonishing! I just saw it in an old issue of SAE, a couple of weeks ago (GSL coverage). Sadly, I believe he's gone, now. -
Wire Wheels--One More Way To Make Them
Straightliner59 replied to Straightliner59's topic in Tips, Tricks, and Tutorials
Thanks, Joe. You are correct, it could be used to make different styles of wires, as well. It requires no special tools or materials, and, the only "skill" required is patience! -
I just posted the article from the old SLM site on building wire wheels,here:
-
Wire Wheels--One More Way To Make Them
Straightliner59 posted a topic in Tips, Tricks, and Tutorials
I put the old page from the SLM site back together, so, here's another method to make wire wheels for a dragster. This method is good for folks who don't care to work with metal. It's pretty straightforward. Sorry for the file size.
-
I heard that! I don't know what I'd do without that stuff. I have mine in an old Evergreen retail bin that I picked up, back when I was working in the hobby shop/distributor.
-
Nostalgia Fuel Dragster--Scale Archaeology
Straightliner59 replied to Straightliner59's topic in WIP: Drag Racing Models
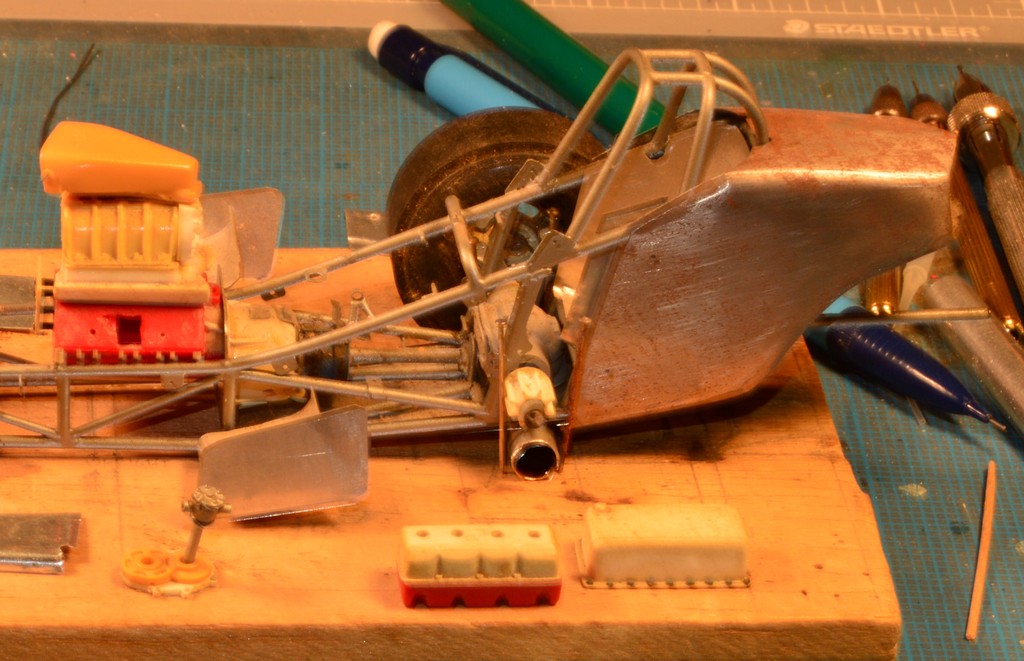
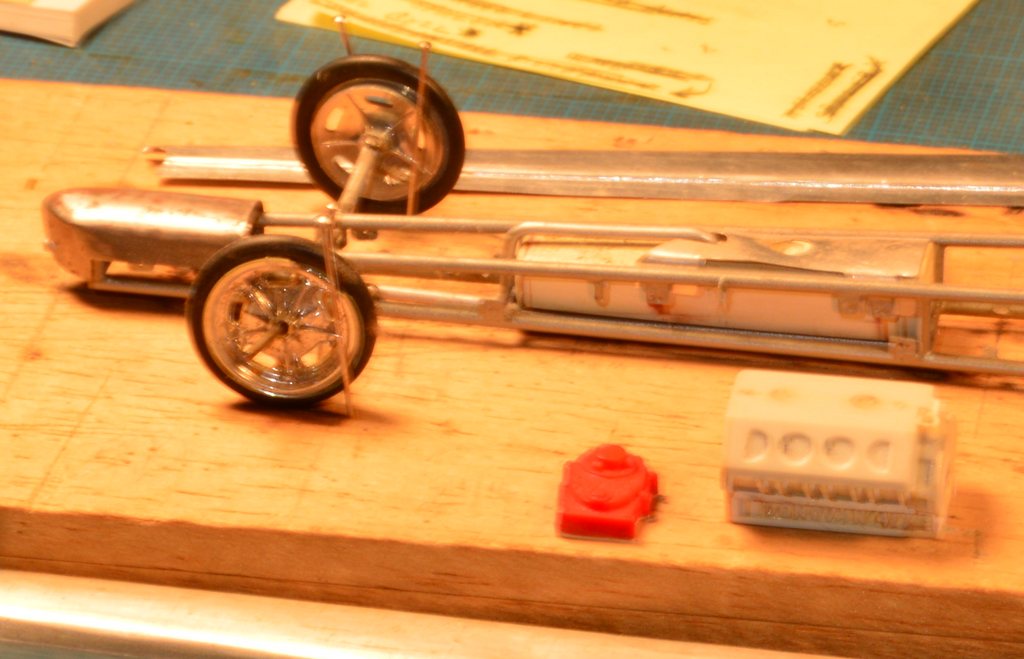
Well, I finished something that I'd neglected, before. The power train is now connected on a single shaft, from the crank snout, to the third member! I wish someone would start making the Strange nameplates for the differentials. I got these as a one-off deal an armor builder , here, did back in the mid-'80s. Don and I decided that we could use them, because he'd scratched one, and cast it, before there ever was one in a kit. Anyway, it's not much, but, it's progress. Before I continue, I am going to finish the Monza. I should have an update in a couple of weeks, or so.
-
Easily the nicest looking aftermarket dragster fronts I have ever seen! Nice work, Curt!
-
Nostalgia Fuel Dragster--Scale Archaeology
Straightliner59 replied to Straightliner59's topic in WIP: Drag Racing Models
Thank you, Bernard! As soon as I started looking at it, for whatever reason, I knew I wanted to work on it, again, and it feels great! Like I said, I want to finish the Monza, first, but, this siren is singing loudly! Hahaha, Mike! Or maybe just finish one?! Well, this should give me plenty opportunity for photos to illustrate it, no? -
Nostalgia Fuel Dragster--Scale Archaeology
Straightliner59 replied to Straightliner59's topic in WIP: Drag Racing Models
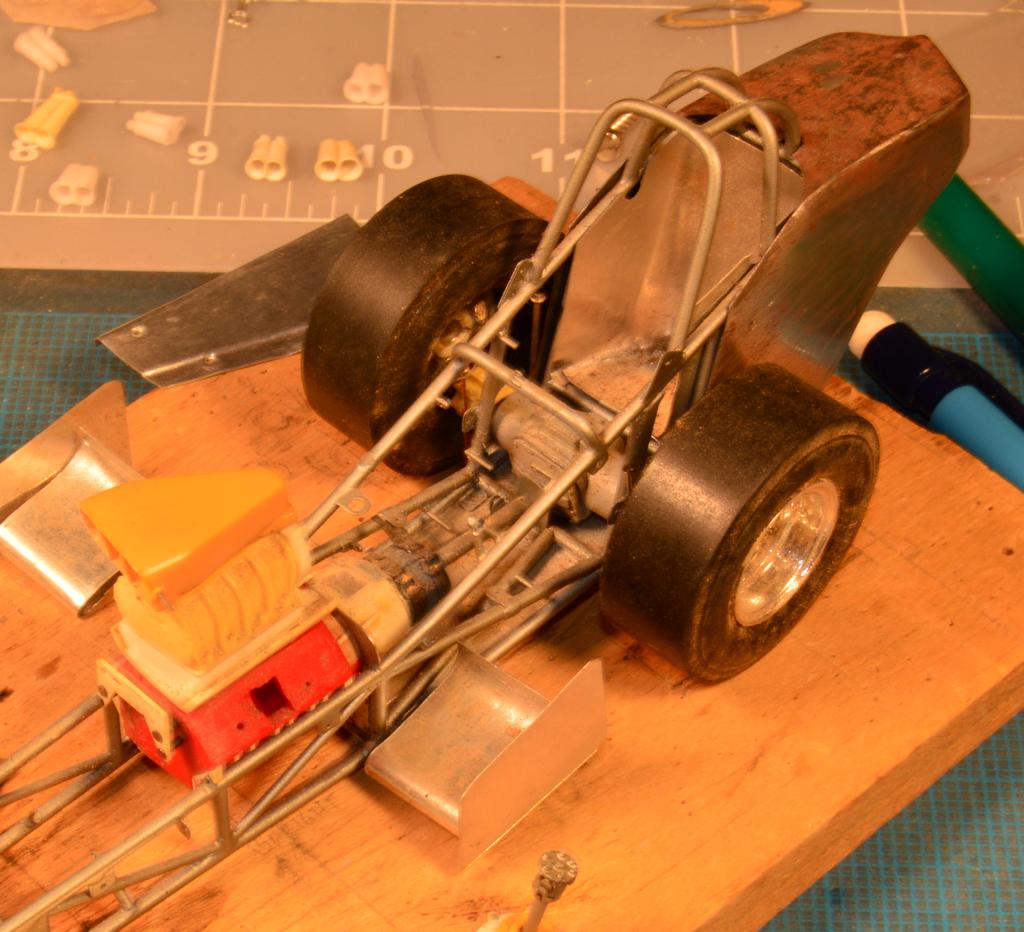
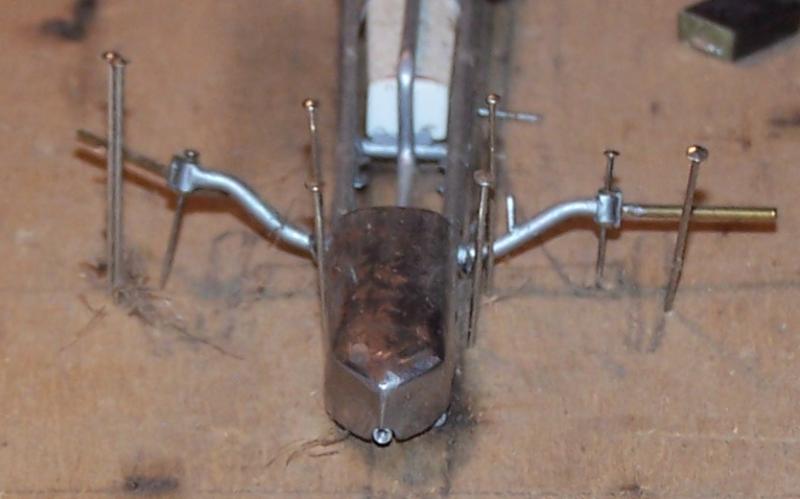
Thanks, Brad and Goat Guy. I think the spark to continue downtrack with this has re-ignited! I removed everything from the chassis, but the firewall. I'm going to determine whether or not I can replace the mount for the steering box without having to remove it, first. I am going to attempt to build a new steering box around a worm and sector gear assembly I was playing with a few years back. I am also going to try very hard to finish the Monza, before I jump fully back into this thing. Here are some shots of the stripped-down chassis.
-
Nostalgia Fuel Dragster--Scale Archaeology
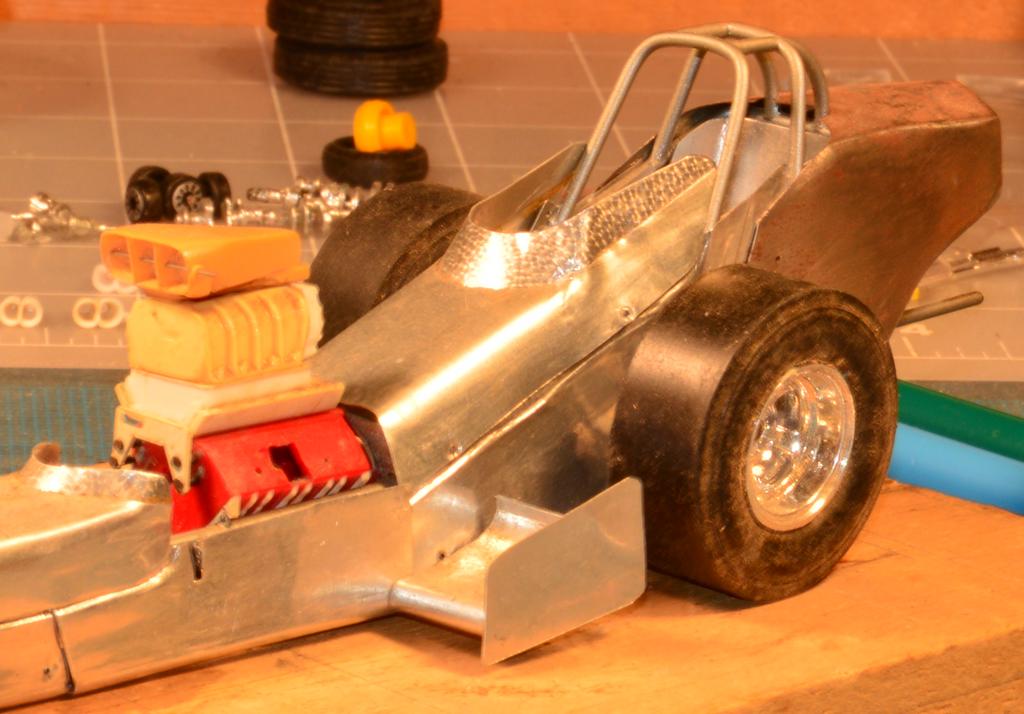
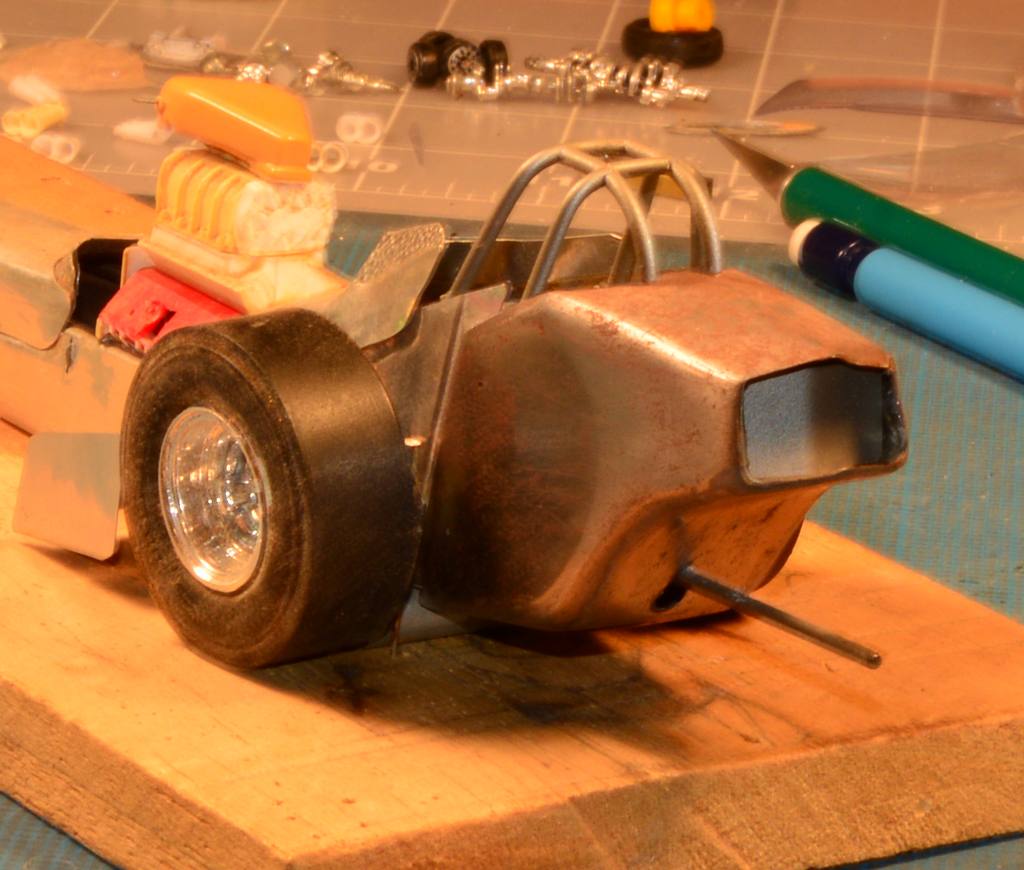
Straightliner59 posted a topic in WIP: Drag Racing Models
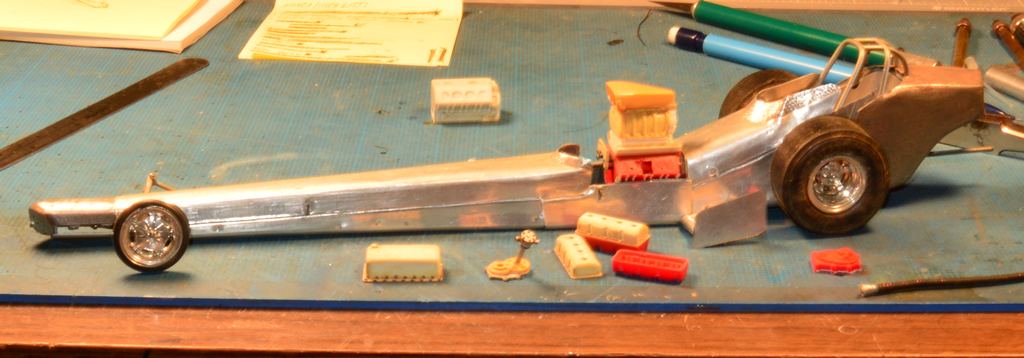
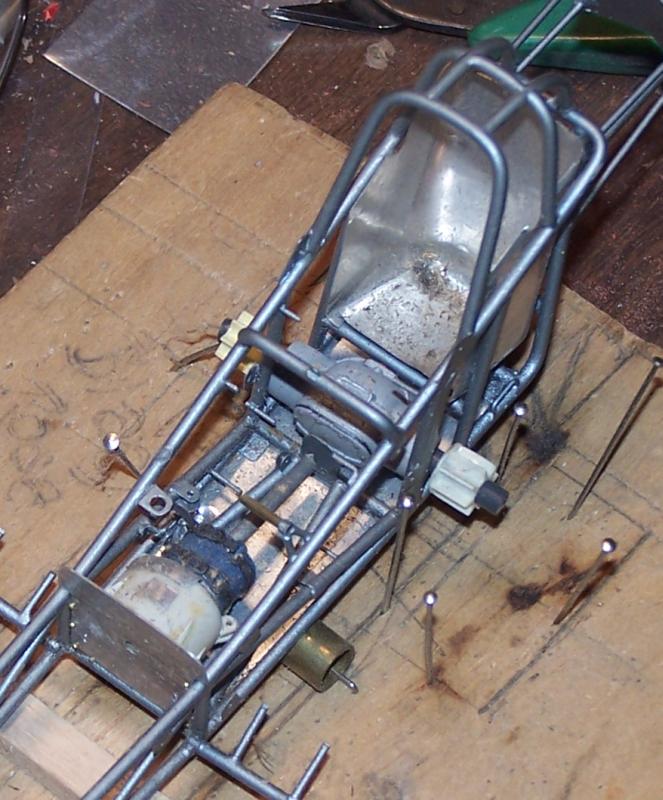
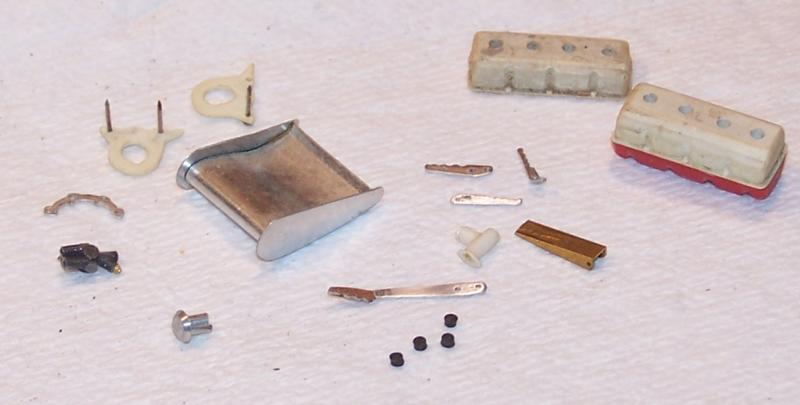
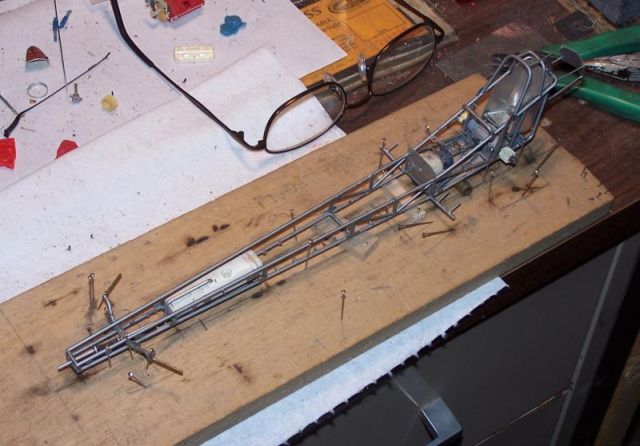
I just dug out this project I have barely looked at in nearly 20 years. I never had a decent camera, when I was working on it, so I figured I'd take some new photos of it--the way they came out, you might not suspect that I have a decent camera, now! The chassis is brass tubing and rod. The nose and tail sections are K&S tin sheet that I formed over wood bucks, then soldered. Rust is fairly evident, especially on the tail section. The rest of the body panels are tooling aluminum (before I discovered 5"X7" aluminum flashing), and would be re-created in flashing, should I ever decide to revive this thing. All the body mounting tabs are cut from K&S shim brass. I made a jig from plexiglass, so that I could cut and drill them, uniformly. I'm not sure what caused this project to stall, unless it was because one of my non-modeler friends bent the BLAH_BLAH_BLAH_BLAH out of the cowl--due to the softness of the tooling aluminum. I wish I could remember what I used to engine-turn the windscreens and firewall, because it's very nicely scaled! The engine mounted in the chassis is a late-model Donovan. Some of its "accessory" parts are visible, as well. In some of the shots, there is another engine. That one is a vintage Donovan I created using the block from the AMT Chrysler 300. I used Plastruct letters for the "nameplate" on the crank girdle. The oil pan and valve covers are laminated Evergreen strip and sheet. In one shot here, some of the smaller details are visible. These include the brake handle, chute release handles, master cylinder, Enderle barrel valve, throttle pedal, etc. I had originally planned to create graphics from the old Header Flames board on Nitronic Research. I'd still like to do that, but, it's not too likely that I can come up with art to work from, at this point. Comments and questions always welcome!
-
It's 1/24. It was originally a Monogram kit. The reissue is in a Revell box. They did Snake's car, as well (when they were originally released). The kits have some innovative features, like molded vinyl fuel lines.
-
1975 Monza--Completed 12/25/2018
Straightliner59 replied to Straightliner59's topic in WIP: Model Cars
Thanks, Rick. I think the thin strip might be the way to go. I was considering something more rubber-like, but, that always leaves the possibility of a reaction, as with the tires from old kits. Thank you, David. Glad you like it! Apparently, I have a thing for green Monzas! -
1975 Monza--Completed 12/25/2018
Straightliner59 replied to Straightliner59's topic in WIP: Model Cars
That was the first one I built! Cool! -
"Bring Out Your Dead" Completion Build--ROUND 2 Is On!
Straightliner59 replied to Snake45's topic in WIP: Model Cars
I think I might have eyeballed them, and gritted my teeth. Got lucky, on this one! -
1975 Monza--Completed 12/25/2018
Straightliner59 replied to Straightliner59's topic in WIP: Model Cars
Yes, you do, sir. I'm guessing that description might be a bit harsh! :-) Michael, did you pick up a kit, or a promo? The first one I built (in '75, I guess, it was an original release annual) was a kit. This is the second one I've done, since. Of course, it's a promo. I have another promo that I built and stripped back down, that I plan to build a curbside model of Grump's car with. Already have the Cady sheet to do it. I have a kit, as well, but it's an '80. They can be had, fairly reasonably priced. Thanks, Espo! I love making little detail items--that's where a great deal of my "zen", in modeling lies. I hope it's one of those models that people don't really notice, until they actually look at it. I prefer subtlety in my models. I'm working on the wipers, now. I have the arms cut out of .005" aluminum sheet. I need to finish filing them to shape. I am using flat nichrome wire to make the "bow" part of the blade assembly, and am still deciding what to use for the squeegees. I am open to suggestions, in that regard. At any rate, I am enjoying the "drive", as Snake likes to say!