Straightliner59
-
Posts
5,805 -
Joined
-
Last visited
Content Type
Profiles
Forums
Events
Gallery
Everything posted by Straightliner59
-
 Finally had a chance to order a Revell '68 Chevelle. It arrived, today. Now, I have to remember not to play with it and the '70, too long, and lose focus on the junior fueler.. I will, however, take a quick look to see how it will work with what I've done to the '70.
 -
Hmmm...not sure I'd use it for any common sizes, because there's Plastruct hex rod. Maybe if I need an oddball size...maybe. It's the scraper for round bits, that really caught my eye! Thanks for posting these. I hadn't even thought to look for it.
-
Will do, once it arrives!
-
I just ordered this. It should be on a slow boat from China, at some point. I like the idea of having a seam scraper for round objects. It also has hex shaped openings in the middle area that they are call a "nut maker". I am guessing that they are to be used as a draw plate, to shape round stock. Has anybody tried one of these? It looks like it can be useful (the seam scraper has positive reviews).

-
That's what I did, with mine.
-
Temporary Holding
Straightliner59 replied to Chevy II's topic in Model Building Questions and Answers
Alene's Tacky Glue. Elmer's makes a similar product, but, it's not their regular glue. -
Thanks, Bernard! I haven't seen any better, in scale, and, I wasn't going to build this thing without them. Nothing screams "small block Chevy junior fueler" like these Enderles--they're just, well...sexy. Someone is bound to begin manufacturing them. PM me your address, and I'll send you an assortment of them to play with, if you'd like. The two things I don't like about Speed City's castings are the heaviness of the walls and the lack of that delicate lip. The thickness could be dealt with, but, not easily, due to the taper. Anyway, drop me a line, if you're interested!
-
I LOVE this! Very, very cool. It captures the look, perfectly! Makes me want to play around with a lakes/salt car.
-
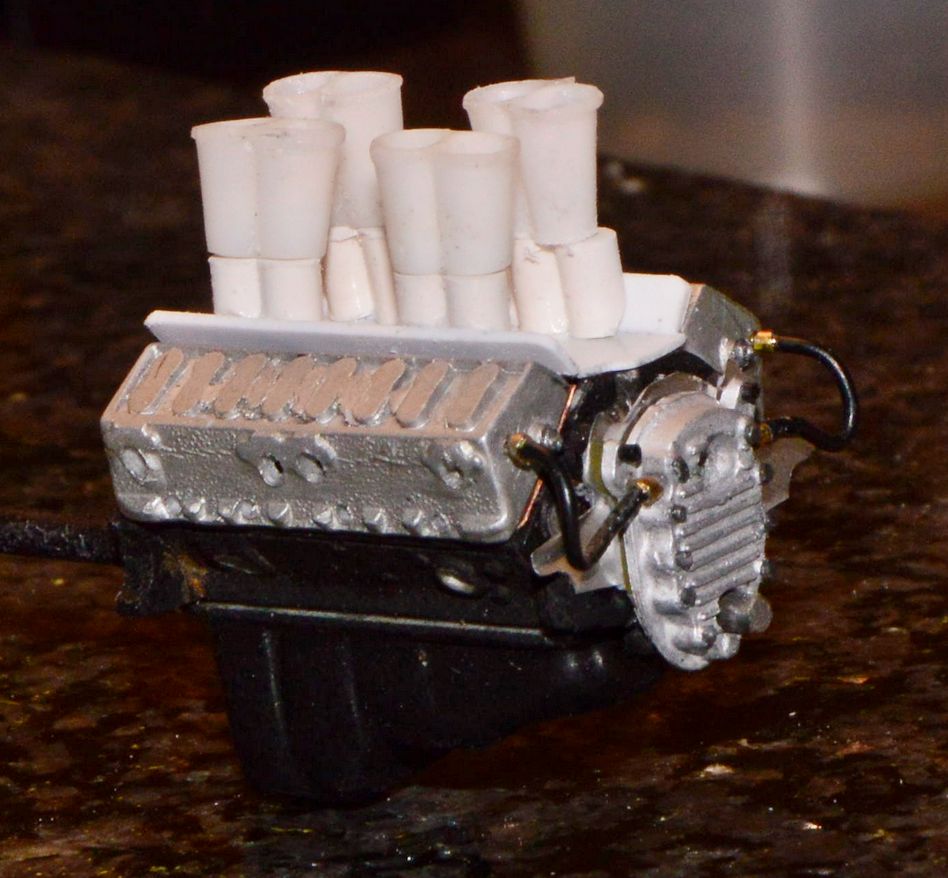
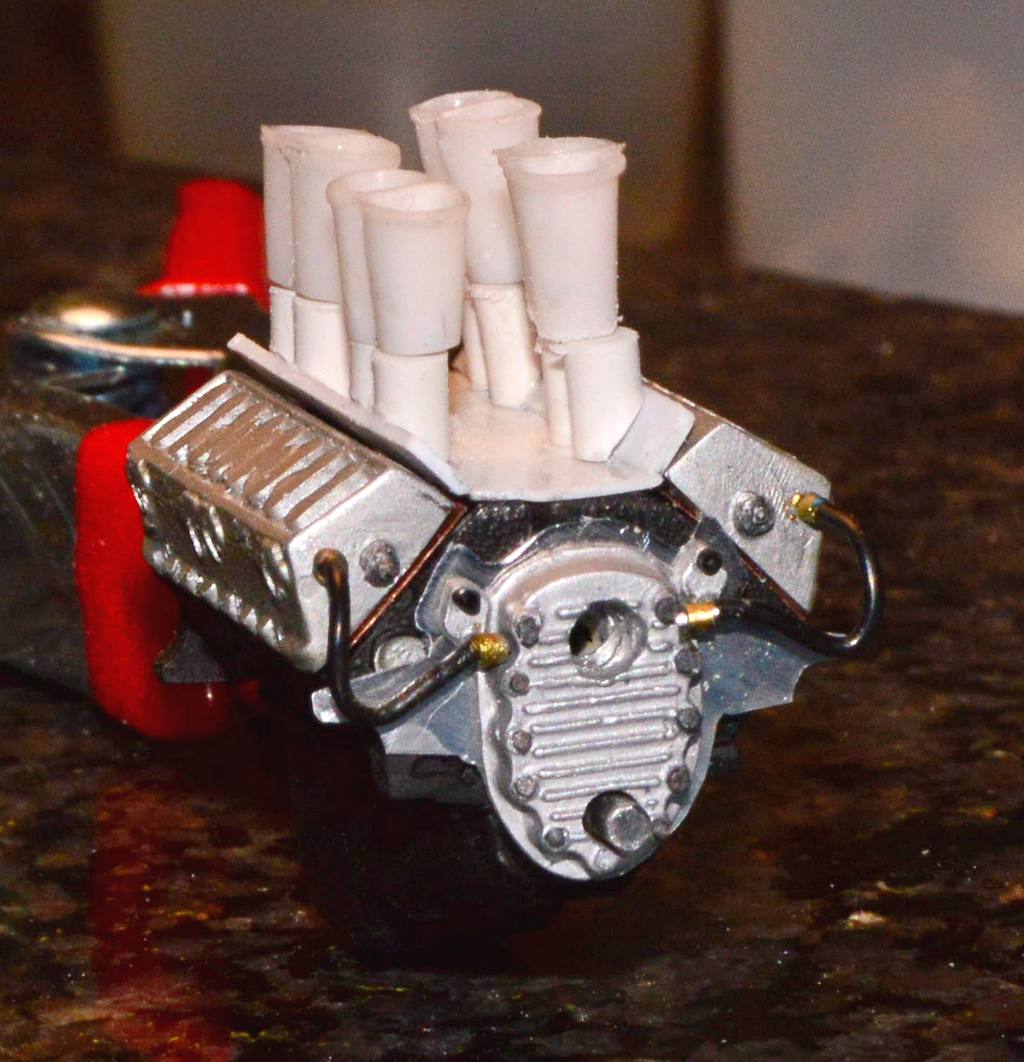
I am sure everyone is sick of these injector stacks, and manifold, but, the progress is significant (in spite of what it looks like). This is the fourth manifold I've worked on for this thing--there may be a fifth. The mounting flanges keep pulling up, and away from the heads, and that drives me nuts! I thought I had it, this time, because I weighted them down. Alas, there they are again, up in the air! Grr. I finally have clean molds to make pretty clean castings, and, I have figgered (sic) out the best way to prep them for paint. The shape and size look right to me, finally. Once I clear this hurdle, I really should be able to get on down the road with this project. If I can find one of the old MPC vinyl dragster seats, I may see if I can adapt it to the aluminum "bucket" I made. I'm very excited to have these stacks so close to done!
-
"Bring Out Your Dead" Completion Build--ROUND 2 Is On!
Straightliner59 replied to Snake45's topic in WIP: Model Cars
I am sure everyone is sick of these injector stacks, and manifold, but, the progress is significant (in spite of what it looks like). This is the fourth manifold I've worked on for this thing. I finally have clean molds to make pretty clean castings, and, I have figgered (sic) out the best way to prep them for paint. The shape and size look right to me, finally. Once I clear this hurdle, I really should be able to get on down the road with this project...
-
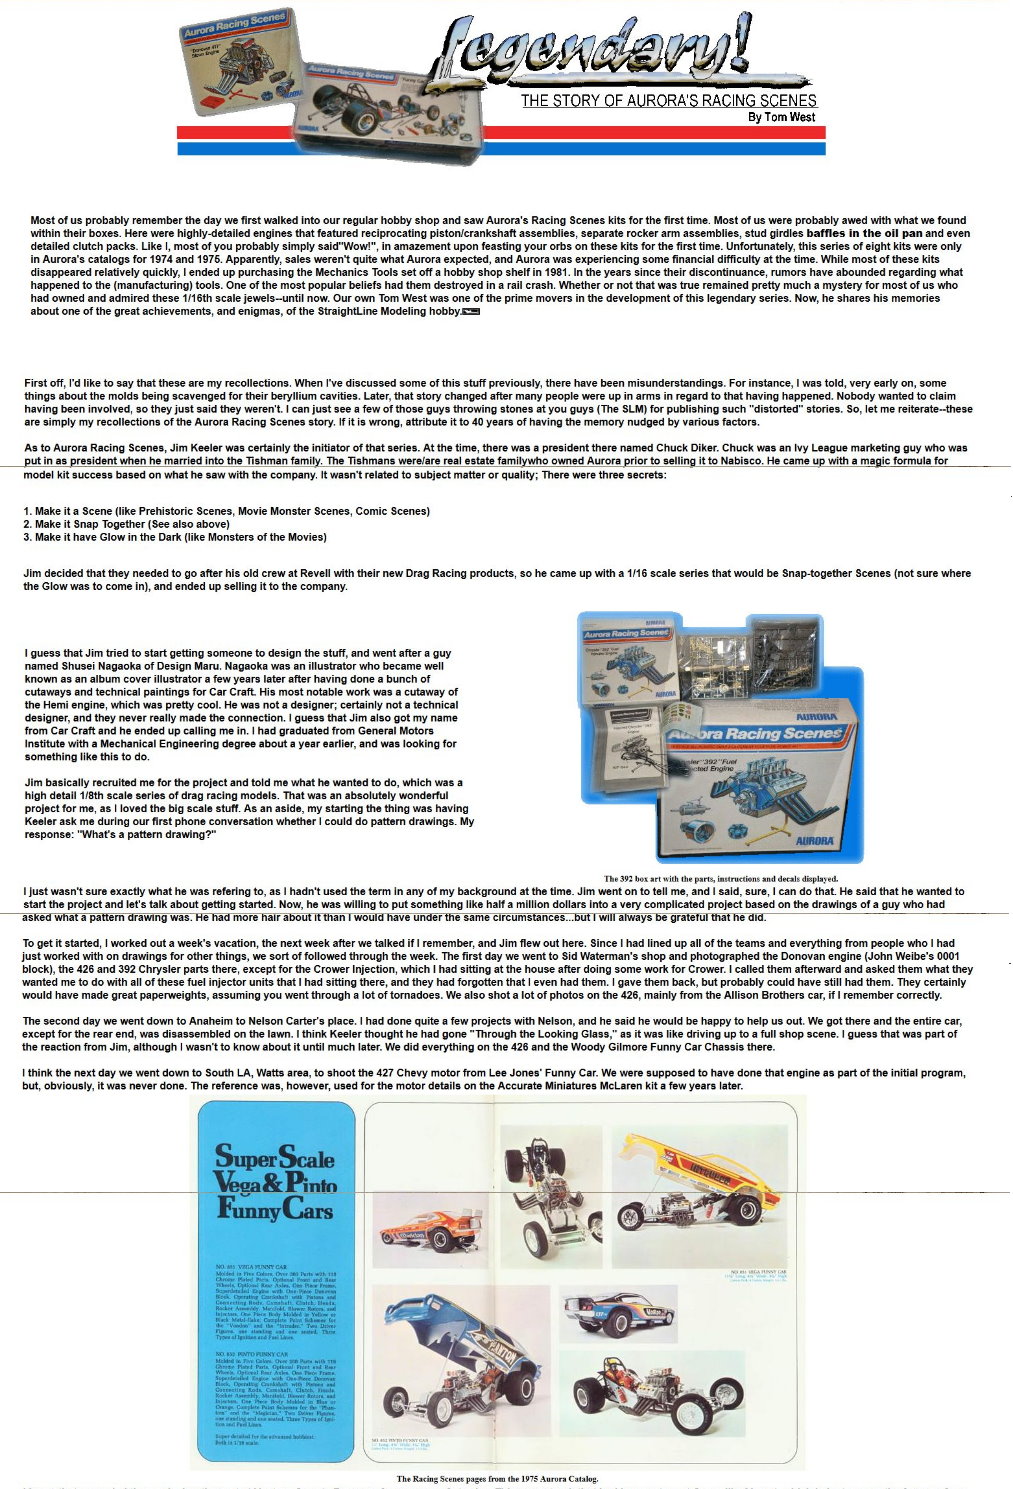
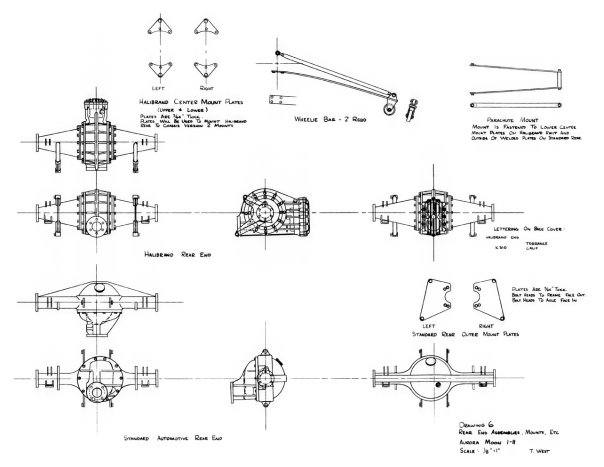
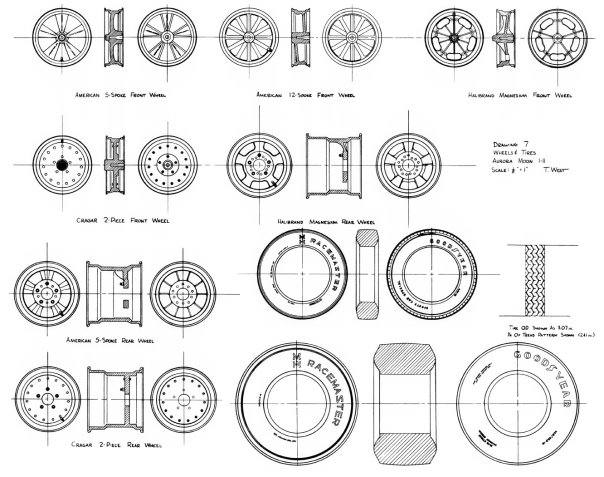
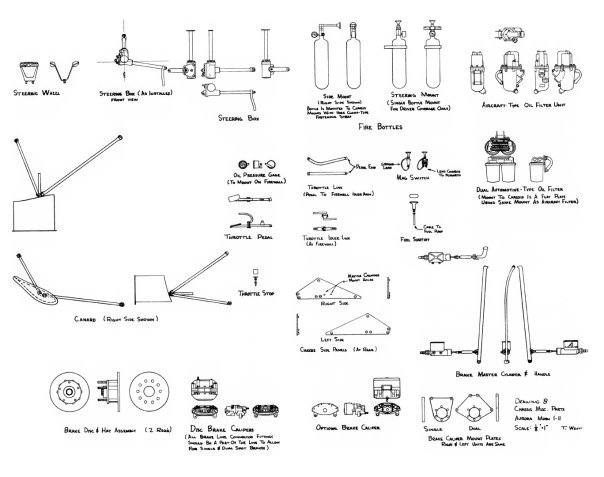
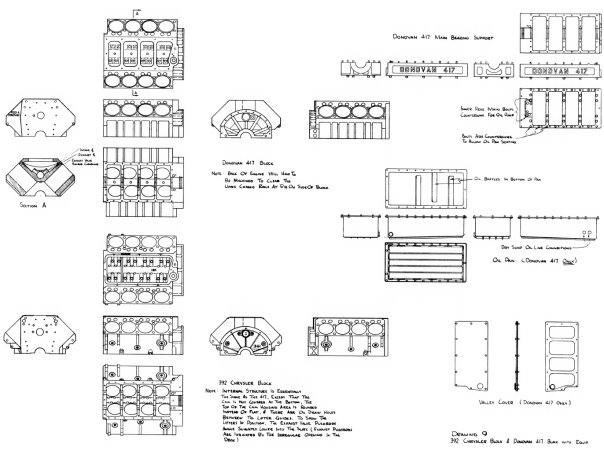
Aurora Racing Scenes-Tom West
Straightliner59 replied to Straightliner59's topic in Car Kit News & Reviews
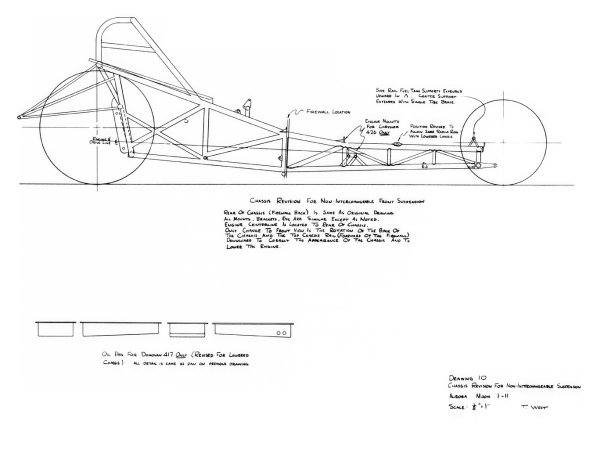
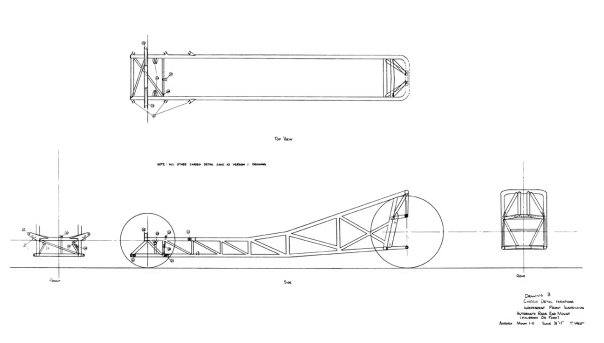
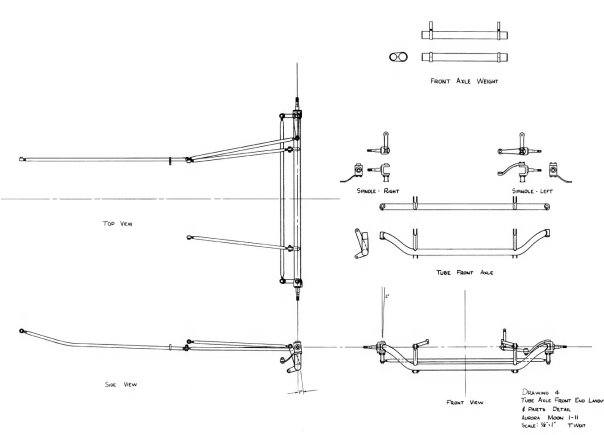
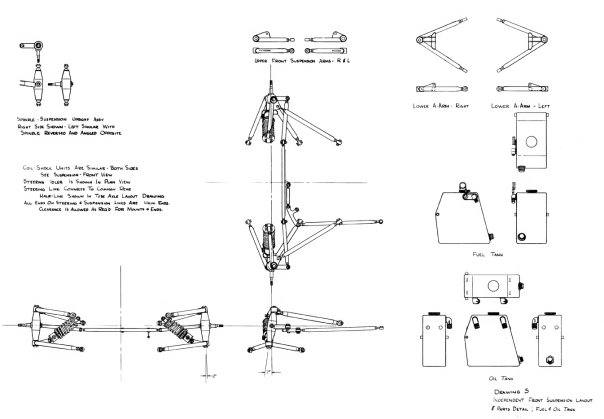
The History Of Drag Racing Models series was written by Tom! Yes, those are Tom's reference photos. I had those linked with the Article. I know that Tom was disappointed in some of the compromises made in order to keep the kits simpler, but, they were paying him, so Aurora called the shots. -
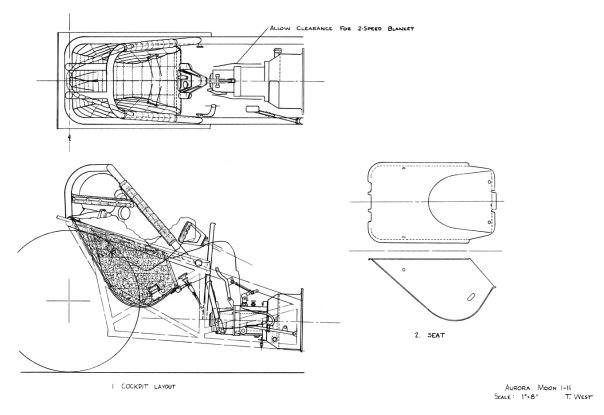
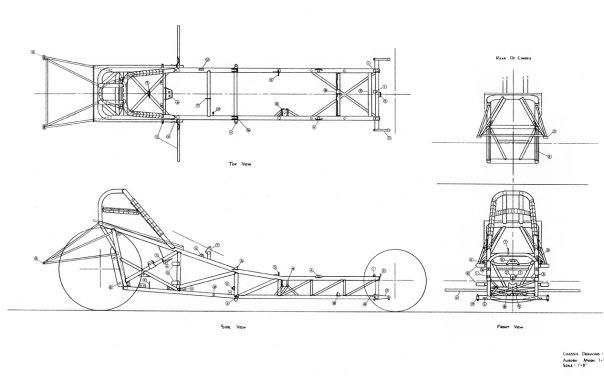
I was looking at this thread: I don't know where the dead link above led to, but, here's the story of the Aurora Racing Scenes in Tom West's own words. I formerly published it on the old StraightLineModeler website. He was gracious enough to write this piece, and email me a bunch of his design drawings for the series. Tom is missed. He had a great love of drag racing, and had a ton of stories, as well. He was a great guy. I hope you enjoy it!
-
Beautiful hot rod! Excellent work!
-
Wow! That's pretty cool, Dave! Unfortunately, I don't have one of their B-25s. I knew Tom fairly well. I remember him talking about the development of the GS. I am sure he illustrated the instruction sheet(s) for it. Of course, he and Jim Keeler did the Aurora Racing Scenes Kits. Anyway, sorry, Drew, it wasn't my intent to hijack your thread. Looking forward to seeing this come together!
-
I believe Tom West was also heavily involved in this kit's development, too.
-
VERY SMALL ROUND FILES
Straightliner59 replied to Ace-Garageguy's topic in Tips, Tricks, and Tutorials
Good stuff, Bill. I've had a set of those reamers in my drawer for years, for just such purposes. They are great! -
I don't generally go in much, for this modern stuff, but, this thing looks bada$$! Very cool!
-
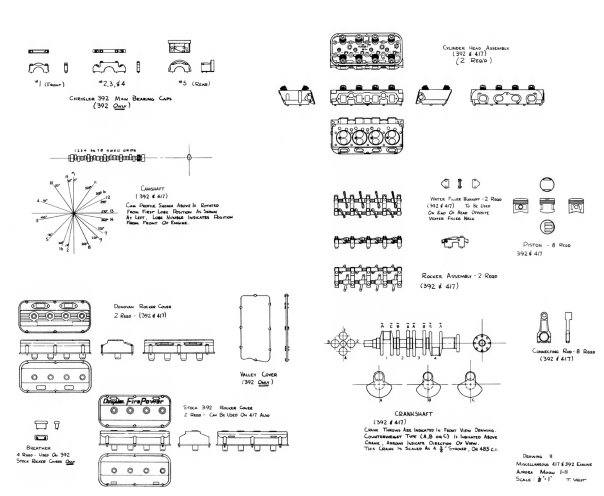
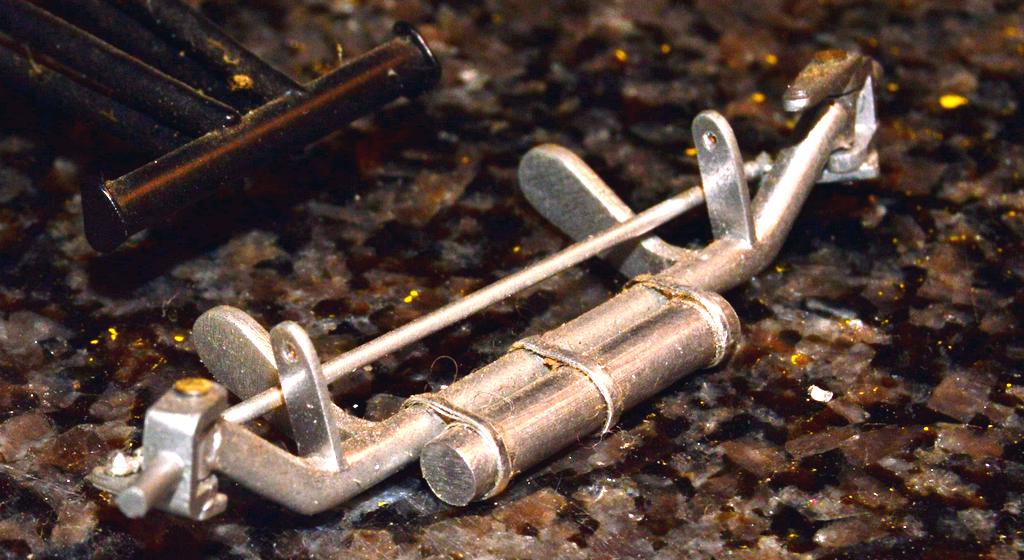
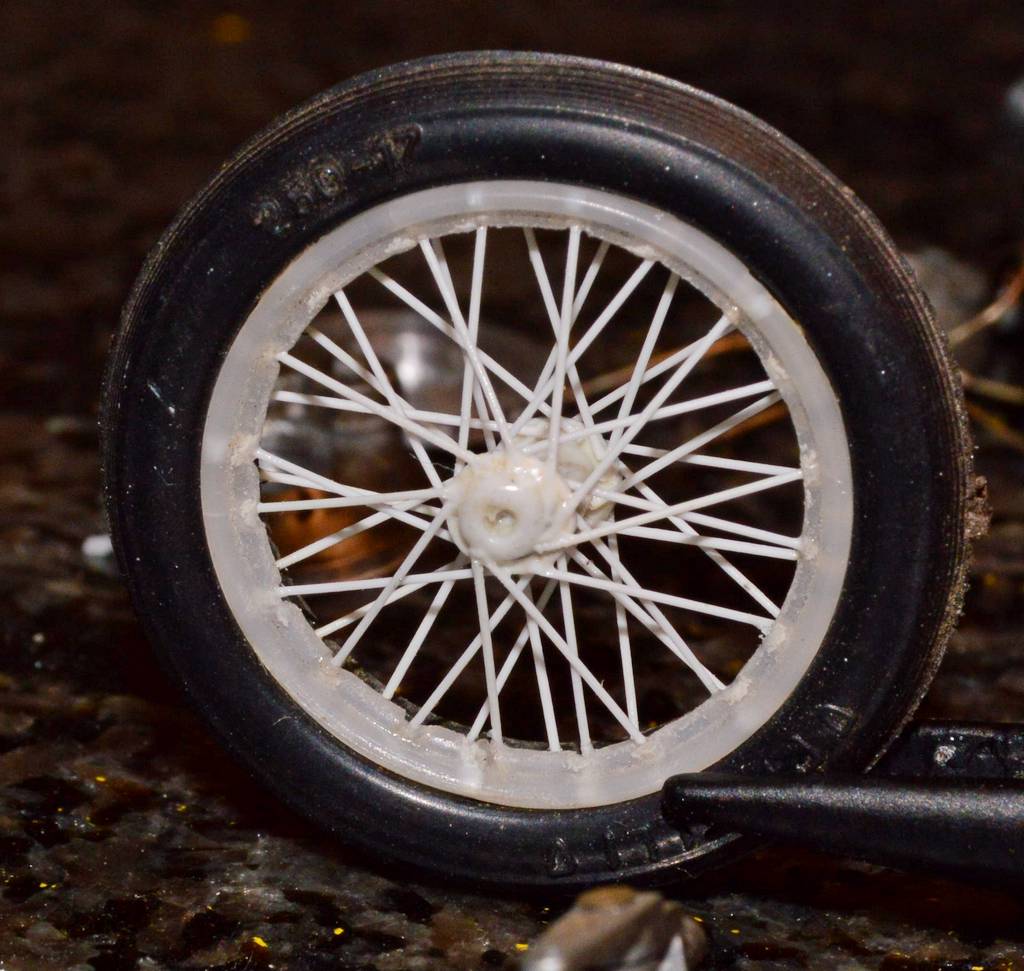
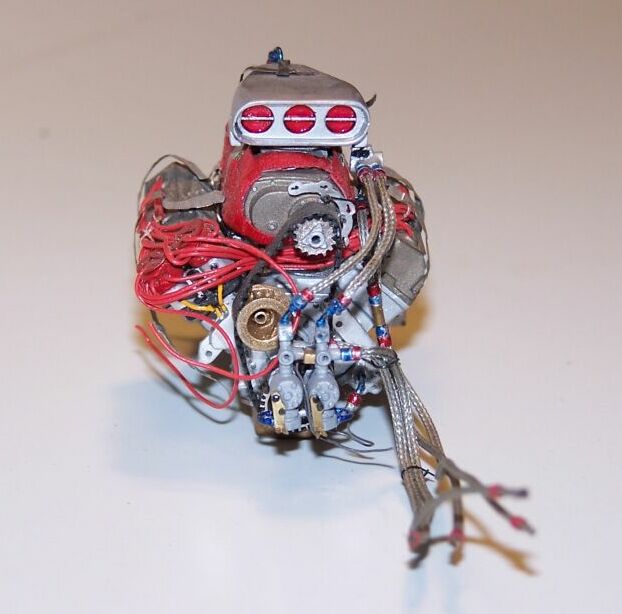
Got a little more done to the engine. The heads, according to the article that inspired this model, are aluminum castings by Howard (I'll assume the Howard's Cams folks, since their name is emblazoned across the cowl.). They were drilled to promote better oil flow. That's what the two lines are, from the heads to the timing cover. Still have the mish-mash of stacks sitting atop the manifold, but, I will begin concentrating on that whole assembly, soon--lots of work to do, there. I need to replace six of the front cover bolts that fell off during the re-installation of the oil lines. I've also included a better shot of the front wheel and one of the front axle, as well. Questions/comments always welcome.
-
I haven't looked in some years, but, on We Did It For Love, Don Ewald used to have a photo of my model of "The Bug", to illustrate that car! I thought that was pretty cool. If you go to Garlits' museum, you can see my model, for real.
-
Those old Otaki wheel and tire sets later became Arii, too, as I recall. Those were pretty nice! Surprised someone hasn't picked them up,and re-marketed them.
-
I made a new front motor plate, and got the front of the engine down. Looks lots better! Working on the front cover, now...
-
Super work! Makes me want to get the brass out, again! Thank you for sharing, and for the inspiration.
-
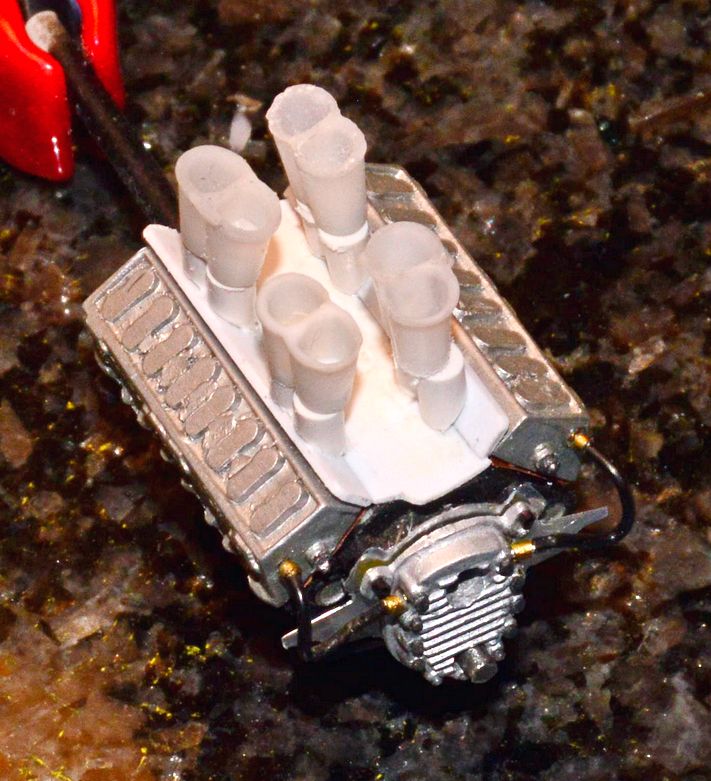
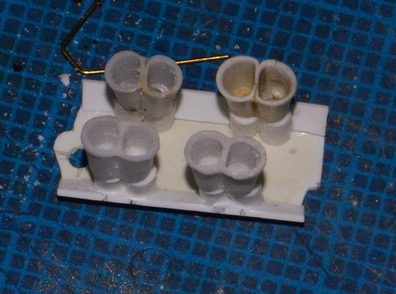
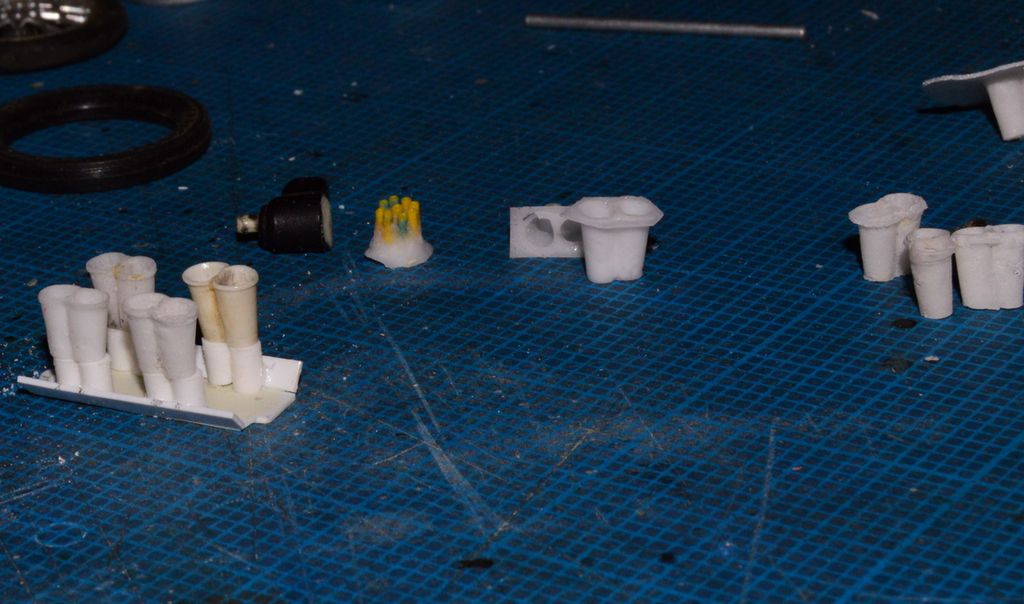
I got some of the stacks cleaned up. I am very satisfied with their shape. I am considering getting two of these units into as pristine condition as I can, and making a new mold. After all the years I've been developing them, I want them to be as perfect as I can make them. In the first photo, the unit in the front left is cast using Alumilite resin. The one right rear is the master I made from Evergreen. The left rear unit is made from two castings using the acrylic resin for fingernails. Finally, the right front unit is a single unit cast from nail resin. Still a lot of work to do, on the fuel injection setup...
-
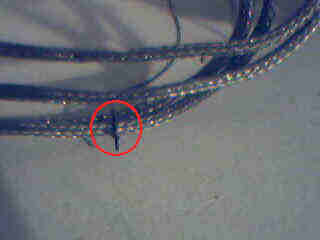
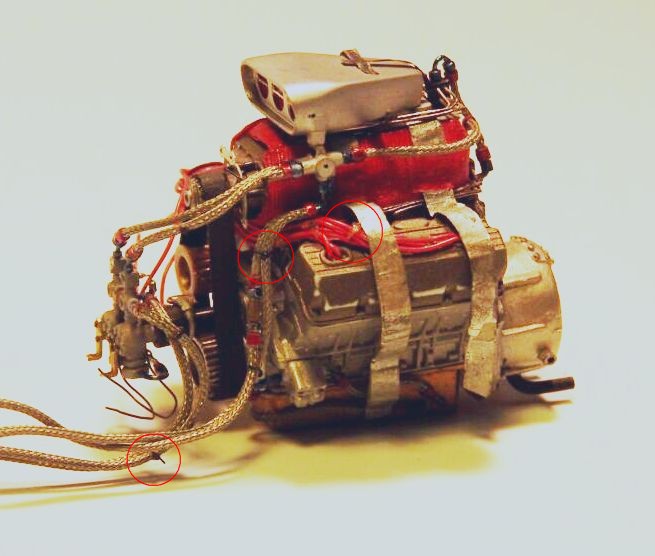
I make zip ties using monofilament fishing line. Clover House also makes (made?--are they still around?) nylon monofilament in black, in a couple of different diameters. I begin by heating one end of the line, until it softens. Then, I flatten the resulting ball between my thumb and forefinger. Then, using a needle, I poke a hole in the middle of the flattened area. All that's left is to wrap the "tie" around whatever you're binding, push the free end through the hole, snug it down, and apply a small drop of cyanoacrylate, and trim the end. In this case, I used clear for the plug wires, and black on the fuel lines. They look better in real life, than they do in my photos!
-
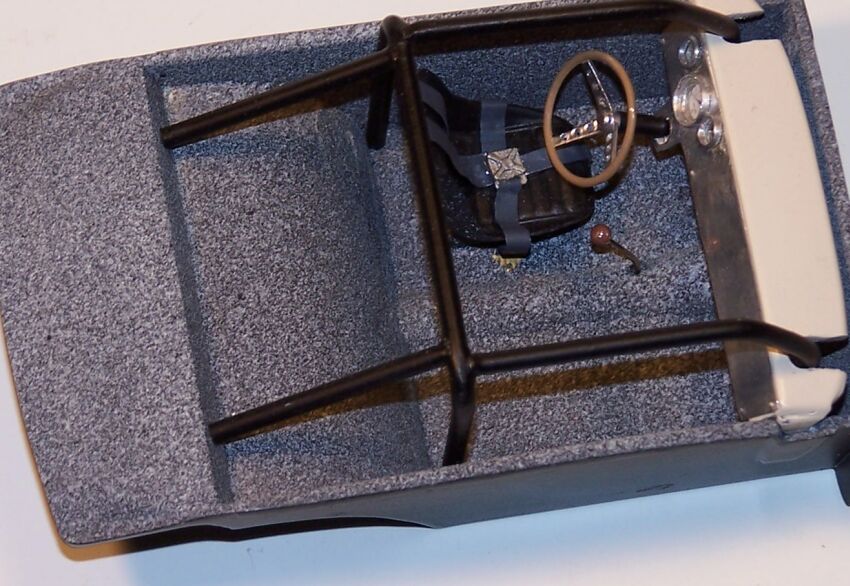
Zolatone was fairly commonly used in race cars, "back in the day". It's an easy finish to replicate, using spray paint to dust on the "flecks" after shooting a base color. Here's a chart of their color combinations, and a couple of places I've used the technique. Hope someone gets some use out of this.