Straightliner59
-
Posts
5,805 -
Joined
-
Last visited
Content Type
Profiles
Forums
Events
Gallery
Everything posted by Straightliner59
-

"Bring Out Your Dead" Completion Build--ROUND 2 Is On!
Straightliner59 replied to Snake45's topic in WIP: Model Cars
Very nice! That is freakin' cool! -
Headers on, and it still fits. Always a good thing! Excellent work, JC!
-
Porsche 356A - Speedster Wars style
Straightliner59 replied to Bernard Kron's topic in WIP: Model Cars
Looking good, Bernard! I would agree with the above, regarding the 904 wheels. You should be able to make those work, and they're nice wheels, too. Keep up the great work, sir! -
Super glue, and a product that RC aircraft modelers use, called epoxy *microballoons works great. I apply the super glue to the area needing work, then sprinkle the *EMBs over it. It sets and cures quickly, allowing you to move ahead with your work. Don Fahrni used this method. I would say that, if it's good enough for Don, it's good enough for anyone!
-
Bantam Fuel Altered - New pics 1-7
Straightliner59 replied to Codi's topic in WIP: Drag Racing Models
Mind blowing work, Tim! Enjoying following this project, immensely. -
Hahaha! You are too kind, sir! So, another update...I got the control cables installed. The throttle cable had to be pieced "together", meeting at the firewall, as the clutch can flange covered the hole I drilled, where the cable needed to go through. Got it so it looks like it's all one part, and, it will be fairly obscured by the body, in the end, anyway. This update has something of a tutorial, as I made four zip-ties, to secure the fuel shutoff and throttle cables. It's not a complex technique, and the results are worth the effort. After all, what looks more like a nylon tie, than a tie made of nylon? To begin, I selected some Clover House .015" black monofilament. Railroaders use it to simulate power lines, etc., I understand. I cut a length of about a foot. After the cables were in place along their respective chassis tubes, I used a lighter to heat the end of the line, until it began to melt, creating a little ball about .030". At that point, while the nylon was still molten, I mashed it between my thumb and forefinger. It's been suggested to try flat-jawed pliers, but, I can't control the "mash" as well, that way. I now have a flat spot on the end of the line. I used a sharp scriber to poke a hole through the now flattened end of the monofilament (henceforth, "mono"). Next I fed the mono through the chassis, looping it around the frame tube and the actuating cable. Finally, I located it where I wanted it to "live", snugged it down, firmly, and hit it with a tiny drop of super glue. I held it taut for a few seconds, to let it set, then, snipped off the rest of the line, to use on the second tie. I am considering ways to flatten the mono, so it looks more prototypical--perhaps a pair of rollers, to pull it through. Anyway, i digress. I hope that this makes sense, with the photos. Questions and comments always welcome!

-
The best reason to go to Salt Lake is for the camaraderie. There are plenty of folks who don't even take anything, just go, to hang out. It's a blast! I won't make it, this year, but, I am going to do everything I can, to make it to the finale, whether or not I have anything I feel I can compete with.
-
'65 Chevelle Z16 (396) Drag Car Ideas
Straightliner59 replied to Snake45's topic in WIP: Drag Racing Models
That's what I get for not previewing the pics. The files indicated PHR 65. Problem is, magazine lead times were 4-6 months. DUH! I just went and looked in the folder--I guess it's a good thing I didn't accidentally get one of the Corvair pics! -
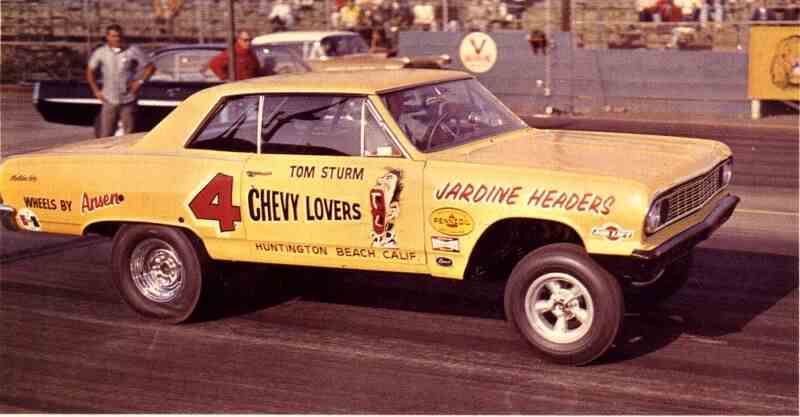
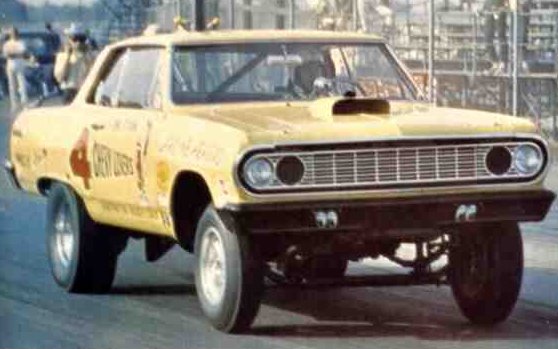
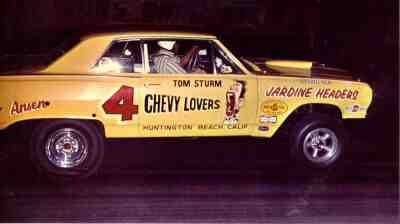
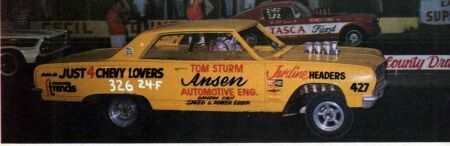
'65 Chevelle Z16 (396) Drag Car Ideas
Straightliner59 replied to Snake45's topic in WIP: Drag Racing Models
Well, I thought this was a Z-16 car. Alas, it was purchased new, by Tom Sturm, with a 283 installed. But, since I went looking for it...
-
Thanks, Ray. I'll trust you with the math! I never gave the L to R, or R to L a thought, but, it makes sense. That's a good thing to remember!
-
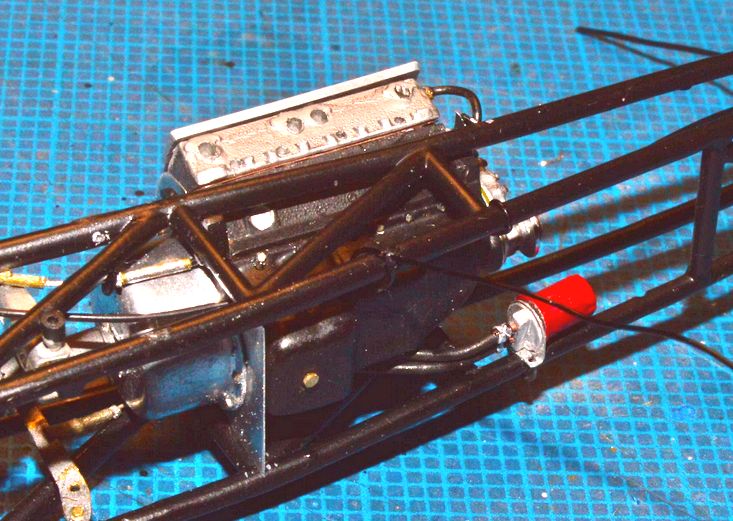
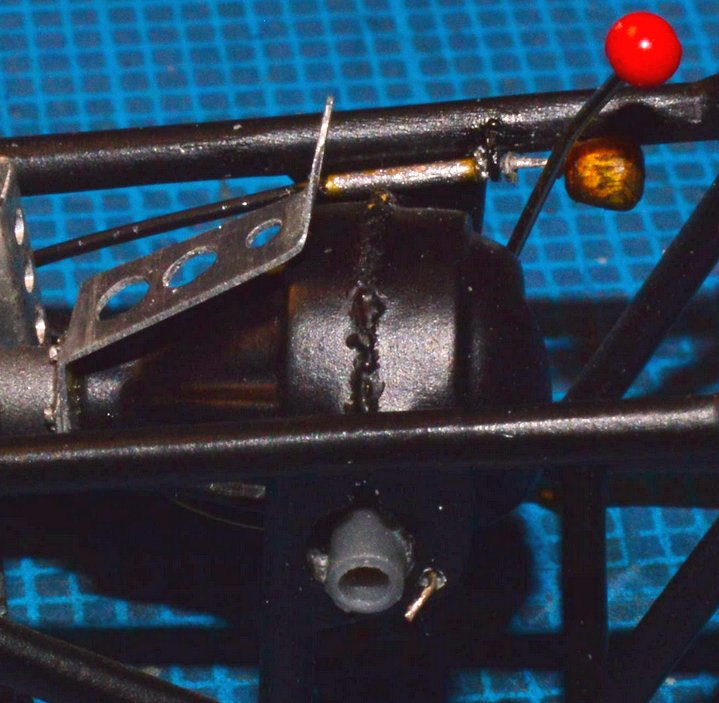
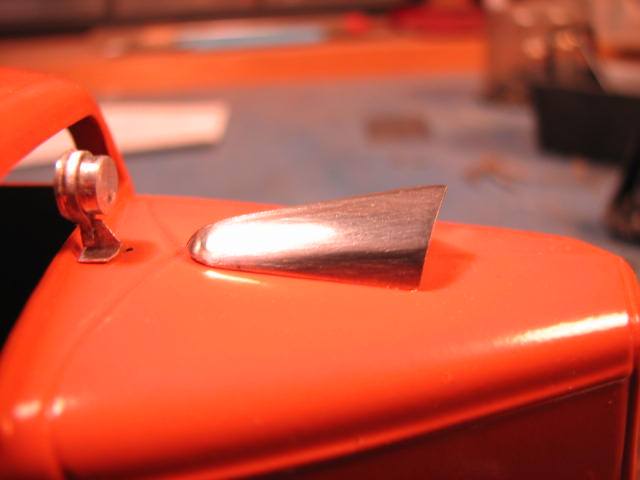
Here are a few photos of the latest: Clutch actuator shaft, from pedal/arm, to linkage on the can, Wooden fuel shutoff knob and cable, installed--I originally made an aluminum knob, then realized that would create three different materials for controls: wooden steering wheel/butterfly, "pool ball" brake handle, and aluminum shutoff knob. I didn't really care for that idea, so, I made one from a piece of dowel, and attempted to stain it to somewhat match the black walnut of the butterfly. There's also a photo of the pieces for the throttle cable and attachment for the pedal. I'll have to fit the cable into the model in two pieces, due to the fact that the hole I drilled in the motor plate got covered up by the bellhousing. No biggie; that detail won't be visible, once the body is on--it will appear as a continuous cable from the pedal, to the injector body linkage. Qs and Cs always welcome! Thanks for looking! Is it just me, or does anyone else feel like a terrible builder, when you take and view these closeup images? Man, do they show the warts!
-
Thank you, Scott! Your method works well, it looks, to me. I think if I just reduce the number of rotations on the knob from 1-1/2, down to a single rotation, I will be good. One thing's certain--it ain't gonna' happen, randomly. It has to be laid out. :-)
-
Kenny Bernstein's Ford Tempo F/C
Straightliner59 replied to 3men2s's topic in WIP: Drag Racing Models
You got that thing right down where it needs to be! Looks good! -
"Bring Out Your Dead" Completion Build--ROUND 2 Is On!
Straightliner59 replied to Snake45's topic in WIP: Model Cars
Thank you, kind sir! -
"Bring Out Your Dead" Completion Build--ROUND 2 Is On!
Straightliner59 replied to Snake45's topic in WIP: Model Cars
Been working on a lot of non-sexy stuff, like making cable assemblies for the throttle and the fuel shut-off. I got the clutch linkage installed, as well as a couple of tabs in the cockpit that I forgot to install, earlier (I'm finding a lot of that stuff! ). I also did some work on the steering box mount, and am hoping to get that all put together, later today/this evening. If I can, I should be able to install the cables, the steering shaft and butterfly, and perhaps get the body mounted. That would be a huge step, and a huge inspiration! I designed a possible graphic for the cowl--see below. I need to install a helmet bar, too, as that was another oversight on my part! DUH!
-
1926 Mack AC Dump Truck
Straightliner59 replied to Jim B's topic in WIP: Model Trucks: Big Rigs and Heavy Equipment
It looks great! I noticed the pin assembly. Excellent work, sir! -
Aluminum Printing Plate Source?
Straightliner59 replied to bigfatforty's topic in Model Building Questions and Answers
Thank you, Trevor. My biggest complaint with the flashing is its plastic coating. It doesn't take too long to clean off with steel wool, or a Scotch-Brite pad, but, it takes some elbow grease! I've never tried printers' plate, simply because I never had a source for it. The flashing is easy to anneal. Once the plastic overcoat is removed, rub a bar of Ivory soap over the surface to cover it, heat it with a torch, and quench it, as soon as the soap film turns black. Then, you can work it to whatever shape you want! -
Aluminum Printing Plate Source?
Straightliner59 replied to bigfatforty's topic in Model Building Questions and Answers
.005". Technically, that's a little thick for dragster bodies, but, it looks great. WAY better than kit provided plastic bodies. I use it for dashes, interior panels, and the hood scoop on my '34 coupe.
-
I can barely be responsible for my own actions, Snake! Don't blame me for yours! Before the Wright's it required enough pressure to kill a toothpick in a hurry. The mild abrasives in the Silver Cream allow the toothpick to simply be, more or less, a carrier for the "cutting" agent. I bought a cheap (around $40) XY table for the drill press to help with uniformity, but, I used a half a turn too much advance, on the test piece. I have used the Dremel rubber abrasive cones, in the past, but, they wear down too quickly.
-
Ah. Great idea! It's got the screws turning, in my head!
-
Aluminum Printing Plate Source?
Straightliner59 replied to bigfatforty's topic in Model Building Questions and Answers
Been using that stuff, for years, now! It's what I built the dragster body with. -
1926 Mack AC Dump Truck
Straightliner59 replied to Jim B's topic in WIP: Model Trucks: Big Rigs and Heavy Equipment
Very cool. Thank you, Charles! -
1926 Mack AC Dump Truck
Straightliner59 replied to Jim B's topic in WIP: Model Trucks: Big Rigs and Heavy Equipment
Where did you get the chains and sprockets? Those look excellent! -
1926 Mack AC Dump Truck
Straightliner59 replied to Jim B's topic in WIP: Model Trucks: Big Rigs and Heavy Equipment
Enjoying this thread! Great models, all around! Nice job, Jim. This has all got me wanting to build mine--I've been considering it, since late last year. Thanks, everyone for the photos and the inspiration. Just need to get my dragster finished, first. -
1926 Mack AC Dump Truck
Straightliner59 replied to Jim B's topic in WIP: Model Trucks: Big Rigs and Heavy Equipment
I know I'm late to the party, with this, but, if I wanted to replicate a greasy look, I'd give oil paints a try. They can be textured, which could add a nice touch of realism. Yes, they dry slowly, but, it could be applied after everything else is done.