Straightliner59
-
Posts
5,795 -
Joined
-
Last visited
Content Type
Profiles
Forums
Events
Gallery
Everything posted by Straightliner59
-

ARII Chaparral 2C
Straightliner59 replied to Mark W's topic in WIP: Other Racing: Road Racing, Land Speed Racers
Is it Jim Hall, or Steve Austin? -
Mine arrived in Arvada, today!
-
Modern Top Fuel Roll Cage Helmet Shield?
Straightliner59 replied to jlucky's topic in Model Building Questions and Answers
The wood buck and thermoforming is a good idea. Also, in aluminum, pick up some Maid-O-Metal tooling aluminum. It forms, easily. It's softer than regular aluminum foil or cake pans. -
I have one I can't even talk about!
-
Hoping mine arrives, soon. I think I am always first to get the newest issue of the other mag, since it's published in Denver. MCM used to be, by Golden Bell Press.
-
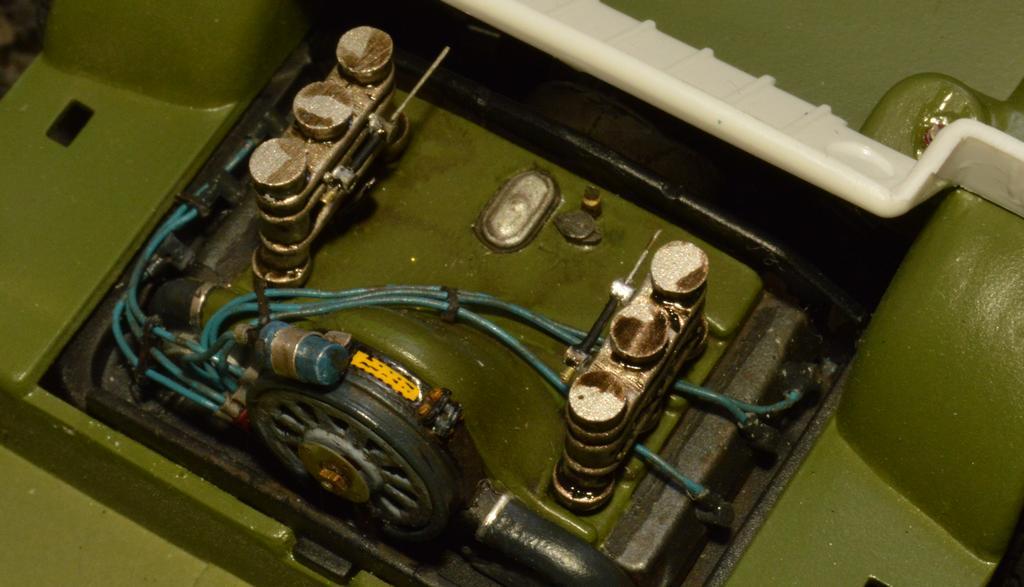
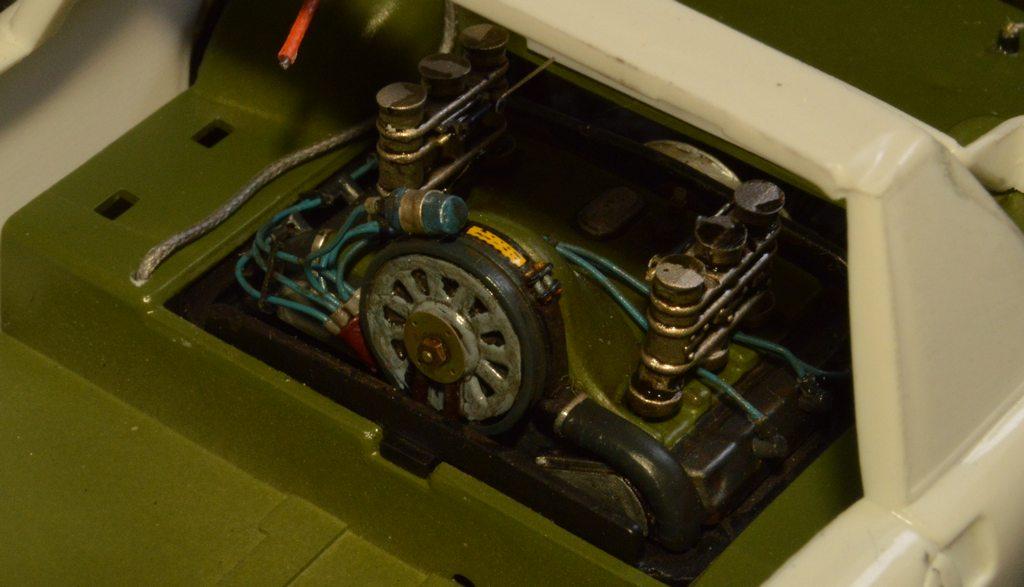
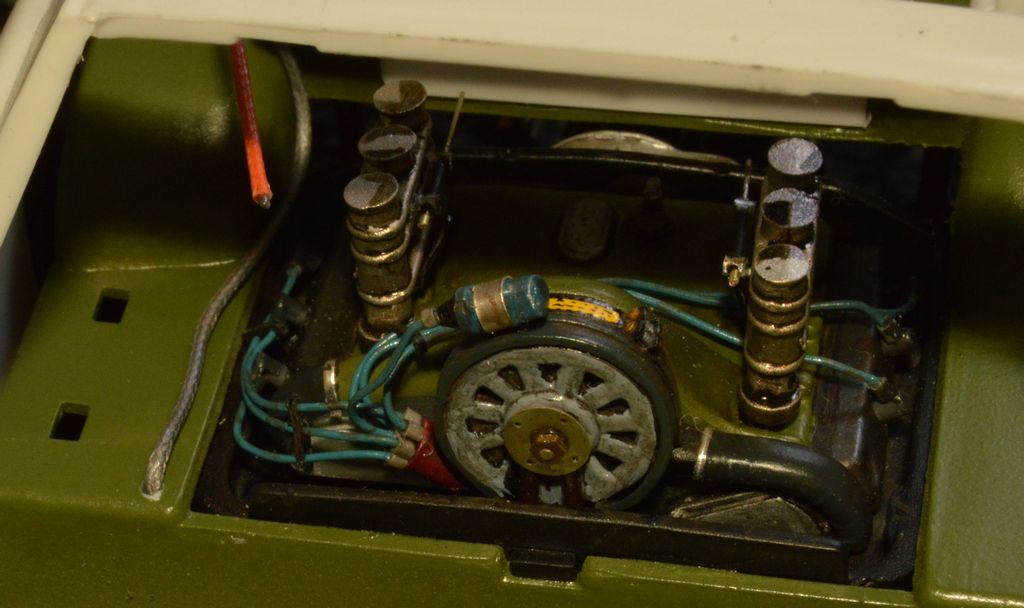
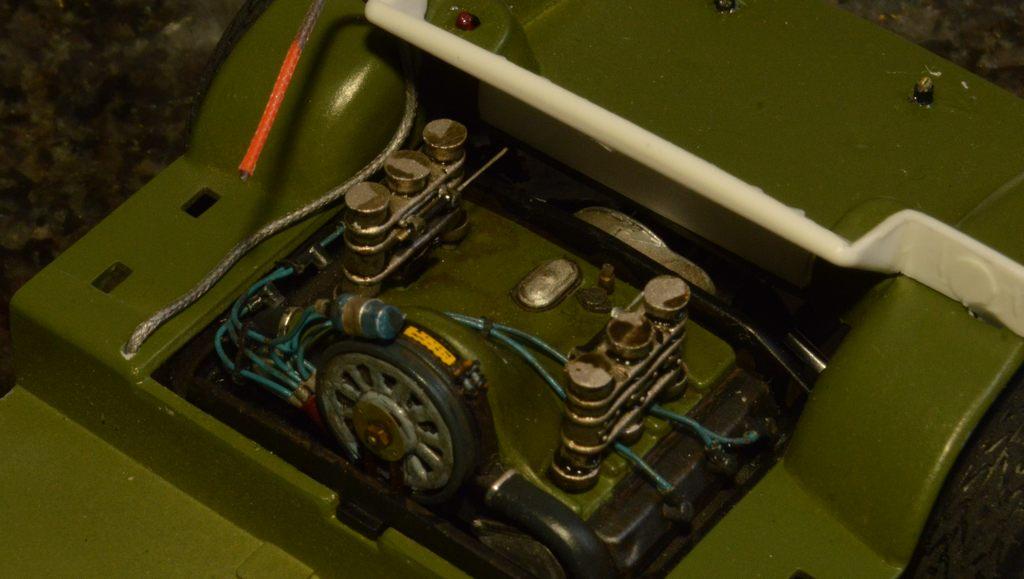
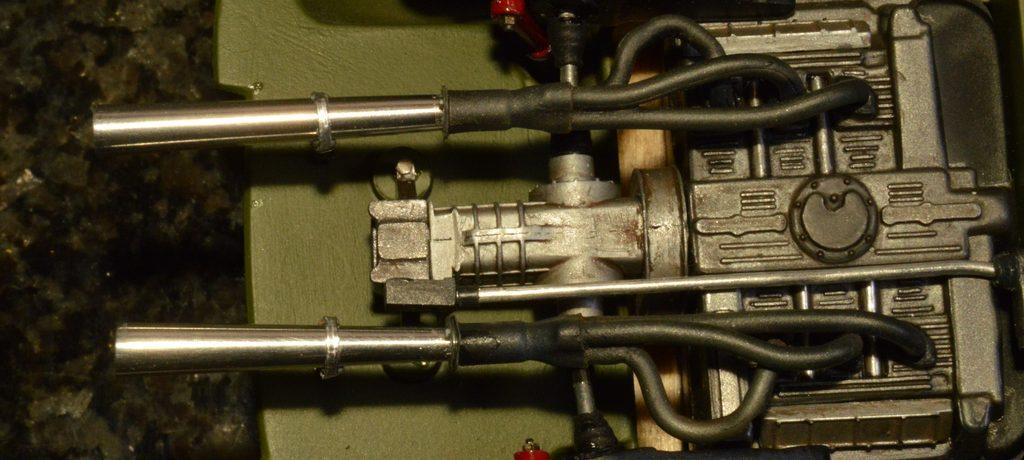
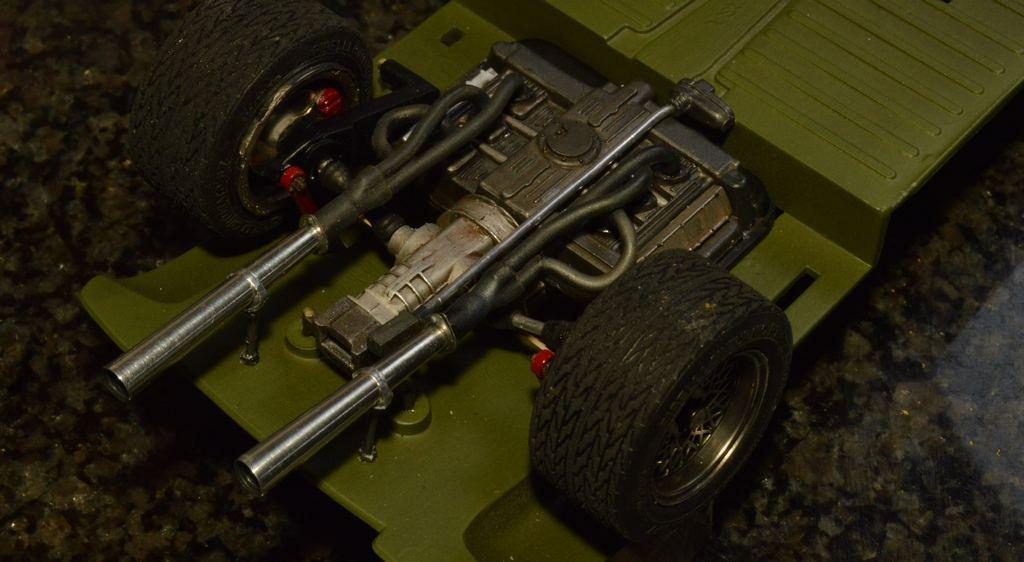
I got the carbs finished, except for getting the fuel inlet nipples trimmed down, to slip a bit of hex and "hose" over them, without them being so long, as they are, in these photos. That said, the carbs aren't glued in place yet, either. I added tabs to mount the throttle cross-link, because, I can't ignore something that huge! It's a prominent feature, so it needs to be there. I finished the carbs by shooting them with Krylon Nickel, then washing them with a mixture of Vallejo Oiled Earth wash, mixed with a little sepia tone India ink. The main fuel line is sinking-core braided, 18 lb. test trolling line (it's in such wide use on the internet, that they can barely up with production!). The carb fuel lines are 1mm aluminum and .3mm brass tube. While I can make the rest of the components, assembly will not be completed until the firewall is painted and installed. Comments are always welcomed. Thanks for looking!

-
I agree with Brian. This is a joy to behold!
-
There's NNL North, in the Twin Cities. There's also my favorite hobby shop on the planet, in St. Paul--Scale Model Supplies, AKA "The Dungeon". It's almost worth the trip, itself.
-
Western Star 4900 FA plow truck
Straightliner59 replied to BK9300's topic in WIP: Model Trucks: Big Rigs and Heavy Equipment
Absolutely beautiful work, Brian! I look at this, and I could swear I was still in Minnesota. Just fantastic work, sir. -
What could this be? Horn button? Or….?
Straightliner59 replied to NOBLNG's topic in Model Building Questions and Answers
That's funny. My uncle designed the AC system for the AMC Pacer. He said it was like trying to air condition a greenhouse! -
Thanks, Ian! I appreciate your comments, my friend. I've never been big on a lot of "flash". I really like things that look practical, and used! It's coming along, pretty nicely. I'm itching to get back on my Warren, Coburn and Miller inspired dragster. Thanks for checking in!
-
Thanks, Brian! They are, for sure. I know you're familiar with that kind of work, as well!
-
I just remembered that there's a sheet of 3/8" glass in my closet that's about 20"X24". I have no place to use it! I already have a granite surface plate, and a piece of 12"X18"X1/4" glass on my workbench. I've been envisioning new layouts for my shop, lately. If I ever get around to redoing it, maybe I'll make space for the big pane.
-
Oh, yeah...you mentioned solder for plug wires. I forgot to mention that you can buy spools of soft wire for fly-tying. I have them in .015", .020", .025", .030" and .035". That stuff works beautifully for a lot of hoses, wires, etc.
-
Mark, yes, it is, indeed, also called craft wire. I actually managed to turn an end of a couple of lengths of this, to make mounting pins on the push bars, on my Corvette. I was surprised it worked, at all! Here's another cheap source for aluminum to turn--dollar store aluminum knitting needles! That material machines beautifully, and given that so much of what we make is tiny--there you go!
-
Thank you, Ken. I appreciate that!
-
I appreciate your comments, Greg! I am going to go out on a limb, here, and say that I'd bet you do have the skills to turn rotors. You're an excellent builder! The hardest part, for me, of machining anything is getting my measurements consistent--I always seem to forget just how far I've turned the knobs! I make drawings, but, any little distraction can make me forget where I was!😂 Rotors are a great place to start, though. They're pretty straightforward. You should give them a try, you might just surprise yourself.
-
Western Star 4900 FA plow truck
Straightliner59 replied to BK9300's topic in WIP: Model Trucks: Big Rigs and Heavy Equipment
It's coming along, Brian. It's looking awesome! -
I use Loctite, in both liquid and gel formulas. I apply it with a needle, glued into a 6" length of dowel.
-
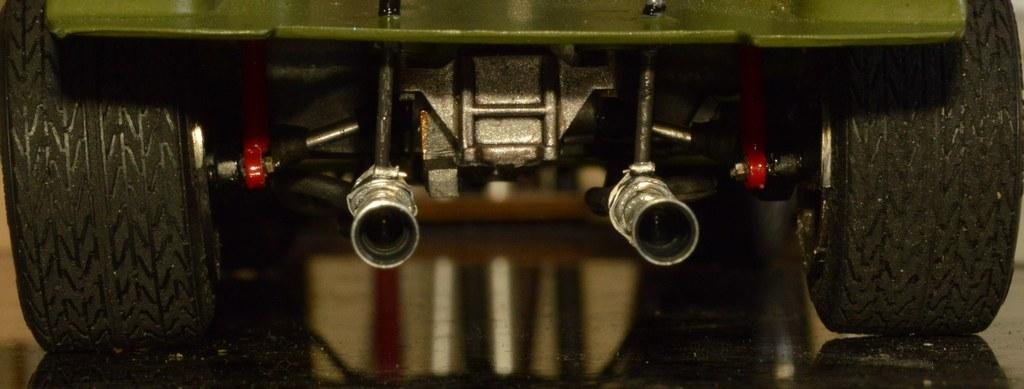
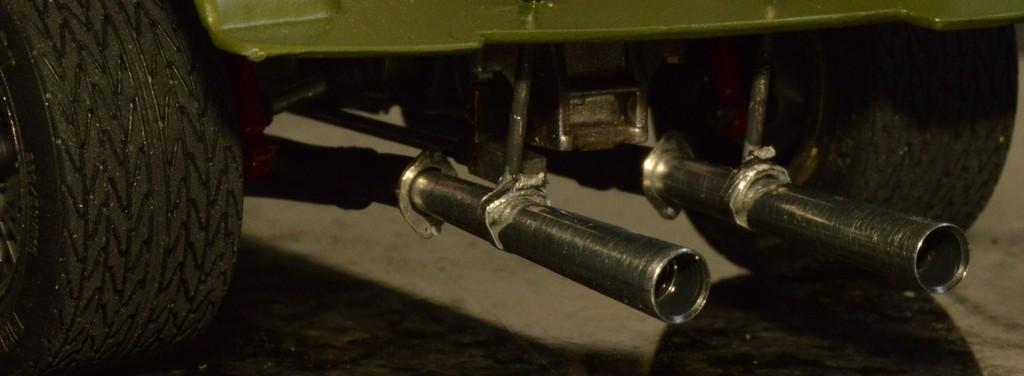
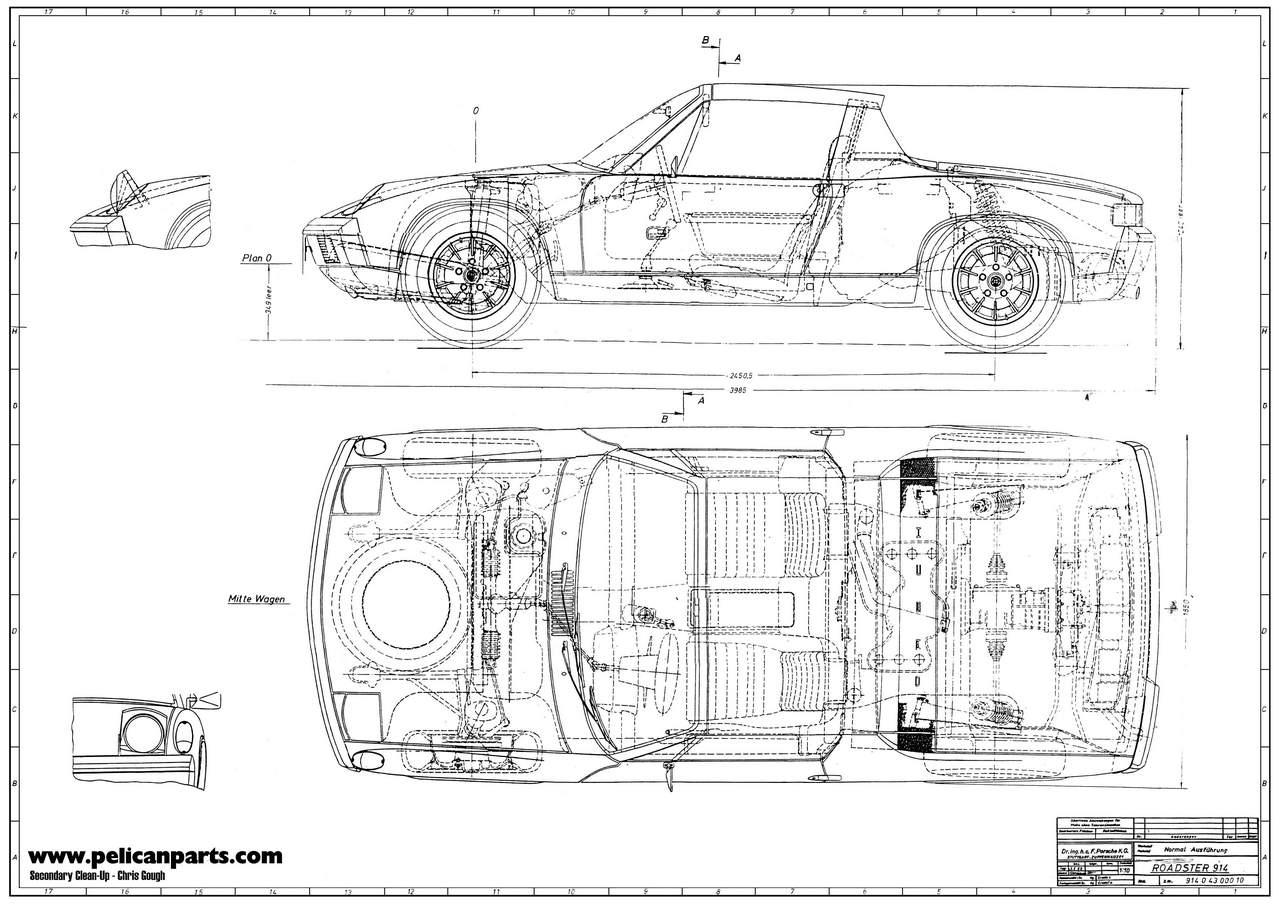
I made the hangers, and got the pipes done. I saw a similar setup, using a hose clamp, so I went with that. I fudged the mounting, a bit, because to mount them to the rear of the tranaxle case still seemed too far forward--especially for the model, so I went through the pan. I'll have to figure out something for the topside, but, it shouldn't be too difficult. I've been comparing the body to the drawing, below. It lines up, nicely, once the sail panels are fixed. The only other real glitch, is that the fender openings should be slightly more squared, but, they don't detract too awful much--for me! Otherwise, lining up any section of the model with the drawing (to avoid parallax distortion), it's pretty dadgum close. I'll be working on the carbs, next. Your comments are always welcomed. Thanks for looking!
-
cheetah reboot
Straightliner59 replied to charlie libby's topic in WIP: Other Racing: Road Racing, Land Speed Racers
Imagine that? -
And, the beat goes on... Excellent work.
-
Farm Floater Truck 1/24th scale
Straightliner59 replied to Randy D's topic in WIP: Model Trucks: Big Rigs and Heavy Equipment
The spring hangers and shock mounts! When it comes to brass fabrication, my hat's off, to you, my friend. World champion solderer, you are! -
That boom is a magnificent work of art. It's absolutely beautiful.
-
Western Star 4900 FA plow truck
Straightliner59 replied to BK9300's topic in WIP: Model Trucks: Big Rigs and Heavy Equipment
I haven't looked at this in a while. Your details are beautiful, Brian! I don't think that U-joint is much too big, if it is. The black paint helps it to look smaller, as well. The finishes on the different parts look like their 1:1 counterparts. Well done, my friend!