Straightliner59
-
Posts
5,795 -
Joined
-
Last visited
Content Type
Profiles
Forums
Events
Gallery
Everything posted by Straightliner59
-
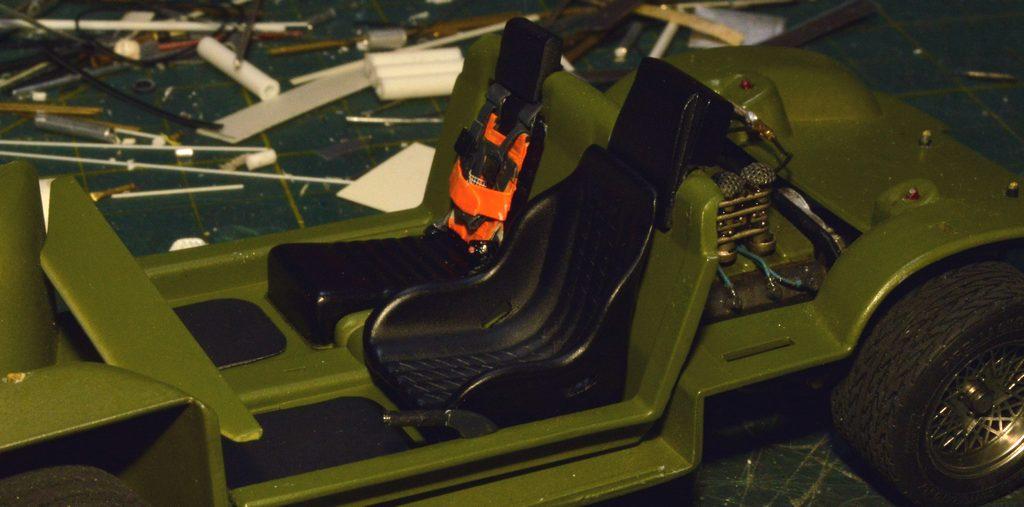
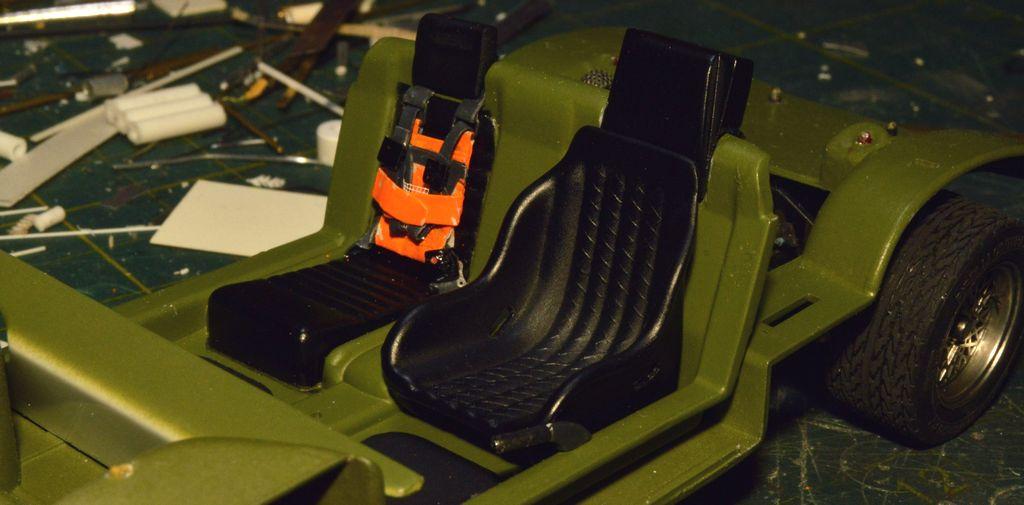
Thanks, kindly! I've made some progress with the pedal assembly. The brake and clutch pedals are the brass pieces on the aluminum bar. I still need to build the throttle pedal. I found some photos of the perforated plate, beneath them, and liked the look of it, so, I cut up some more of the automatic transmission screen. I am mixed, as to the Eduard harnesses. They're easy to assemble, and, other than their heavy texture, they look nice--I esecially like the stitching. I'm not real keen on their texture/malleability when it comes to posing them--they're stiff, and they feel a tad brittle. I feel like their assembly method will make other harness kits more easy to put together, although that may just be due to their instructions more clearly indicating how to assemble them. Anyway, I still favor my wine bottle foil, for making belts. Questions, comments and critiques are always welcomed. Thanks for looking!

-

ARII Chaparral 2C
Straightliner59 replied to Mark W's topic in WIP: Other Racing: Road Racing, Land Speed Racers
Bummer about the screws. It looks great, though! -
Thanks, Jon! I appreciate your kind words. Thank you, Brian! That's the kind of stuff I've always appreciated on other people's models--just little, fun stuff to look at, that I don't notice, right away. Those release buttons are easy! I just drill the handle, and run the shaft through, and finish the end. I'm still considering a new brake handle, at this point--maybe one with a hand grip. I'm also in the process of working out what I am going to do with the pedal cluster.
-
Thanks, Tom. I guess it hadn't dawned on me, just how light it would be. Makes perfect sense, though. This thing just gets better and better! Looks awesome, all laid out, like that. Hope your health stuff settles down, for you.
-
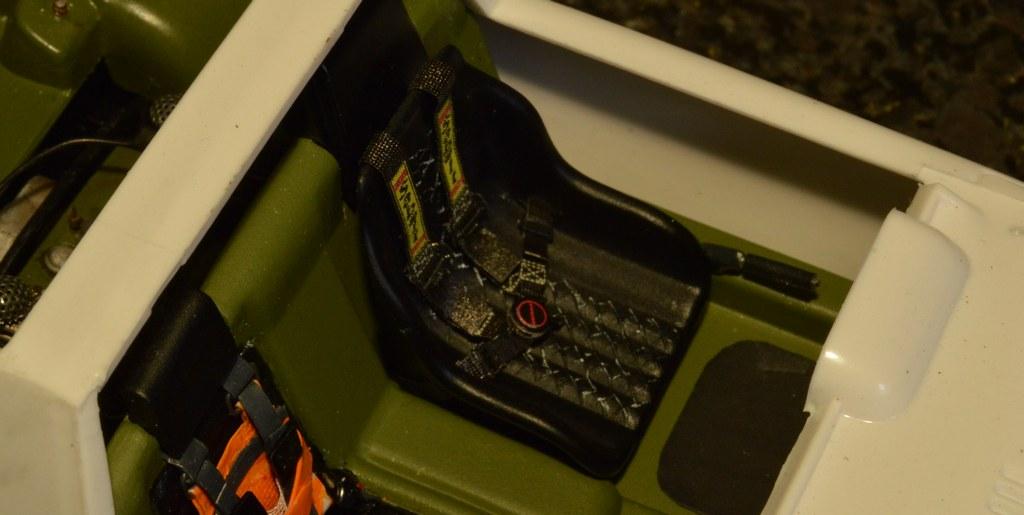
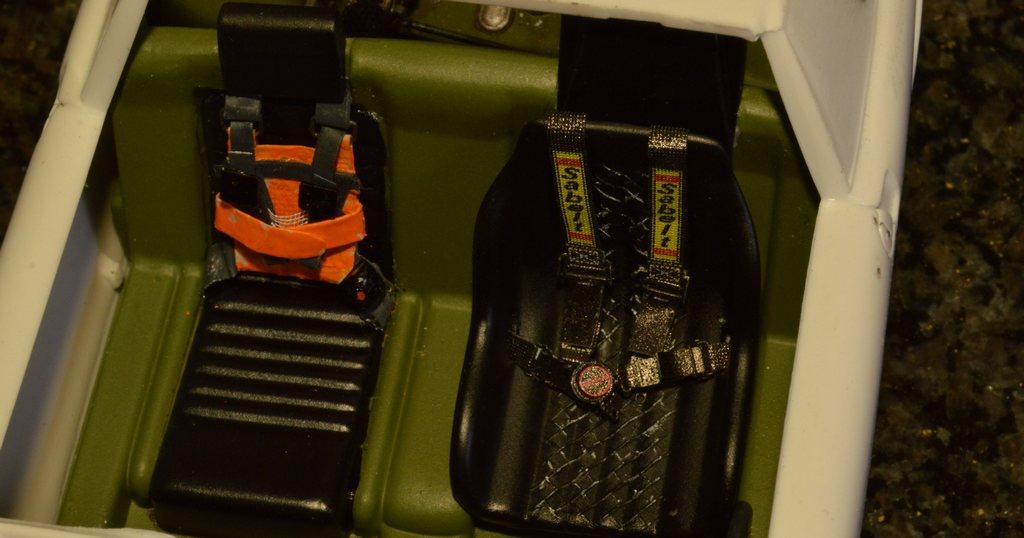
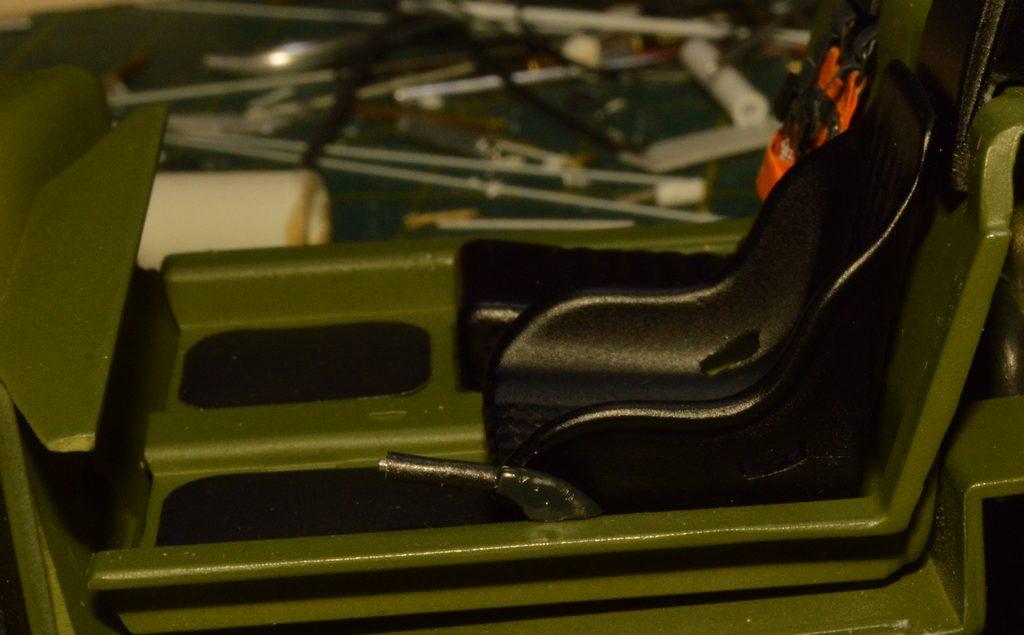
I got the driver's side headrest installed. I don't even see it, in the instruction sheet. Also, I couldn't find a back, for it, even though it has receivers for pins, for one. I made that from Evergreen strip, then cleaned it up, and sanded the headrest, so that it would fit into the space it's supposed to. Finally, I shot it with Krylon Satin Black. I drilled and filed openings in the seat bucket, for the harness, and painted that the same. I'll be using a set of Eduard Sabelt harnesses. Also, I carved and sanded a base for the hand brake from Evergreen. The handle is wire insulation, while the shaft is some Christmas tree ornament hanger wire. Revell mounted it in the wrong place, compared to the real world item. Since there's not enough room on the floor, where it belongs, anyway, I glued a tab to the base of mine, and cemented it in Revell's location. I made a pair of floormats from some slightly textured paper, and painted them Krylon Utra Flat Black. As always, your comments, questions and critiques are welcomed. Thanks for looking!
-
AMT Hell Drivers Mustang II body issue
Straightliner59 replied to Daddyfink's topic in Car Kit News & Reviews
I was gonna say the same! -
I guess I'll need one of the BRE Datsun pickups. I've been wanting the pickup, and the BRE livery will go along with my 240Z and 510 kits.
-
My only real beef with Rustoleum is dry time. Probably because I use Krylon, and have, for fifty years. Krylon dries very quickly. If I mask with Parafilm, I can accomplsh a two-tone paint job in a day, with Krylon. The only times i've had any problem with Krylon, it was self-inflicted! Anyway, that isn't relevant to the thread, I suppose. Rustoleum does have some very nice colors. Next time i need to use some, I may decant, and cut it with lacquer thinner, and see hw that behaves. I agree with David, about the vitriol some of those FB guys like to spew over a model that doesn't even belong to them! There are a lot of those loudmouths whom I have never seen anything built by, too, yet they talk down about guys who've been building, forever.
-
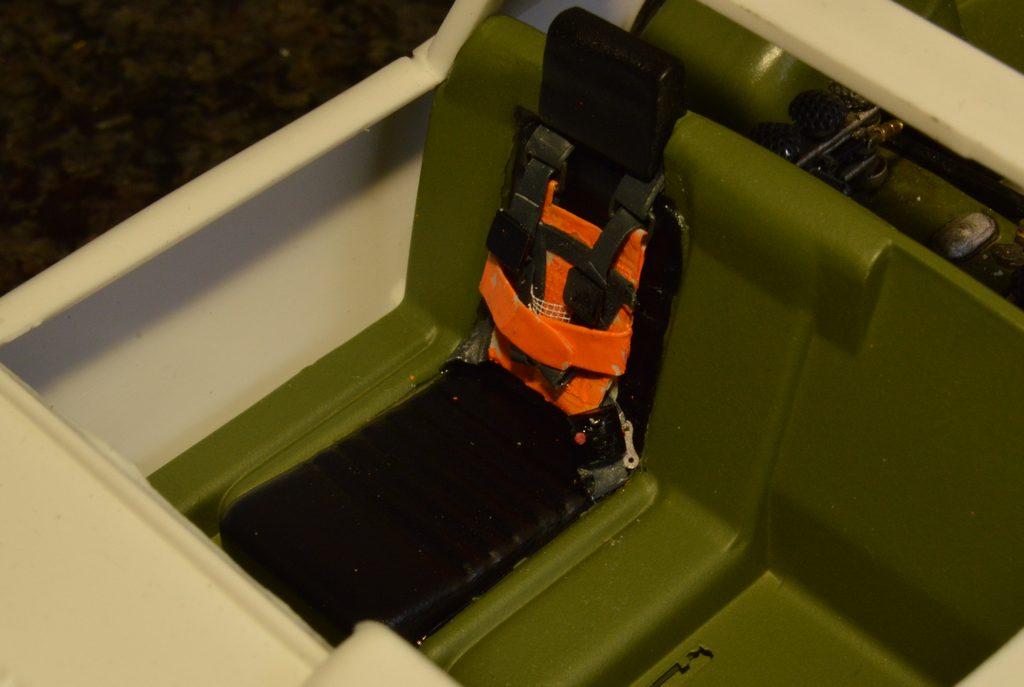
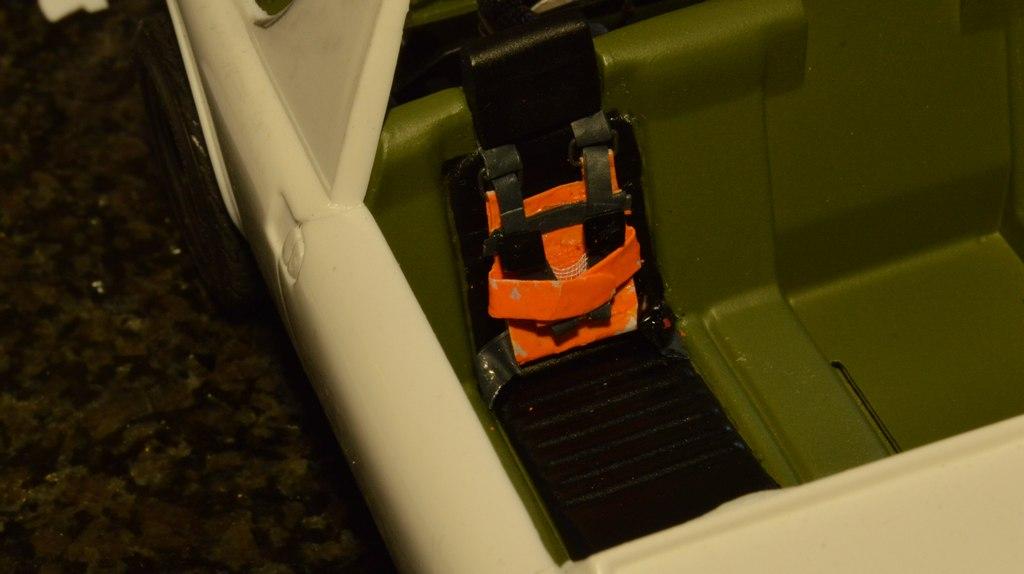
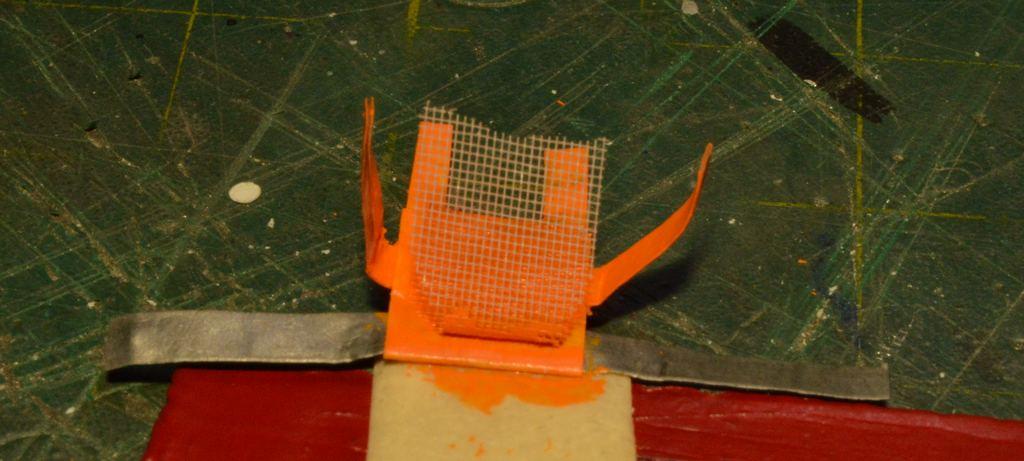
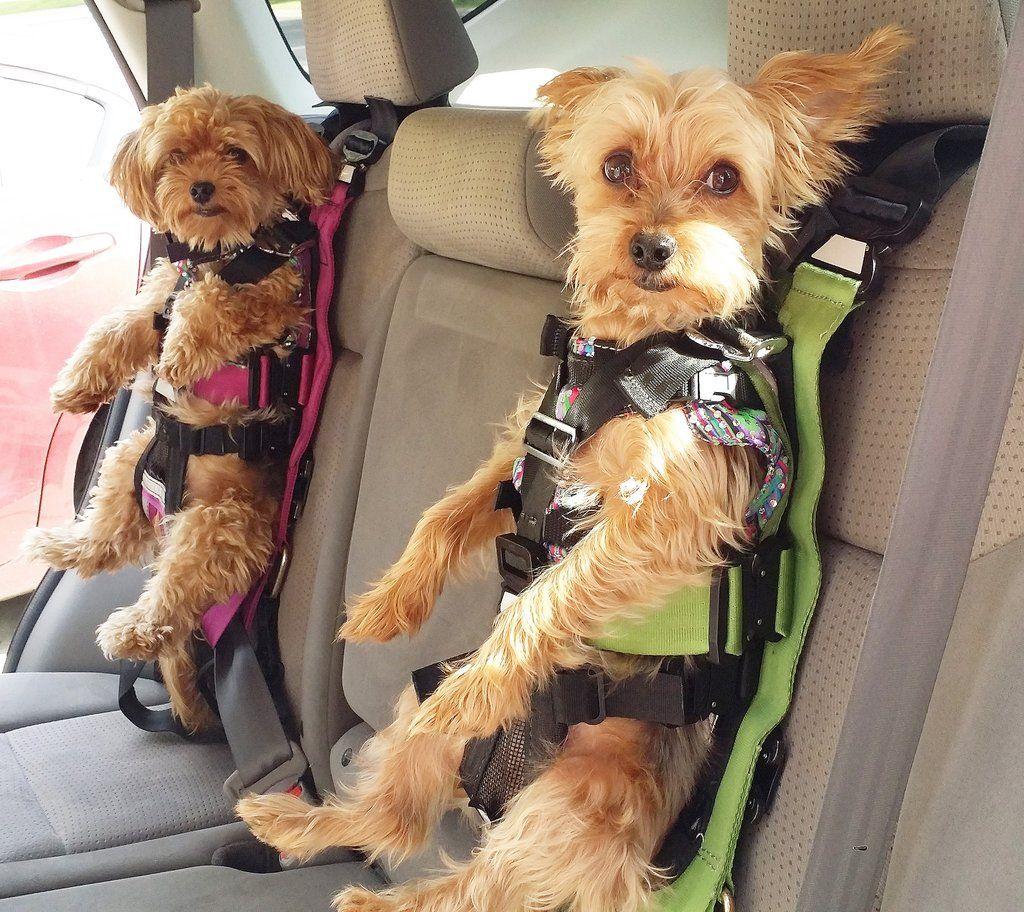
Except for a bit of touchup, although it isn't a perfect replica of the one above, the pooch pouch is done! Not too bad, I reckon. I used kitchen parchment soaked in diluted white glue, for the main part of the assembly. The straps are my typical wine bottle foil, as are the lap belts. The mesh carrier is a tiny bit of a bag that must have come from some long-ago wedding. It appears to be one of those they put rice or bird seed in. I dry brushed the mesh withsome Humbrol off-white naval color. Thanks for looking!
-
1940 Ford Sedan Early 60’s Gas
Straightliner59 replied to Dennis Lacy's topic in WIP: Drag Racing Models
A pretty-much perfect rendition! Beautiful work! -
Thank you, sir!
-
Western Star 4900 FA plow truck
Straightliner59 replied to BK9300's topic in WIP: Model Trucks: Big Rigs and Heavy Equipment
Oh, they will!😂 You'll be happy you did them, though! -
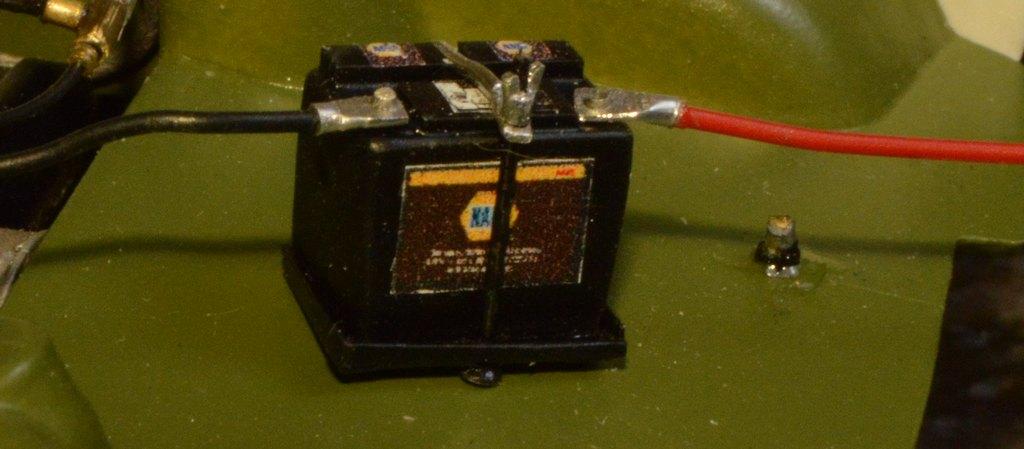
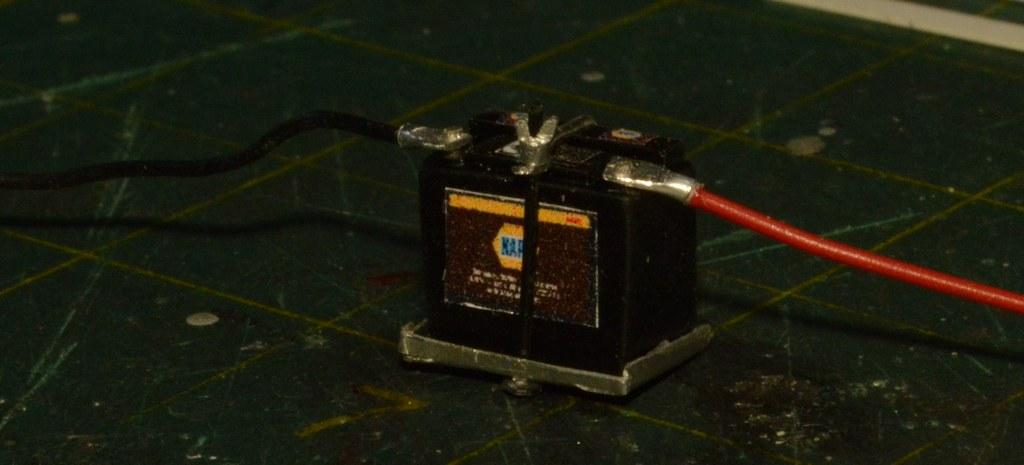
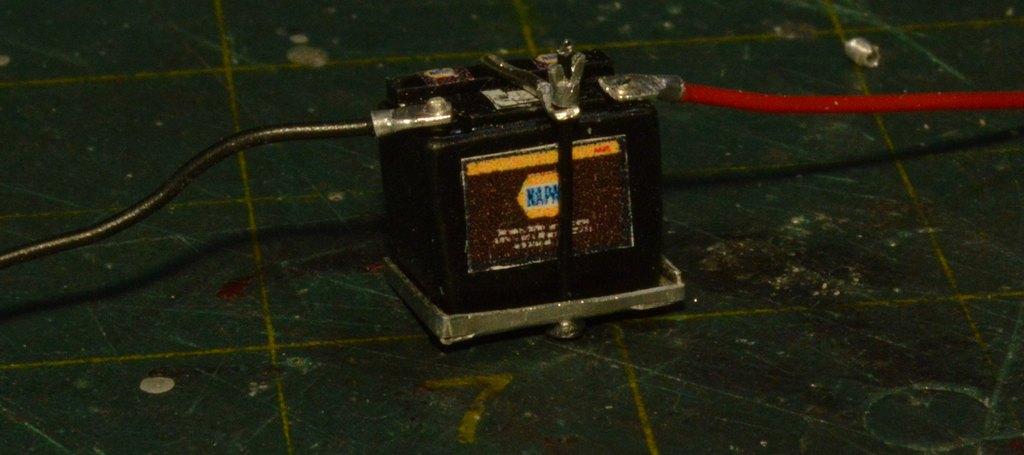
The battery is completed. I'm currently working on the doggie harness. This oughtta' be interesting!😄It needs to be there, to personalize the model. Also, I am thinking of trying something with the engine cover. Thnks for looking!
-
Western Star 4900 FA plow truck
Straightliner59 replied to BK9300's topic in WIP: Model Trucks: Big Rigs and Heavy Equipment
Chains are off to a roaring start, Brian! They look great! -
Those guys, back then were always machining stuff to make it suit their needs. I figure that since we modelers dont have any way to test the actual practicality of something, all we really need is plausibility!
-
Thanks, Mark! Looking forward to seeing that! Thanks, Brian. Both of the air filter assemblies are in my display case, currently. Hmmm...they'd work out, nicely for a Porsche-powered Bug. The clearance could likely be found, there.
-
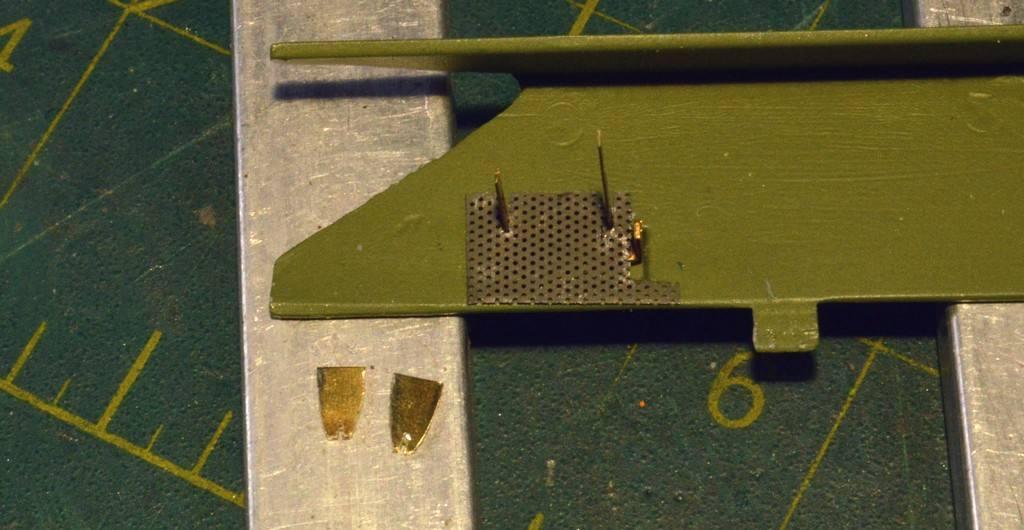
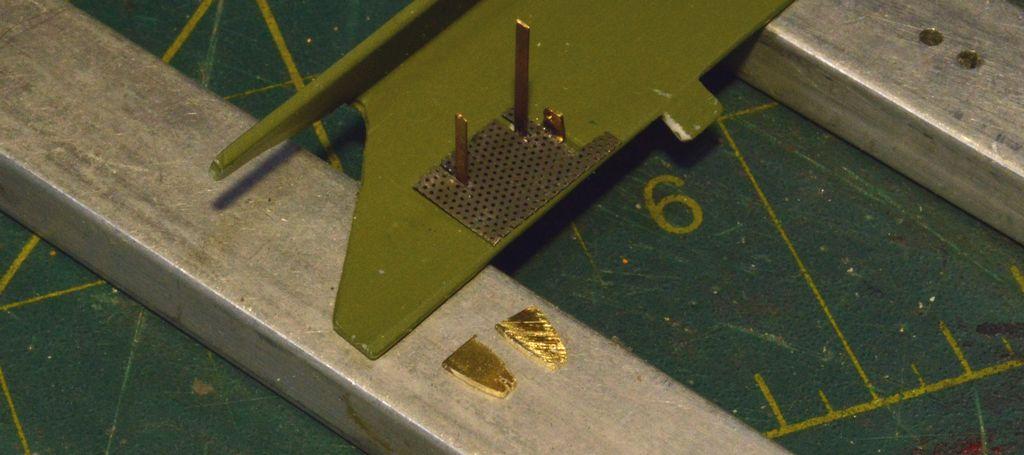
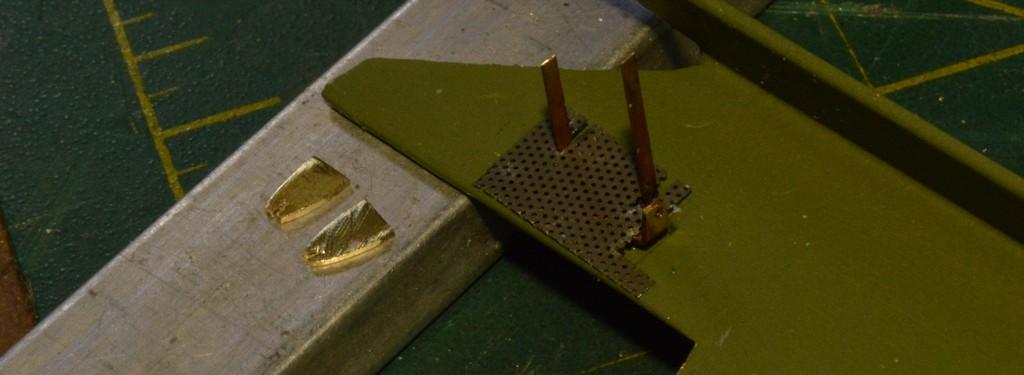
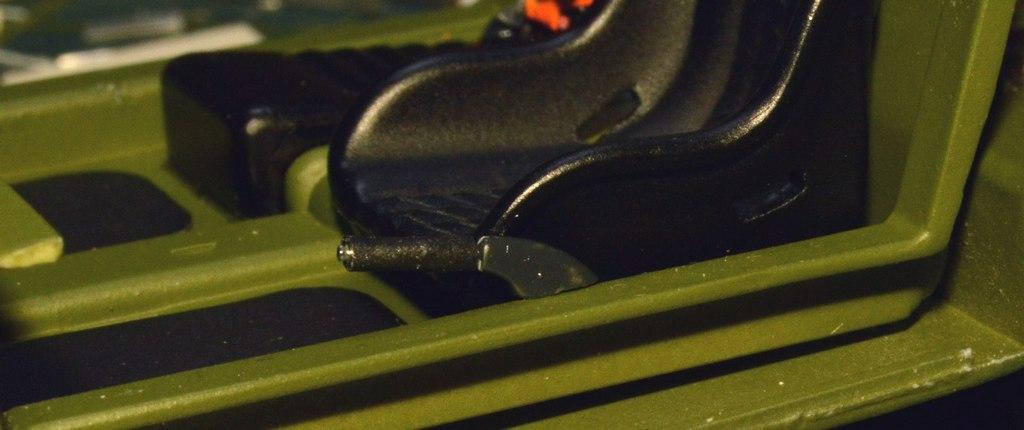
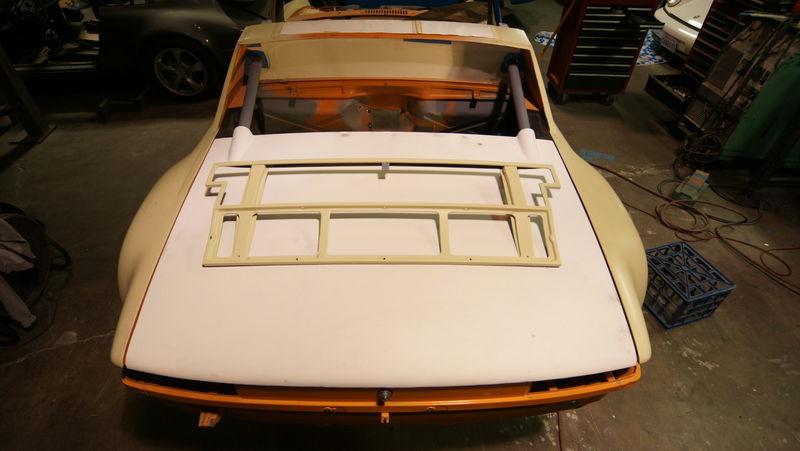
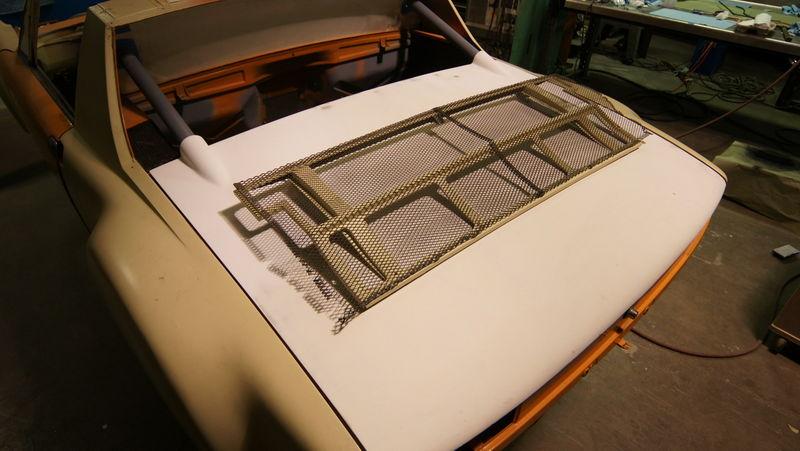
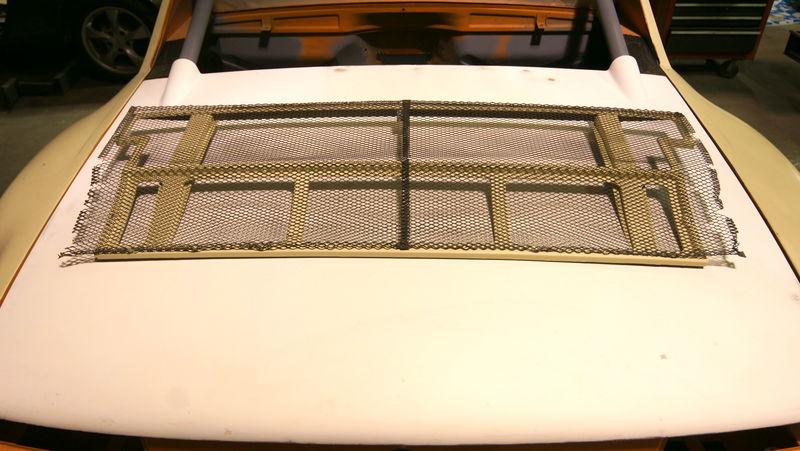
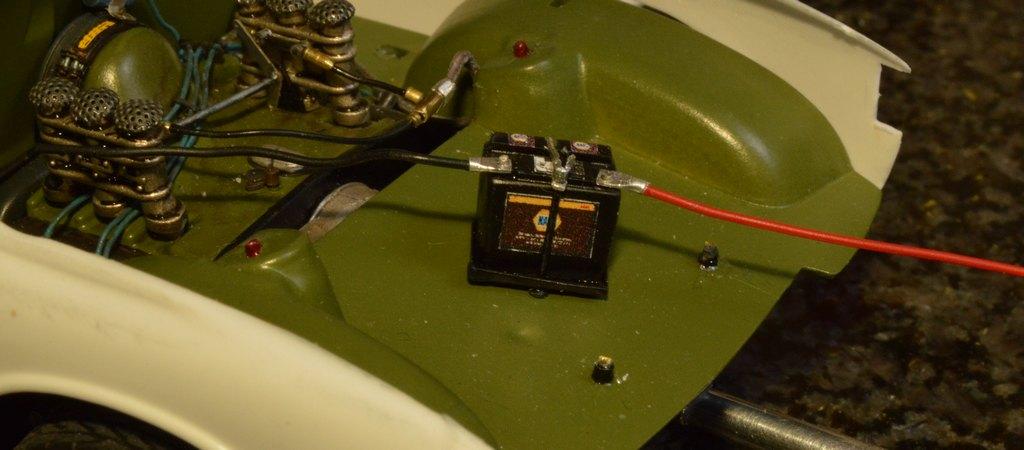
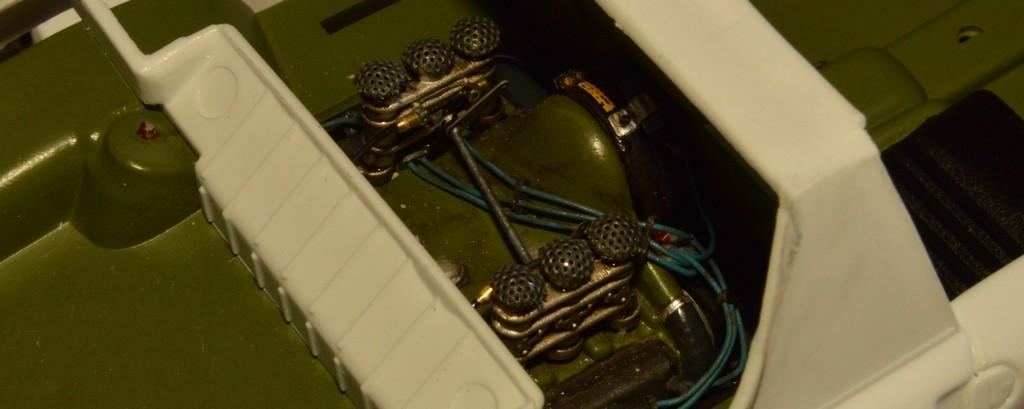
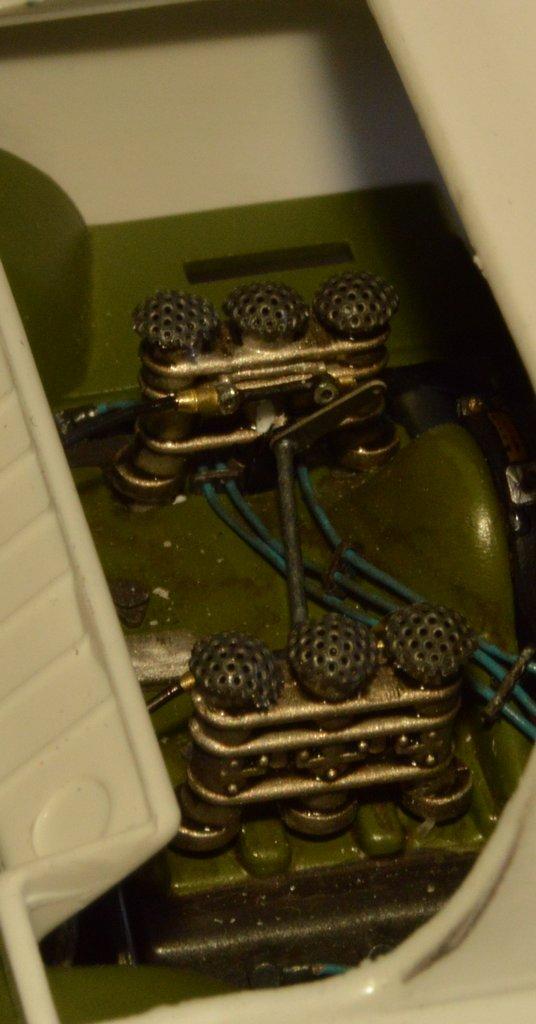
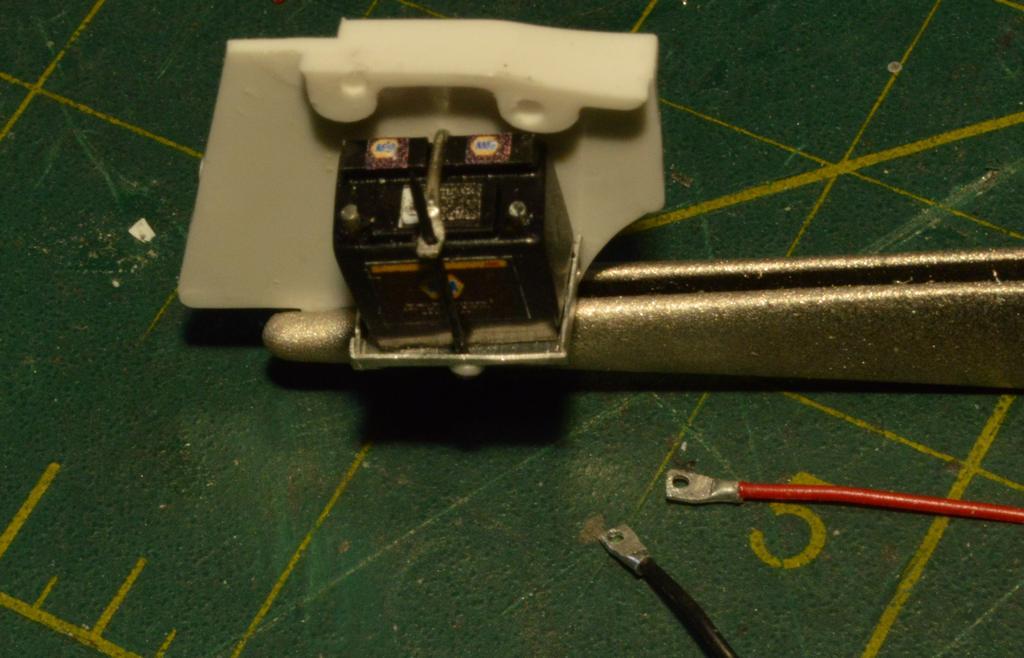
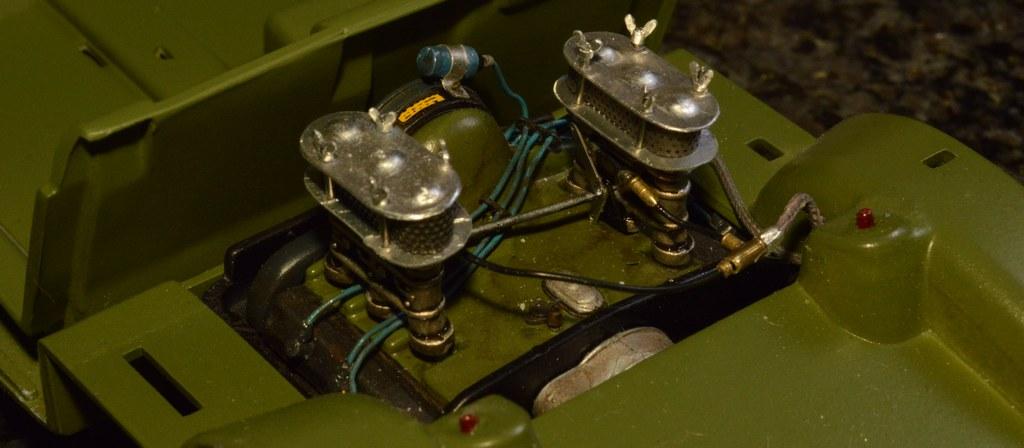
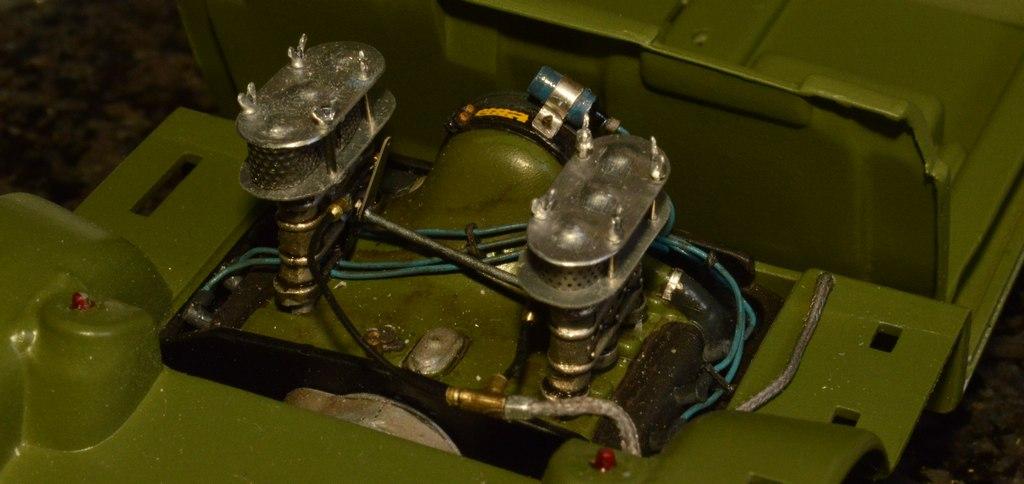
I discovered that the air cleaners were too tall for the engine cover to shut. I remembered watching Doug Whyte building his Monogram 904 for the 24 Hour Build, one year, and topping the carbs with screens he punched and domed. I had tried it with woven screen, but didn't care for the result, so, I went with this auto-trans screen. Not too shabby, and the lid will close, now! Next, I dealt with the battery. I found a kit battery (because it already fit, just needing a bit of cleanup, I opted to use it, rather than scratch one), then cleaned it up and added the top details from Evergreen strip. The terminal posts are .030 fly-tying wire (lead free, of course!😀). I made the terminals from 1mm aluminum tube. Cables are from a roll of something I bought, online. I made the tray from flashing, the hold-down post from a .023" brad, and the hold-down "strap" from wire. I was determined to use at least one wing nut, on this thing, so, here we are! Thanks for looking!
-
ARII Chaparral 2C
Straightliner59 replied to Mark W's topic in WIP: Other Racing: Road Racing, Land Speed Racers
Looks beautiful! The screens worked out, very nicely! -
No doubt! That's what they're made for, for sure. I use them all the time in the mill and lathe. I bought a ton of them, in lots of 50, most of them resharpened Kyoceras.
-
Yes! I've become a big fan of beeswax for bits, saws, etc. It's surprising, the difference it makes.
-
Western Star 4900 FA plow truck
Straightliner59 replied to BK9300's topic in WIP: Model Trucks: Big Rigs and Heavy Equipment
I hear that. Nothing is more frustrating than having to rework something major down the road, because of something we forgot to do. I truly wish I could eliminate that shortcoming from my life! Alas, it seems like I always forget something! -
I am sure you built one! I might have the only one that's not accounted for, and I feel rather badly, about that.
-
Western Star 4900 FA plow truck
Straightliner59 replied to BK9300's topic in WIP: Model Trucks: Big Rigs and Heavy Equipment
That, too, looks spot-on! I was driving Freightliners, at the time. They didnt have the foiled insulation. This thing is so fine, sir! -
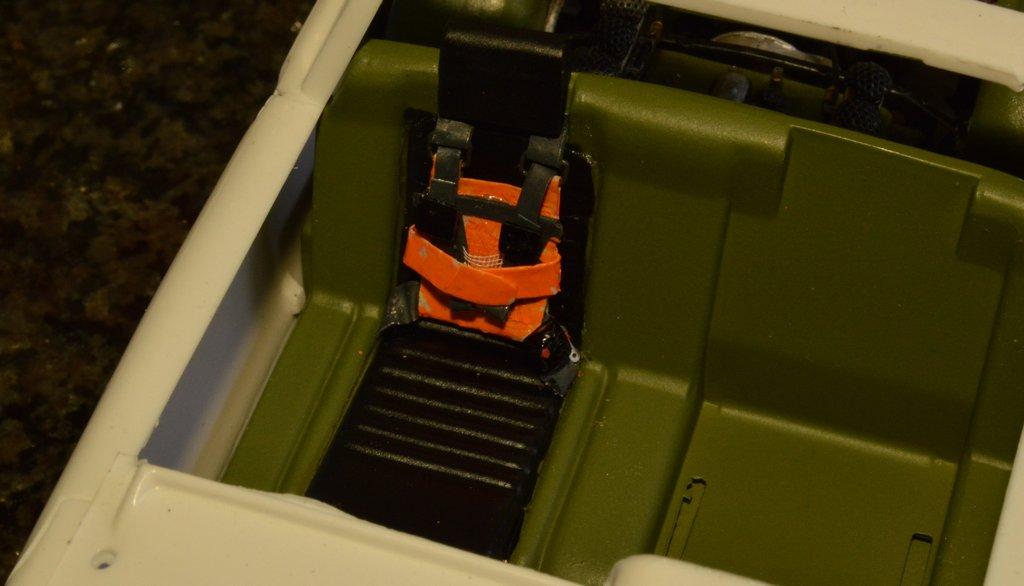
The interior floor unit is painted. I got the fuel lines installed. They're not close to perfect, but, they'll be tucked behind the rear bulkhead area thingie, never to be seen again! Next, after the seat's painted, I have to scratch up one of these harnesses. The friend I'm building this for has a little dog, and, she's gonna be riding along, I would assume. She might as well look like a racer. It doesn't look particularly comfortable, but, it looks about as safe as it could be. These pooches don't look thrilled!😂 Anyway...Thanks for looking!
-
Western Star 4900 FA plow truck
Straightliner59 replied to BK9300's topic in WIP: Model Trucks: Big Rigs and Heavy Equipment
Utterly fantastic work, Brian. Your choices of materials are excellent. All looks like it should. Even if it's not completely prototypical to the truck, the insulation could easily be a thermal blanket, applied later on.