StevenGuthmiller
-
Posts
14,971 -
Joined
-
Last visited
Content Type
Profiles
Forums
Events
Gallery
Everything posted by StevenGuthmiller
-
It’s not so much that we missed you Snake, but more like we couldn’t believe that you’d be silent for so long!! ? Just joking. Glad you’re making a comeback. Steve
-
I always just fill the recesses with plastic and then prime very well and paint. I think this is one of those areas where a lot of problems can be avoided by simply priming adequately. The hoods on the MPC ‘68-‘69 Dodge Coronets were notorious for the hood cutouts, but you’ll have a pretty difficult time knowing that it ever existed on this ‘68. Steve

-
 At first, it sounded completely new to me, but after looking at the videos on YouTube, it does look very familiar. Steve
 -
PONTIAC Starlight Black -
StevenGuthmiller replied to 1972coronet's topic in Model Building Questions and Answers
As already mentioned, Starlight Black is black. No metallic in it. Metallic blacks and pearl whites are a relatively recent thing. As far as I know, neither was available in the 60s. Steve -
Automotivetouchup.com
StevenGuthmiller replied to Fantom's topic in Model Building Questions and Answers
Shouldn't need that much. I can pretty easily paint a 1/25th scale body with an ounce or less. I would think that 3 bottles should do it. But regardless, it certainly won't take 8, which is what you'd need to spend $110.00. Steve -
Automotivetouchup.com
StevenGuthmiller replied to Fantom's topic in Model Building Questions and Answers
$25.00 for a couple of bottles of Scale Finishes doesn’t sound so bad after all. ? Steve -
Just my personal observations. Steve
-
I couldn’t agree more!! Steve
-
All one has to do is look at the detail level of these two kits to understand how things have changed. Granted, not every car produced in kit form gets a new tool, but it seems that more and more, people expect it, yet still want to pay 1971 prices. I'm not picking on you, or any one else in particular, but it just seems to me that in this day, people are much more interested in quick results than they are in learning the processes required to do some of these things without expecting the after market or kit manufacturers to do it for them. I guess at some times, I have a far different outlook on the hobby than others might. I'm an old fart and I enjoy doing things old school. I revel in finding solutions to some of the idiosyncrasies of the hobby through innovation and thought rather than just ordering what I don't want to address myself, or demanding that it be provided inside of the box. I get it. It would be nice if every script set for every car model, old and new, was offered through the after market. But until somebody wants to take the leap forward to do that, you just have to take the time to learn how to address it the old fashioned way. Steve
-
Isn’t it funny how innovation continues to move forward with car models, but the modelers never seem to be able to be satisfied. We always seem to want all of the latest bells and whistles included in our kits.......that is until we get a glimpse of the price tag, and then we scream and holler about how the model companies are screwing us. ? Steve
-
Automotivetouchup.com
StevenGuthmiller replied to Fantom's topic in Model Building Questions and Answers
Okay. I saw the "Dark Brown" on another page, but it looked way to dark, so I assumed it was not the correct color that the OP was looking for. In any case, Scale Finishes carries that Dark Brown Poly as well. Steve -
Automotivetouchup.com
StevenGuthmiller replied to Fantom's topic in Model Building Questions and Answers
I don't see anything by that name on the chip sheet. Looks like "Camel" would be the closest. I understand that you're looking for a spray can, but Scale Finishes does have 1979 Pontiac "Camel" if you have an airbrush. Steve
-
Automotivetouchup.com
StevenGuthmiller replied to Fantom's topic in Model Building Questions and Answers
Never used it, but I hear that it's quite expensive. What year is "Heritage Brown"? Steve -
The acrylic dries pretty fast, so it doesn’t take long. I would say 15 or 20 minutes would suffice. Steve
-
1964 Pontiac Bonneville Convertible.
StevenGuthmiller replied to StevenGuthmiller's topic in WIP: Model Cars
Thanks Dennis!! Managed to get into the shop for a few minutes today and make a shift lever. A knob taken from the AMT '62 Catalina kit situated on a straight pin. I even managed the "H" pattern on the knob. The numbers are a little out of my realm of possibility. Steve -
In other words, he's telling you to wear a mask constantly. Steve
-
If you're spraying the stuff in the air, wear a mask. If you're just using thinners to thin paints, clean brushes, etc, I wouldn't worry too much about it. I was in the drywall business for 25-30 years, and though we wore dust masks for sanding and paint spraying, I'm sure that I ingested a lot more dust and fumes than your average person. Couple that with over 50 years of model building, if it was going to kill me, I'd probably be long gone by now. I think it's like just about anything else. If you're susceptible to something, take precautions. Steve
-
1964 Pontiac Bonneville Convertible.
StevenGuthmiller replied to StevenGuthmiller's topic in WIP: Model Cars
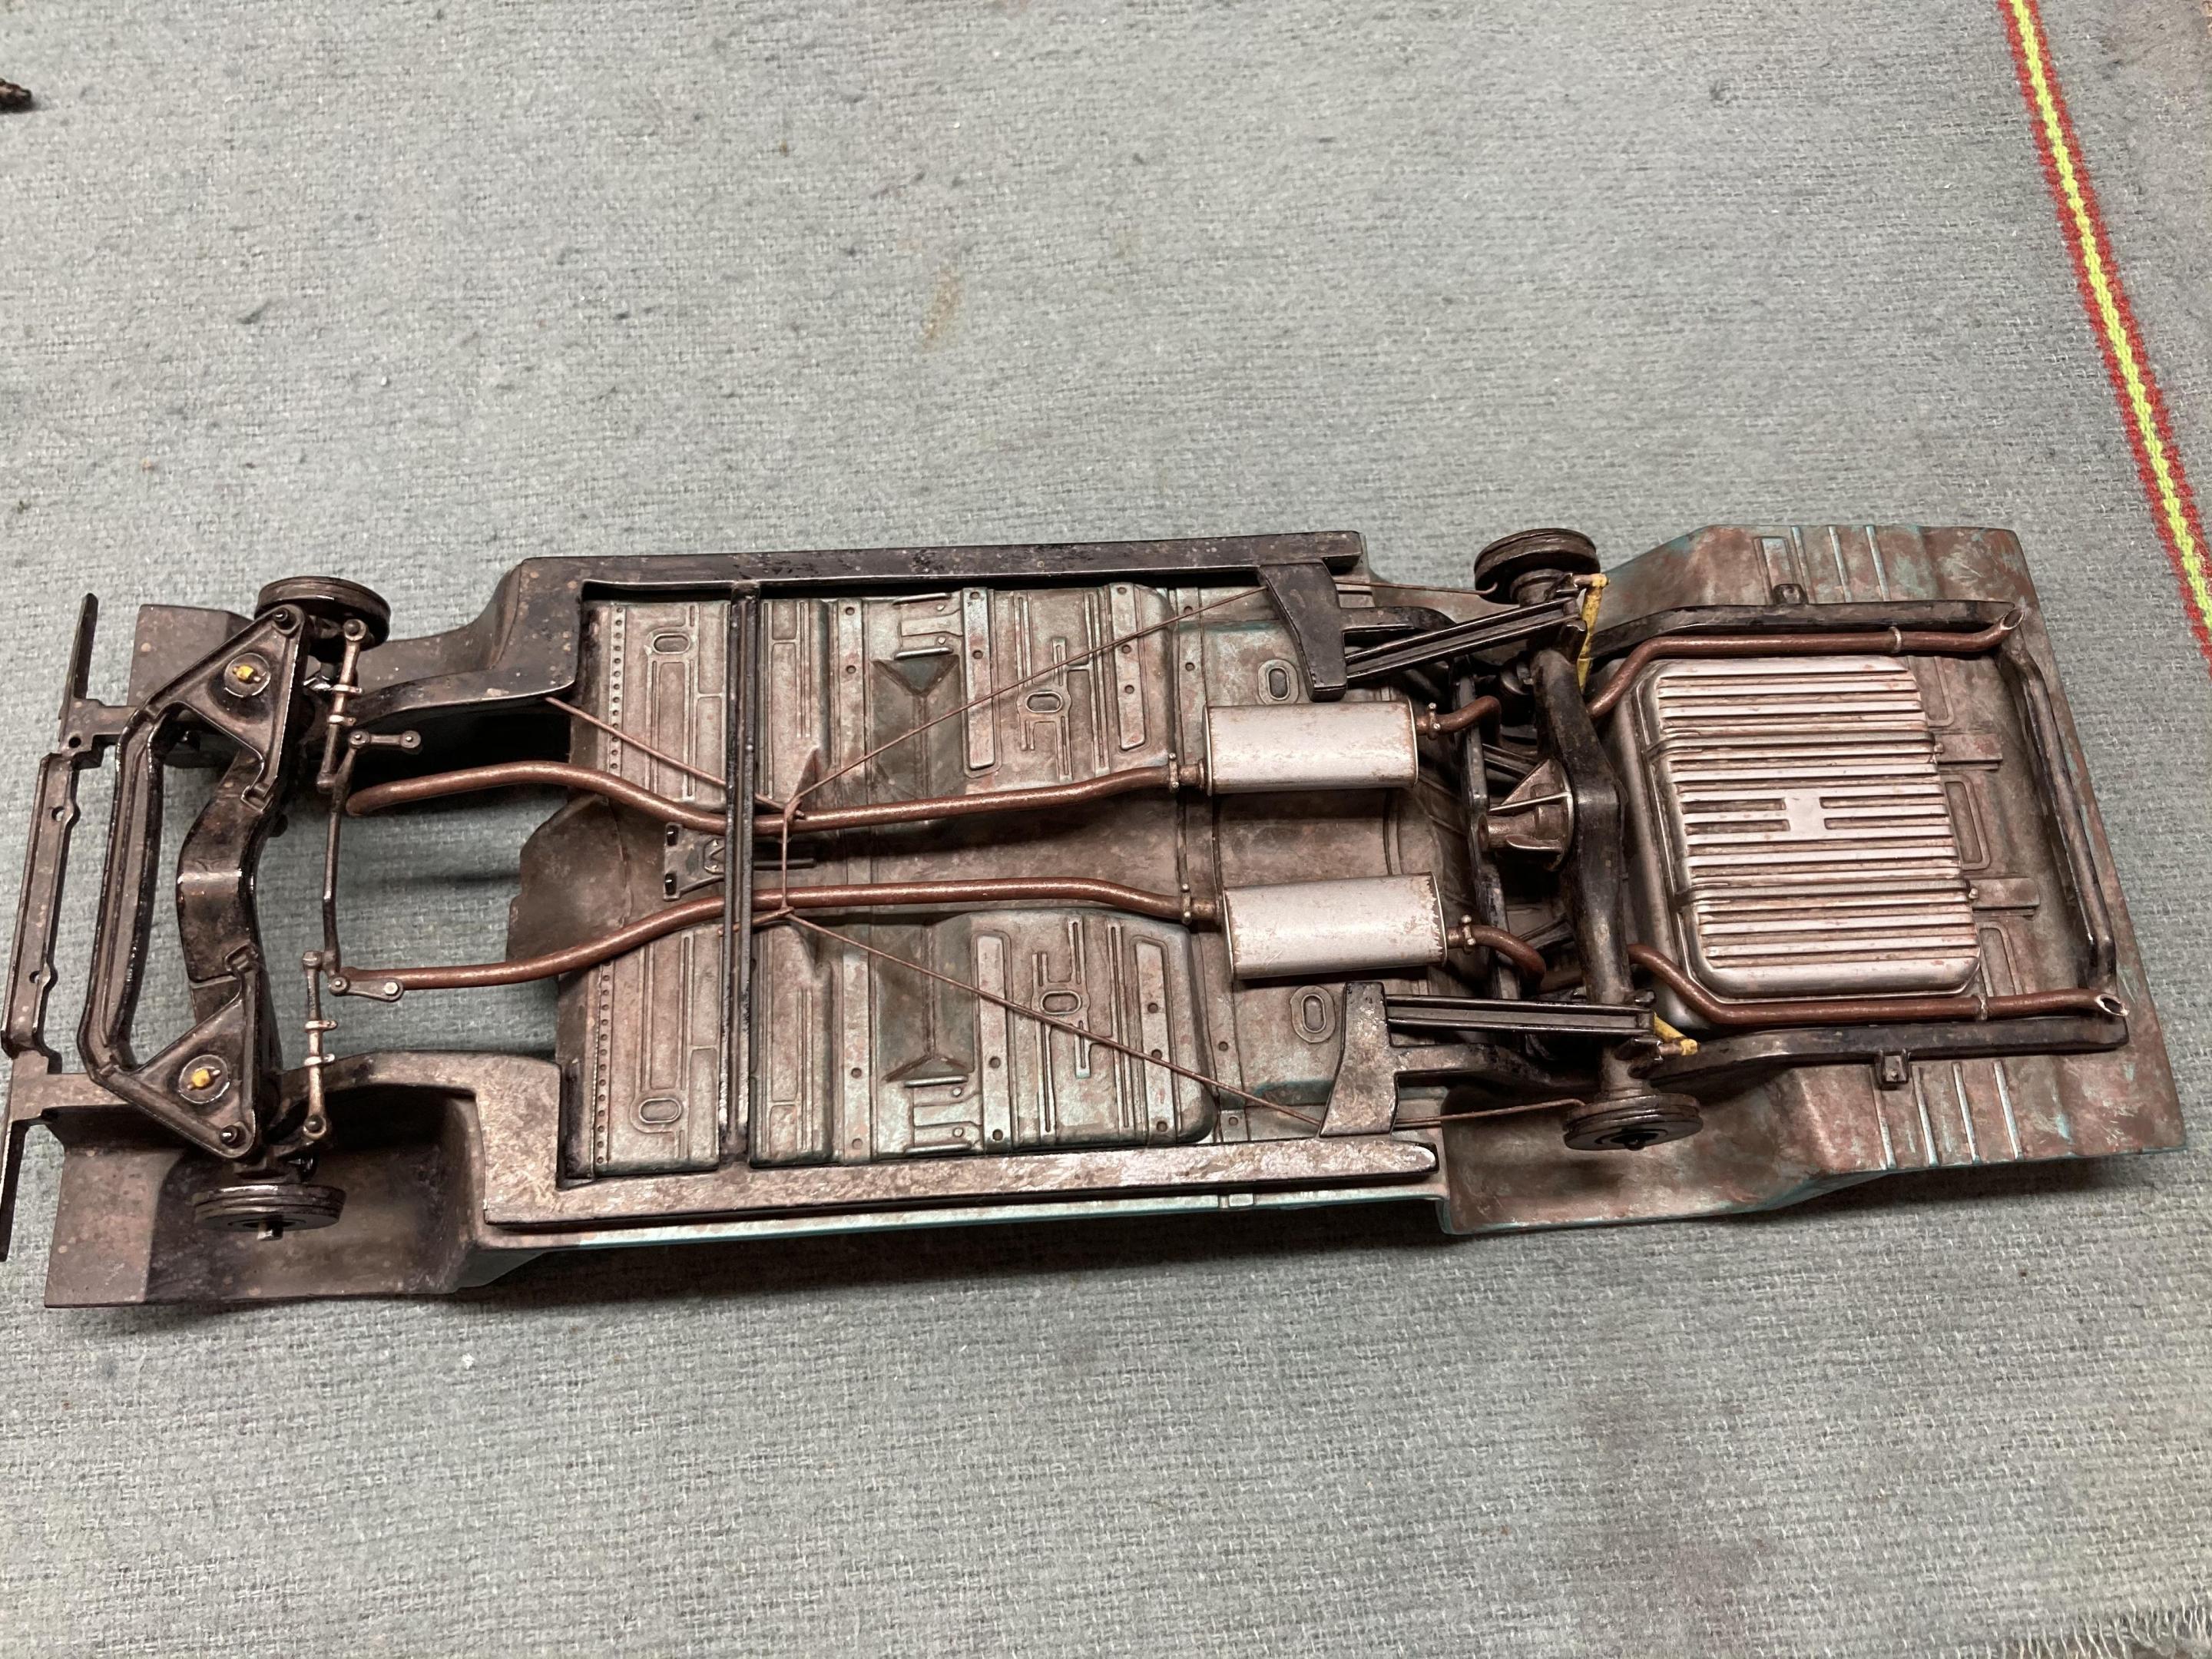
Thanks guys! Not getting much time to dedicate to the bench lately, but I did manage to get into the shop for a few minutes to pick out a couple more details that needed doing before I can begin the final assembly of the interior. As this model is designed to depict a vehicle with some use, I needed to add a little dirt to the pedals, and of course, the driver's side floor mat shouldn't appear pristine. I also added a bit of trim around the base of the shift boot. That's about all that I could find time for today. Steve -
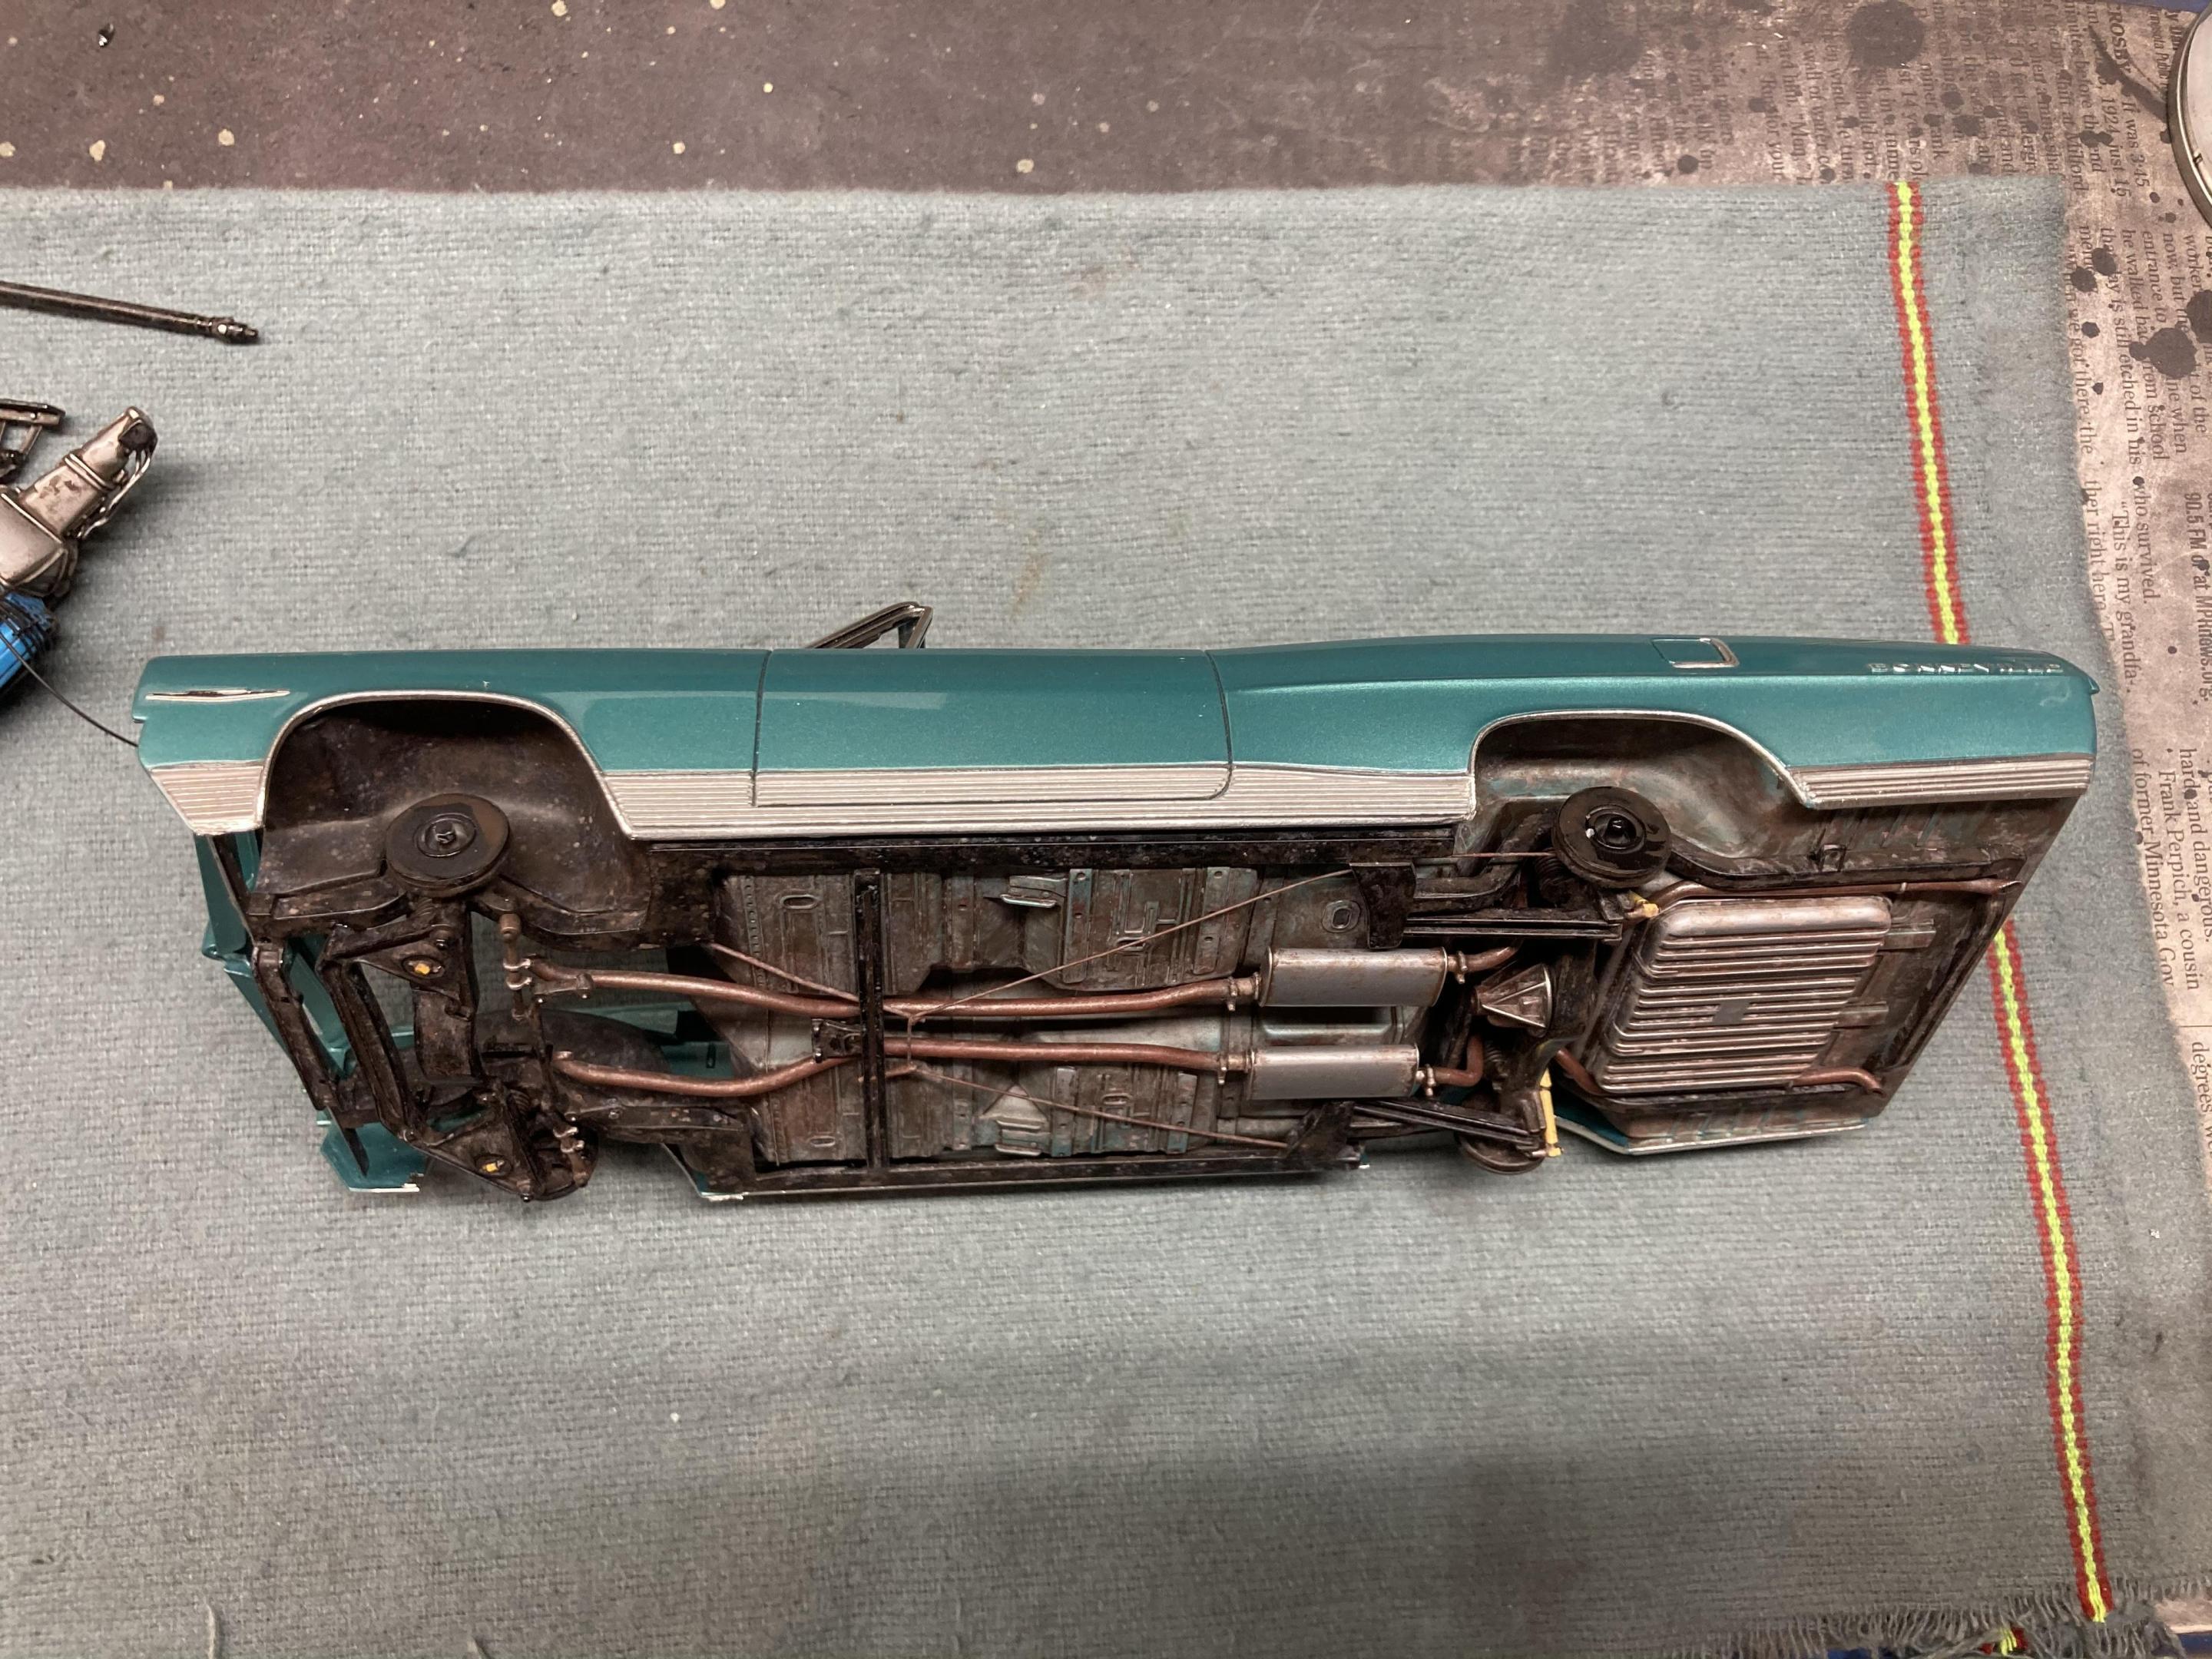
I would use the same colors. The chassis pictured above was first painted with varying finishes, including gray primer, body color, flat black, gloss black and some metal finishes. As you said, the rust oil and dirt doesn't care what color the surface is. Steve
-
One of the big advantages to using an acrylic craft paint is that if you don't like what you're seeing, you can just wash it off and either start over, or leave it un-weathered. With a solvent based, or oil paint, you're stuck with it if something goes south. Steve
-
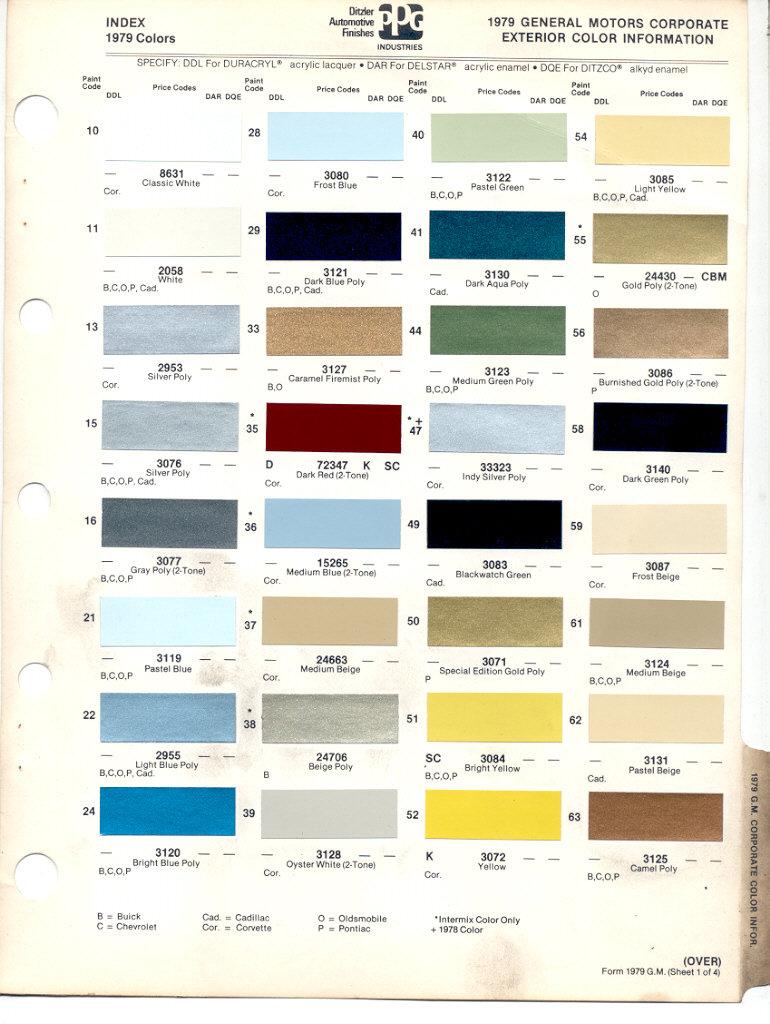
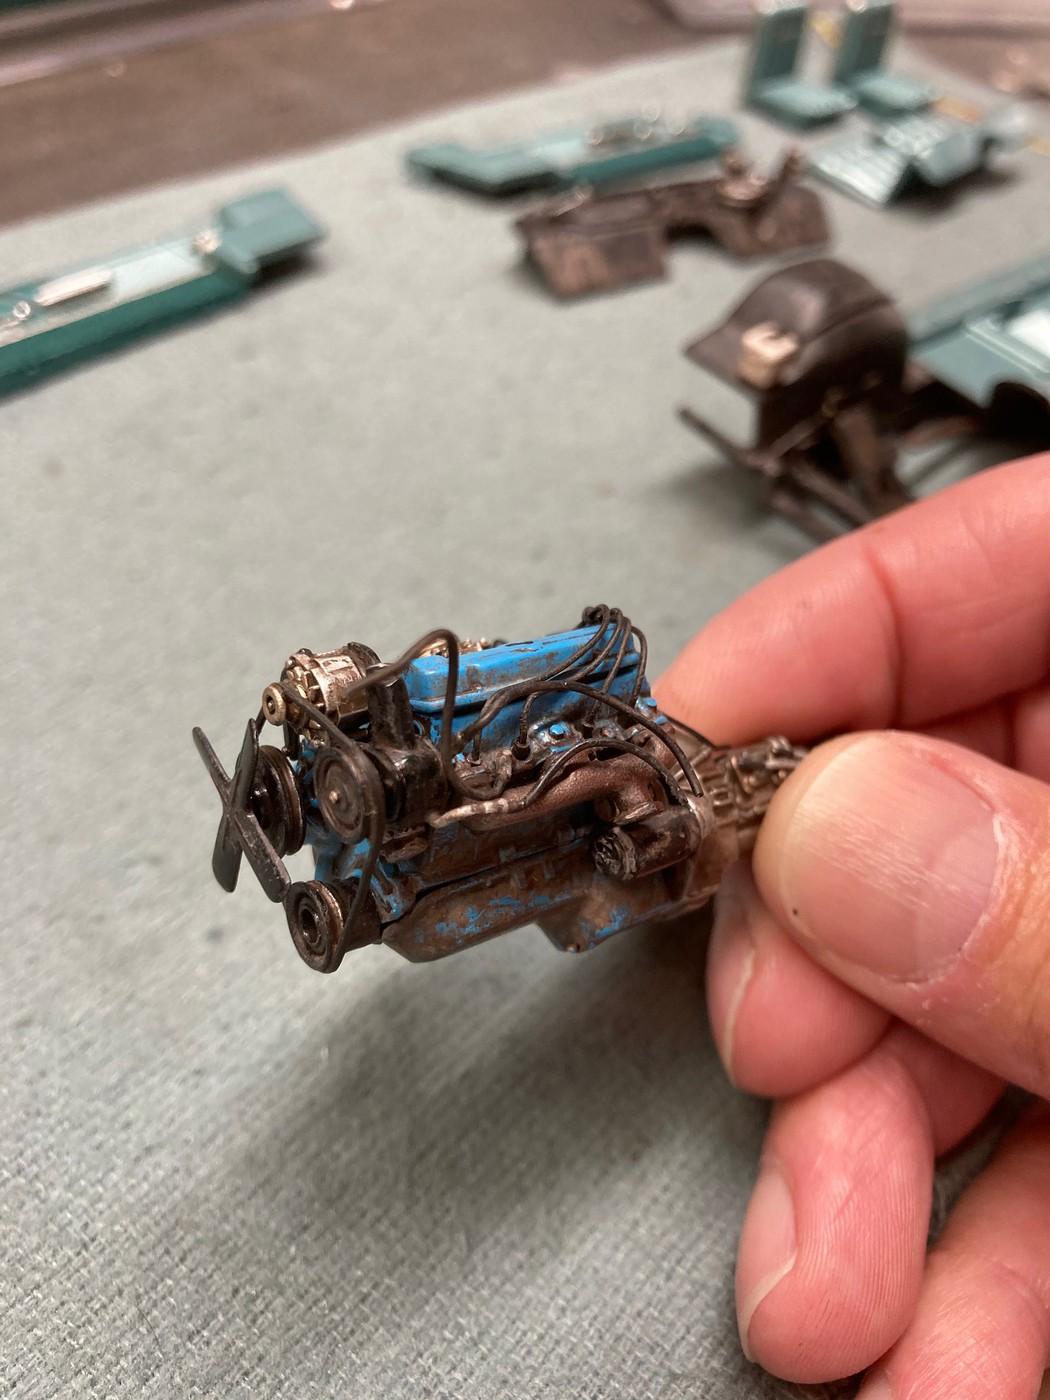
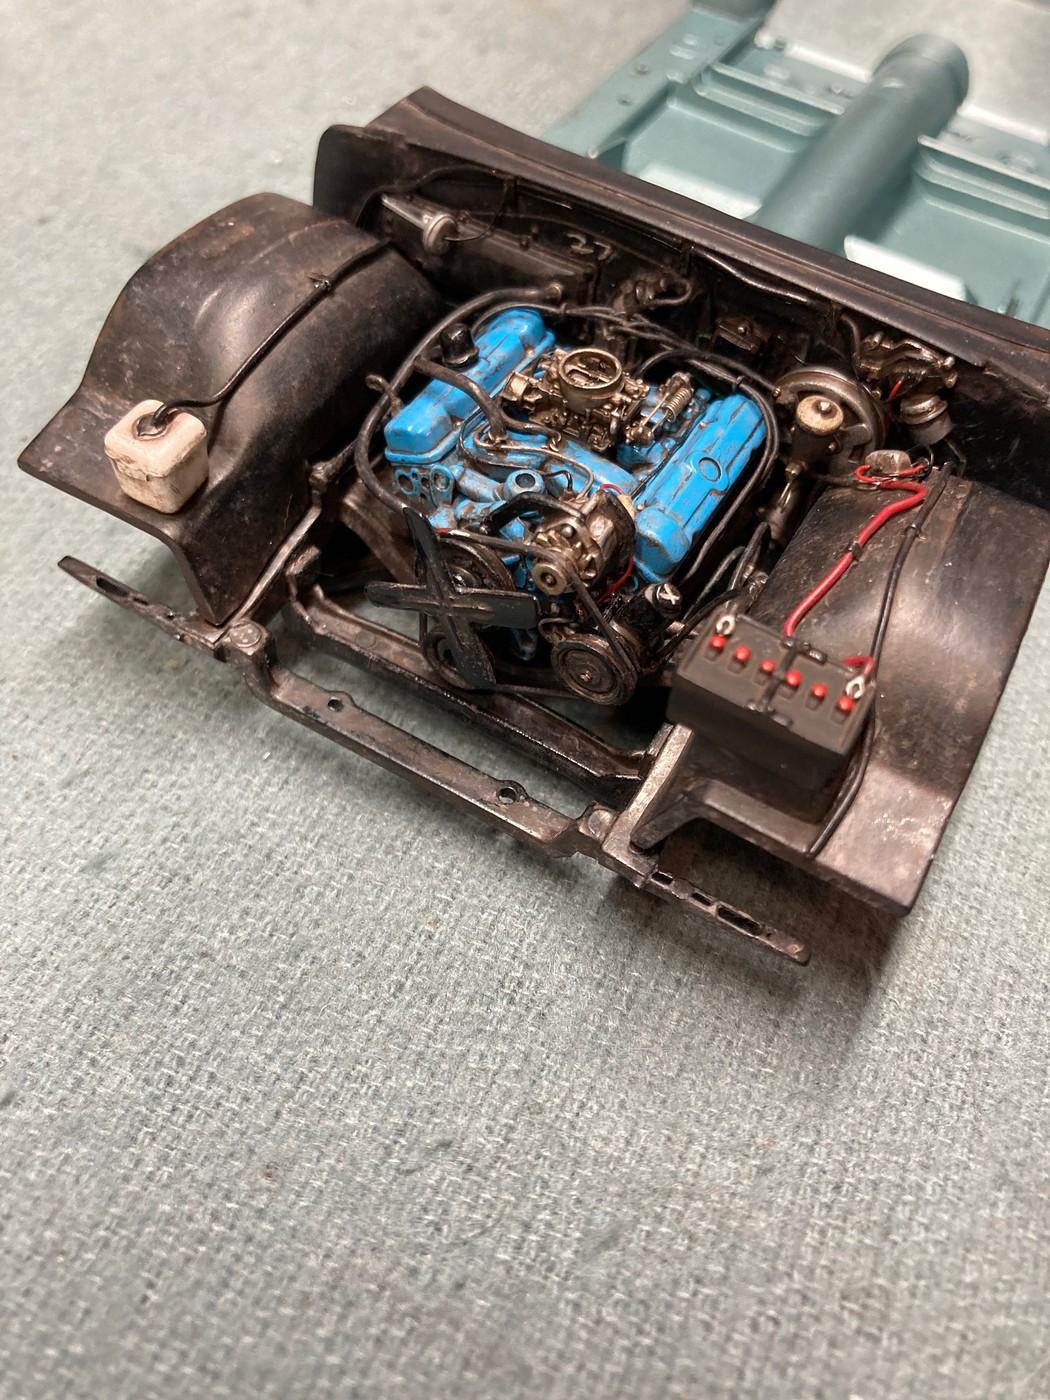
Hello folks. I posted this basic weathering tutorial in a thread by Jeremy Linn who was looking for some tips on some basic weathering for chassis, engines and engine bays. This technique was designed to help depict a vehicle that has seen some time on the road, and of course can be modified to portray something less, or more used. My intention was to begin getting away from the standard "like new" builds that you normally see, and begin to represent my models as something that that the average car enthusiast would likely have in his garage if the car was actually driven on a regular basis.. Or more specifically, a representation of a well maintained vehicle of a several years of age, and 20,000-30,000 miles on the odometer under normal daily driving conditions. Nothing more is required than a few colors of acrylic craft paint, a medium sized paint brush, Q-tips, and paper towels. The colors chosen are a series of 3 colors, mixed from the 4 colors of paint pictured, and thinned to a wash consistency. (all flat colors) A dark "oily" brown mixed from brown and black, a rusty color mixed from brown and red, and a dirty tan mixed from light tan and a little brown to simulate a little road grime. First, the oily brown was washed onto the parts, allowed to dry slightly, and then, using a lightly dampened Q-tip, the parts were wiped mostly clean to the point of leaving the color mostly only in the recessed areas. Once dry, (it only takes a few minutes to dry satisfactorily) the next color, the rusty red, was dry brushed very lightly over select areas of the parts. By select areas I mean only the areas where you might see light surface rust, such as the chassis plate, lower portions of the engine, and lower portions of the firewall, radiator bulkhead, etc, as you wouldn't expect to see a lot of rust on the upper half of the engine or engine bay. The dry brushing is achieved by dipping the brush in the thinned paint, and then wiping and dabbing the brush on a paper towel until almost no color is being noticeably transferred to the paper towel. Then using the same dabbing motion, dab around various areas of the part to be weathered. Let the paint dry for a few seconds and then with another lightly damp Q-tip, roll and dab the Q-tip over the surface to distribute the paint in a random fashion to blend and eliminate any noticeable brush marks. The colors should be barely visible throughout the dry brushing process, but the building of the different colors will give a nice grungy weathered effect as you continue along. Then using the tan, and the same dry brushing technique, again go over the areas where you would expect to see road grime, dust and dirt, and again, use the Q-tips to blend. Finally the same techniques were used returning to the oily brown to give the effect of a little more surface oil and dirt. Yes, this technique will take some time to get all of the surfaces covered, but in the end, I think it's a nice affect, and a relatively easy one that doesn't require purchasing a bunch of specialized paints, chalks, etc. And in the end, you're applying oil, dirt and rust, so it's nearly impossible to make a mistake. Grunge has no pattern per-say. Concentrate the heaviest weathering on areas where you would expect to see it, (say the lower half of the engine) and lighter where the surfaces are more protected, (like the upper portions of the engine). Steve
-
Thanks John. If it's helpful, maybe I'll post it in the "Tips, Tricks and Tutorials" section. Steve
-
I use water. It works best if it's very thin. Maybe not quite as thin as water colors, but not too much thicker than that. Steve
-
Okay fellas. Here is a synopsis of how I did the weathering on the above chassis, engine and engine compartment. Nothing is required except a few colors of acrylic craft paint, a medium sized paint brush, Q-tips, and paper towels. The colors chosen are a series of 3 colors, mixed from the 4 colors of paint pictured, and thinned to a wash consistency. (all flat colors) A dark "oily" brown mixed from brown and black, a rusty color mixed from brown and red, and a dirty tan mixed from light tan and a little brown to simulate a little road grime. First, the oily brown was washed onto the parts, allowed to dry slightly, and then, using a lightly dampened Q-tip, the parts were wiped mostly clean to the point of leaving the color mostly only in the recessed areas. Once dry, (it only takes a few minutes to dry satisfactorily) the next color, the rusty red, was dry brushed very lightly over select areas of the parts. By select areas I mean only the areas where you might see light surface rust, such as the chassis plate, lower portions of the engine, and lower portions of the firewall, radiator bulkhead, etc, as you wouldn't expect to see a lot of rust on the upper half of the engine or engine bay. The dry brushing is achieved by dipping the brush in the thinned paint, and then wiping and dabbing the brush on a paper towel until almost no color is being noticeably transferred to the paper towel. Then using the same dabbing motion, dab around various areas of the part to be weathered. Let the paint dry for a few seconds and then with another lightly damp Q-tip, roll and dab the Q-tip over the surface to distribute the paint in a random fashion to blend and eliminate any noticeable brush marks. The colors should be barely visible throughout the dry brushing process, but the building of the different colors will give a nice grungy weathered effect as you continue along. Then using the tan, and the same dry brushing technique, again go over the areas where you would expect to see road grime, dust and dirt, and again, use the Q-tips to blend. Finally the same techniques were used returning to the oily brown to give the effect of a little more surface oil and dirt. Yes, this technique will take some time to get all of the surfaces covered, but in the end, I think it's a nice affect, and a relatively easy one that doesn't require purchasing a bunch of specialized paints, chalks, etc. And in the end, you're applying oil, dirt and rust, so it's nearly impossible to make a mistake. Grunge has no pattern per-say. Concentrate the heaviest weathering on areas where you would expect to see it, (say the lower half of the engine) and lighter where the surfaces are more protected, (like the upper portions of the engine) and you really can't screw it up. Steve
-
I’m currently at work, but I’ll give you what pointers I have later this evening. The best part about the technique that I’m using is that you don’t have to buy a whole bunch of expensive or specialized materials to get these results. All you need is a few bottles of cheap $1.49 acrylic craft paint, and a paint brush. Steve