Snake45
-
Posts
22,539 -
Joined
-
Last visited
Content Type
Profiles
Forums
Events
Gallery
Everything posted by Snake45
-

Old School Retro Cool Custom '67 Camaro--Update, New Pics 10/9/18
Snake45 replied to Snake45's topic in WIP: Model Cars
We have a winner! AMT '67 Camaro. The hood is almost a drop-in on the Revell '67 body. It's a tight fit at the rear, and the cowl curve is almost a perfect match, but the front end will have to be narrowed, and possibly shortened as well. The taillights DO drop into the Revell holes, and the grilles will fit with only minor tweaking. I'm going to set it up to use both--the divided chrome one and the body-colored one. -
Now I know where they went!
Snake45 replied to Oldcarfan27's topic in General Automotive Talk (Trucks and Cars)
I just noticed that on both the box art and the instruction sheet, the Corvette's stock front turn signals have been smoothed off (removed). I wonder if the kit body was made that way, or if the instruction sheet tells you elsewhere to remove them, or what? -
Now I know where they went!
Snake45 replied to Oldcarfan27's topic in General Automotive Talk (Trucks and Cars)
I see this sheet tells you to cement the headlights in either open or closed position. The original '63 roadster included a retainer piece that held the headlight bar in place so it could be rotated. I have one in the stash to restore. -
Old School Retro Cool Custom '67 Camaro--Update, New Pics 10/9/18
Snake45 replied to Snake45's topic in WIP: Model Cars
You got one out of three right. -
BTW, I posted this same thing on another board ( a gun forum) and have gotten 8 or 10 replies, but not one person has gotten it yet, and they don't seem to be even listening to it! Several have said they listened to 10 or 15 seconds and quit because it was "too country" or "not country enough" for them.
-
Looks like you could build it out of sheet styrene without a lot of trouble.
-
I'm not a tub fan, but that is just straight-up cool! I REALLY dig your Little Drag, though.
-
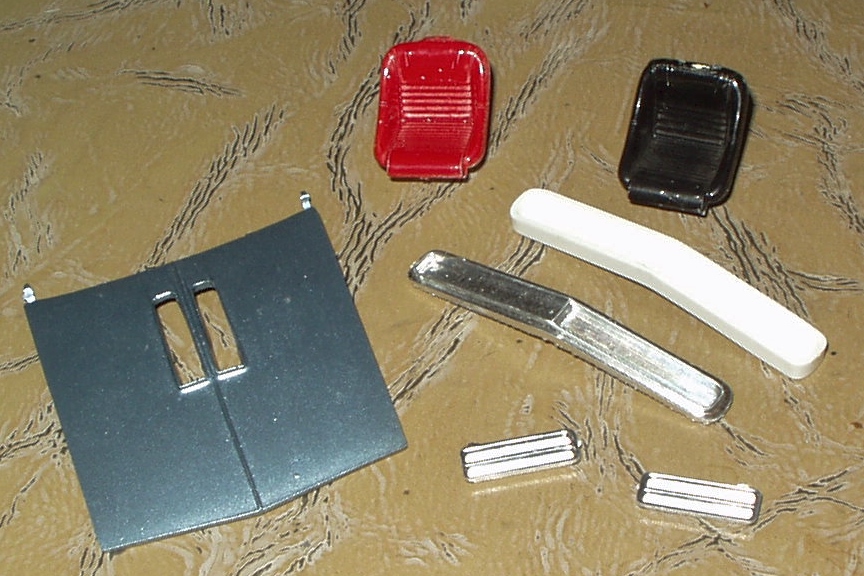
My new friend Ewetwo sent me these rare, cool custom goodies from a very rare '60s kit. I'm gonna build a model around them!

-
Just finished this one.
-
How to Remove "Ghost Trim"
Snake45 replied to diymirage's topic in Model Building Questions and Answers
I believe the main active ingredient in Tenax, Pro Weld, etc, is methylene chloride. -
OH Nooooo!!! It can't be, but.......
Snake45 replied to shoopdog's topic in General Automotive Talk (Trucks and Cars)
Agree. This is fixable. You shouldn't HAVE to, but then the world is full of stuff you shouldn't HAVE to do. -
So few actually do that. Good for you!
-
Nice work! Model on!
-
OH Nooooo!!! It can't be, but.......
Snake45 replied to shoopdog's topic in General Automotive Talk (Trucks and Cars)
Lindberg owes you a good body. Contact them, and send this pic. If that doesn't work, this is fixable. It's not difficult, just time-consuming and tedious. Dunno how hard it might be to match the paint, though. -
Ollie's strike again
Snake45 replied to GLMFAA1's topic in General Automotive Talk (Trucks and Cars)
Indeed! I'm going to try to re-create the dune buggy AMT did with it in the late '60s. -
Beautiful, and the finish is magnificent! Great sit--you've got it high but not TOO high, and with a very subtle rake instead of nosejacked. I like this a lot!
-
First thing I heard in it, too--even before the first verse!
-
This song reminded me of another one almost instantly. Did some googling and found out I'm not alone in hearing it--I didn't even get the names of both songs into google before it prompted me with exactly what I was looking for. Do you hear it, too? https://www.youtube.com/watch?v=sq93t3J4R5c
-
The "it" under discussion was the tube-chassis, one-piece fiberglass body era of funny cars, not the birth of funny cars in general.
-
It's a disastrophe!
-
It actually started in 1966 with the factory Comets of Nicholson, Chrisman, et al. I think a couple more cars were built that way by the end of the year but the tube-chassis floppers really started to take off in '67. By '68, the AWB cars with steel bodies and anything like a factory frame were pretty much gone, or at least no longer competitive in the top ranks of "funny car." Some soldiered on as Altereds; others as "Ultra Stocks" (which eventually became Pro Stock), and I've heard a few eventually turned up as bracket racers.
-
2 Chevys with the tops cut off
Snake45 replied to ewetwo's topic in Model Building Questions and Answers
I believe your mystery piece is a custom "vinyl" roof overlay for the 2nd generation Riviera (1966-1970 or so). I know such a piece was in the original annual '66; I don't remember if it was carried over into the common '69 reissues. -
I rescued another Welly Porsche from Rite Aid yesterday, this one a yellow Boxster S. I hope to Snake-Fu it today--it won't take much, just some touchup on the lights and maybe polish a scratch off the windshield. This is the third Porsche I've rescued from Rite Aid.
-
And also pretty cool!
-
Drilling holes in styrene rod
Snake45 replied to Evil Appetite's topic in Model Building Questions and Answers
Since he said "centered," I'm guessing he means in the end. This was the best method I ever found for drilling holes in model airplane machine gun/cannon barrels: Start by putting a nick in the center with the tip of a new Xacto knife. Examine closely. It is exact center? If not, you can "carve" it out a little to move it. Start reaming out the hole with the tip of the blade, correcting as you go to get/keep it centered. (This is easier than trying to do it with a drill bit.) When you've got a perfectly centered divot, which will be shaped like a shallow cone. When you're satisfied that the divot is centered, you can get out the appropriate drill bit and start drilling. I never had to drill these gun barrels very deep, as all I needed was the impression of depth, achieved with black paint. I can't imagine trying to drill any length of rod all the way through.