Snake45
-
Posts
22,539 -
Joined
-
Last visited
Content Type
Profiles
Forums
Events
Gallery
Everything posted by Snake45
-
You're right, there's no primer between the blue paint and the yellow. And judging from that lower left side, only one coat of it, too. Oh well. Yes, I blacked out the steering wheel arms--and turned the steering wheel right-side up, too! I too love the Mono Big & Little Goodyears. Only kit I know with them was the '70 Chevelle, and I've only got a couple sets. I think these are the small ones. If they're the bigs, then that '65 Vette glue bomb I rescued had four of them, because they were all the same size. I'm gonna check that, because I could use another pair of the bigs.
-
I've done three Monogram '69 Camaros, one of them even semi-presentable, but none of them Yenkos or blue. Yah, do give a look at your junk pile for quickie projects. These things are an amazing amount of fun for the effort and money involved.
-
Thanks Michelle, Cobra, and Deuces!
-
Very, VERY cool project! I too have fond memories of that article and have thought of trying to do something similar. We now know that the Sizzler is way oversized (closer to 1/20 than 1/24?), but the (real) Bantam body is so tiny that it really doesn't look out of place used this way. (I saw a real one at a car show a while back and it made a VW Beetle look like a '40 Ford.) I think a lot of us here will be following this project. Drive on!
-
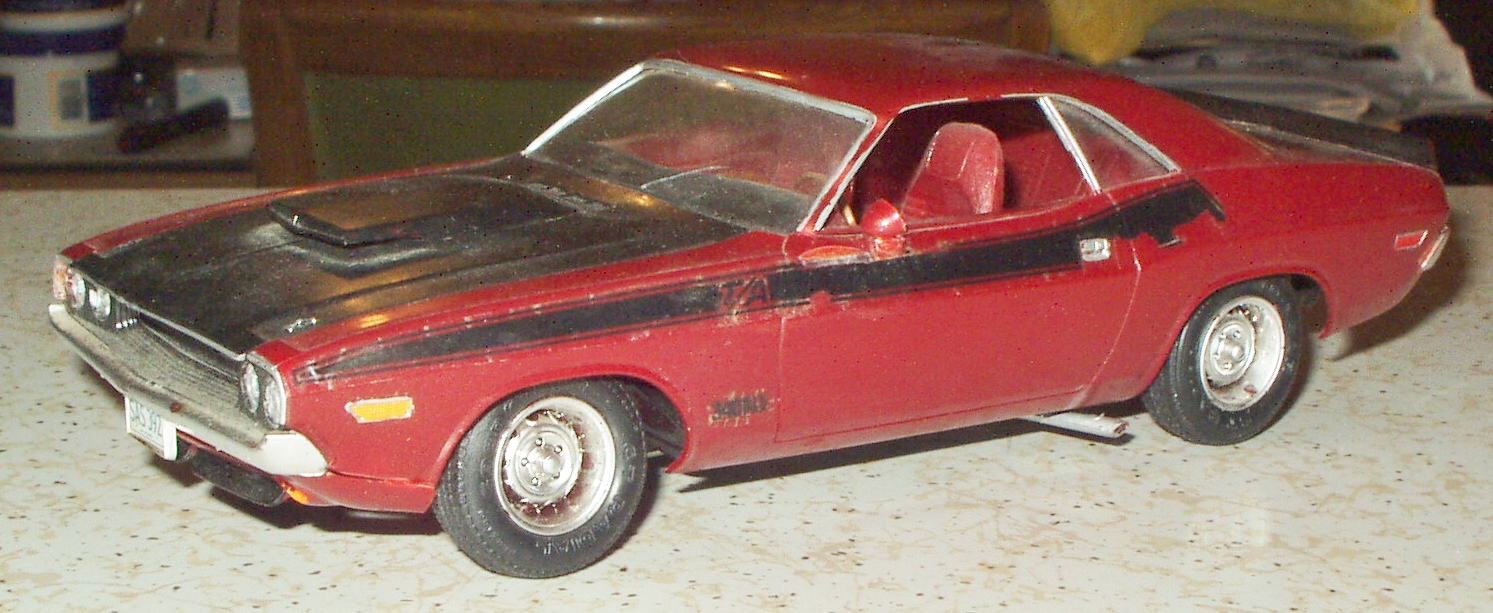
 I finished disassembly of this glue bomb Challenger, which I started yesterday and had to step away from. I should call this one a GLUE bomb, as it was REALLY glued together and I had quite a time getting it apart. Remains to be seen how good the usual Snake-Fu can make it look. The body is currently swimming in Lake Purple to remove the sloppy chrome trim. The plan is to polish the nice metallic burnt orange plastic. We'll see what happens.
-
The C-pillar was right on the original AMT '64 Cutlass HT (and on the '64 GTO, '65 GTO, and '65 Chevelle). It's a bit off on the Revell Z16 Chevelle, and even more off on the Polar Lights '64 GTO. The PL GTO should be fixable. Not sure about the Revell Z16. The error is subtle but would take a lot of work to correct. Its biggest problem is that the top of the window line is perfectly straight with no subtle curve in it.
-
That didn't sound enthusiastic. I really liked this one, but their second song wasn't quite as good (IMHO, and also evidently those of the judges) and they didn't advance beyond the first live show.
-
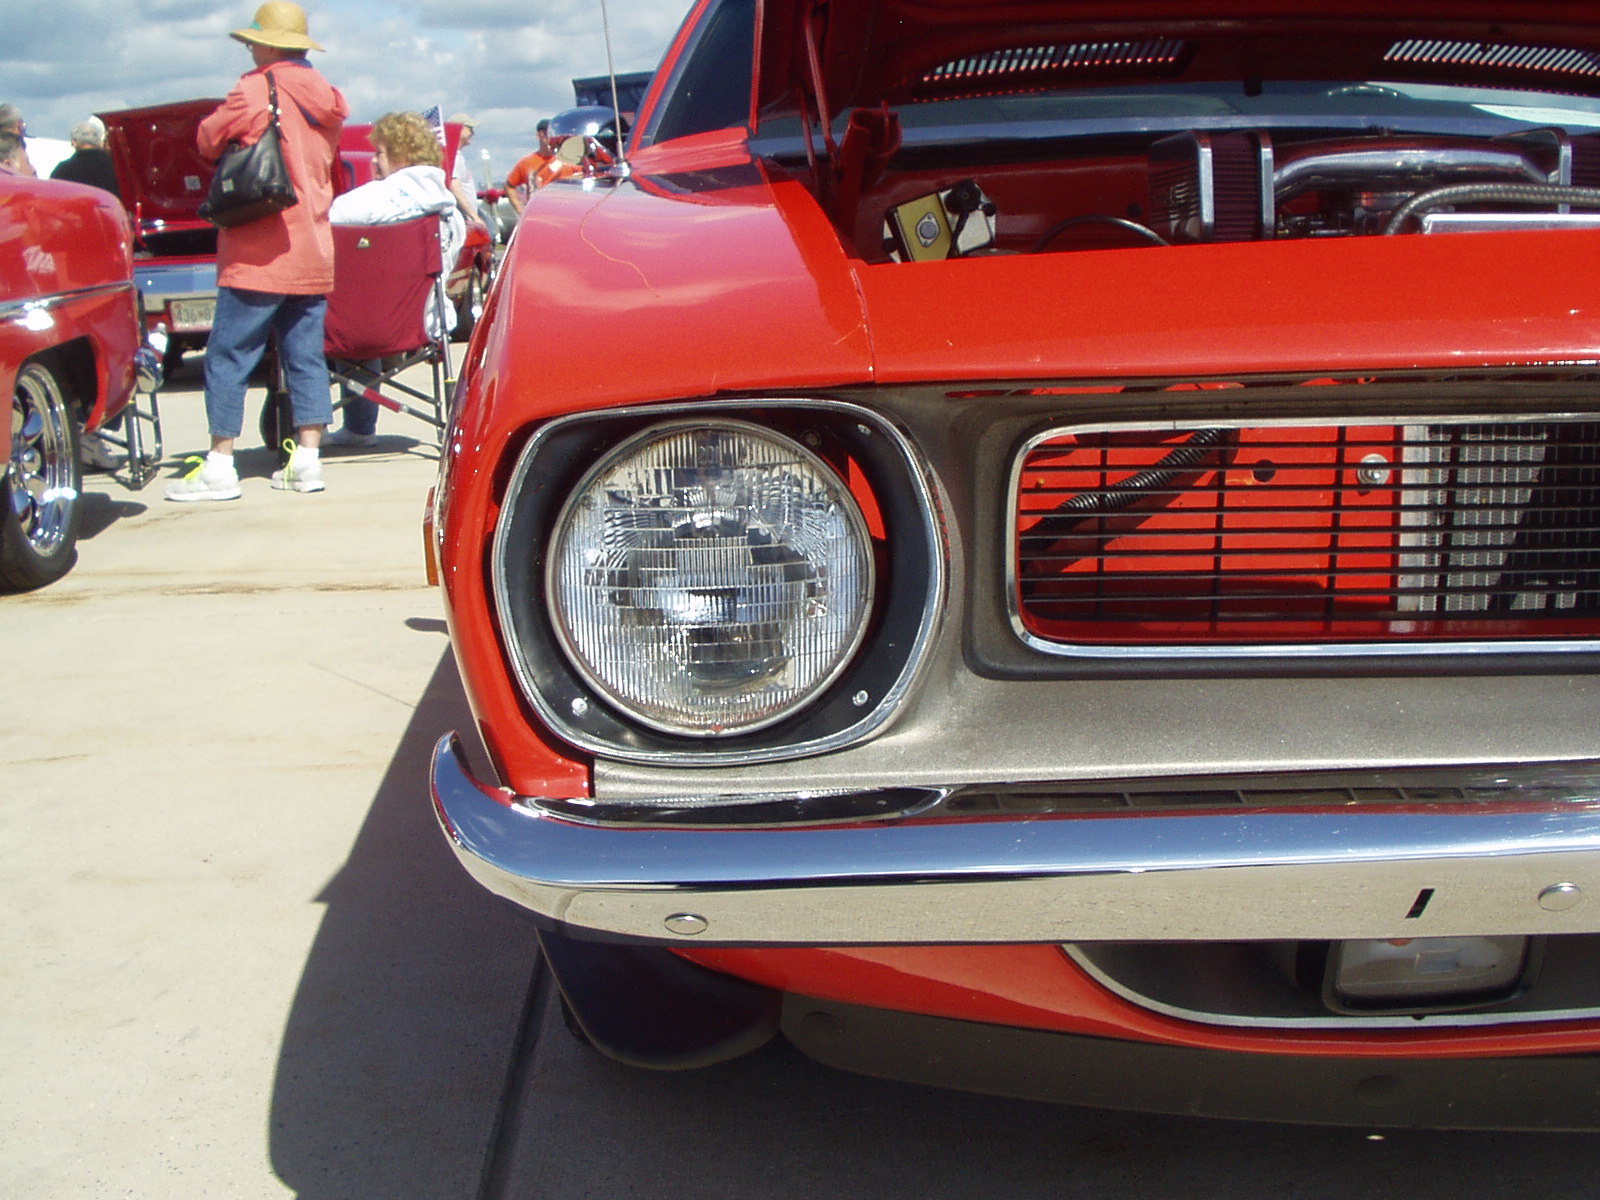
For those who don't know, here's what the headlight buckets SHOULD look like:
-
That turned out pretty cool, and your craftsmanship is excellent! Model on!
-
Then you should like these guys:
-
Well now I just have to have one of these! But I'll probably come up with some other kind of induction system, if not a whole engine. Having a hard time getting my head around an Enderle-injected, 6-71 blown Hemi on the sand.
-
Was the original MPC '72 grille better than the grille in the last-reissued "pro street" version or the '74 snapper?
-
Very cool! But it's got nothing on this real Hawker Sea Fury of the '60s:
-
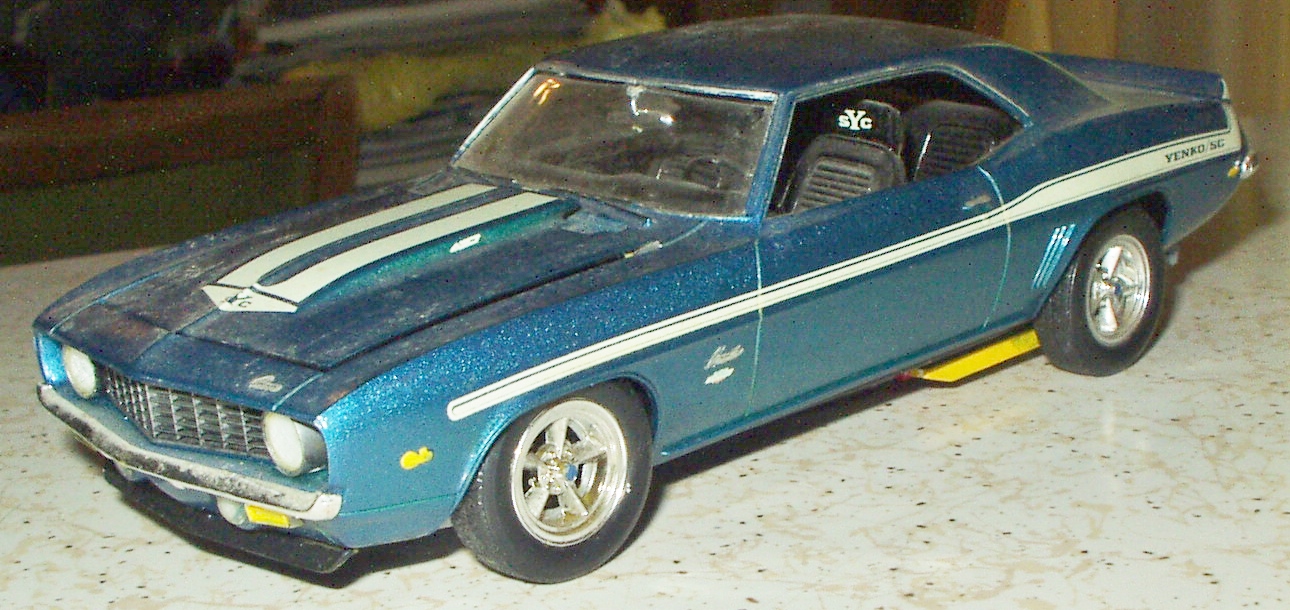
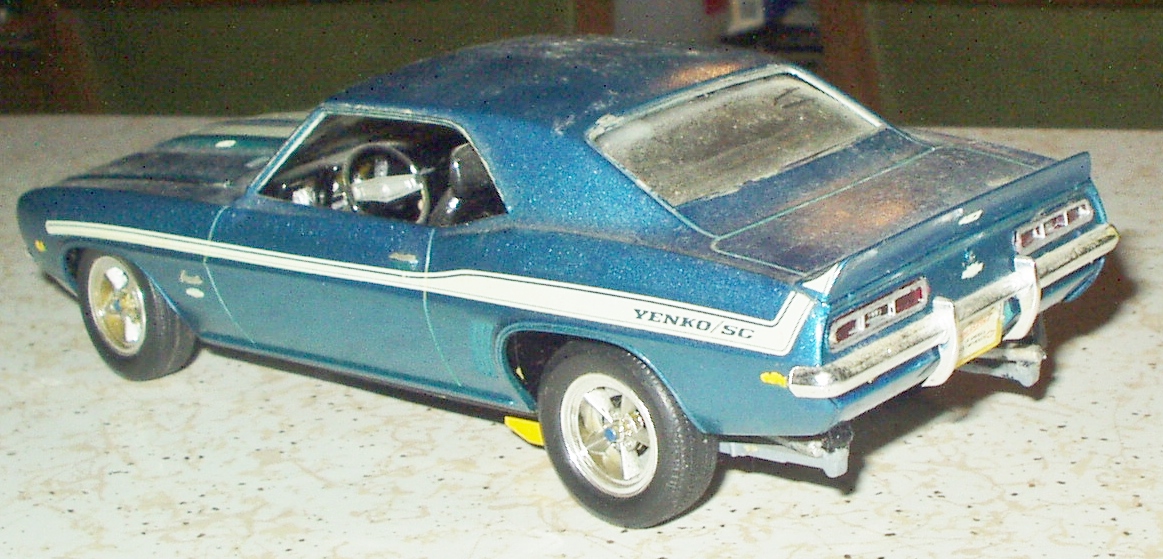
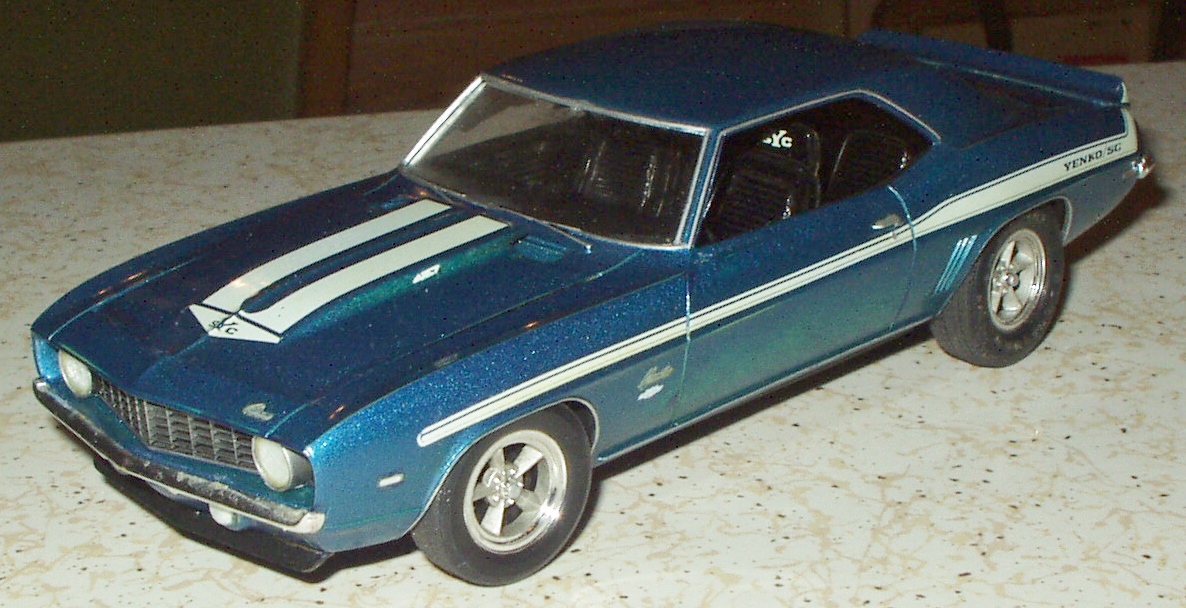
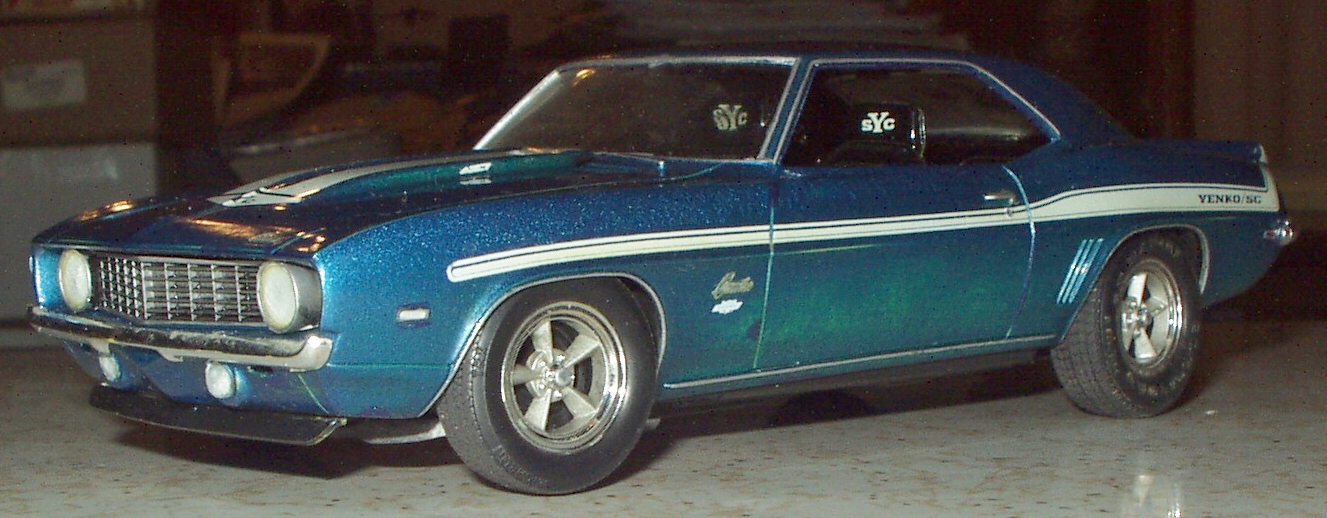
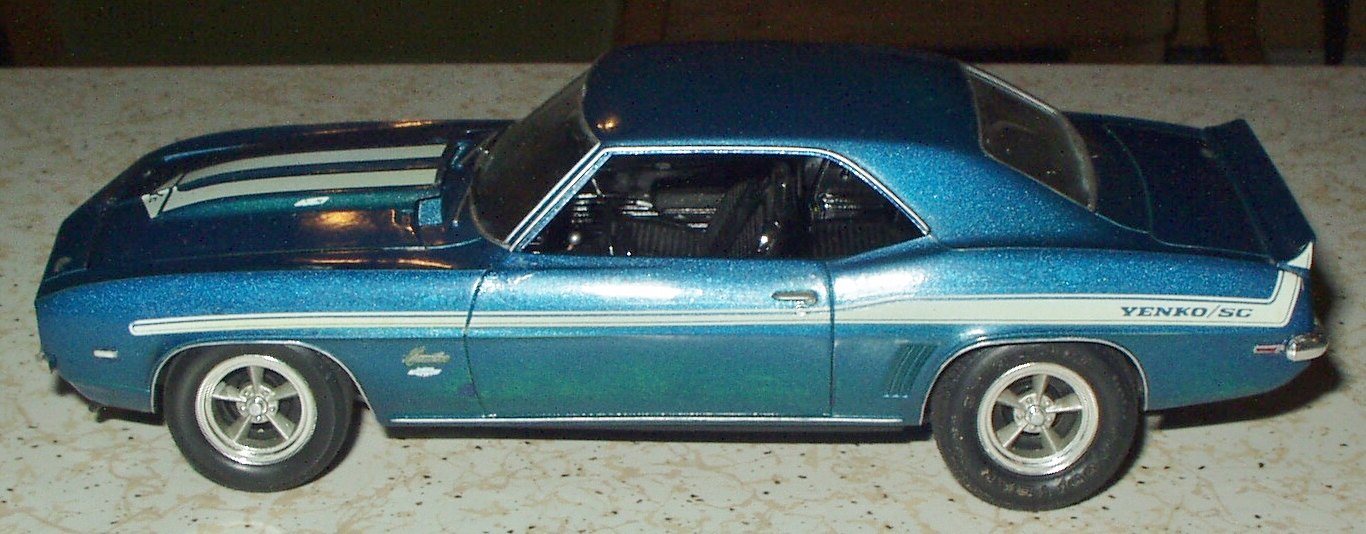
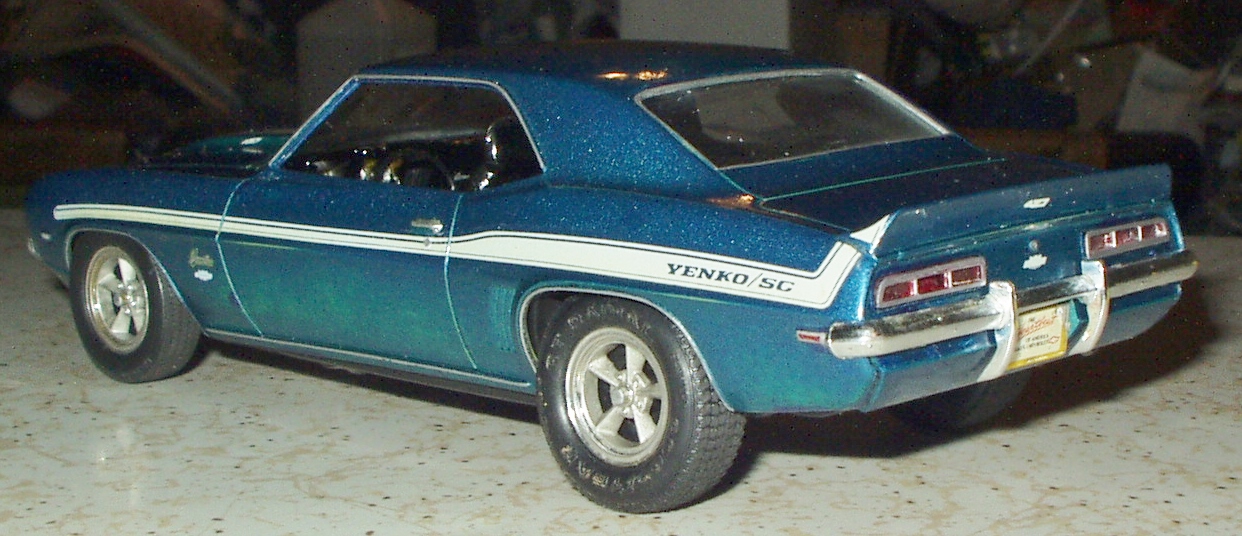
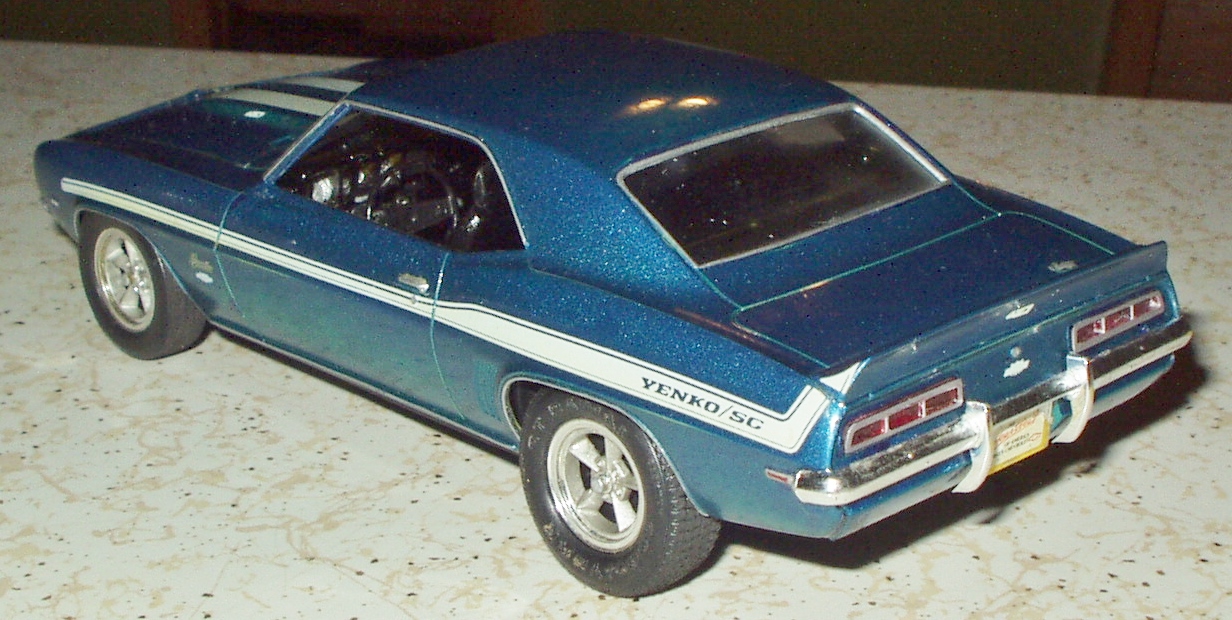
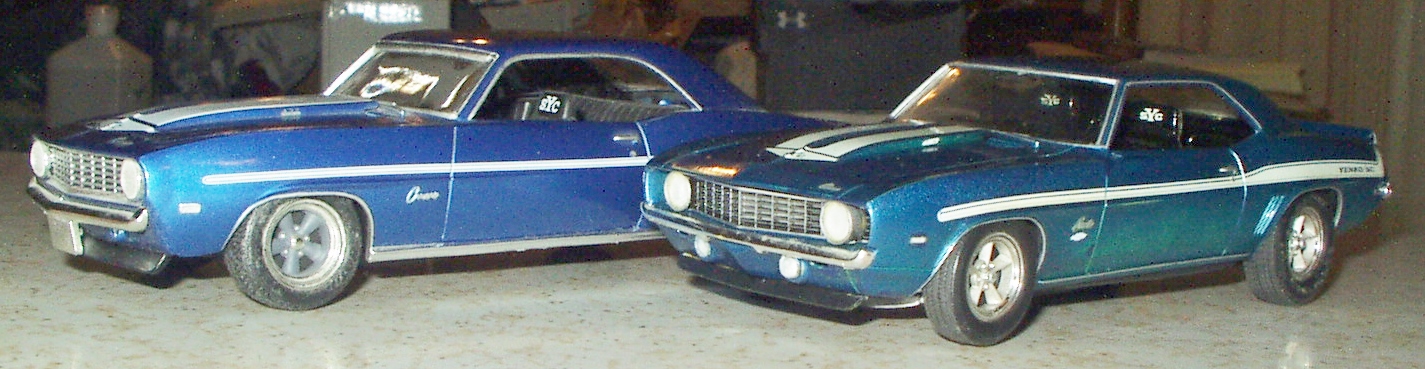
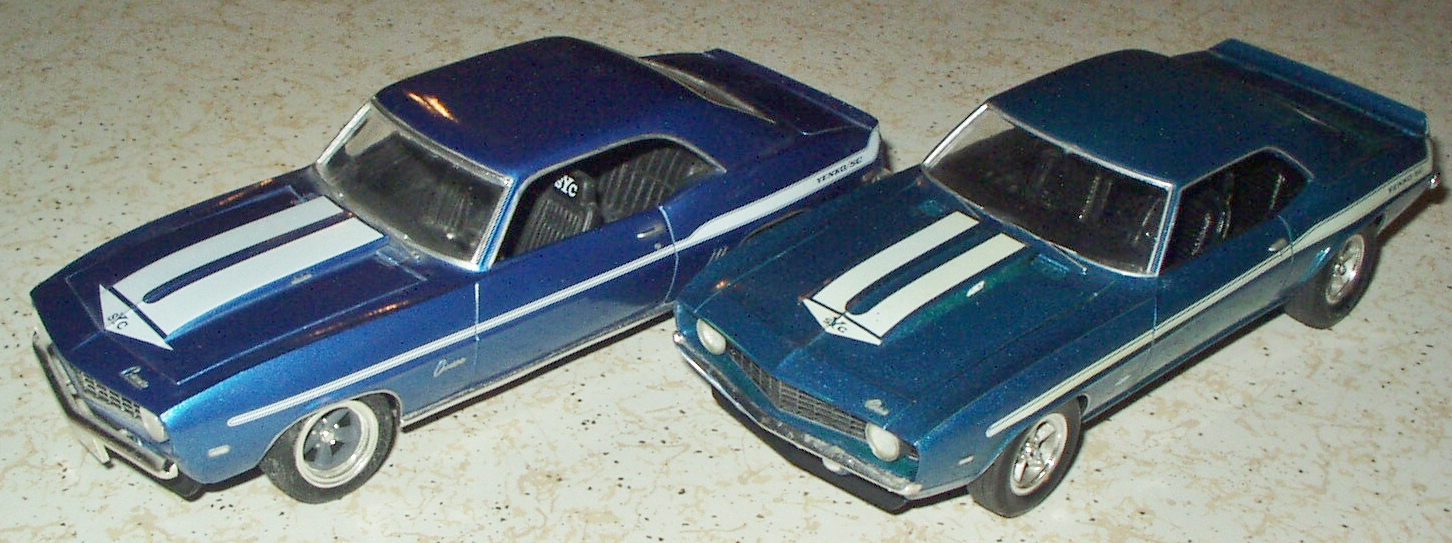
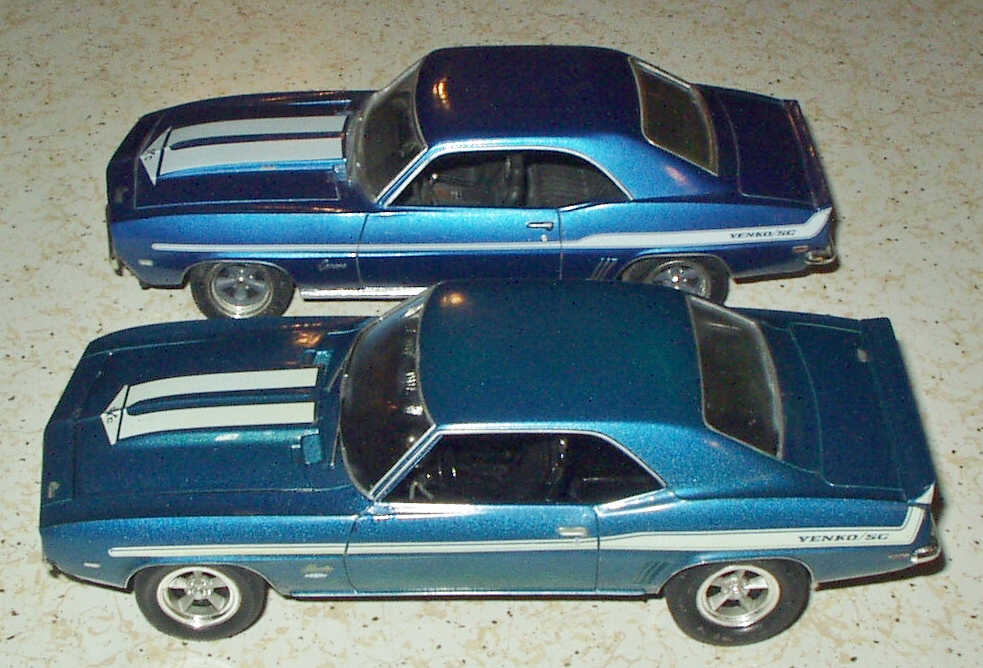
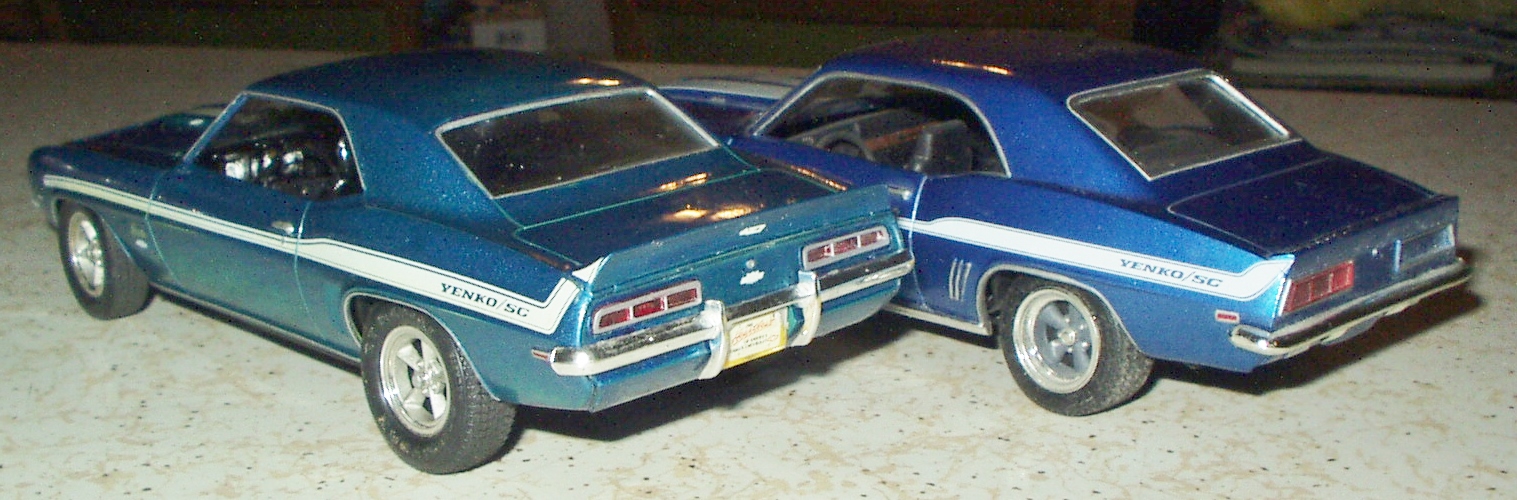
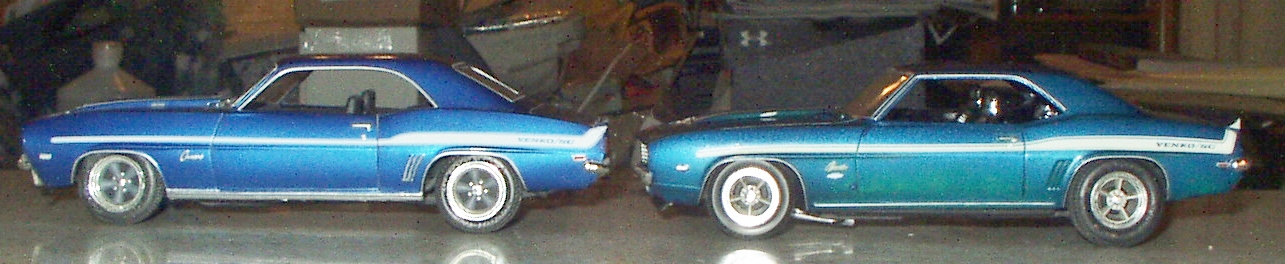
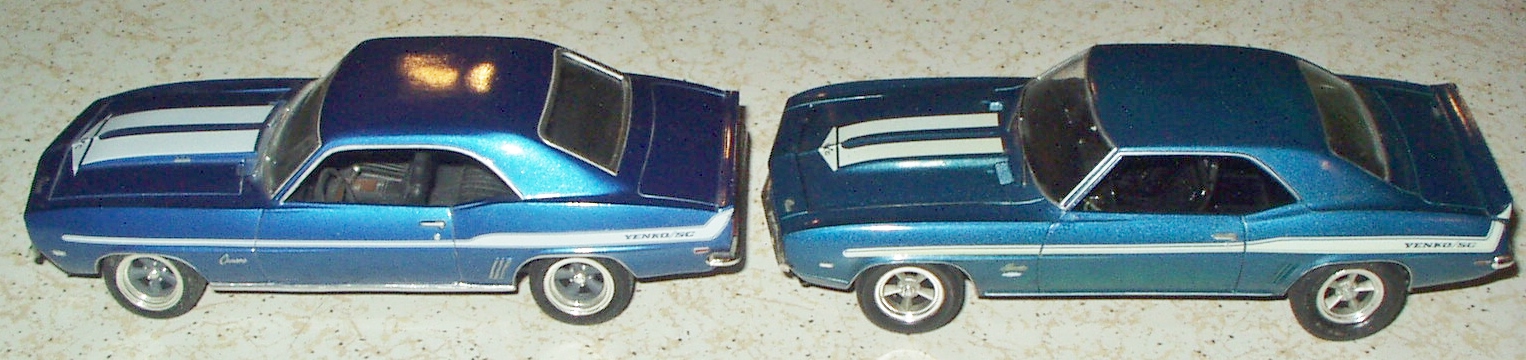
Bought this Revell Yenko Camaro at the monthly local toy show on August 1st. Although I've built several of these, and have several NIB kits, I couldn't resist the model's apparently “good bones” and thought it might make a quick, easy rescue. Besides, I didn't already have a blue Yenko. It was 100% complete, and came apart without too much trouble. One of its major problems was the badly applied chrome silver paint trim, which had slopped over onto the blue paint in several and noticeable places. I tried with no success to polish these overages off with Wright's Silver Cream, and ended up having to carefully wet-sand several spots off with #1500 or #2000 WetOrDry. In a couple places I broke through to the yellow plastic; in others I just gave up. Also had to sand out either a paint run or glue booger in the area where the driver's outside mirror would have been mounted. I'm virtually certain the paint was Rustoleum Cobalt Blue Metallic (available cheaply at my local Walmart), as that's what I used to cover and touch up the silver overages and bare yellow spots. I decanted it from the can by just spraying some into the can cap and applying it with a fine brush. The paint polished out quite nicely with Wrights—it's tough stuff. I didn't get all the orange peel out but I did get a fairly nice shine overall. (The decals survived the polish-out, too.) The Cobalt Blue is a bit darker than '69 Chevy LeMans blue, but not as dark as Dusk Blue (which wasn't offered on the Yenkos anyway), but oh well, it is what it is (i.e., a glue bomb rescue). The paint was a bit thin on the lower portion of the left side fender, door, and quarter so I didn't polish that area too heavily. Under some light, and in some of the photos, the kit yellow plastic shows up, but in real life it's not that obvious just looking at it. I could have masked this area off and hit it with another coat of the Cobalt Blue, but decided against it at this point. Maybe another day. I polished out all the glass, which had some glue damage. The black interior just got some black touchup and some simple Silver Sharpie details. I removed the engine and squirted the chassis, radiator wall and firewall with TouchNTone flat black. The engine was then reinstalled with no modifications. I removed the OB's homemade yellow traction bars and crude rear spring jack-up blocks. But I kinda dug his jacked-up look with its Day 2 vibe, so I replaced the kit's rear TRX tires with larger Goodyear GT Radials from some Monogram kit (actually, from the Mono '65 Vette I murdered out last week.) I painted the wheel spokes and inner surfaces with Testor Steel, and touched up the chome parts with a Deco Color Silver Chrome pen. All four side marker lights had been crudely and sloppily painted with yellow enamel (see the Before pics). I defined the edges with the Cobalt Blue, then painted the bezels Silver Sharpie, then the lenses with a fine Red Sharpie for the rears and some Folk Art Pearl White acrylic on a toothpick tip for the fronts. I couldn't get either the headlight or front parking light lenses out, so just trimmed up their ragged edges with an Xacto and then painted the parking lights with the Pearl White acrylic. (Notice the OB had mounted the kit RS backup lights under the front bumper! Of course those had to come off.) I cut the side stripe decals away from the door lines, which IMHO really helps in realism. I re-chromed the window trim and rocker panel trim with my usual Silver Sharpie; the wheel opening trim was chromed with the Deco Color pen, which is actually easier to use for that sort of thing. I'm fairly pleased with the finished product and its 8-10 hours of effort, much of which was in polishing the paint. I've often said that for my “rescues,” I'm happy if it looks like something I might have built in 1968 and ecstatic if it looks as good as something I built in 1969. I think I achieved that here—it's not as good as my very best 1969 work but definitely better than most of my 1968 stuff. This was my 56th glue bomb rescue of Other Builder's Models (I've also done 11 of my own), and my 8th completed rescue this year. Thanks for looking and, as always, comments welcome. Oh, and here it is with an AMT (ex-MPC) Yenko I built for my kid back in the early 2000s. “One of these things is not like the other”--one looks like a '69 Camaro and the other one looks like a Krass and Bernie cartoon of a '69 Camaro. If you can't see the differences between these two bodies, I really don't know what to tell you.
-
There was a feature article on a clean, very nice, slightly restomodded '64 Cutlass HT in the August issue of Hot Rod. (I only just got it--my subscription issue was never delivered, the Aug issue never showed up at Walmart, and I had to call them for a replacement after the Sept issue arrived.)
-
Hella cool! I'll have to get at least two of these. Might try to do a tribute to Shane's late lamented Blackbird of Street Outlaws. Tim, you asked what Pro Stocks we'd like to see Round 2 bring back. I'd like to see the Motown Missile '74 Cuda, but only if they fix the headlight buckets and grille. (I already have a couple of the old, wrong ones.)
-
Con-Air 1967 corvette from a revell 63 snapper
Snake45 replied to Whosurdaddy209's topic in WIP: Model Cars
Good call using the nice '63 snapper instead of the wretched misshapen '67 roadster kit. One of those could serve as an "organ donor" for the fender gills, though. Drive on! -
And if you ordered from Auto World, they NEVER had your complete order, and would send you a "credit" for the missing item(s). Which means you had to order something else, and pay another shipping charge, and then get ANOTHER credit for an out of stock item, and so on and so on ad infinitum. I wonder how many of us here "died with" a credit from AW, i.e., just gave up and ate the loss. I couldn't believe it when I first ordered from Squadron Shop in the '80s. I'd mail them a check and just seven or eight days later, I'd have my items, and if they didn't have something, they sent you an actual REFUND CHECK! Later, I'd call in my order using a credit card and would have my order in 3-4 days. Once I called in an order on Saturday morning and it was at my post office on Monday afternoon! I am not making this up!
-
Cool tank, Oldscool! Model on! You just reminded me, I have one of those bought cheap at a club meeting maybe 20 years ago. I started it and got about halfway through the build before a shinier squirrel showed up. I need to dig it out and kick it through the goalposts. Come to think of it, I saw a real one of these at an airshow a few years ago and seem to remember taking some detail pics of it. I'll have to dig out all my old 35mm prints and see if I can find them.
-
I saw it and don't remember much about it, except that it was pretty good. I'll watch it again if I find it on one of the streaming services I have.
-
A true "rescue," as I define it, doesn't really take all that much work, it's just a matter of fixing or improving little things. If it takes a lot of work, that's a full "rebuild" in my book. Generally speaking, only rare or valuable models are worth the effort of a full rebuild. The whole trick to a successful "rescue" is selecting the right subject. You want something with "good bones," something that's basically complete with a paint job that can be saved. I've done a couple rescues with a repaint, but I call those "rehabs." I guess I should consider this one a rehab instead of a rescue, but the flat black paint was so relatively effortless that it's closer to the rescue category. The flat black paint was much less effort than the paint polishing and touchup I do on most rescues. Thanks for the kind words!
-
Thanks Matt! Isn't it though! Thanks! Thanks Michelle! Thanks Hmann! Yeah, I'm already planning a couple more. Stay tuned. Thanks Zippi! Awwwwwwww, Yeahhhhhhhhh! You know, I think you're right. Thanks so much! I've seen several posts on here asking where you could find those wheels. I think these are the only ones I've ever seen. Thanks! Thanks, Pappy!
-
Motor trend super models
Snake45 replied to R. Thorne's topic in General Automotive Talk (Trucks and Cars)
I have two of those already pre-hacked. I'm trying to figure out how to un-hack them. -
All it needs is some ATMs and gas nozzles.
-
That sounds like a plan.