peteski
-
Posts
9,227 -
Joined
-
Last visited
Content Type
Profiles
Forums
Events
Gallery
Everything posted by peteski
-

Removing partial chrome plating, or paint over?
peteski replied to thedude's topic in Model Building Questions and Answers
First post? Welcome to the forum Dude! While the paint (and glue) adhere better to bare plastic, there is no absolute need to remove the "chrome" before painting. "Chrome" is actually a layer of clear enamel or lacquer over bare plastic, which is then metalized with a very thin (few atoms thick) layer of aluminum, then usually another clear coat is applied to protect the thin layer of metal. If you use water-based paints then I would prime the metalized areas first. If you are using "stinky" enamels or lacquers, then you might not even need to prime. But the shiny surface might show through the paint, so priming makes sense with either paints. -
What you are experiencing is what steered me to preassemble and test fit as many things as I can, prior to painting. I use white glue and masking tape to hold things together. I also often pin parts together (but glue the pin to only one of the parts, so they are removable. Pinning parts also assures perfect alignment after painting. Yes it all takes extra time, but it saves a lot of aggravation (and wasted time) fixing things that don't fit rigth, or are installed in the wrong order.
-
Why worry about overdone "teeth" in a wheel cover? It is only a model (toy) after all. At least that's what many said about the recent Revell Jaguar with a windshield that is too short. At least wheel covers can be easily redone by the modeler (even using 3D printing) while reworking the body and windshield of that Jaguar would require major surgery. I'm not pointing fingers at any specific people - just find it amusing that some major inaccuracies in a model are ignored by certain group of modelers, but is it ok to point out smaller flaws which are easier to fix without being told to get over it because it is just a hobby..
-
This could be info about the drill stand/case itself. Often these are purchased separately from the bts by the company that sells the complete sets, then they add the drill bits snd resells the complete drill set in a case.
-
Well David, I'm not into race cars either, but this is not about the type of a model being built - its' about the craftsmanship. I'm not into a lot of stuff, but that doesn't mean I am not going to look at them or appreciate the work that goes into them. Mark is doing a lot of scratchbuilding, and his attention to literally the last bolt and nut is absolutely amazing. But since you are not interested in race cars, just forget about it. Whatever . . .
-
Almost a Flying Car
peteski replied to Daddyfink's topic in General Automotive Talk (Trucks and Cars)
Now who will be the first to model that? As mentioned, a 1:24 scale aircraft is available (but it likely will be rather pricey, and most model car builders are pretty tight when it comes to spending money). This would even make a decent rat-rod! -
There is a range of modelers (from mediocre to brilliant) in any hobby. If you want to see some absolutely incredible level of modeling here, see Scale-Master's thread. If you have the patience, read through the entire thread. He achieves some amazing feats of modeling, and the level of detail is unbelievable!
-
Here is a good thread for you to read (compete with drill sources). Just the other day I pointed someone to it.
-
Well, yes and no. If you posted the photo as an attachment to a post, you have some time (couple of days?) to go back to that post, edit and delete that photo. But if you wait too long and the post cannot be edited, then the photo cannot be deleted. If you uploaded the photo to the gallery, then you cannot delete it. But in either case, if you contact one of the moderators, they can delete your photo.
-
OMG Tom! That is a 1st world problem! It is just so very difficult to swipe the unlock code, instead of the fingerprint verification, isn't it!? Terrible! Try unlocking the iPhone which uses face recognition while wearing a mask!! More 1st world problems!
-
How many models have I built? I do this as a fun hobby, so I don't keep track. If we go back to my childhood, maybe hundred or couple of hundred? I was quite prolific as a teen (mostly WWII aircraft and airliners back then). In my adult years maybe 40-50? Not sure. As for the airbrush and vector drawing programs, I don't thing you have to be advanced modeler to own or use them. They are simply tools for the trask at hand. Just like a chisel or chainsaw. You can use those tools in their basic application, or for advanced jobs. For example the same chisel can be used to cut openings for a striker plate on a door jamb, and to sculpt a beautiful wood carving. Chainsaw can be used to cut down trees, or the same chainsaw can be used to create beautiful wood sculptures. It is not the tool, but how you use it. Same with airbrush or vector-based graphic program. For questions about airbrushes and compressors see the very top sticky thread in this section of the forum. There are others too. That subject is well covered becuase it is often asked about. From reading your responses in this thread it seems like modeling is just a temporary whim with you. You come here looking for help, then you keep on griping how difficult and awkward things are (specifically decal design and printing). It seems that you want to instantly become an expert modeler (at least as far as decals go). Dude, things are not that easy, and you either accept that, get good at it, achieve results you desire, or like I said earlier, go back to your hobby of game simulators. BTW, most decals I print are for my fellow model club members (not for my models). Every decal design I create makes me better at it. Here is one of my models with decals decals I designed for it (the gold pinstripes).

-
(PICS) 1/8 Scale Volga M21 kit from DeAgostini
peteski replied to traditional's topic in Diecast Corner
Growing up in Poland in the '70s, I remember seeing these cars (usually painted black). I thought the see-through speedometer was so cool (without realizing that the concept was probably "borrowed" from the American Thunderbird). -
Installing Outside Side Mirrors
peteski replied to TransAmMike's topic in Model Building Questions and Answers
Don't feel bad - my workbench often gets out of control. I work on too many projects at a time, leaving me about 1 foot square of working surface. But I'm Peteski, not Tom. Dont' accuse him of having a messy workbench! -
Installing Outside Side Mirrors
peteski replied to TransAmMike's topic in Model Building Questions and Answers
My caliper almost never leaves the top of my workbench! If I can find it there that is. Actually, it is there, visible!
-
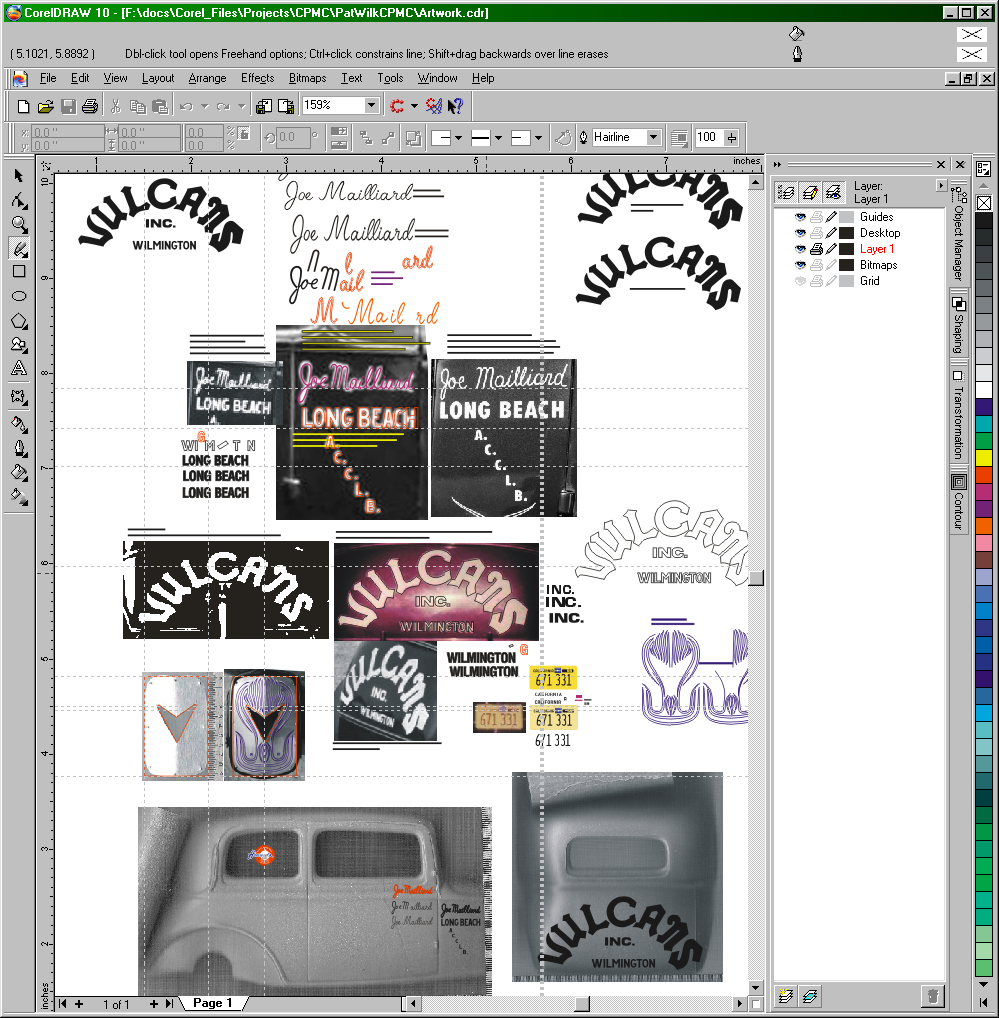
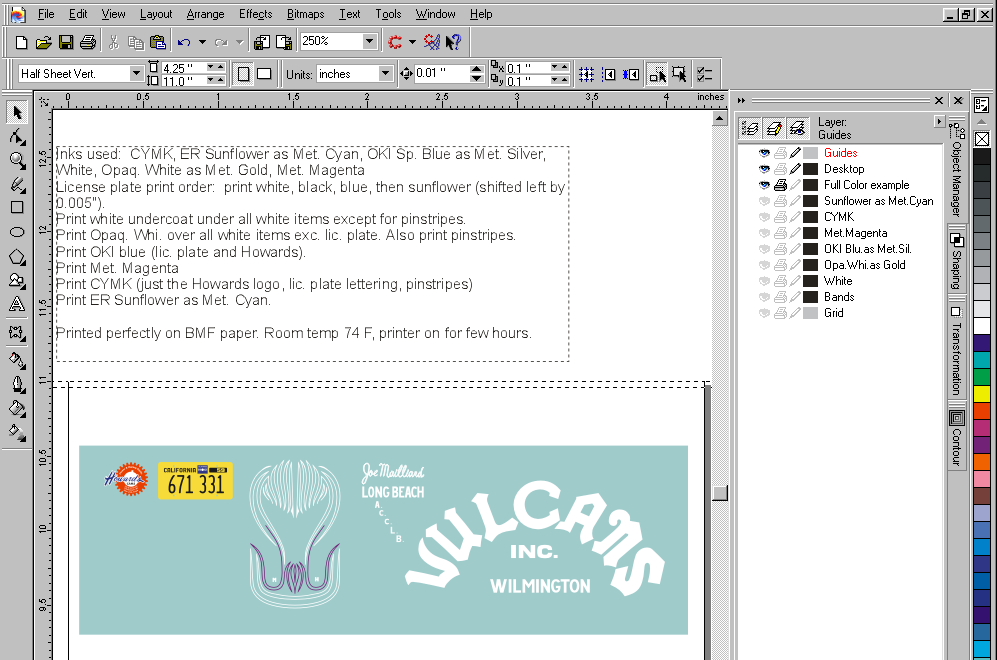
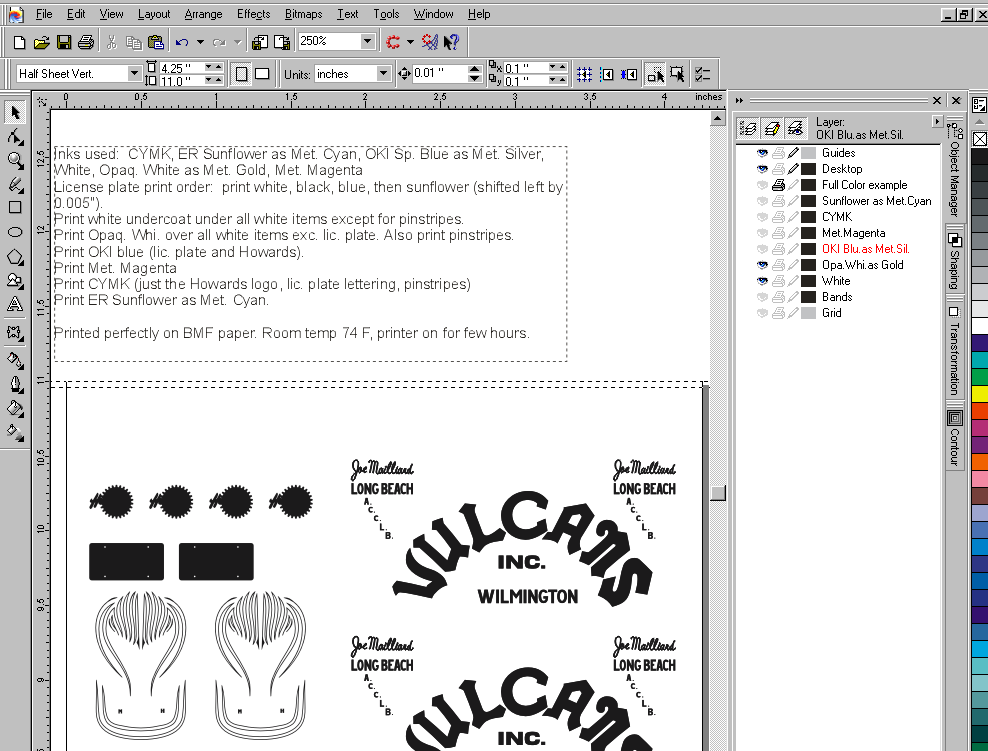
"Yes" to all your questions David. Corel Draw (or other similar programs like Adobe Illustrate or Inkscape) can do all you mentioned (and much more). And much easier than repainting things pixel at a time. But you will need to do some learning. Thankfully in today's digital world, there are plenty of video tutorials on hwo to perform all the "magic: in those programs. Only thing is needed is time and some patience. I often use a photo or a scan of some logo to trace it into clean vector format. Each color can be made into a separate vector object and can easily be manipulated (like changing its color). Corel Draw also offers automatic tracing of bitmaps into vector objects, but the original bitmap needs to be hi-resolution and clear. I still find that I can do better job tracing bitmaps manually than what the program can do. And vector-based drawings can easily be resized without any pixelation. This is sort of like the modeler who uses spray cans to paint their models but refuses to use an airbrush, because he thinks it is too much of a pain to clean after painting. If he broke down and decided to get an airbrush, he would realize that the cleanup is not all that tedious, and the airbrush allows for much better control and better paint jobs. If you want to get better and quicker results (and have easier time dealing with decal manufacturers) it is time to graduate from MS Paint and pick up a vector drawing program. Inkscape is free to use. Personally, I use Corel Draw, because I started with version 2 or 3 back in the early '90s, so I'm used to it. I currently use version 10 and 12 (current onbe is version x8 or 18). I have no need for the latest - mine do all I need (and a lot more) already. Here are some examples of my decal designs in Corel Draw. This is my virtual "sketchpad" This is where I do my tracing. The photos (bitmaps) are placed in the Bitmaps layer and locked. "Bitmaps" is just a name I assigned to that layer - it is just like any other layer in Corel. I then do the vector tracing over them on Layer 1. The black/white images of the car body are actual scans of the model. I place a copy of the tracings over those scans and size them to fit on the model. As you can see there are rulers around the drawings, so all the sizes are in real inches - no guessing needed. Once I have all the objects sized properly in the sketchpad file, I create the actual decal artwork. The above image is not what I'll be printing on my alps printer - it is just a rendering of what the printed objects will look like when printed out. Notice the instruction above the drawing - that is what I use for printing. Also notice all the different layers defined on the rigth. Each of those layers is a separate print run for Alps. Alps has the ability to retain the paper inside, so each printing pass will be perfectly aligned with the previous passes. All but the CYMK layer are printed as spot colors. I also use special Alps printing tricks, sch as relabeling cartridges. Alps is a very capable printer, but there are many tricks that aren't covered in its manuals. There is a large Alps users community where we share our printing techniques. This is what the actual artwork for white ink (to be sent to the printer) looks like. All that is black will be printed with white ink, and all the white "paper" areas will be left blank. Here you see that the white ink will be applied under the license plate and Howard's Cams logo color images which will be printed in subsequent print passes. As you can see, this process is not the simplest, but the results are excellent. And since I work in actual-size artwork, the size that shows up on the screen is the same size that gets printed.
-
Installing Outside Side Mirrors
peteski replied to TransAmMike's topic in Model Building Questions and Answers
Looks good so far. For the future my recommendation would be to pick up a $20 digital caliper (Harbor Freight) to take the guesswork out of what size drill to select and the diameter of the wire. It really makes model building easier. I couldn't function without one. -
Installing Outside Side Mirrors
peteski replied to TransAmMike's topic in Model Building Questions and Answers
True. I drill these by hand. I use the PCB drill bits which have 1/8" shanks, so they are easy to hold in my fingers (or in a pin-vise). That #80 bits are very fragile, but I usually manage not to break them. -
Instead of hoping that the UPS driver will smarten up, give your ill-health neighbor your phone number, so if the package is misdelivered again, he can just call you , and you can walk over and pick it up. You mentioned that you live in a friendly neighborhood - the neighbors should have already shared their phone numbers.,
-
Installing Outside Side Mirrors
peteski replied to TransAmMike's topic in Model Building Questions and Answers
I also pin mirrors and many other small parts. I have used 0.012" diameter brass rod (and drill with #80 [0.0135"] drill bit) for really small parts. It is doable but you need to have steady hand and go slow. -
I can do that in Corel too, but I find that manually tracing the bitmaps takes less time than fixing the auto-traced curves.
-
I think I'll end my comments here with a statement that an average Joe cannot magically get their custom decals made. What is needed are learned skills and understanding of the process. Like it or not David, you need to acquire knowledge of the process and lingo. Listen, when started building models you didn't know about all the various paints, adhesives and techniques which are involved in model building. You had to learn and acquire them. You also need to understand that the same goes for designing and printing custom decals Educate your self about the process and the lingo. I suggest that you should stop looking for shortcuts, and gain the knowledge and experience which will allow you to be successful at designing custom decals for your hobby. You mention designing some artwork in MS Paint which was then successfully used (after being converted to vectors by someone). Think about it - if you learned how to work with vectors, you could provide a print-ready artwork without getting someone else involved. And as I mentioned few times before, vector-based drawing programs have lots of features which make drawing your artwork much, much easier. You would save time on the artwork design, and once you learn this skill, you can use it for any other hobby or professional work. Vector drawings (because they can easily be drawn to exact and known dimensions) can be used for things other than just decals. I often create drawings for making custom model parts. I print that artwork in 1:1 scale and use it as template for cutting those parts. When I design decals I often place the actual model on my scanner then import the scan of the model into Corel Draw, and place it on a lower layer and lock it. Then I can draw the decal artwork directly over that 1:1 scale scan of the model. That way the decal will fit perfectly when printed. It makes the design so much easier than guesswork. I'm showing you my tricks to convince you that it might not be such a bad idea to learn a new skill for your hobby.
-
Noel, Blank decal paper is not *THAT* expensive. Cheaper than a small bottle of hobby paint. Still, my trick to double my use is to split each letter-size (8.5" x 11") sheet in half vertically. I end up with two 4.25" x 11" sheets. I just design my artwork to fit on that width paper. Then I have another paper-saving trick. I often print very small images and only one or two. I place them right at the very top printable edge of the artwork page, print, then cut the decal off from the top of the page. I end up with vertically-partial half-sheet. I then use that partial sheet repeatedly for future small jobs. Sometimes I can get 5 or 6 separate decal projects from one half sheet without having to print them all at the same time. I still keep the 11" length of paper size in my artwork (just have the objects to be printed on top). The program or the printer do not care the the sheet is shorter than expected. It still gets ejected properly. Of course this only works if the artwork does not require full size width. But even then, if the length of the artwork is not full 11", I can trim the printed images of the top of the sheet and use the remaining blank piece for next project that doesn't require full sheet. Of course the printer does have minimum length pf paper that it can deal with, so if I get to that point I have to throw away the small remaining piece of paper. But overall I squeeze as much as possible out of my decal paper. As far as using white vs. clear film paper then yes, unless the decal will be applied to a white-color model, it needs to be printed on white. If printed on clear and applied to a non-white surface, the color of the surface will tint the colors of the decal. It is standard subtractive color method. If the decal is transparent yellow and applied to a blue model, the result will be green decal image. I know of at last one decal manufacturer who actually uses that to their advantage. Here is an example https://k4decals.com/collections/reefer-decals/products/mistletoe-hams-36-ft-billboard-reefer-decal-mistle . Specifically look at and ready the instruction scan. It explains things.
-
David, What is the big rush? What you are doing is a hobby - it is a pleasure activity which is supposed to provide fun, not stress. Relax, take your time. Unless of course you have limited number of days here on this third rock from the Sun. As I see it, is you rather than us, who is trying to rush things. There is a lot to learn, and you need to start with basics. As for why it seems so difficult to get custom decals produced, it is because no company has produced an affordable printer with capabilities similar to what those Alps printers can do. Why? Simple: the market for such specialized printer is not large enough for the venture to be profitable. It is always about the money. And just like with other parts of our hobby, in order to get good at something, you need to acquire the skills and tools to do a quality job. You can complain all you want, but that will not make things any better, or provide a faster solution. If you are impatient, the models will not turn out well. Again, this is a hobby, not a high stress job. Trust me, you will not become really proficient modeler in few days. I have never met any modeler who turned contest quality models right after he picked up model-building as a hobby. You really should not expect everything to just instantly fall into place. You need to be patient (and gain experience). I still recommend you upgrade to something more advanced than MS Paint. I'm speaking from experience here. I have been building models since pre-teens, and I'm now only few years your senior. I have been using Corel Draw (in my hobbies) for about 30 years, and Alps printer for about 20 years. I quite comfortable with both, but I still have things to learn. By the same token, you can't just jump into this whole home-brewed custom-decal making process and become an expert in few days without doing some in-dept research (and follow the advice you asked for). Also, often if you want something done rigth (and fast), you have to do it yourself. I dint' want to deal with outside decal vendors - I wanted to print my decals in my workshop, rigth after I created the artwork. That is why I invested in my Alps printer. I just do the decals myself. But there was a learning process involved, and I'm still discovering things that improve my skills. There are ink jet printers out there which use UV-cured inks that can print directly on the models (and can do white inks), but they are very expensive commercial printers. There are also 3D printers which can use multiple colors of resin while printing the model, so the model comes out with all the decoration already on it (not decals needed). But in either way, there is a learning curve involved. No instant gratification. Thanks for the explanation abotu your fantasy scheme - I like it!
-
The Metallic-silver Alps pints looks just like silver paint. Depending on the viewing angle, just like silver paint, it will l look darker or lighter. I'm not sure if that will look good as window, but I could be wrong. Gray can be accomplished on Alps by printing a layer of white ink over black ink, but not all Alps printers are capable of that. It is a complicated story. There are now also several opaque gray inks (spot colors) available from Elephant Rocket, but I'm not sure if the decal makers use those inks. They have to be ordered directly from Elephant Rocket in Japan.
-
I'm pretty sure that Kadee uses Alps printer, so they will have similar limitations as all other the cottage decal manufacturers (majority of which also use Alps printers). If you bothered to read through the website with Alps printing tutorial (I pointed to earlier in this thread), you would see several Alps color charts shown there. These are not Pantone, but simply combination of Alps inks printed in spot color overlay mode. Since those color charts were done, Elephant Rocket (yes, that is a company name) in Japan has introduced a whole new range of ink ribbons with spot colors, so the range of available non-dithered colors Alps can print has increased quite a bit. Well educated decal makers who use Alps do not want to print halftones, because Alps does a terrible job with halftones, but it gives excellent results with spot colors. Not sure about your question about Microscale decals and clear. The print decals using silk-screening process, and custom blended color inks (also no halftones). Those inks are very durable and will not run when clear-coated, even with hot paints. I also do not understand you so concerned about the 8" x 10" size of the decal sheet. What you should be paying attention is the proper sizing of the images on the sheet itself. Vector format preserves the sizes of the objects, so regardless of what size sheet they are printed on, they will retain correct size. The margins might change, but the images will always have the correct size. Again, another reason to work in vectors. But even with bitmaps, if you use a more advanced bitmap editor, you can change the paper size without changing the size of the images on that artwork. We are all trying to help you here, but I'm not sure how much you are accepting. Maybe you should have stuck with game simulators after all. I'm also curious about Preston American Original. I did a quick Google search and didn't come up with anything useful. Is that a fantasy scheme?