peteski
-
Posts
9,227 -
Joined
-
Last visited
Content Type
Profiles
Forums
Events
Gallery
Everything posted by peteski
-
Some good info there, but unfortunately Photobucket "ate" the photos from last couple of pages.
-
OK, this seems like useful info, but which is that fly tying wire in your photos? Also it would be good to show a straight piece, instead of it being tightly wrapped on a small diameter piece piece of styrene. And since I'm critiquing things, I might as well mention that you might considering correcting the subject line of this thread before the post edit time expires. It will be easier to find that way.
-

Constant & Annoying Emails From Finescale Magazine
peteski replied to Ramfins59's topic in The Off-Topic Lounge
I've been a FSM subscribed for about 30 years and the latest issue (just got it the other day) actually has few automotive articles. -
The OFF button doesn't preserve battery life by much. ON most calipers it only shuts down the display (which used only small fraction of the total power used by the digital circuitry). If the power button really turned it all off, the caliper would have to be re-zeroed every time you power it back on. Not only that. With the power off move the jaws to another location and turn it on - it will correctly show the new position - if it was off, it would not do that. Yes, my digital calipers are inexpensive Chinese ones. Here is some good info http://fliptronics.com/tip0006.html
-
Good luck Gabby - let us know what you come up with. We're always interested in member's models, and ideas they have.
-
Gravity colors USA problems?
peteski replied to Polaco's topic in Model Building Questions and Answers
isn't there a mega-thread about problems with Gravity Colors USA? -
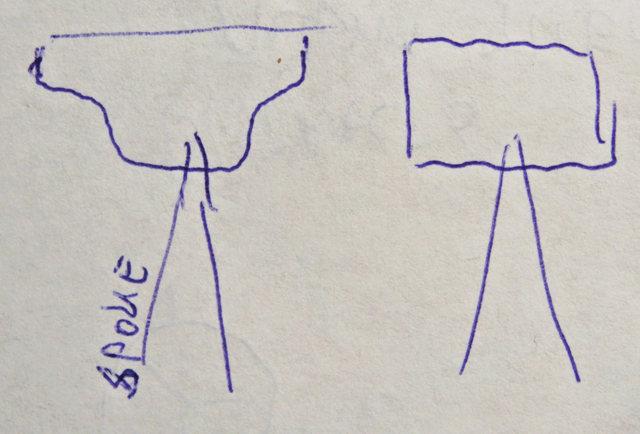
Thanks for those better photos Curt. Those show the wheels much clearer. While the nicely laced thin-wire spokes look very realistic, there is another feature that IMO greatly detracts from the realism: It is the shape of the rim. If you look at the 1:1 wheels of this type, RMCoM resin wheels, and surprisingly even the kit's stock wheels, the rim has a stepped-U cross section. Your rims seem to have flat sides, and more of a rectangular cross section. To me that seemingly small inaccuracy makes huge difference in the wheel's appearance. Roughly drawn cross section of the prototype wheel (left) and yours (right). I'm wondering why you went through great lengths to lace the wheels with thin wire, but didn't machine the rims to have a more prototypical shape? Is this a limitation of your machining process? I would love to purchase few sets of your wheels, but the shape of their rims is holding me back.

-
Curt, I went to Teds Marketplace website and only found 2 listings for 1:25 and 1:25 scale wheels. One (in stock) is for 18" wheel, and the other listing gives a choice of 18" or 20" wheel, but neither is in stock. Neither listing gives the width of the wheel. Too bad that those dimensions are not provided on Ted's site, so one would know which one to buy. Here they are: https://www.tedsmodelingmarketplace.com/dragster-wire-wheels-1-24/ https://www.tedsmodelingmarketplace.com/dragster-wire-wheels-1-25/
-
Steel tubing thin wall hypodermic source?
peteski replied to 89AKurt's topic in Model Building Questions and Answers
Looks good! In the meantime I found another source for hypo stainless steel tubing. http://www.componentsupplycompany.com/ Their part numbering system reminds me of the Small Parts Inc. They carry wide range of tubing, and other useful stuff. -
I like the way you solve your modeling problems Paul. I do have a question: the "spoke" in the last photo seems awfully thick. The spokes on the 1:1 thresher look much thinner. Couldn't you use thinner wire for the spokes? I also counted 12 spokes,not 8, on those wheels. Going through all the trouble machining the parts, why not make it closer to the prototype?
-
Thanks Skip!
-
LOL! That reminds me of sanother anecdote from my childhood. My cousin and I were in the back seat of my uncle's Trabant, going on a holiday trip. My aunt was in the car too. The car was running rough (2-cylinder 2-stroke engine, but a bit larger than the one in Mikrus). My uncle pulled over, opened the hood and poked around the engine. He then borrow my aunt's nail file and used it to clean either the ignition points or the spark plug electrodes (I don't recall), We got back on the way and the car was running much better. Ah, the good old days . . .
-
Thanks for the update Geoff - I just ordered one of those conversion kits. The ordering process is really smooth, and I was able to use PayPal. Looks like Chris knows what he is doing (both, casting resin, and setting up his online store).
-
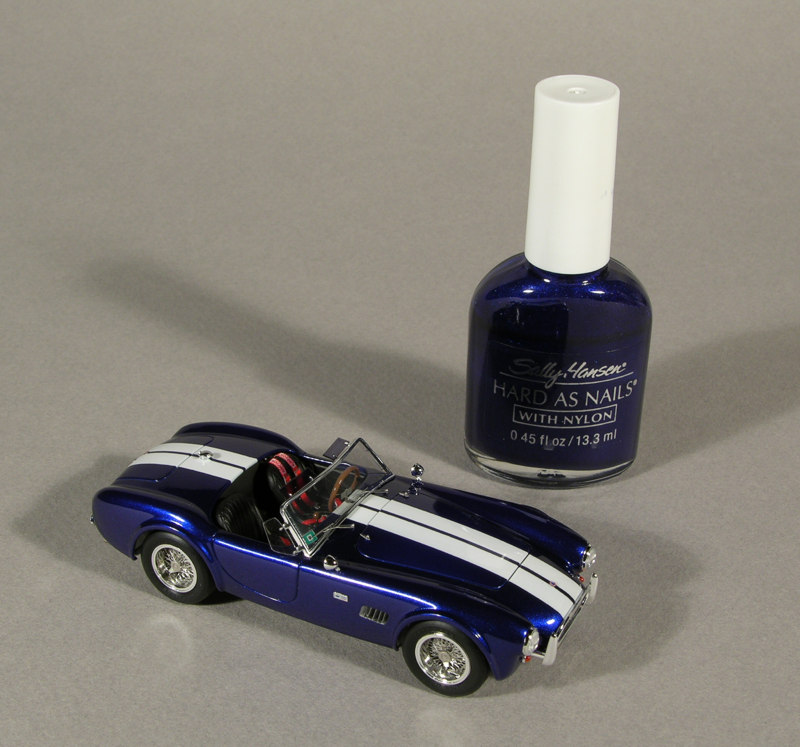
Thanks Gabby! I airbrush nail polish. It is quite thick out of the bottle, so it needs a lot of thinner for airbrushing. I don't have the specific proportions because I thin it when I put it in my airbrush jar until it looks "right" to me. Plus, different polishes have slightly different viscosity. I would say it is probably 50/50 polish/thinner. I used generic lacquer thinner. The model in the photo above was first primed using Tamiya fine gray primer, then couple coats of the blue lacquer. I then masked and painted the skunk stripes using Accu-Paint (a model railroad paint that goes on thin and is opaque). For the top coat I airbrushed couple of coats of Testors wet look clear (decanted from a can). What color will you paint the cab? If it is dark, some holographic polishes are fairly transparent, so a stripe of that type would almost be a "ghost" stripe which would only show up when the light reflected off the metallic particles. That might be the look you are going for. Or if you want it to be more prominent, shoot the stripe area wit some lighter color paint as a base coat for the holographic stuff. Whenever experimenting with paints or techniques it is bast to test the effect on plastic spoons, or even plastic soda pop bottles. They are cheap and disposable. That way you won't have to strip the model if the effect is not what you were looking for.
-
Gabriella, While I do not have any specific info about that paint, the "flake" in its name got my attention. TCP Global sells paints for 1:1 scale cars, so that is what I'm worried about. Metallic paints have to be "in scale" to look realistic on a model. If you paint a 1:25 scale model with a metal flake paint meant for a 1:1 car, the model will look odd in-person, and even worse when photographed. Model metallic finishes should use very small size metallic particles. Unfortunately even some metallic paints made for models (Testors One Coat Lacquers are a good example) use oversize metallic particles. Those do not look realistic on a model unless you are depicting a 1:1 scale vehicle which uses a "bass boat type" metallic flake paint. The paint you are looking at might just have out-of-scale size particles. Have you looked at nail polishes? Those often feature finely ground holographic or color-changing flakes that are suitable for models. I have probably around 100 bottles of nail polishes which I bought for painting models, like this one. This particular nail polish had some very fine metallic particles which look good even on a 1:43 scale model. Just some food for thought . . .
-
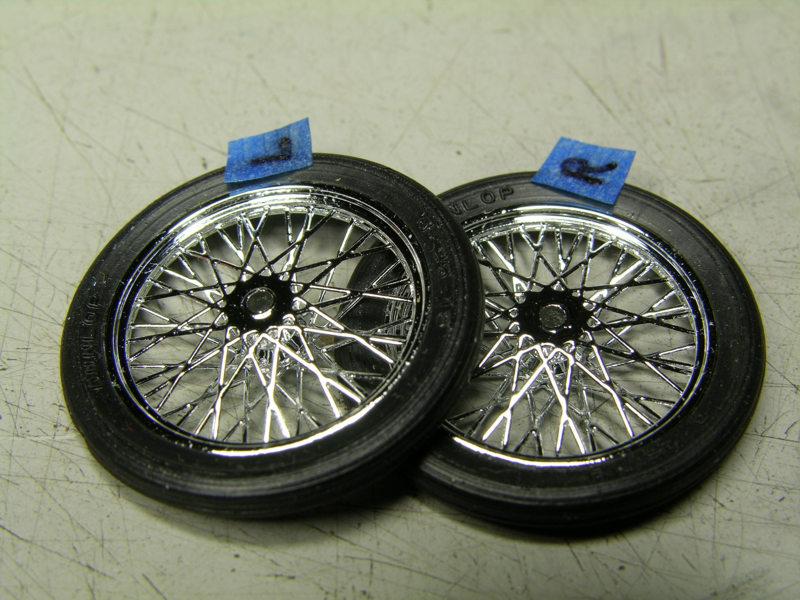
For years RMCoM (Replicas and Miniatures Co. of Maryland) used to have several sizes available. They had photoetched spokes, resin hub, rims, and tires. It also included a resin jig for shaping the spokes. This is one of the sets I assembled and sent out to be "chromed". Unfortunately those are out of production, but you might find them on eBay, or maybe some members here have a spare set.
-
I suspect that the target market for this kit is not the typical model builder, but just an average person who wants to have (for whatever reason) plastic model of Ramen noodle cup. They probably figured that those model builders would find stickers easier to deal with than waterslide decals.
-
Unfortunately Harry passed away couple of years ago, so this model likely never was completed.
-
Bede BD-5 & BD-J
peteski replied to Scale-Master's topic in All The Rest: Motorcycles, Aviation, Military, Sci-Fi, Figures
These look great! Could you maybe post a photo with something like a quarter, or your ruler, for size reference? -
While not always accurate or complete, https://en.wikipedia.org/wiki/PZL_Mielec makes no mention of any Cobra bodies.
-
Are we starting another anti-donk thread? Don't we have another one already going?
-
The Official EBay Discussion Thread
peteski replied to iamsuperdan's topic in General Automotive Talk (Trucks and Cars)
Mike, that sounds to me like the hacker got into your PayPal account and was using your bank account as a source of a payment? Even if you didn't catch the problem for several days, I think PayPal should have taken care of the problem (and they did). The bank doesn't know how PayPal is using the money it withdraws - bank only sees PayPal as the payee. But the bank, under the circumstances, should have forgiven any fees they charged. I have had my PayPal account for 20 years. I have it tied to my bank account (for collecting payments) and credit card, but I always use a credit card for payments. My "PayPal" bank account is separate from my main account, so even is someone hacks my PayPal account and wants to use my bank account as a source of funds, they won't get much (less than a $100). And if they use my credit card for funds, I'm protected by the credit card's policies. -
"Polished" Stainless Steel Finish
peteski replied to 1972coronet's topic in Tips, Tricks, and Tutorials
I'm glad I could provide advise. Maybe Shapeways now uses different printers and resin than then did few years ago (last time I bought some items there). Back then the highest detail material was FUD and FXD (but I know that they changed the names, but maybe also have better printers too). Sounds like a layer of primer fills the striations smooth. As far as the paints go, I think you would get more of a polished look using Alclad II Polished Stainless steel over gloss black or gray, than using Testors Metalizer. I would recommend a spoon test if you happened to have both types of paint. That saves from stripping the "good parts". -
List of kit semi-truck engines (how to find)
peteski replied to TECHMAN's topic in General Automotive Talk (Trucks and Cars)
Contact one of the moderators - they can arrange for you to modify the old post. Either PM one of them, or even use the "Report Post" link in the upper right of the post you want modify, and tell them what your intentions are. -
The example Michael used has a very unusual fancy paint and trim. Most Mikruses had a more pedestrian look. Seeing it again brought back memories of a funny story. Back in the '60s my mom worked as a draftswoman in an architectural firm housed in a large old building which had very wide staircases and hallways. One of the architects owned a Mikrus (average workers could not afford to own one). Several of his co-workers got together and carried his car to the 2nd floor, and placed it in the hallway right by his office. They all had a good laugh, but he wasn't amused at first. As far as the cost goes, I think Michael meant to state that Mikrus cost 4 annual average salaries. Back in those days Polish salaries were really low, so most people could not afford even a micro-car. My father had a small Polish motorcycle. I'm pretty sure it was the SHL M11.