stitchdup
-
Posts
7,139 -
Joined
-
Last visited
Content Type
Profiles
Forums
Events
Gallery
Everything posted by stitchdup
-

What Did You See In Your Yard Today?
stitchdup replied to Tim W. SoCal's topic in The Off-Topic Lounge
the only other birds of prey around me are hawks and owls but they are smaller than folk think. the seagulls are bigger than most of them. its impressive to watch them hunt though they miss more than nature documentaries would make us believe, lol -
i've edited it for you
-
What Did You See In Your Yard Today?
stitchdup replied to Tim W. SoCal's topic in The Off-Topic Lounge
saw a big bird of prey the other day but it was out on the water. i'm sure its one of the sea eagles thats been nesting on the island of hoy. i thought it was big when i first saw it but it just seemed to get bigger so i must have noticed it from a distance. their due to start breeding soon as their a young couple but i only saw one -
3D Parts Printing Service?
stitchdup replied to YellowHound's topic in Model Building Questions and Answers
just send me a pm with your email. we'll work it out from there. sorry i took so long to reply, the notification only came through tonight -
Volvo VNL860 - new 3D print
stitchdup replied to Bren's topic in Truck Aftermarket / Resin / 3D Printed
I tend to print 2 or 3 of the parts i know will warp at various angles when i do a print. for example i printed 3 roofs and 5 grilles for a 37 lincoln yesterday and 5 sun visors. i only did one of each the first time and none turned out decent. you can straighten prints after curing too if you use near boiling water and have very chilled wet cloth but it wont work on thick parts. i've been getting more good results with jayo resin than i did with anycubic resin. the area the printer in needs more heat with it though, the anycubic was more forgiving on temperature. the jayo is half the price too but i couldn't get it for my next resin, so i'm trying creality resin after seeing some good reviews. -
beer is just a bread smoothie
-
What Did You See In Your Yard Today?
stitchdup replied to Tim W. SoCal's topic in The Off-Topic Lounge
just say they are air b+bs, that seems to get anything classed as a house -
explosion proof and explosion resistant are not the same thing,
-
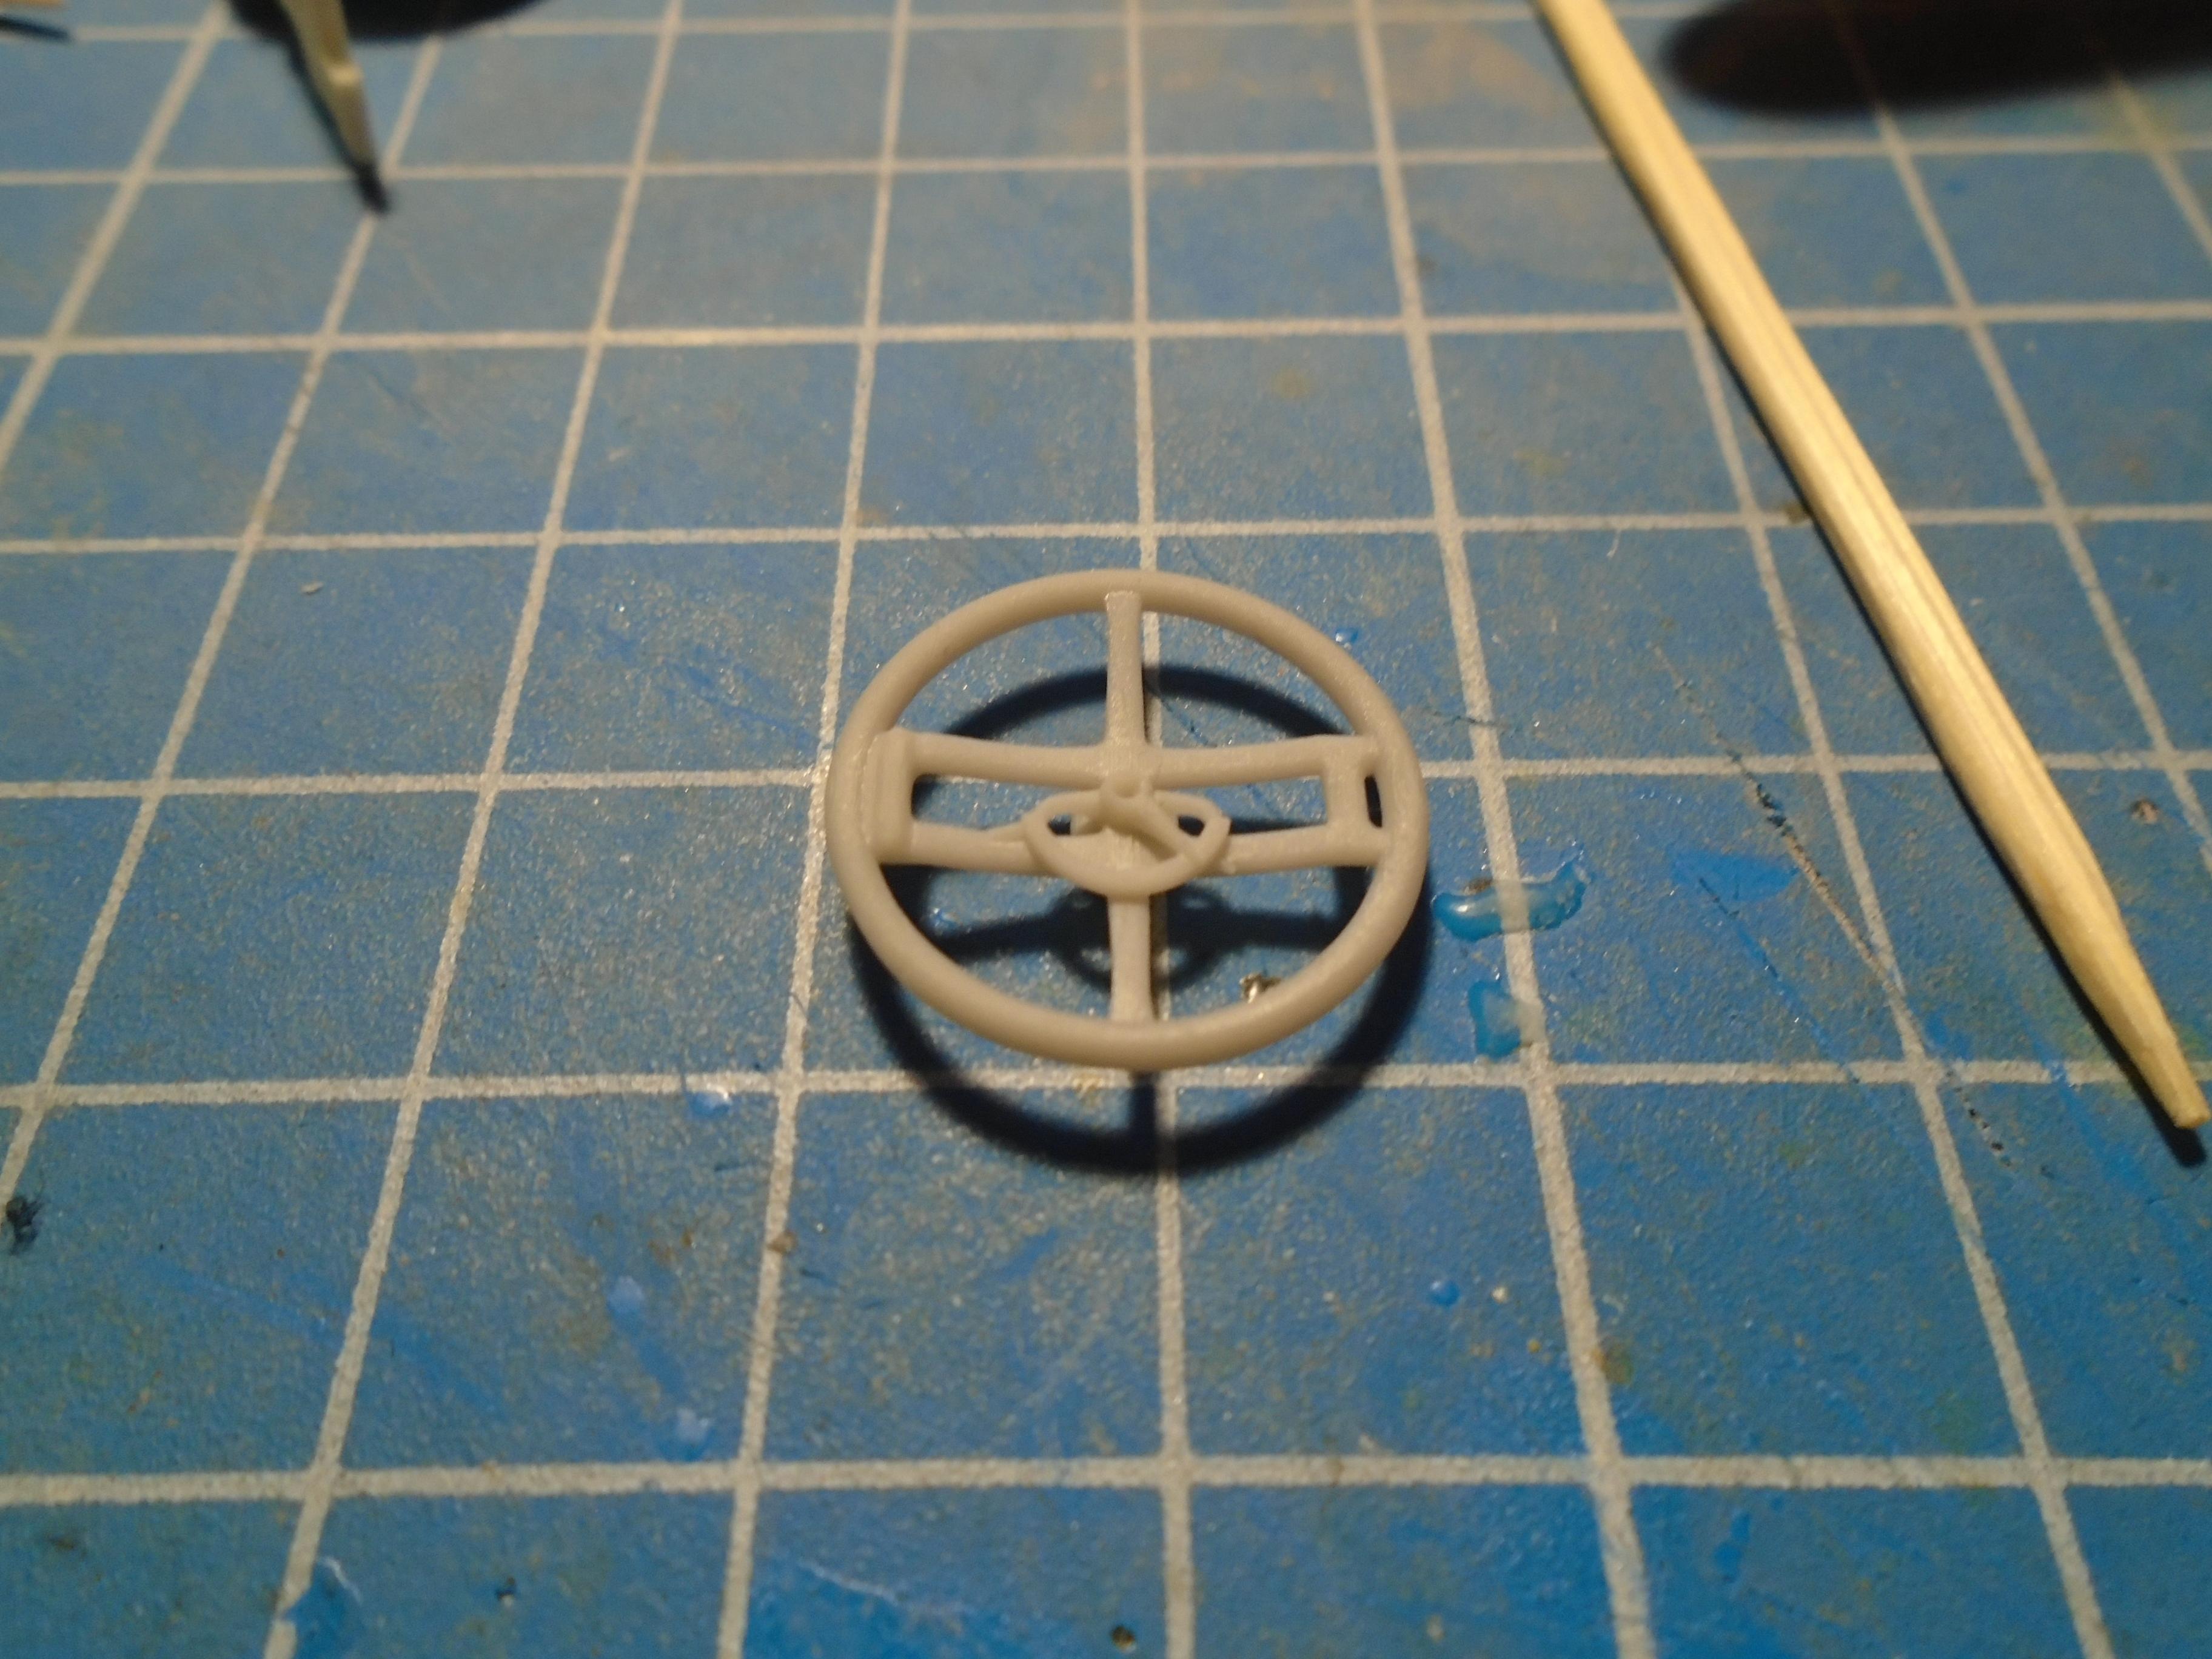
fat man steering wheels
stitchdup replied to stitchdup's topic in Model Building Questions and Answers
i completely forgot to post pics of the print so here they are front and back. printed in jayo resin at 0.03 layer height on an anycubic m3 max. files from nahunel customs/ditomaso on cults. one of these will be on my icm model a once tamiya paint is back in the local shop
-
The Future of Revell...for 2024 at least.
stitchdup replied to niteowl7710's topic in Car Kit News & Reviews
i thought this was already out, i'm sure i've see it in a couple shops. i'll still need to get one though if just for the new lower grille as i dont recall it in the un bus or camper -
DupliColor sealer not drying.
stitchdup replied to NOBLNG's topic in Model Building Questions and Answers
the sealer wont always stop the orange or red getting through (especially on the revell t2 vw buses), but silver paint works every time. -
What Did You See In Your Yard Today?
stitchdup replied to Tim W. SoCal's topic in The Off-Topic Lounge
apparently he heard a noise inside a hollow tree trunk and stuck his head in to look -
machine to rage against include any that dont work and just as many that do work
-
This is how i lower tamiya bugs and ghias. there are files for 3d printed dropped axles but the tamiya bugs dont really need them if you have a small drill bit. the only added parts are the sewing pins and 20mm elastic. i start by drilling through the axle end of the suspension arms until the depth passes the shock mount on the axle (7mm) and then remove the suspension arms from the axle. take care not to mix them up. next we need to have the wheels we want to fit as anything wider than stock is going to need the axle narrowed also so now is the time to do it. i usually remove the bars on the axle between the shock and first upright then use the shock mount to line up for drilling the axle. you need these cuts to be square or the suspension wont work. now when you go to fit the underhood piece to the tamiya you will find it no longer fits over the axle, but dont worry as the bottom of the underhood piece has a lip around the edge which once removed means the parts fit again. for the wheel hubs i drill through them from top to bottom and glue in some elastic (i tried rubber bands but the glue made them brittle) and now drill out the outer ends of the suspension arms for mounting the elastic to. i leave the shock fitment until last on the floorpan as it can be used to ensure it sits level and usually means nicking much shorter ones from something else or scratching them. on this axle i have removed the shock towers as its a fair bit narrower. of course the other option for a narrowed axle is to rob it out of the old 1/25 revell kits before drilling the suspension arms removed and back together with pins (dont forget to rough up the pins before gluing) and there we go, we now have a modern styled front suspension for a dropped bug
-
thats an awesome build,
-
Volvo VNL860 - new 3D print
stitchdup replied to Bren's topic in Truck Aftermarket / Resin / 3D Printed
very cool, i just had a look through the files and that old austin has caught my eye but 140 bucks for just a cab shut them again. i'll see if i can find a couple of other folk to share the file cost (and i have a couple of folk in mind) -
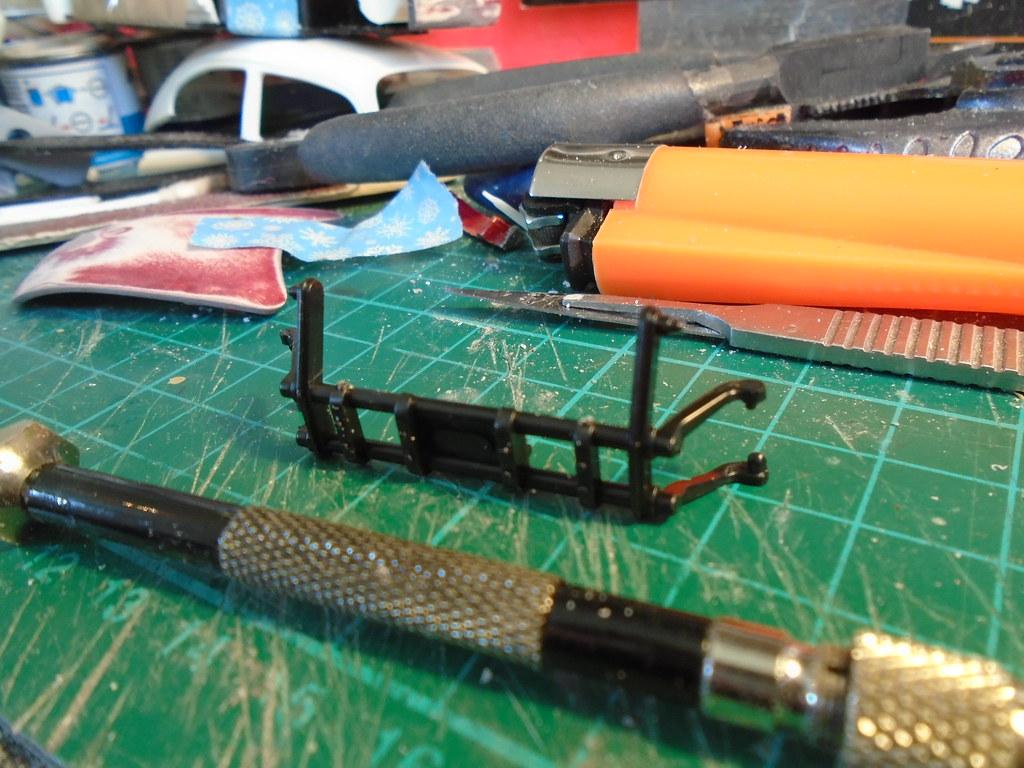
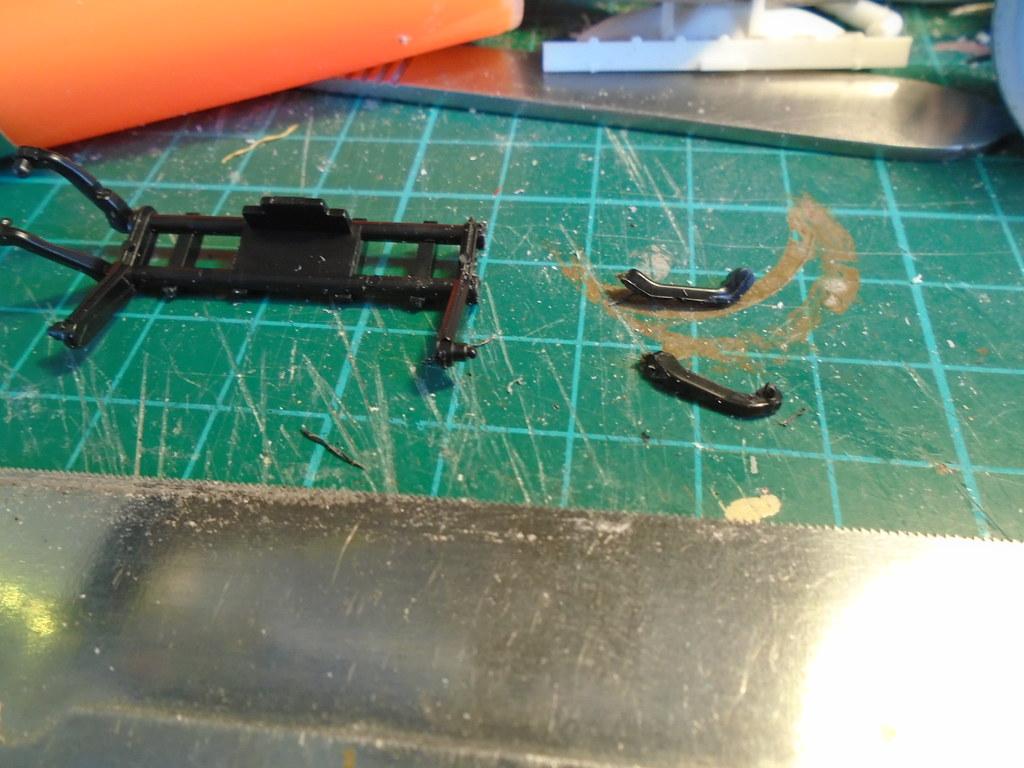
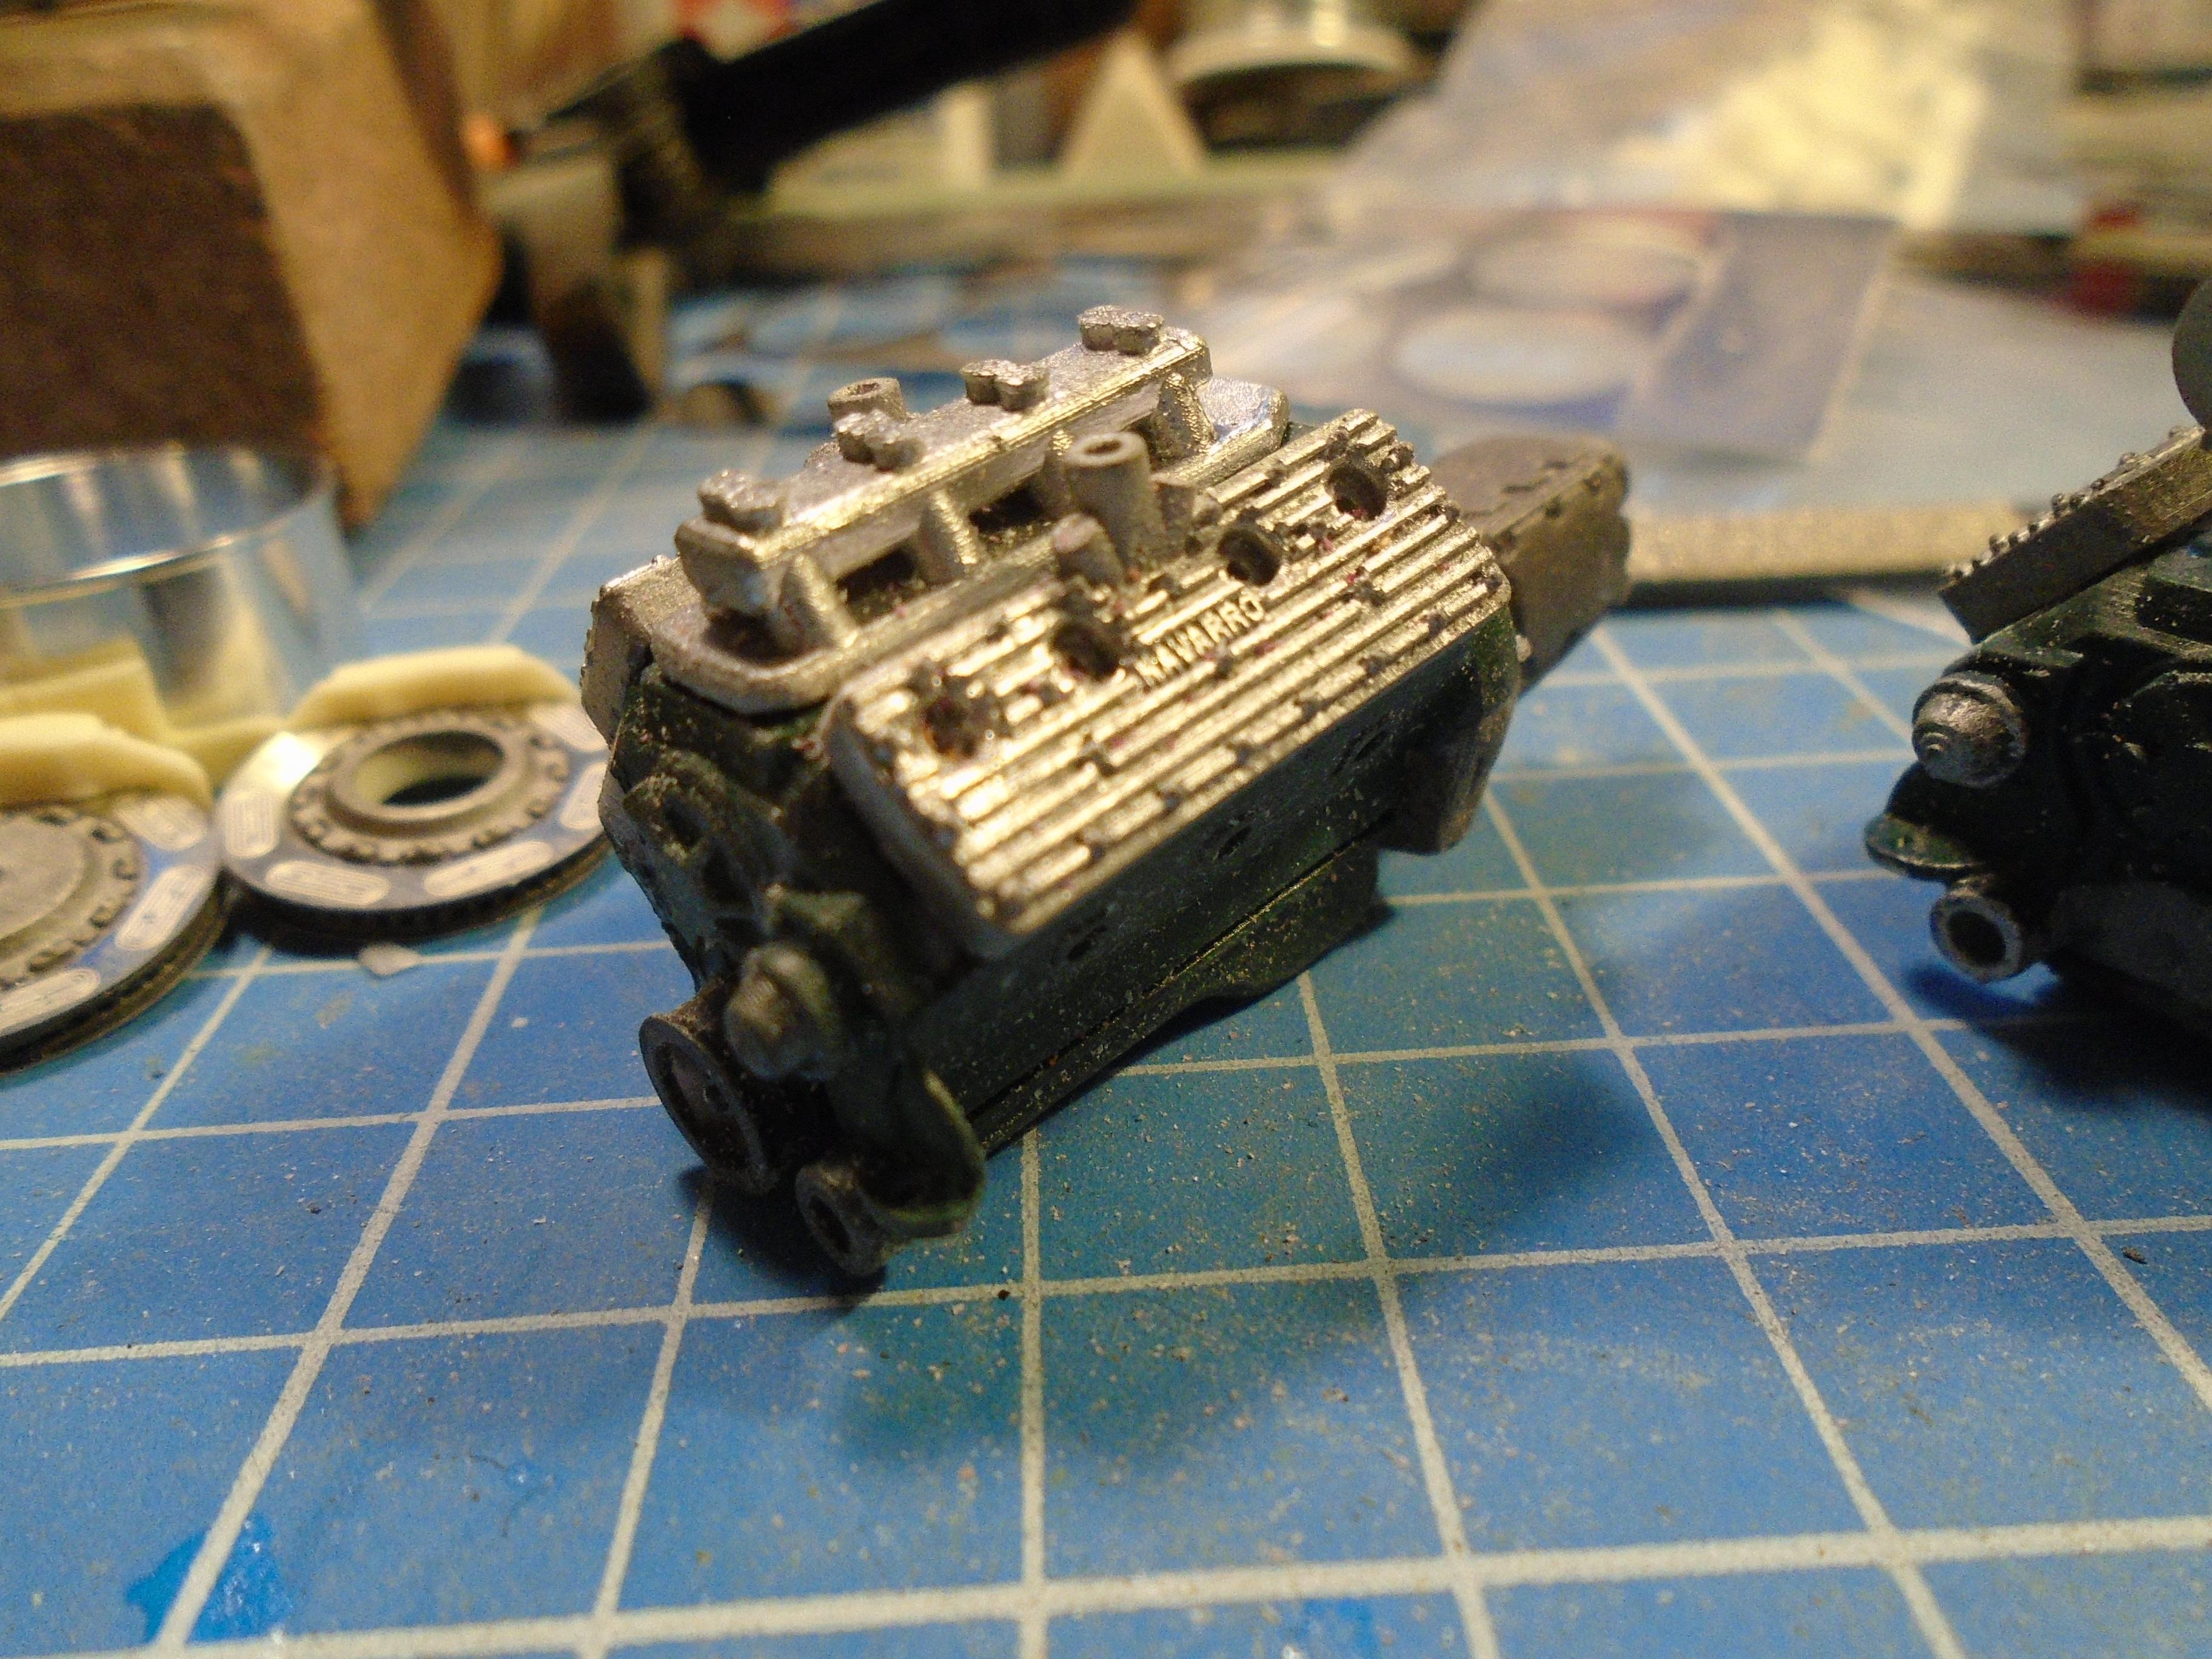
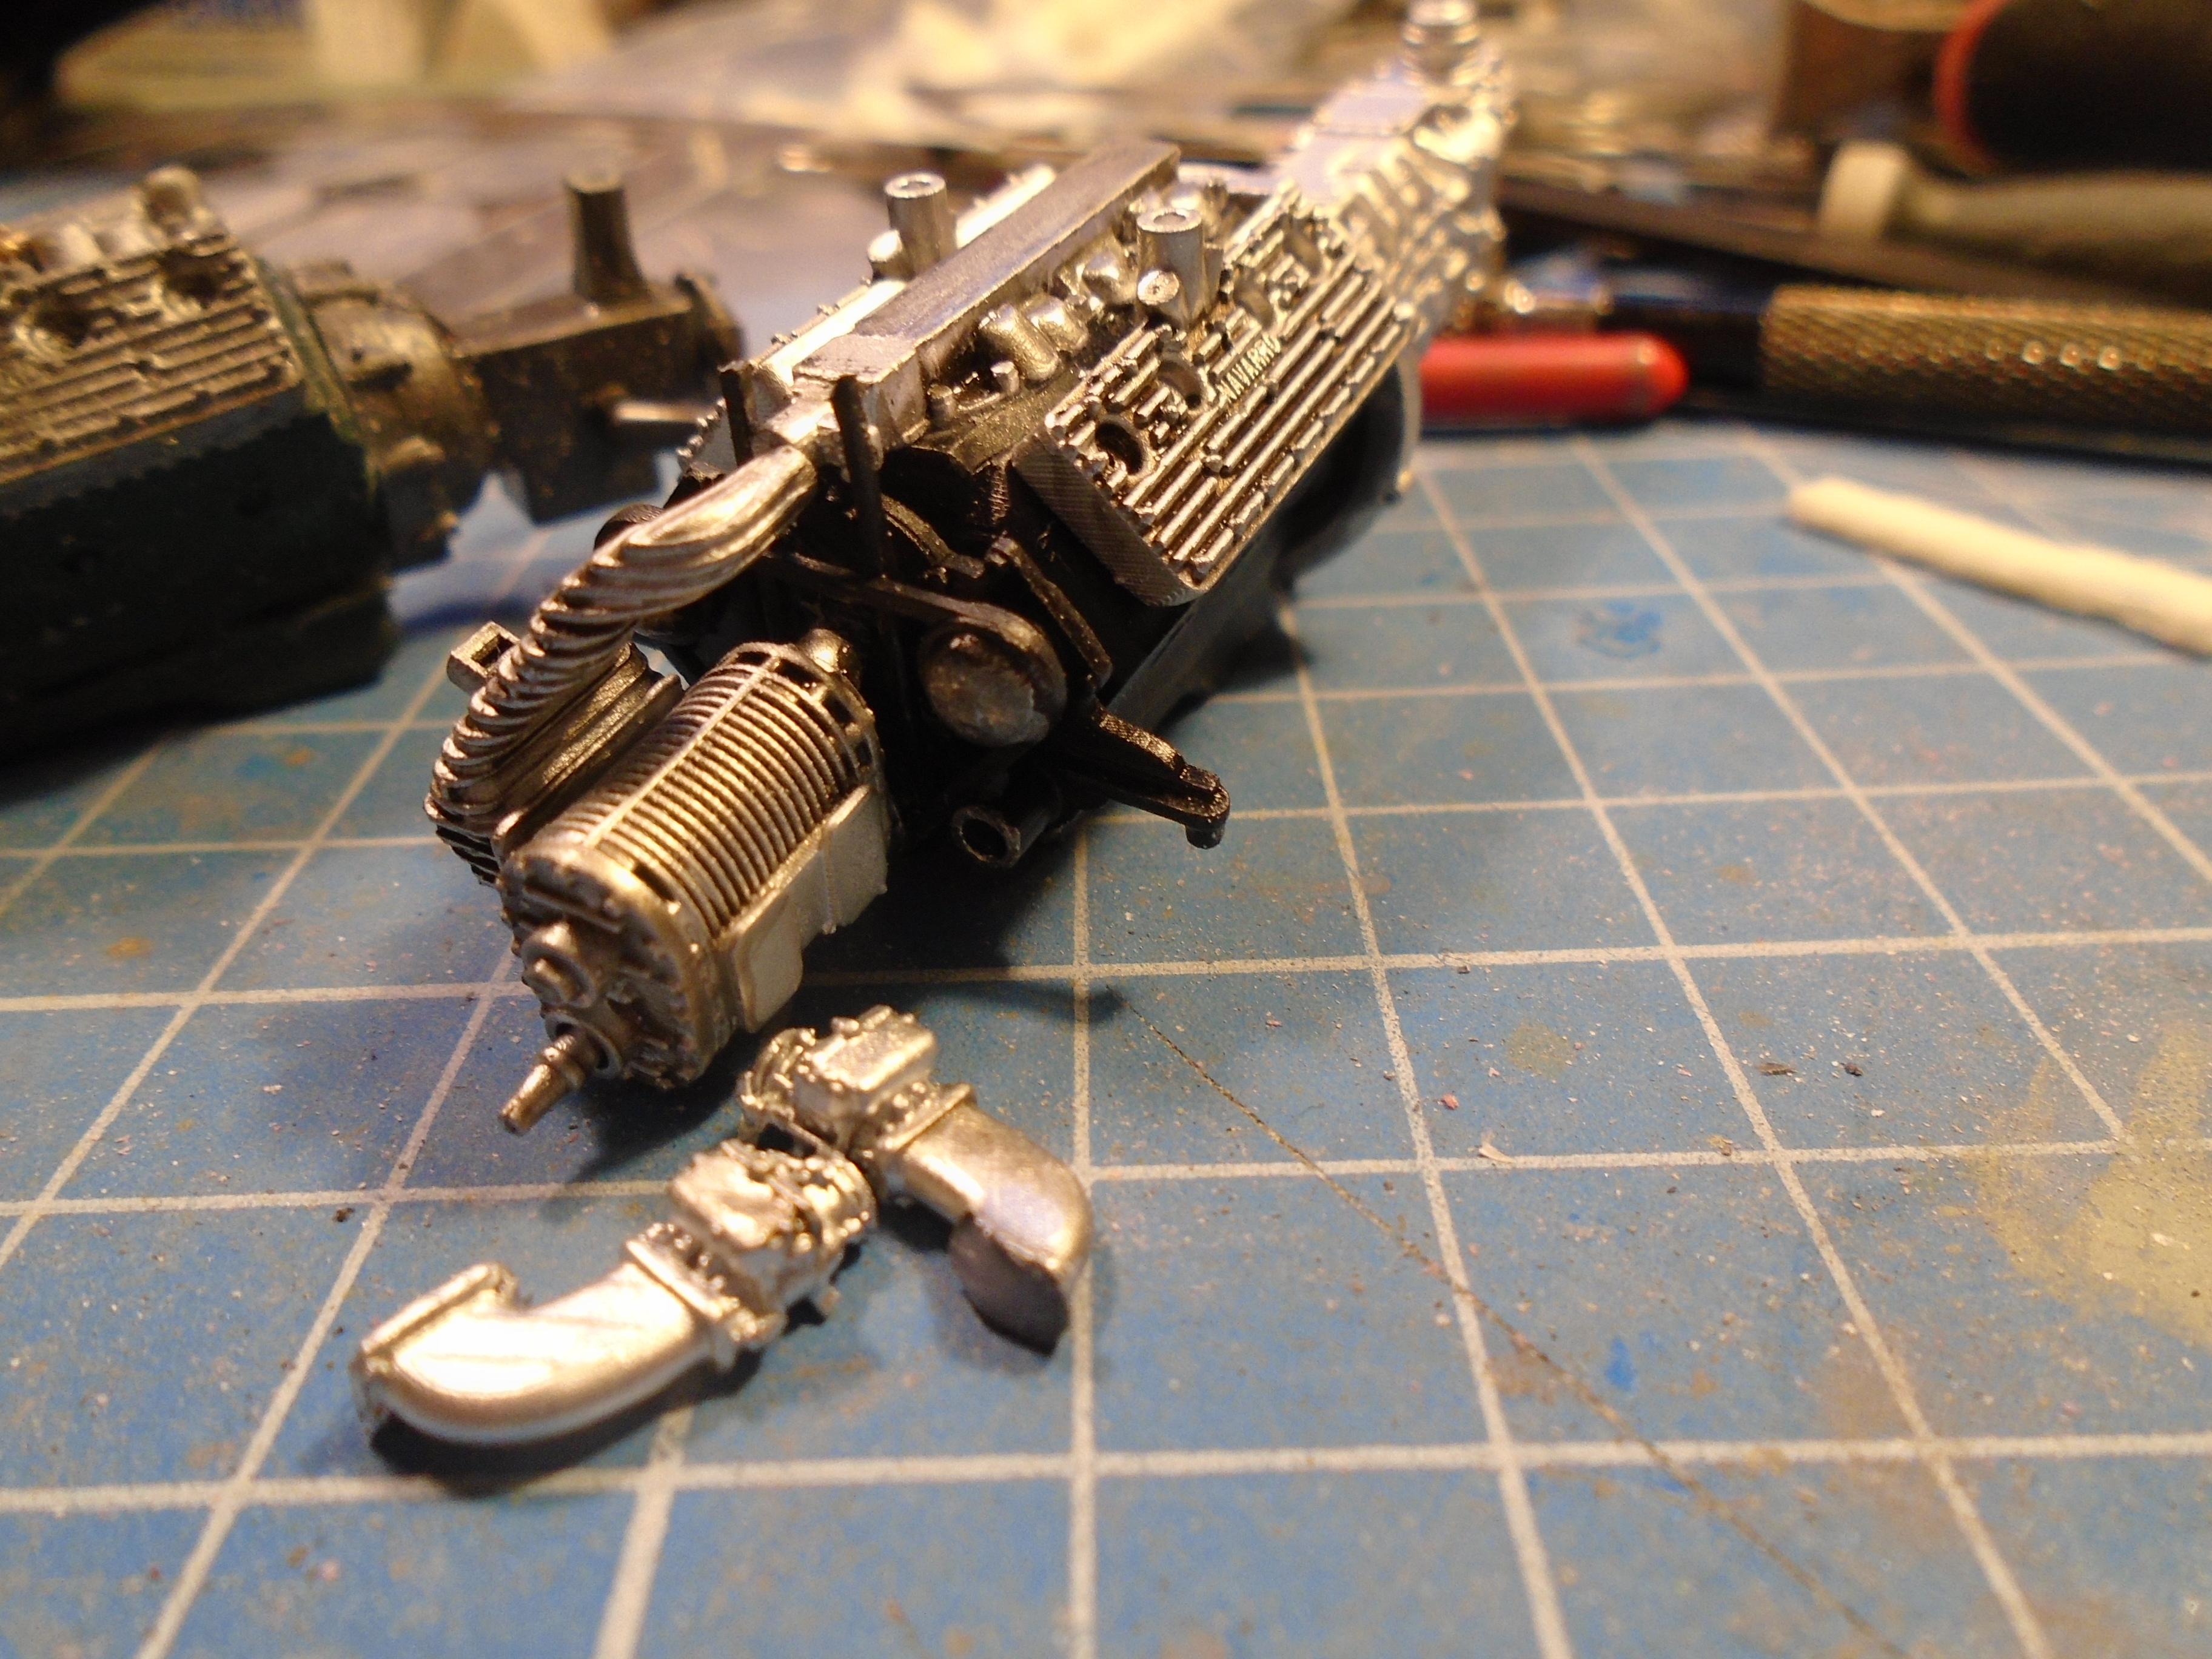
the world is your oyster with the flatheads, there must be 100 variations available in 3d prints, the aftermarket and kits. do you want reverse flow twin charged fantasy motor, realistic old speed parts, old school superchargers, if its been done in 1/1 its probably available now. heres 3 i have in progress for various builds from various designers. the front blown engine has been slightly altered to make a streetable motor as it had nothing for cooling it so its a mix of different designers prints. 4 stromberg motor frentzel blower front blown. this has been modded a lot
-
i should have instructions for the stock kit if thats any help to you?
-
What Did You See In Your Yard Today?
stitchdup replied to Tim W. SoCal's topic in The Off-Topic Lounge
your smarter than this guy then
-
Winter project need suggestions
stitchdup replied to JerseeJerry55's topic in Model Building Questions and Answers
heres a truck pic guy i follow https://public.fotki.com/boballoa/ theres american trucks on it but it can take some searching through them -
DupliColor sealer not drying.
stitchdup replied to NOBLNG's topic in Model Building Questions and Answers
I'm losing my faith in duplicolour primers. The last 2 tins of filler primer and one tin of red primer sprayed nothing but fibres similar looking to flocking even after shaking for much longer. i'm using stuff from bodyshops now called proline, much much better but a little more cost -
has any of the area you did the painting in got any overspray? you could use it for a test if there is some
-
tool is an insult in some britsh dialects which means the person is an idiot that needs to be led by the hand to complete a job
-
lets use a employed mechanic as an example. if you go to them and they open youtube on their phone instead of a workshop manual then you know to go elsewhere. youtube is entertainment, not a reference library
-
he sold everything,