bh1701
-
Posts
389 -
Joined
-
Last visited
Content Type
Profiles
Forums
Events
Gallery
Everything posted by bh1701
-
LED Tape strip light questions
bh1701 replied to bh1701's topic in Model Building Questions and Answers
Thanks, Steve! I checked out Evan's Designs and that has given me a lot of ideas! Bart -
One of my next projects is going to be the Polar Lights Star Trek Galileo 7 shuttlecraft with the full interior. I would like to be able to light the interior. The interior ceiling has a large rectangular piece of frosted glass in it. I expect there to be a little bit of space between the interior ceiling and the exterior roof of the shuttle. I am thinking that the LED Tape strip lights that are out there might be a good solution to put in that space. Would likely attach the strip to the underside of the exterior roof. The strip of lights won't be that long - probably about 8 - 10 inches or thereabouts. But, I don't know much about these lights. What do you think the best power solution would be - batteries, DC or AC? How do you connect the power to the light strip? Regardless of the power source, it will need to be outside of the ship. Are there small connectors I could use in the wires going to the power source so that I could connect/disconnect it (to be able to take pictures of the model without visible wires flowing out of it)?. I would probably route the wires and connector to come out behind the nacelle struts on one side so it wouldn't be that noticeable. Can anyone provide some good sources for a short strip of lights and any other items I would need? If anyone has other ideas on how to approach this, I would welcome them. Thanks, Bart
-
The original color I wanted to use was Testor's Model Master Dark Bronze Metallic (discontinued quite a while ago). I had two cans, but one starting oozing out which is why I went with Testor's Fiery Orange. One poster mentioned that Tamiya has Metallic Orange TS-92 (which is readily available). I had looked at that color and felt that Fiery Orange was just a little better match. Good luck with your kit! Bart
-
Thanks! The carpeting was done using a Brown Embossing powder. I have two different methods I may use to to apply it - brushing a thick layer of paint (in a similar shade as the power) and then using a spoon to drop the embossing powder into the paint while it is still wet, or brushing some thinned white Elmer's glue and using the spoon to drop the powder into it. Sometimes I think I may have also used a model railroading product -Woodland Scenics Scenic Cement, which looks like white glue that has already been thinned. I believe I used the thinned Elmer's Glue to do this application. As I write this, I am thinking another option might be to brush a thick layer of a clear paint and then apply the powder. This would prevent any potential impact of the paint on the color of the powder when it is applied. I may have to try this idea! Bart
-
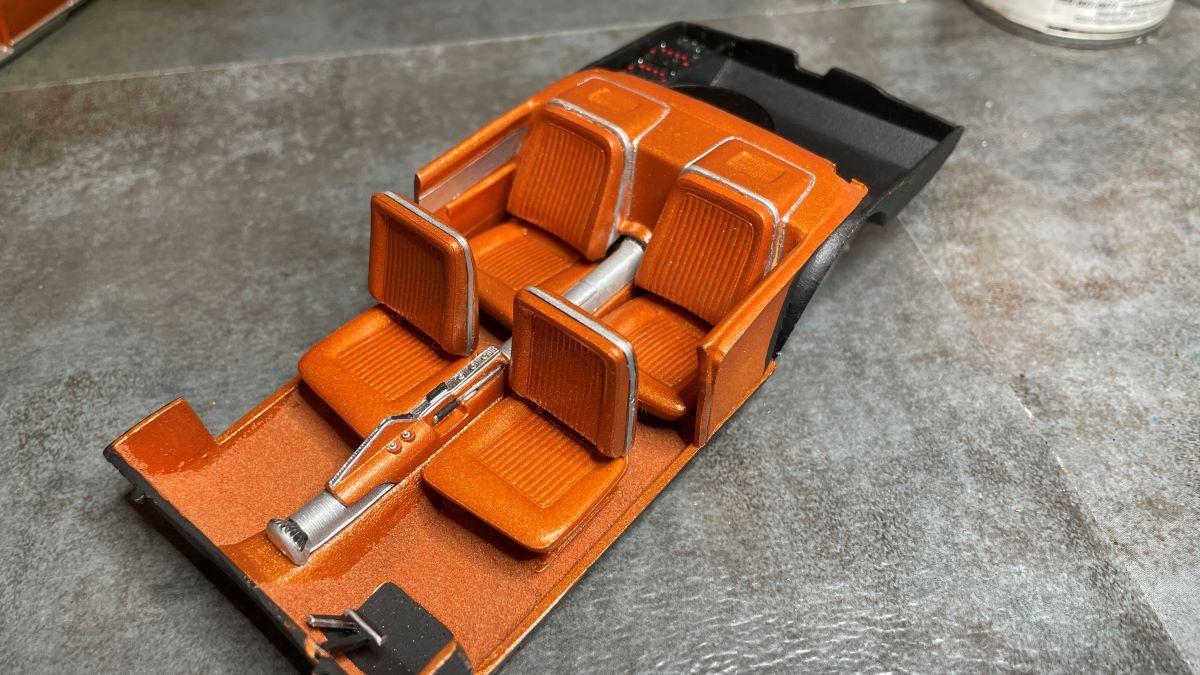
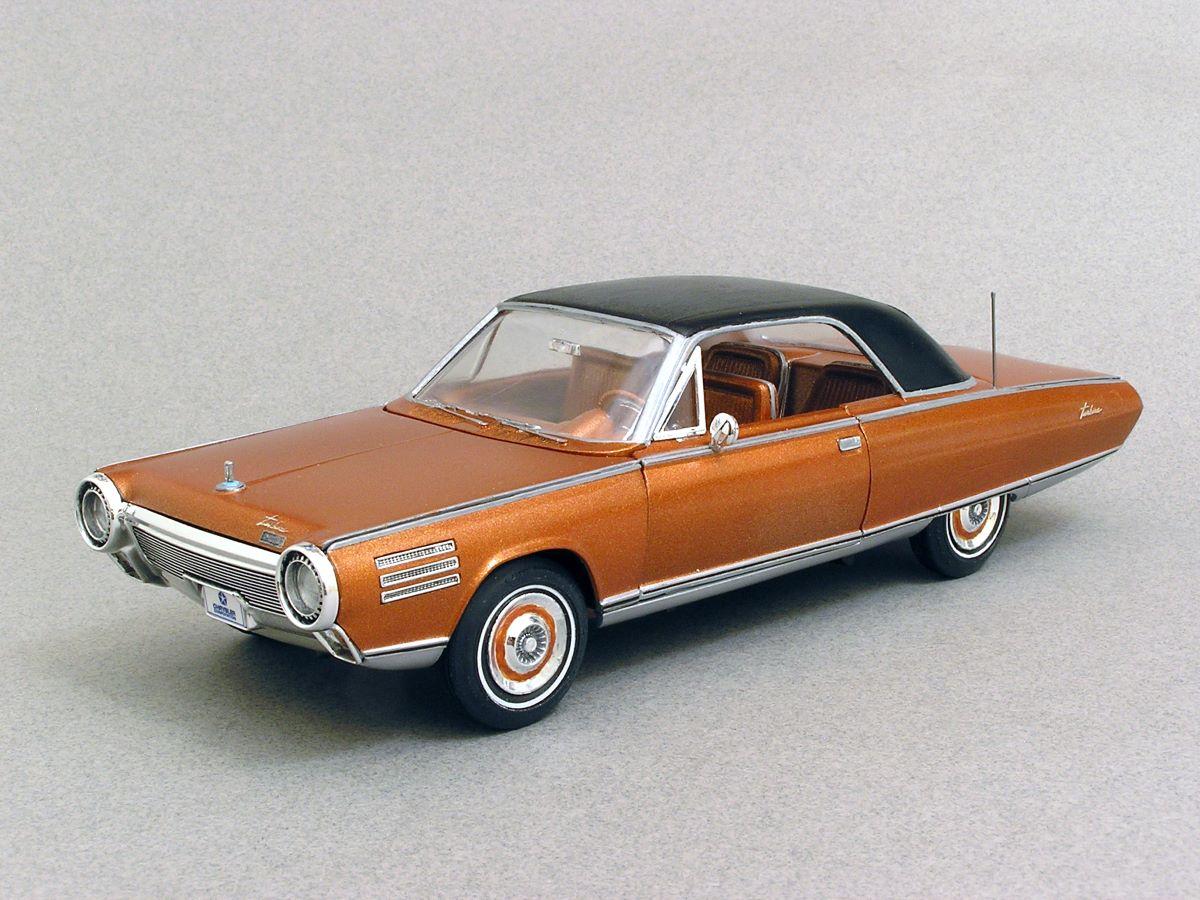
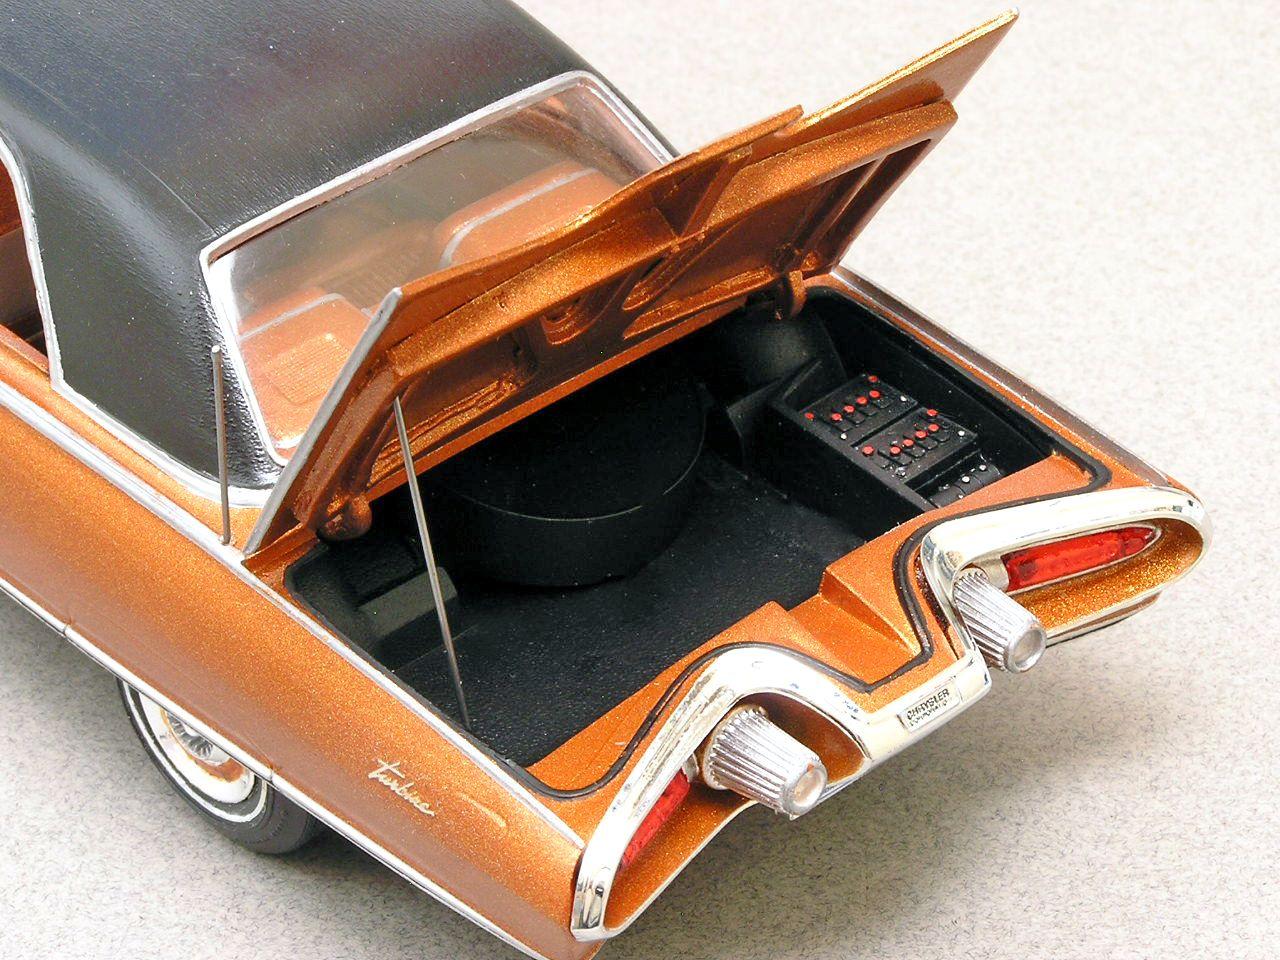
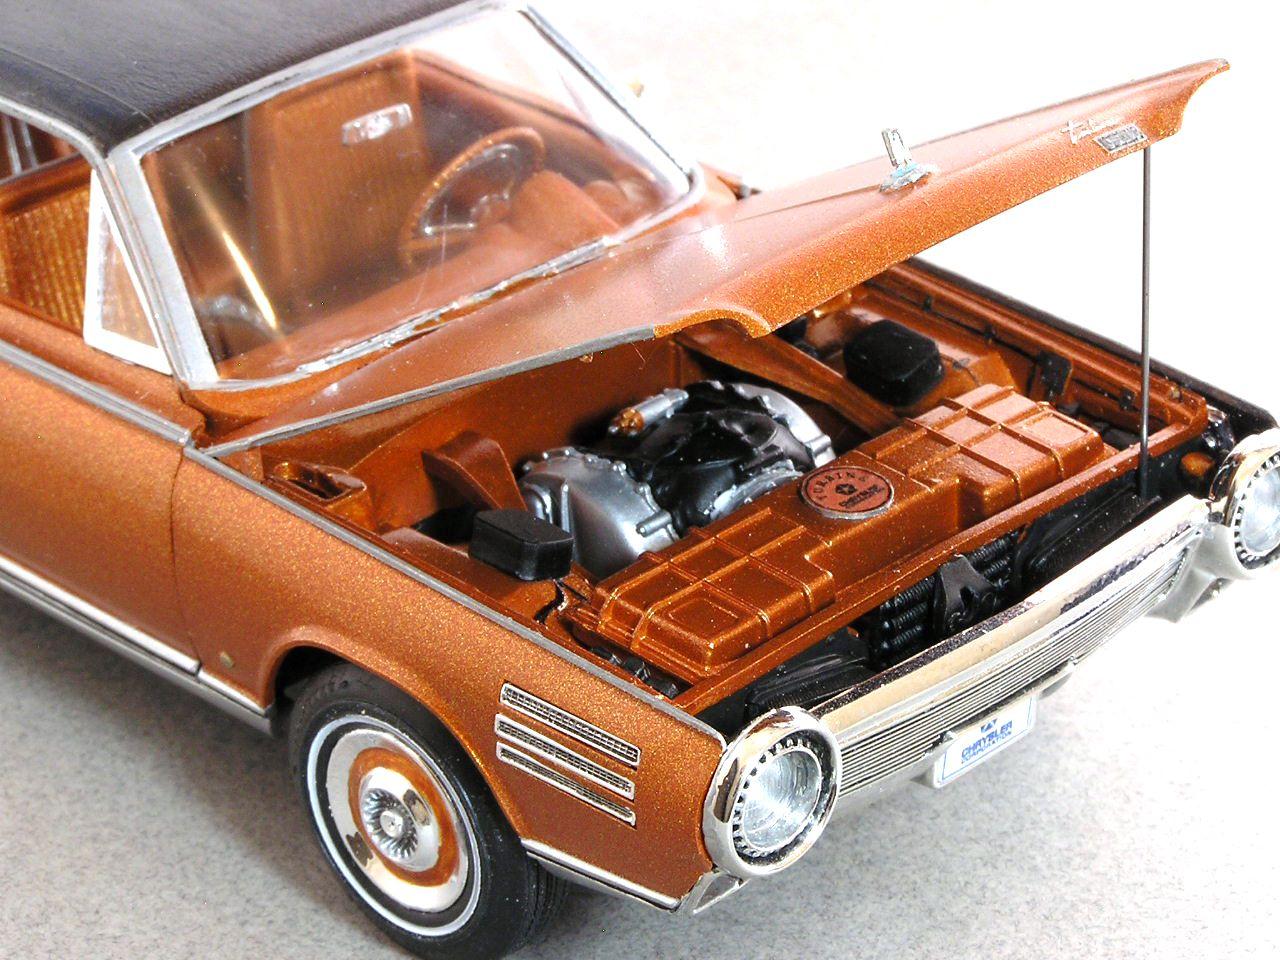
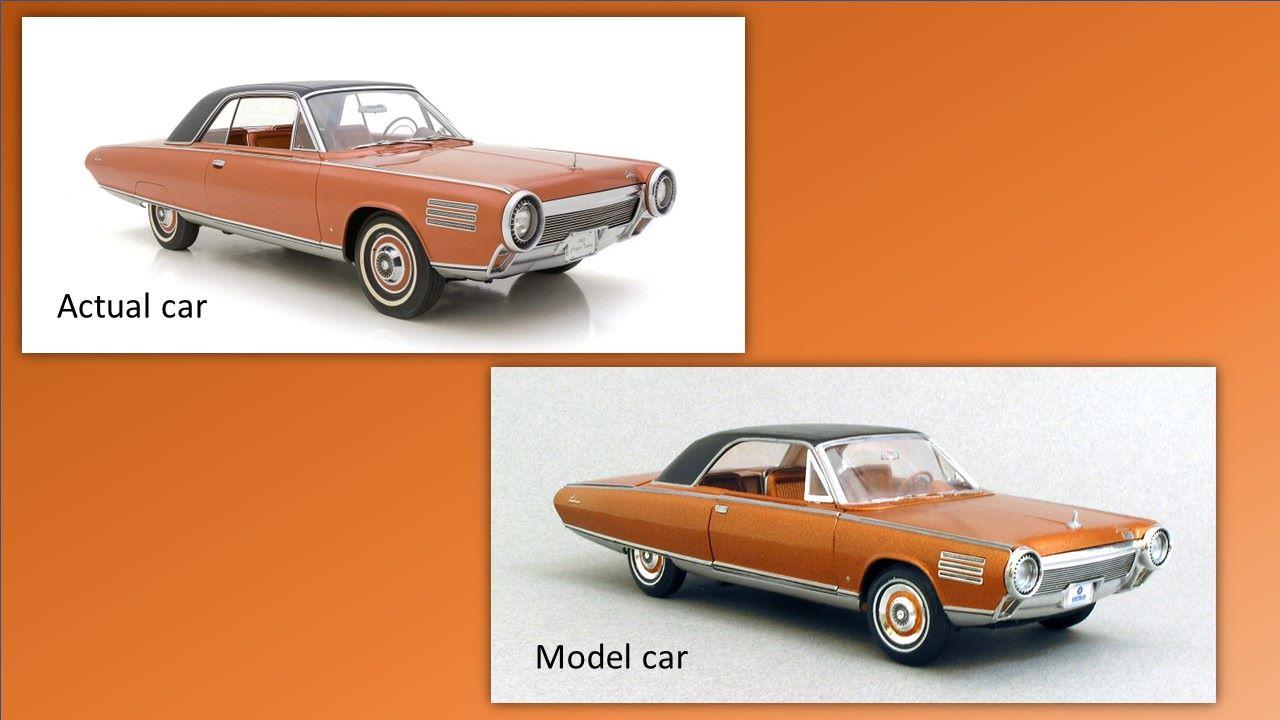
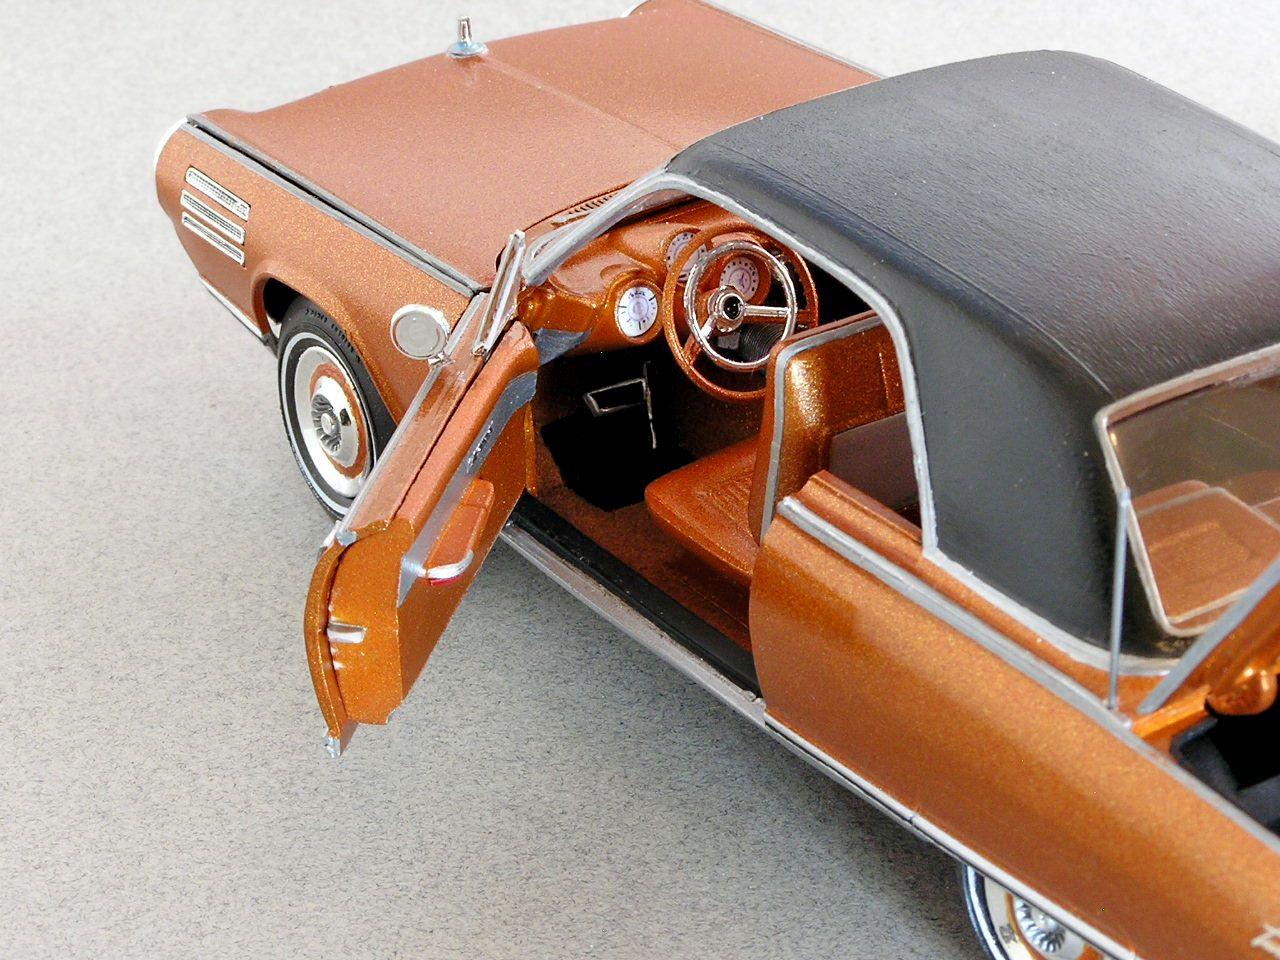
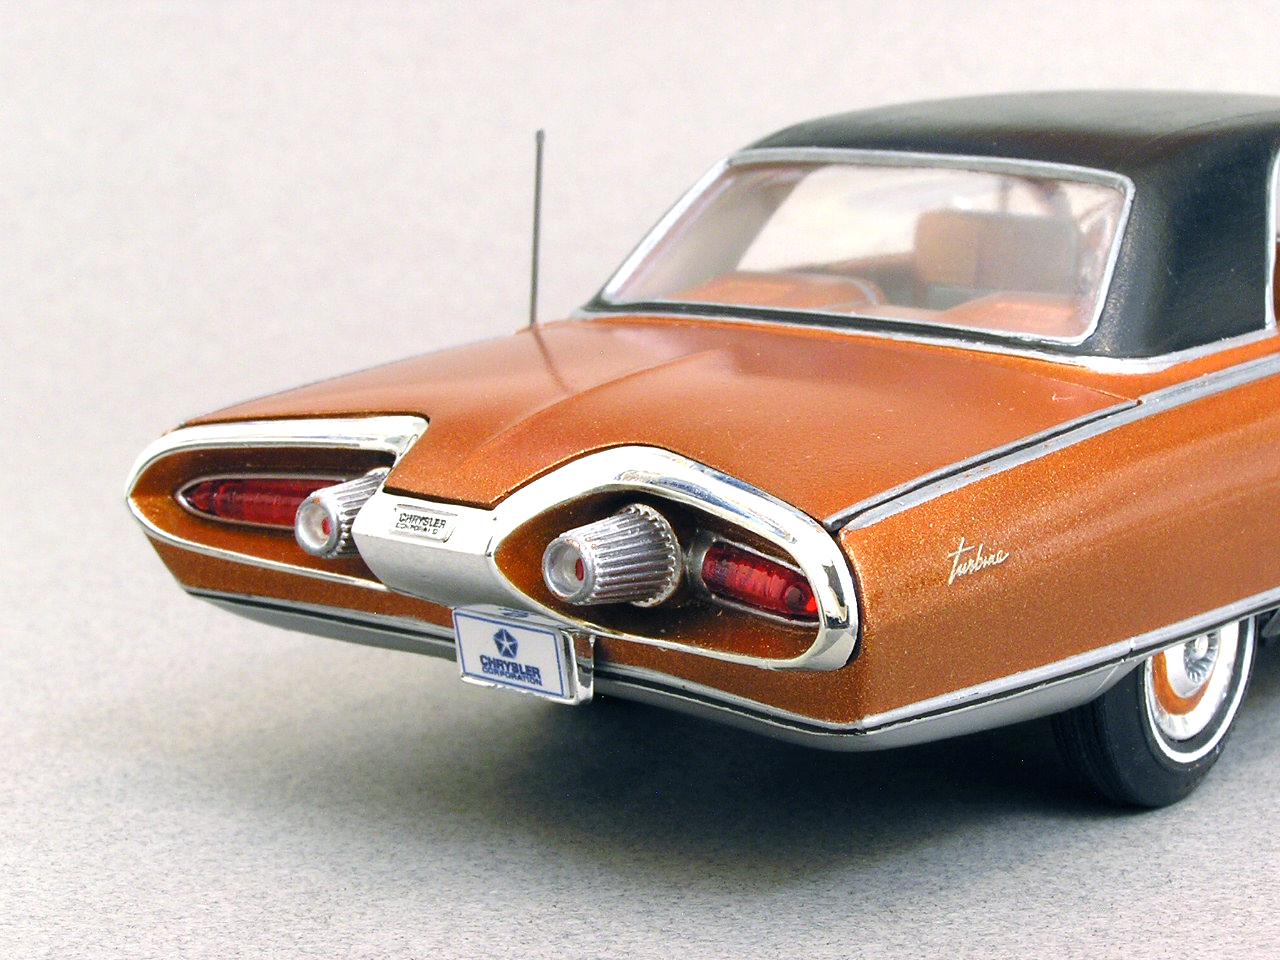
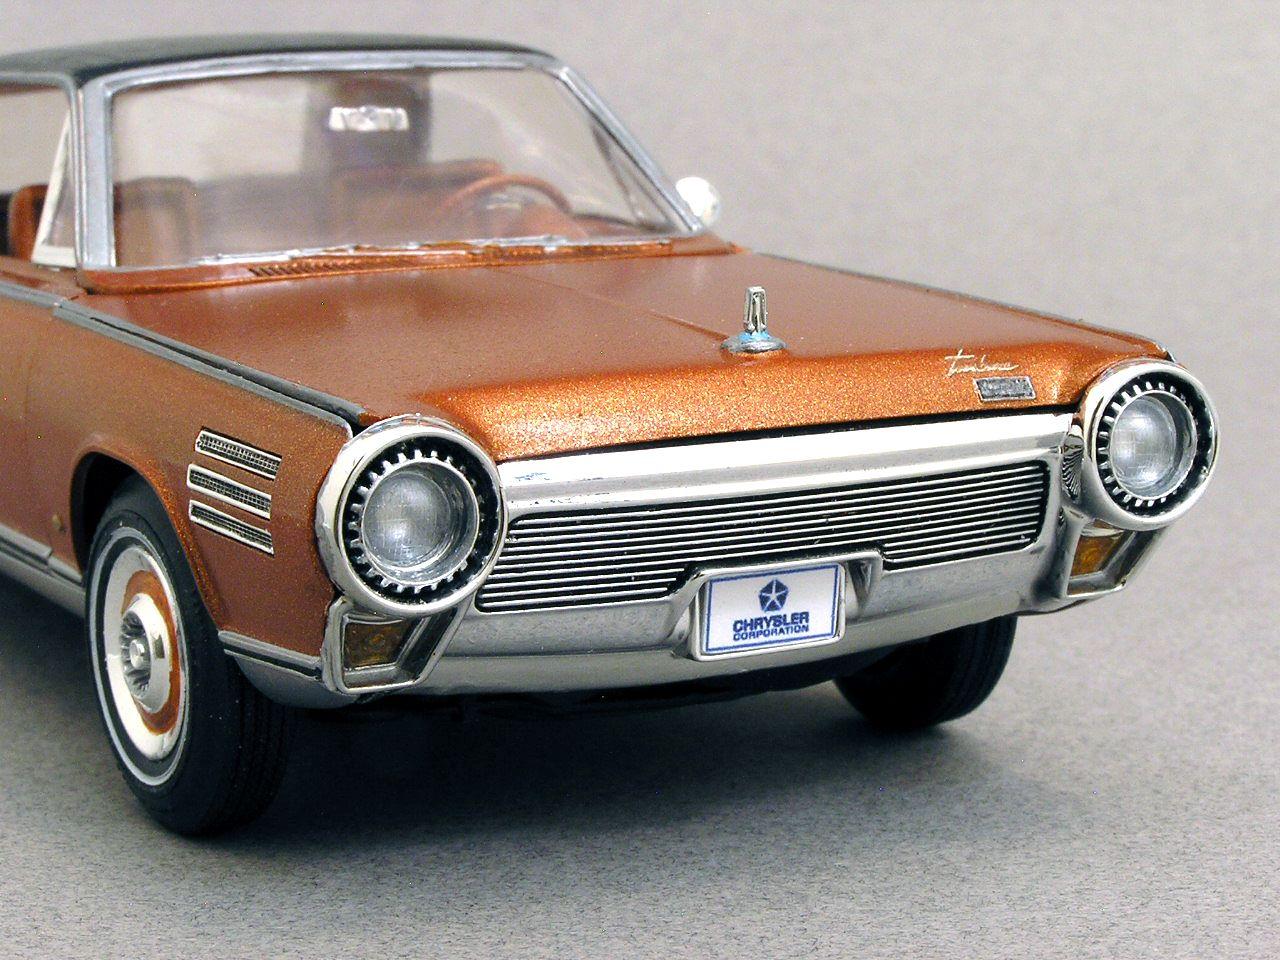
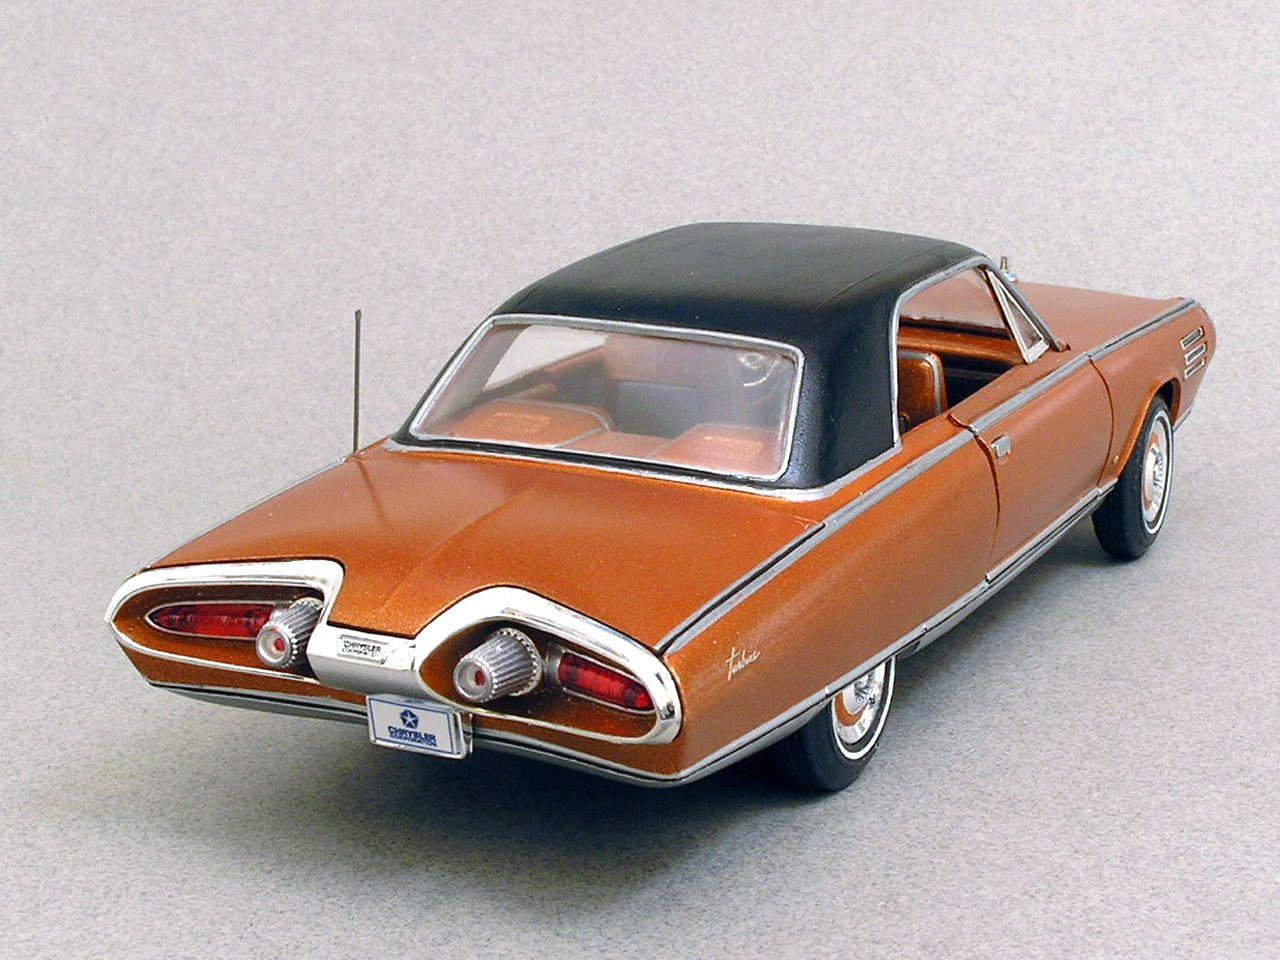
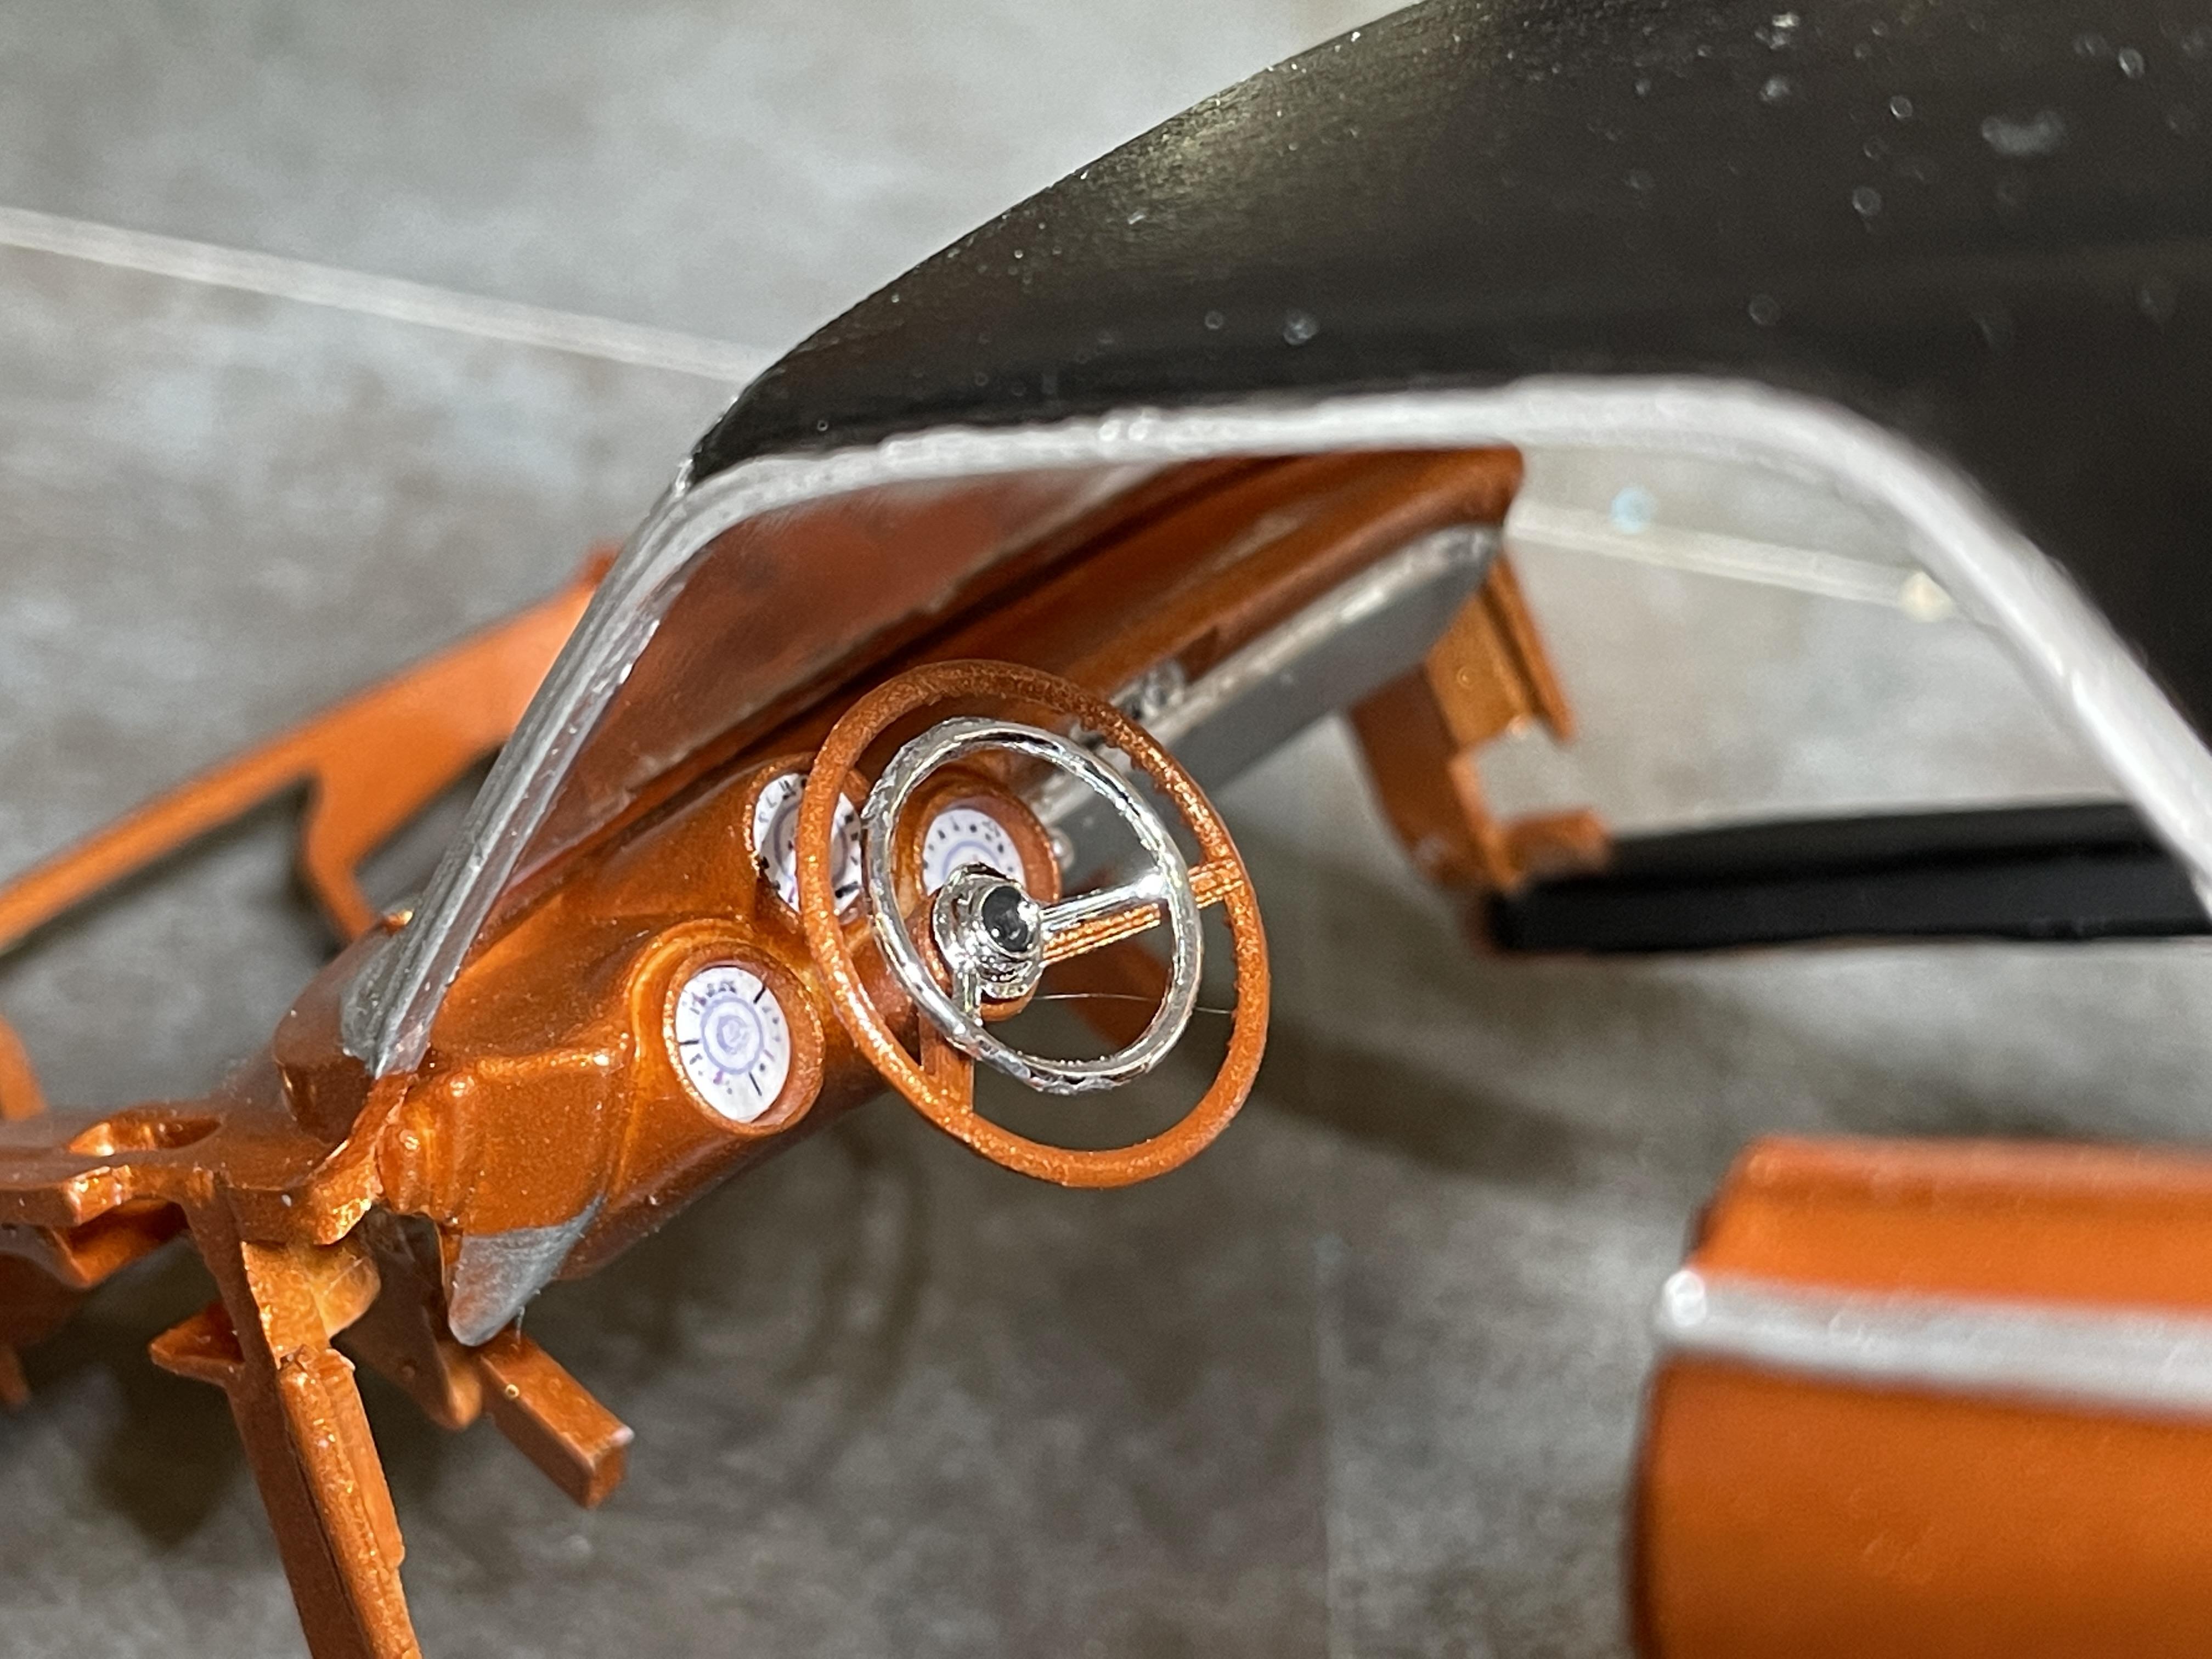
Here is my first completed kit for 2023 - a 1/25th scale Jo-Han model of the Chrysler Turbine car. I remember building this model back in the 1960's when I was much younger. My 2023 build turned out a lot better than the one I made many years ago! The color is Testor's Fiery Orange. Not sure if this is still made by Testor's, so when I found a couple of cans at Hobby Lobby I grabbed them! The body was molded in white, so this was not the original release of this kit. This reissue had a lot of serious flash on it. I did need to do a little sanding on the door panels, interior panels, and body to get the doors to fit better (but not perfectly). I also used magnets behind the door panels and the door jambs to help keep the doors closed. All chrome is hand painted, except for the Turbine scripts on the body sides and the hood. Thanks for looking! Bart

-
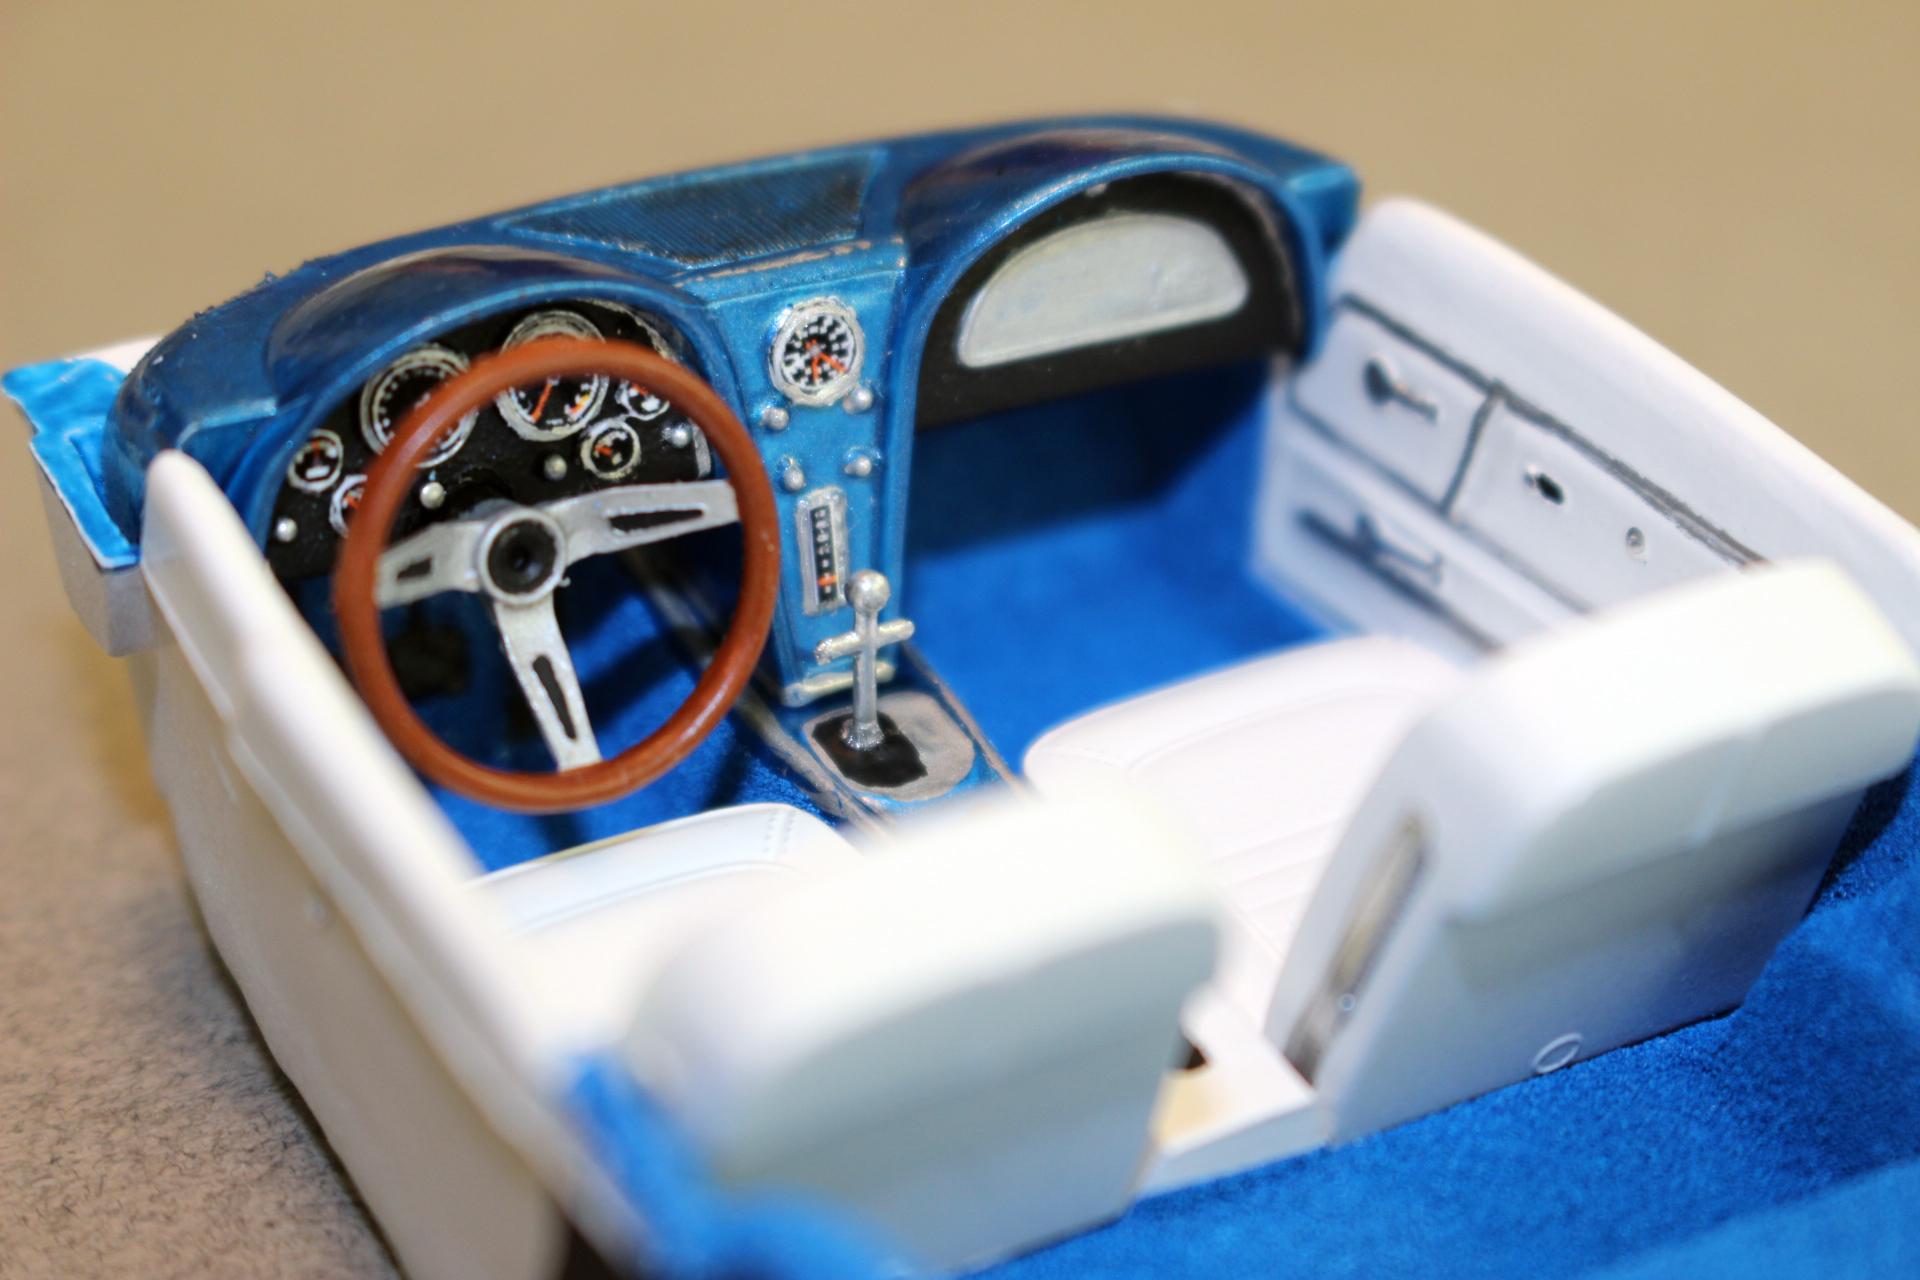
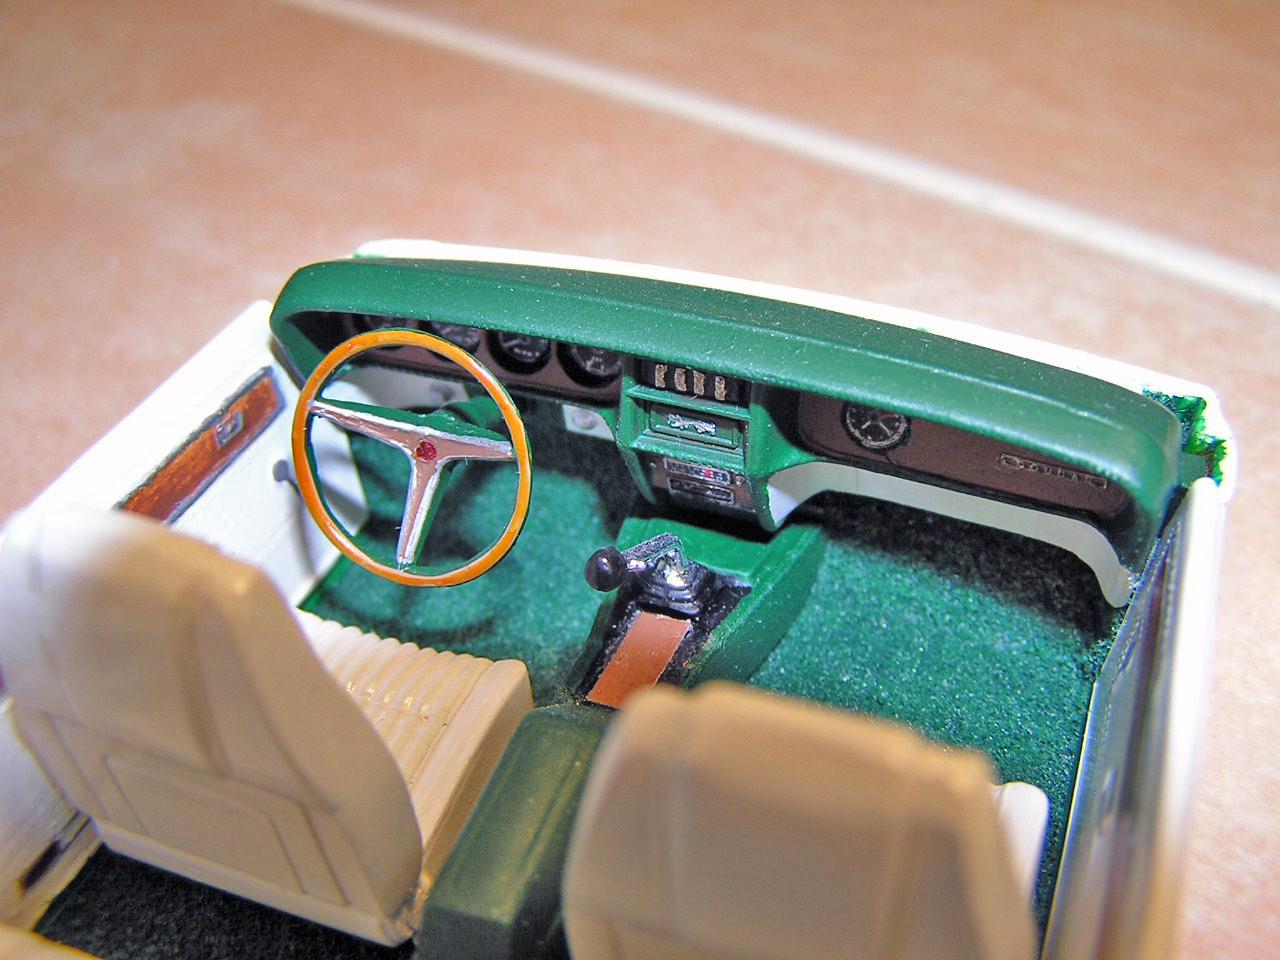
On eBay, look for "BestModelCarParts". He sells printed sheets with gauges, speedometers, and radio faces for quite a few model kits. I have bought several and have been pleased with them. I will also look on the internet for photos of dashboards. If I can find a good shot of a gauge I need, I will bring it into Photoshop to erase everything but the actual gauge, and then will do any tweaking of the image that is needed. Another good source for photos of gauges is to look on eBay for one that someone is selling. Their photos will often work, too. For both methods, I will put double-sided scotch tape behind the paper and will attach that to very thin sheet plastic. Then, I cut the gauge out and secure it to the dash with glue. I bought a leather hole punch tool that works well to punch the round ones out. The really small round gauges may need to be hand cut with a small scissors (Like a fingernail scissors). I will put a small dab of glue on the dash where the gauge needs to go and then attach the gauge. In the photos I included, the Corvette dash and Cougar dash have gauges from BestModelCarParts. (The Blue and the Green interiors) The Turbine Car has gauges from internet photos that were tweaked in Photoshop a bit. (The dash hanging below the windshield) Hope this helps! Bart
-
I built the Prestige version of this kit and was quite happy with it. The only issue I had (as mentioned by others in this post) was the opening doors. I had to do some sanding on the edges of the exterior and interior door panels to get them to fit well. I wish I had used some hidden magnets inside the doors panels and the body to keep the doors closed snugly. I hadn't learned that trick using magnets at that time. The doors do close well, but when you pick the model up, one or both doors tend to pop open slightly. Bart
-
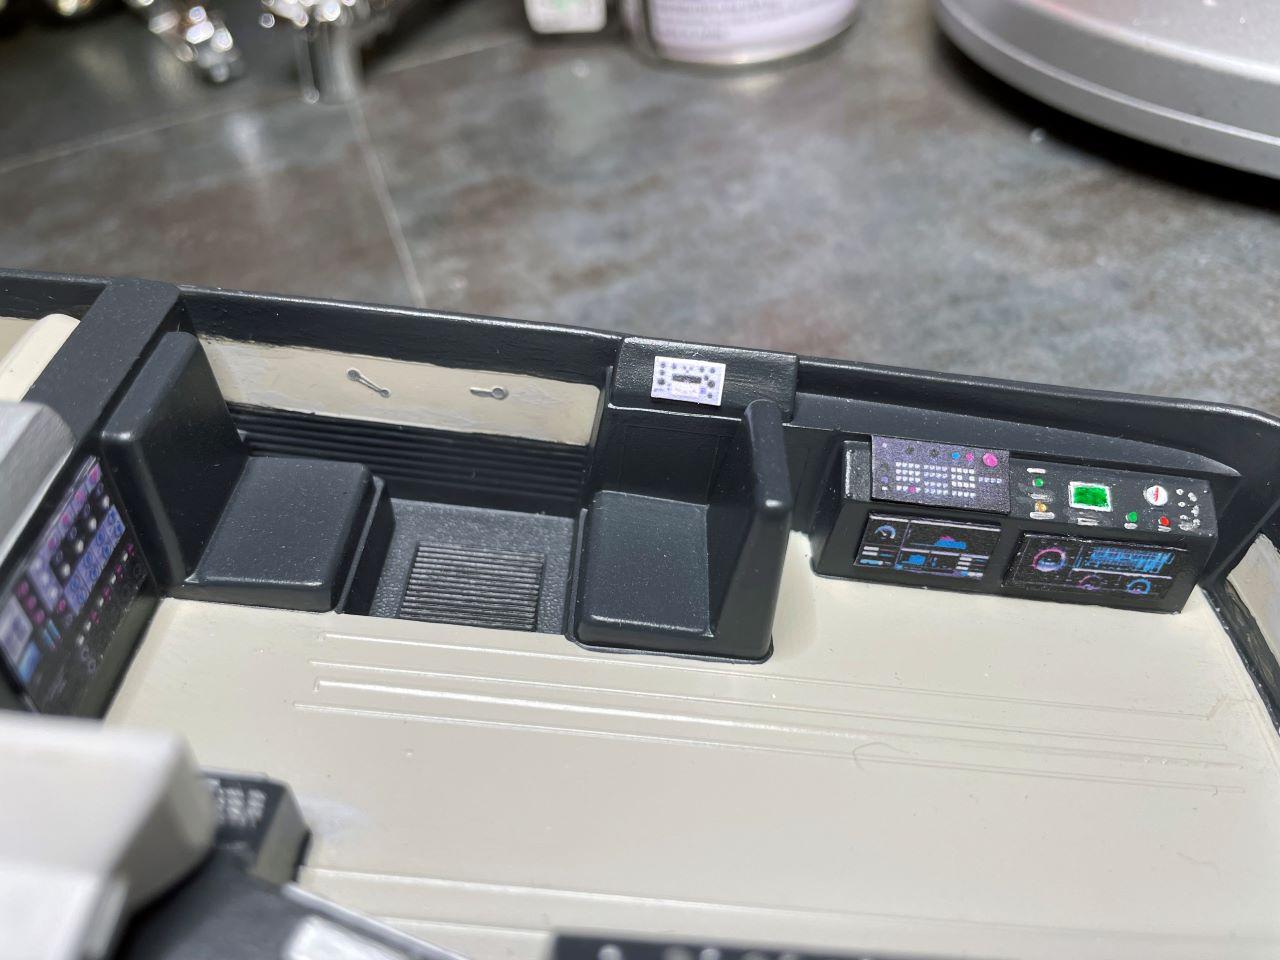
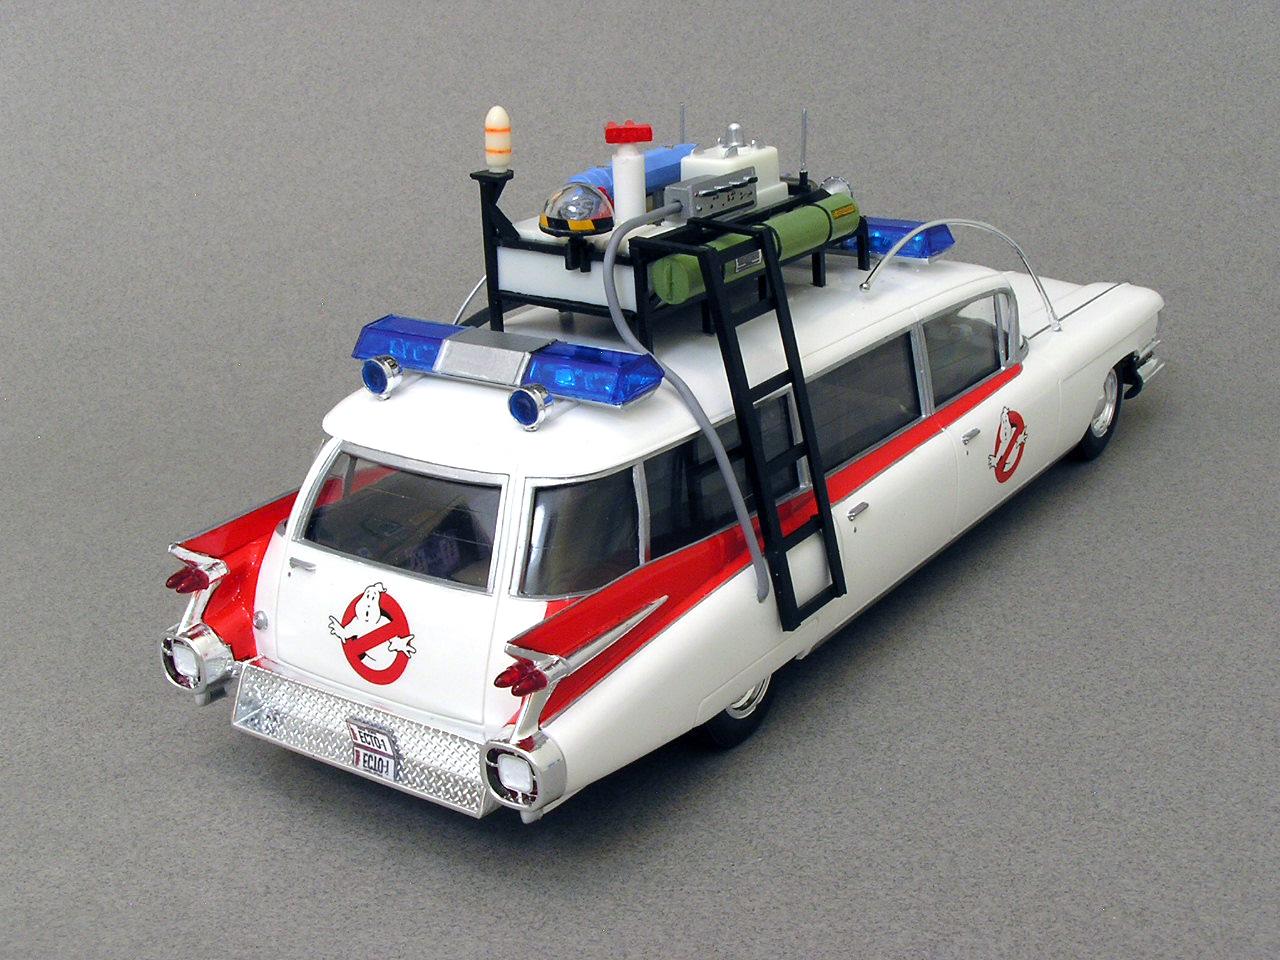
Here is my latest completion – a 1/25th scale Ecto-1 Ghostbusters vehicle. The kit that I bought was actually an Ecto-1A, which was the vehicle from the second movie. After doing some research, I learned that the vehicle in the second movie had quite a few additional gadgets added and modifications made to the vehicle from the original movie. I have included a photo of both vehicles to illustrate how different they were from each other. I wanted to build a vehicle that represented the Ecto-1 from the first movie. The modifications I made include: 1) Modifying the frame on the roof to remove the extensions that had been added to the front and rear for the second movie. 2) Making the radar system (the gadget with the 2 red tubes coming out of it). 3) Adding the GPS system (the white dome with red stripes at the rear of the roof frame). 4) Making the siren and red light on the front of the frame (caps from pens were used to make the bodies for these). 5) Adding the black hoses on the driver’s side rear (wire was inserted into black heat shrink tubing to create these). 6) Adding the antenna on the driver’s side rear (plastic rod bent to shape with a drop of glue to form the ball on the end). 7) Making the ladder for the passenger side (made with pieces of plastic strips). ? Added the gray hose behind the ladder (A piece of gray wire). I took some creative license with the interior by adding a lot of control panels and gauges to the side of the rear interior compartment. While it’s not an exact replica of the Ecto-1 from the first movie, I think it turned out to be a reasonably close representation of it. Thanks for looking! Bart Not my models below, but it helps to illustrate the differences between the car in the first 2 movies.
-
There was no cutting of the tape. This is the width that it came in. Sorry but I don't remember where I got it, and the little plastic bag it came in doesn't say what size it is. I know I found it somewhere on the internet, but i don't think it was from Amazon or eBay. Here is a picture of it on a piece of plastic. It definitely bends! You can see the size of the roll of tape - enough to last a lifetime. I have 2 more rolls like this (3 rolls was the minimum order!). The model is 1/25 scale. My best guess is that it was probably 1/64" tape. I am pretty sure I would have bought the narrowest width available. I know you need gold, but if anyone wants one of the other two rolls of black tape that I have, send me a PM and we can work something out! I have way more striping tape than I would ever need! Bart
-
I'll second the use of Chart Pack tape. I used it (or could have been a similar brand) to do the pin stripes on this Miata. Bart
-
Fixing Chrome Headlights
bh1701 replied to drifterdon's topic in Model Building Questions and Answers
I use a cheap craft paint I got at either Hobby Lobby or Michael's. It was from the Martha Stewart line of paints (might not be made any longer?). The color is called Pearl. It has a silver-white pearlized finish. If the Martha Stewart line is no longer available, maybe one of the other craft paints has something similar. The headlights on this Lincoln were done this way. I would guess that you could add some Bondic over them to simulate the lenses (but I did not do that). Thanks, Bart
-
An amazing looking model! I might even say "fascinating"! I built their 1/2500 scale version. I assume this is the 1/1000 scale model. I can attest that he Aztec decals were definitely a challenge on the kit I built. How easy was the lighting to do? I just may want to consider building one of these! Bart
-
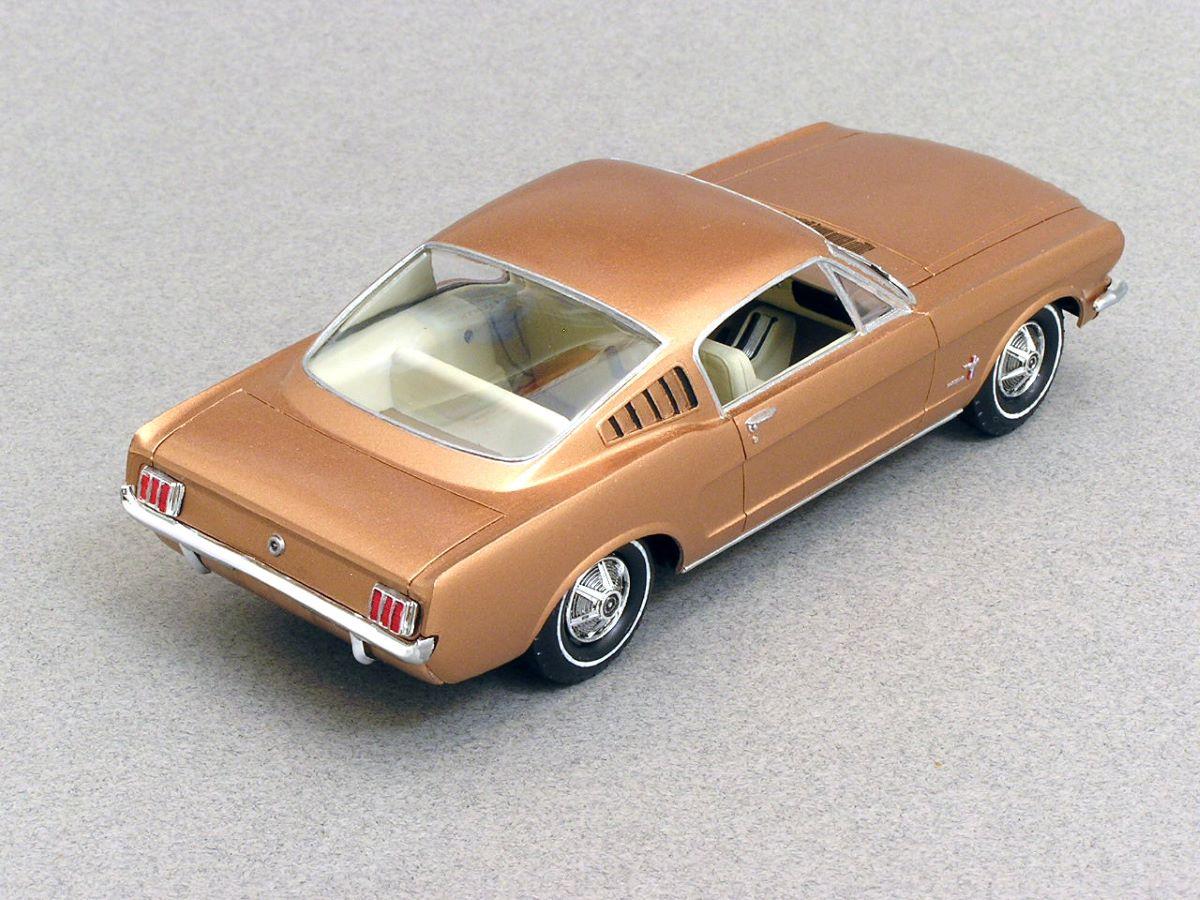
My AMT 1/32nd scale 1965 Mustang 2+2 Fastback.
-
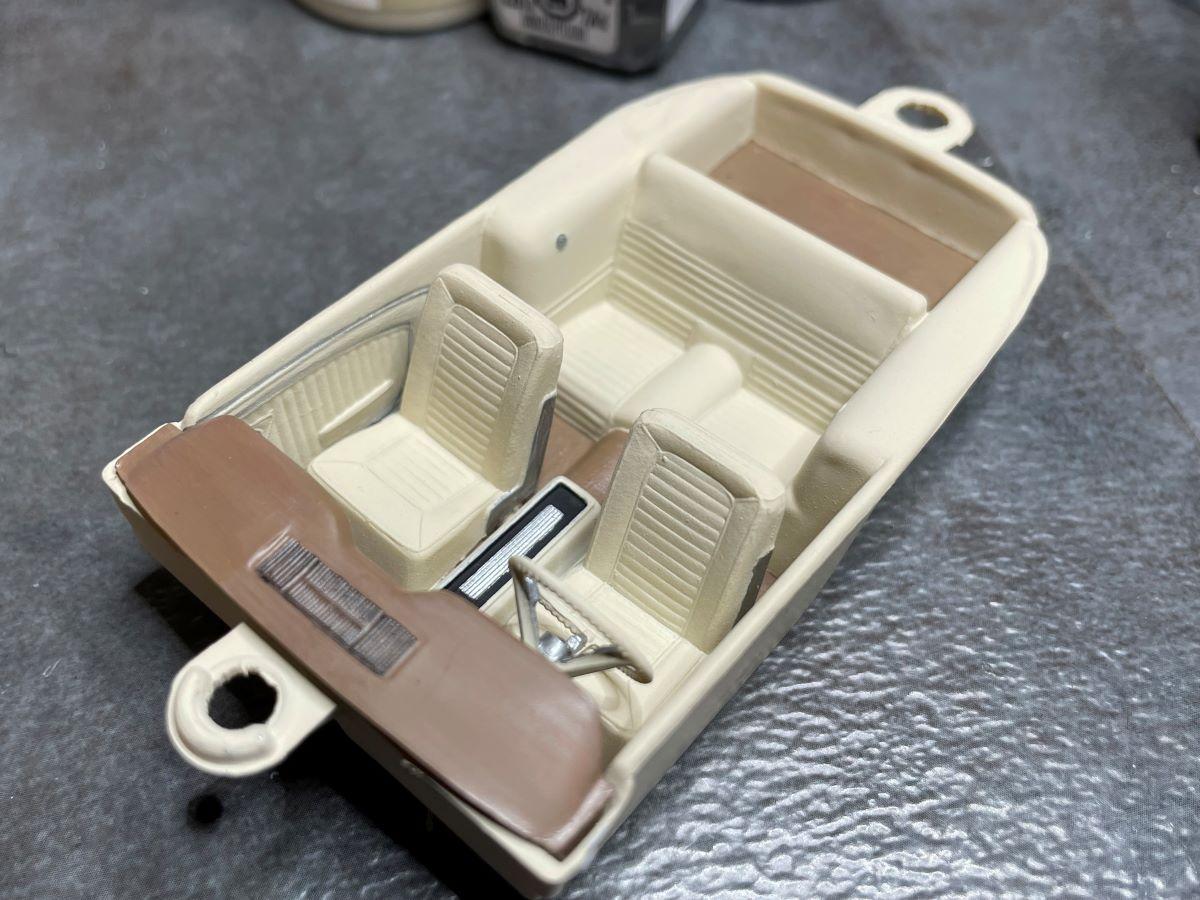
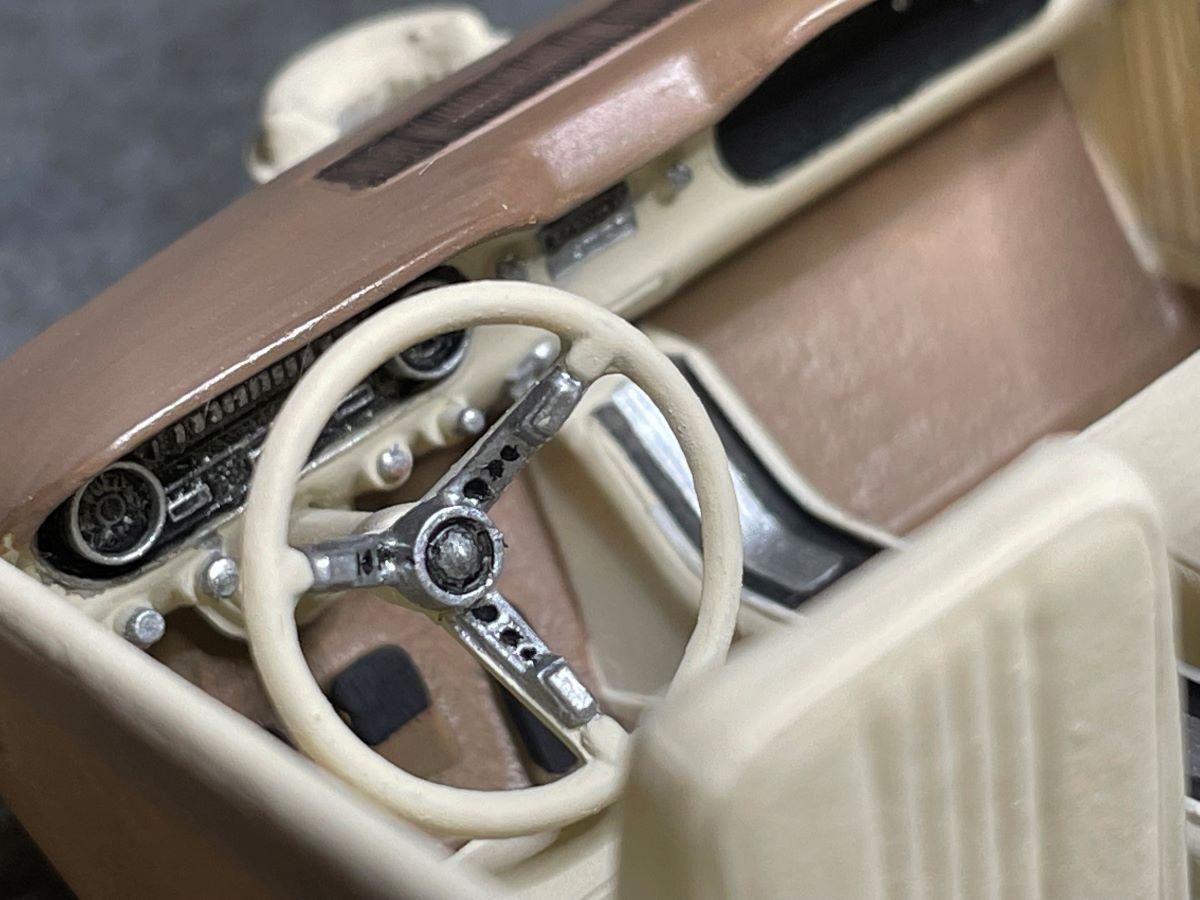
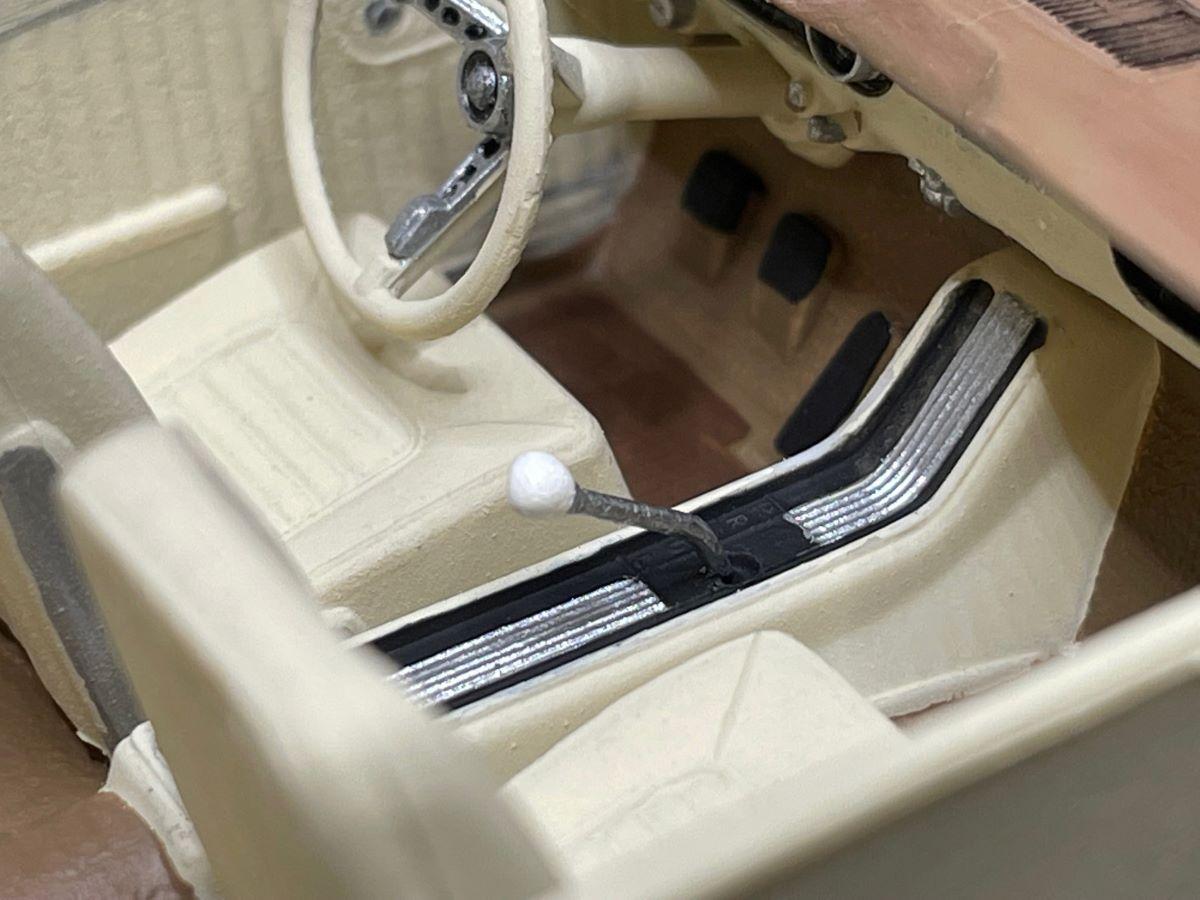
Here is my latest completion - a 1965 Ford Mustang 2+2 Fastback. This is one of AMT's 1/32nd scale kits and the it was a fun kit to build. The color is Testor's Gloss Copper. The level of detail is really good, although it does not have any front turn signals or backup lights. I probably could have figured out a way to add some, but it was rather late in the construction when I noticed this.. One big challenge was painting the whitewalls on the plastic tires that the kit has. A trip to the R/C section of the hobby shop provided me with the parts I needed to come up with a creative solution. In the interior, I added a gear shift using a piece of stiff wire and a blob of canopy cement to form the knob. I was also very pleased with the way the dashboard details came out; black wash was used on the instrument cluster and the speedometer numbers are very readable. The Mustang tri-bar emblems on the front fenders were a challenge to paint, but they came out well. I did the best that I could with the tiny Mustang scripts, but they don't hold up very well under magnification. Thanks for looking, Bart
-
AMT 1961 Buick Special station wagon --built from NOS kit
bh1701 replied to rsmodels's topic in Model Cars
Foil on the scripts is perfect! Obviously not using the paint over foil method. Great work. I may check out the #16 blades you mentioned. I built one of these kits back in the 60's when I was very young. My plan was to strip it and rebuild it, except I cannot find it now! I am worried that it accidentally got put in a box that got thrown away/ ? Looking forward to seeing the Edsel kit. Bart -
Any sources for 1/32 scale whitewall tires?
bh1701 replied to bh1701's topic in Model Building Questions and Answers
Thanks! Your tires also look good! My daughter has a Cricut cuttter. I am thinking that taking a sheet of their white vinyl and creating lots of whitewalls in various widths and scales might be something I may try to see how they look. Bart -
Any sources for 1/32 scale whitewall tires?
bh1701 replied to bh1701's topic in Model Building Questions and Answers
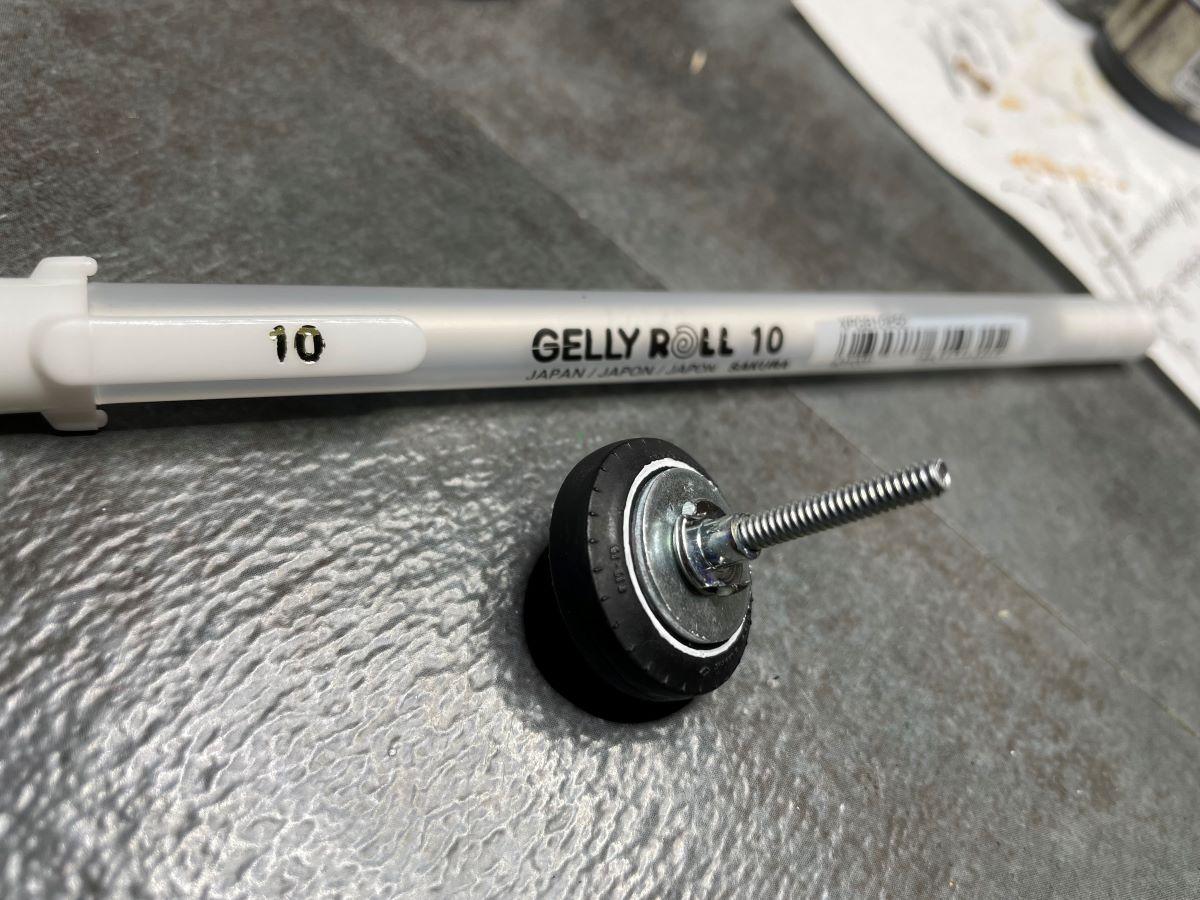
Here's the best solution that I came up with to add whitewalls to the black plastic tires on my 1/32nd scale 1965 Mustang. A trip to the R/C section of my Hobby Store helped me find #4 machine screws, washers, and nuts. The picture shows how I secured a washer on the tire. A Gelly Roll pen was used along the edge of the washer. After everything was dry, a couple of coats of semi-gloss clear were added to provide some protection to the white ink from the pen. I think they turned out pretty good. Thanks, Bart
-
I am working on the 1/32nd scale AMT 1966 Mustang. The kit has 2 piece plastic tires. I'd like to see if anyone has any sources for 1/32nd scale tires with the thin whitewalls that were used on these cars? I can find lots of 1/32 scale slot car tires, but none have whitewalls on them. I am going to try to paint whitewalls on these tires using a circle template and a white Gelly Roll pen. I have used this technique on 1/25th scale tries, but I don't know how successful I will be with these smaller ties. Thanks, Bart
-
Why are decals lifting off after application?
bh1701 replied to bh1701's topic in Model Building Questions and Answers
I am only putting the decals in water for a couple of seconds and then lay them on a towel for a few moments until they can be slid off the backing paper. I have used my own printed decals on many other models and have never encountered this issue. No waxes or polishes have been used. They are going over Tamiya Gloss White Lacquer spray paint. Oops - my post had them listed in the wrong order. I do use the MicroSet 1st and the the MicroSol after they have dried. Thanks! Bart -
I created and printed some custom decals and am having some issues with them. I apply some MicroSol to the gloss finish on the model (it tends to just "bead up" rather than coat the area), apply the decal, and let it dry. After it has dried, I go to apply some MicroSet and the decals lift off the surface as I start to brush the solution on. Wondering what I might be doing wrong? Some details: Decals were printed onto the decal paper using a laser printer The decal paper is either from MicroScale or Bare Metal Foil. I have sheets from both companies and can't tell which ones were used for these decals. I have applied two coats of the Liquid Decal Film to the decals before applying them to the model. I do find that the decals are ready to slide off the paper after only a few seconds of being dipped into water. Wondering if I need to let them stay on the paper longer to get more adhesive on the decals before sliding them off? Thanks, Bart
-
I have rebuilt several kits that I did as a kid in the 1960's and 1970's and encountered interiors I had brush-painted with Testor's Black enamels. Definitely a thick layer of old paint that also proved difficult to remove. My usual approach with Easy Off had little to no effect on it. If my memory is accurate, I did have pretty good results using Tamiya Lacquer Thinner. I would use a paint brush to apply it, let it sit for a few minutes, then apply some more and move the paint brush around to "scrub" the surface. When the paint had loosened up, I would then apply Lacquer Thinner to a paper towel and would wipe the surface. I'd repeat the process as often as needed until the paint had been removed. As mentioned before, there still may be some staining on the plastic that will never go away, and you may have stubborn paint in crevices (a paint brush with stiffer bristles or a toothpick can help work some of that out). When you're all done and apply some primer everything will look good and all of the details covered up by brush-painted Testor's enamel will be visible again! Thanks, Bart
-
Very nicely done! Thought the interior came out really well. Bart
-
This Cougar was molded in orange. I used silver as the initial primer coat, and then followed up with regular primer (either Tamiya White or Gray - I have a feeling it was probably White). The final color covered just fine with no trace of orange anywhere! Thanks, Bart
-
I built one of these when I was a kid in the 60's. I am certain that mine did not turn out as well as yours did! Looks great! Bart
-
That's cool that you own a real one! I am jealous! You are right that the stripes under the trunk do not go down far enough. Also the one on the left side under the trunk (not visible in my photos) has a more correct curve at the top corner to my eyes. The one on the right is a bit more angular at the corner. I remember that I had to make each of those corner strips using 3 different components - some of it Photoshop and some in PowerPoint. I am also not convinced that the proportions on the AMT kit in several places were a 100% match to the real thing. And I can also be a critic of my own work - as you will now see: 1) The stripes on the side of the real car appear to be thicker in height towards the front and become slimmer as they work towards the rear. Mine are uniform in height all the way. 2) The stripe on the front fender that drops down was also a pain. The side marker lights on the AMT model didn't look to be as wide as they are on the real car, so I had to alter those stripes to be about the width of the marker light on the model. 3) You'll also notice that the stripe doesn't extend below the marker light on the front fender; that was going to way too small of a decal to work with. When you print your own, you have to cut the decal extremely close to the size of the actual decal shape. Remember that the entire 8 x 10 sheet is just one single, giant decal! Finally, I don't think the proportions of / details on the AMT body are all 100% accurate. That makes it hard to shrink an image of stripes for a real car down for a model that may be off in some places. But, I am very happen with the overall model the way it turned out and most people wouldn't pick up on some the inaccuracies that exist with the decals. Thanks, Bart