Impalow
-
Posts
1,065 -
Joined
-
Last visited
Content Type
Profiles
Forums
Events
Gallery
Everything posted by Impalow
-
 Ive often wondered how much different those Tamiya weathering kits are from makeup... haven't worked up the courage to try. I already spend way too much time looking at nailpolish.
 -
Very nice and clean!!
-
its perfect! absolutely love it!
-
I also like it! very cool!
-
Very very nice! Ive been curious about this kit.
-
oh man... that is awesome pat!!
-
Clear Over Alclad?
Impalow replied to StevenGuthmiller's topic in Model Building Questions and Answers
I have some experience with both alclad chrome and the Alsa "mirrachrome" on some 1:1 projects... I can confidently say any type of clear on top will cause some dulling of the chrome effect. While working on the 1:1 scale Alsa stuff I spent many hours on the phone with their customer service, and an engineer...Ill share a little insight of what they told me, now this has been a few years so some details may be lost, but I think the concept is still accurate for all of these faux chrome paints. The sprayable chrome paint is really microscopic metallic particles suspended in a acetone like substance. The acetone is meant to lightly etch the high gloss black base surface and allow these little particles to stick to the black base. The harder your basecoat, the less durable your finish will be. I have had good luck with the rattle can Dulpi-color Enamel Clear over a black base before spraying the Alclad. In the 1:1 world this clear is awful, and not durable at all.. but it seems to be just soft enough to allow that acetone to do its job. Another trick I've been using, is to spray the alclad within 10 minutes of spraying the clear on the black parts.. this ensures the clear is still soft. I have found this to be pretty durable for handling, much more than I was expecting. Now to the reason why you shouldn't use the a clear top coat... These tiny particles are designed to lay onto the shiny black surface in a somewhat uniform pattern, (supposedly microscopic diamond shapes that interlock) they work kinda like a 2 way mirror, and reflect the black surface back through them to create the chrome effect. Any top coat will make these little flakes float upward into the clear, which increases the distance between the particles, allows more of the black to show and ruins the chrome effect. At the time I was working with this, Alsa had been trying to formulate a clear that didn't do this with no real luck. So a quick less nerdy recap.... use a soft base coat, don't clear over-top, handle minimally and you should be fine. Here are some photos of my 1:1 faux chrome experience... a learning experience to say the least. Gloss black base Alsa Mirrachrome - No clear And since this was a real car and needed protection... after clear... ugh.. still looks okay, but much more like a stainless steel than chrome. (the car is my dads 1953 Oldsmobile 88, it has been in the family almost 20 years, had monochrome red bumpers for a long time.. painting this way was a fraction of the price of traditional re-chroming... so we gave it a shot) -
Thank you all for the fantastic feedback! I'm very honored by all of the comments.
-
Just booked our room! Ramada was sold out, but the Holiday Inn had a suite left for the 3 of us Friday night.. So its confirmed Andy, my dad and I will be there.
-
Thank you Bruce! Yeah those turn signals were a bit of a thorn in my side during the last part of the build, they look better in person than in the photos. But still funky.. I agree with the small lights, it was just too late at that point... oh well... notes for the next build.
-
Thank you all for the comments and compliments! It really means a lot! Thank you! Honestly, I have no idea, it was off and on the bench since about July of last year.. but i really started working on it full time starting the 1st of the year. So lets say about 4 months working an average of 4-5 nights a week for a few hours.
-
Eric Goodrich`s:: "IRON LUNG" - On the Workbench 2/8/16
Impalow replied to John Teresi's topic in WIP: Model Cars
Absolutely phenomenal as usual john! I love your style of detailing & weathering, it makes it instantly recognizable as one of your builds. -
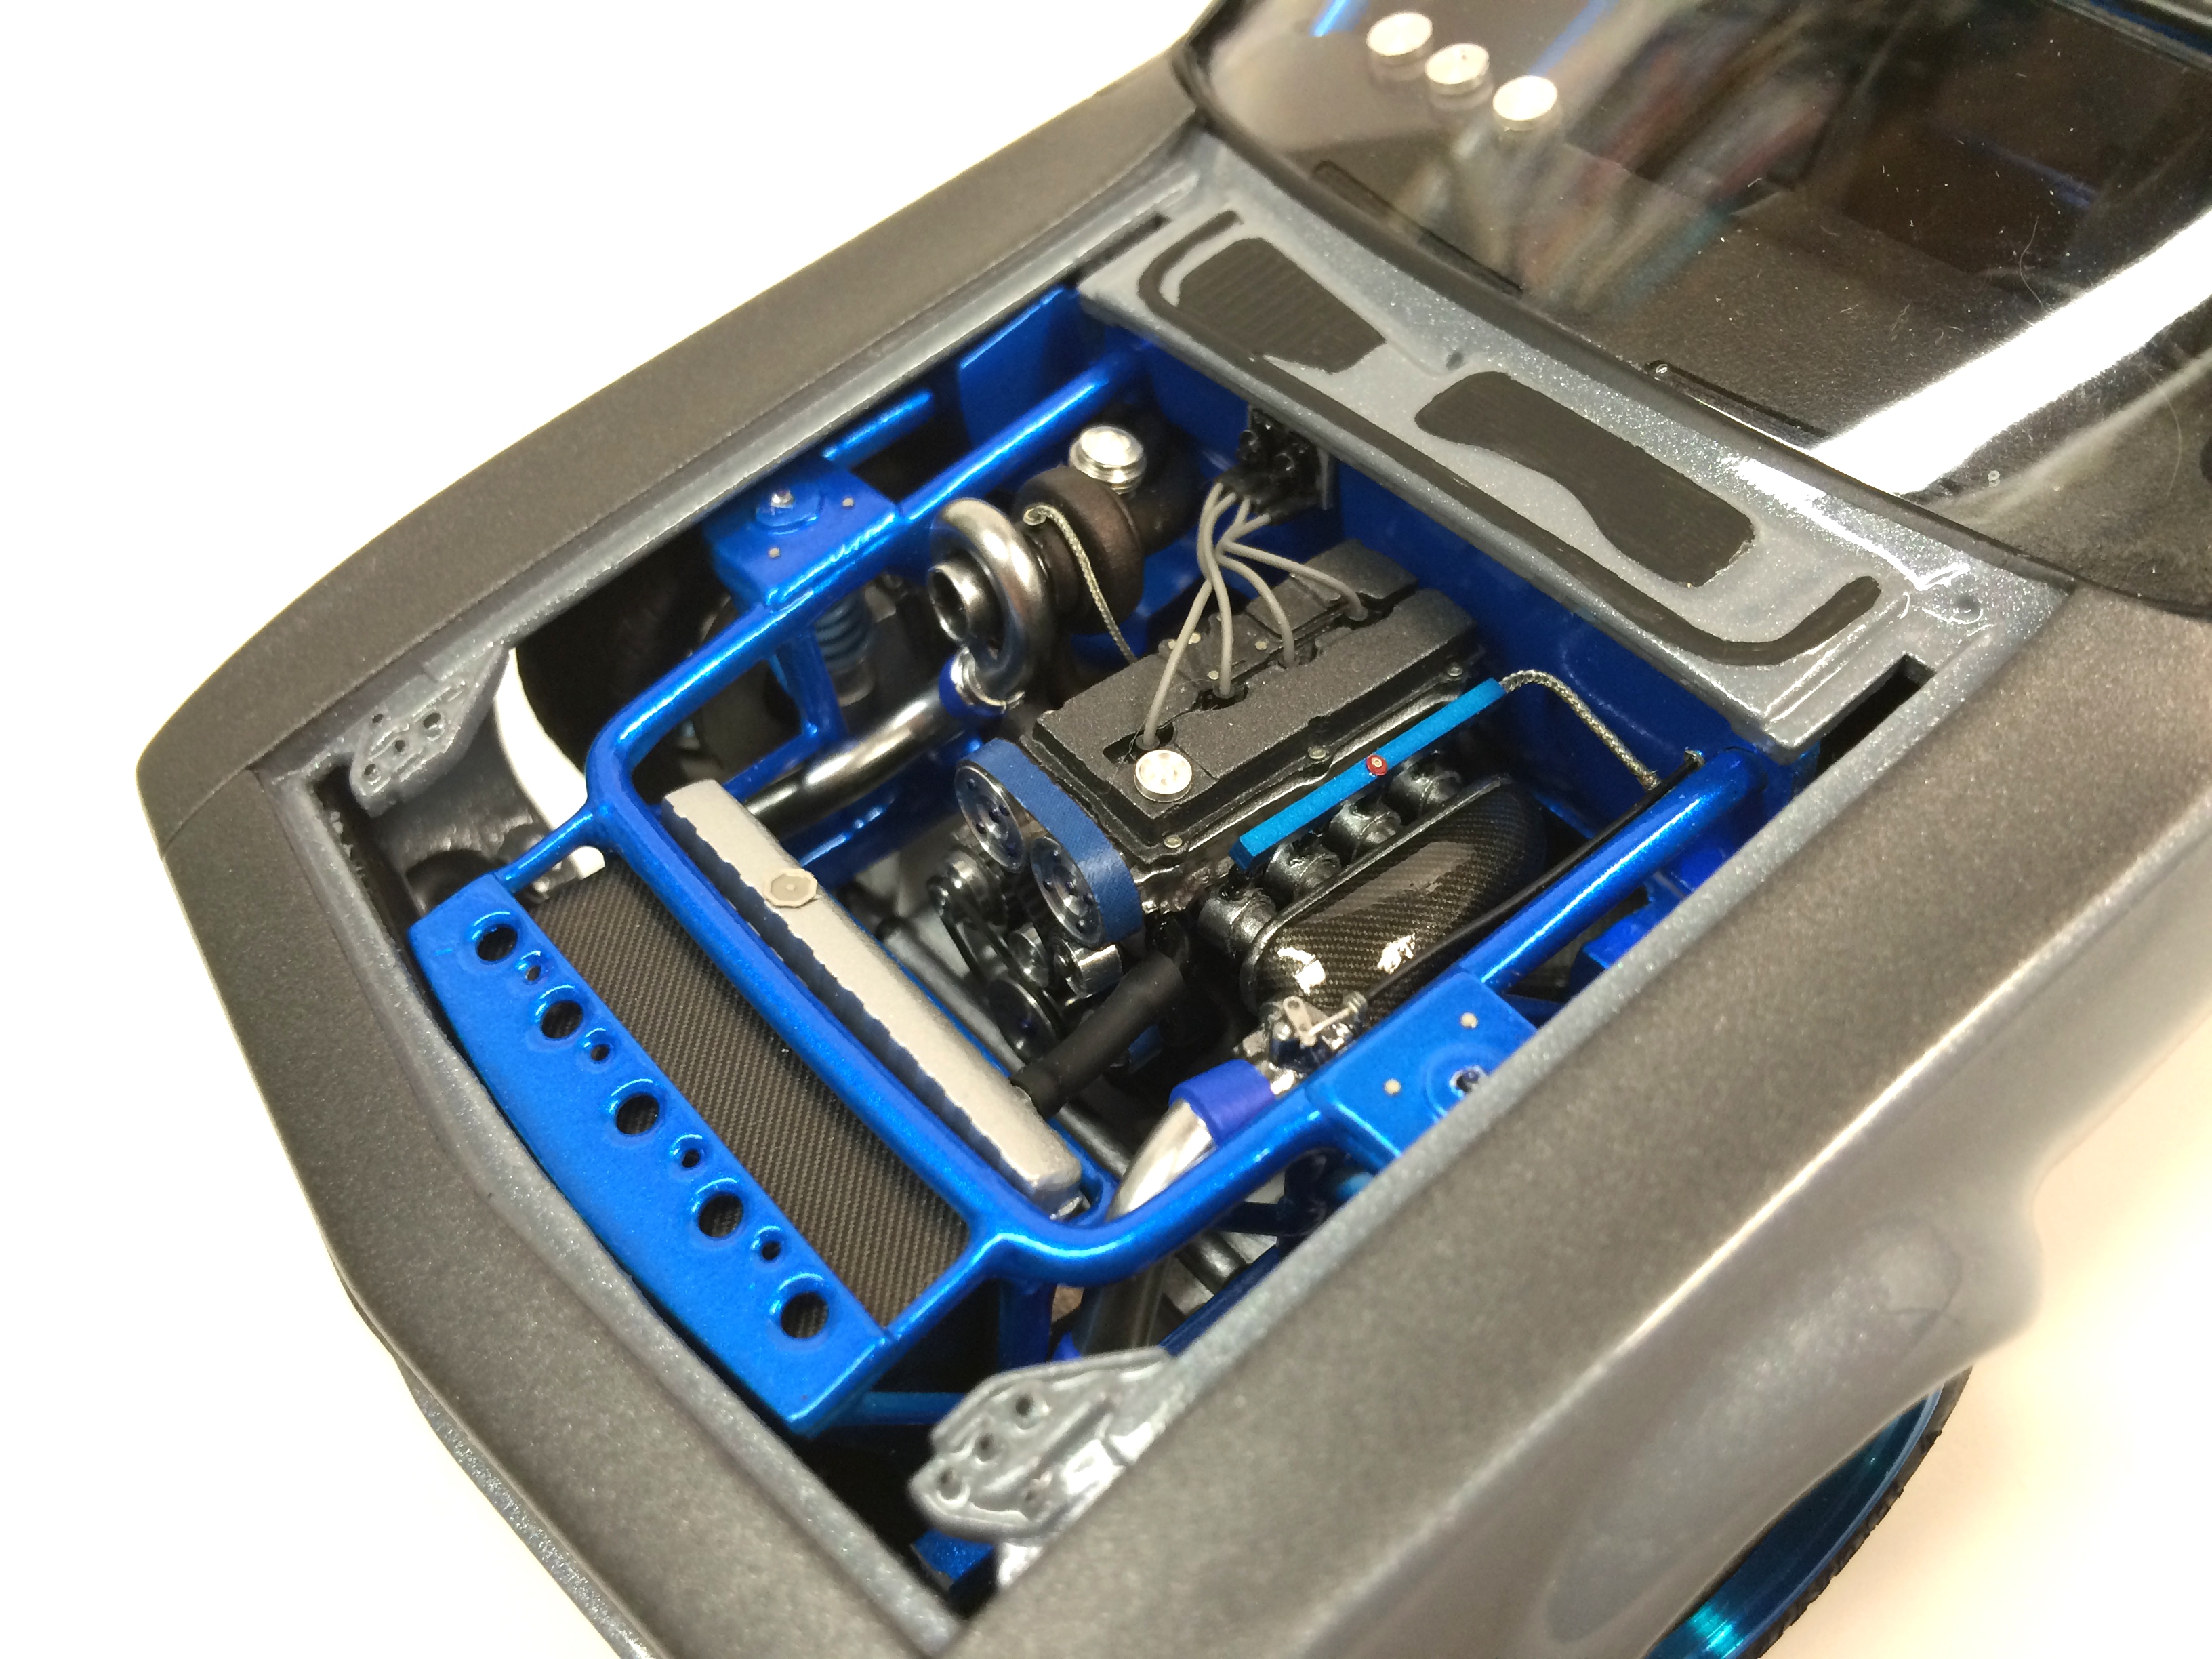
Sure! Its a Scale Production intercooler I picked up at a show, but the fins were pretty bad.. so i sanded them off. Primed and painted with alclad polished aluminum, then I brush painted the center section flat black. After that was dry I cut a piece of the detail master radiator face panel to size, making sure to keep it very very flat. I then flooded the black area with future and set the photo etched piece in place. Let that dry and applied a few more coats of future to encapsulate it in there. It was pretty easy and worked better than i expected. Here is a link to the detail master photo etched piece: http://xtremescaledetail.com/component/hikashop/product/52-detail-master-2490-radiator-face-panels
-
Awesome idea!!! I love it!
-
Thank you all for the positive comments! Under Glass photos done! Check them out here:
-
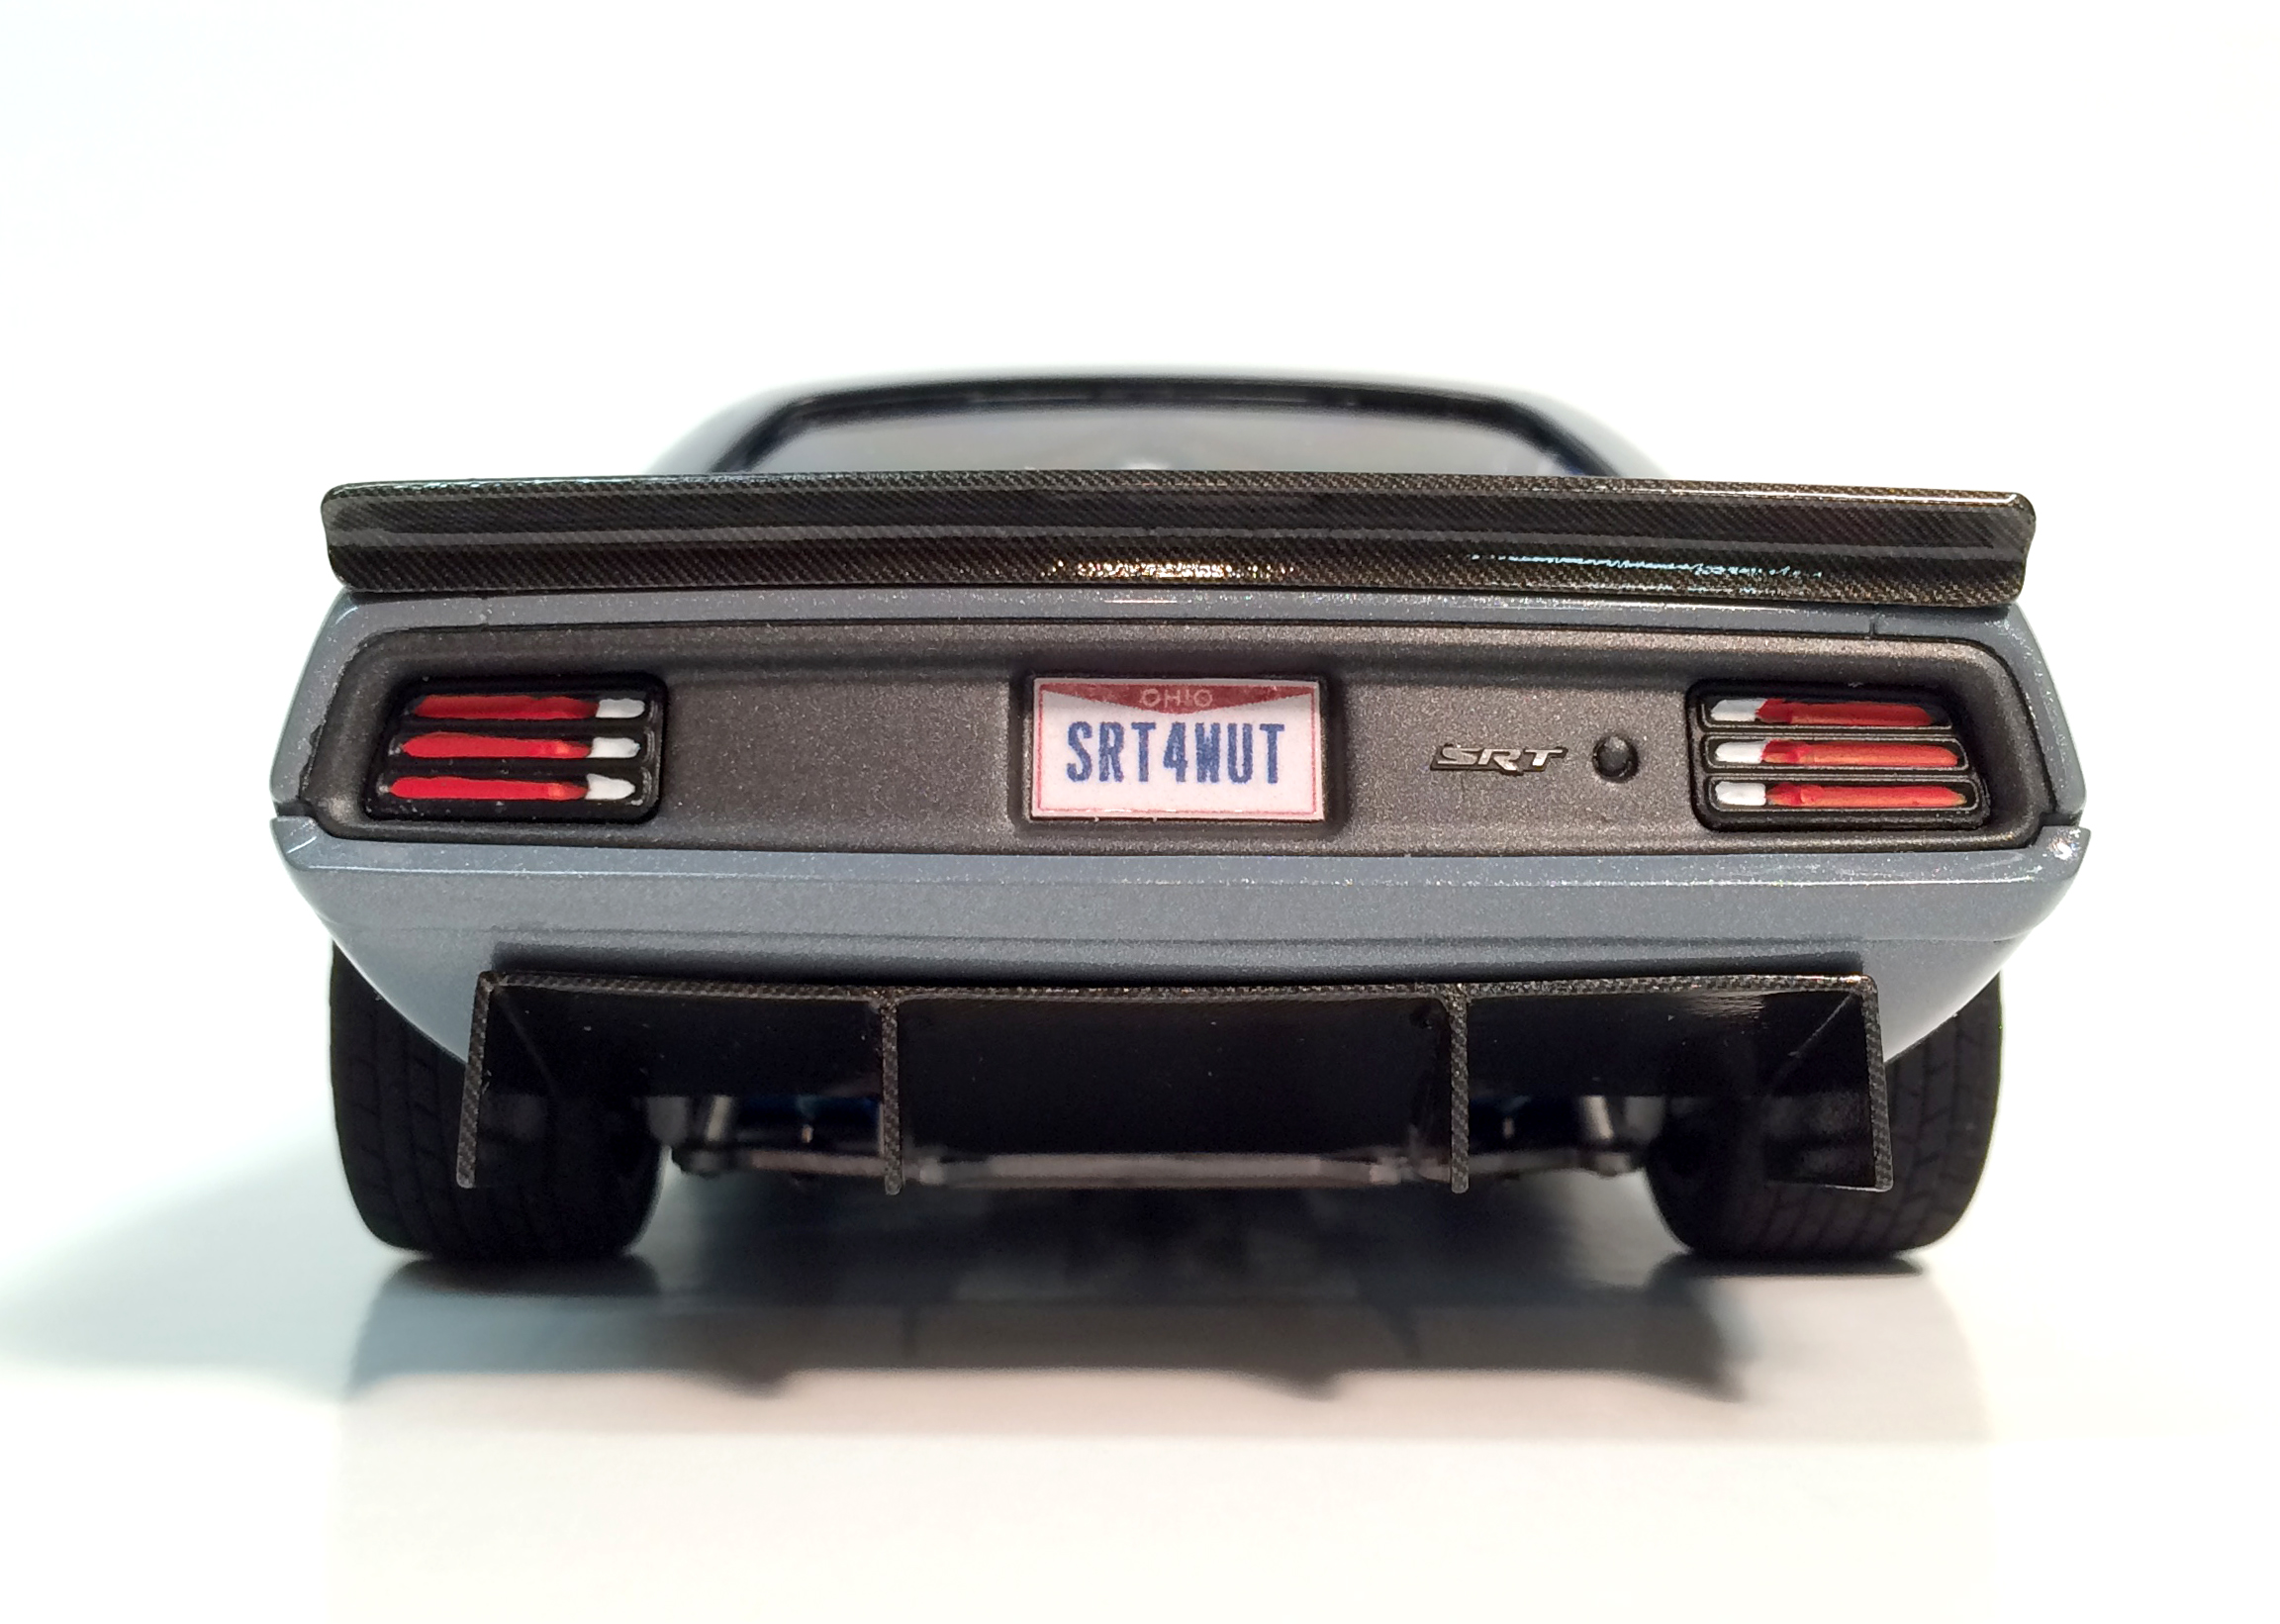
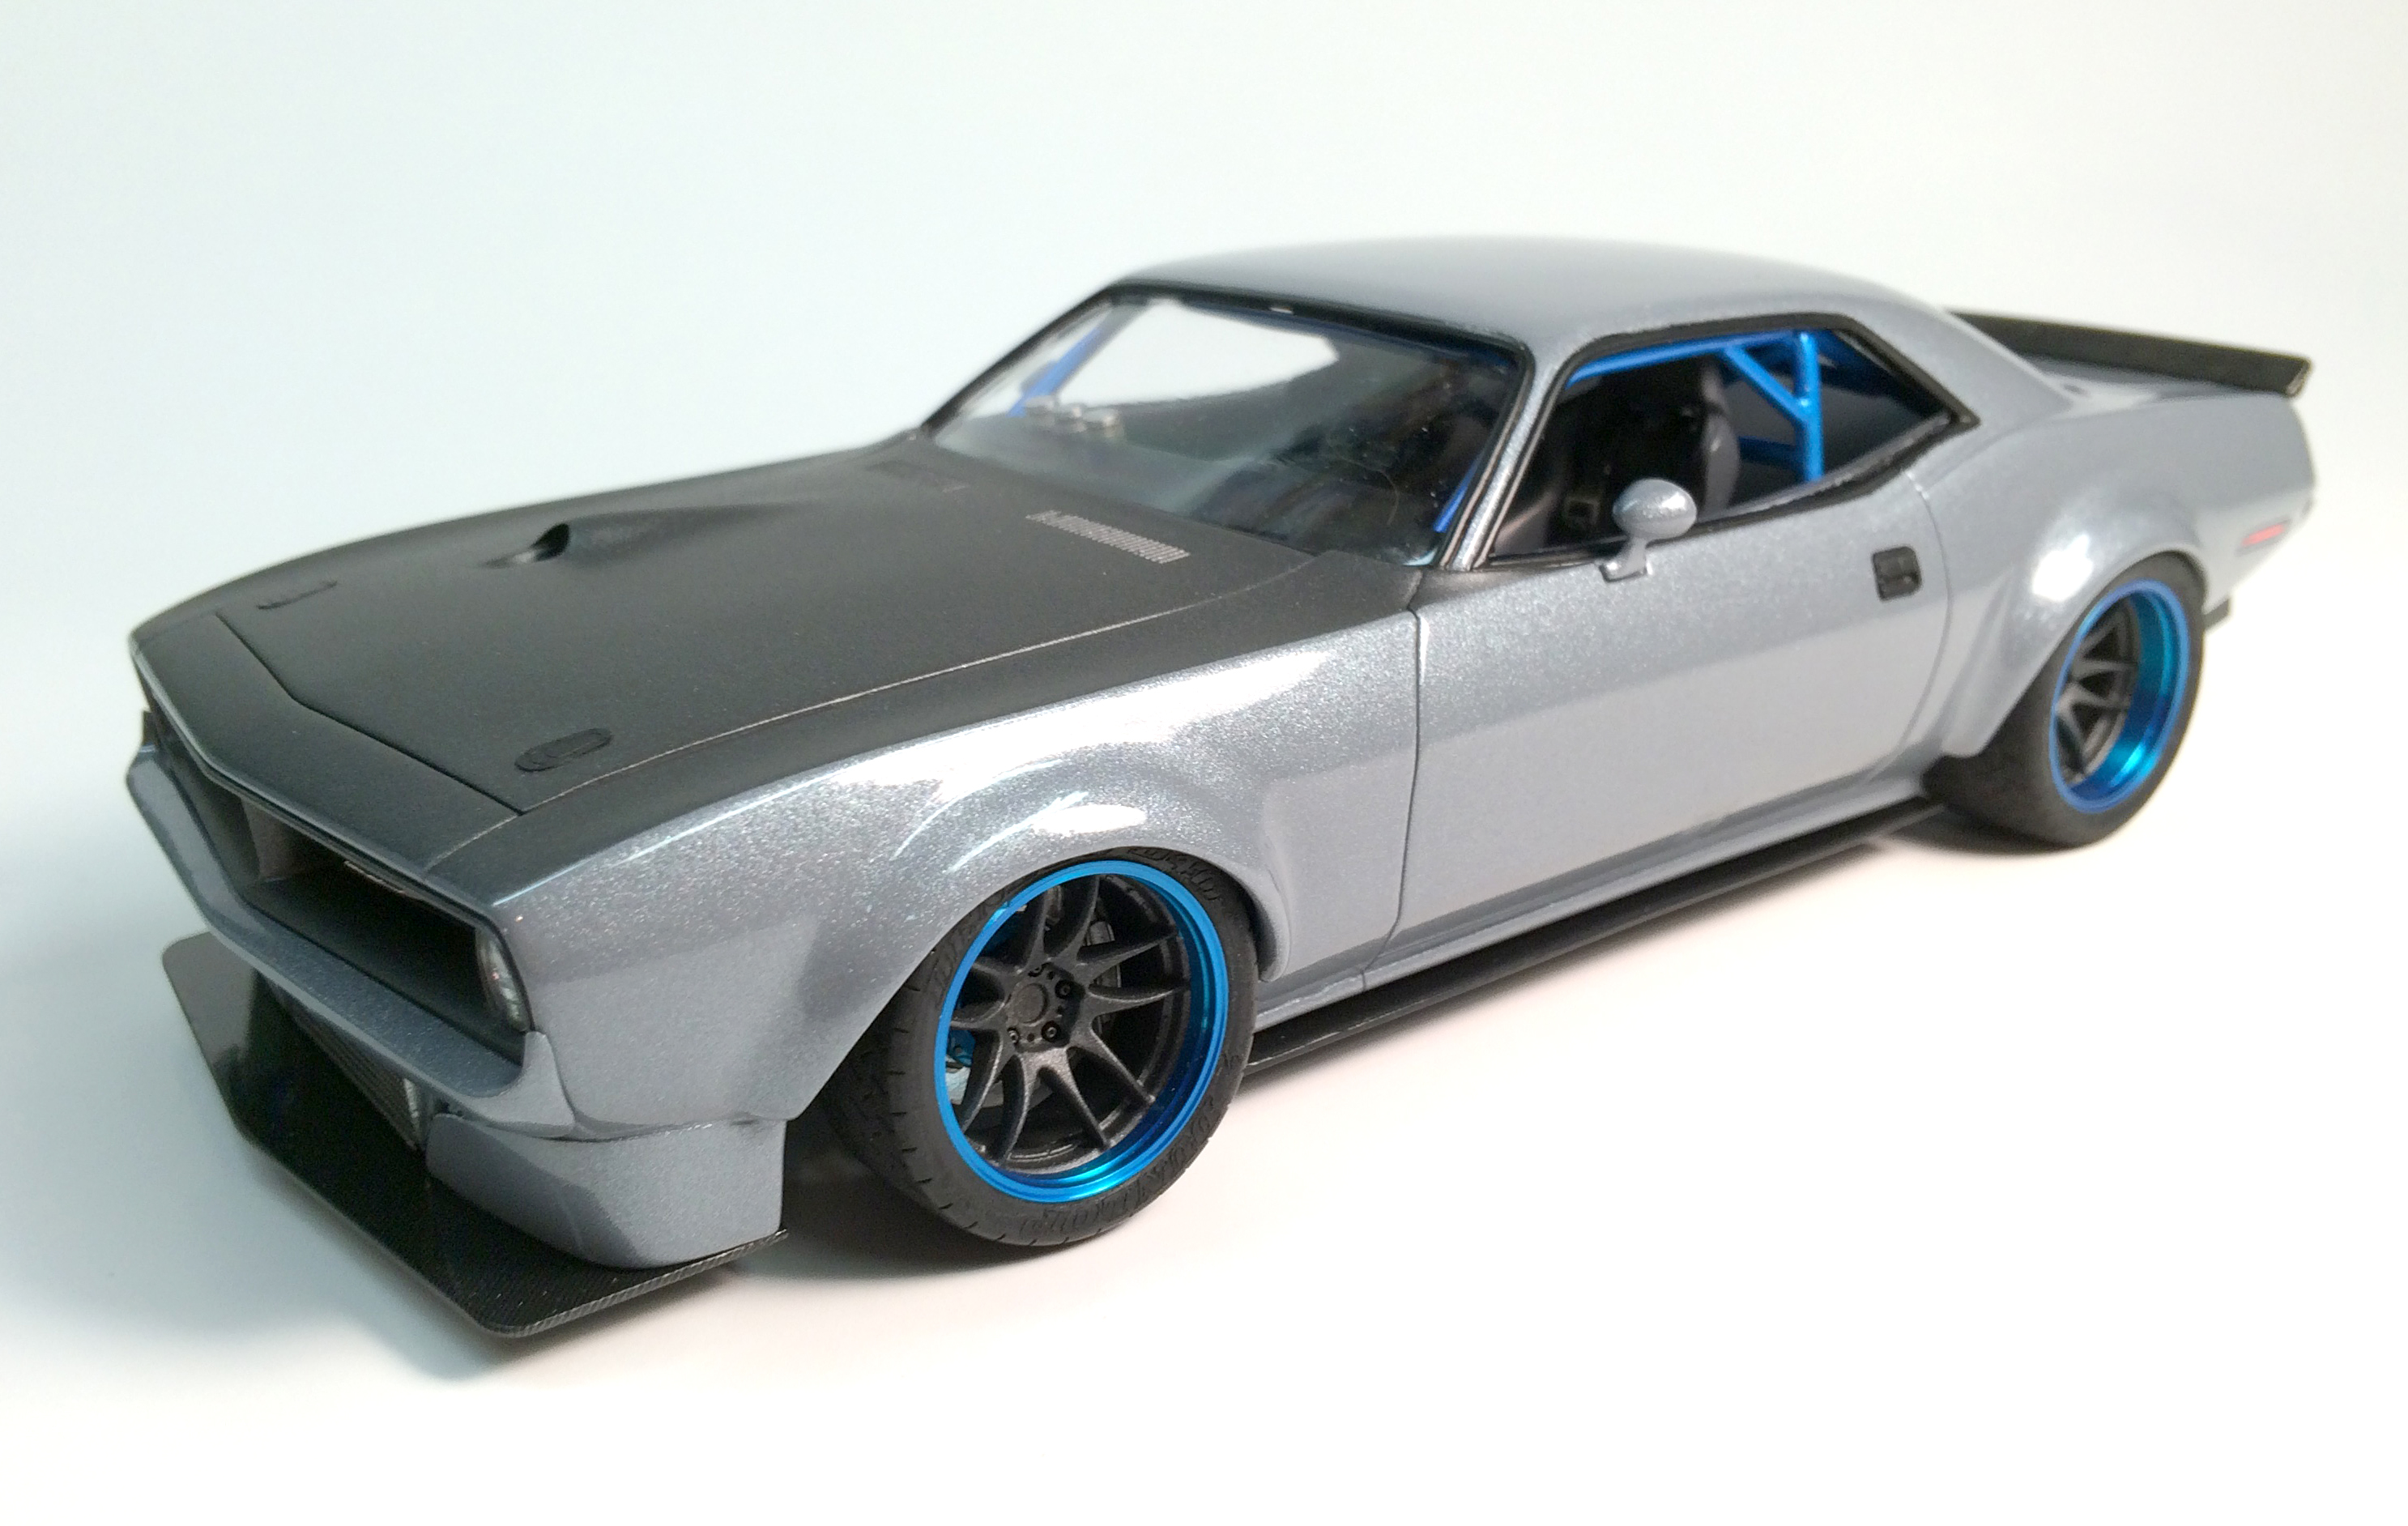
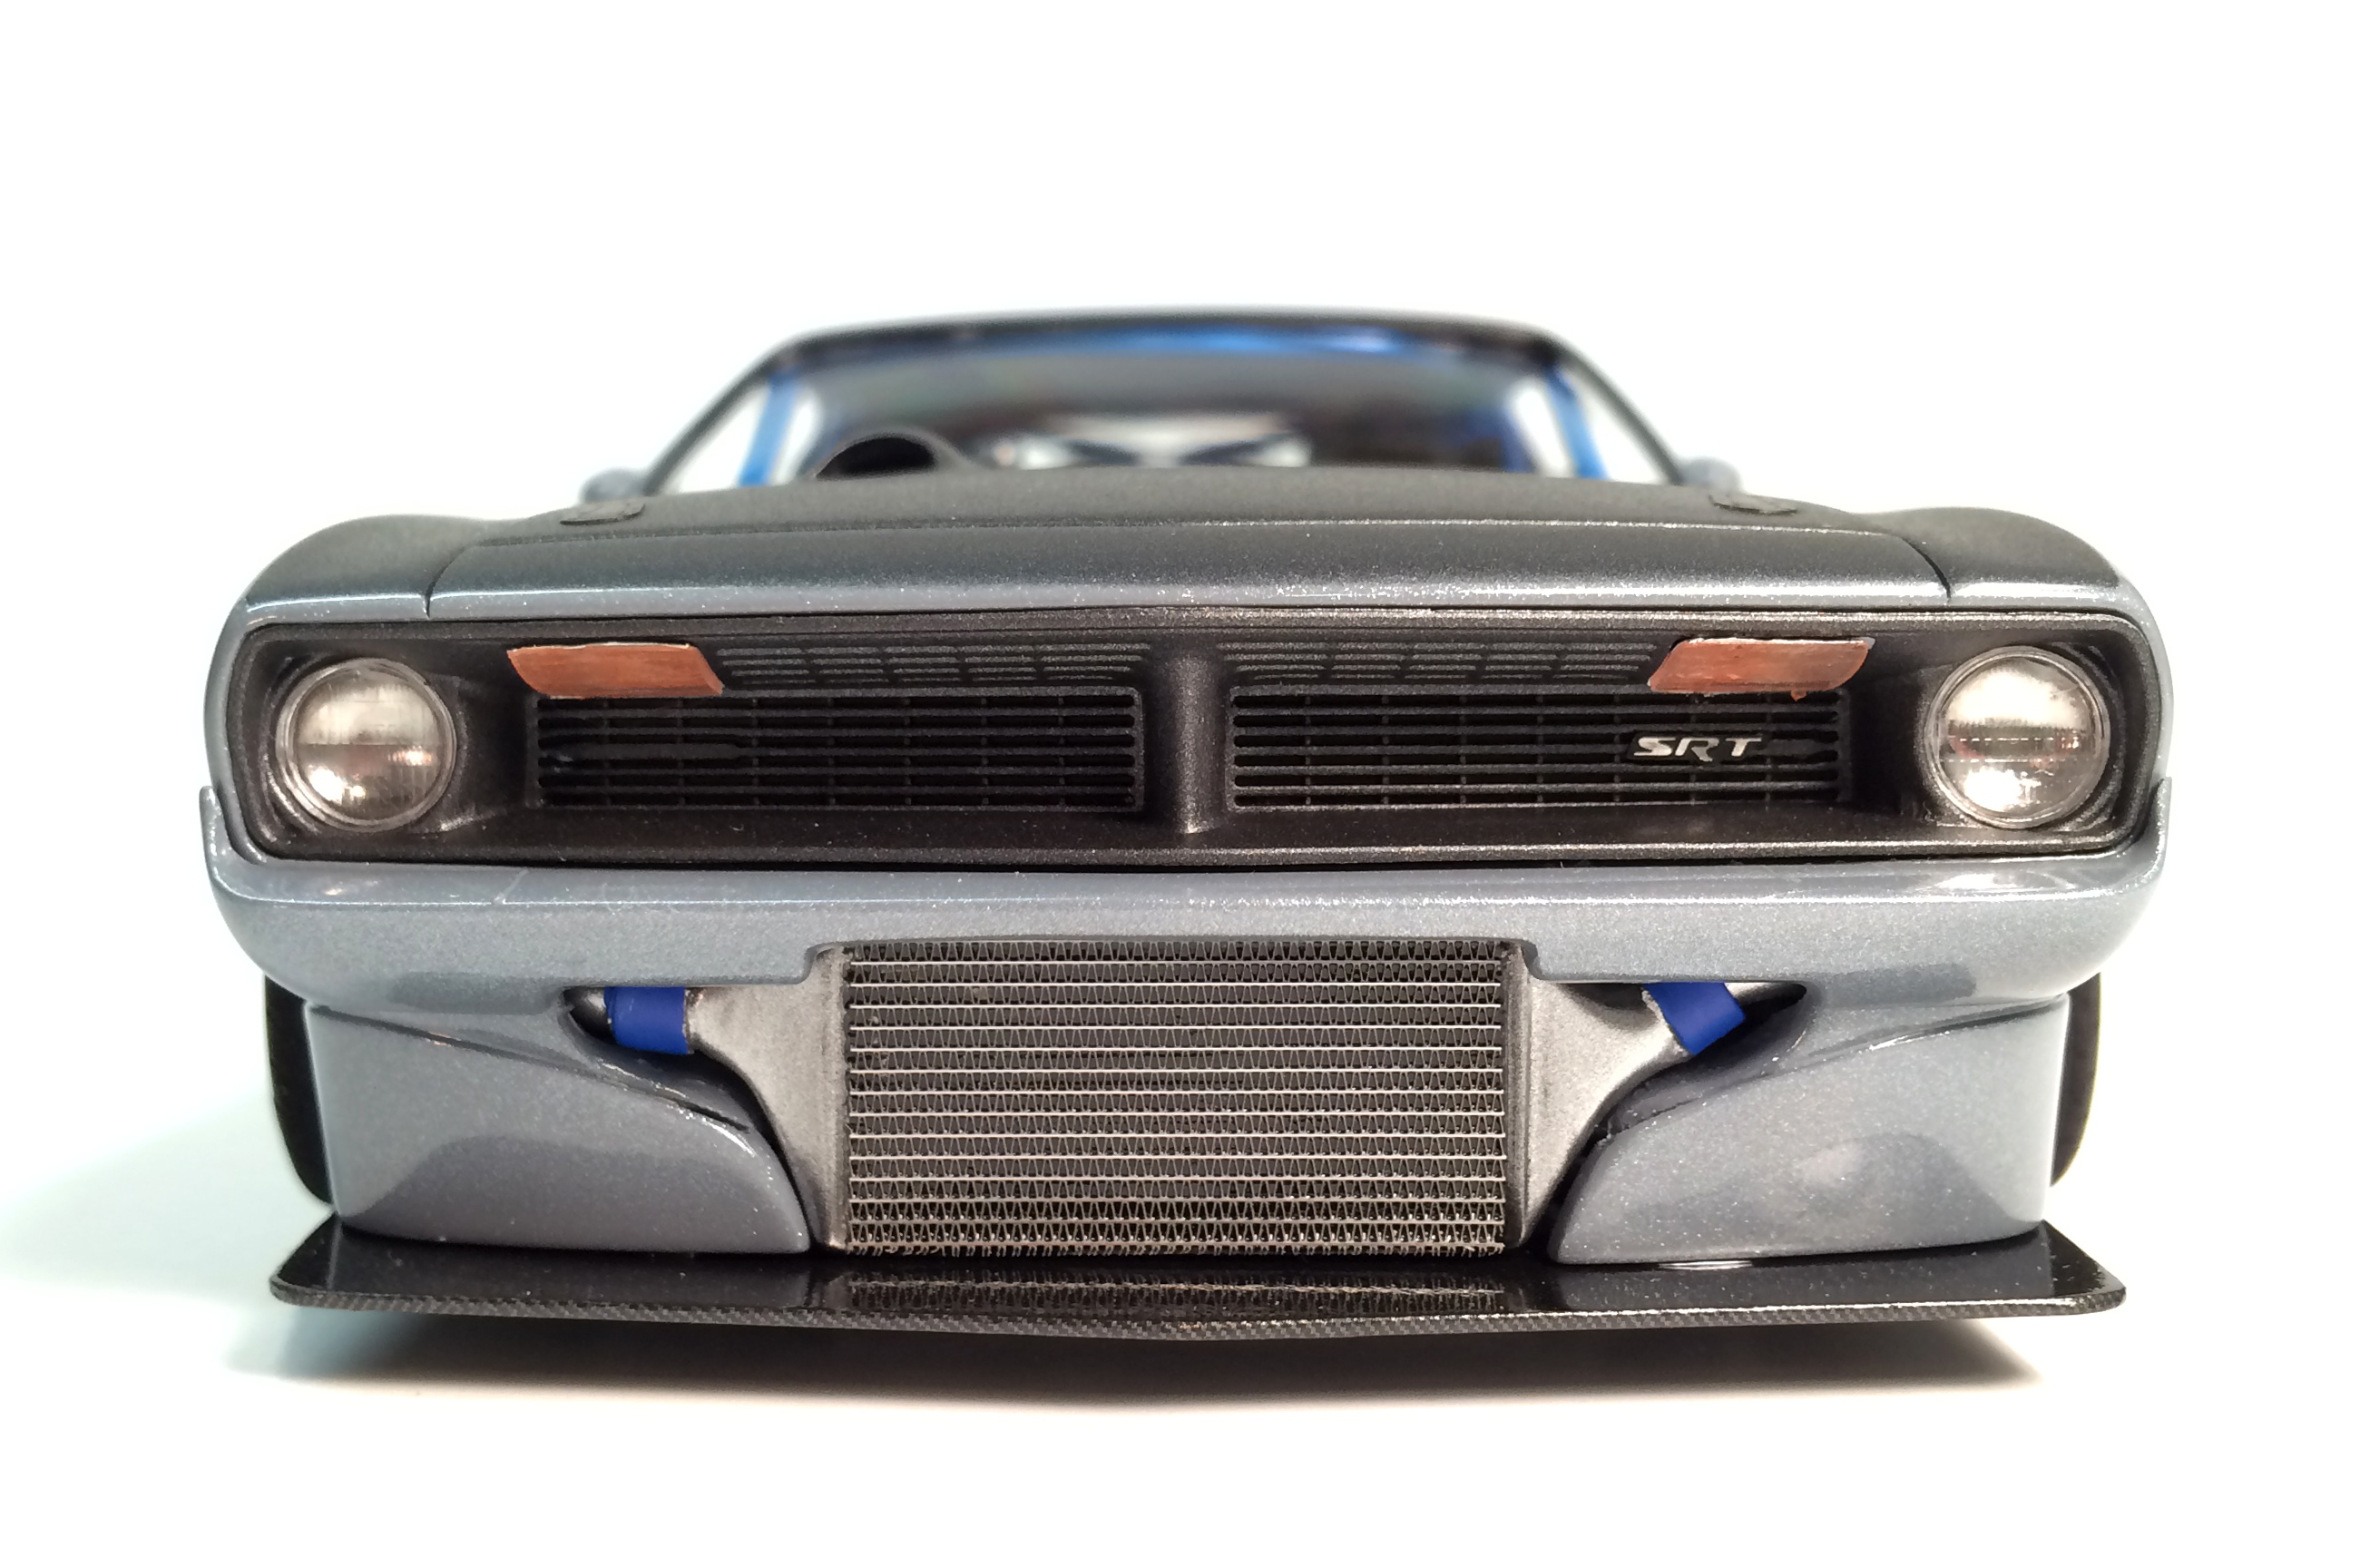
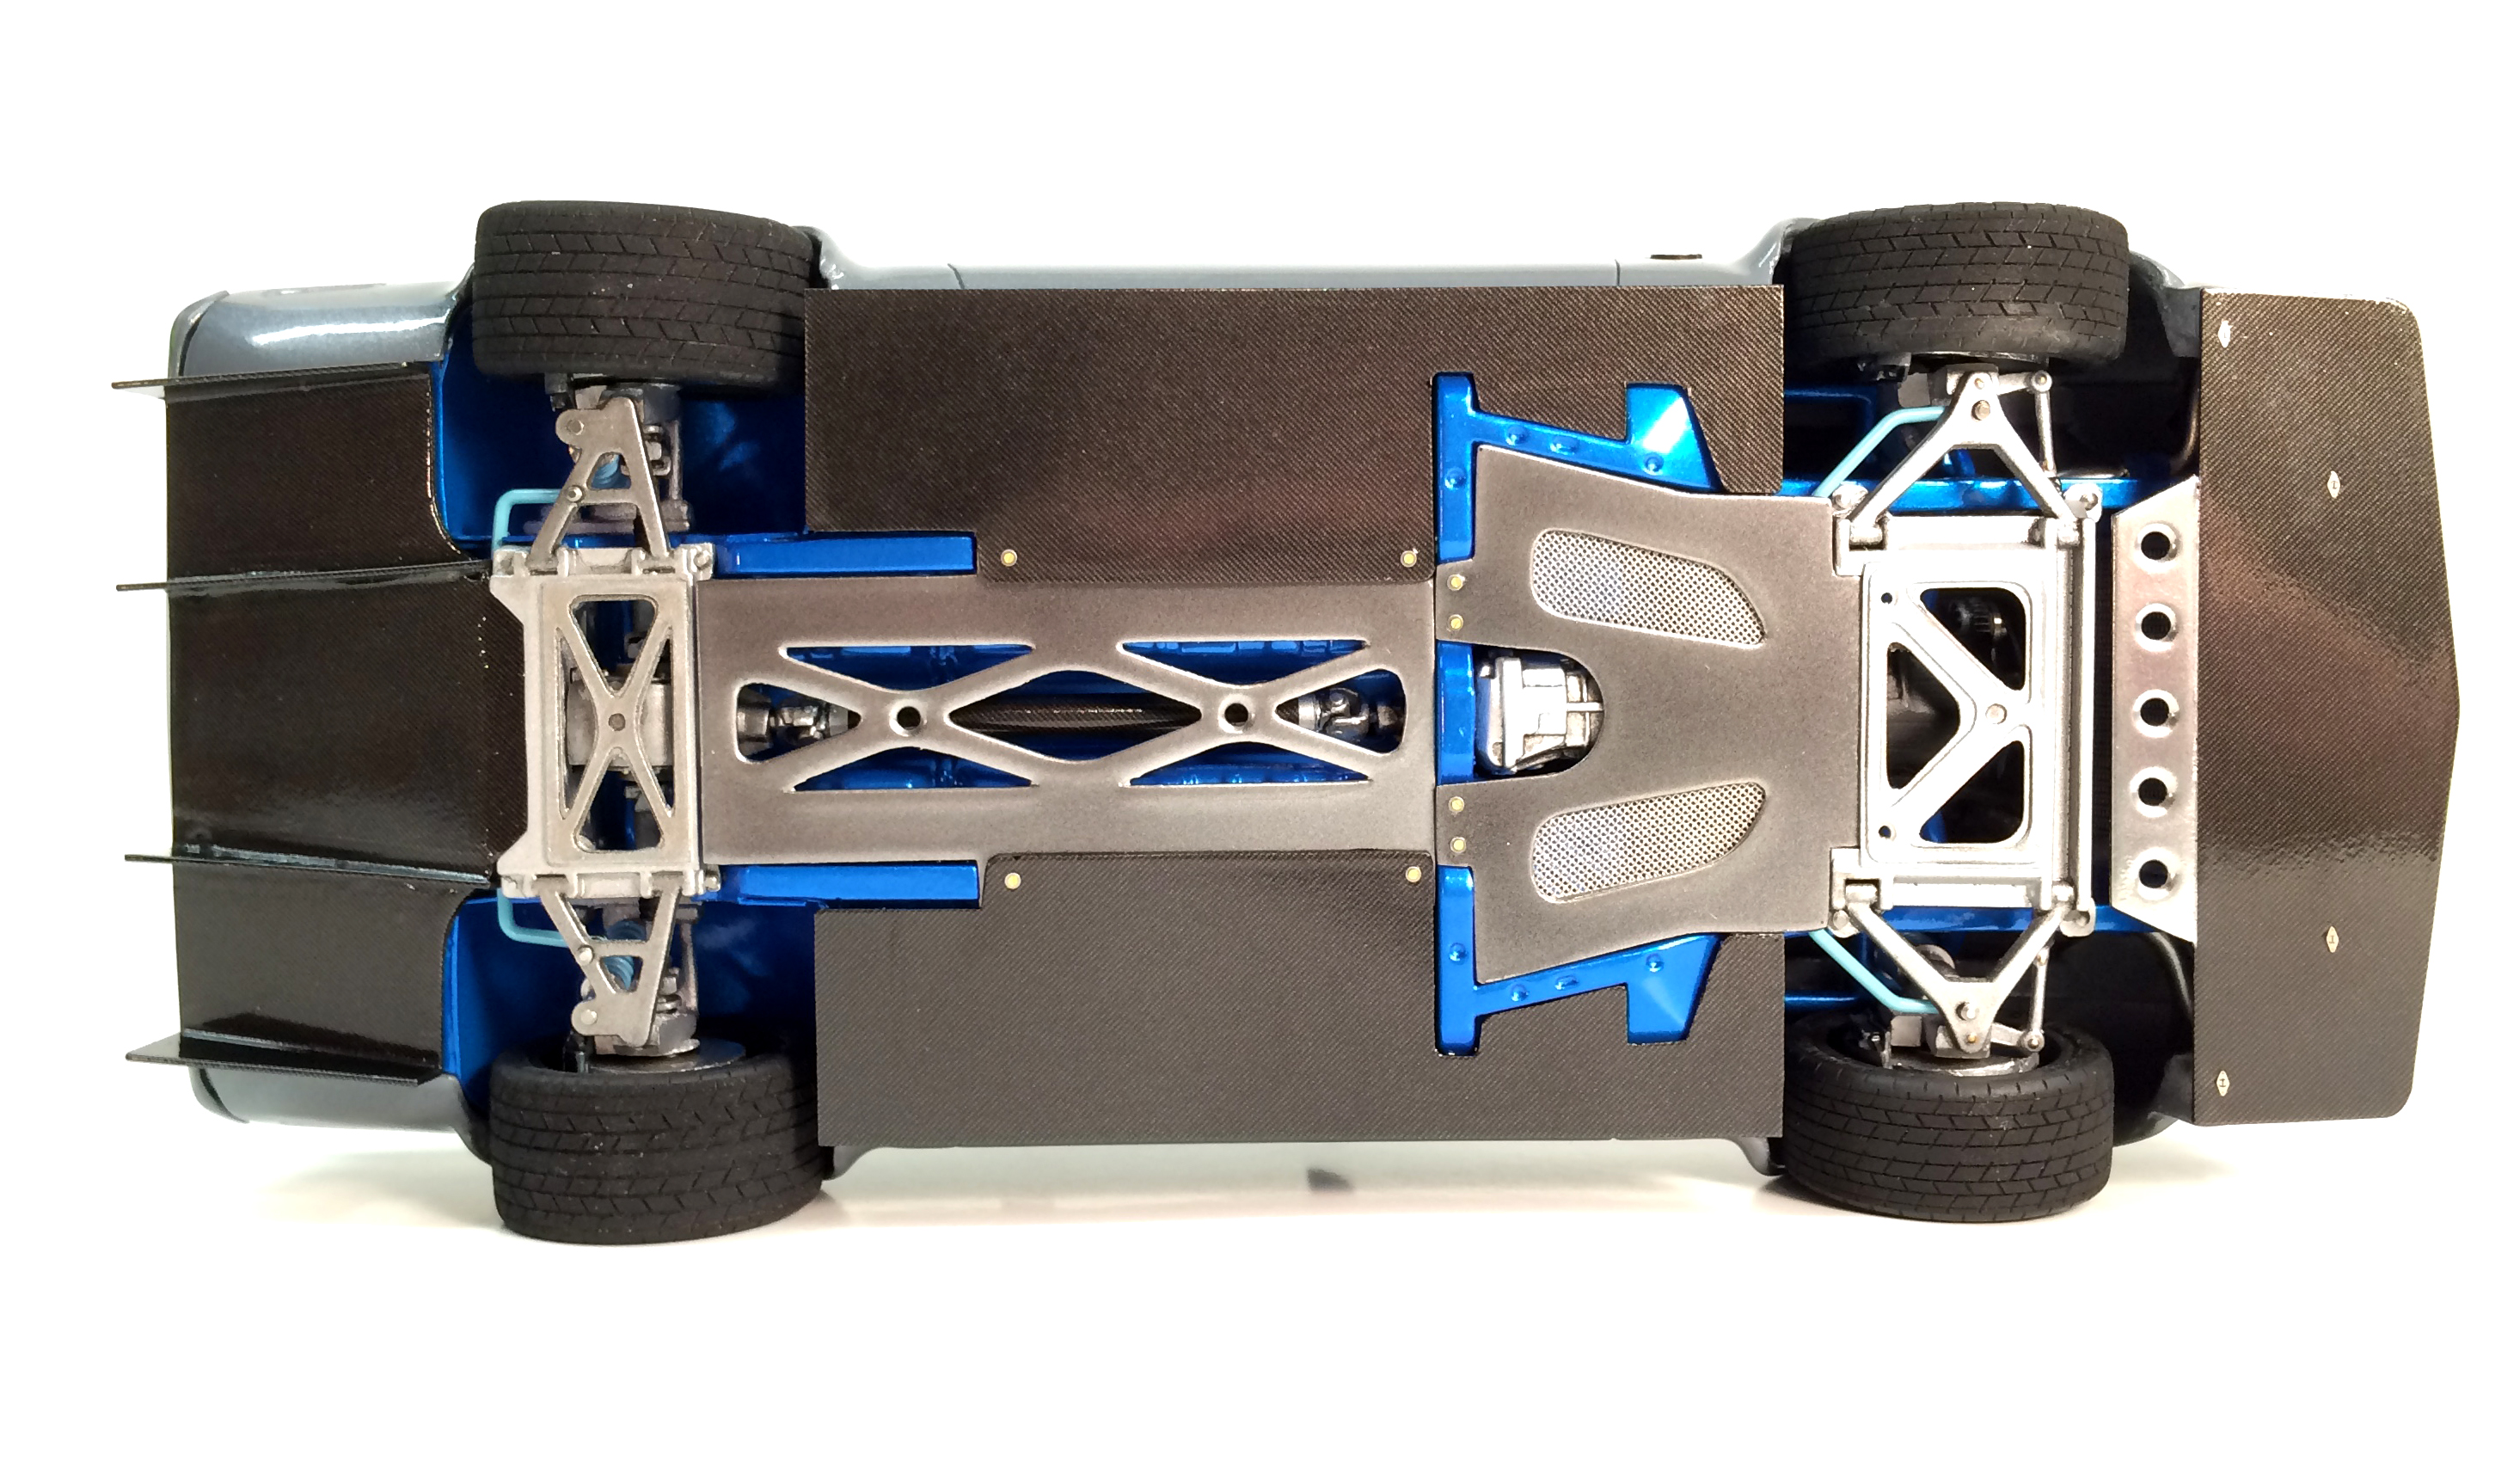
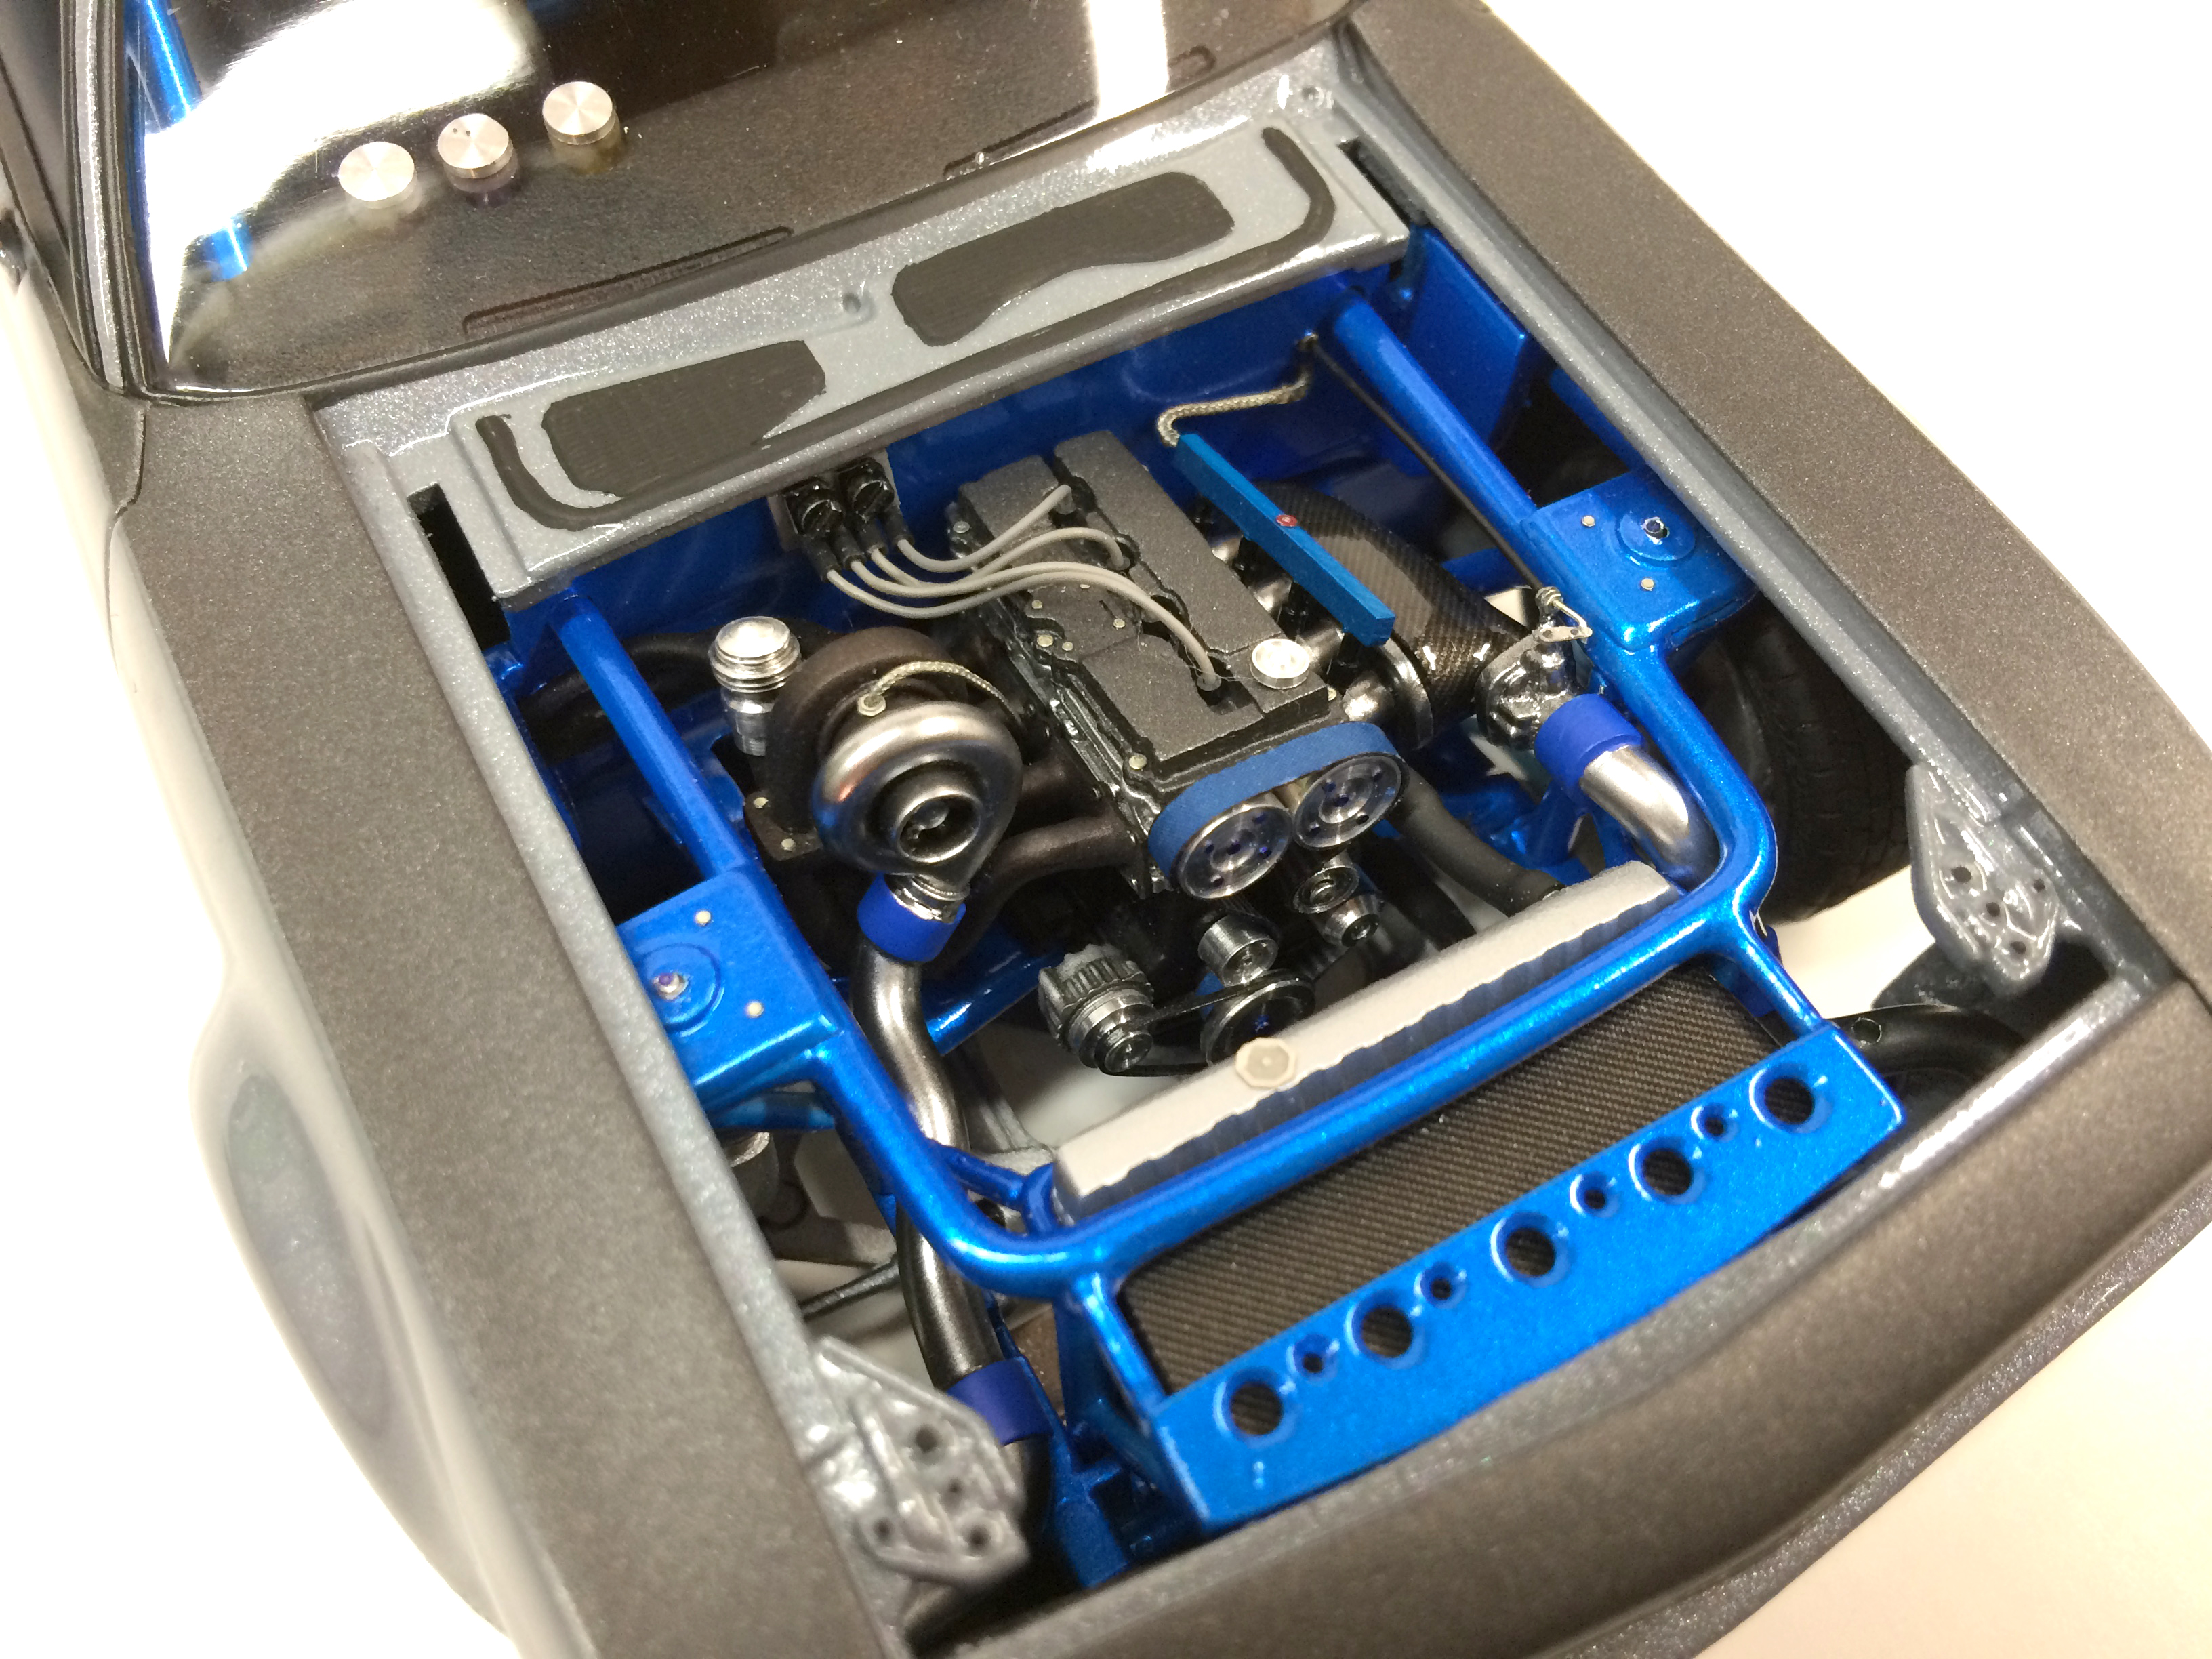
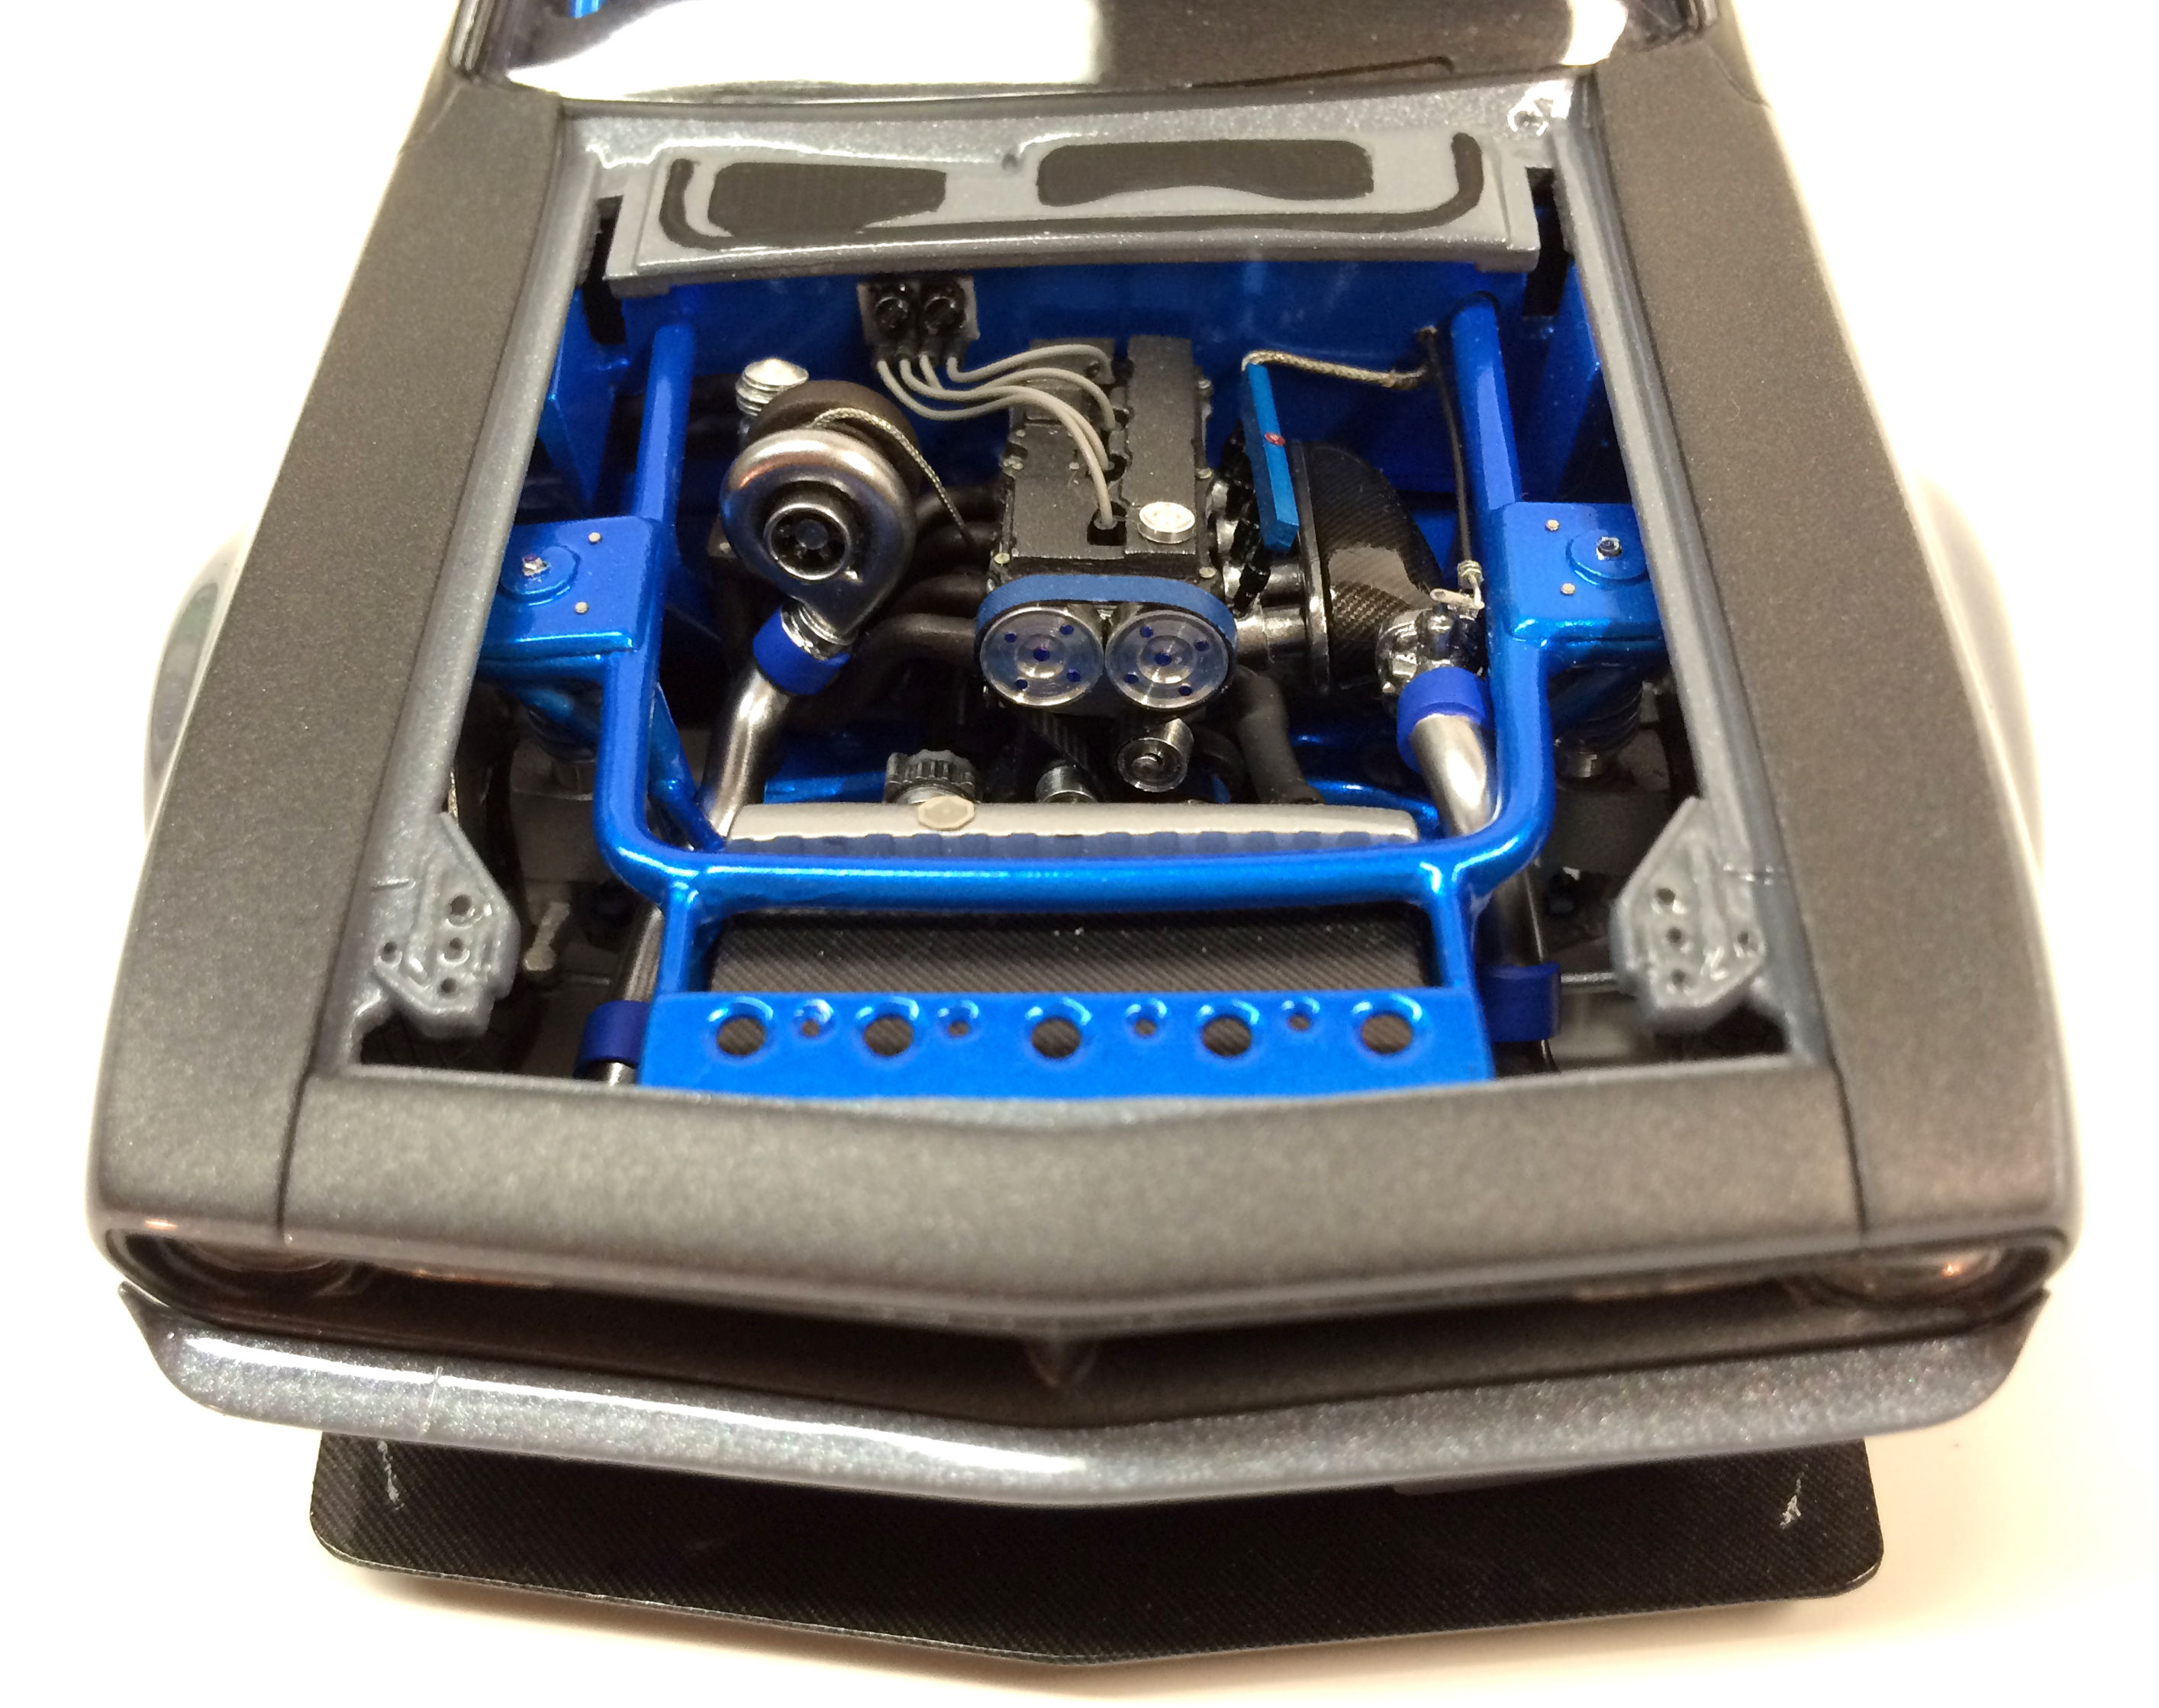
Finally some studio shots... thanks for looking! Here is a quick rundown: 3d printed Neon SRT4/ PT Cruiser Engine - the block, head, cam cover, intake plenum and oil pan were 3D printed the rest was scratch-built or machined (only kit parts are alternator, and throttlebody) Full independent suspension from the C5R Kit adapted to the fit tub'ed and massaged cuda chassis plate. Machined shocks and struts. Wheels are Aoshima Work Emotion 18's with custom machined lips. Tires are from the tamiya Porsche 959. Lips painted with tamiya clear blue. Scratchbuilt roll cage and tube front frame section Smoothed interior tub, reworked dash for Digi-Dash and brake and clutch fluid reservoirs. Resivoirs turned from acrylic rod and filled with tinted future. Clearly Scale ACR seats. Flared fenders from Aoshima hakosuka works kit, molded in, scratchbuilt spoiler, and front air dam. Fully bellypan and diffuser covered in scale motorsports 1/24th scale twill carbon fiber and Alclad polished aluminum Paint is tamiya neutral gray followed by a white pearl mid-coat and then urethane clear. Accents are GunMetal non-buffing metalizer. For any detailed questions the build log is here: http://www.modelcarsmag.com/forums/topic/105248-turbo-4cyl-cuda-done-321/?page=1

-
very nice! I bet those decals were fun... yikes.
-
Thanks for the pics Tom!
-
Thank you all! for sure martin! when he first told me his idea i was like "ewe"... and then that turned to "ahhhhhh" ... it turned into a gorgeous build Yeah, wow.. Almost had to.. I was so busy working on this thing I almost forgot my "rat rod" hadn't been to a show yet, and that was the featured theme... I was blown away at all the awards... Really didn't expect that at all...Sorry i missed seeing you, if i did miss you... I was kind of a walking zombie by noon..hahaha
-
yup.. i was pressuring him about getting back on this yesterday Tom... maybe he will listen to both of us.
-
L-700 RR
Impalow replied to Brianl's topic in WIP: Model Trucks: Pickups, Vans, SUVs, Light Commercial
beyond awesome!! great idea! -
Chris thanks for better explaining the non-issue... you found the words i couldn't... haha
-
Finally finished photos from the show... I will take better photos for my under-glass post here in the next few days: Here s a group shot featuring Andy (exesivefire) my Dad (I keep forgetting to help him set up an account) and mine... It was fun building the same kit between the 3 of us and seeing how each one of us tackled the build and discussing the issues. All in all the Ohio challenge table had around 10 Cudas on it, this was just our contribution.
-
Thanks guys!!! Well I did it.. not quite sure how.. But i managed to get this thing together around 2:30am Sunday morning then headed out to the show around 5:30am after a short nap.. I can honestly say this is going to be the last one I thrash on like this.. Just took the fun of out the final assembly, and added stress. I had some minor hiccups with the glass and other fitment issues from warped pieces that almost made me want to throw in the towel on several occasions. But the results were worth it, and I am very pleased with the final model. On top of all that I managed to bring home the Ohio Challenge class win, and the honor of selecting next years build car!! (Revell 29 roadster) Due to thrashing these are the only real in progress photos I had... oops. Grille with hobby design SRT emblem from challenger detail set: Intercooler piping, and ignition coils installed... the intake and throttle cable went all wonky in this pic.. but fixed it later: Chassis pan installed... this was fun.. Exhaust and waste gate exit: Cool littler teaser photo:
-
Thanks Andy! and thanks for talking me into getting some CA and Kicker about 3 projects ago. Trim is painted! Body is done minus glass & assembly.. Huge relief, I was fretting about this. Tonight is brakes/ ignition coils & exhaust.. Getting closer.