
68shortfleet
-
Posts
601 -
Joined
-
Last visited
Content Type
Profiles
Forums
Events
Gallery
Everything posted by 68shortfleet
-
Started yet another build Monday afternoon, basically building this box stock just for fun as a quick build. I am even using the paint colors shown on the instructions for most parts. It has basically stalled though at about 26 hours after starting it. Waiting on paint and glue to dry. The floor pan in the kit was horribly warped out of the box though. Put it in warm/hot water and got it pretty close. Not sure yet if it is going to cause problems later on. Put in a parts request to Revell to see if I can get a replacement. Was a little disappointed to see that the kit has four wheel disc brakes, pretty new thing in the 60's, really doubt that the real car had them. Quick shot of the body getting ready for some color. At this point, the inside of the body has been painted, outside only has overspray on it. Car is actually completely painted now though. Turned out way too well for coming out of a can. Frame/suspension is also fully assembled, along with the interior.
-
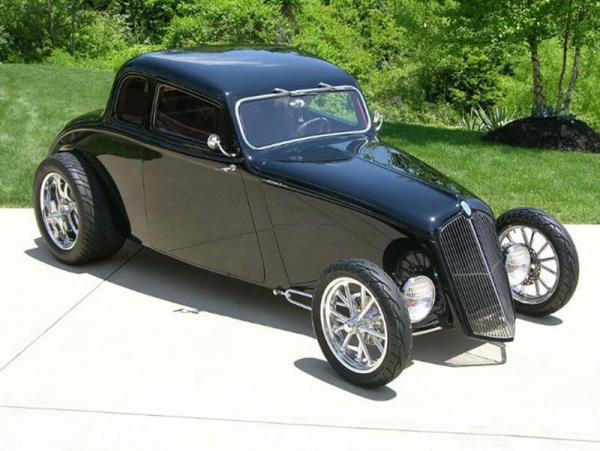
 Annnnnd, it's under glass now. Might come back to it and add tail lights and license plate. Maybe even some radiator hoses too. Not putting a mirror on it though.
 -
Well, this started as a horrible gluebomb that I built as a kid in the early eighties, possibly even the late seventies. I originally built it as a dually stakebed, then rebuilt it with a cardboard bed with the wrecker boom in the back, then started to rebuild it as a stocker with another style stakebed(original long gone). So, this rebuild took a very different approach. About all of the original that is left is the cab and possibly the motor. I scratch built the frame and new floor pan, everything else came out of the parts box. Couple of firsts for me in this build, first scratched frame and first 1/25 motor I have given plug wires. Short build thread can be seen here. http://www.modelcarsmag.com/forums/topic/107108-34-lindberg-gluebomb-rebuild/ It needs a couple of things still though. I need to find a set of tail lights I'm happy with and maybe a license plate, could also benefit from some radiator hoses. But it's not getting a mirror.
-
Those little tiny wires will make a person drink. But, it sure does look better with some wiring.
-
Making progress. Still not sure what motor I will finalize this with though. Quick progress picture.
-
I like this idea. Maybe shorten the deck a little and give the bodywork little angle upward at the rear. I think it would help the proportions a lot.
-
Wow Greg, that took a big pair to cut that up. Looks good though.
-
Very nicely done. Seems like it needs a right front flat tire too...
-
Thanks to AMT/MPC
68shortfleet replied to oldcarfan's topic in General Automotive Talk (Trucks and Cars)
I too would really like to see the 70's Datsun pickup and the original issue Dodge on the shelves again. -
Revell 60's Drag Master Parts Pak Retro Drag
68shortfleet replied to Dennis Lacy's topic in WIP: Drag Racing Models
Very cool, though I would be tempted to narrow up a car body to put on it. Like the tub for a 27 turtledeck maybe.. -
AMT '40 Ford Sedan Box Art Build - Update 12-20, Box Art Pic
68shortfleet replied to Bernard Kron's topic in WIP: Model Cars
Excellent work on the decal sheet Bernard. Glad I was able to help. -
AMT '40 Ford Sedan Box Art Build - Update 12-20, Box Art Pic
68shortfleet replied to Bernard Kron's topic in WIP: Model Cars
That's going to be a cool build. I have the right side capped header if you can find the left side. I also have the original decal sheet, but it has a tire burn on it that hurt the two decals on the bottom right as viewed in your picture above. -
AMT '40 Ford Tudor Hot Rod Next Up? Maybe...
68shortfleet replied to John Goschke's topic in WIP: Model Cars
Looking good. I just had this kit in my hands a few hours ago while looking for my next build. -
Little more progress, made motor and trans mounts, squirted the frame flat black. and for some reason I don't like it anymore. Maybe this one is supposed to be white? Stole the Hemi from the other gluebomb rebuild on my bench. I built generic motor mounts that fit all the generic motors that came in the AMT 32 Ford kits for years. They will work for this build. Certainly more detailed offerings out there, but I don't need that for this build. Threw on some generic wheels/tires, pretty sure these won't be staying though.
-
Lookin good Greg
-
Thanks guys, hope to get a bit more done over the next few days.
-
Excellent work, just might have to copy some of it.
-
Really like where this build is headed. Just the way I like them, extremely low.
-
Here is another rebuild of a AMT roadster. I originally build this kit in the early 80's. It got a brake fluid bath about 13 years ago and put in a large baggie for a later date. Well, that time has come. I wasn't the best body to work with and i really saw very little reason to try very hard on it when the new revell bodies are so much easier to work with. Anyways, i have had an idea in my head to channel a full fender car. And this rough old body seemed like just the ticket to start cutting on. It just is not turning out like I had imagined though. Not stopping yet though, thinking the gray color might be part of the problem. Hemi is straight out of the parts box, haven't even washed the dust off of it yet. Might not. I have chopped a grill shell and 34 commercial grill too.
-
So for my return to the hobby, I finished a decent looking channeled 32 roadster. Next up was to see what I could accomplish with possibly the worst gluebomb in my parts box. I believe it to have started at a Lindberg 34 Ford, but maybe not. I originally got this kit in the late 70's maybe early 80's. Anyways, it looked terrible. I got the hood carved off of it and the floor removed. Still have not got one of the seats off the floor. The visor area of the cab was a disaster, with the visor completely missing and the windshield frame extremely cut on. I had to improvise a lot to get a windshield shape back, and forgo the visor. There is still visible glue(lots of it) on the interior cab back that can be seen in the picture. No idea why a glue tube was ever near this area, but I'm the one that did it as a child. Once I got the body reasonably cleaned up, I could not envision what to actually build with it, so I chopped the top. Now I have ideas of what to build. I also made a styrene firewall that I mounted to the backside of the firewall, probably need to add some detail to it. Also have a new styrene floor started and a set of parts box seats picked out. I do not have the bed to this kit, so it is getting some kind of exposed fuel tank over the frame rails. Have a tank built, but not sure i am happy with it. Then the frame, I had a few stock style frames I could use from Lindberg and AMT, along with some suspension pieces. But none of those frames allowed the ride height I was imagining. So, here is my first attempt at a scratch built frame, with some suspension parts from(I think) a AMT 32 Vicky. Here is one picture to give an idea of where this built is headed, not sure exactly what wheel I will end up with, but I know the tire height, so that allowed be to build suspension mounts. I'm not sure what motor it will get yet, but I have several parts box specials that would fit the build.
-
BK, the front axle location is stock. Lowered by the Tim Boyd method I think(I've never seen his article though). The grill shell actually needs to be a tiny bit lower to be even with the cowl, but I'm not fixing that now. So, I'm actually surprised that it looks as good as it does. The rear was also lowered a lot with the removal of the "airbags" and modifying the coilovers.
-
Return to the hobby warmup, 32 roadster
68shortfleet replied to 68shortfleet's topic in WIP: Model Cars
And this one is all finished up. Feel free to see the under glass thread. http://www.modelcarsmag.com/forums/topic/107039-32-roadster-warmup-build/ -
Well here is a quick build to get myself back into the hobby. Had not build a kit in about 13 years(also a Revell 32). Thought that a kit that I had done before would be a good warmup. It really isn't anything special and we've all seen plenty of Revell 32's, yet they never seem to get old. Everything is out of the Revell box except for the license plate decal. The decal in the kit doesn't fit the license frame in the kit. I channeled the body over the frame and widened the kit rear axle(not enough either) so the tires would clear the body. Body paint is Model Master Olive Drab(1911) with a Model Master Clear Top Coat(2936). All other paints were either generic Testors or Model Master bottles that I have had for years. Biggest annoyance with this kit is the decal for the dash guages. It shows 13.6°F and 186 volts. Seems like that would be a simple thing to get correct.
-
Return to the hobby warmup, 32 roadster
68shortfleet replied to 68shortfleet's topic in WIP: Model Cars
Quick mock up picture. I am liking this color in gloss. Tried something new and rid it of a lot of "chrome", and painted the windshield frame, license frame, taillight housings, headlight housings flat black. Now I cant decide if maybe I should have used gloss on those too. But I like the look of the black on those parts so far. Also like the ride height I ended up with. I am having issues getting the wheels to fit the spindles. The rears are really sloppy, but the fronts won't even go on the spindle yet. Feels like I am going to break the front axle trying. I think I am going to dip the spindle in purple power to get rid of the chrome and hope the diameter is reduced just enough that the wheels fit properly. So, in this picture, everything is just propped into place, like the windshield frame, grill shell, front wheels not snapped onto spindle, body just resting in place. And to top it off, this project has been boxed up for a few days. Off to do the head gaskets in my daughters Subaru, so I need the workbench space. -
Yah, I think you pretty much nailed the image in my head. Car is looking good too.