Kmb0319
-
Posts
468 -
Joined
-
Last visited
Content Type
Profiles
Forums
Events
Gallery
Everything posted by Kmb0319
-
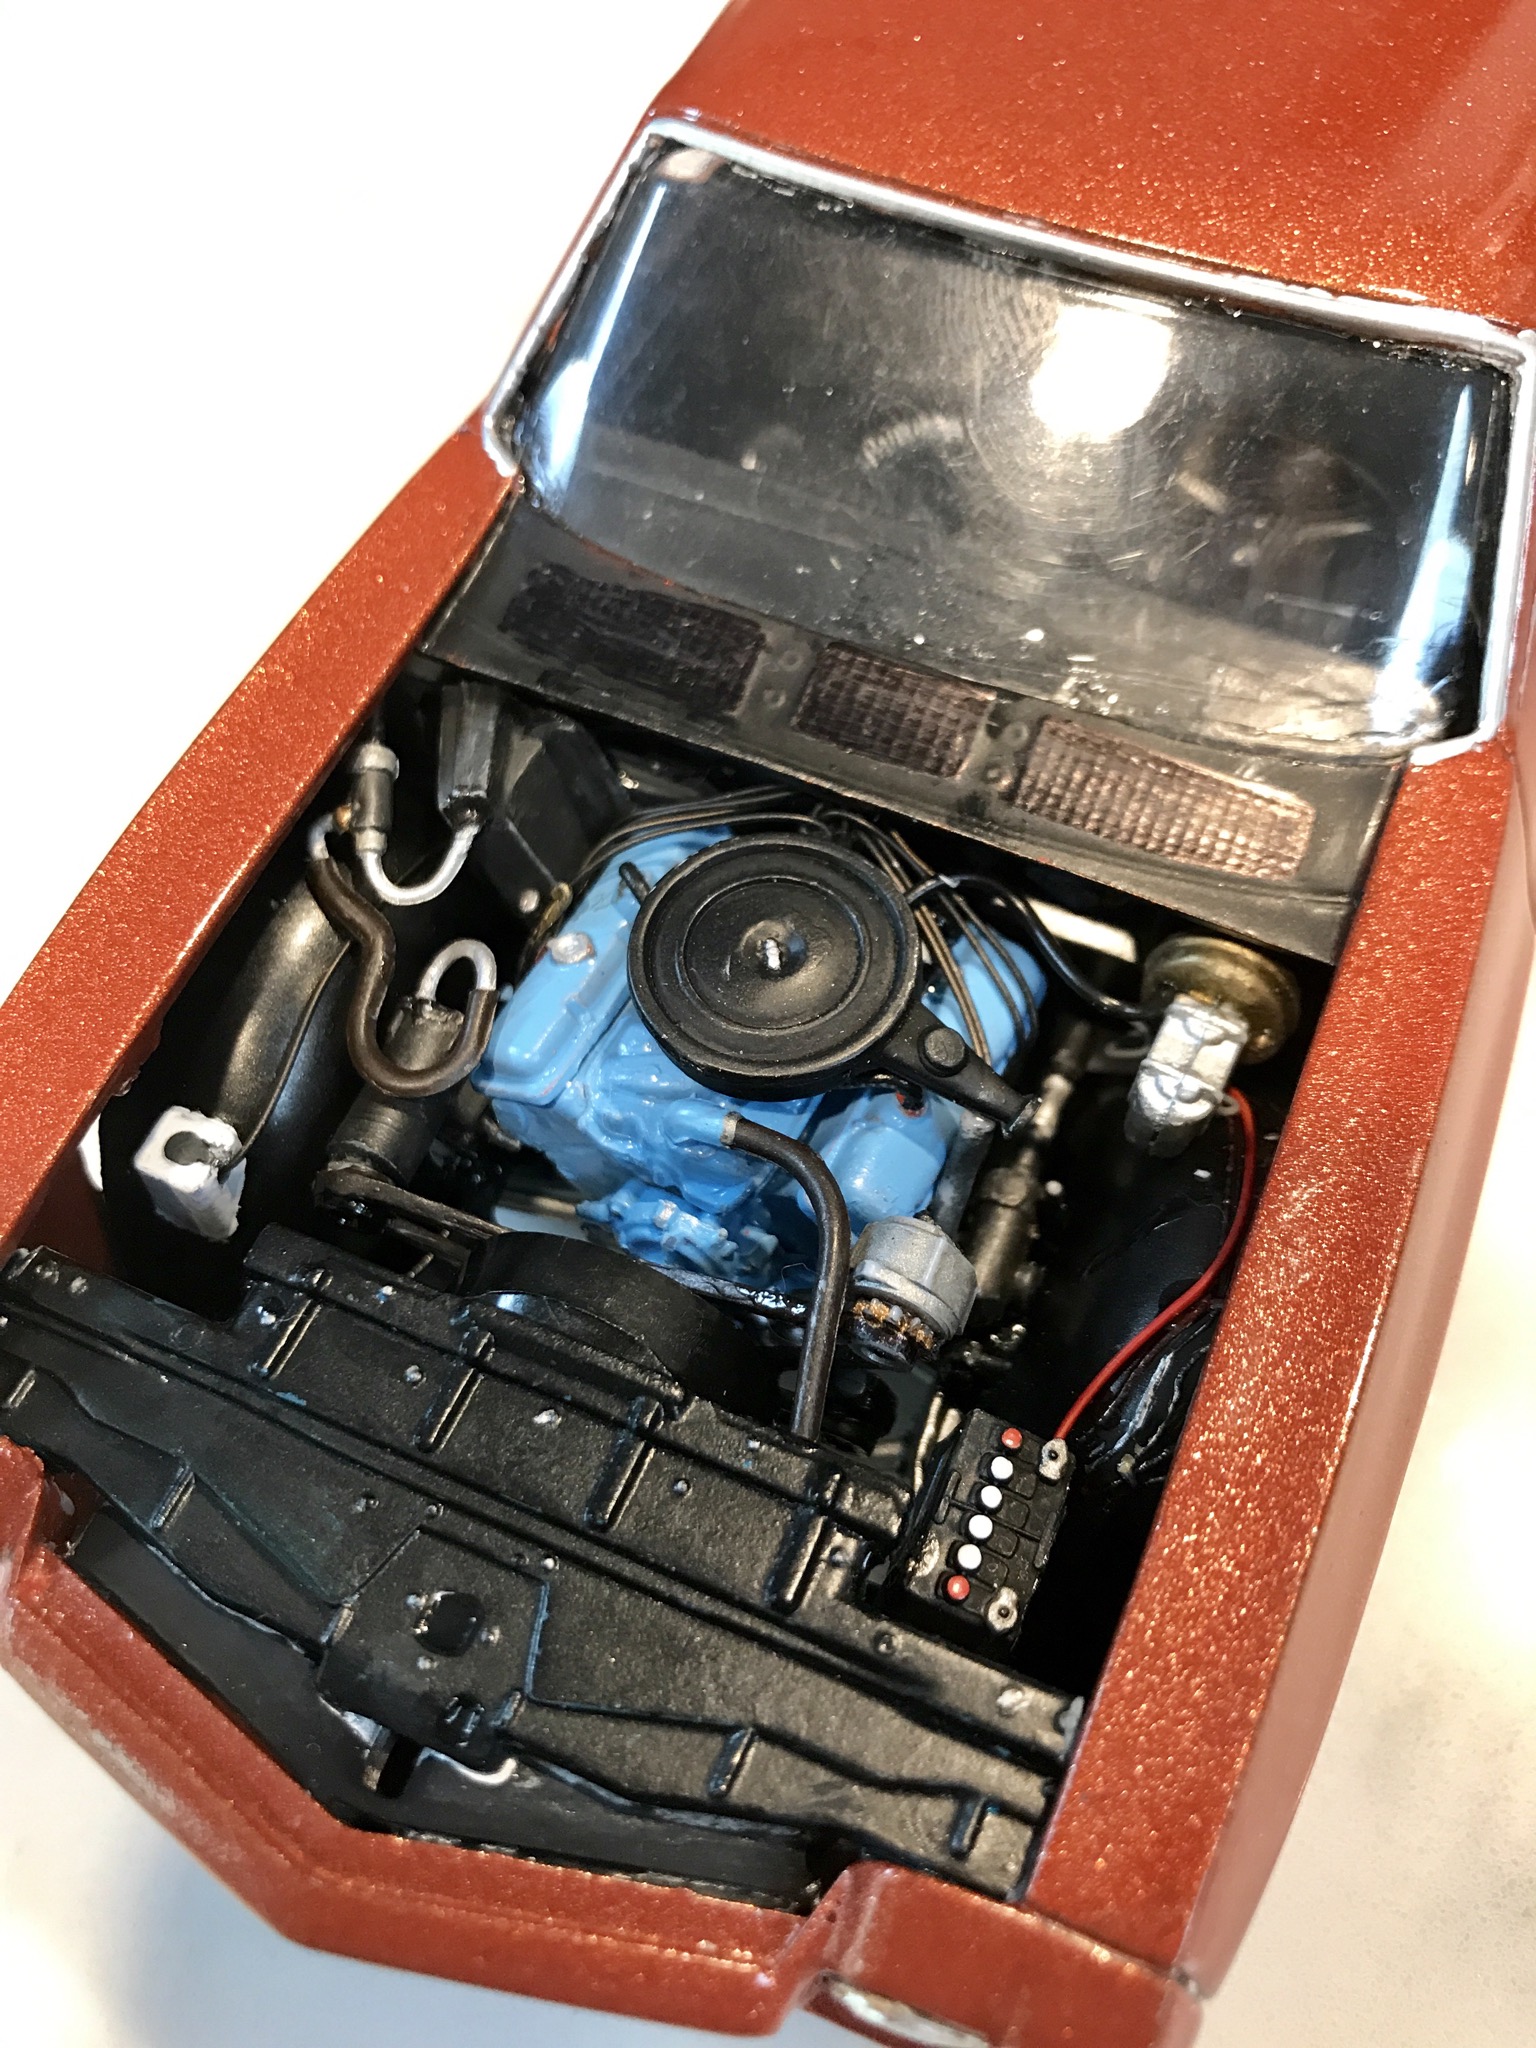
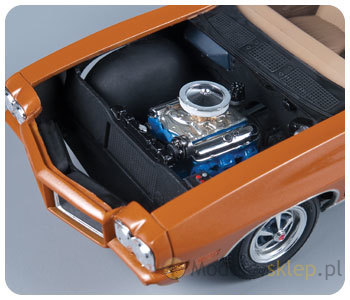
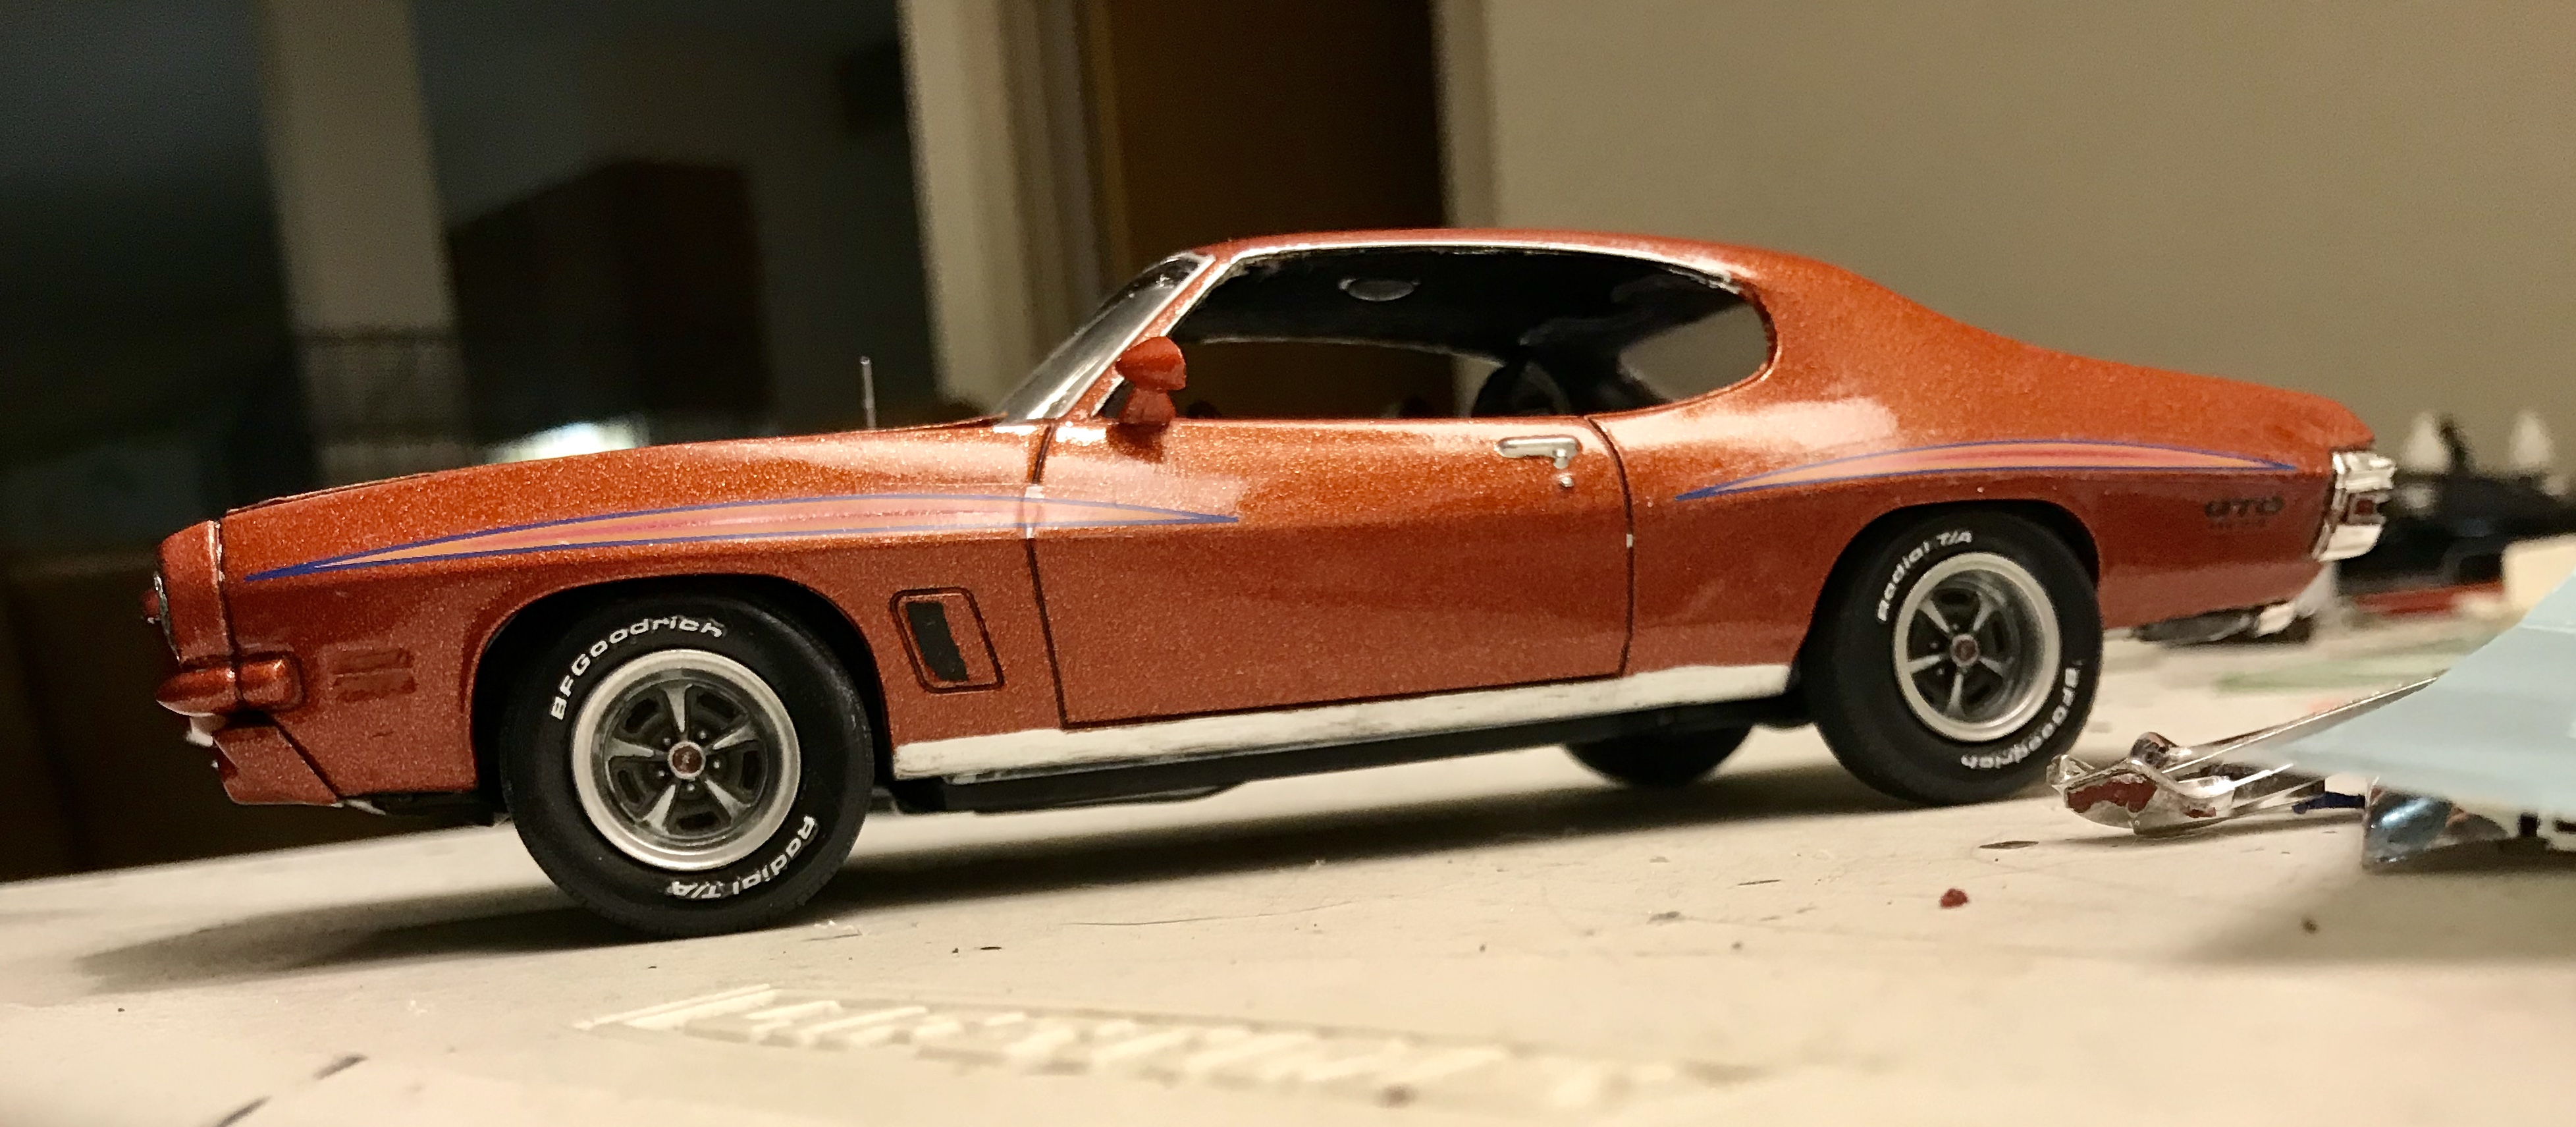
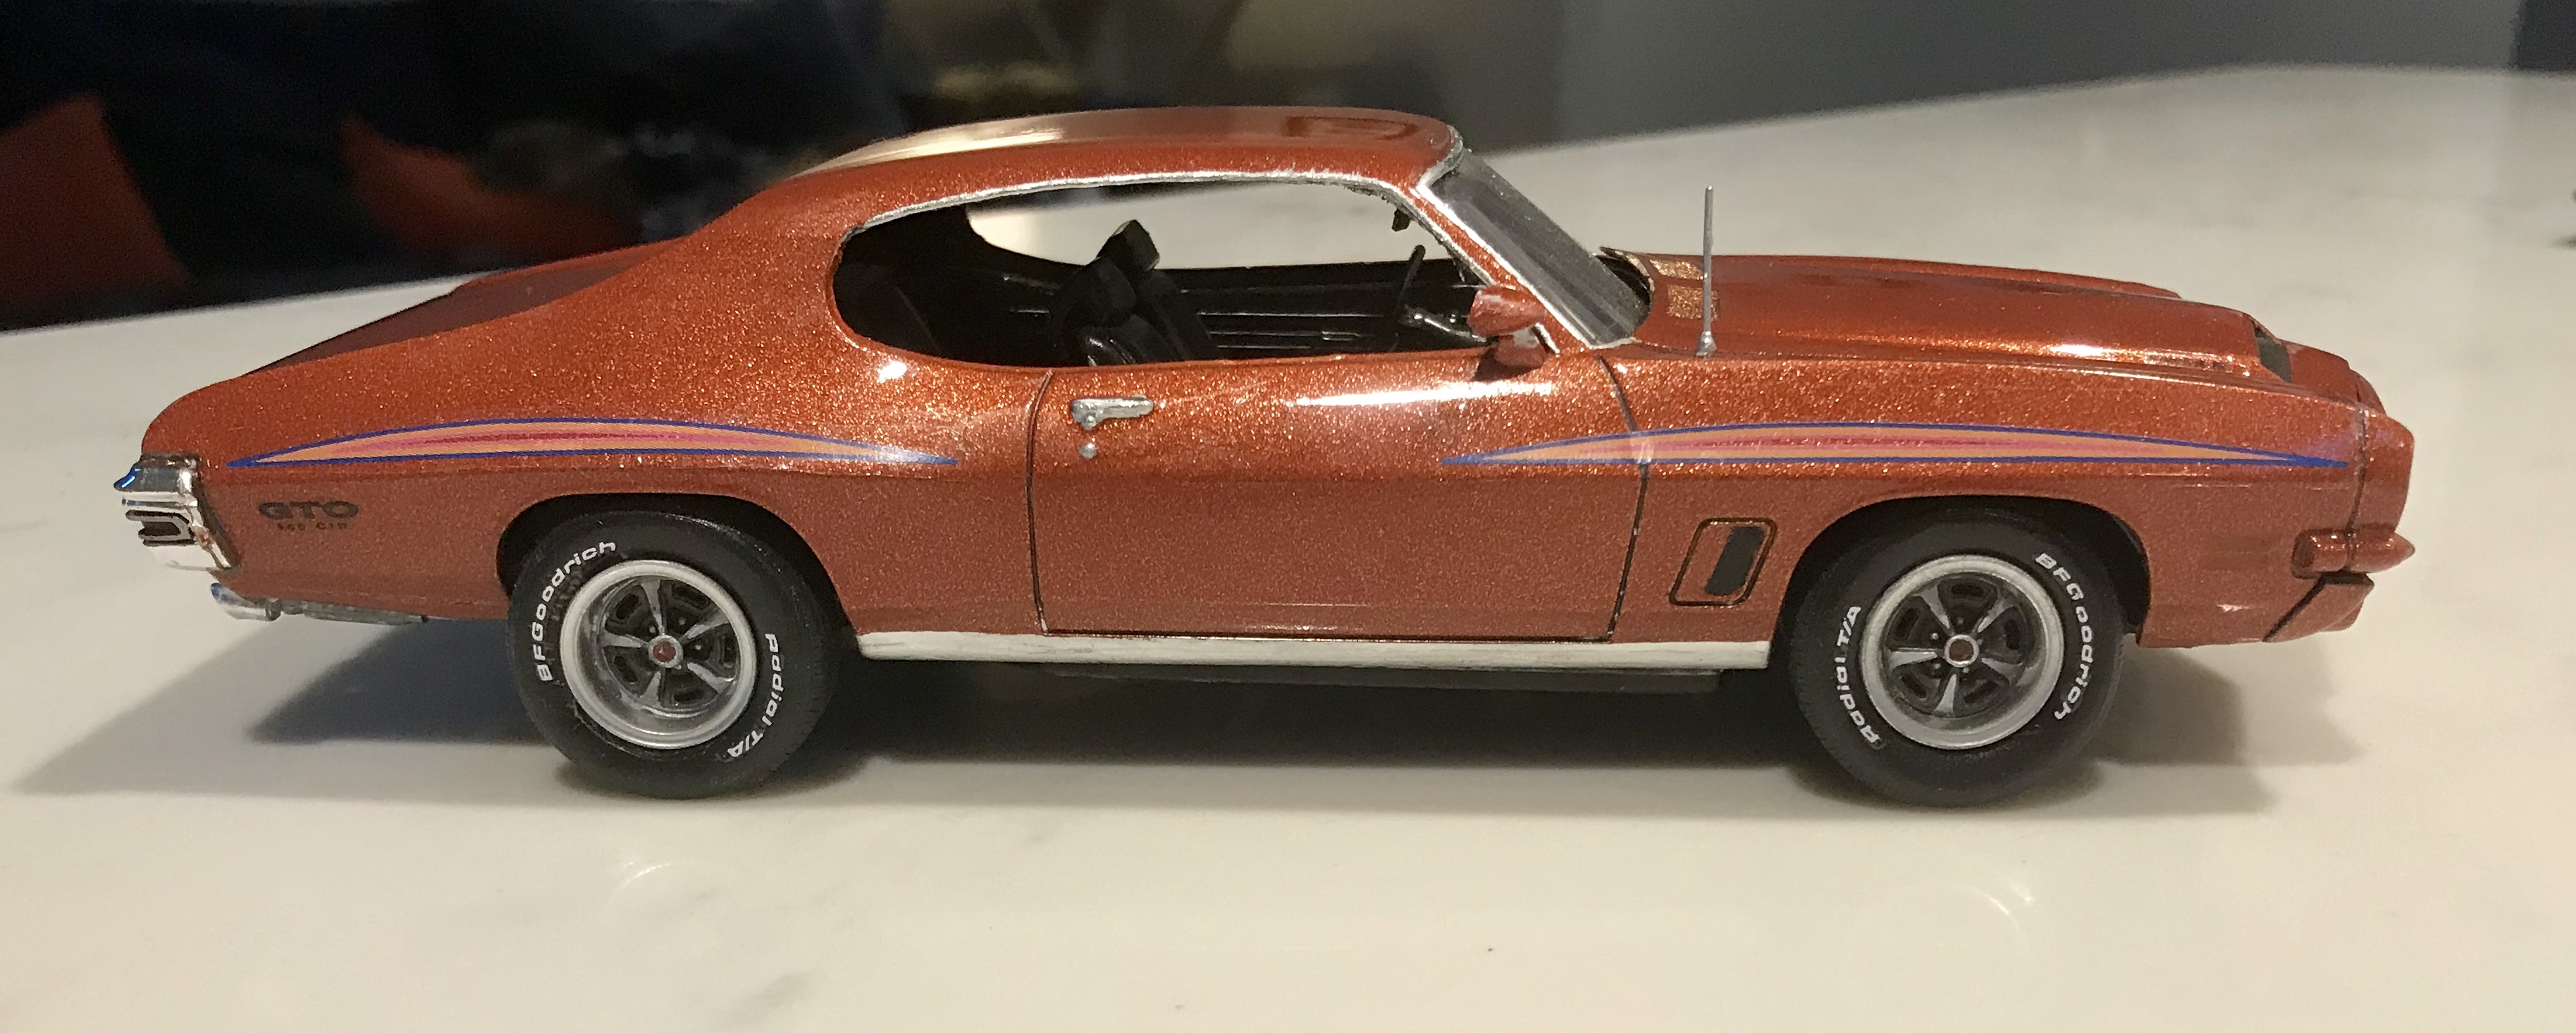
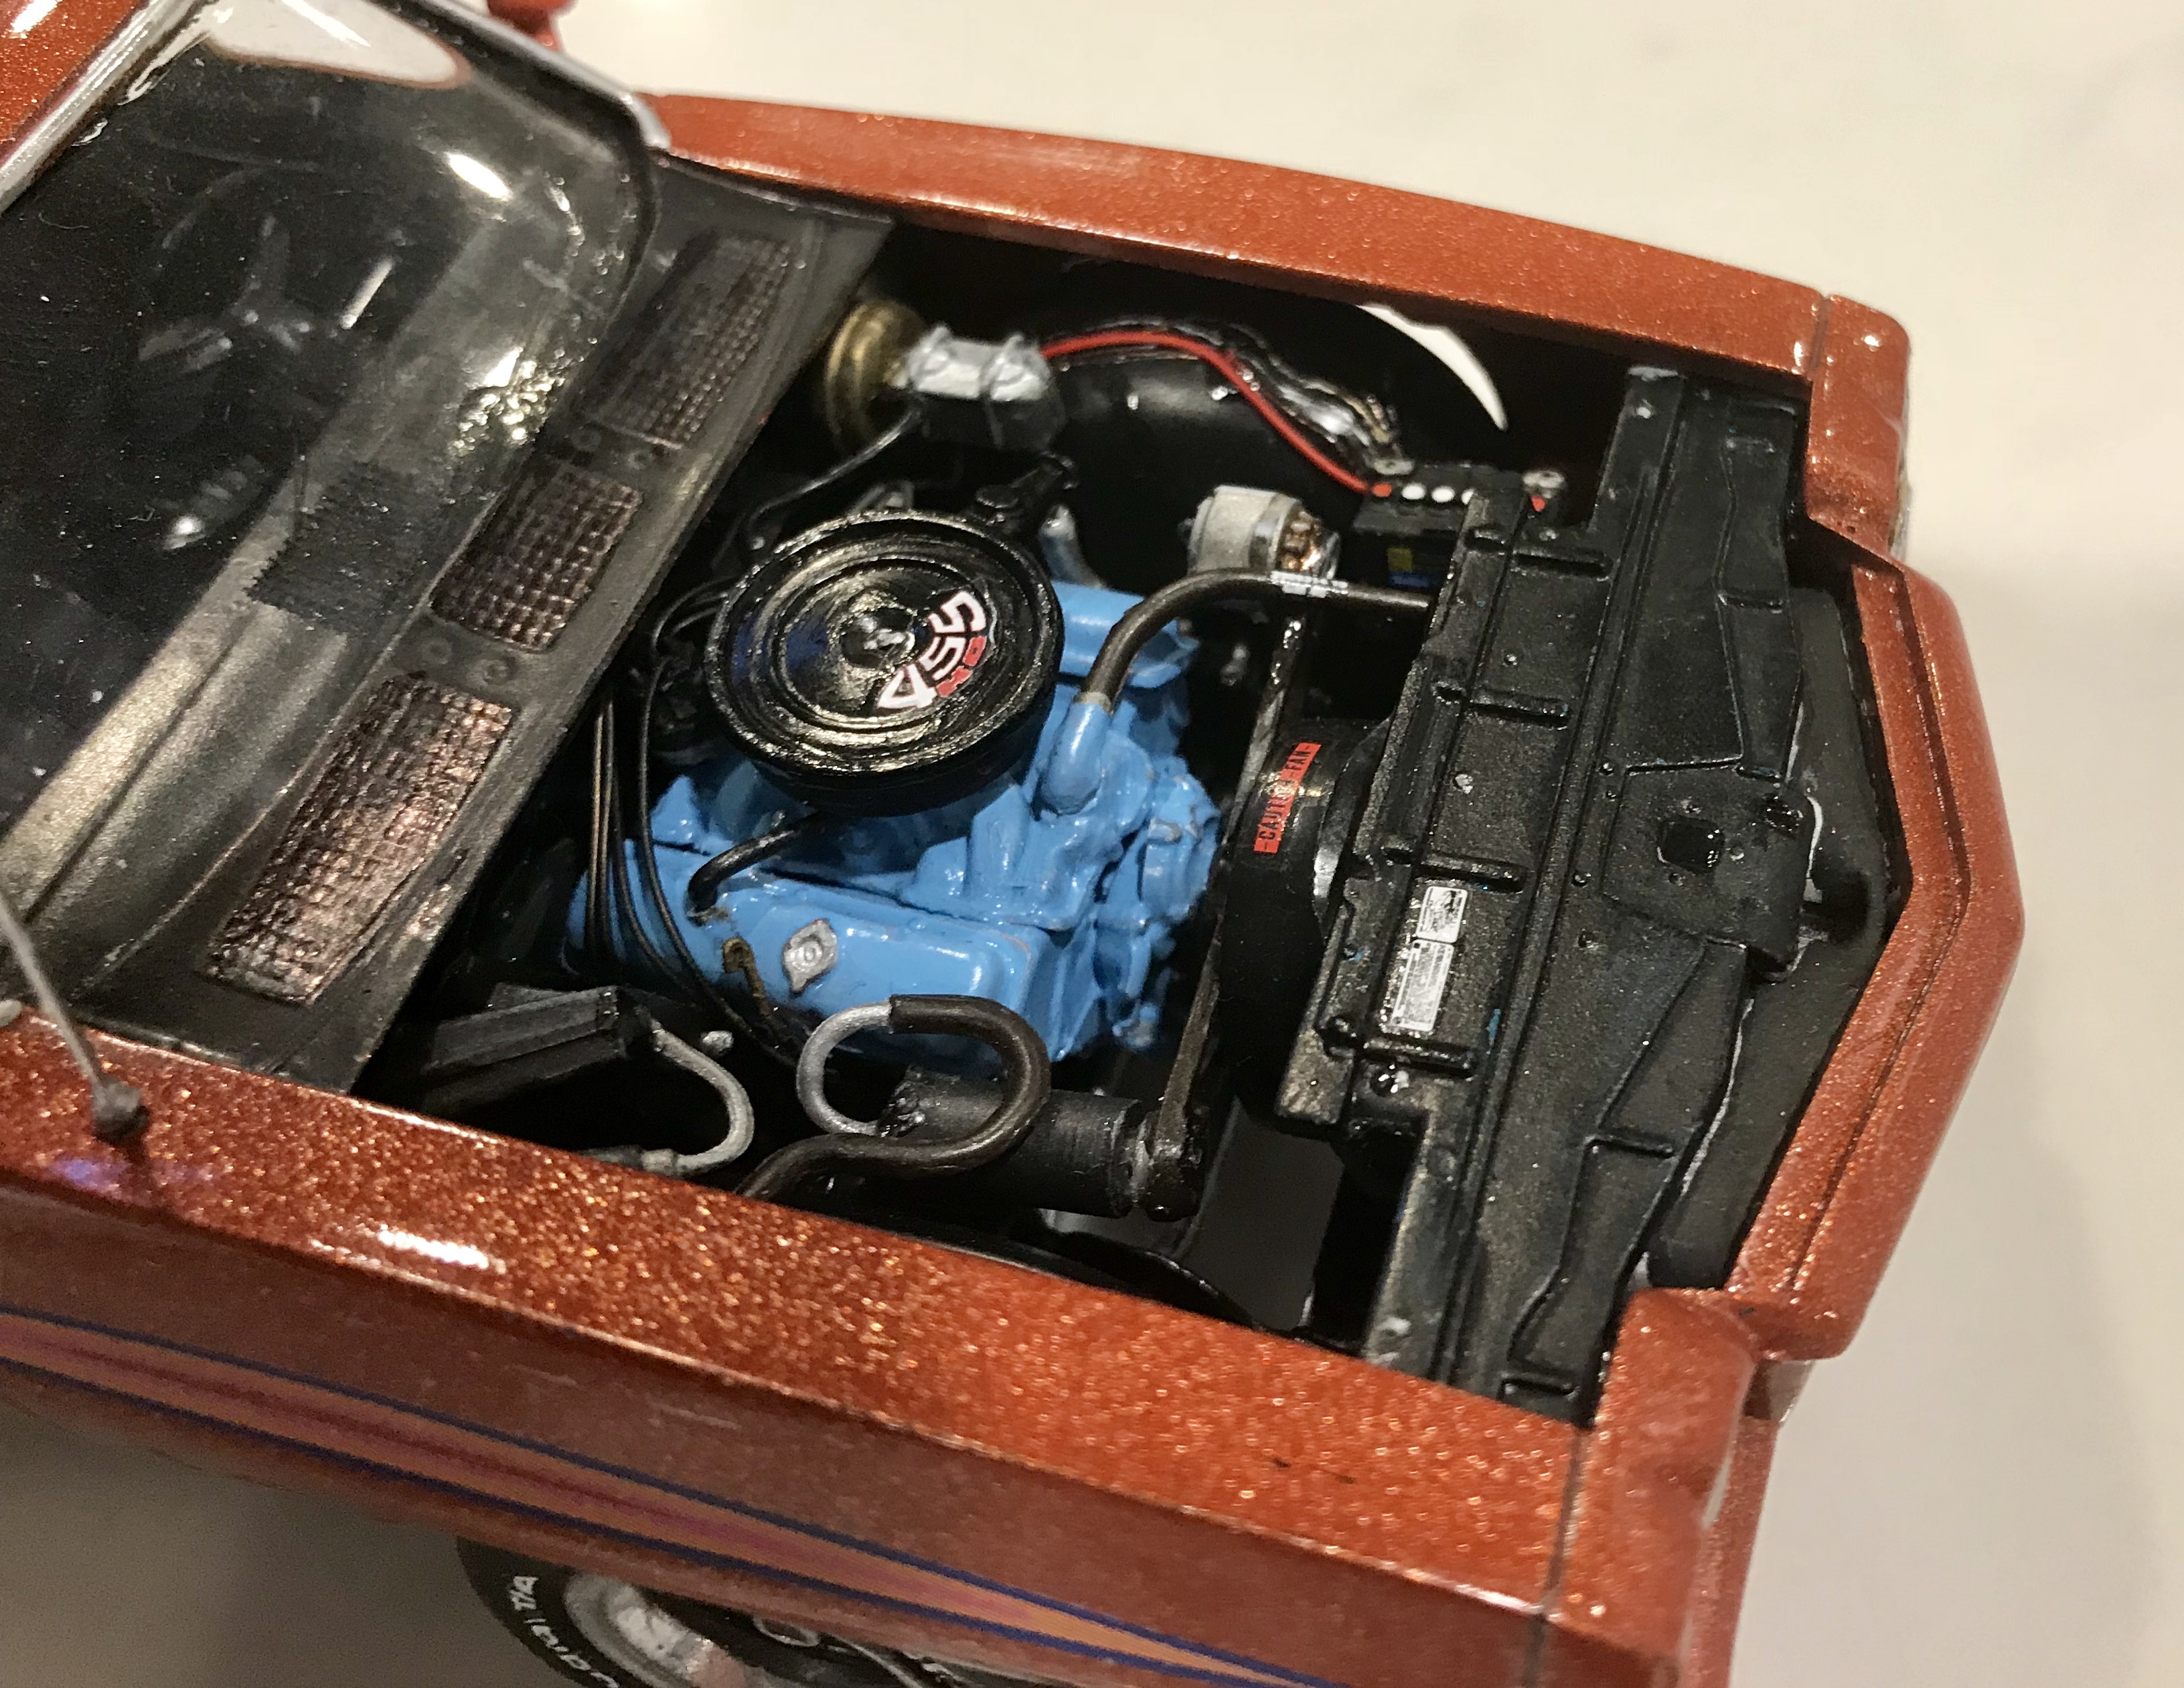
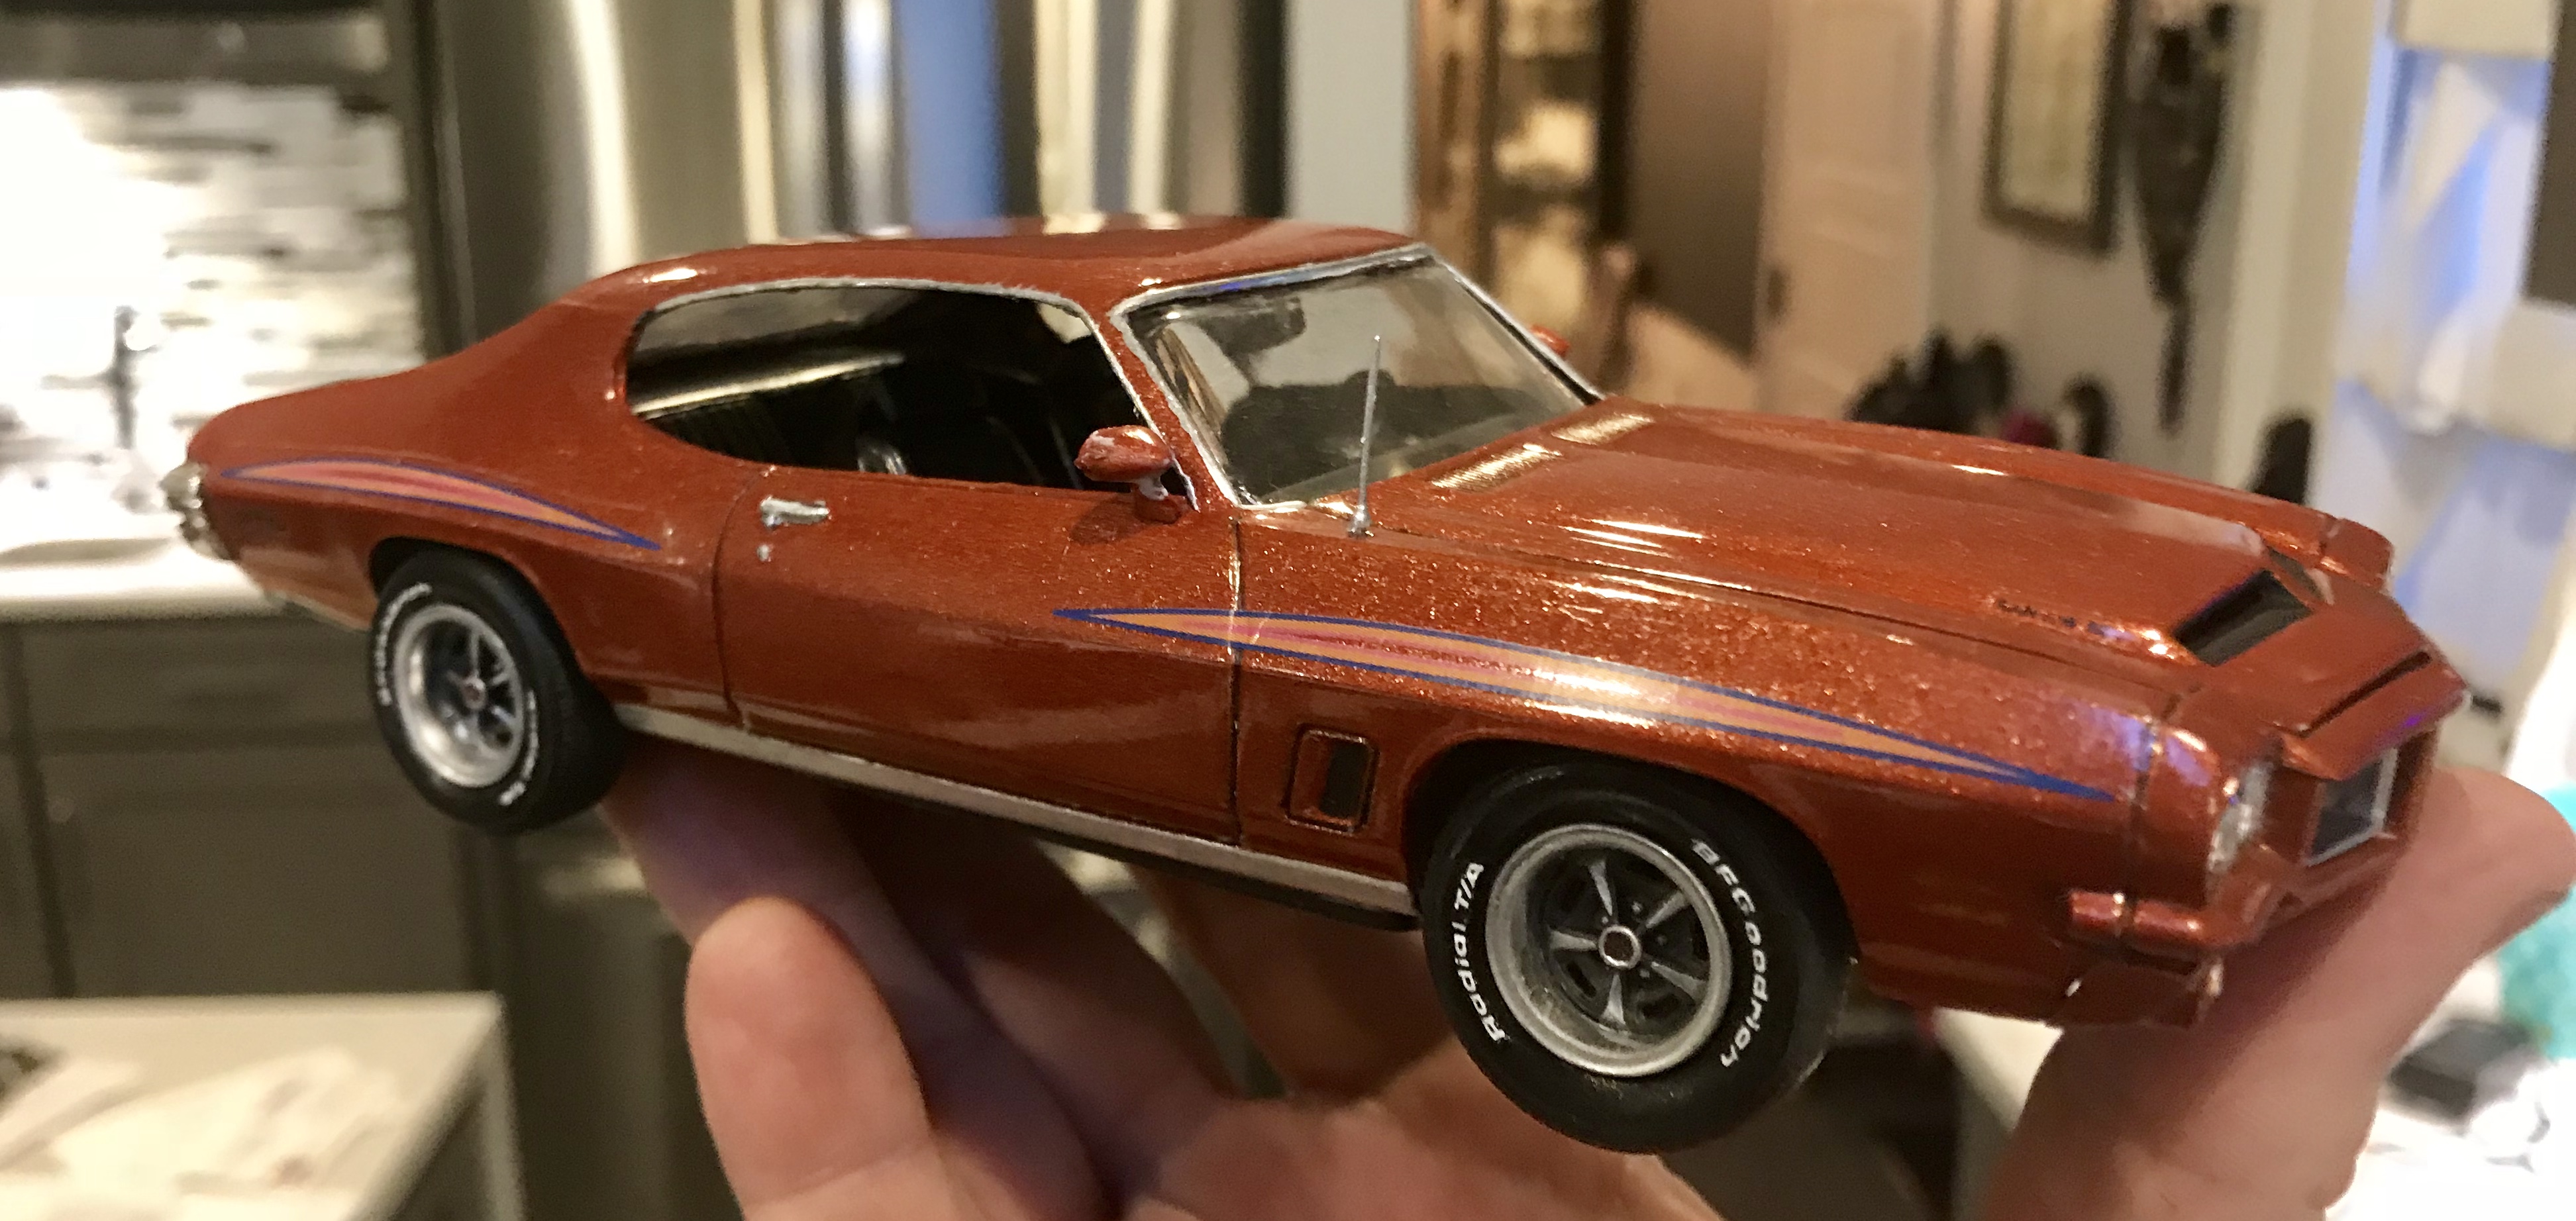
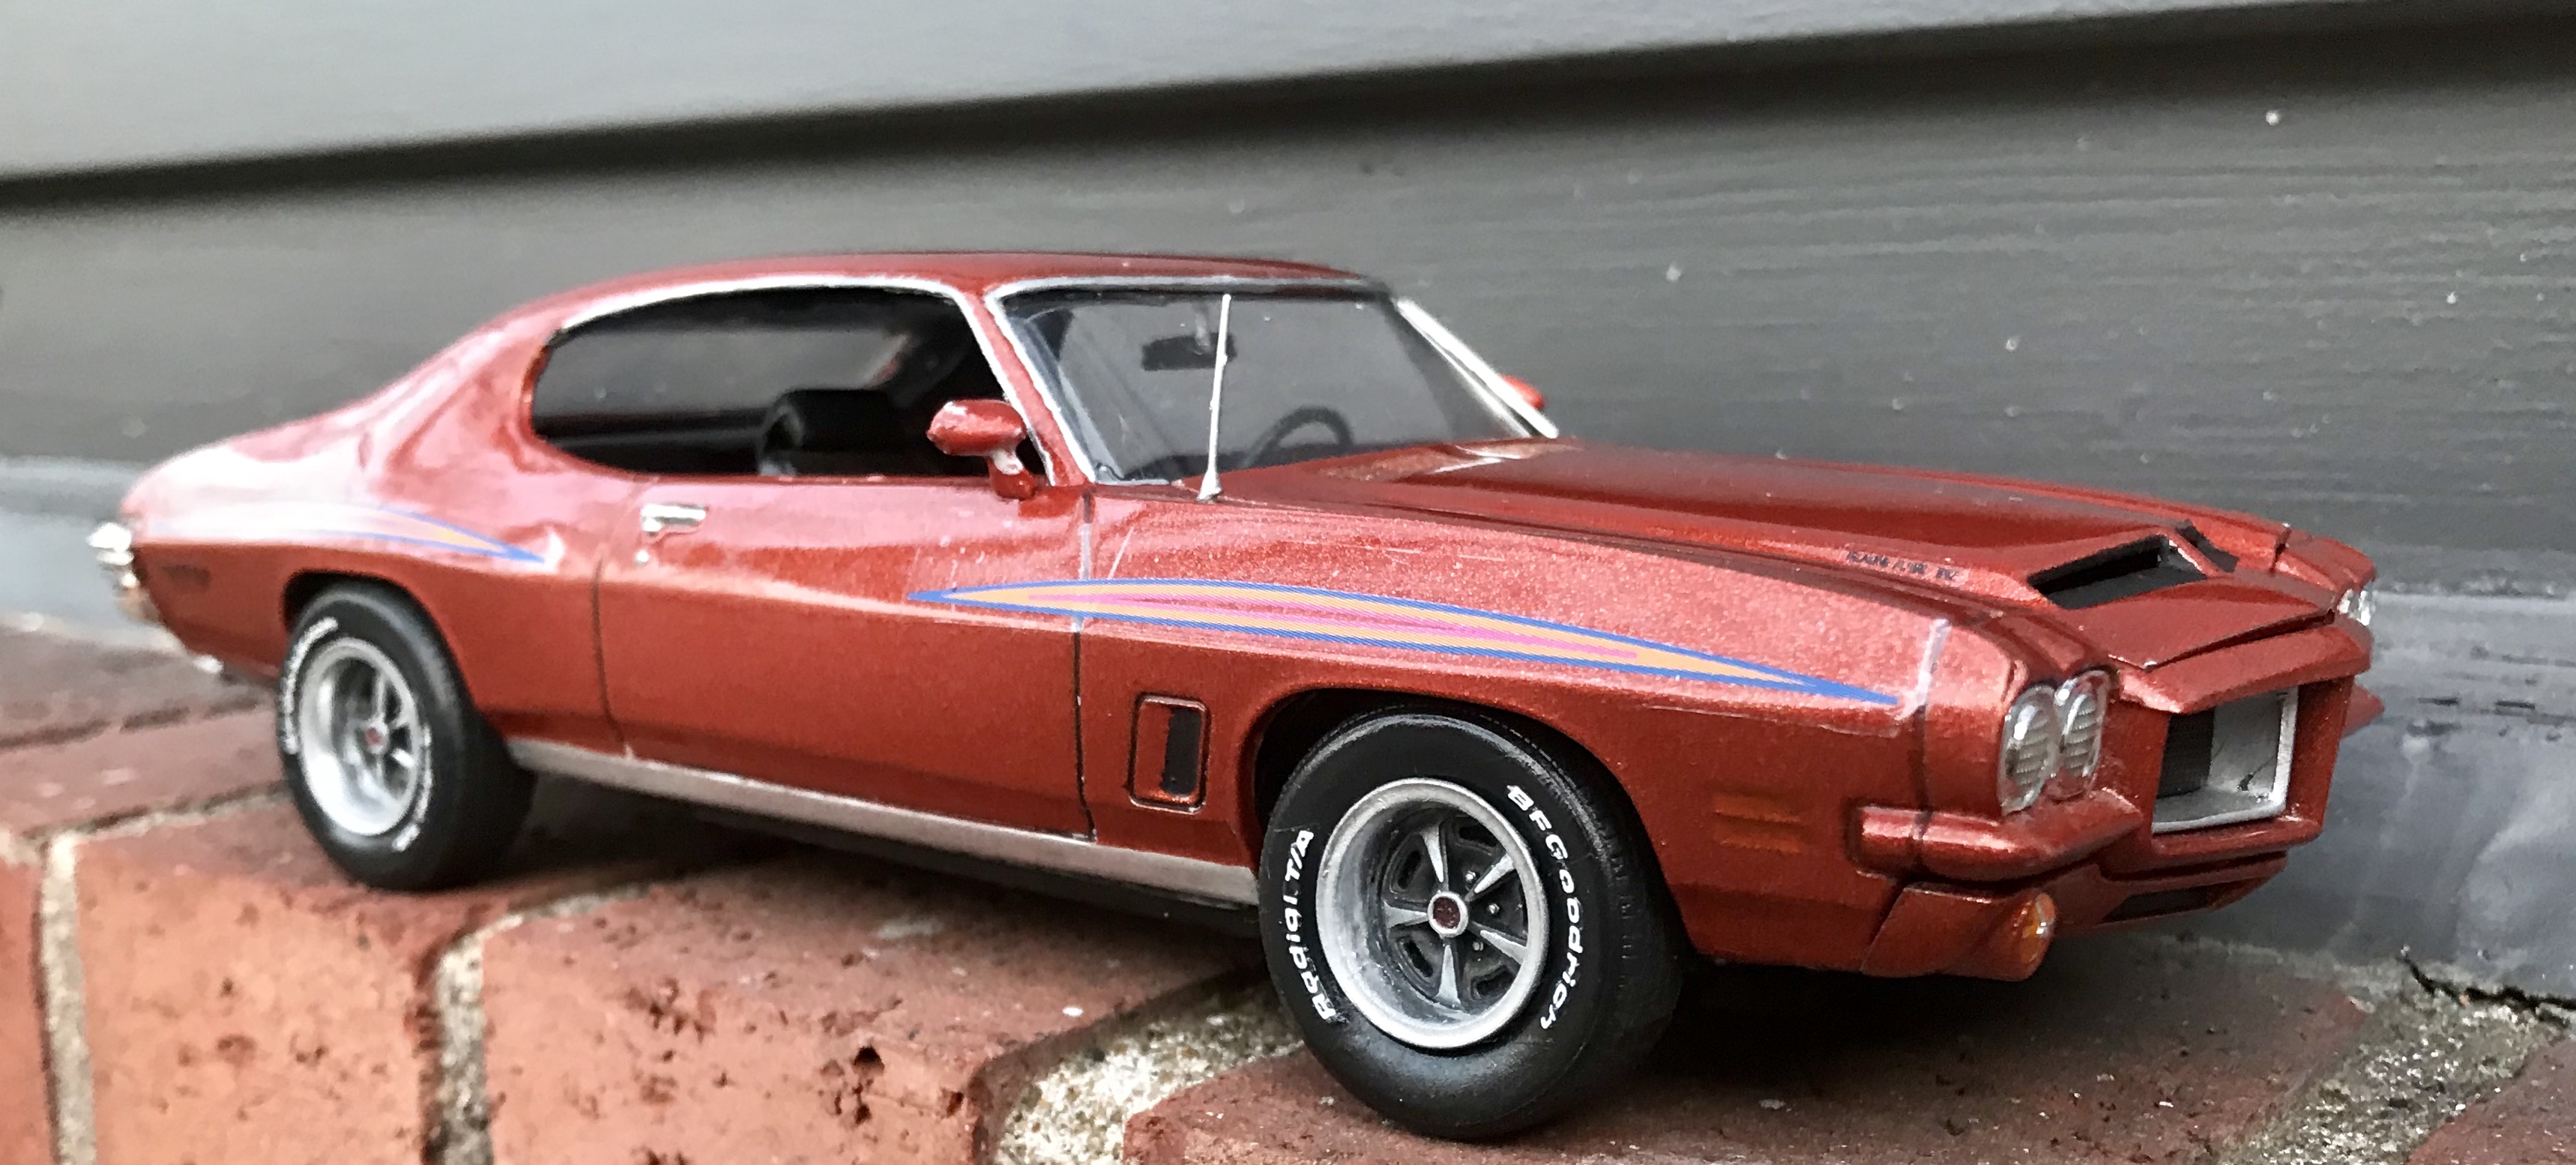
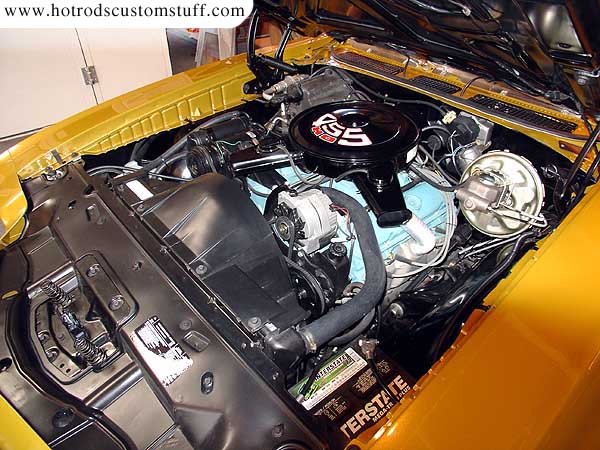
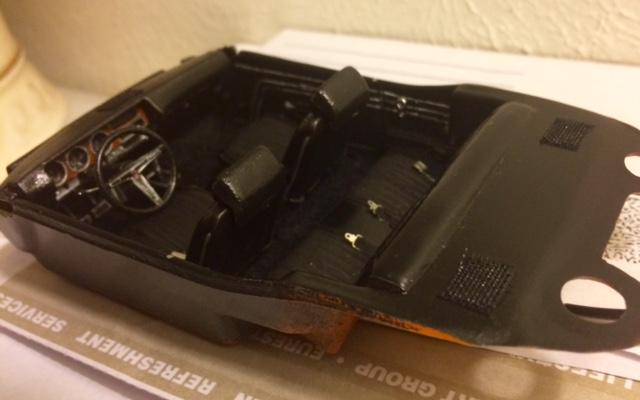
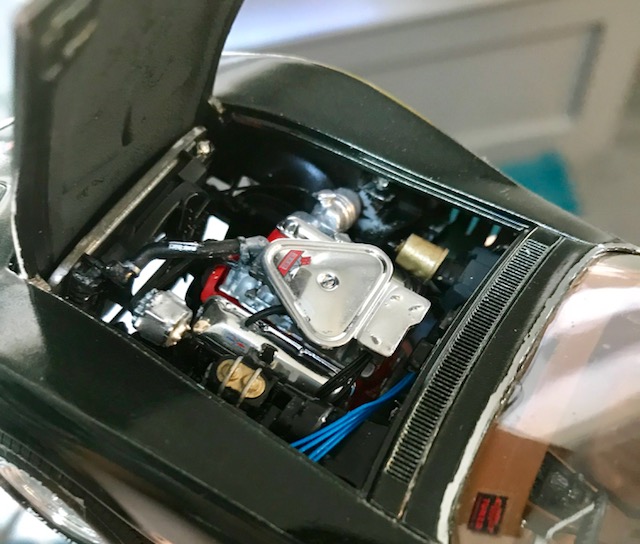
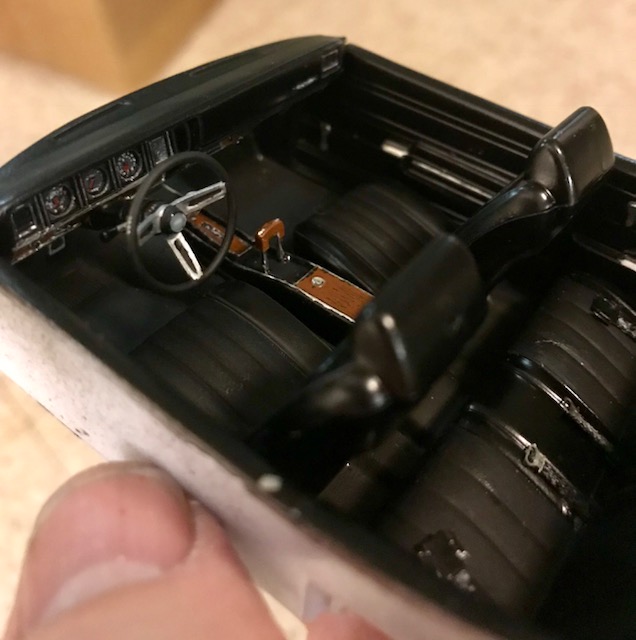
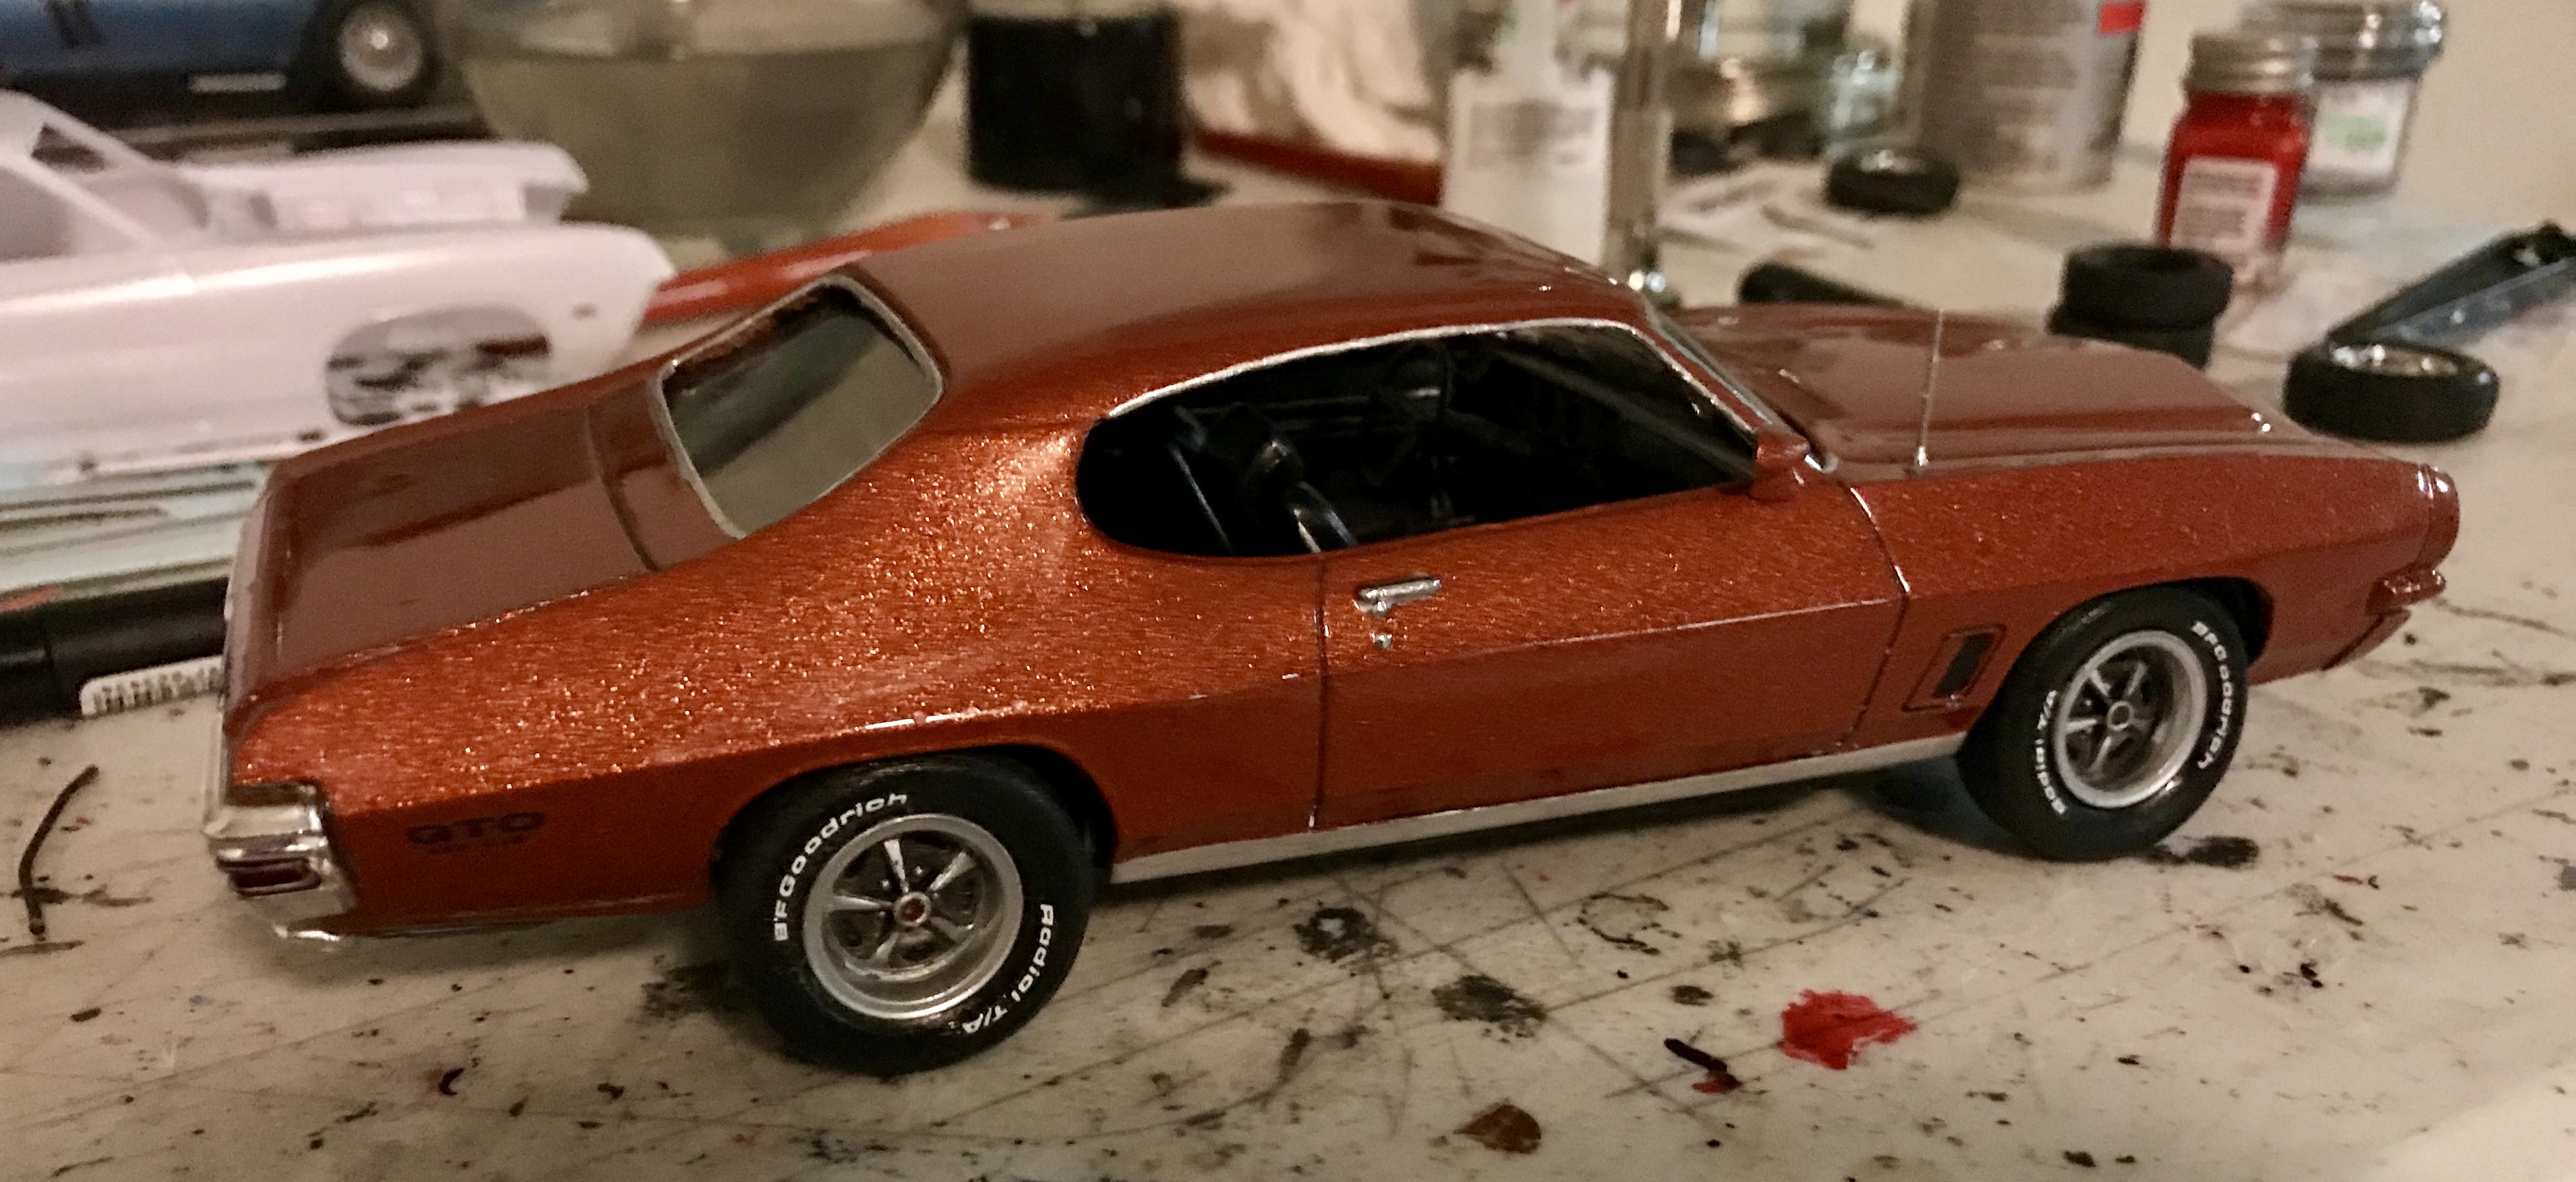
 Well, this was a P-R-O-J-E-C-T. I was talking cars with one of my best friends in the summer of 2016, when he told me his favorite car of all time was the 70-72 GTO. I knew there was a model of one, but I was also aware that it is easily in the debate about the worst model ever made. Still, I went and bought it and figured I’d take some time and try to make something out of this hunk of junk. Since this kit lacks any detail, I also bought the AMT 69 Hurst Olds to get a better chassis/suspension. Let’s just say that wasn’t enough... in the end, there are parts from at least 7 other kits in this thing, plus aftermarket stuff.... hence the name. I did have some grand plans initially to get more detail parts than I did, but I didn’t want to have $150 invested in one build. As this kit is severely lacking, each part of the build was its own project: Chassis- I used the chassis from the the Hurst Olds, exhaust tips from the AMT 69 Chevelle, 2-piece Pontiac rally wheels from Model Roundup and BF Goodrich tires from Fireball Modelworks. Interior- I did a lot here that I won’t post photos of on this thread, but I have a large WIP if you want to look it up. I originally planned to purchase some photo-etched window cranks and other pieces, but in interest of costs, just detailed the faintly scribed trim As best as I could. I found some good decals for the gauge faces, found a better looking shifter, tried making a headliner out of a dried baby wipe, made a turn signal stalk out of a shirt pin, flocked the carpet, and cut small pieces of screen to make speaker covers and the center dash vent. It’s not perfect by any means, but certainly is a more realistic representation: Engine: Well, this took a LOT of work. From the box art, this is what under the hood looks like: This is a photo of what an actual engine from a 72 GTO looks like: Just a little different... ? I started by taking some advice from my WIP readers and bought the Revell Pontiac 421 engine. That didn’t give me much more than a block. Valve covers came from the 69 Chevelle kit, belts from another kit, heater box and a/c from the Revell 65 Impala. I raided my parts box, cut lots of hose and wire, and even sawed the front radiator shroud out of the 69 Cutlass body. I got a little closer to the proper look: Then, all I needed was my decals to arrive: Body- And here lies the biggest problem with this kit... the rear bumper that’s far too wide for the body. I was too afraid to cut the bumper, and wasn’t confident I could get it straight if I did. I thought about trying to insert some sheet styrene to widen the trunk, but decided to go a simpler if less convincing way. I cut both sides of the trunk and spread the rear fenders to better reach the ends of the bumper. The gaps are way too large, but it will have to suffice. The paint is Testors Fiery Orange with Mr. Hobby clear. Unfortunately, I had a really flawless finish until I was trying to get the bumper on, when some Krazy Glue ran through the large trunk cracks and settled into the paint. Outside of that, the antenna and rear view mirrors are from the parts box, and I got the Judge decals from Keith Marks. I wasn’t working on this continually, as it sat for long periods waiting until I could purchase the next pile of stuff I needed to make this thing worthwhile. It was a fun project, but one I’m glad to have finished. I’m putting it in a case and taking it to my buddy. I think he will like it, so that’s all that matters. There are a few things I wish had come out better, but a lot of work and extra detail, including a few things I had never tried before went into this, so it was a good learning experience. All in all, not too bad for a really bad kit. Hope you like it and thanks for looking!
-
Bill, you’ve completely taken over Under Glass this weekend, and I LOVE it!! All great builds, but this one just has something extra in the stance, colors, subject... it’s my favorite. I could repeat this on each post other than the favorite part. GREAT WORK!!!
-
I’ll be watching for that one!!!
-
Thanks Ron!! Funny, when I researched, my top two colors were burnt orange and red. Burnt orange was my favorite, but my Testors Fiery orange was a little too light, and I didn’t think I could truly replicate the color without ordering a $30 can of automotive paint. This was my favorite picture:
-
Thanks!! There is something ever so slightly off... I wonder if it might be a tiny bit short, because while everything looks right, it seems a little stubby compared to 1:1 photos. Anyway, the green one was painted with automotive paint from automotivetouchup.com. It’s Pontiac Verdoro Green.
-
It’s Testors Model Master 2945 Turquoise Metallic.
-
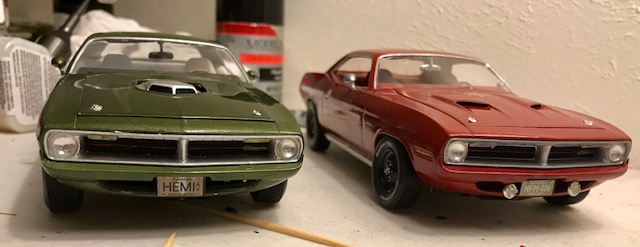
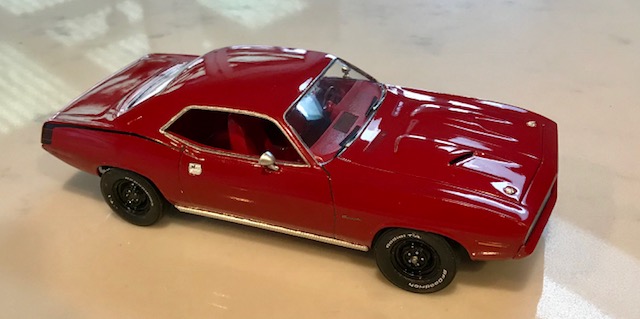
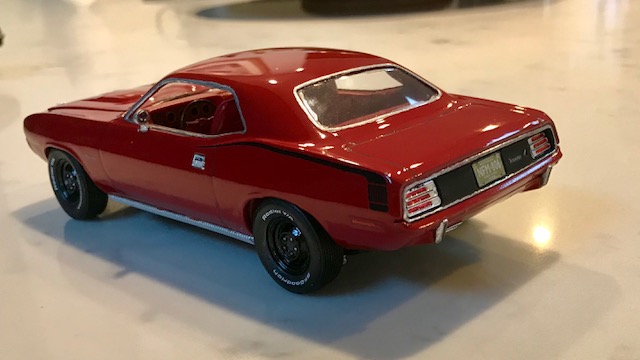
When I got back into building, one of the first kits I had to do was the brand new Revell 70 Hemi Cuda. Like most people, I didn’t understand the horribly overdone fender lips, but outside of that, this is one of the best kits Revell has ever produced. The fit is precise, things like rear view mirrors and glass installation are engineered better than others, and detail is fantastic. So, still having my original build holding a place of honor on the shelf, I decided to do one more. I wanted to change it up a little this time, but keep it stock. I used the shaker hood on the first build, so this one had to get the other one. It’s an imaginary dealer special order sleeper, I guess, although I shouldn’t have used the hockey stick stripes to really be a sleeper, but couldn’t resist. When I researched, I was surprised that the color that struck me most was red. I’m generally not a fan of basic red.. I’ve built 5 Ferraris, and none are red.. but it just looked right for this. Of course, I finally build something red, I have to go all out, so it has a matching red interior. The engine is wired as usual, but in a new way. Having two kits in process and only 1 spare pre-wired distributor, I tried something new: I glued my plug wires into the heads, then trimmed and glued them to the kit distributor. For the ignition coil, I snipped the tip off and drilled it to glue a wire in. Finally, I used the nice Chrysler Rally wheels on the first build. The Rallys in this kit were donated to my AMT 71 Charger to give that some better rims, and this got some steelies that I painted black. Paint is Testors Flame Red with automotive clear. The hemi Dash/Interior Dash/interior (WHOA, that's a lot of red!) Finished: And, with the original: Thanks for looking!!
-
Post moved
-
This was my high school/college ride... you’ve done a beautiful job on it, and the Rally’s and Polyglas are a HUGE improvement. Awesome job!!
-
I mean, c’mon.... that’s like Van Gogh showing up at an art show and saying “sorry, guys, only got two paintings done this year.” Two more masterpieces for us to aspire to. I’m still looking for that paint tutorial... can’t get to that issue of the magazine!
-
Thanks guys...Disco, there’s no clear on this... just 2 coats of black paint. Sounds like I need more paint, but I’ll have to buy some more Duplicolor black, as I think some of the orange peel is the can is almost gone and losing pressure. But, I’ve had a lot of trouble cutting through Duplicolor paint, even with wet sanding.
-
I’m struggling with a paint job and thought I’d throw a question out to those far more advanced than I. I’m building a 70 Monte Carlo, and decided to go black on black, as it is the muscle car limo. I used my Duplicolor black, which has always given me solid results. I am getting near the bottom of my can, and had a very different experience this time. First of all, I usually get a very dull finish, which I can polish to somewhat shiny before I clear. This time, it came out like this: A little dark, but you can see the reflections in the roof and rear fender. However, it also had a lot of orange peel... looked great from a distance, but not so good up close. With the sharp corners at the tops of the fenders, I was worried about wet sanding, so I tried compound first. I used Tamiya coarse, fine and finish compounds, and it didn’t do much. So I got out the Testors polishing pads and did a full wet sanding... then hit it with all 3 Tamiya compounds again, using each compound twice and pressing harder than I should. I was actually worried about cracking the body. This morning, I grabbed the Meguiar’s Scratch-X and went over the whole body again, digging in as I polished. The paint feels smooth, and it looks amazing from a couple feet away. But this is my roof close up: You can see how much orange peel is still there. This has 2 coats of paint on it. Any thoughts on smoothing this out more? Do I keep polishing, add more paint or move on to clear? Or do I throw it in brake fluid and start over? This is a common issue for me... I polish over and over, and nothing seems to cut through Duplicolor finishes. Thanks and happy new year everyone!!
-
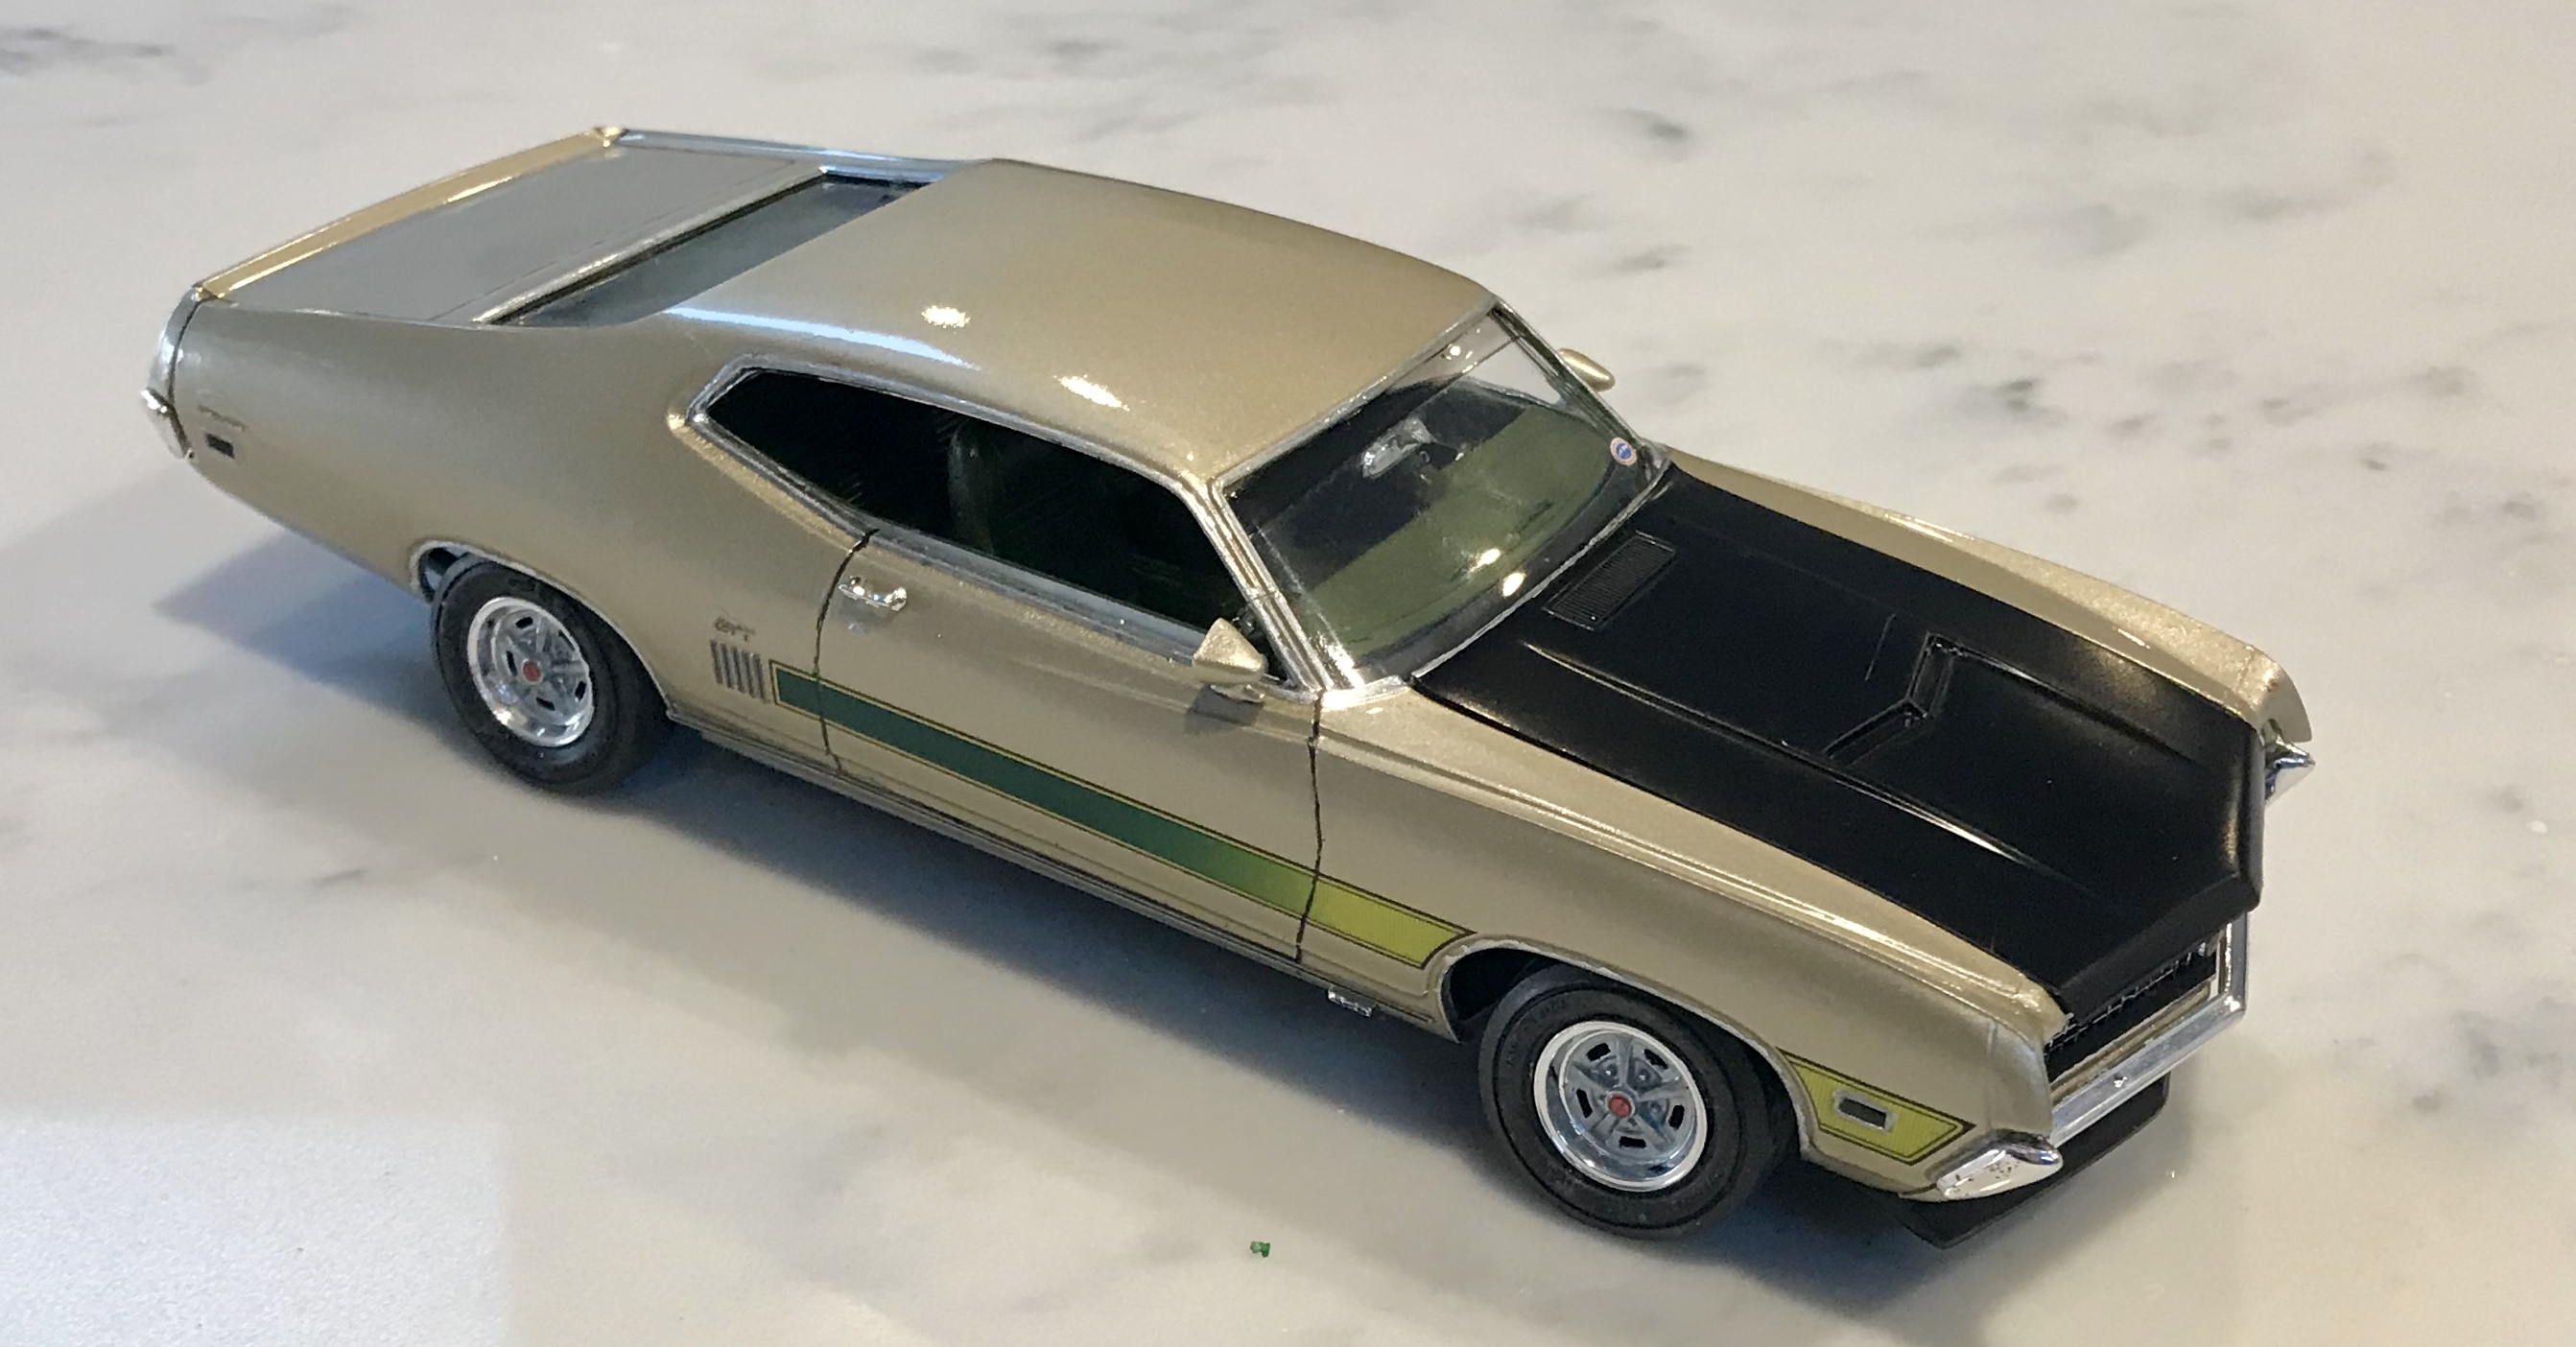
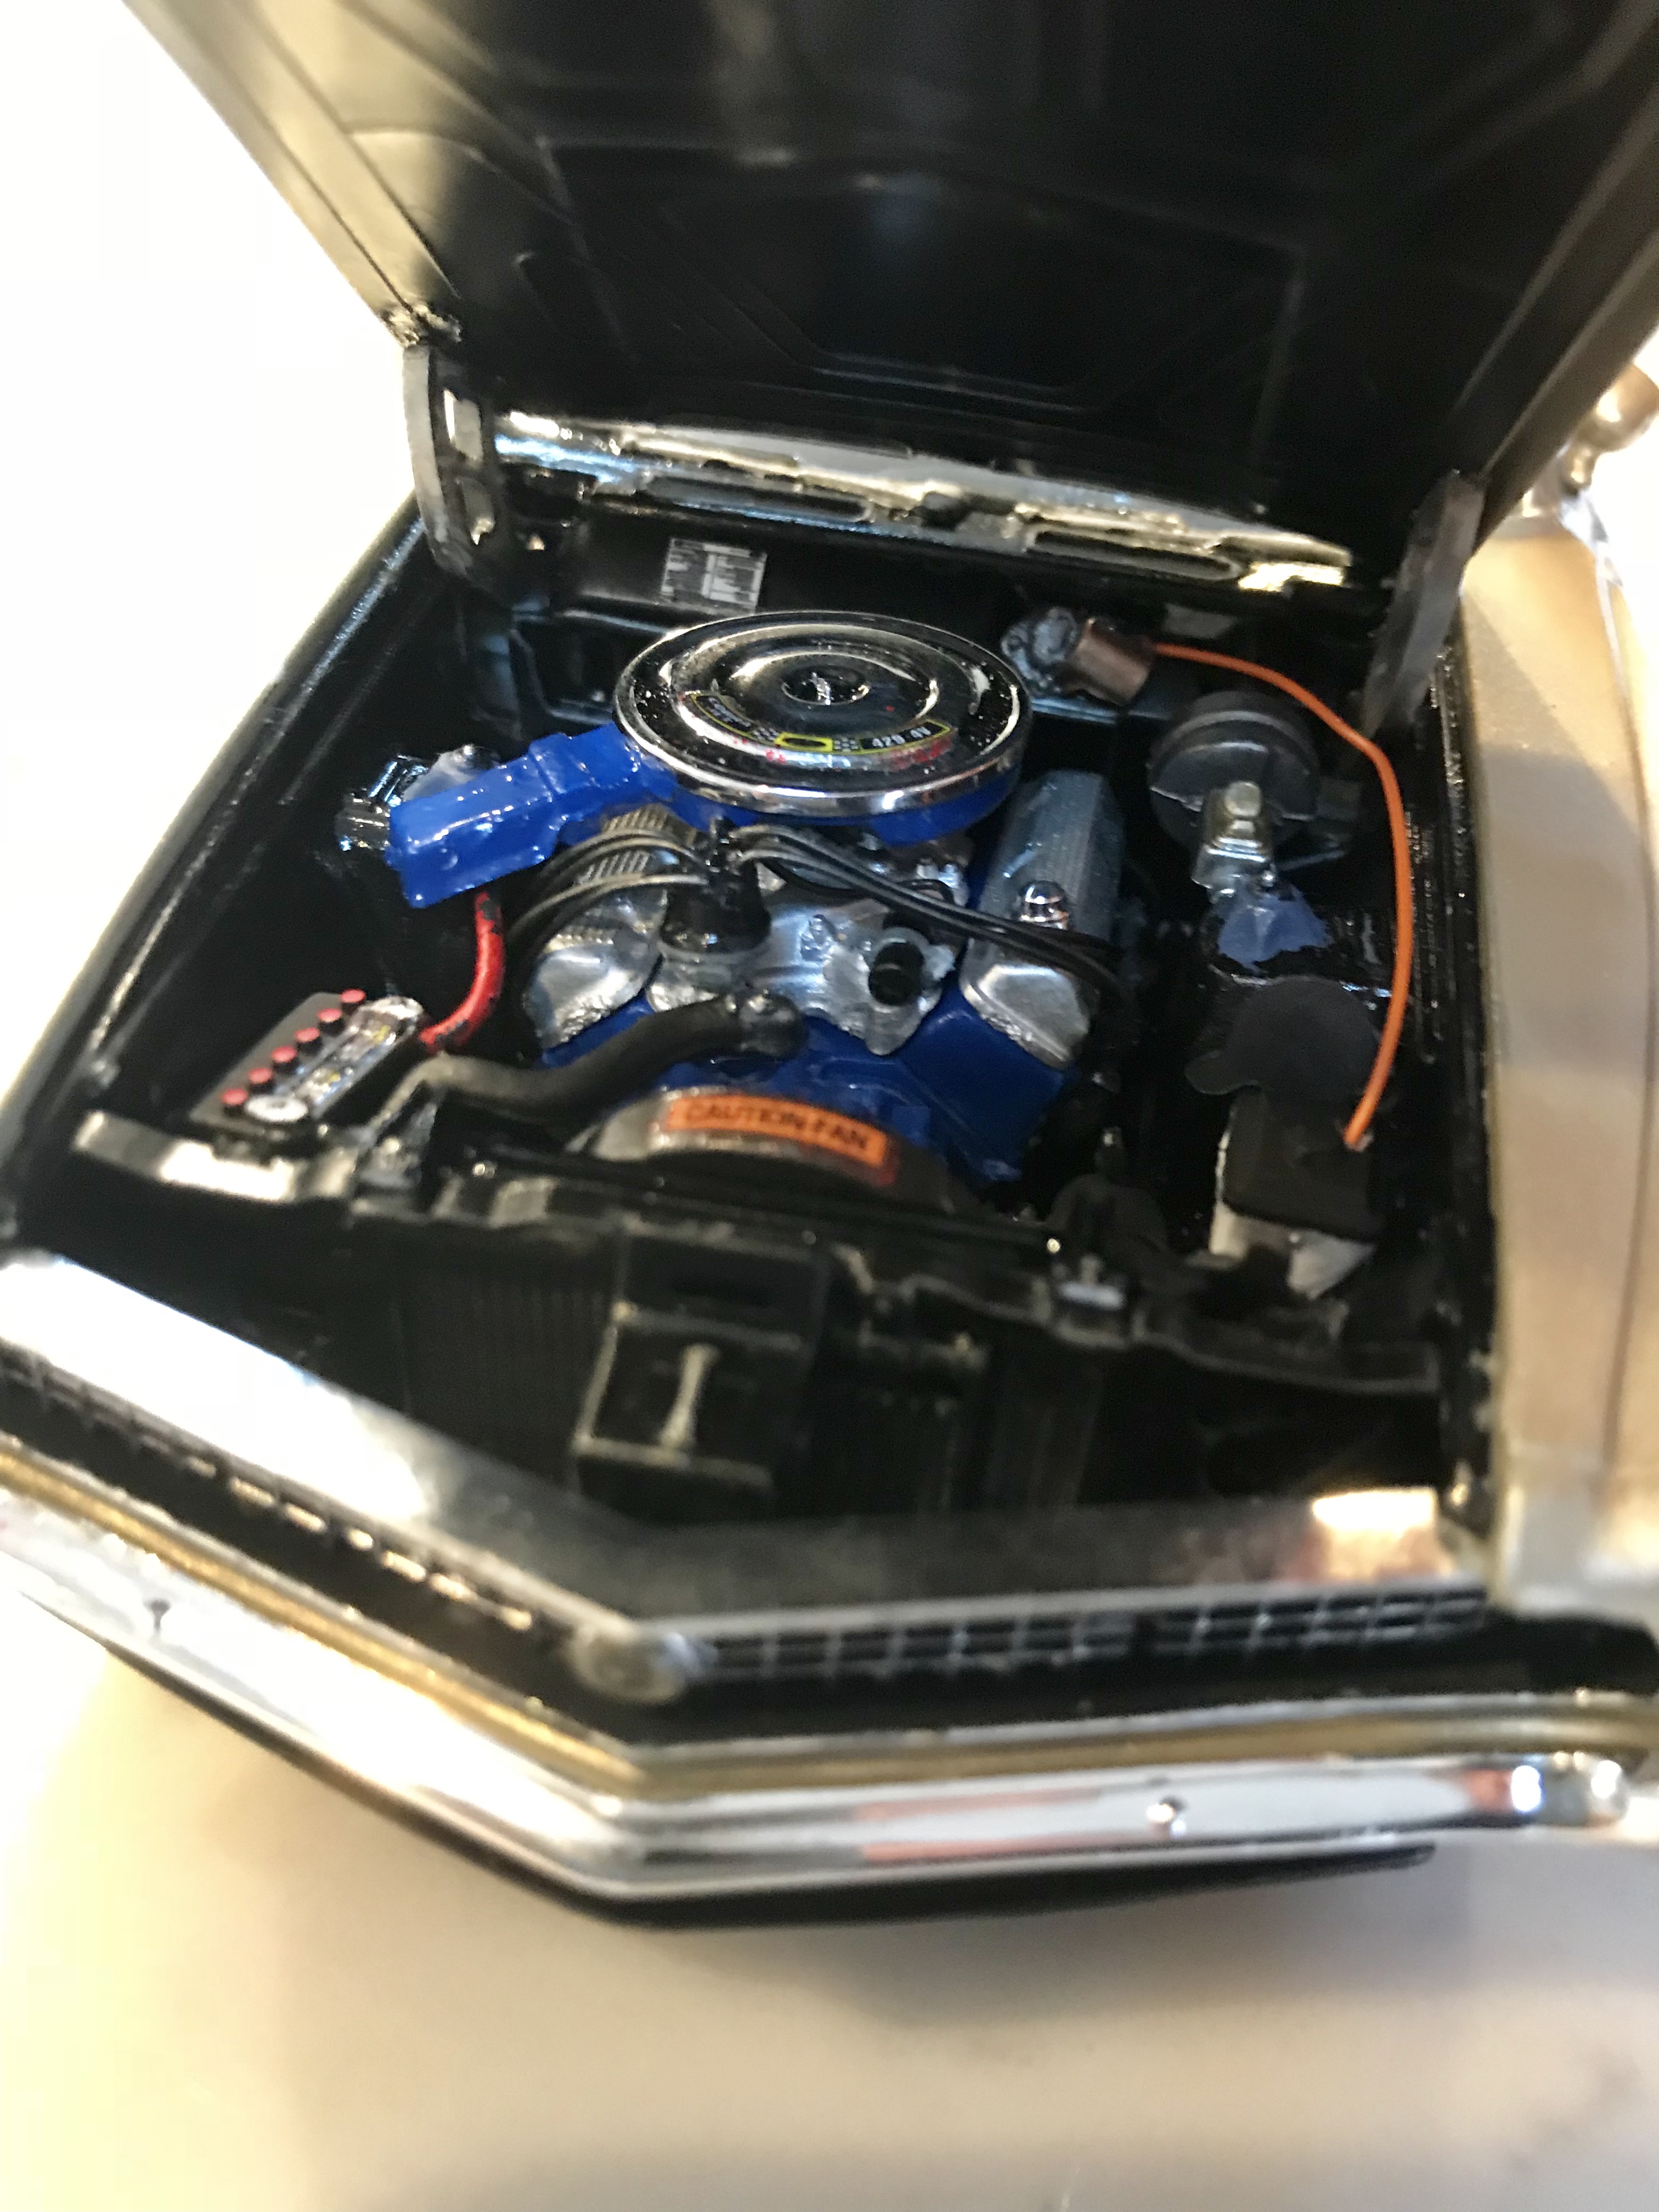
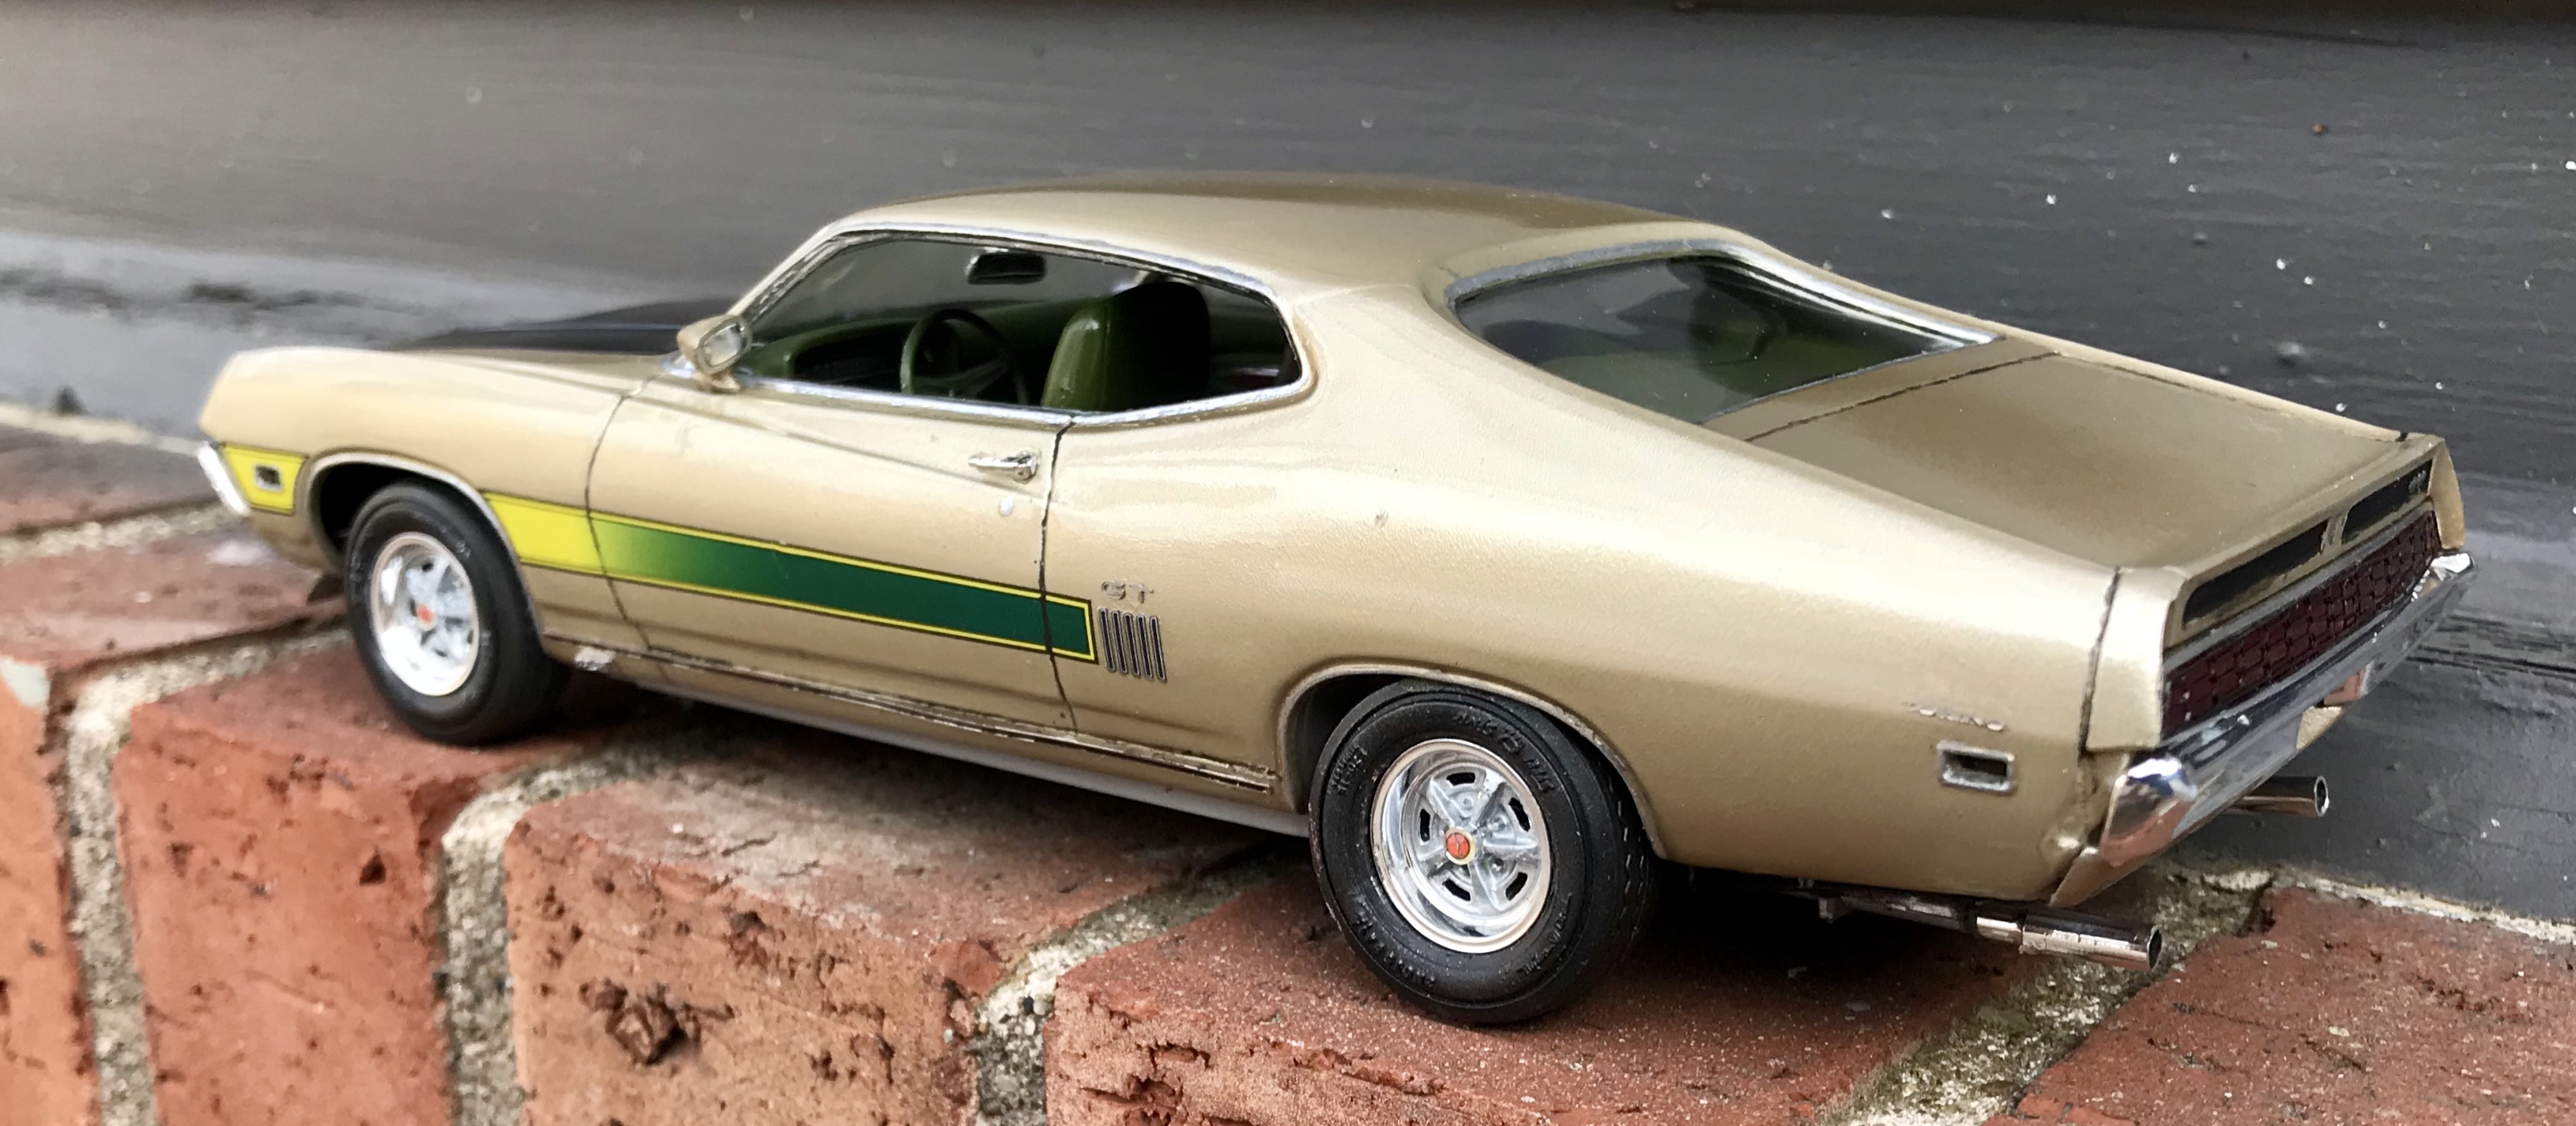
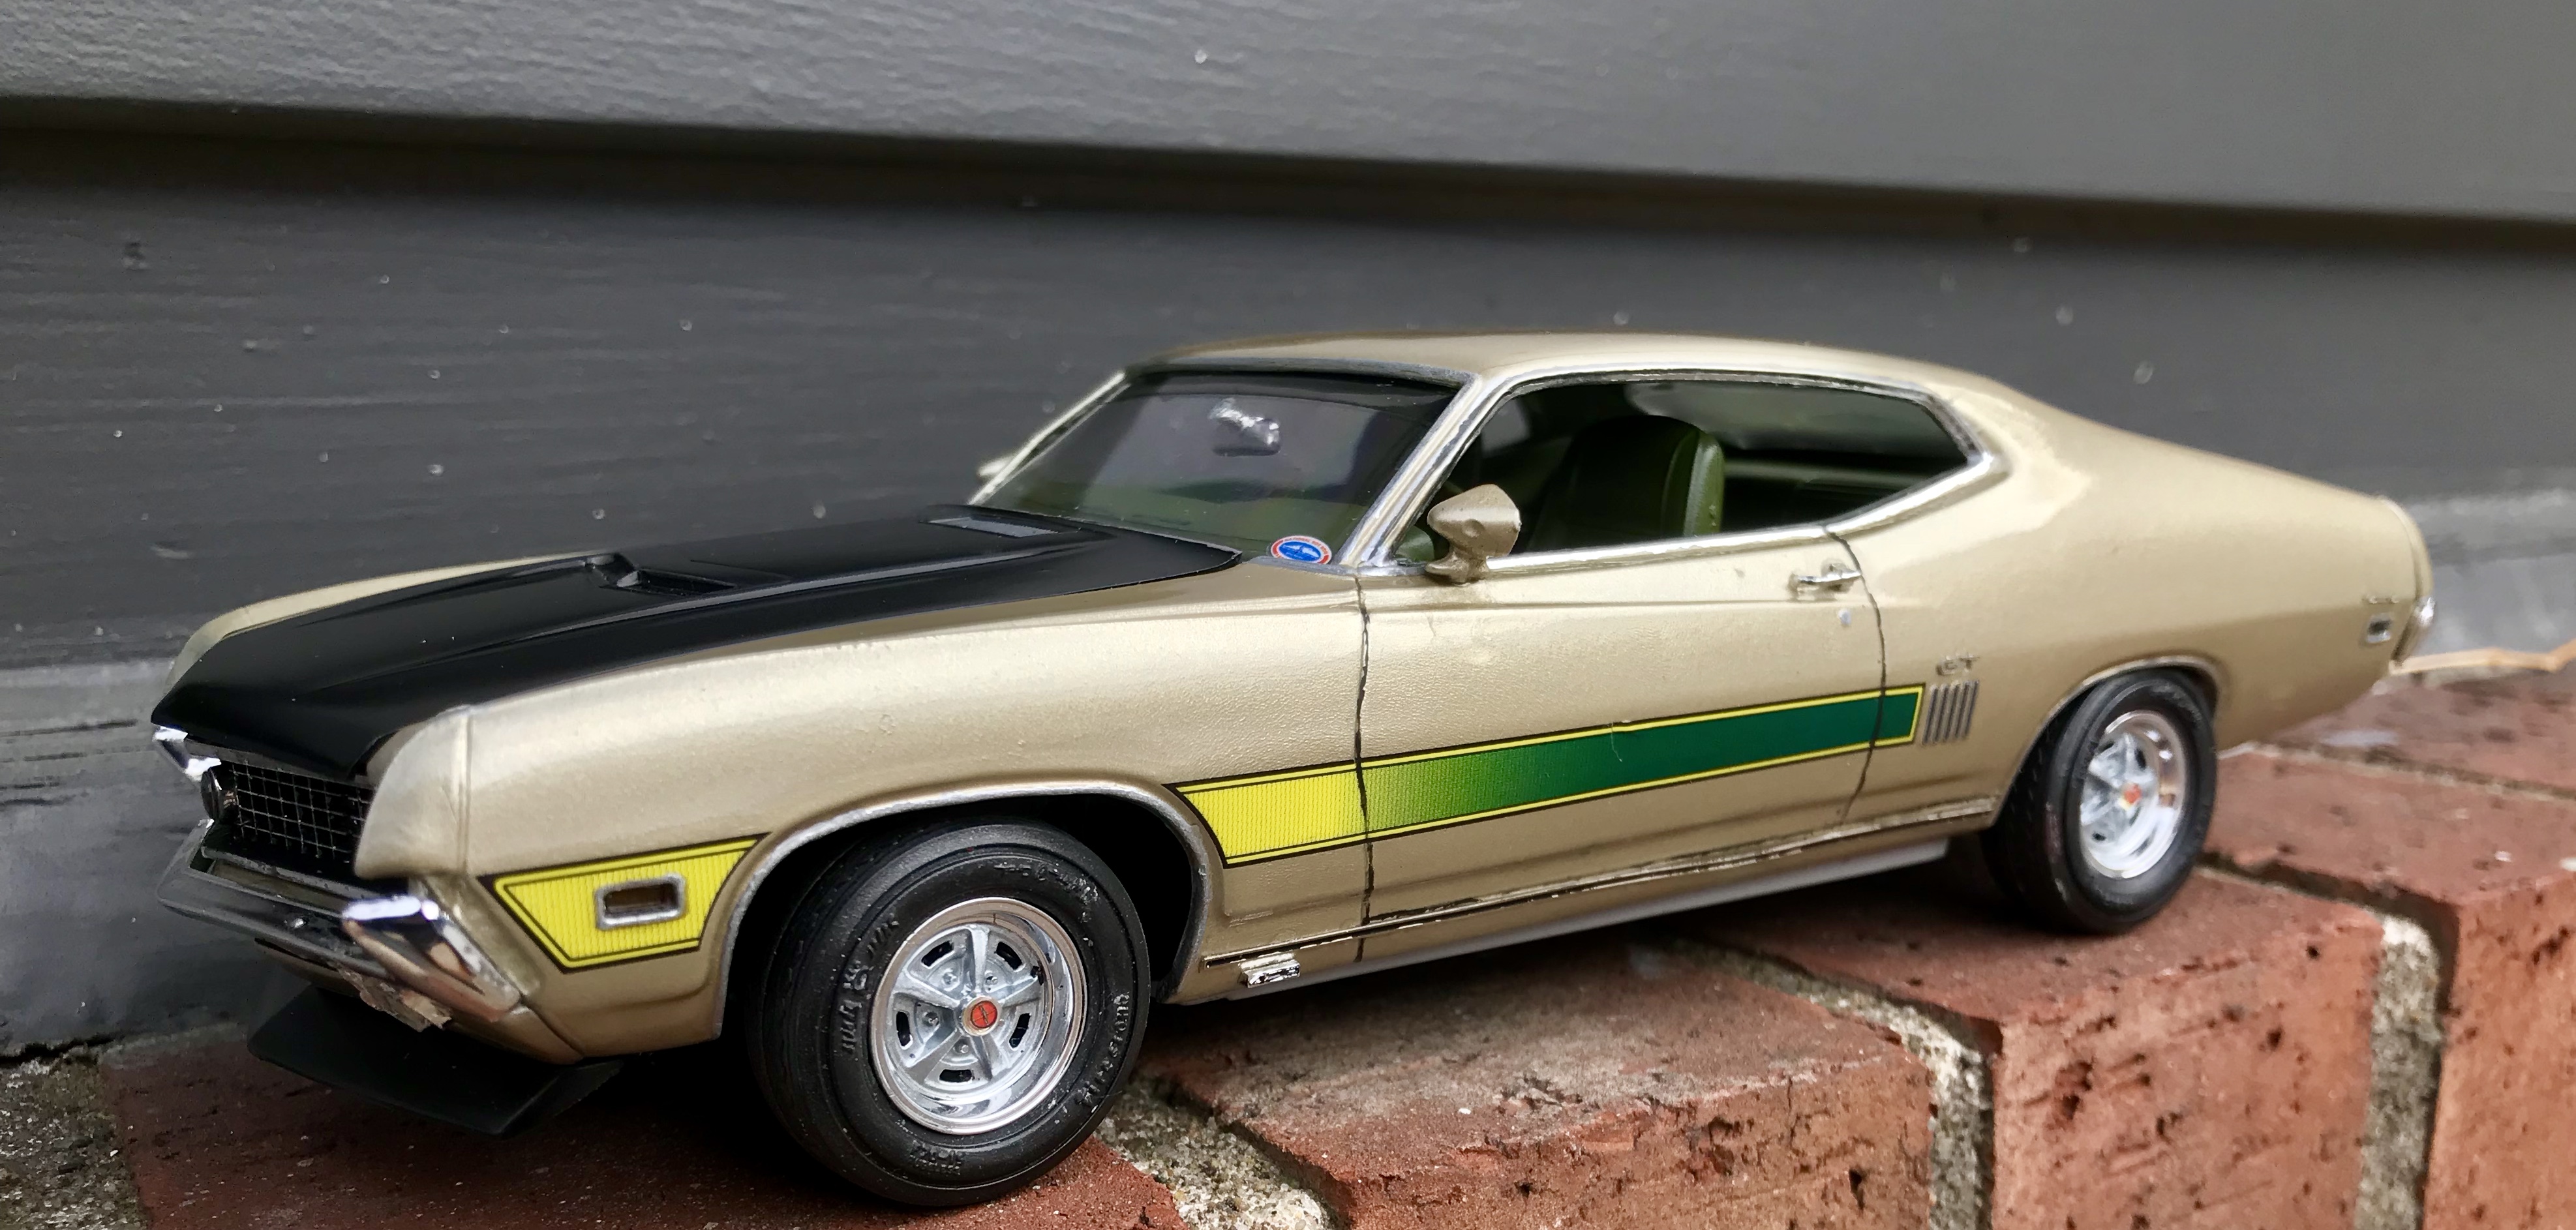
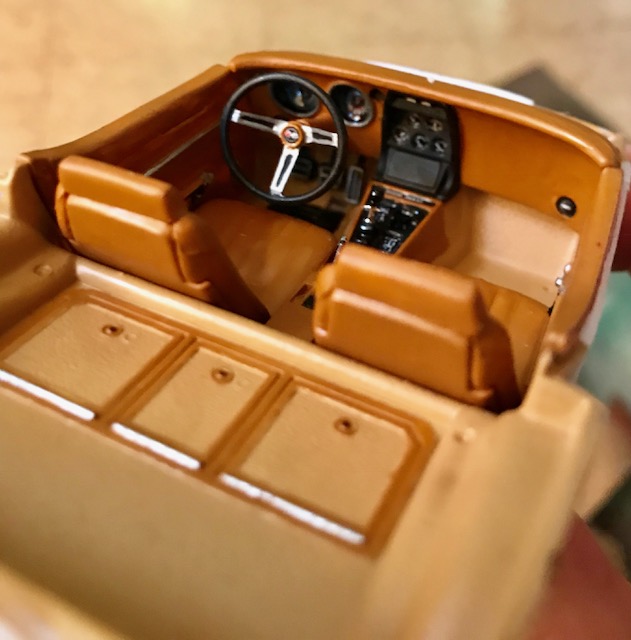
So, in January, my first post of the year was a Revell 70 Torino GT that I converted to a 71 and made for a good friend to give to his dad. It was his dad’s favorite car that he always regretted selling. This was that build: I’m getting to the end of available kits that I really want to build, and will be starting a new job that won’t allow much building time, so I’m currently repeating a few kits that were great to build and I felt I could have done a better job on. Since I gave away the Torino, I figured I’d do another for my collection. I went into the build with a couple rules: change the look from the last build and use the cool stripes. In the end, my build came out fine, my rules not so much. I originally planned a burgundy/white color scheme... should have gone with that, but couldn’t find a shade I really liked. Then I got hooked on the idea of a green interior. I have a lot of green cars, and have never done a white one, so that was the new plan. Then I got cute and outsmarted myself. Instead of jut buying a can of white, I tried a gloss Ivory from Rustoleum. Decent thought, TERRIBLE paint. After that was stripped, it stained the plastic, and while I primed again, I was worried about how difficult white can be, so what now? With the interior already green, I ended up back with gold. This time a light champagne gold. I was also determined to use the pad printed Goodyear Polyglas L tires, but the wheels and backs kept falling through the opening... they are just too small. Tried a couple others, but they had the same problem or were too little for this car (like the kit tires), so I ended up using the same Firestones I used before. So much for making it different! Painted the magnum 500s bare steel because I like that look and it was different, and blacked out the hood... so there! They weren’t supposed to be this close...oh well... happy new year everyone! My green interior Engine Complete
-
OK, I’ve already submitted a couple, but this needed to be included in this thread. My 70 Buick GS Stage 1. This was unique for me as the color I wanted was an enamel, which I generally avoid. I don’t have an airbrush, so I’m using rattle can But, I laid two coats on, let them dry for two weeks, and compound was all I needed to get the finish smooth and set for clear. Three coats of Mr Hobby clear and somebwax... pretty happy!!
-
Beautiful work!! I’ve built 5 Ferrari’s.... none of them are red, and this is a perfect example of why. They look spectacular in other colors. Man, this one just sings!!!
-
They are in the box! You get the rally wheels with white walls for the Yenko version, but the side of the box shows a non-Yenko 427 Vette with Torque thrusts, a different good and air cleaner. It’s all in there to pick from.
-
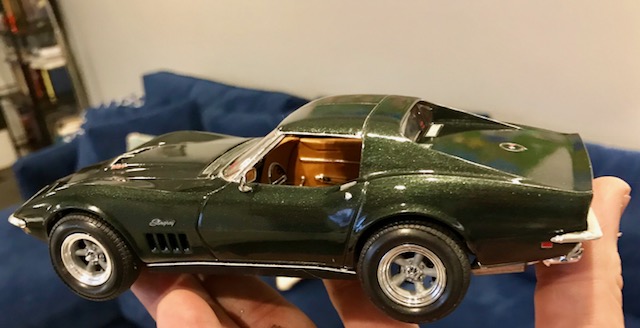
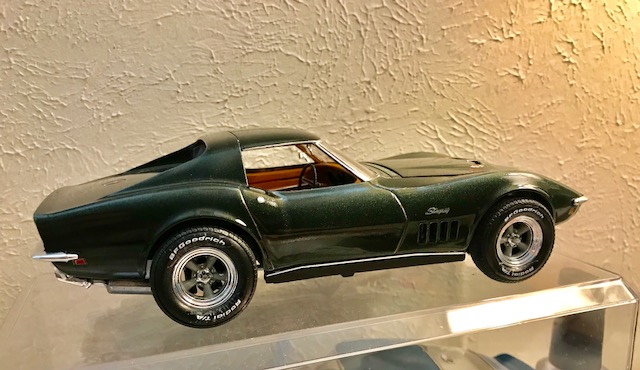
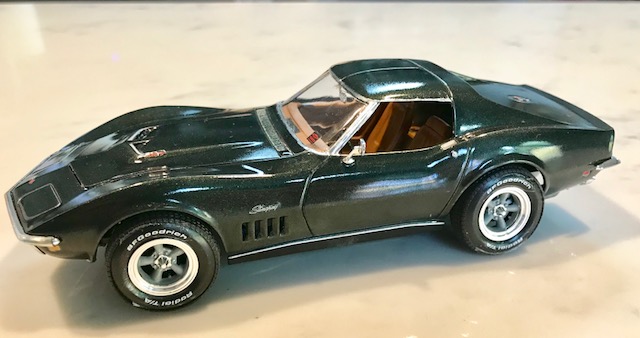
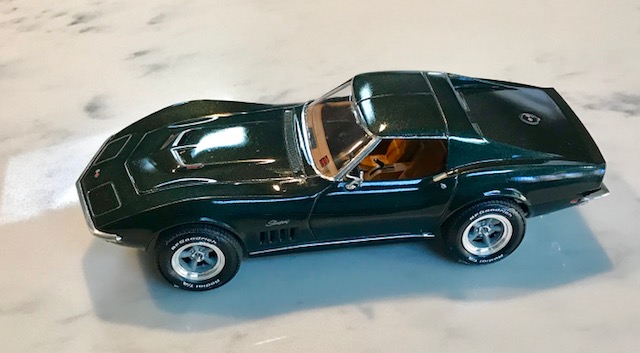
I'm not a huge Vette fan personally.... but I have always liked the 63-67 and 68-72 versions, and my collection lacked any Corvettes. When Revell re-released the 69 Vette coupe, I decided to remedy that. Nice kit... simple build. I added some wiring and hoses, but not much else. Probably my all-time favorite GM color is Fathom Green, so it got that with the saddle interior. I thought I'd want the Chevy Rally wheels, but actually liked the torque thrusts better on this car. Fireball Modelworks tire decals completed the build. The only oddity of this kit is the dash... strange that there isn't the storage pouch or even a glove compartment molded in, but other than that, it's a nice kit. Hope you like it. Happy Holidays everyone! Interior Engine I hadn't put the tire decals on yet, but this shot of the green in the light shows why I love this color: And, done...
-
Bill, when you build a masterpiece like this, you only need one!!! This was a “drop the mic” build...
-
I’m drooling again.....
-
buddy baker's grey ghost
Kmb0319 replied to cdntrucker's topic in WIP: Stock Cars (NASCAR, Super Stock, Late Model, etc.)
My favorite NASCAR vehicle ever, and you NAILED it!!! Beautiful work! -
Revell had marked the re-release of the Pro Modeler Daytona on their 4th Quarter releases, with a mid December projection. I wasn’t seeing anything about it, and Model Roundup didn’t list it in their “coming soon” category, so I went to Tower Hobby. I found it... with a late April release date now. As this is not a terribly old tooling, what’s the big delay? Could it be they are updating the NASCAR parts? Don’t know if anyone has heard anything, but I’m curious as to is holding it up for 4 months.
-
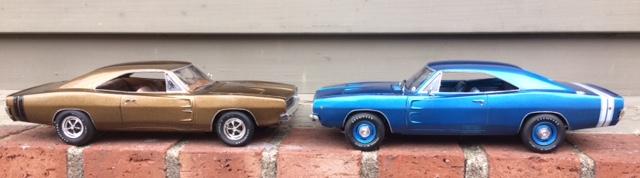
Here are my twins.... I’m waiting for the re-release of the Revell 69 Daytona!
-
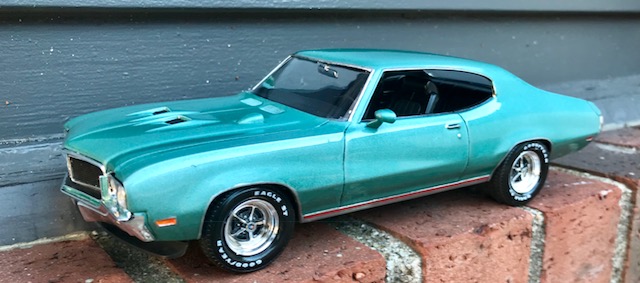
This started out as a nostalgia build, as I built this model when I was in high school and wanted to do it again. Also, I don't have any Buicks in my collection, and this was the ultimate muscle Buick, so it was perfect. (it will be alone until someone releases the boat tail Riviera) I didn't want to do the GSX... first of all, I'm not a fan of yellow. Second, while the graphics and rear spoiler don't look bad, they are a little ostentatious for a Buick, so I wanted to build a Stage 1 that also fit the brand. In doing a little research, the photos that stood out to me the most were the cars in Turquoise, so I decided to do that. The only worry was that I had Testors Model Master Turquoise, which was a good match, but was an enamel. I've had a few problems with enamel finishes myself, but read lots of nightmare stories that have kept me away from using the stuff. Like any other enamel finish, the paint was a little thicker and thus went on heavier than I preferred, but I didn't have any major issues. Once on, I was a little frustrated at a few dust particles settling in, but had to live with them, as my experience with enamel is that it can't take wet-sanding. However, after letting it sit on the desk for a good three weeks, it was finally gassed out. Instead of trying to polish with sanding pads, I just grabbed the rubbing compound, and BAM.... it buffed out to a nice looking finish before I even added clear. Once a few coats of clear were added, I was amazed... I ended up getting one of the best finishes I've ever gotten. I wired the engine and added a few hoses here and there, but there wasn't much else to do with this kit, as it's pretty strong as-is. I made seatbelts, but only in back, as most pictures showed the fronts retracted below the sides of the front seats. I also raised the rear, as the biggest drawback of this model I have seen is the rear end drooping and the tires sitting too far inside the fenders. Finally, a set of Fireball Modelworks tire decals finished her off. This was just one of those builds where most everything went right. It started out as just a fun build of something I first did 30 years ago, and ended up being something that will have a place of honor on the shelf. Hope you like it. Thanks for looking! Interior: 455: Had to get a couple reflection shots to show the paint on this, inside at night and in the sun:
-
FrankenGoat - making something DECENT out of the MPC 72 GTO
Kmb0319 replied to Kmb0319's topic in WIP: Model Cars
My tires came in... took a little experimentation with different wheel backs to get the stance I wanted, but I got it. Added the radio antenna, now it just awaits the Keith Marks decals.
-
FrankenGoat - making something DECENT out of the MPC 72 GTO
Kmb0319 replied to Kmb0319's topic in WIP: Model Cars
I cut mine out of the AMT 69 442/Hurst kit, which is also the chassis I used. The kit has been stated in a couple threads as a good replacement chassis, so the core support is about the right size.