Chariots of Fire
-
Posts
2,782 -
Joined
-
Last visited
Content Type
Profiles
Forums
Events
Gallery
Everything posted by Chariots of Fire
-

ALF Fire Chief Updated 9/21
Chariots of Fire replied to kilrathy10's topic in WIP: Model Trucks: Big Rigs and Heavy Equipment
Whew! LOOOONNNNNGG it is! Local FD has been looking at a new tower built on a Pierce chassis. It's actually a platform that sits inside the length of the body and it is not that long. They accomplished it by making the aerial portion a 5 section unit. The bed portion is about 5 feet wide just to contain the other 4 sections. But what a difference it makes in overall length! It's a mid mount rather than a rear mount and the bucket sits in a lower section than the rest of the body. I'll try and post some pix. PS. Lookin' good, JT! BTW you going to look in on "The Return" on Saturday? -
ALF Fire Chief Updated 9/21
Chariots of Fire replied to kilrathy10's topic in WIP: Model Trucks: Big Rigs and Heavy Equipment
Just curious. What is the purpose of the added supports under the first bank of compartments? I can understand fishplating the frame but you would not see that typically. -
Thanks, Guys. But there is already a "misteak"! The radius of the curve in the front is all wrong and pulls the front too close to the sides. I did some spot checking with the drawings and it stood out like sore thumb! So the front has to come off and get re-built.
-
Hangin' in as they say. Covid sure has put a damper on things from church attendance to regular shopping! Getting back to the old normal is a must!!?
-
Hey, Dan! I just put the grill away for the winter! Getting cooler here in the northeast! Even the dog has his backside toward the heater this morning!
-
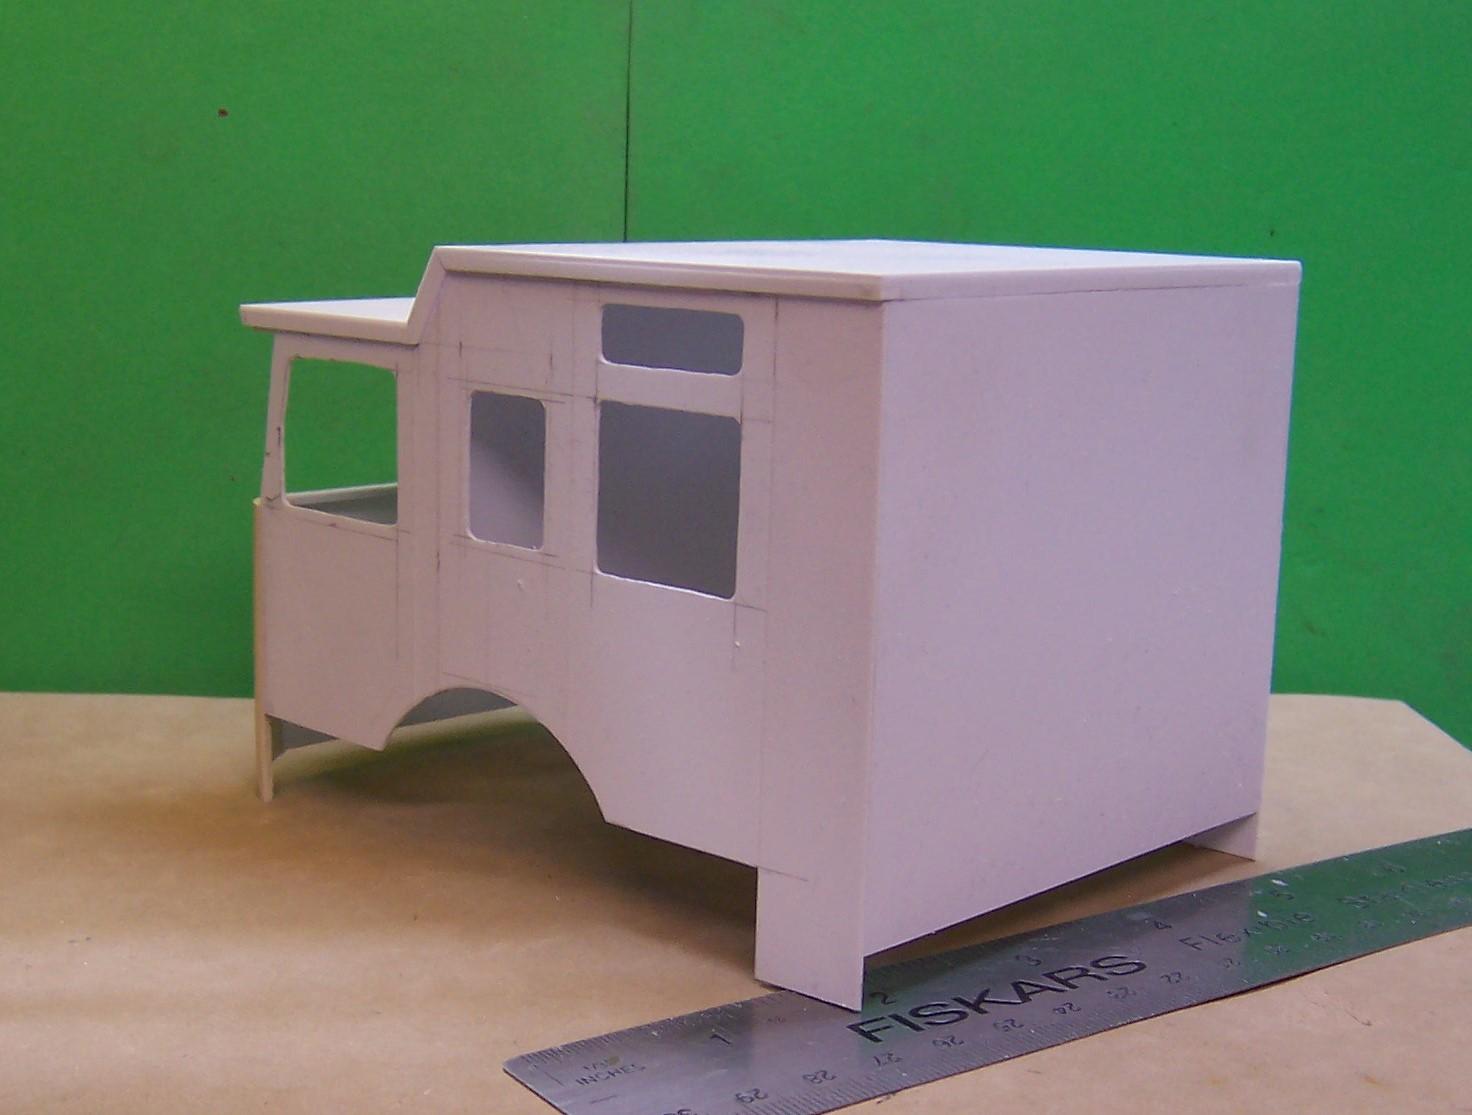
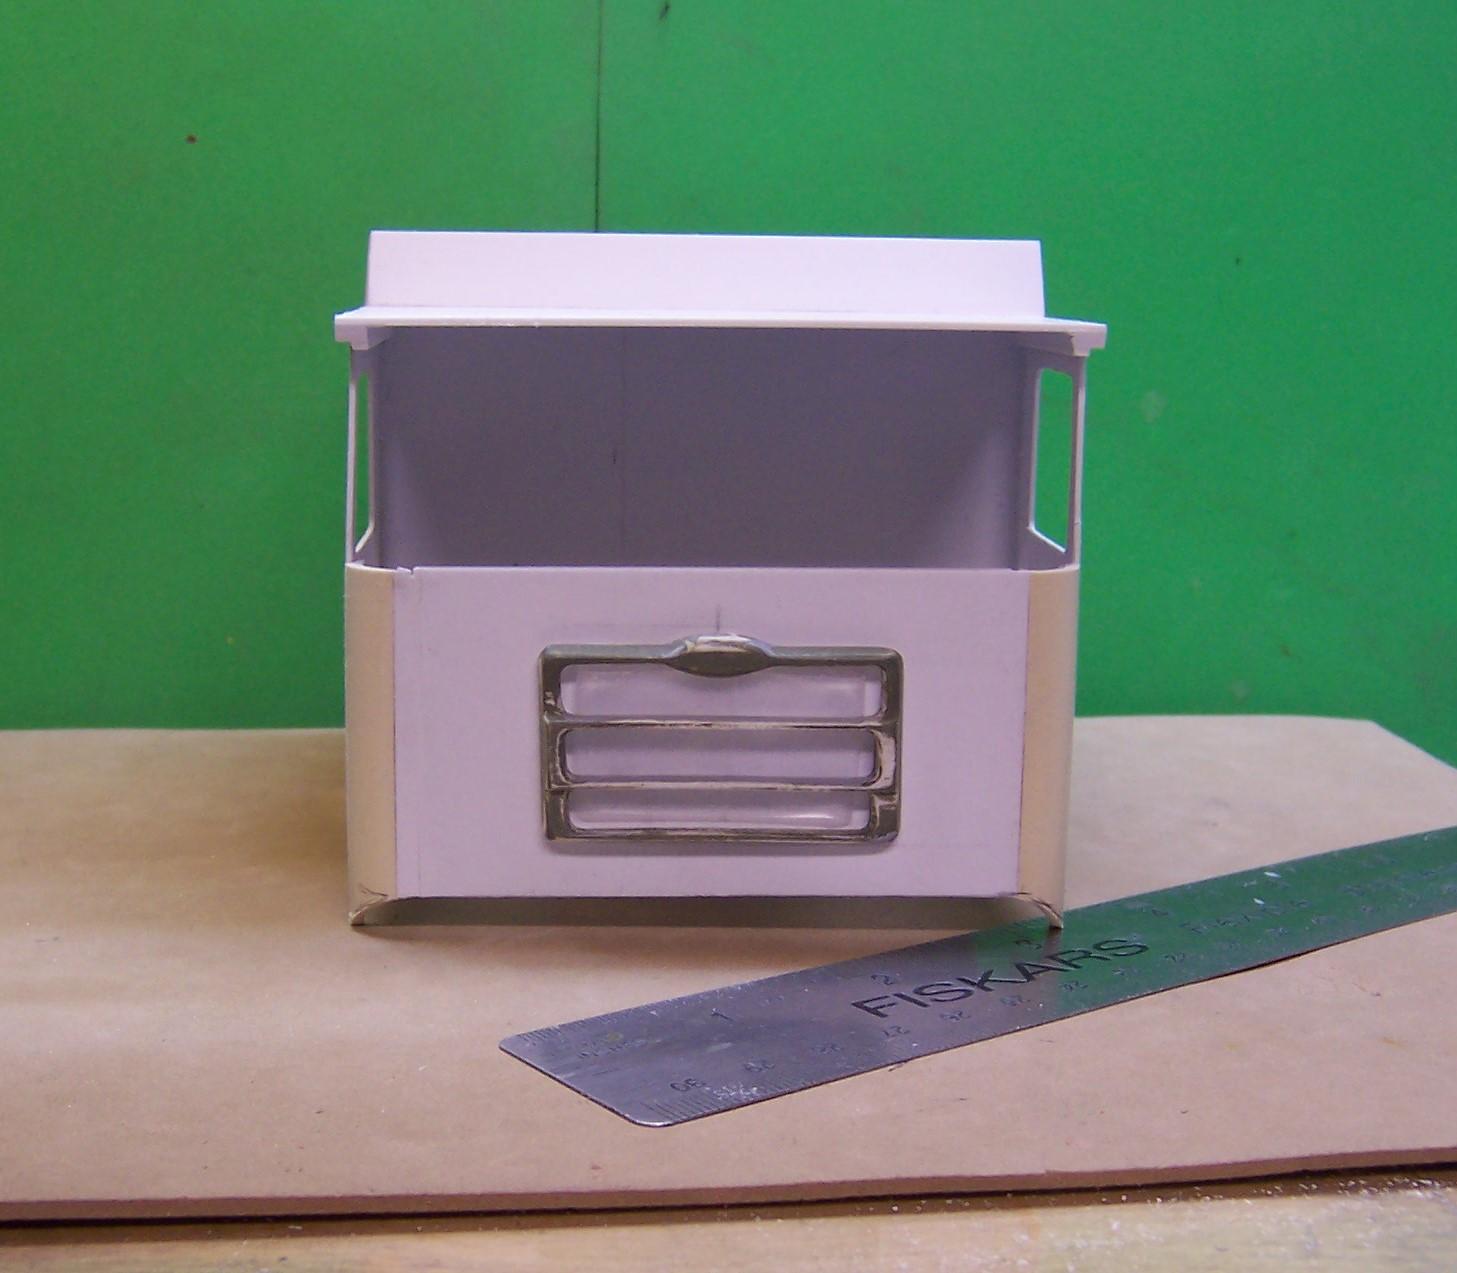
I'm still working on the grill and trying to get it to the point where it will take some Molotow Chrome or Alclad. Every little flaw shows up and so it has to be nearly perfect. In the meantime work on the cab has begun. Cab side was laid out on 0.030" sheet stock and cut to shape. Window and door openings have been cut and the door lines have been scribed. This one will not have opening doors but the inside will still eventually be detailed. The front top of the cab still has to be shaped but the basics are now complete. I found some PVC pipe at a local hardware store that was about right for the corners of the cab. A small section will have to be put in each upper corner.

-
ALF Fire Chief Updated 9/21
Chariots of Fire replied to kilrathy10's topic in WIP: Model Trucks: Big Rigs and Heavy Equipment
Hey, JT. You are talking to the original aerial man, Greg. He'll "steer" you in the right direction!? -
Now the trick is to get it chromed up. Sanding out the imperfections is absolutely necessary. Right now the test piece is gloss black and I can see some places that either need filling or some additional sanding. Then another coat of gloss black and some Alclad. The Molotow pens are nice but in this case I want to air brush it for a nice finish. I'll try the larger Molotow pen as well for contrast and see which is better.
-
Drill Bits - #60-80
Chariots of Fire replied to Hawk312's topic in Model Building Questions and Answers
Try Drill Bits Unlimited. Large assortment of small drill bits on 1/8" shank. They are extremely brittle but are sharp as sharp can be. You can buy them it packs or if you have favorite sizes you can get multiples of them. I like #70 and #72 for pins and plug wires. Get 5 of each and they come in a nice package. They are not expensive. -
Mack monogram fire truck
Chariots of Fire replied to Aerodyne03's topic in WIP: Model Trucks: Big Rigs and Heavy Equipment
That is a nice looking piece! Do you think you would do another one?? -
Mack monogram fire truck
Chariots of Fire replied to Aerodyne03's topic in WIP: Model Trucks: Big Rigs and Heavy Equipment
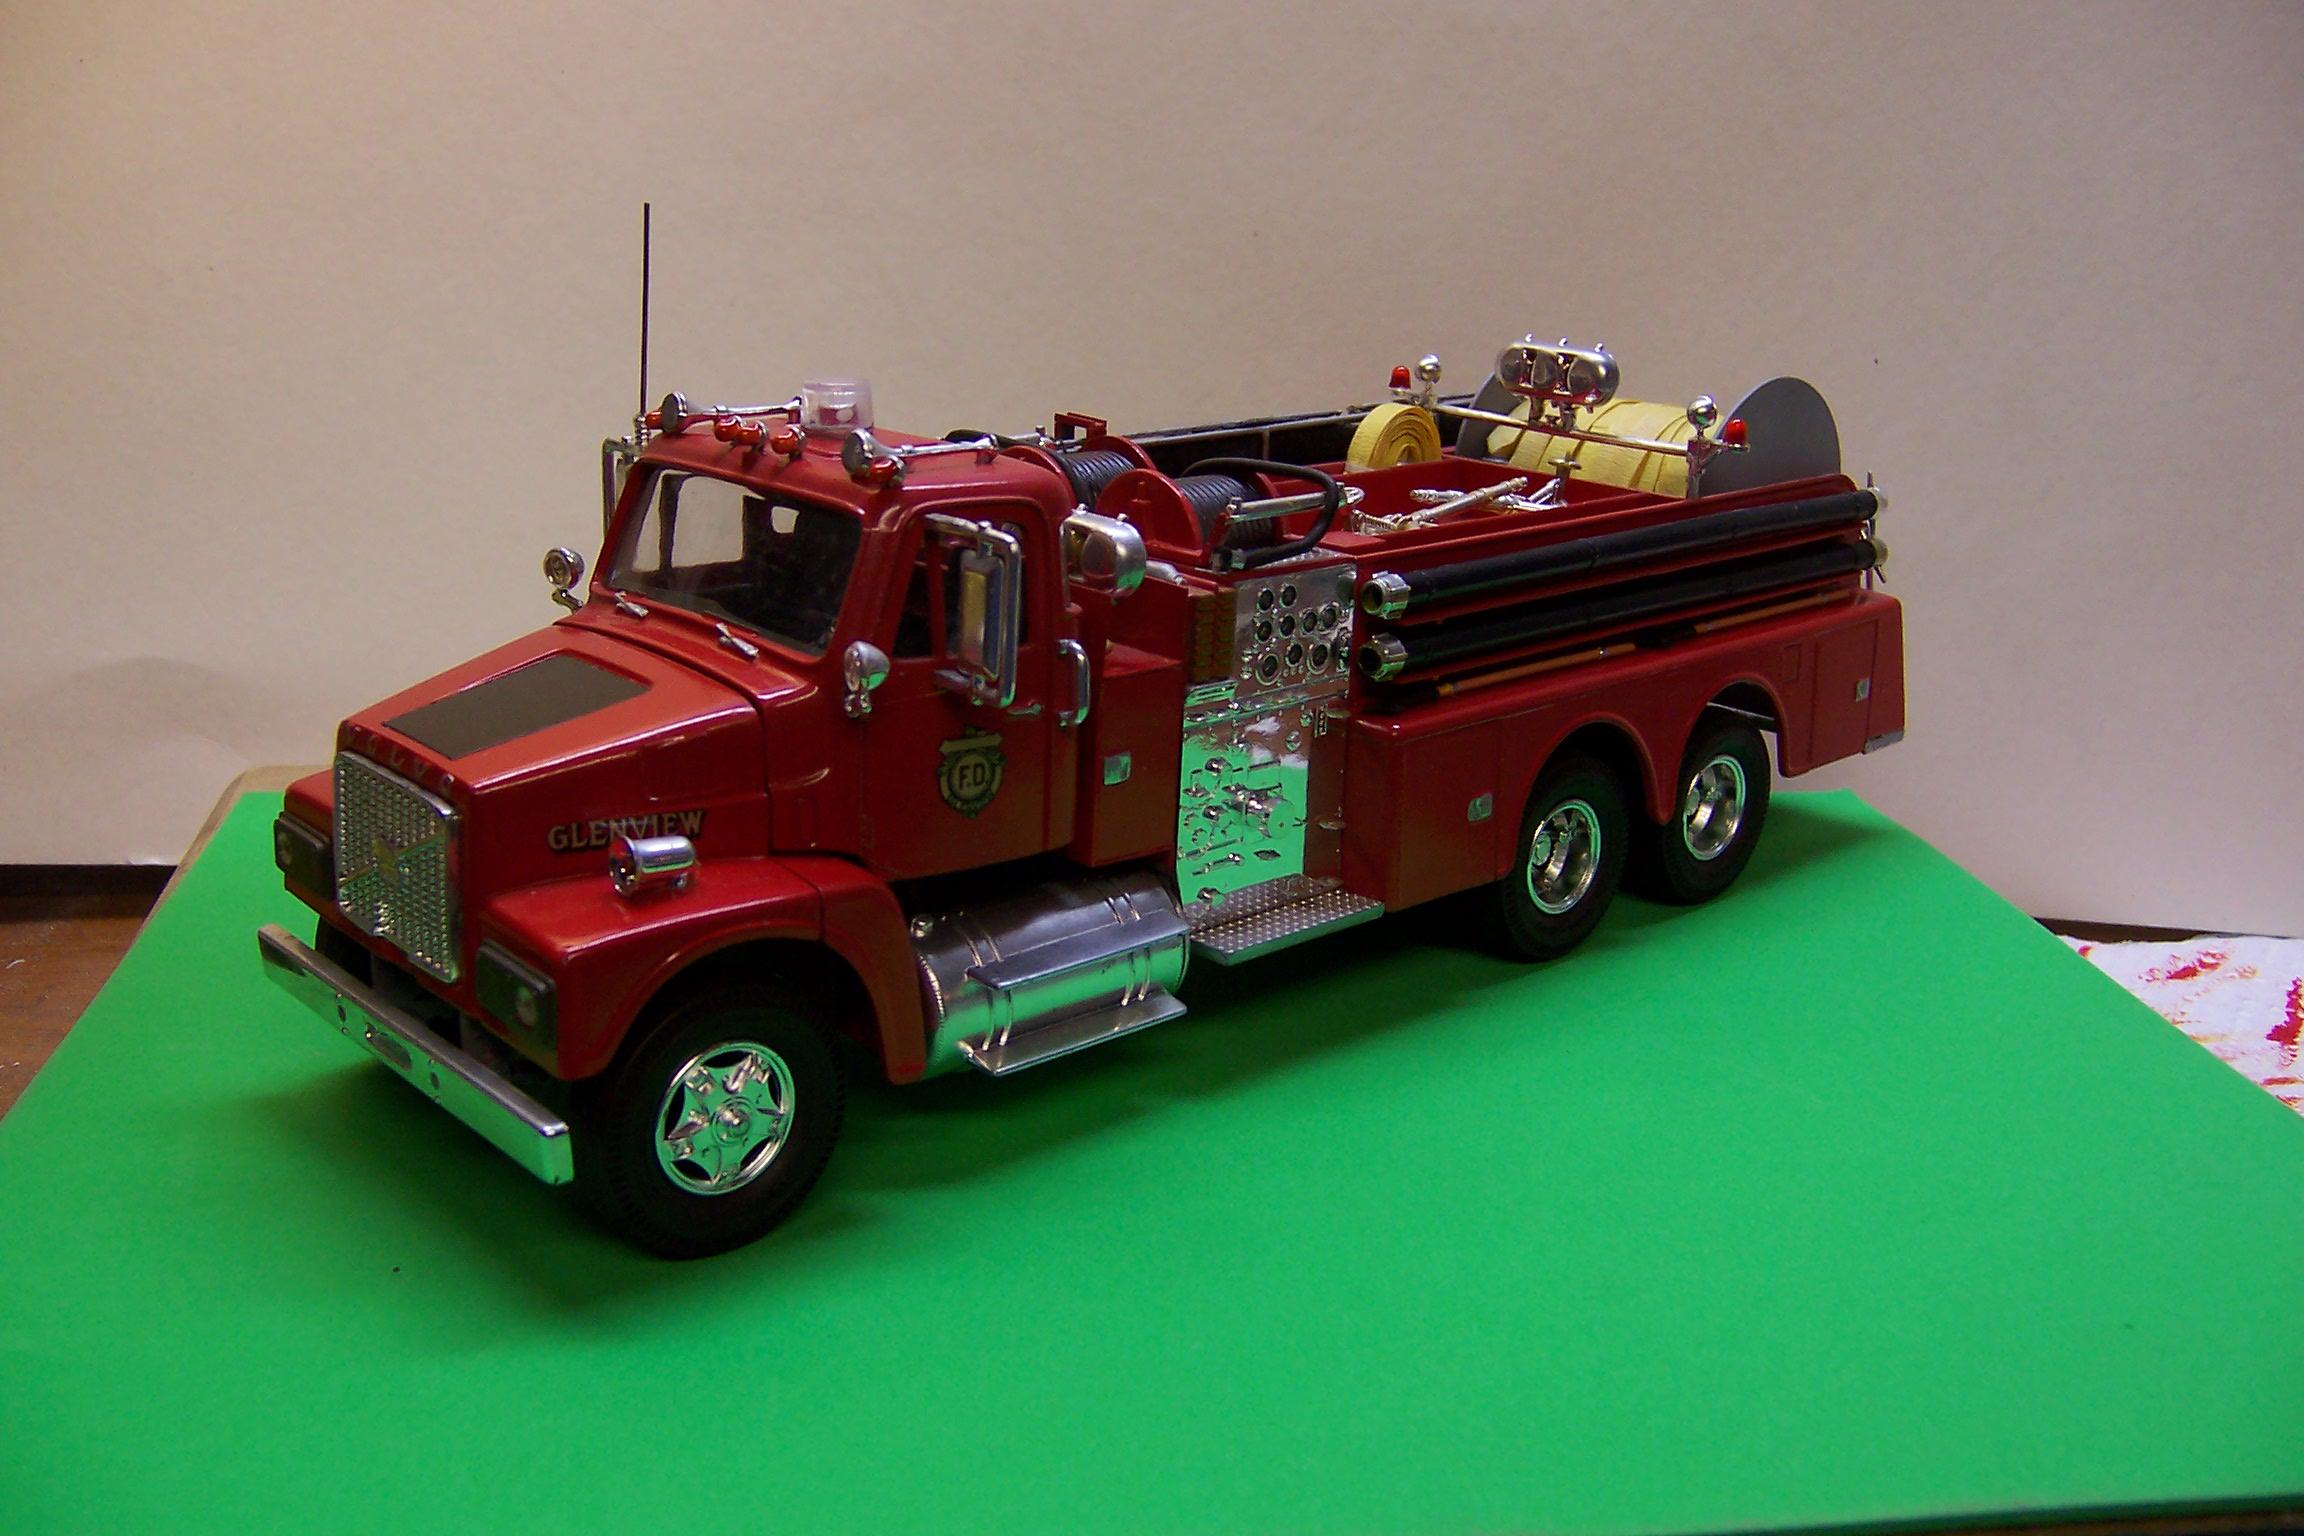
Great paint job, Enrico! That is going to be special! Here's another one I did many years ago using a 1/32 scale Volvo cab. This type of rig was popular in rural areas of New England back in the 1960's and '70's where they did not have a hydrant system. They simply laid out long lengths of large diameter hose and used that instead. After the fire was over, they rolled it back up on the large reels. The body is two of the Macks cut so as to create a longer body with tandem rear axles.
-
Mack monogram fire truck
Chariots of Fire replied to Aerodyne03's topic in WIP: Model Trucks: Big Rigs and Heavy Equipment
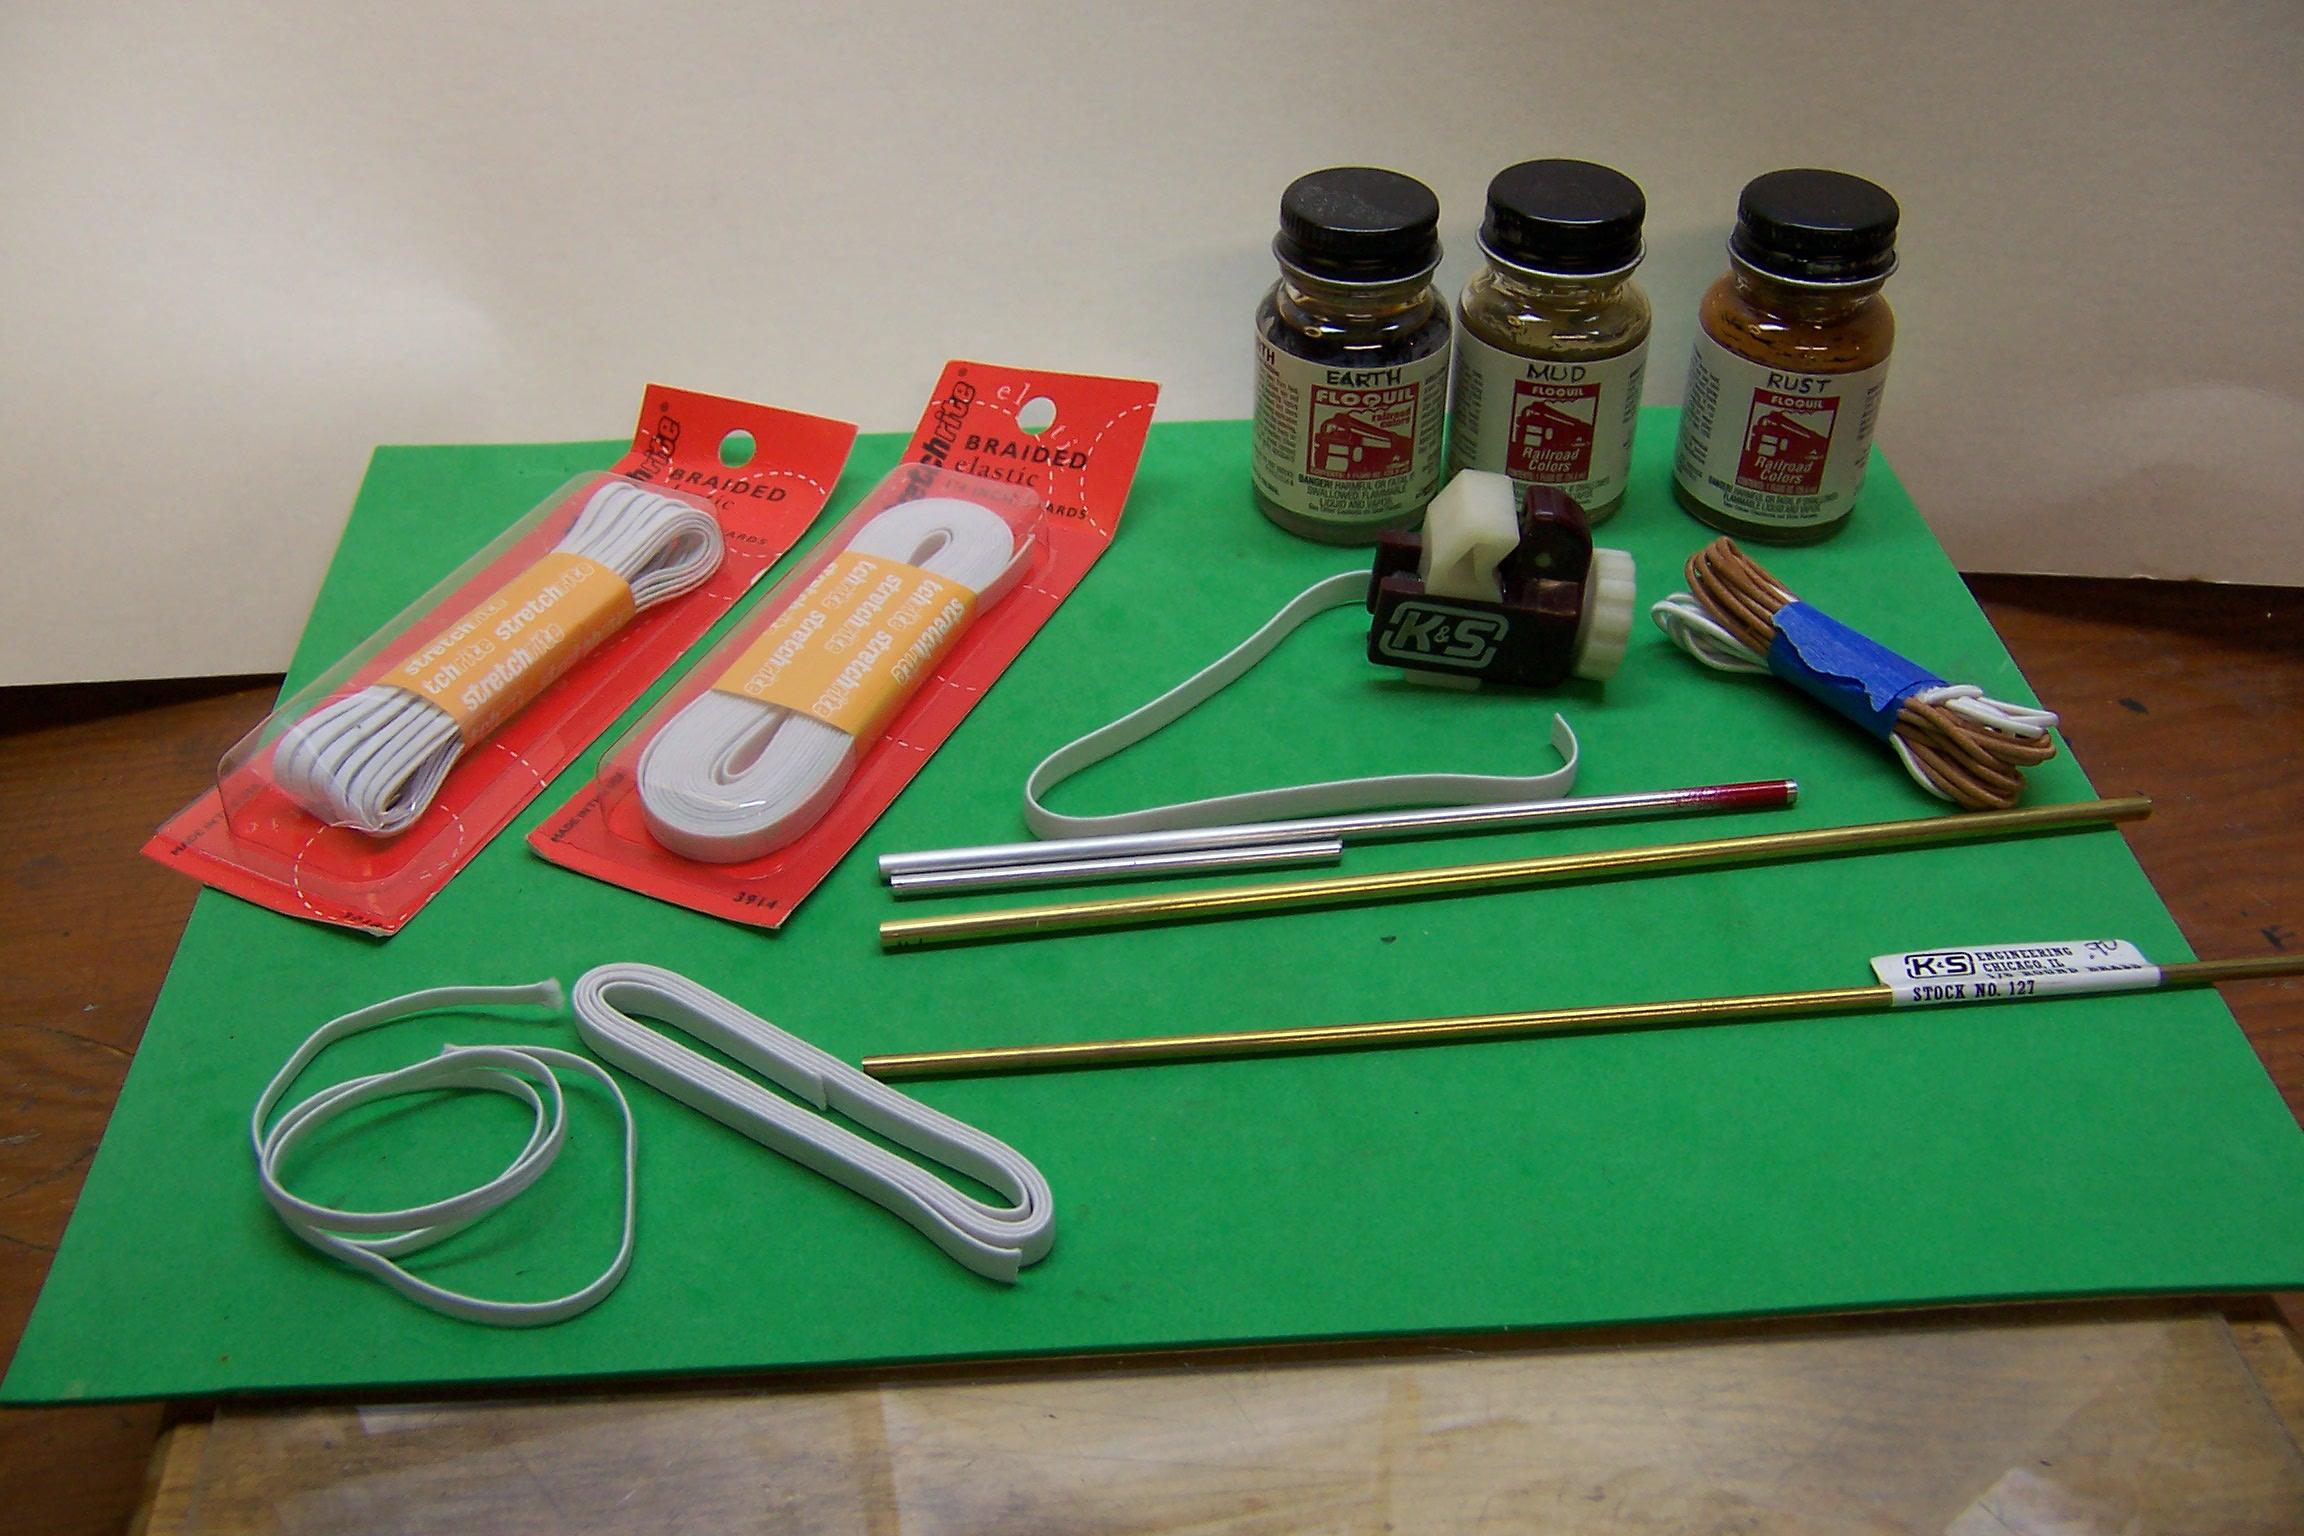
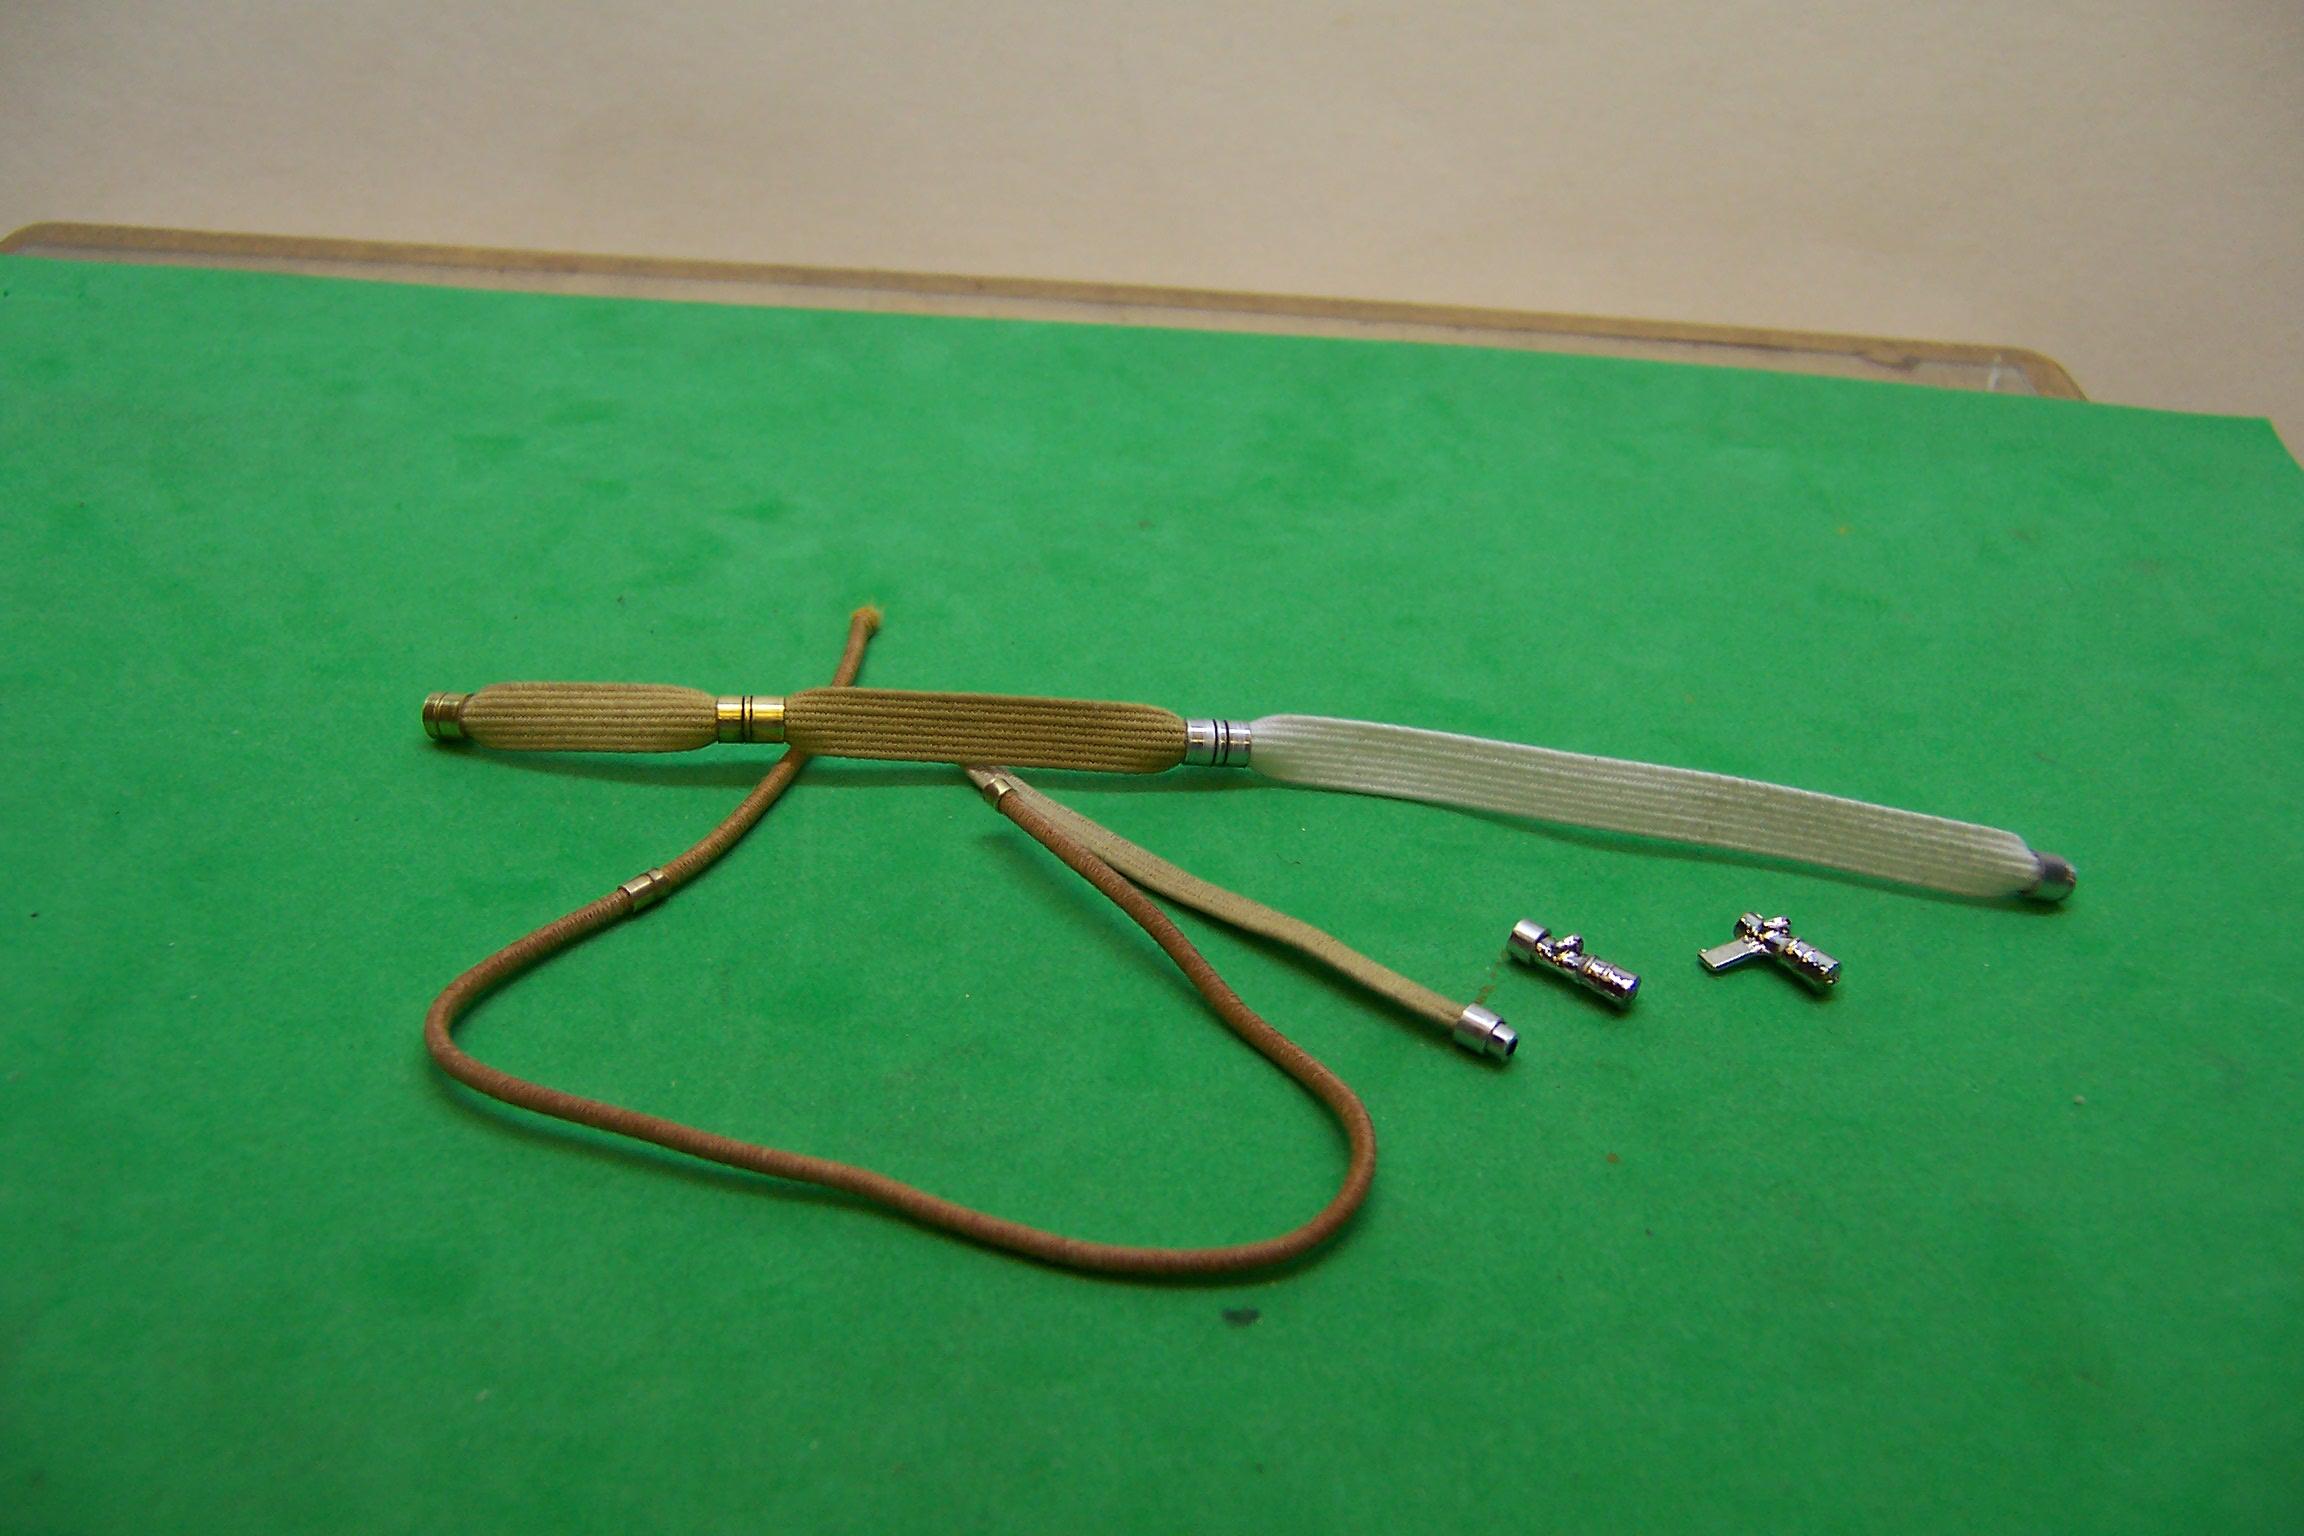
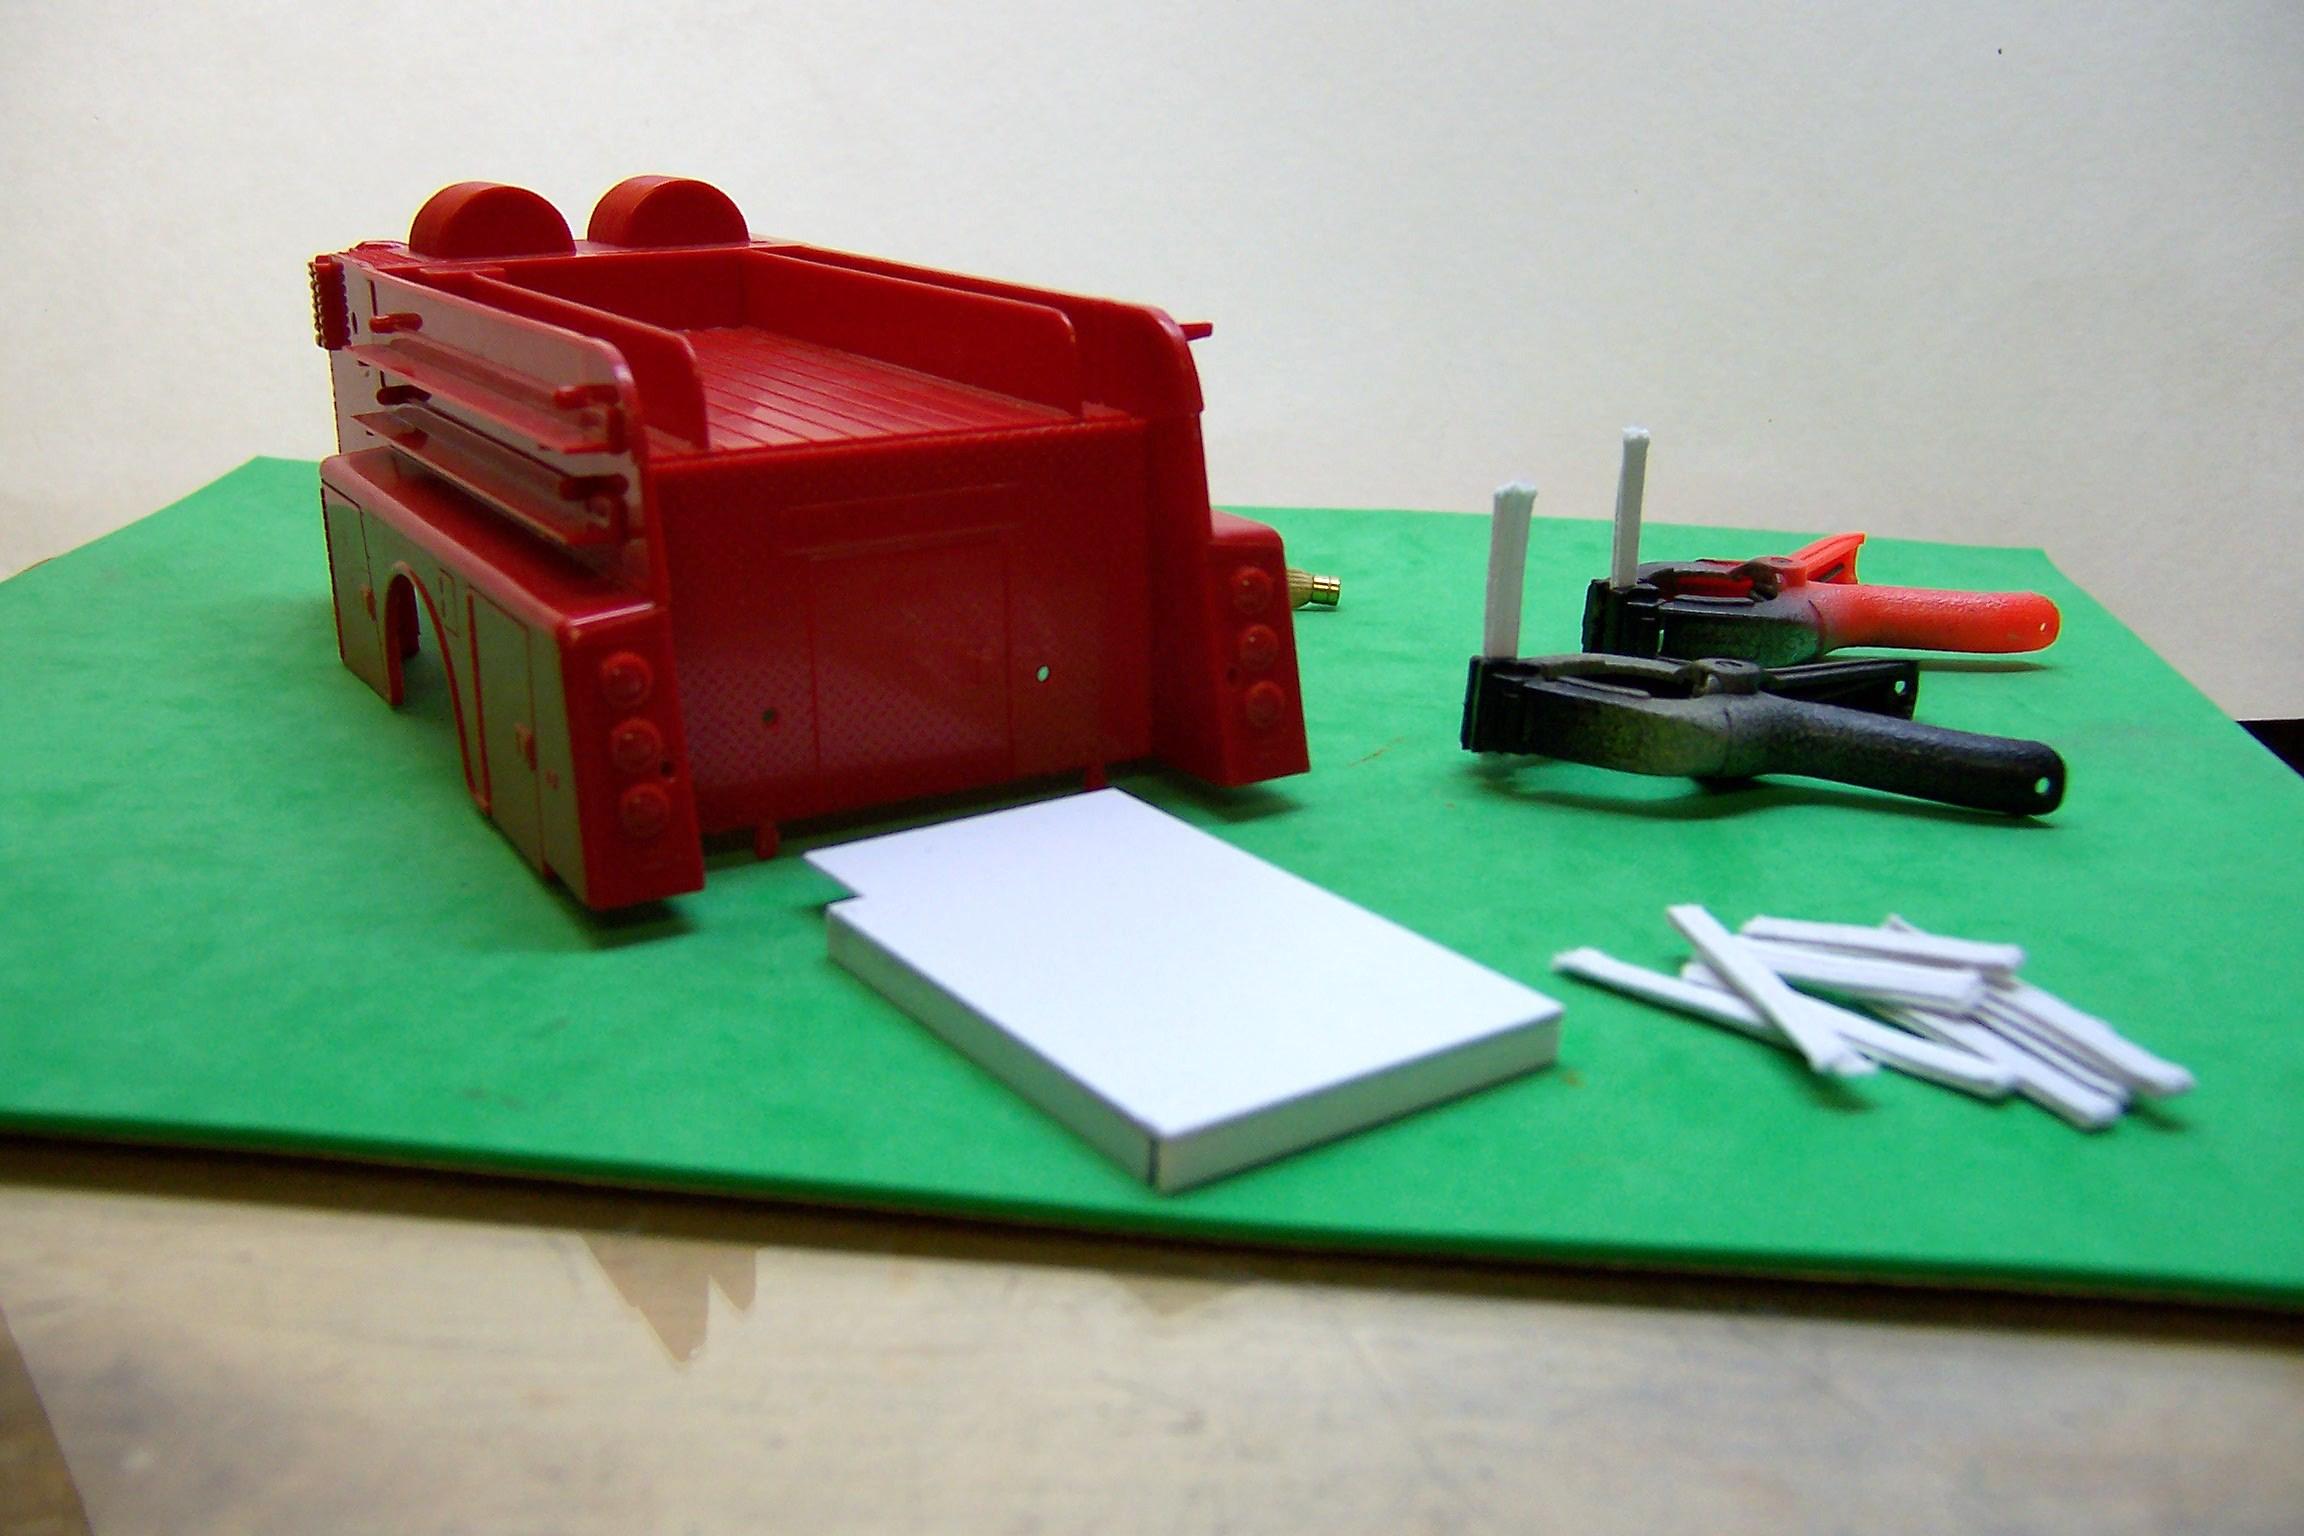
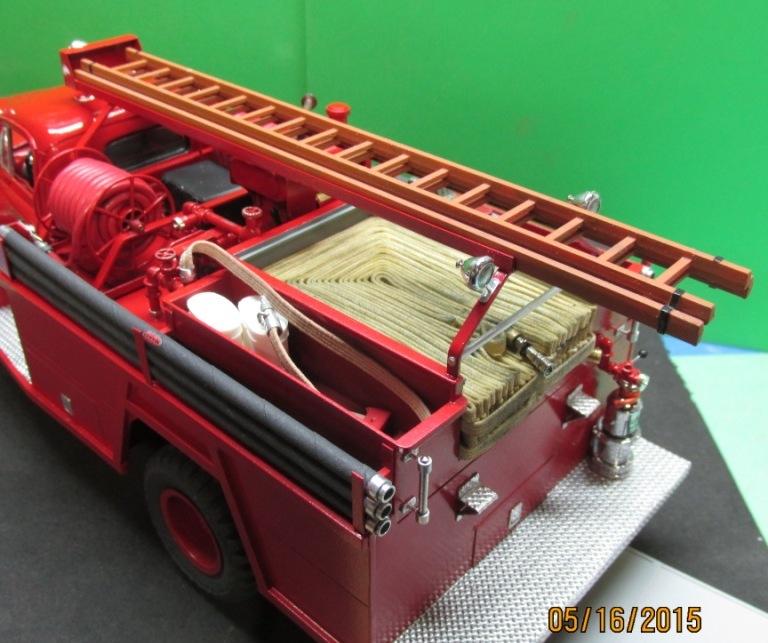
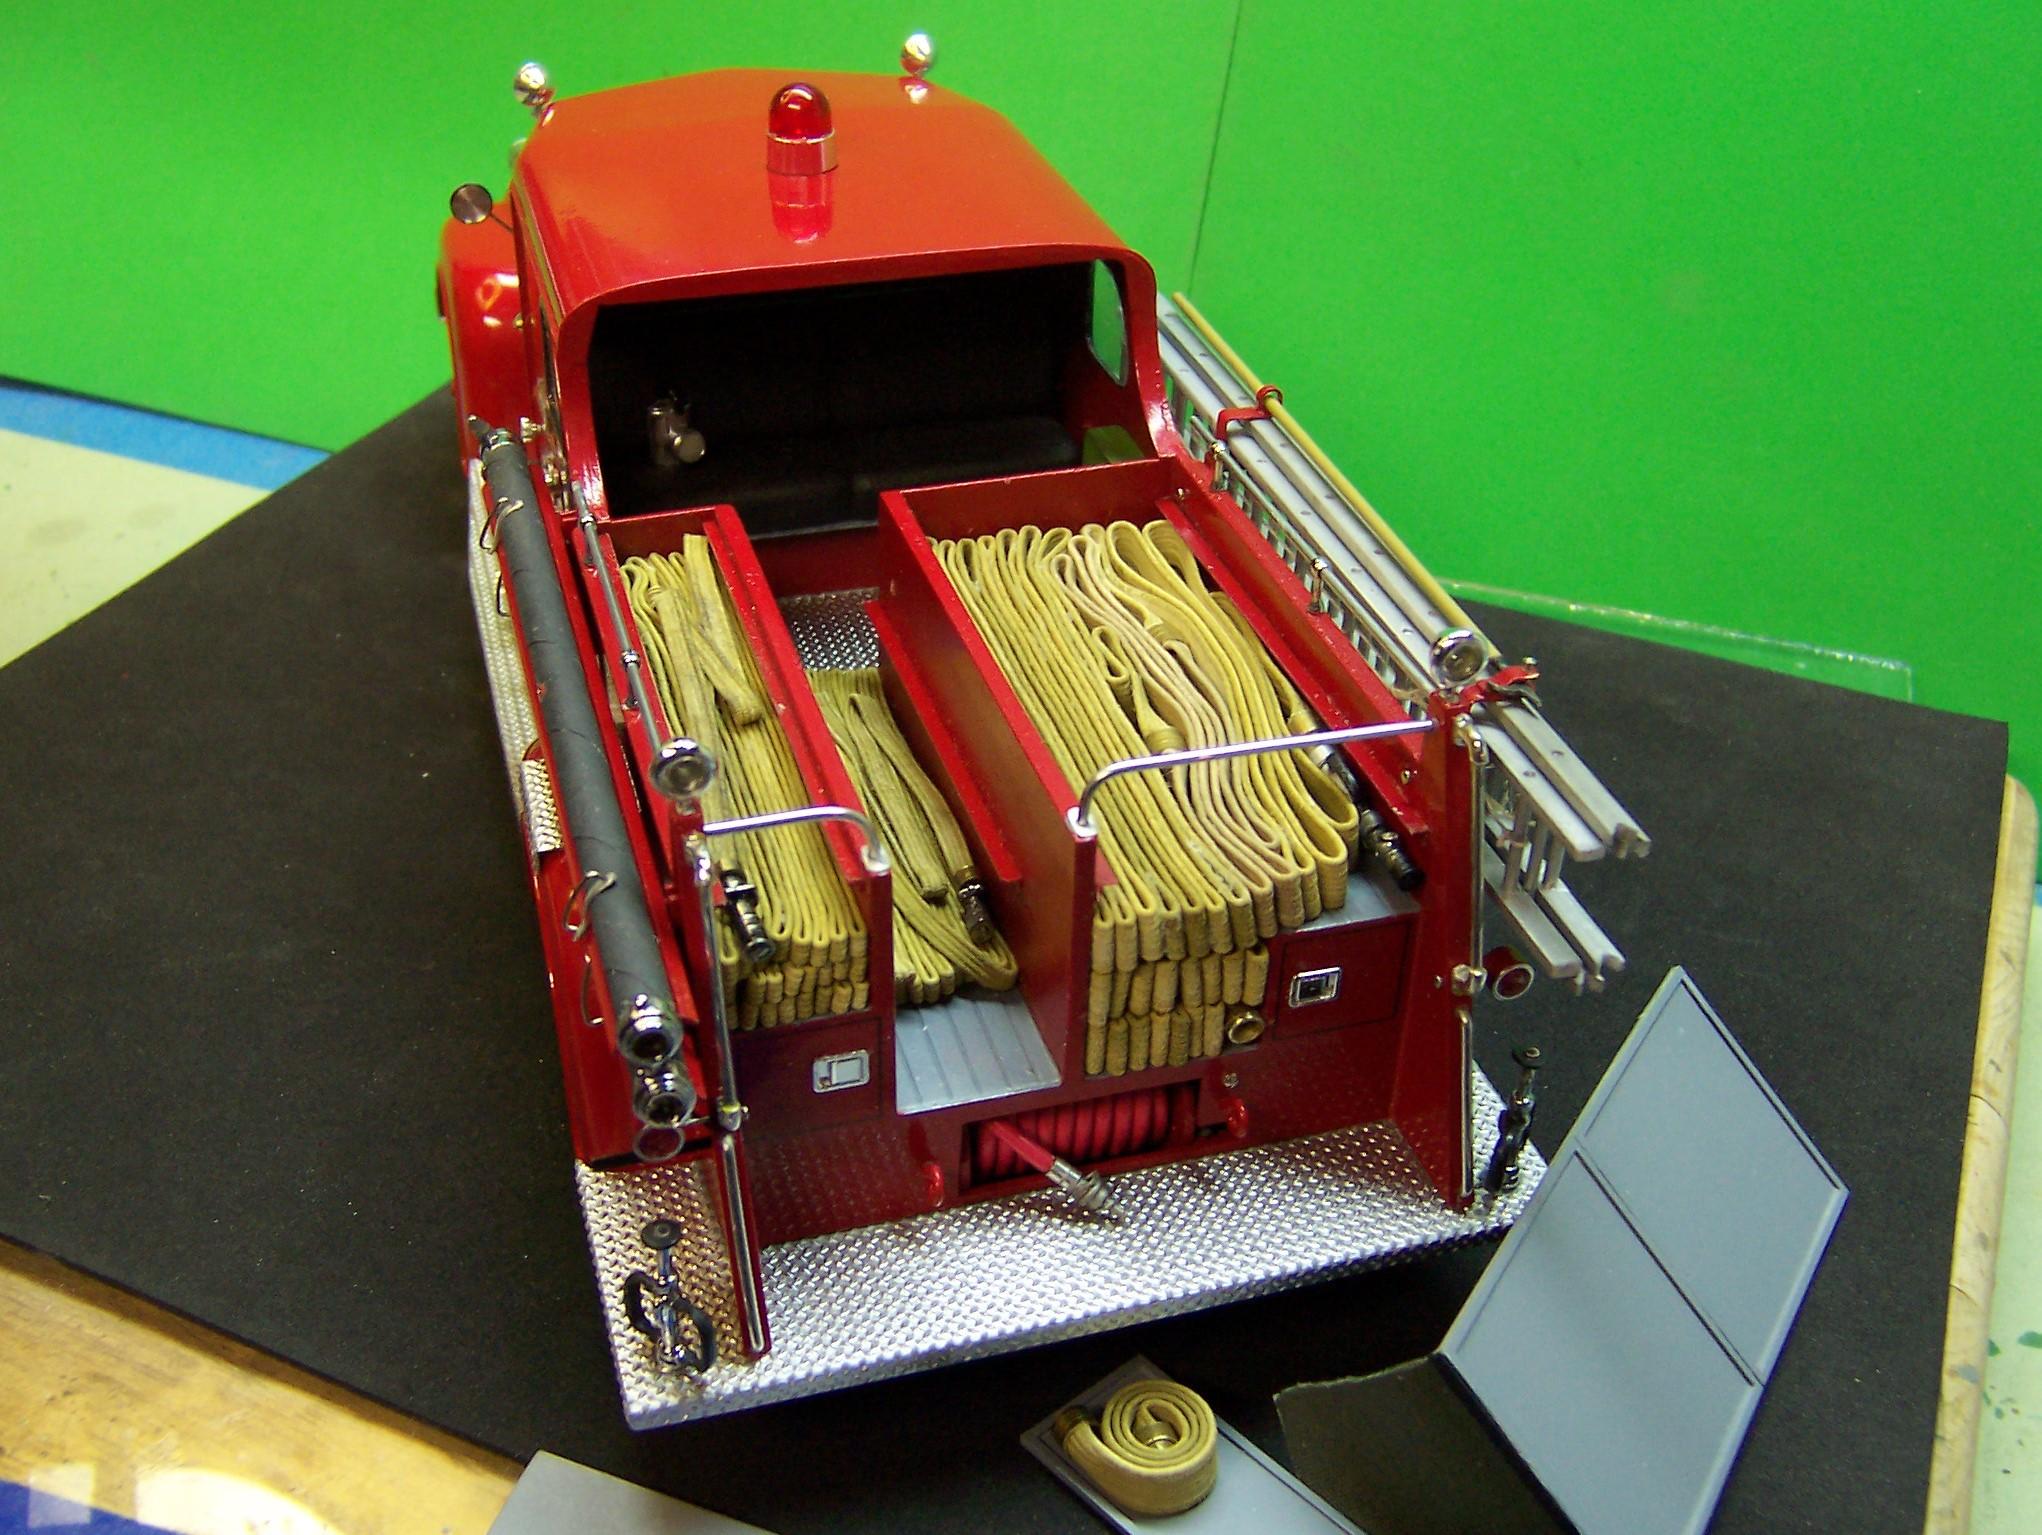
I'll do this one step at a time. The first is how to make up the hose that will be placed in the bed. So we start with the materials. Those nice old Floquil colors shown below you can't get anymore but there are plenty of acrylics out there that will work just as well. The hose is made of sewing elastic. Shoelaces just do not work as the weave is way to thick. The elastic comes in 1/8" and 1/4" wide pieces. I use the 1/8" elastic for working lines and the larger elastic for supply lines. You also need some aluminum tubing for modern couplings and brass tubing for earlier couplings. The Mack CF could use the aluminum tubing just fine. First stain the elastic with some light earth colors to imitate cotton jacket rubber lined hose. If you are using new synthetic hose you can leave it white as most of it comes that way. More modern hose is even different colors than that. You can cut the tubing to make couplings like I have made below. Since the hose is not charged it would look something like what is below. Note I joined an older cotton jacket type hose with the newer hose on the right. Nozzles can be made from brass tubing or in this case I got them from Don Mills Hobbies. Now on to actually filling a hose bed. Here is the back of one of the Monogram Mack CF trucks. In the photo below I have made a shallow box that will fill up part of the hose bed. This is done to cut down on the amount of elastic you have to use to fill the bed correctly. Also in the photo are some small sections of elastic that I have folded over and glued. They are temporarily clamped until the glue dries. You will need to make several of these. The shallow box is now in the bed and I have begun to fill up the rear of the bed with the short pieces of elastic. In this case I stained the elastic first. Note that the hose is lying flat. This is known as a flat lay. The entire rear of the bed needs to be filled with the short elastic pieces until the bottom is completely covered and is filled to the level of the shallow box. With the end of the hose bed filled begin to fill in the rest of the hose bed over the shallow box. Try and hide the end of the elastic underneath. Start by running a full length of elastic from the front of the hose bed to the rear beginning to cover the short pieces of elastic previously put in place. Just continue this procedure over the full width of the bed until at least two layers cover the entire box. You don't want any of the box to show through the layers of hose. They don't have to be placed perfectly. Real hose beds rarely are. If you want to you can add couplings along the way. Just make sure that the elastic hides the fact that it does not fully fill up the tubing you use for couplings. Once you get the hose in position the nozzle can be added to the end as shown in the photo. Below is an example of a horseshoe lay. The hose runs from one side of the hose bed around the front to the opposite side and then back again. Ultimately it meets in the middle. Not too many hose beds are loaded this way today. In the example below the hose is loaded in what is known as the accordion lay. It starts on one side, returns on the same side and extends across the hose bed as shown until the bed is full. It is placed in more than one layer to fill the bed with as much hose as it can carry. On the left is 1/8" elastic and on the right is 1/4" elastic. And here is another example. This time I used 3M yellow tape to simulate large diameter synthetic hose. I folded the tape in thirds in long strips and then placed it in the bed. Along side is some of the white elastic for regular cotton jacket supply lines. I hope this has helped in providing some ways of making a model fire truck look more realistic. A model fire truck without hose looks pretty empty!
-
Mack monogram fire truck
Chariots of Fire replied to Aerodyne03's topic in WIP: Model Trucks: Big Rigs and Heavy Equipment
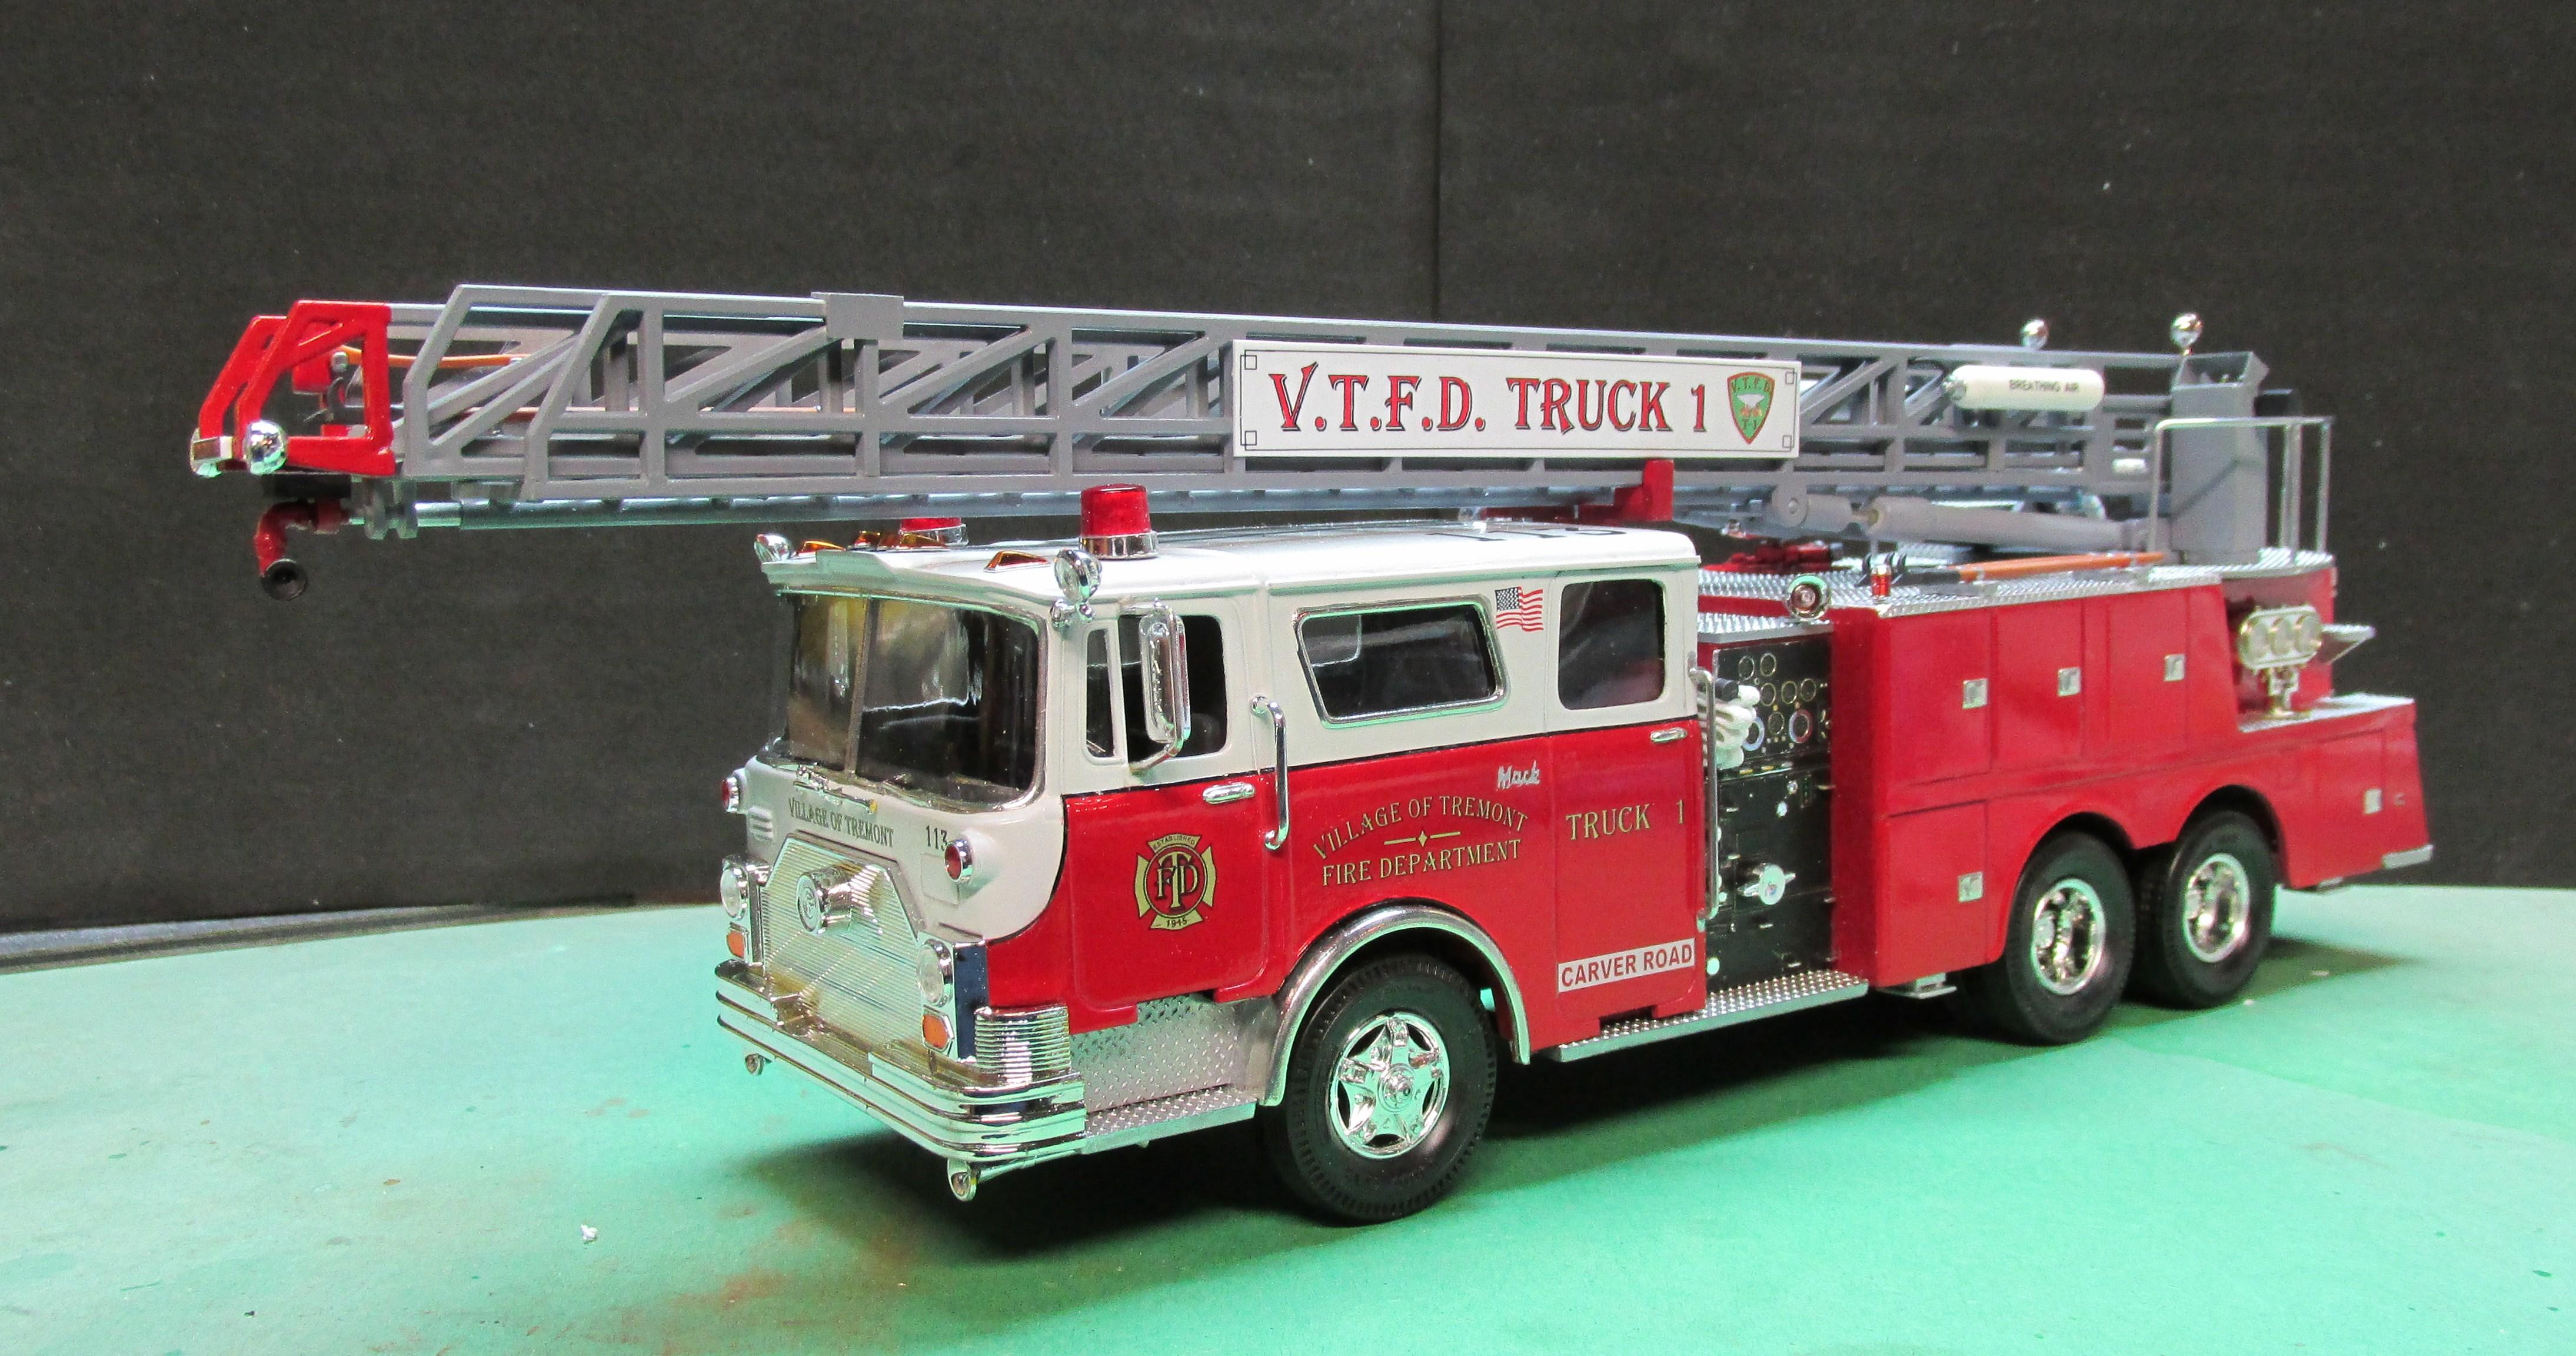
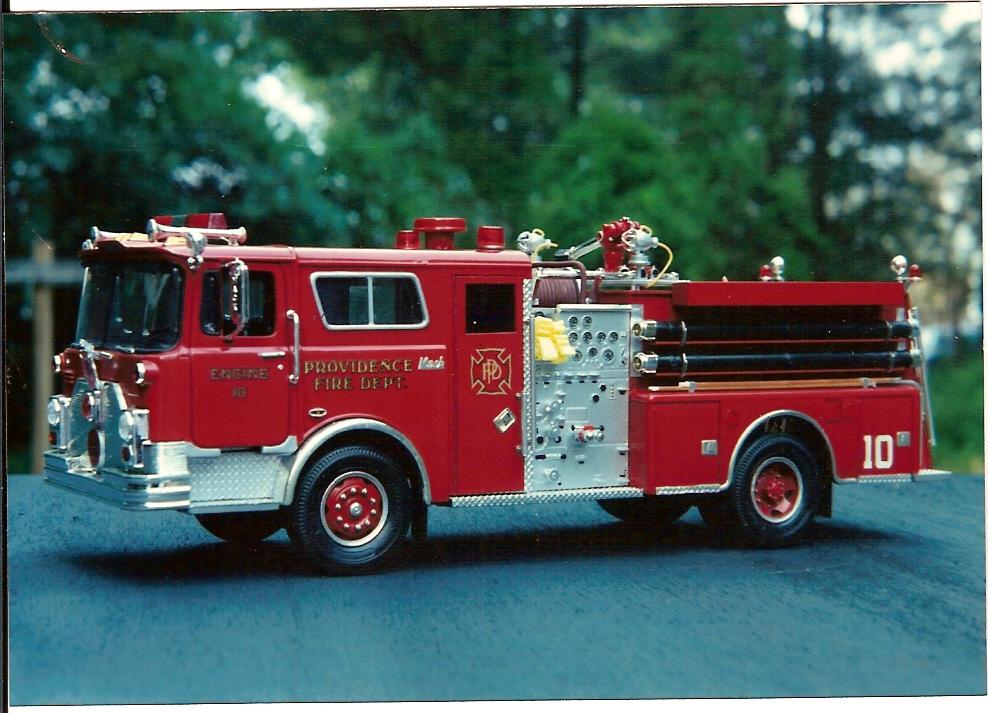
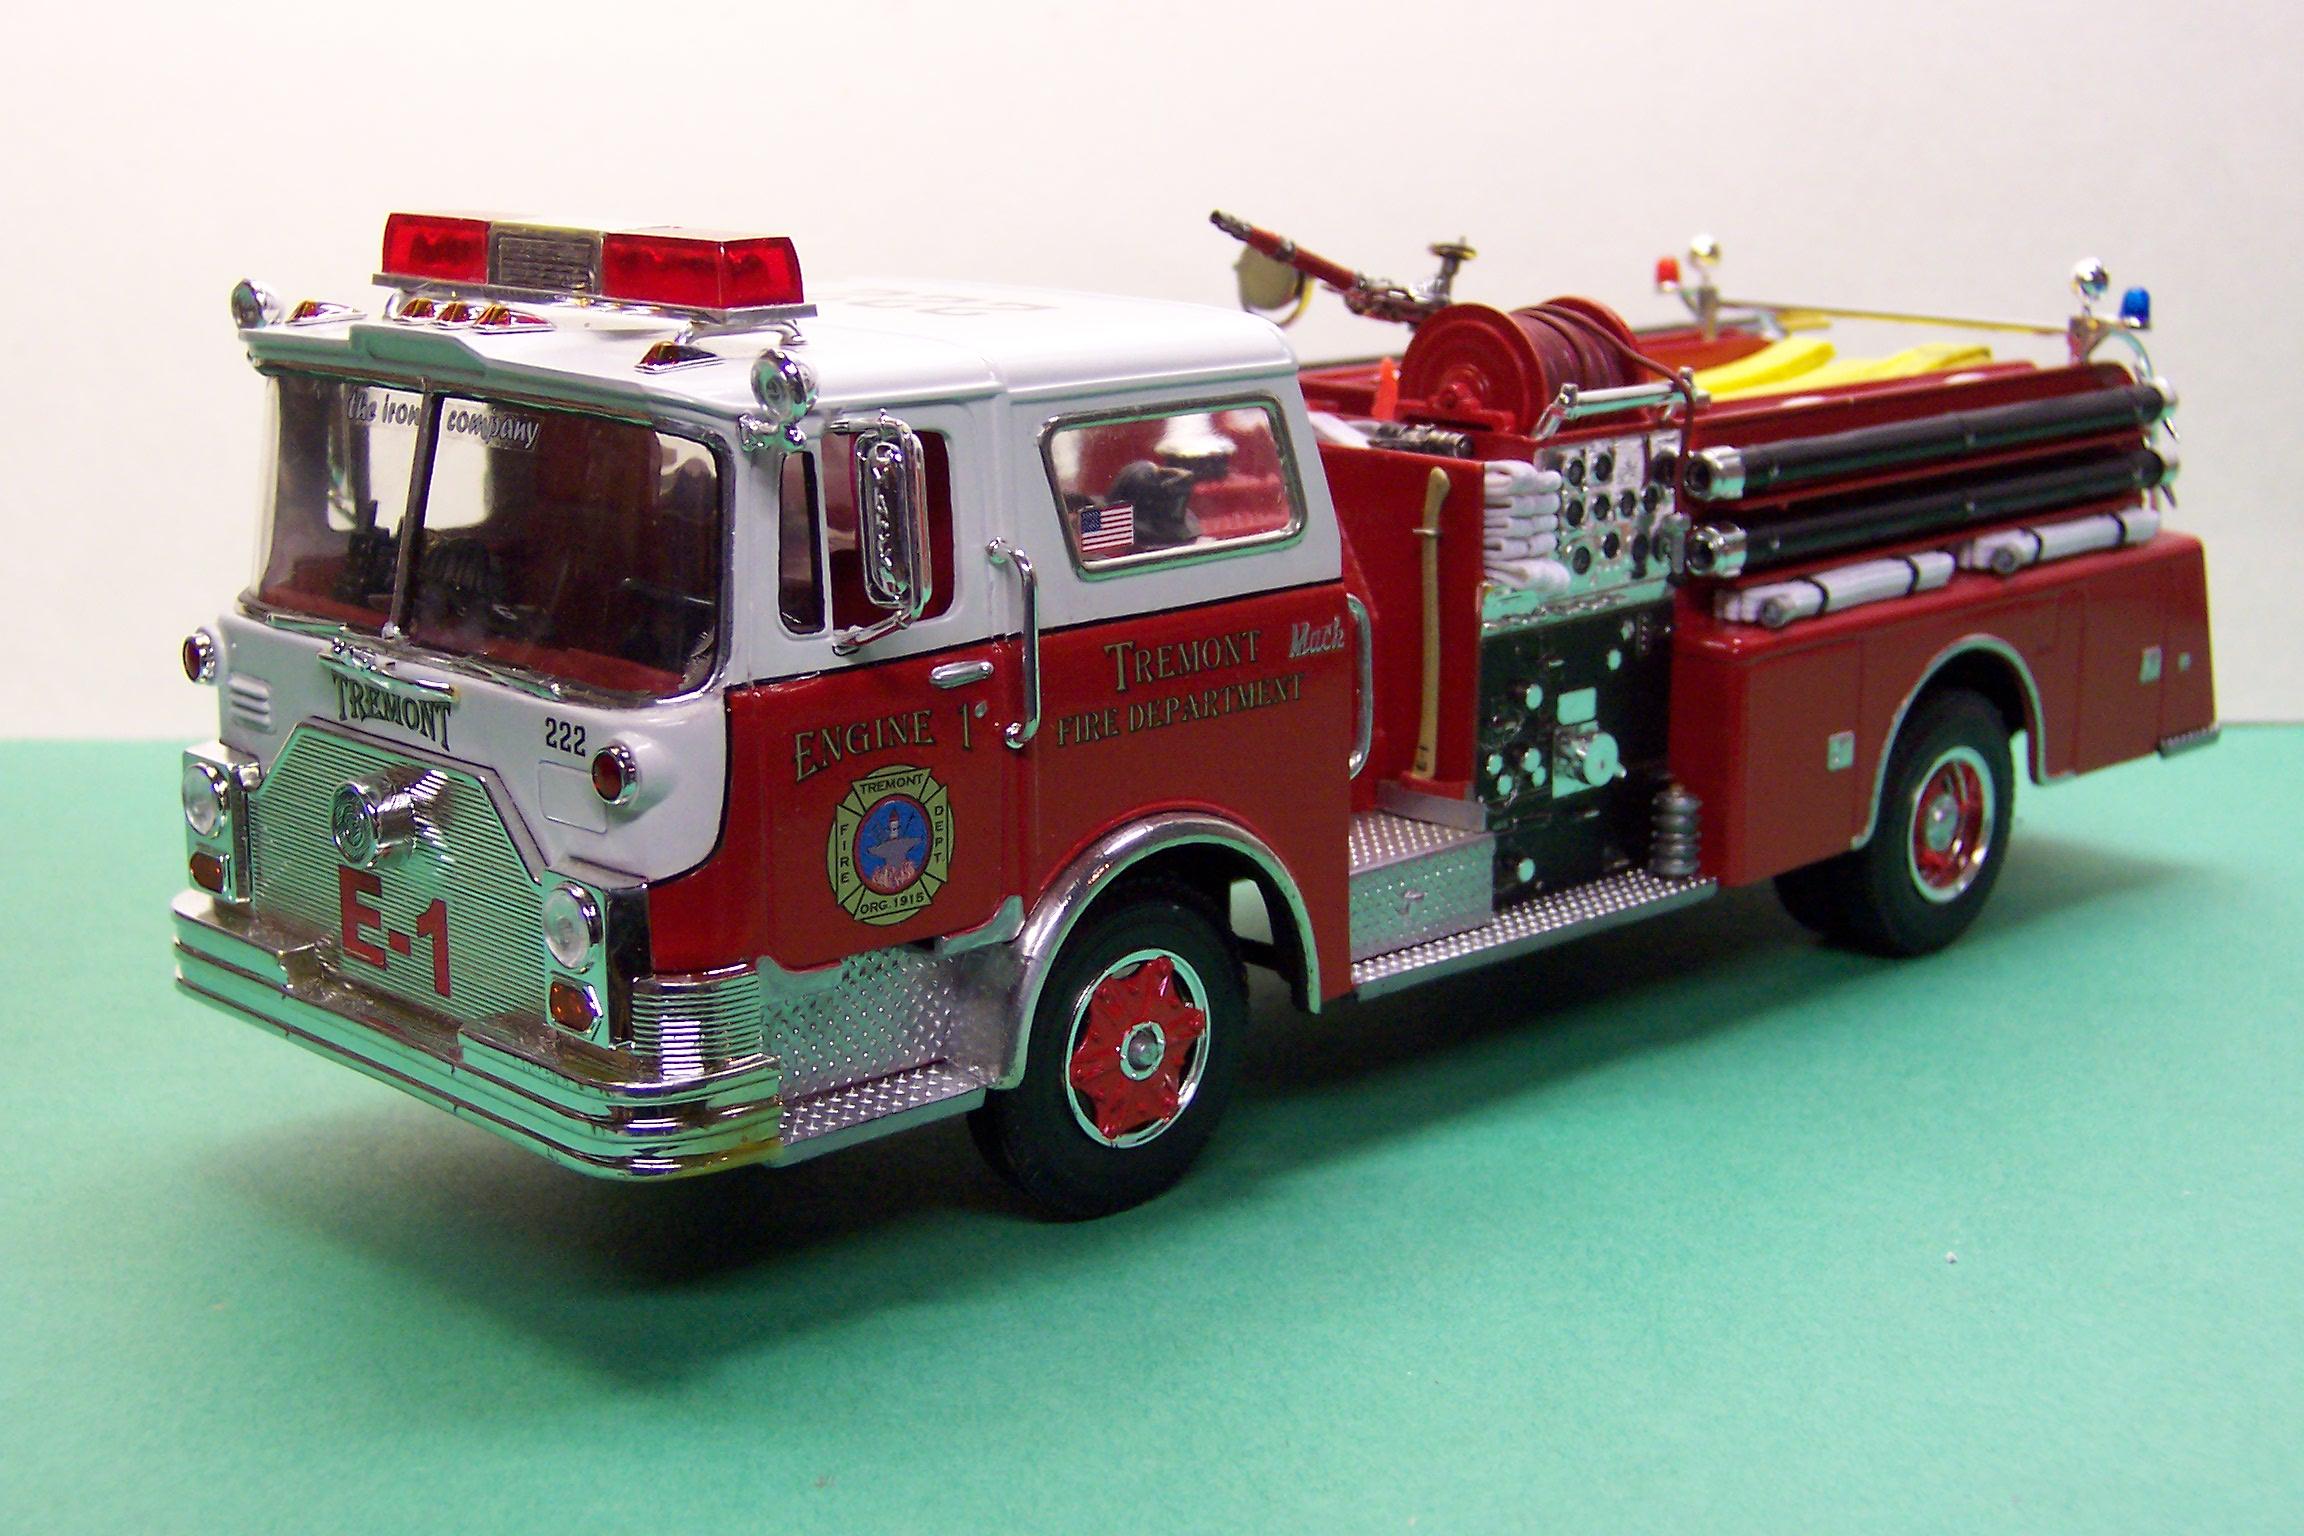
Those are nice easy kits to work with. Even though they are snap kits, a lot can be done with them. Here are some examples with some extra things added. If you are going to paint the model a different color be sure and use a good primer first. The yellow tends to bleed through, especially if the color you chose is white. I've also used the spare tires from another kit to fill in the backs of the tires since they are open. Slice off the sidewall of the extra tire, sand it smooth and glue it to the back of the tire you are going to use for the model. The look is improved a lot that way. For the aerial ladder below I used more than one kit to extend the cab and make the body. The aerial came from a Hess promotional toy and was modified with a new turntable. Note also that the windshield is one piece in the kit. The actual windshield has a divider in the middle. That can be done using a piece of plastic strip stock. The Providence, Rhode Island engine was built using two cabs. Other details were scratch built. The last one is almost as it comes from the box but I cut out the molded in cross lay hoses, filled in the hole and added some sewing elastic for hose. The hose on the reel is small solder wire. I made up a tutorial on how to create a hose load for the bed that I can post if anyone is interested.
-
In this case I have a copy of the builder's diagrams that give the overall dimensions. They are drawn to a scale of 1:24 if you had a full size plan. But scanned in the size obviously changes. So I copy the plan into a CAD program and draw a line in 1/25 scale that represents the wheelbase (as an example dimension. Others could be used) and then resize the drawing so that the picture wheel base matches the line wheelbase. Everything else follows suit. If I can I will get actual dimensions and eliminate some of the guesswork. Once the drawings are to 1/25 scale size I can print them out and use them for patterns. You can do that with photos as well. Scan them in, copy to CAD and then size appropriately. The limiting factor, however, is that in a photo the only thing in proper shape is what is directly in front of you. The camera lens does not know to compensate for that so you have to be careful what you are taking dimensions from.
-
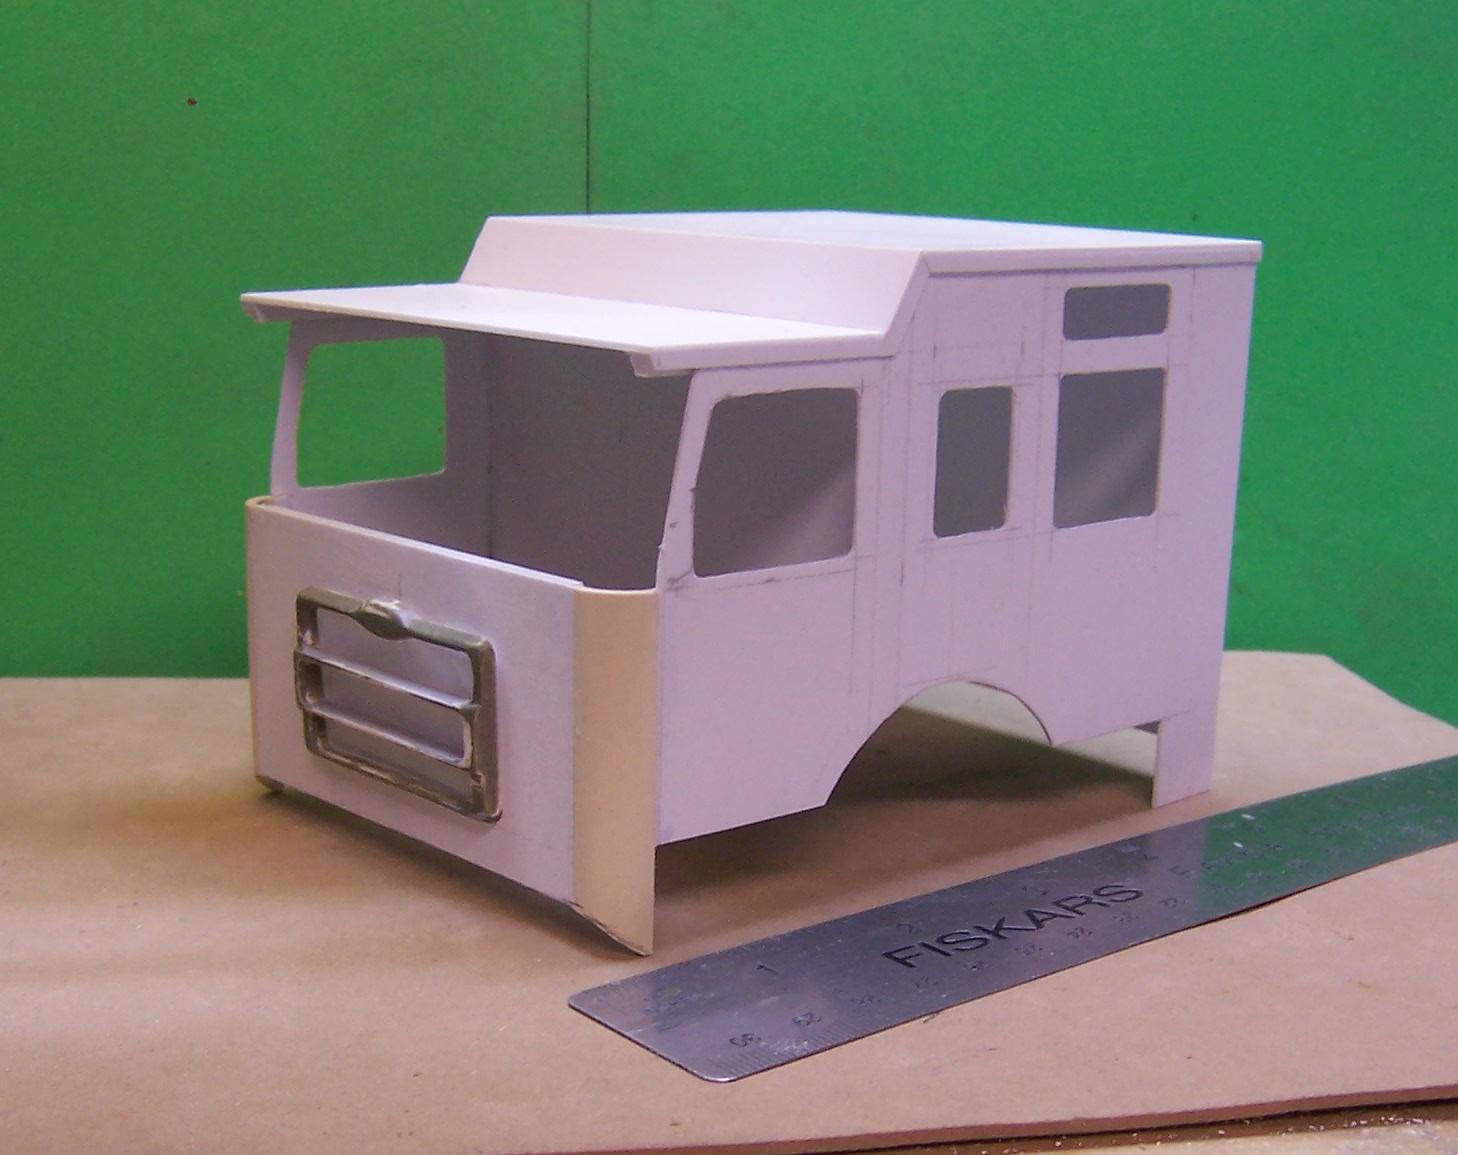
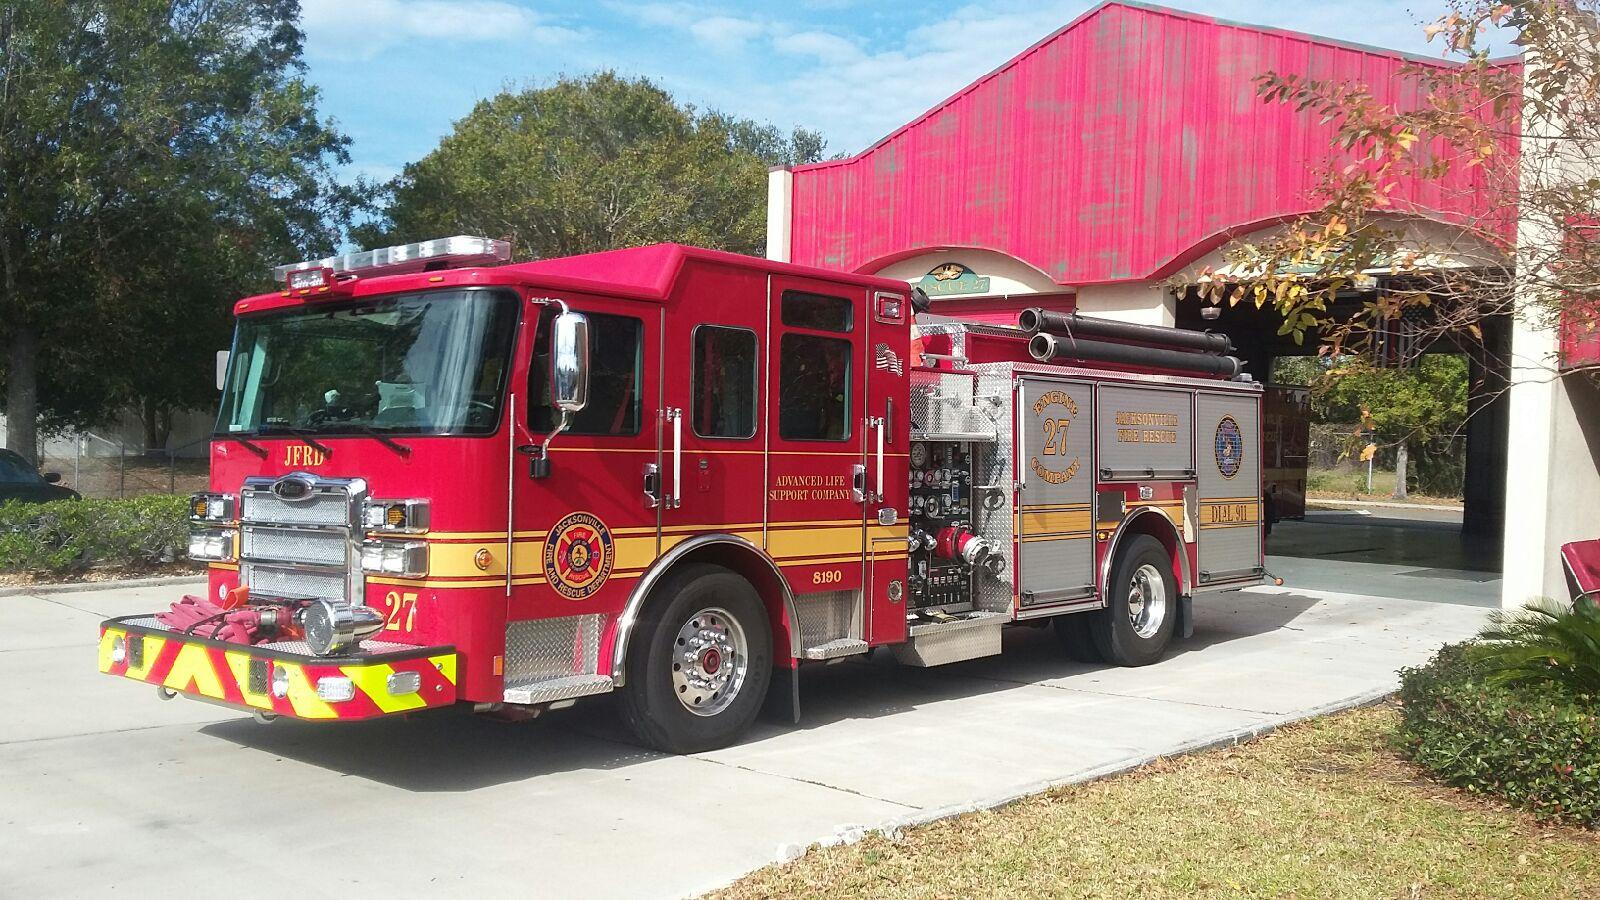
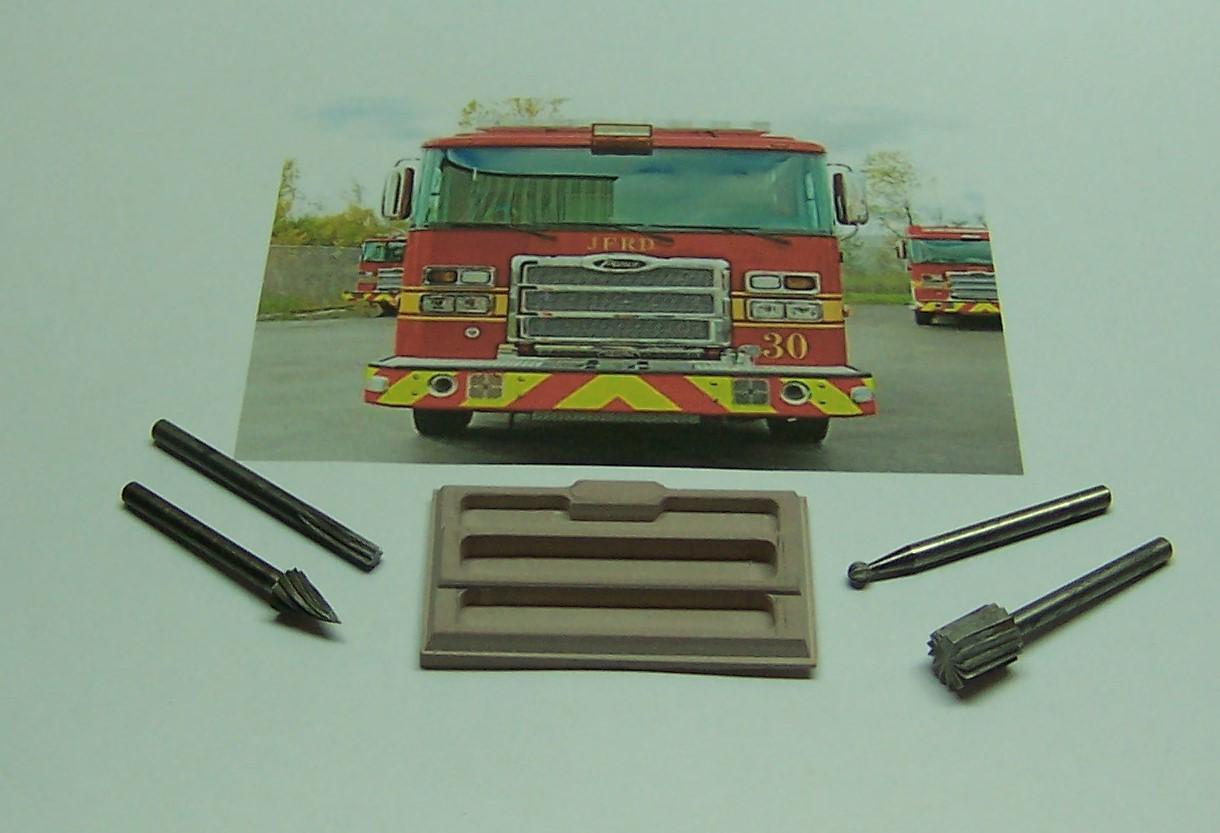
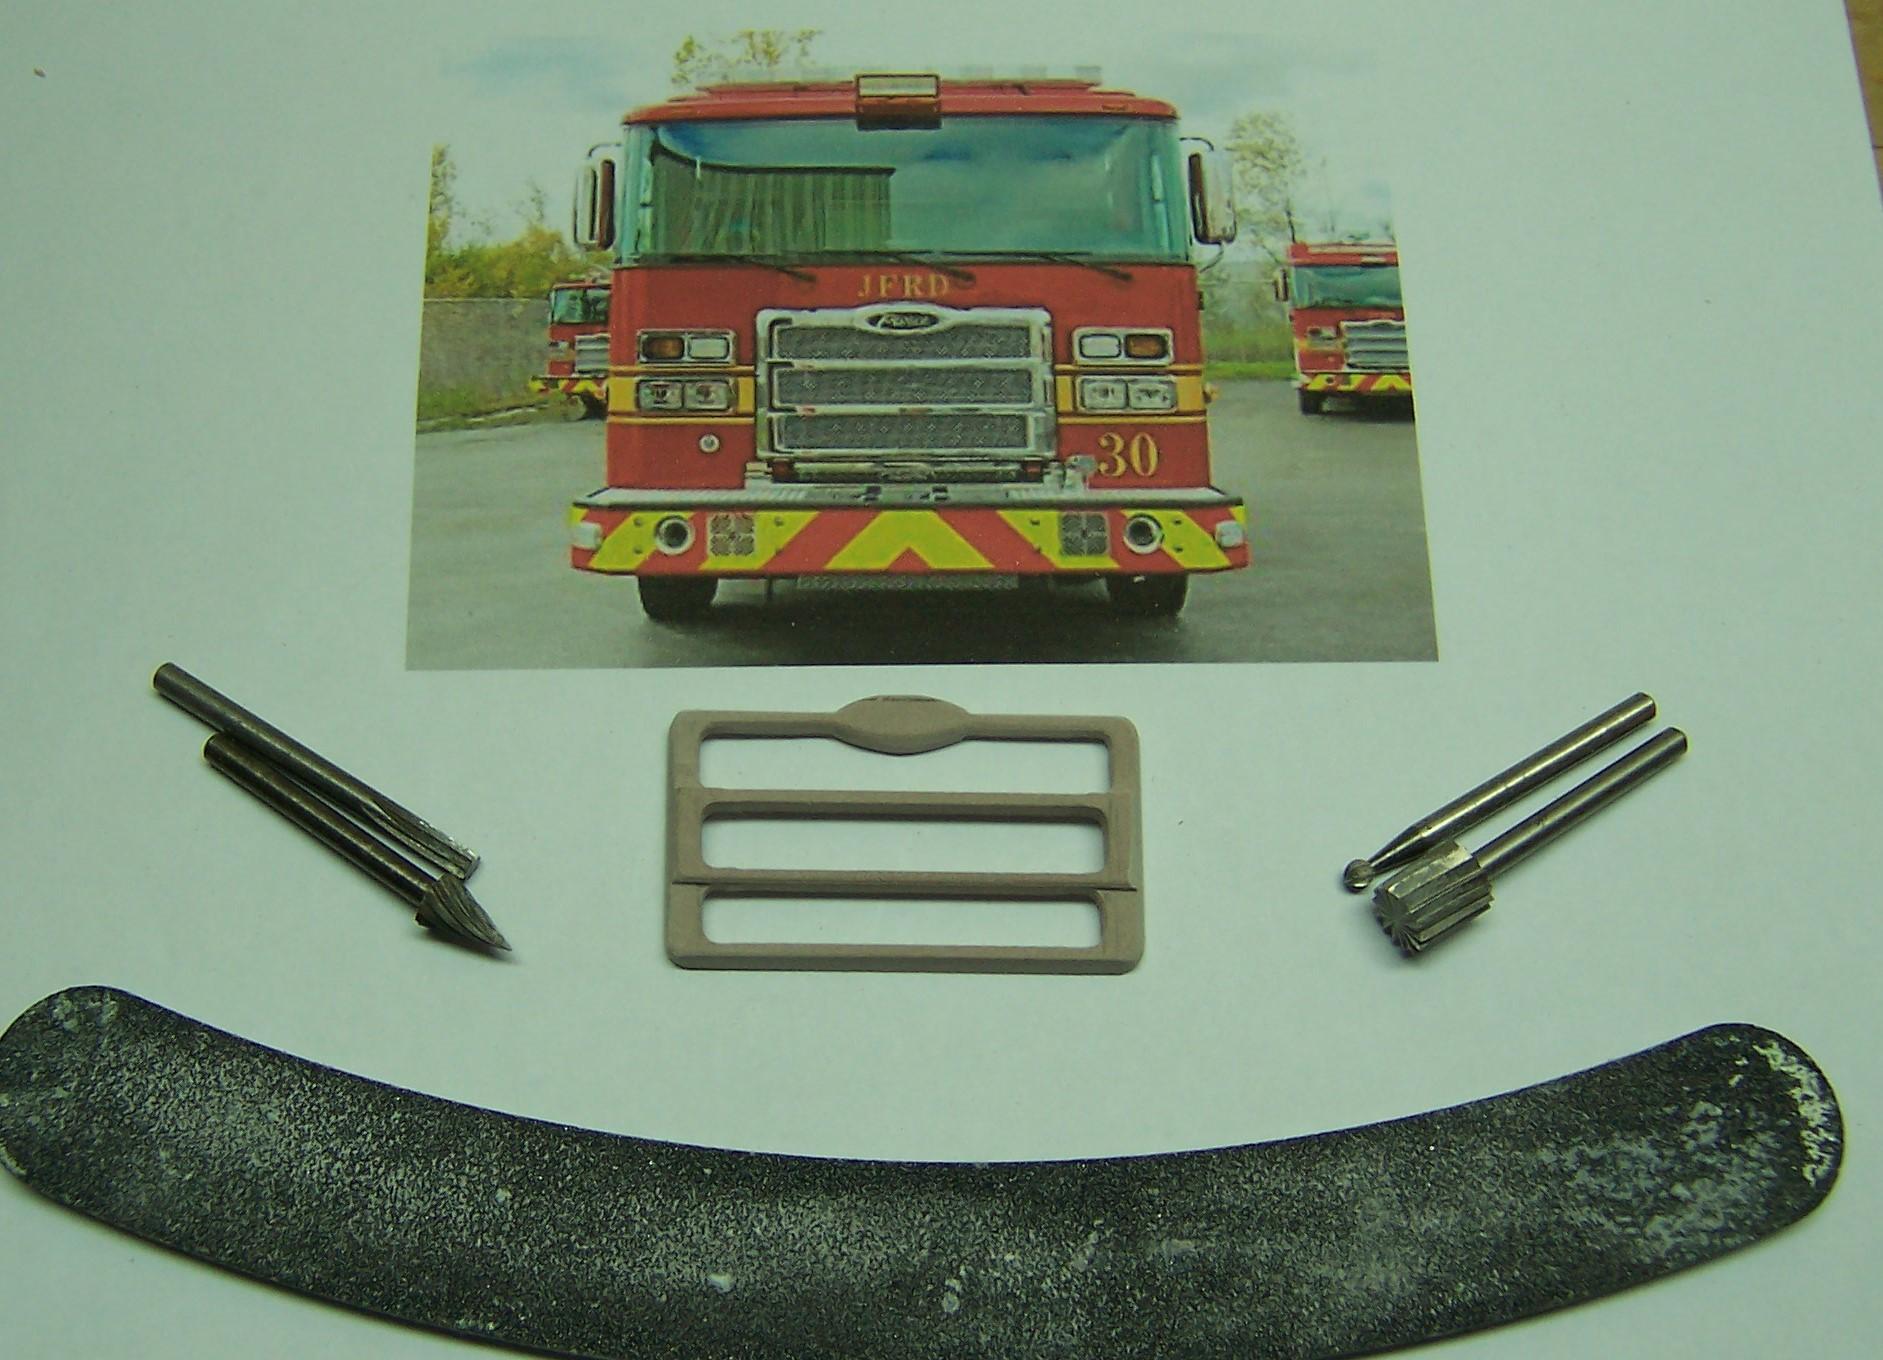
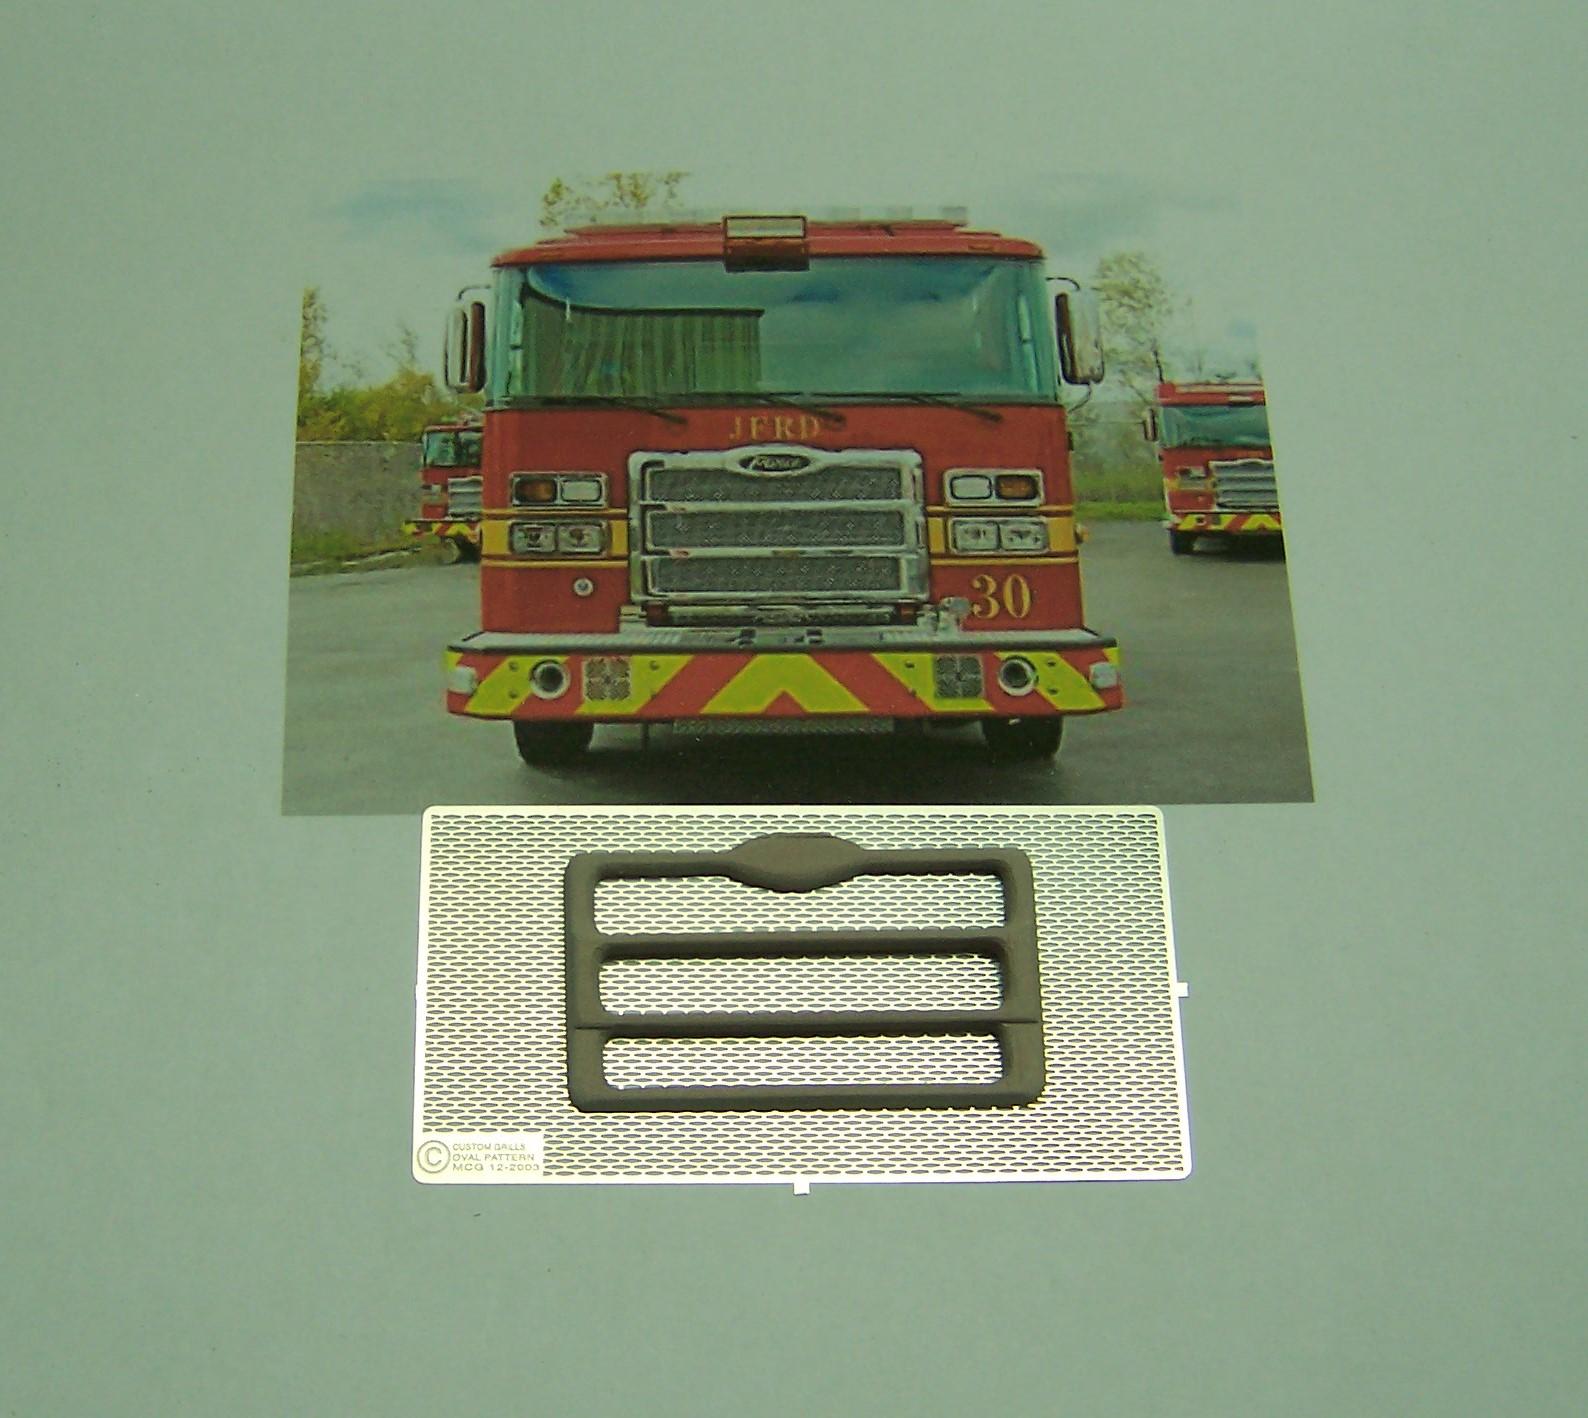
Got a new build on the workbench. This time it's a new rig with plenty of opportunity for scratch building. The Trumpeter kit will have some widgets that I can use and the frame and tires will come in handy. I started out with the grill because it is the most intricate and needs to be smooth and crisp to stand out. I have used Renshape for fenders and such but not for something as delicate as this. After drawing out the overall shape on the Renshape I used various cutters in my drill/mill to cut out the inner portions and to smooth up the surface. It has two different levels so using a flat cutter for that made the job easy. This is what it looks like as it came out of the mill and the excess stock was sawn away. Next was to thin out the back. I first used the disc sander to get it close and then did the rest with sanding sticks. I continued until the backing got paper thin. Thinning the grill out made it easy to take a sharp Xacto knife and run around the openings to eliminate the paper thin membrane. Now its necessary to really work on the outside shape and thin the back even more. Once the thinning is done and is ready for finish work, this photoetch mesh pattern will be used to back the grill up. It's not exactly like the real thing but it will be close enough.
-
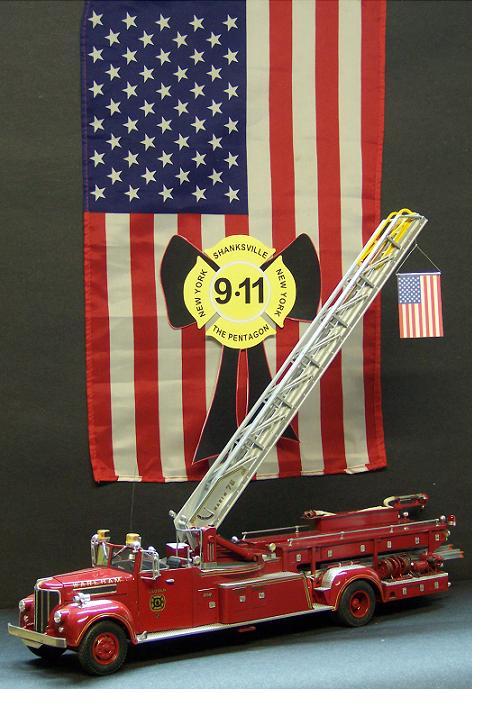
Once more we remember.
Chariots of Fire replied to Chariots of Fire's topic in Model Trucks: Big Rigs and Heavy Equipment
You're right, Tom. So many now who haven't the slightest clue! That's why it is so important to pass the information on and in a truthful way. I was in my office; did not see the first plane hit the towers but we went and got a portable TV and watched the second one hit. Unbelievable! I think also of what it must have been like to make the decision to storm the cockpit of the plane that crashed in Shanksville, PA. Everyone on that plane knew the end was coming for them. Todd Bemis is the only name I remember but I remember also what he said: "Let's Roll!" and they did it anyway. -
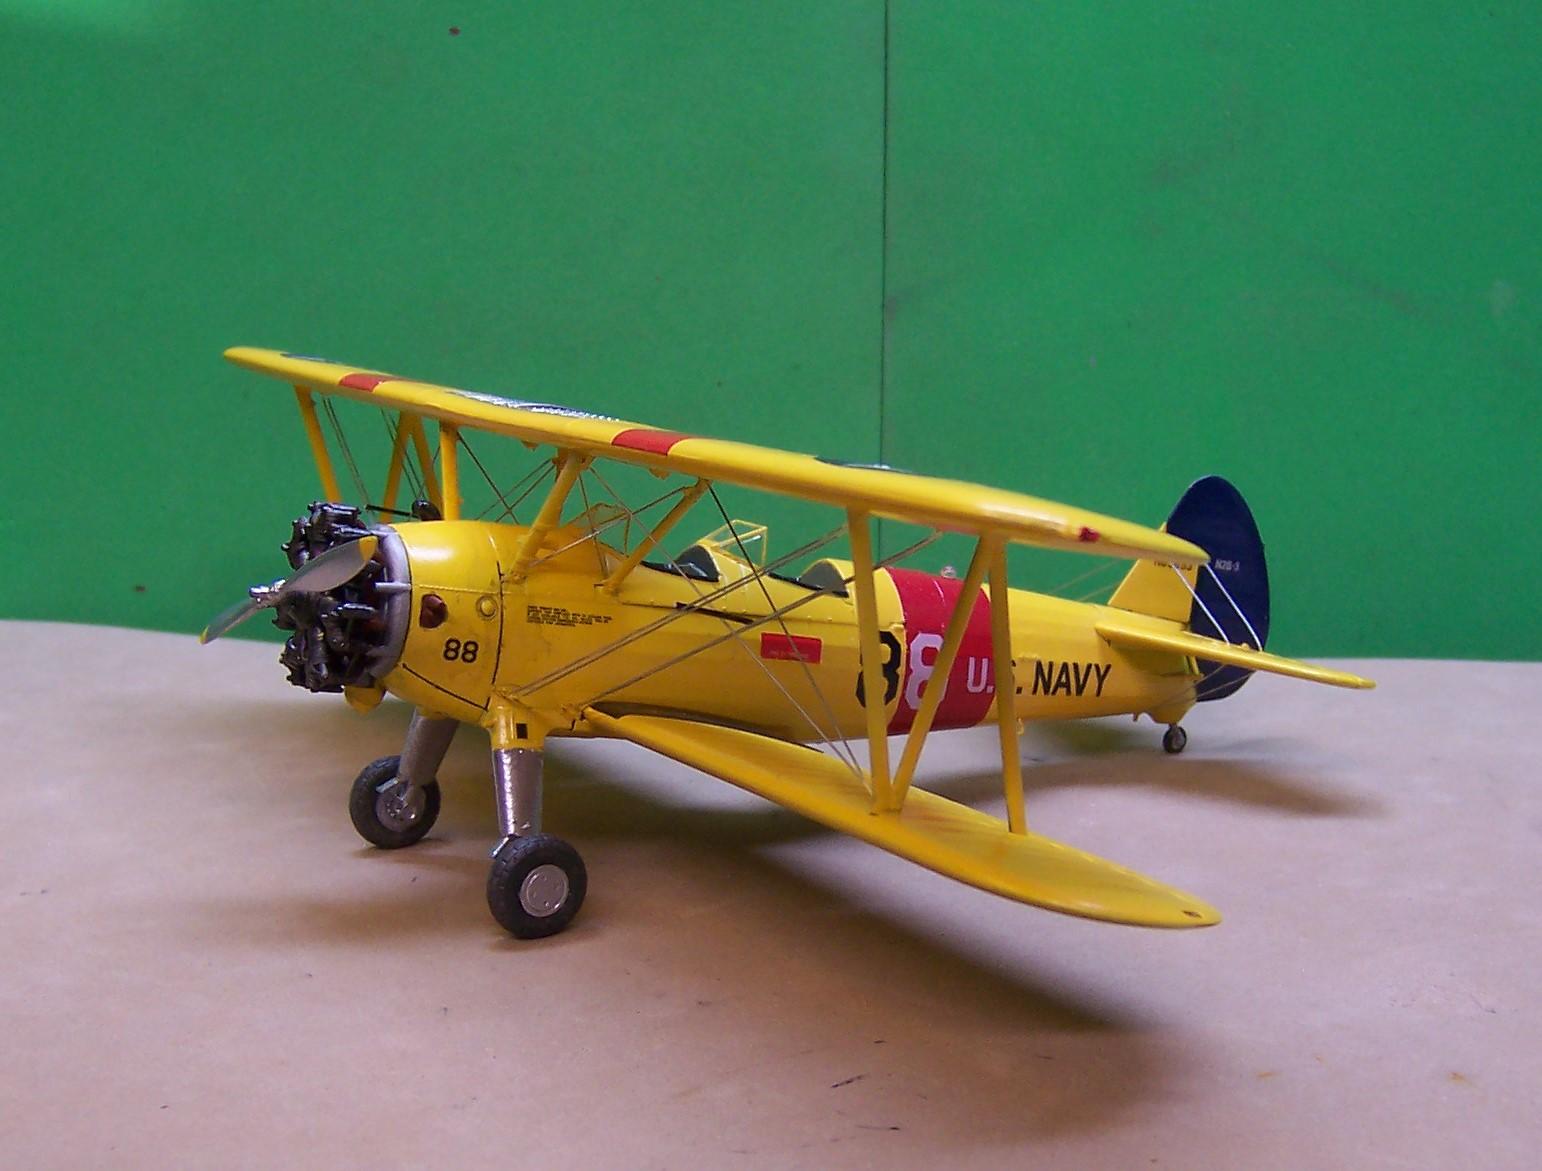
Try IPMS also. Lots of builders of aircraft that are part of that group. FSM magazine has a lot of info in it. Also a visit to the LHS is a good idea to see what a great variety there is in aircraft models of all scales. I like doing one from time to time. Here are a couple I did over the last few months during the covid thing. A J2F-2A Duck and a PT-17 Stearman.
-
Once more we remember.
Chariots of Fire posted a topic in Model Trucks: Big Rigs and Heavy Equipment
-
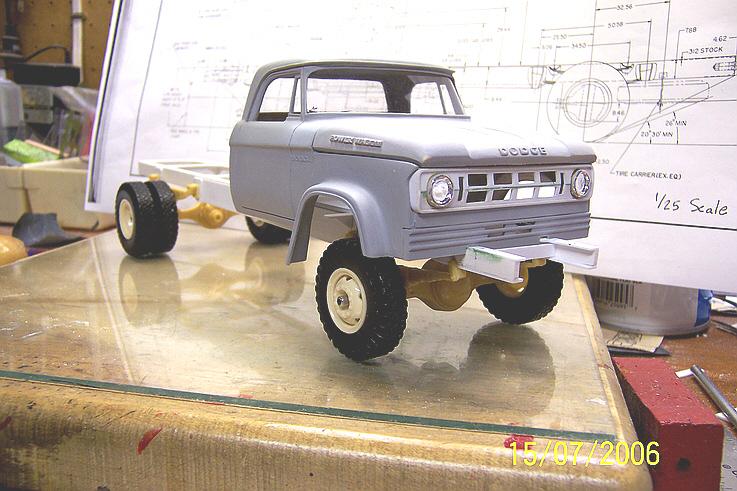
I did a '68 Cab for a truck like this. Grill would need to be modified slightly. The ramp portion would have to be scratch
-
CA and other things I'm clueless about
Chariots of Fire replied to SCRWDRVR's topic in Model Building Questions and Answers
CA is about all I use for all around building since I do a lot of scratch building. However, I would never use CA to fix small photoetch pieces in place such as name plates, emblems, etc. because it would only take one mis-alignment and there's no forgiveness in making an adjustment. This is especially true when trying to fit a badge on a nicely finished paint job. For those types of things I would use either 5 minute epoxy or some clear lacquer. In certain instances white glue might work but it does not make a particularly good bond with photoetch materials. CA will fog clear glass for windshields and window glass so don't use it there. Again I use 5 minute epoxy waiting until it has become tacky before setting the glass in place. Hope this helps. -
Mattel VacuForm guidance?
Chariots of Fire replied to aurfalien's topic in Model Building Questions and Answers
Micro-Mark sells them also. I bought one some time ago and have used it several times. Biggest challenge with them is the size of the clear plastic they supply. It's short a couple of inches to be able to take advantage of the full sheet of stock. I found a supplier of clear material outside of M-M that sells pre-cut sheets that fit perfectly and at a much cheaper price. The unit M-M sells is a dental style unit and works pretty well. -
I wouldn't waste my time with the Blitz. Not even close. Yes, the '41 Chevy P/U is basically the same cab. Take a look at the '37 Ford P/U. It has similar fenders and the headlights are separate like the Chevy above. Not a lot of re-shaping would be necessary to create the Chevy grill. All said, you've got your work cut out for you.
-
I'd like to see some additional photos of what you did if that is possible. Your work is outstanding and exceptionally clean. It would be really valuable if we had a section on this board for good how-to topics. Tips, etc. are ok but something of this magnitude needs to be developed to where we could take the time to really study the work involved. Right now I'm working on milling the grill for a new Pierce Enforcer cab. I'm doing it in Renshape in the hope that I can then create a mold for casting. It's on hold for a few days. Last night while working on it the drive belt on my drill/milling setup gave way and I'm waiting on a new one to come in the mail. Will post some pics of progress. Thanks for what you do, Jurgen! A great inspiration for sure!
-
Bedford recovery truck
Chariots of Fire replied to PierreR89's topic in Model Trucks: Big Rigs and Heavy Equipment
Works for me! Nice job on both rigs. Quite a contrast between the two when they sit side by side. -
Thanks to all for the kind comments. It's all a learning process, right? Try something and if it works, great. If it doesn't???well..........do something different! It's what makes modeling fun.