Chariots of Fire
-
Posts
2,782 -
Joined
-
Last visited
Content Type
Profiles
Forums
Events
Gallery
Everything posted by Chariots of Fire
-

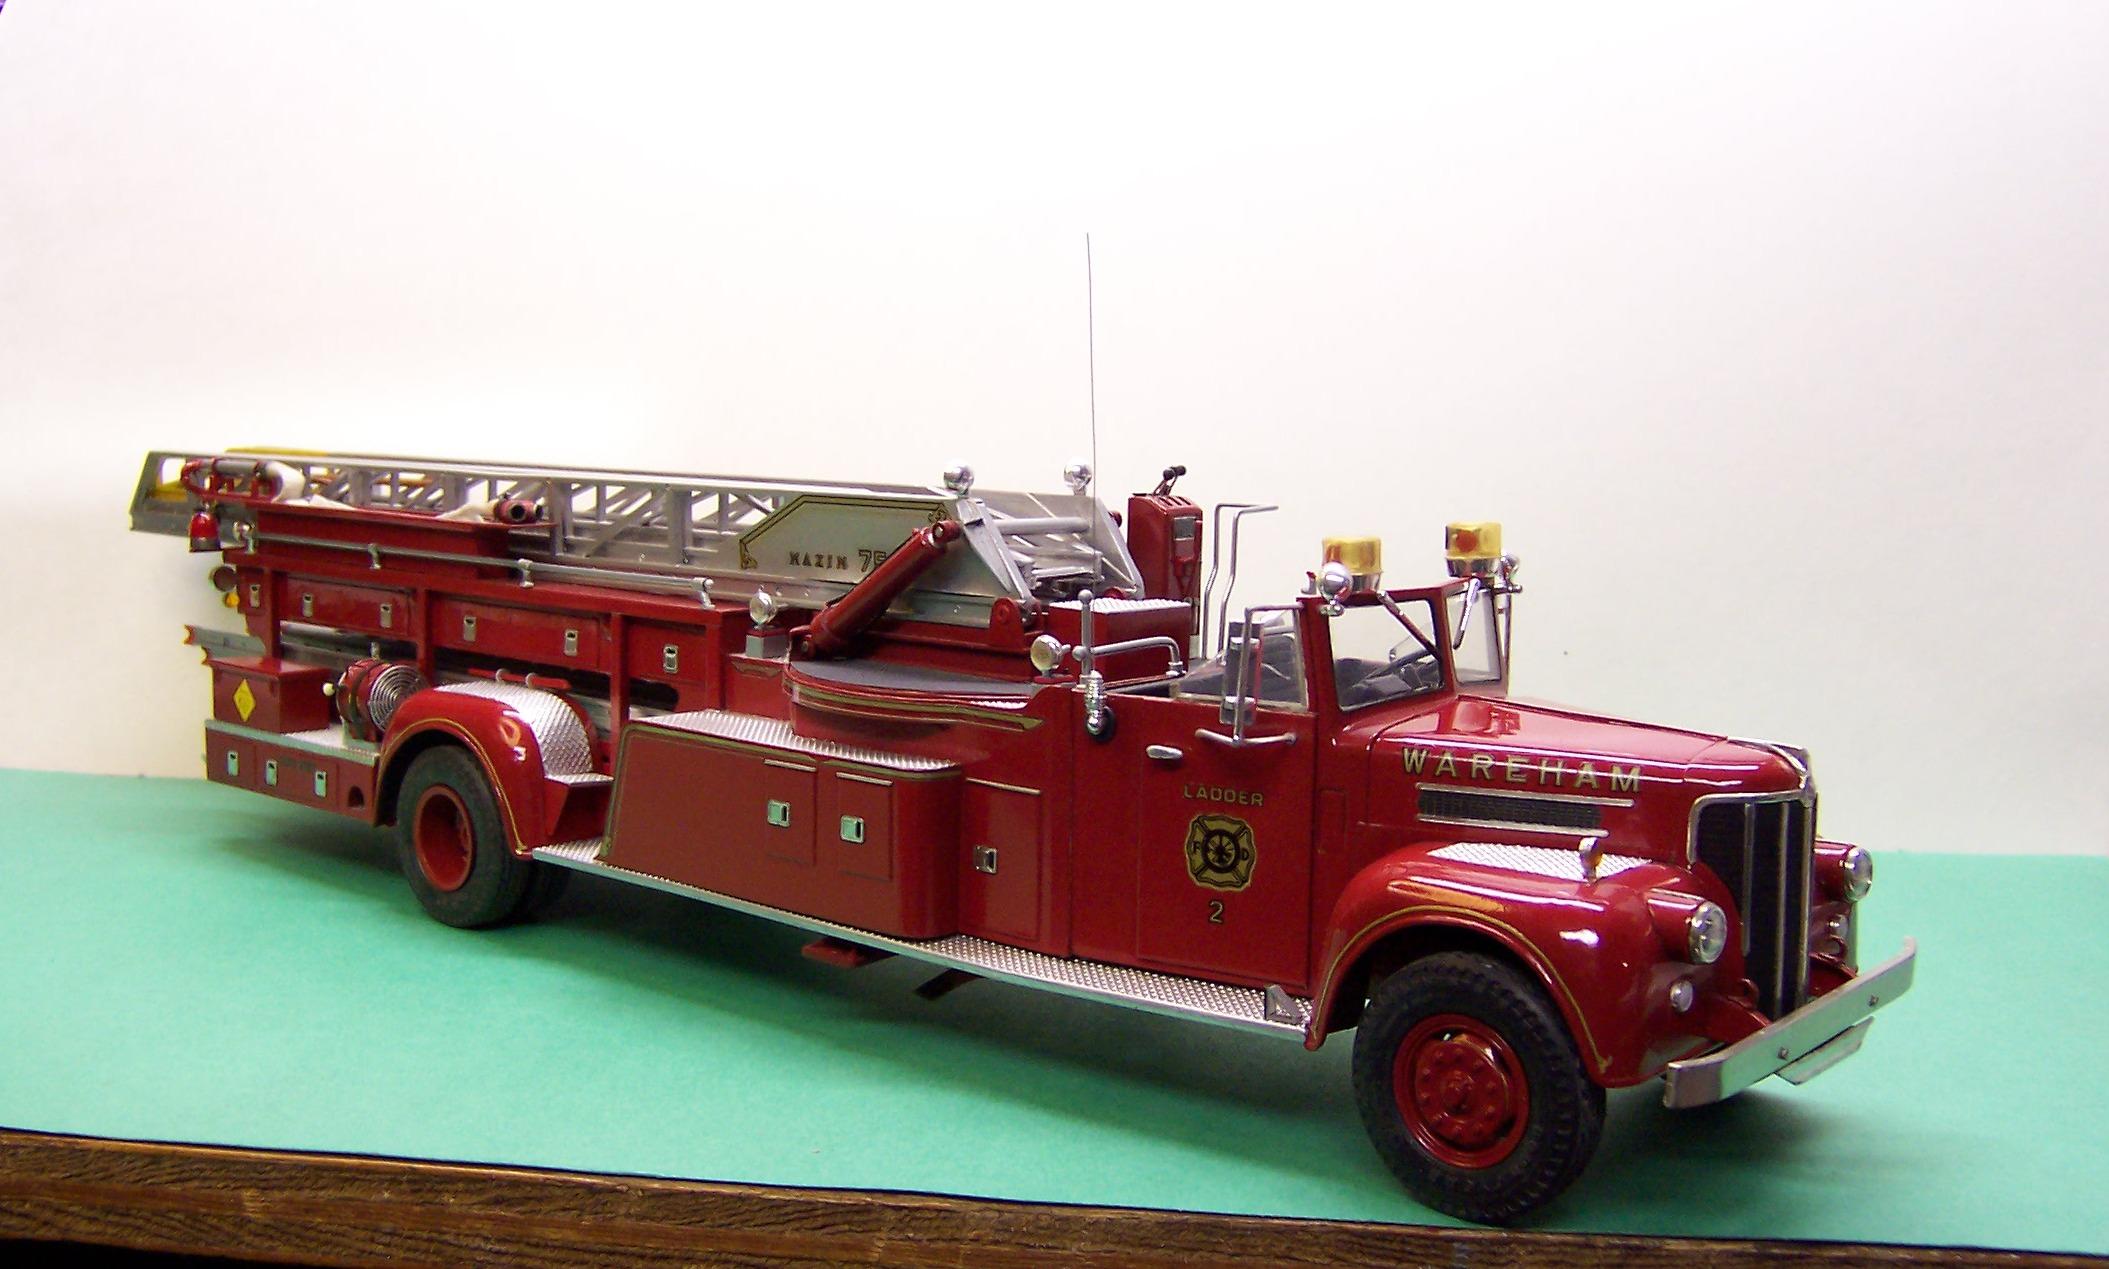
ALF Fire Chief Updated 9/21
Chariots of Fire replied to kilrathy10's topic in WIP: Model Trucks: Big Rigs and Heavy Equipment
Hey! JT! What better logo than UT Volunteers for a piece of fire apparatus! Looking pretty good, my man! Mirrors are just right, too! Ok........no more foolin' around. On to the boom!!!? -
It's been a while since I used that last technique but it did come in handy. Years ago I used it to form some fenders for a 1955 Maxim aerial. Wrapped the plastic fore and aft and to the side. That left holes in the corners but they were easy to fill in with some sheet stock and then sand them round. Today I'd opt for the Renshape but 30 years ago who ever heard of Renshape! Here's the '55 Maxim that was done back in 1985 using the boiling water technique for the fenders. Remembering back I did it with the grill also on this piece. That is a former KW grill that I wrapped around a broom handle to soften it.

-
HI, Ed. Don still does business out of East Boston. I'm still able to get the square and round door latches and some nozzles from him. I imported the city seal from images on line and then incorporated it into my graphics programs to develop the striping. ALPS does the printing.
-
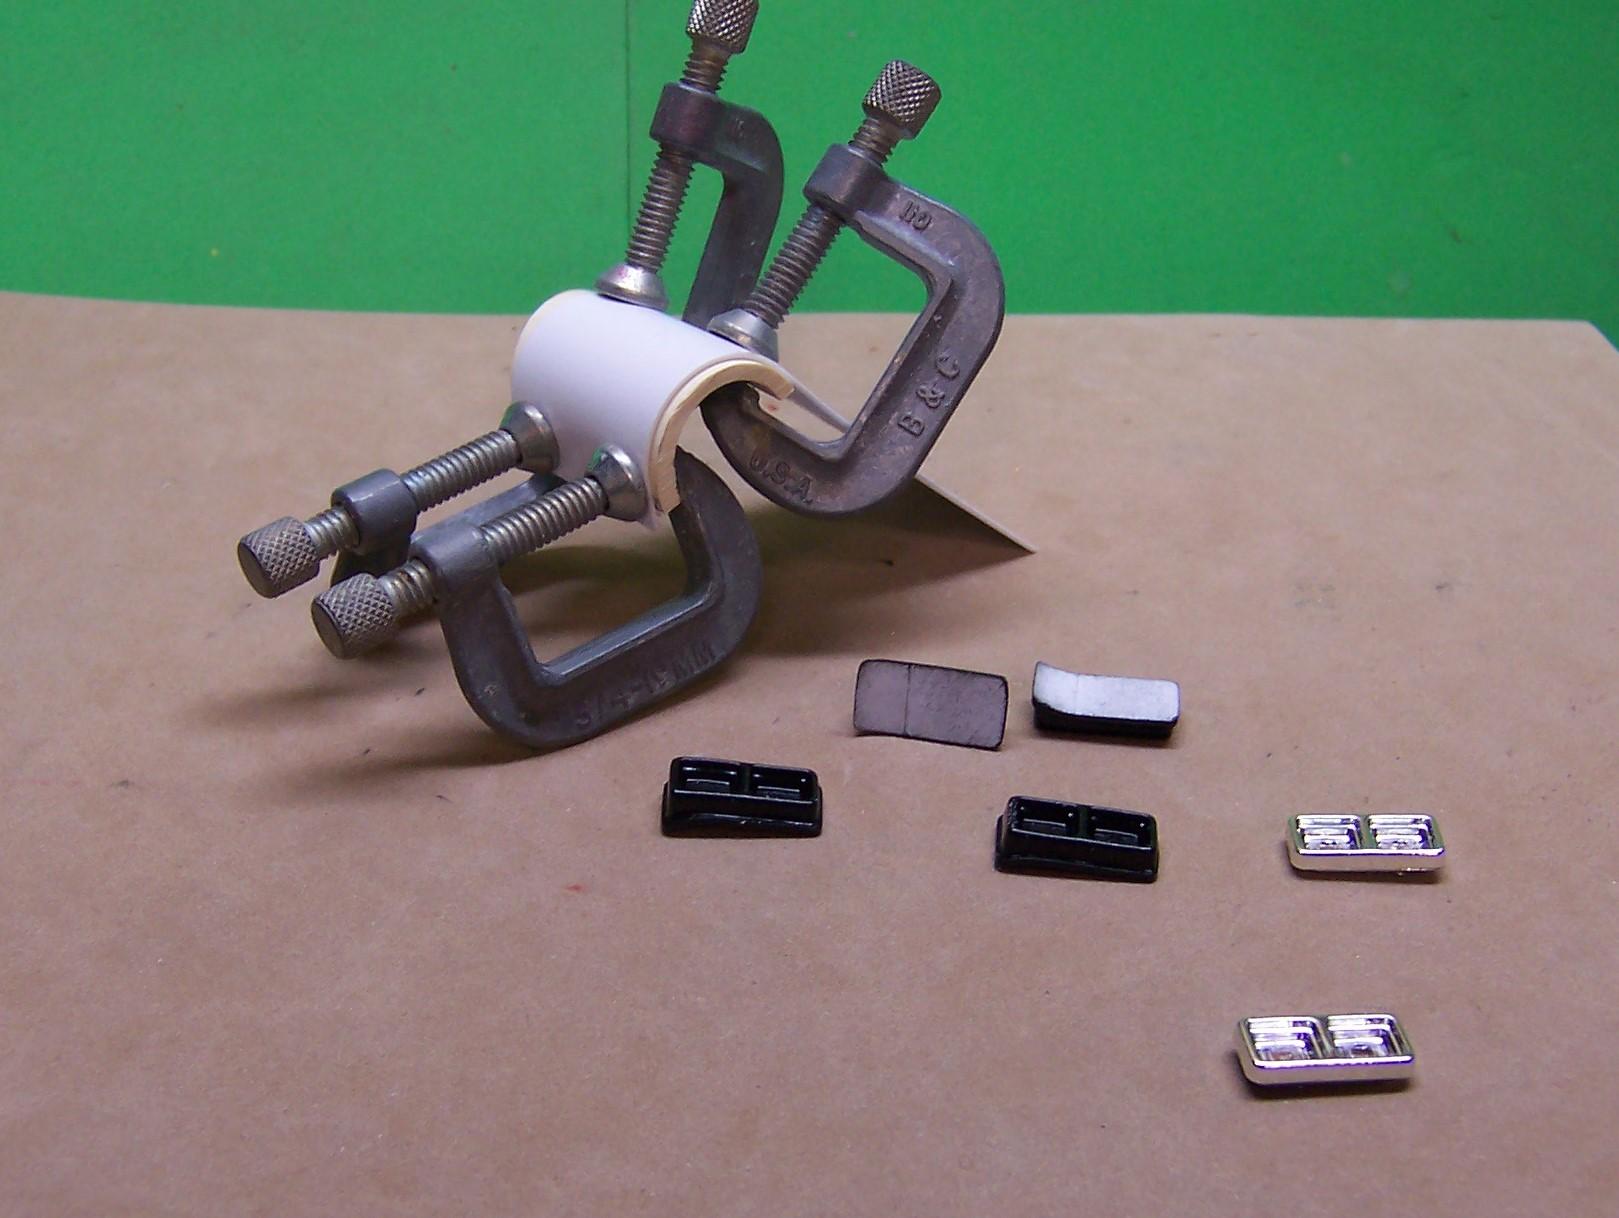
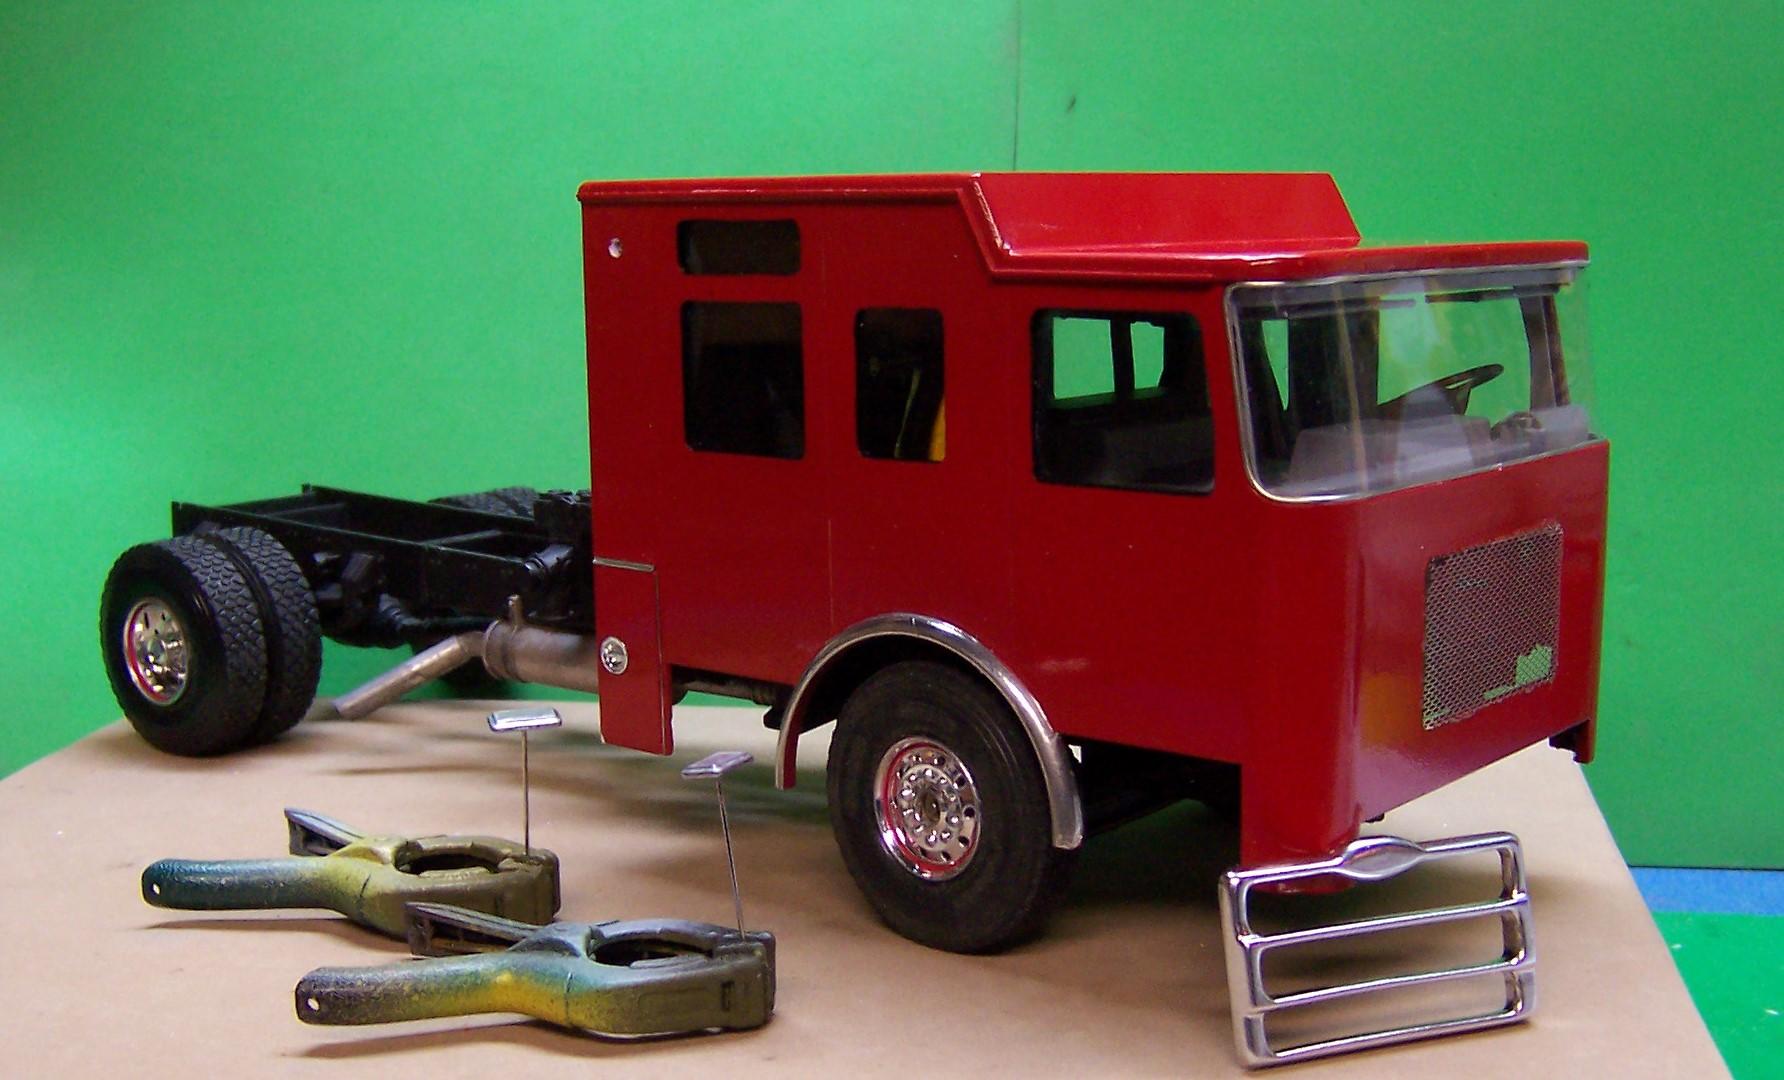
More work completed. If you look at the photo above the windshield is trimmed in bright work. The real truck has a black trim along with the edge of the glass being black as well. I used a sharpie to make the transition. Just holding it steady around the perimeter of the trim gave me the look I was hoping for. Nice and smooth along the windshield and the red paint. Next up is work on the front bumper. It has a center depressed box for a front attack line, air horns and speakers in the front and warning lights on the sides and at the corners. I used some 0.030" sheet stock, Don Mills Models treadplate and some brass strip stock to complete the construction. In the photo below is a mockup of one of the decals that will go on the sides of the rig. The Jacksonville seal is for the center of the door. The part to the left wraps around the front and the other end goes to the wheel well trim. The black headlight bezels will be given a coat of Alclad II the same as the grill. The Federal Q2B siren came from the Trumpeter kit but it has no front detail. That is taken care of with a piece of bright aluminum and a Federal decal to imitate the Federal symbol and the mesh with round holes. Here's how I made the curved bezels for the headlights. Using a section of PVC pipe that was used to form the cab corners, I wrapped a piece of 0.030" sheet stock around it and clamped it tight. This gives the sheet stock the same inside radius as the outside radius as the PVC and in turn the same radius as the cab corners. The whole assembly was dropped in boiling water for a few minutes to soften the sheet stock. The heat does not affect the PVC so it maintains its shape but softens the sheet enough that it takes the shape of the PVC. When cooled it stays curved and can be cut to form the base of the headlight bezels like the ones in the photo. Once they are ready they will be attached to the cab with 5 minute epoxy. Placement is critical so as to keep the alignment straight from side to side and up and down. CA would not allow me to do the adjustment at all.
-
Keeping things parallel and square
Chariots of Fire replied to Chariots of Fire's topic in Tips, Tricks, and Tutorials
Now that's a great tip! And how did you determine the 67.5 deg for bending? I understand the math but how was it accomplished to make the jig? -
Pull the frame in just a little or you won't be able to dump the load without interference.
-
Freightliner Cabover
Chariots of Fire replied to k100's topic in WIP: Model Trucks: Big Rigs and Heavy Equipment
What did you have to do to narrow the front axle? -
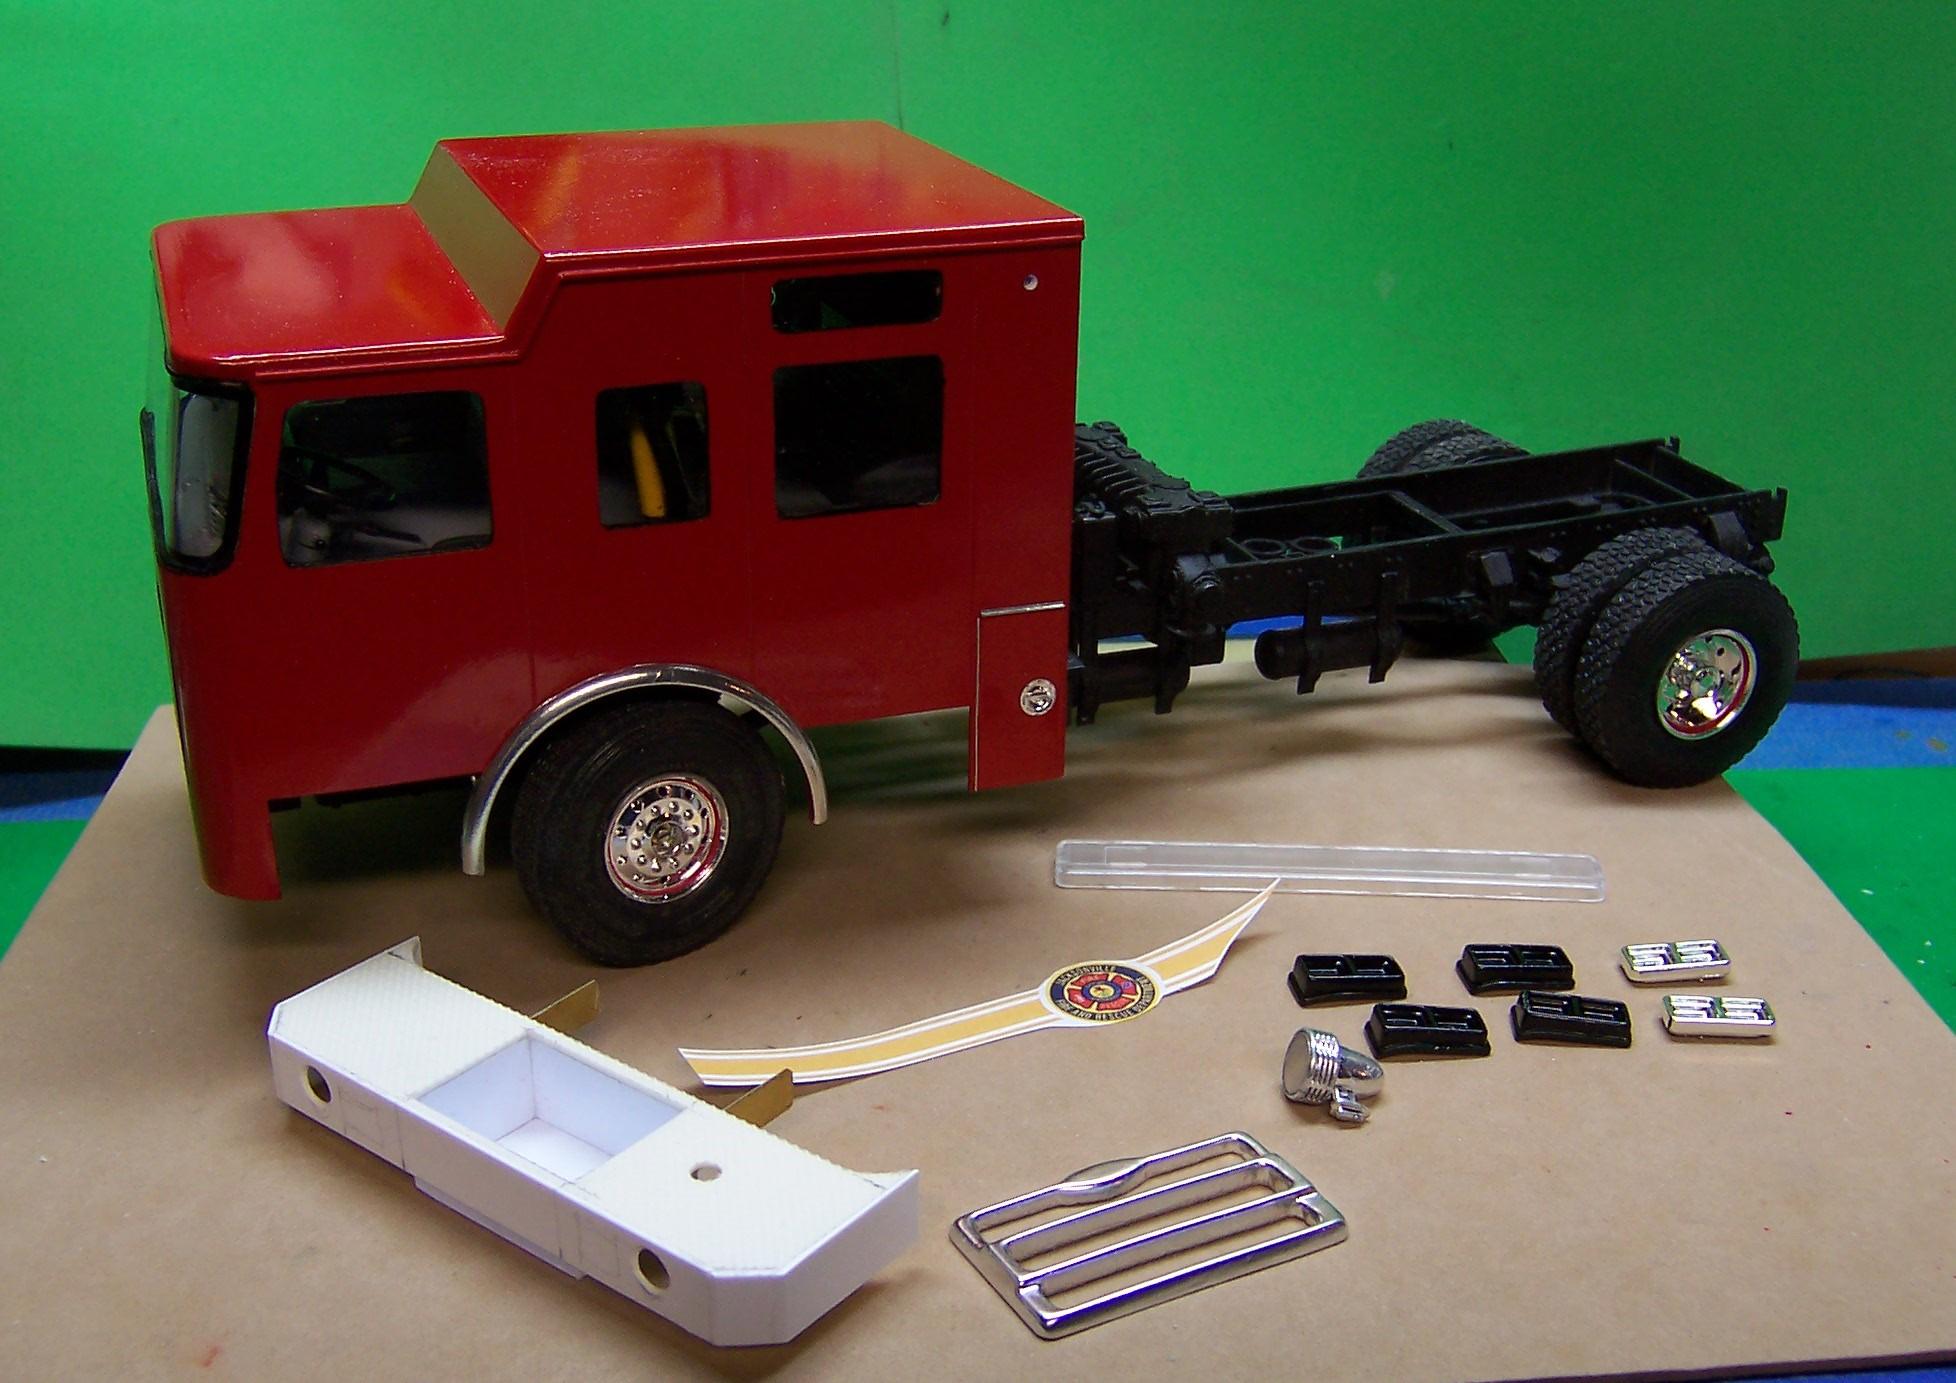
Got a little painting done on the cab. Duplicolor #398 bright red. Since the photo was taken the windshield has been outlined in black. Working on the headlight bezels now. Got to get the compressor out to do them in Alclad II.
-
Keeping things parallel and square
Chariots of Fire replied to Chariots of Fire's topic in Tips, Tricks, and Tutorials
Not my watch! It still only tells me the time!? And the day of the week if I adjust it for 30 day months and for February! -
Keeping things parallel and square
Chariots of Fire replied to Chariots of Fire's topic in Tips, Tricks, and Tutorials
They say we now have more computing power in our cell phones than they had back when we sent the astronauts to the moon. And they had a whole room full of computer hardware! -
International RF-190
Chariots of Fire replied to DRIPTROIT 71's topic in WIP: Model Trucks: Big Rigs and Heavy Equipment
My compliments, my man! That looks great! Where did the mirrors come from? They look like they really belong there. -
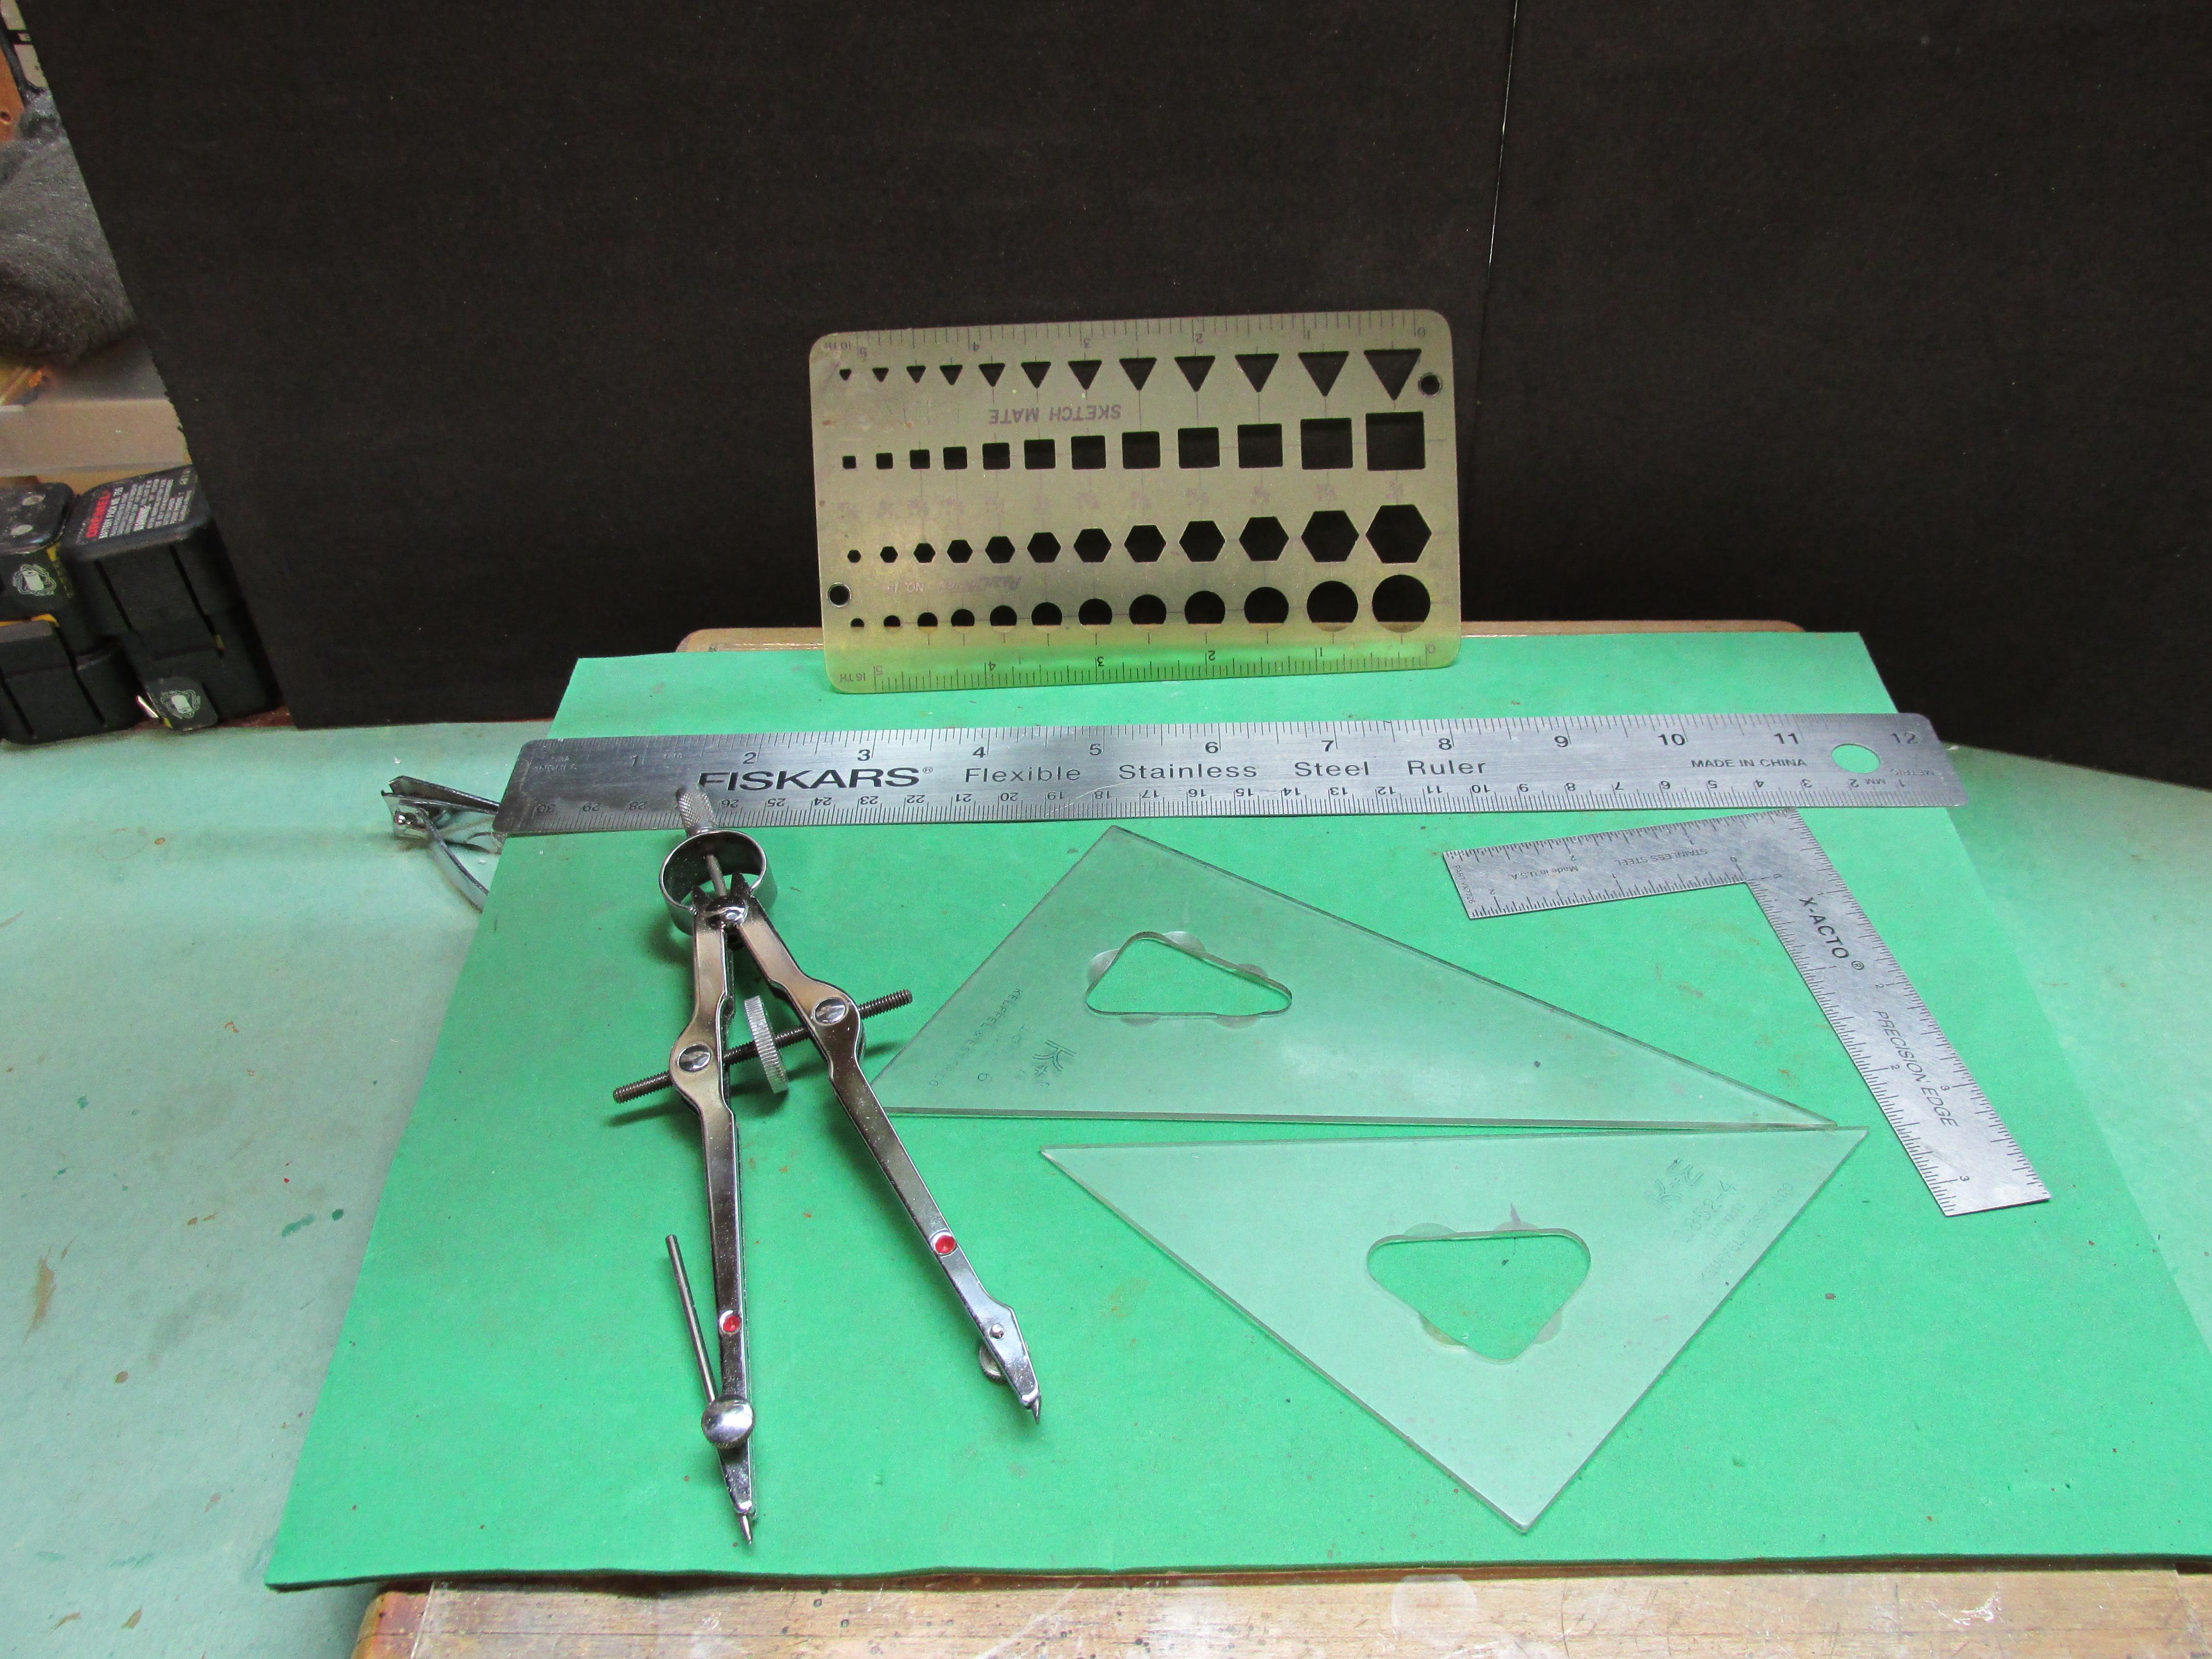
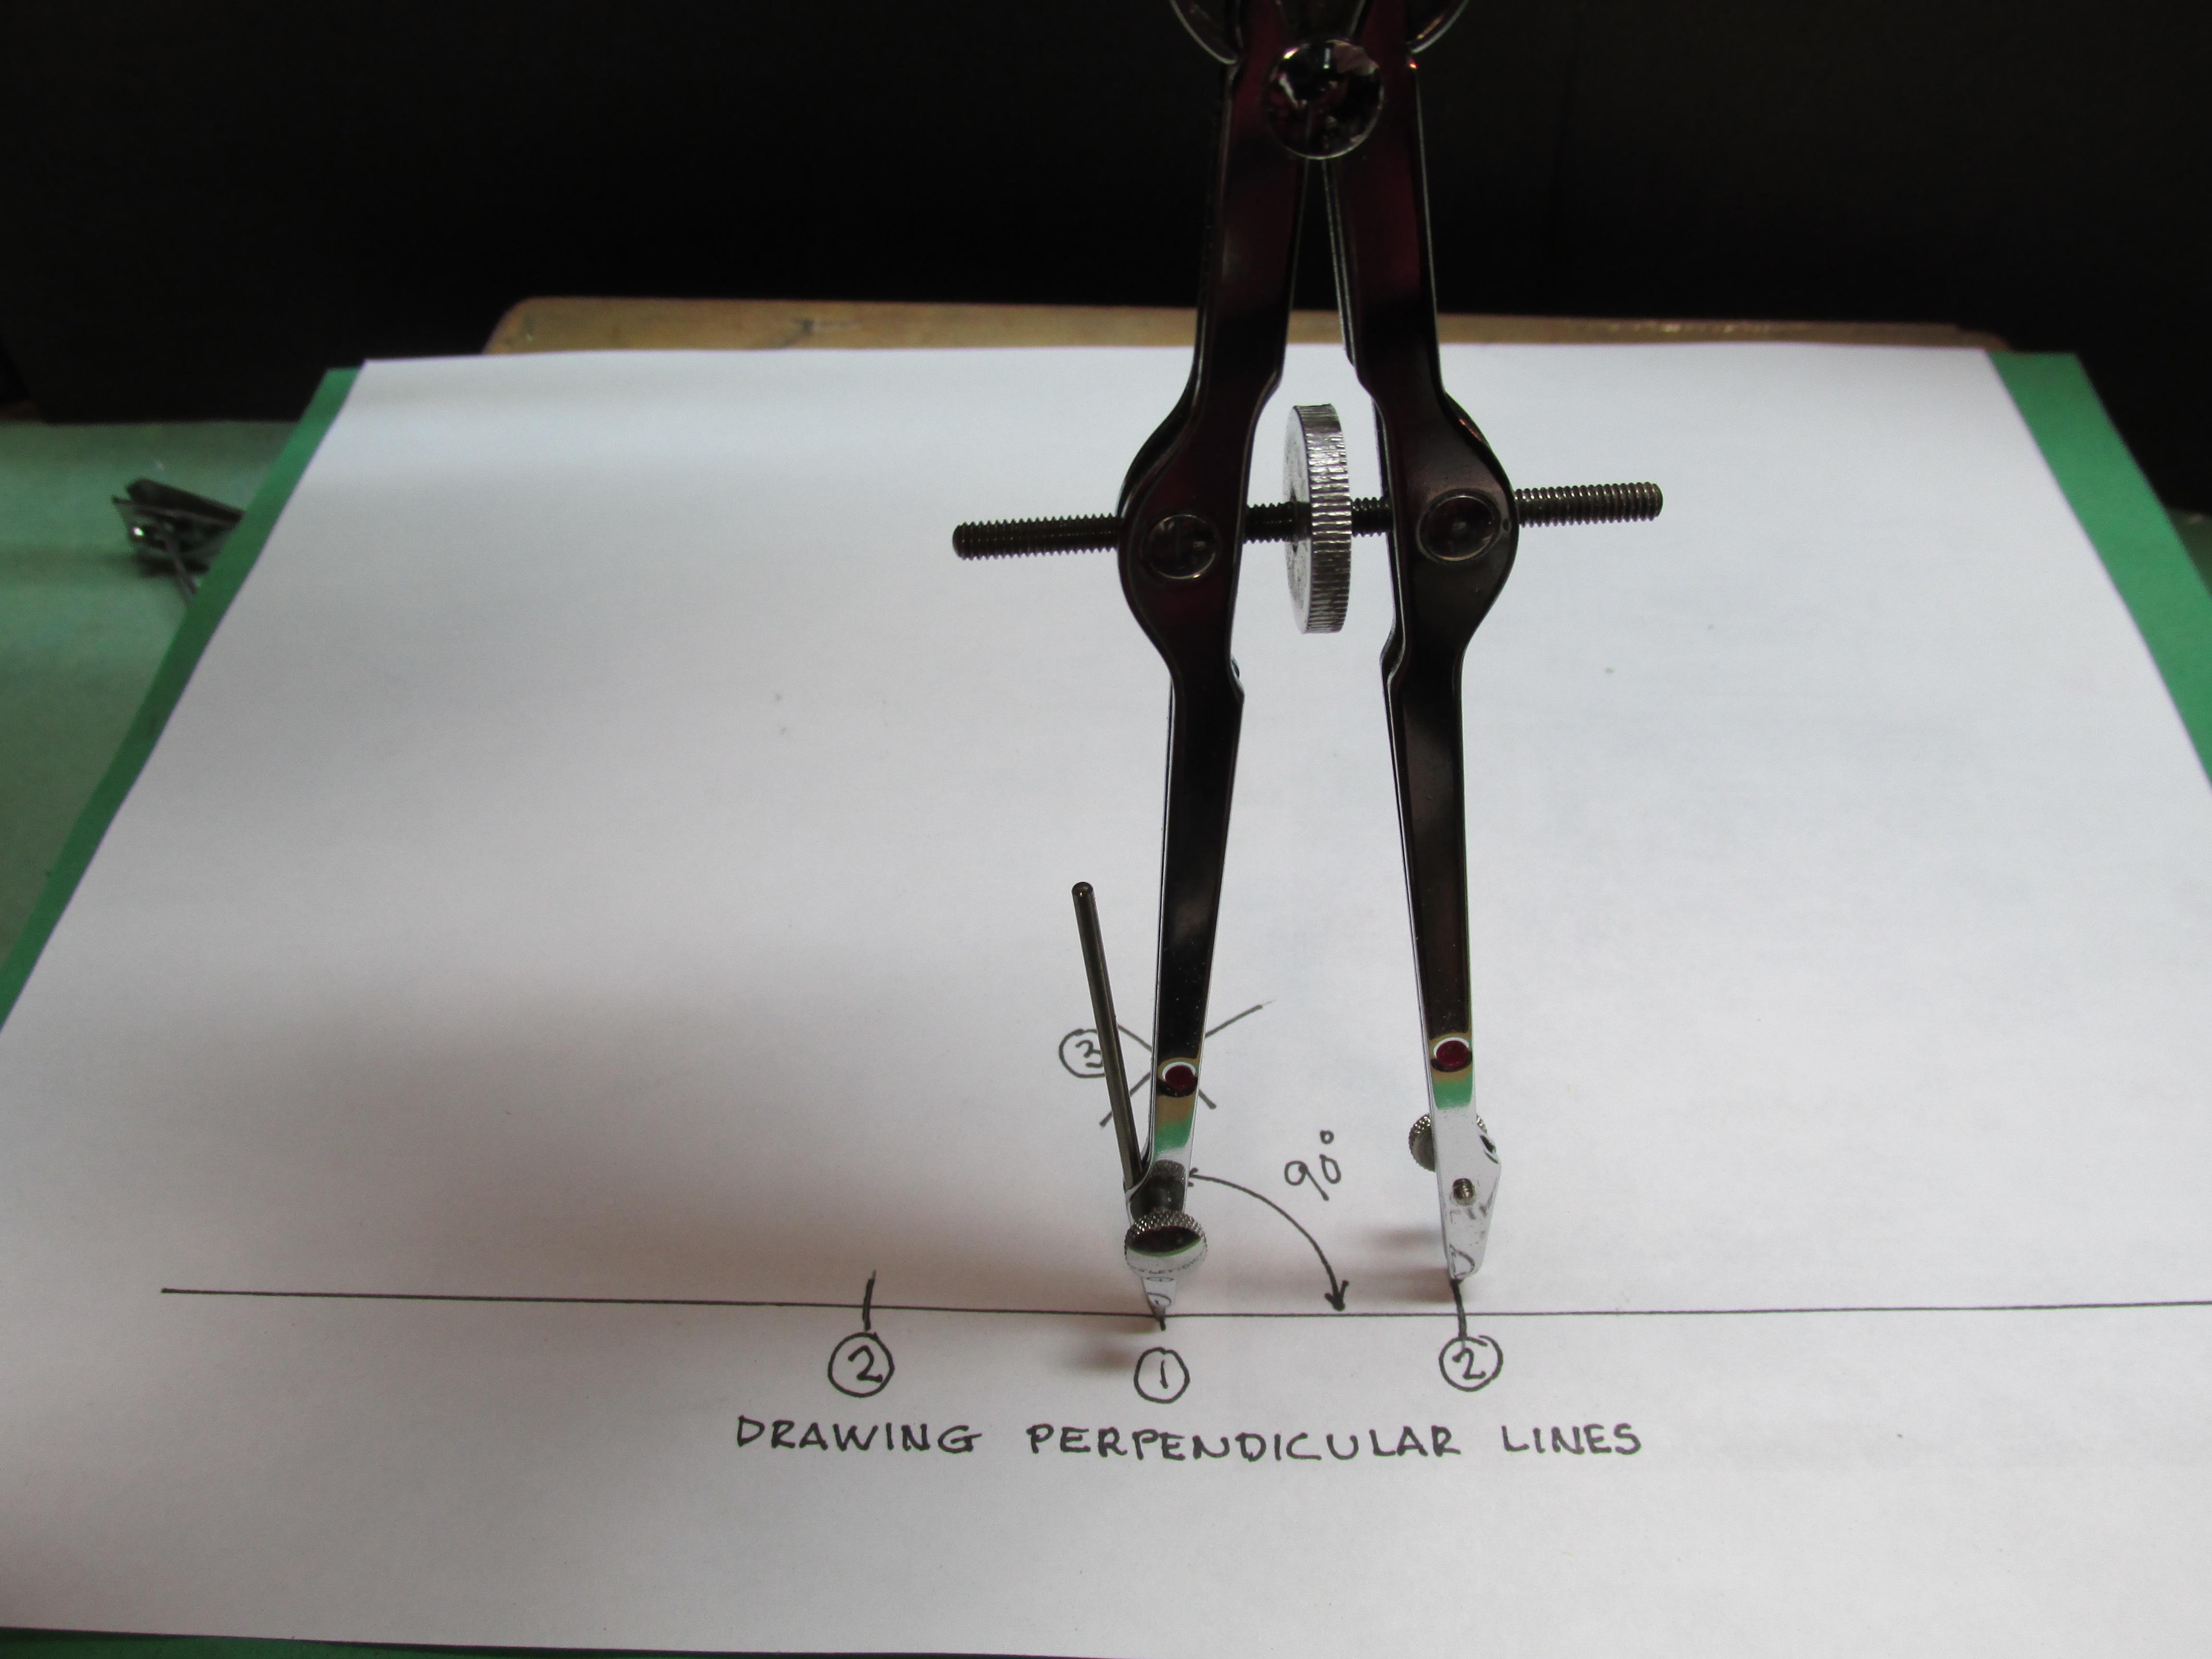
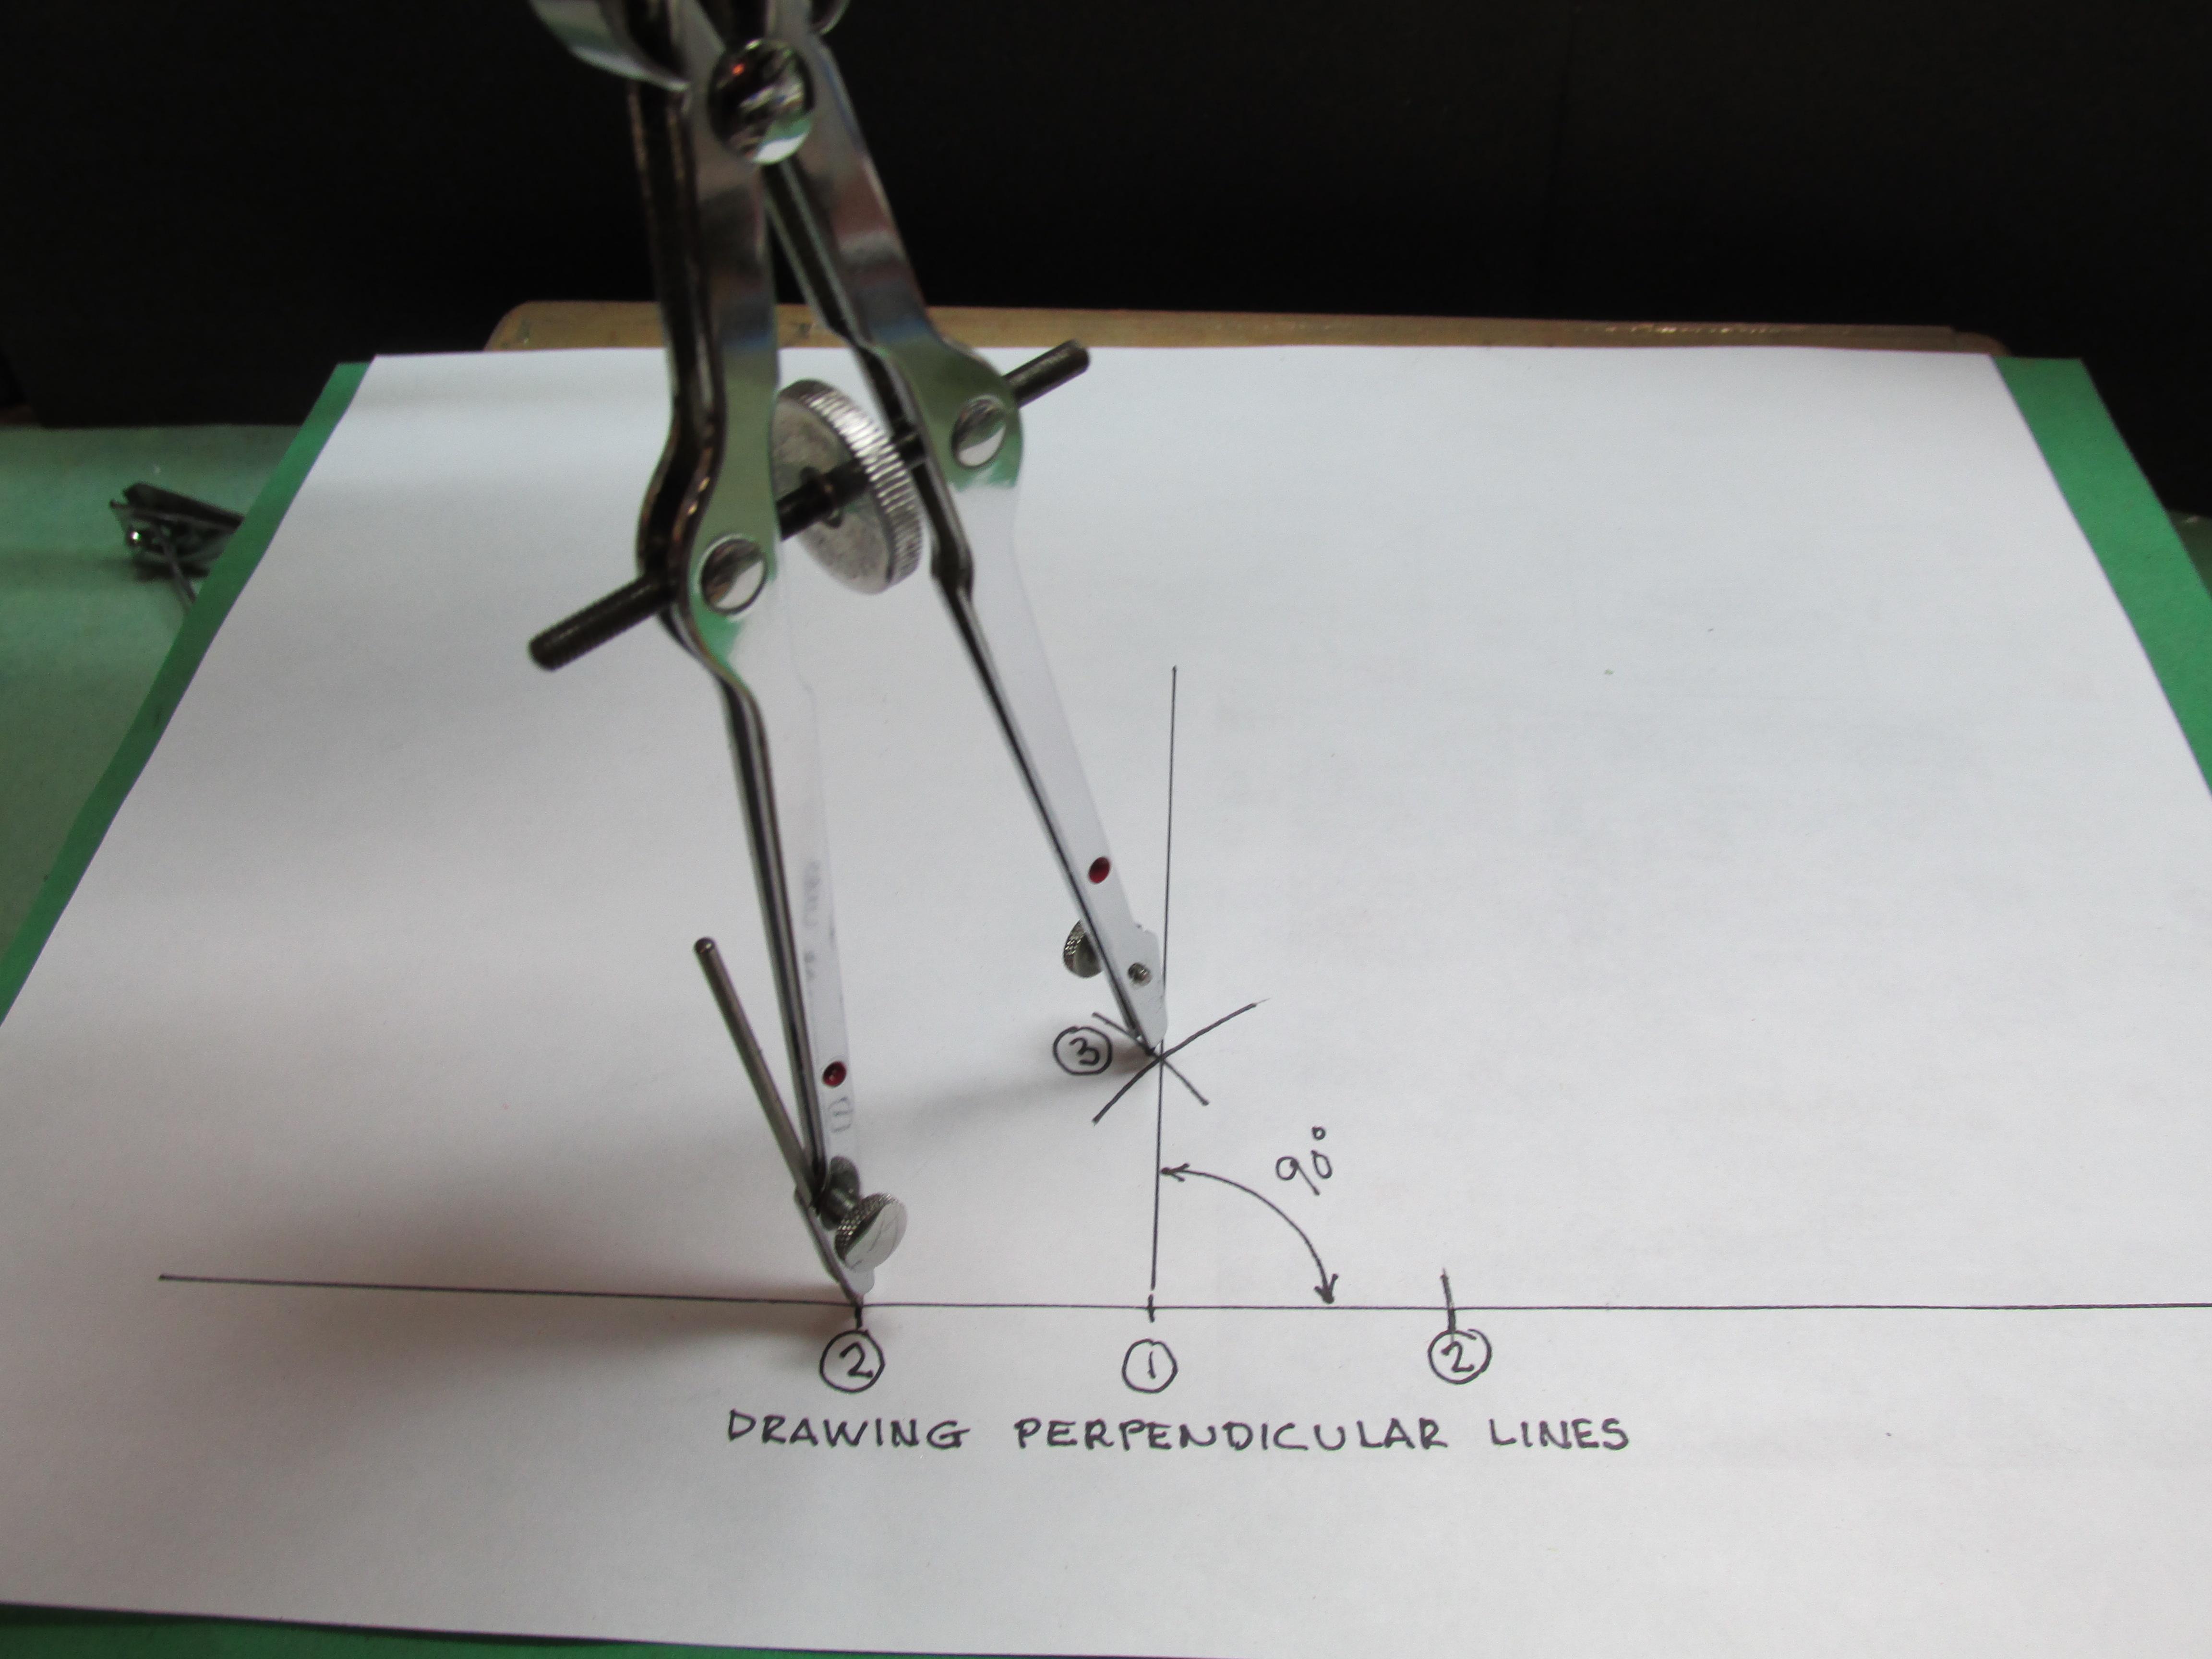
I had a recent question about what I use in making 90 degree angles when cutting plastic. Here are some of the tools and techniques you can use in doing that. In the photo are the following: A template for triangles, squares circles and hexagons. An adjustable compass A steel ruler in inches and millimeters An Xacto square 3" x 4" marked off in 64ths 30/60/90 and 45/45/90 drafting triangles. These tools can be used in a number of ways to make cuts square and true. Above I have a piece of plastic sheet stock that is laid on one side and the Xacto square laid next to it. Holding them together it is easy to draw a line anywhere on the plastic that is 90 degrees to the edge that is laying flat. Never assume that you have a 90 degree edge on a plastic sheet. It may look square but it might be off just enough so if you try and make a line 90 degrees to the edge lying flat it will not be parallel to the edge that is standing up. Check it to be sure and mark it off so that you can trim it to 90 degrees. Another way is to use two triangles. In this case I chose to make a line that is 90 degrees to the two parallel lines and to do so at the tick mark. Start by laying one triangle against the horizontal line. Hold it there and put a second triangle against the slanted side of the first triangle. Hold the second triangle firmly and slide the first one down until the right hand edge is at the tick mark and draw the line. This works because the triangle has a 90 degree corner. Don't have triangles or a square? Use a compass. Here we start with laying out a horizontal line and want to make a perpendicular line to it a #1. Open the compass to any comfortable space and draw a tick mark on each side of mark #1 (2). Now open up the compass some more so that the space between the point and the pencil lead is greater than between #1 and #2. Put the point of the compass on #2 left and draw an arc. Then put the compass point on #2 right and draw another arc so that they cross at #3. Connect the point where the arcs cross with the tick mark at #1. The line you draw will be 90 degrees to the horizontal line. As will any measuring. Measure twice and if you are not sure measure again. Don't be the guy that measures twice and finds that it is "still too short"!!?
-
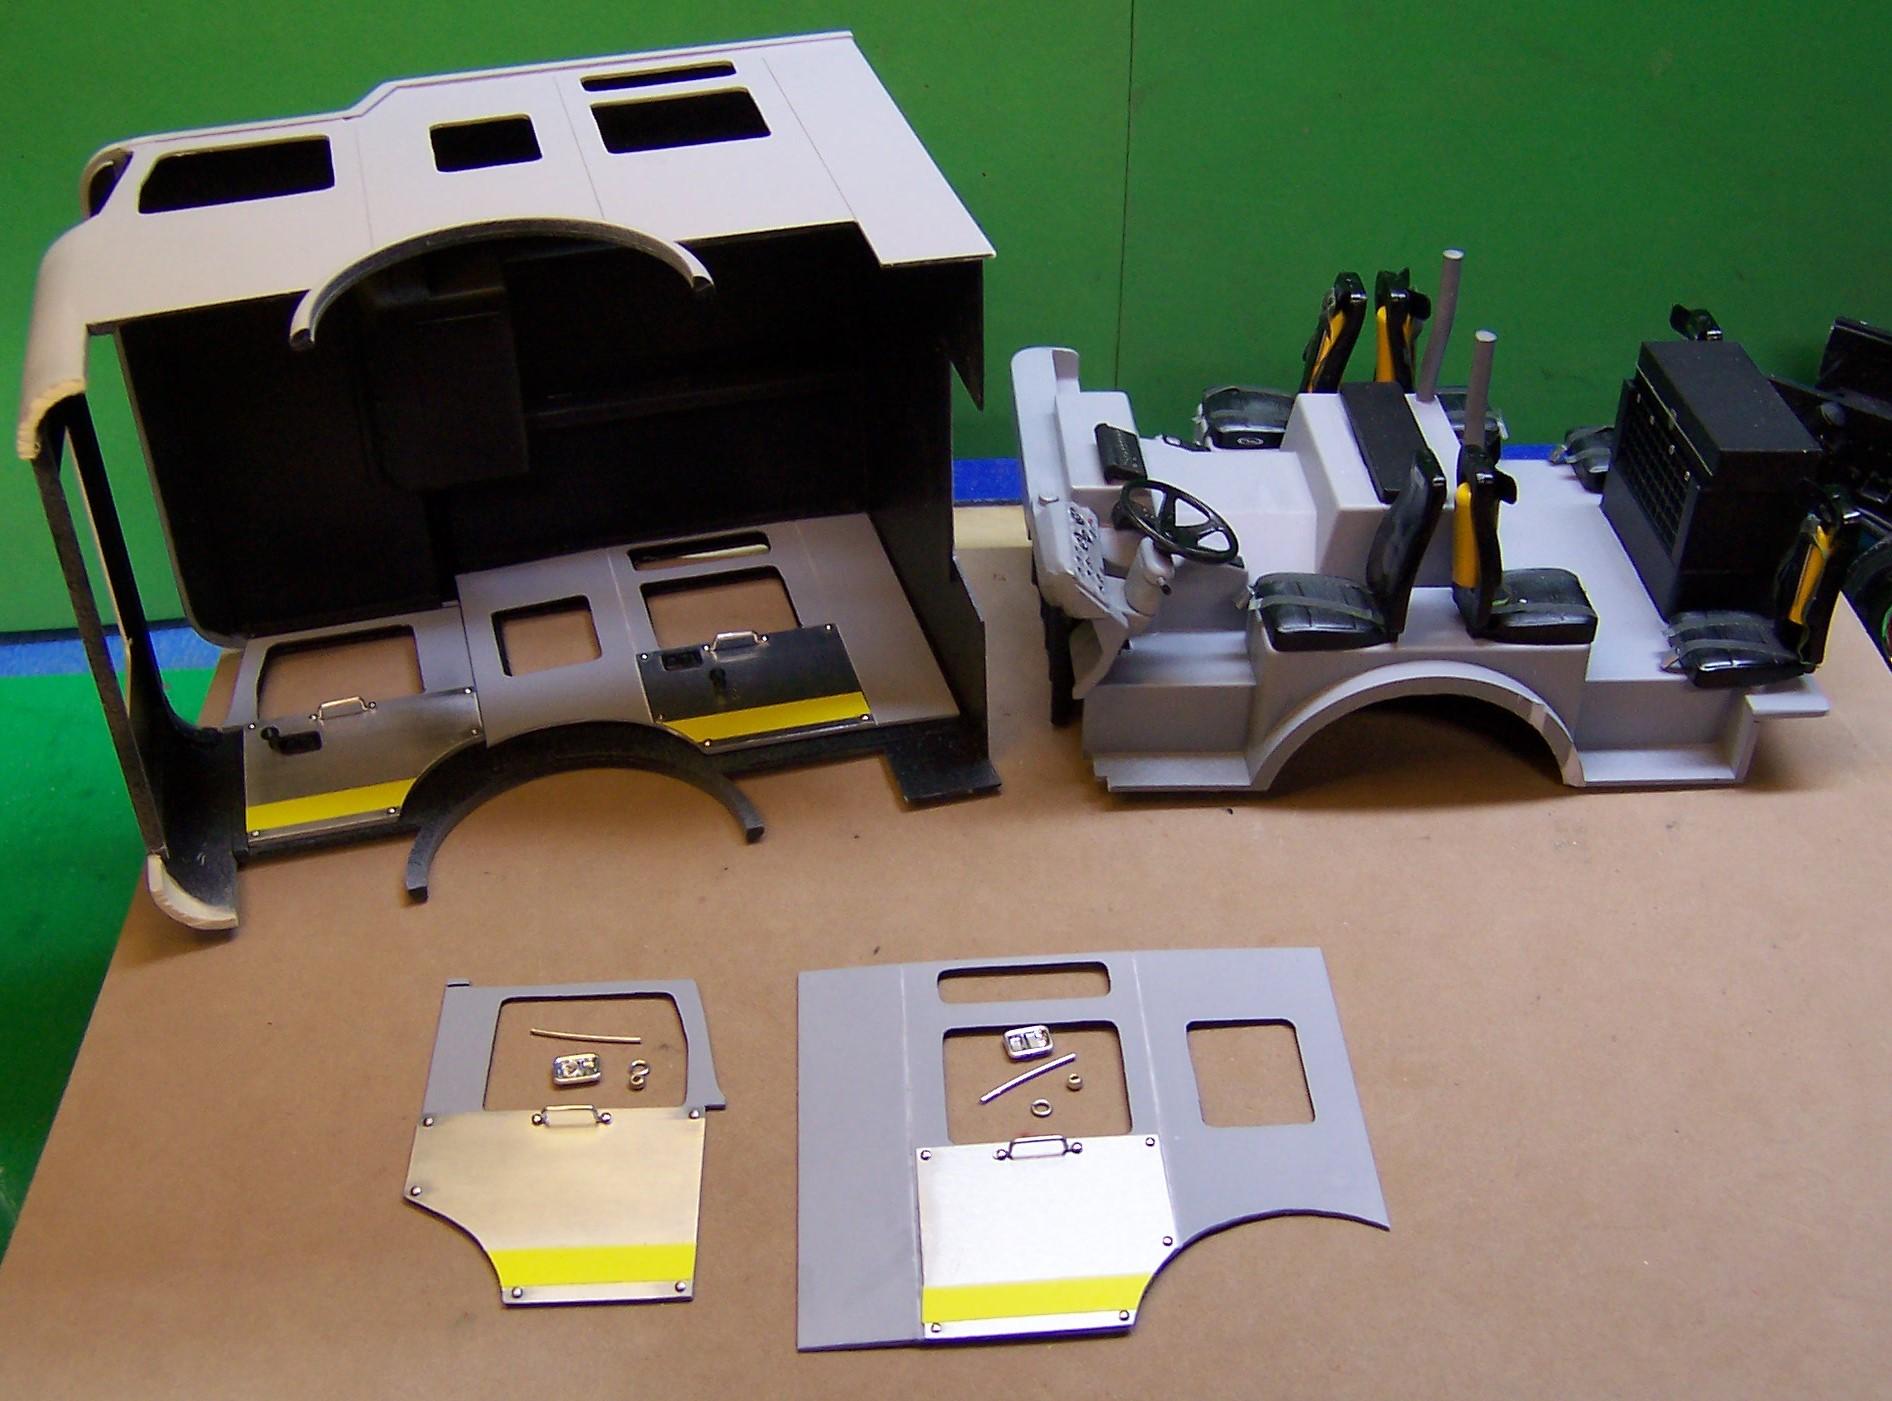
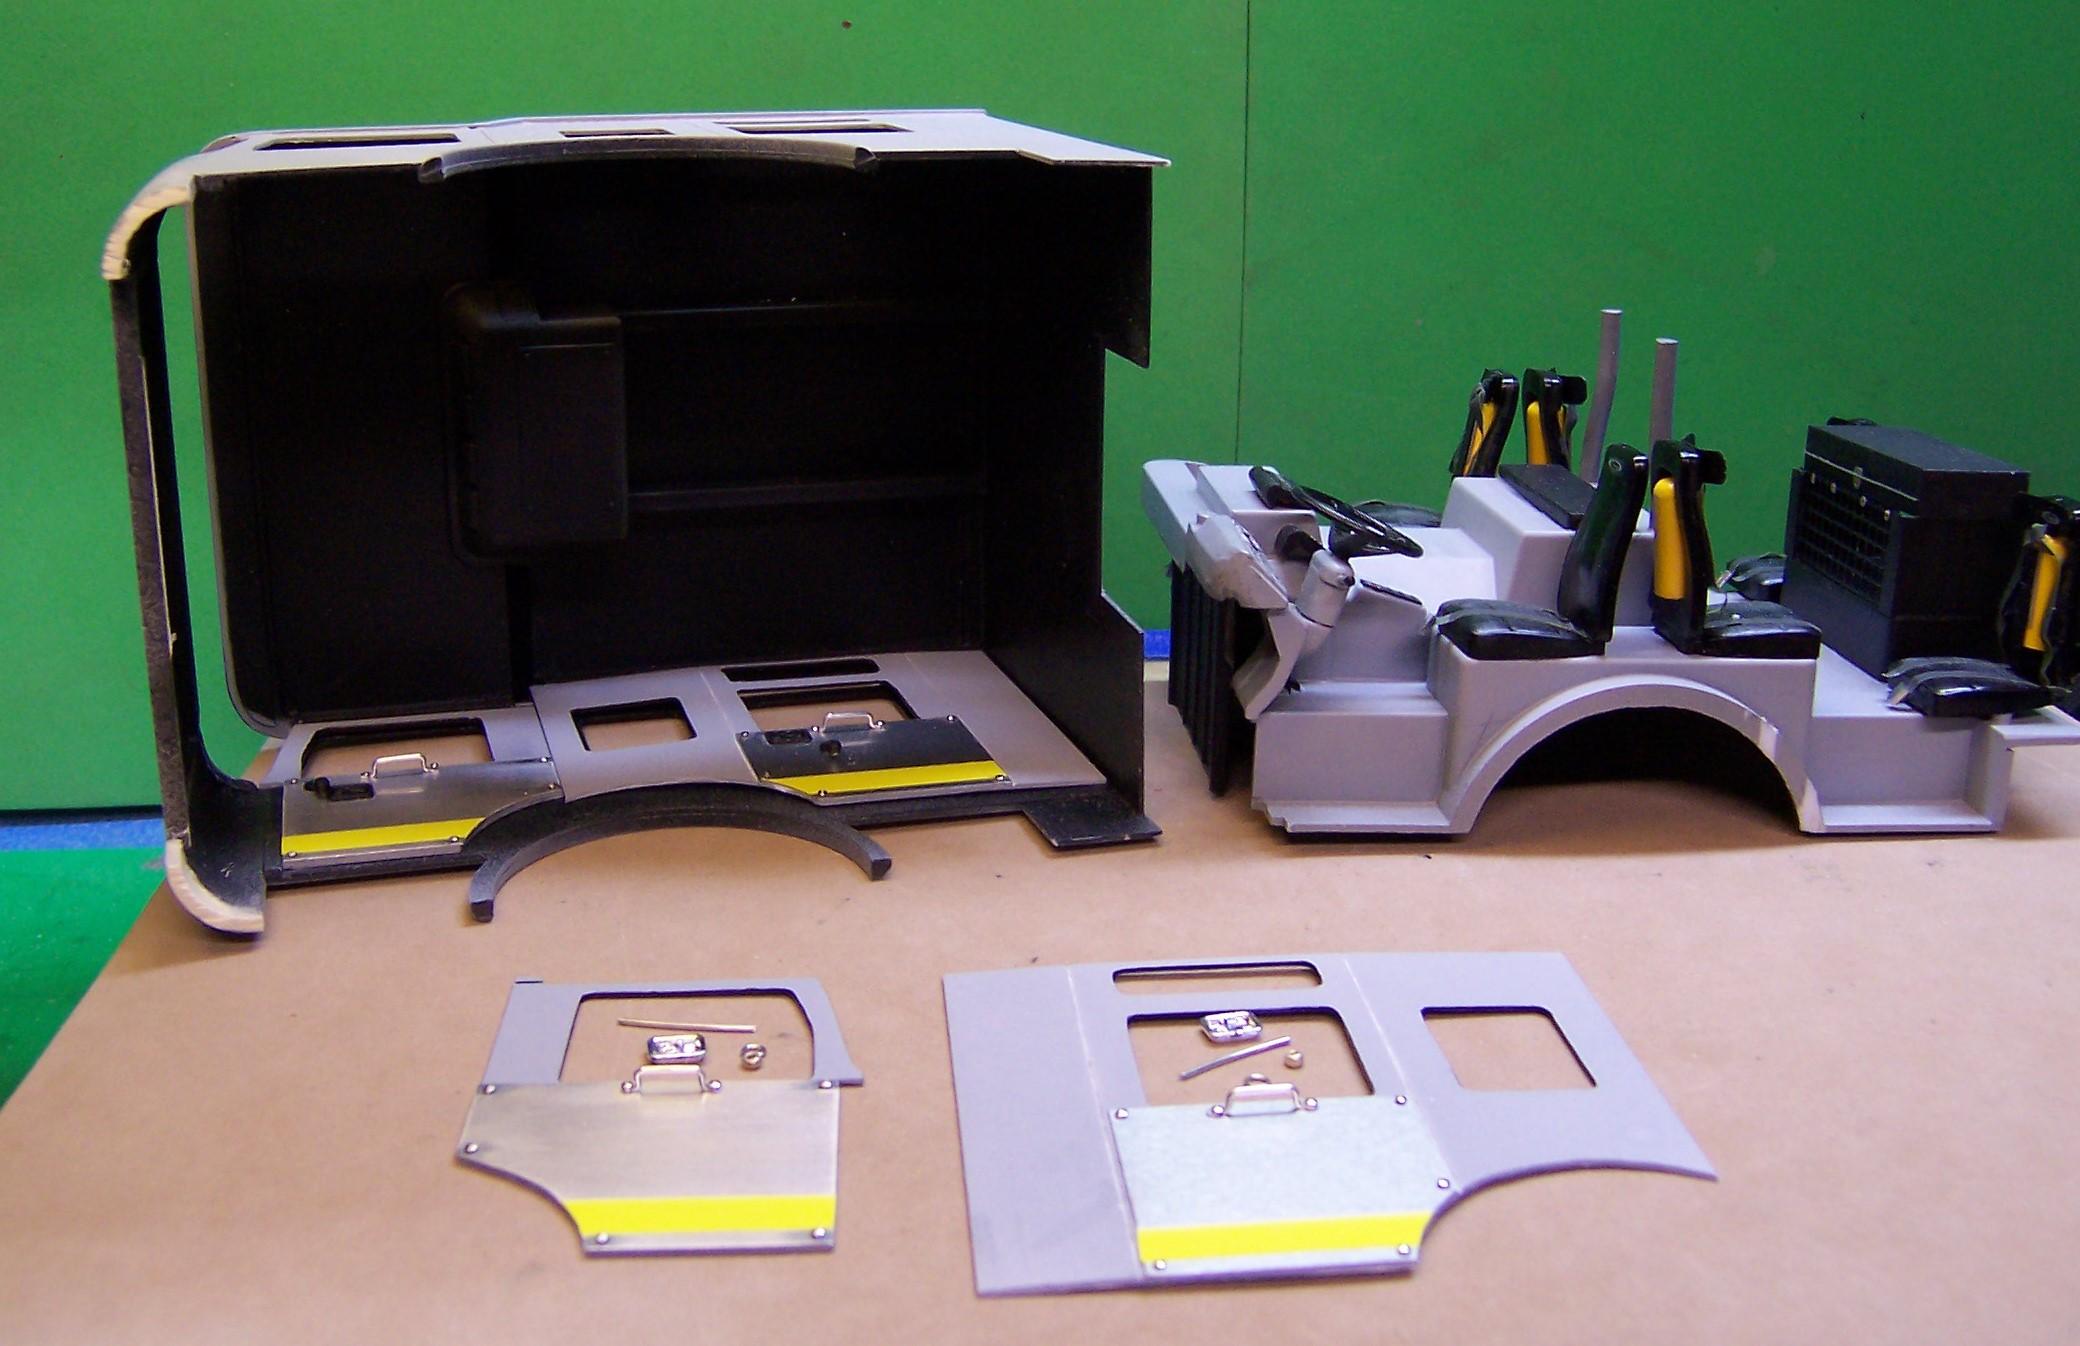
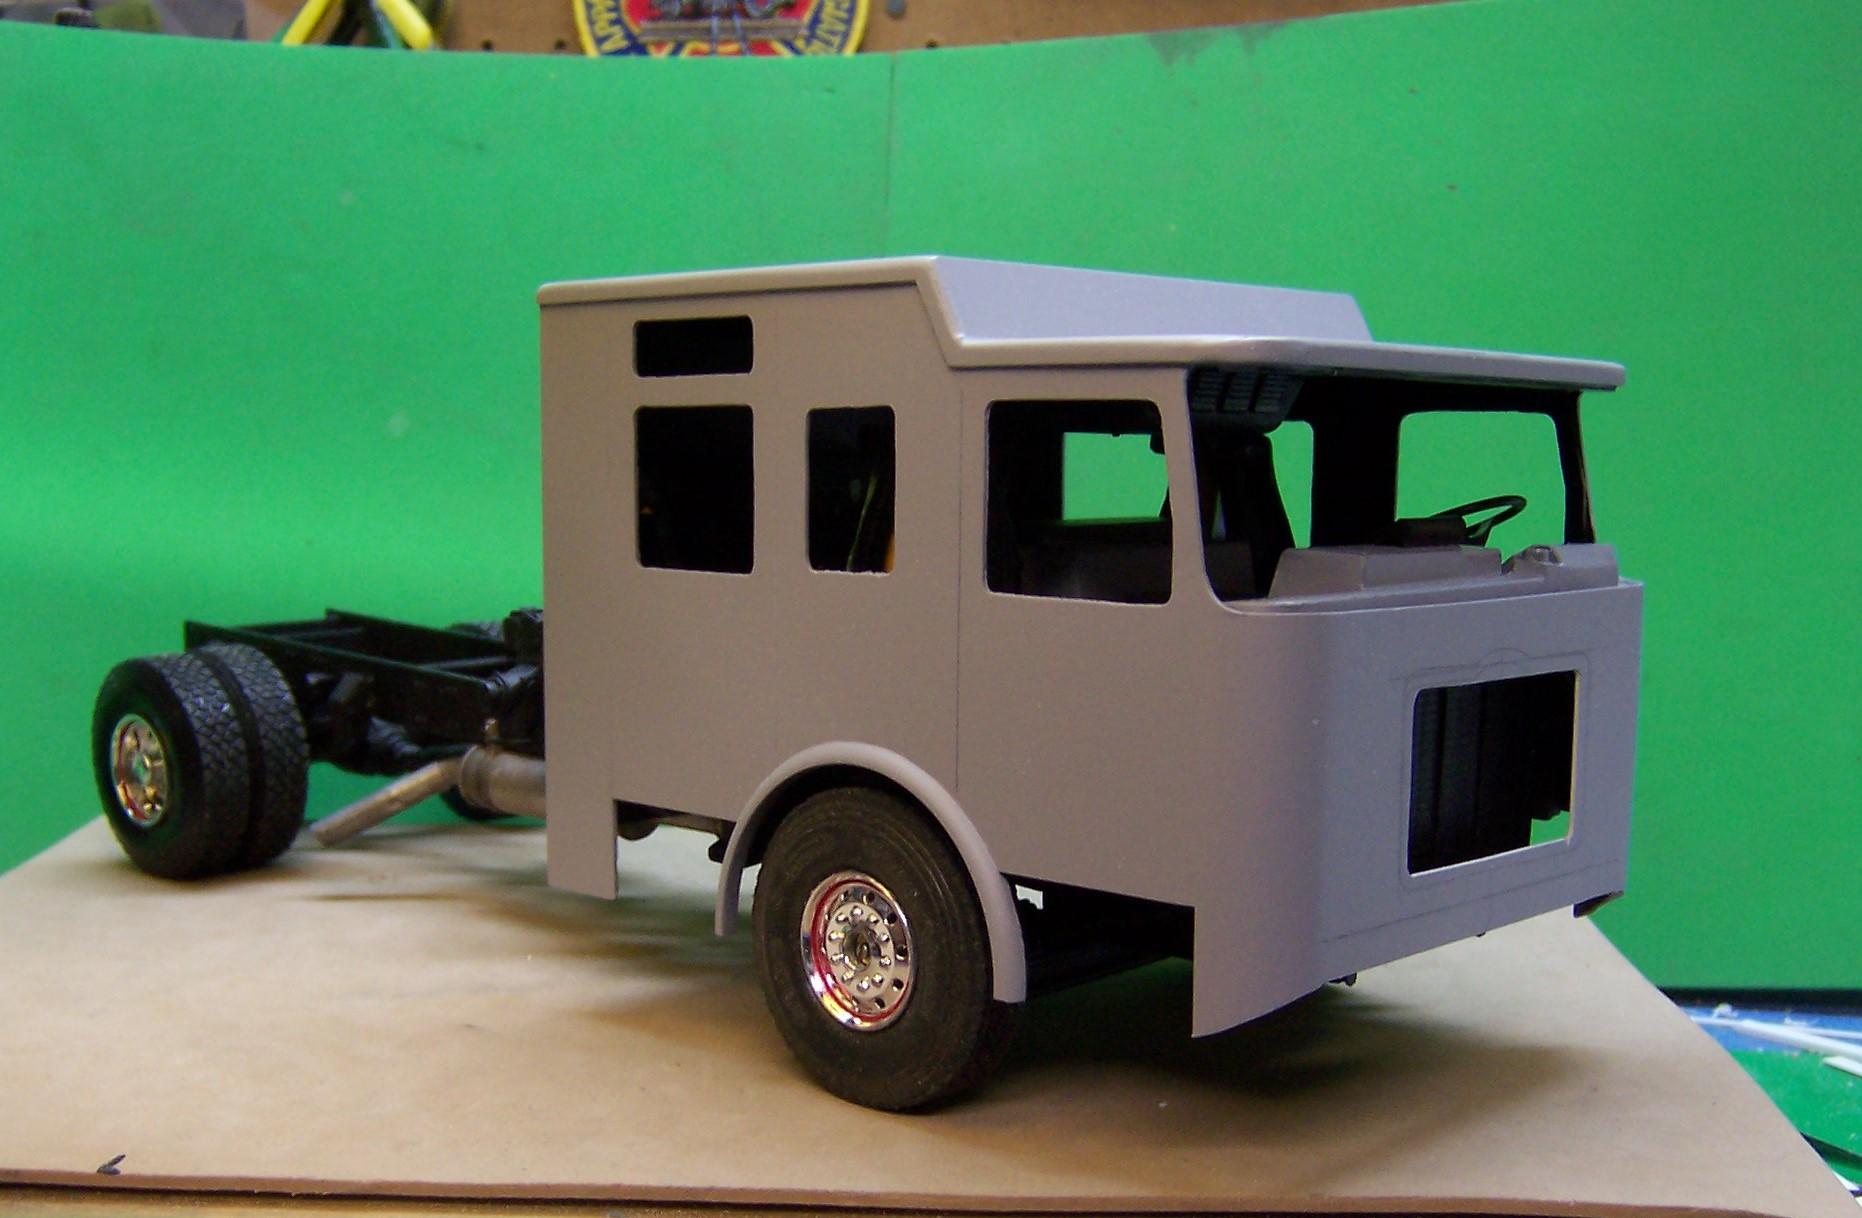
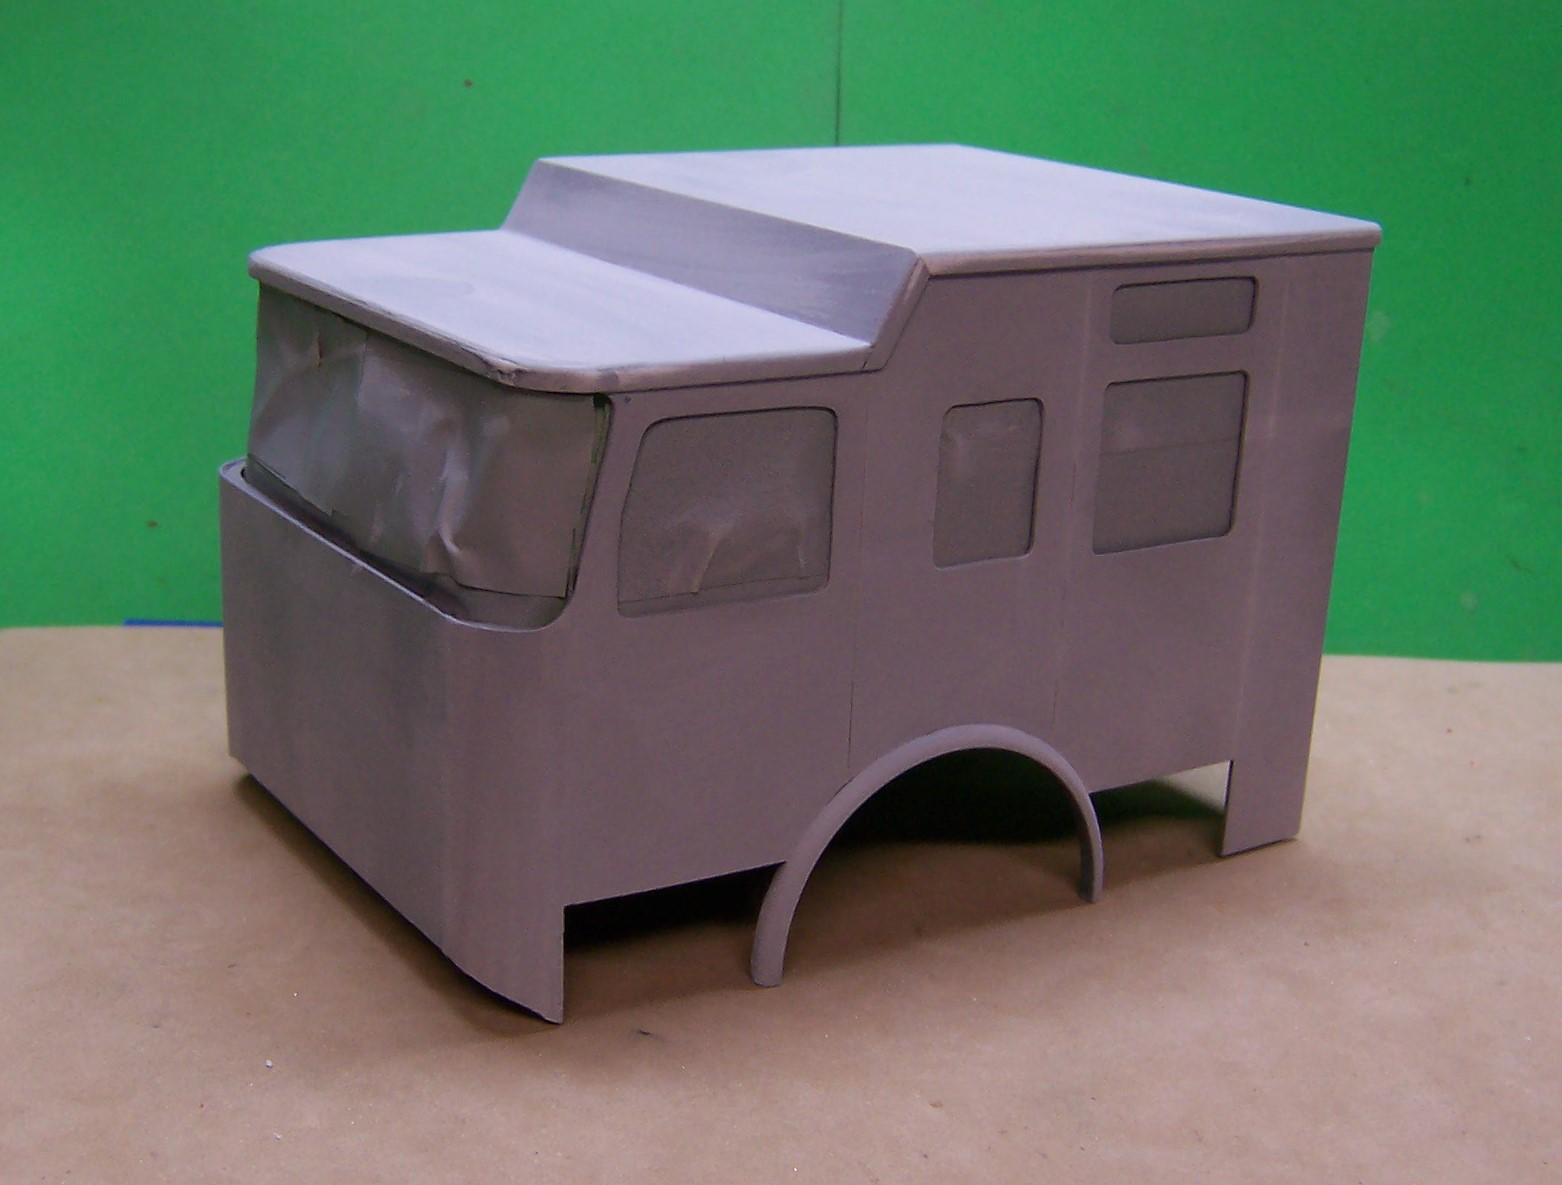
Been working on the interior panels for the sides of the cab. Pierce MFG has some great photos of the interiors of their apparatus. And you can do a virtual walk around of the entire inside with just a move of the mouse. It's been a blessing to pick up on some of the details that will go into the model. Using that information here is where we are with the interior panels. I used some brushed aluminum for the lower panels, painted the rest with a gray primer and then used a black felt marker to darken in the edges of window openings. The same will be done with the exterior window openings on the cab. Clear sheet stock will be locked in place between the sides of the cab and the interior panels. The Trumpeter kit has door latches that were meant for the outside but they nearly are the exact match for the ones that are used on the inside of the Pierce. The outside ones will have to be made special as they are a unique feature not like any other door handles. The aluminum panels are held in place with CA behind but to be sure they don't come apart (aluminum does not really like CA for the long haul) they have been pinned at each corner. Pins were glued from the back, cut off and the ends sanded smooth with the back of the plastic panel. Still to be made in the two panels are holes for the door latches and some window cranks. The yellow bands represent the reflective safety striping for visibility when the doors are open. The pull handles are made from the same soft bright aluminum wire as the window cranks. They are bent "z" shaped and then the ends are squeezed to flatten them out. Holes are drilled in each end and through the aluminum panels and plastic backing sheet. As with the other parts,, they are pinned and glued in from behind and then filed smooth.
-
I've had the same issue but have found that some polishing after the paint is really dry will take care of the problem. The main reason I like Duplicolor so much is that is a fine pigmented paint and does allow for polishing and some sanding between coats without getting soft in the process. Found a can of Duplicolor acrylic red the other day at Ollie's. Haven't tried it yet but will only do so an a sample piece of plastic after priming just to see what happens.
-
I'll see you there. We can talk model building!?
-
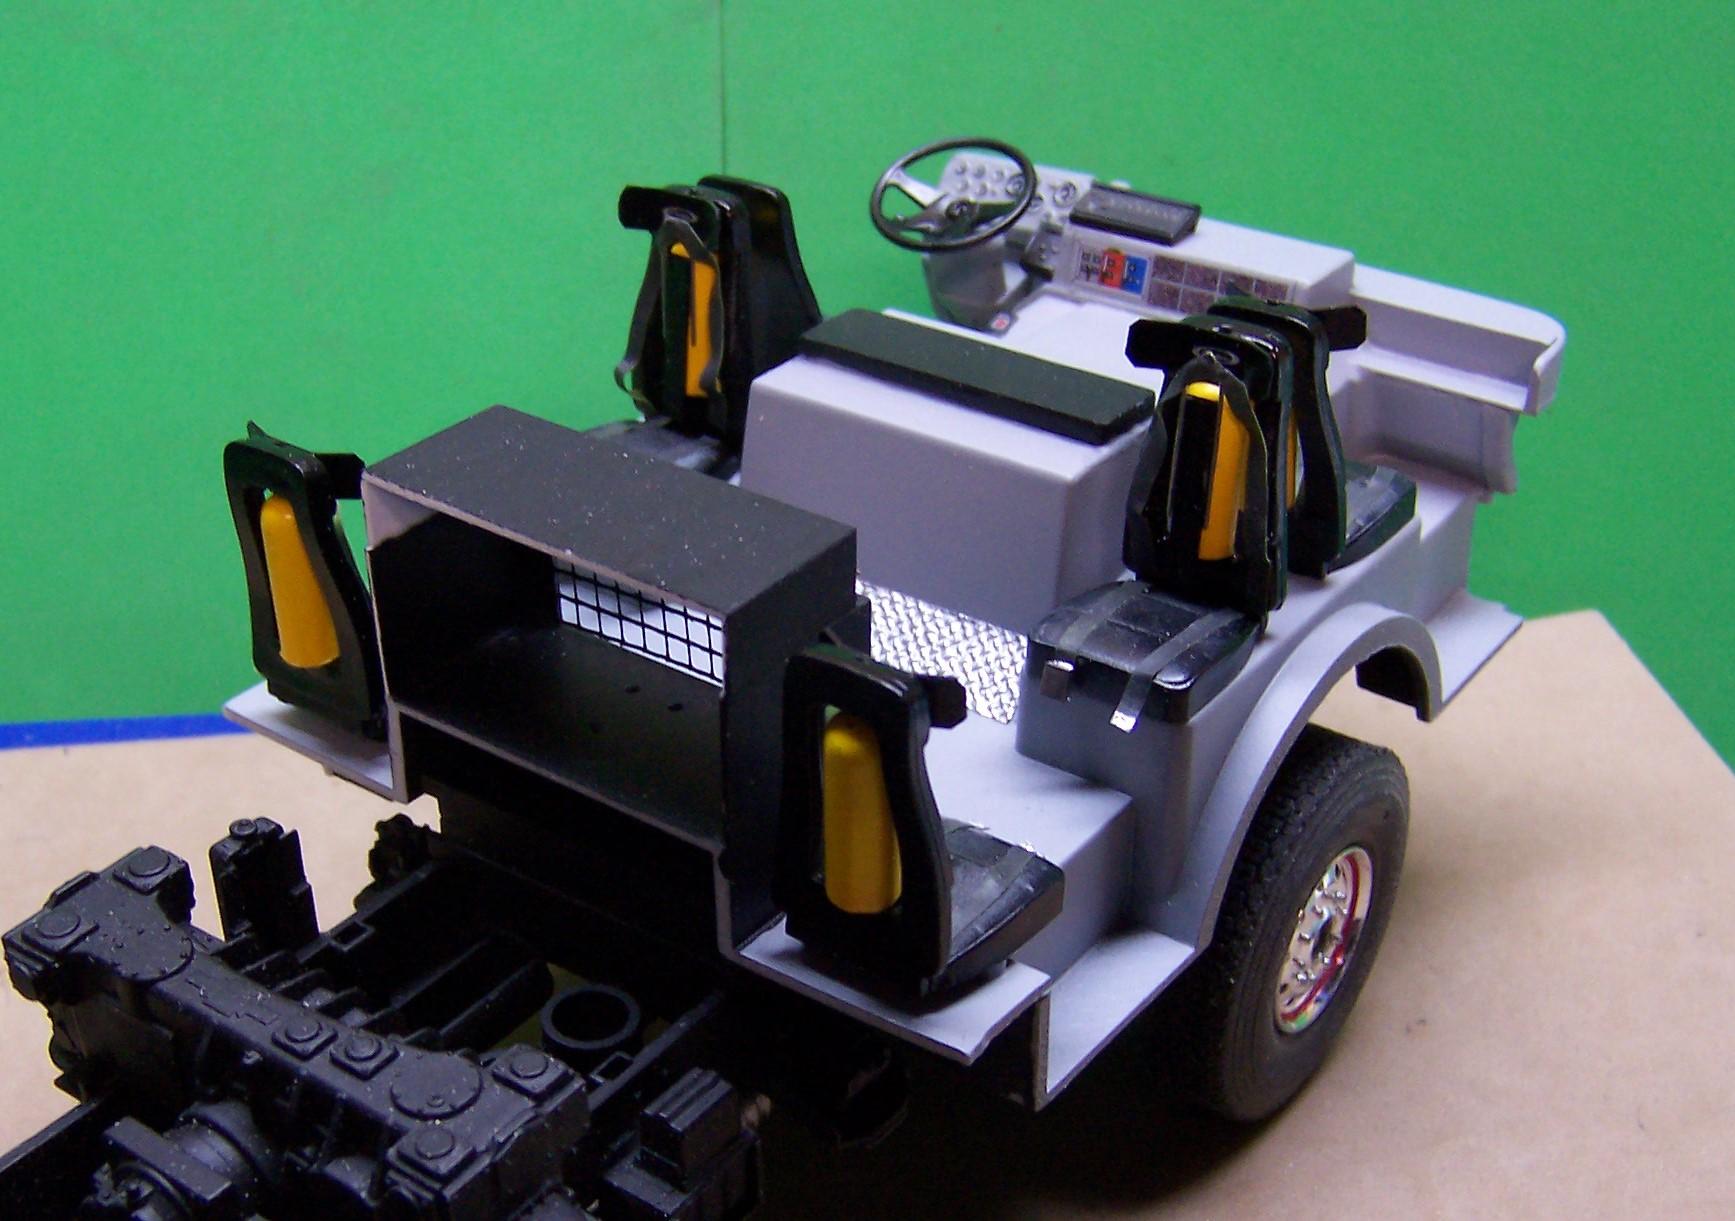
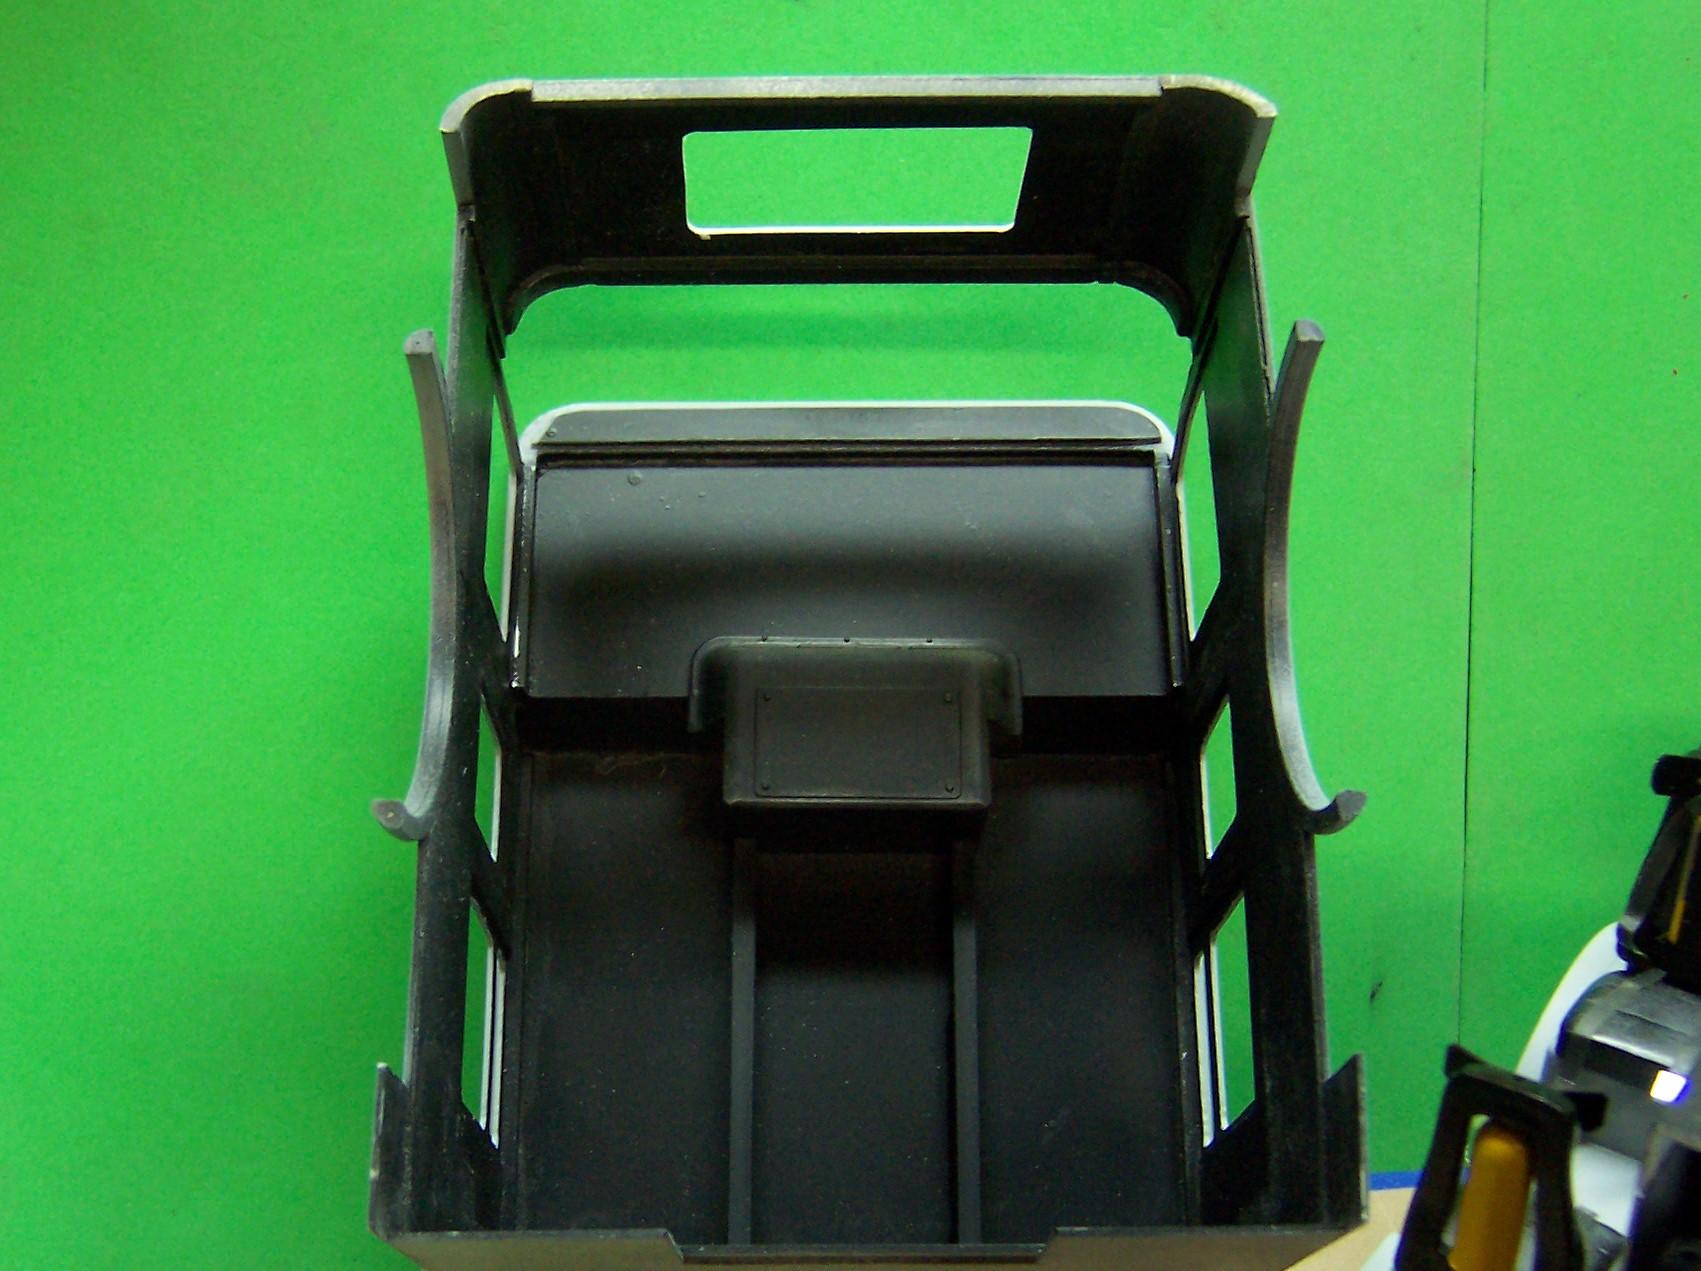
Just a couple more photos of work that has been done recently. Yesterday I was able to get a bit done with it raining steady outside all day. We are in drought conditions here in the NE so it was good to have it for once. The interior tub is about done with the exception of two braces that go from frame to roof in back of the AC unit. I have to bend up some tubing for the installation. And I got the AC unit mounted inside the cab and the hole cut in the front where the grill will go.
-
Your avatar looks like you are already grown up! Better start soon!??
-
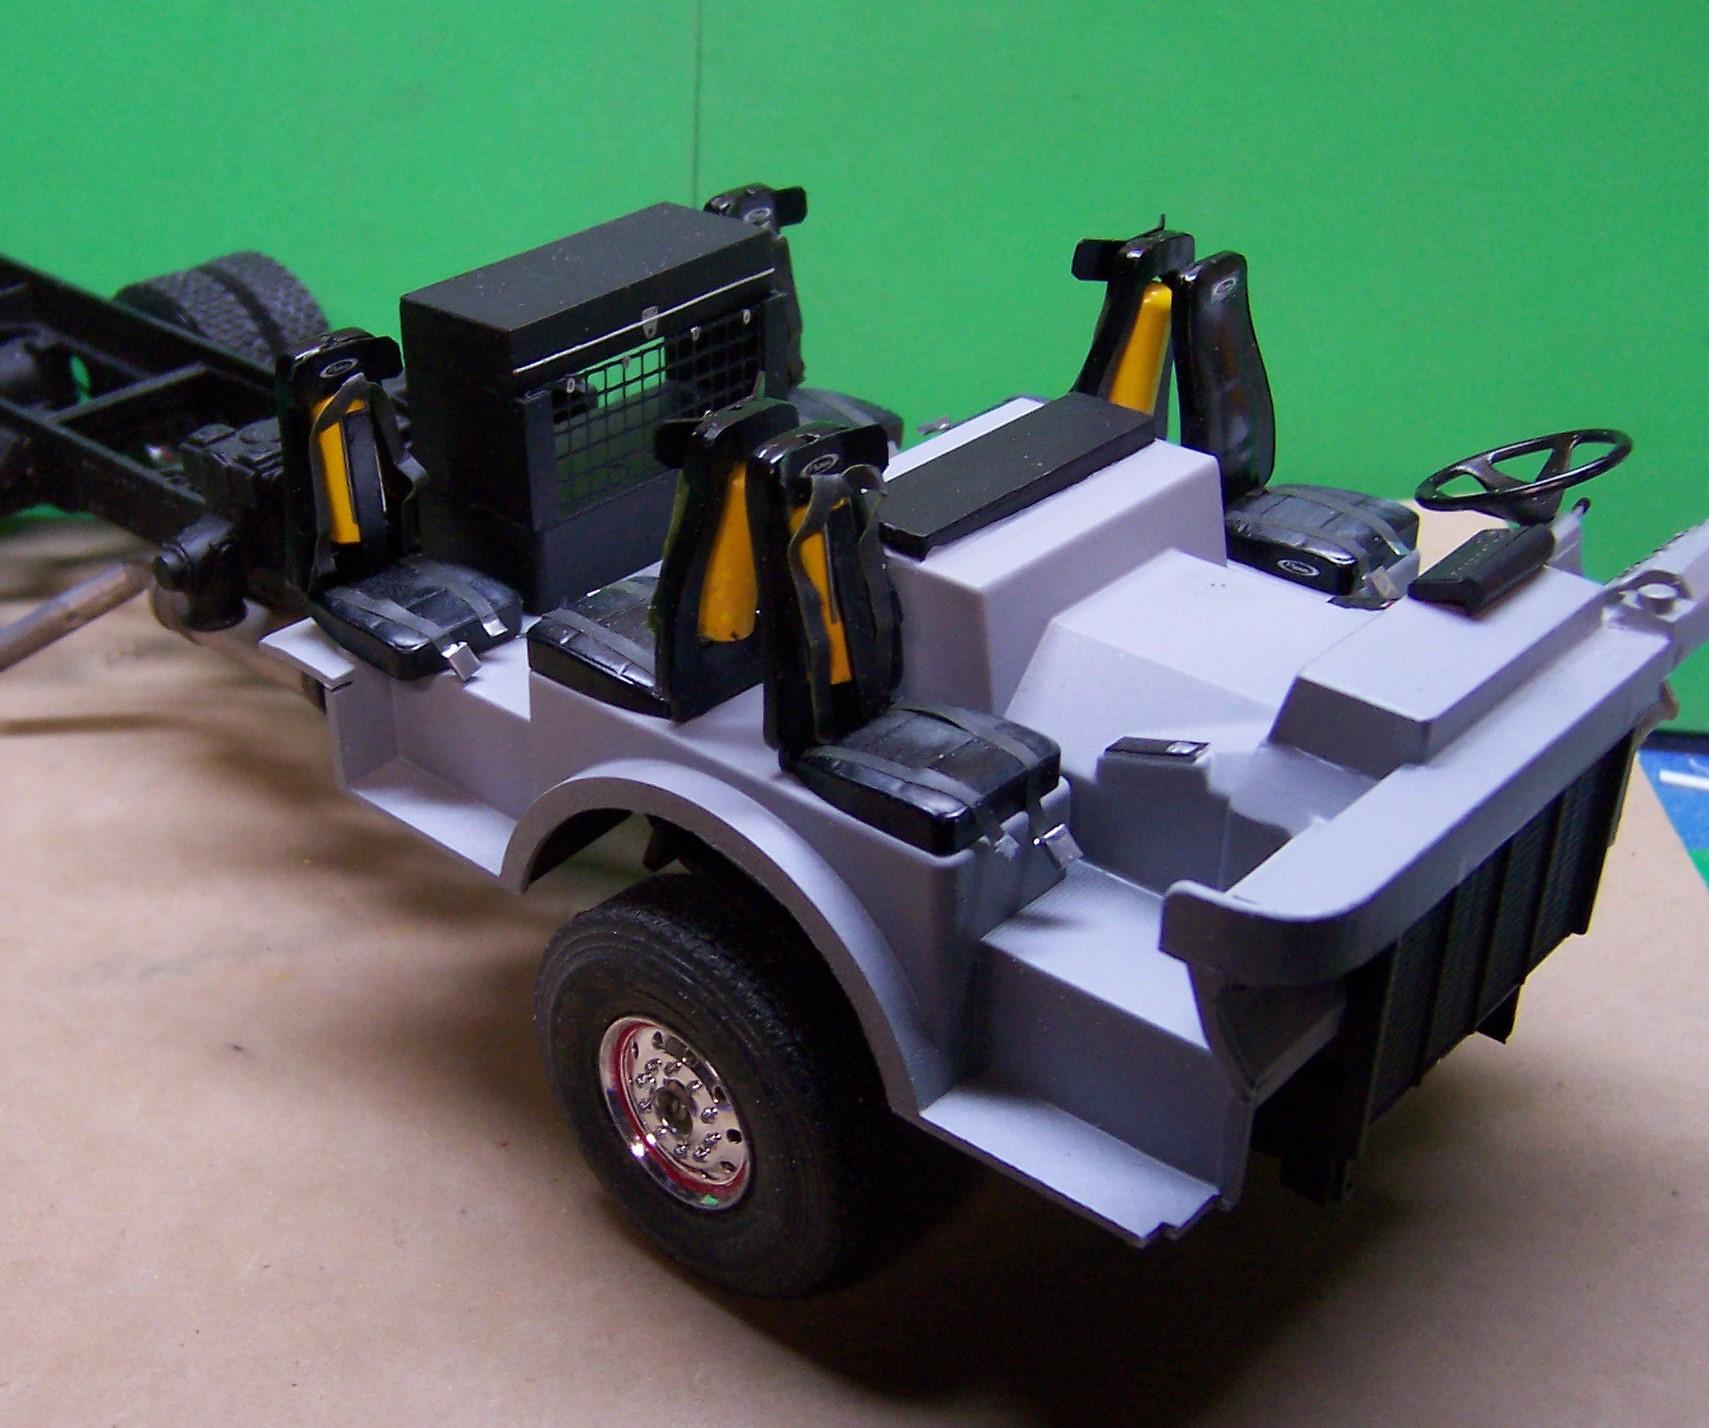
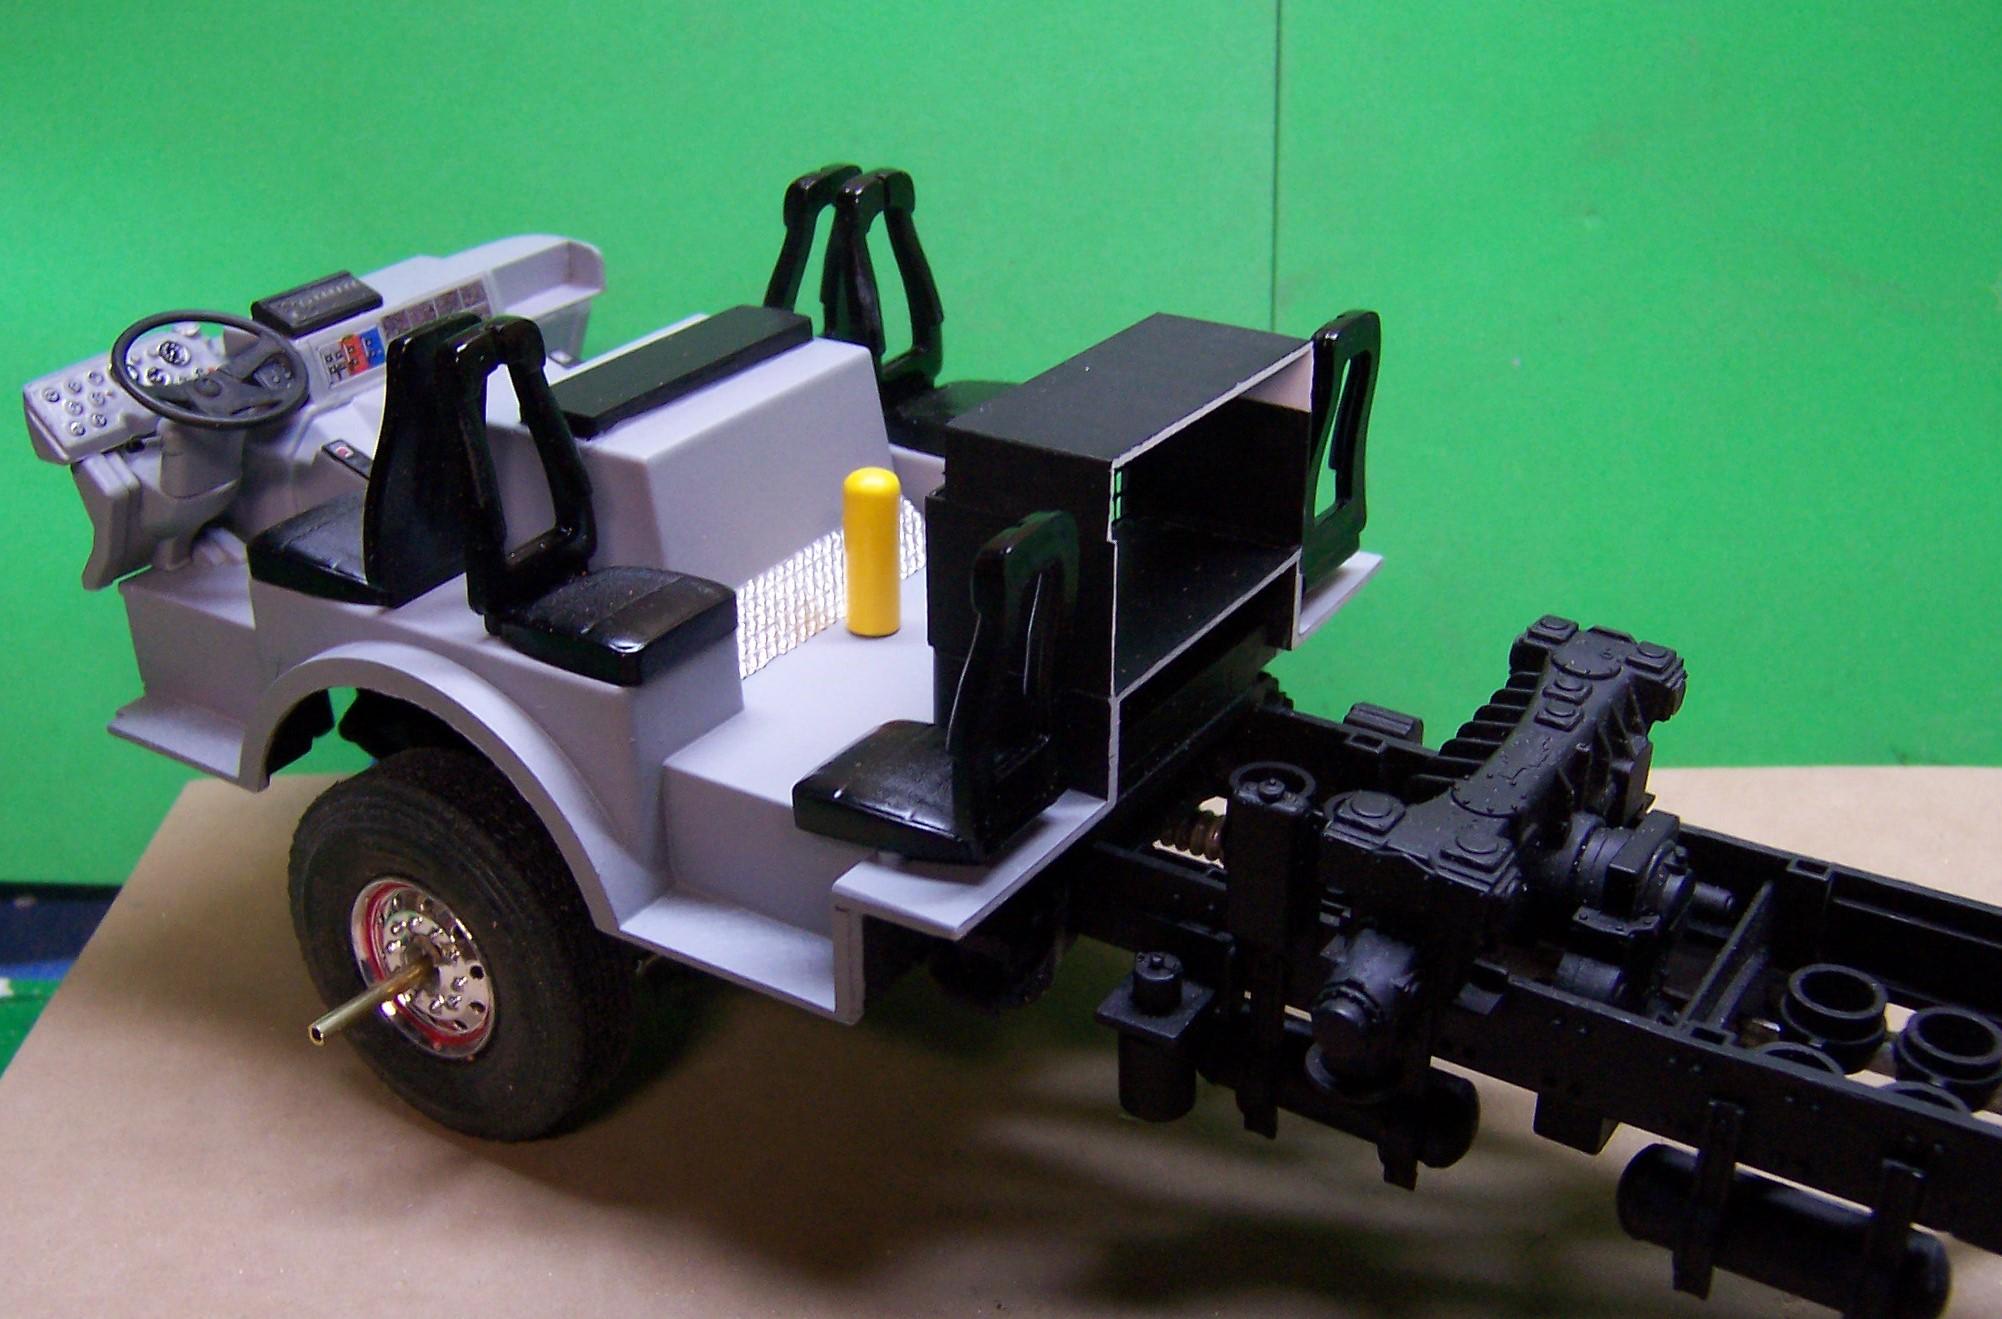
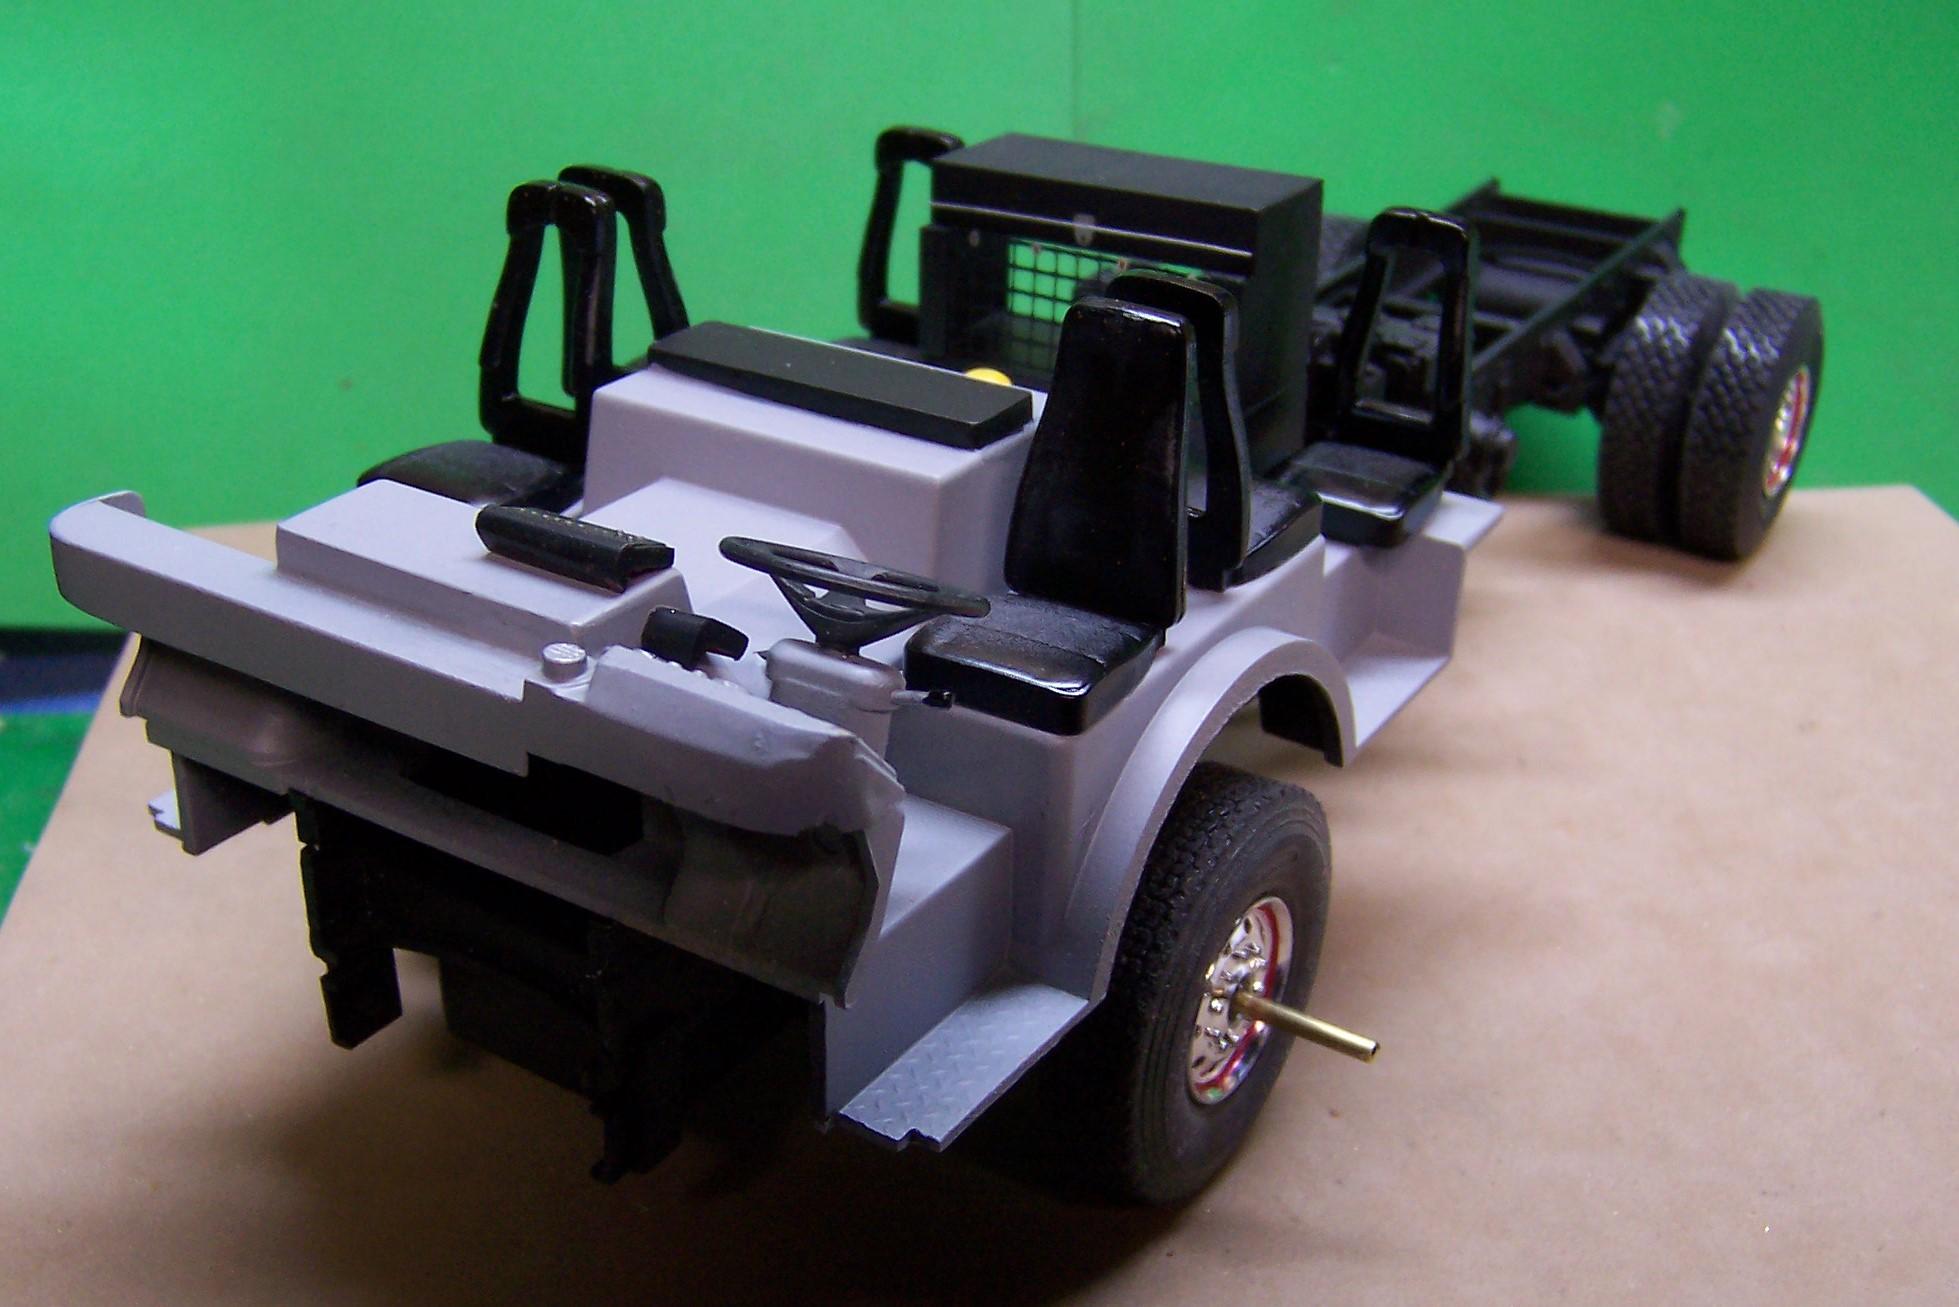
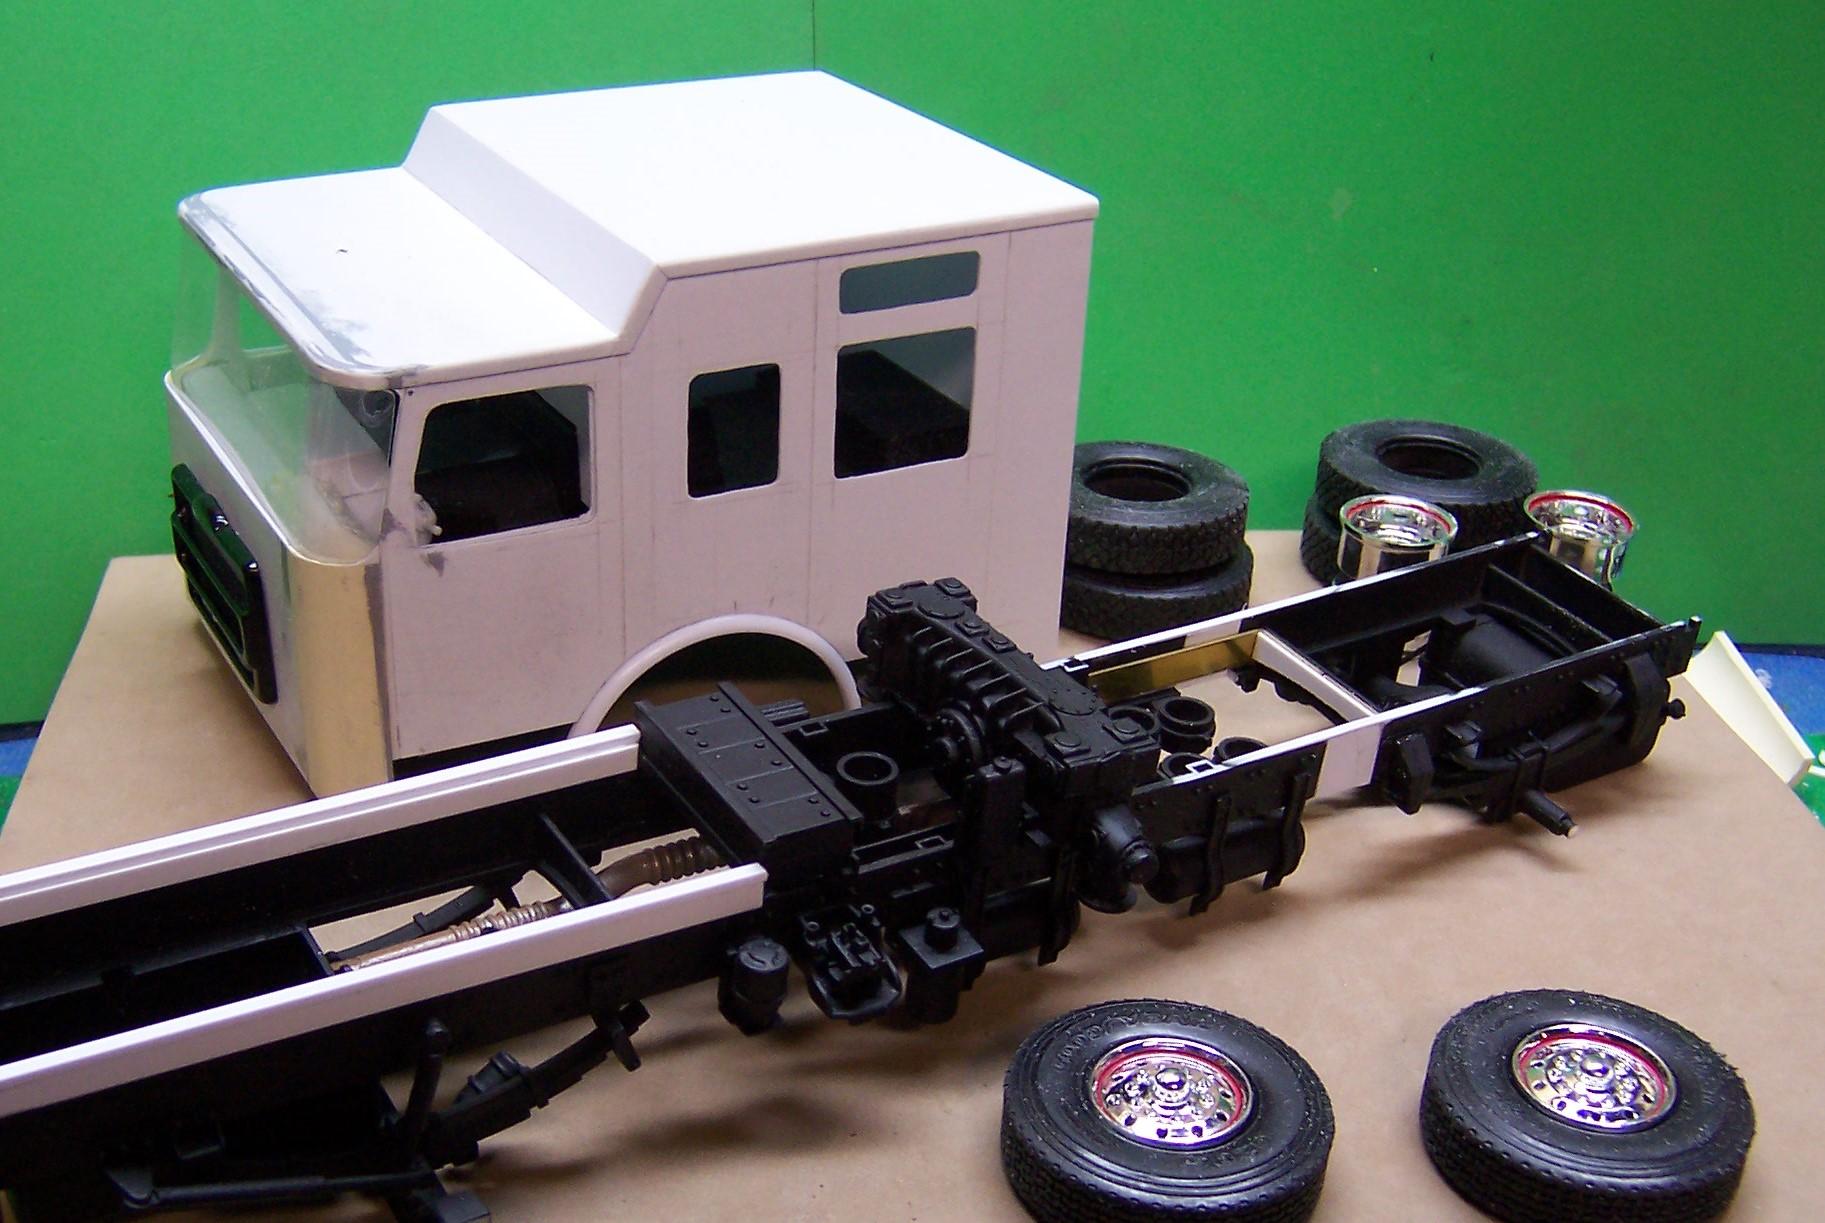
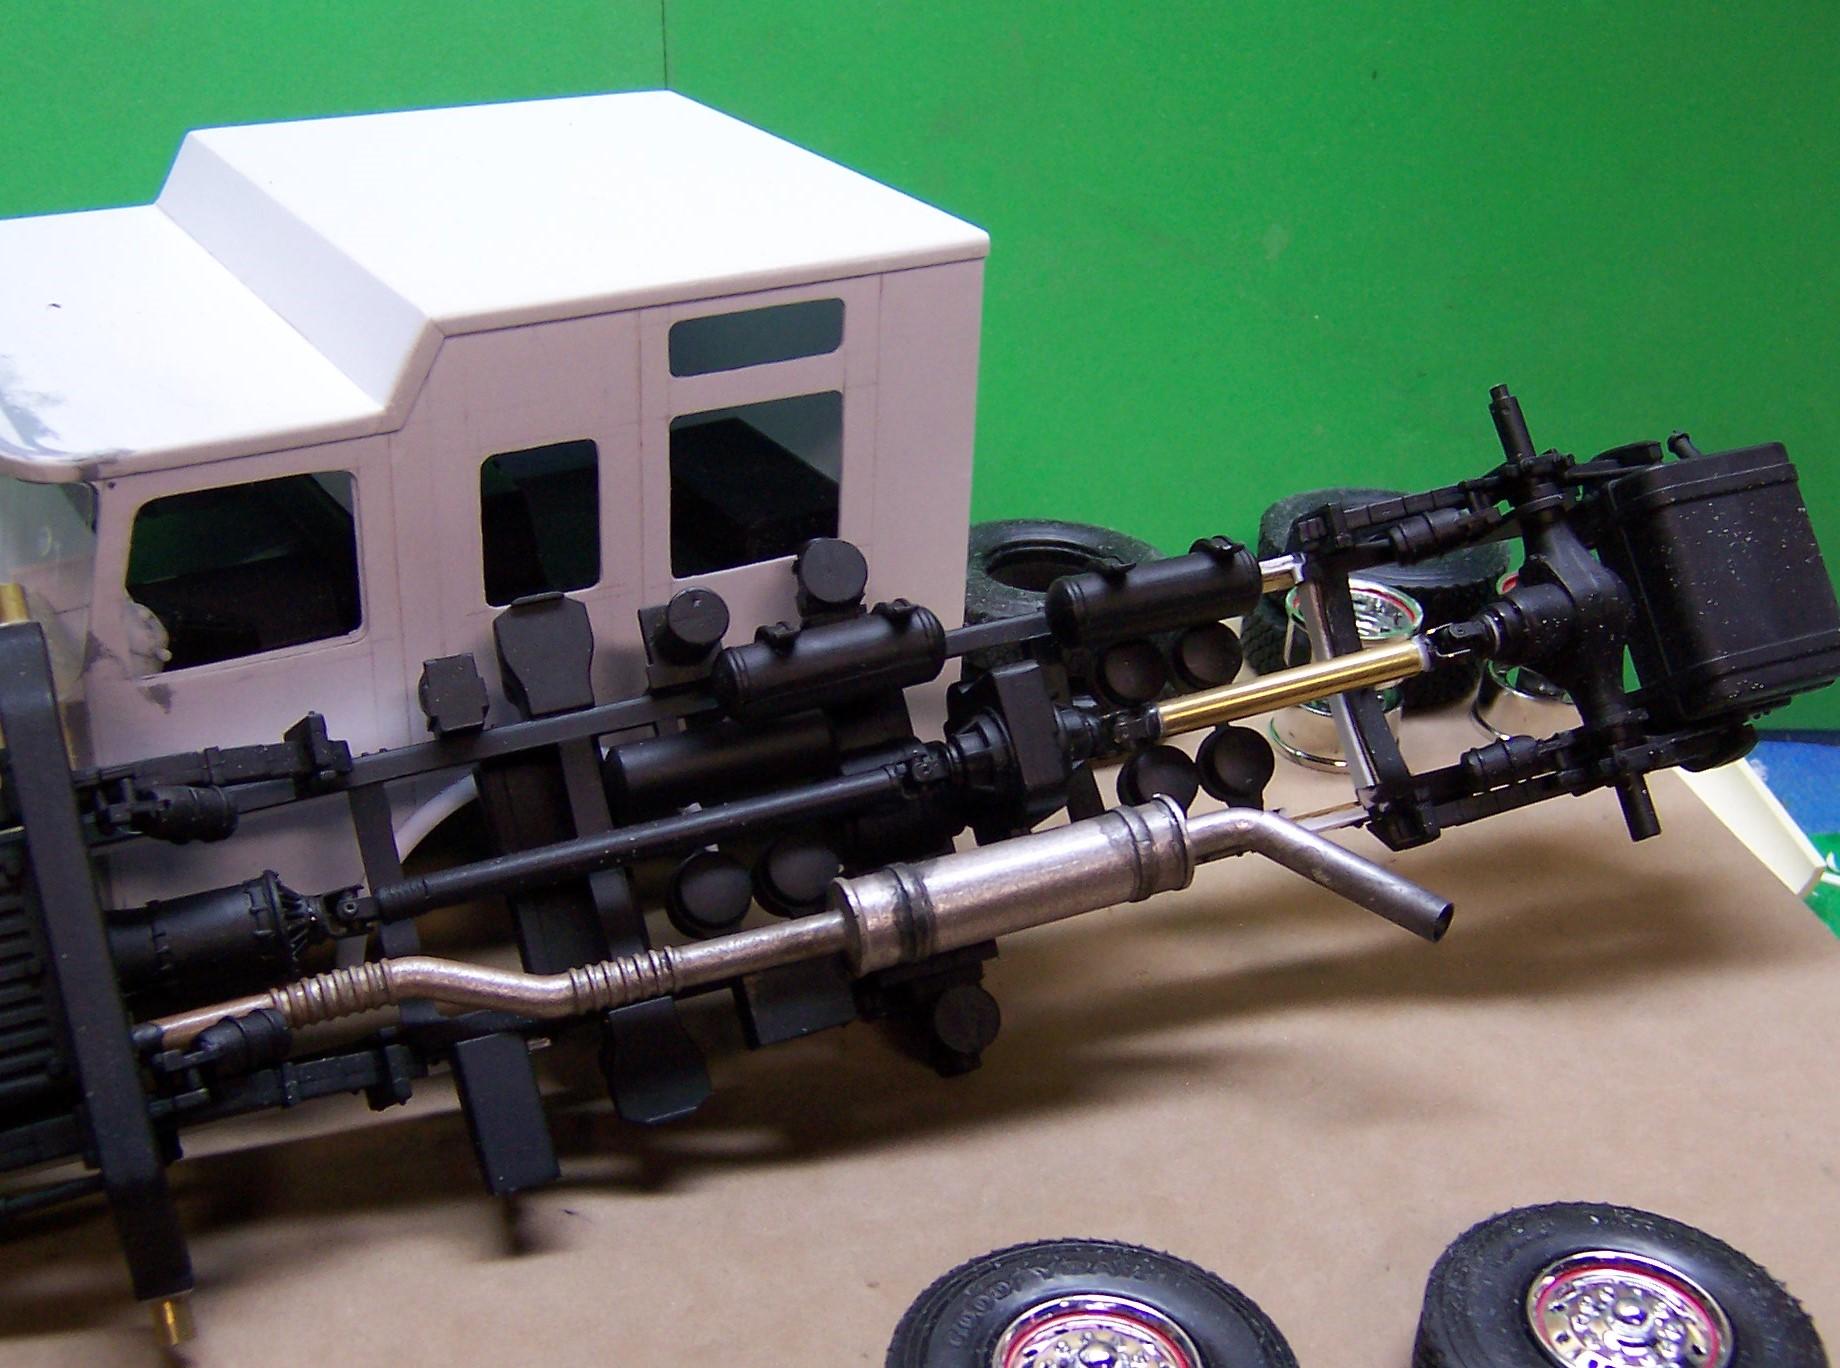
Moving right along, I spent some time with the interior tub. With some photos of the actual truck I put together some pieces that would resemble the inside of the cab. The seats came from the Trumpeter ALF. Some minor modifications will make them look more like Pierce work. The ALF dash was too far away from the Pierce dash so I looked into my stash of older kits and found a KW gage cluster that was close. I also took one of the 1/32 scale Monogram Macks and from a kit I had already cut up took the additional dash controls and butterfly switch cluster. I cut them apart and relocated them to the Pierce dash. There was also some room for decal work that imitate the additional controls and AC unit. The yellow tubing is the first of 5 SCBA bottles that will fit in the open back seats. Not a good photo but on the dash you can see the Mack gages; one small one just to the left of the steering wheel and one up on the console. To the rear of the cab are two seats with an open netting type storage compartment with a hinged top. The back wall of the cab will be right behind the seats and compartment. I also did some work on the front axle. The wheels are now permanent with tires mounted. I made the tie rod out of 1/16" diameter brass tubing with the next size up for the ends. I cut a notch lengthwise in this piece and drilled it out for the bolt and nut. An additional bracket was made for the wheel back where another piece of 1/16" tubing was soldered on. The end was pinched and drilled for the bolt. I soldered the tie rod end only on end to start. On the other wheel I mounted the tie rod end and inserted the tie rod. Using a long ruler I lined up both axles so that they were straight. It was only then that the second tie rod end was soldered to lock it in place. The bolts are #90 frorm the LHS. They will be cut off and the nuts secured from loosening up. On the bottom of the axle is a piece of strip stock. I had to cut the axle in half and shorten it some so that the tires would be under the wheel well flairs. The strip just adds some stiffness to the axle. There is also a piece on top but it well hidden. Finally I gave the cab a coat of flat black paint inside and then masked off the windshield and side windows and gave the outside a first coat of gray primer. Door lines have been scribed and after each coat they need to be opened up again so that the lines are not lost. The flaws now show up and will have to be fixed before moving on. Next up is to cut the hole in the front panel for the grill. A radiator will be installed behind the photoetch mesh but there won't be any engine in this one that you can see. The oil pan is there but that is all. Another Trumpeter peculiarity. No engine!
-
When I'm doing resin I use too many to wait that long!?
-
On a similar theme I use throw away plastic communion cups to mix the casting resin when I'm doing small parts. Got a box of 500 for about $12. I mark one for part A and then slip it into the second cup, accounting for the depth of the bottom of the cup and mark the second one for part B. That gives a pretty even 50/50 measure for mixing.
-
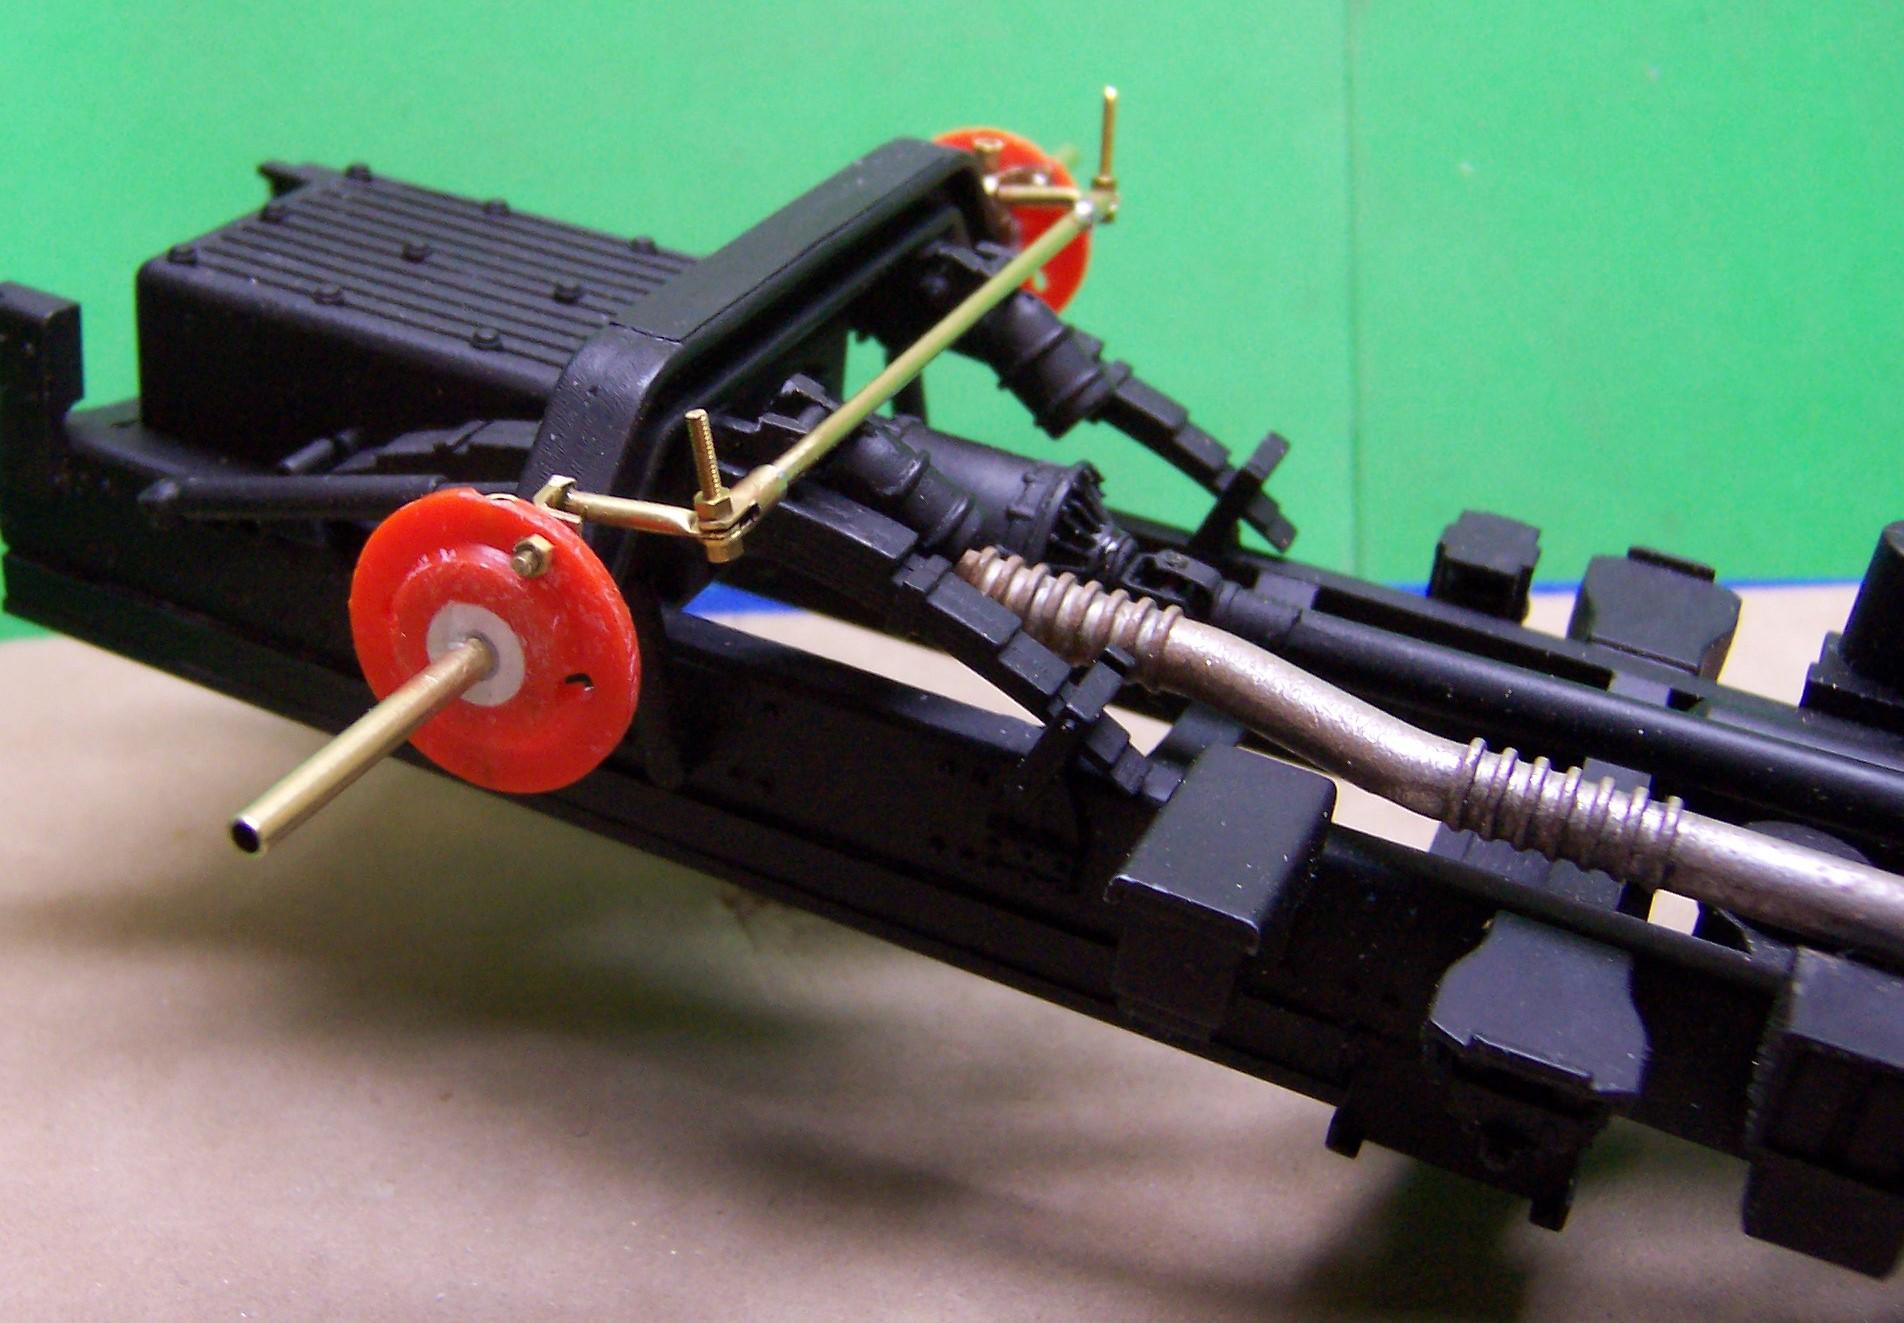
Have at it, my Friend! ? I should have kept track of all of the different ways I have done the front steering. Again, Trumpeter really missed the boat on so many little things that would have made a nice kit a great kit. There are no kingpins on the axle ends! Even AMT/Ertl had them on the ALF's. And a tie rod too! Trumpeter doesn't even seem to have that; at least I have not found it yet in the kit. Oh, well.. What difference does it make? The rig has them now!? And I've added the backs of the rims. It will help to keep the tires in place. Next to do is to drill out the rear axle and add the solid rod to hold the rear wheels on.
-
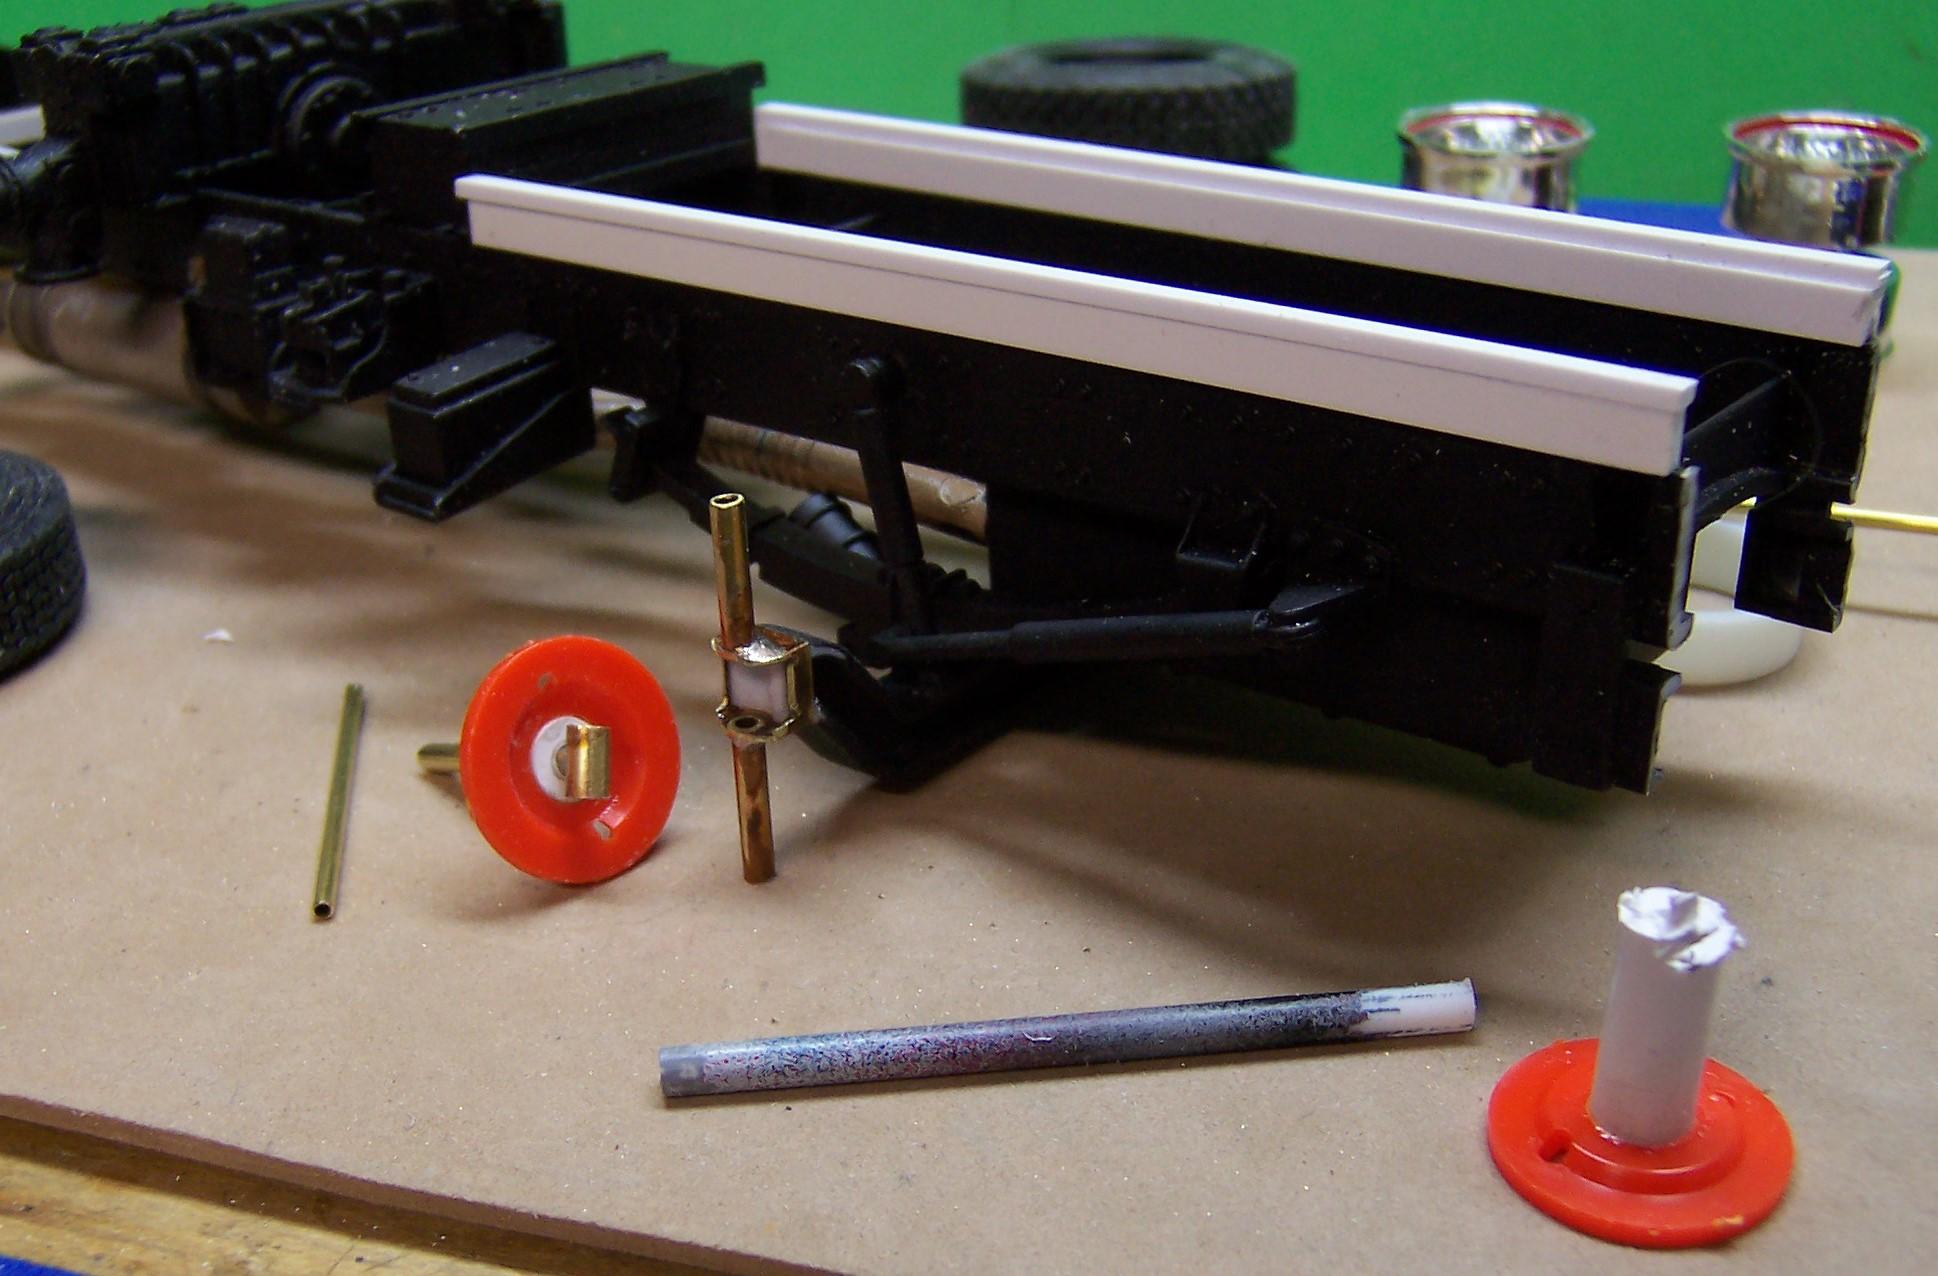
The Trumpeter kit has many nice features but some of the engineering leaves one to wonder. The wheels are snap on much like the old Monogram 1/32 scale kit wheels. For such a large vehicle, even if made right out of the box they are flimsy both front and rear. So I'm changing that not only to strengthen the axles and wheels but to make the fronts to turn. The back axle will be a one piece solid brass rod that will run from one set of wheels through the differential to the other. Here is the front axle so far. I had to pull the axle in about 3/16" to get the tires completely inside the wheel wells. I very much dislike tires sticking outside the flairs. Some tie rod brackets will be added to the orange pieces that will be glued to the brass axle extension. The wheel will be held on with a small screw and washer inside the chrome wheel. Then it will be capped. Below is the axle housing made of square tube stock. Only a bit of sanding was necessary on the kit axle to slide the square tubing over it. Holes were drilled in the top and bottom surfaces and a brass tube was run through and soldered top and bottom. Then portions of the square tube were cut away including the brass tube that was inside. This left a place for the small piece of tubing next to the orange backing plate to fit in. The smaller brass tube to the side slides in from top to bottom locking the backing plate and axle in place. Vertical tubing will be cut off eventually to the proper length. I also did the frame lengthening to get the 194" wheel base. Since the frame was already put together, I had to decide where to make the cut. As it worked out the best place was just ahead of the rear tires. The rear piece had a really short piece of frame rail left but there was a sturdy crossmember there. So I bent some 1/4" wide strip brass stock to a 90 degree angle and glued it inside the frame rail at the cross member. This was done on both sides. Then a second piece of plastic strip stock was glued over the top of each piece of brass at the cross member. Then it was case of gluing the longer part of the strip brass to the front frame section on each side but extending the front section out about 12 scale inches. Then the gap was filled in with sheet and strip stock. Once painted the joint will not be noticeable and it is surprisingly strong. The only problem with doing what I did was that the rear drive shaft would now be too short. So I cut it at each U-joint (it was still too short?) and substituted a piece of brass tubing of the same diameter but lengthened the appropriate amount. The driveshaft was reinstalled and will be painted again.
-
International RF-190
Chariots of Fire replied to DRIPTROIT 71's topic in WIP: Model Trucks: Big Rigs and Heavy Equipment
NIce color! I like it! -
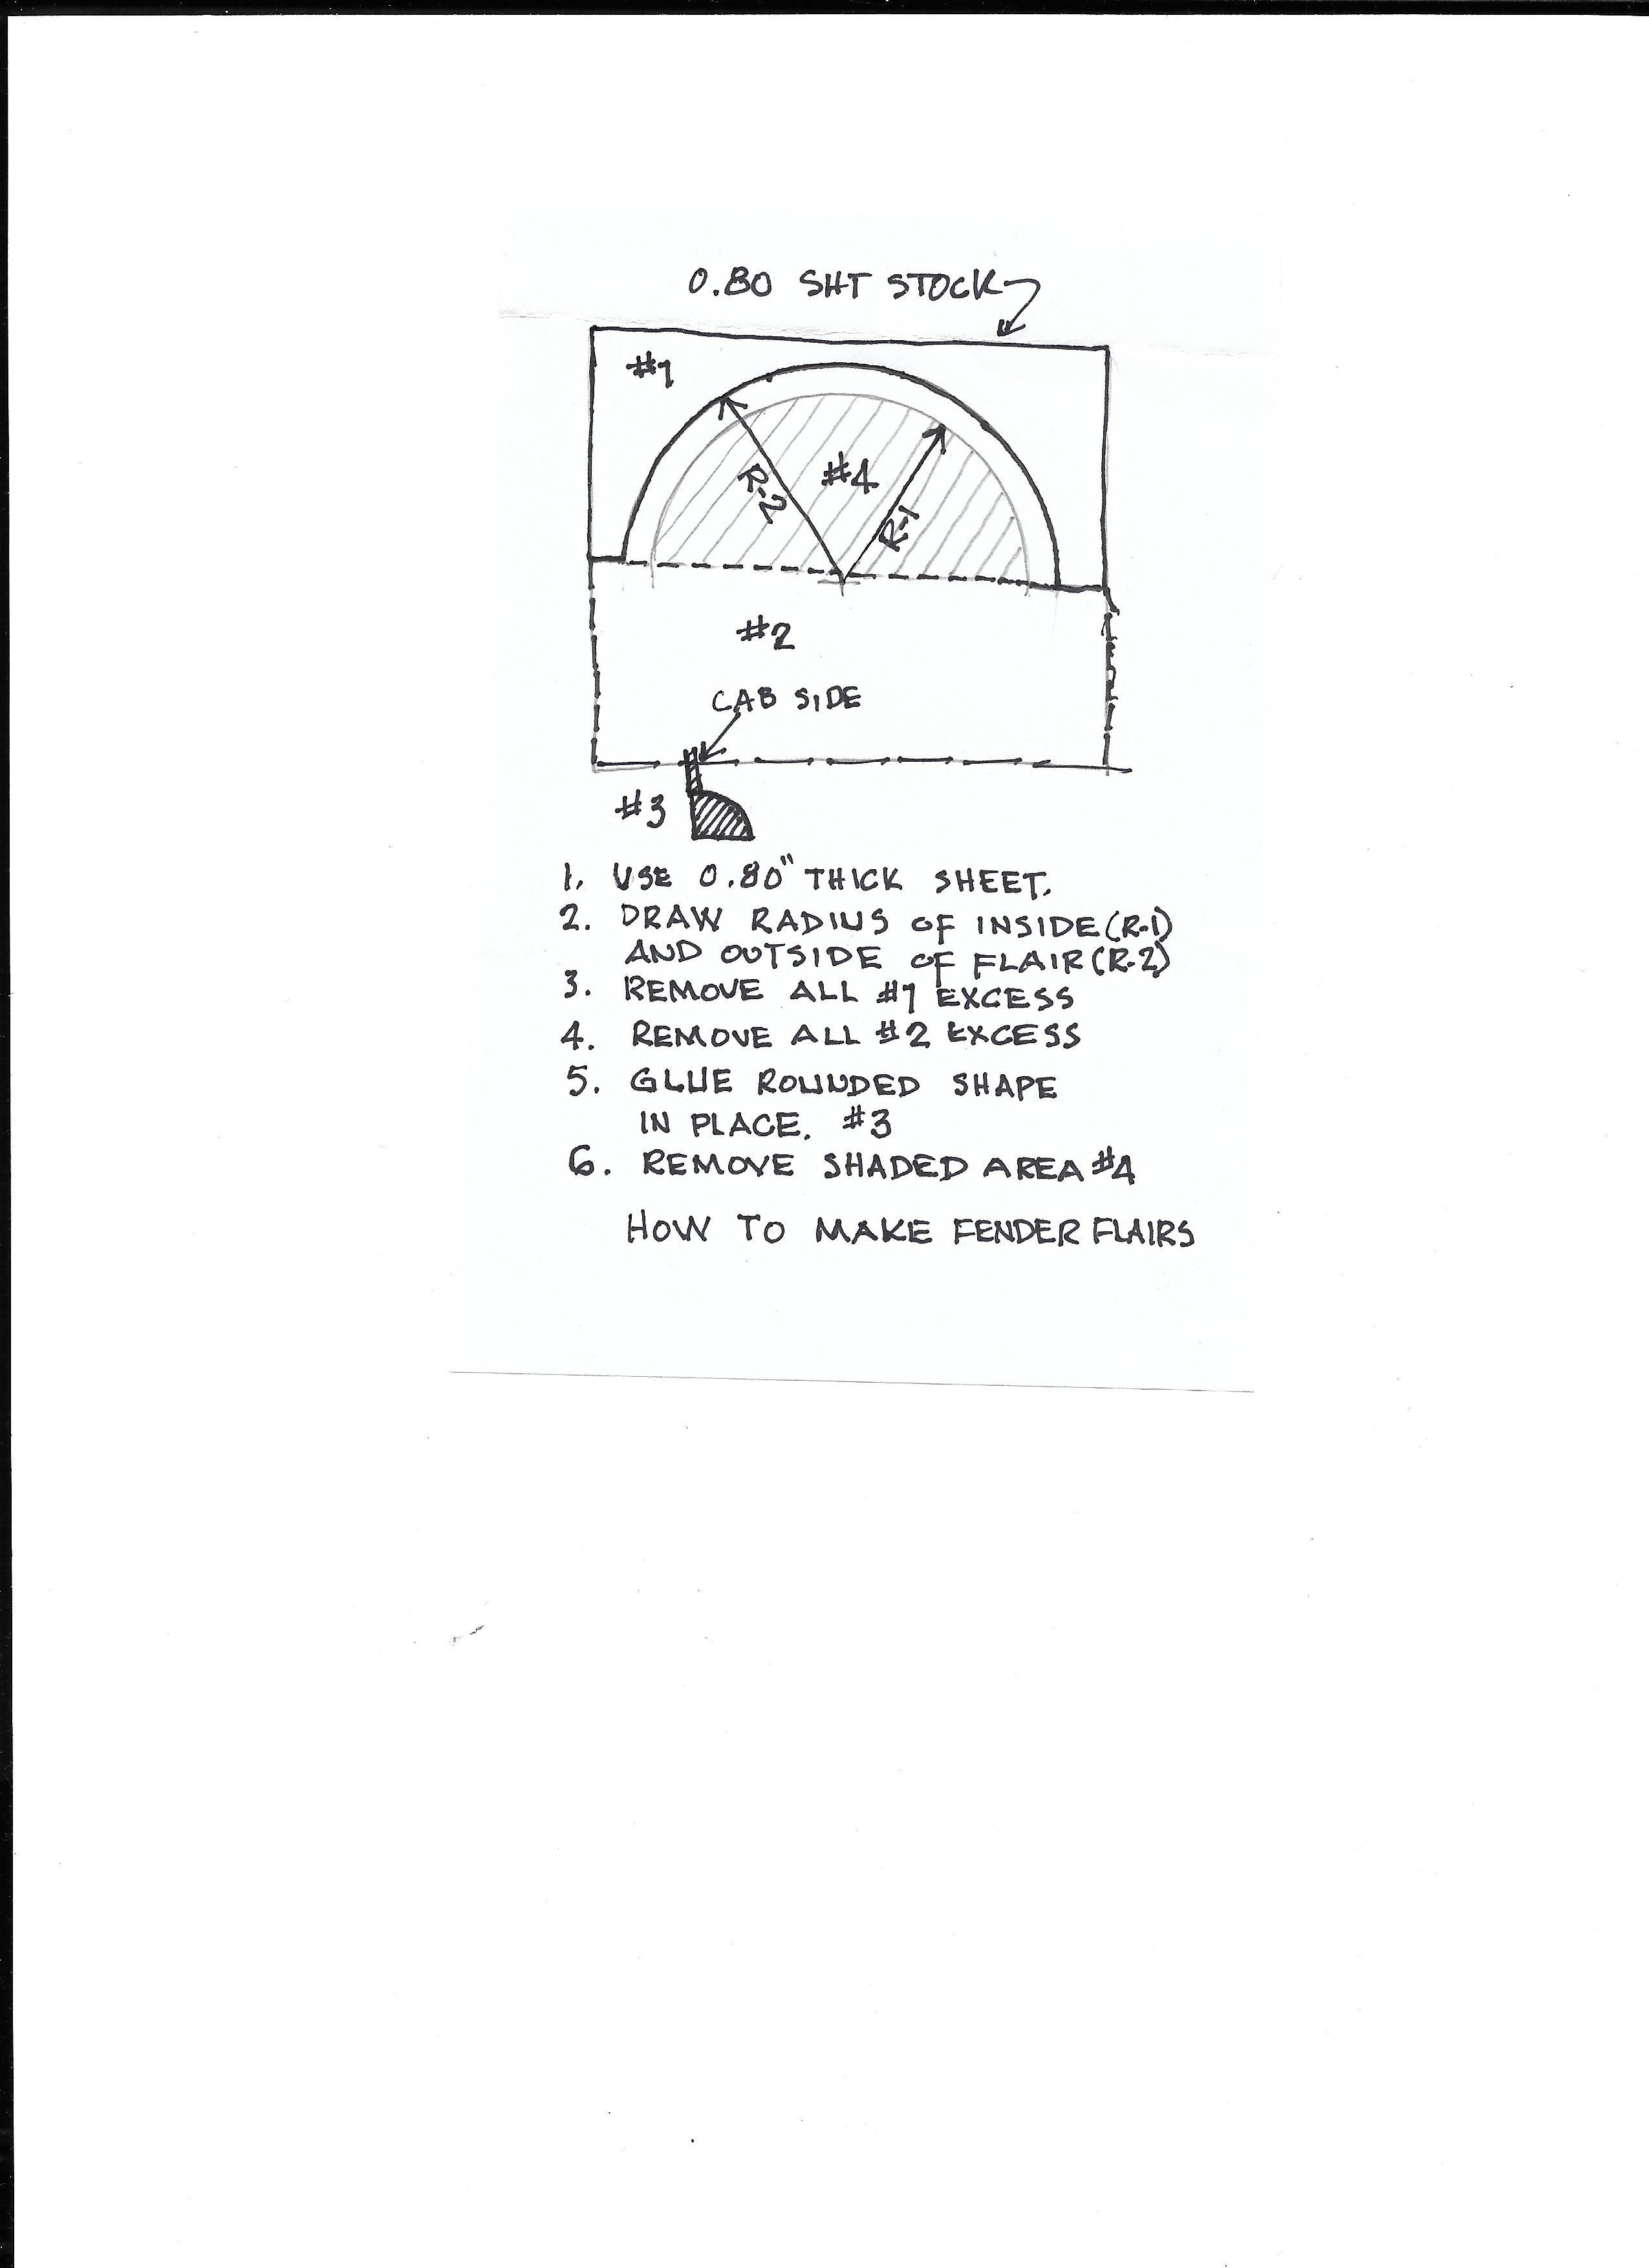
I decided to do the tutorial on making fender flairs. This is a hand drawn sketch of how I would make them if I had no other source for them. In 1/25 scale the front fenders of the Ertl ALF kits can be used for them as well. They just have to be trimmed to get rid of the excess width. The trimming needs to be done so that it ends up right at the edge of where the chrome trim plate would be glued on. Getting back to the hand crafted way here we are. You will need the following tools to make the flairs. A ruler, a drawing compass, Xacto knife and preferably a Dremel with a sanding drum. Start with a sheet of 0.080 thick sheet stock. Actually, in thinking about it, 0.100" thick stock might be better. If you don't have a thick sheet, laminate two or three thinner sheets together to get the thickness. Measure the outside radius of the flair that you want and with the compass draw the outside curve (R-2) on the sheet stock. Then reduce the compass radius to R-1 and draw that in. Next remove all of the excess of the sheet stock shown as #1 in heavy black lines. Be careful when going around the outside radius R-2 by leaving just a bit of the line work. Then remove all of the sheet labeled #2. Where you cut will be the bottom of the flairs. You will end up with just the outside curve roughed in and a shape like half an orange. Now carefully sand the outside radius R-2 along the line and then begin to sand the edge like quarter round as shown in the cross section #3 below. When that is done and smoothed up remove all of the shaded excess material #4. Leaving that to last makes it easier to handle the sheet stock during the shaping process. Start by rough cutting the material away and then use the Dremel and sanding drum to finish up. Work carefully so that the two radii remain concentric. The flair needs to be even width all around. Once this is all done glue the flair in place. BUT before you do, make sure the curved part of the cab and the flair touch throughout. Sand away the high spots so that the joint is smooth and neat all the way around. Glue the flair in place from the BACK!!!!! and let the glue fill in the joint. The back surface of the flair should be flush with the inside surface of the cab. If anybody wants to give it a try let us know how you make out.
-
ALF Fire Chief Updated 9/21
Chariots of Fire replied to kilrathy10's topic in WIP: Model Trucks: Big Rigs and Heavy Equipment
Fine piece of work, JT.