Chariots of Fire
-
Posts
2,782 -
Joined
-
Last visited
Content Type
Profiles
Forums
Events
Gallery
Everything posted by Chariots of Fire
-
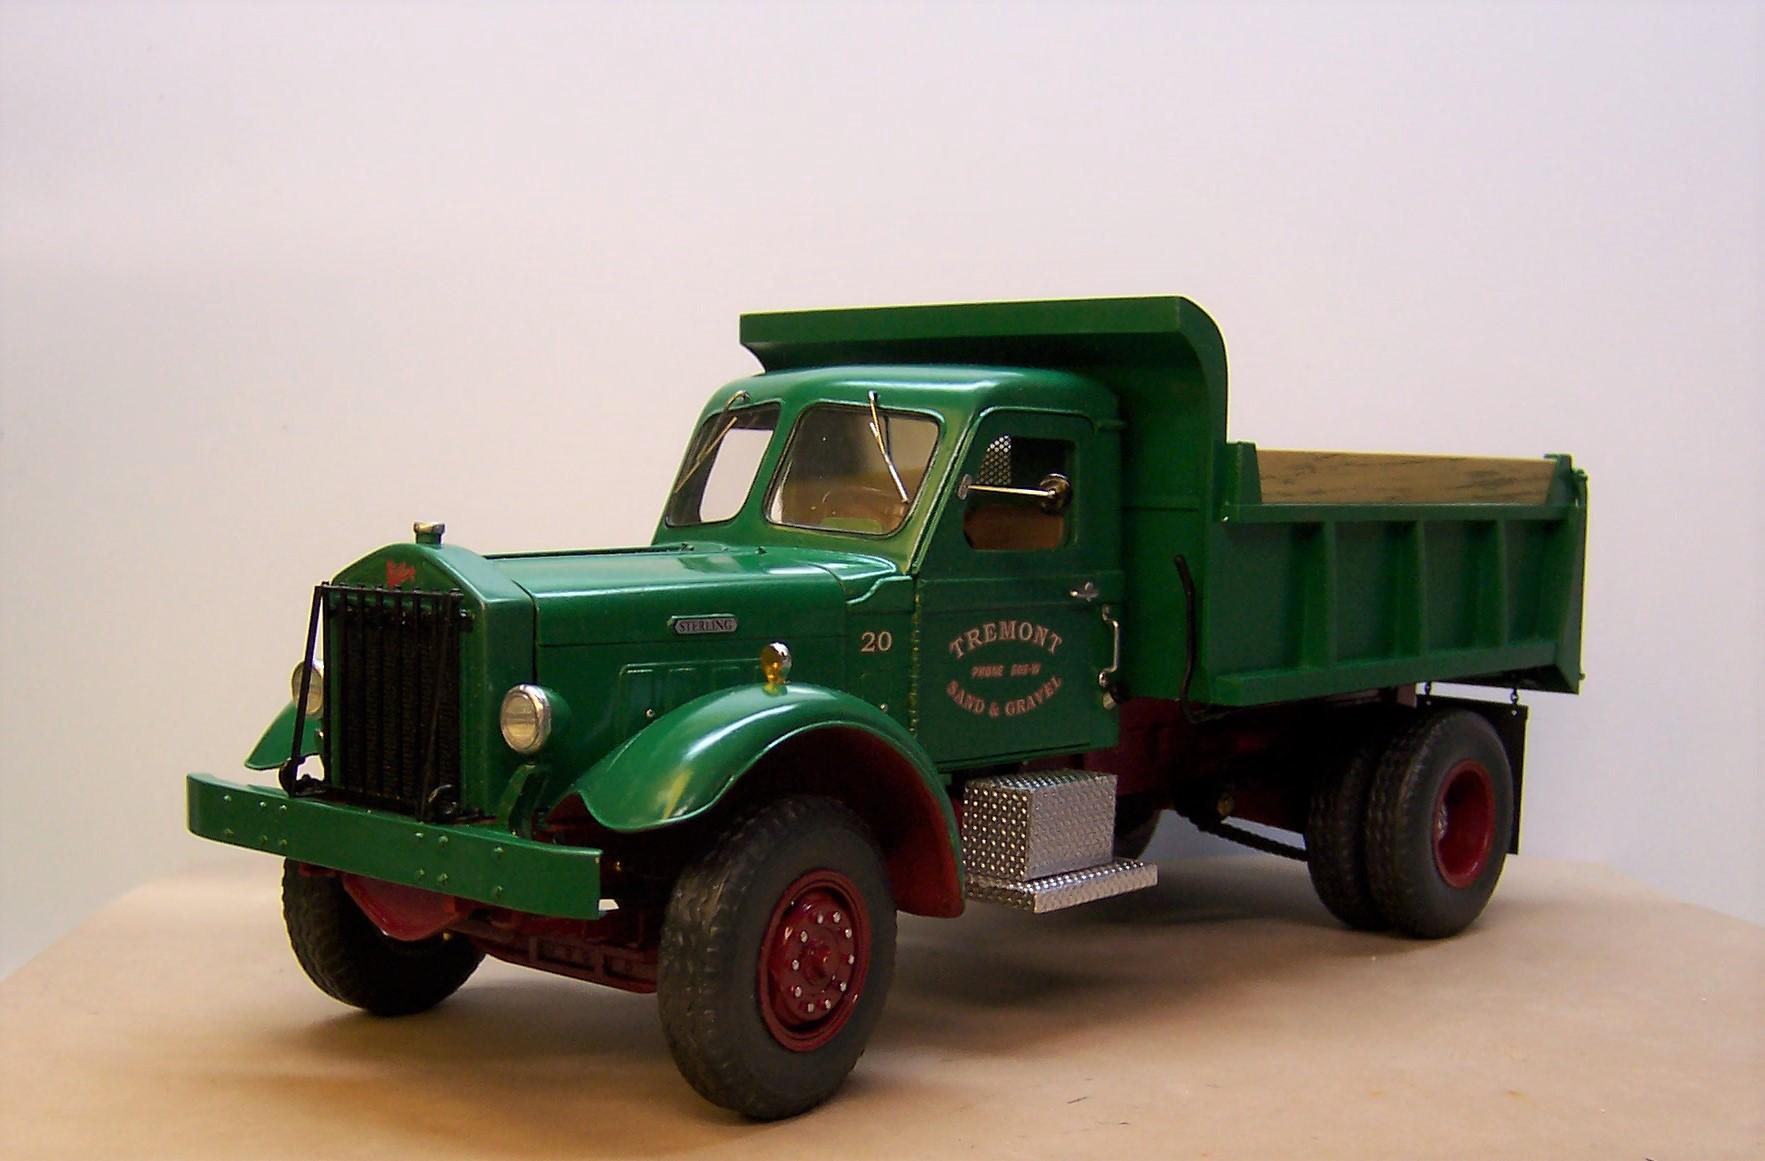
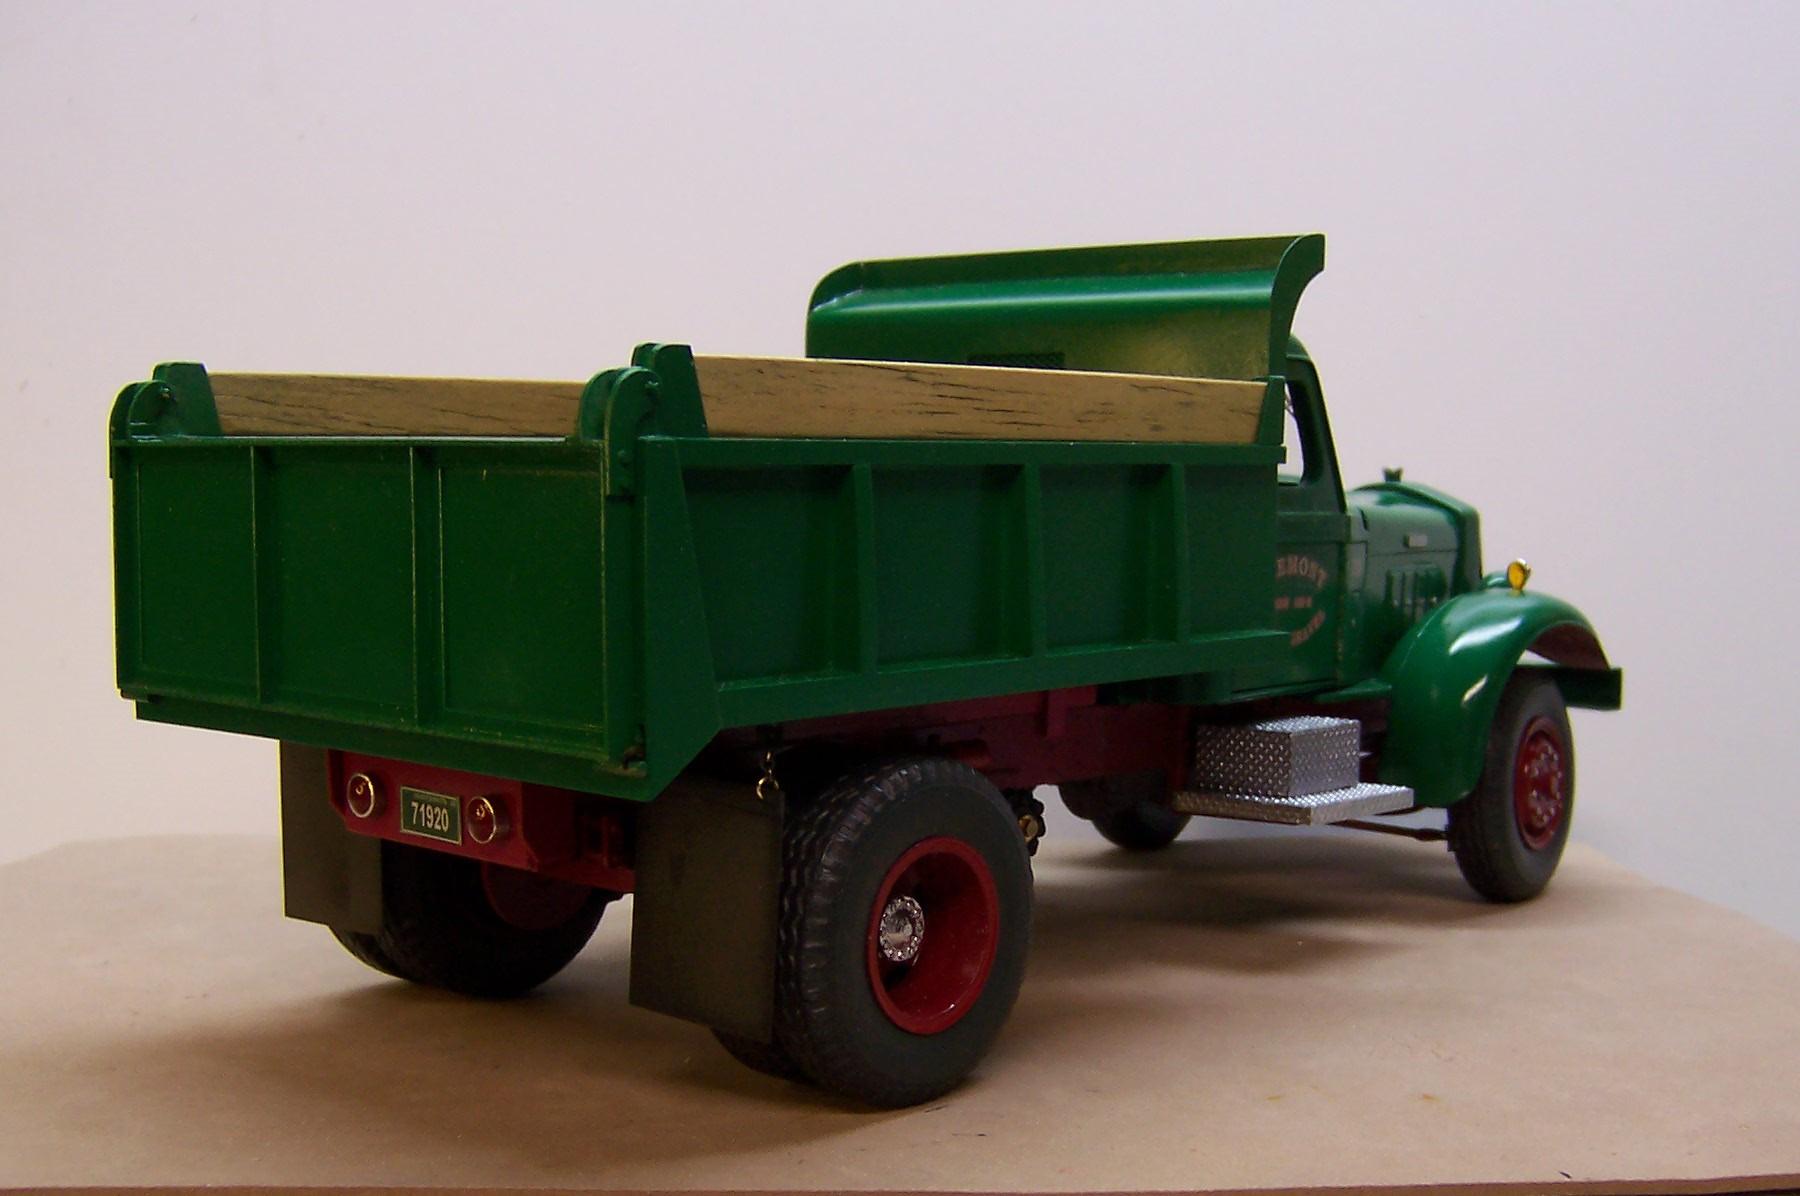
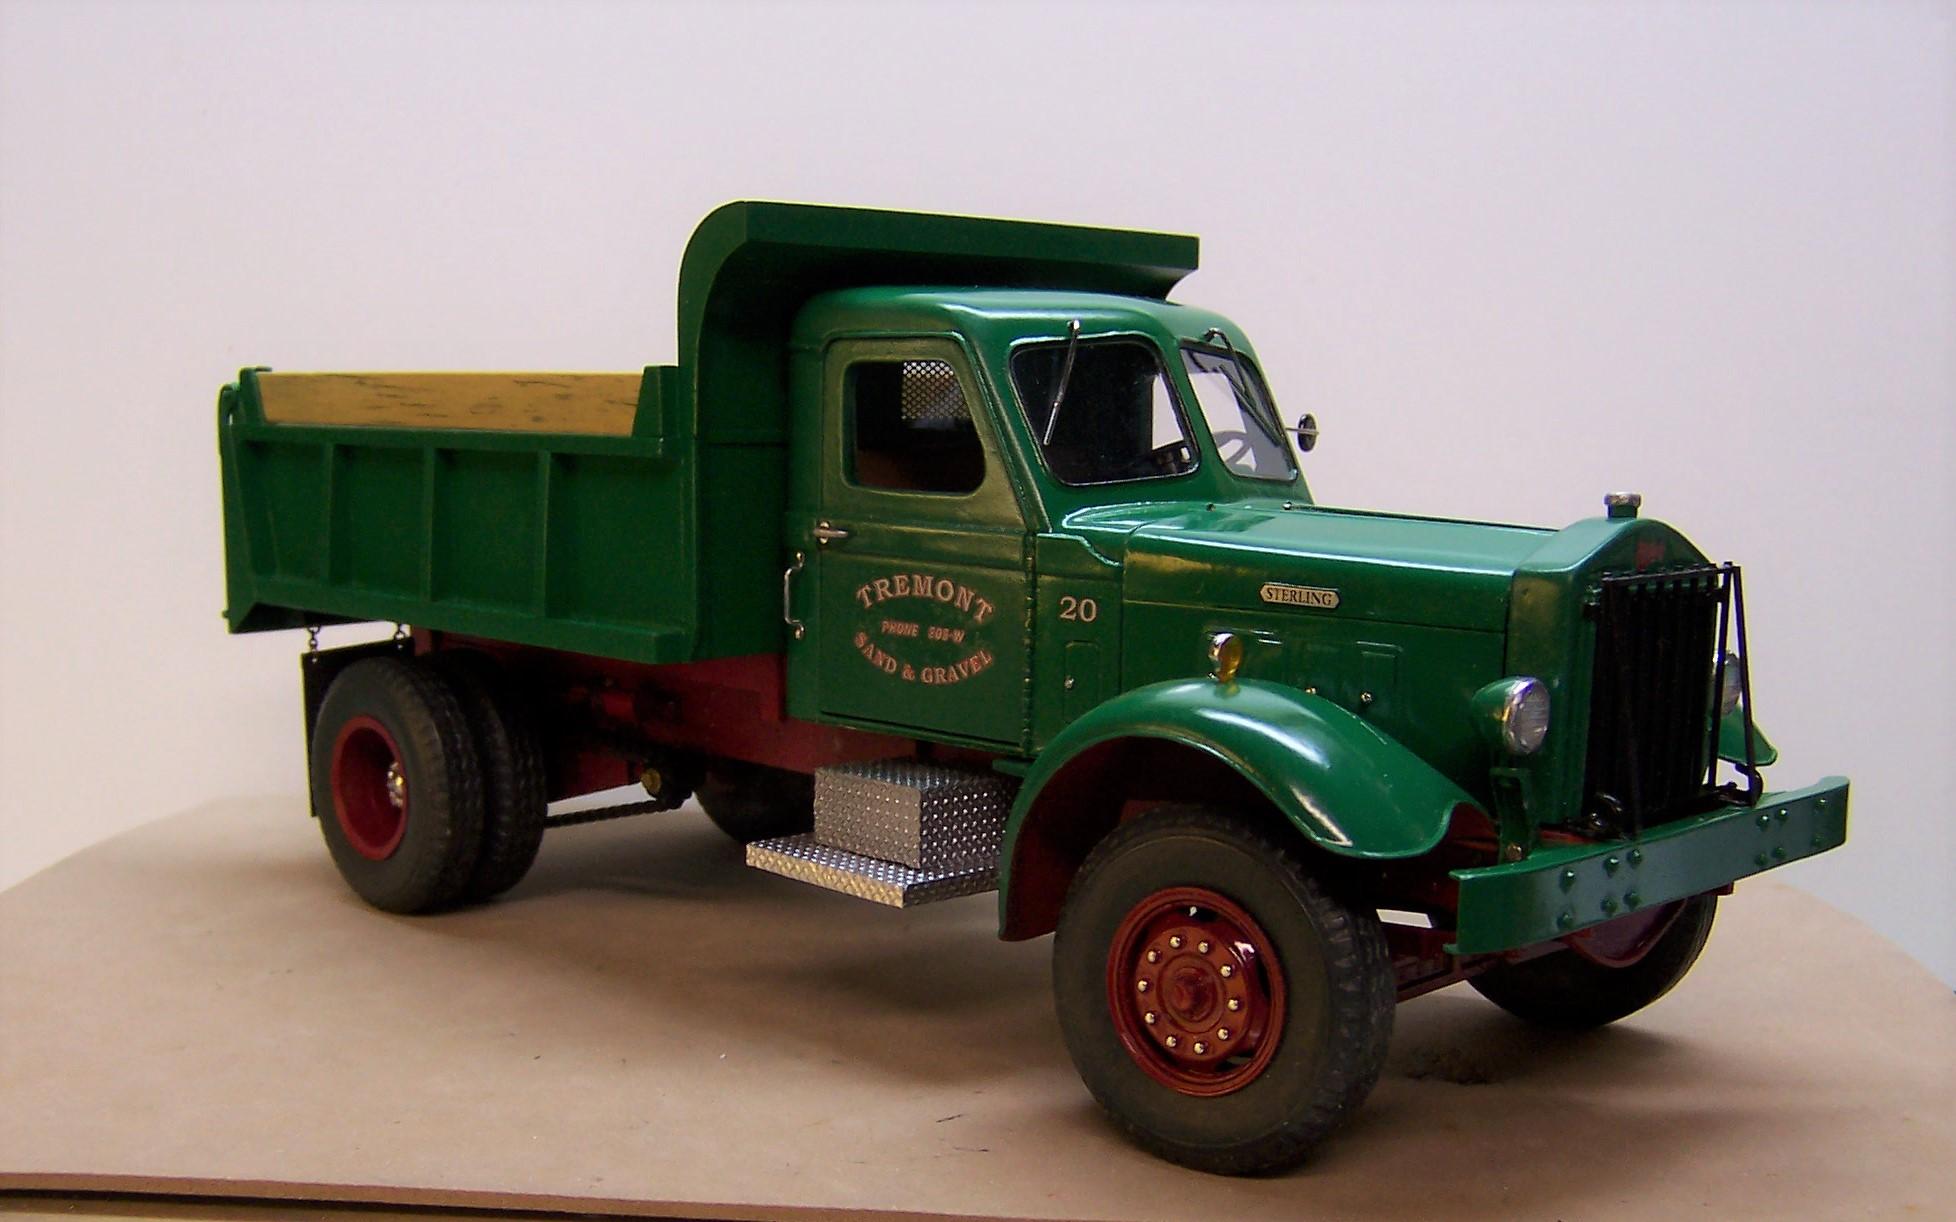
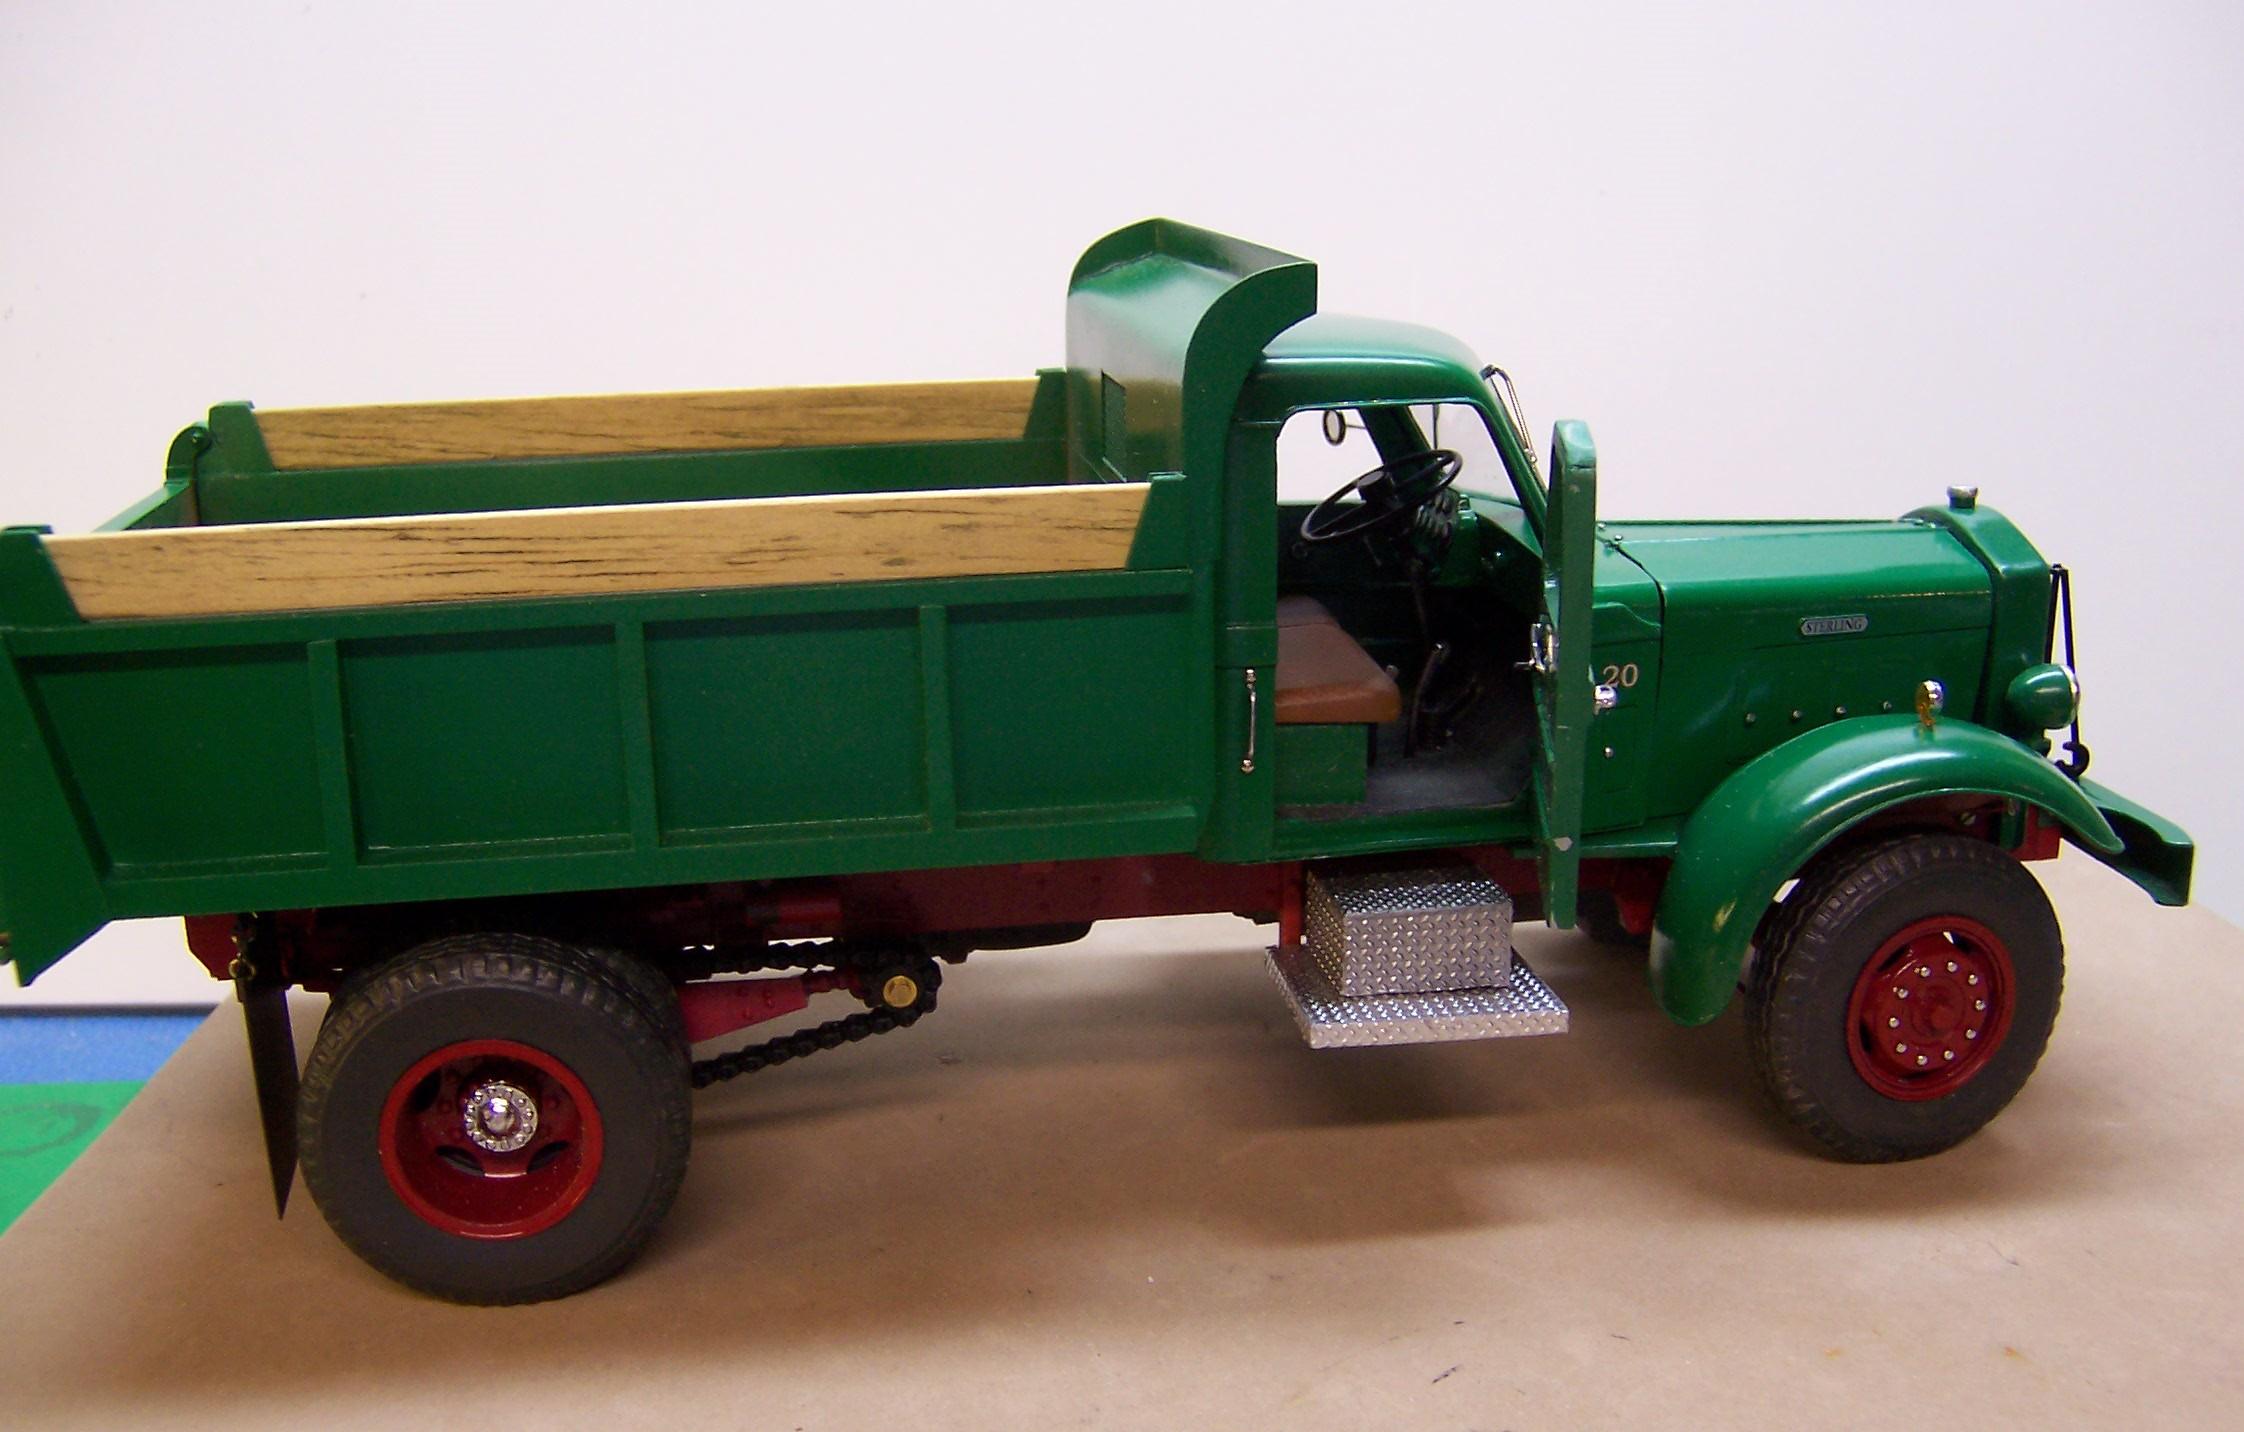
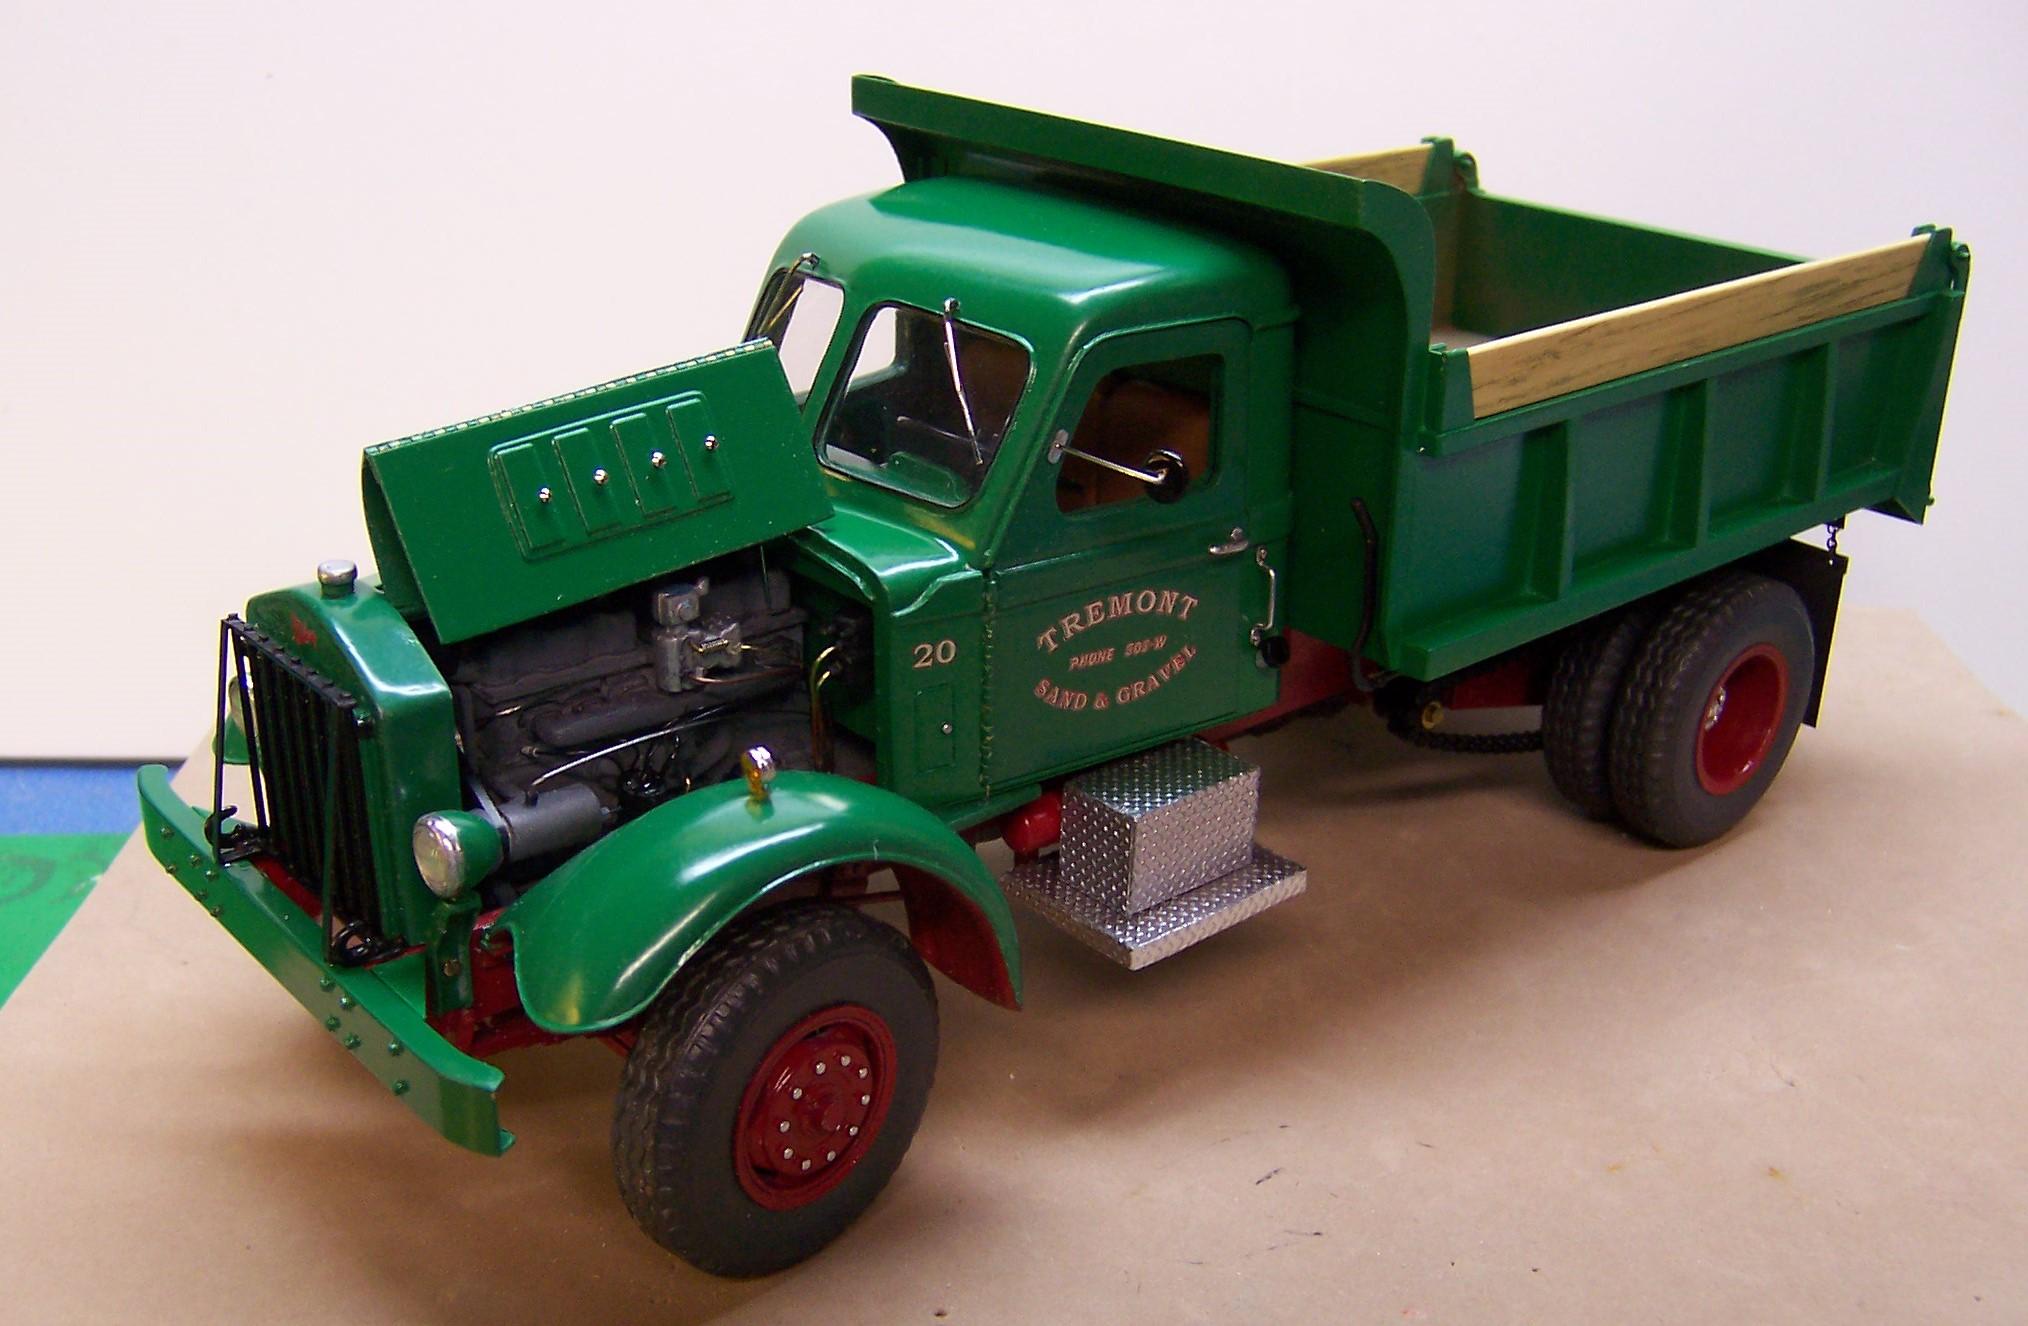
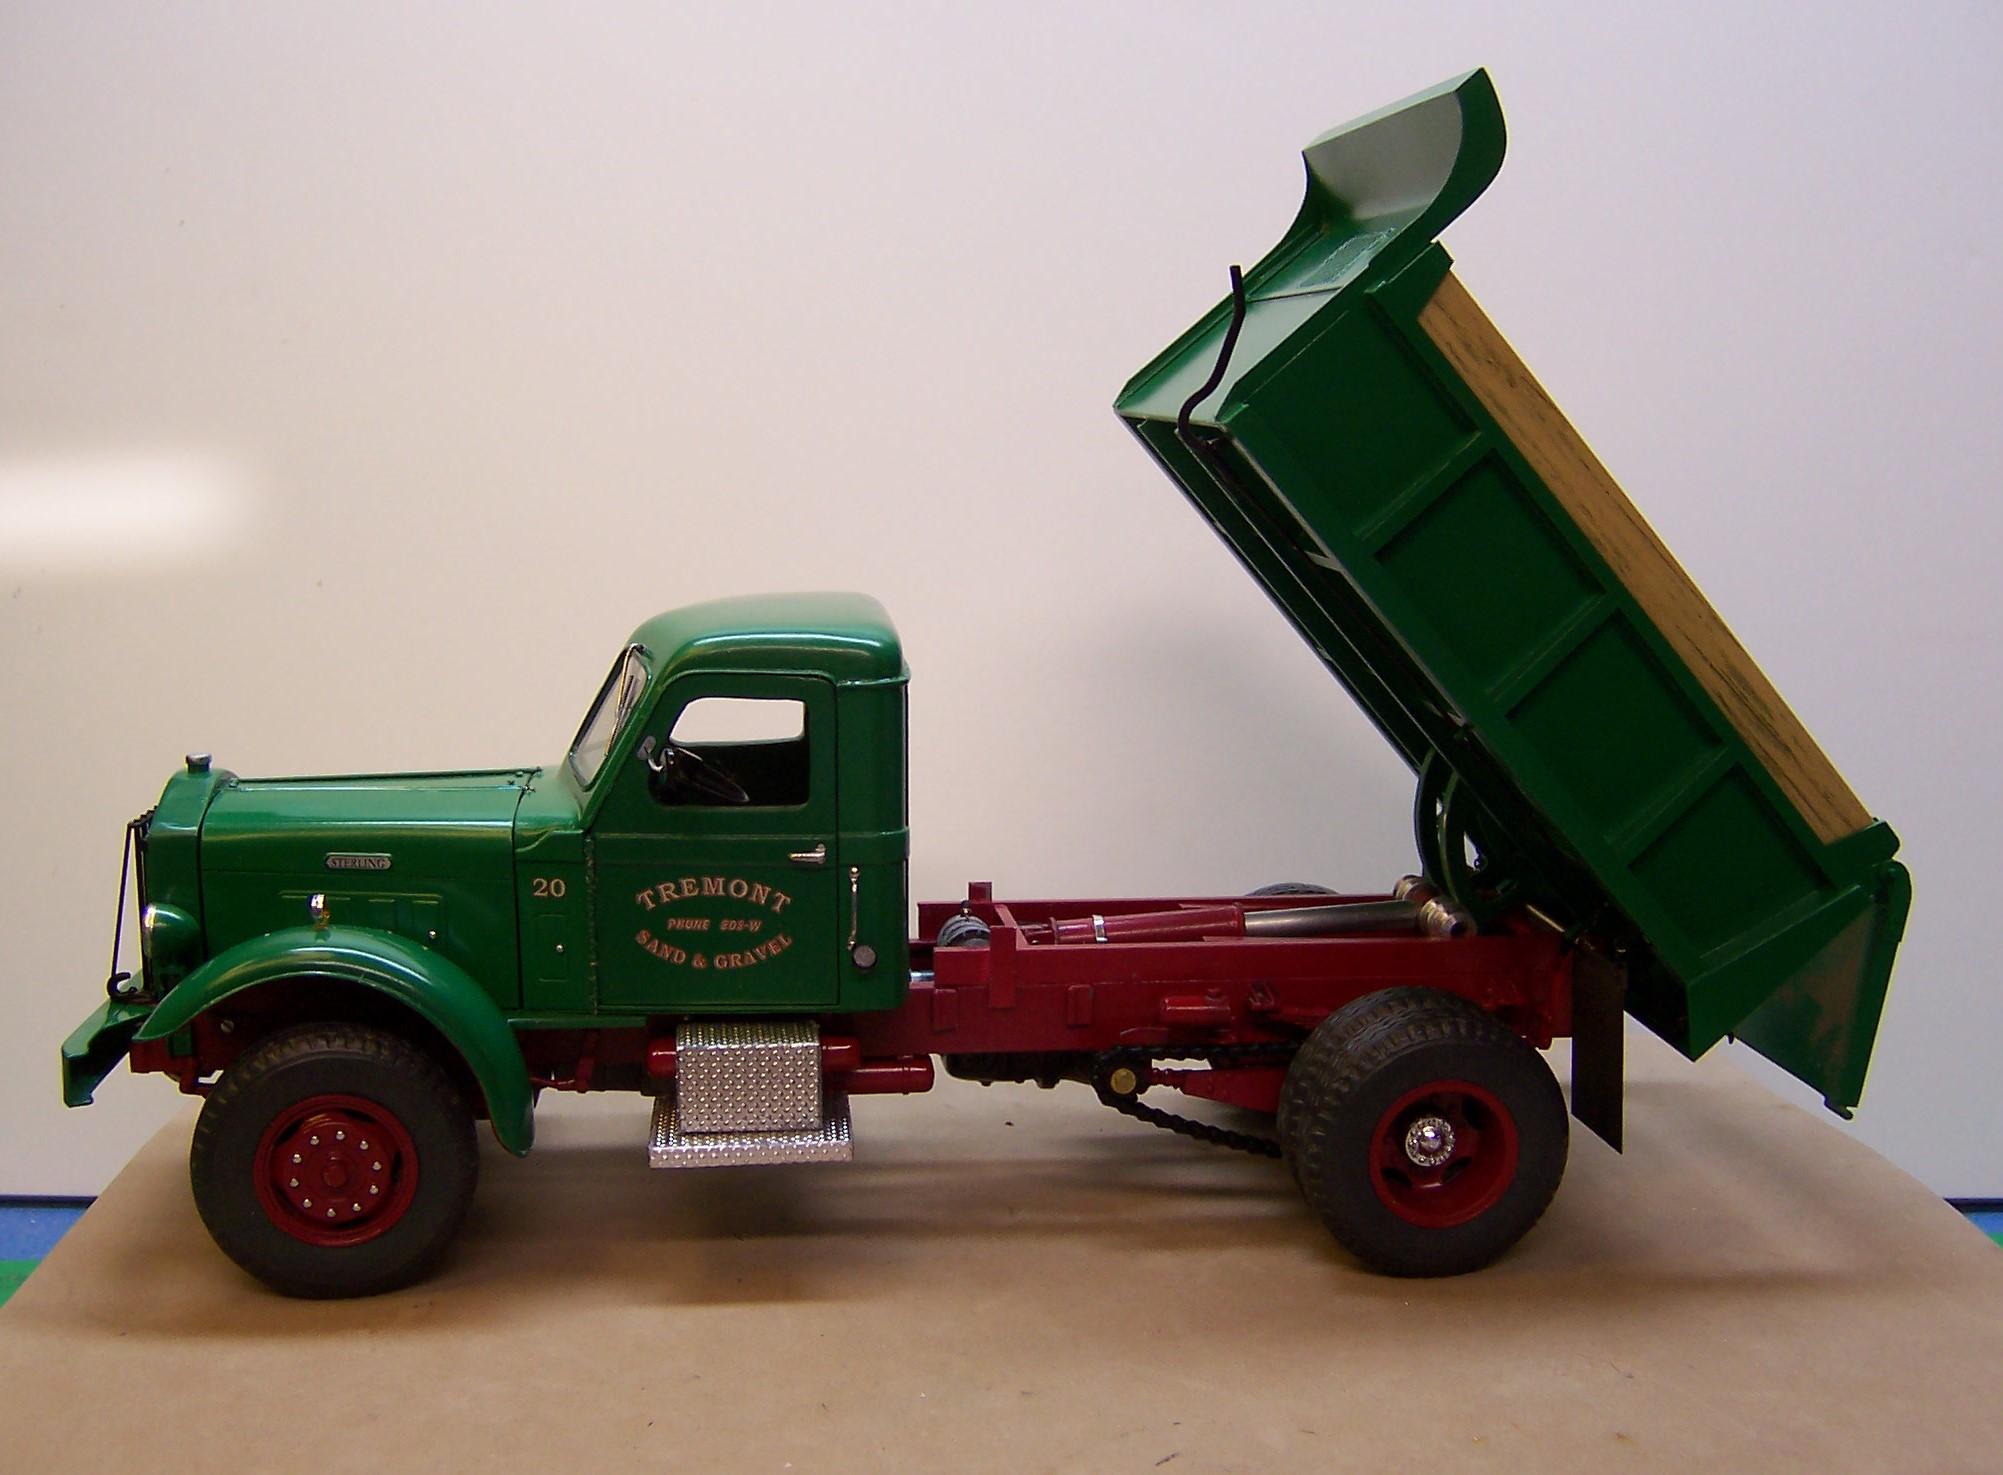
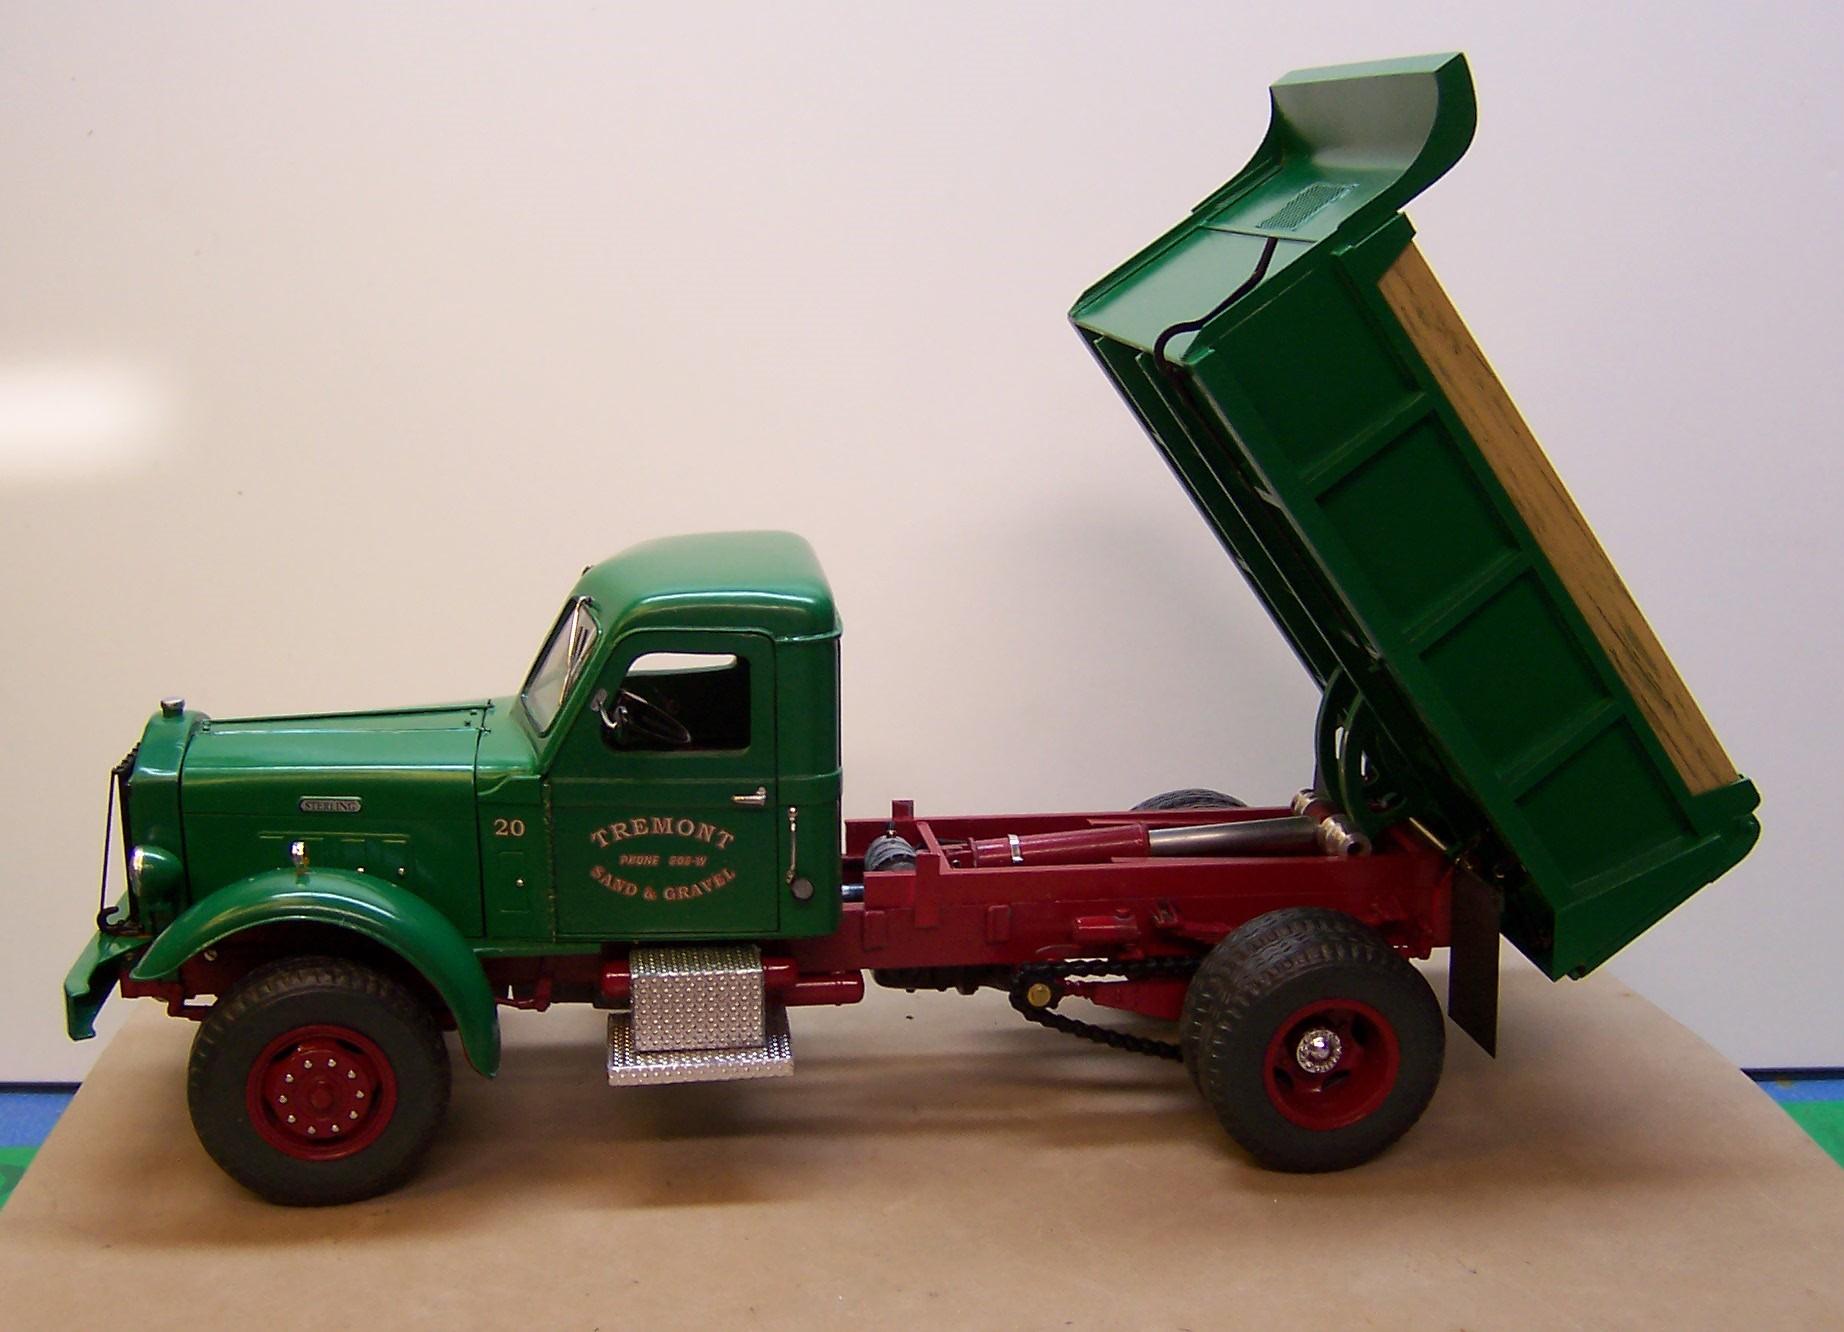
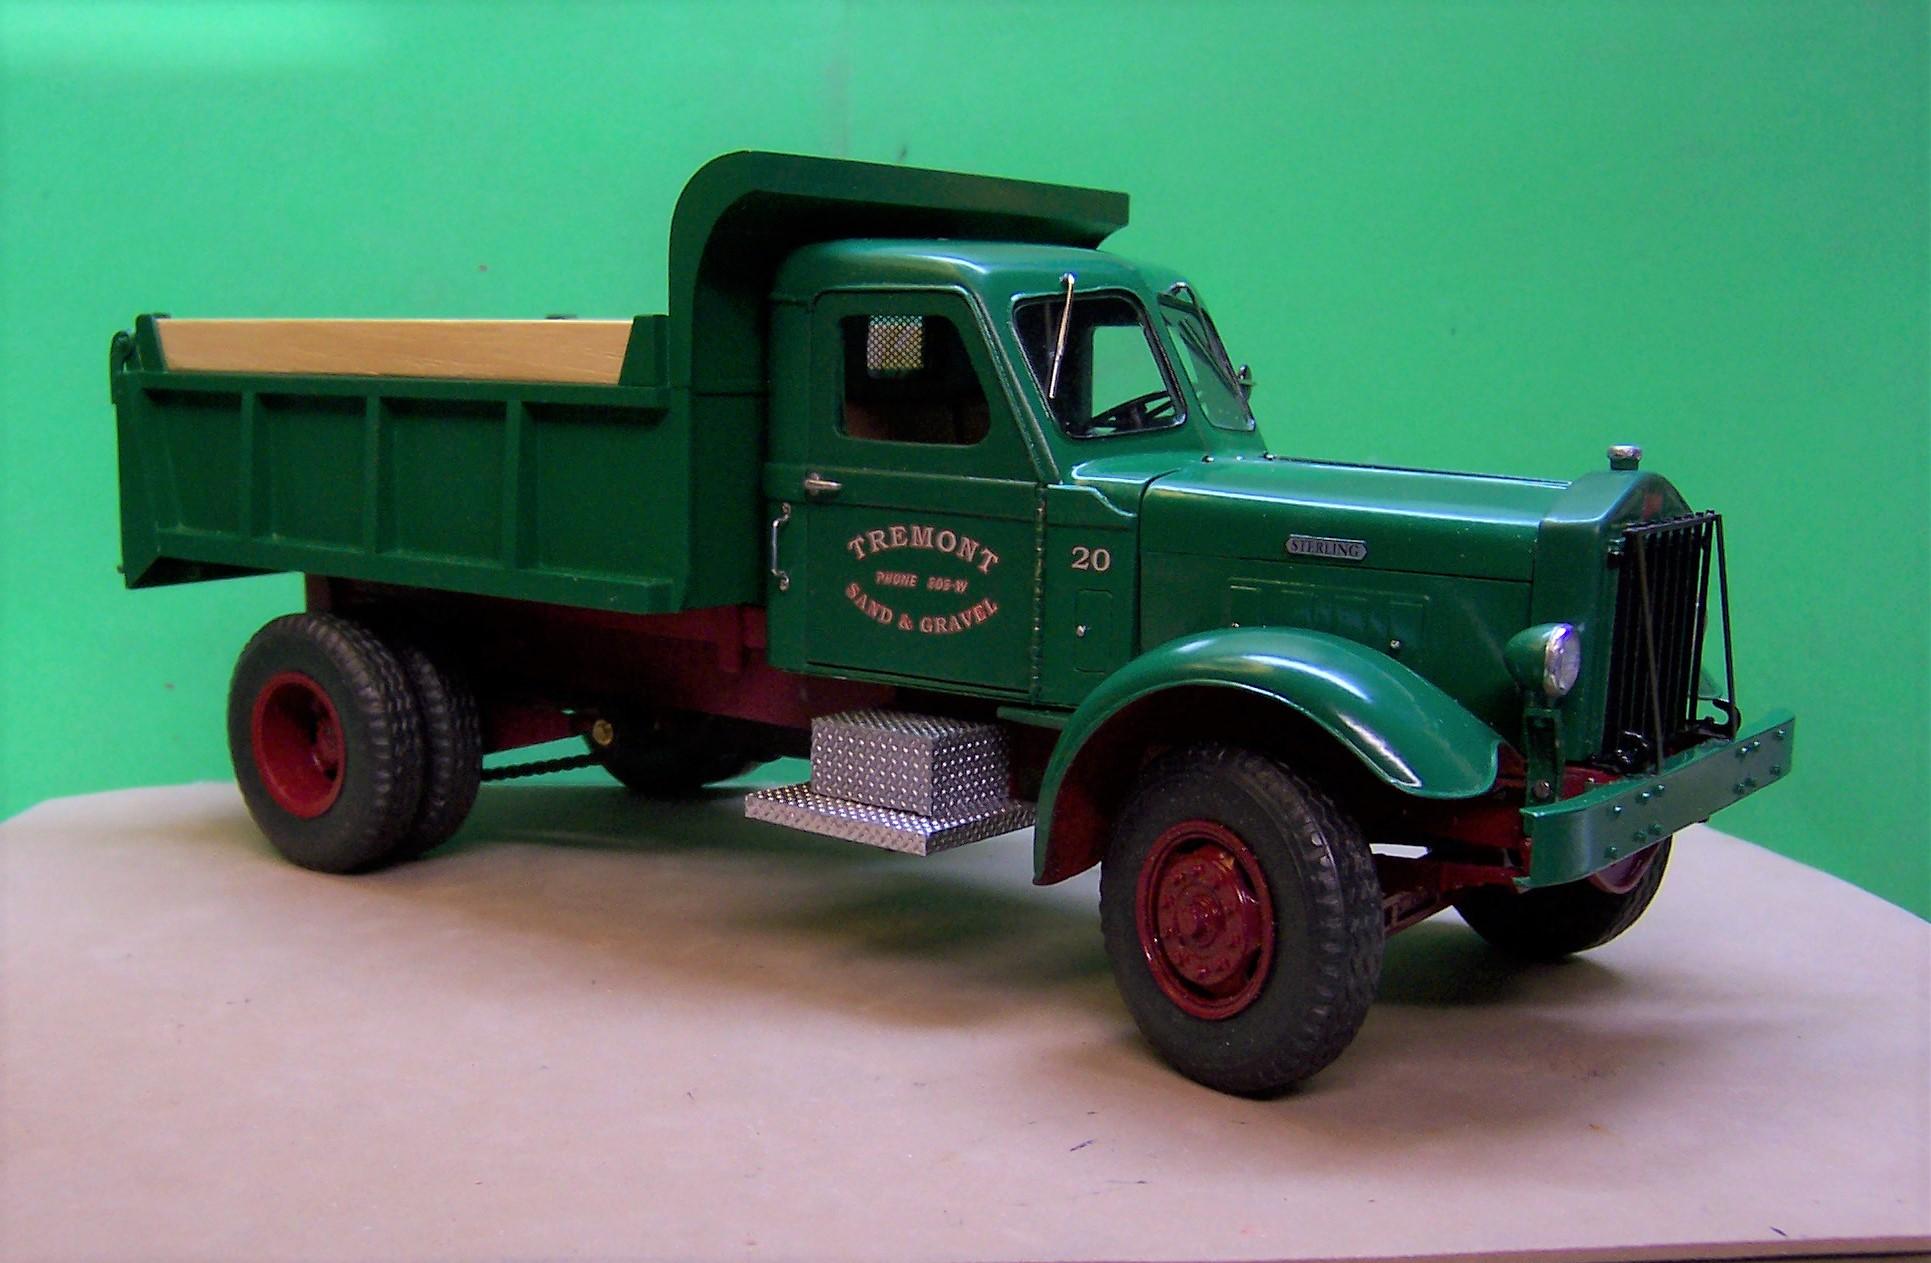
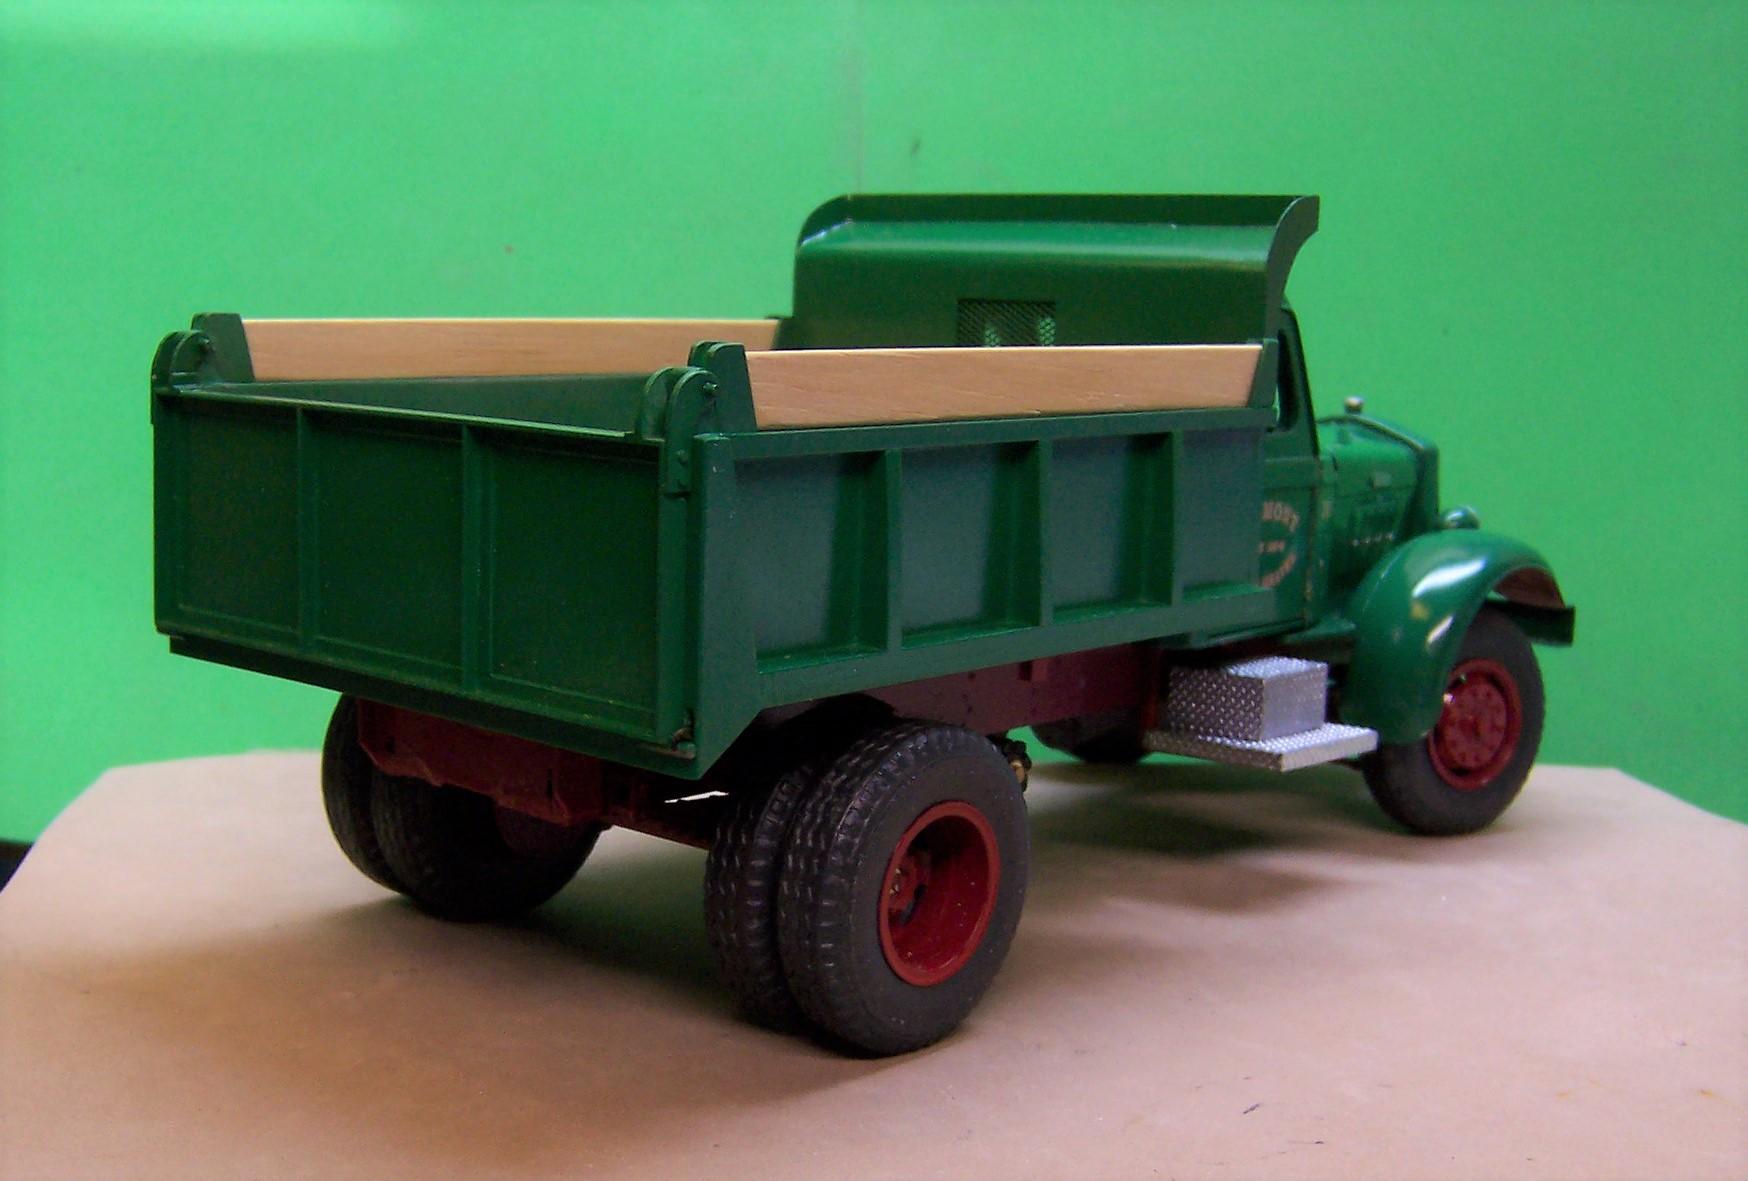
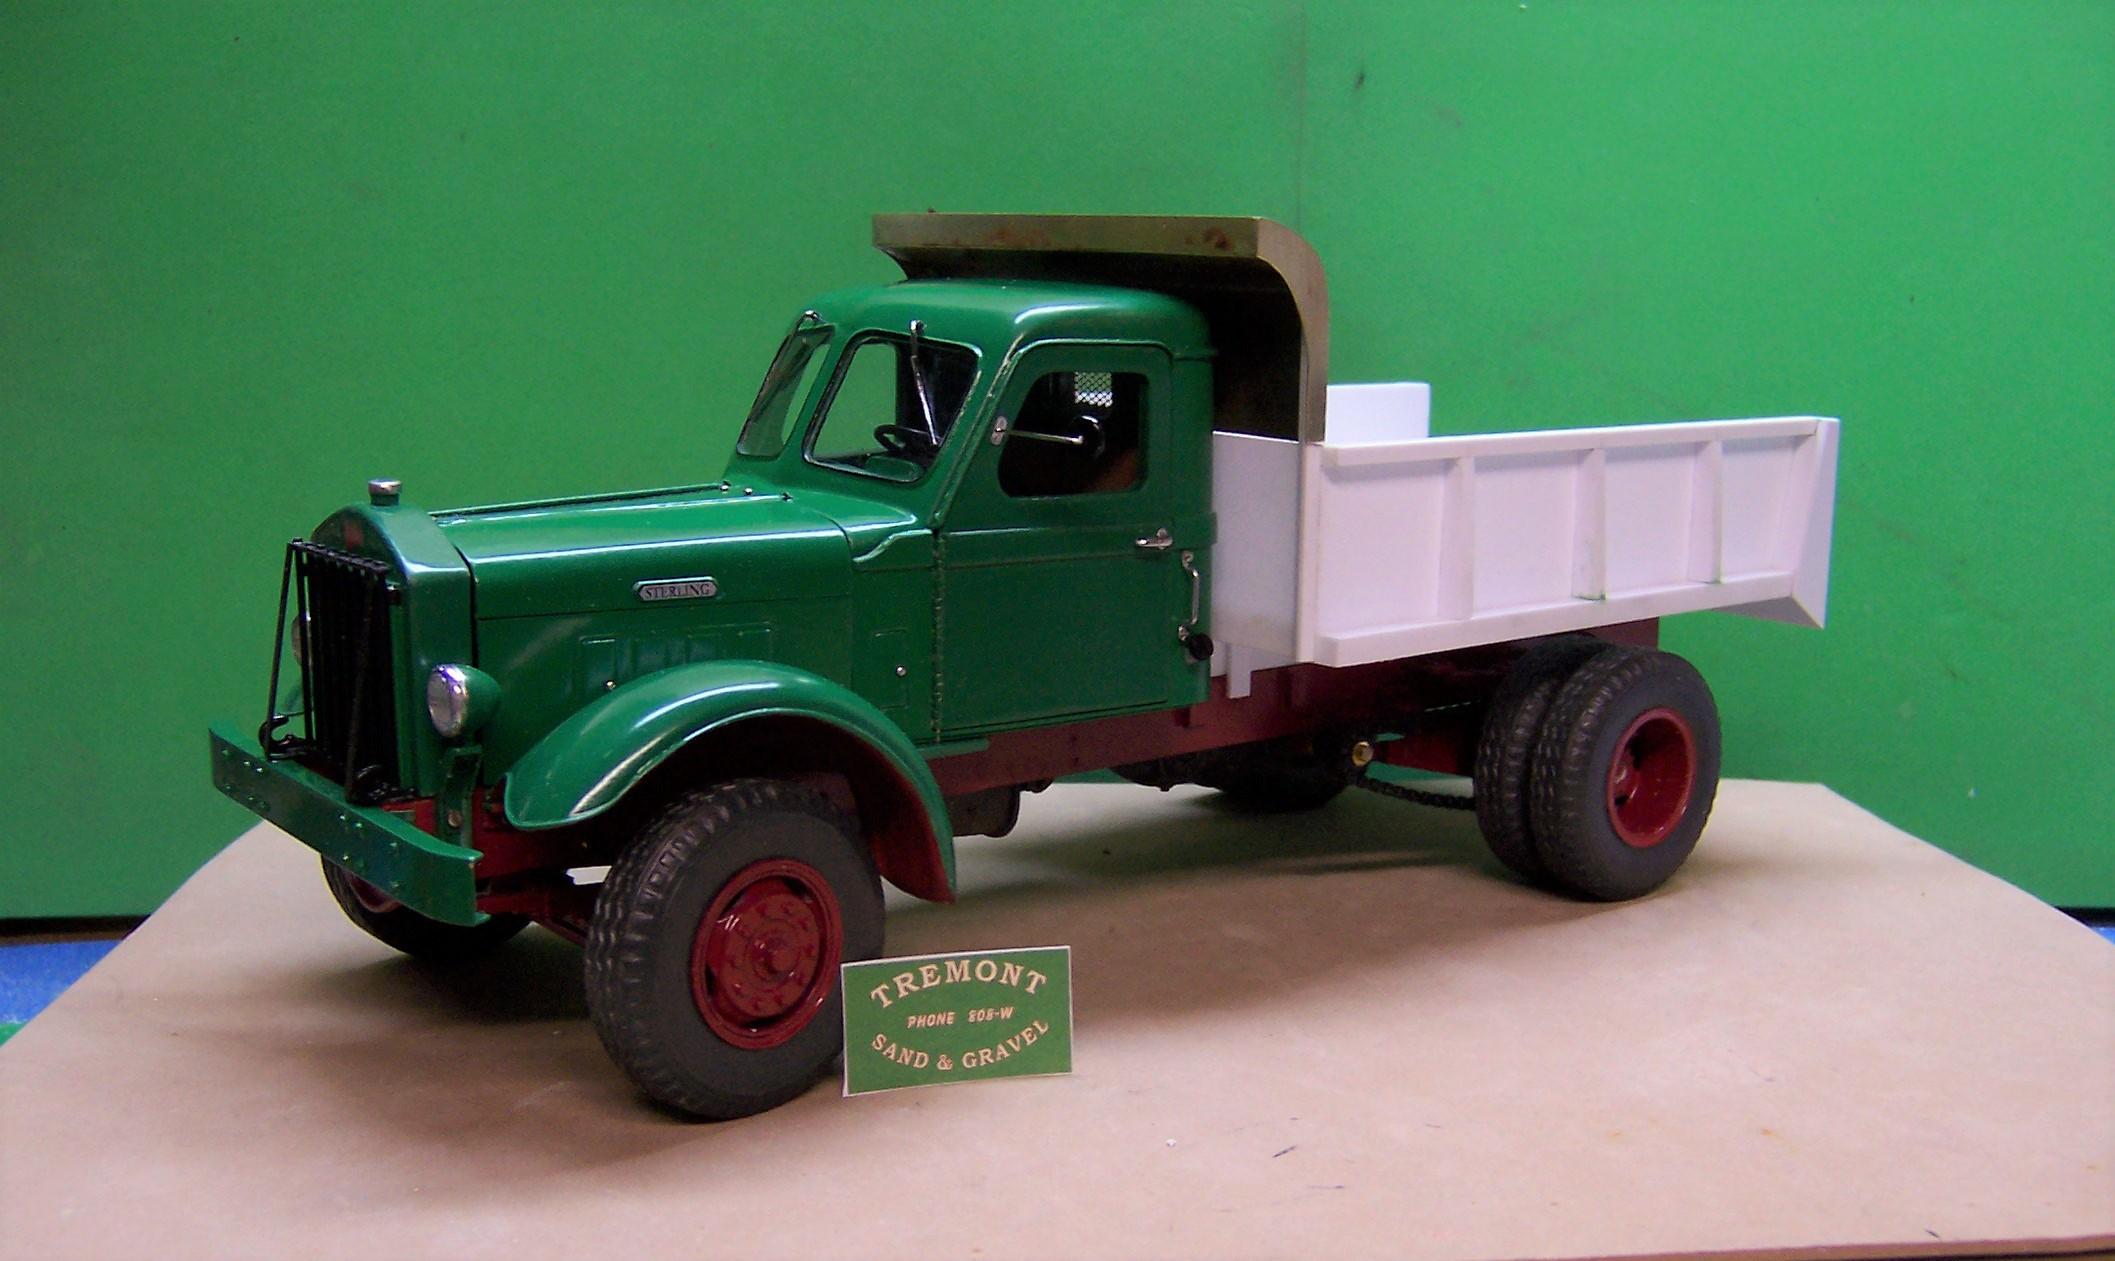
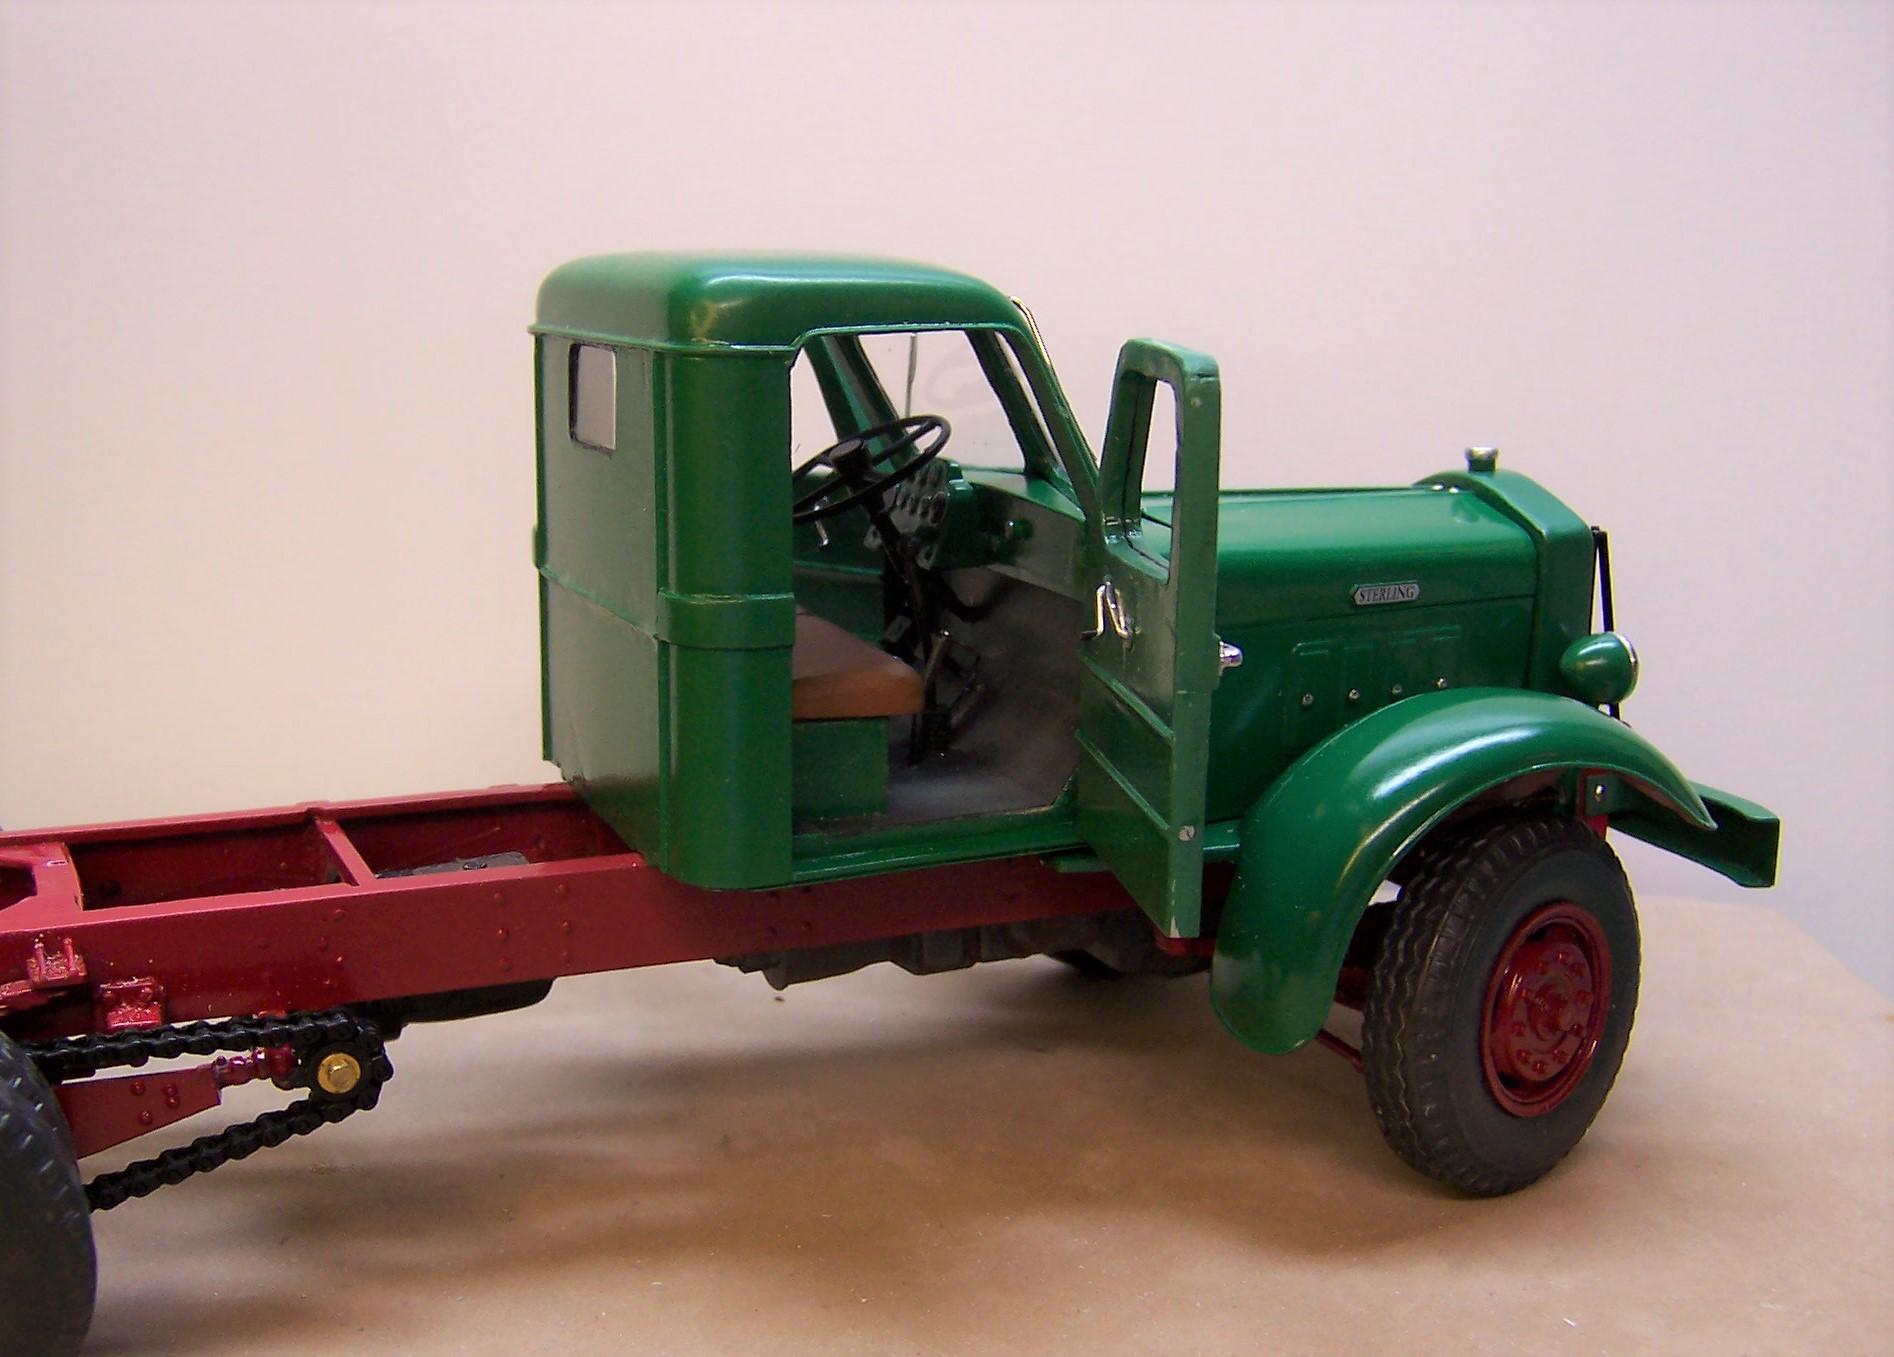
 Tonite closes out the work in progress on the Sterling. Thanks to Dave Natale for the AITM cab casting, fenders and interior. He does some great casting. Details are finished up so here are the closing shots of the build.
-
Got a good start, Tom! Keep us posted, eh?
-
1948 Sterling HC 175
Chariots of Fire replied to Chariots of Fire's topic in WIP: Model Trucks: Big Rigs and Heavy Equipment
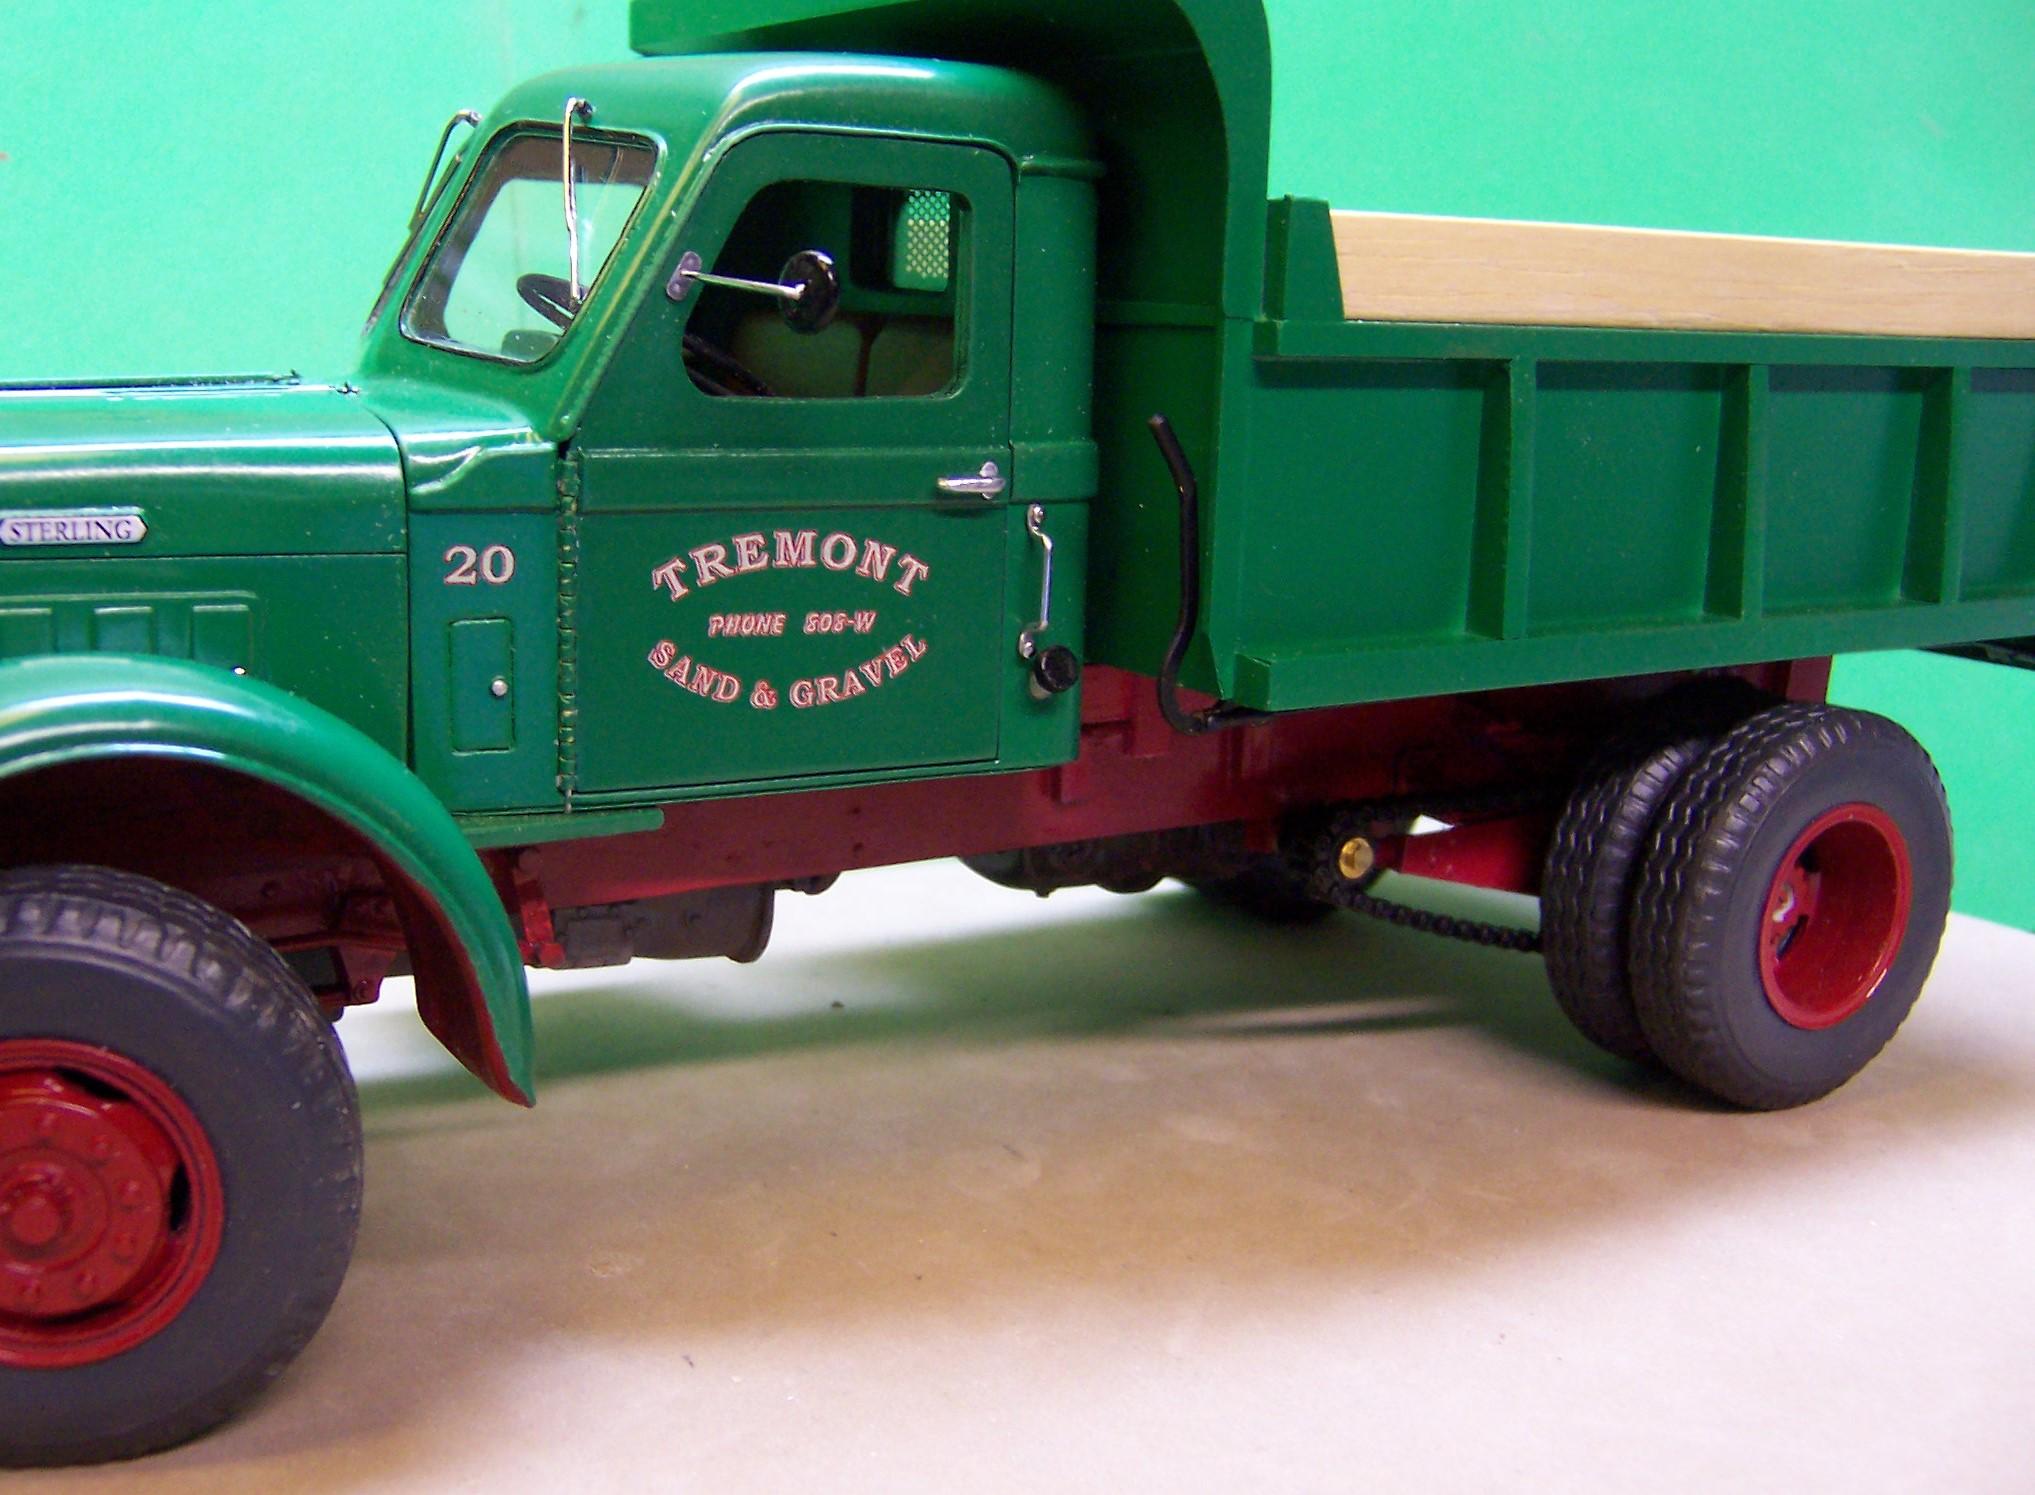
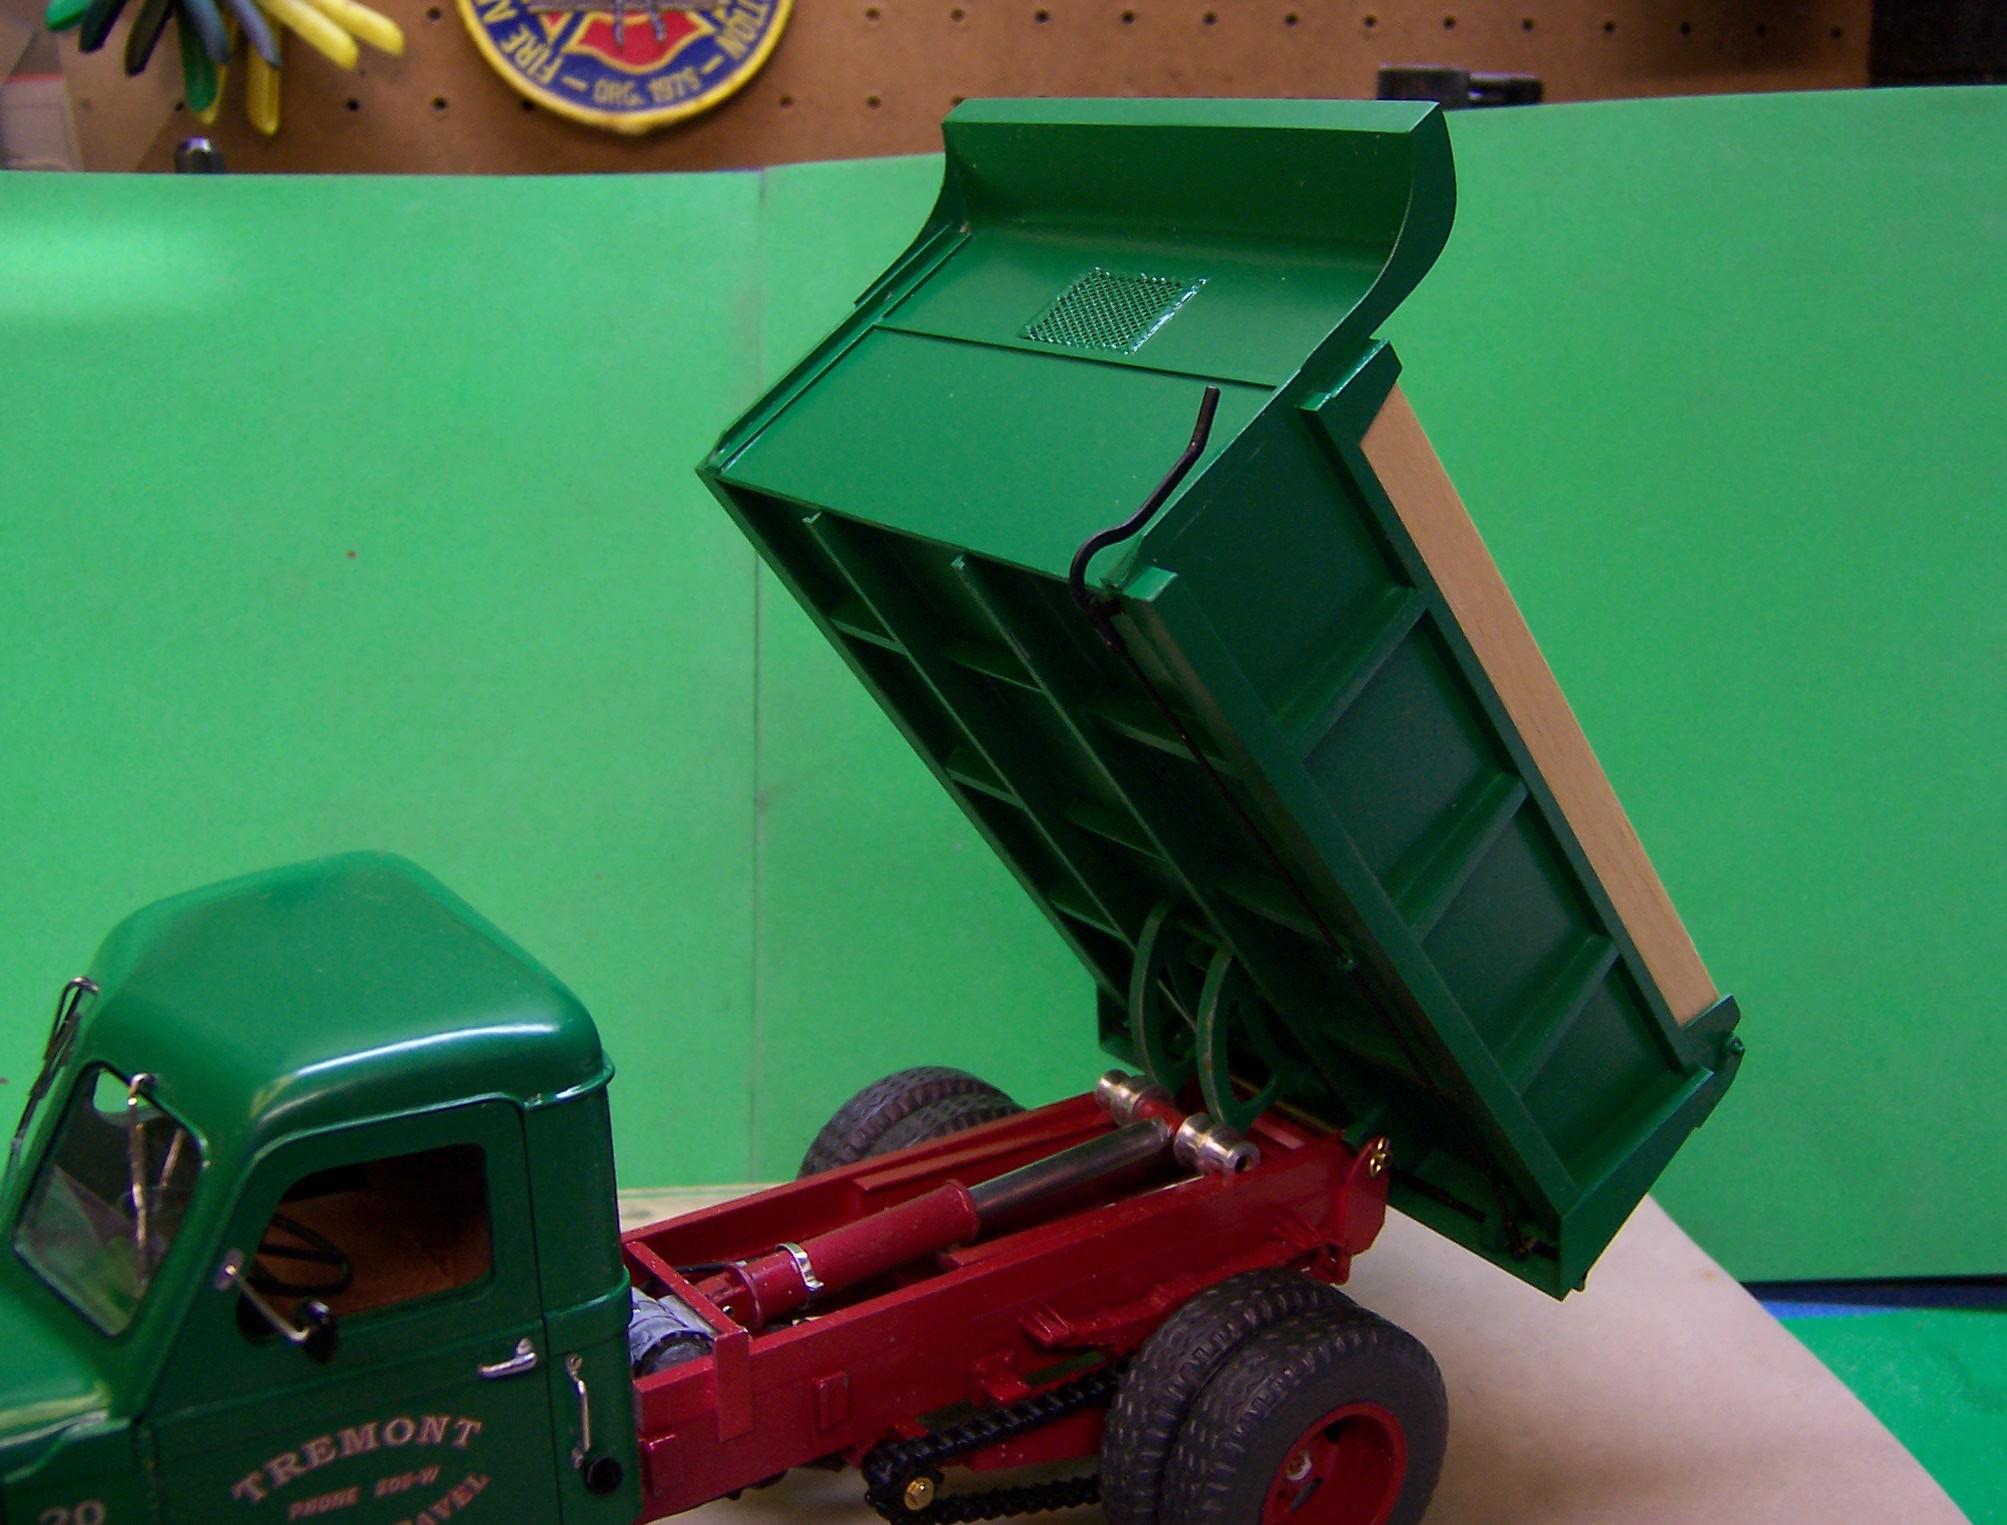
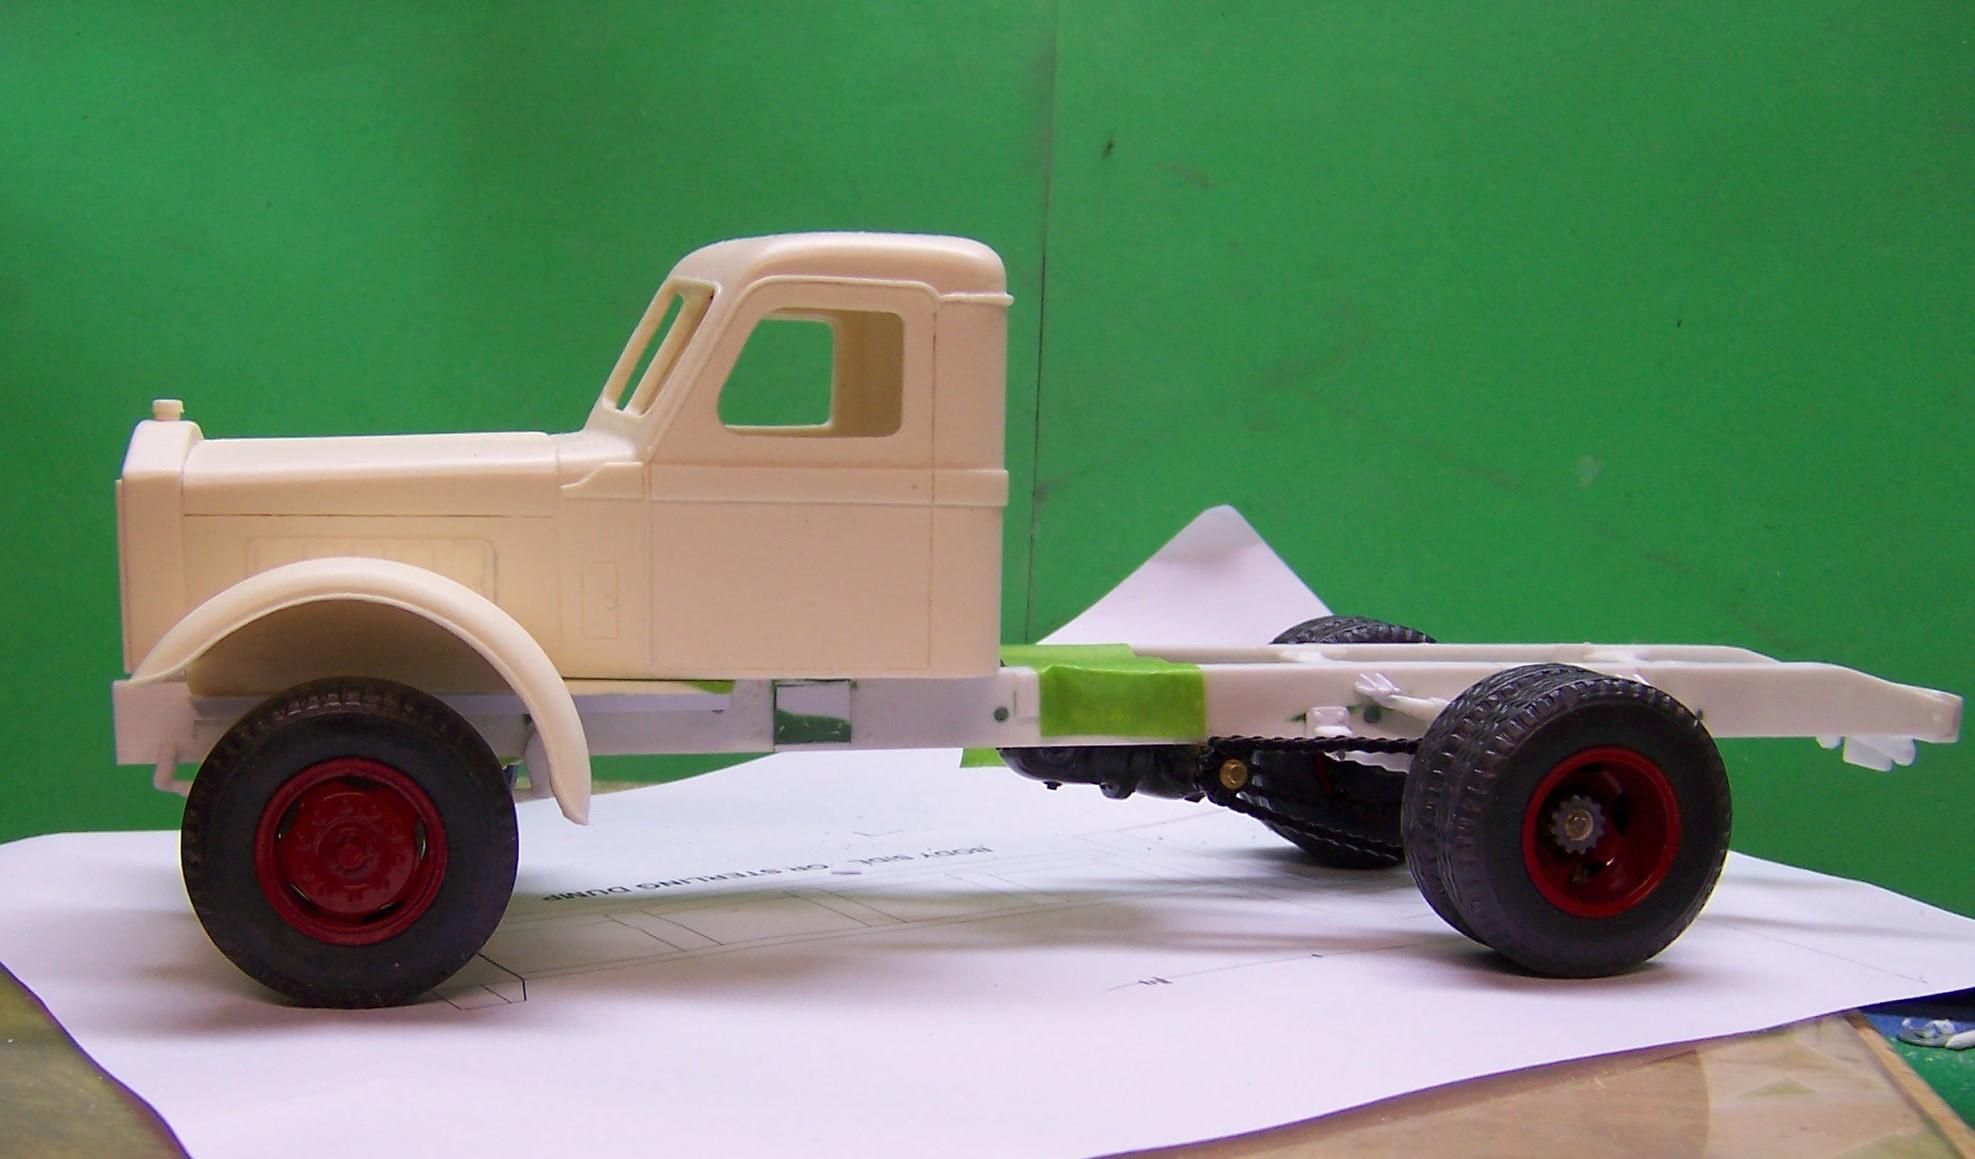
Body is now painted and the latch and handle are in place. Still some detailing left to do but we are approaching the end of the build. Each of the driving chains need an oil container and spout that would drip oil onto the chain to keep it lubricated. There are also some air cylinders needed as these rigs had air brakes and step on the driver's side. Mud flaps and tail lights also need to be added. I decided to make the interior of the body look as if it has been used in spite of its pristine outside appearance. I left the center portion of the body in primer and then went over it with some Doc O'Brien weathering powders.
-
1948 Sterling HC 175
Chariots of Fire replied to Chariots of Fire's topic in WIP: Model Trucks: Big Rigs and Heavy Equipment
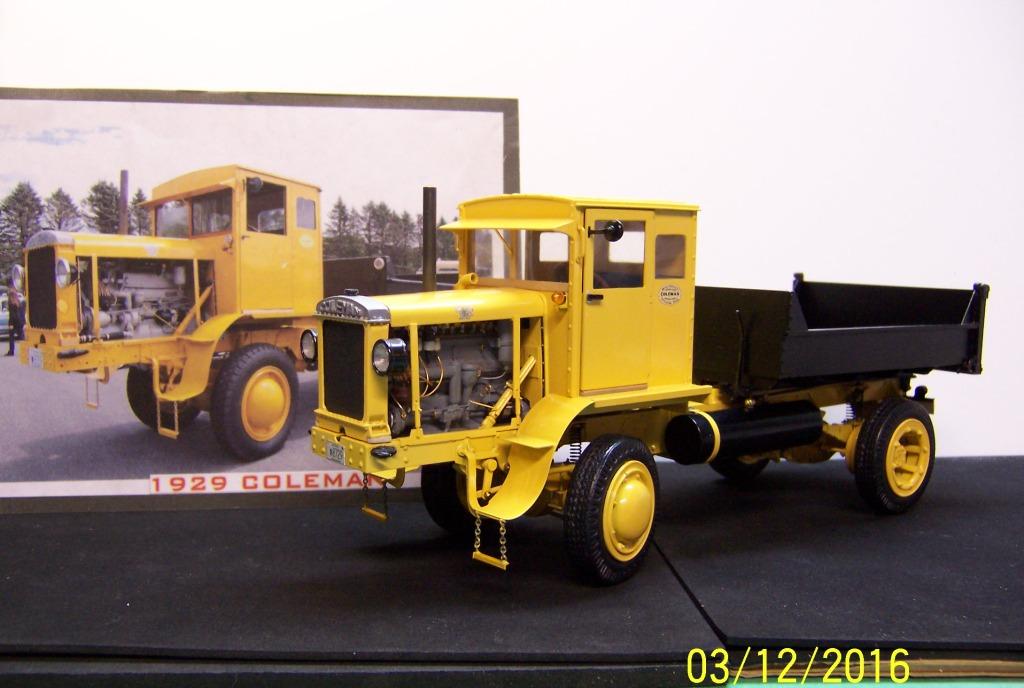
Daniel are you familiar with Littleton, CO? Coleman trucks were made there and they came up with the Coleman front wheel drive. Here is one with the same type of lifting mechanism. The real one is in New Hampshire.
-
1948 Sterling HC 175
Chariots of Fire replied to Chariots of Fire's topic in WIP: Model Trucks: Big Rigs and Heavy Equipment
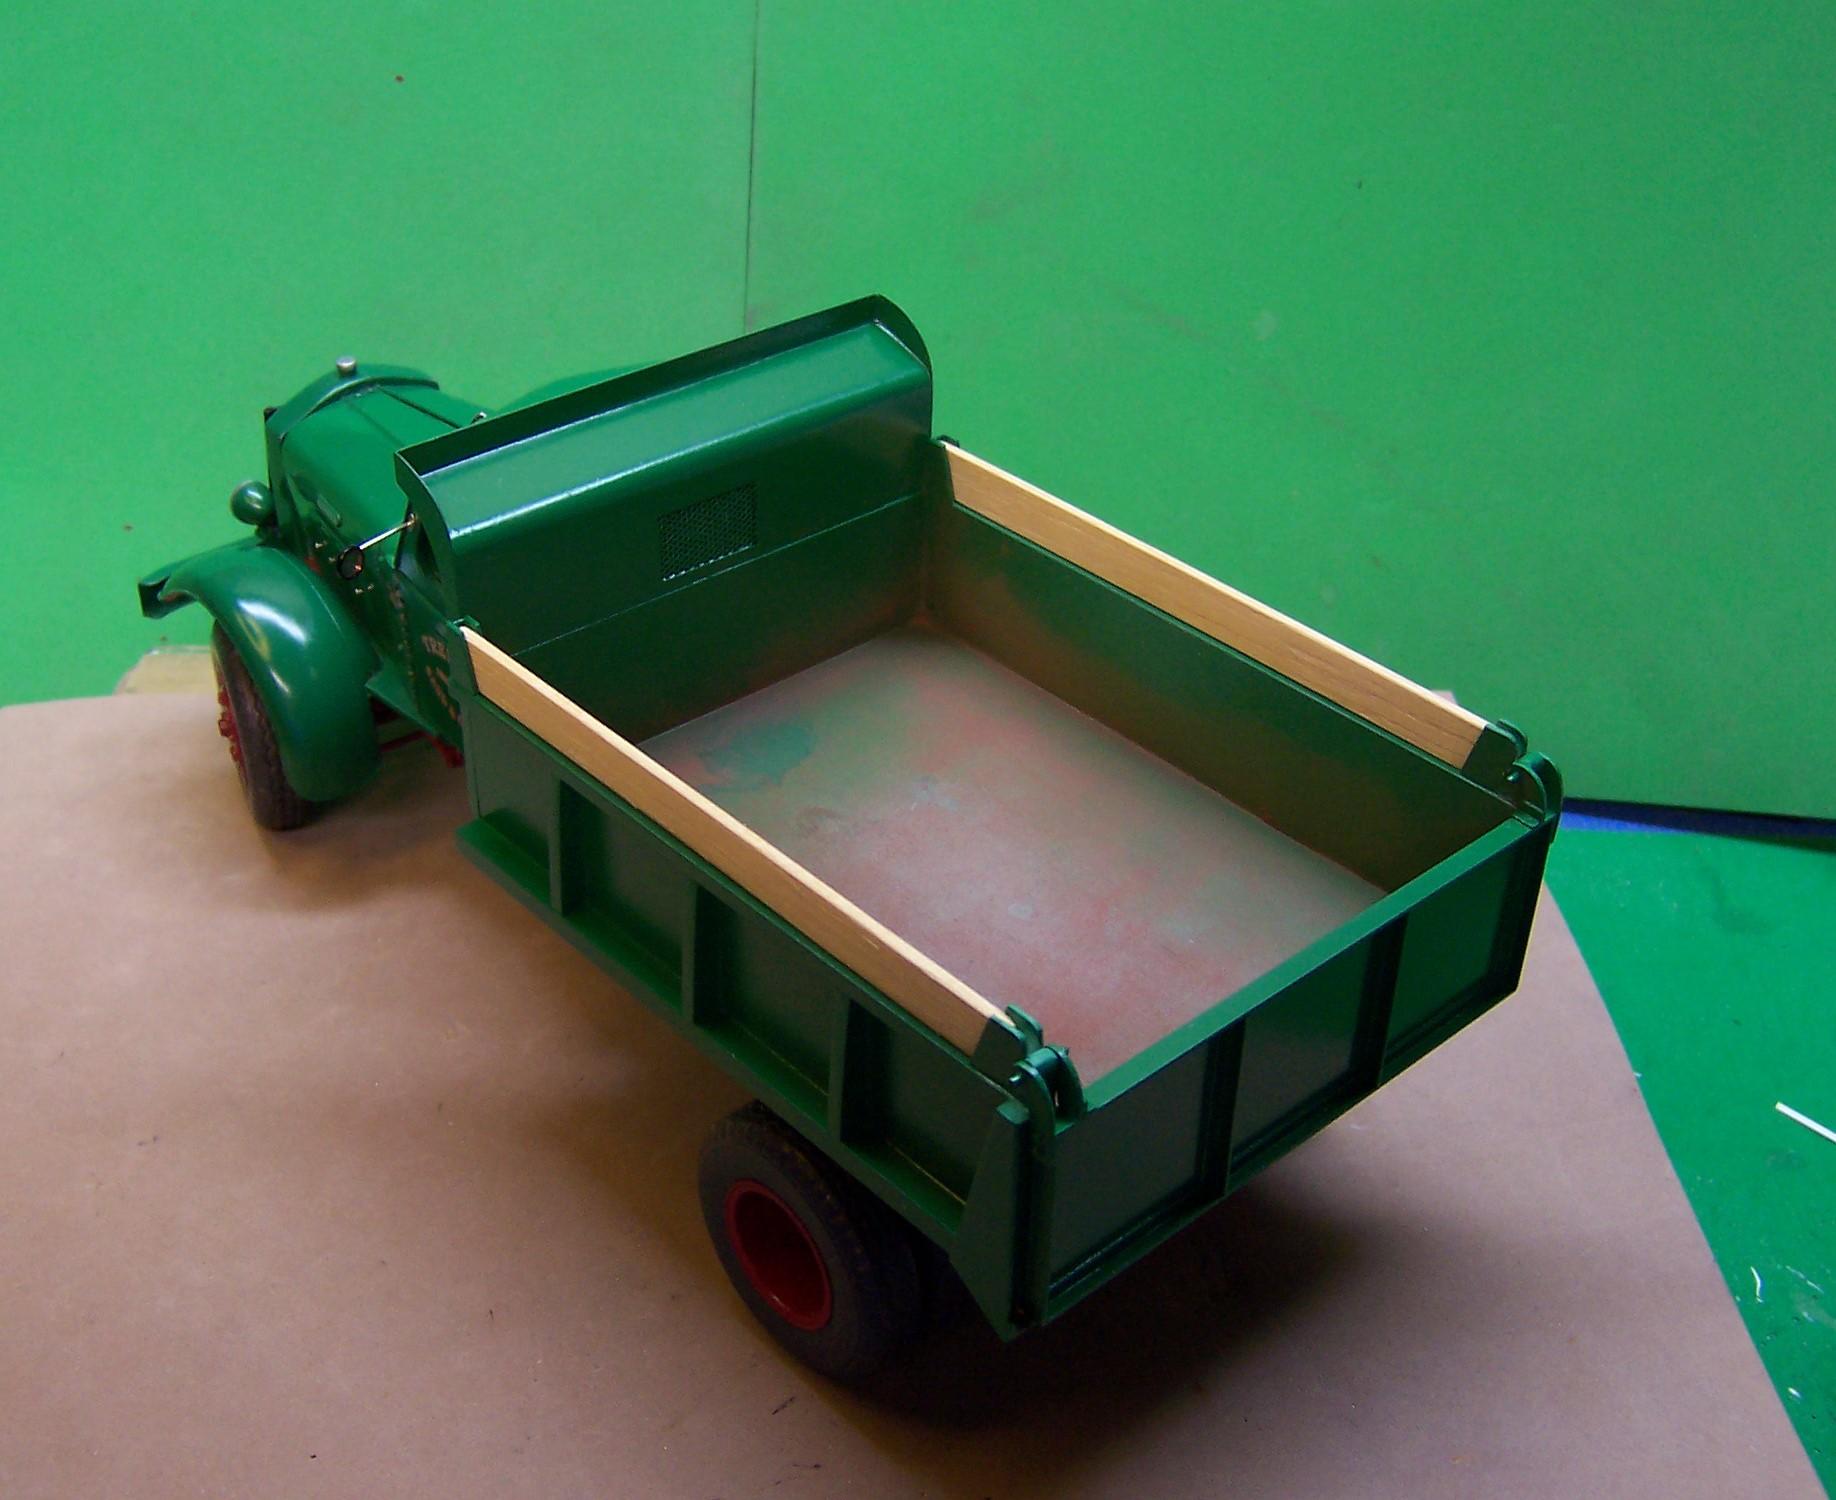
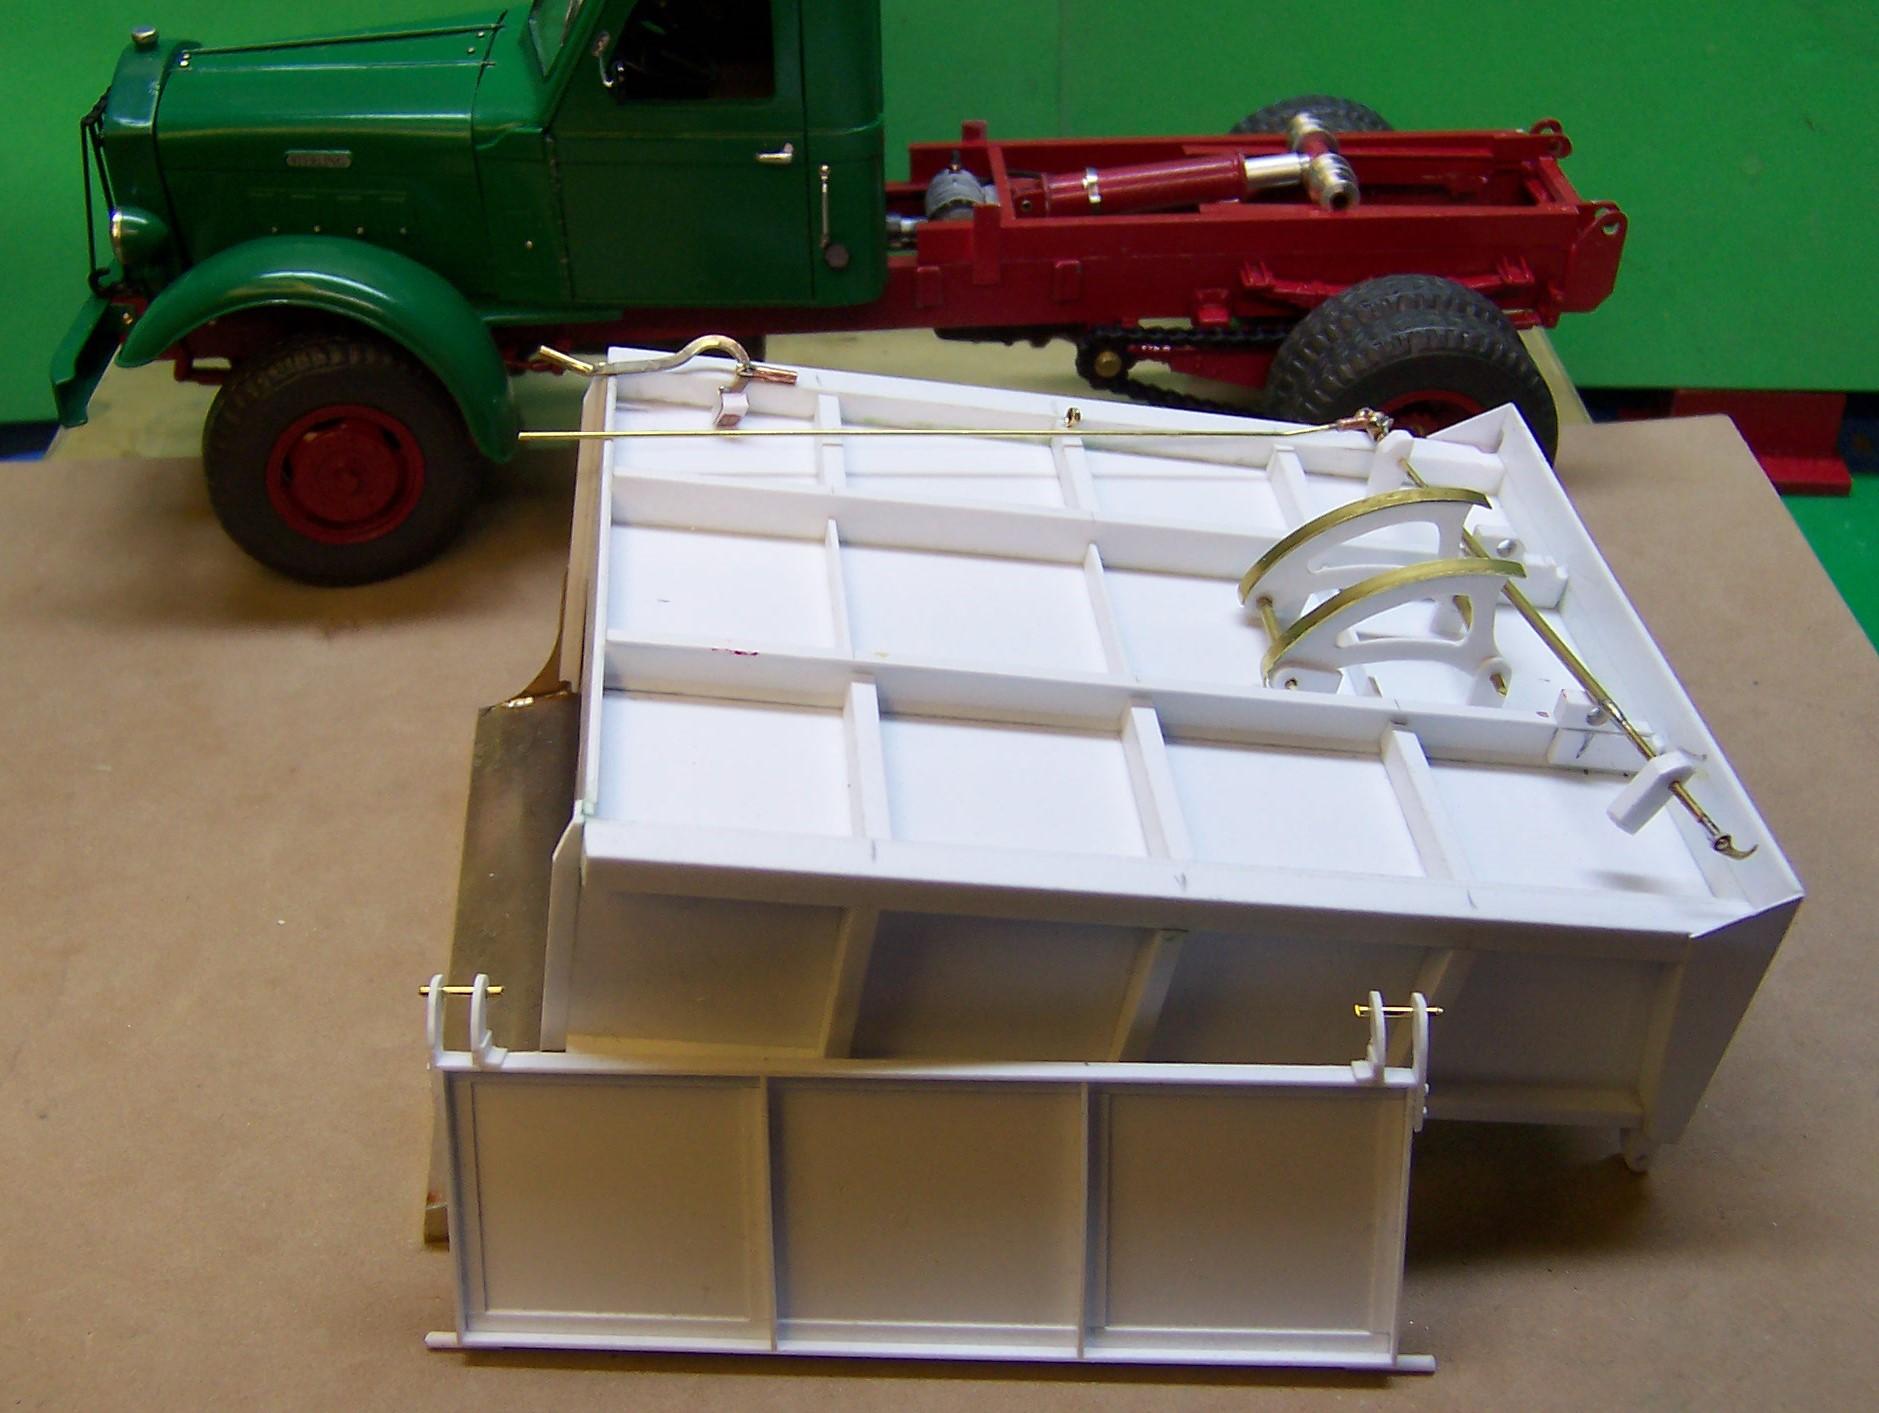
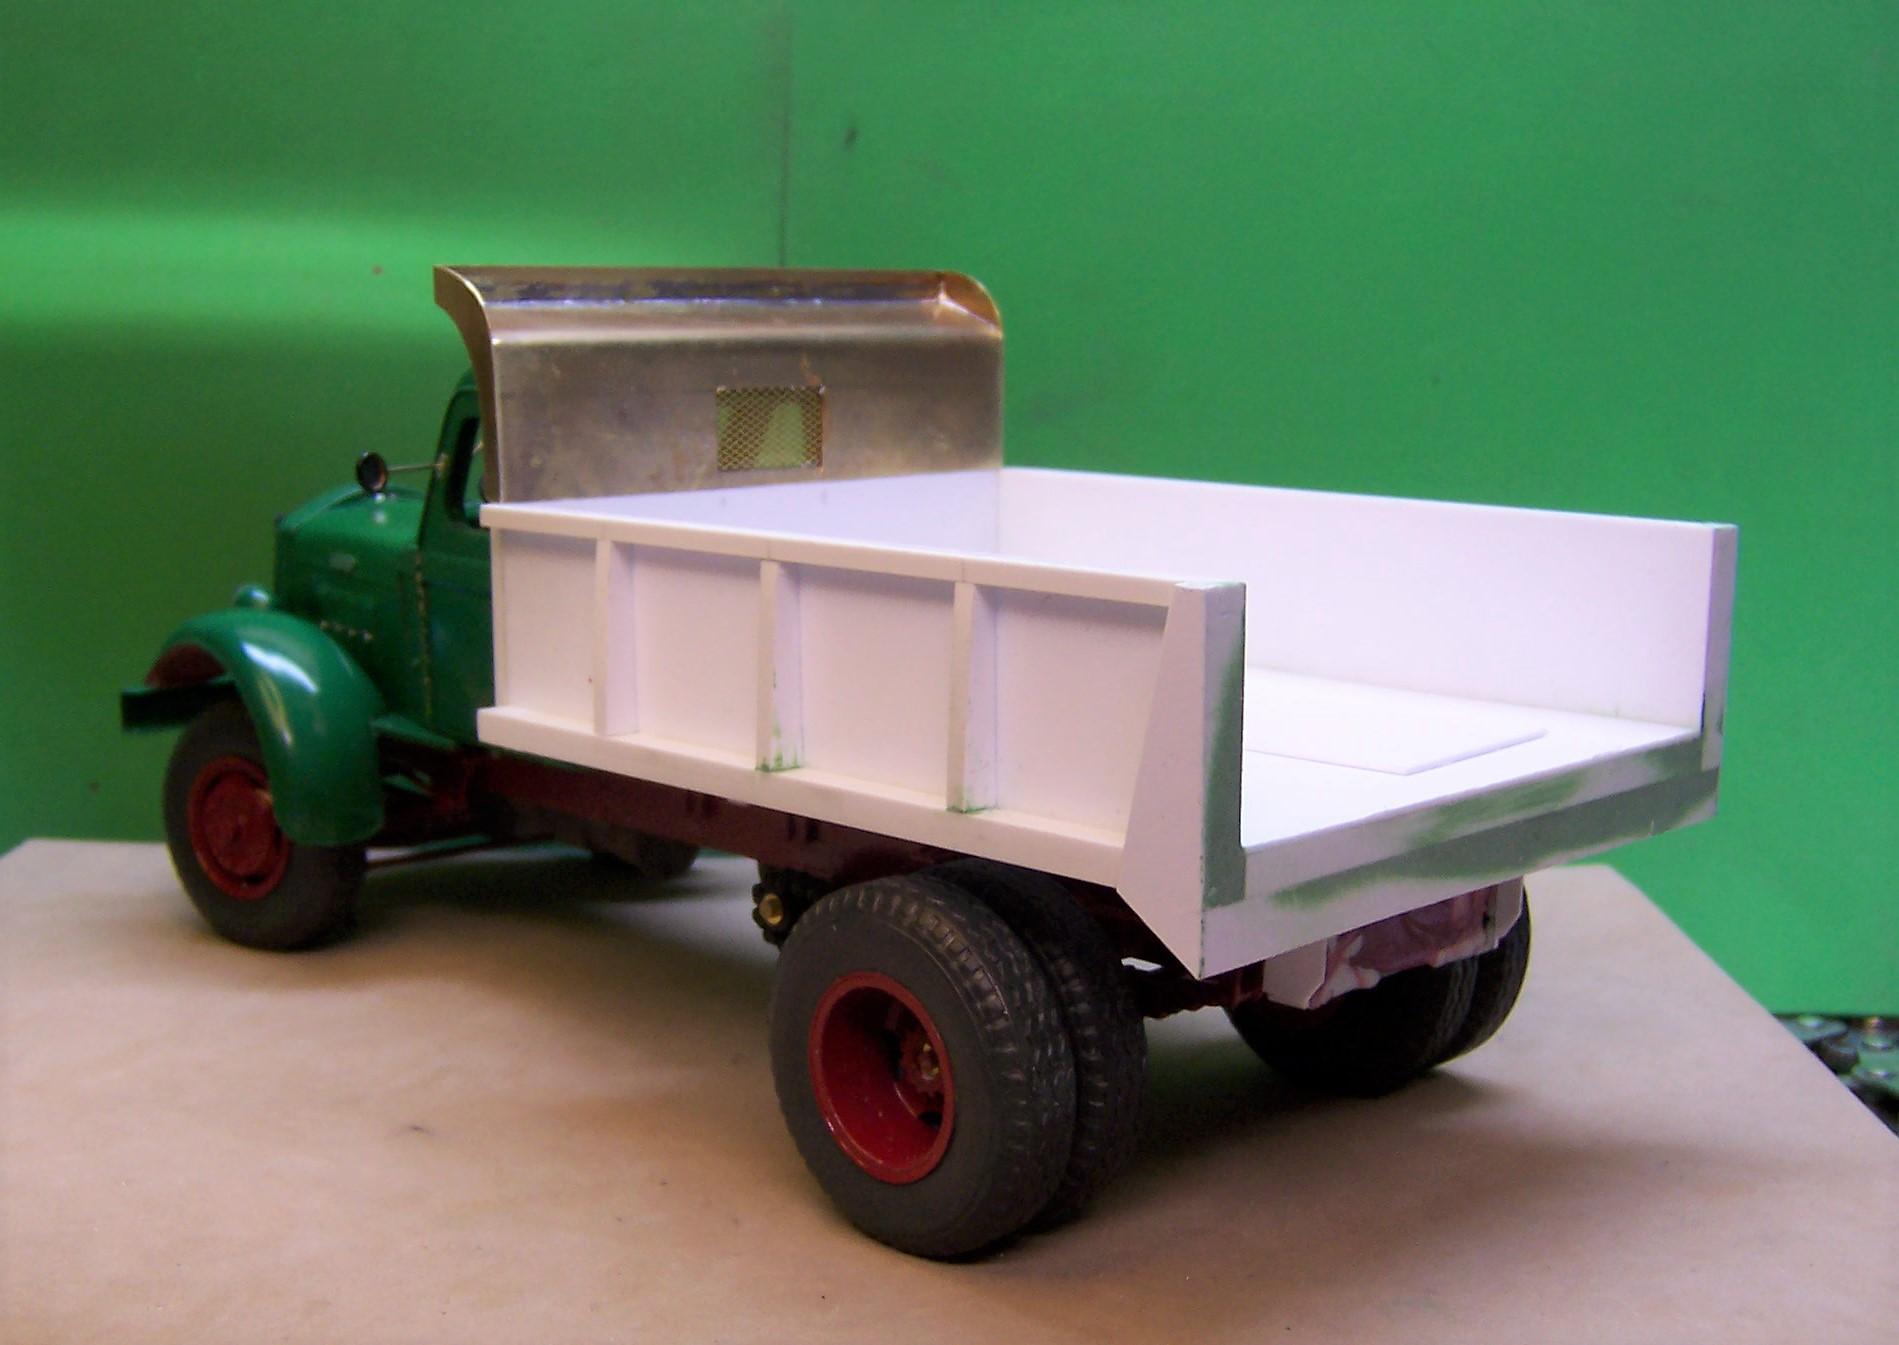
The work on the tailgate is done. Although the option of adding a small sliding gate was appealing, I think I will forego it on this one and concentrate on just the basics. The operating tailgate is taking shape though with the mechanical side of things done and ready to install. The bottom needs to be painted first though. In the photo are the latches that go through the end of the body attached to a long rod that is hidden underneath. The handle for opening and closing the latches is at the corner of the body. The connecting rod is in the middle. It will be soldered to the handle after installation to insure that both the handle and latches are in the correct position for operation.
-
1948 Sterling HC 175
Chariots of Fire replied to Chariots of Fire's topic in WIP: Model Trucks: Big Rigs and Heavy Equipment
It surprised me, too, Jeff. But the photo doesn't lie so that's the way it got made. Working on the tailgate now. -
1948 Sterling HC 175
Chariots of Fire replied to Chariots of Fire's topic in WIP: Model Trucks: Big Rigs and Heavy Equipment
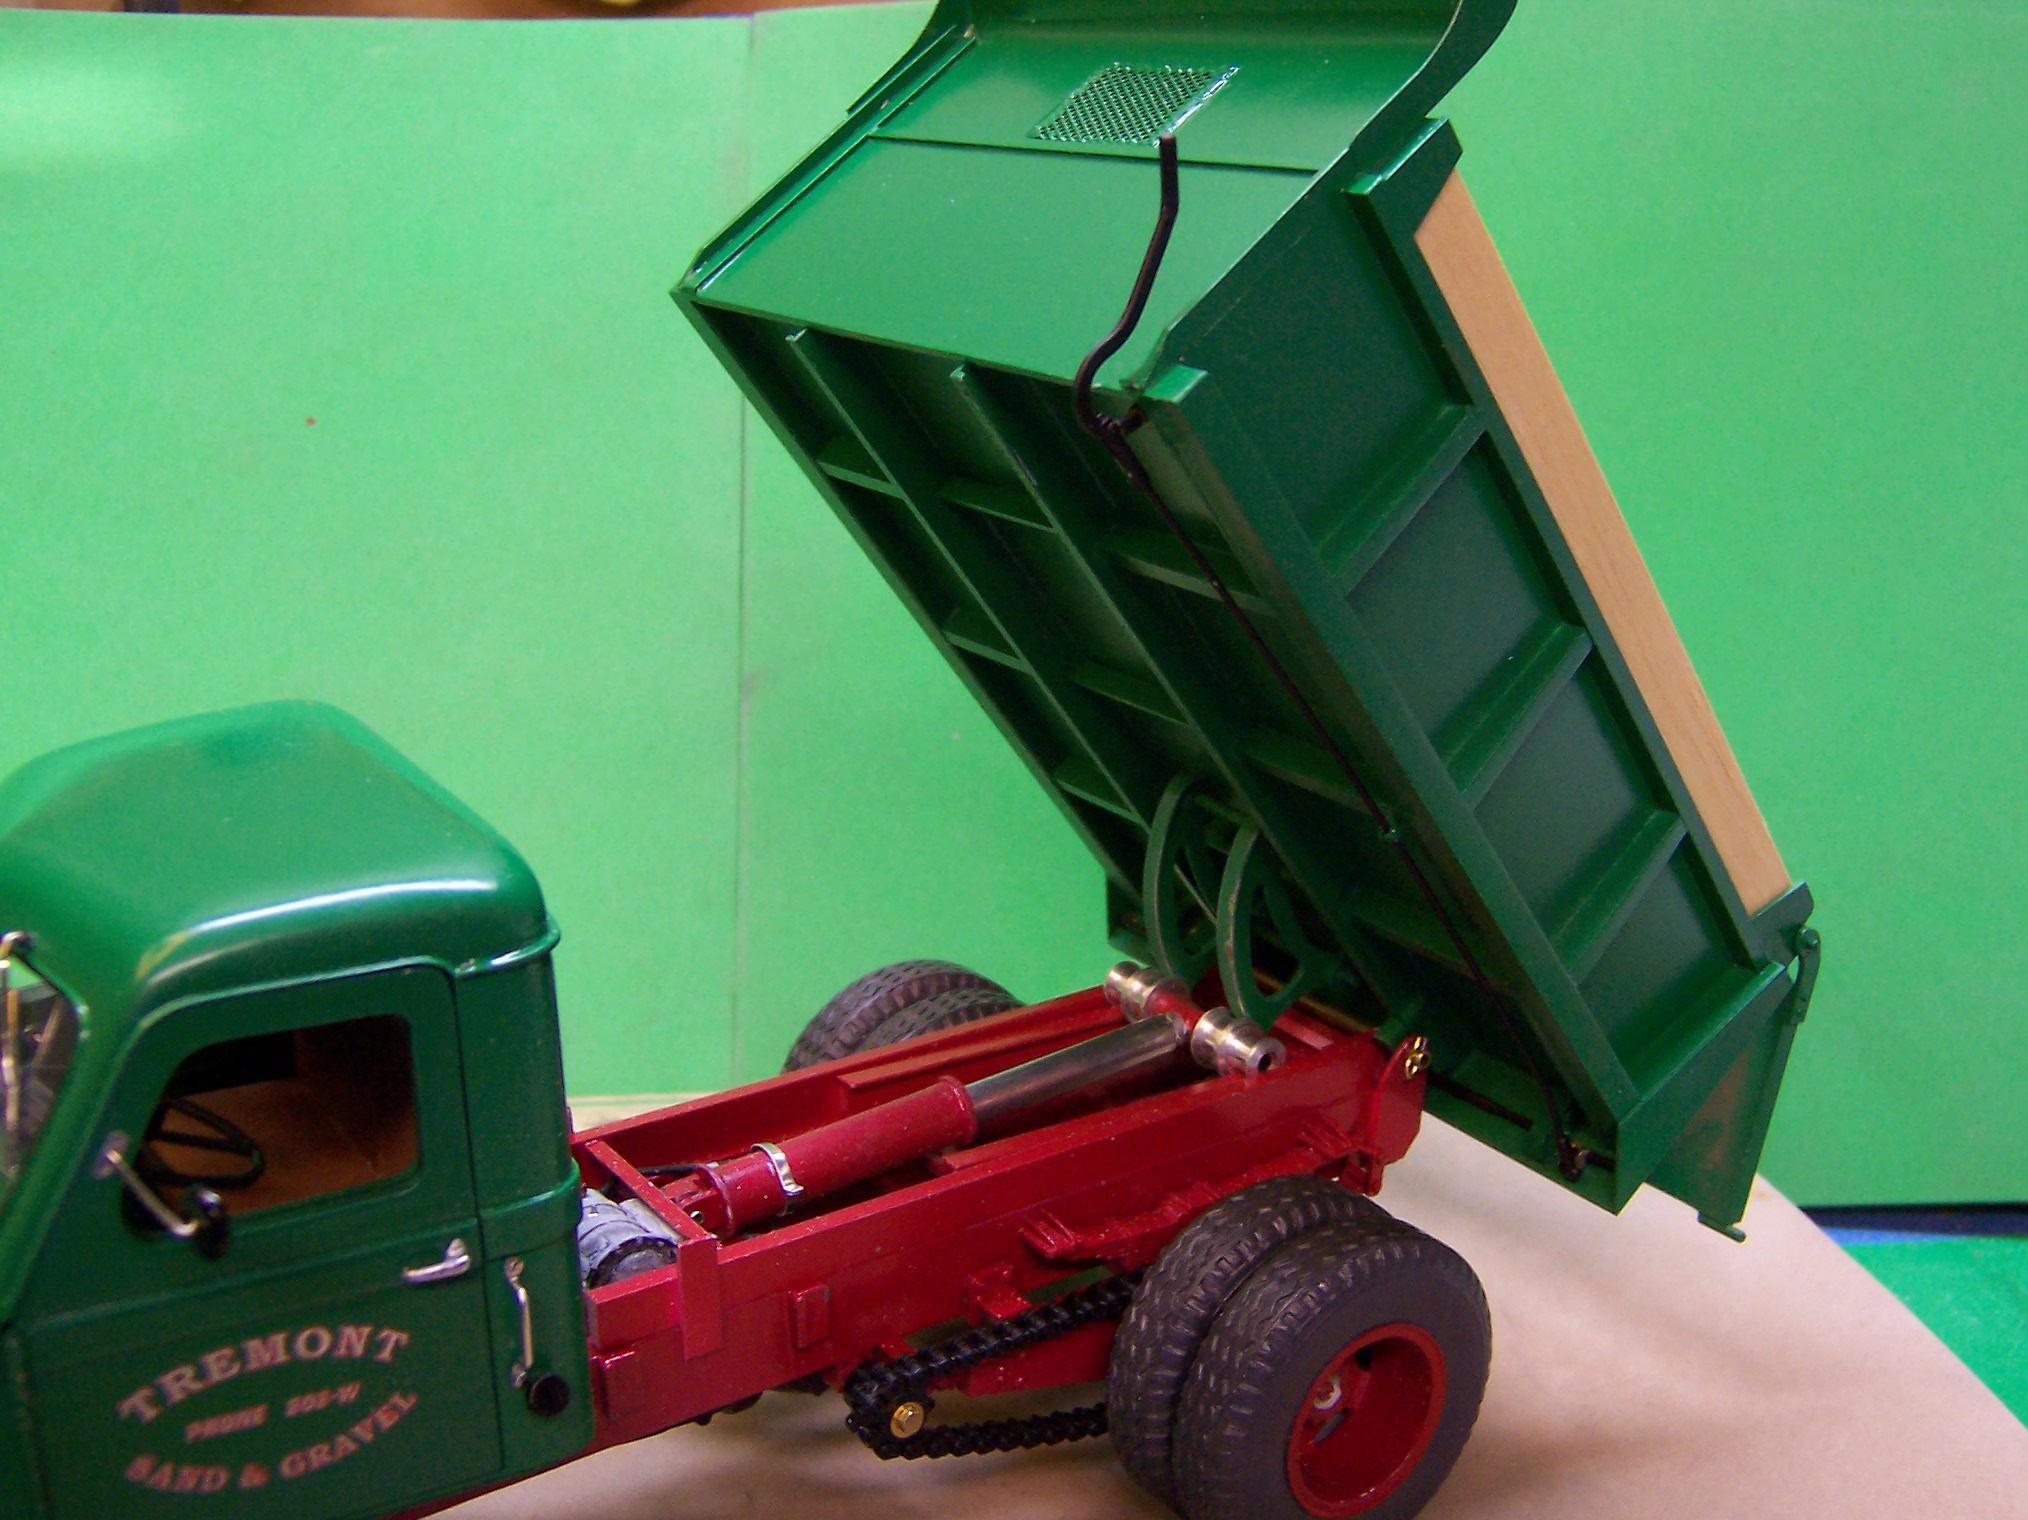
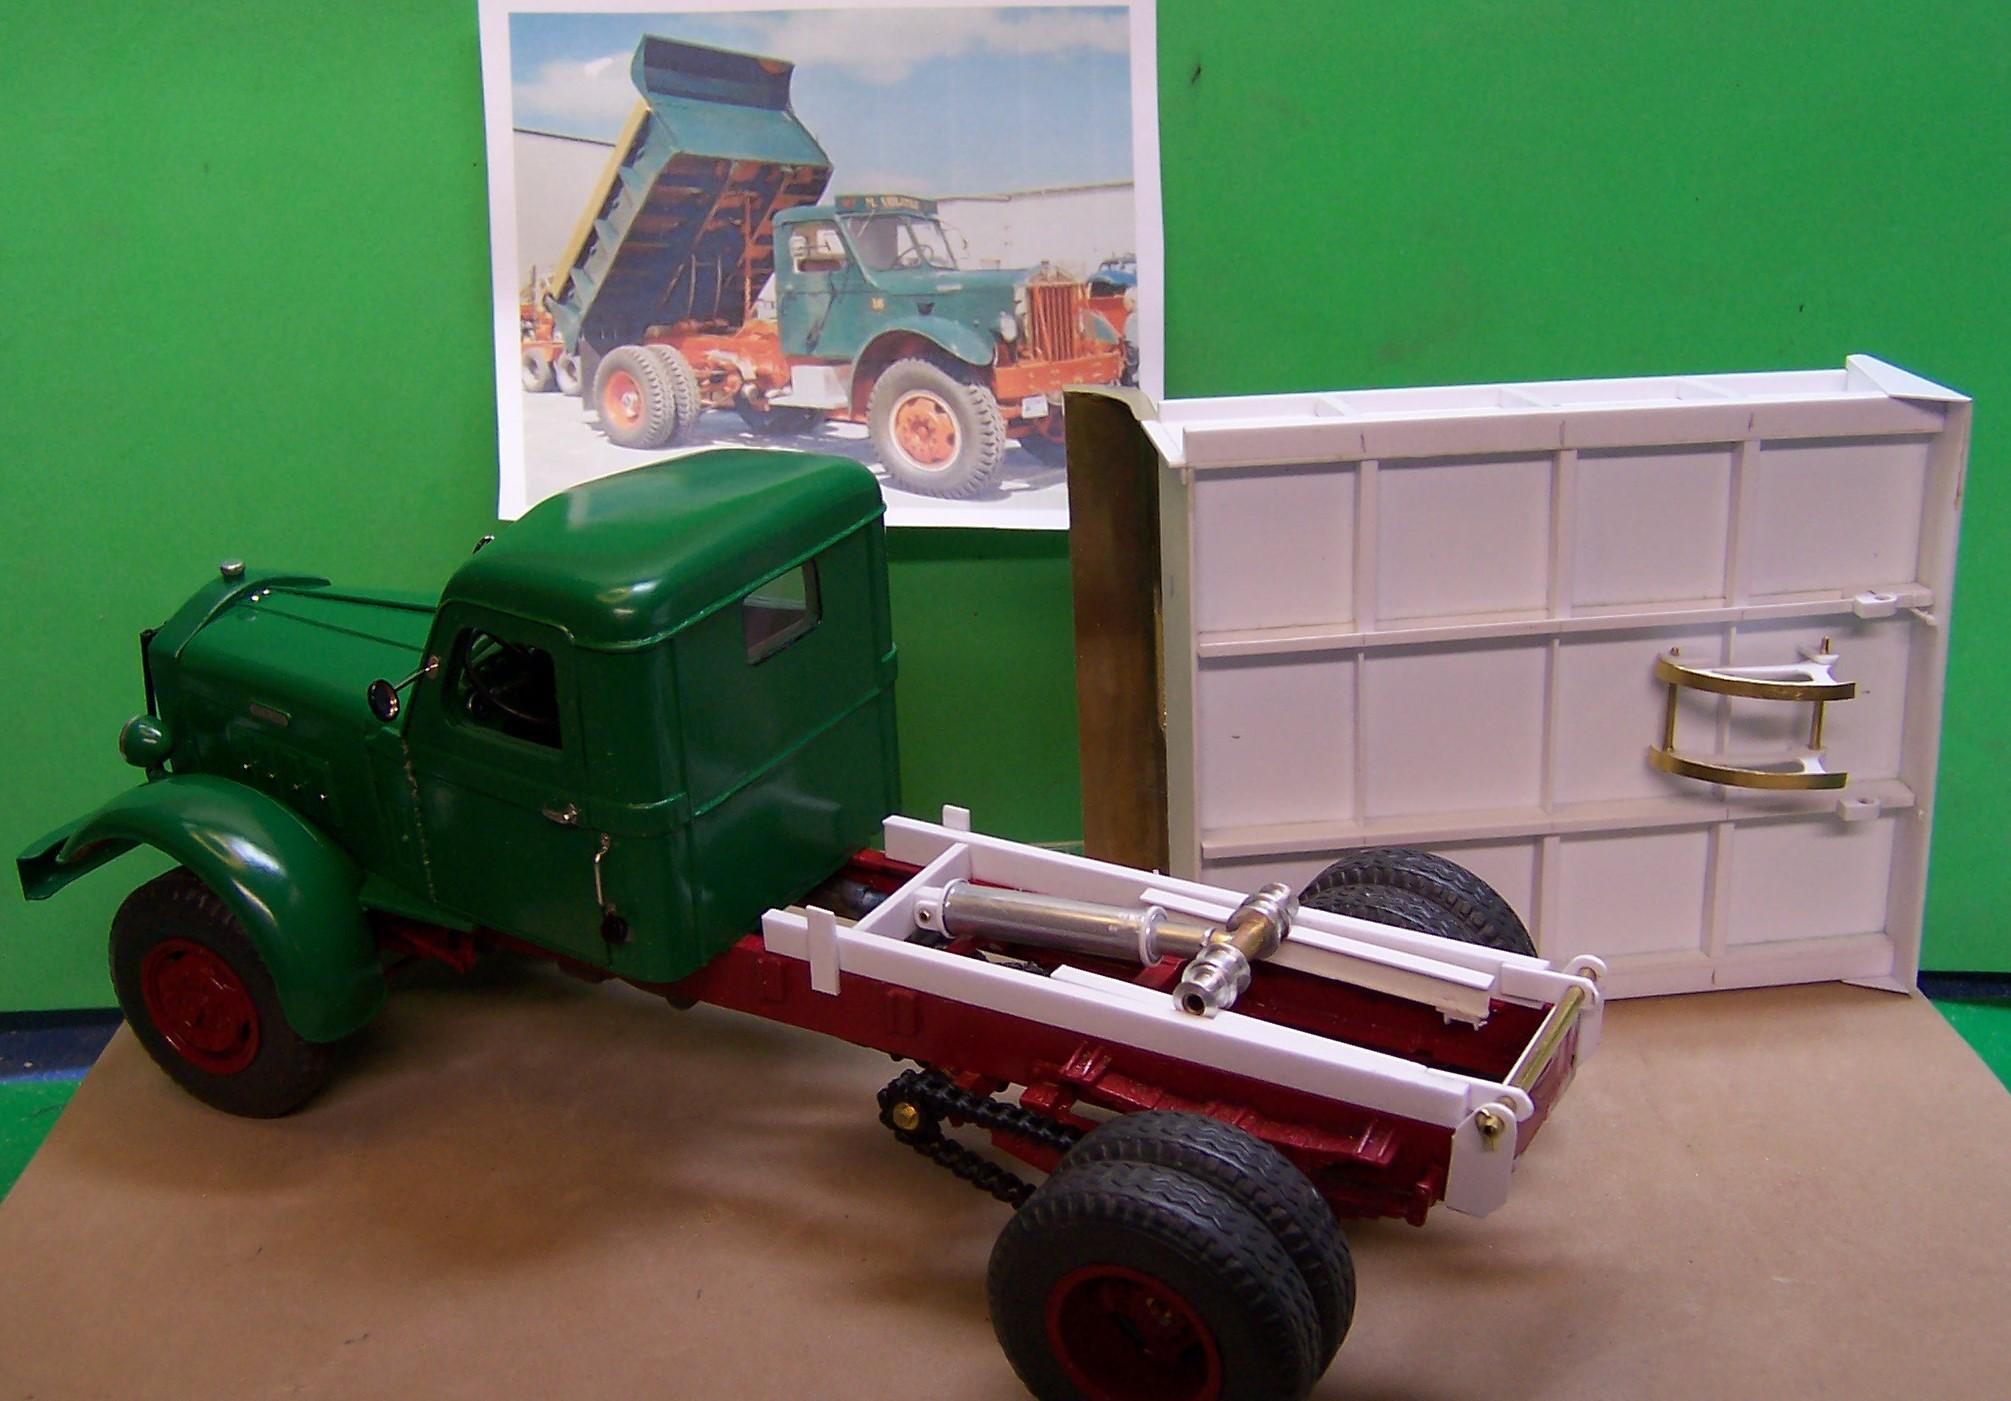
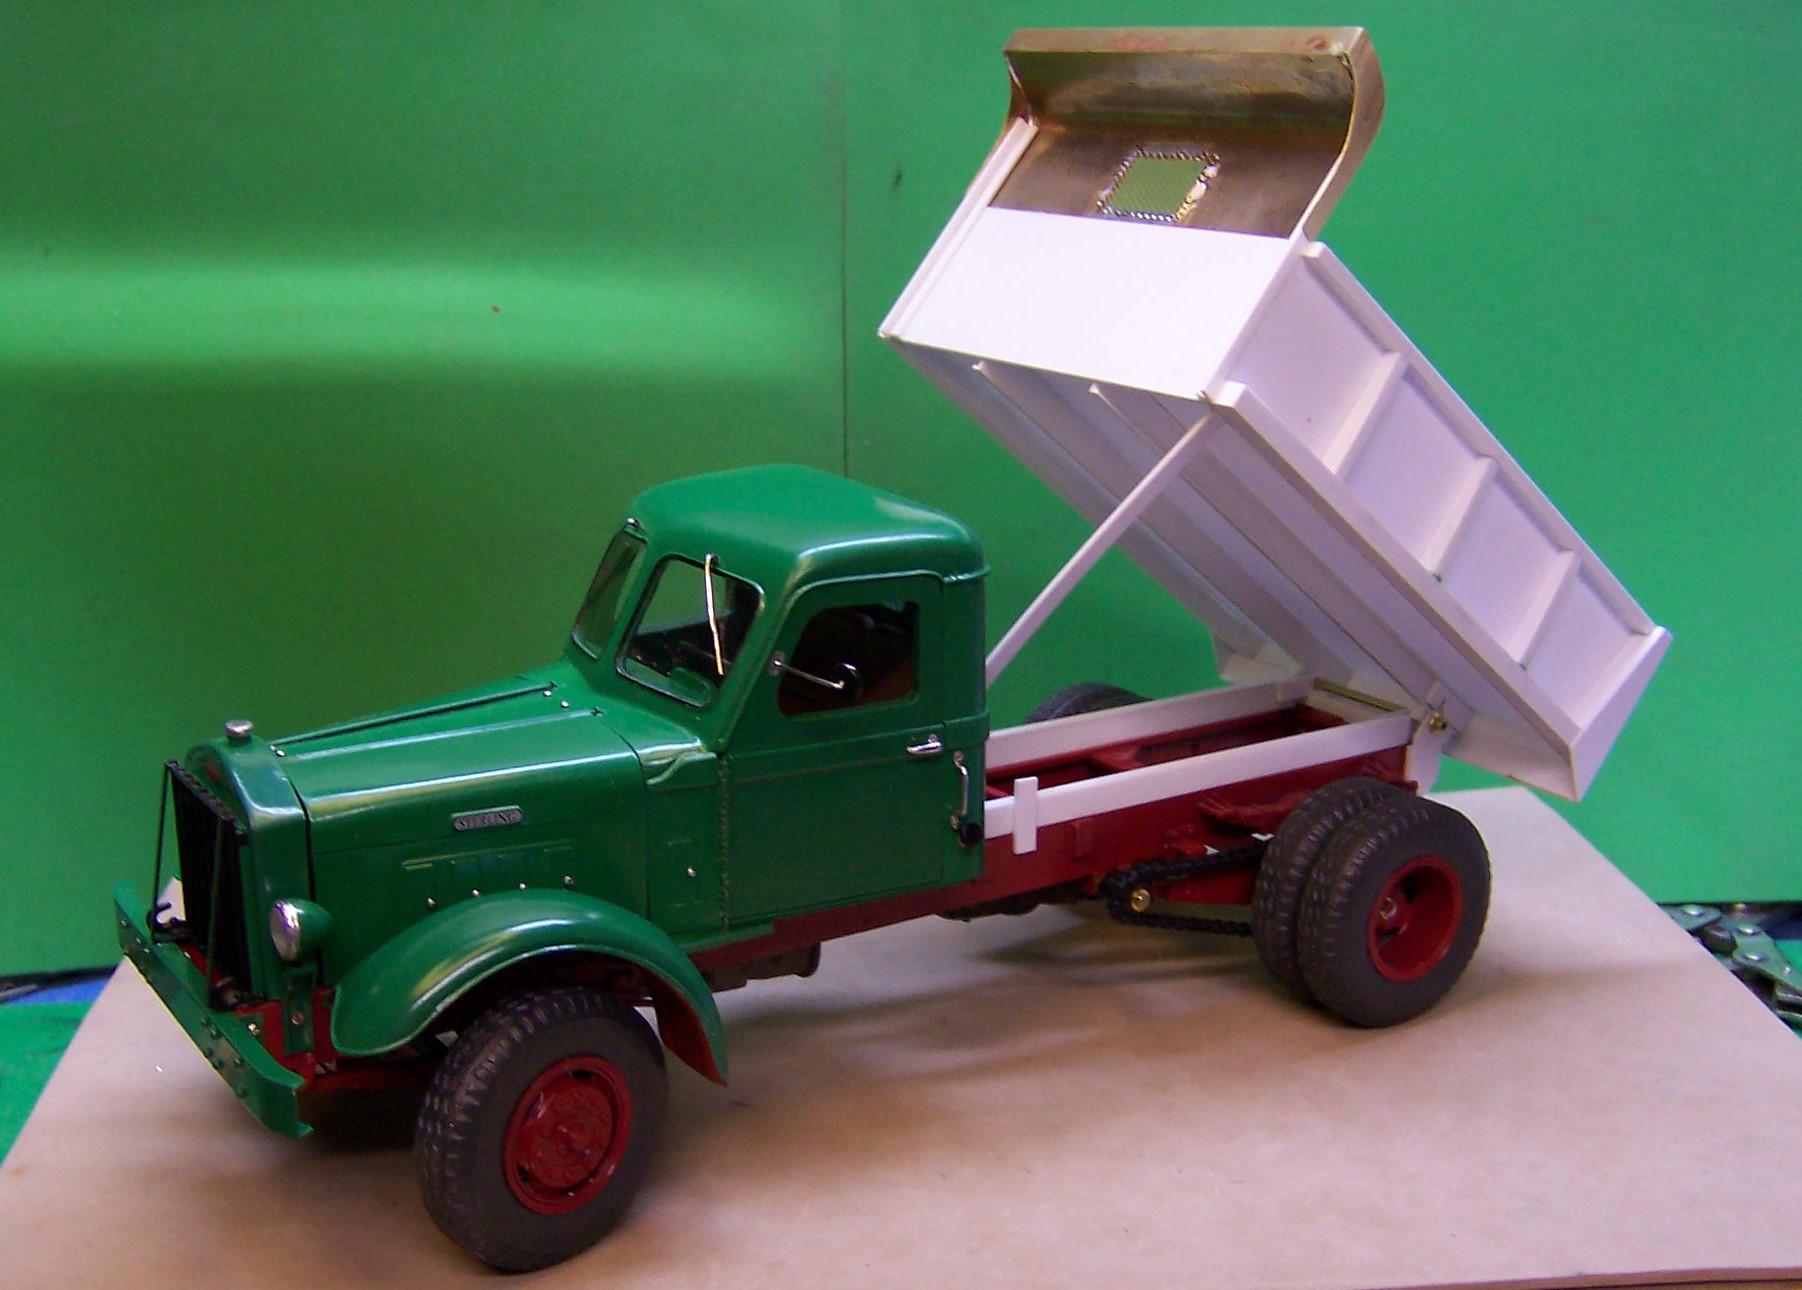
Got the body lifting mechanism done today. It's an older style but the photo in the background shows that it was really done at least some of the time. I would have expected a slightly more modern version of mechanical arms and just the piston but this is were we're at. The piston in the photo above is in the retracted position. When moved back the inner rollers apply pressure against the curved runners and move the body up. And this is where it would be at full extension.
-
1948 Sterling HC 175
Chariots of Fire replied to Chariots of Fire's topic in WIP: Model Trucks: Big Rigs and Heavy Equipment
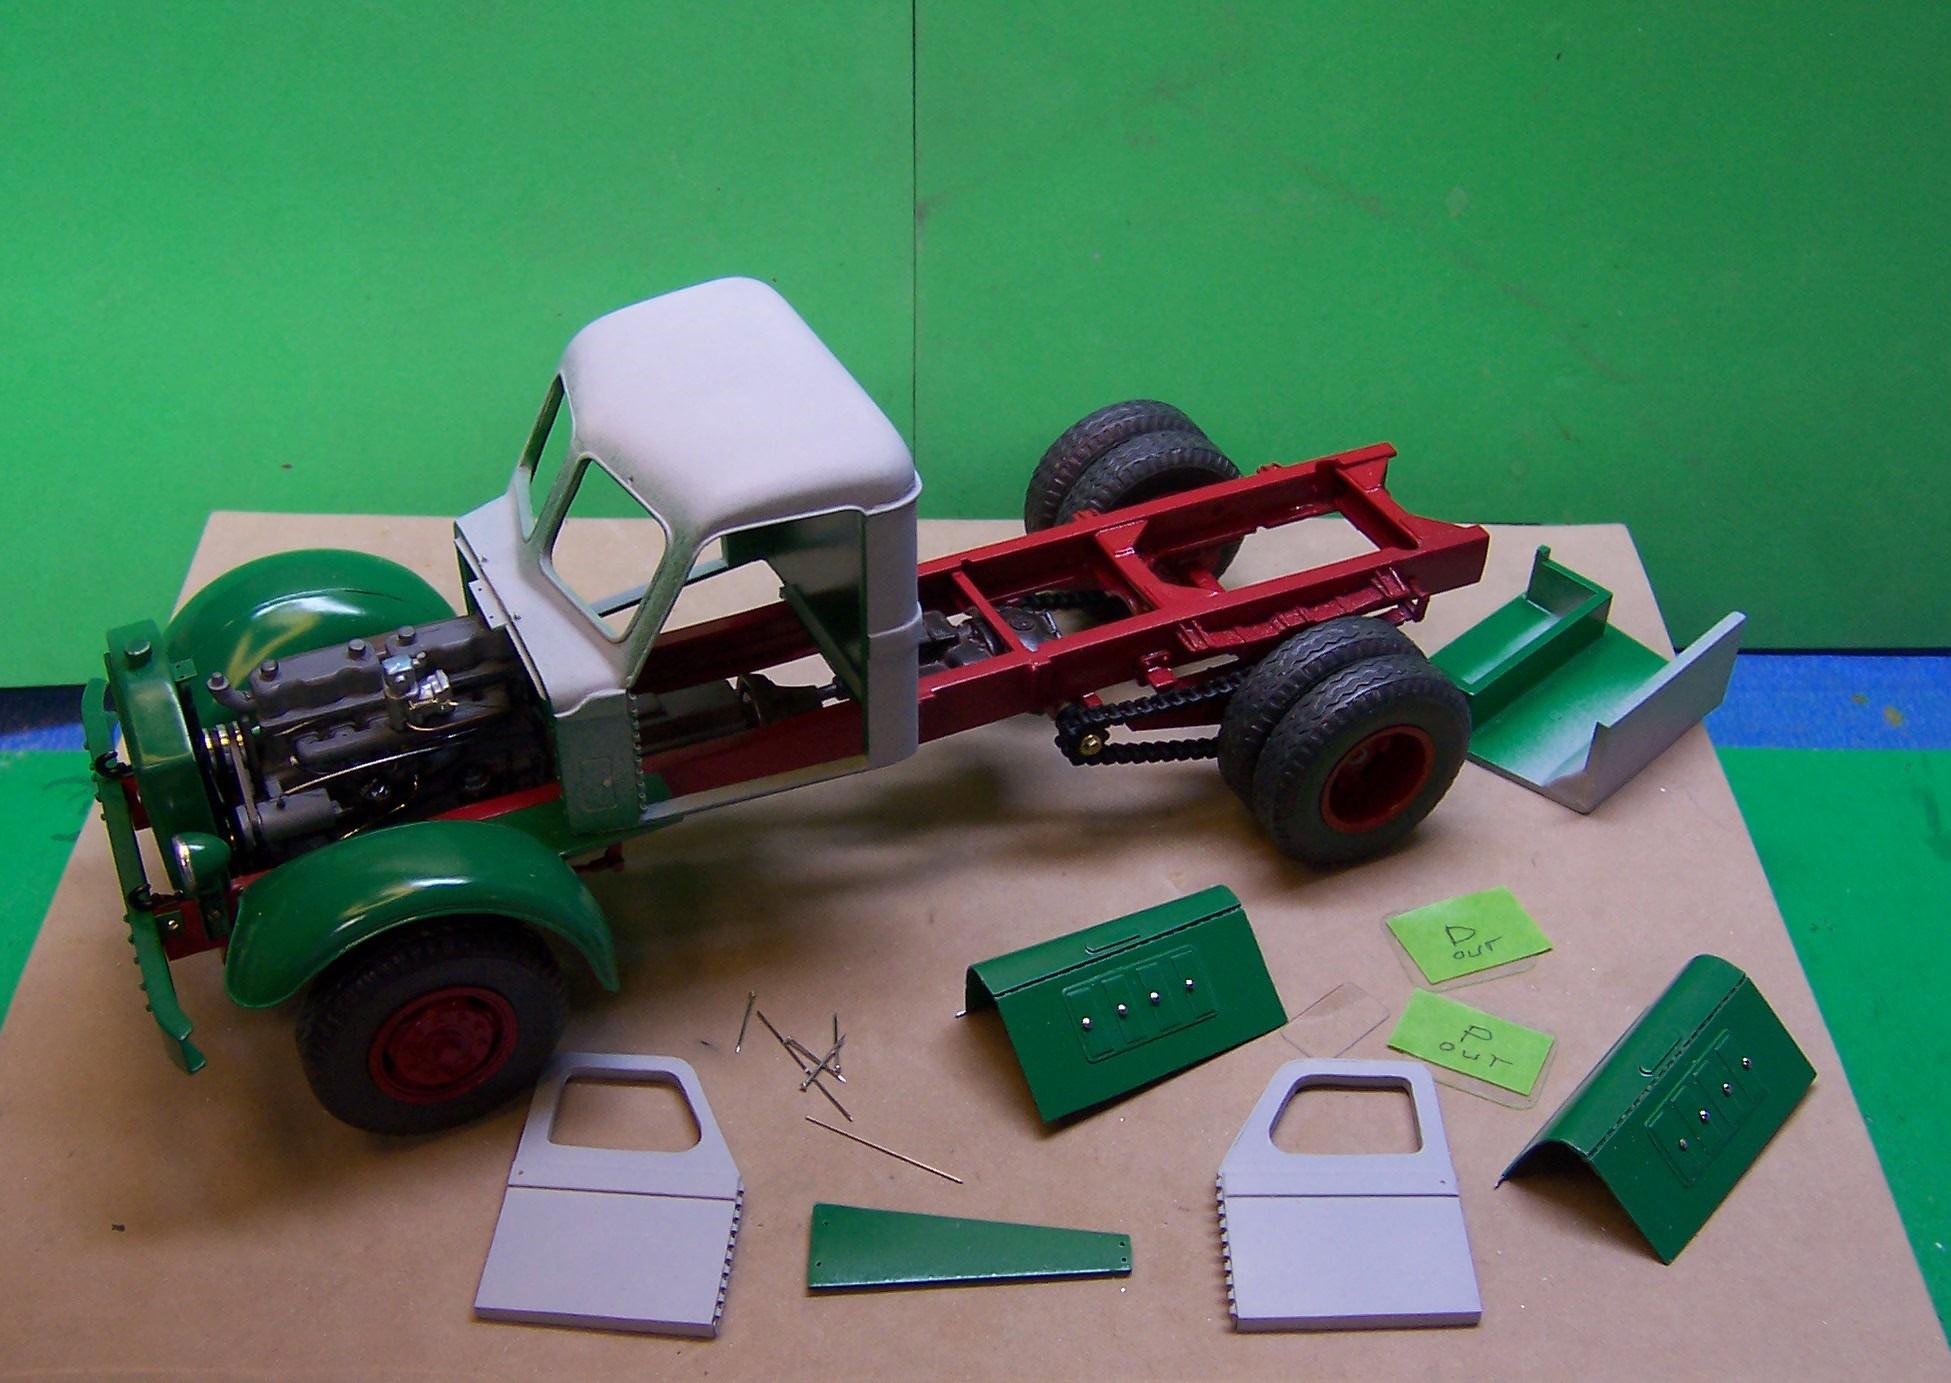
A couple of more pix of progress made. Deciding it was time to begin the truck body I got out the 0.030 plastic sheet stock and some strip stock of various sizes and went to work. I adjusted the length to a 10' long body. Somewhere in the process the sides got wracked so that it was not square. It was taken apart sufficient to make a new floor and square up the sides and front. The upper portion was going to be of plastic but the brass is so much easier to bend and when soldered together looks better scale wise. A tailgate and lifting mechanism still have to be done and there are some details left on the chassis to complete.
-
1948 Sterling HC 175
Chariots of Fire replied to Chariots of Fire's topic in WIP: Model Trucks: Big Rigs and Heavy Equipment
made some real progress in the last day or two. It seems that once you get to a certain point in a build it comes together quickly. So here we are as of the end of the work session today. Still the body to build that is for another day..
-
1948 Sterling HC 175
Chariots of Fire replied to Chariots of Fire's topic in WIP: Model Trucks: Big Rigs and Heavy Equipment
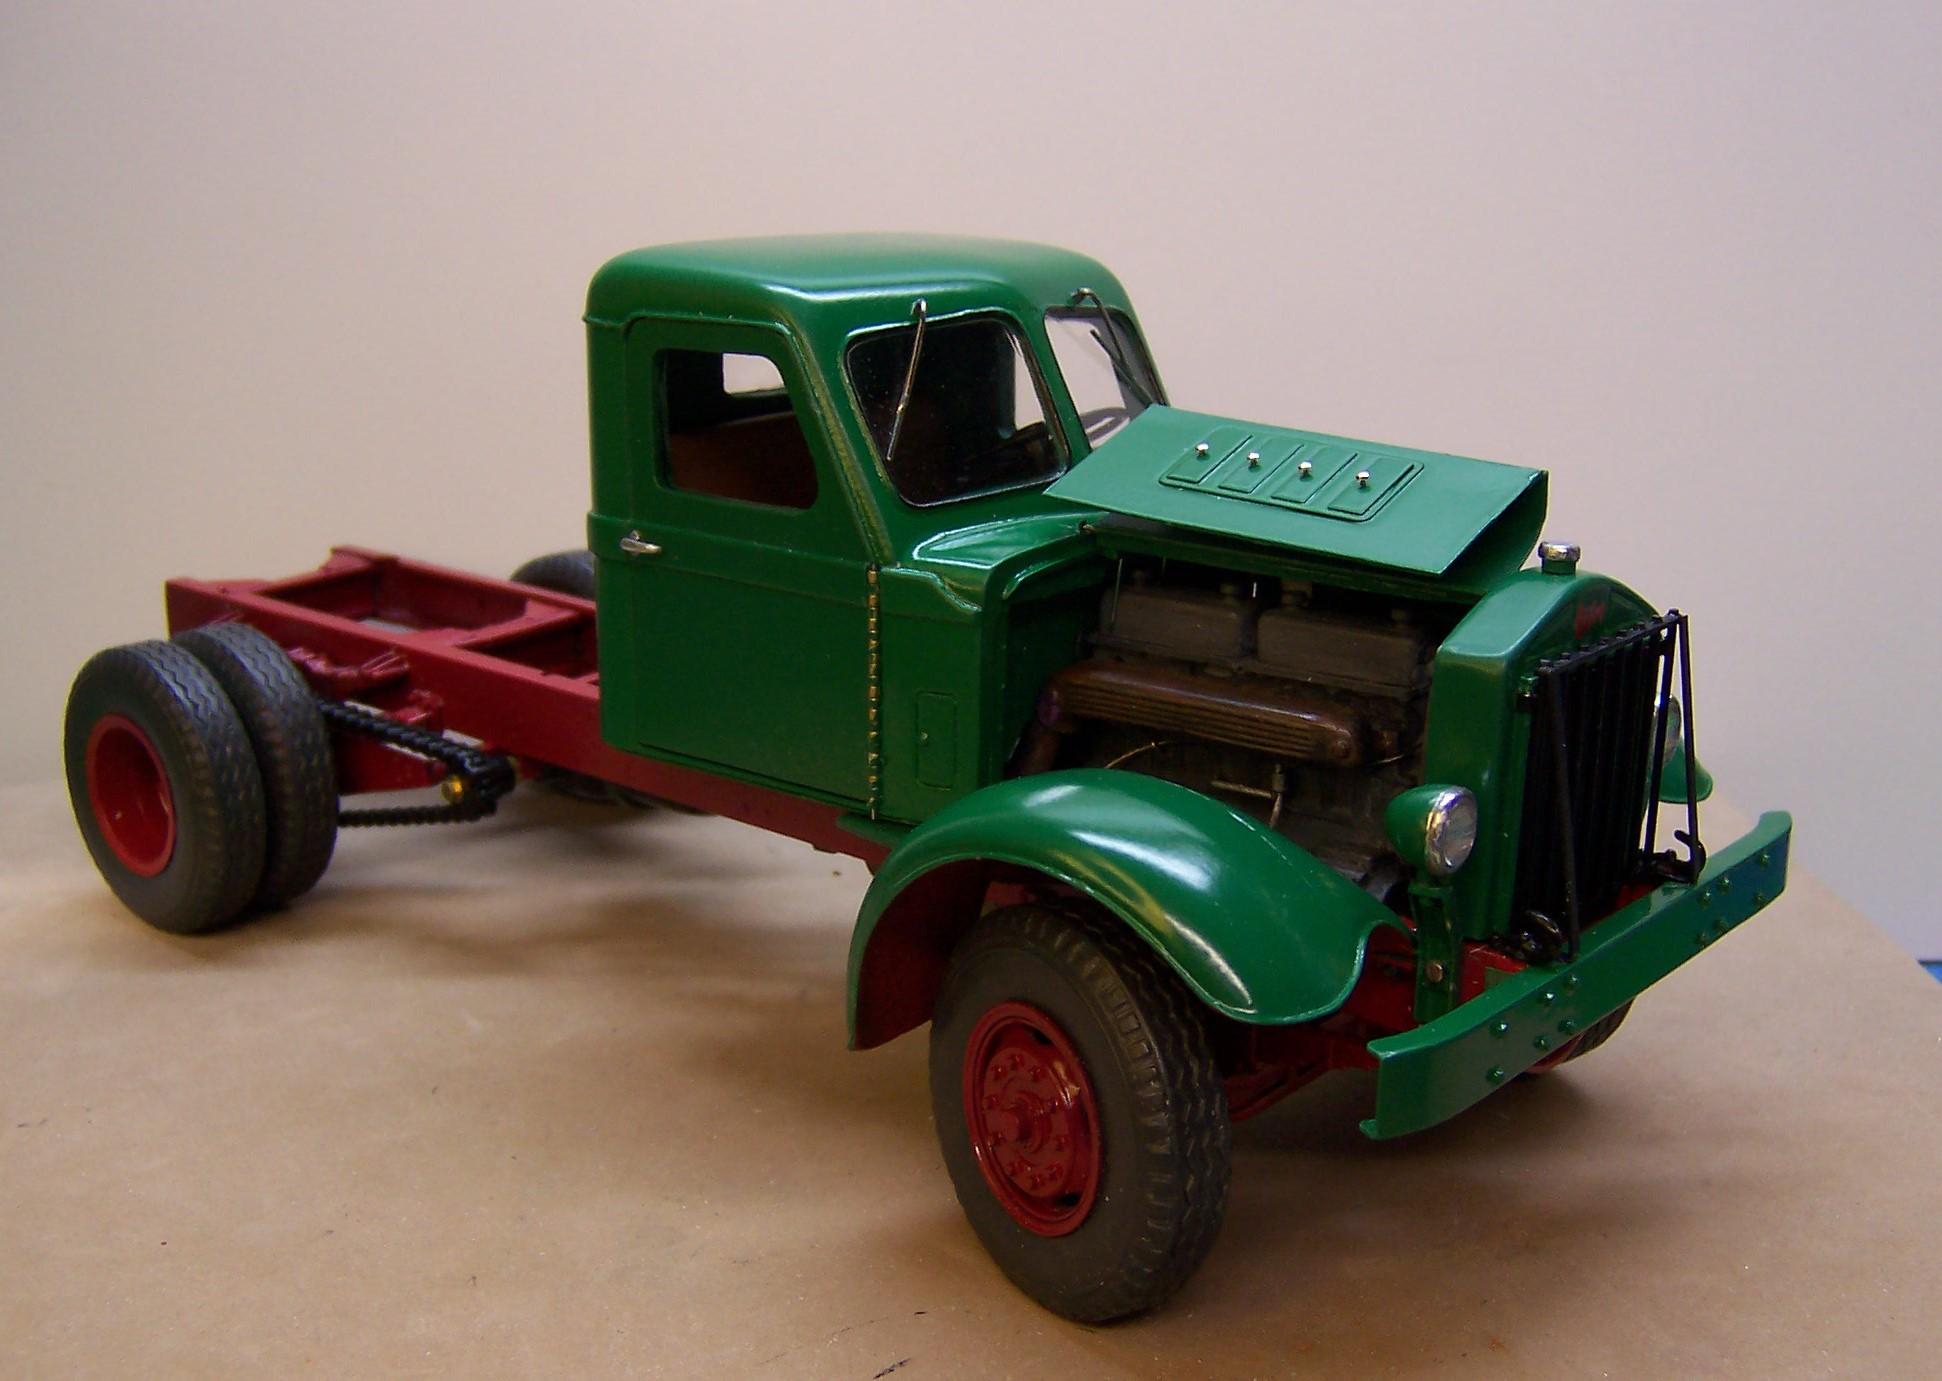
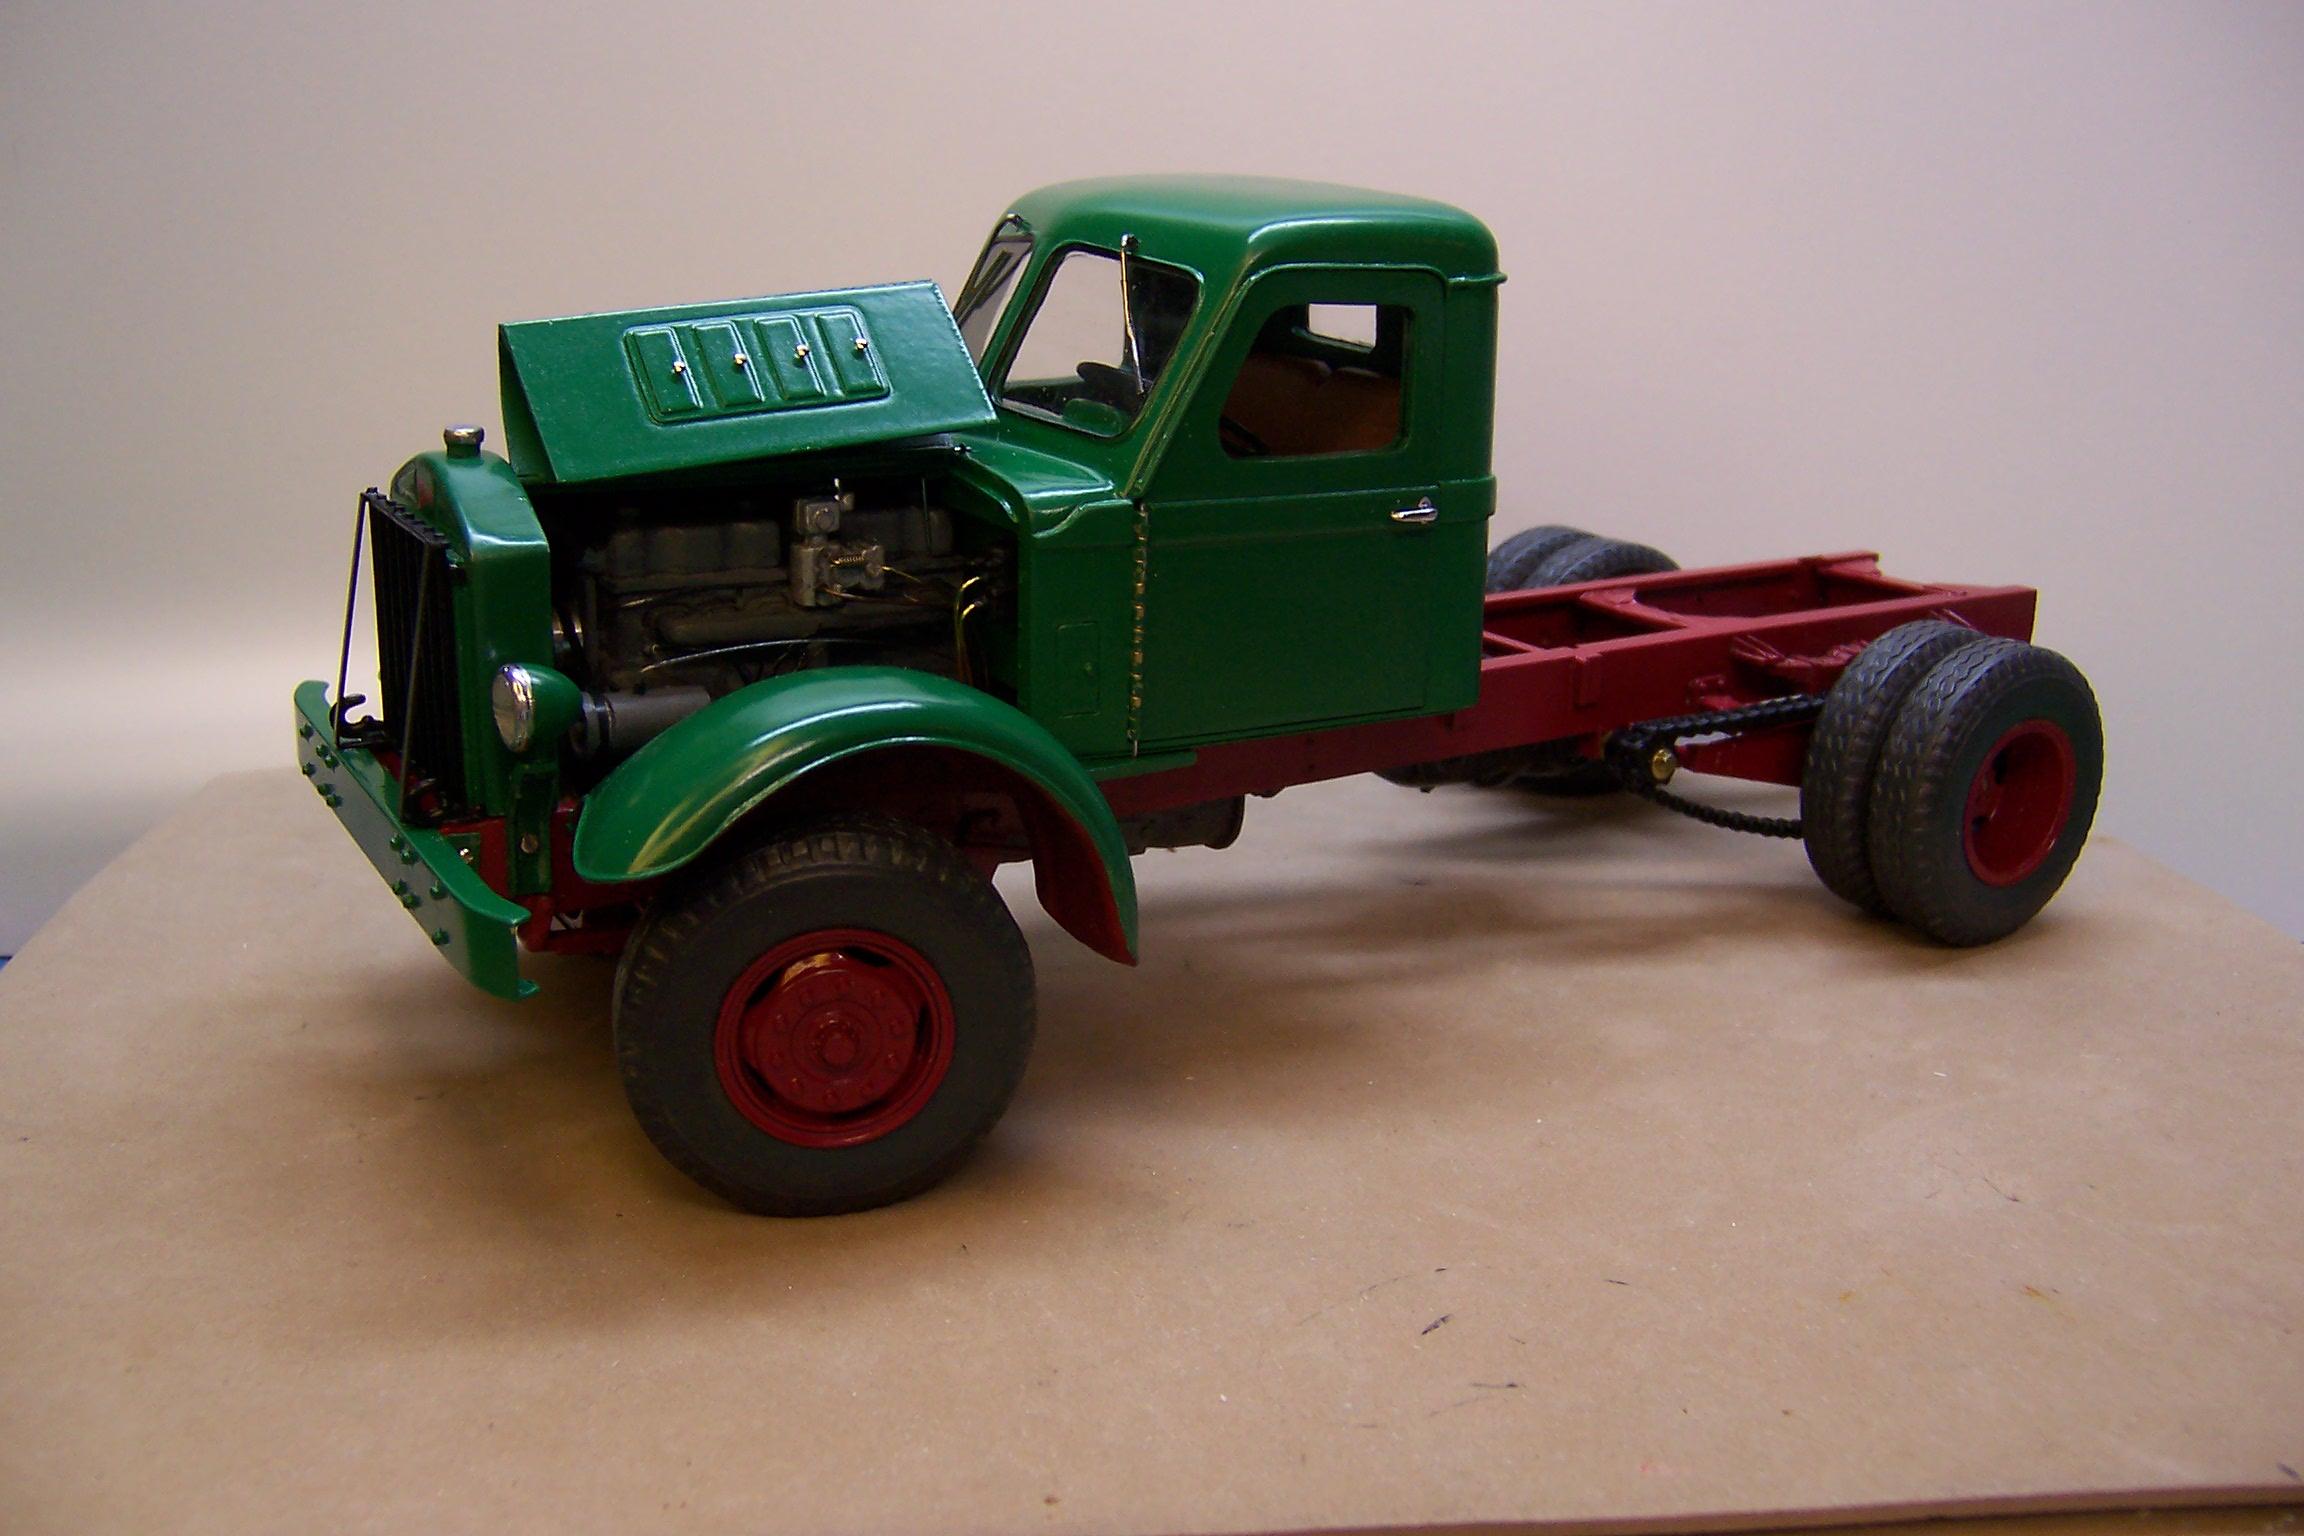
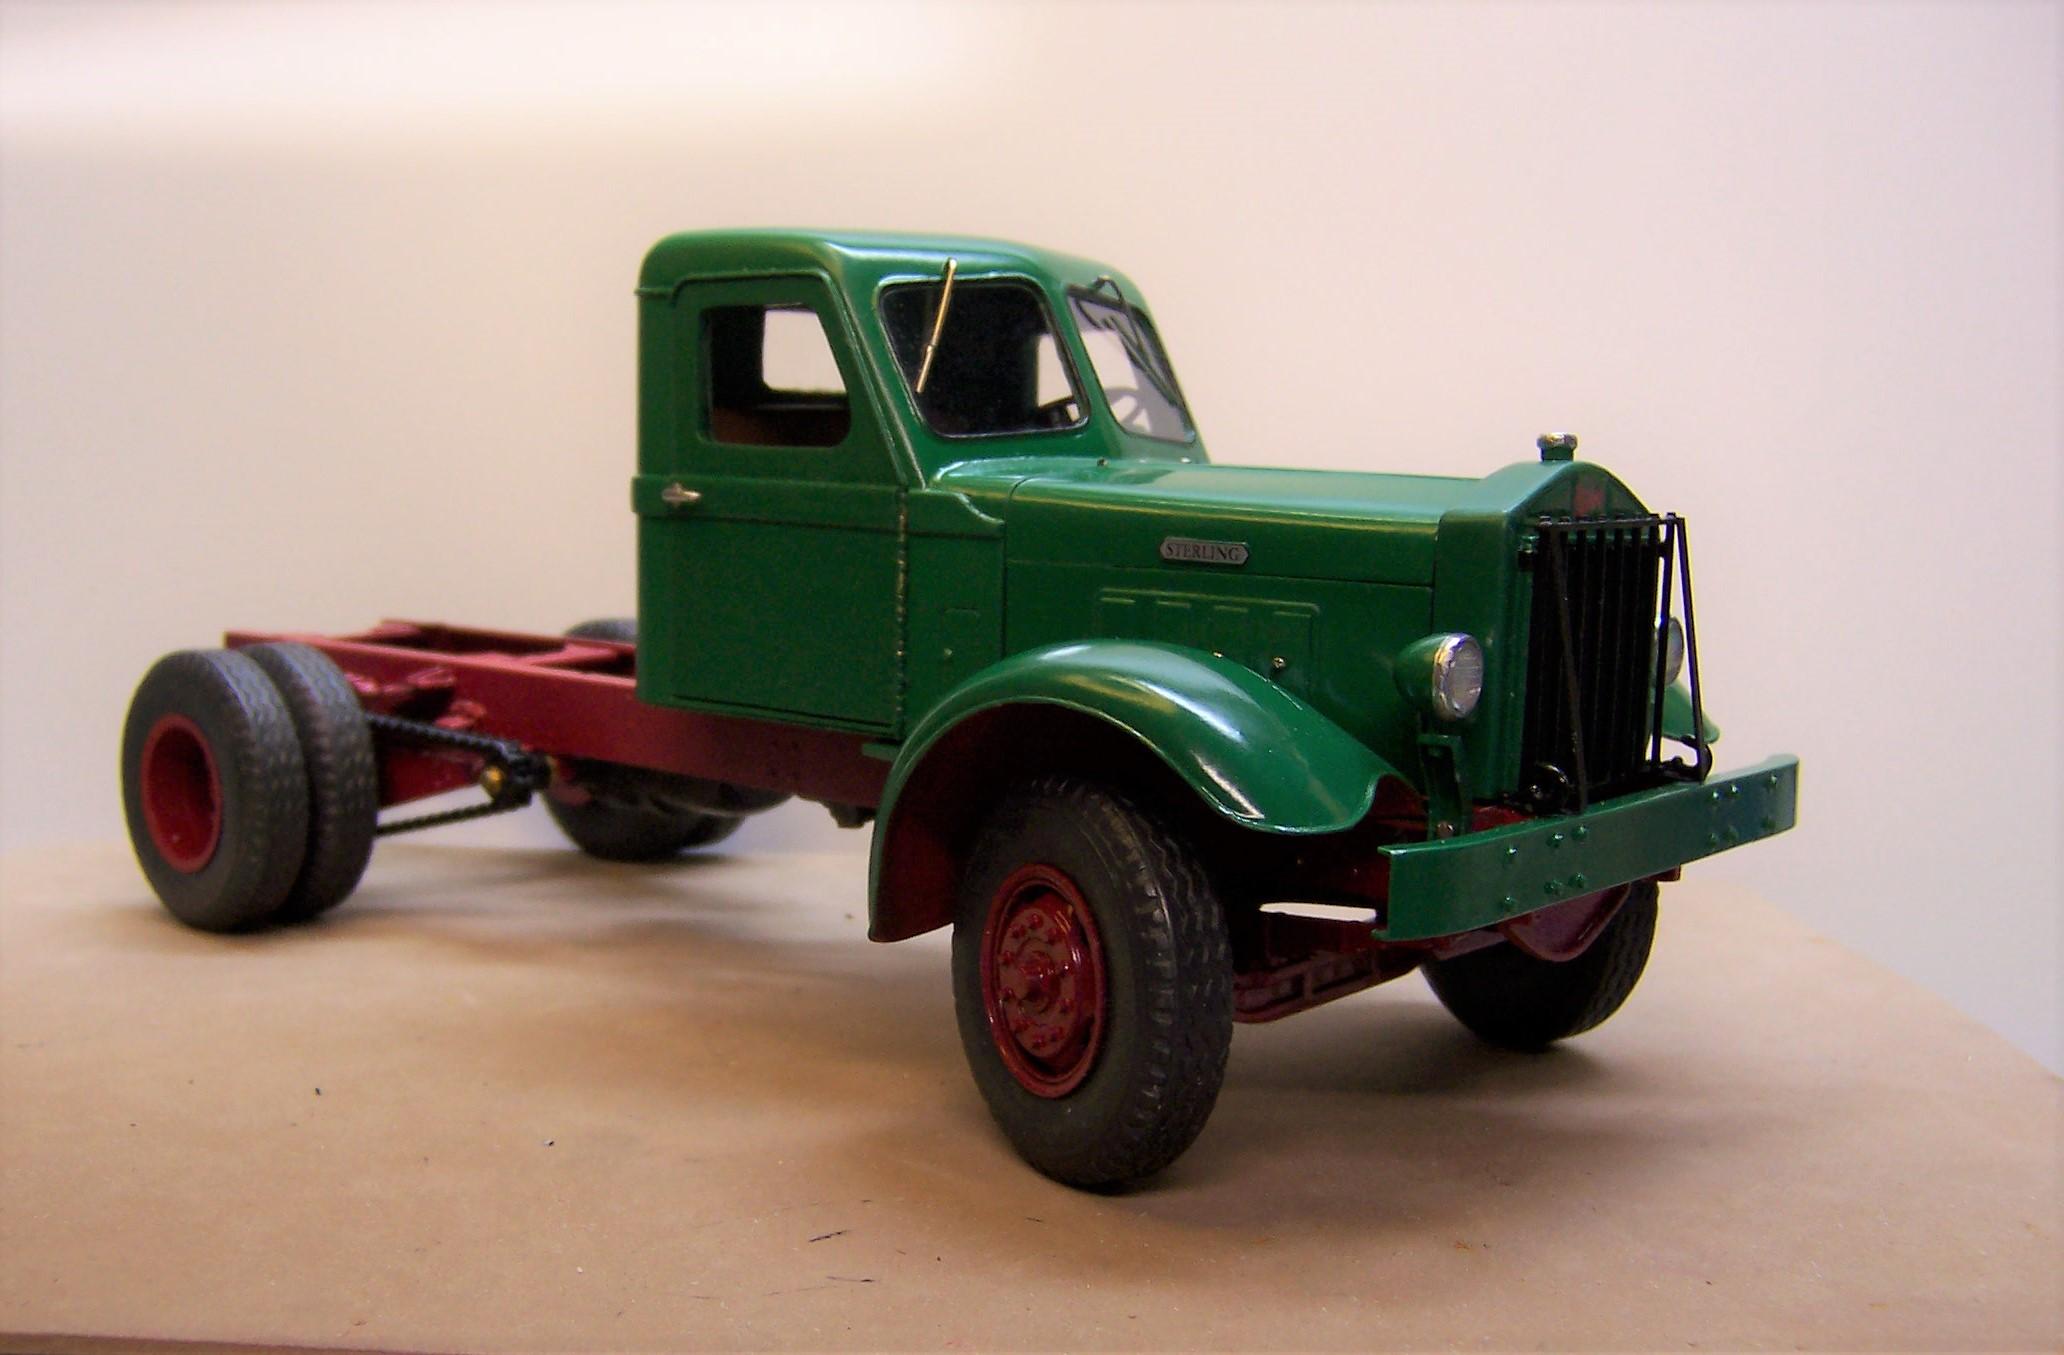
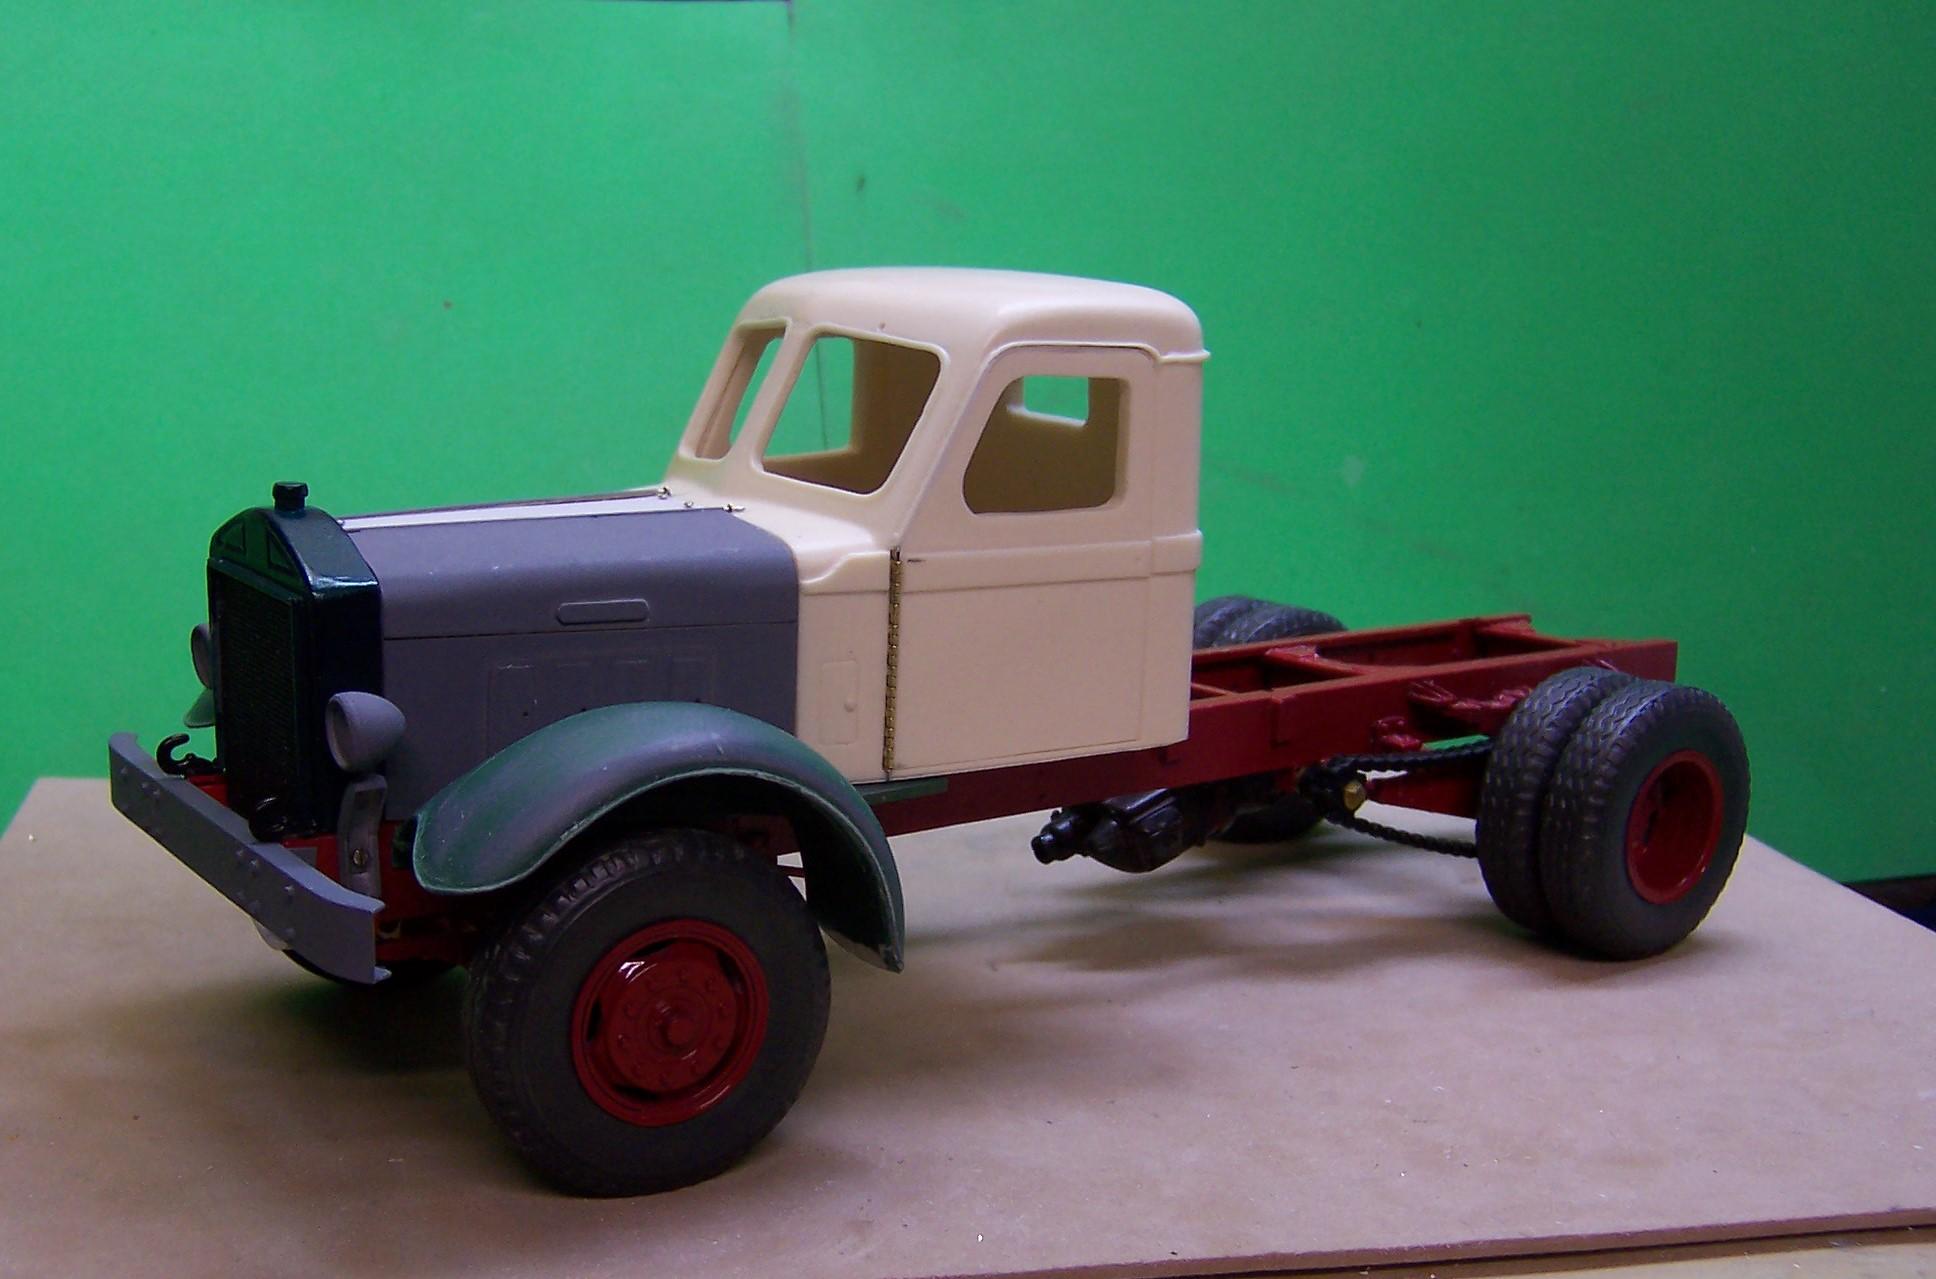
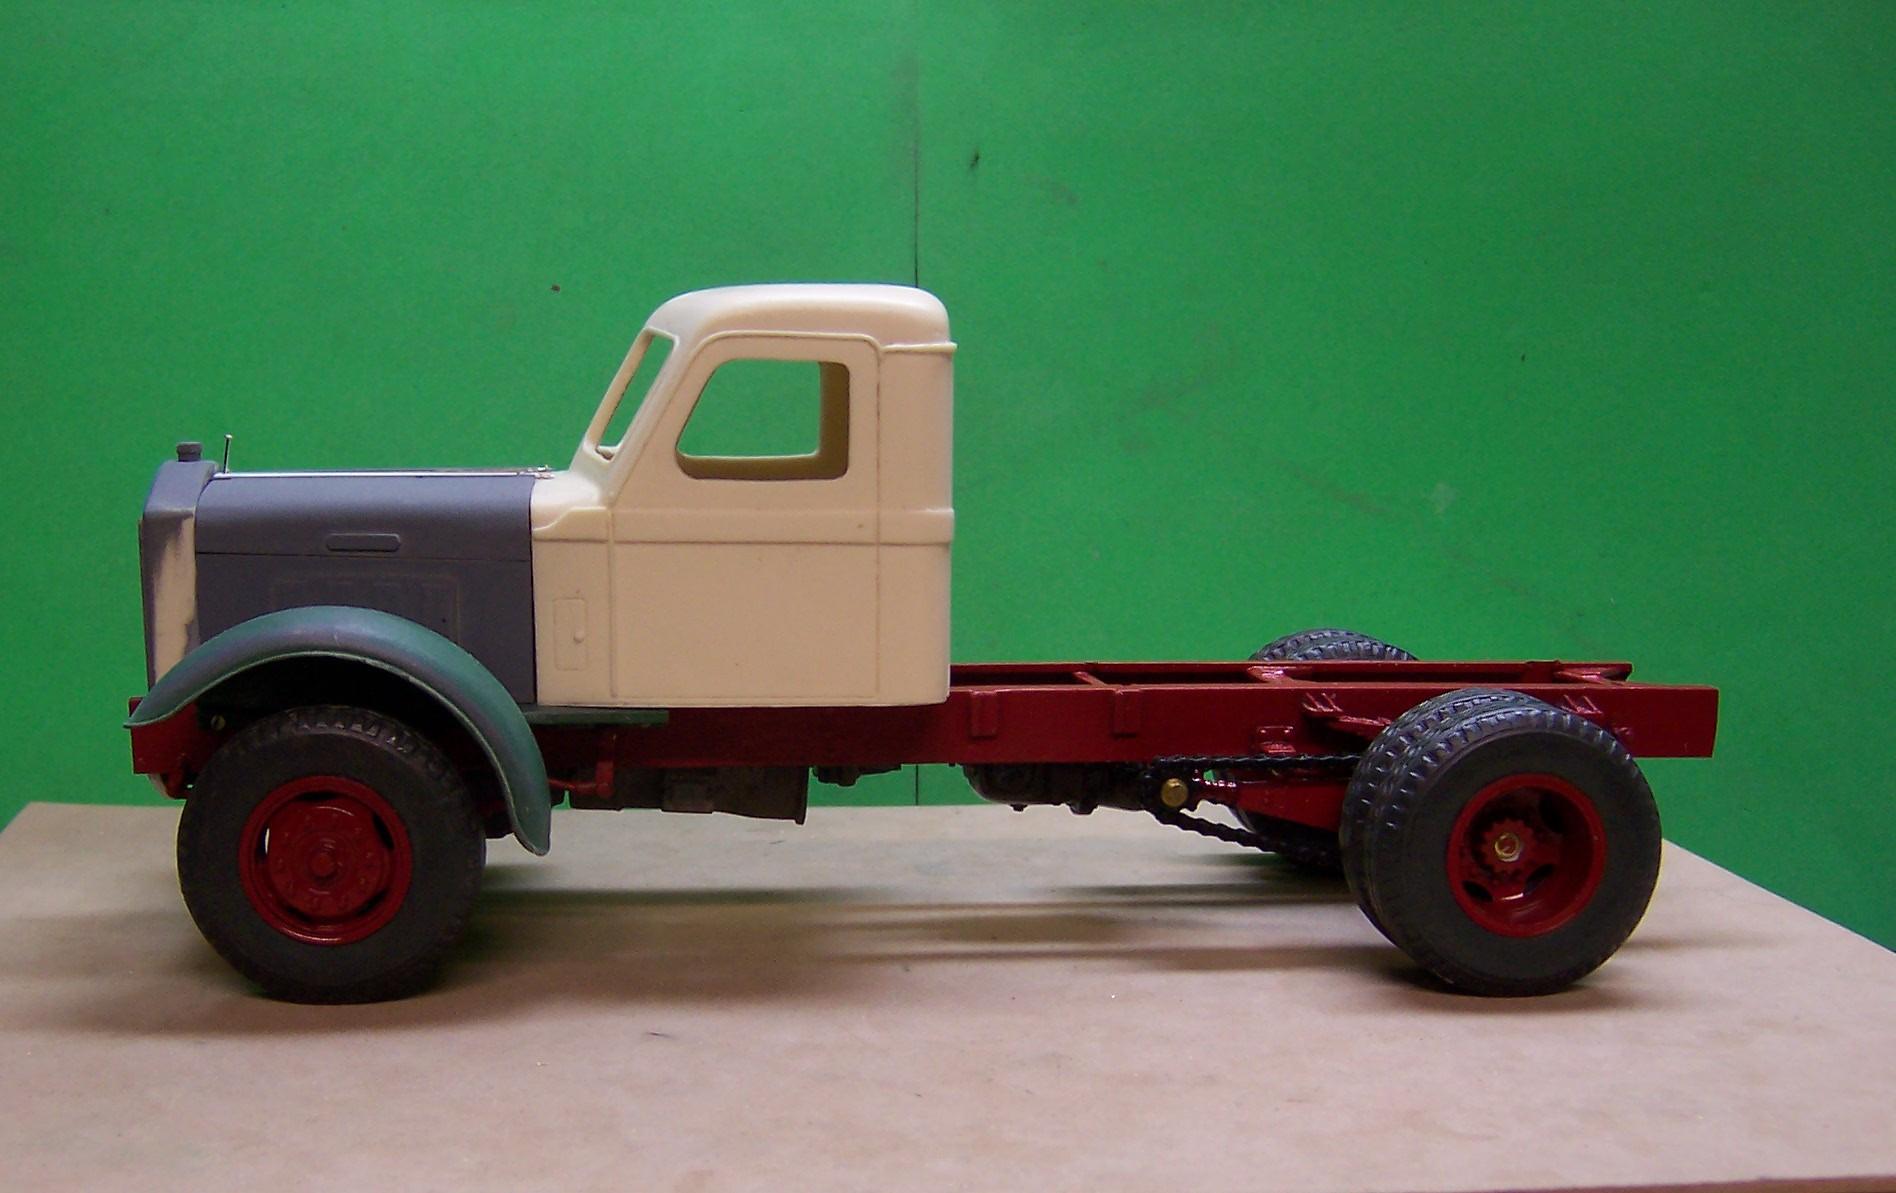
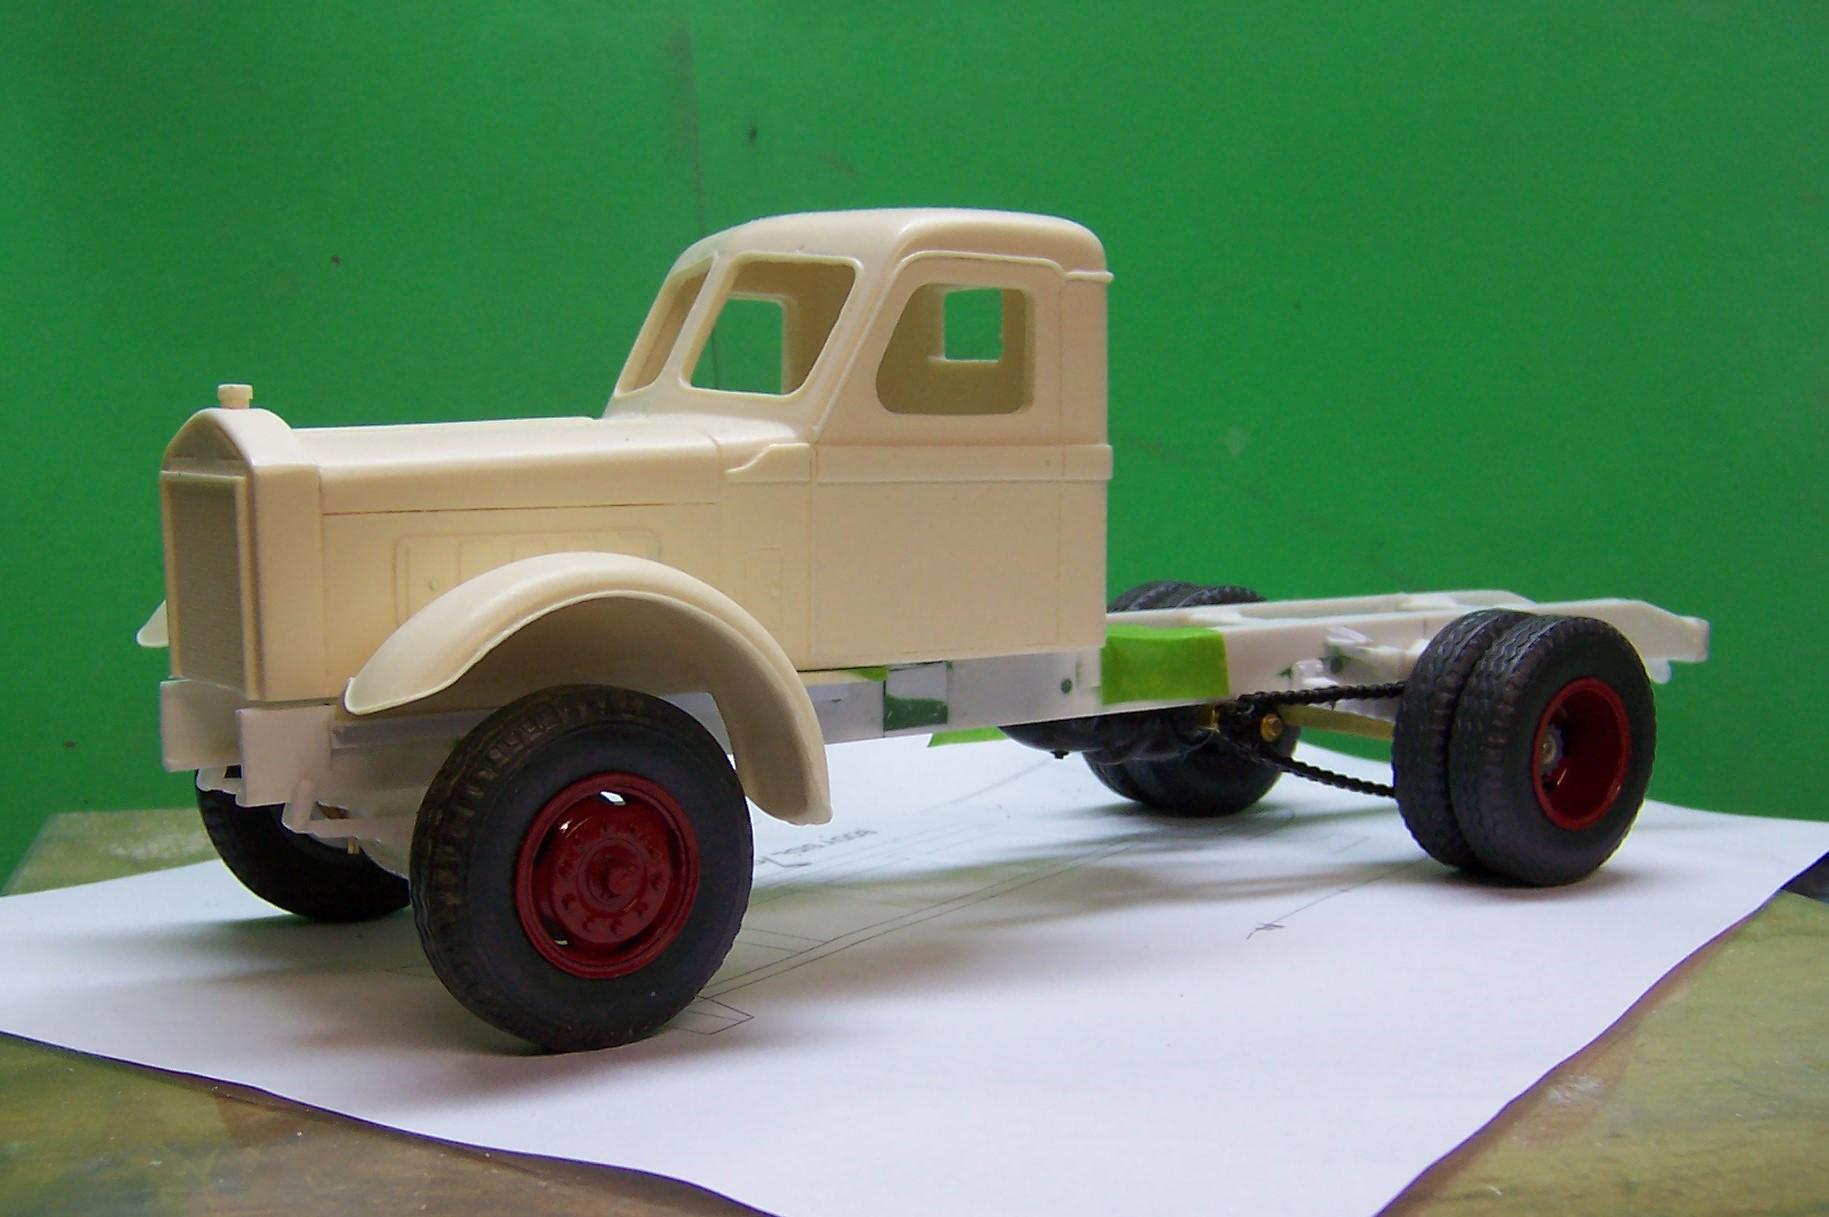
There comes a time when it is just time to paint! So piece by piece things are getting some color. The engine is now set in place and the fenders are set permanently. The radiator is in place but only temporarily. Paint needs to set a bit more so I can use some Novus on it and polish it up some. Windshield pieces and rear window are ready to go in as soon as the cab is painted. I added the fire wall from a Pete kit. It fit almost perfectly and perfectly and needed only slight adjustment along the sides and upper corners.
-
1948 Sterling HC 175
Chariots of Fire replied to Chariots of Fire's topic in WIP: Model Trucks: Big Rigs and Heavy Equipment
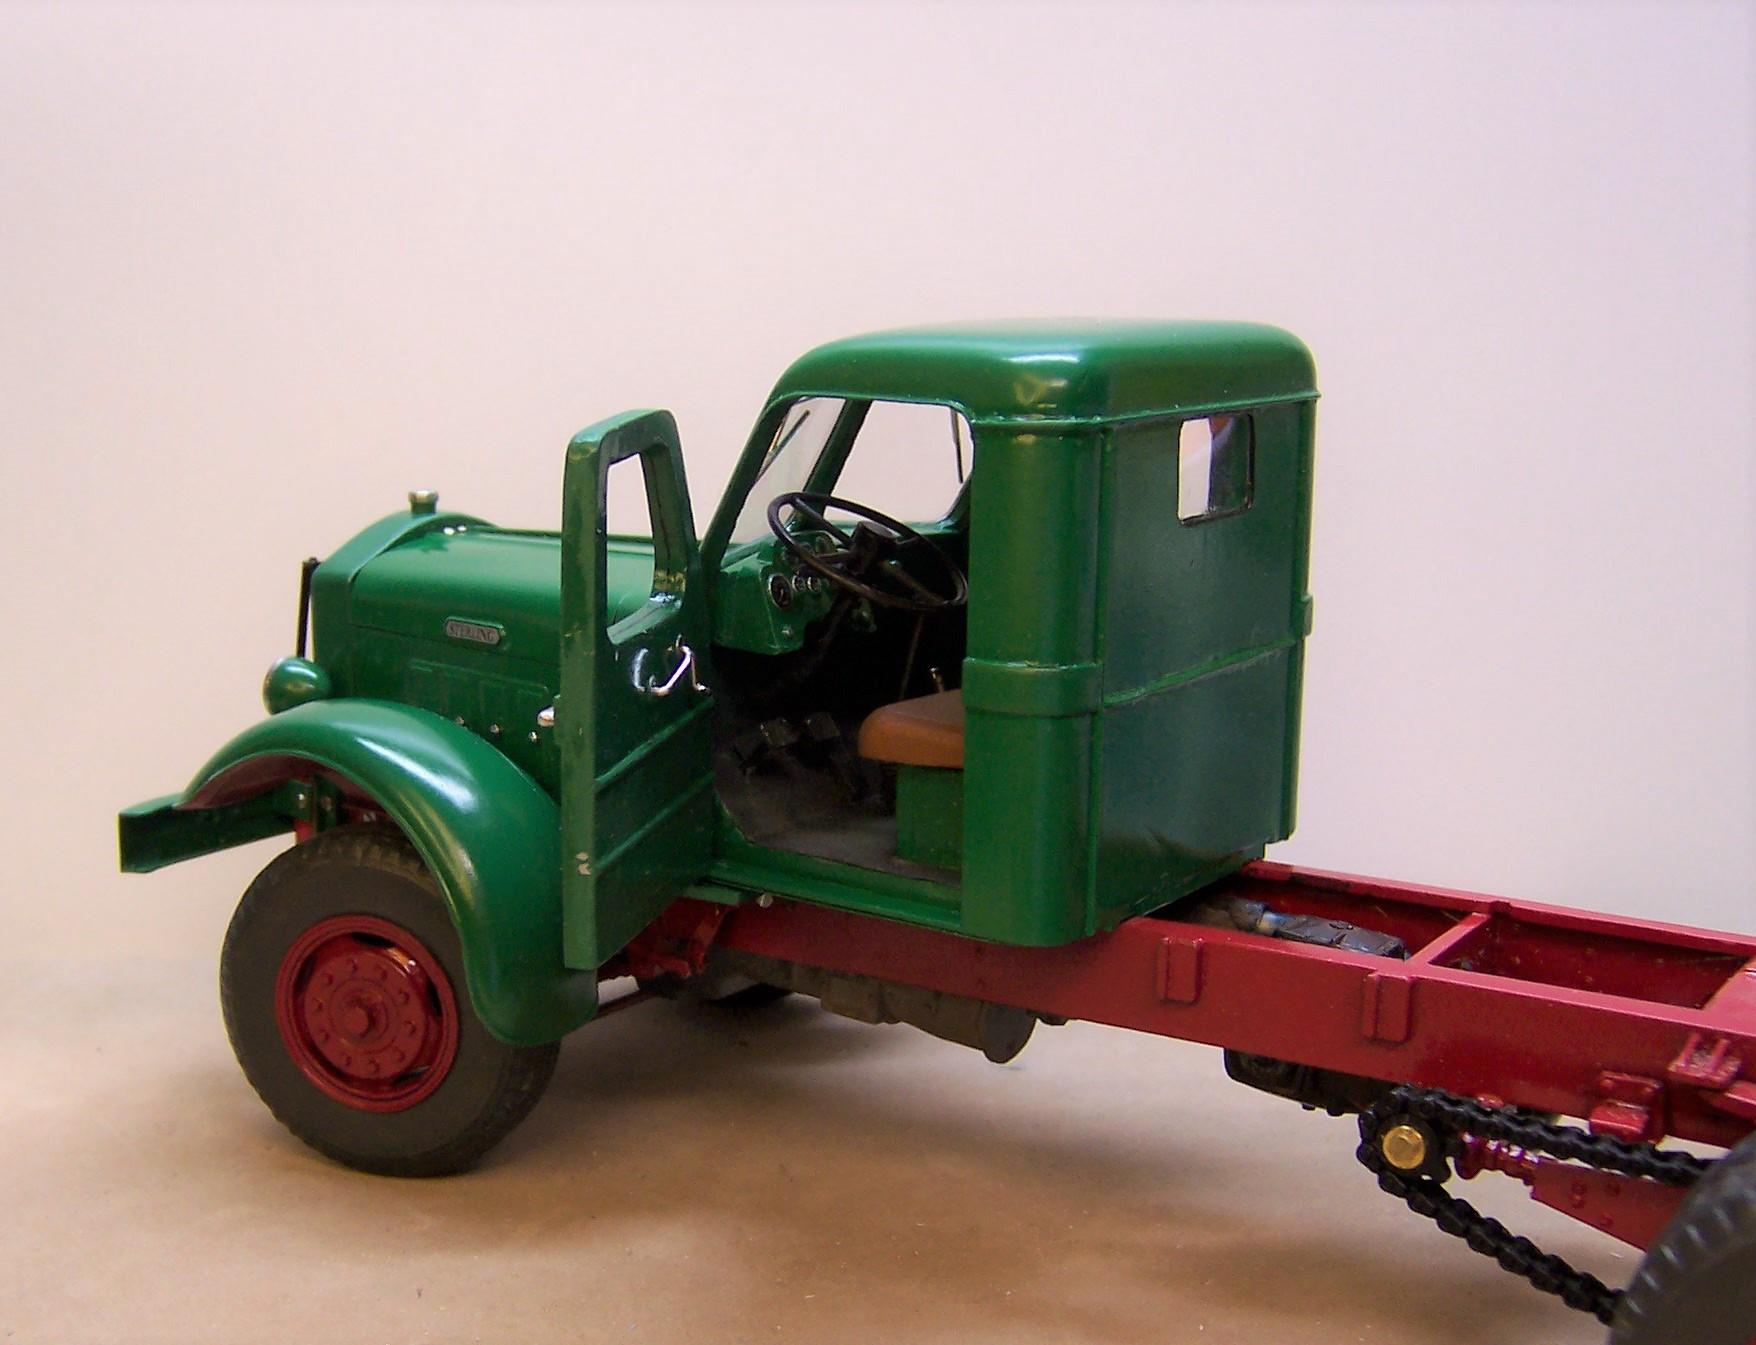
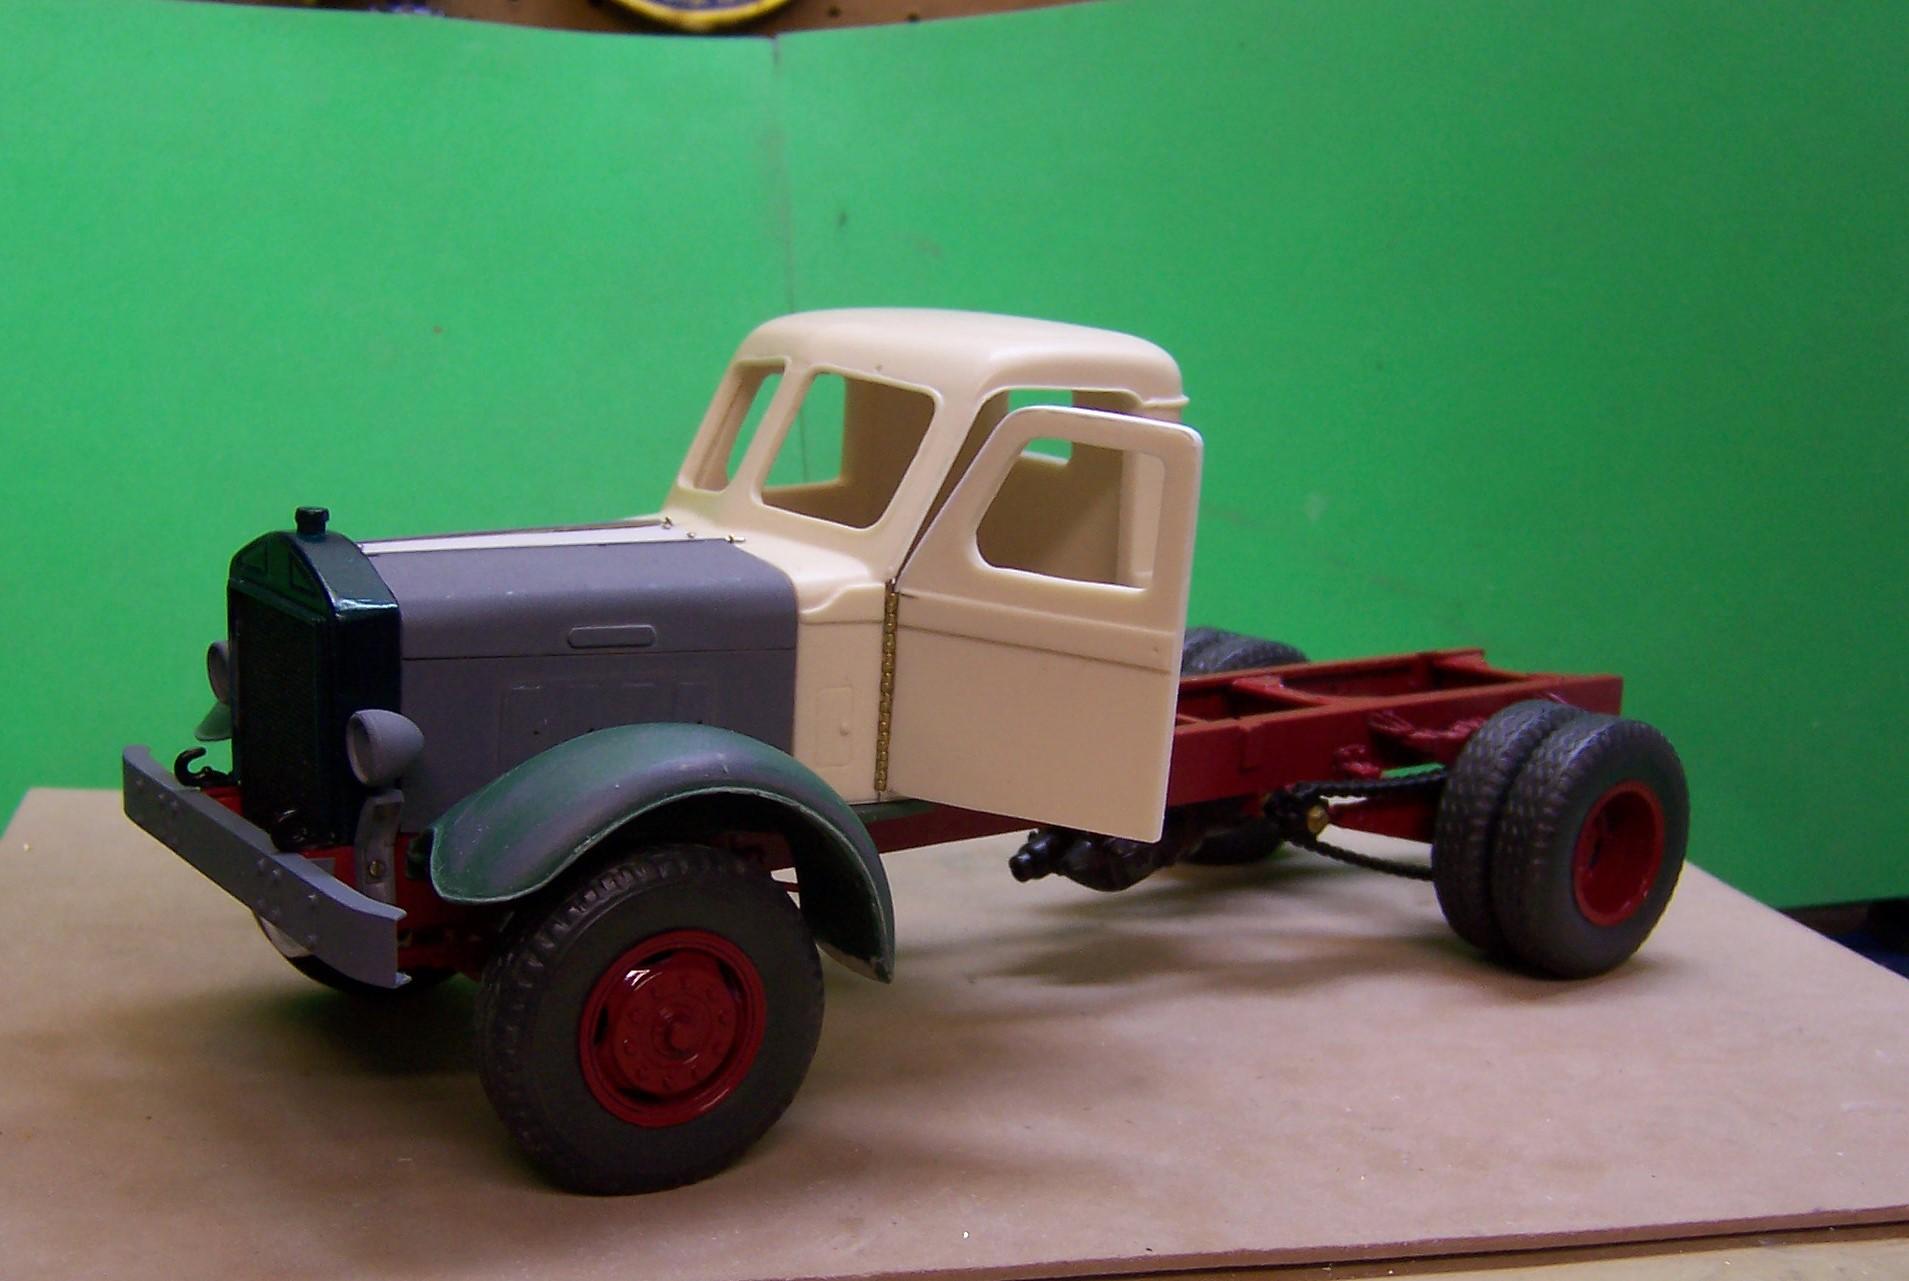
After a lot of scribing and cutting the doors came free and I had just enough of the piano hinge left over to do the hinges for each door. Unlike most trucks of the period that used butt hinges, the Sterling used a continuous piano hinge on its doors. CA was used to tack the hinge pieces in place. Then the holes in the hinges were drilled through and small brass nails were set in place. On one side the nail heads were filed down nearly flat so that the two sides would not bind. Fit was pretty good and only needed a bit of trimming and adding a strip of Evergreen to get back an even opening. Only the upper leading edge of the door and the upper edges needed a strip of plastic to close up the opening on the driver's side. The other side needed no shimming at all. ?!! The shim stock is hardly visible but will likely need a small amount of putty to clean up the edge. The piano hinge from the inside of the door jamb. The door edge is similar. I can still remove the pin in the hinge to take off each door for primer and paint.
-
1948 Sterling HC 175
Chariots of Fire replied to Chariots of Fire's topic in WIP: Model Trucks: Big Rigs and Heavy Equipment
Right, again. Juergen: The parts are not identical to the real thing on the engine. Most of it will not be seen well anyway when the engine is installed in the chassis. Open the hood on any vehicle and we see mostly what is near the top. So I tried to make the top of the engine look close. We are not ever looking to reproduce in miniature the exact thing that is full size. If we could do that I would make the key that starts the engine!? So we look to make the eye see things that look right with clean building, some color, various shapes and sizes of materials and a weathering effect that brings out details. Military builders have mastered this part of building quite well I think. So to make a long story short do not feel that you are being critical. Not taken that way at all. Now I am working on cutting the doors open. Lots of scribing and sawing to get them separated from the rest of the cab. The effect will eventually be worth the work. -
1948 Sterling HC 175
Chariots of Fire replied to Chariots of Fire's topic in WIP: Model Trucks: Big Rigs and Heavy Equipment
And here's one with the headlights mounted. The AITM headlights are solid resin castings so I opted to cast some open ones from a previous build that had the same buckets and insert some clear lenses.
-
1948 Sterling HC 175
Chariots of Fire replied to Chariots of Fire's topic in WIP: Model Trucks: Big Rigs and Heavy Equipment
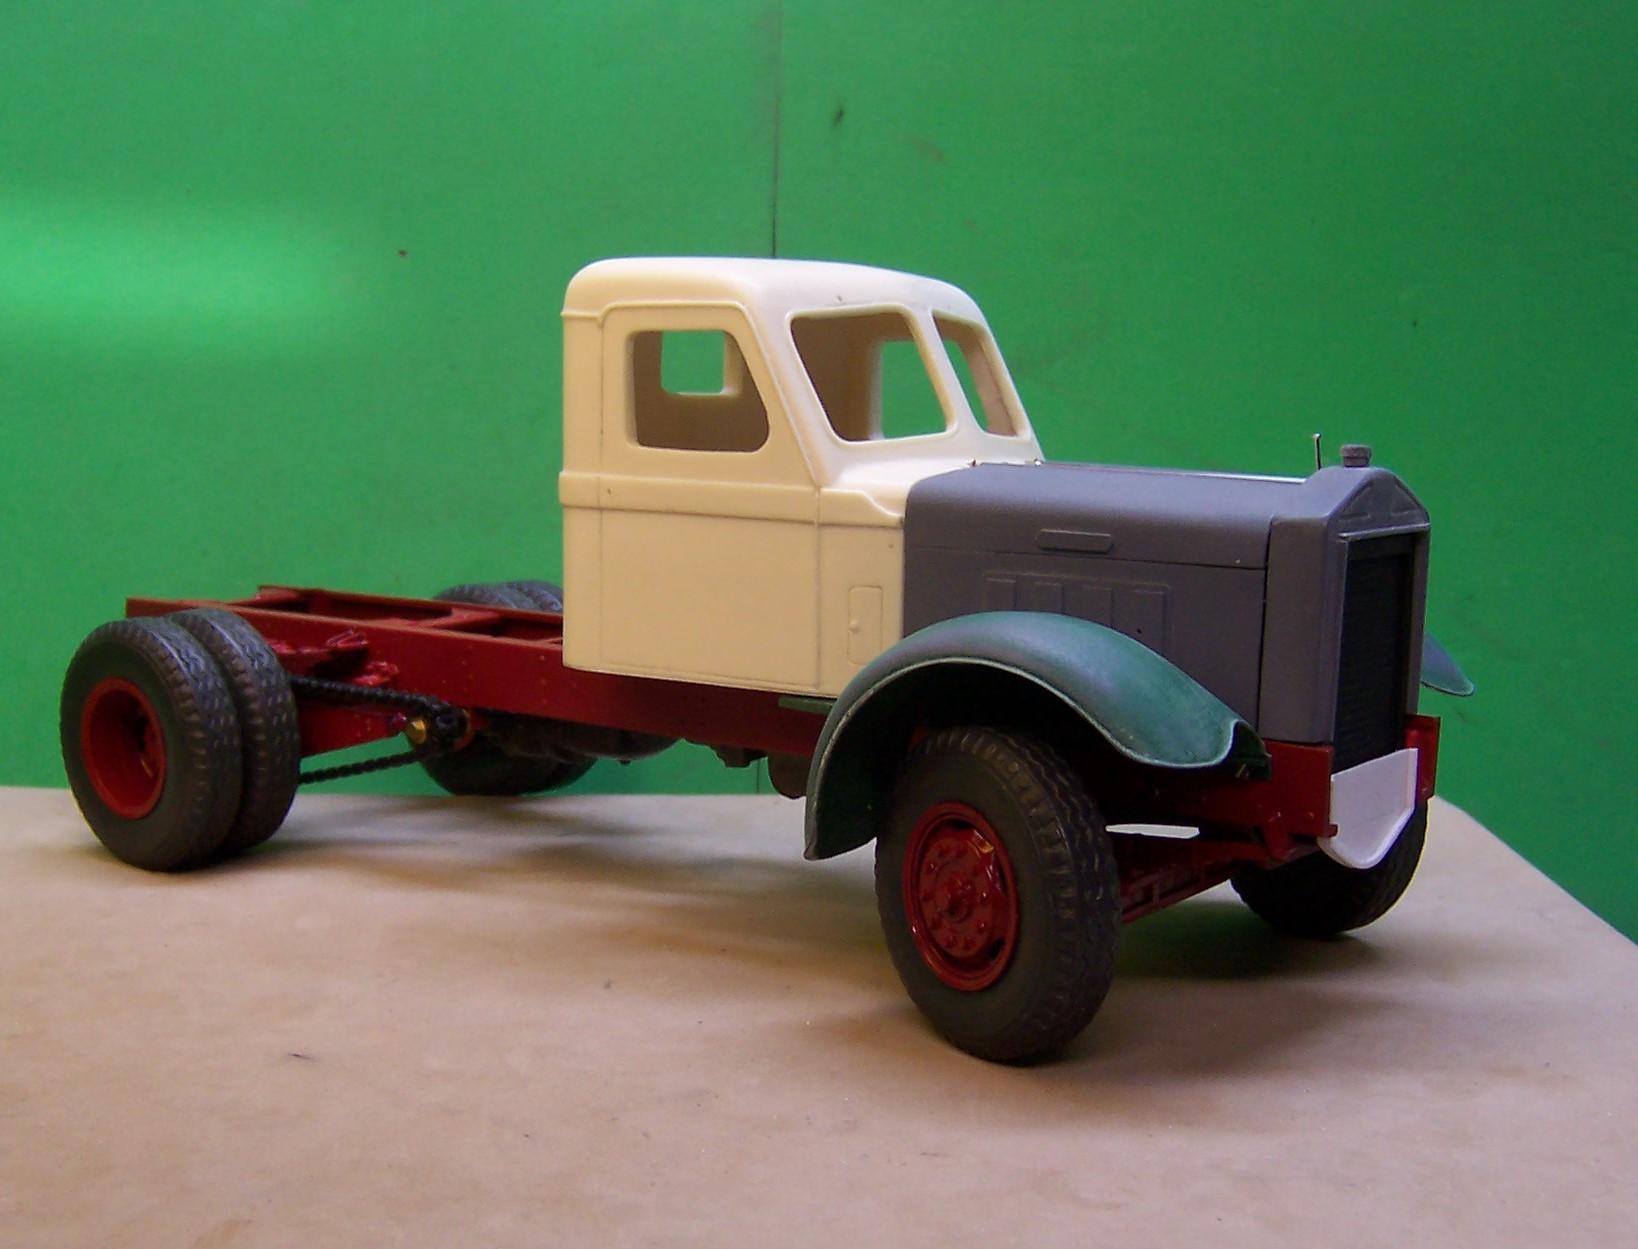
Here's the truck with the brass bumper attached. it is made of 3 pieces of flat stock soldered together with a bracket on each side behind that "bolts" to the sides of the frame.to the sides of the frame.
-
1948 Sterling HC 175
Chariots of Fire replied to Chariots of Fire's topic in WIP: Model Trucks: Big Rigs and Heavy Equipment
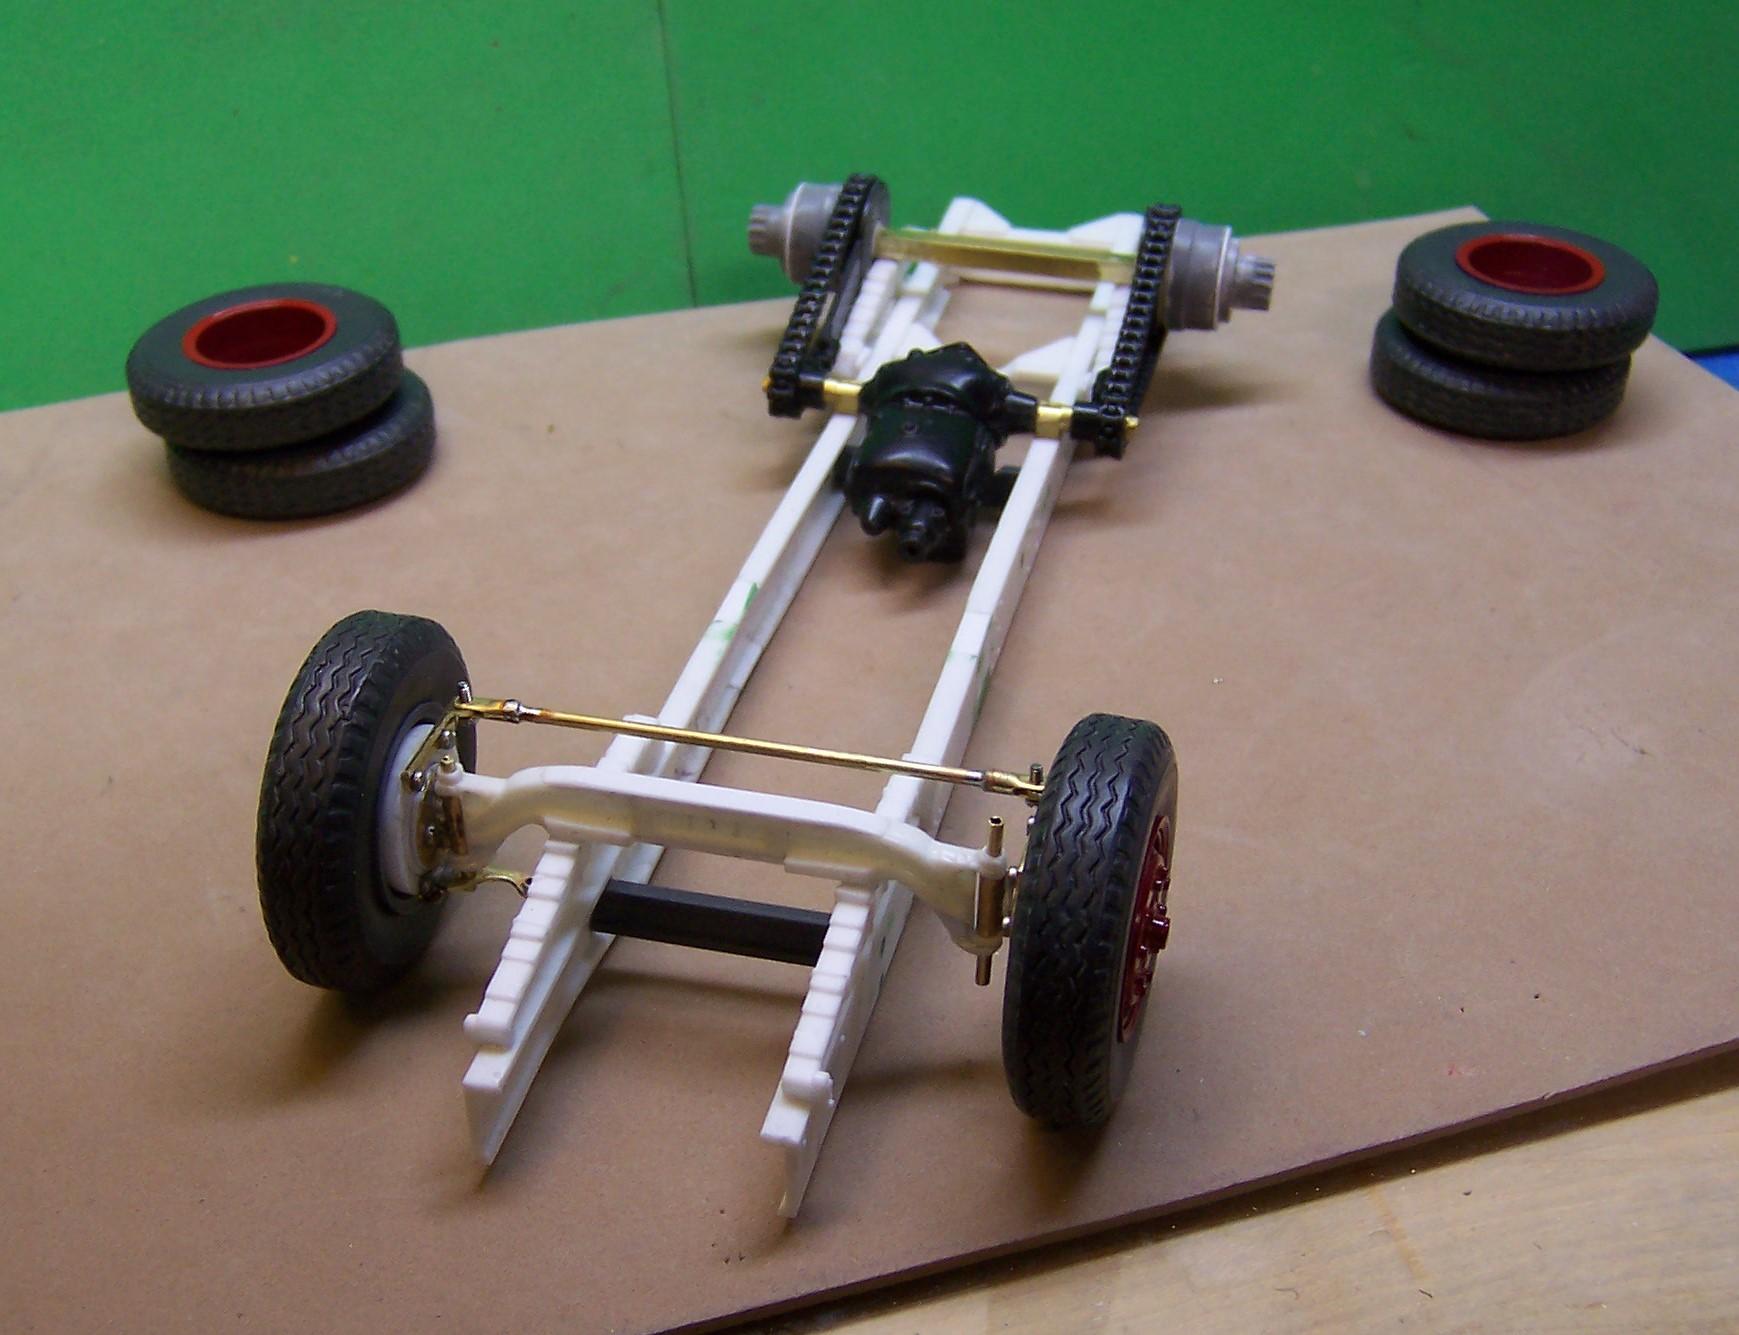
You are right, Juergen. The chain is a bit hefty but it's all they have. Each link measures about 3.5mm in length and is about 4mm wide to the outside of the pins that hold each link together. It is much larger than what is in the kit for the Monogram Mack AC but I think it is more realistic and would be beefier than the AC anyway. No resin cast parts on the Waukesha. The block and oil pan were from a Peterbilt kit. The exhaust manifold is from the Mack AC (actually 2 of them glued back to back). The rest is plastic tubing, aluminum turnings for the fan belt pulleys and some craft wire. Fan is from one of the American LaFrance fire truck kits. The brass bumper is done. I just have to let the primer dry and I'll take some photos. -
1948 Sterling HC 175
Chariots of Fire replied to Chariots of Fire's topic in WIP: Model Trucks: Big Rigs and Heavy Equipment
Thanks, Tim. We'll keep it moving! Right now I'm working on replacing the resin front bumper with one made of brass. The resin one does not have the curved ends like the ones I see in the Sterling Photos. More postings to follow. -
1948 Sterling HC 175
Chariots of Fire replied to Chariots of Fire's topic in WIP: Model Trucks: Big Rigs and Heavy Equipment
Got the chain and sprockets from Micro-mark. I used the #8 and #20 sprockets that have a 1/8" diameter center hole. Makes attaching to an axle real easy. The chain only is sold in 12" lengths but it comes apart easy and can go back to any length you want. -
1948 Sterling HC 175
Chariots of Fire replied to Chariots of Fire's topic in WIP: Model Trucks: Big Rigs and Heavy Equipment
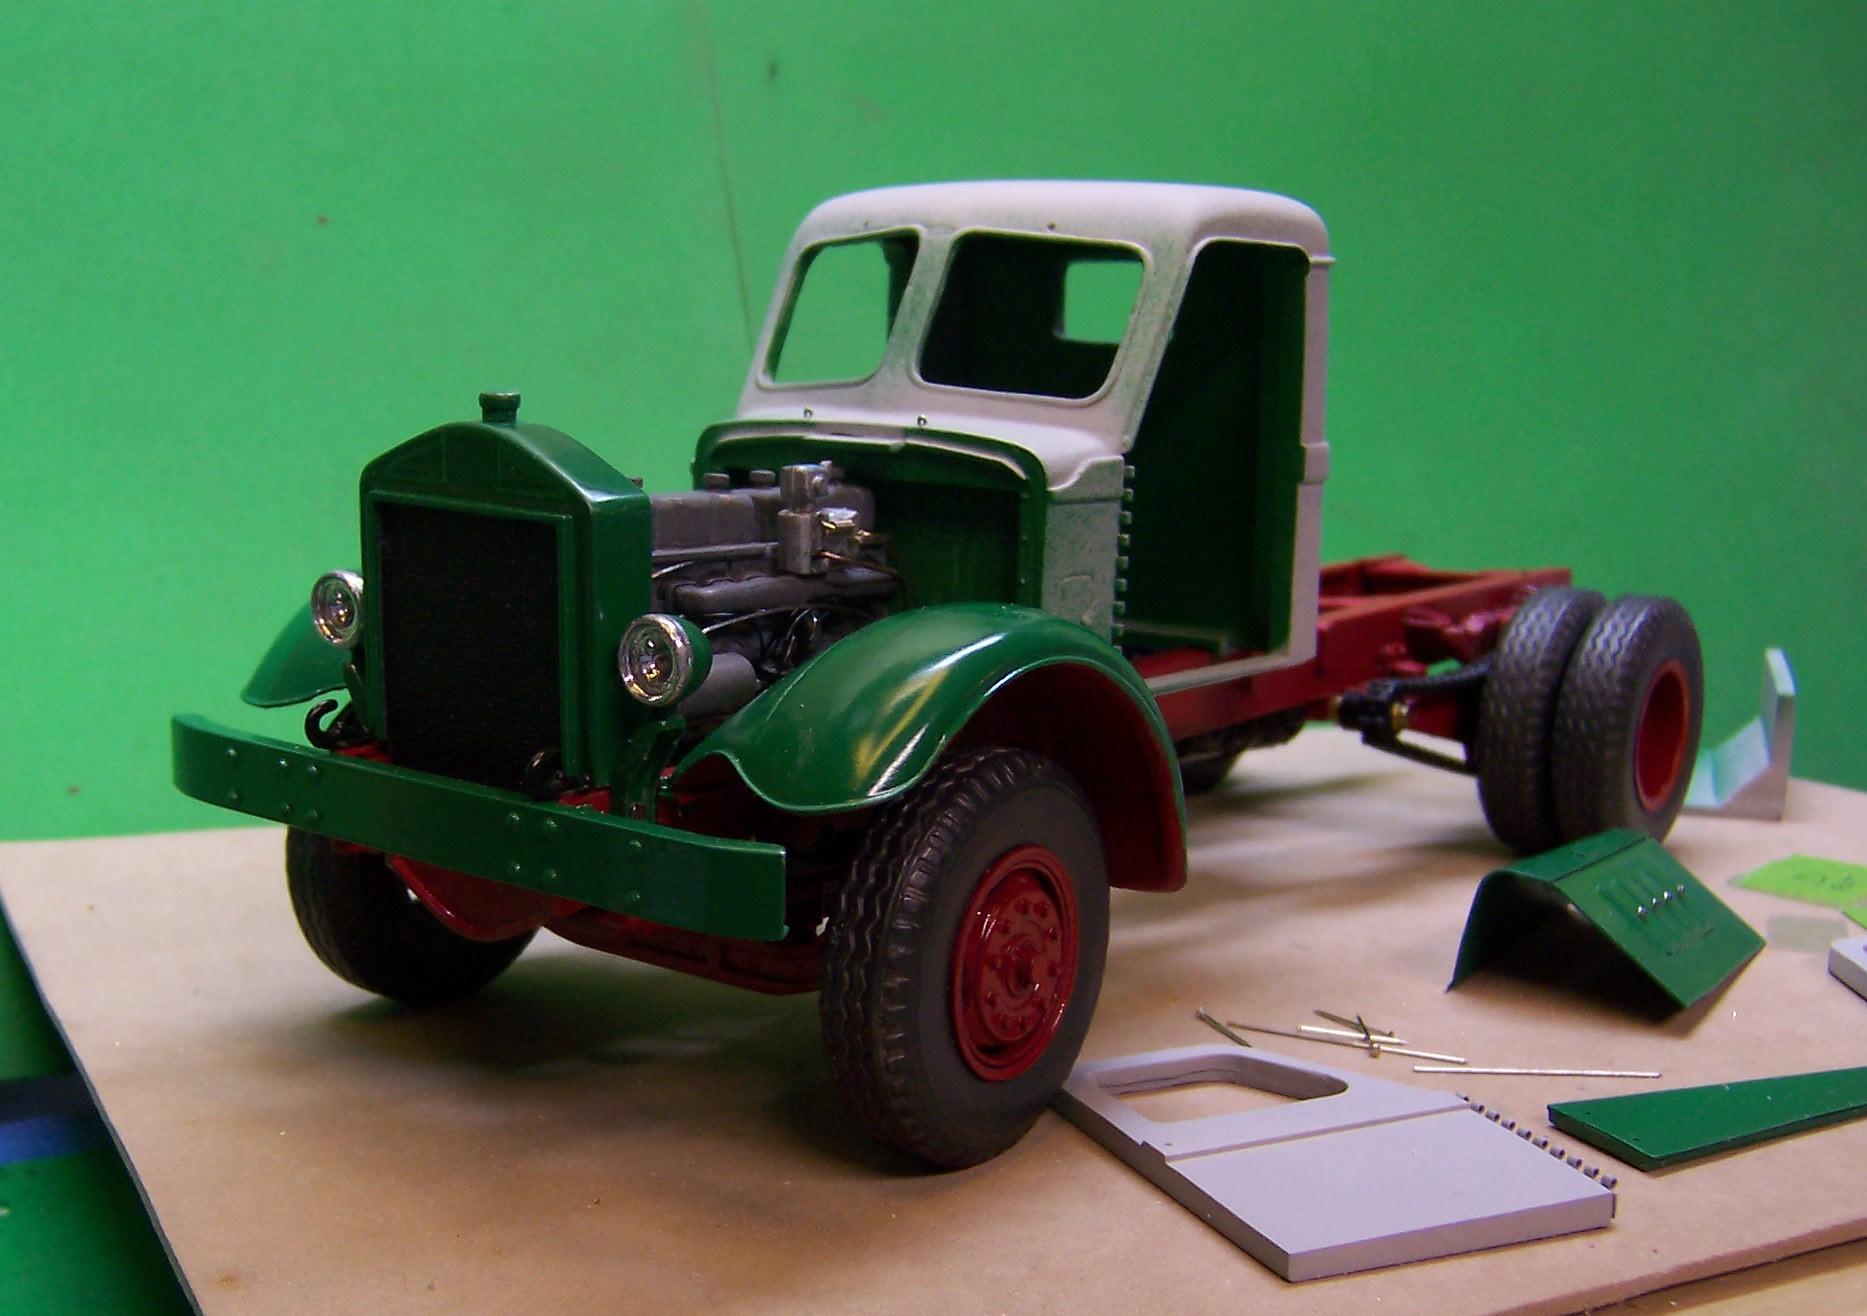
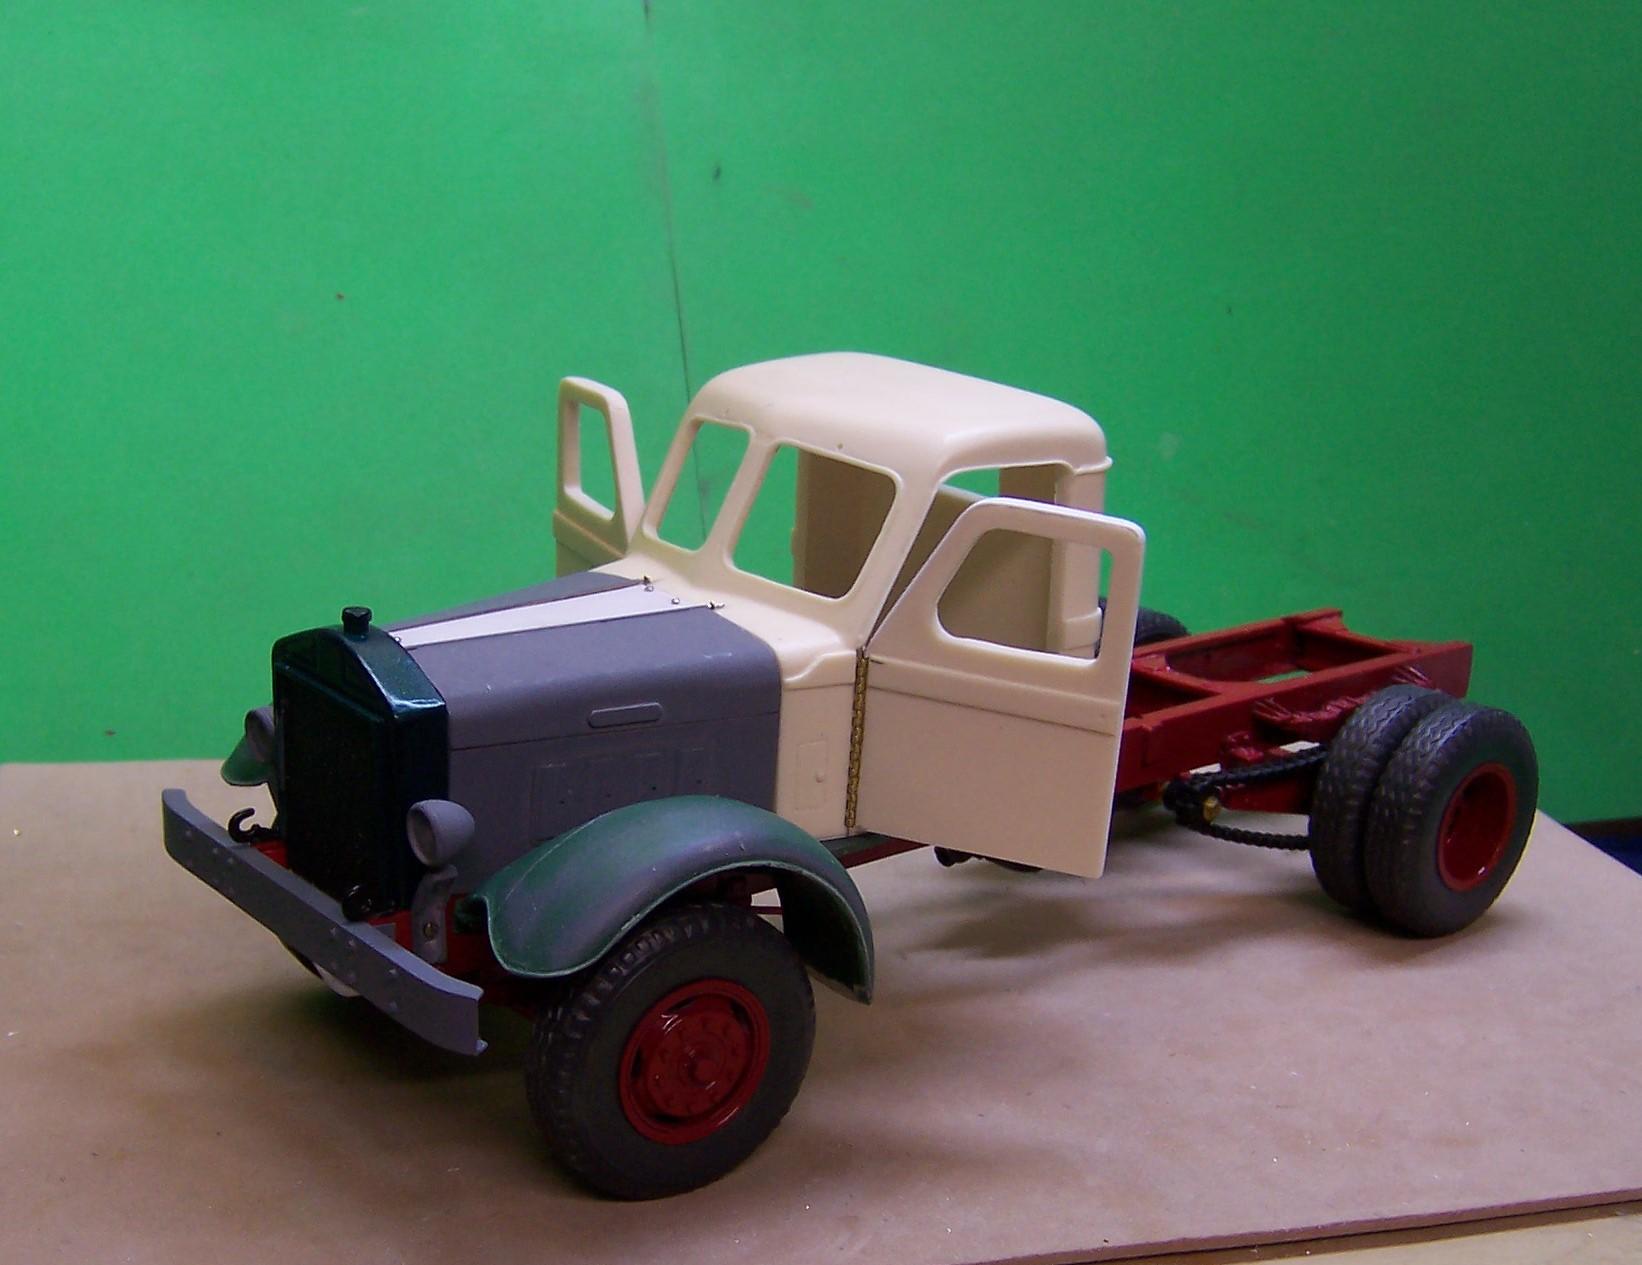
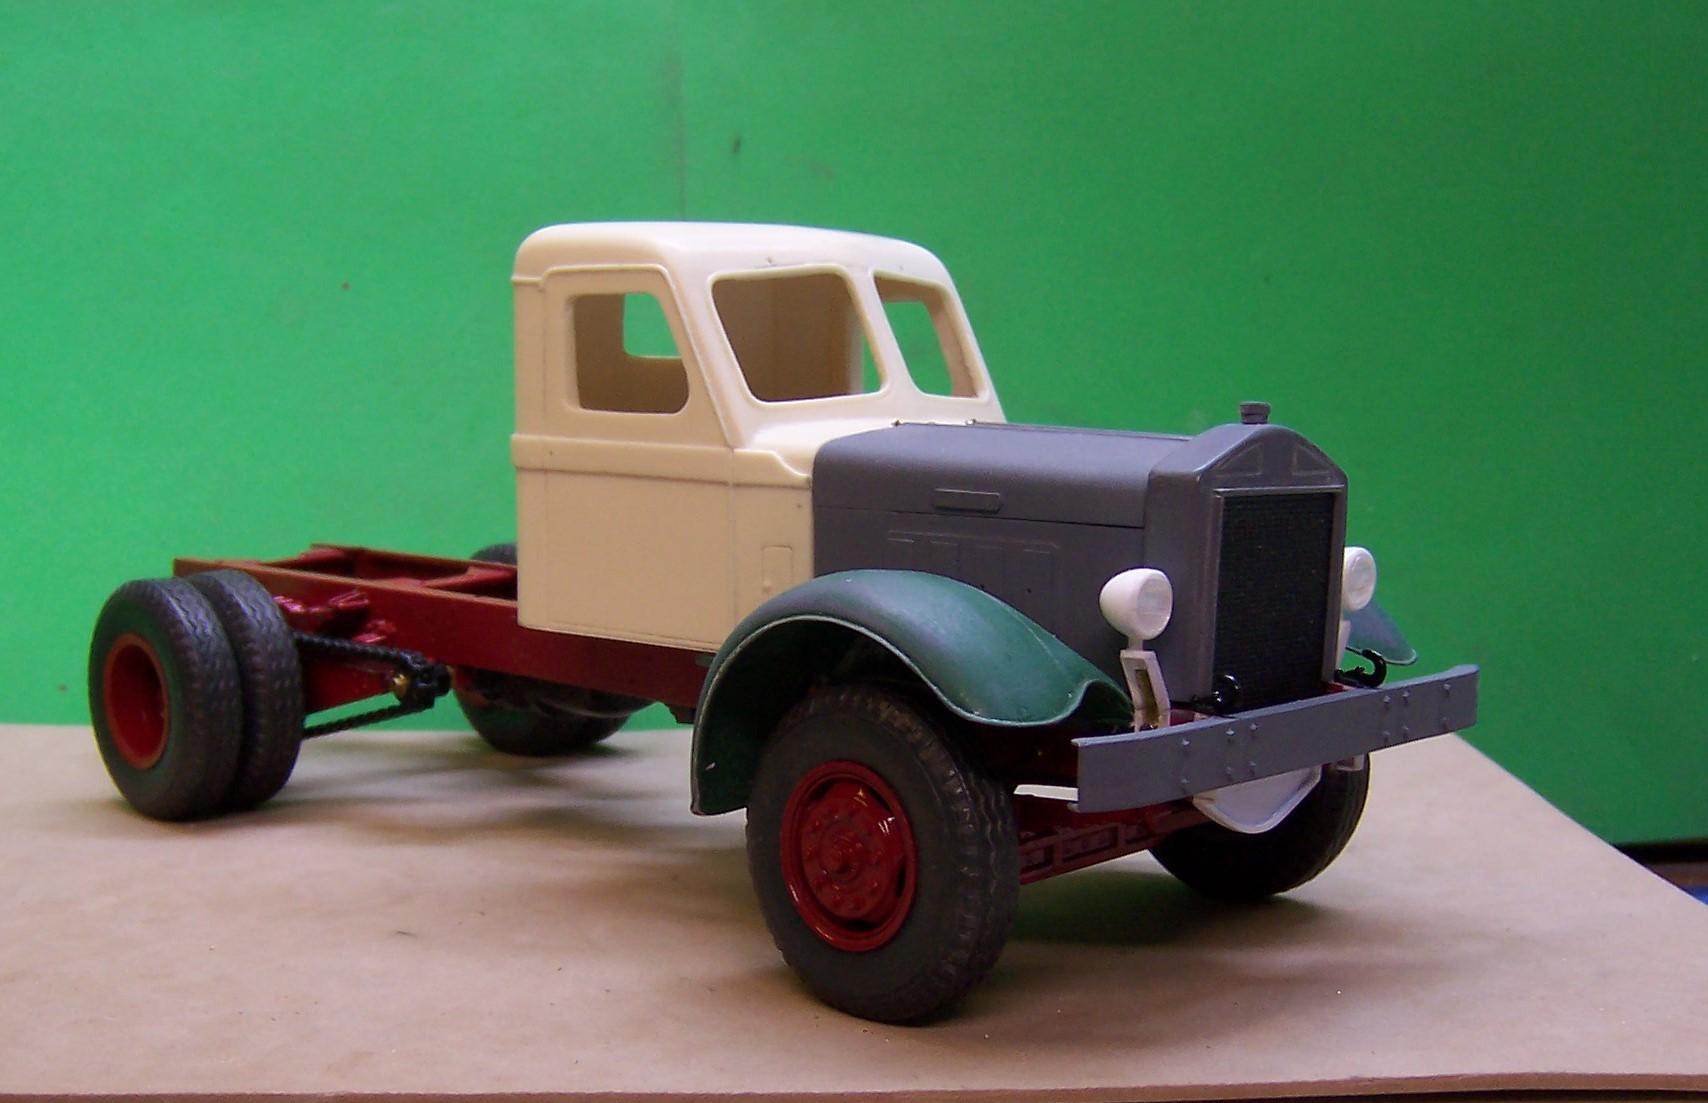
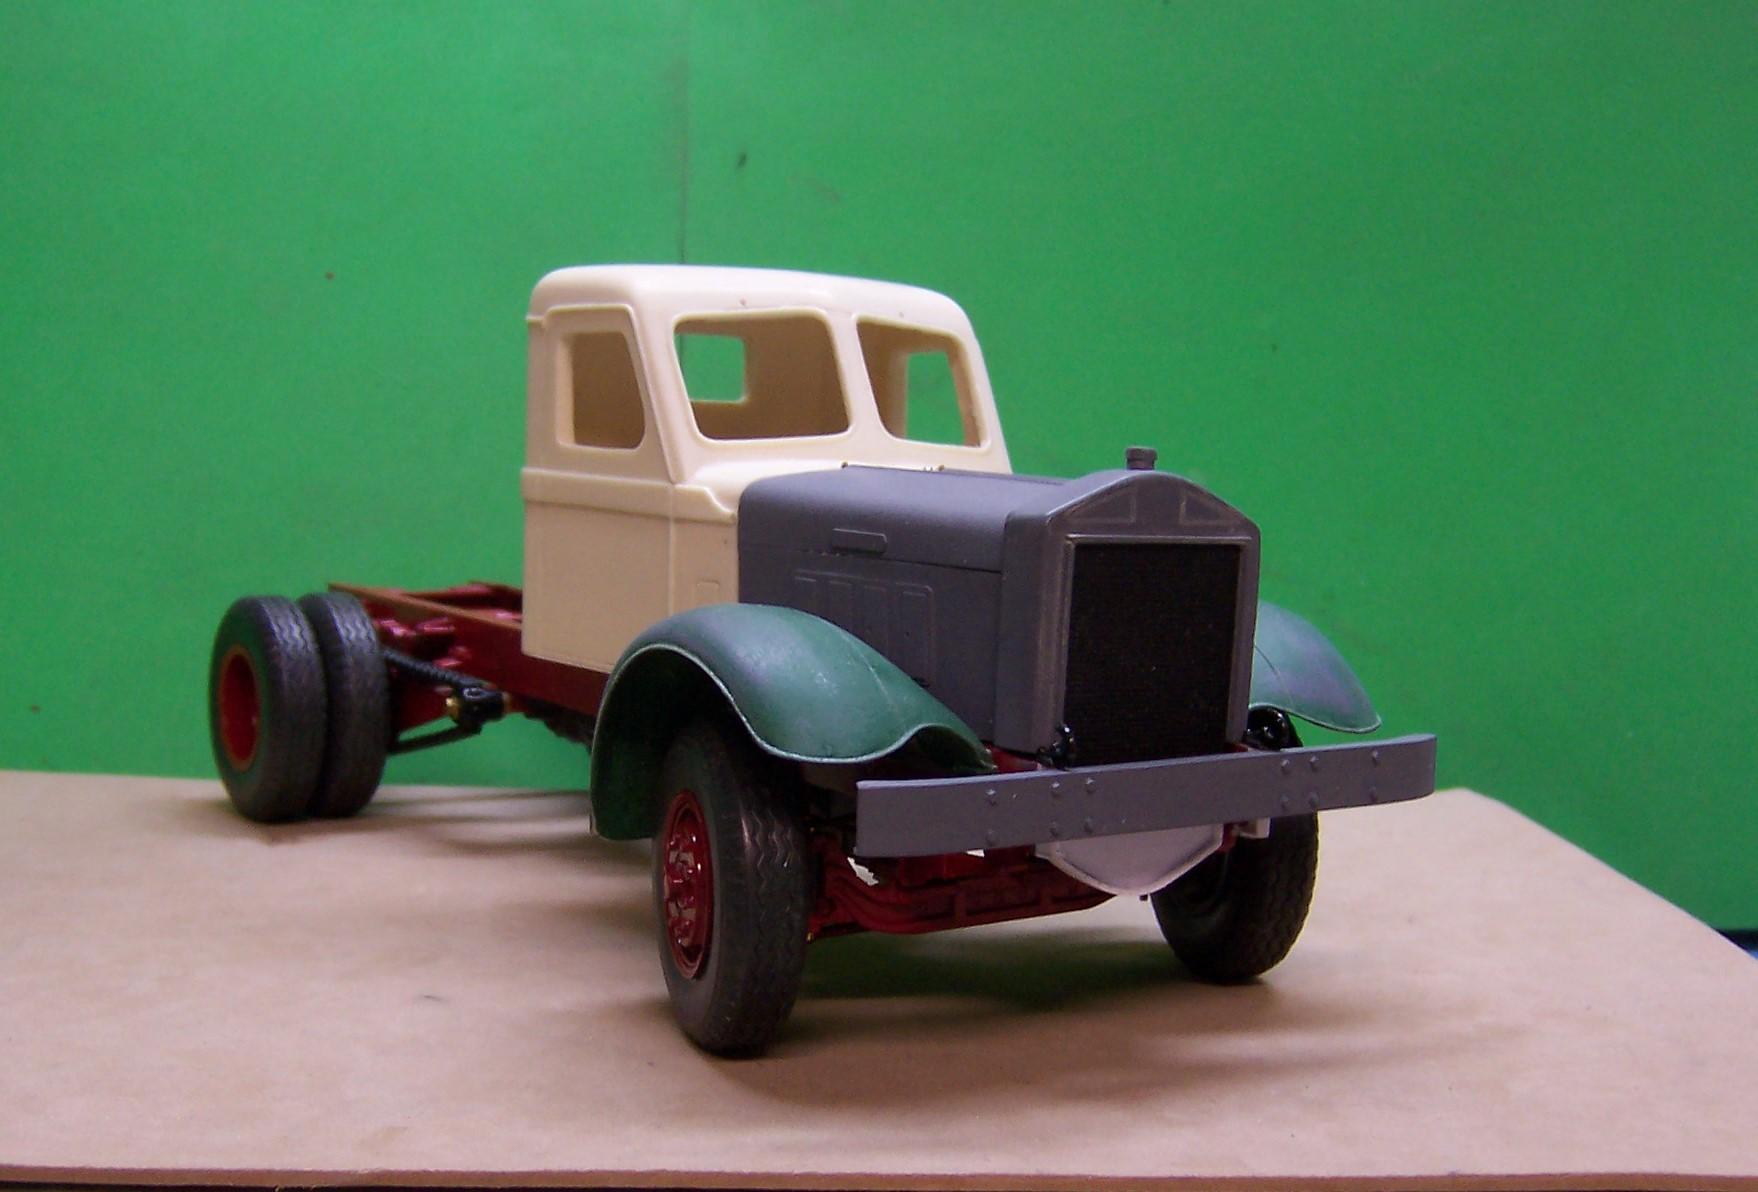
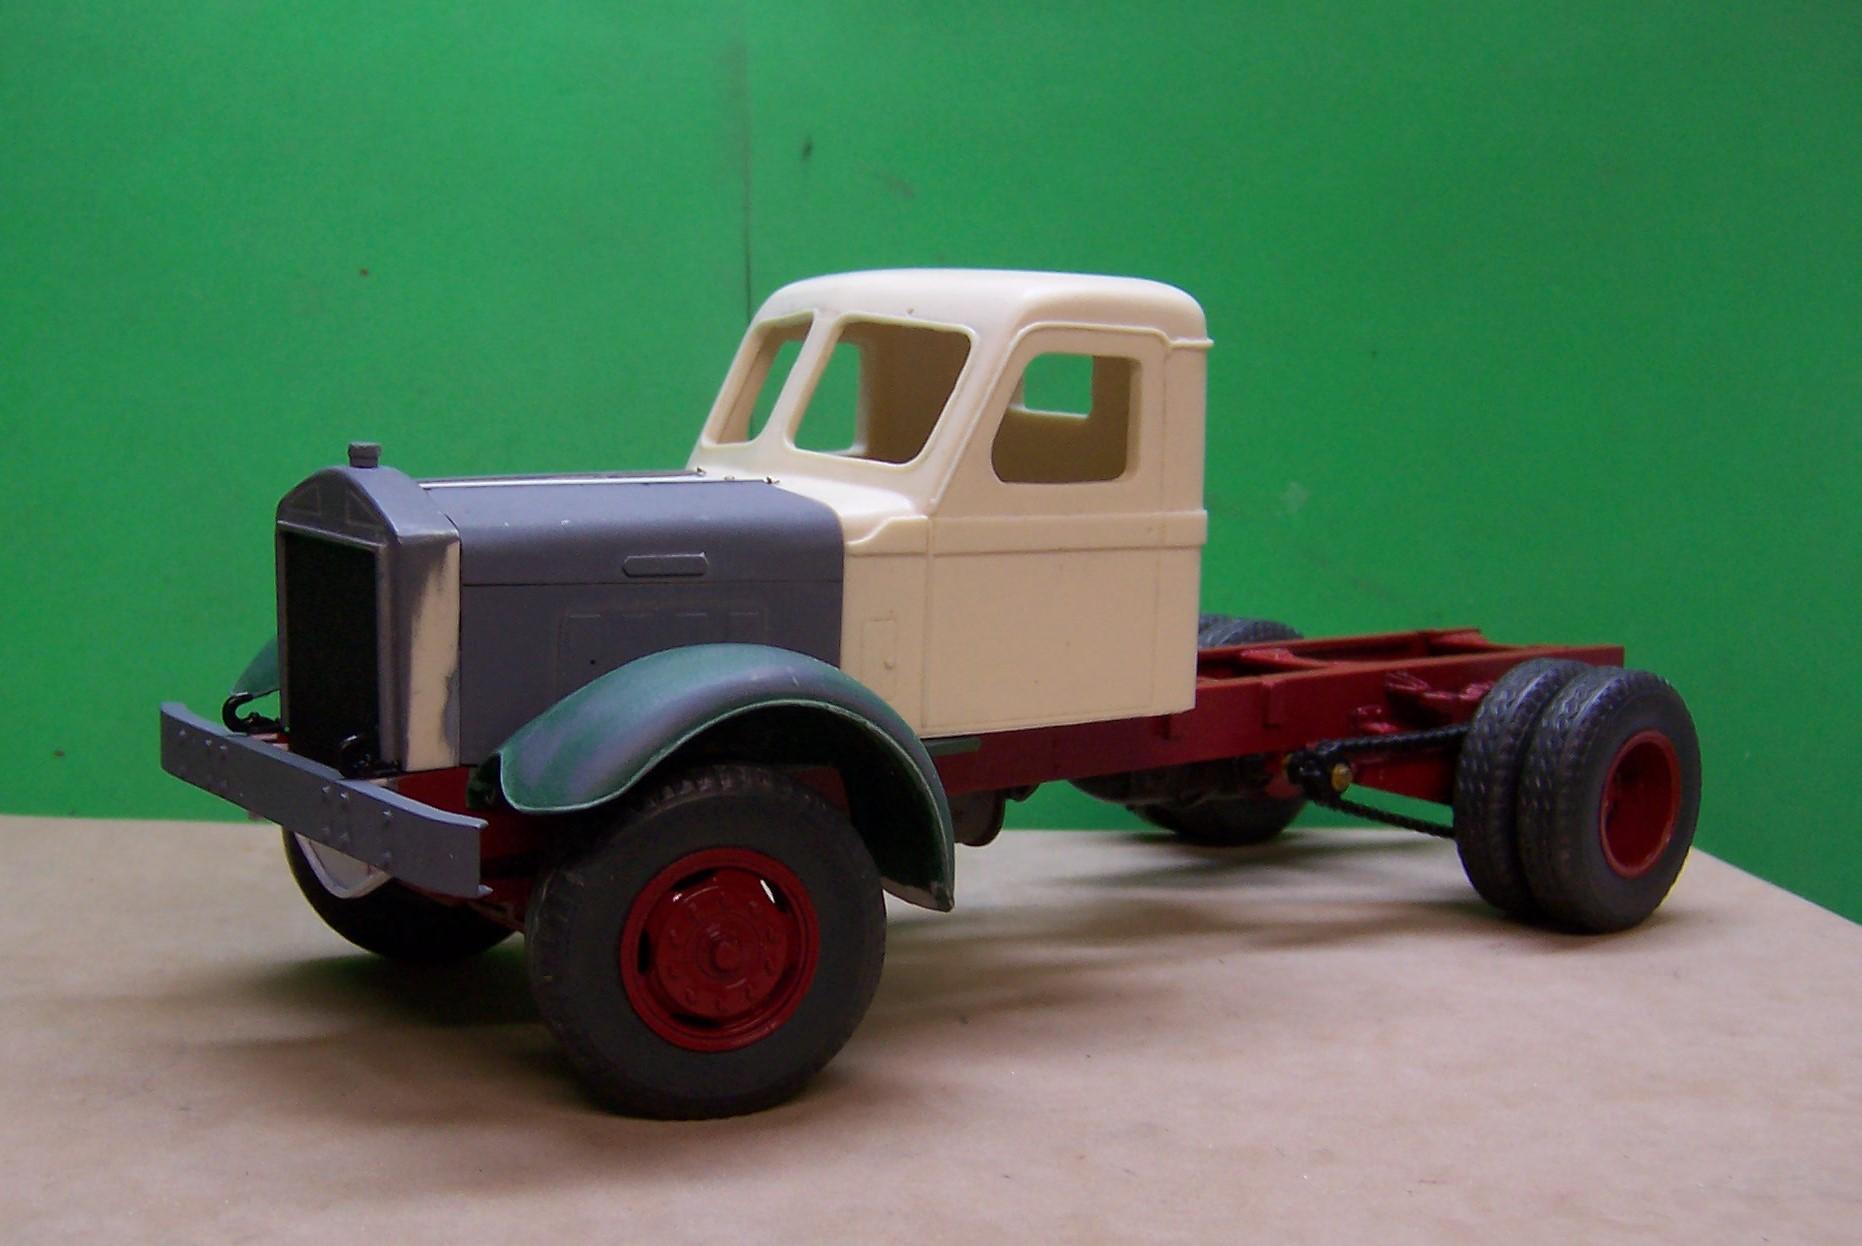
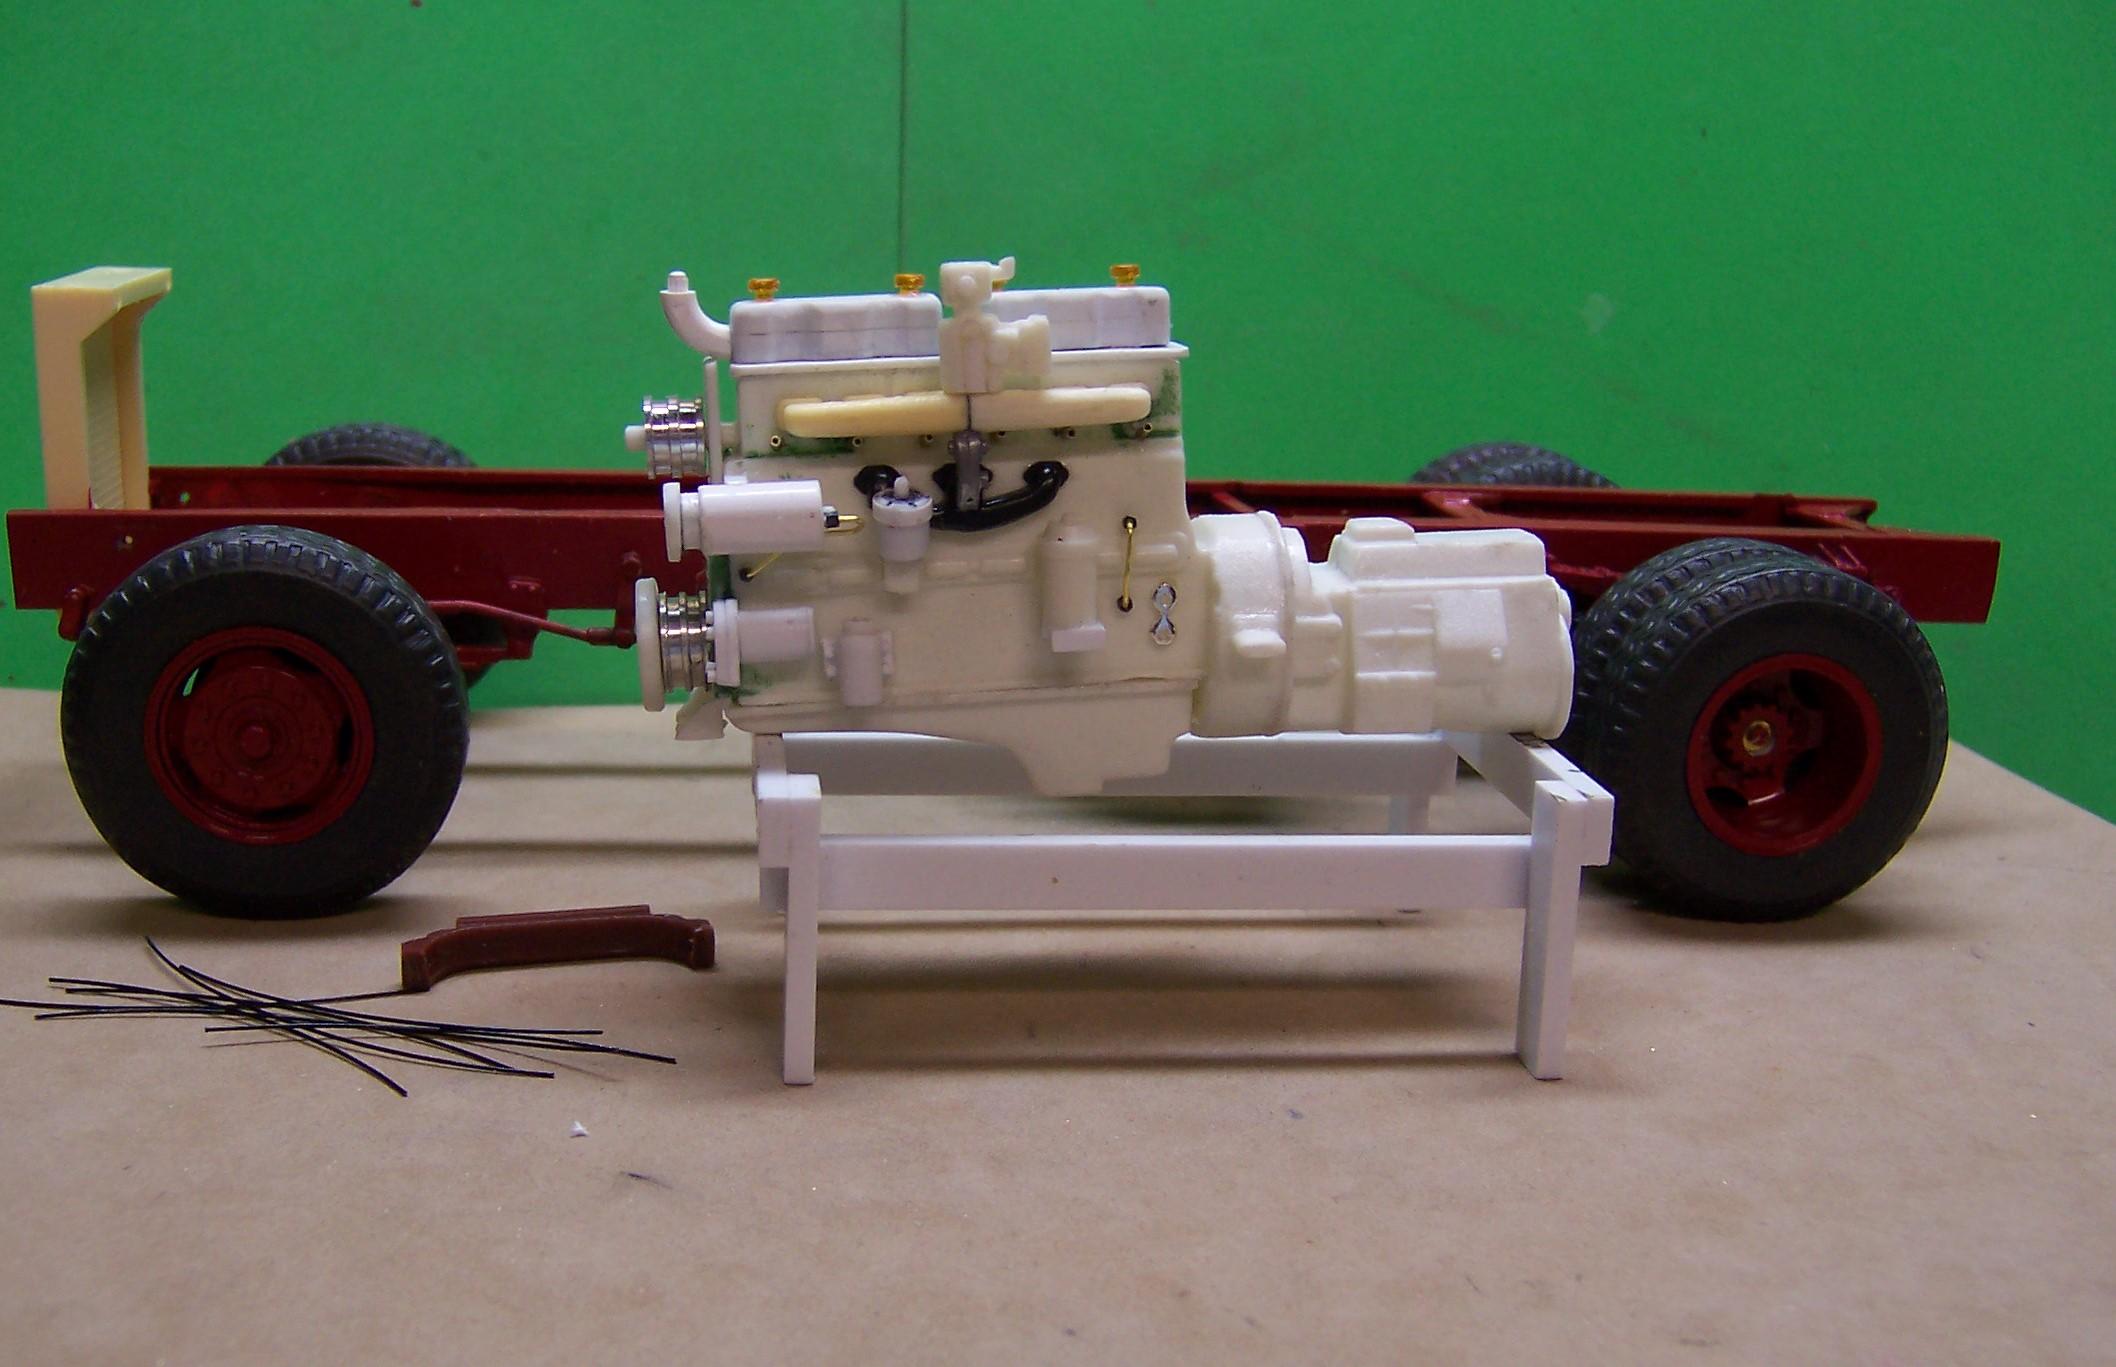
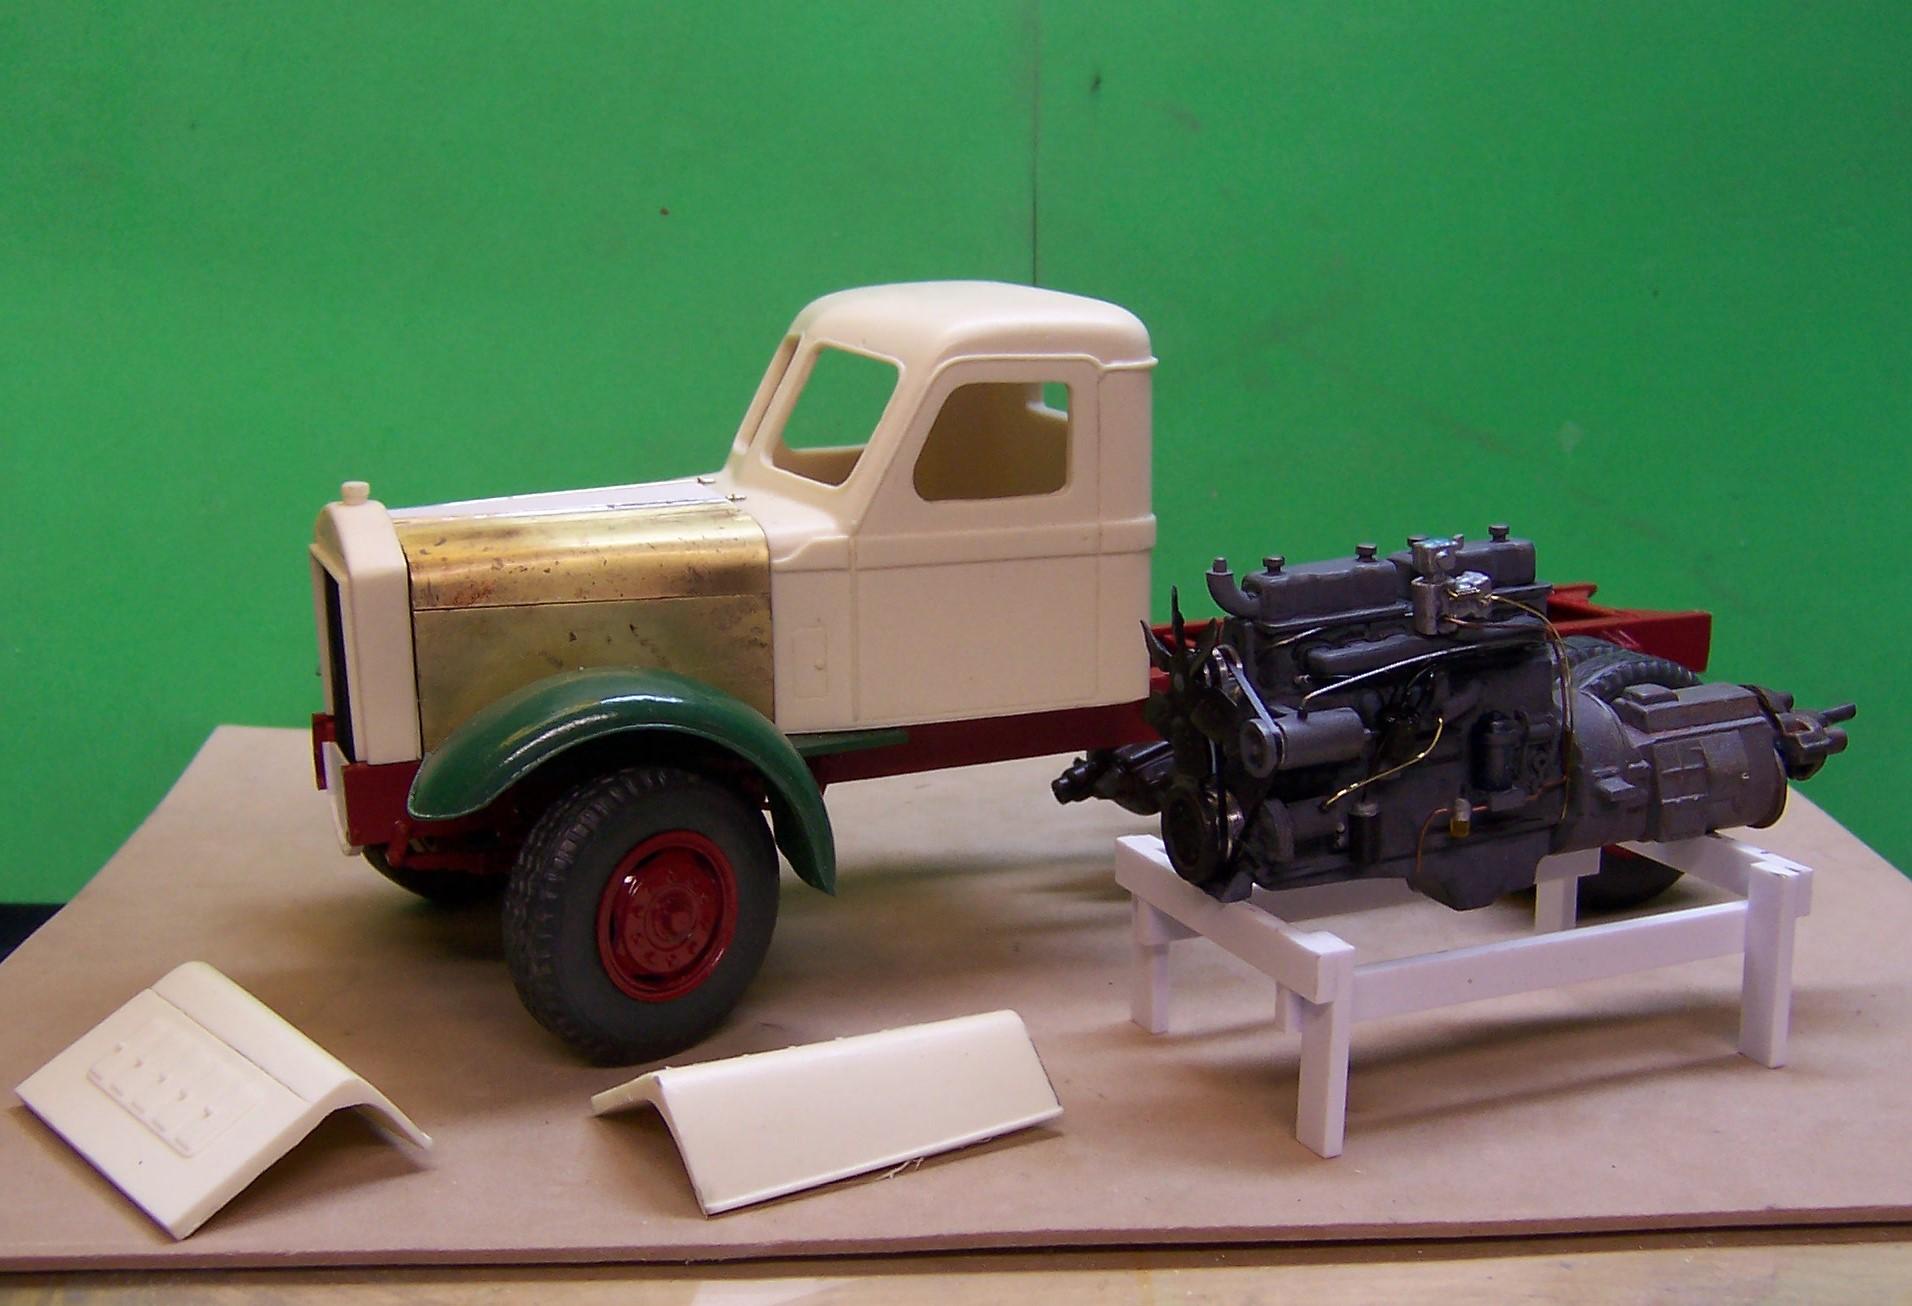
Progress has been slow on this one. LIttle things just seemed to get in the way. But we move on. The hood was cut clear of the radiator and cowl so that opening hood sides could be made of brass. The engine is basically done and represents a Waukesha 6 cylinder gas engine of the period. Now the cab and radiator have to be set with some locator pins for final fit of the hood sides. Fan belt pulleys are turned aluminum. A piece of electrical tape sliced into a thin strip can be wound around like a belt. The engine is painted and wired. The basic hood sides have been formed with a small piano hinge connecting the top pieces to the side pieces. A small brass tube was soldered to the opposite side of the top pieces and a stainless rod slides through into holes in the radiator and cowl. I painted the fenders with primer and then some Duplicolor general purpose green. But it took forever to set up. So I need to take a trip to the auto parts store and get some Duplicolor automotive paint. Much better to use. Hood sides have the louvers in place and the Sterling name plate above. Once painted a decal will be made up for the name plate using black and silver. We'll see how Molotow chrome works on the top of the radiator shell. The fenders have now been sanded down getting rid of the bad and rough glossy look. New paint should be a lot better.
-
AMT 1950 Chevy Truck
Chariots of Fire replied to jdhog's topic in WIP: Model Trucks: Pickups, Vans, SUVs, Light Commercial
That's purrrrty! -
Looking pretty nice. Was the engine and pump for the de-icing equipment mounted in the very back in that area that has the grill?
-
New Dodge build
Chariots of Fire replied to Repstock's topic in WIP: Model Trucks: Big Rigs and Heavy Equipment
I think it is fine the way it is. You have put so much time into it so far it would be a shame to cover it all up with just a box. I go for the ramp truck as well since it would be movable to show off all the detail underneath. Weather the bed with a light touch of rust here and there and just a small amount of dirt where tires might end up on a damaged vehicle. A small amount of grease on the winch cable...……..etc. -
1948 Sterling HC 175
Chariots of Fire replied to Chariots of Fire's topic in WIP: Model Trucks: Big Rigs and Heavy Equipment
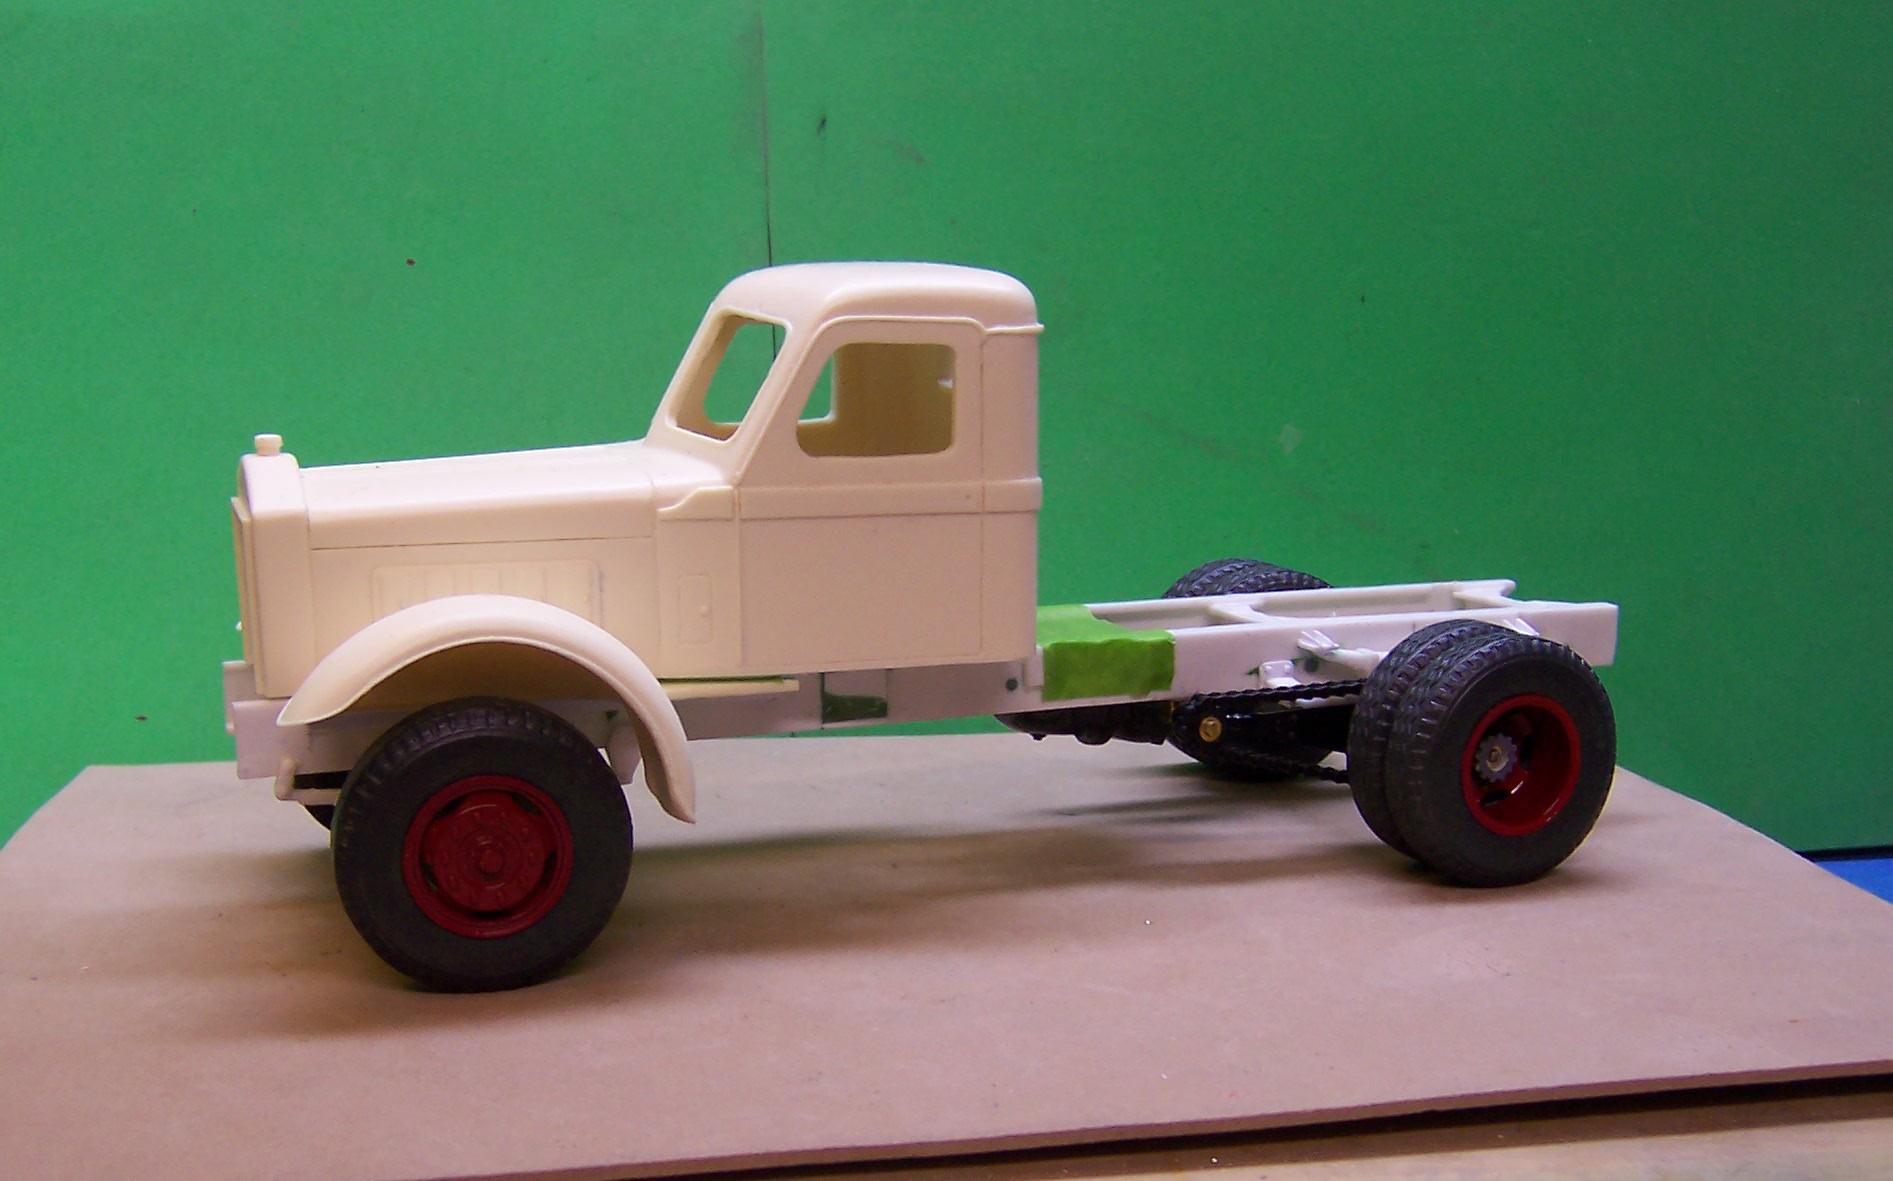
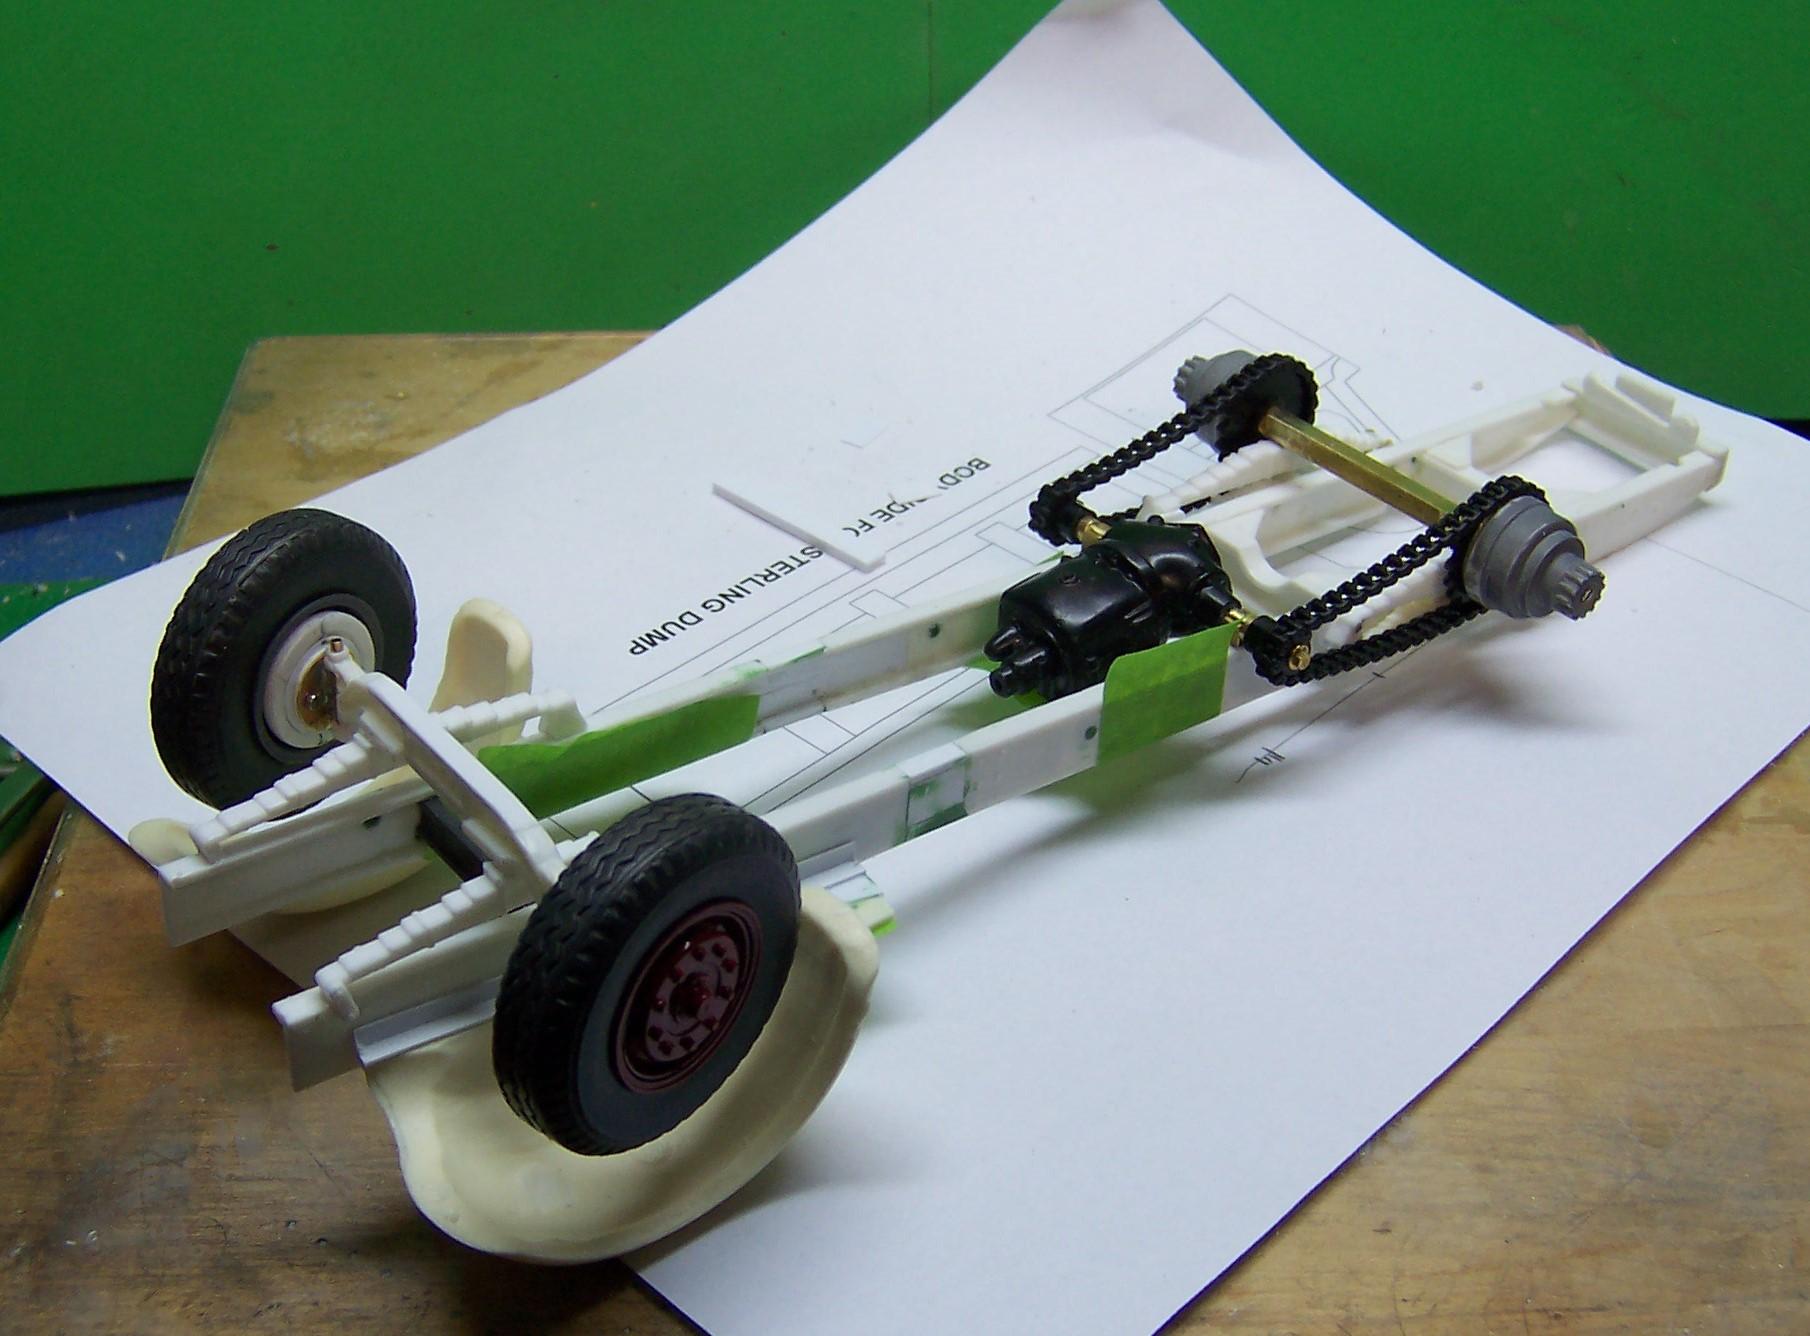
Got a bit more done on the frame and axle setup. Slack adjusters were added to the rear axle and the front axle now is steerable and the tie rod is set in place. I used a lot of little screws to put the brass parts together against plastic. Pretty solid. When it is ready for final assembly I will superglue the brass to plastic as well as the screws. But for the number of times I've taken things apart for fitting, the glue is on hold for now.
-
Finally got some work done on the Sterling. It took some fiddling to get the height right. Working with just photos is a bit more difficult than being able to adjust from actual measurements in the field. But we're getting there. The original cab casting had about 1/4" more material under the hood and doors. I cut that away the way that many of the trucks show in photos. Thinking of removing the hood and making it out of brass sheet with opening louvers. Probably the cab doors will open as well. The frame is from a stash kit but the back end needs to be cut off for a dump version. The springs are from an AMT ALF kit with the back ones modified with some helpers. The front axle is from a similar kit but has working knuckles with the aid of brass tubing. Tie rod and steering linkage still to come. The jackshaft is from the Mack AC kit. Sprockets and chains are from Micro-Mark. Wheels are from the AMT ALF kit and the tires are resin castings to a scale 41" diameter.
-
Mashpee Breaker 354
Chariots of Fire replied to Chariots of Fire's topic in WIP: Model Trucks: Big Rigs and Heavy Equipment
Check it out in the finished projects. Lots more to see than here. -
Talk to me about hard lines
Chariots of Fire replied to Monty's topic in Model Building Questions and Answers
I use craft wire and bead wire all the time. Some is mylar coated and looks great for winch cable. The brass and copper wire are good as well as the solder wire. All are soft and bend easily but once bent hold their shape. Paper clip wire is too heavy and not easy to bend as has been suggested.