Chariots of Fire
-
Posts
2,782 -
Joined
-
Last visited
Content Type
Profiles
Forums
Events
Gallery
Everything posted by Chariots of Fire
-

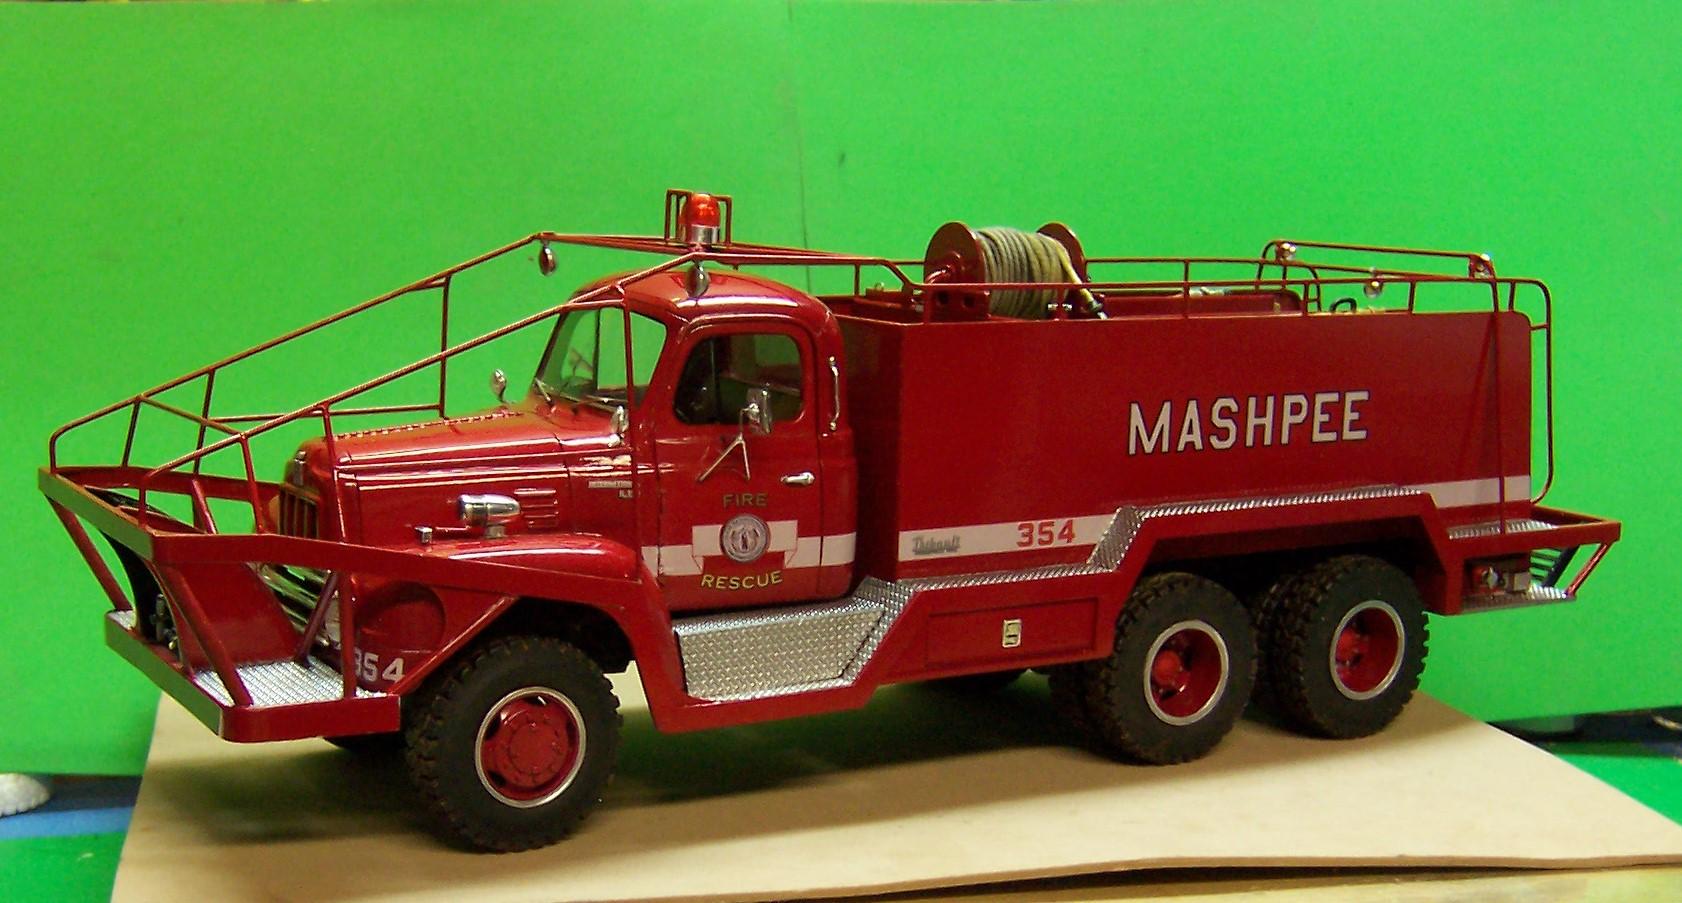
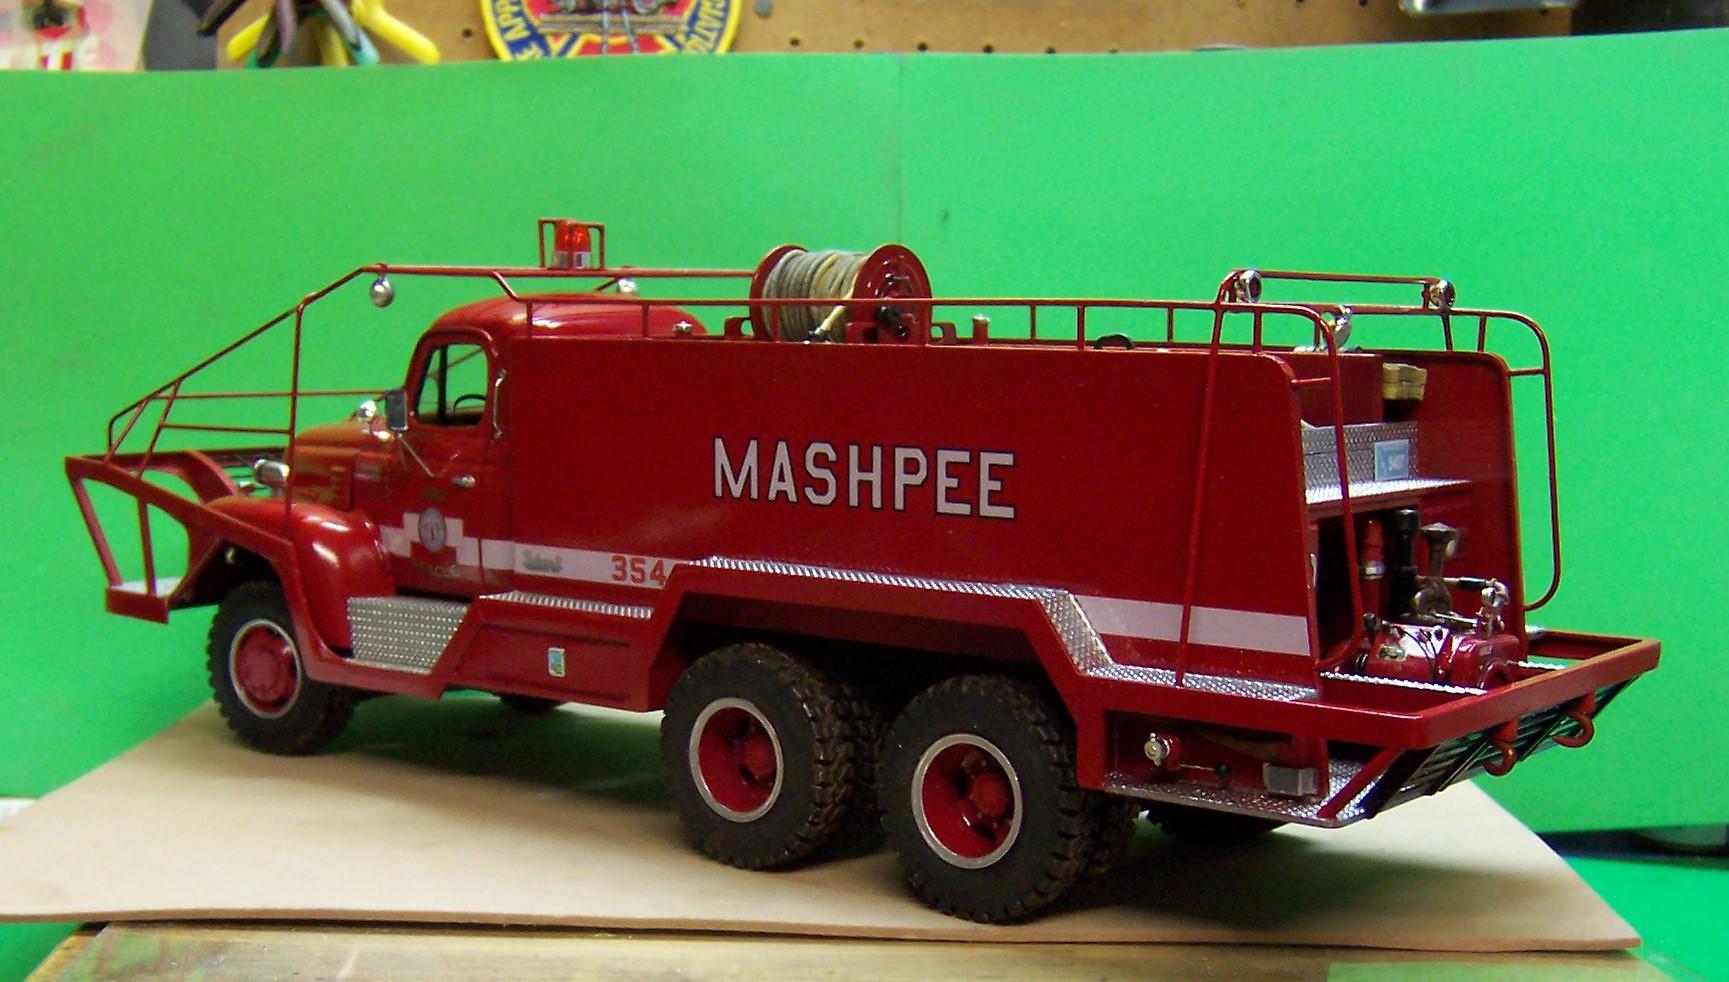
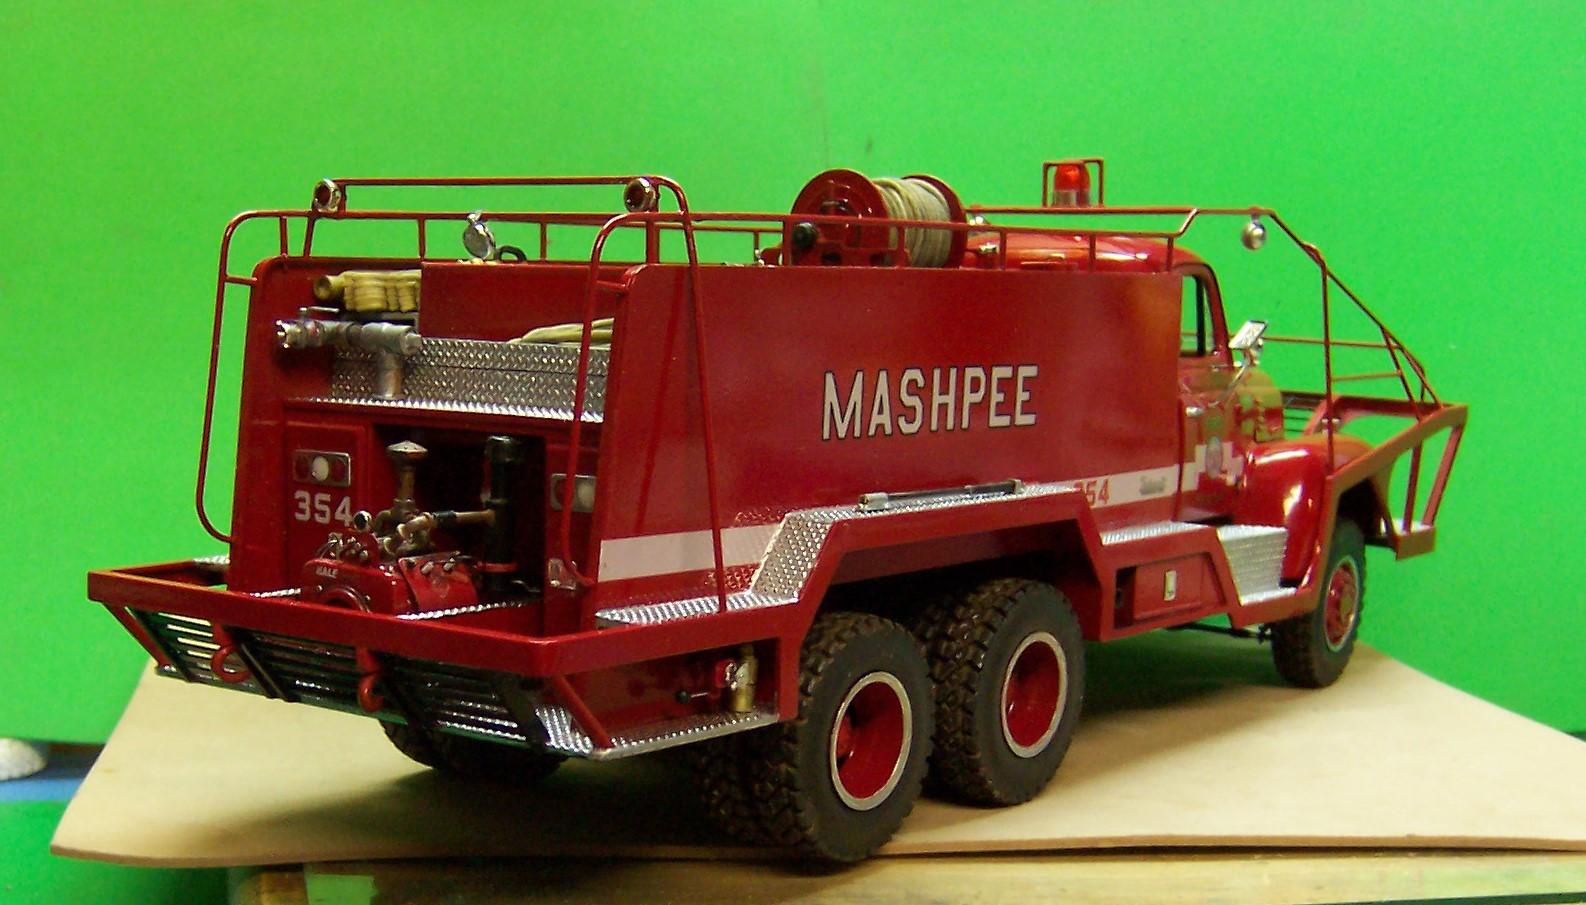
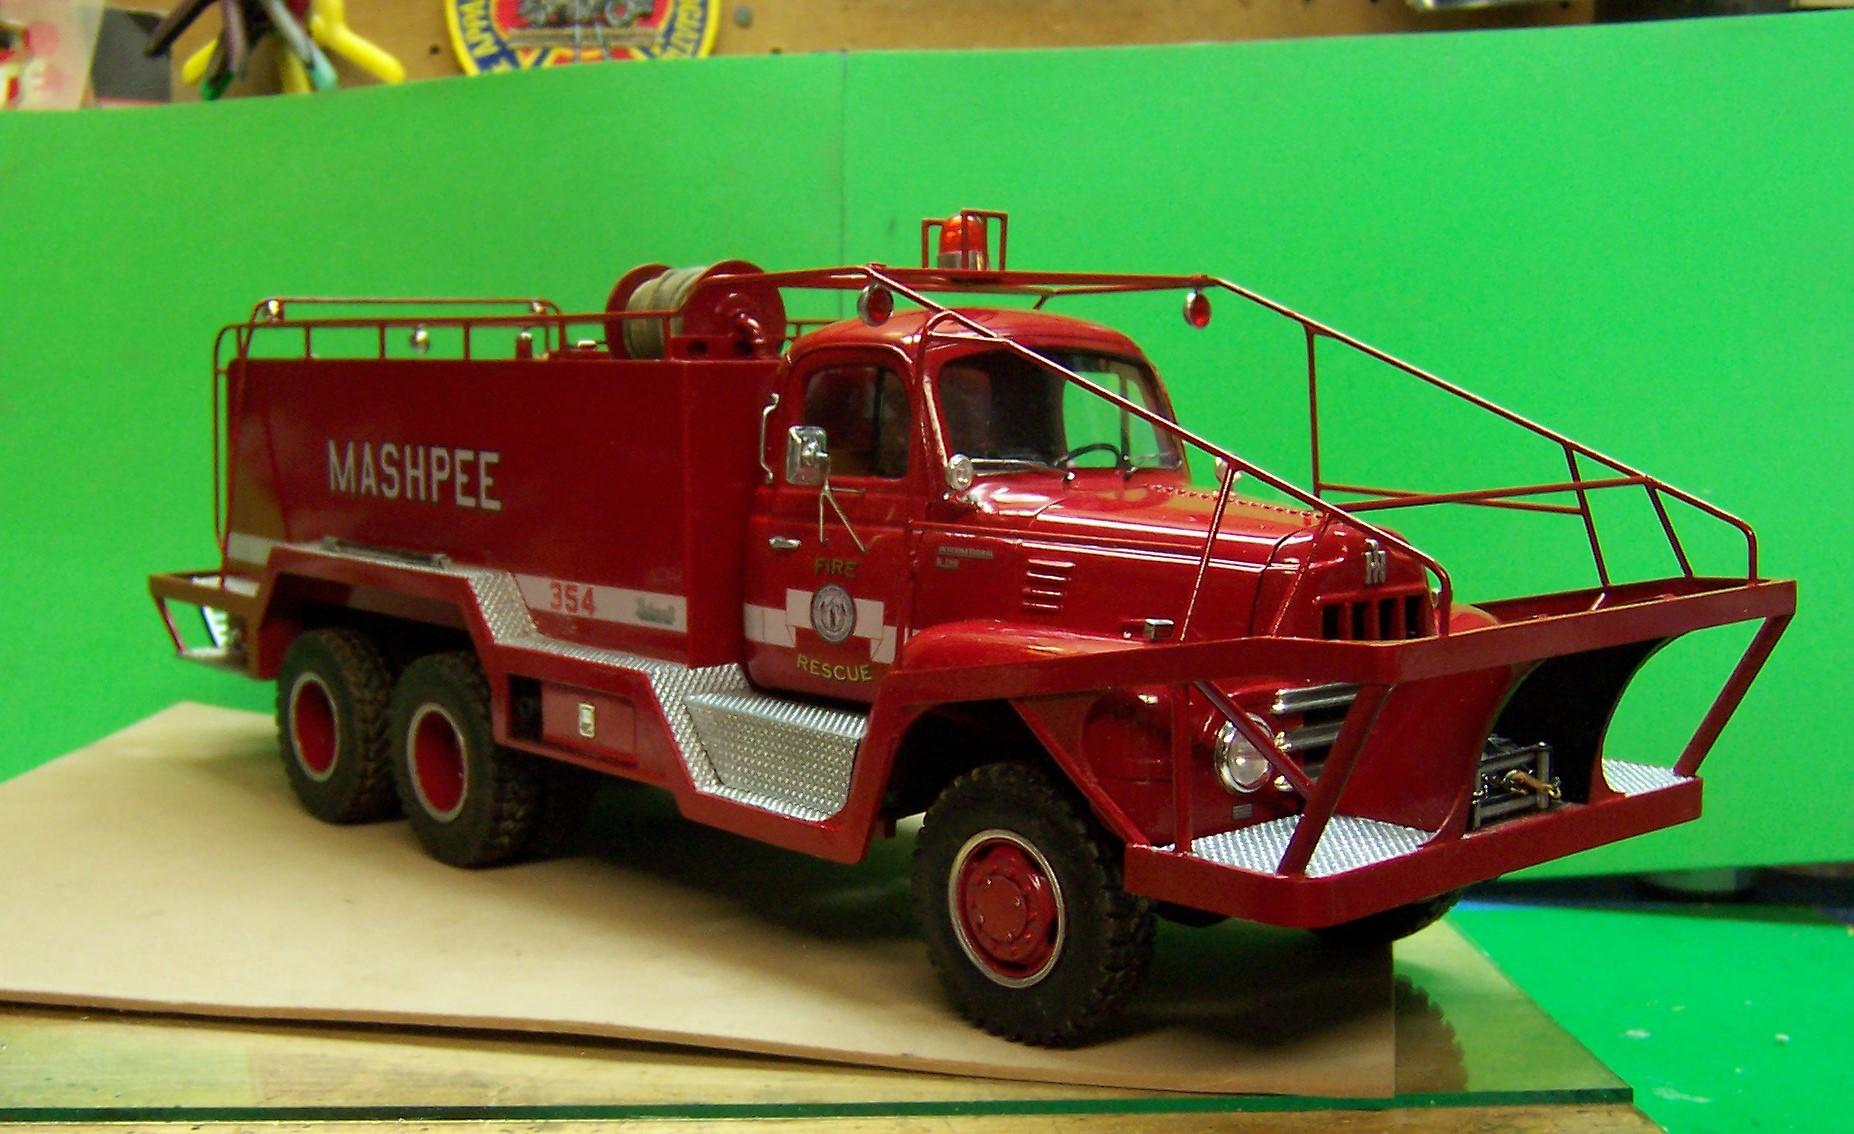
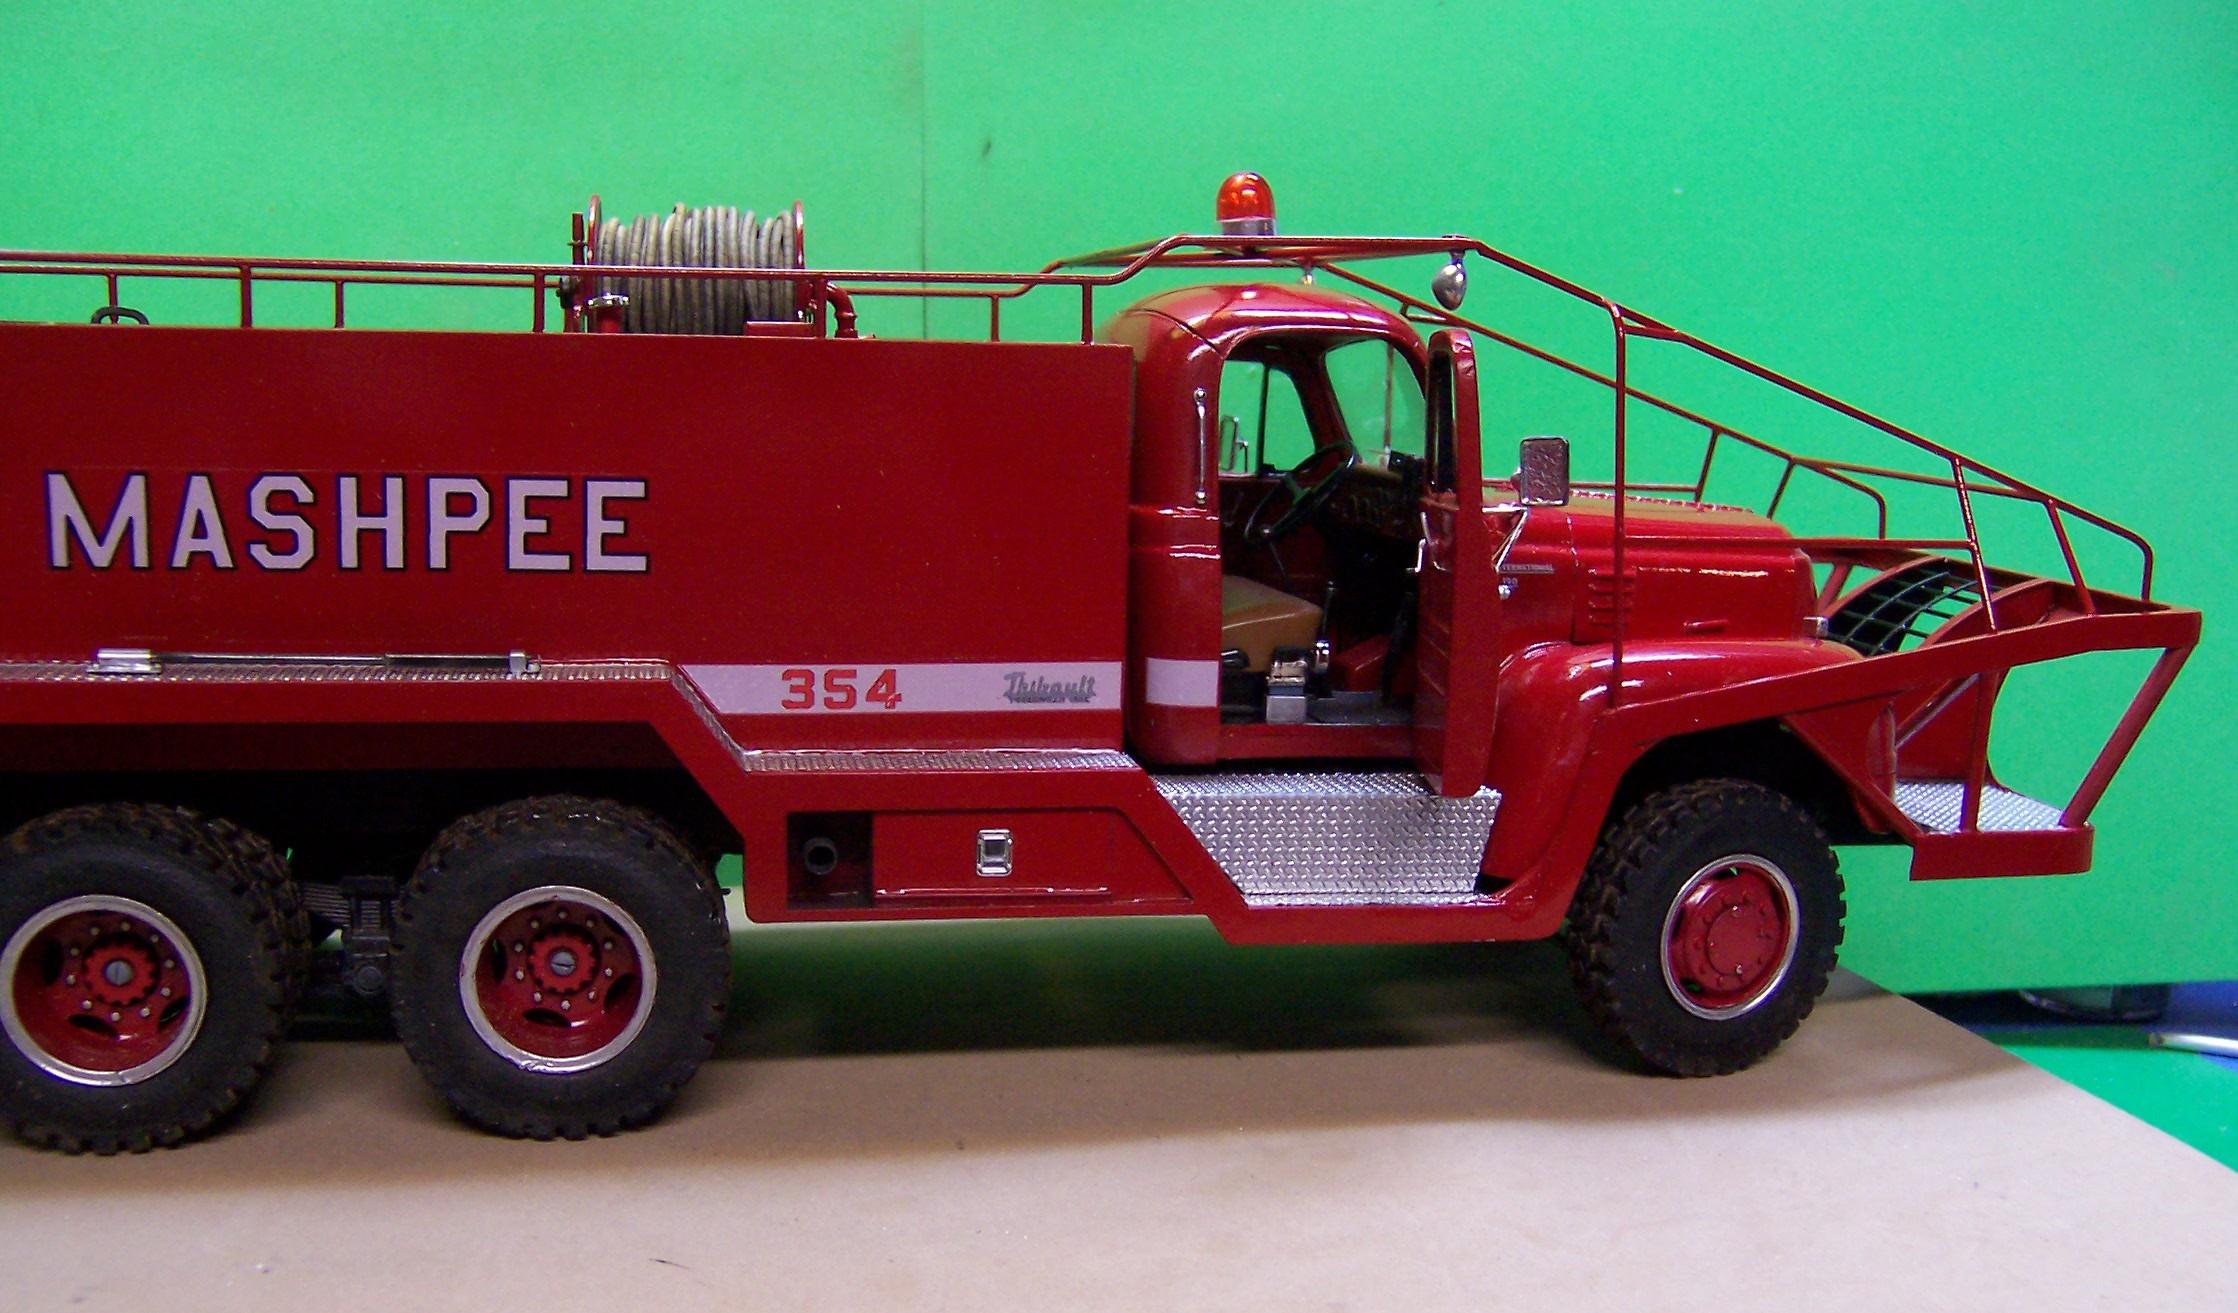
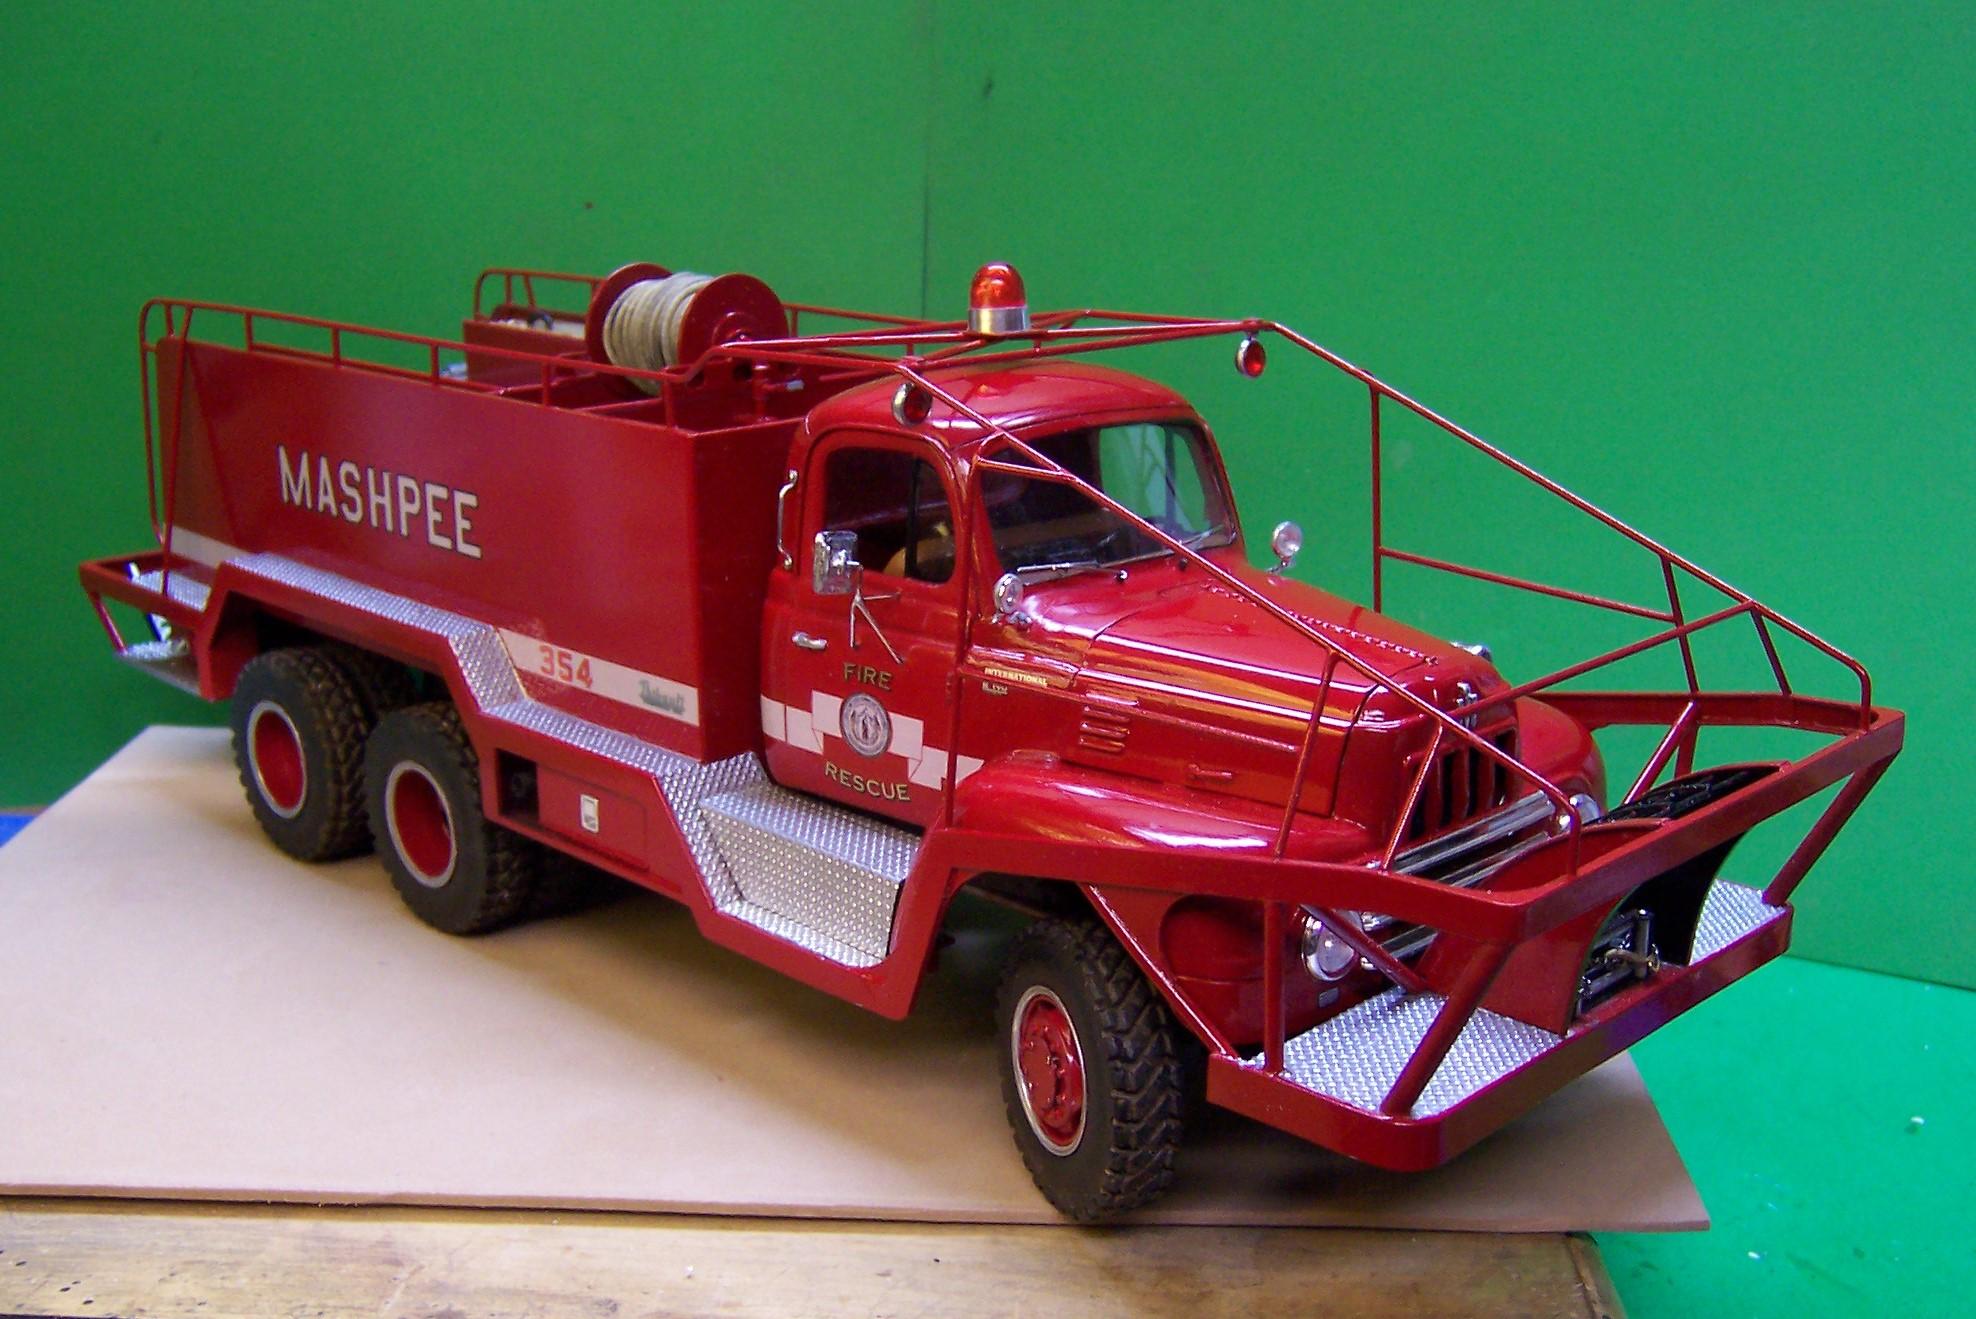
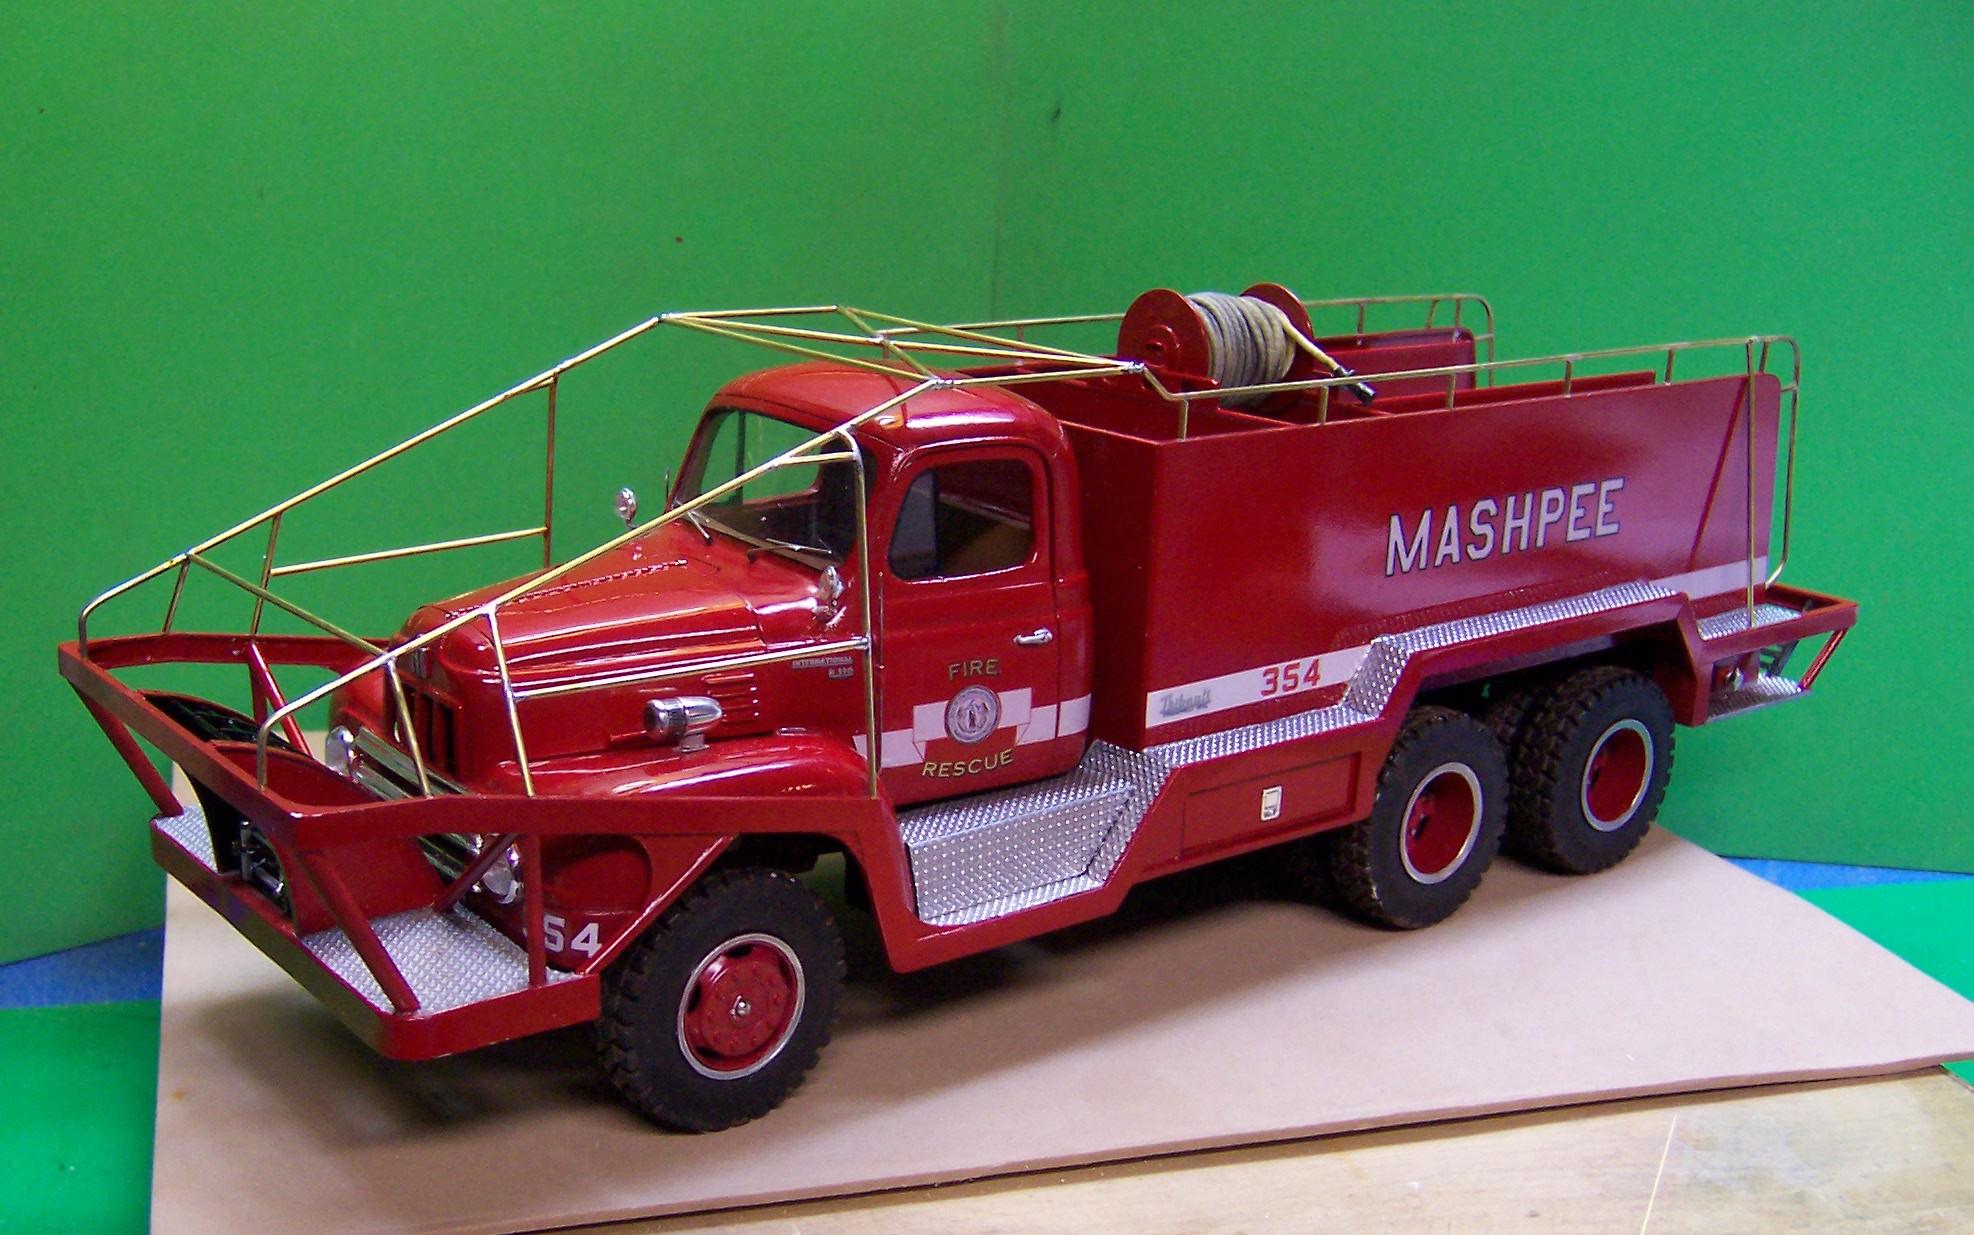
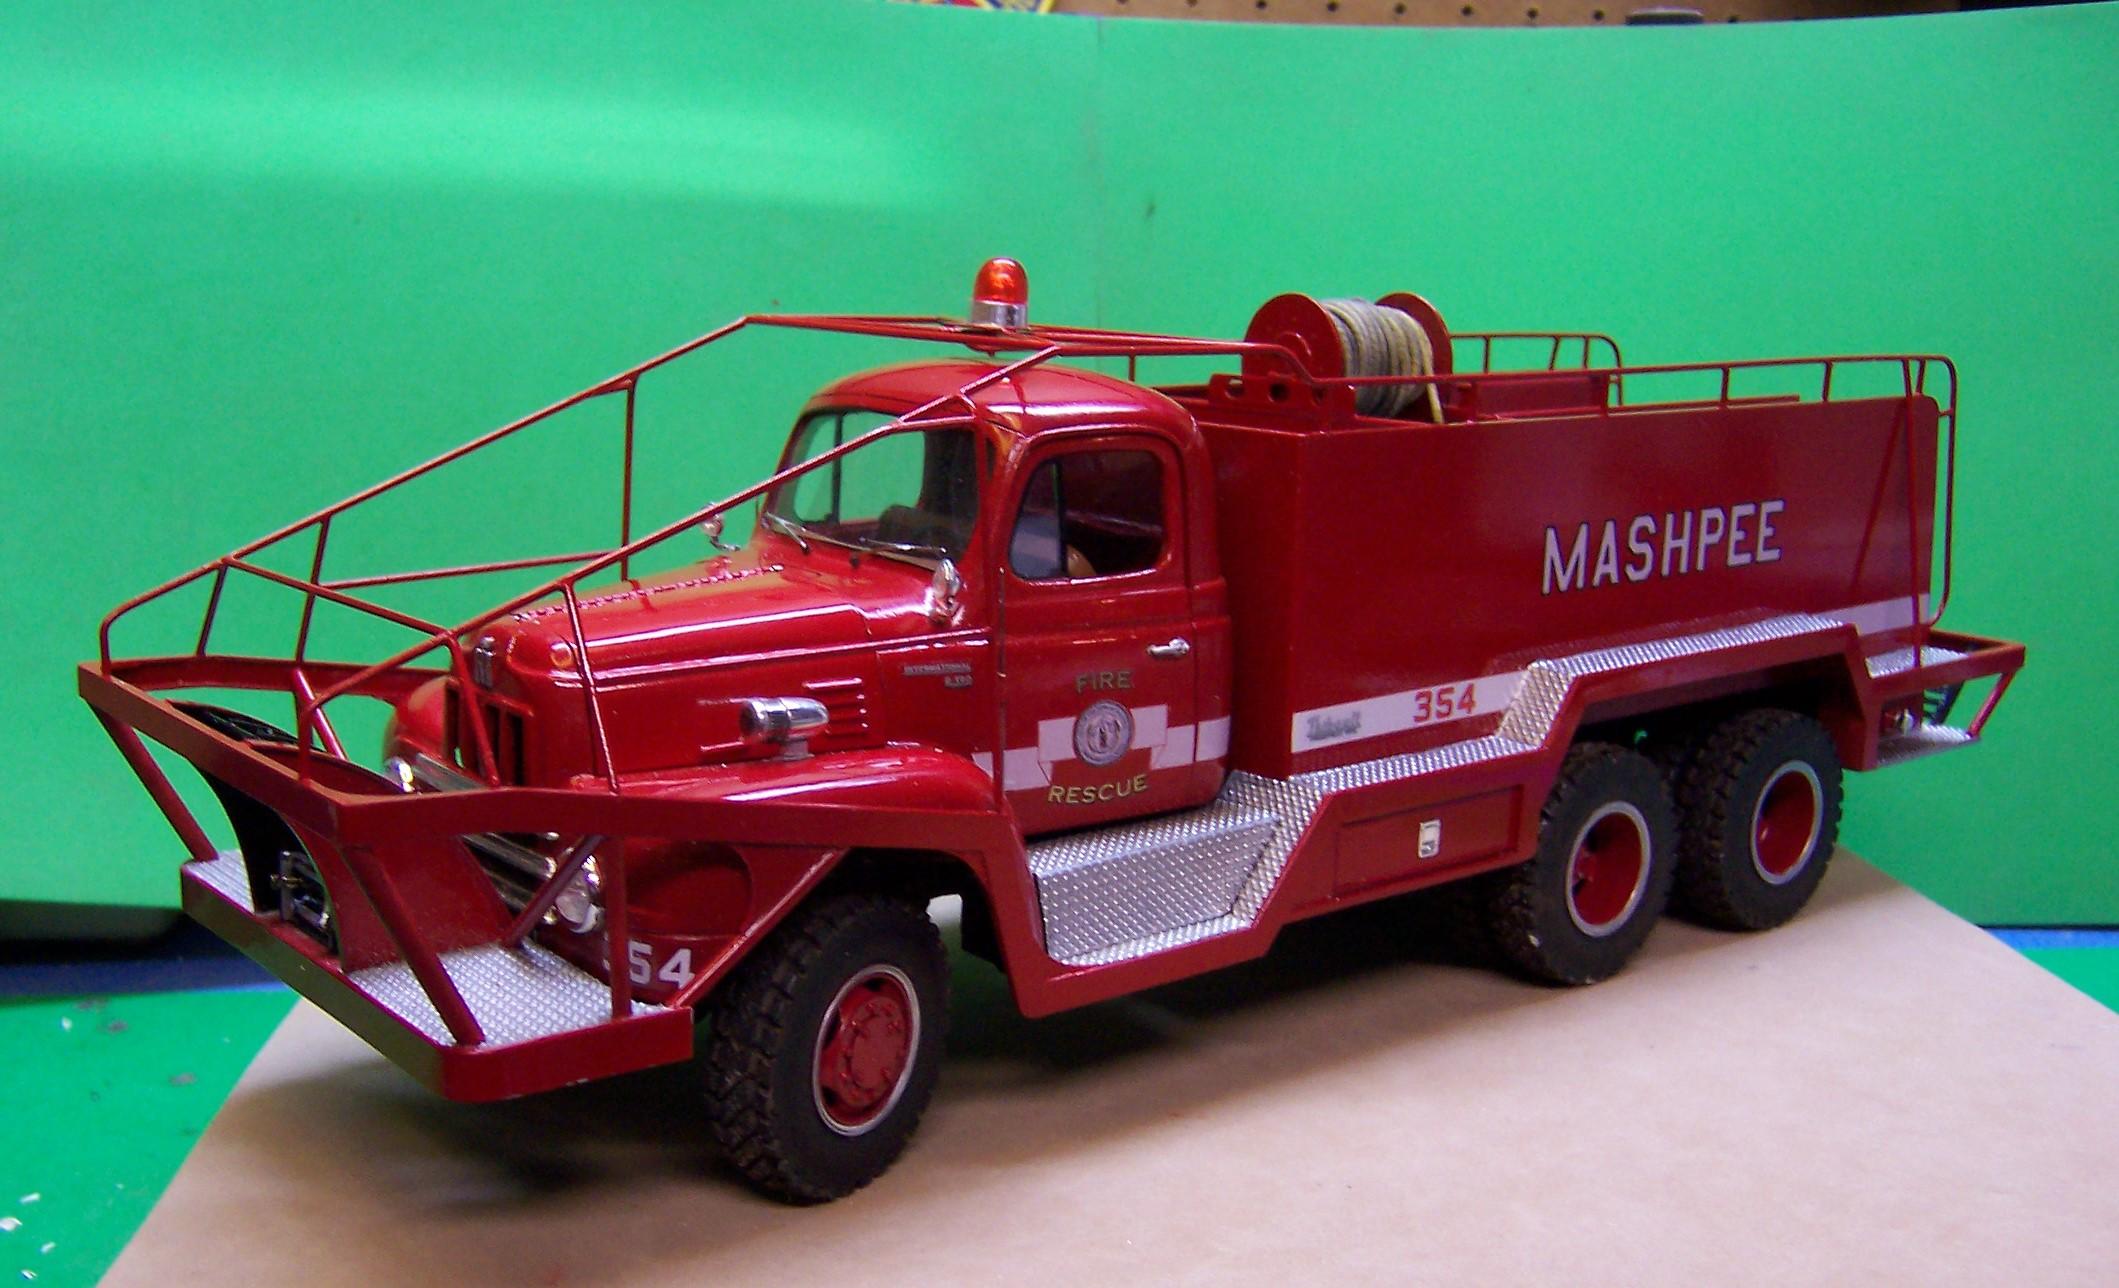
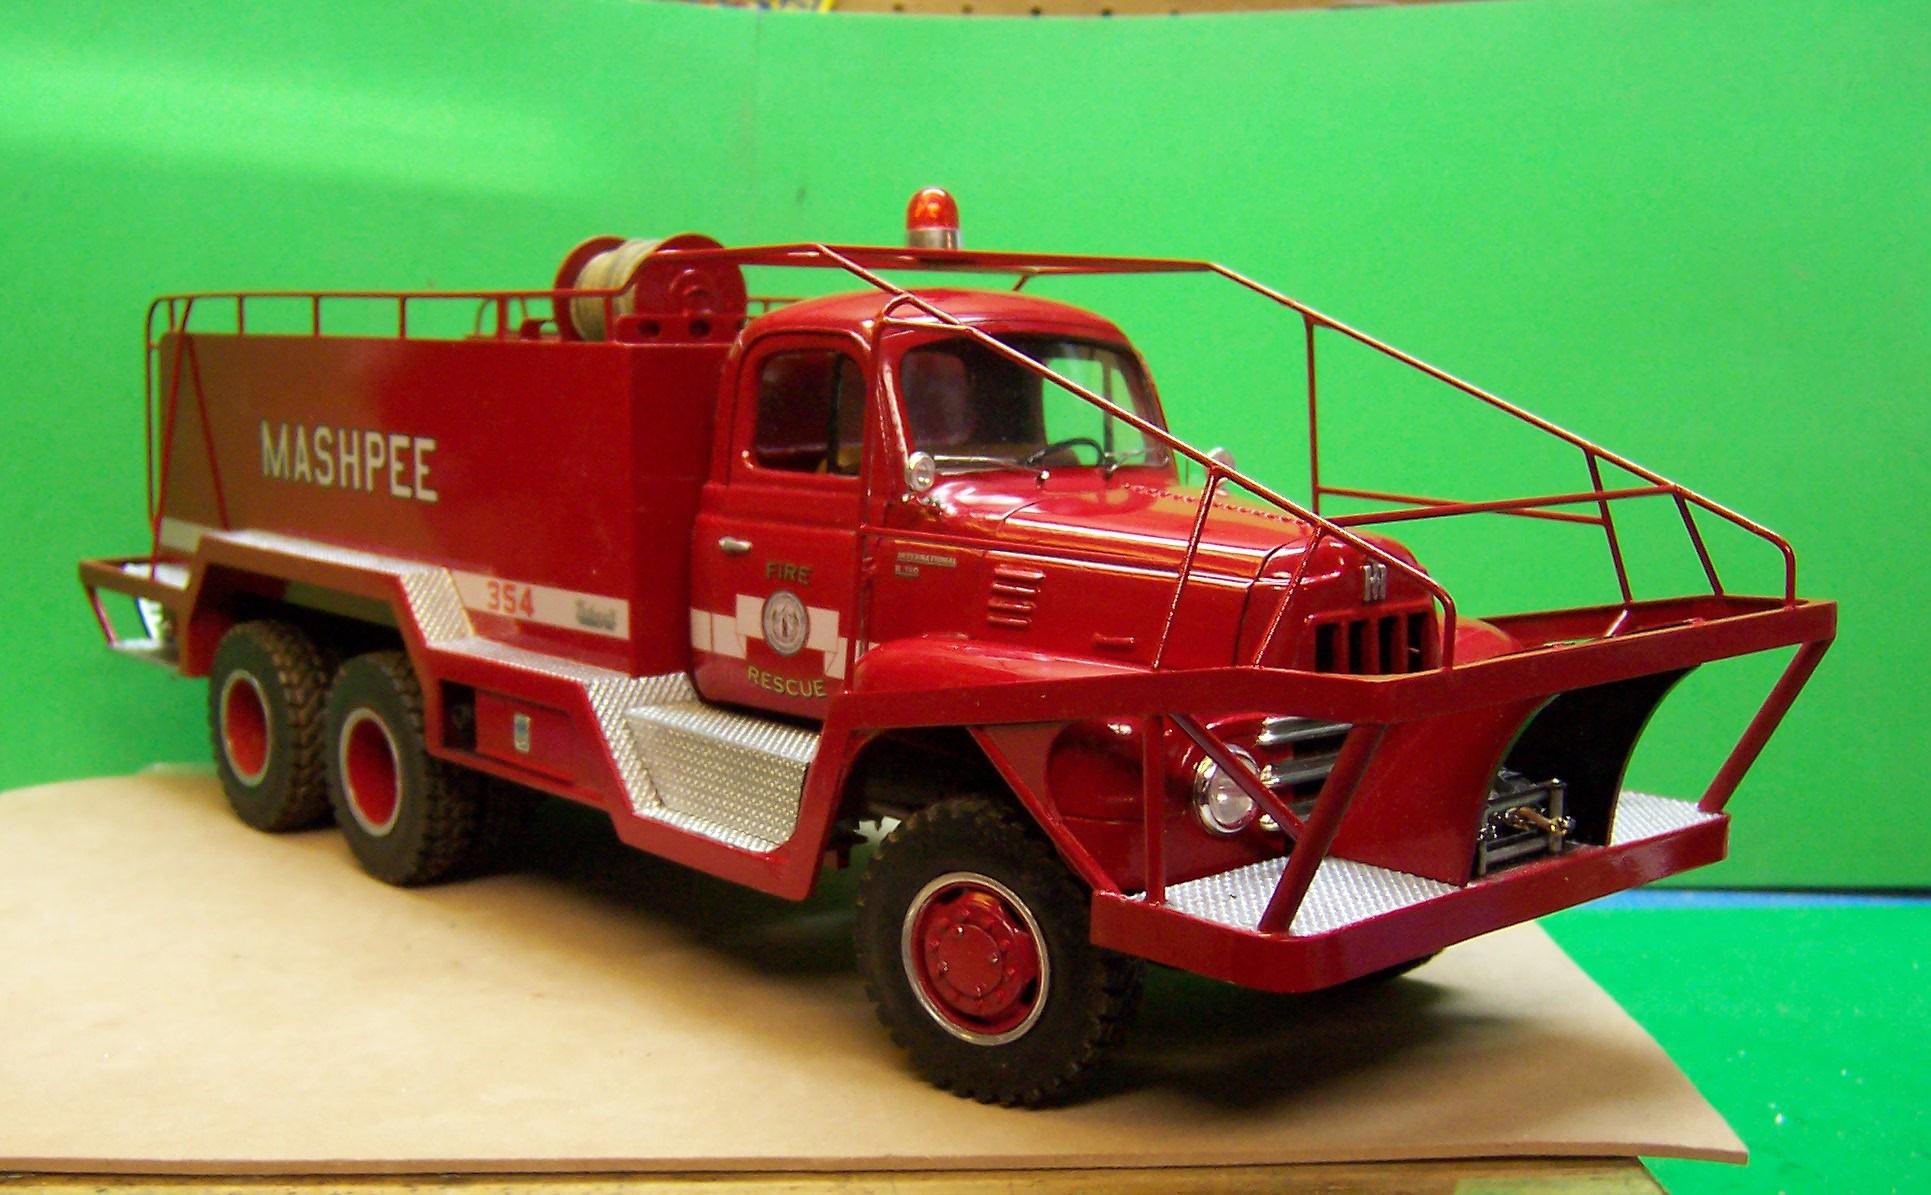
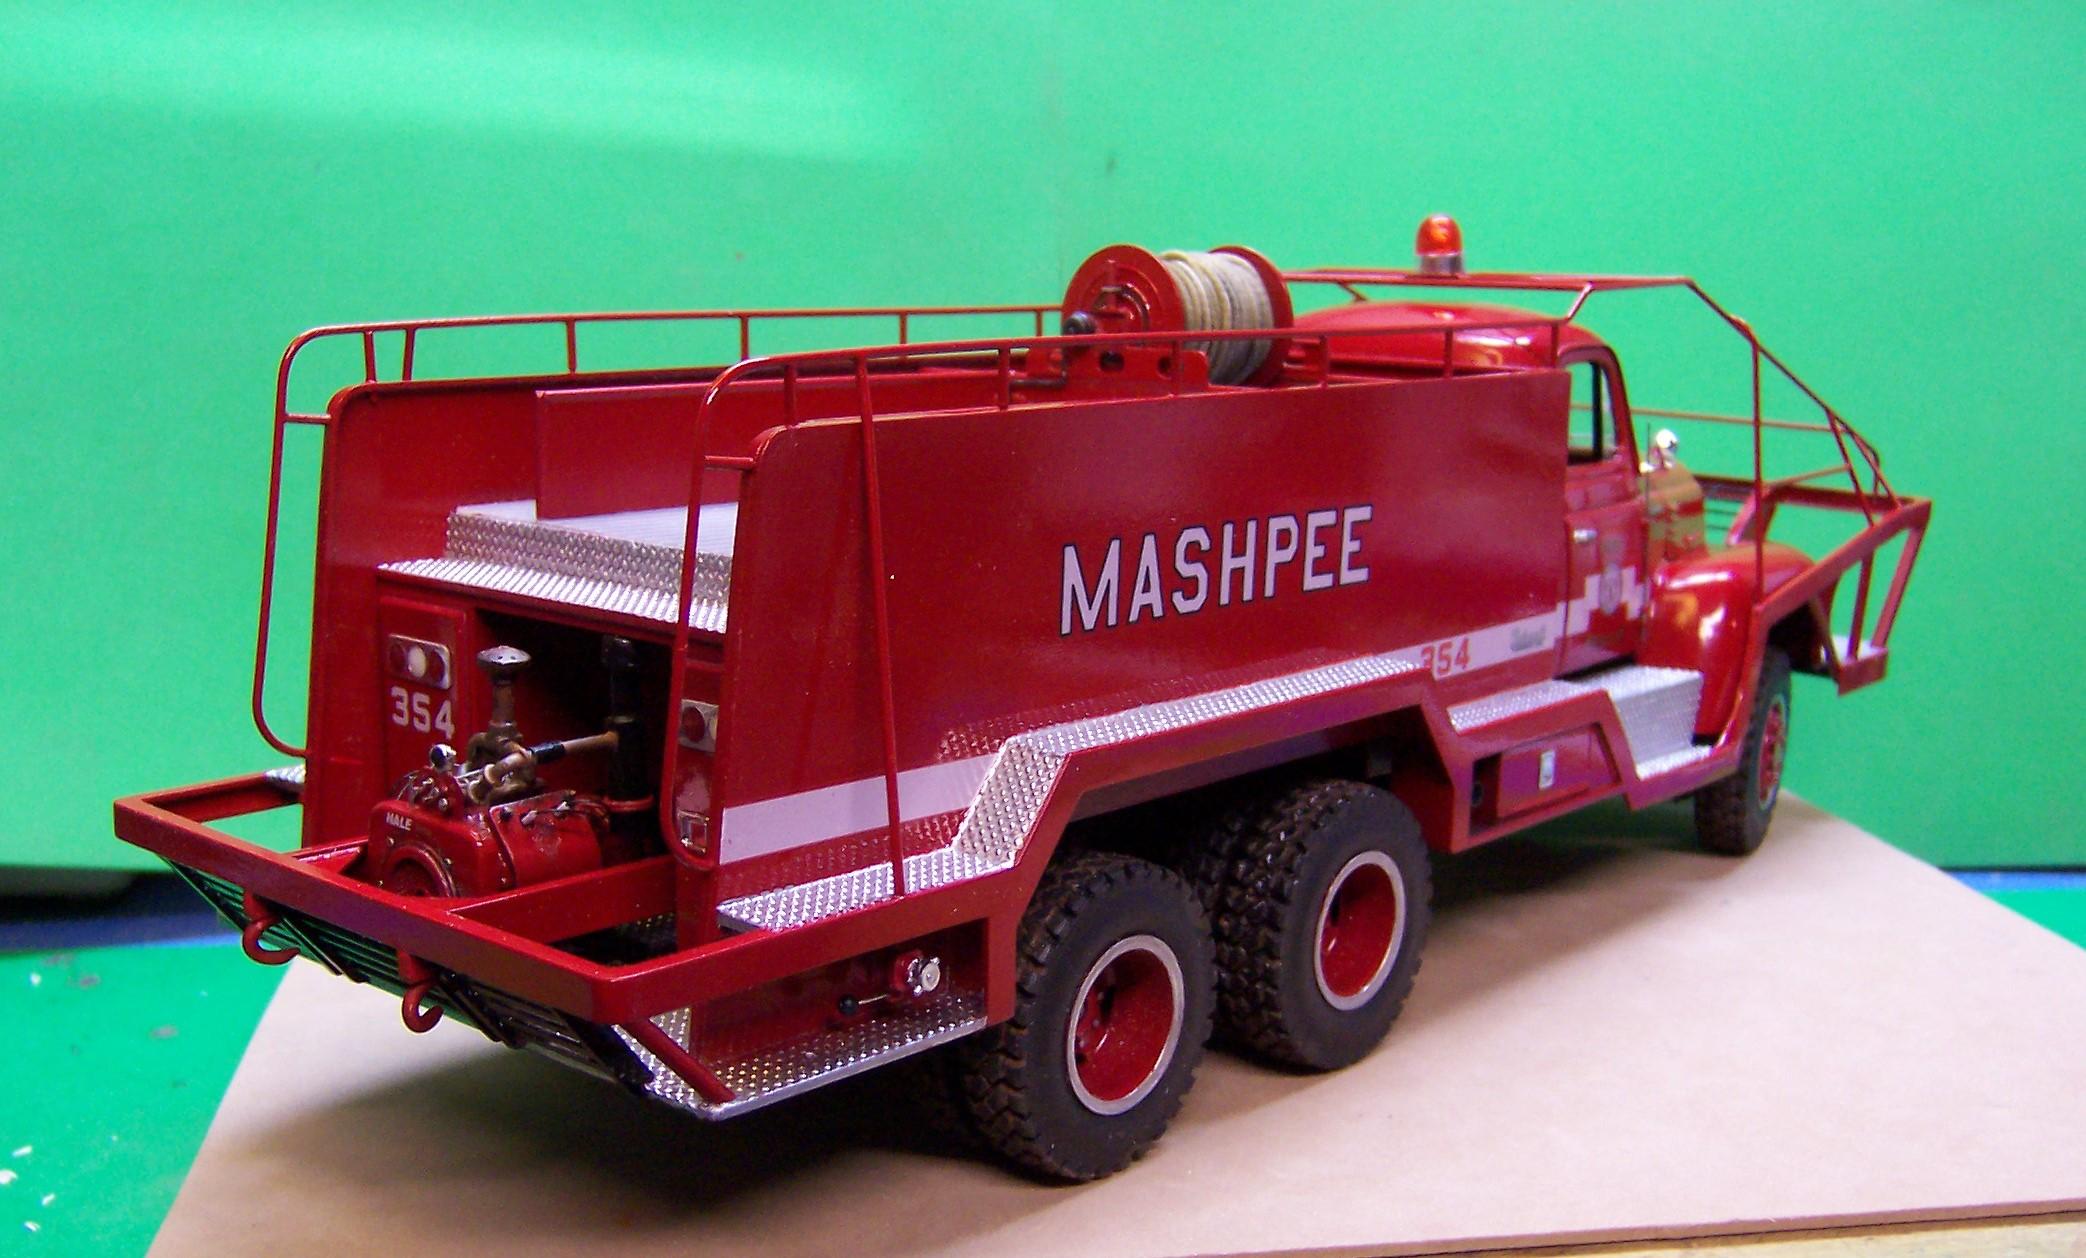
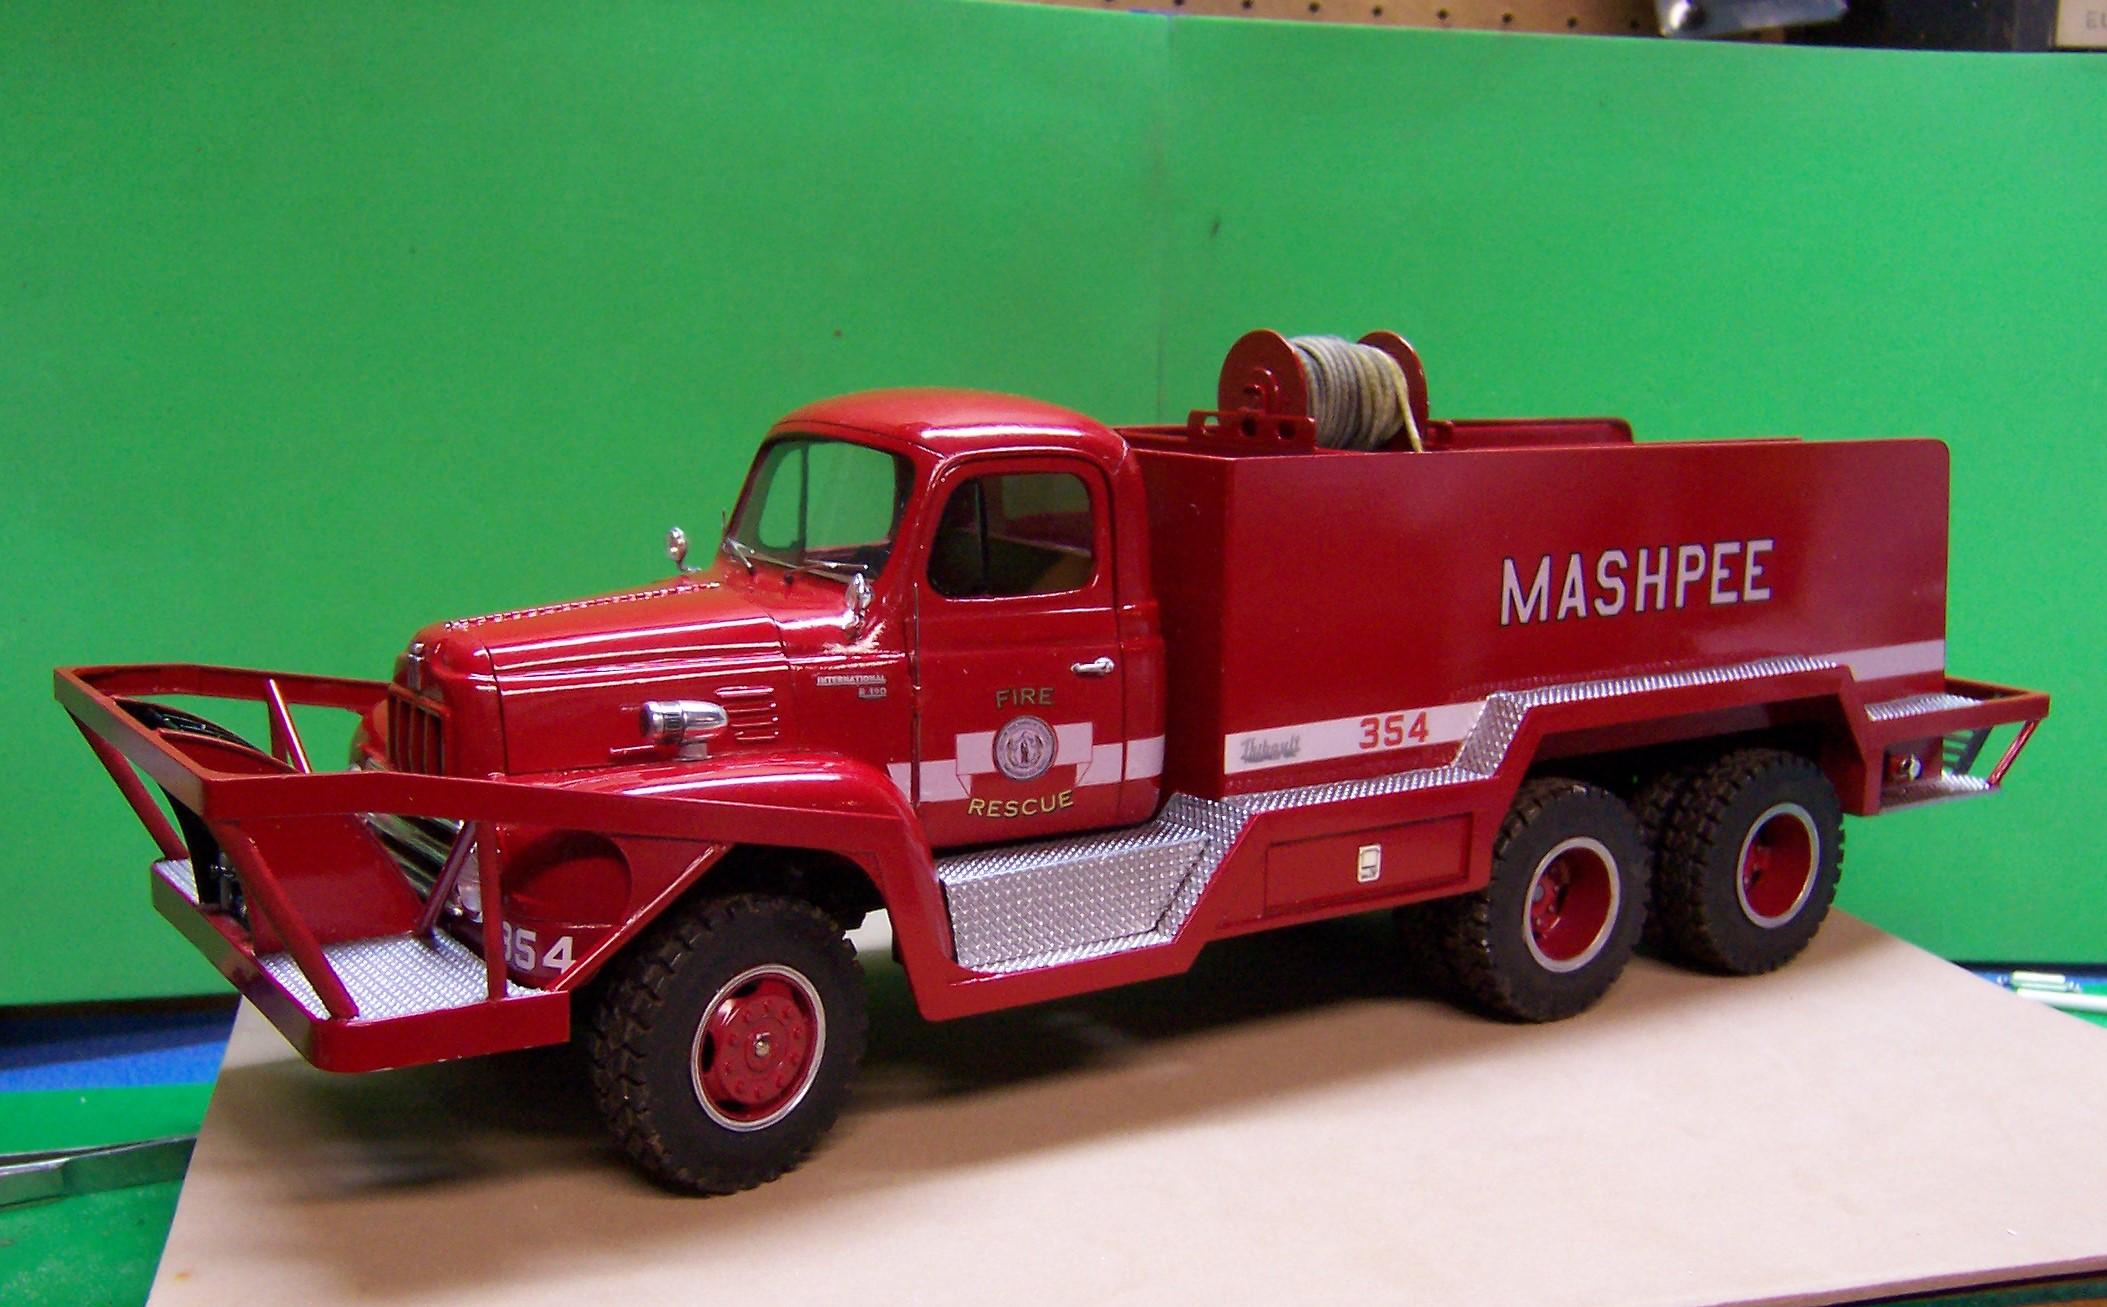
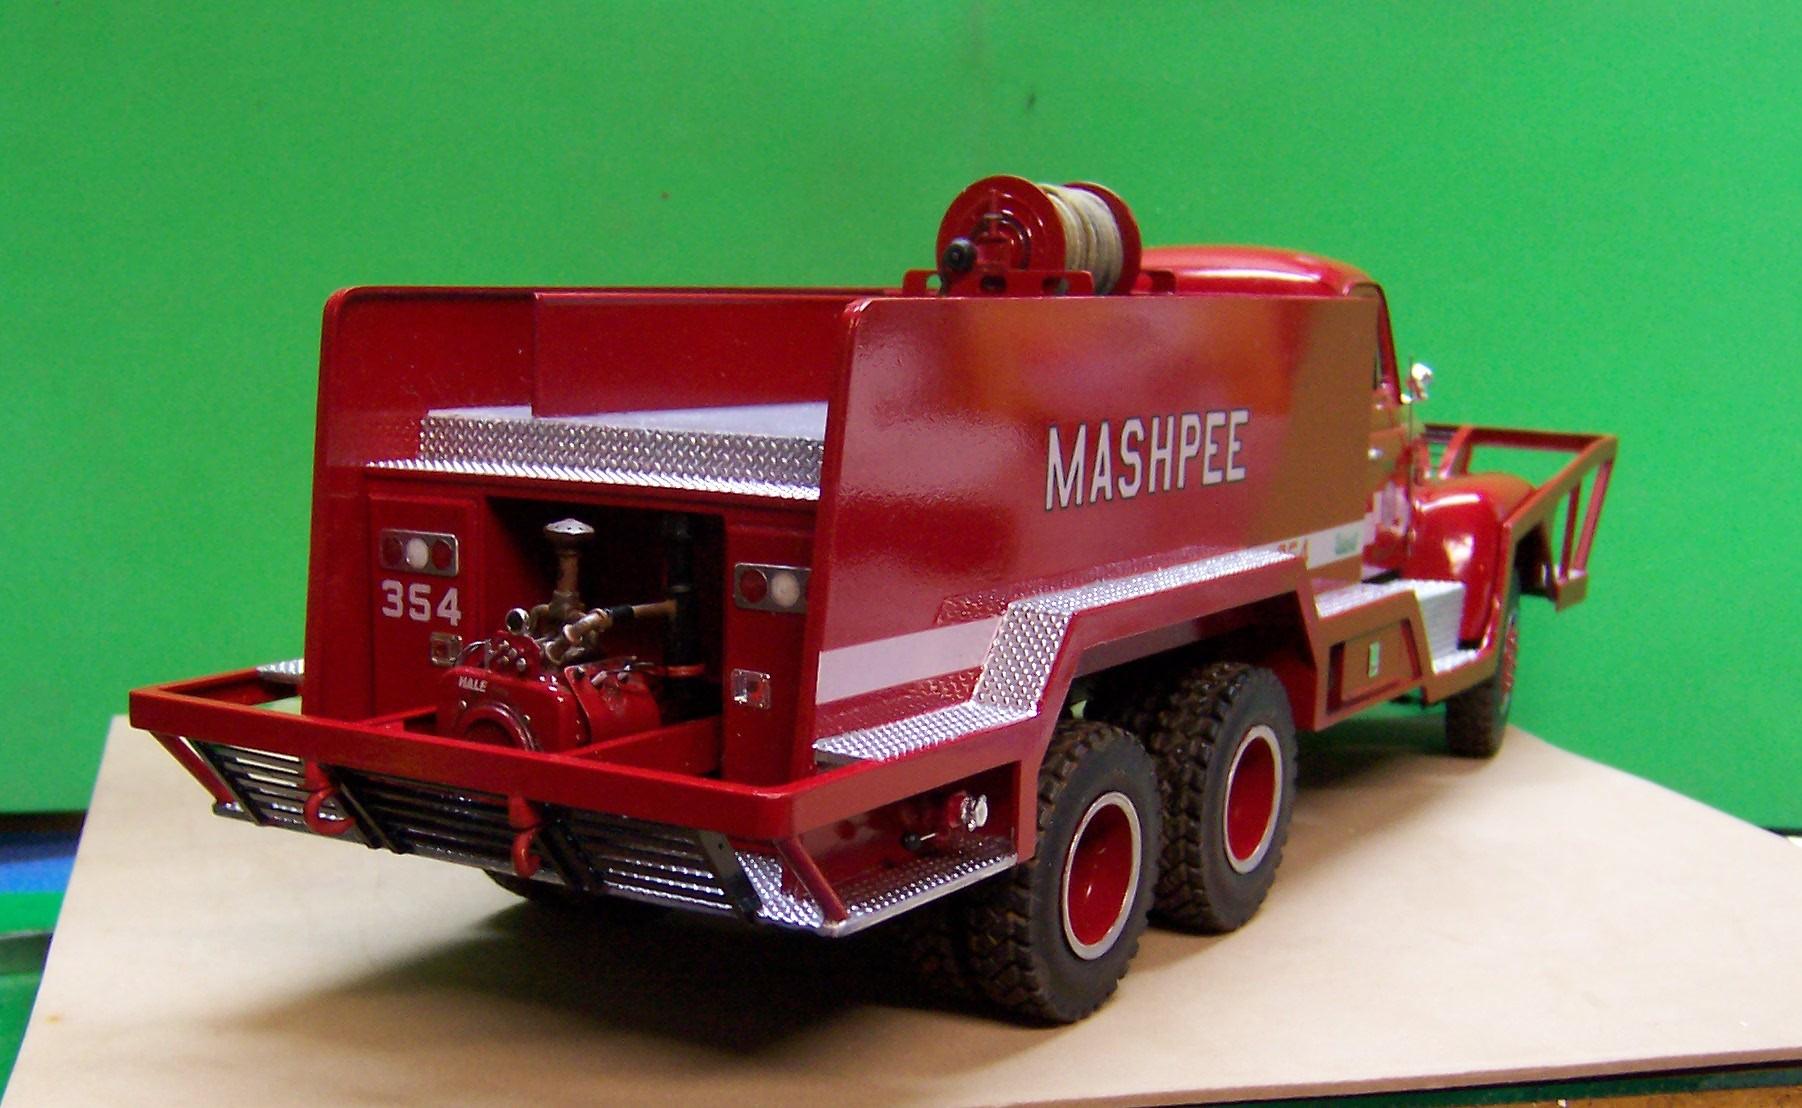
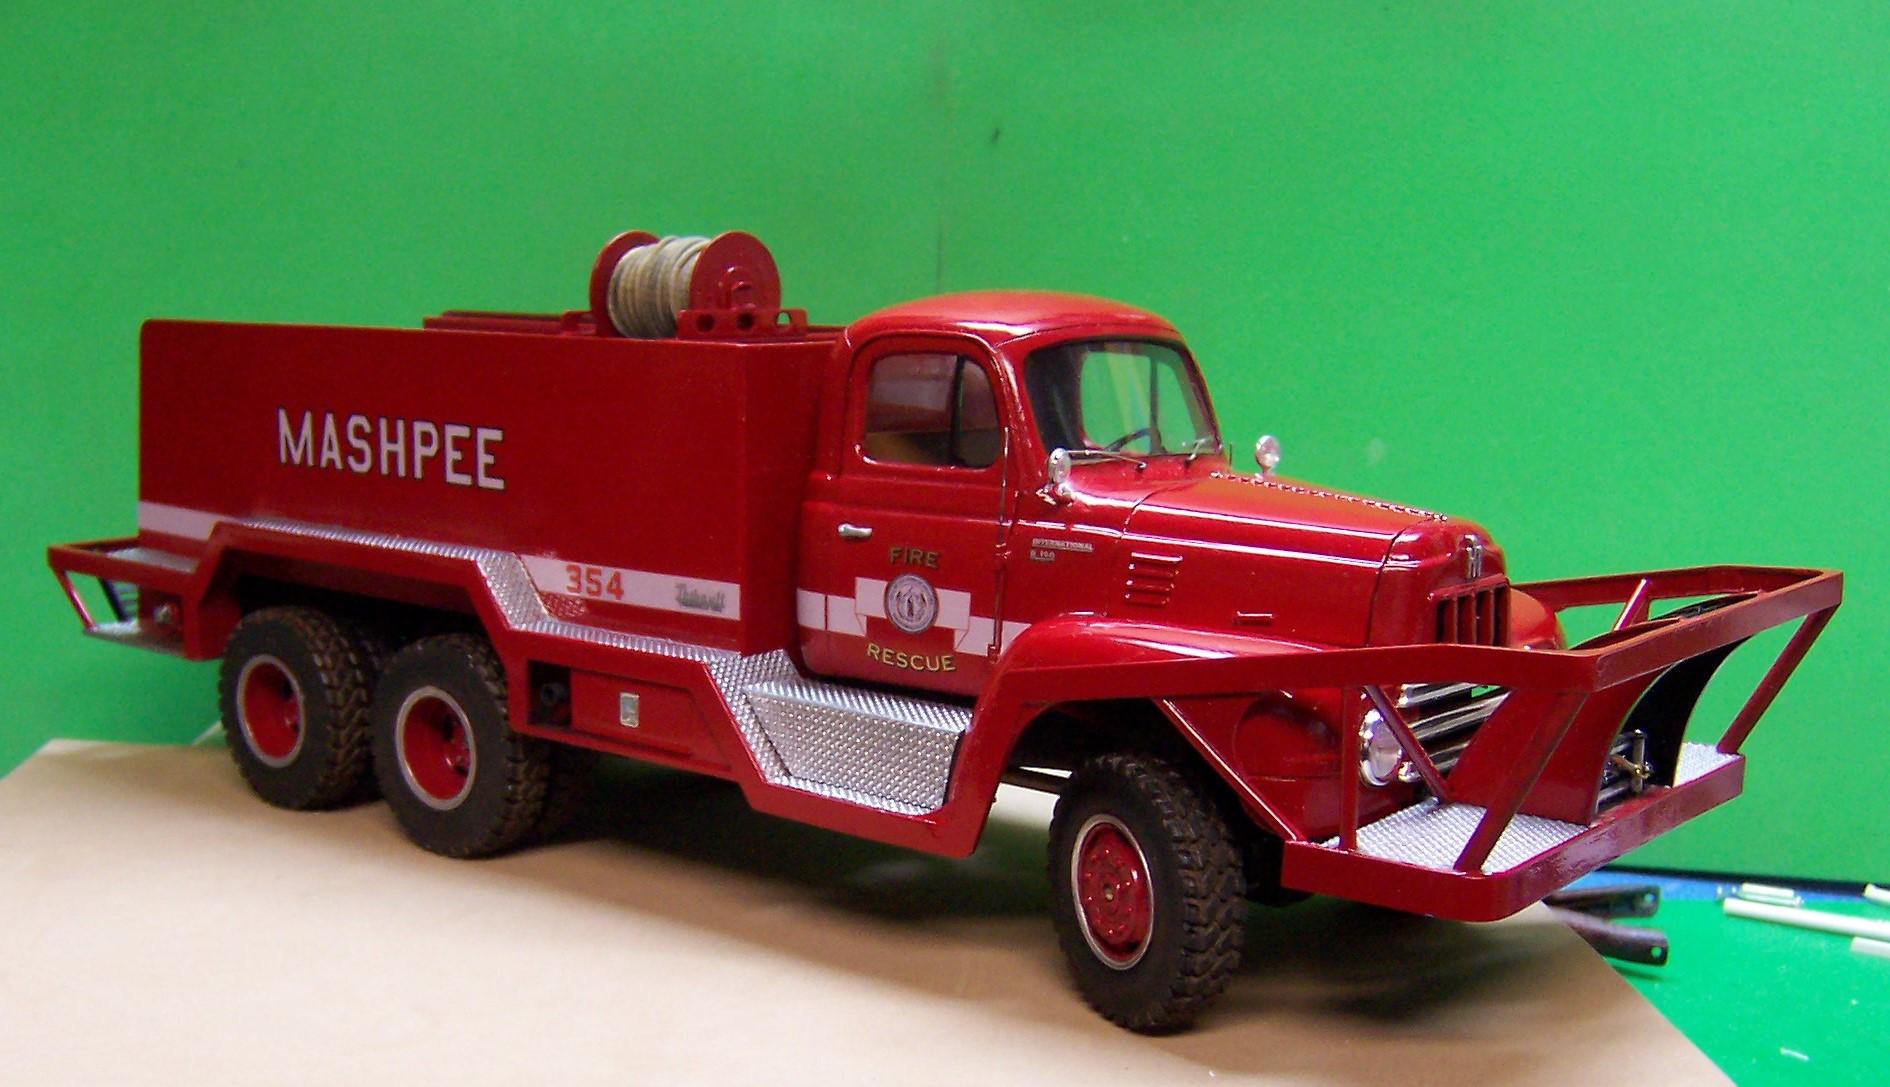
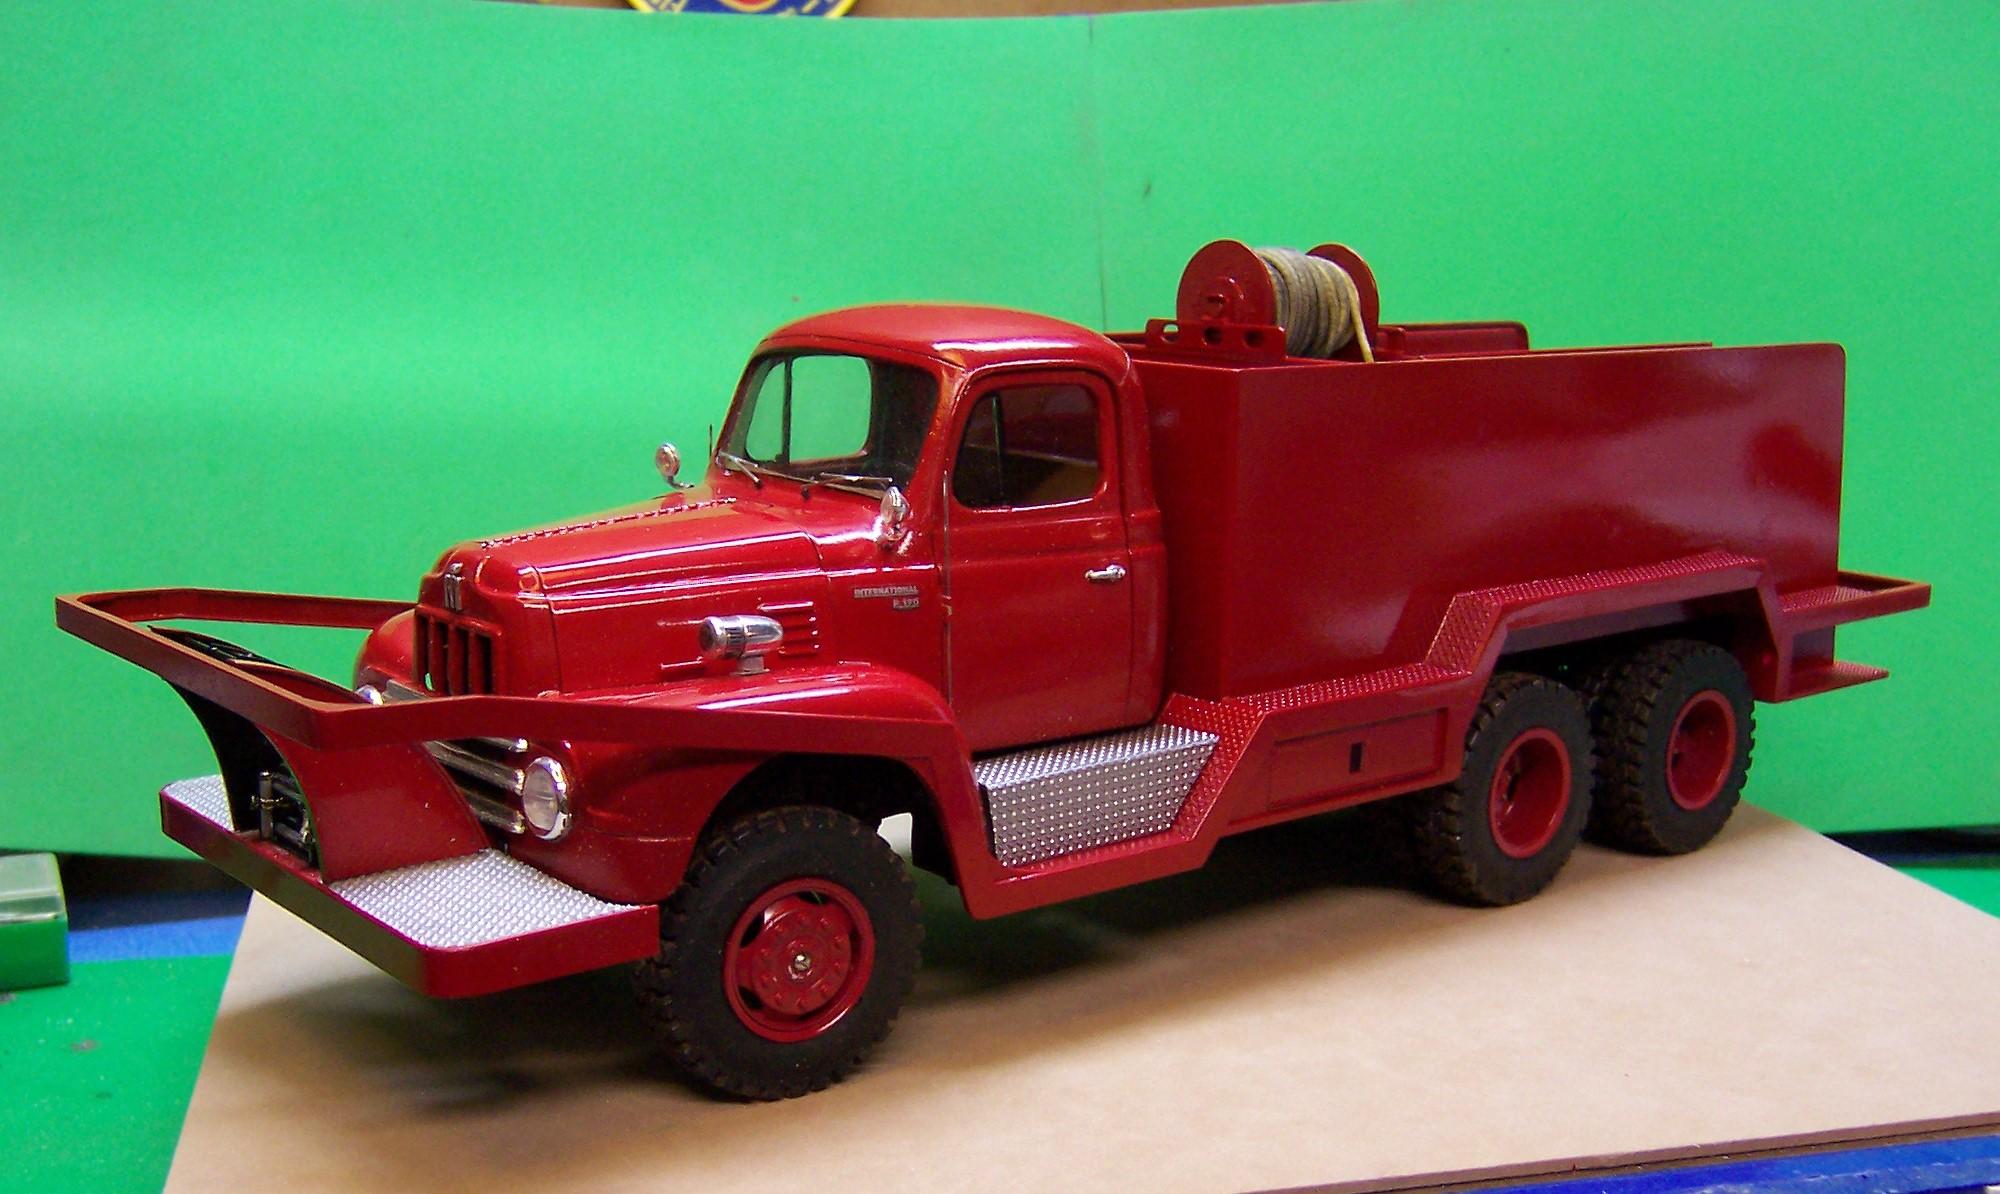
Mashpee 354 is finished.
Chariots of Fire replied to Chariots of Fire's topic in Model Trucks: Big Rigs and Heavy Equipment
Jeff and I are looking forward to it, Tom! Thanks. -
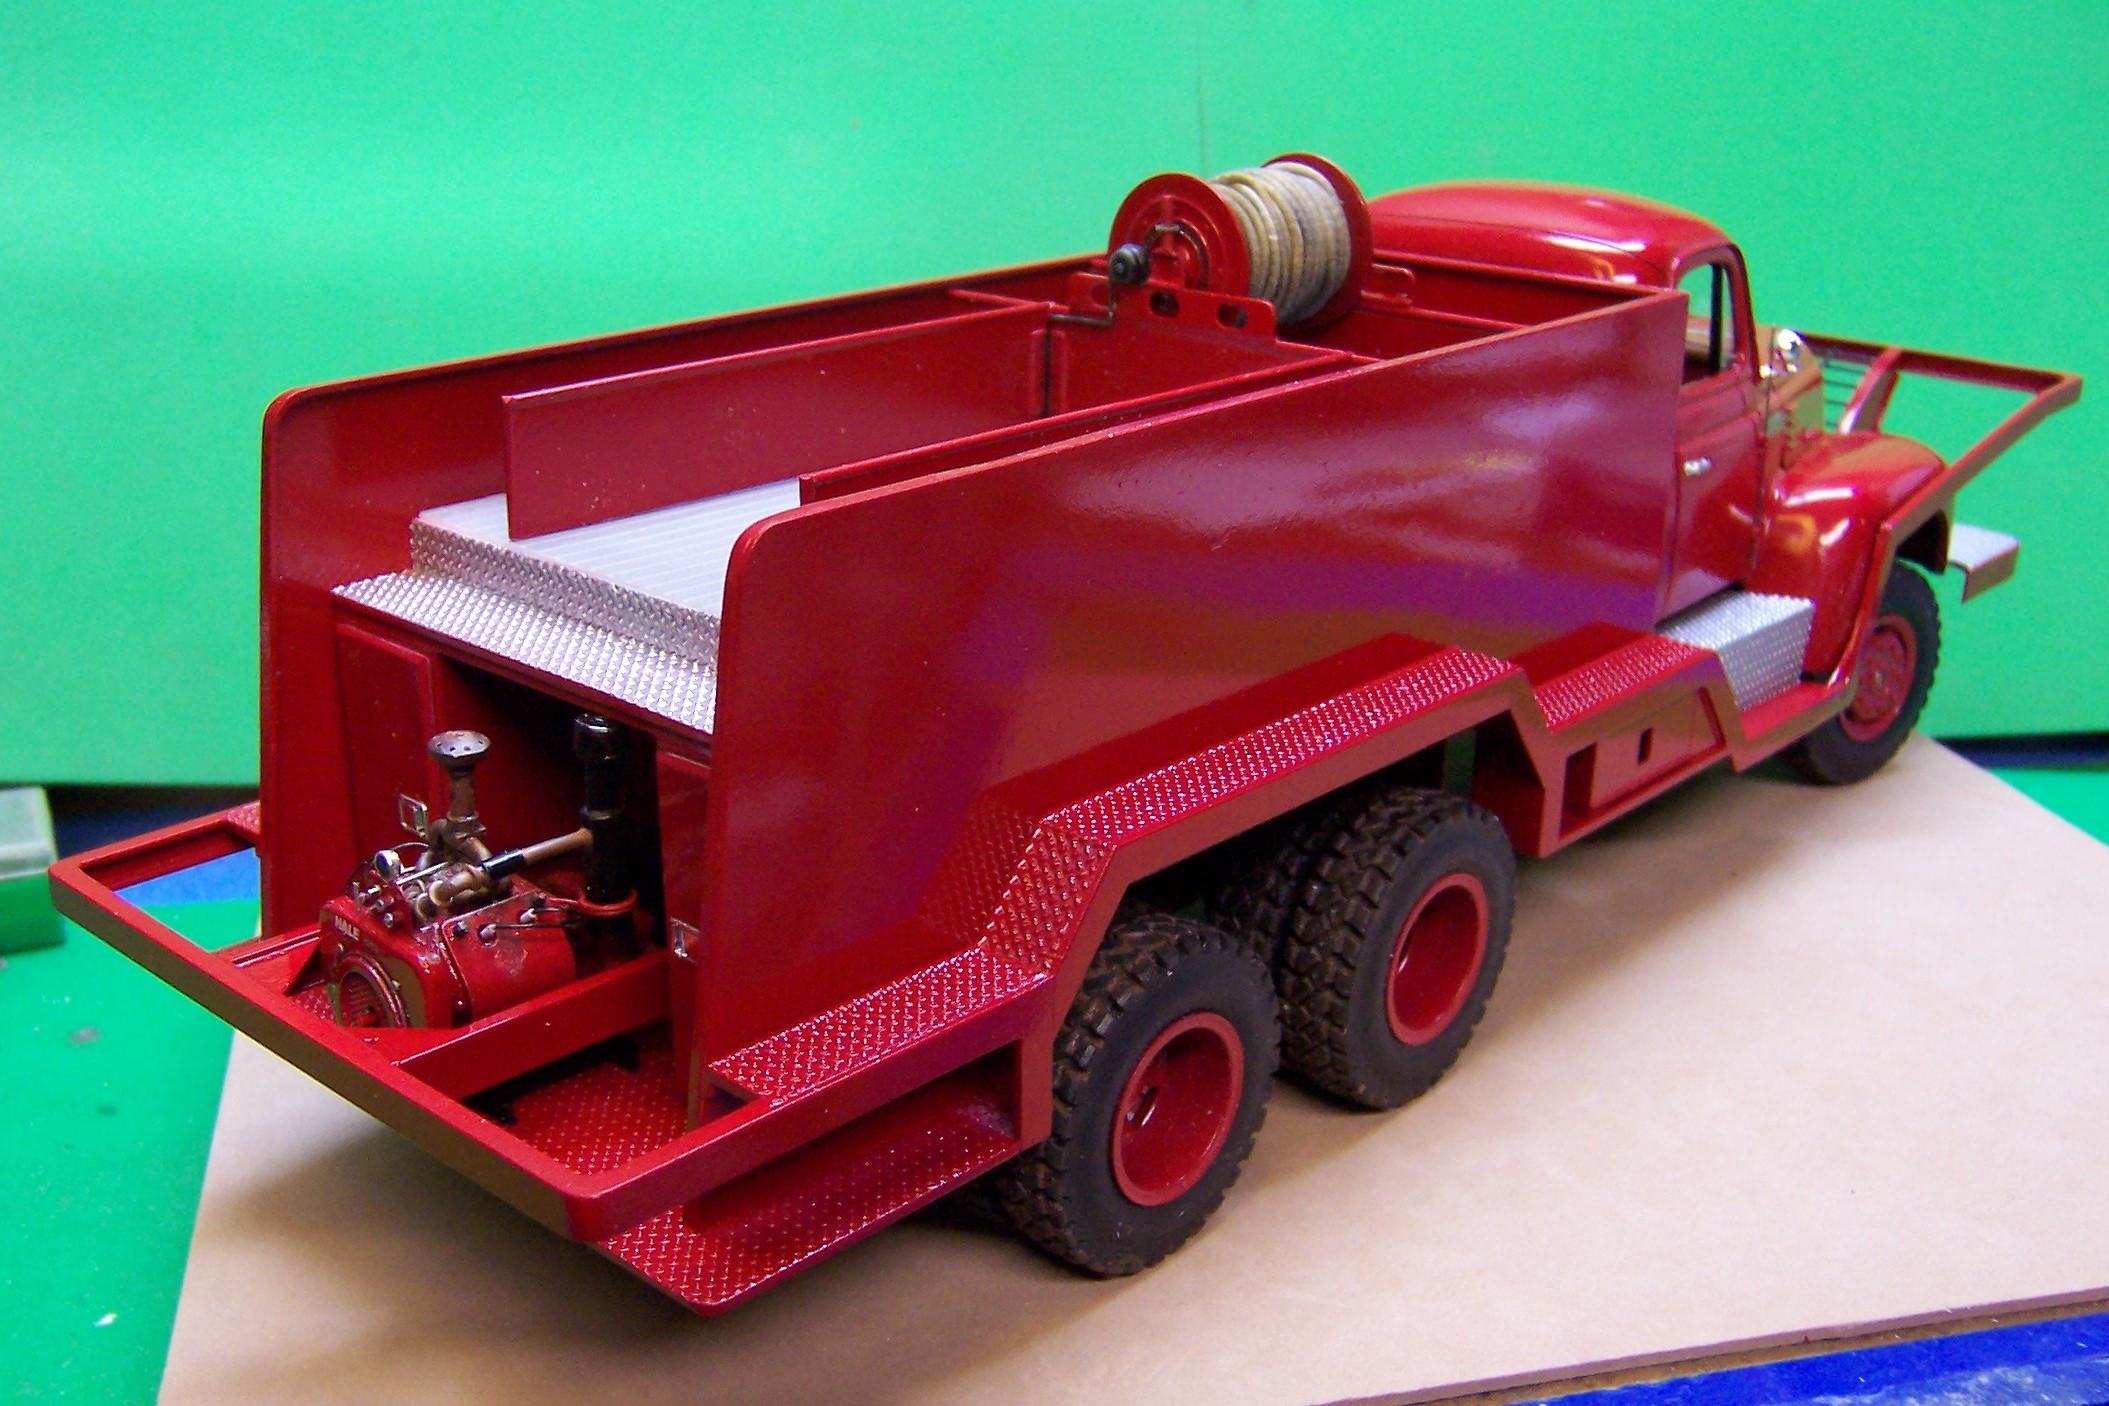
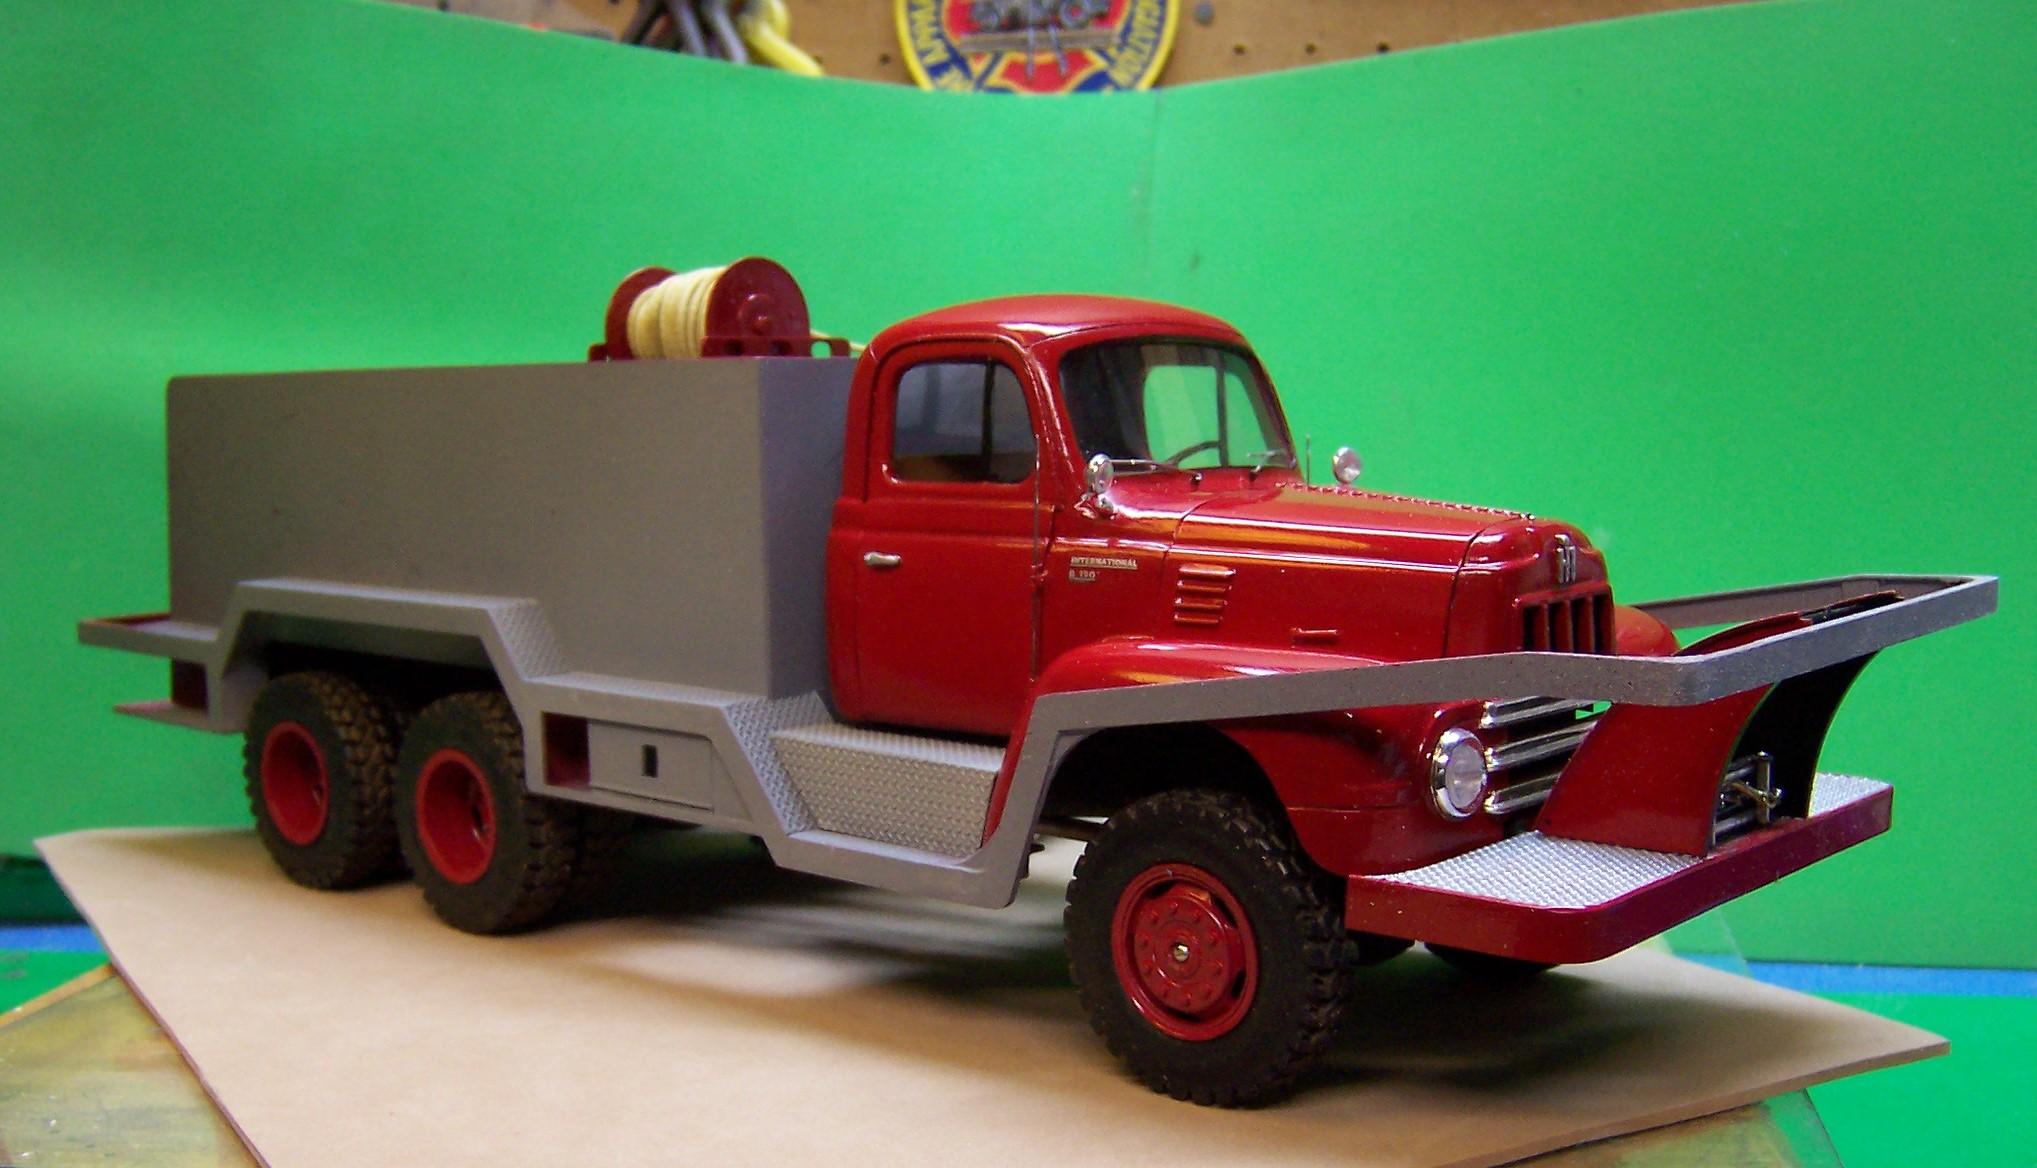
The work on this brush rig has come to a close. It began in early January with tire castings. Ended up today with some last minute detailing. So here are some photos of the finish product.

-
Thanks for that tip! I use Locktite on all my projects. Just seems to be a better product. And I've had some driprails to repair before as well but used a different method.
-
Truck Mirror Brackets
Chariots of Fire replied to Chariots of Fire's topic in Tips, Tricks, and Tutorials
Not brass, Pete. Most likely stainless. Whatever they are they solder well. Got them in Michaels as I remember. -
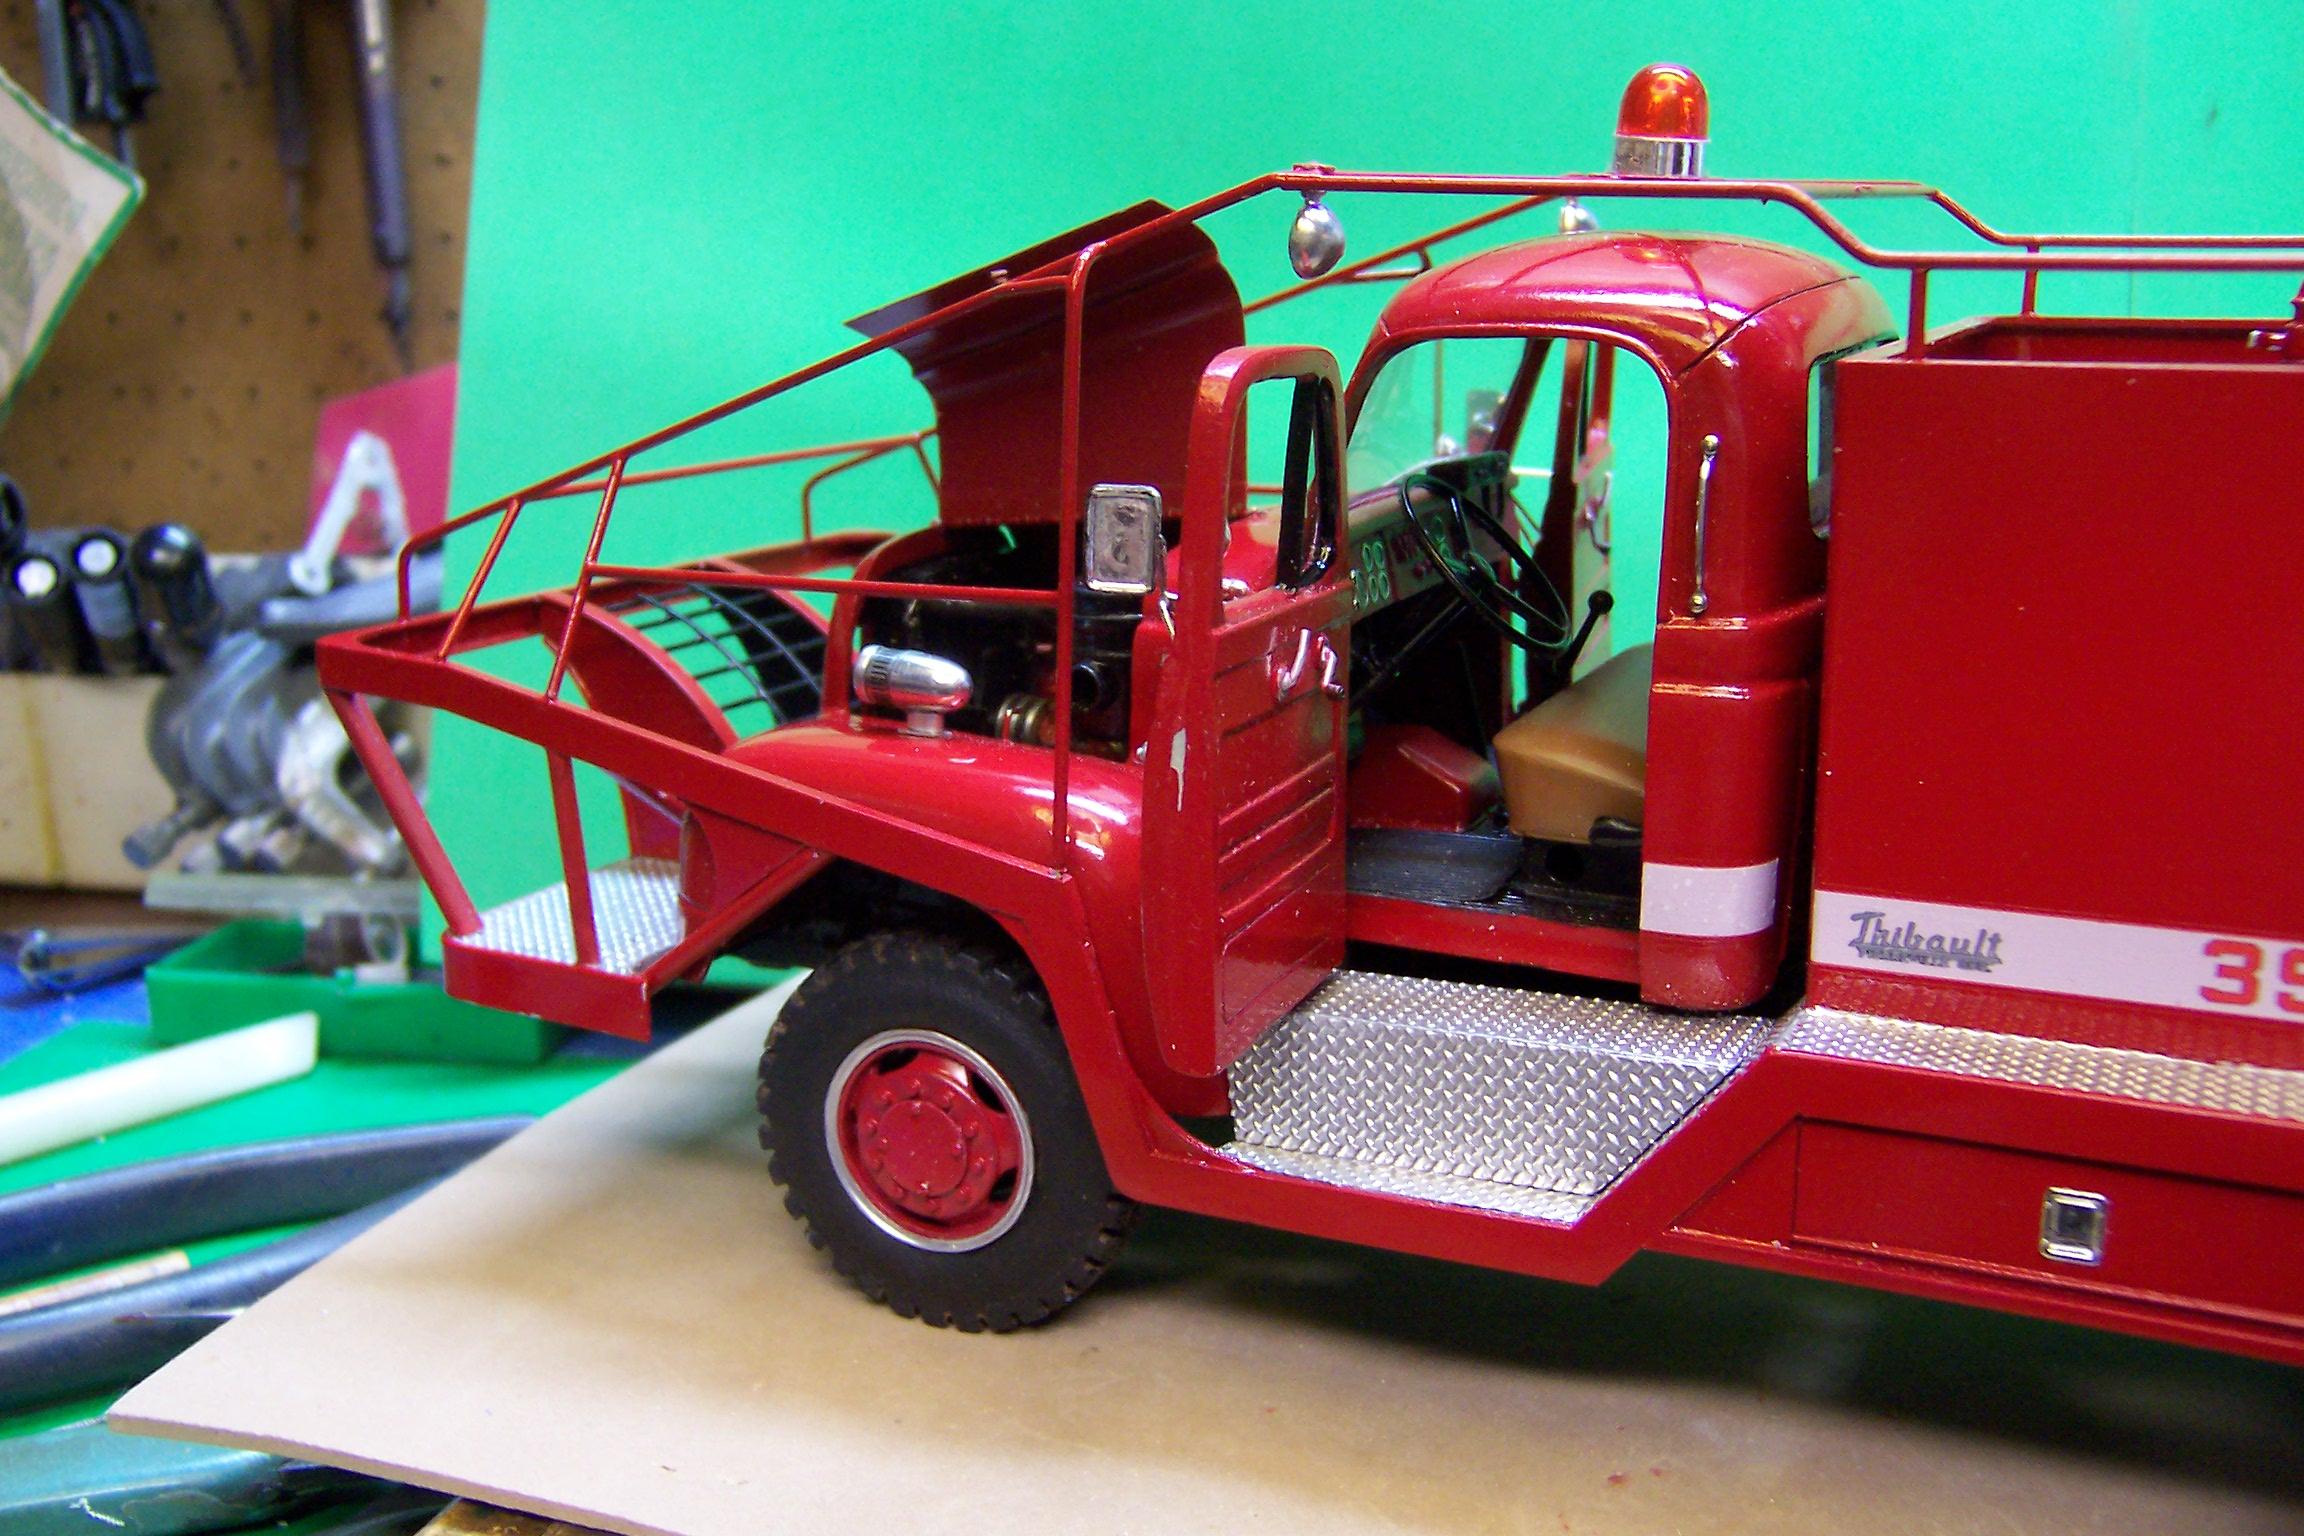
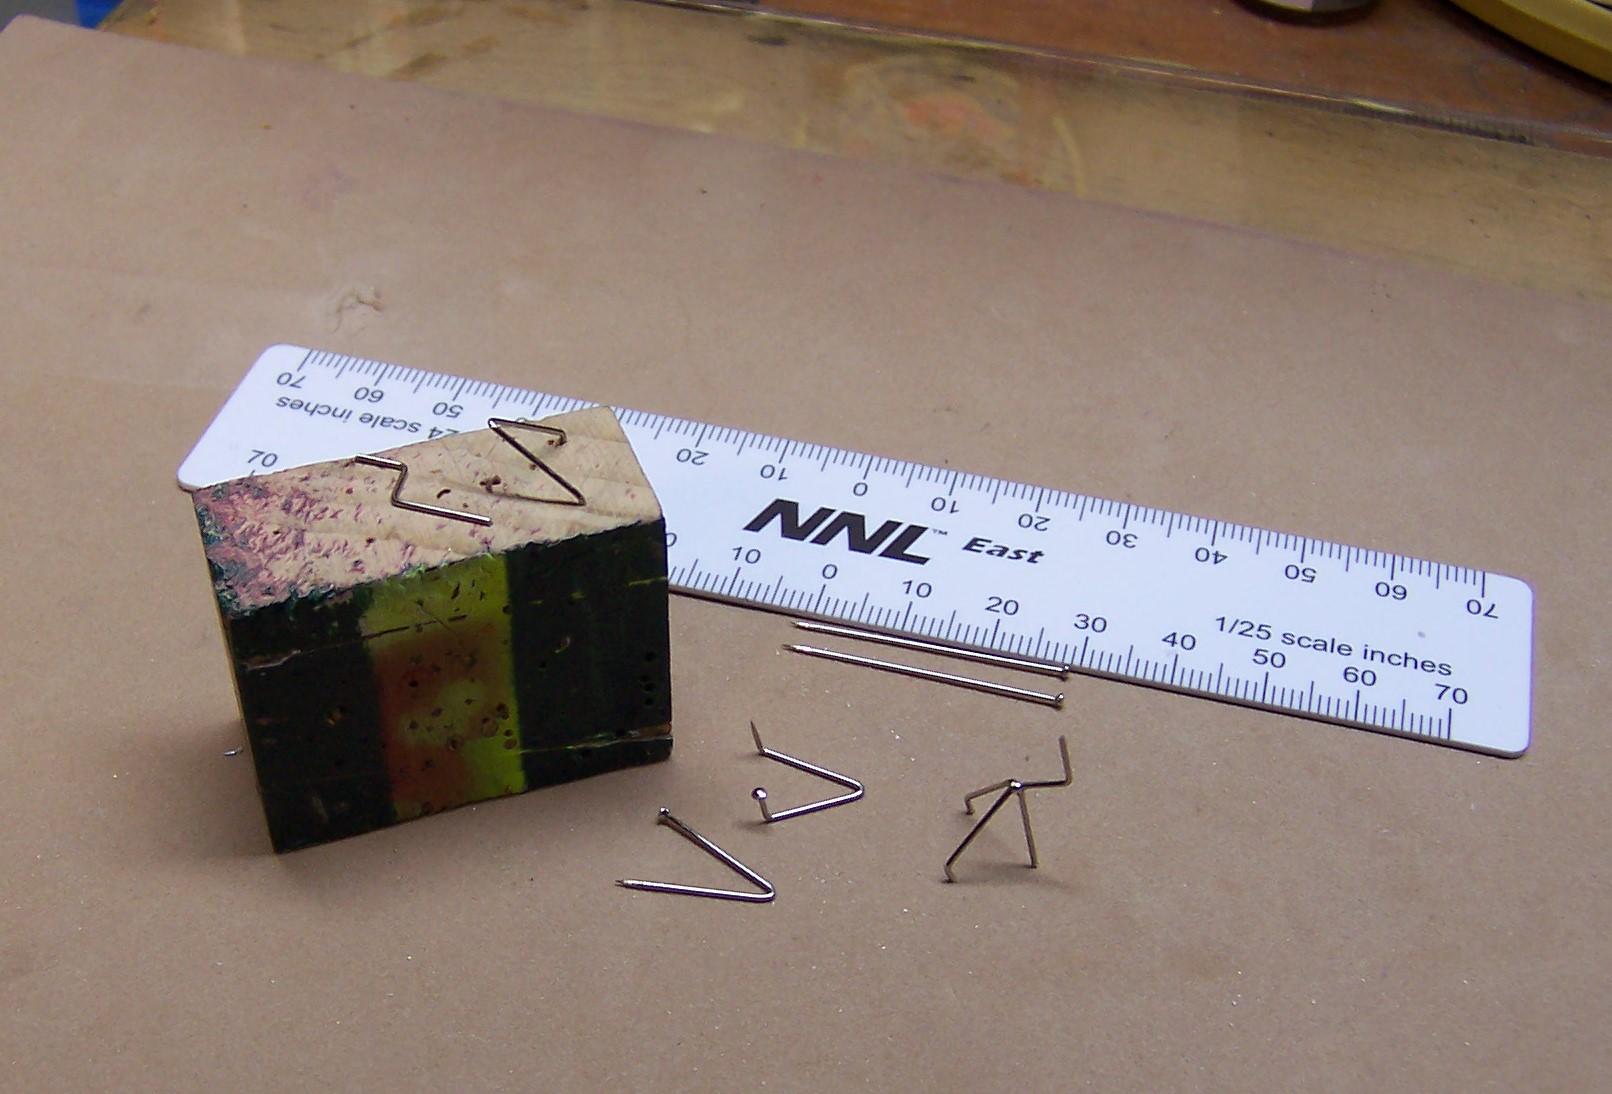
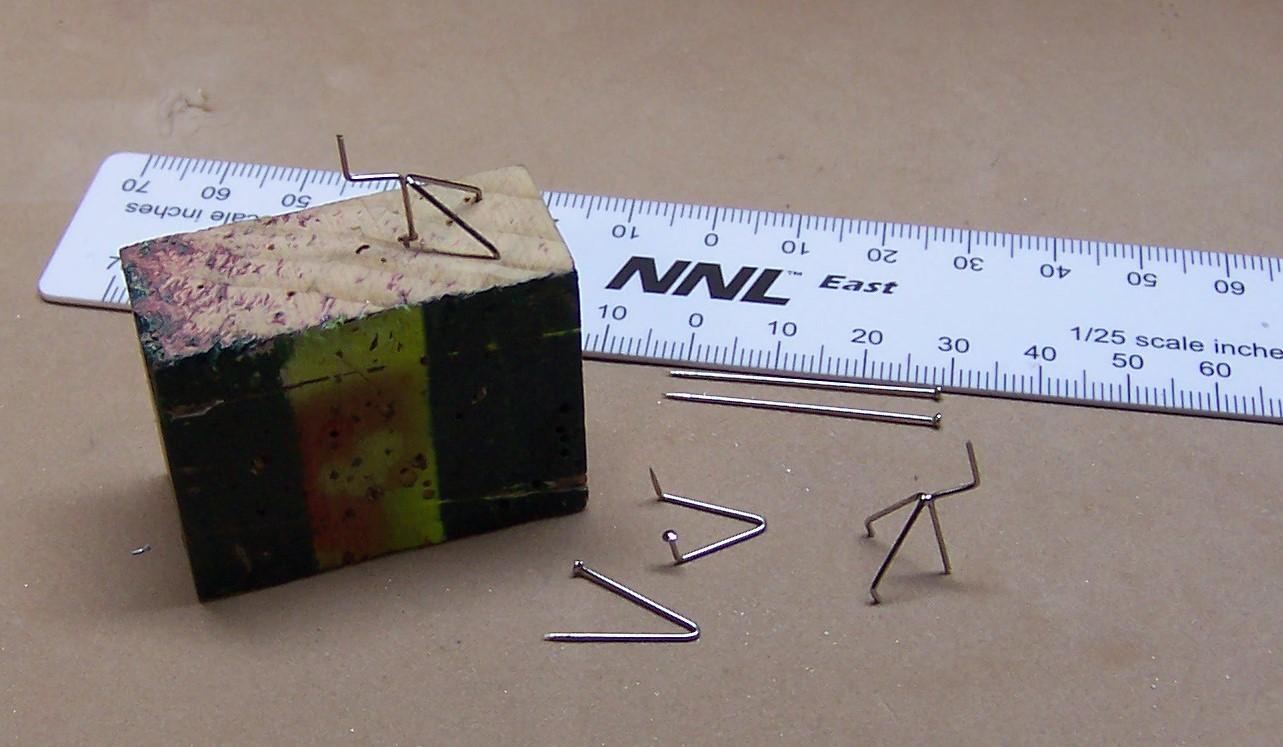
I needed a set of mirror brackets for a truck project that I have just about finished. The brackets are the same as the ones with mirrors found in the Revell Jeep Honcho kit. But the brackets and mirrors in the kit were way to clumsy. So I decided to make some. First I found a similar mirror to the kit mirror and made a mold for reproducing it. I only found the one in the spare parts box. Then I went on to make the brackets. I started with two long silk pins that are in front of the NNL scale. I then bent them in a V shape like the one at left. Next I bent the ends at not quite right angles like the one in the middle. On top of the wood block on the left is a second pin that has been bent Z shaped. And beside it is the V shaped pin set in two holes that keep it upright. The Z shape piece goes in a similar hole directly under the top of the V. Like in the photo below. Now you need to get out the soldering iron and with a TINY bit of solder join the two pins at where they meet and you will end up with a bracket at the right that can be installed on the truck door. Use the bracket to establish the location of the small holes that would be drilled in the door sides to set the ends into. Here's the way the mirrors look. After the mirror came out of the mold I coated it with Molotow Chrome.
-
Way to go Peter!!? It's what the hobby is all about!
-
Ok! The secret is out! In one of your pix I saw a full size fender in the background! That can only mean you are using your shrinking machine to get all those parts done! That's no fair!?
-
Nice build, Graham!
-
Mashpee Breaker 354
Chariots of Fire replied to Chariots of Fire's topic in WIP: Model Trucks: Big Rigs and Heavy Equipment
Hey, Greg! I don't know how many beacons. Actually I haven't added the little bit of protection they put in front and in back of it. Still got that to go along with a lot of other stuff! -
That boom is just crying for some brass work!!?
-
Mashpee Breaker 354
Chariots of Fire replied to Chariots of Fire's topic in WIP: Model Trucks: Big Rigs and Heavy Equipment
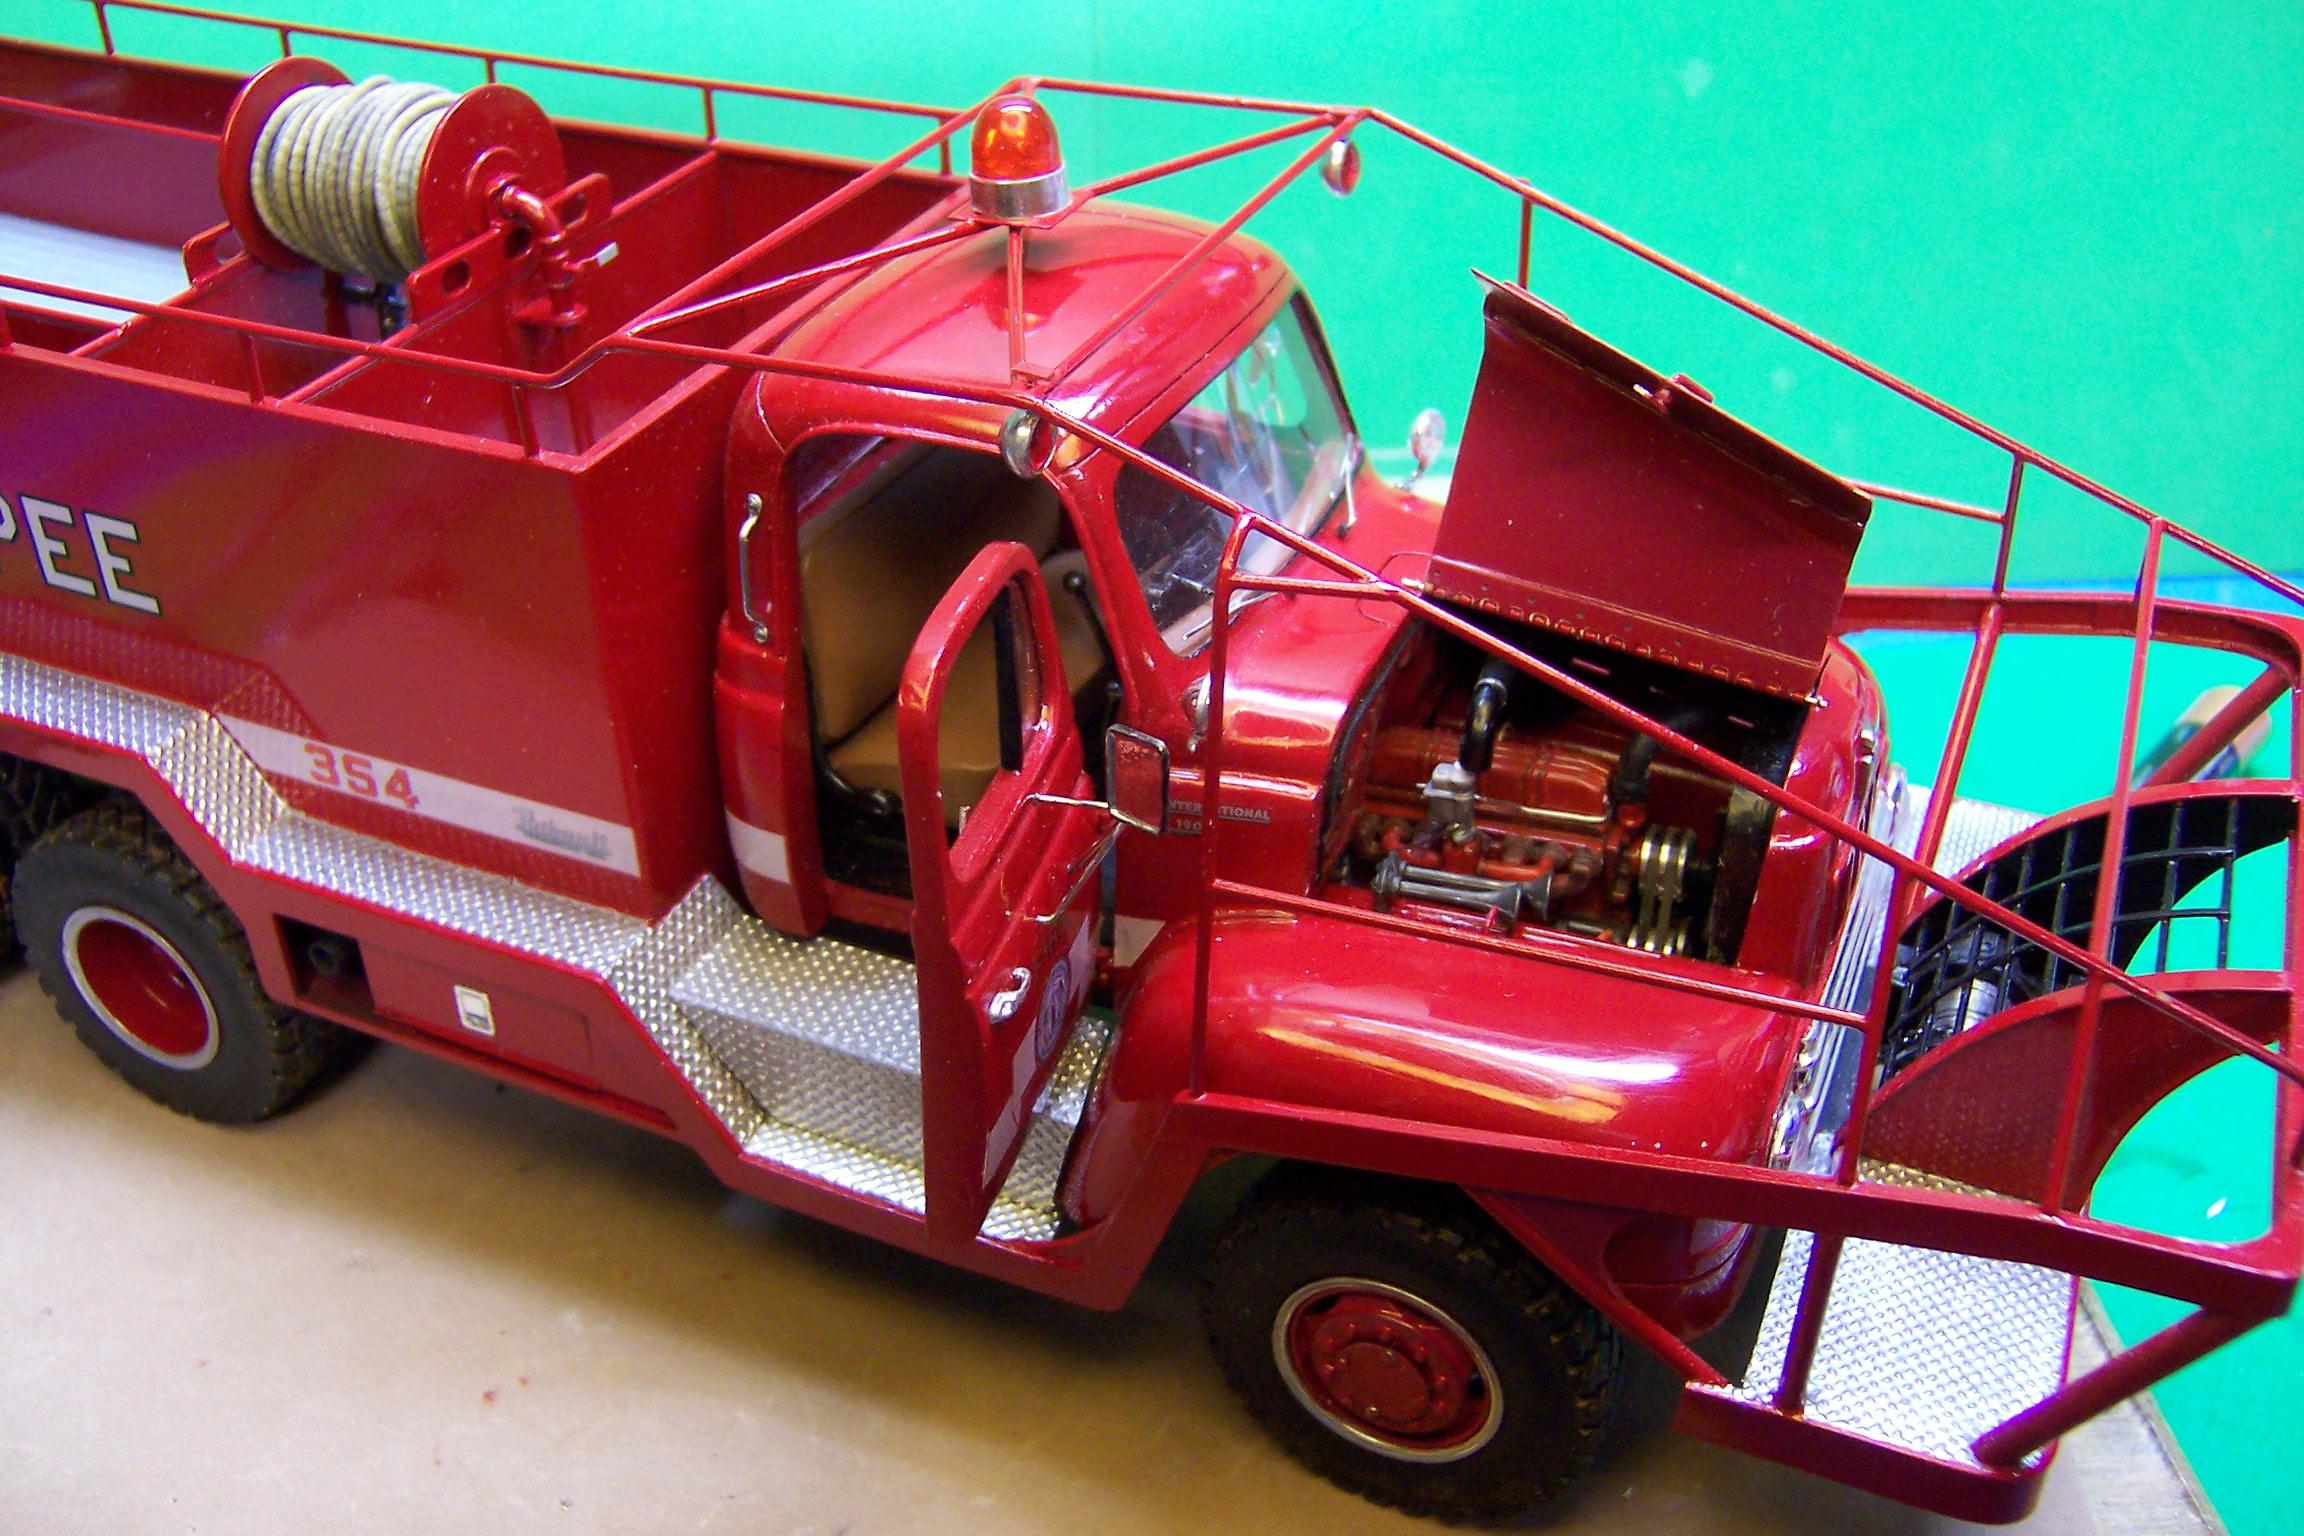
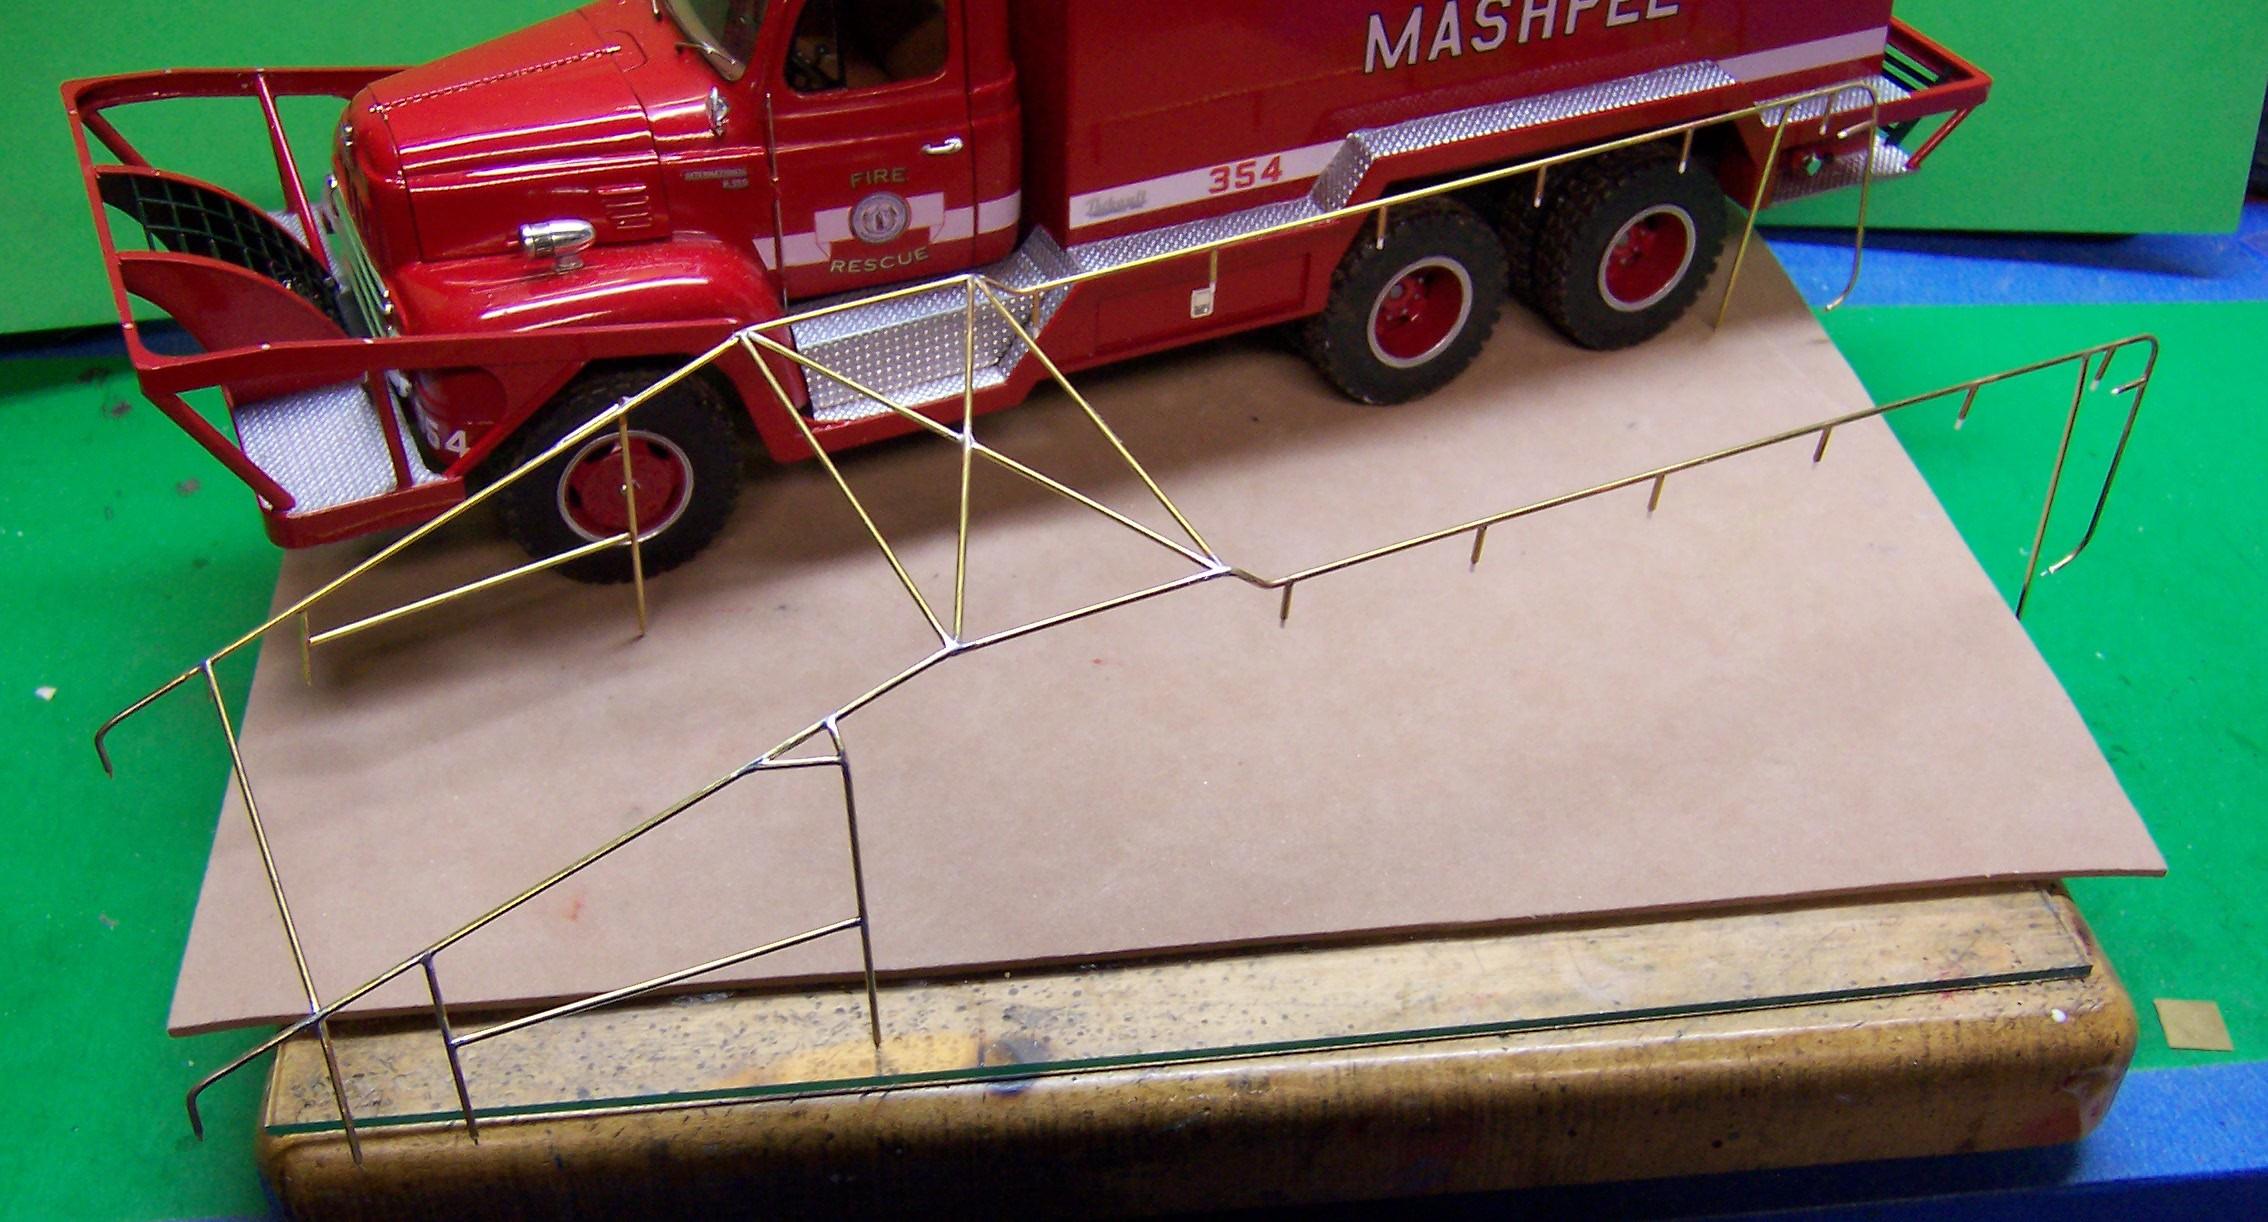
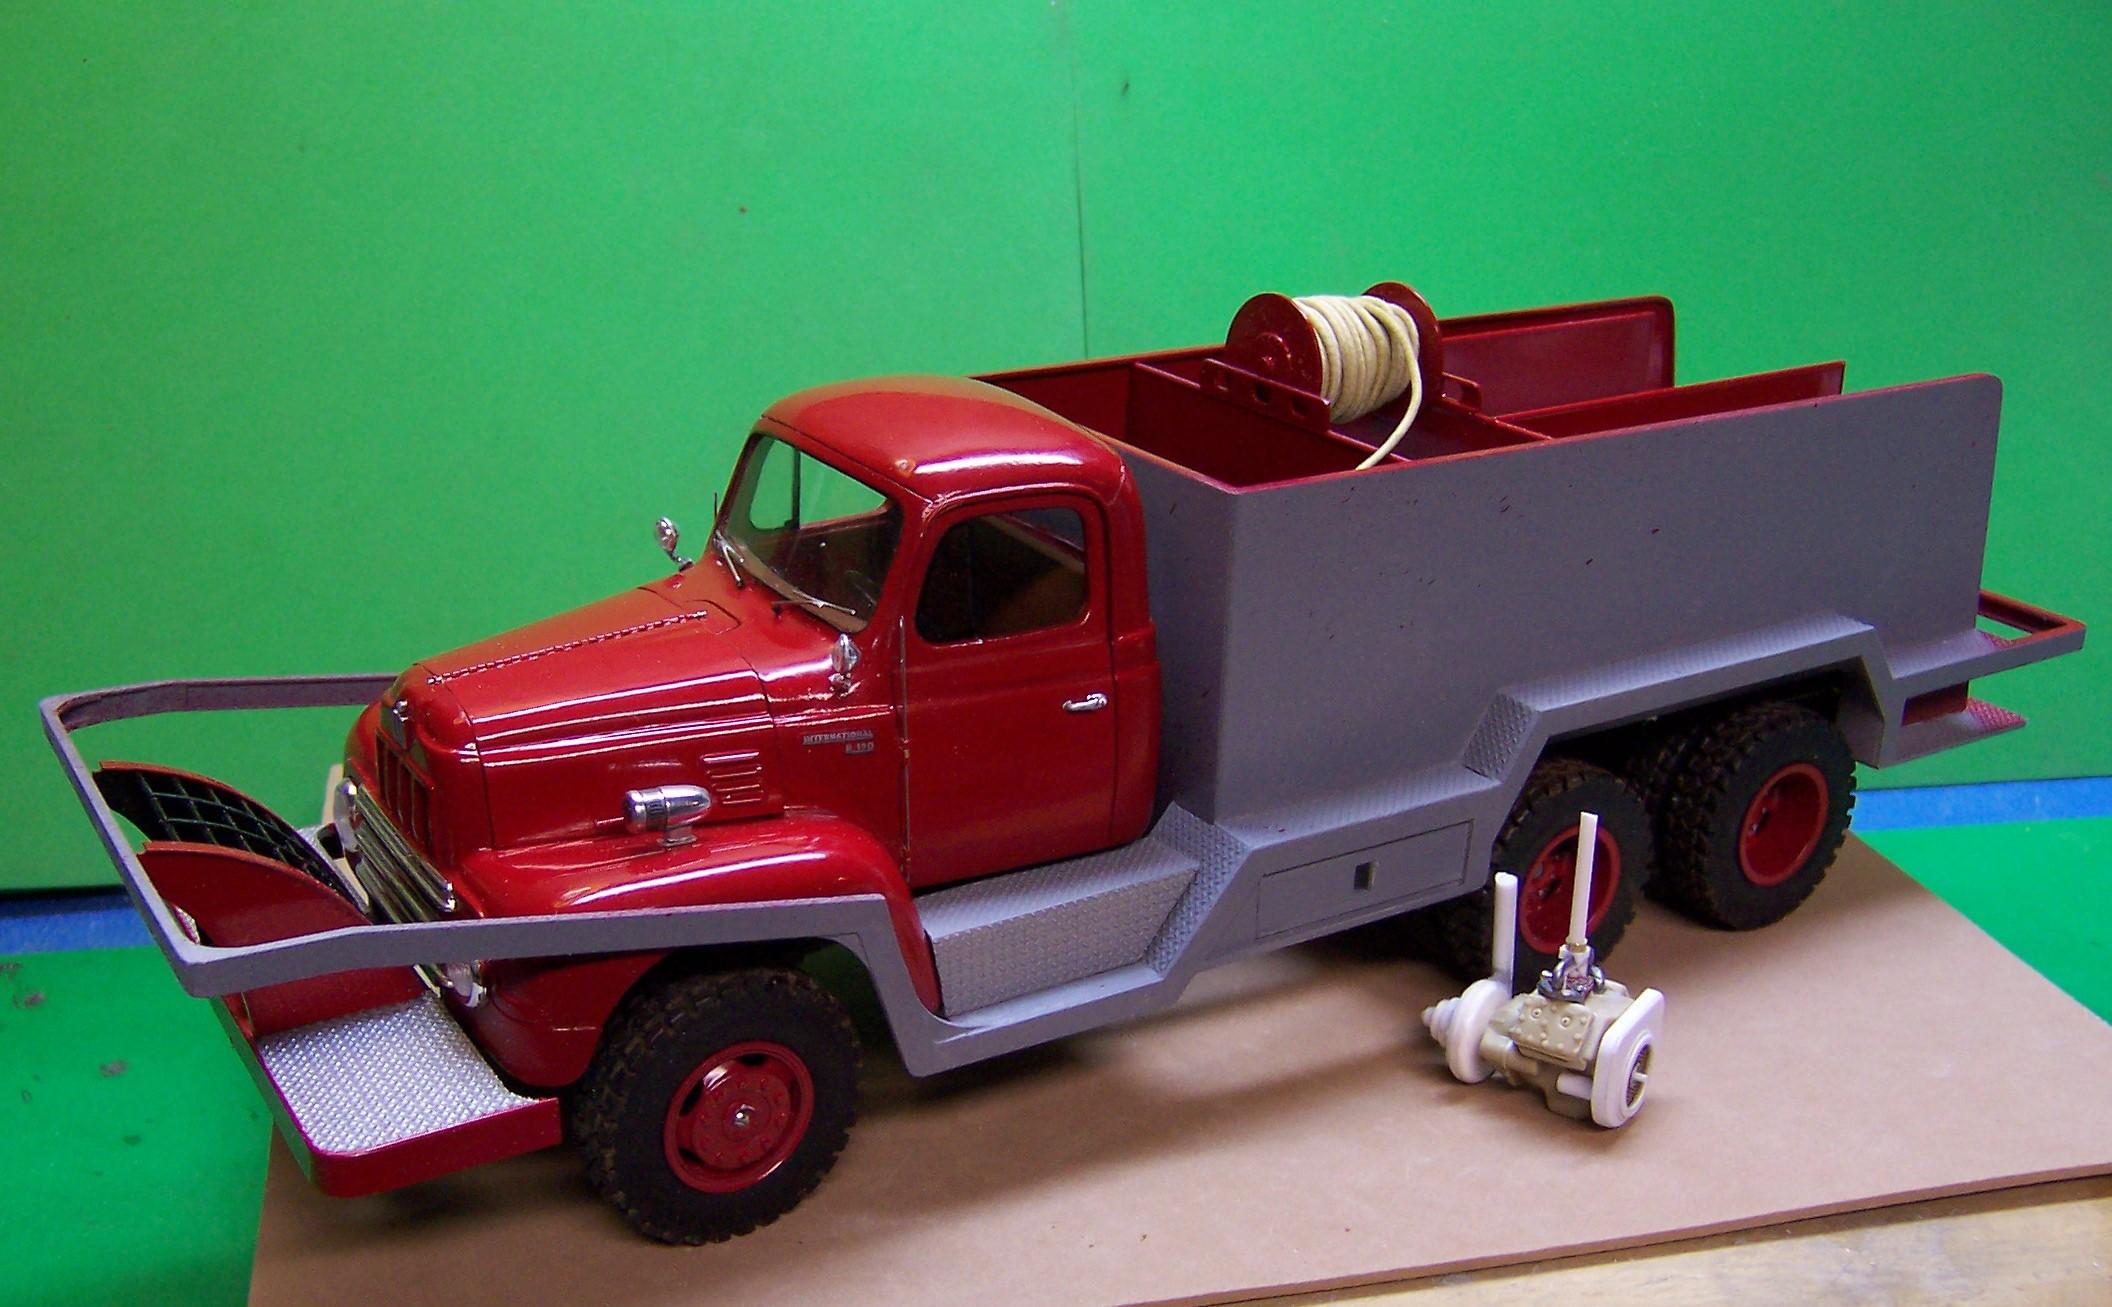
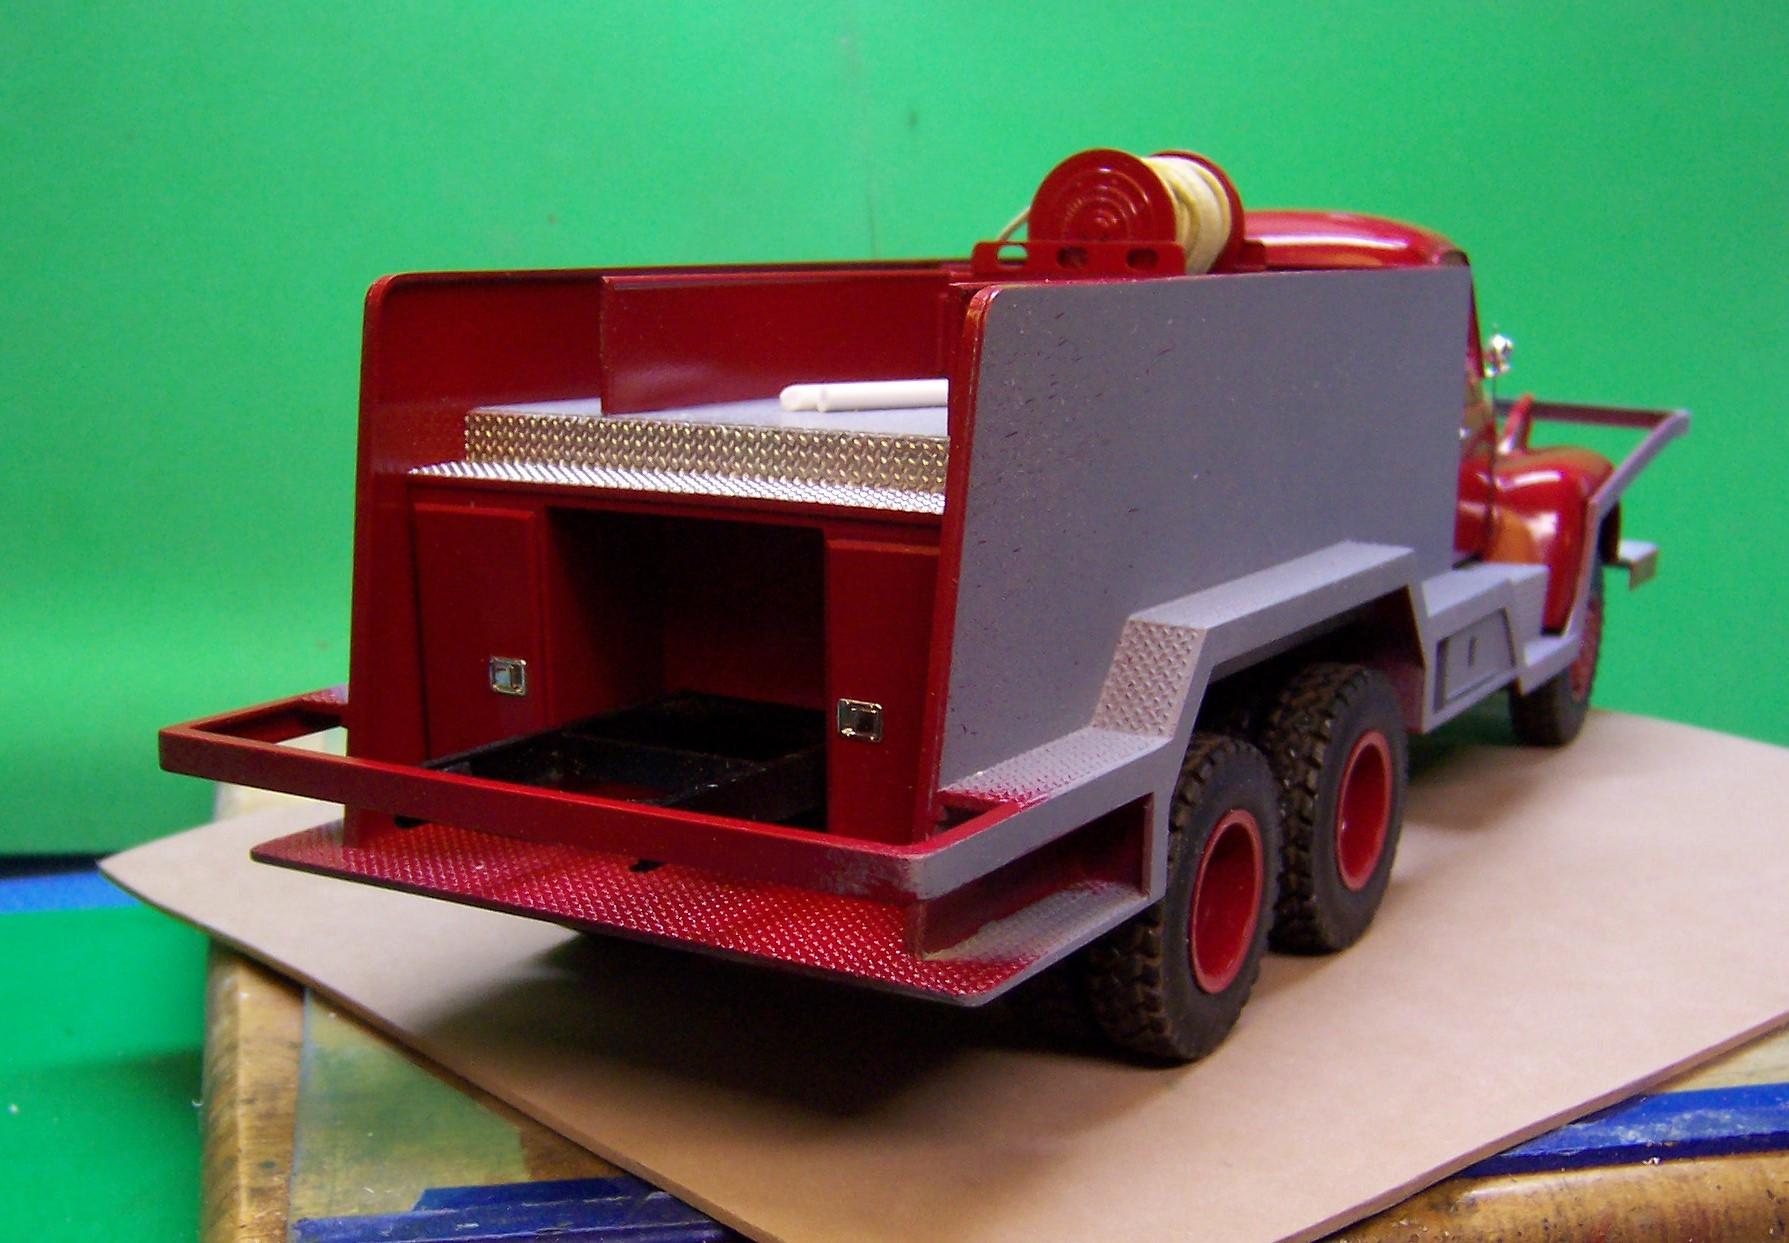
Continuing on...The top bars have been put together all as one piece so that they could be painted away from the rest of the rig. Trying to do it while attached and with a brush would be a disaster. The work was done by first fabricating the parts on the top of the body sides. As one piece they run forward over the cab and stop just in front of the windshield. Then the two main bars from the corners of the lower brush bar were added and soldered where the first bars stop. This gave me a solid beginning to work everything else around. Solid brass rods were used for all except for the short sections on top of the body which were done with tubing so that a piece of plastic rod could be inserted inside. The rods were ground down at each end to form a pin that would go into pre-drilled holes. They helped keep everything in place as the soldering progressed. After soldering was complete the joints were cleaned up with small files. Here is the complete upper bar work standing alone for painting. After it dried it was re-set using the pins as guides. Note the plastic rods and pins that go in the drilled holes that are visible on the lower bars. With the bar work completed it is now permanently fixed to the model.
-
Mashpee Breaker 354
Chariots of Fire replied to Chariots of Fire's topic in WIP: Model Trucks: Big Rigs and Heavy Equipment
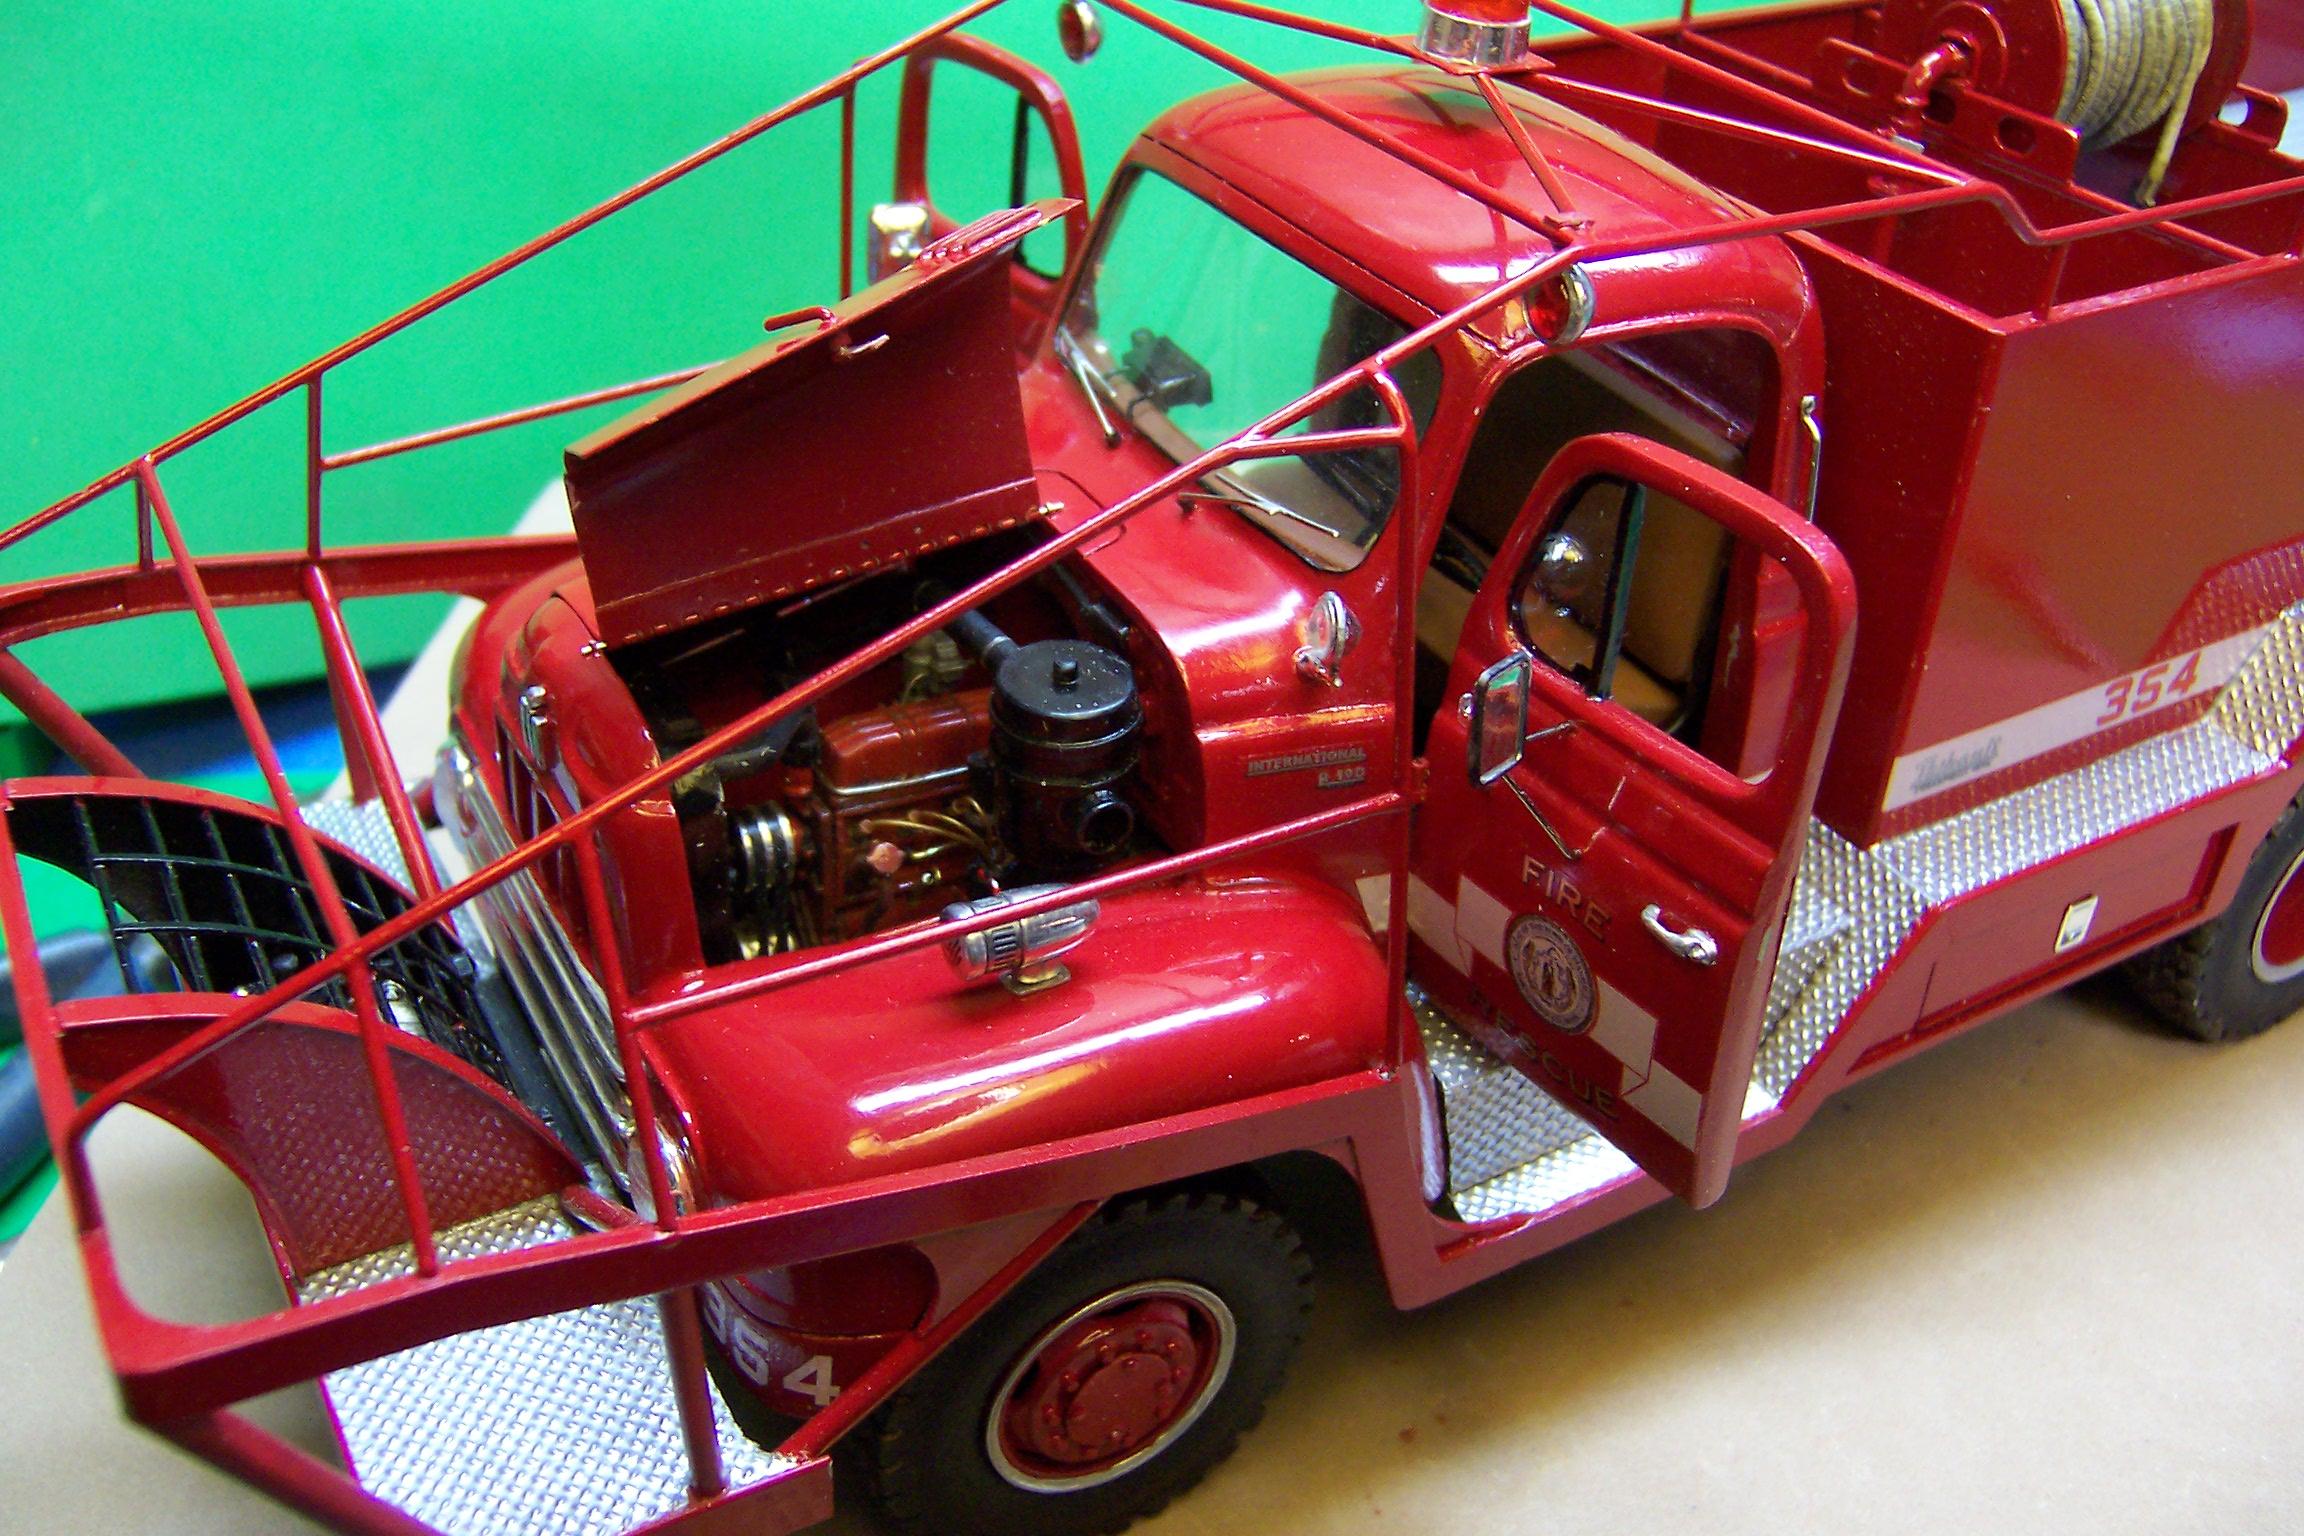
GE used to say progress was their most important product. So we got progress. But I'm not GE.? Lots of detail stuff going on since the last post. The body and cab are now secured to the frame and the front bar work has been completed. It stiffened up a lot with the addition of the braces. Next will be to start the upper brush bars that will be made of brass rod soldered and pinned together. Here is the progress so far.
-
When you do make sure the paving crew members stay 72 mm away from each other. (that's a scale 6' in case anybody needs to know)?
-
Well, I guess you did all of the right things. Reference materials, photos, measurements go a long way to getting things right. Hope you have enough sub-assemblies that you can paint separately. Something I have done a couple of times now when it comes to painting is to brush paint areas that are hard to get at with a rattle can or air brush without putting too much paint there. Use a bottle color that is close to what the outside color will be. I think a flat is better than a gloss. When you do the rest of the outside the overspray will cover the edges of the brush painted areas so you won't even notice the difference.
-
Yer joshin' right? You don't know much about this machine????????????????????????????Looks to me that you know a lot about it! Fantastic work my friend!!?
-
Mashpee Breaker 354
Chariots of Fire replied to Chariots of Fire's topic in WIP: Model Trucks: Big Rigs and Heavy Equipment
Got it a long time ago from a UK supplier. Unfortunately he went out of business and they are no longer available. I wish they were as they are real handy for hood and even doors that have the continuous hinge. The small door hinges are readily available from places like Micro-Mark. -
Mashpee Breaker 354
Chariots of Fire replied to Chariots of Fire's topic in WIP: Model Trucks: Big Rigs and Heavy Equipment
The body got a coat of paint today but it needs one more. It is a shade darker than the cab and that is just a case of not as much paint on the body as on the cab. A light sanding and then a final coat should do it.
-
Too coarse unless it is N or Z scale. Asphalt aggregate is 3/4" or smaller in actual scale.
-
Makes you wonder if he's going to find some scale asphalt mix to put inside the hopper, eh???
-
Mashpee Breaker 354
Chariots of Fire replied to Chariots of Fire's topic in WIP: Model Trucks: Big Rigs and Heavy Equipment
The hose is sewing elastic that I stained. The reel is from one of the AMT American LaFrance kits. I thinned down the reel sides considerably before assembly. It still needs supports, the supply line and the small electric motor for rewinding the hose. -
Oshkosh snow plow
Chariots of Fire replied to gotnitro?'s topic in WIP: Model Trucks: Big Rigs and Heavy Equipment
??!!!!?️A high 5 for sure! -
Mashpee Breaker 354
Chariots of Fire replied to Chariots of Fire's topic in WIP: Model Trucks: Big Rigs and Heavy Equipment
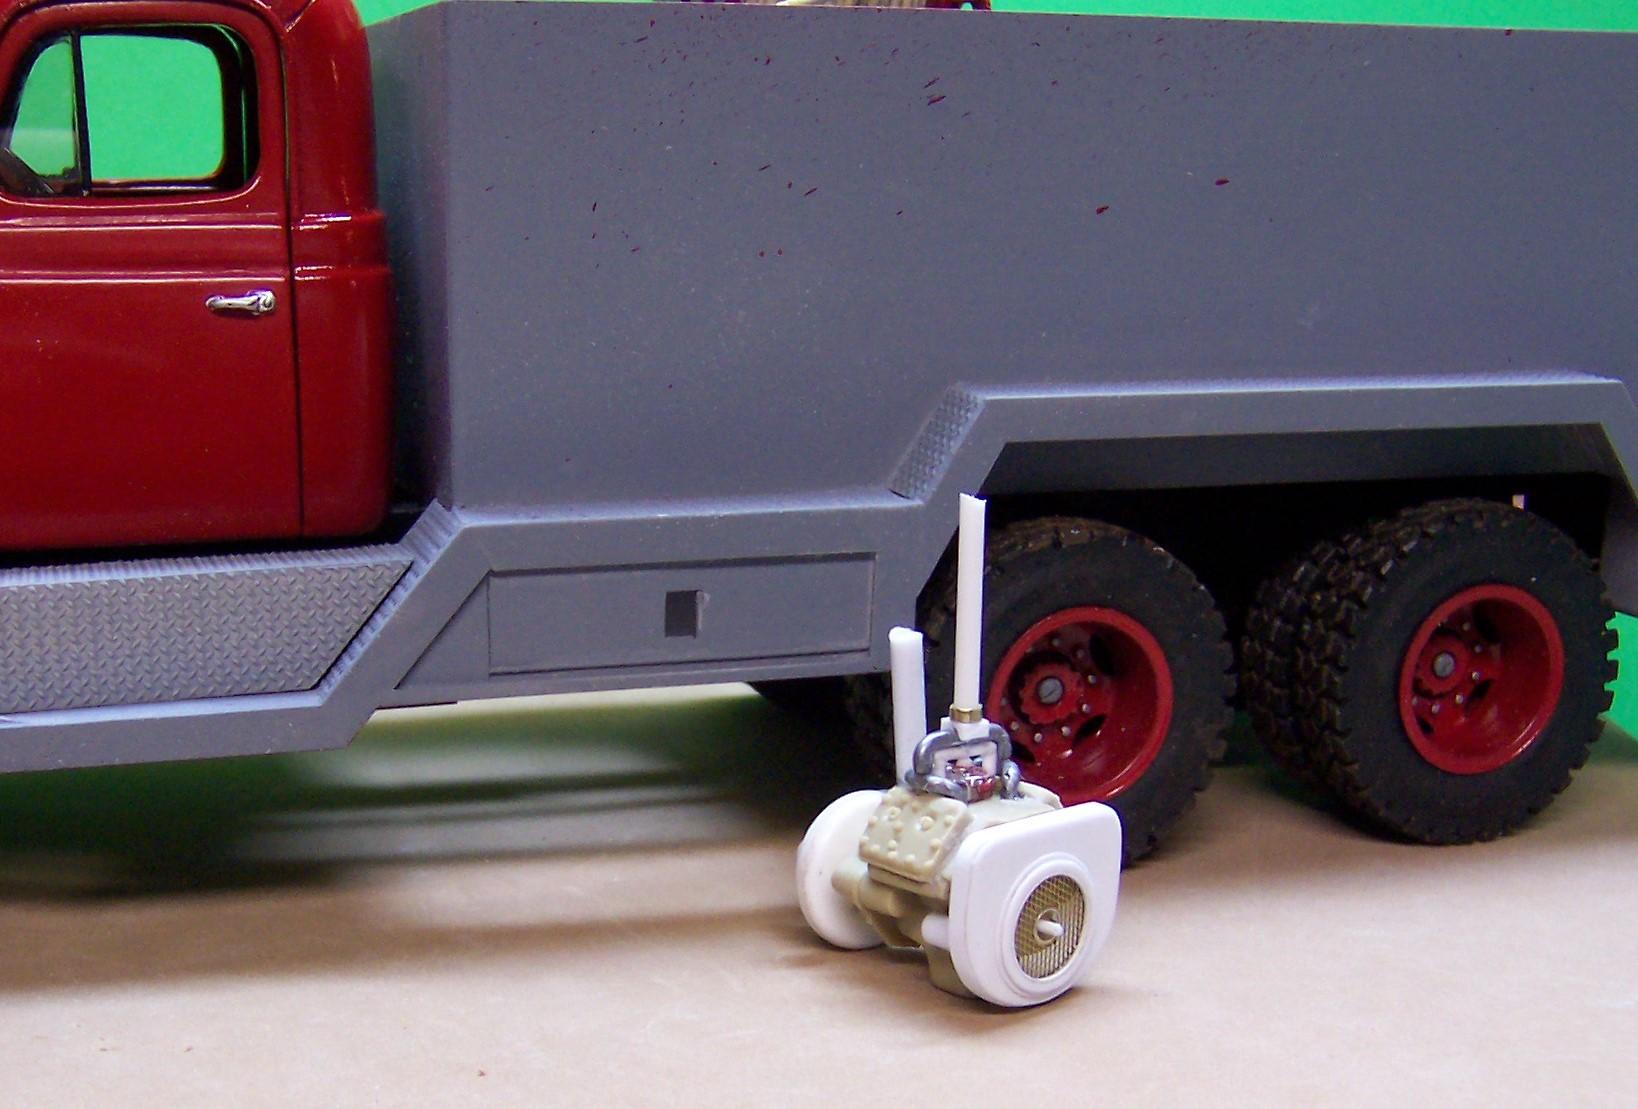
Work continues with some painting completed. Doing pieces separately on this model seems to be working best as I don't have too much paint in some places and not enough in others. Also got started on the Wisconsin V-4 powered Hale pump for the rear. Lots more to go.
-
Well Done! That's about as nice as it gets! Blade weathering is especially perfect!
-
This whole mess can cause one to get a bit edgy. I don't know what the future will bring but I know One who does. Nothing to fear, really.
-
You keep going and the Decker Construction Company is going to need a bigger shop!?