Warren D
-
Posts
1,839 -
Joined
-
Last visited
Content Type
Profiles
Forums
Events
Gallery
Everything posted by Warren D
-
Cat D8H Dozer
Warren D replied to Warren D's topic in WIP: Model Trucks: Big Rigs and Heavy Equipment
If you want to showcase your work, please start your own thread. -
Cat D8H Dozer
Warren D replied to Warren D's topic in WIP: Model Trucks: Big Rigs and Heavy Equipment
If I recall, the PE set had instructions included (or maybe it was download from the CTM site) -
Cat D8H Dozer
Warren D replied to Warren D's topic in WIP: Model Trucks: Big Rigs and Heavy Equipment
Yes. -
Well done, looks great!
-
Ryder IH Loadstar Box Truck
Warren D replied to DRIPTROIT 71's topic in WIP: Model Trucks: Big Rigs and Heavy Equipment
Good start, I agree with going with the spoked wheels. Something about the 6 holes doesn't look right for that cab, at least not from what I remember here in the northeast. Good to hear they might be cast again, I meant to get one or two but put it off..... Had one of those on the front end of a school bus back in 1979, 3rd day out the head gaskets blew on the 345. Found out it wasn't me, that bus had a history of blowing head gaskets about weekly. Heads were probably warped but the mechanics just kept putting in new gaskets. -
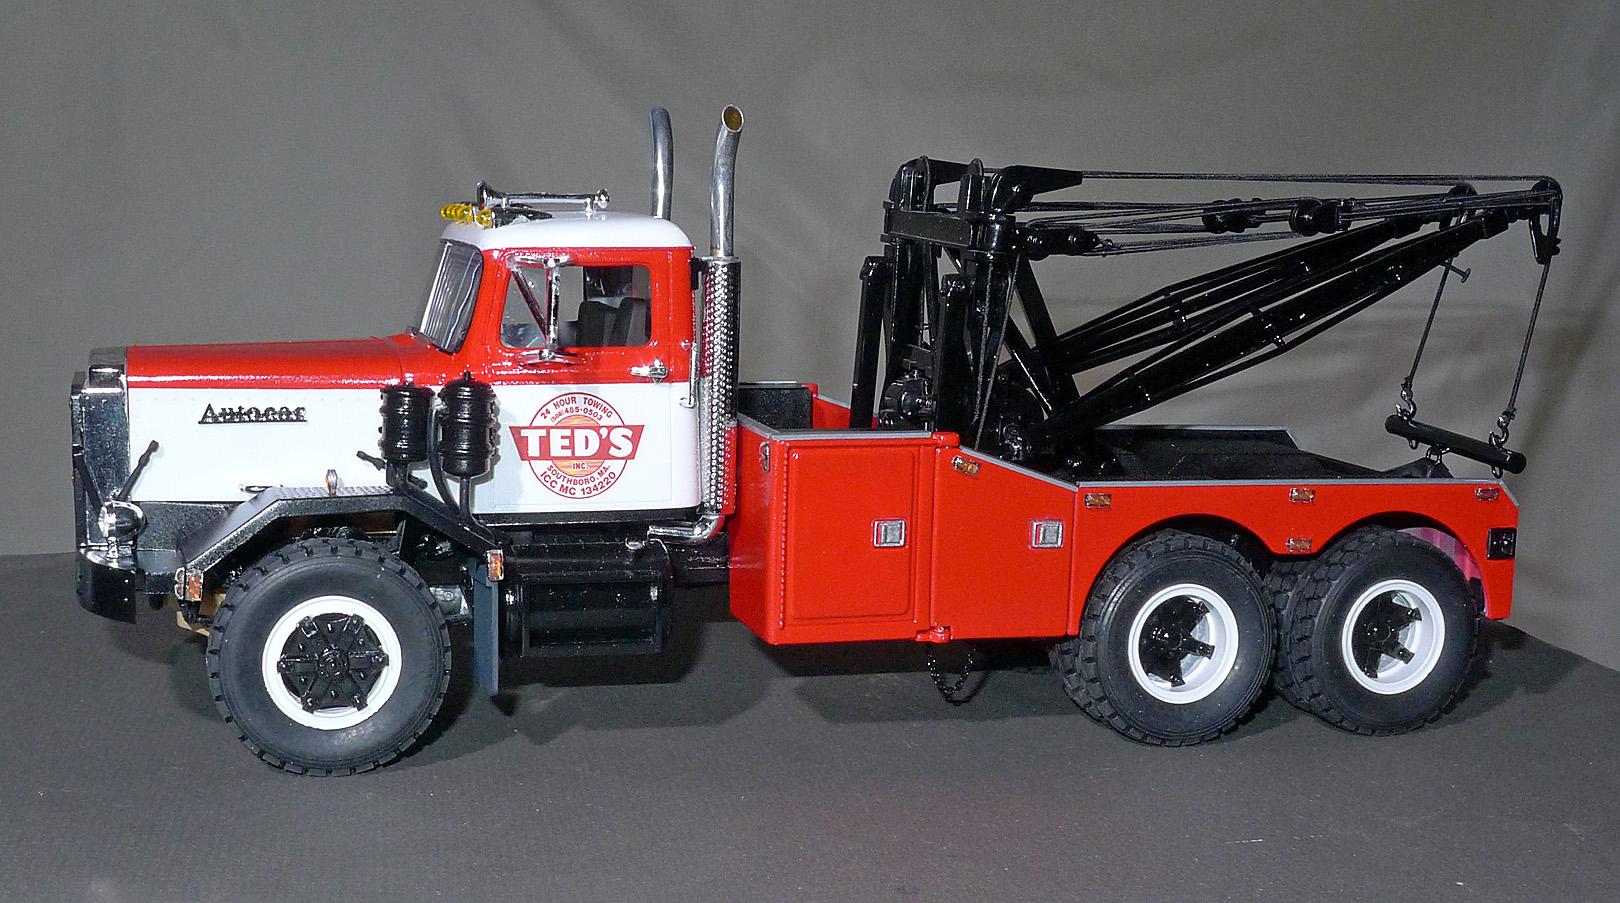
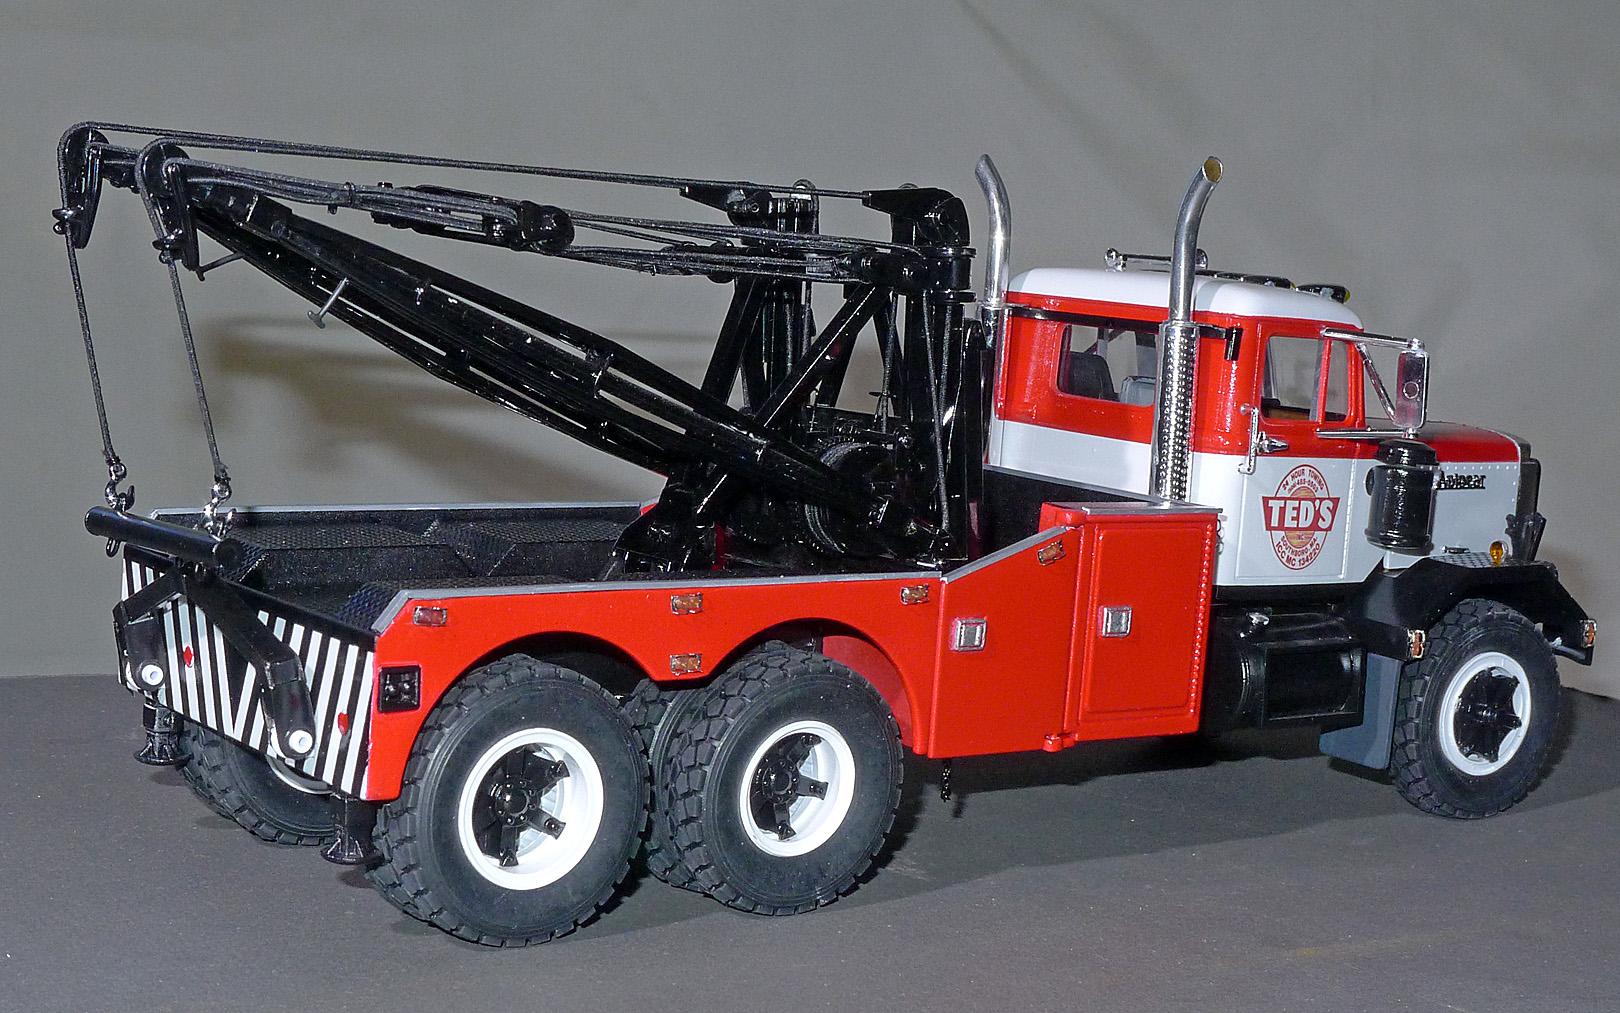
Autocar Holmes Wrecker
Warren D replied to Warren D's topic in Model Trucks: Big Rigs and Heavy Equipment
Thanks! Thank you, nothing says wrecker better than red, white and black! Thanks Thanks Thank you Thanks Thanks Thank you Thanks Thanks Thanks, the real one is a real beast Thanks Thank you -
Autocar Wrecker
Warren D replied to Warren D's topic in WIP: Model Trucks: Big Rigs and Heavy Equipment
Calling this one DONE! -
I saw the freshly restored Autocar wrecker at the Bolton, MA truck show last fall. I think I got very close, though I didn't notice that the front of the wrecker bed was cut back and wrapped around the stacks until I was almost done. (Correction would have required cutting up the wrecker bed as well as shortening the chassis 1/4". With everything painted and assembled I decided to take some artistic license.) Otherwise, I'm pleased. AMT Autocar dump truck cab, fenders, hood, engine and front chassis, Pete wrecker rear chassis grafted to front chassis. Wheels and tires from Scale Scenics, 24.5's! Lights on body and nose from CTM. I usually paint the stripes on the rear but as I seem to be having more trouble getting crisp lines, I decided to go the decal route which worked very well. Wrecker body from First Gear, rear tow gear from scratch.

-
Very well executed! A friend drove one of those many years ago, shorter wheel base and in Kimberly Clark pink. I think that was the only time in 40+ years he didn't run with a CB!
-
I had trouble with the Mr Surfacer, it wasn't sticking to the resin/print. When I shot the color coat and masked for the second color, the tape peeled the primer off. Mr Primer worked great but it's not available anymore. Mr Surfacer always seems very runny to me.
-
Interesting build. I've been using Rustoleum sanding auto primer on 3d printed parts, several coats needed with aggressive sanding in between. Alternate to that is skimming 3M Acryl-Red glazing putty. Just be warned it sets up extremely hard and needs aggressive materials to sand it smooth.
-
Autocar Wrecker
Warren D replied to Warren D's topic in WIP: Model Trucks: Big Rigs and Heavy Equipment
Thanks! Thanks, I gave up trying to paint the stripes and went with decals. Thanks, trying some different products. Thanks! -
Autocar Wrecker
Warren D replied to Warren D's topic in WIP: Model Trucks: Big Rigs and Heavy Equipment
Long overdue update, cab is painted and on the chassis. Wrecker bed is almost finished, waiting to get it on the chassis to add the delicate details. Lots of time spent waiting for the paint to set up. While the acrylics set up fast, I've been finding the longer I wait, the better things go, especially with different brands. This build has paints by Tamiya, Pollyscale and Testors Aztek.
-
Like this? : https://globalscalemodeltrucks.com/products/copy-of-freightliner-powerliner-96-resin-model-truck-conversion-cab-1-25-and-1-32-scales
-
GMC Crackerbox
Warren D replied to carsntrucks4you's topic in Model Trucks: Big Rigs and Heavy Equipment
Well done, with some of the best weathering I've seen! -
International CO-4000, Navajo Trucking.
Warren D replied to Repstock's topic in Model Trucks: Big Rigs and Heavy Equipment
Looks good, I like the short WB. -
Looks good to me!
-
Ryder Ford H Model
Warren D replied to DRIPTROIT 71's topic in Model Trucks: Big Rigs and Heavy Equipment
Looks good, another obscure subject! -
Scratch end dump in progress
Warren D replied to cdntrucking's topic in WIP: Model Trucks: Big Rigs and Heavy Equipment
Good start! -
1926 Mack AC Stake Truck
Warren D replied to Chuck Most's topic in Model Trucks: Big Rigs and Heavy Equipment
Well done. I'd suggest some grease on the drive chains.... -
2023 BRBO GMC Topkick Fuel Oil Delivery
Warren D replied to Warren D's topic in Model Trucks: Big Rigs and Heavy Equipment
Thanks, I needed something to break up the open space! Thanks, Charles! Thanks -
2023 BRBO GMC Topkick Fuel Oil Delivery
Warren D replied to Warren D's topic in Model Trucks: Big Rigs and Heavy Equipment
Thanks, as you might have noticed, I like different! Thanks -
2023 BRBO GMC Topkick Fuel Oil Delivery
Warren D replied to Warren D's topic in Model Trucks: Big Rigs and Heavy Equipment
Thanks, the grille was actually easy, I shot the whole thing in black Pollyscale and then ran a Molotow pen on the raised portion. The trick was even pressure and speed. -
1972 GMC 4x4 wrecker
Warren D replied to leafsprings's topic in Model Trucks: Pickups, Vans, SUVs, Light Commercial
Nice job on a light duty wrecker. -
2023 BRBO GMC Topkick Fuel Oil Delivery
Warren D replied to Warren D's topic in Model Trucks: Big Rigs and Heavy Equipment
Thanks, and thanks for your advice! Some (maybe most) of these builds are like waffles, the first one is a throw away! If I did one again, I know there are things I'd do differently.