absmiami
-
Posts
4,781 -
Joined
-
Last visited
Content Type
Profiles
Forums
Events
Gallery
Everything posted by absmiami
-
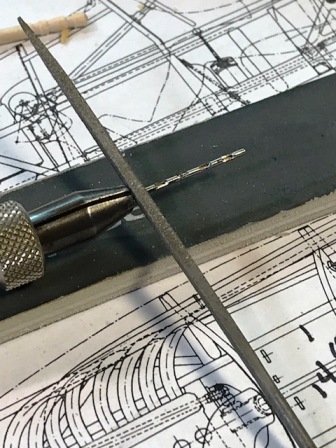
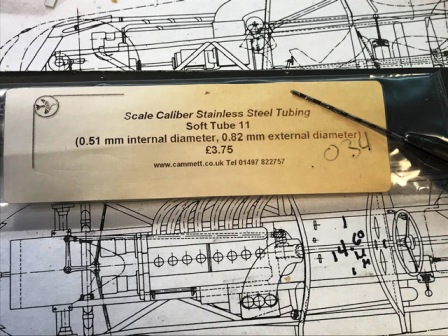
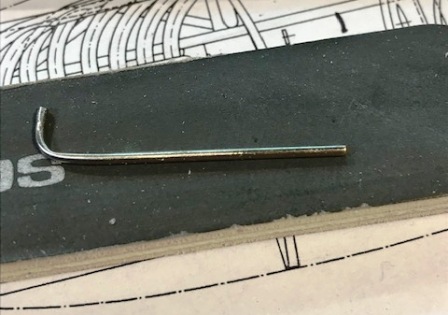
one of the better features of the MFH Alfa engines is that they took the trouble to include a small diameter tube that carries two electrical wires back from the distributors to the engine bulkhead - the tube is perched on top of the right hand cyl head. so I grabbed a length of .082 mm steel tubing that I bought years ago from an English internet site/seller and filed a bunch of notches - the perforations are then opened with the point of an Xacto knife - and the head of a small dia pin drill and than threaded some .0075 inch black detail wire - the tube is about 3/4 inch in scale and should be close to scale accurate still have to figure out how to secure it to the valve cover - later .... and thank you Misters Laski and McNutt once we stop learning we are totally screwed - right ??

-
trying to figure out where all of the water and oil lines are going -- thinking about this for weeks and then I remembered that the Fusi Alfa Romeo bible - published about 40 years ago - had the answers ! the book has a very good chapter on the 158 and 159 with half a dozen factory (?) drawings - including diagrams for the water and the oil lines yeah .... So the scroll shaped pump that I made needed a second outlet - that sends water down a pipe that distributes the coolant to the center of the cylinder head just below the exhaust pipe openings so I made the pipe with a length of .047 nickel silver rod - filed and shaped and tapered that will be glued in place after everything is painted .... that's one water pipe down and three to go ....
-
gracias but your Delage parts are starting to get restless ... maybe I should start to finish the Delage engine on this blog pondering ....
-
one of my favorite kits I'm planning to build another one next year or so .... like how you finished the seat covering, is it brushed on oil based paint or something else ?? shame it will be hard to see once this is finished ... will the body be British racing green - or what ? by the way - how dare you let "life reasons" interfere with your posts ...
-
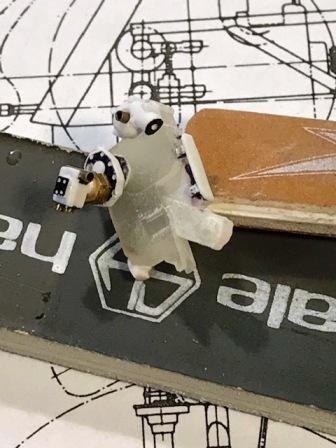
almost done - but the pumps are in place for the photo - but not attached will paint these separately - pondering whether to drill the dimpled holes and glue in some tiny bolts or bolt-head detail - I might - because the bottom of the engine will be visible through the sump opening dunno
-
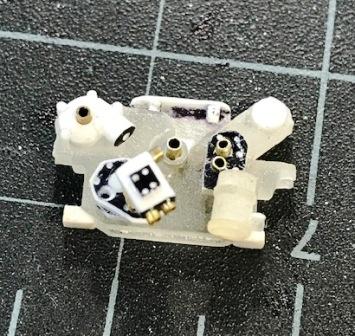
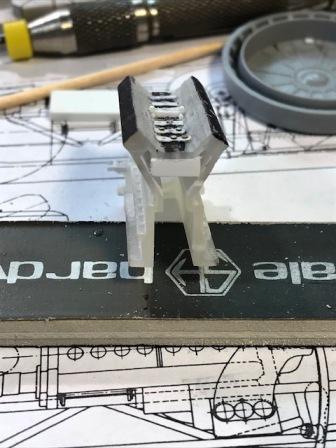
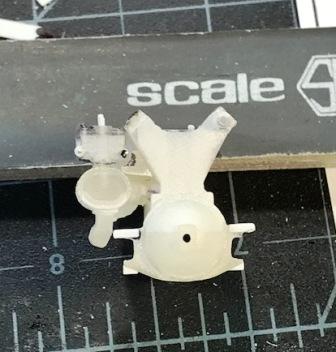
also had to make changes to this portion of the 3-D casting to locate what appears to be a pump and filter on the photo-right side of the casing the MFH 158 and 9 engine kits get this right - so I am referencing a couple of building blogs of these kits for help - getting as much of this cone as possible before gluing this portion of the gear casing back to the engine block - as I had done with the cylinder head
-
time to make and/or correct some pumps at the front of the engine - using the usual suspects - evergreen plastic rods and stock - and a length of .040 brass tube cutting and drilling etc the scroll shaped pump is part of the cooling system - haven't yet figured out where everything runs ....
-
yup
-
wait a minute ... do you have the files and random tooth cutting bits made by Perma-grit ????
-
has anyone kitted the '64 500 superfast ?? that's when Enzo hit the sweet spot ...
-
this design is very interesting not an expert - but I think Pinnin proposed both front and rear engine designs to Ferrari - when? - in '67 ? this car carries design features from both the rear engine proto - the Dino - and the fr engine prototypes .... so it's a mutt but a very pretty one .... the coachbuild forum is devious - lots of rabbit holes to crawl down ...
-
but: who was Princess De Rethy ??
-
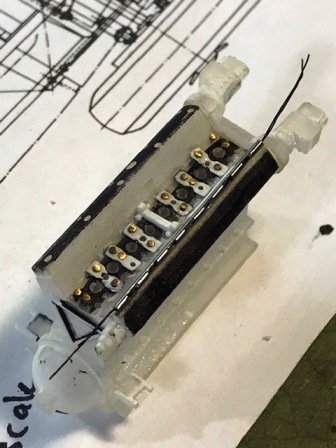
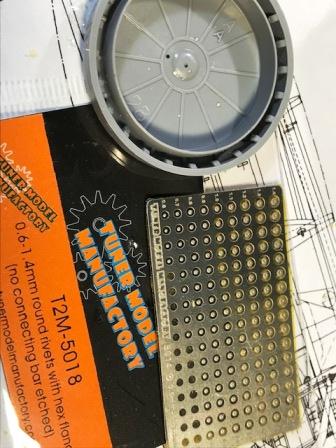
this week's lab experiment ..... the supercharger has a ring of small bolts lining the end cap facing forward in scale they can't be much larger than - what? - 3/8 inch ? to attempt to duplicate this ring of bolts I removed the smallest photo-etched bolts from this Tuner Model Manufactory sheet ... I picked them off of the backing with a hobby knife and coaxed them into a film container cap can't use a tweezers - these parts are too small the pens that I buy for my office - Pentel - have these neat little protective nibs on the pen tips took one off and glued it on to the end of a tooth pick - it's just a little bit sticky ... this tool can pick up the dots - just a little surface pressure will hold the dot to the "tool" to transfer it to the surface of the part, which I coated with some clear acrylic paint for an adhesive once the dot is on the part you can move it around and locate it with the end of a hobby knife now I'll paint the part - which will hopefully secure the "bolt" detail ... we'll see ...
-
thanks but we recently lost THE engine guy Gerald WIngrove missed the news - as I seldom follow the treads in the other sections of this forum lets all make something tonite - in tribute ...
-

Gerald Wingrove has passed away.
absmiami replied to Bugatti Fan's topic in General Automotive Talk (Trucks and Cars)
proud owner or four of his books they have always inspired me and informed me RIP -
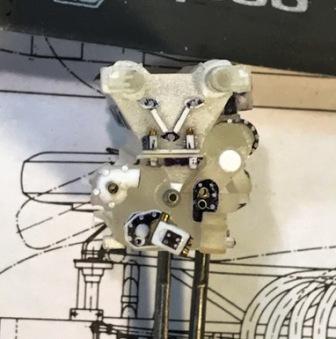
jammed a piece of evergreen strip into the cylinder head when its time to fit plug boots and radiator pipes into the cylinder head - the extra material will keep everything in position than sawed the gear case in half and added some bits and pieces of evergreen to detail the front and back of the cyl head now need to make two pumps that sit down low in the front of the gear case - one - or both - not sure - are oil pumps - one might be a filter ... haven't quite figured this all out yet oil lines go in and out of a tank in the scuttle and in and out of a small radiator sitting under the water radiator and then through a pump and then in and out of the engine block so if anyone would like to send me the MFH instructions for the 1/12th 158 kit - the pages showing the oil lines - that would be nice .....
-
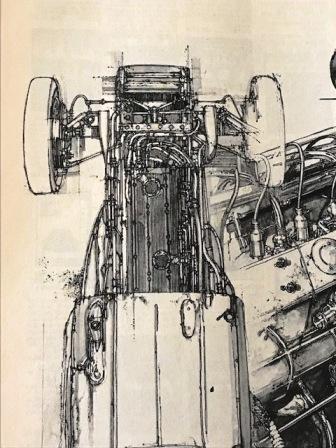
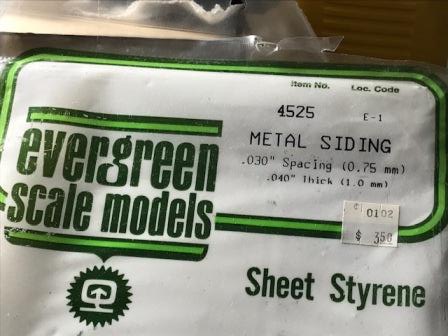
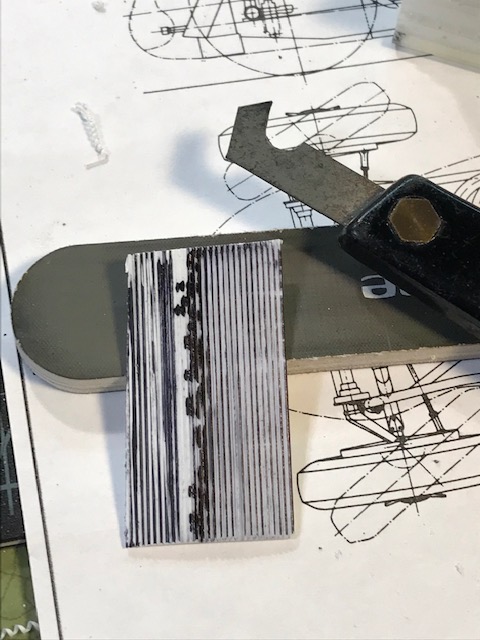
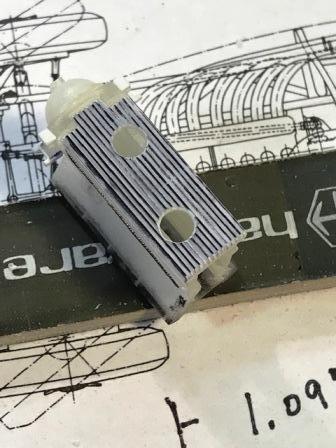
Road and Track mag used to be really good Really ! they would sometimes publish drawings fr artists that would show us stuff that we could not otherwise figure out - like what does the bottom of the engine bay on an Alfa 158 look like ?? this is a scan of a section of a full page layout the sheets of evergreen plastic come in handy every third blue moon ... the correct size "metal siding" sheet - railroaders would use it to make an HO scale metal roof ... was scribed w/a Tamiya scribing tool to open and deepen the grooves ... presto - one finned engine sump base - with a couple of round oil filter covers punched from sheet plastic ... will be epoxied to the bottom of the block after finishing more stuff ...
-
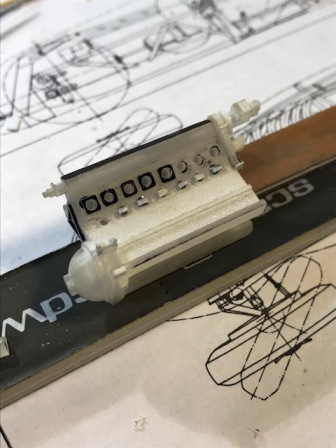
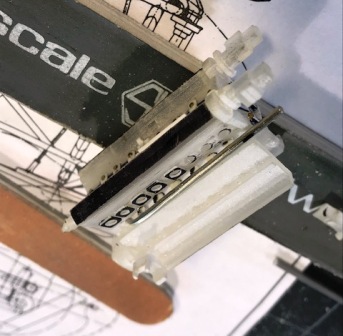
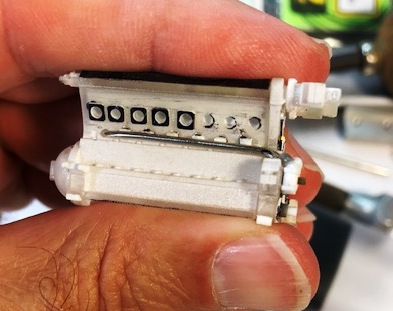
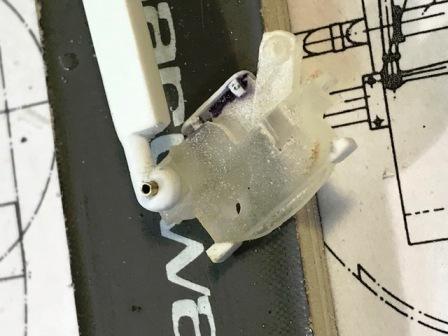
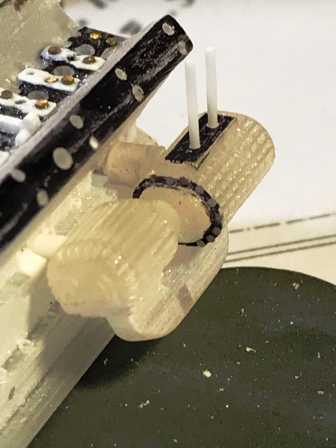
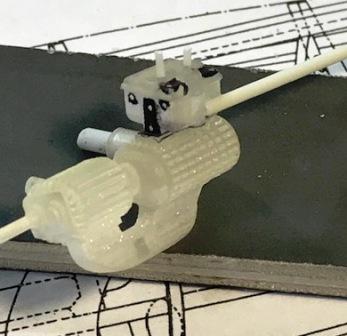
don't try this at home - no just kidding Do try this at home ... the plug wires run through a really neat guide that is drilled with plug holes and openings for (?) heat dissipation like swiss cheese this would be a bear to machine - like the supercharger - would take hours to do well so I appreciate the 3D printed part - which is very accurate but can we open and drill it for the wires ?? turns out that we can - the material is translucent - so you can see where the twist drills are going but the material is also tough and just a little flexible so if you go slow and use progressively smaller and larger drills, you can actually open the part which is pretty cool ....
-
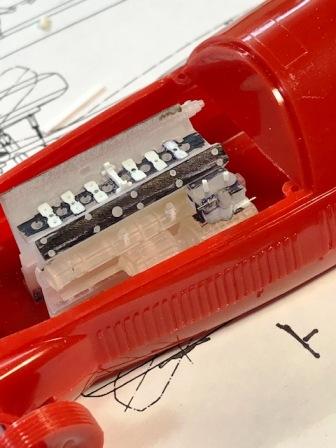
as I was adding some detail to the Weber Carb I recalled that Indycals' instructions warned that there might be some interference with the intake manifold once the supercharger and carb were attached yup, there is .... not a big deal - removed some material from the back one third of the manifold and on goes the supercharger and weber carb ......
-
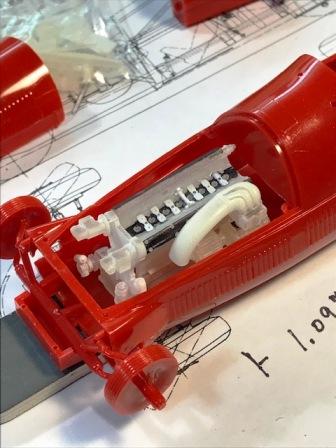
some test fitting want to make sure that the engine with the carb and intake horn will clear the bonnet its close but looks OK a profile photo of the real car looks like this ... about the intake manifold though ....
-
in case you've never opened a Merit kit box ... by the way - the art work on the original kit boxes was great ... 0793 is shot of the kit engine sitting on the kit frame with the new and improved engine besides quite a difference in scale block length vs the Merit engineer's guess ....
-
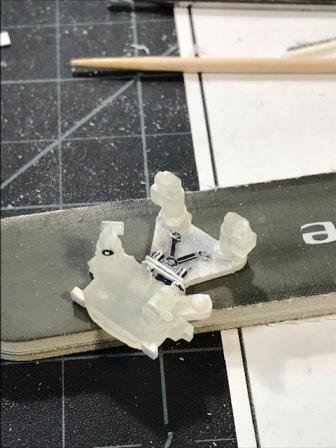
all of that great cyl head detail that was drawn and printed into the top of the cyl head was removed to shorten the engine so I then had to replace it with some bits and pieces of Evergreen plastic the engine actually had a two piece cyl head - two blocks of four cylinders - bolted together in the middle that's what the part is in 0790 - representing the tabs at the center of the cylinder head that are bolted together ...
-
the cylinder head marked the valve cover bolt holes with an xacto and a caliper measure, divide, and drill - I'll add some RB Motion dome-head nuts - the smallest ones then sanded a slight "crown" to the cyl head the black is just a sharpie to help me with the marking and measuring - actually you could "paint"the valve cover w a sharpie finish most of the engine will be flat black anyway ...
-
one brief note for Merit kit owners the kit engine has a single supercharger - which is accurate for the early 158's the Indycals engine kit duplicates the two stage supercharger on the 1950 Fangio car the intake horn points forward and down - this is correct for the Fangio car the later 158s and 159s had the intake horn that turned up and drew its air from the behind and above the engine bay so even GP cars from the early fifties were evolving and changing within the racing season this is not a recent development !!
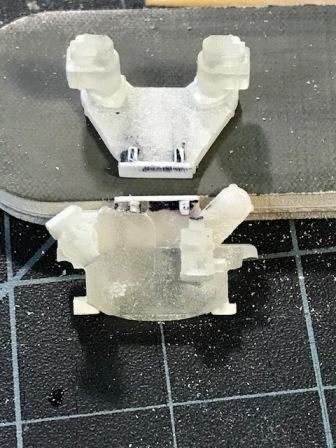
-
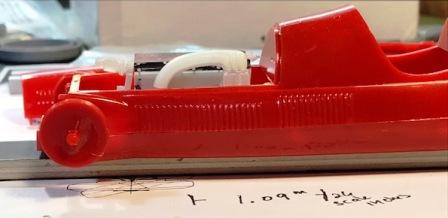
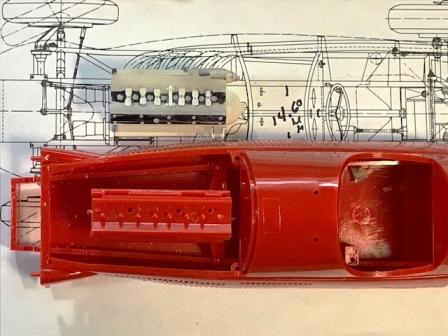
the printed parts had pegs that matched the kit mounting points on the kit frame one small problem the kit frame is all wrong ... I've got enough drawings and literature to be certain that the frame rails ran straight back - like a ladder - yes, it was referred to as a ladder frame ... and were only 16 MM - in scale - apart - a very narrow - and simple - frame the round chassis tubes visible on the 159 were not used on the 158 you can also refer to a building blog for the 12th scale MFH - they got all of these details correct so on the back side of the gear case cover you can see 2 things thing 1 - Portaro gets the basic shape of the block and cyl head right thing 2 - I've begun to modify the frame mounts by removing that section from the printed parts and re-shaping the 3D material and adding evergreen for the mounts - front and back so whenever I get around to 1. grinding out the kit frame, and 2. making the new frame - from Evergreen stock - no big deal - the engine will slip right on to the frame and should be securely mounted ...