Dragonhawk1066
-
Posts
3,932 -
Joined
-
Last visited
Content Type
Profiles
Forums
Events
Gallery
Everything posted by Dragonhawk1066
-
Very nice!
-
Excellent work!
-

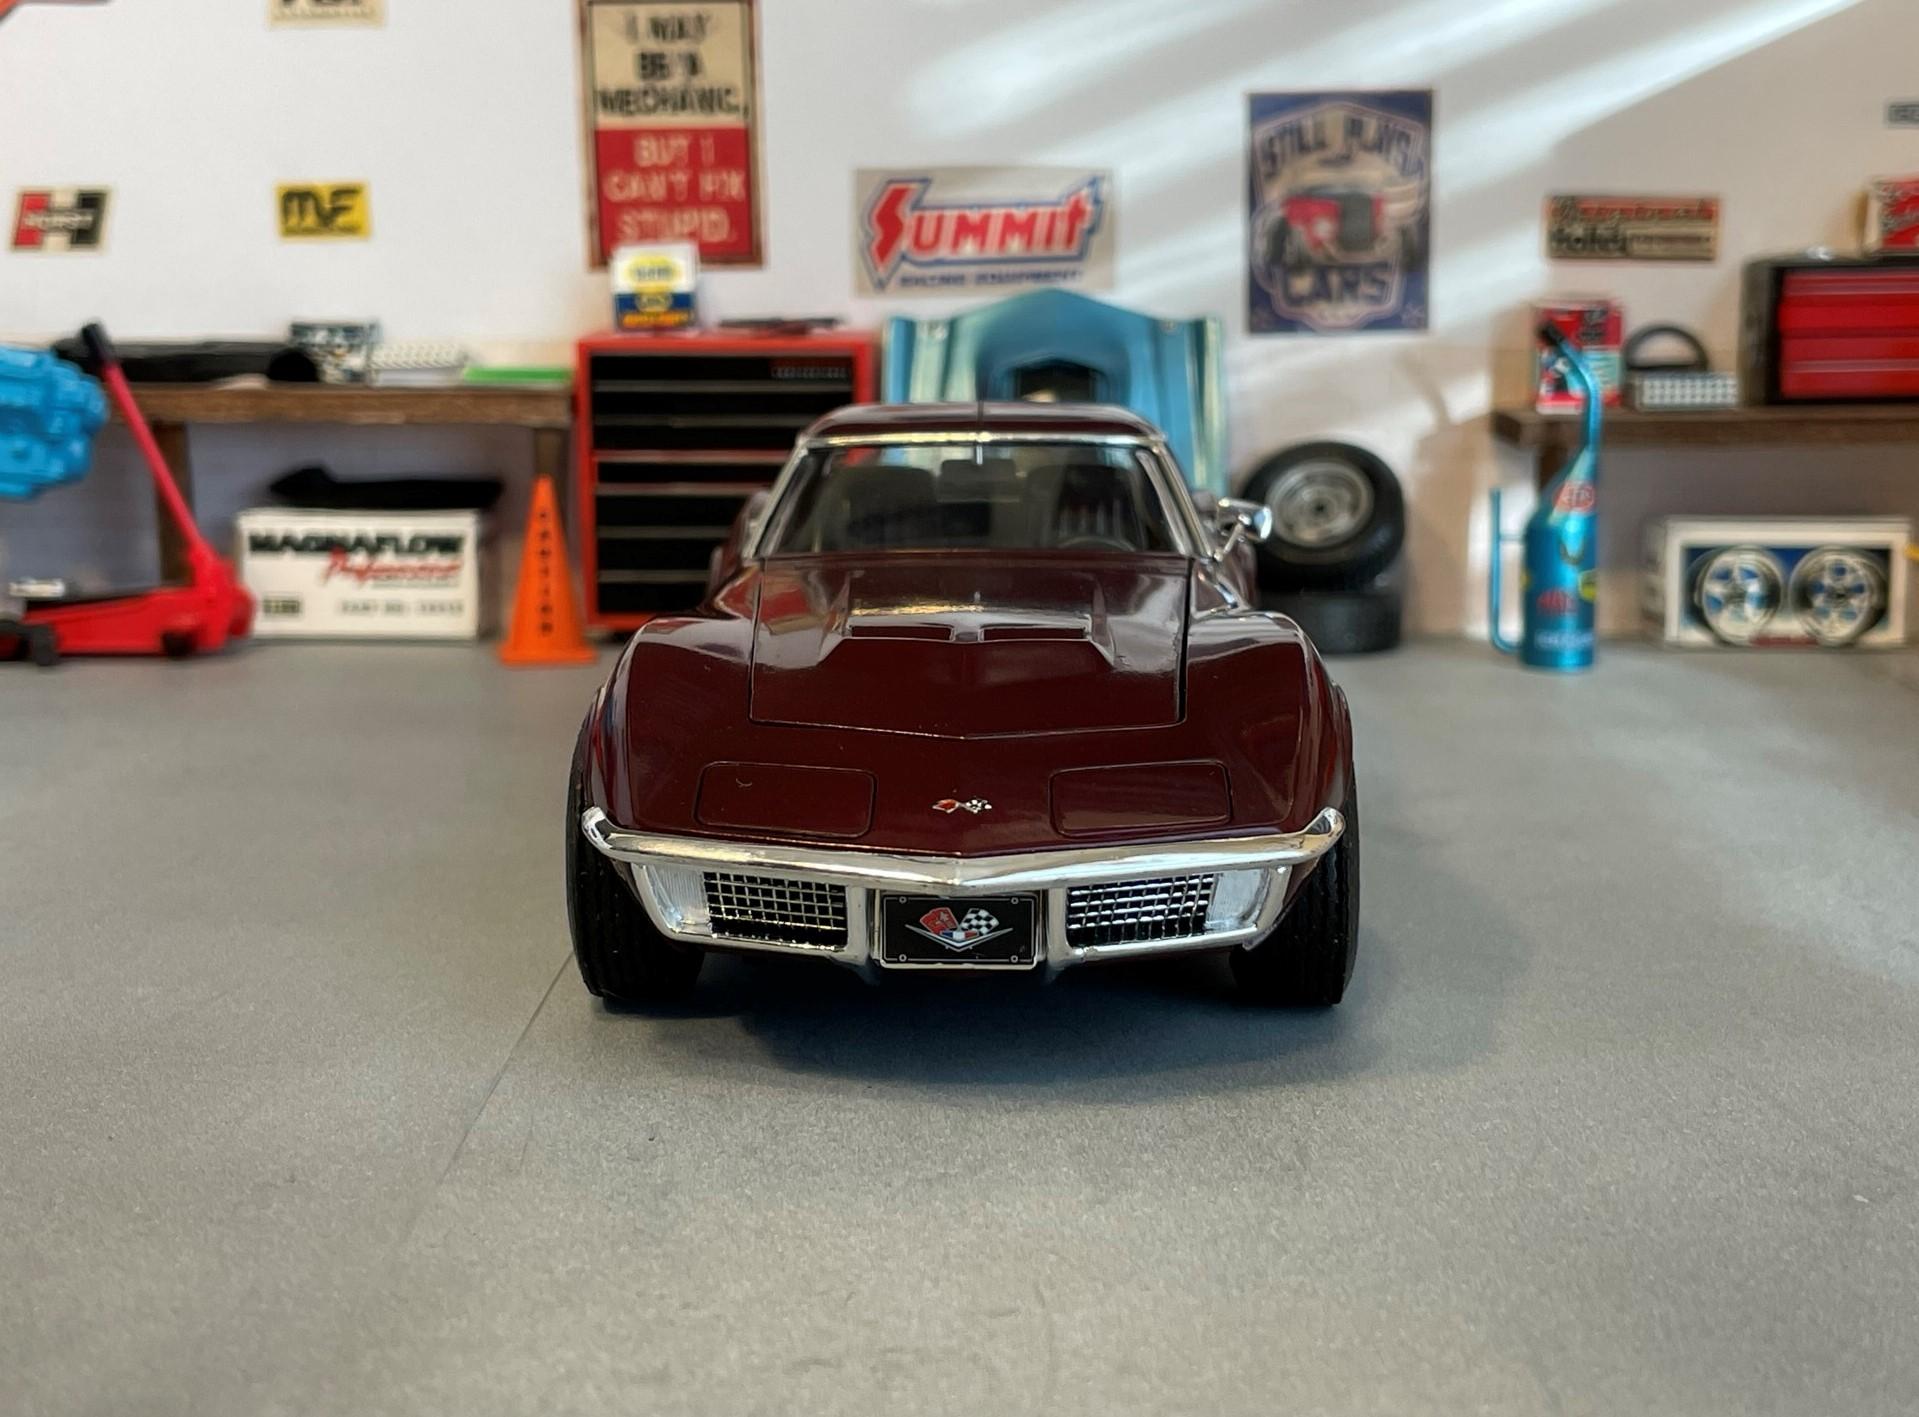
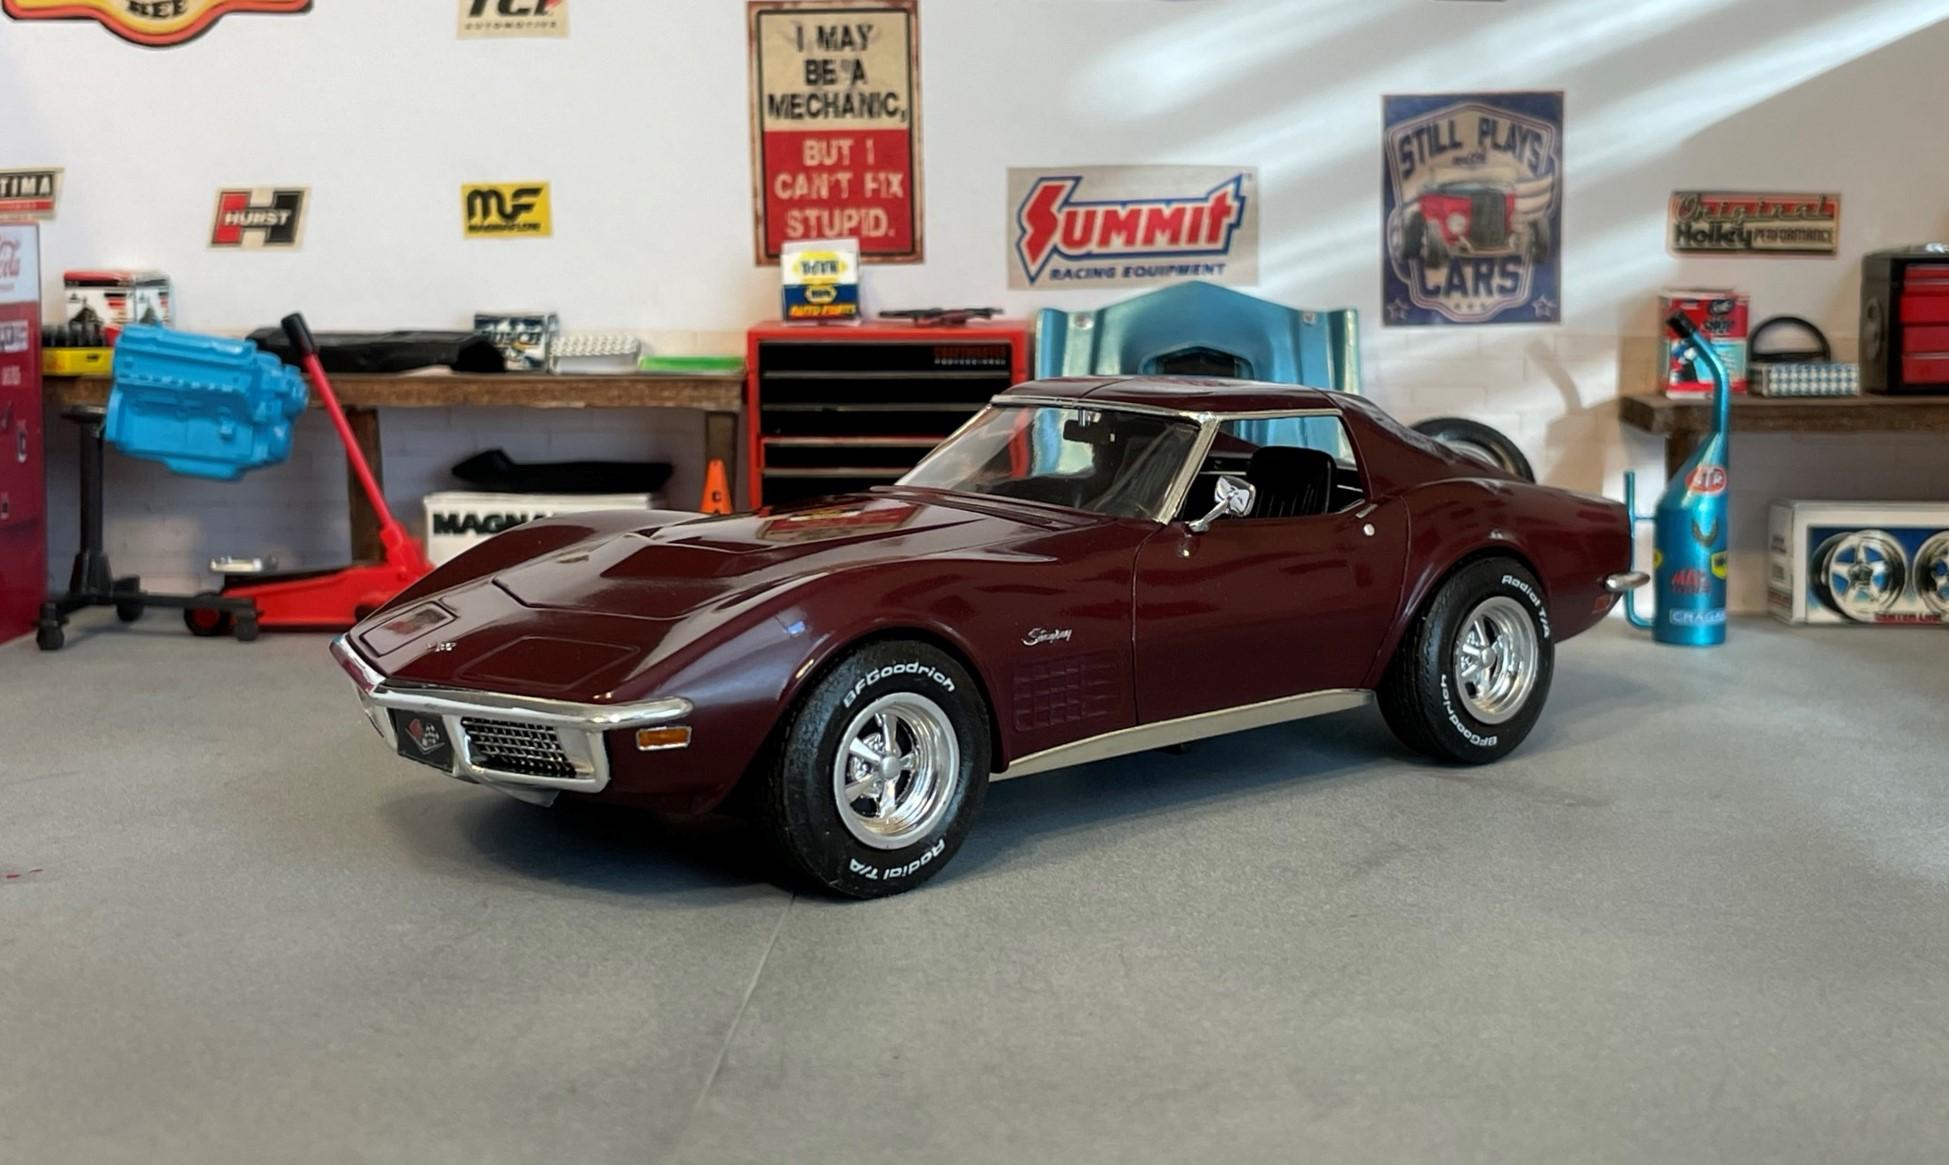
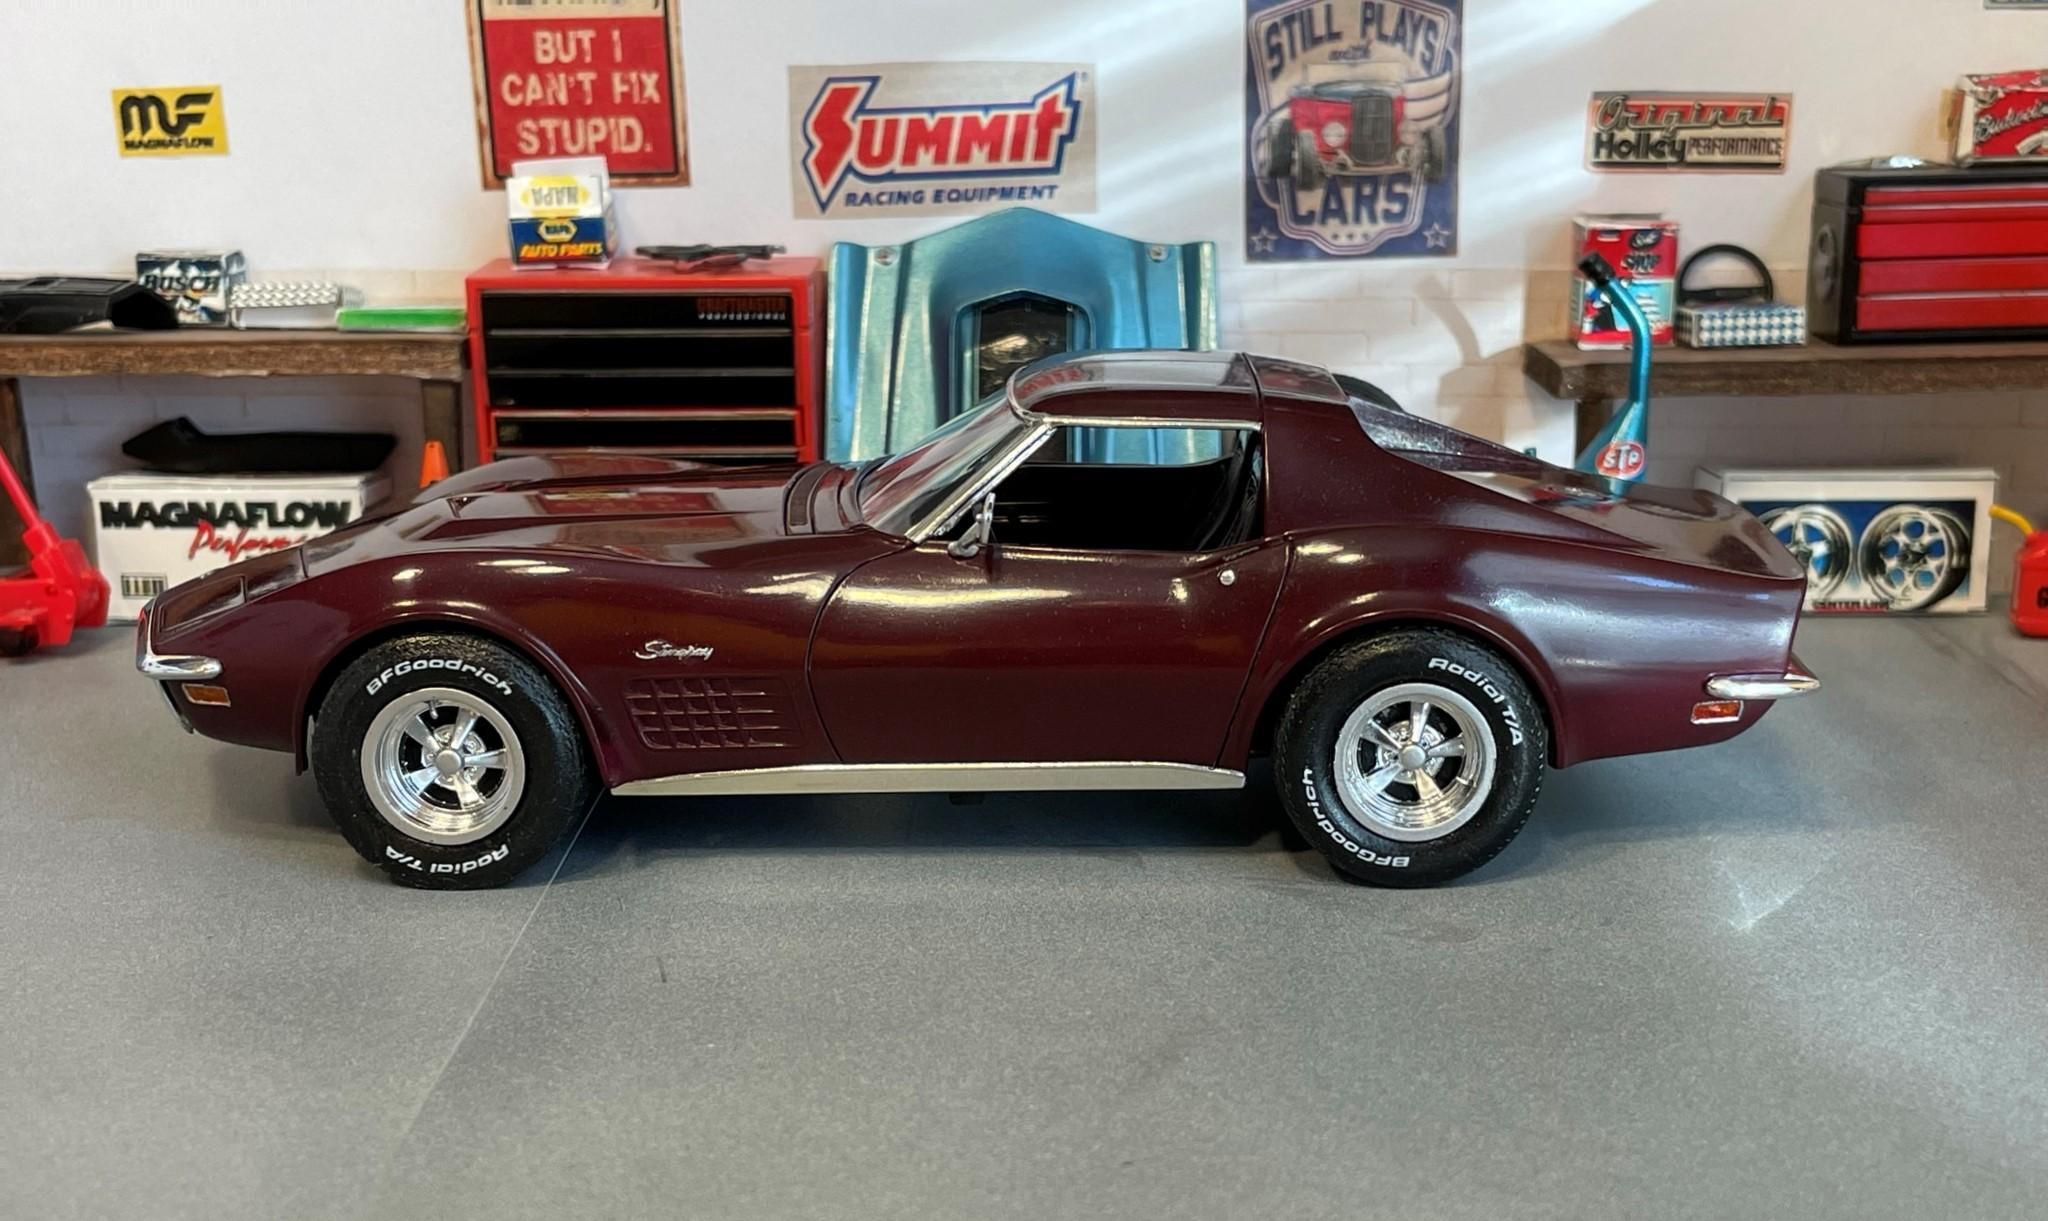
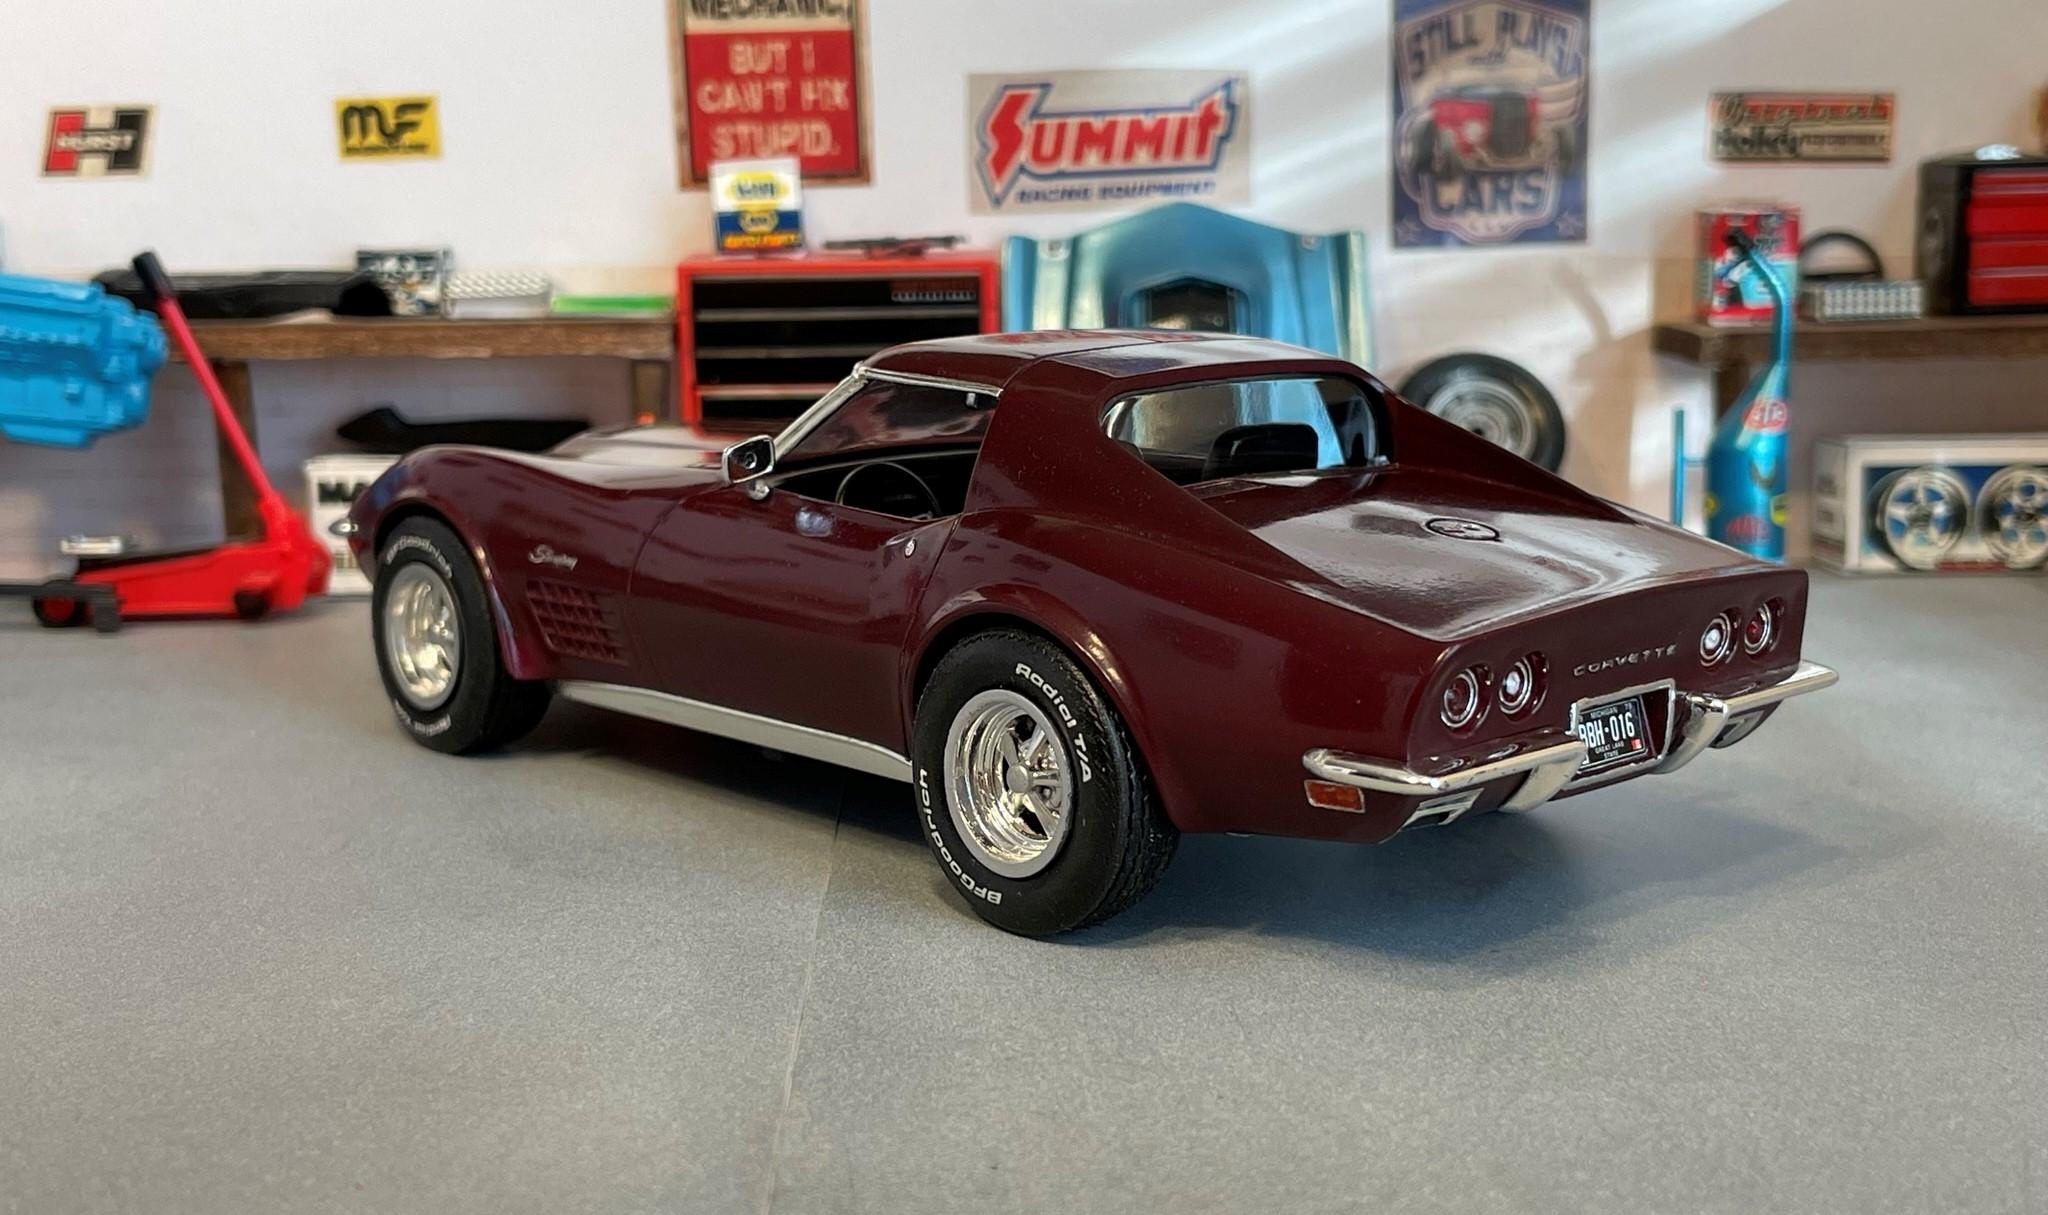
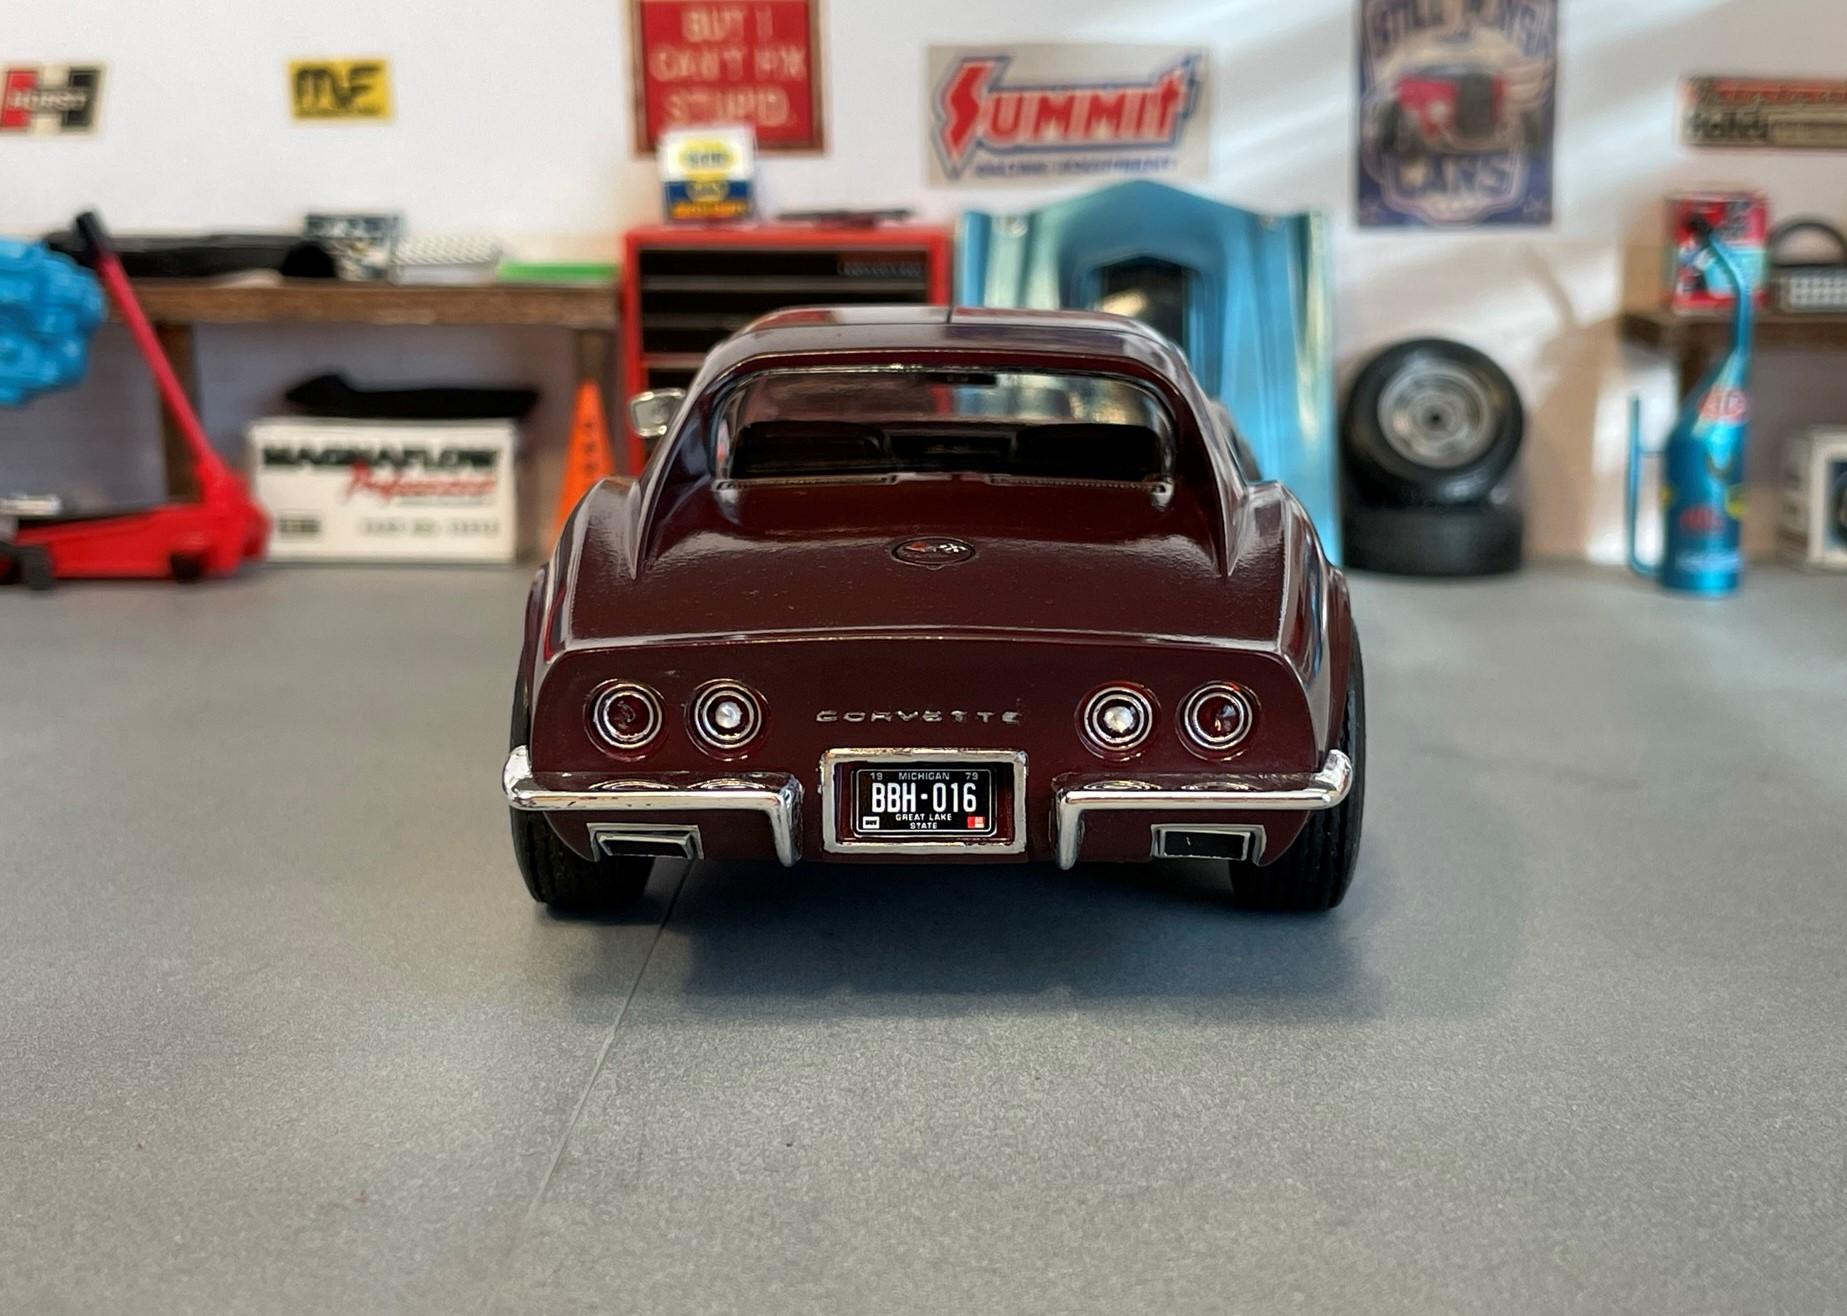
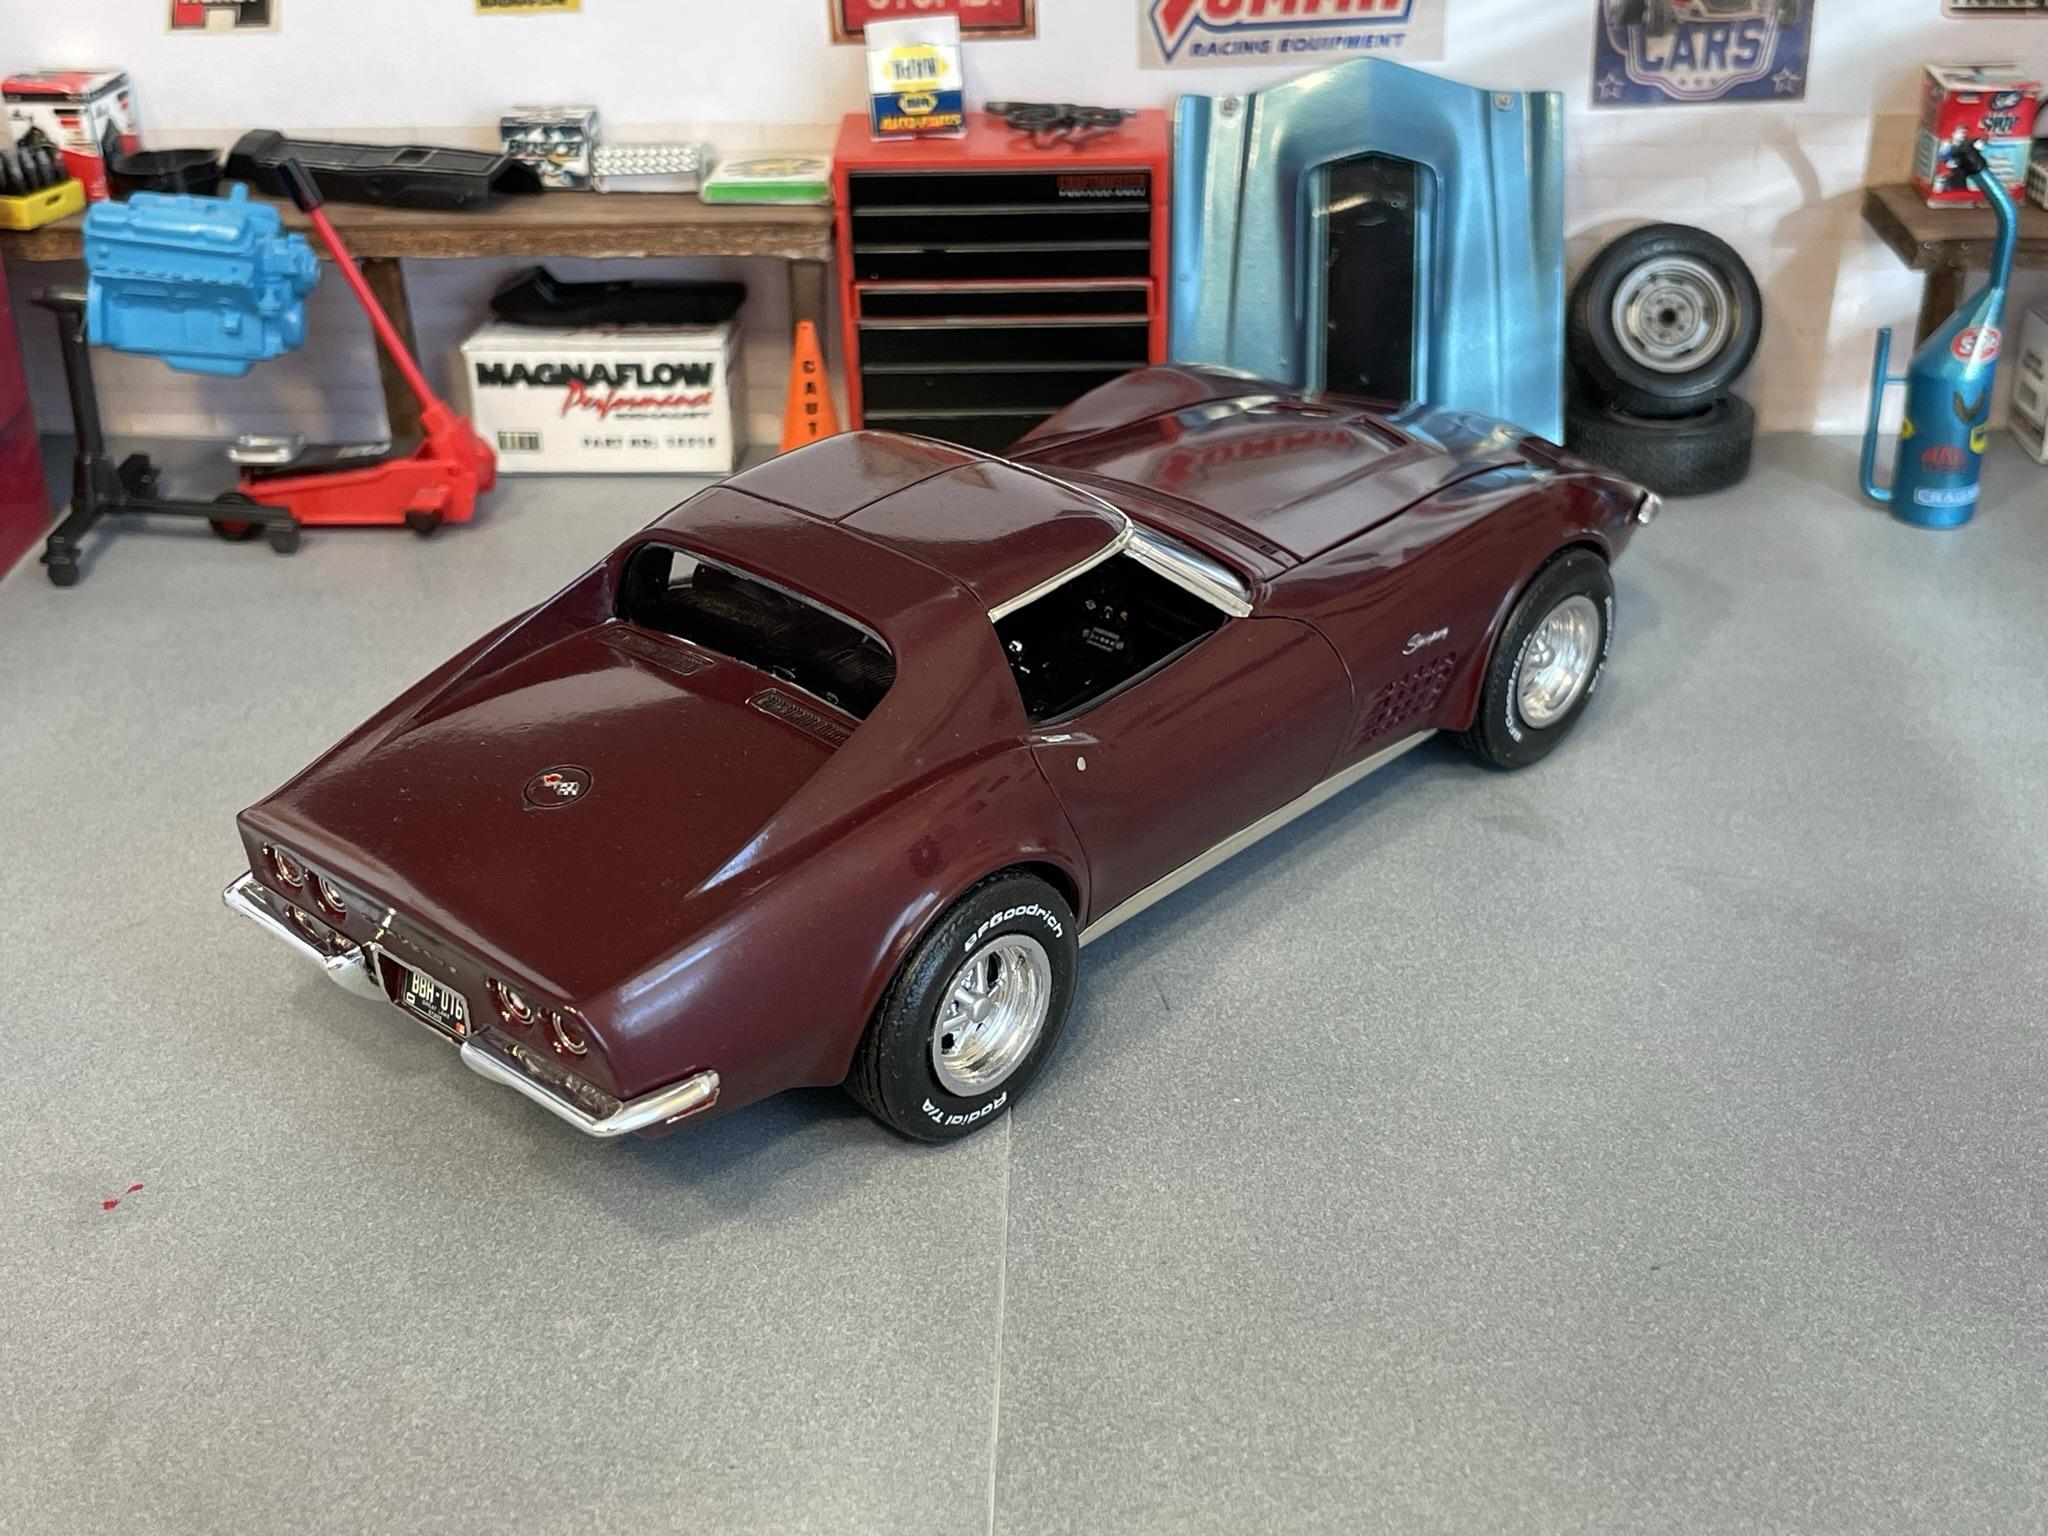
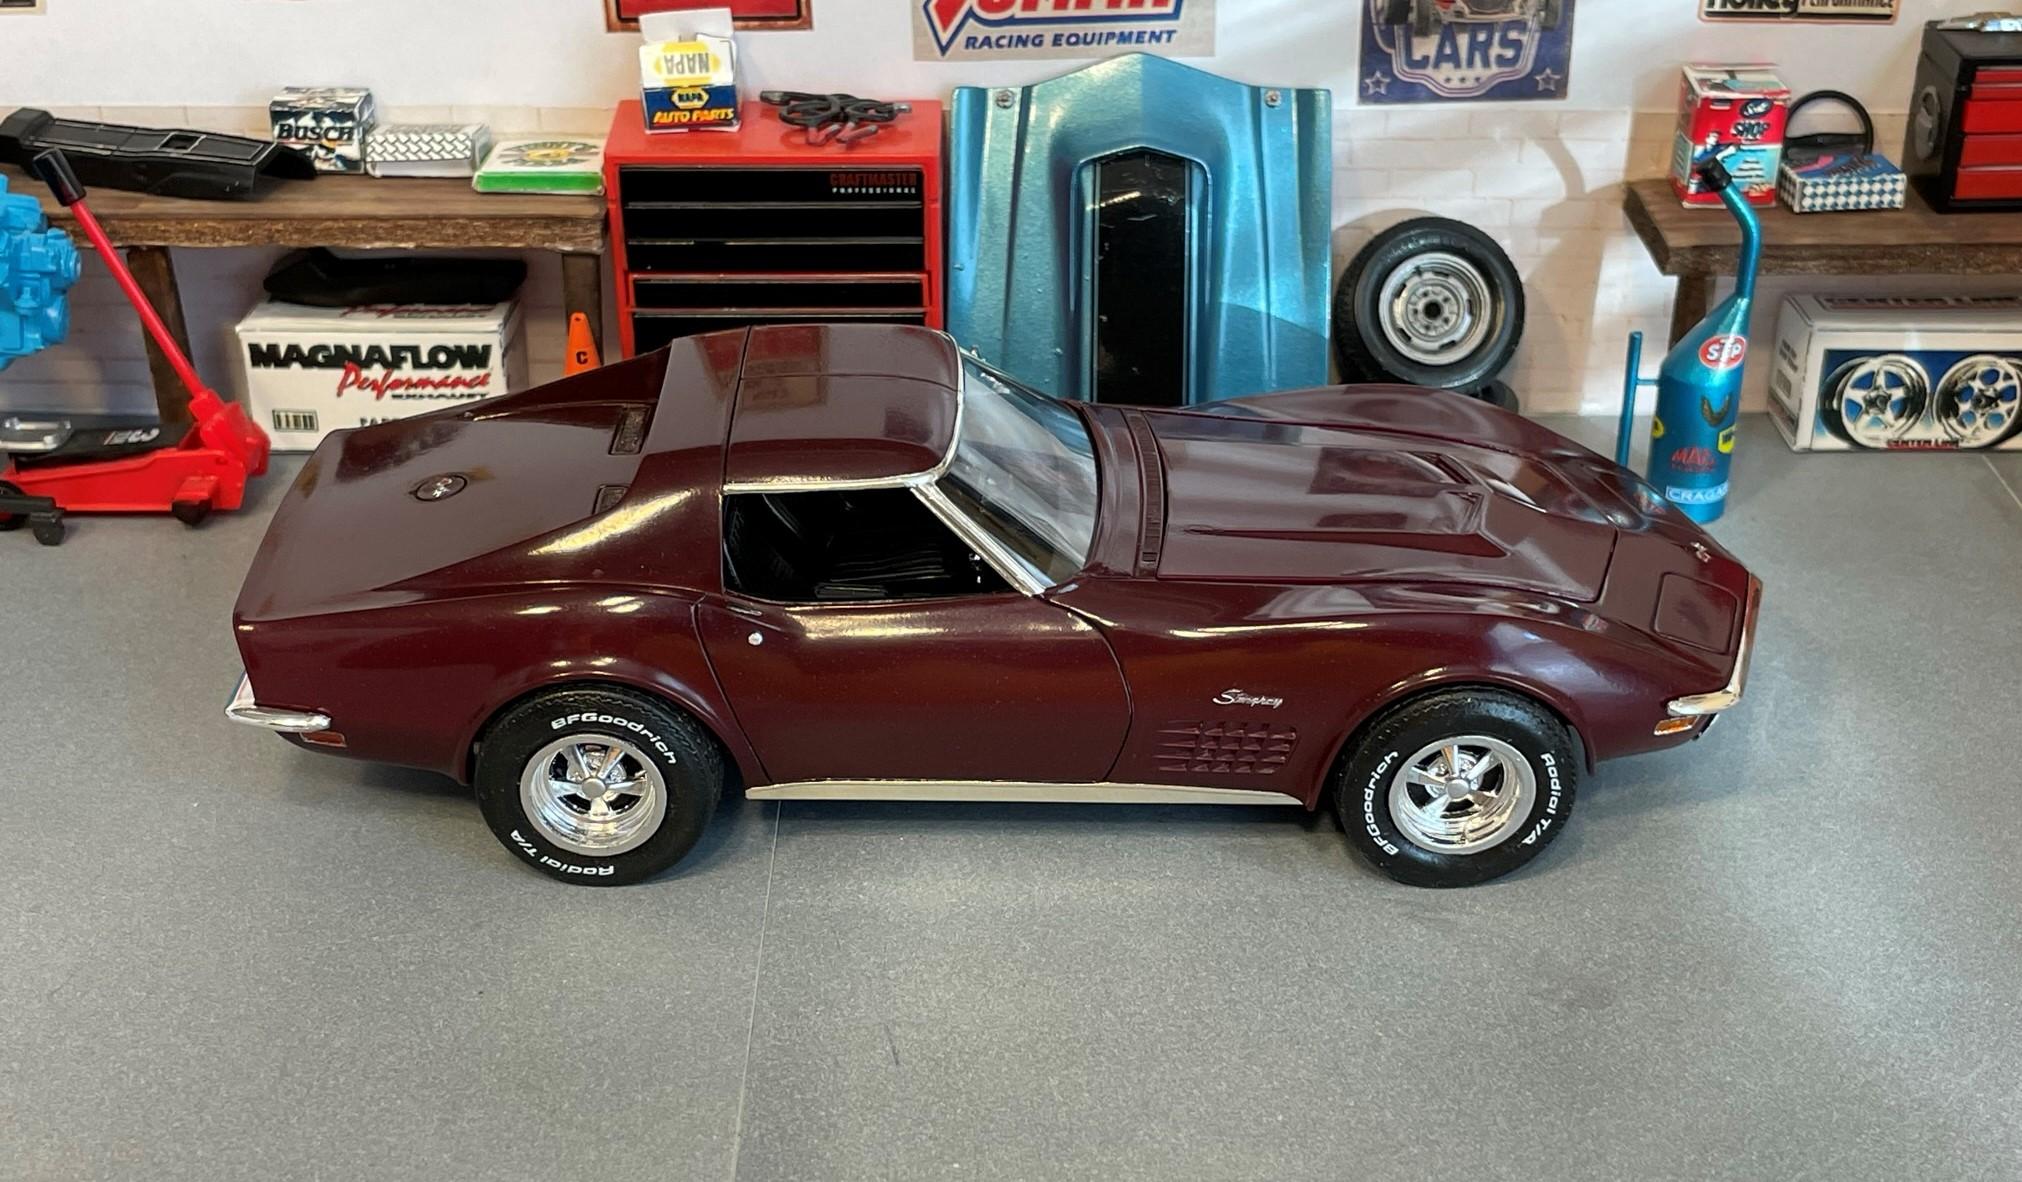
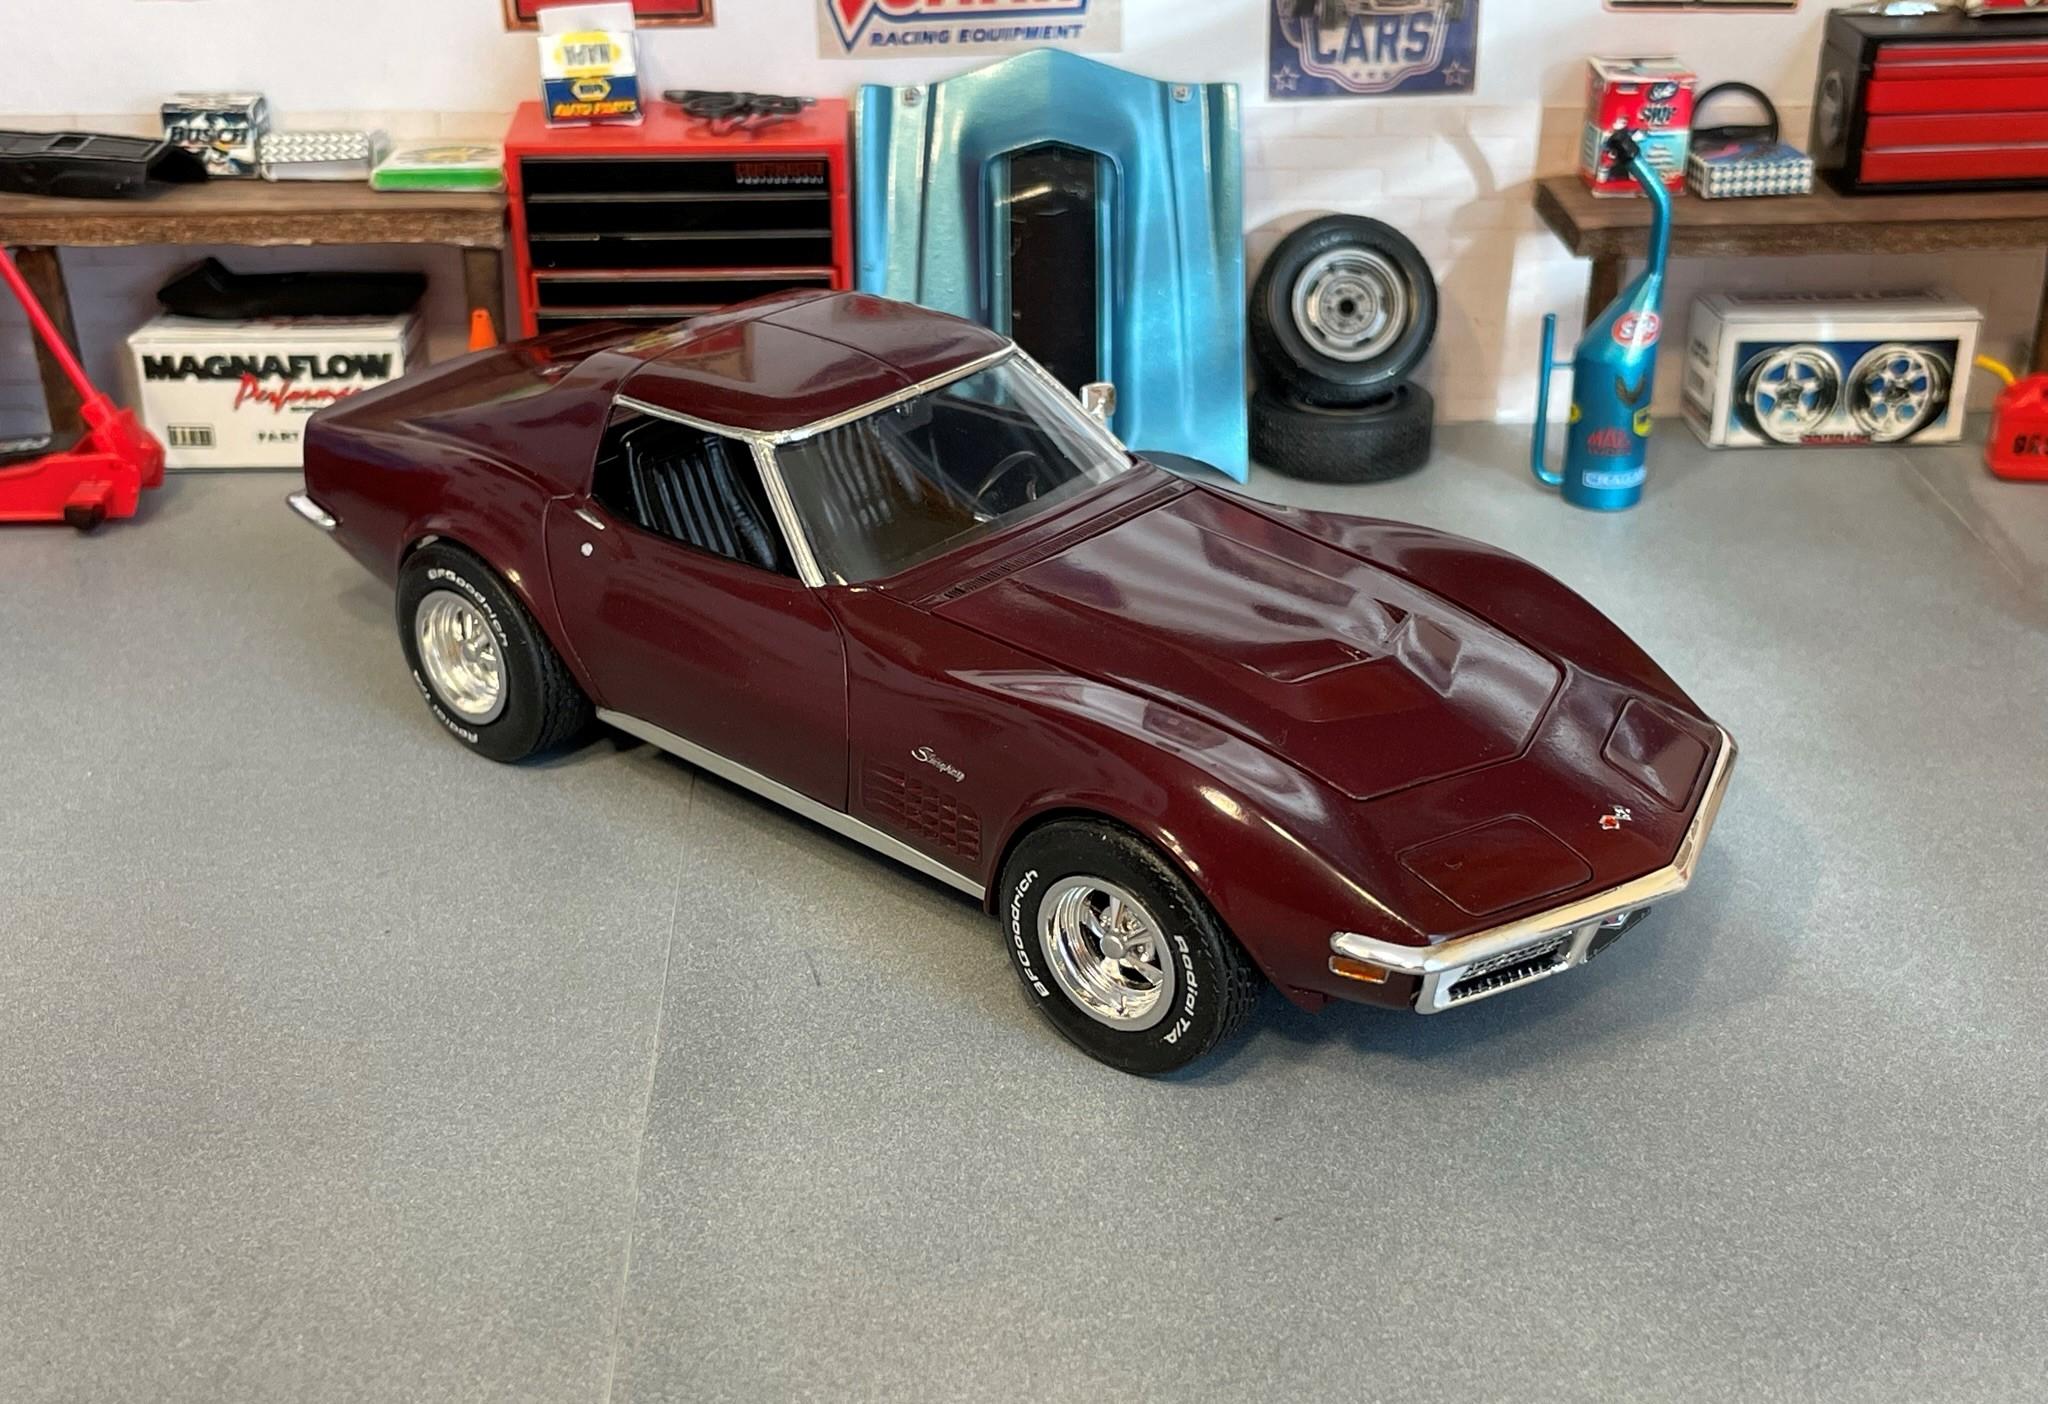
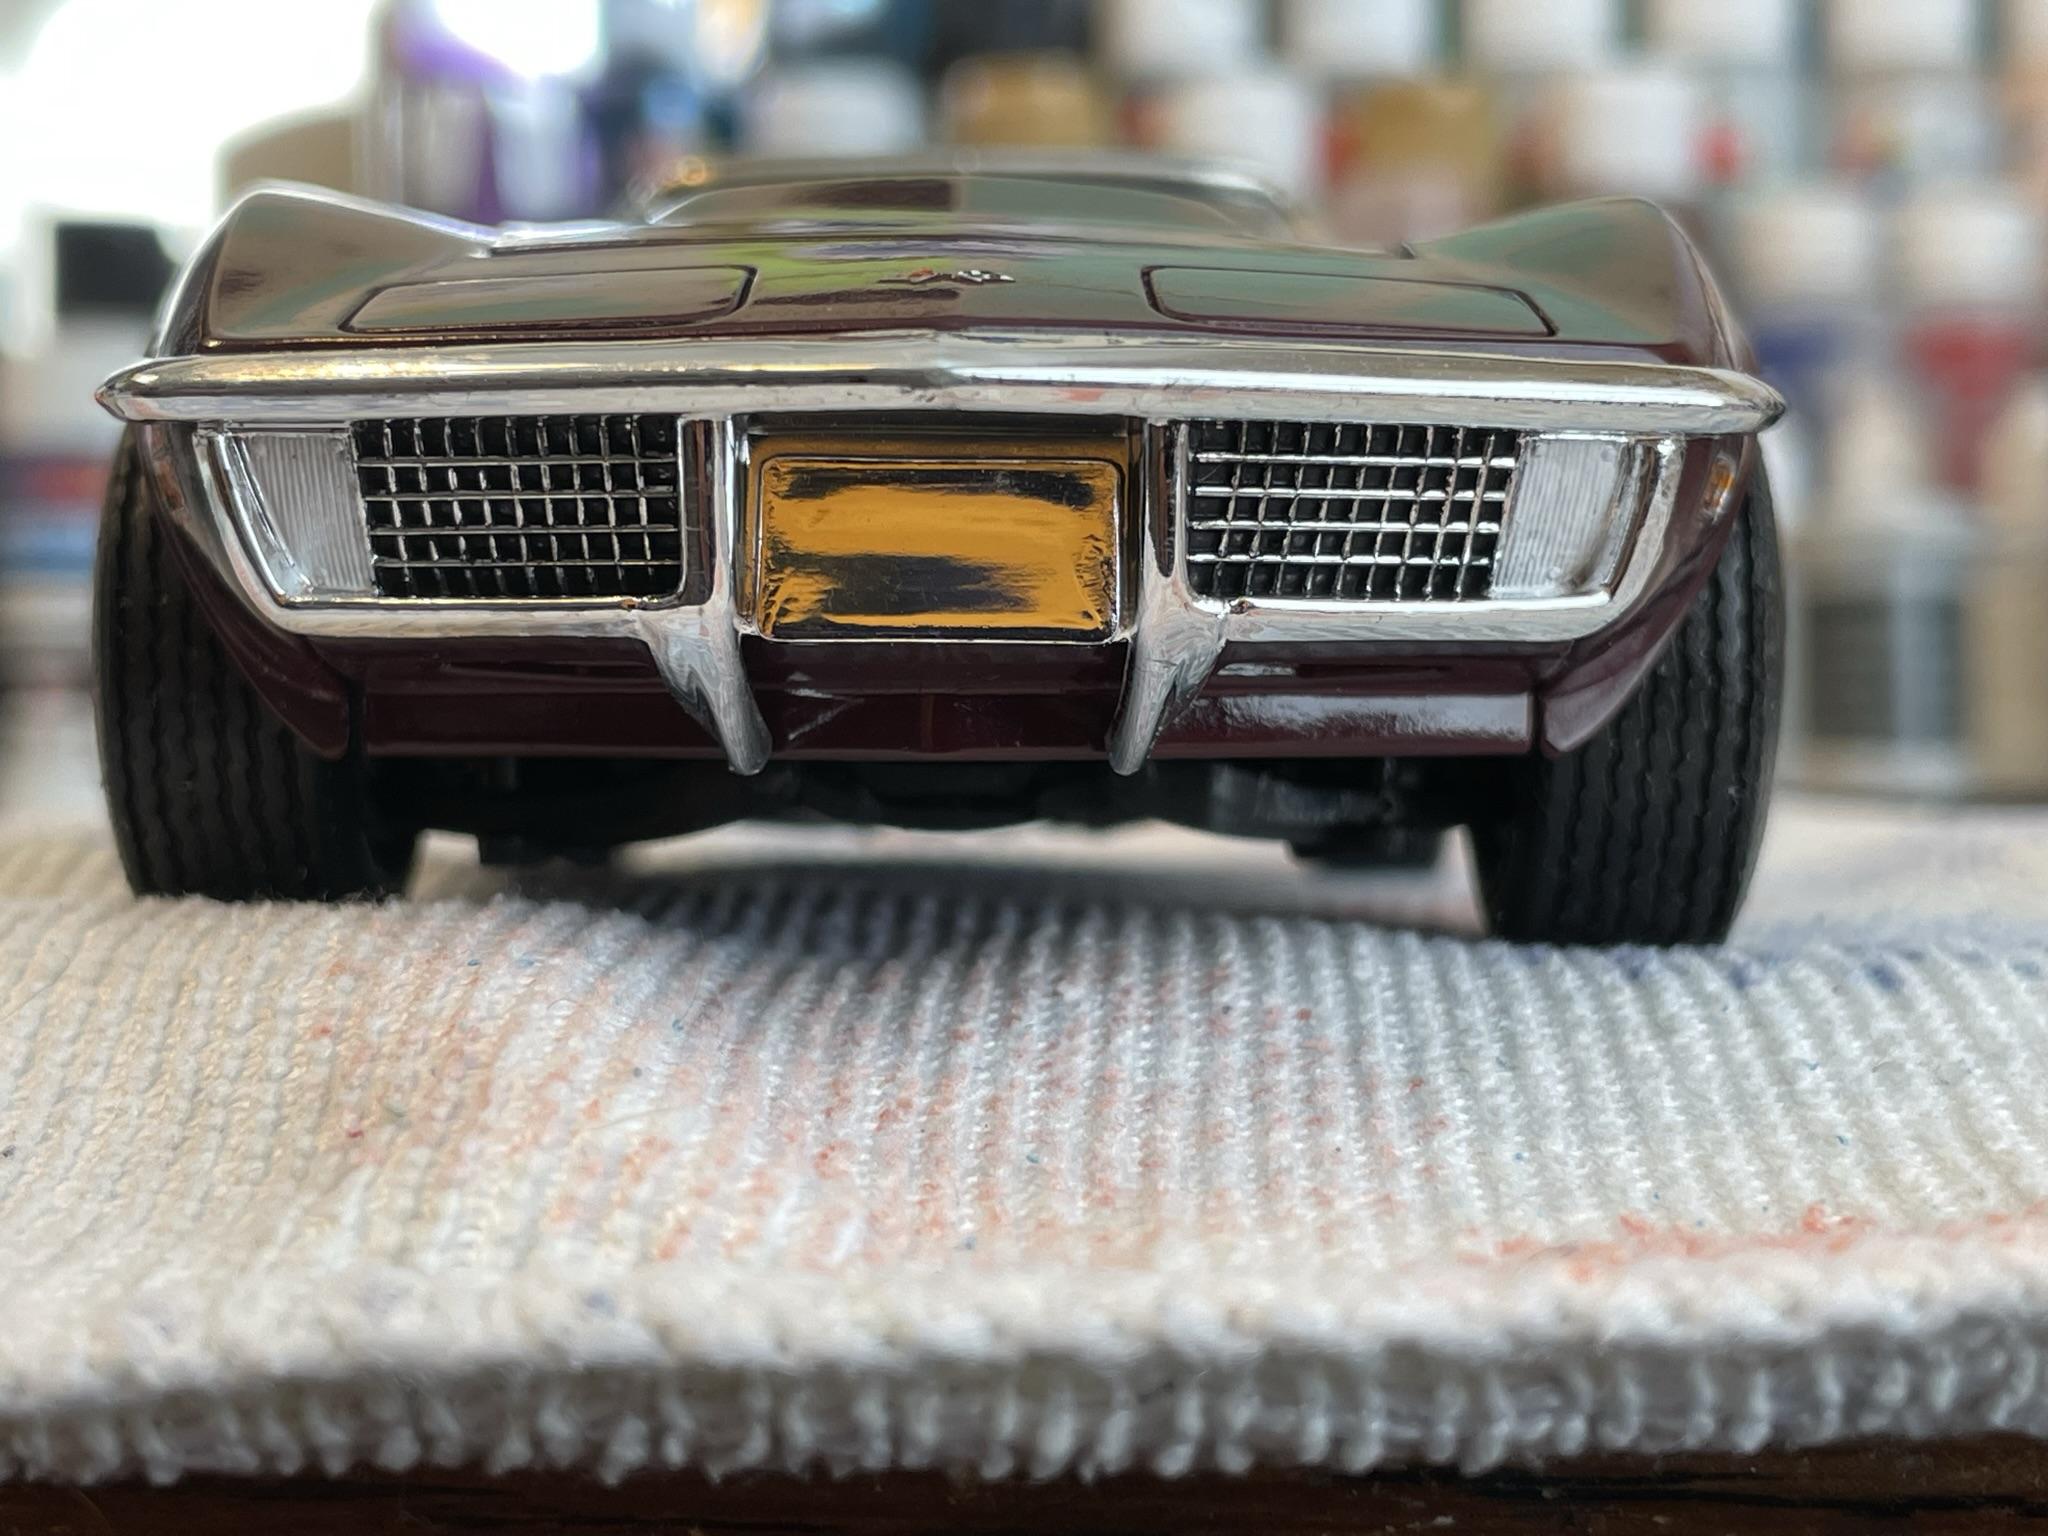
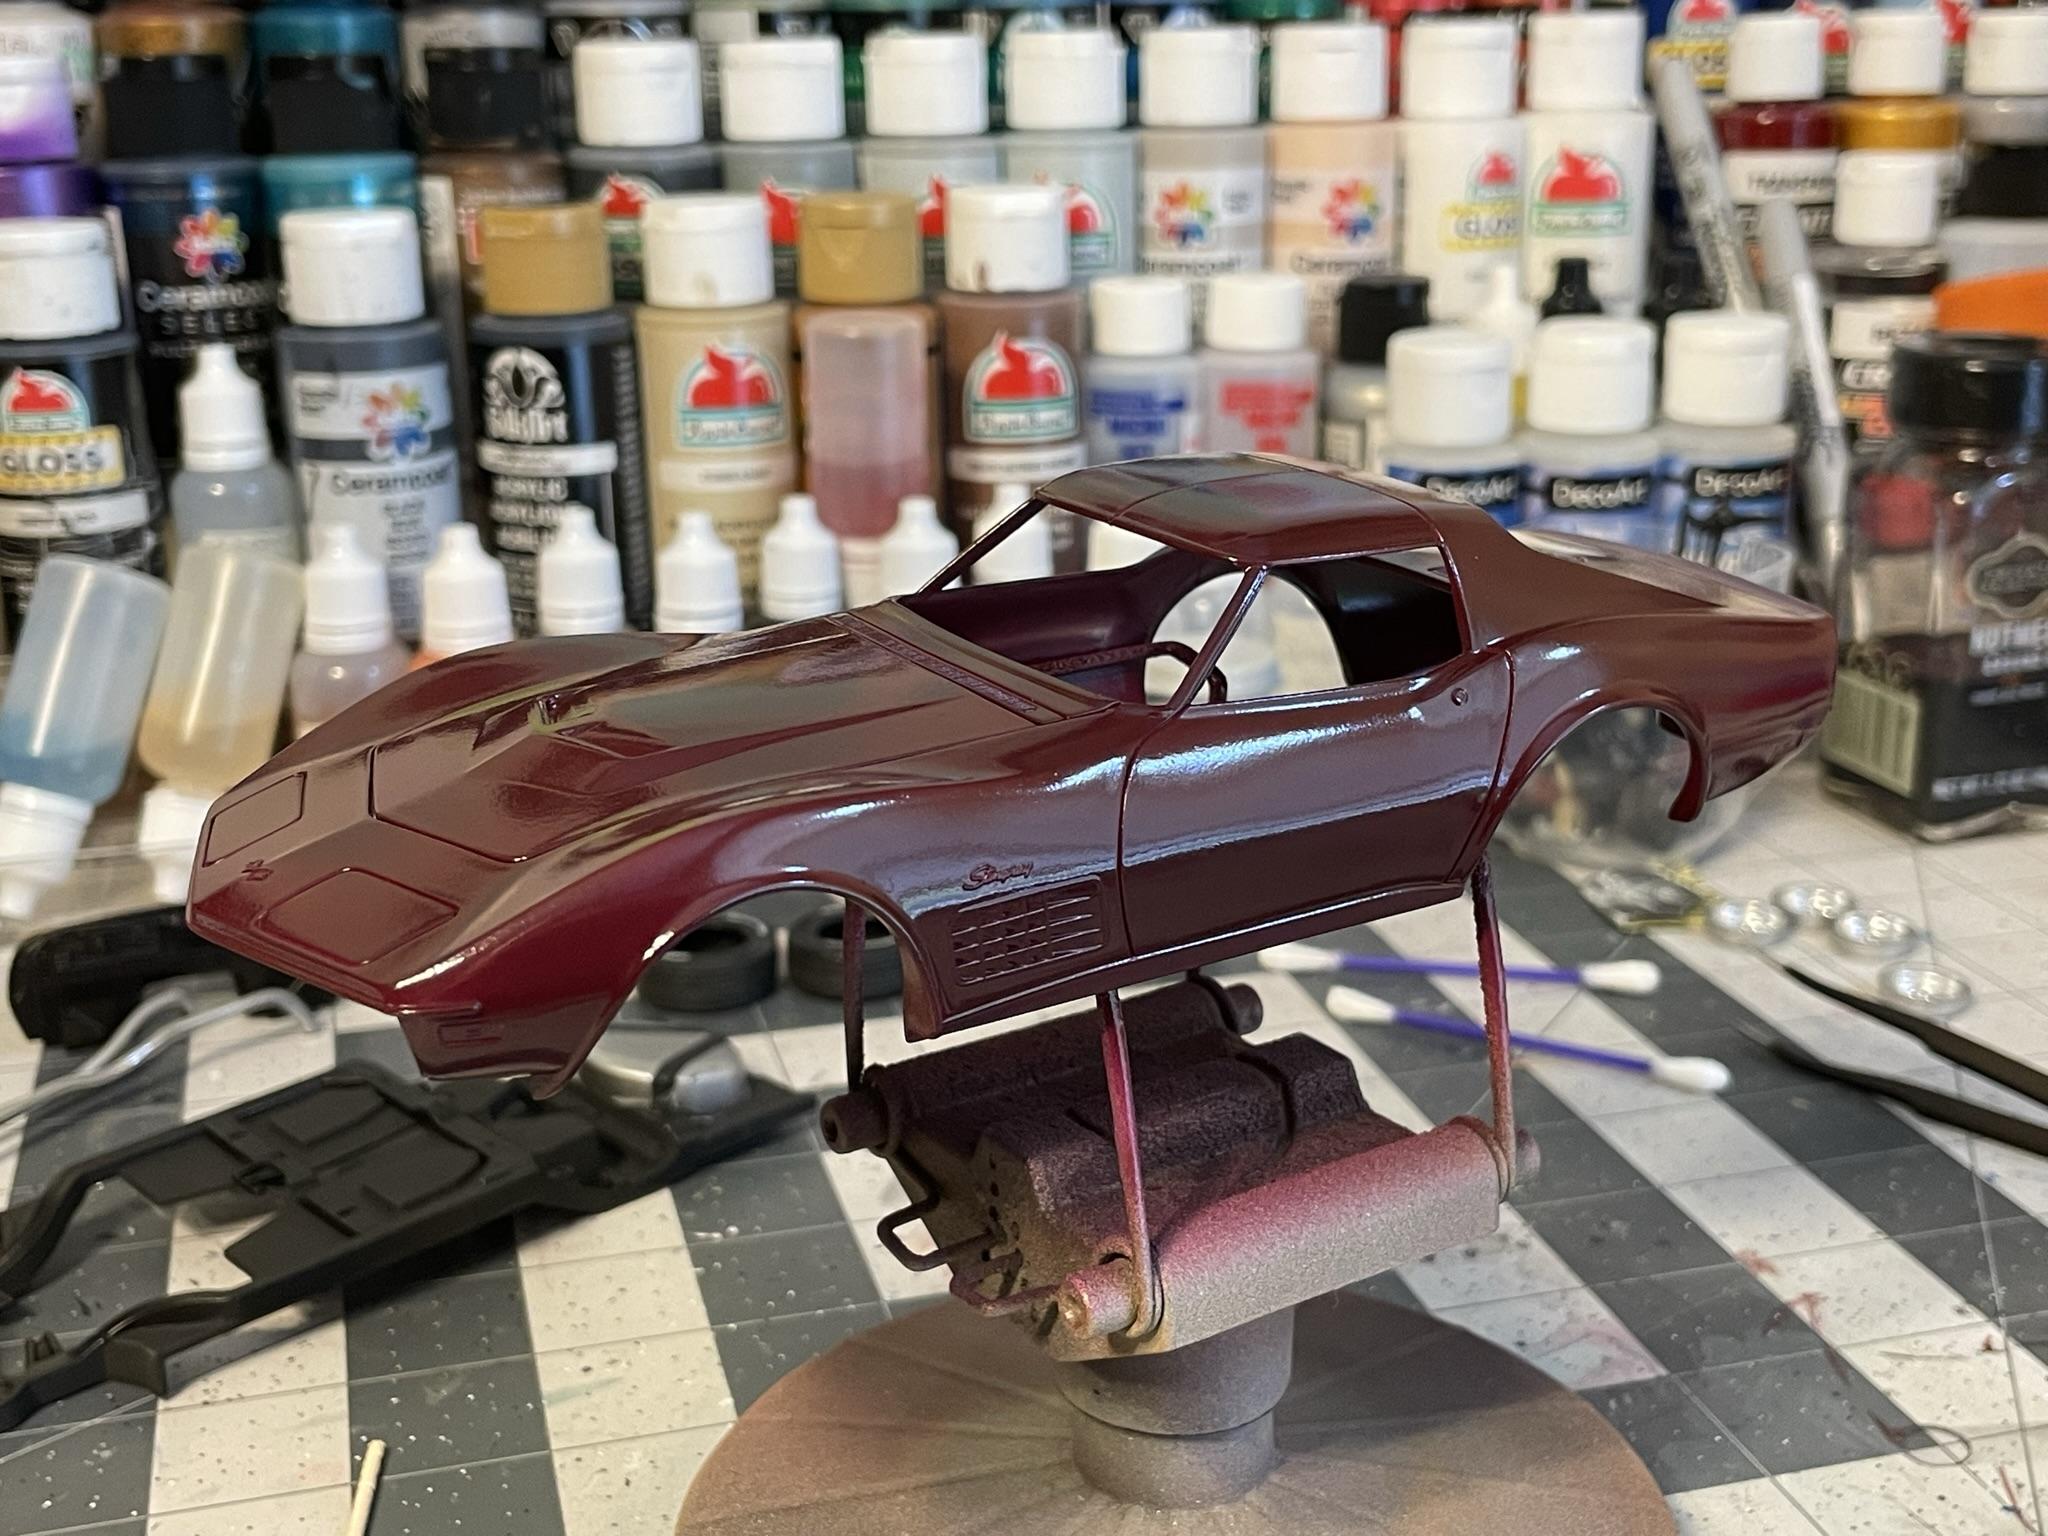
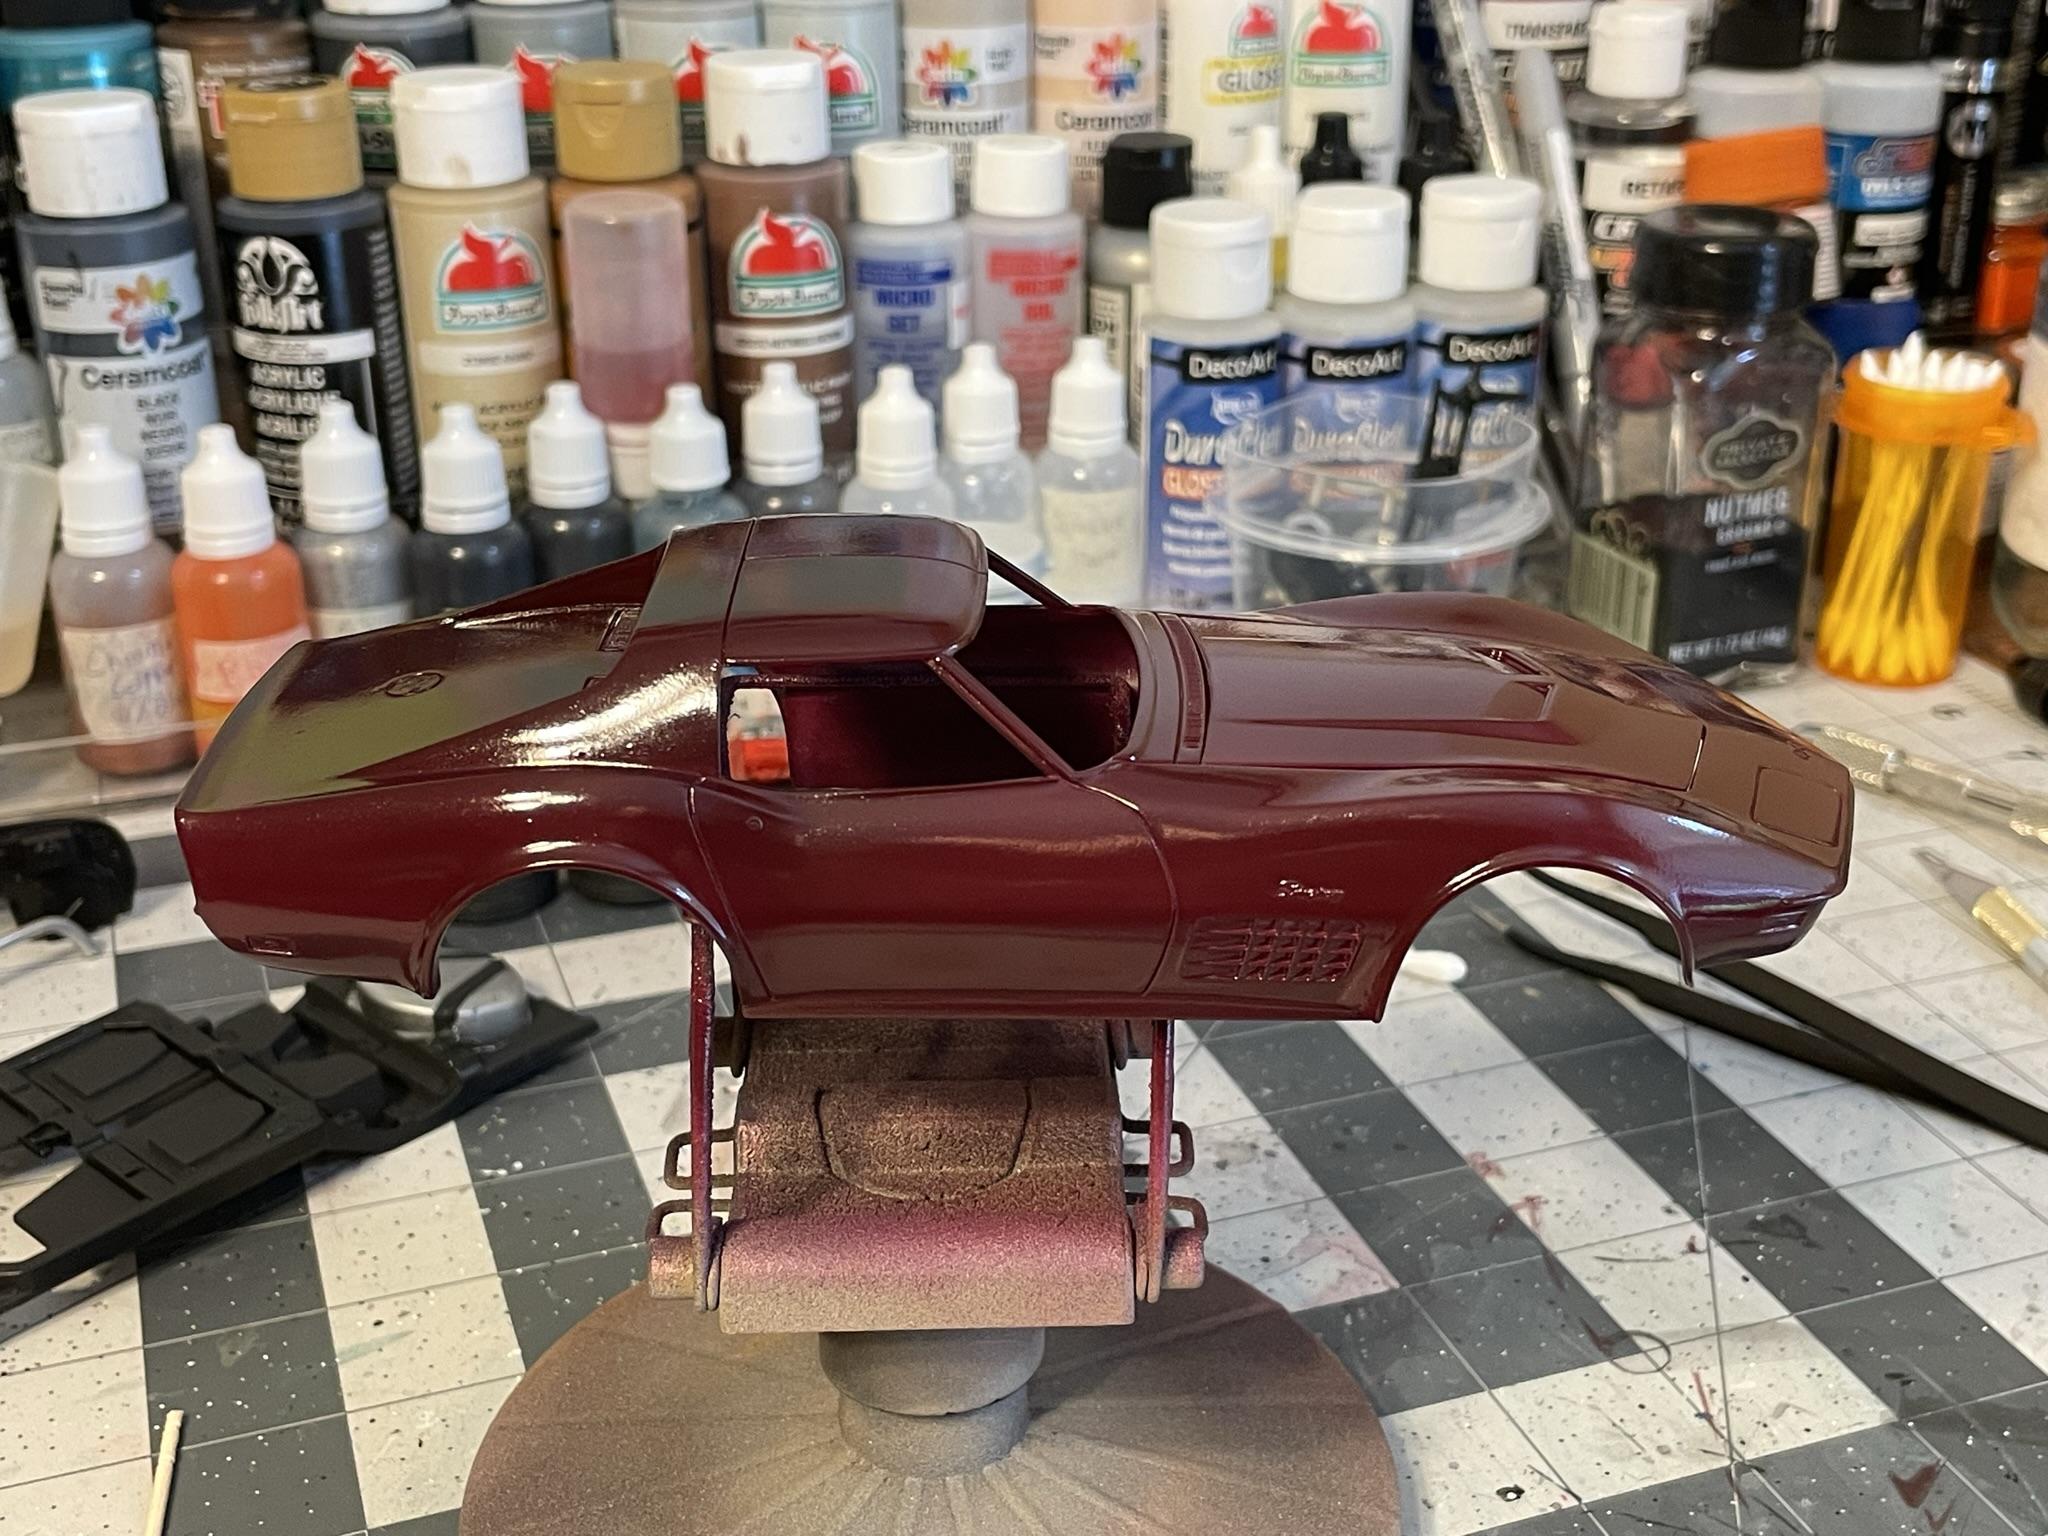
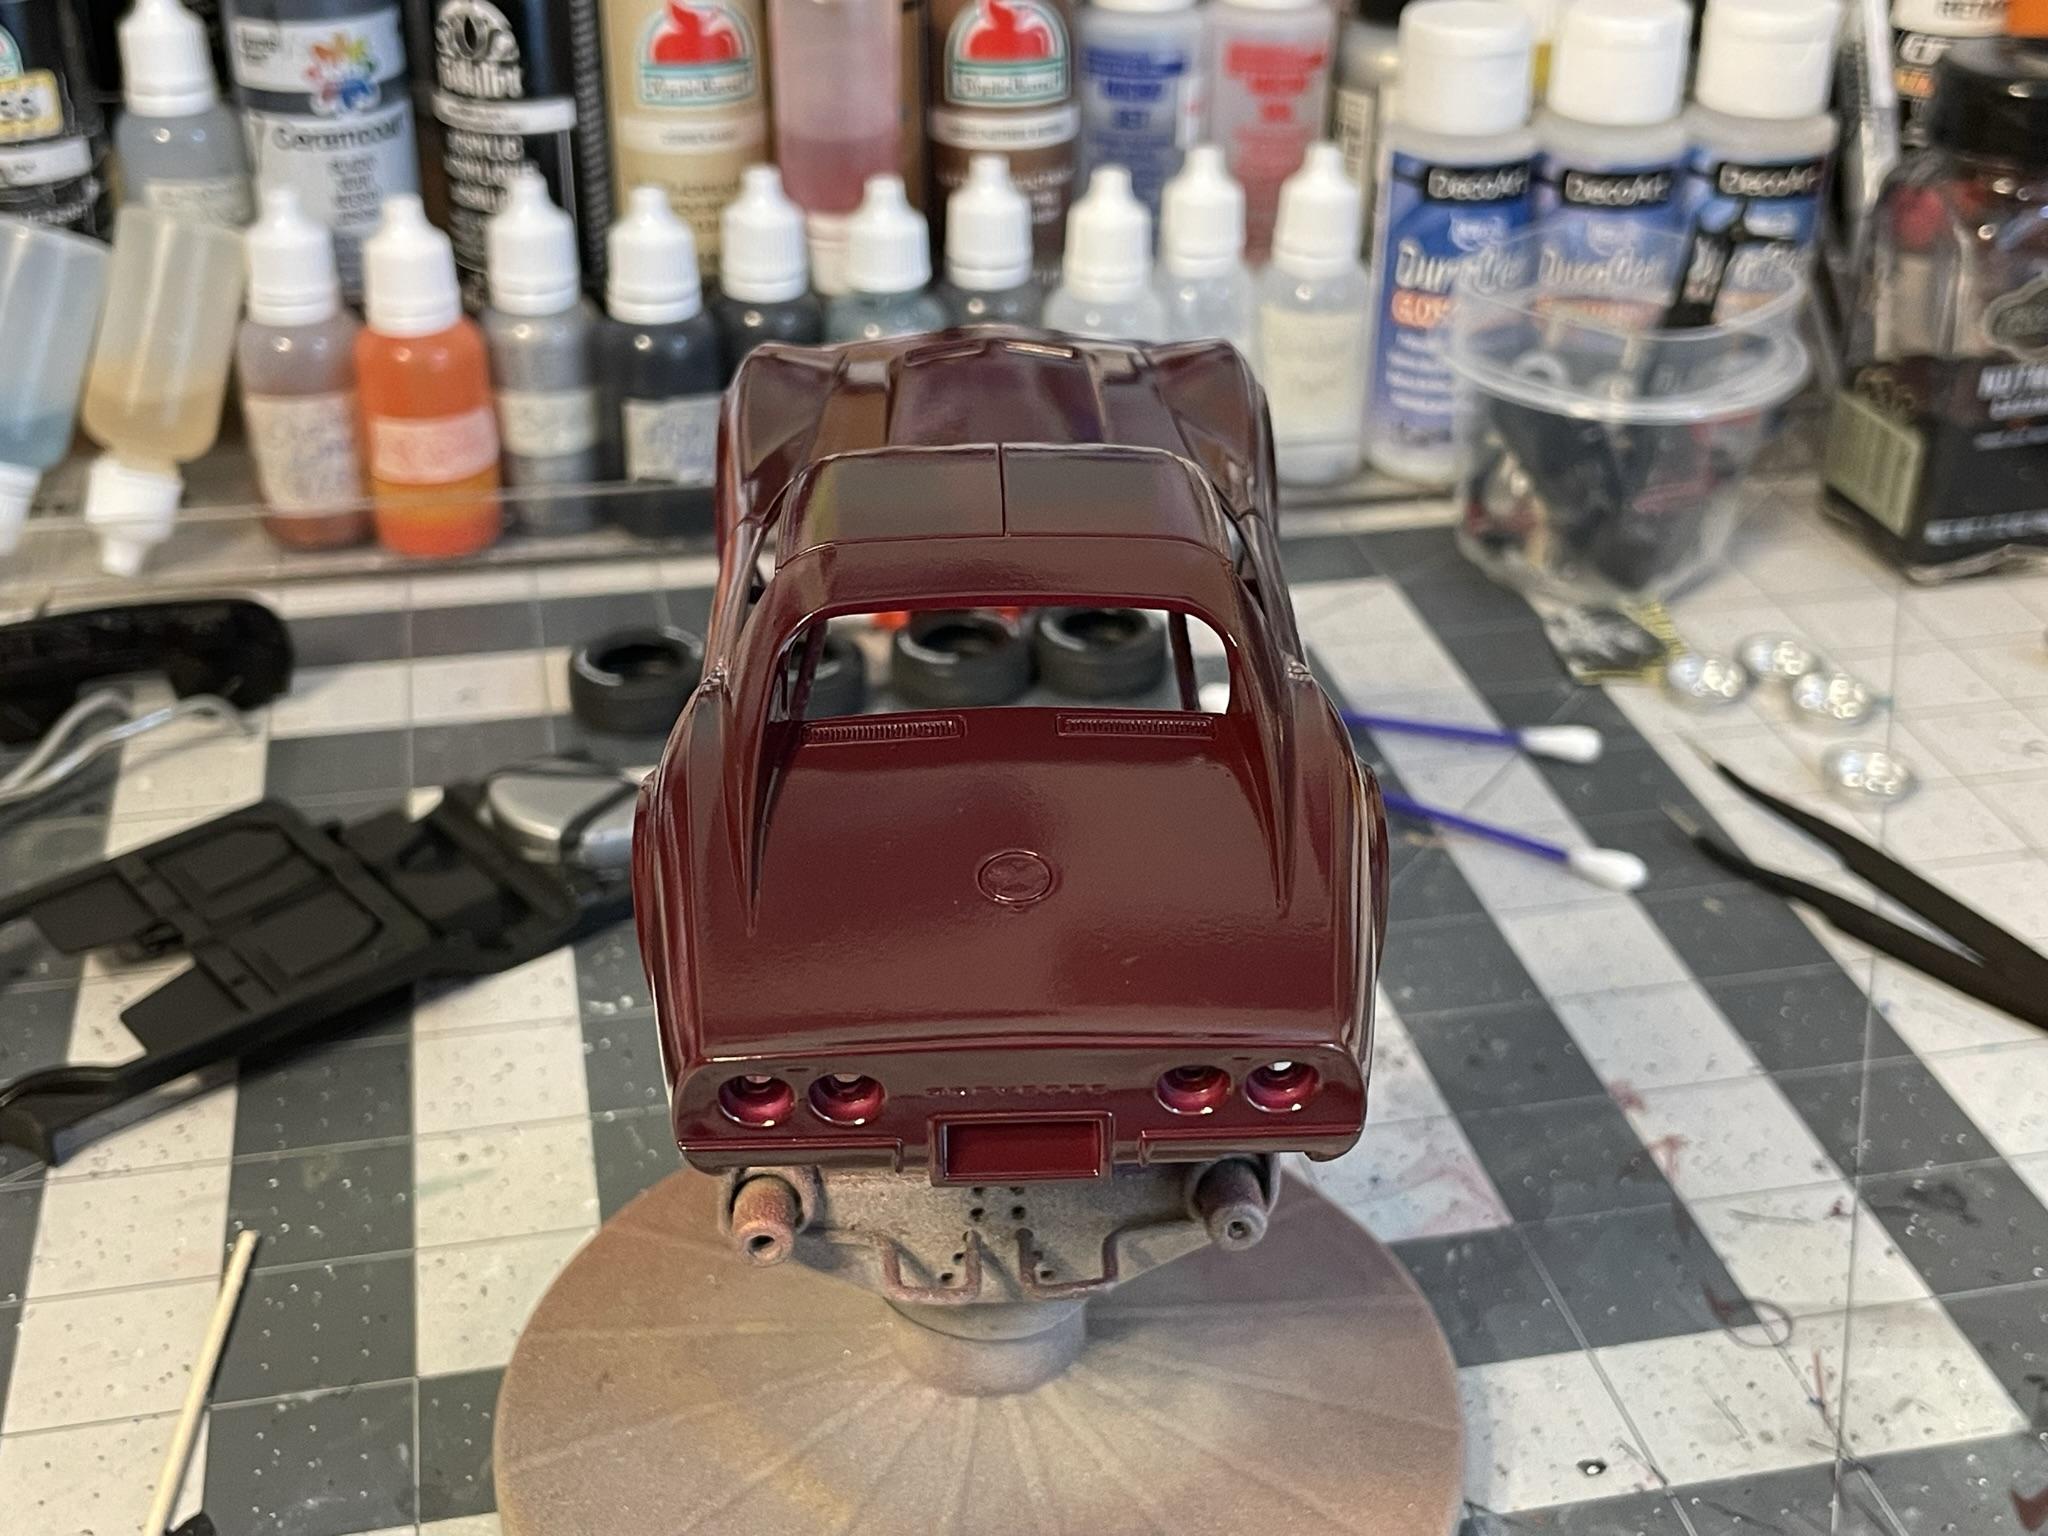
AMT 1970 Chevy Corvette LT-1 in Dark Plum.
Dragonhawk1066 replied to Dragonhawk1066's topic in Model Cars
Thanks guys! -
Very well done!
-
Very nice!
-
That's a great blue paint job with a very nice interior and nicely detailed engine compartment.
-
Nice looking Camaro! Resin hoods can be pretty tricky, I've wrestled with a few that just wouldn't be defeated, lol.
-
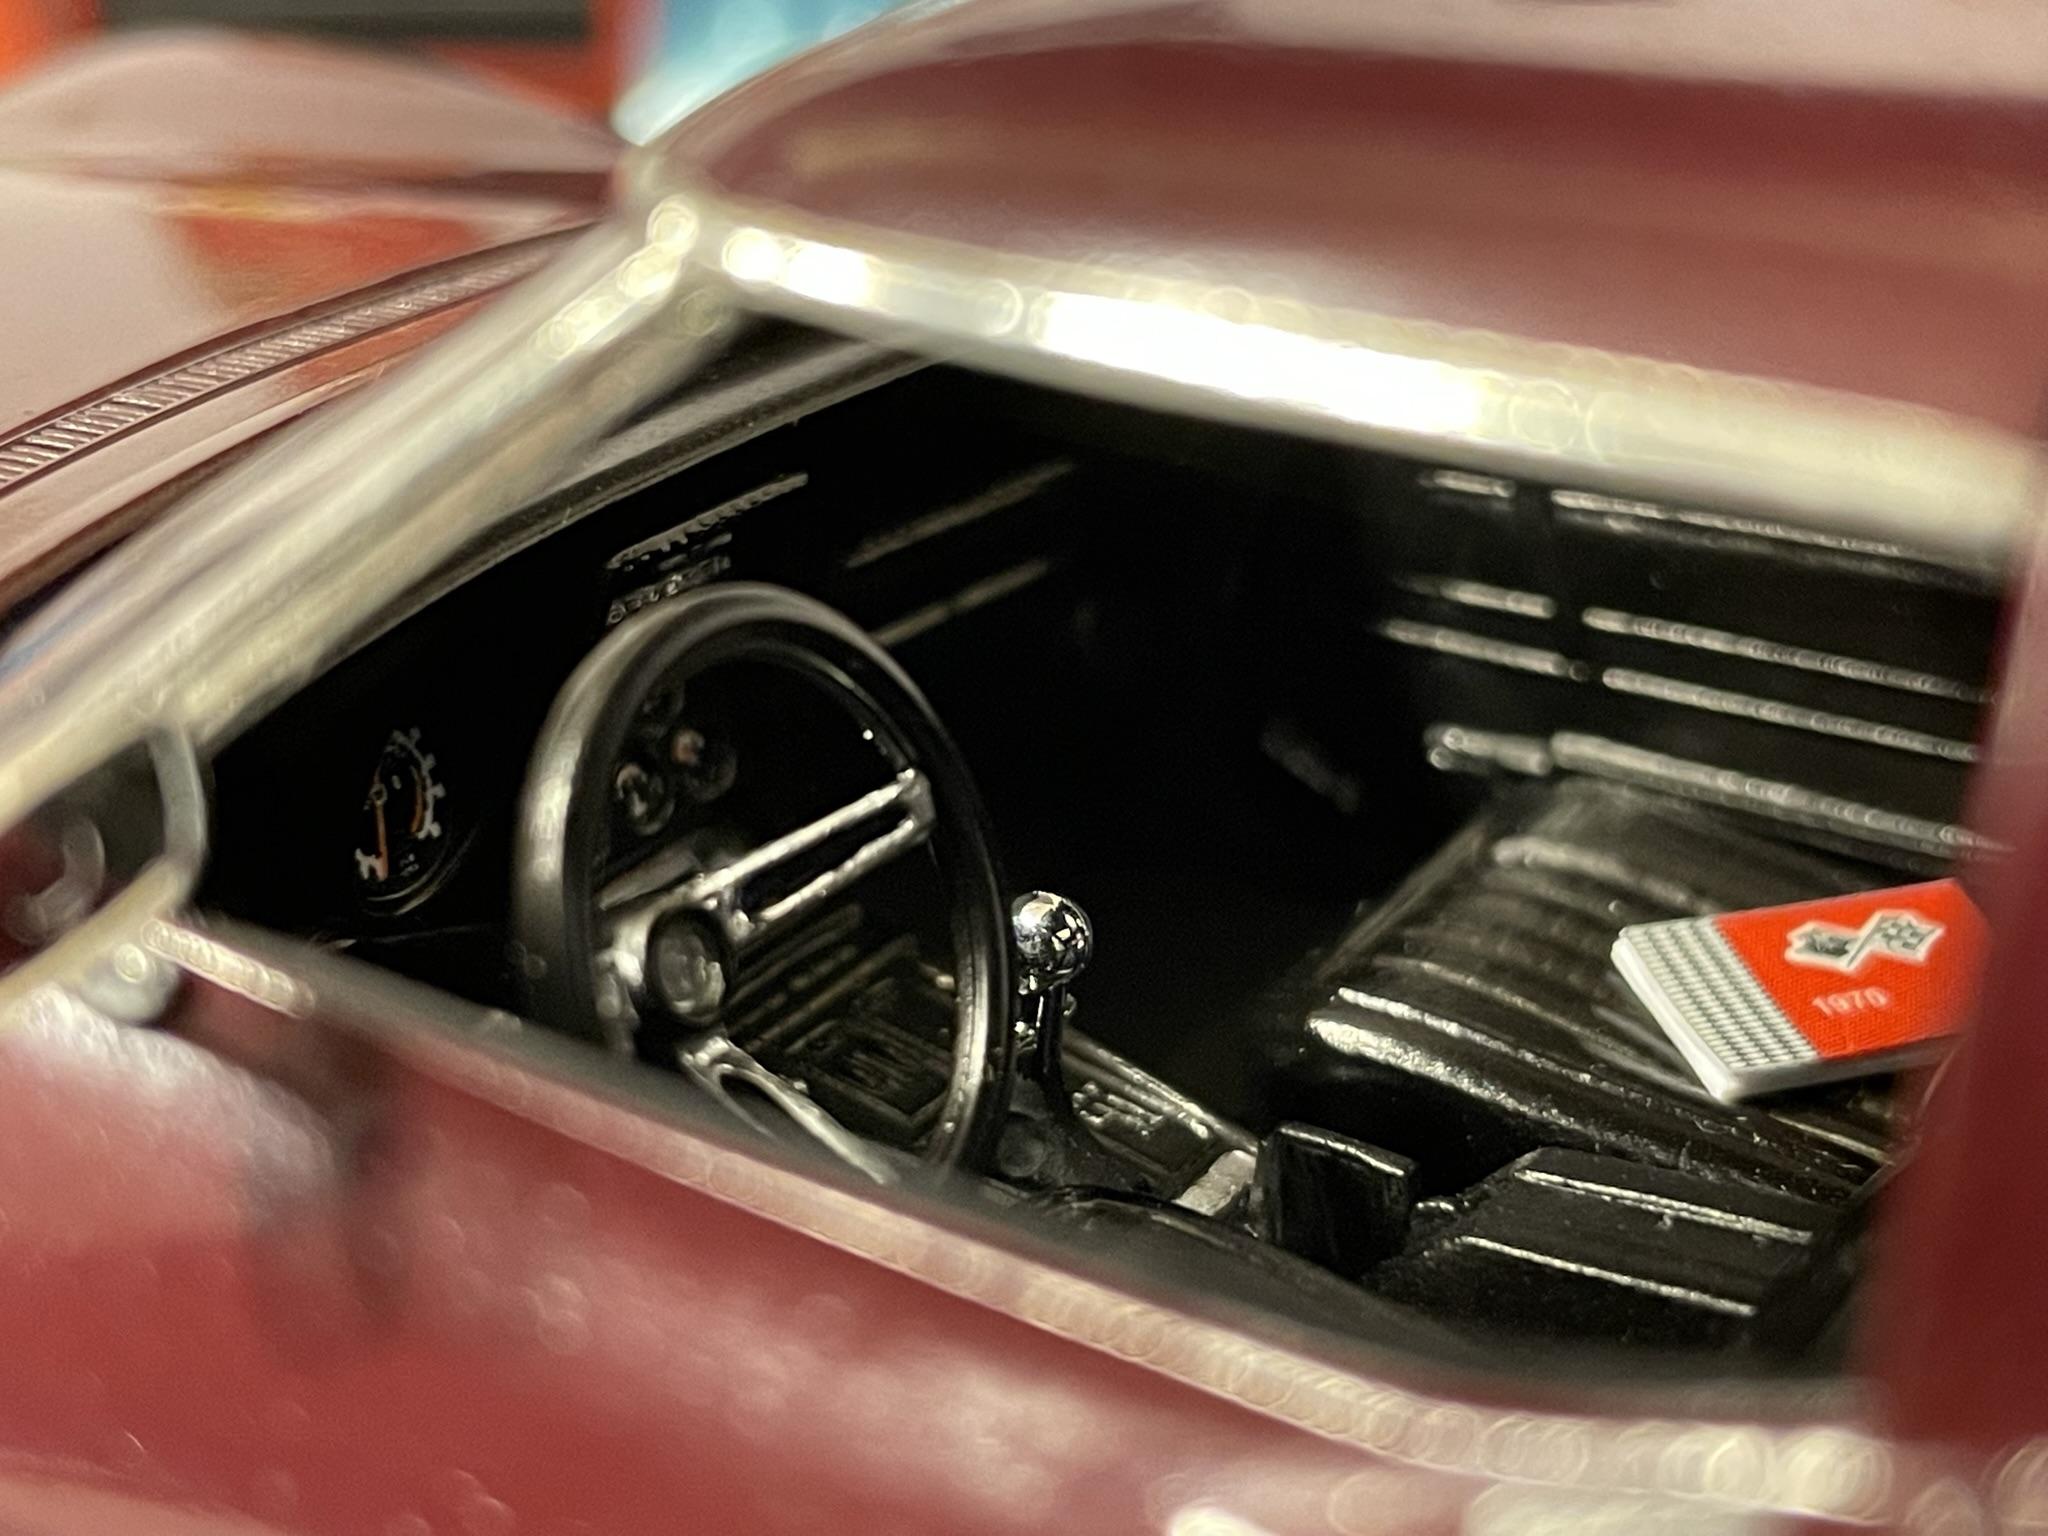
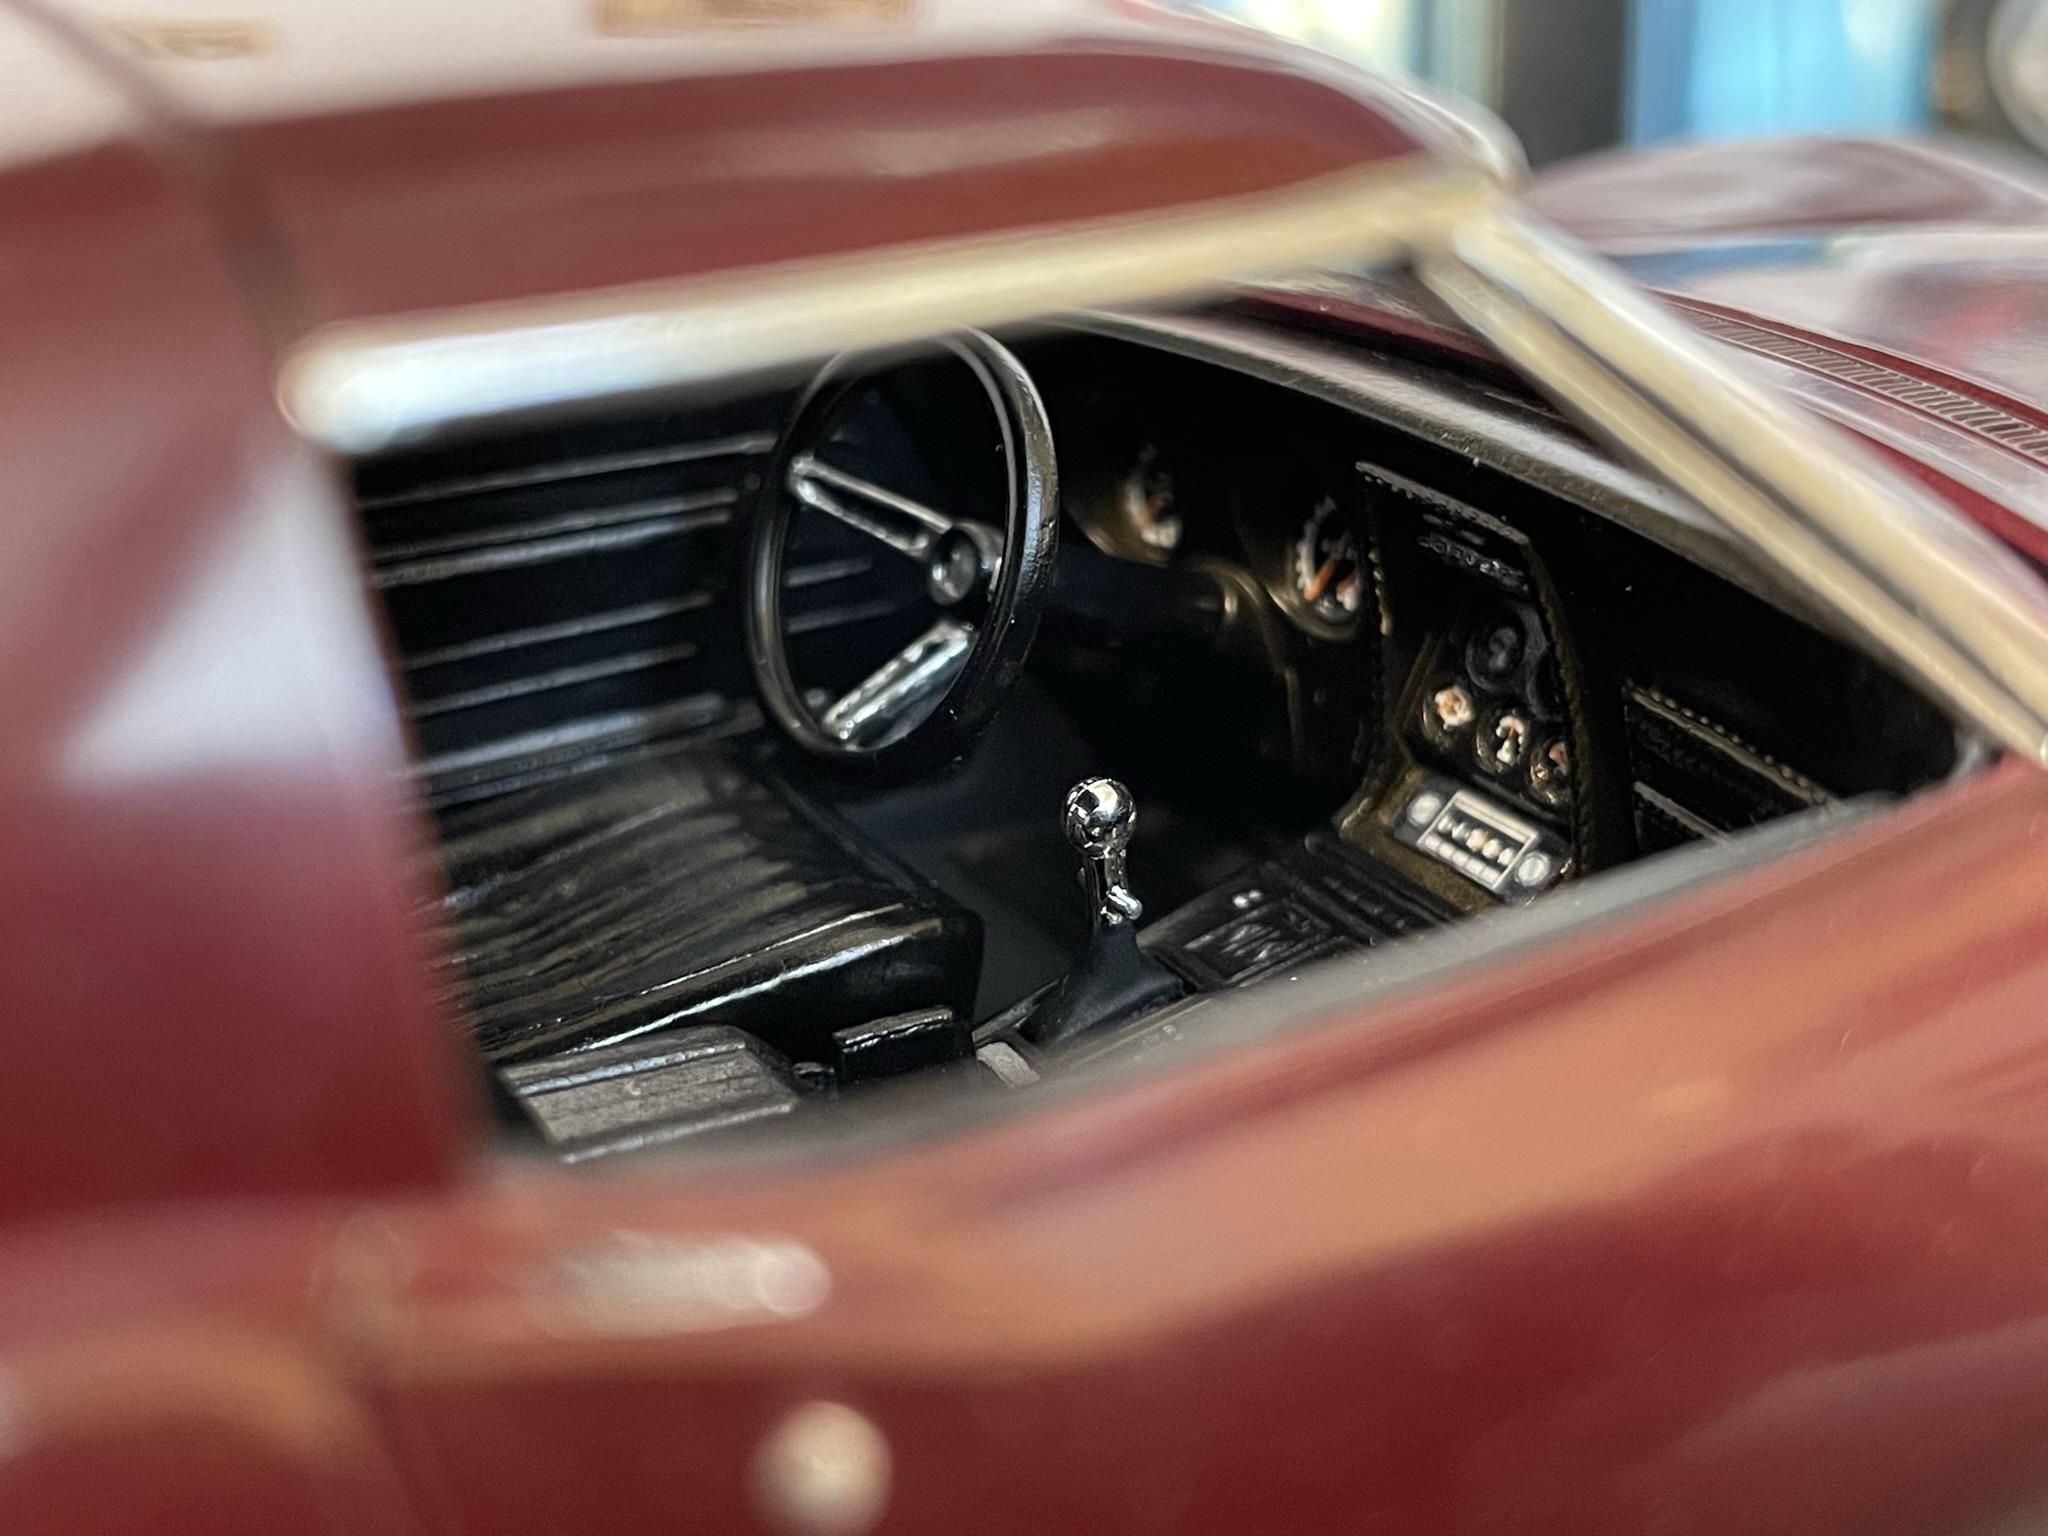
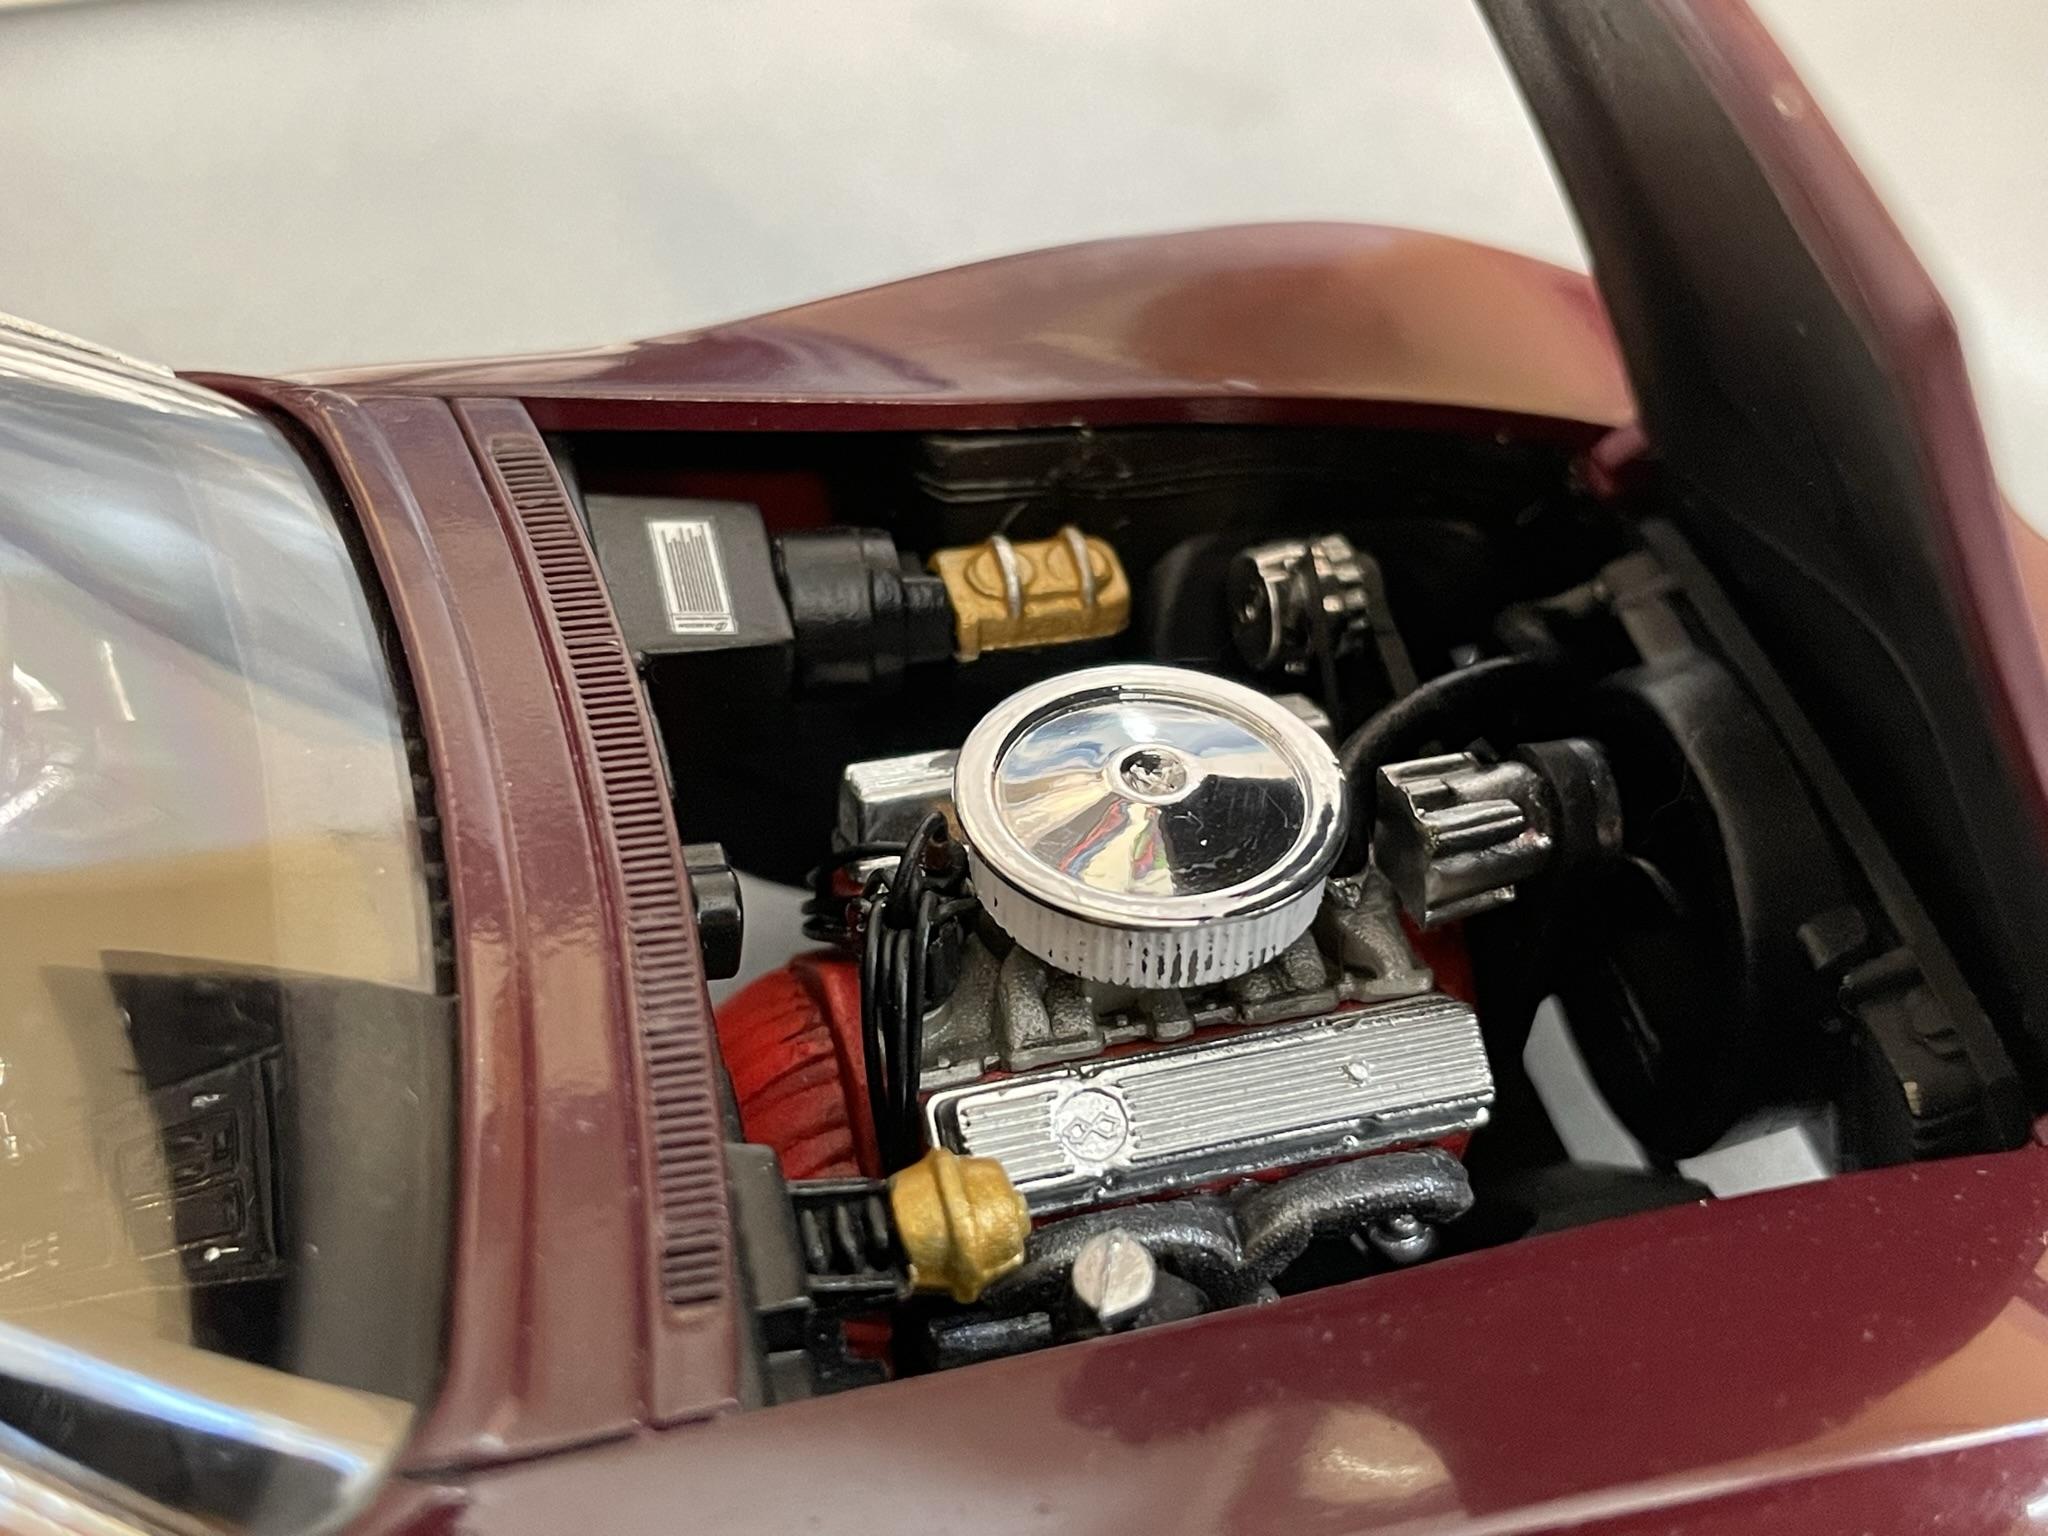
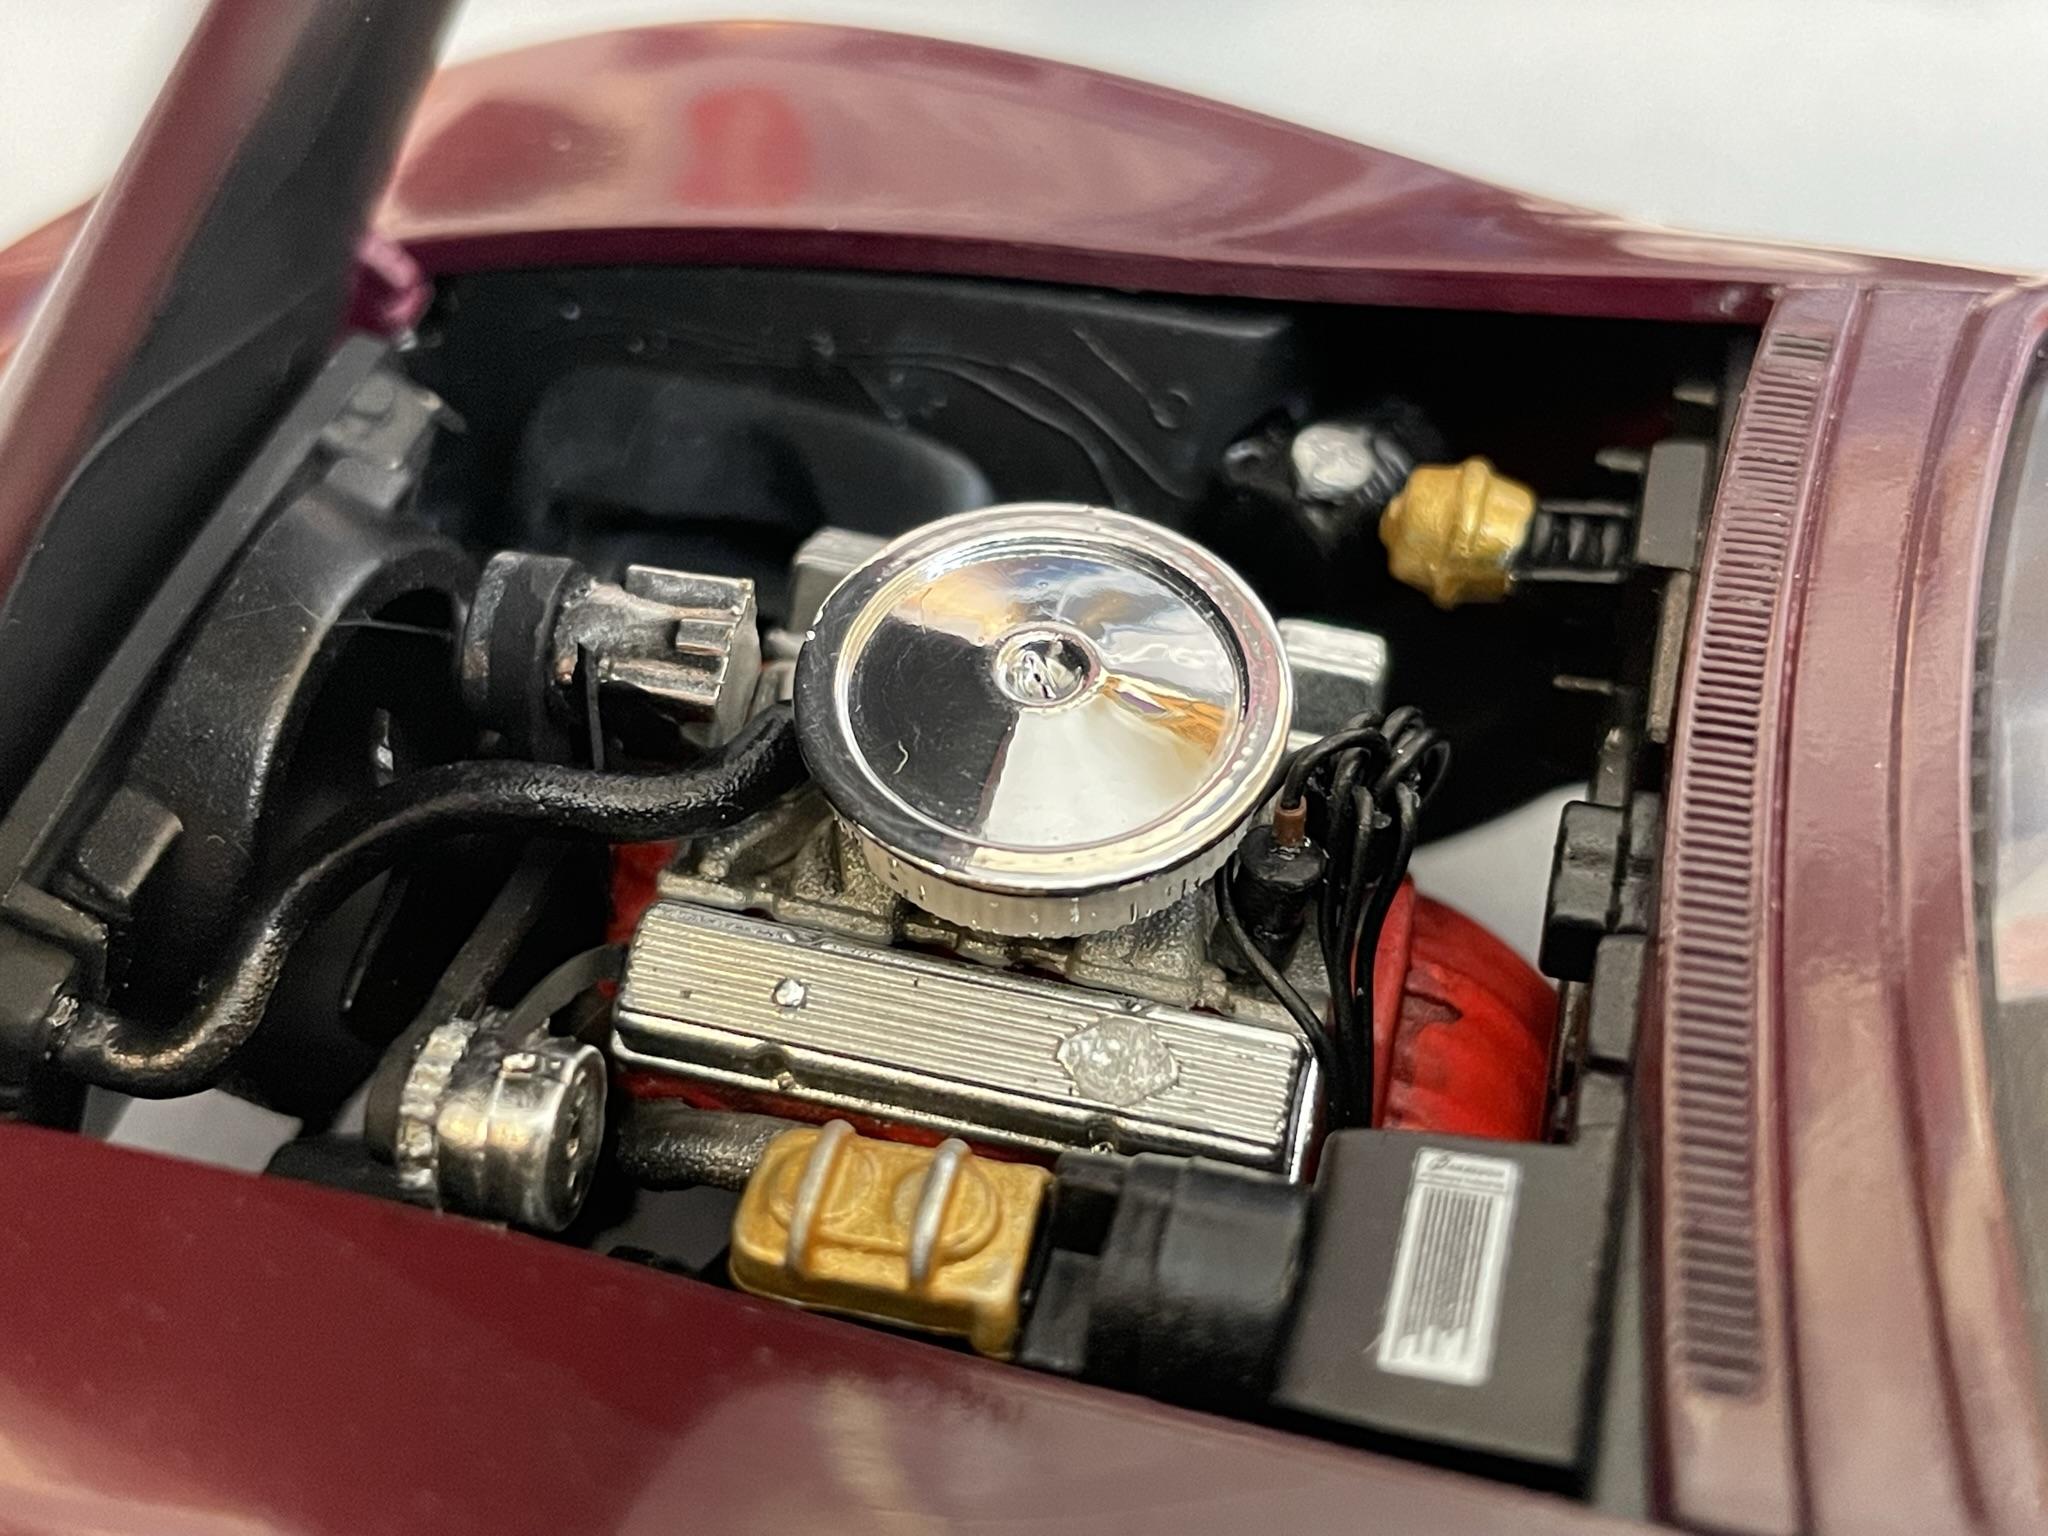
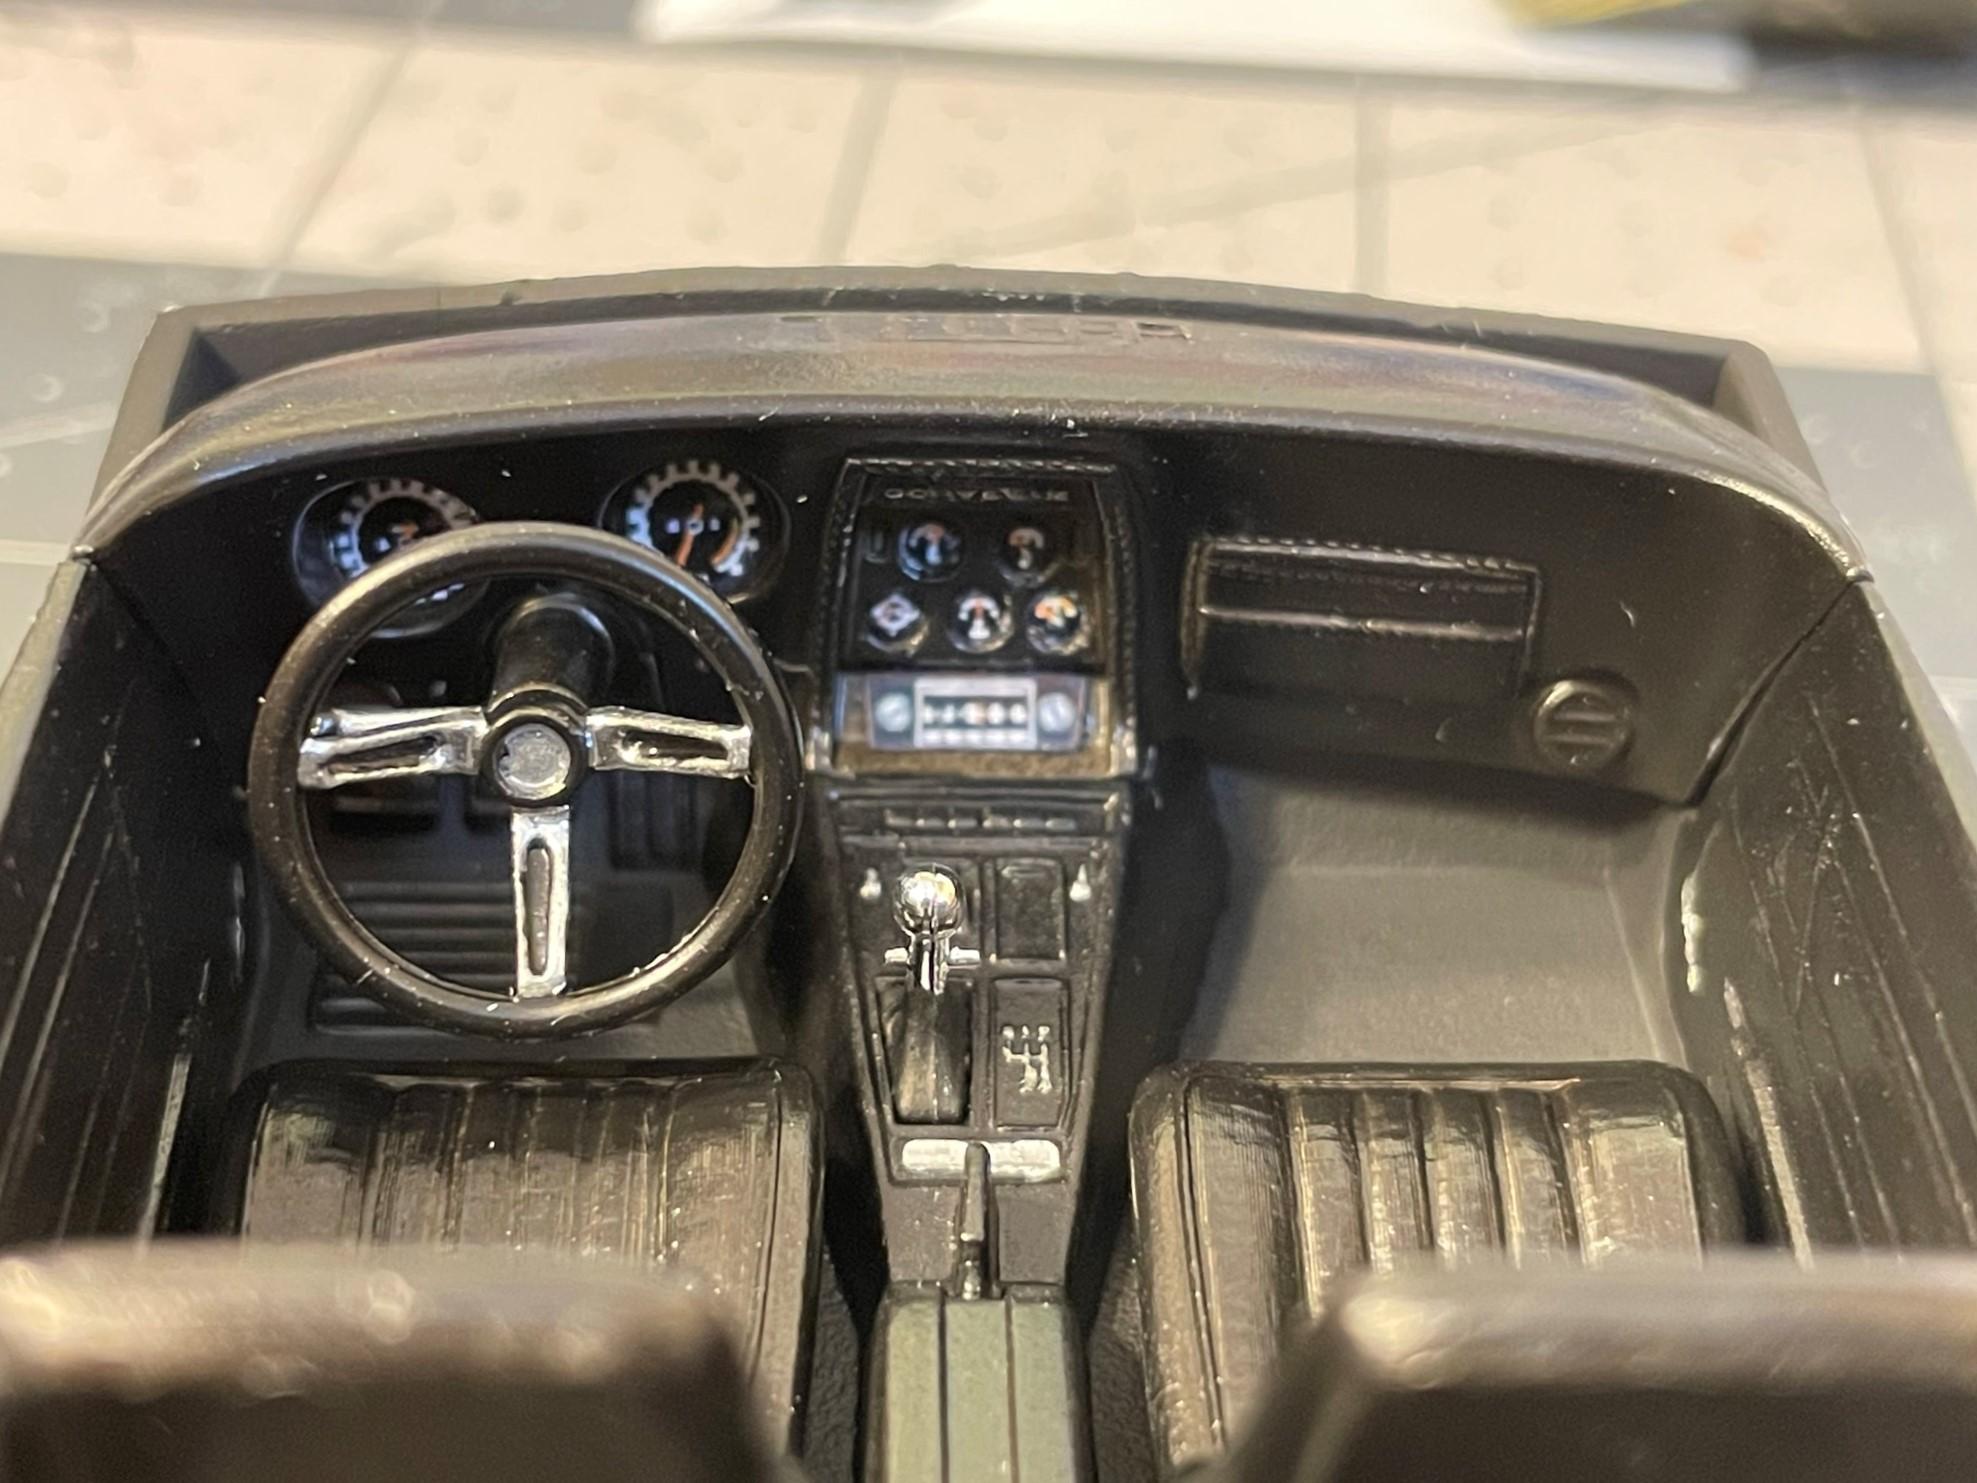
My version of the AMT 1970 Chevy Corvette LT-1. It's painted in Anita's Dark Plum and cleared with Createx UVLS 4050 Gloss Clear. The interior is Delta black with Anita's Glossy Black seats, dash and door panels. I thought the Cragar's added a nice little something to the overall appearance with the body color and applied some Fireball Modelworks Radial T/A decals. I added valve stems and ignition wires for extra details, used BMF for the trim, bestmodelcarparts gauge decals, and glued the kit's owner's manual decal to some sheet styrene and tossed it onto the passenger seat. It gave me a bit of a tussle in a couple of places, nothing too bad, and is a pretty decent little kit overall. Thanks for looking!

-
AMT 1970 Chevy Corvette LT-1 in Dark Plum.
Dragonhawk1066 replied to Dragonhawk1066's topic in WIP: Model Cars
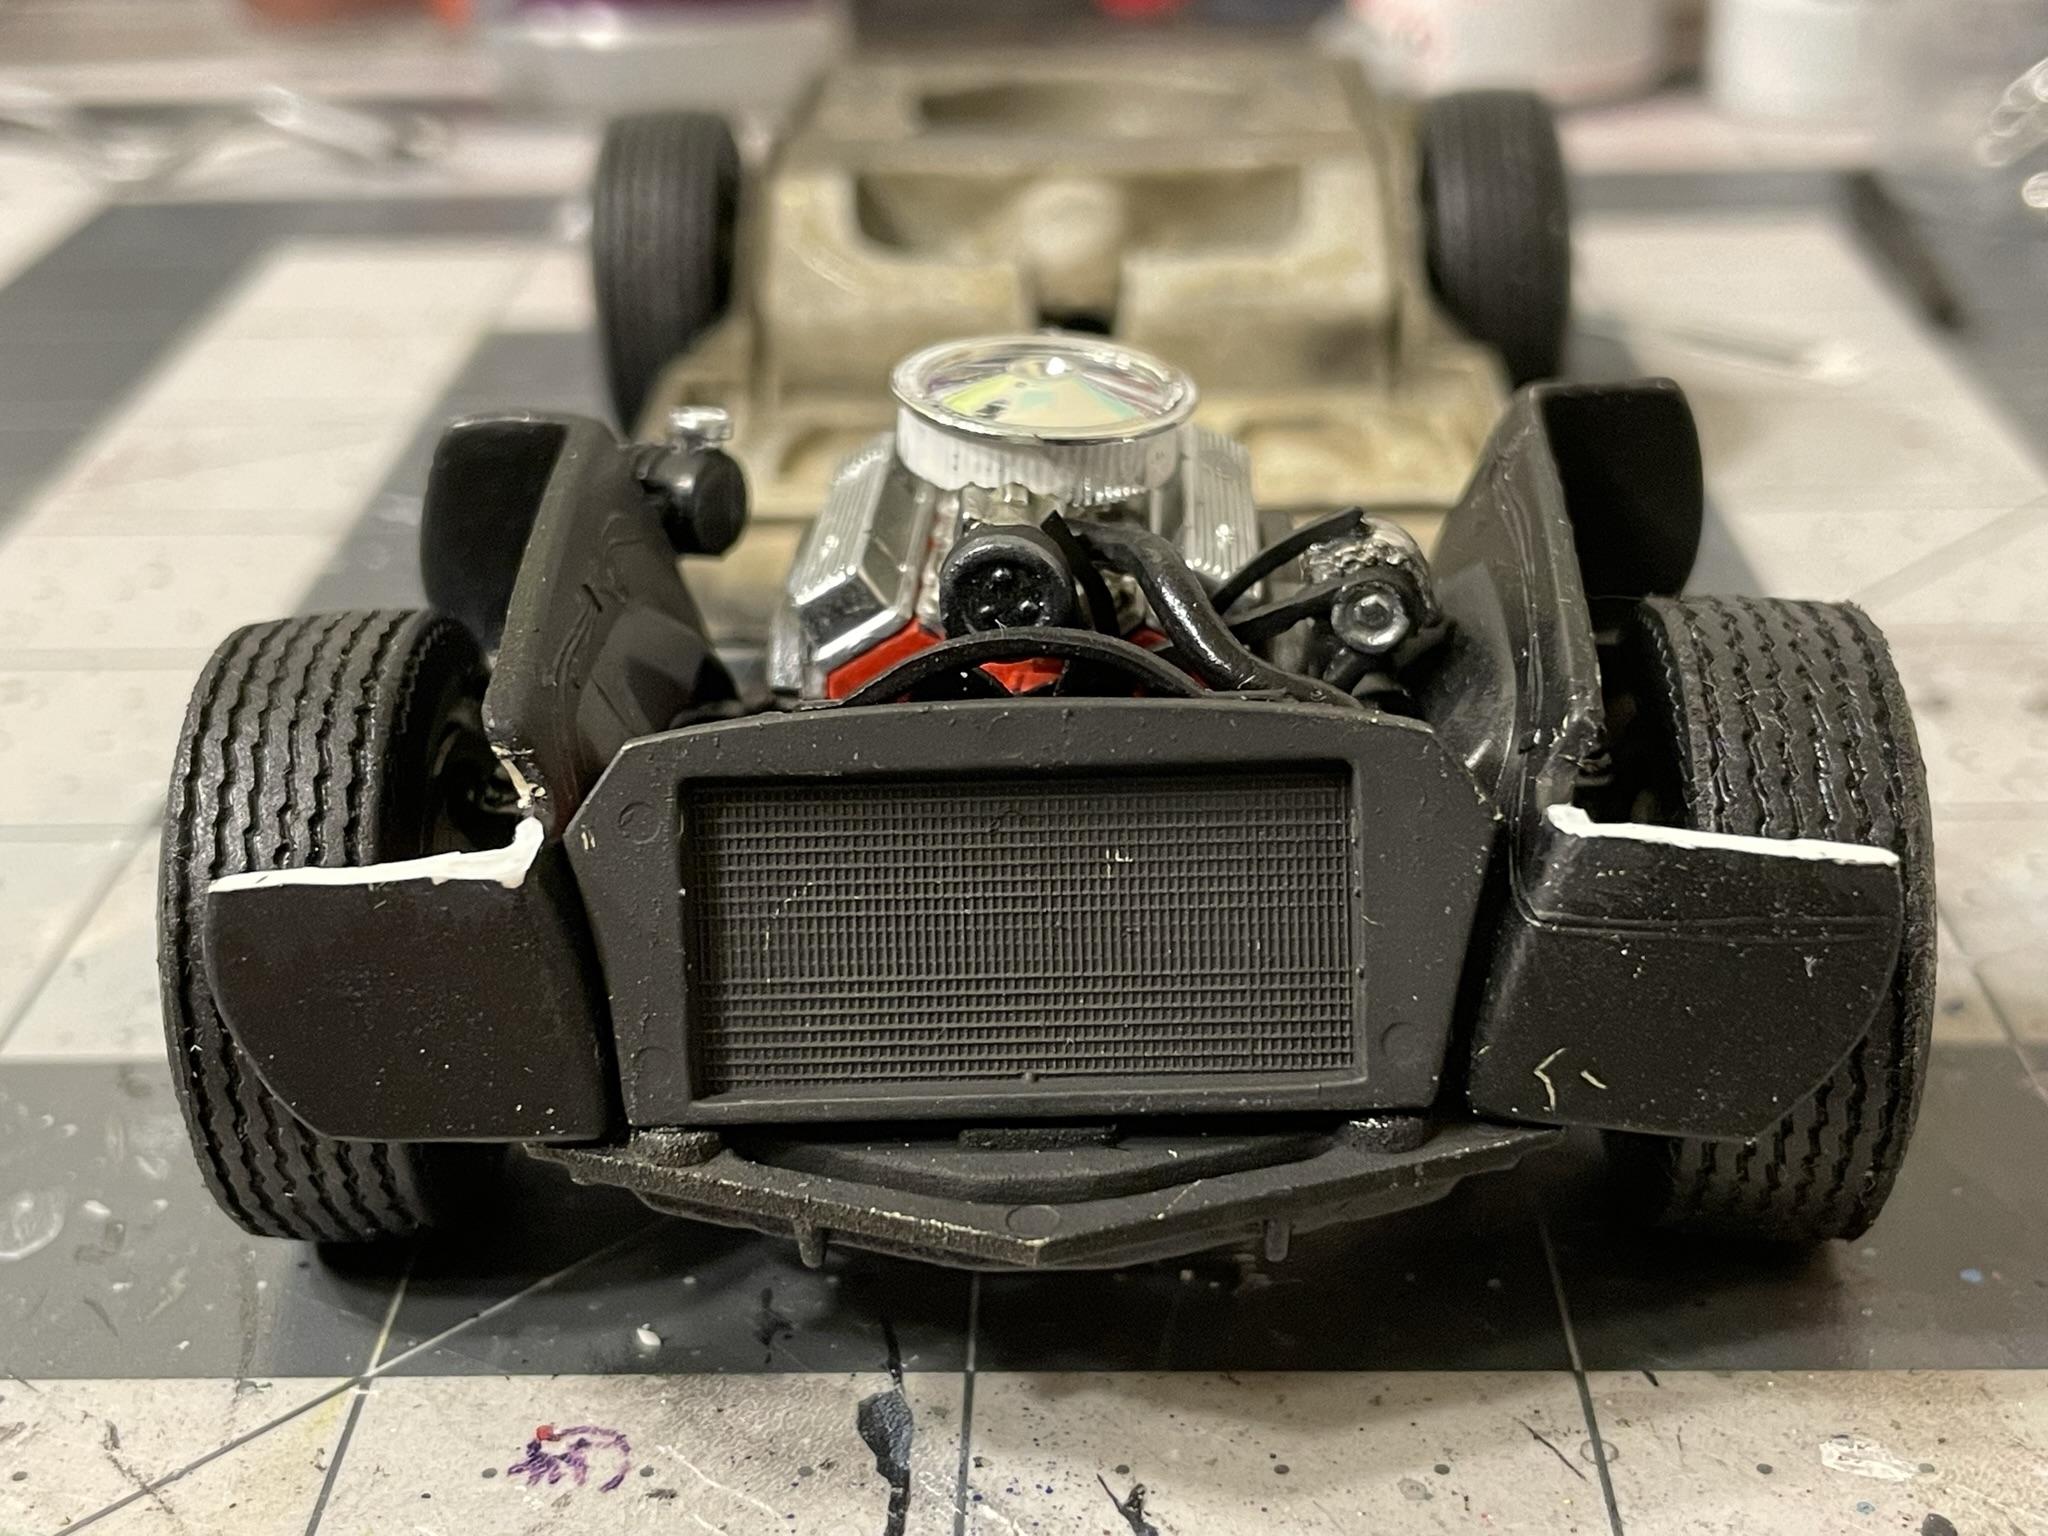
The hood sits nice and flush and opens nicely after the trimming of the front of the inner fenders. Also, while fitting perfectly initially, after attaching the body to the chassis the front air dam is about 1/2mm short. I ended up cutting a couple pieces of strip styrene and placing them on the edges of the air dam so they catch the inner fenders. I also had to trim the front bumper behind the turn signals to clear the strips. With that done, it's all finished.
-
AMT 1970 Chevy Corvette LT-1 in Dark Plum.
Dragonhawk1066 replied to Dragonhawk1066's topic in WIP: Model Cars
Thanks! I'm just going with it. You have to get pretty close to notice it, and while it may be quite evident on the show table, it'll never see one, lol. It'll look pretty good in my display cabinet whenever I get one, lol. -
AMT 1970 Chevy Corvette LT-1 in Dark Plum.
Dragonhawk1066 replied to Dragonhawk1066's topic in WIP: Model Cars
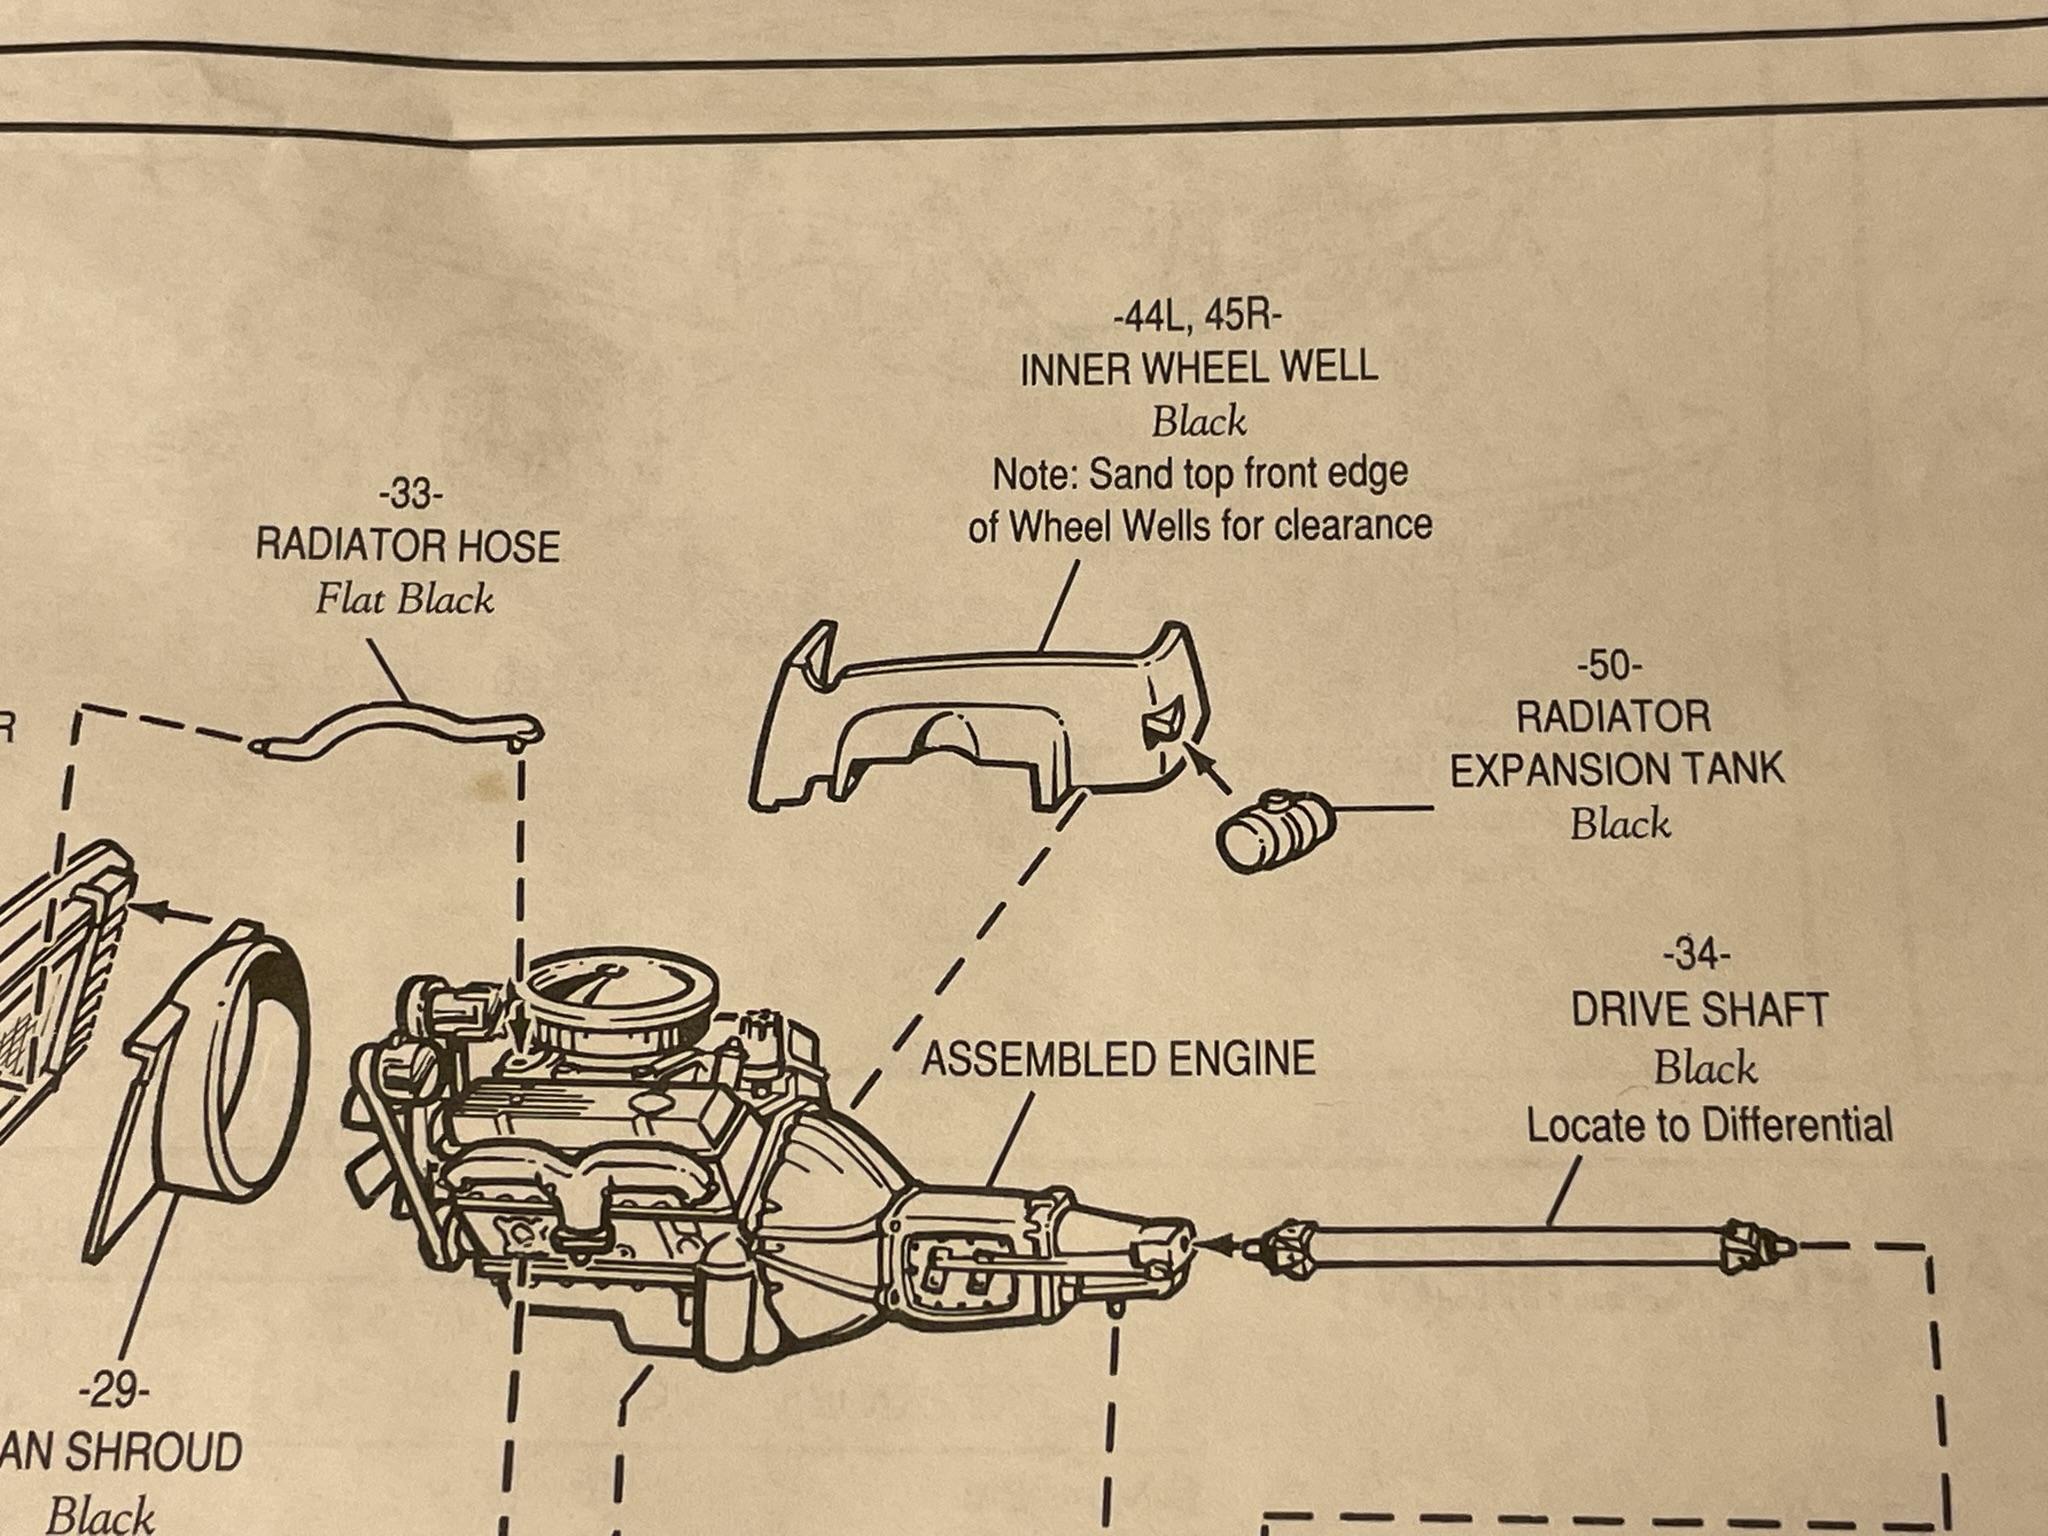
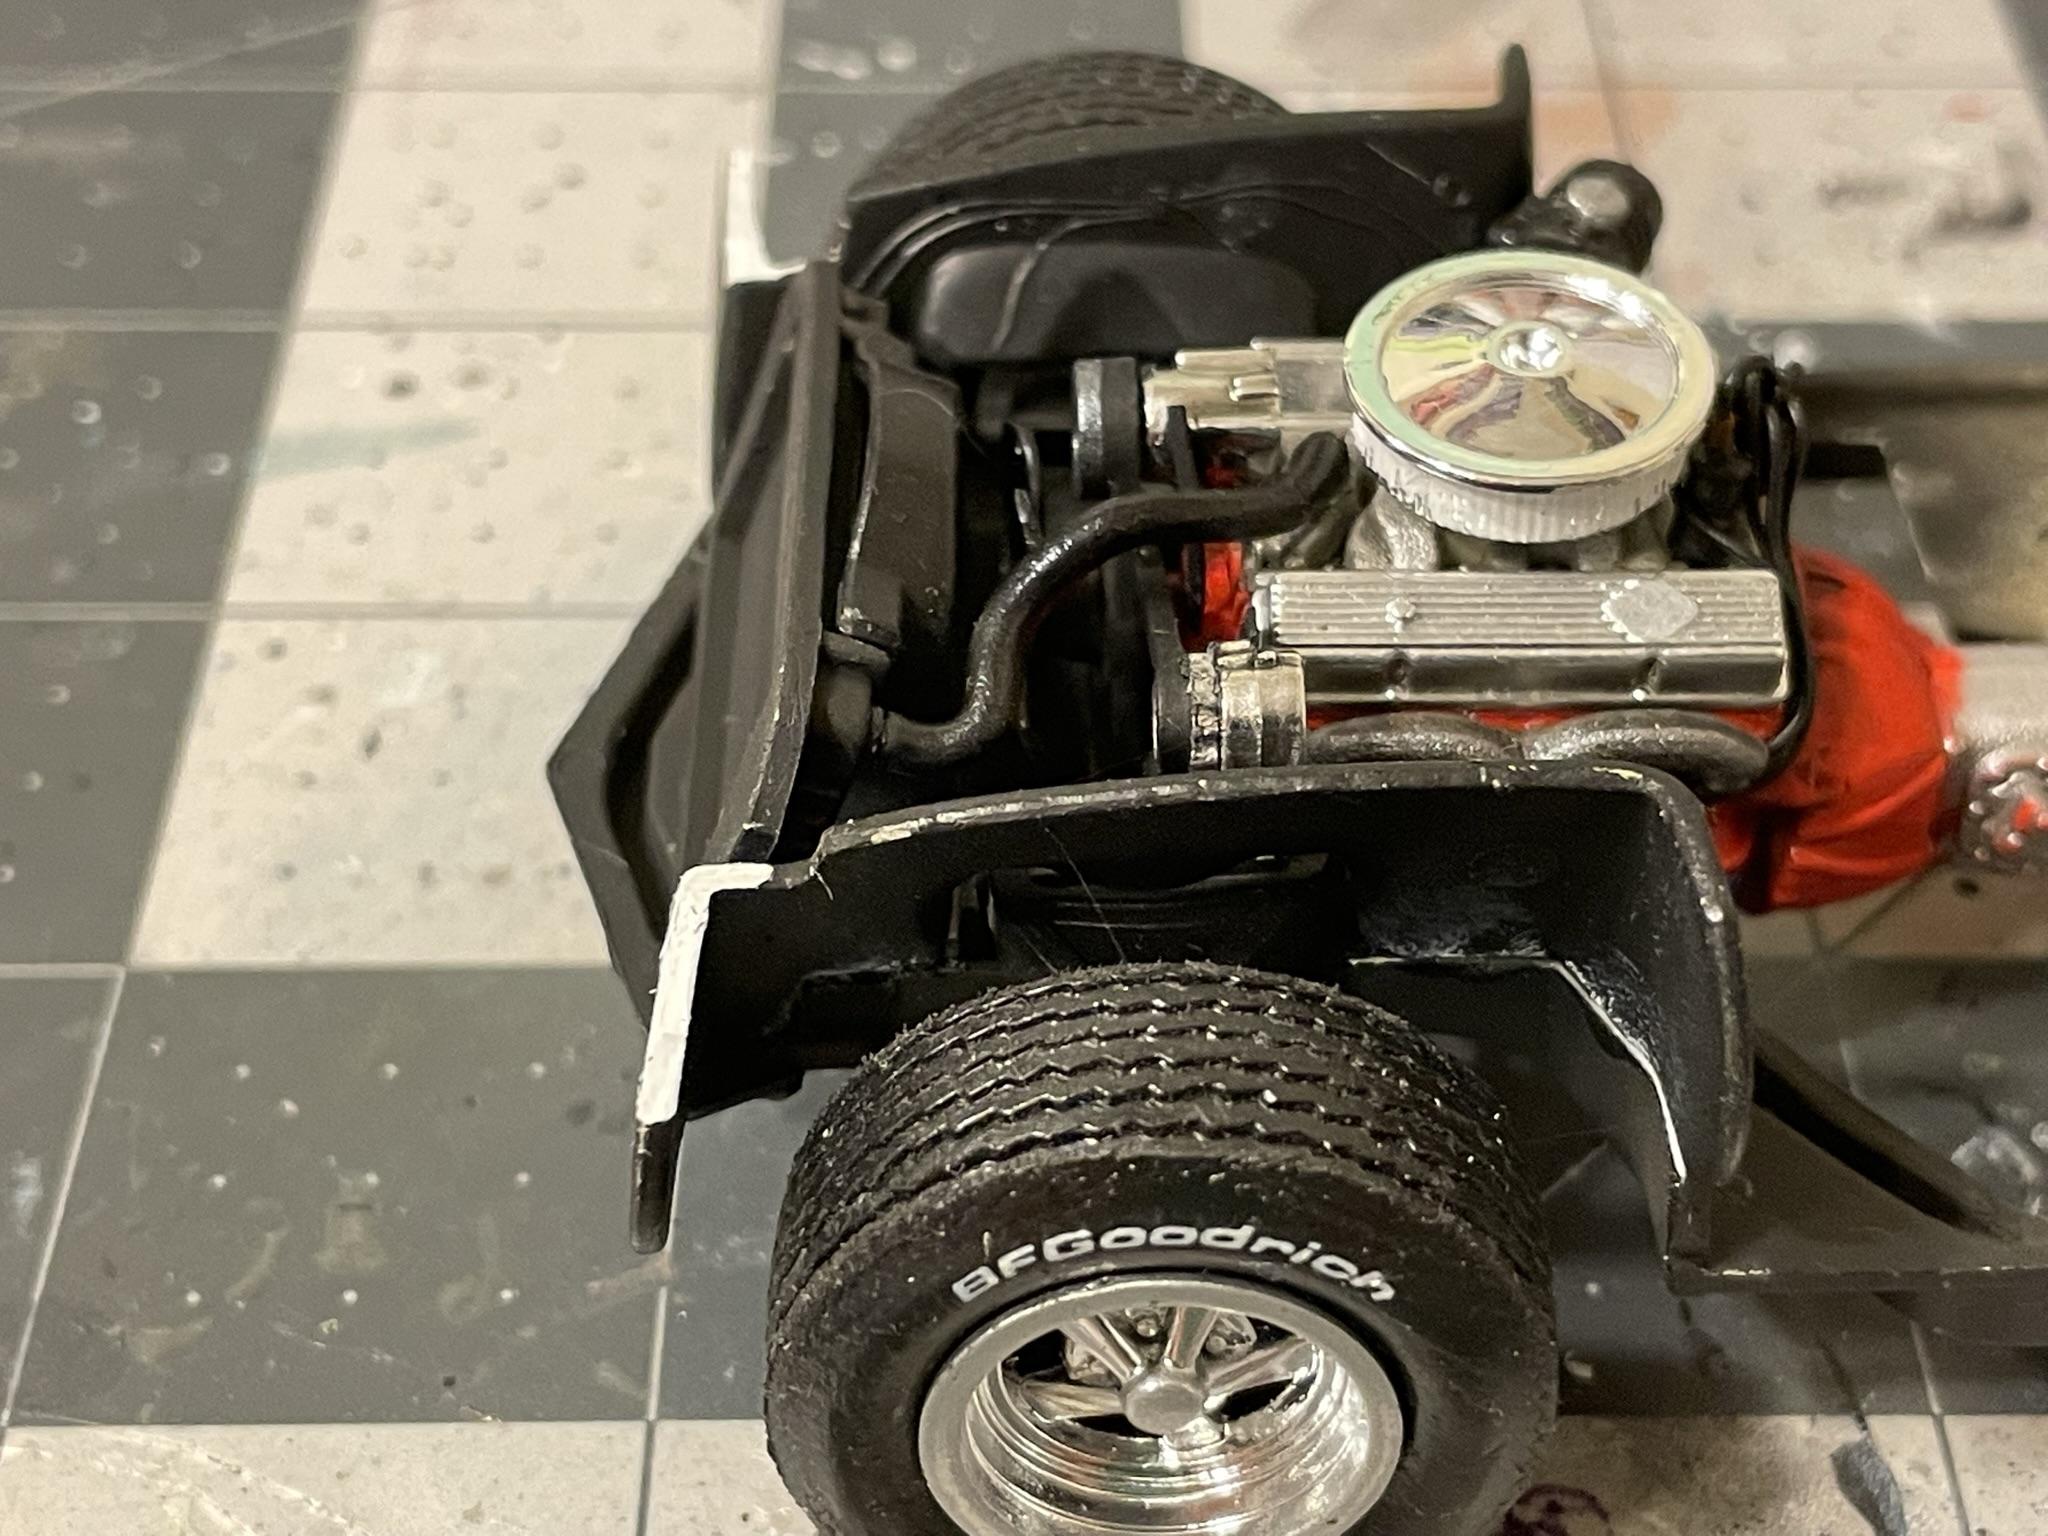
The instructions say to sand the top front edge of the wheel wells, so I used my rotary tool to whittle it down. After a test fit, I noticed they needed to be ground down some more, but I went with the sprue cutters this time. I cut even with the indentation for the hood pin pivots so as to not have to keep popping the body on and off. There should be plenty of clearance now, and everything else lines up quite well with the stance looking pretty spot-on, so hopefully tomorrow I can pop the body on one last time and get it glued down.
-
AMT 1970 Chevy Corvette LT-1 in Dark Plum.
Dragonhawk1066 replied to Dragonhawk1066's topic in WIP: Model Cars
I wet-sanded, polished, and waxed the body a few days ago, but I see that I messed up a bit with the clear. I ended up over thinning it and spraying it on too heavy because while I was wet-sanding, after I wiped off the excess moisture, the surface was still a tad soft and some lint from the paper towels I used ended up getting stuck on. It's not bad enough, for me personally, to strip and start over but it is there. After that adventure, applied the BMF on Friday, which was a fairly quick operation as there isn't much trim to do on this year Corvette. I also managed to finish the interior and complete the rolling chassis.
-
Createx Transparent for Candy Effects?
Dragonhawk1066 replied to Mopar440_93's topic in Model Building Questions and Answers
Yes, they really seem to have a very realistic scale metallic look. More so than the craft paints I normally use, which really aren't bad either. -
Createx Transparent for Candy Effects?
Dragonhawk1066 replied to Mopar440_93's topic in Model Building Questions and Answers
Yes, they're all pearls. I also did the AMT 1969 Plymouth GTX in Pearl Silver, but that doesn't show off in pics very well. -
Createx Transparent for Candy Effects?
Dragonhawk1066 replied to Mopar440_93's topic in Model Building Questions and Answers
I really like using Createx paints, as well as craft paints. I use their 4011 Reducer, 4030 Balancing Clear, and 5607 Retarder when mixing pretty much at their recommended ratios and they spray very well. I tested Transparent Deep Red, but it seemed too dark to get a good idea on transparency. The UVLS 4050 Gloss Clear is a great clear coat as well and I have started using it as my go-to clear. The '29 Ford Roadster is Pearl Plum over a Metallic Charcoal Gray base, the '55 Chevy Cameo is Pearl Turquoise over a medium gray primer, and the '67 Shelby Mustang is Pearl Tangerine over a Metallic Gray base, all with UVLS 4050 Clear for an idea of how they look.
-
Revell 1969 Camaro
Dragonhawk1066 replied to Perspect Scale Modelworks's topic in Model Building Questions and Answers
The orange is the Revell Germany boxing, the green is for the U.S. market. The instruction manual for the Germany kit is much better illustrated and the decals might be a little different, but it's the same kit. -
That sure looks enticing! I kind of can't believe none of the regular kit manufacturer's ever did this one. It wouldn't happen to have come with a set of decals, those flames would be pretty tough to try to paint on?
-
I was blessed enough to be able to make a trip to Hobby Lobby today to pick up a few kits for the first time in probably 6-8 months or so. Unfortunately it'll probably be another 6-8 months or longer for my next spree, so I took advantage. I was going to limit myself to 3 or 4 at the most, but the wife chose the '56 Thunderbird as a request, and talked me into the '71 Cuda for the $15 sale price. The '67 Vette and '69 Chevelle were the prime scores for me. No '71 442, '70 Road Runner, '85 Z28, or '55 Chevy to be had despite the shelf stickers for them. I got a few paints including the Pearl Magenta for the T-bird and some more much needed Createx Clear while we were there too. I also ordered some more tiny drill bits from Amazon.
- 39,073 replies
-
- 2
-

-
- johan
- glue bombs
- (and 1 more)
-
Great color and very nice engine details!
-
Ferrari 512 TR (Testarossa) in "blu sera / rosso" (Fujimi)
Dragonhawk1066 replied to Tommy124's topic in Model Cars
Great color choice on a good looking Ferrari! -
The Boot Hill Express - Halloween themed group build
Dragonhawk1066 replied to Nacho Z's topic in Model Cars
That looks excellent! -
Nice work!
-
AMT 1970 Chevy Corvette LT-1 in Dark Plum.
Dragonhawk1066 replied to Dragonhawk1066's topic in WIP: Model Cars
In that case, I'd probably hang out there every day, LOL. -
AMT 1970 Chevy Corvette LT-1 in Dark Plum.
Dragonhawk1066 replied to Dragonhawk1066's topic in WIP: Model Cars
I sprayed the Createx UVLS 4050 Gloss Clear on this morning. Although Createx recommends a 10% Reducer ratio, I found about 25% for the clear is the sweet spot for my Paasche H airbrush at around 22 psi. I sprayed 3 medium coats followed by 2 medium-heavy coats with about 10-15 minutes in-between the coats. Createx also recommends a minimum 48 hours before wet-sanding, so I usually give about 72 hours which puts me hopefully wet-sanding on Thursday.
-
AMT 1970 Chevy Corvette LT-1 in Dark Plum.
Dragonhawk1066 replied to Dragonhawk1066's topic in WIP: Model Cars
Yes it is. I'd probably drive by that place every day if I lived that close, LOL