Hermann Kersten
-
Posts
595 -
Joined
-
Last visited
Content Type
Profiles
Forums
Events
Gallery
Everything posted by Hermann Kersten
-
Pete 352
Hermann Kersten replied to tbill's topic in WIP: Model Trucks: Big Rigs and Heavy Equipment
Great paint job Tom, the color is awesome! Hermann -
BRBO 2020 Mystery build
Hermann Kersten replied to Vince66's topic in WIP: Model Trucks: Big Rigs and Heavy Equipment
That is really small Vince, but very interesting to see how you manage this little one. I was also thinking of that......I'm still missing some small parts of some finished projects.?? Hermann. -
1983 Freightliner FLA
Hermann Kersten replied to KJ790's topic in WIP: Model Trucks: Big Rigs and Heavy Equipment
Thank you JK, i have now 2 cabin halves on the table.? With the Archer decals you have to be careful when painting, sometimes they get detach at the corners when spraying paint. I would say, bring it on!!! Hermann. -
1983 Freightliner FLA
Hermann Kersten replied to KJ790's topic in WIP: Model Trucks: Big Rigs and Heavy Equipment
Oh yeah, nice to see somebody else do a conversion on this AMT kit. Well KJ, given your previous projects, I think the ambition is justified.? If i understood it well, you widen the cab or did i misunderstood that? Looking at the ctm grill, it look like the original wideness of the AMT cab. I'm asking it, because I'm also working on the same size of this FLA, mine will be a high roof. If you want the picture removed, just notify me. Since the rivet work is not done yet, I can always adjust the width of the cab if necessary. In any case you have a follower on this one, I am curious what you will do with the rivets. Hermann.
-
Snap Pete day cab conversion
Hermann Kersten replied to tbill's topic in Model Trucks: Big Rigs and Heavy Equipment
Great build Tom, i love the colors you use on this one! Hermann. -
Some pictures you have to look really good if real or not. Great job! Hermann.
-
1/24 International 9670 NASA Tank
Hermann Kersten replied to dragstueck's topic in Model Trucks: Big Rigs and Heavy Equipment
Awesome build Juergen! Hermann. -
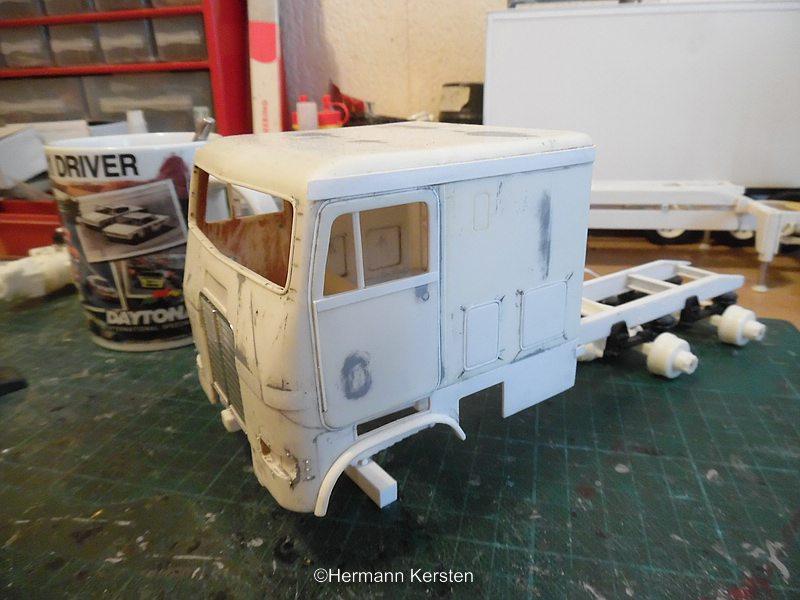
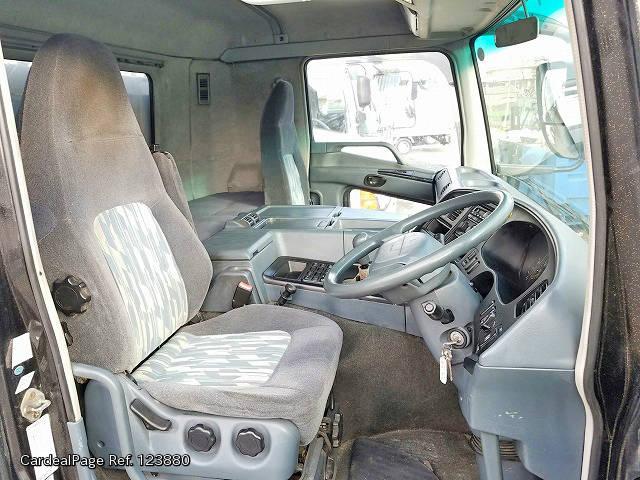
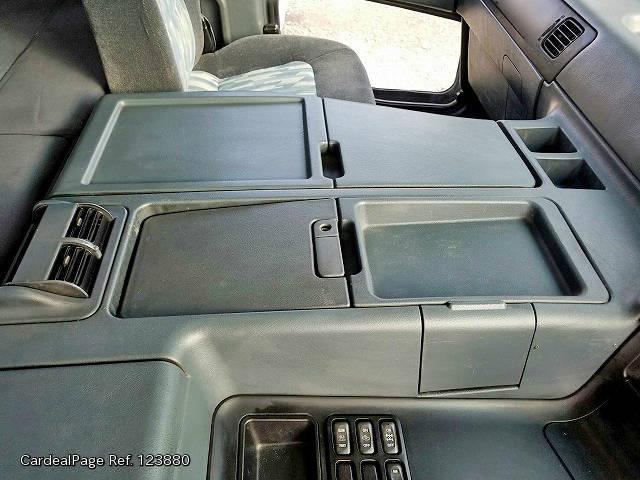
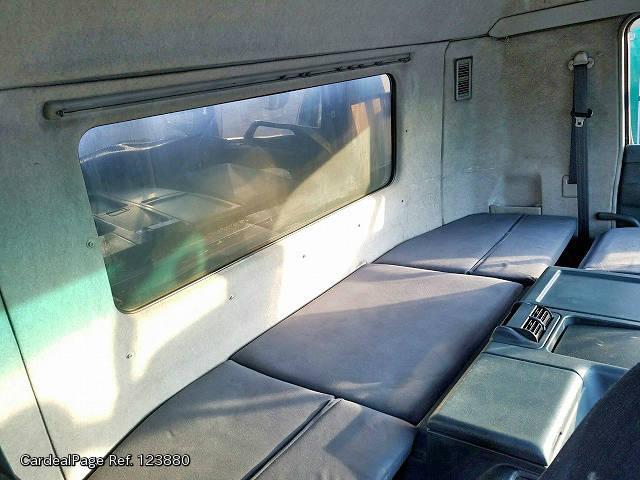
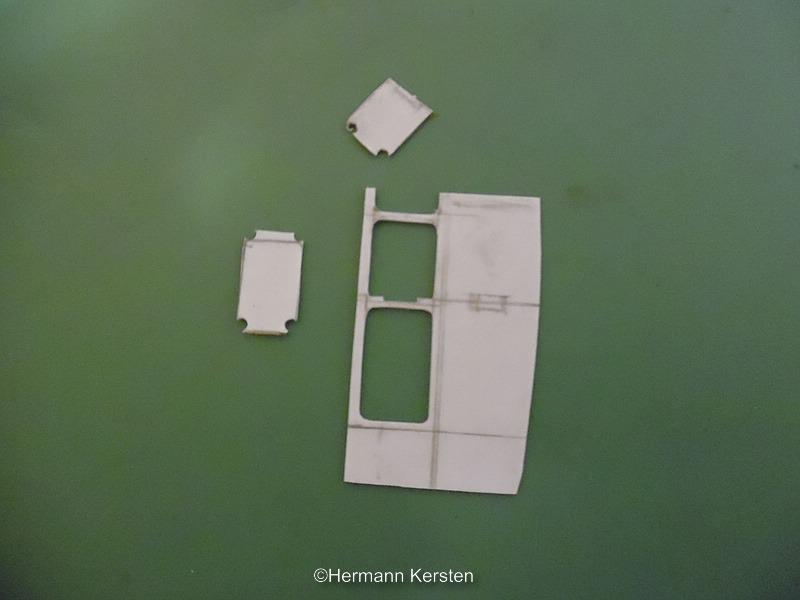
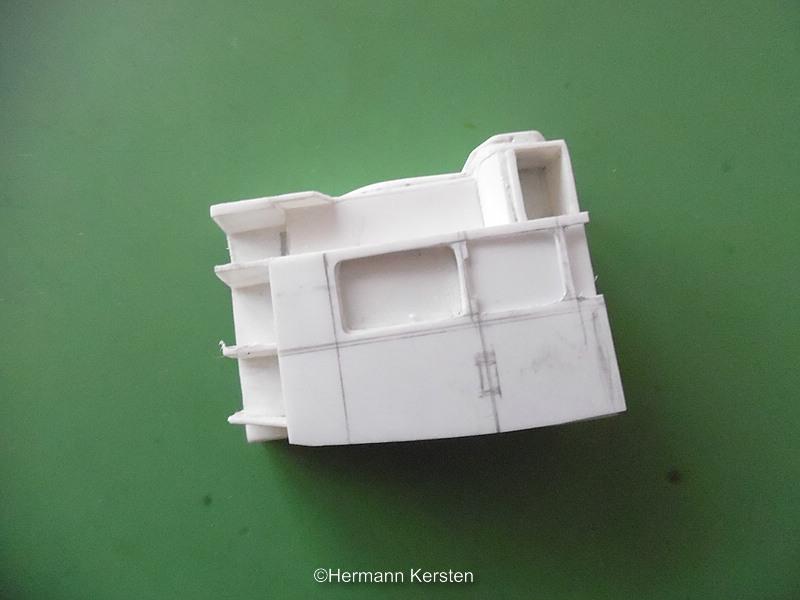
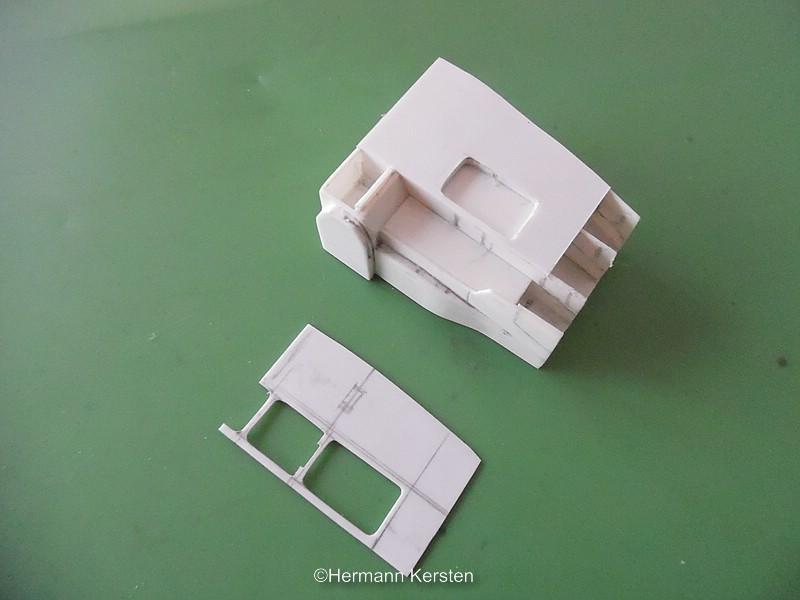
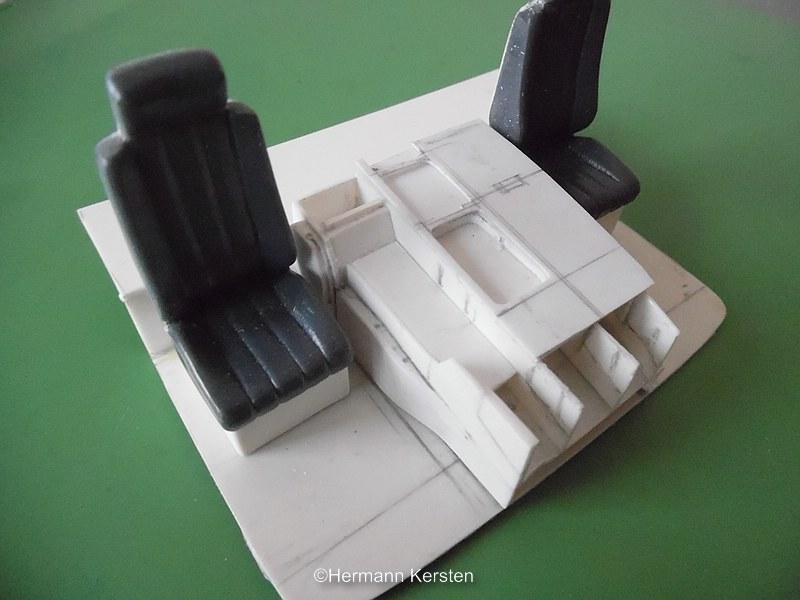
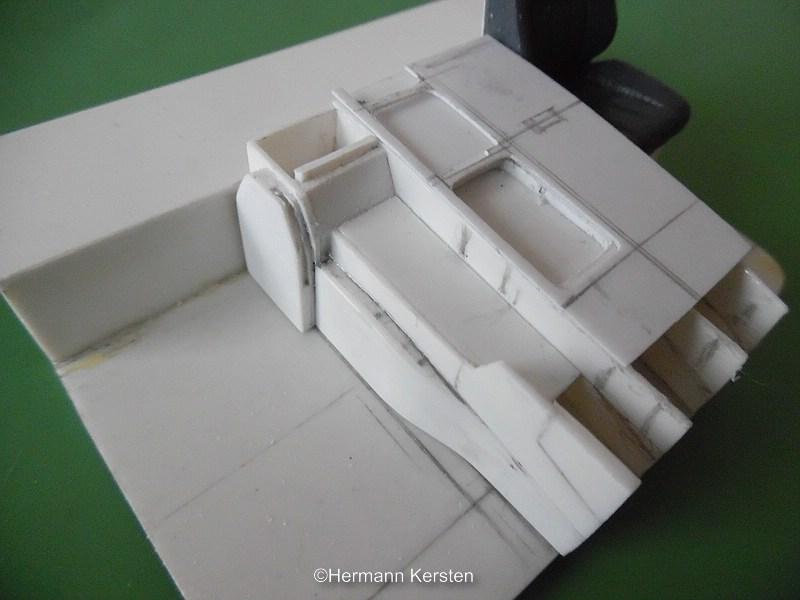
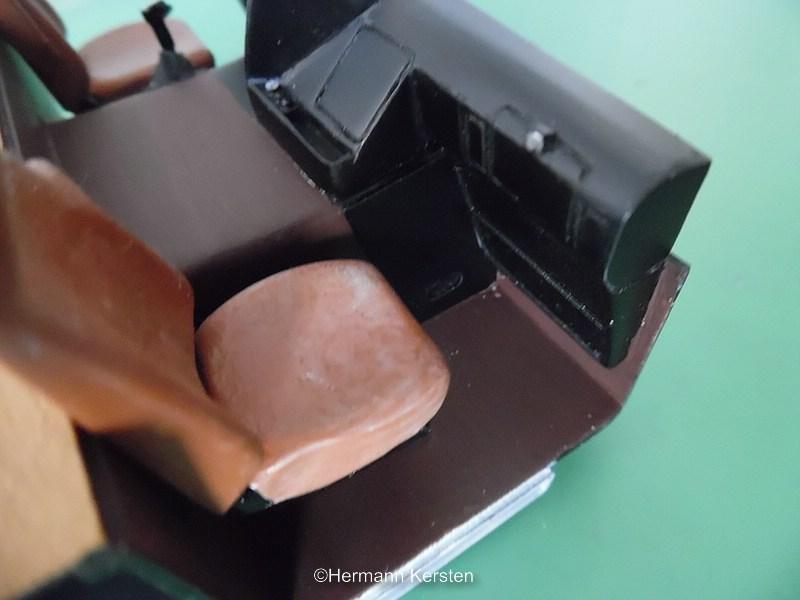
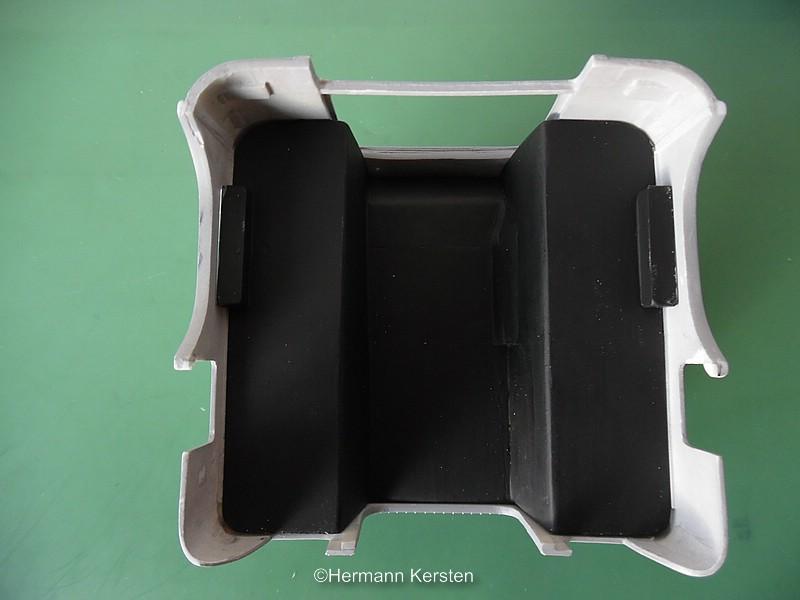
Thanks for the nice comments guys! Yes, here it also continues, today it's time to start the interior. I can tell you, that this interior is not the easiest one, lots of shapes and angles. First i show you the real interior..... Yep, as you all can see, not the easiest one. The first attempt was a failure, because the console was too high. So, i started all over again, as i always keep in mind..."it's just plastic", and with the second attempt it looks more in proportion. First i searched in my Actros spare-parts box and picked 2 seats out, modified these seats a bit, and made the boxes for the seats what is needed for this Fuso. The driver seat need some more work, but that is for later. Then it was time to make the tunnel and tunnel console and had to cut out a lot of styrene parts of different shapes and sizes. It is really unbelievable how many different shapes there are on such a console. I had to determine the scale, because i don't have dimensions of this tunnel console, but with some comparisons with the height of the seats and door windows, i figured out and estimate what the dimensions should or could be. Then with a cutter and a lots of patience, it was time to cut. With this tunnel console and storage compartments, i laminate the 0,5mm styrene plates, to get the final look of this console. And the slow progress so far. The upper plate is not glued yet, because i have to cut out some more hatches. When this console is in shape, then i will continue with the dashboard, what is also full of different shapes and angles. That's it for today, and till the next time! Hermann.
-
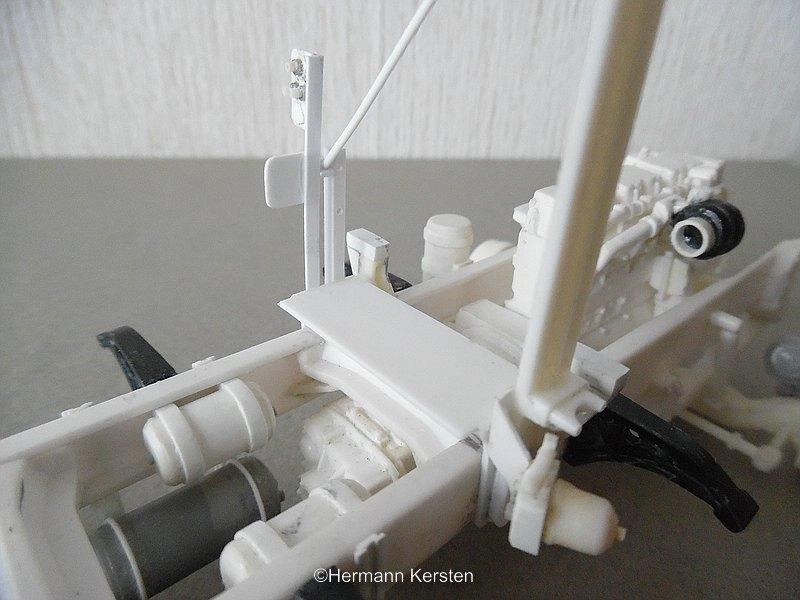
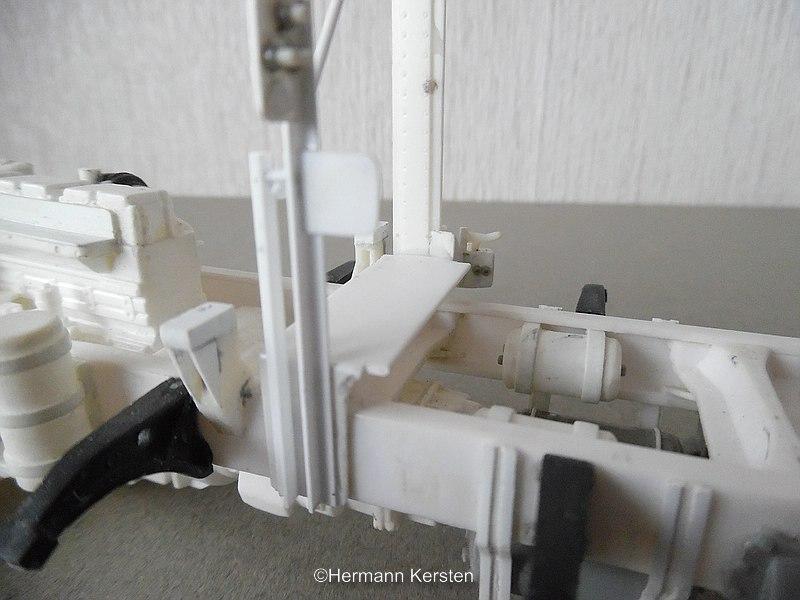
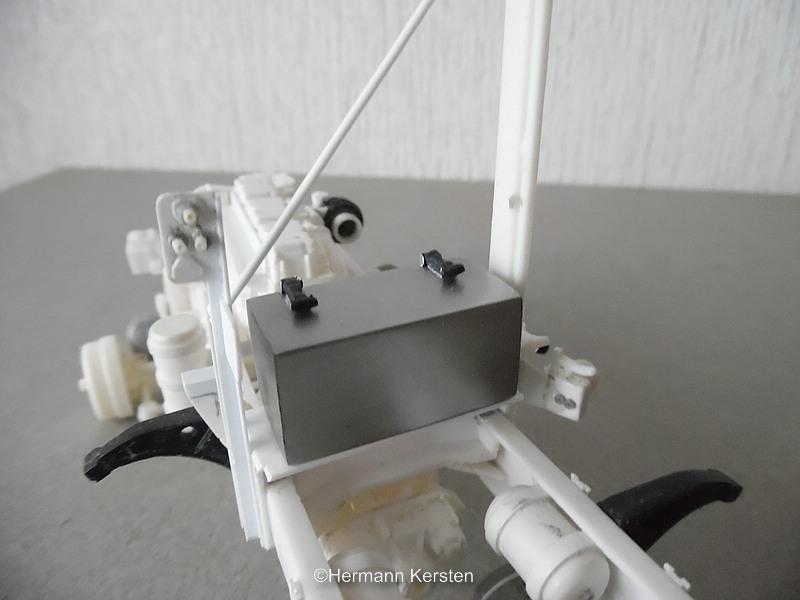
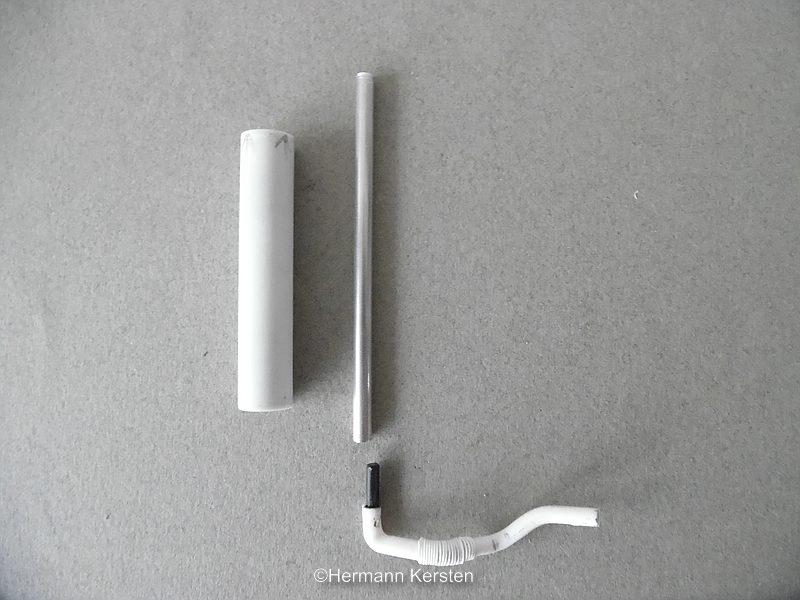
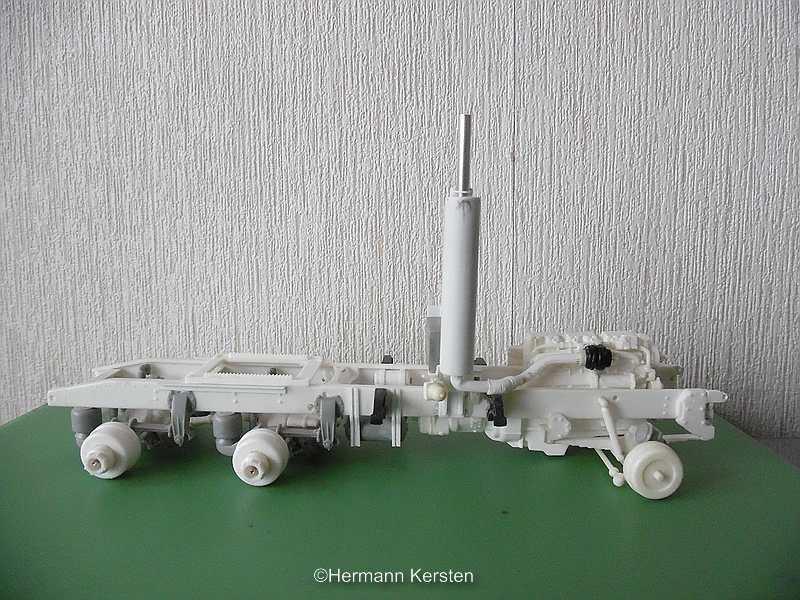
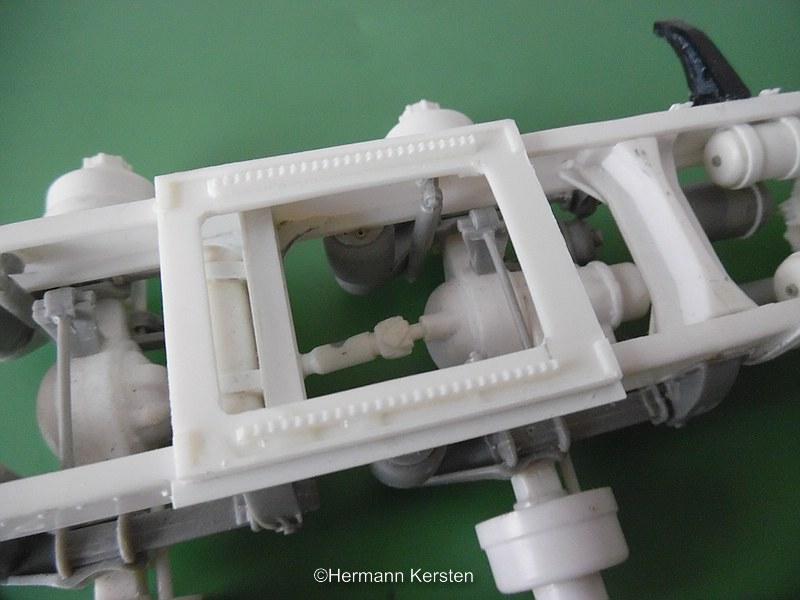
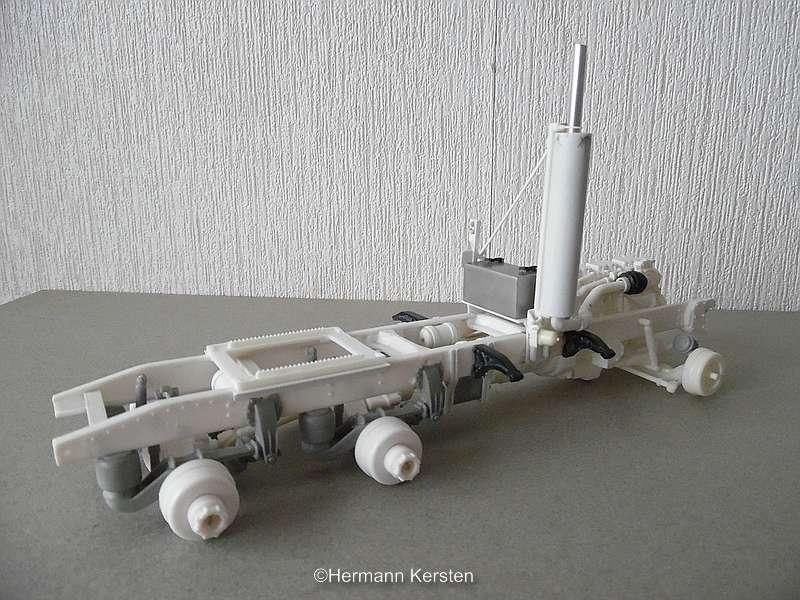
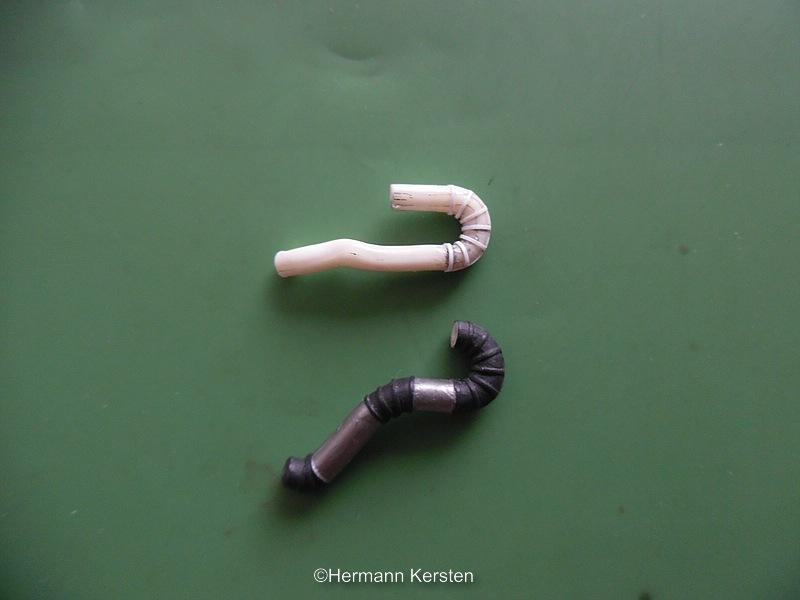
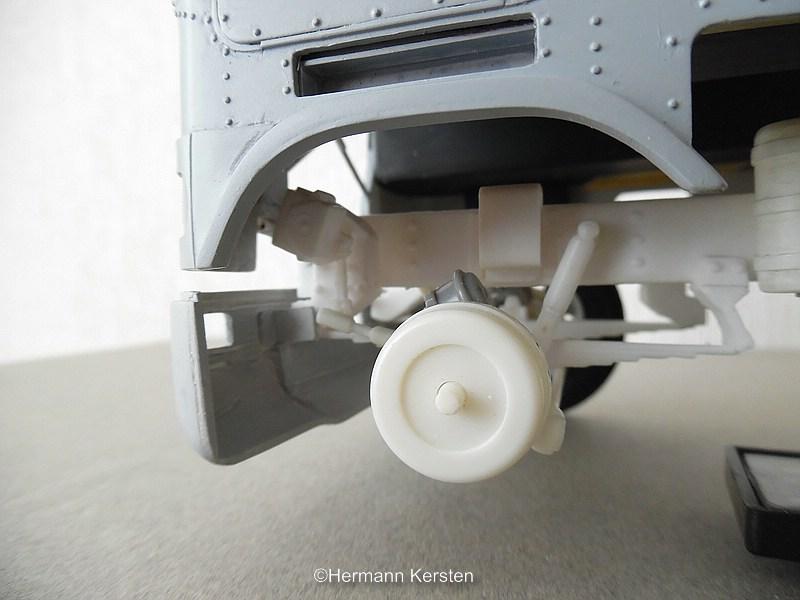
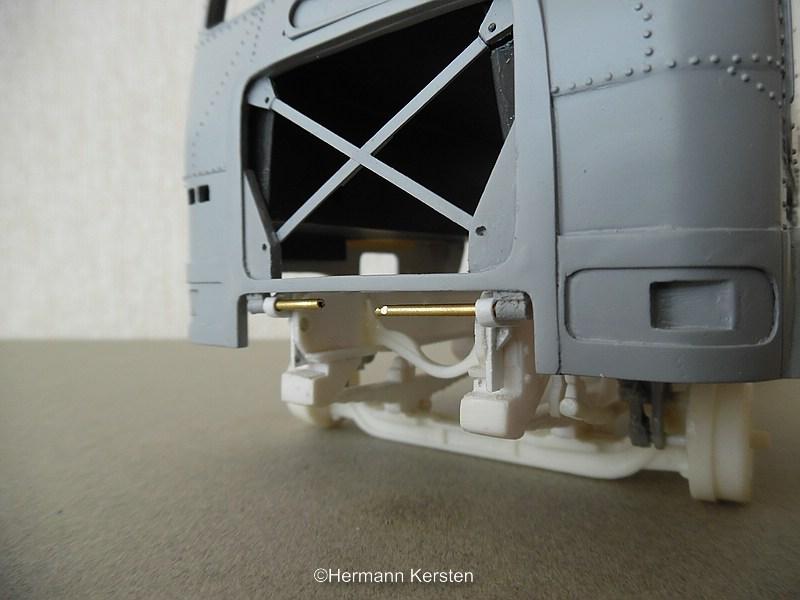
Thank you Dave, and i replaced the cross brace for a thinner one. I exchanged the 0,5 x 1,5mm strips with the 0,5 x 1.0mm strips, and looks more better now. Then it was time to continue with the chassis. I removed the exhaust tower and made a new one, where i drilled small 0,5mm holes for the clamps that are placed around the exhaust pipe at the top and the bottom. I saw with my reference pictures, that i had to made the supports for the battery box on the chassis, and then connect the exhaust tower on these supports. The other side i had to made the same situation, and attached the other tower on the outside of this support. And with battery box.... The exhaust pipe is made out of 4mm aluminum. On the bottom of this exhaust, i made a 3,5mm plastic sprue connector, what fits inside the alu pipe, and in this situation the exhaust pipe is always absolutely straight. The pipe to the turbo, i used the plastic stacks from the kit. With a lighter i made the bends and with 0,5mm round i simulate the flexible piece. The plate for the fifth wheel is now also open, just like with the FLA. The fifth wheel itself will be movable, because i drilled 1mm holes at the 5th wheel and at the support, where i later will put a 1mm brass tube inside the holes. The next job was to make simulate the rubber parts for the air supply to the turbo. I made this from a sprue and 0,5 x 0,25mm strips, the lower painted one is from the Marmon, to show the result at the end. And all together so far. Ok guys, that's it for today and see you next round! Hermann.
-
BRBO 2020 Pete wrecker rebuild
Hermann Kersten replied to DrKerry's topic in WIP: Model Trucks: Big Rigs and Heavy Equipment
Nice progress on this project Kerry, and remind... haste is the enemy of this hobby!? Hermann. -
Time consuming details, what will pay off at the end.? I love this kind of projects. Hermann.
-
Great progress, and yeah....if they used more trucks and trailers in the movie, then it's just a case of choice, what in this case means that you have some freedom.? Hermann.
-
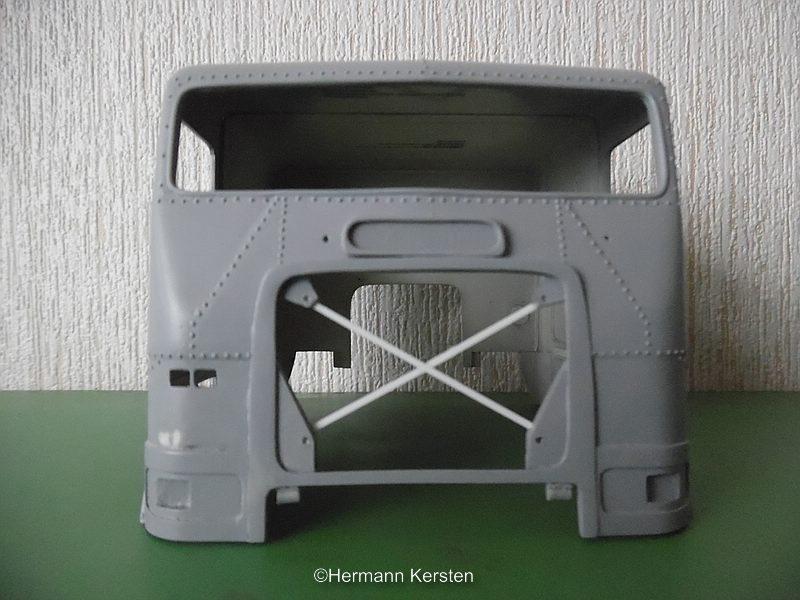
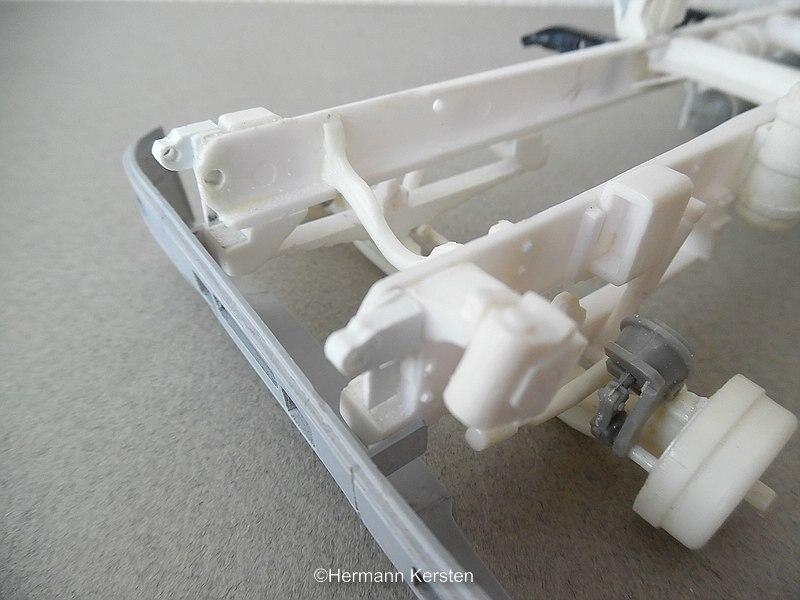
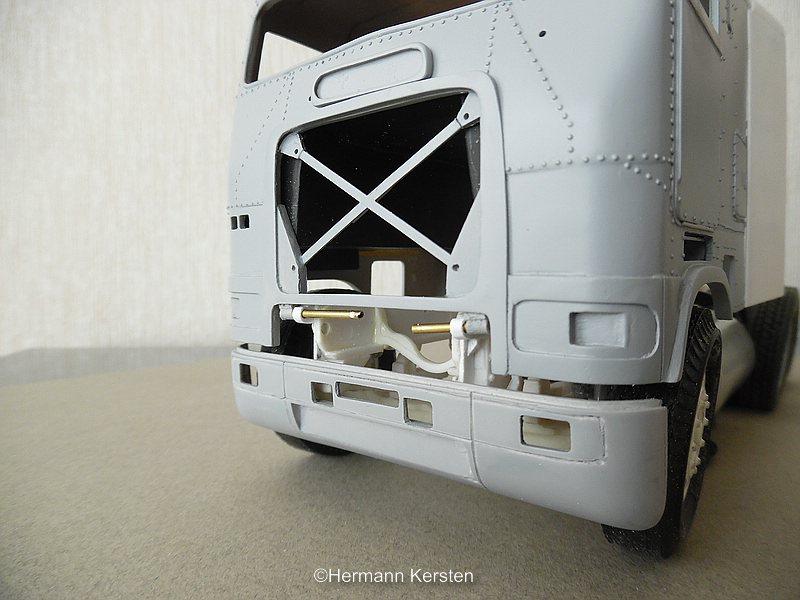
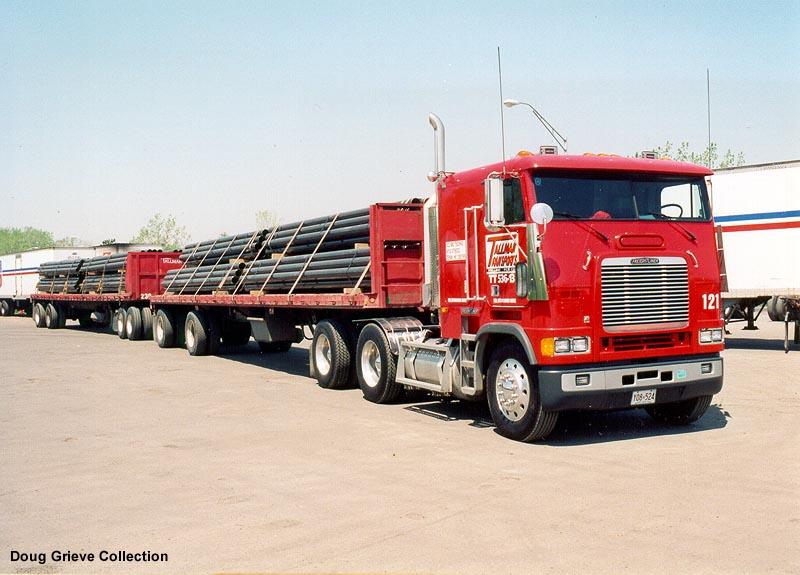
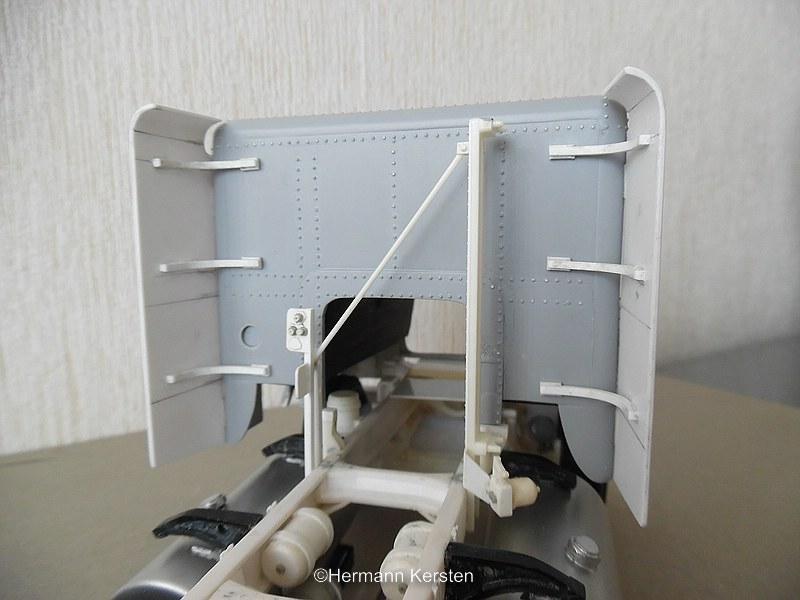
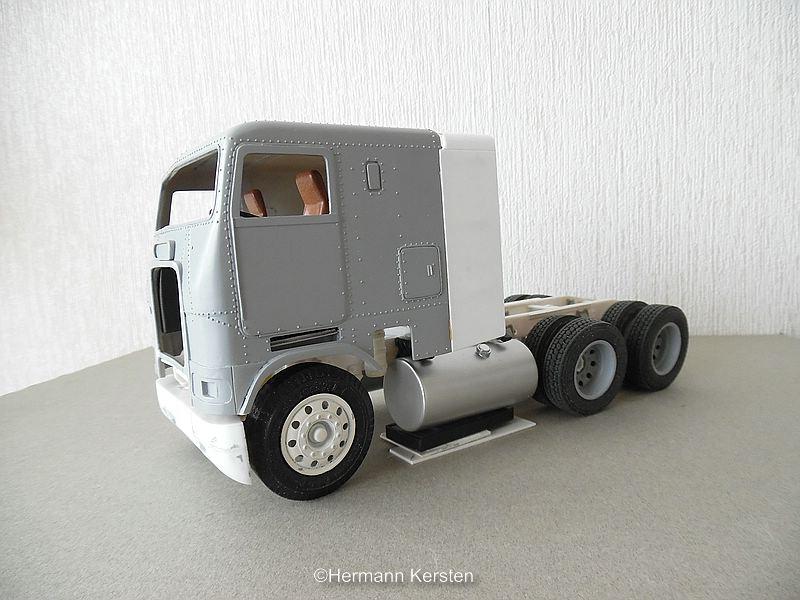
Thank you Dave! After some fit and a some comparisons with the reference photos, I saw that the height had to be reduced by a few millimeters. The front bumper has his forms now and i removed the excess styrene on the backside of this bumper. Now i only have to fill and sand some small spots on this bumper and when all is good, then i can start to paint the bumper.. Now i have the sizes, i made also another one, for the Future build of an FLA, to show that after the raw build, i cut out the upper part, make a strip with the holes, and glue this strip to another strip for strength and shape for the replacement of the first strip. When in this stage i sand the edges, then i get the natural panel lines what i need for this bumper, without any carving. Then it's time to make the supports of this bumper, and after some measurements i came up to 6mm for the supports and 3mm space between the front of the leafsprings and the back of the bumper. As everybody can see, i make the new hinges for the cabin. These hinges are more to the upper and glued them on the chassis. After some investigation of the detail pictures, i made the front like the real one. On the inner support plates on both sides of the radiator area, i glued the hinge points of the cabin, under these inner support plates, or whatever they call them. The hinges looks uneven on the picture, but they are perfect inline of the chassis. I measured every side relative to the chassis, and the cabin is absolute straight on the chassis.? And the result so far...... Note, the right hinge was at the time i made these pictures not exact straight, but i solved it already as you all can see in the upper pictures. For the cabin color, i think i will do something like the picture below...............I'm still doubting, in any case the bumper will be painted in the same colors as in the picture below. That's it for today and see you next time! Source: Hank Truck Pictures by Doug Grieve. Hermann.
-
I understand Raymond, but what I'd like to know is, for what purpose is this done? Hermann.
-
Finished mini big rig gas truck
Hermann Kersten replied to cobraman's topic in Model Trucks: Big Rigs and Heavy Equipment
You put an awesome model on the table, these details on a 1/48 scale.... you must have hawk eyes. ? Hermann. -
White Road Boss
Hermann Kersten replied to Bronzekeg's topic in Model Trucks: Big Rigs and Heavy Equipment
I'm always awed by your paint schemes, and this one is no exception. Excellent work all around. Hermann. -
Beautiful Transtar, i love the colors, nice and fresh. Hermann.
-
BRBO Kenworth K100
Hermann Kersten replied to KJ790's topic in Model Trucks: Big Rigs and Heavy Equipment
The Kenny and paint job are awesome, the colors you choose, fit this truck perfectly. Hermann. -
Autocar A64B Concrete Truck
Hermann Kersten replied to Tankman's topic in Model Trucks: Big Rigs and Heavy Equipment
Beautiful model with realistic details. The cement texture looks absolutely real. As Bisiaux Philippe mentioned, it would be much more better with outside pics Great job all around. Hermann -
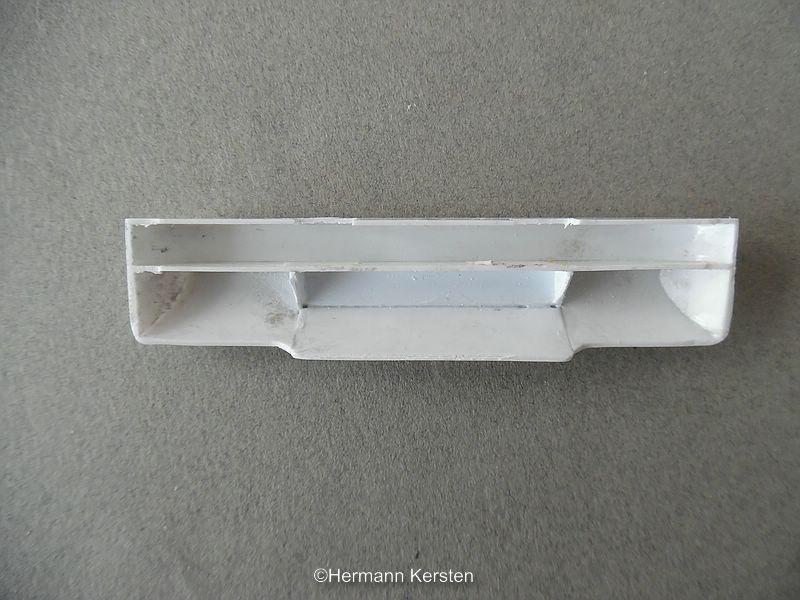
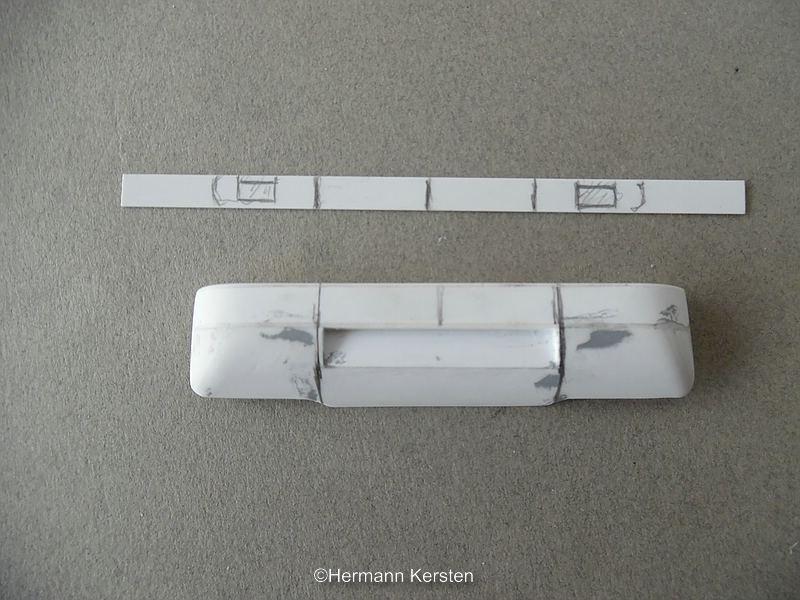
Hello everybody Does anyone know for what reason the grill of this international is not centered? On photos with lifted cabin, I see, as far as i can see, nothing unusual in the engine compartment. Hermann.
-
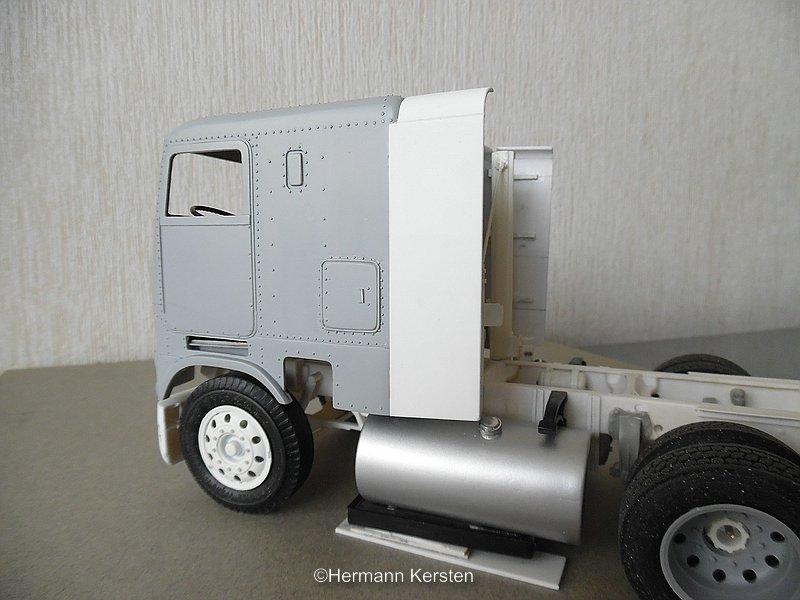
Thank you Andrew! Today it's time for the bumper and the fenders on the cab. The bumper will be the same bumper like my first FLA conversion, and i only have to cut out the upper part, so that the part with the fog lights can be glued in separately. In this way you get the panel lines in it nicely, and at the ends of this strip, the corners must be rounded. In another way I don't get these curves nice and evenly.? And the side fenders that are made out of 2x0.5 mm styrene sheet, glued together and made it curved in the upper part of the fender. When the glue has hardened, this curved part stays rounded. Then all the parts attached with some tape, to see how it looks like so far. That's it for today folks! See you next round. Hermann.
-
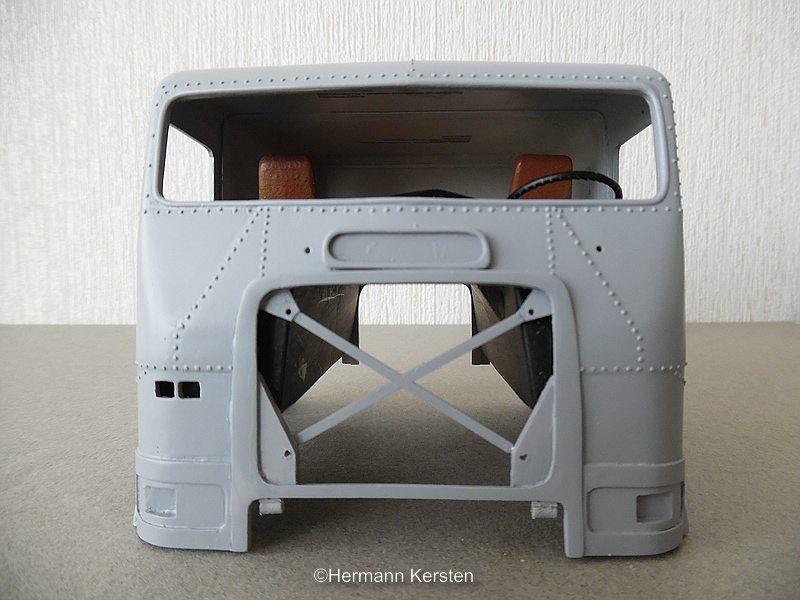
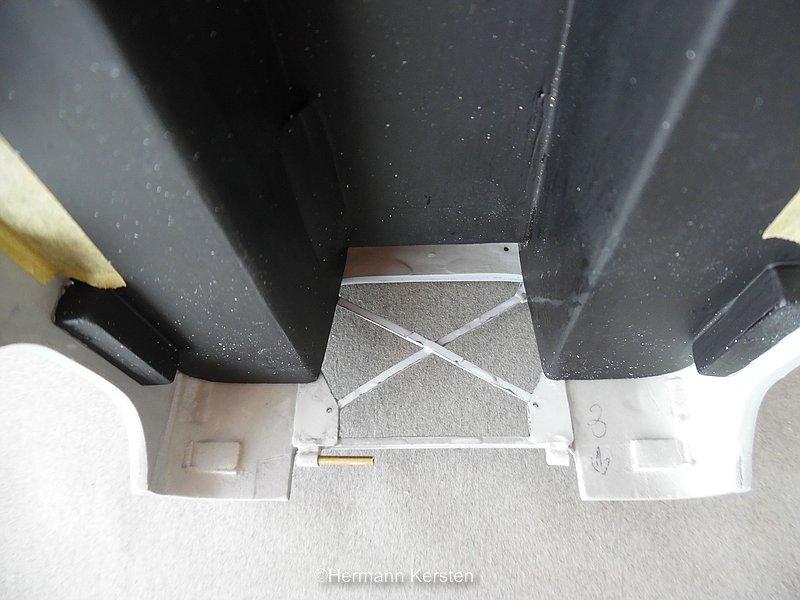
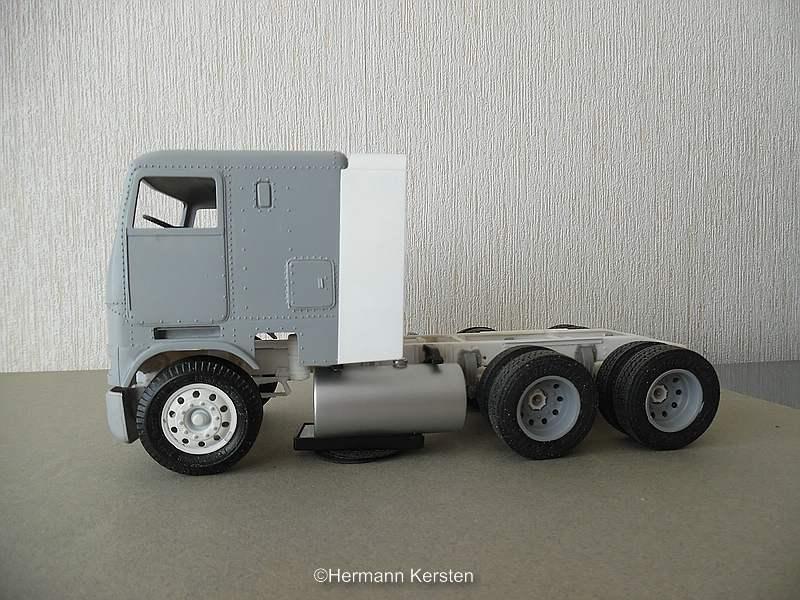
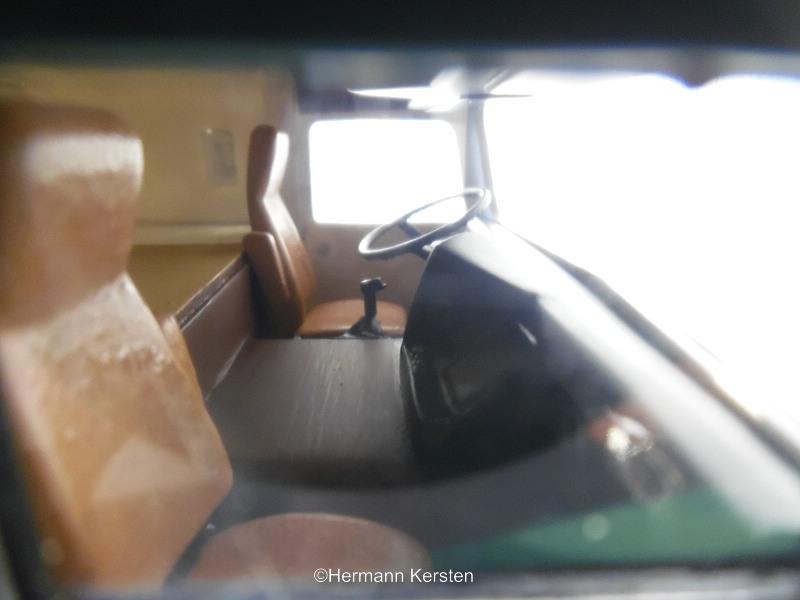
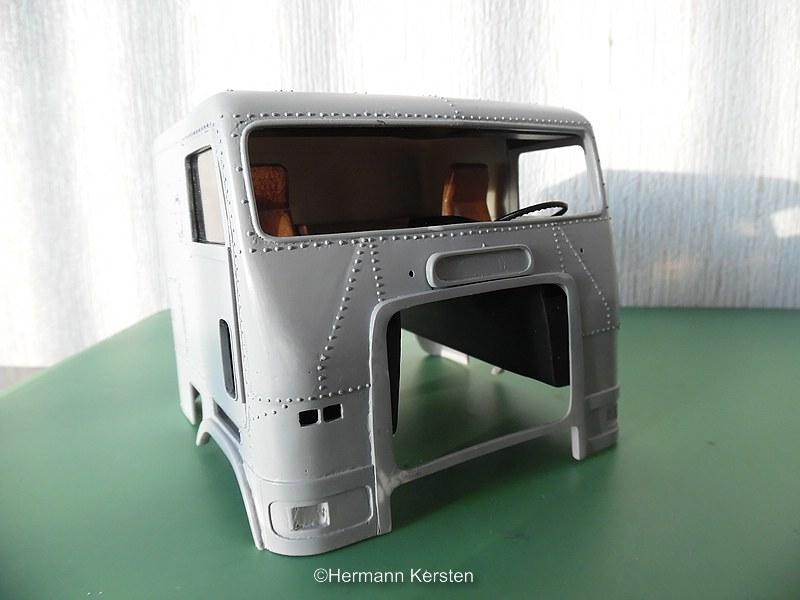
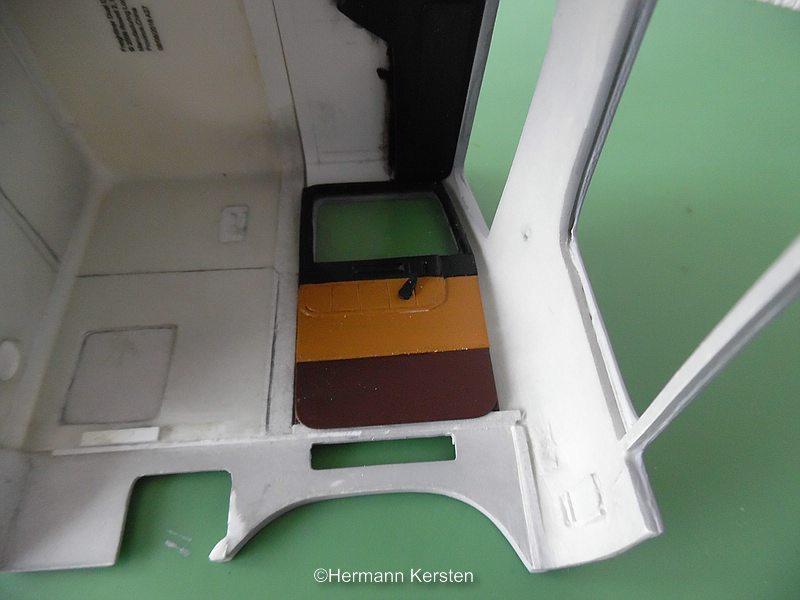
Hello everyone! The interior is done, i made the lower dash parts, attached and painted them to finish the interior. There is not much to tell about it, so let the photos tell the story. On the photos I see that on the back of the seats, a little bit of paint has to be added here and there. Now only have to make a curtain strip on the ceiling, and a curtain in 3 pieces, so i can roll up the center piece. After that i will continue with the engine, because i need to modify the engine and radiator. See you next round! Hermann.
-
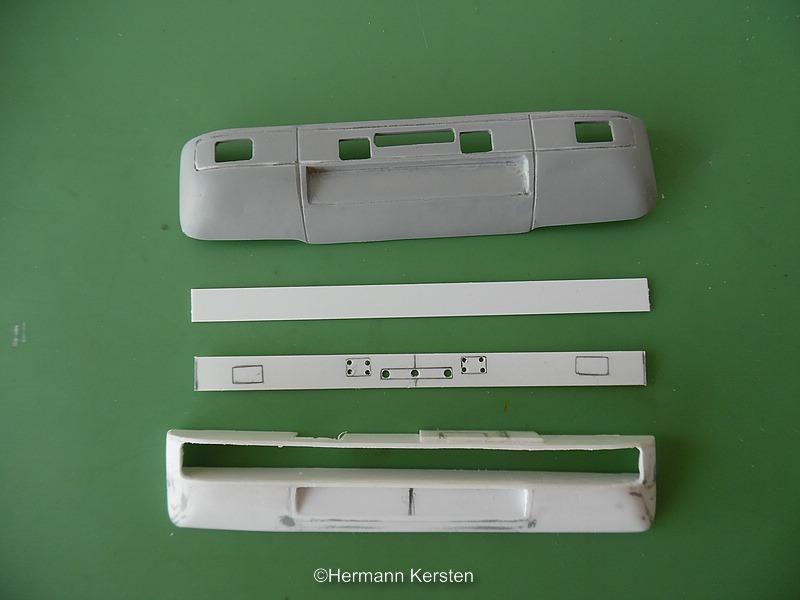
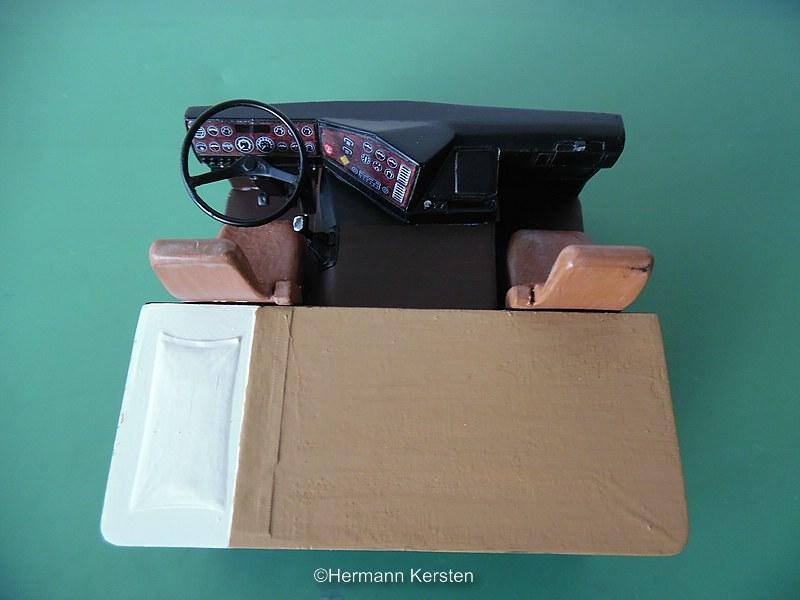
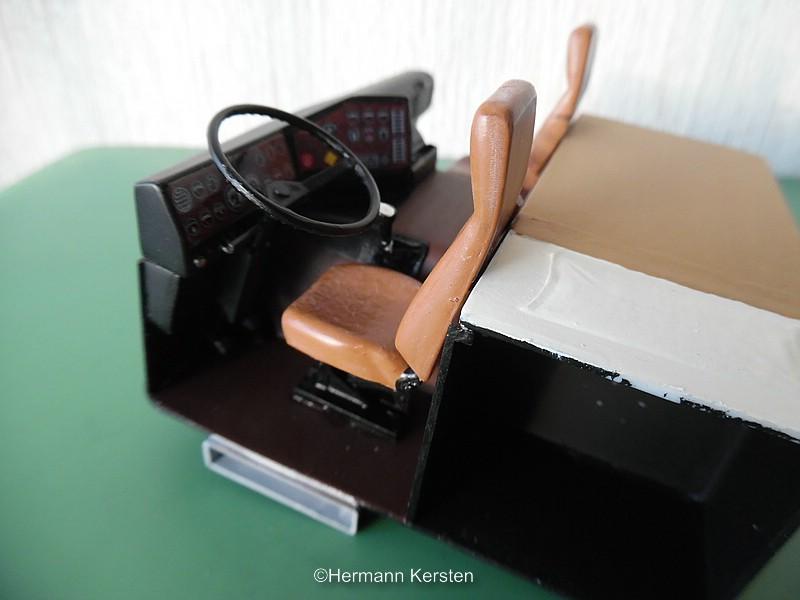
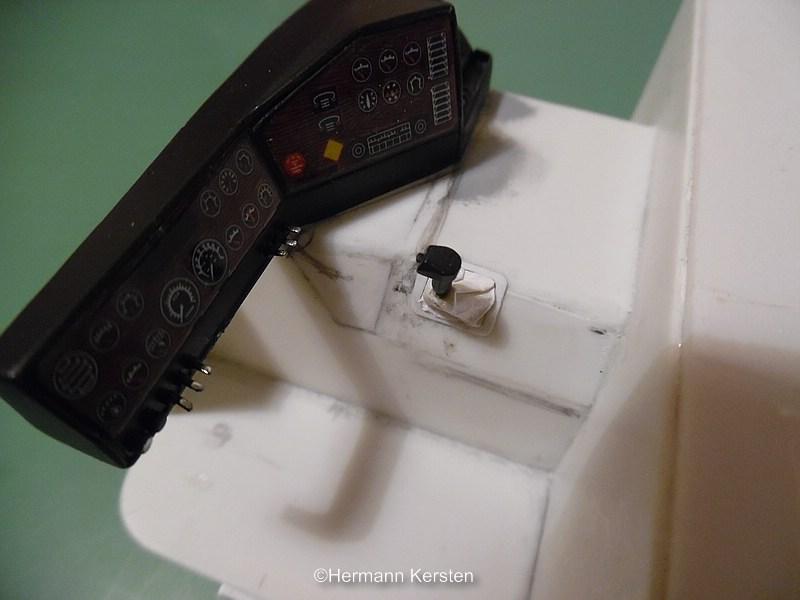
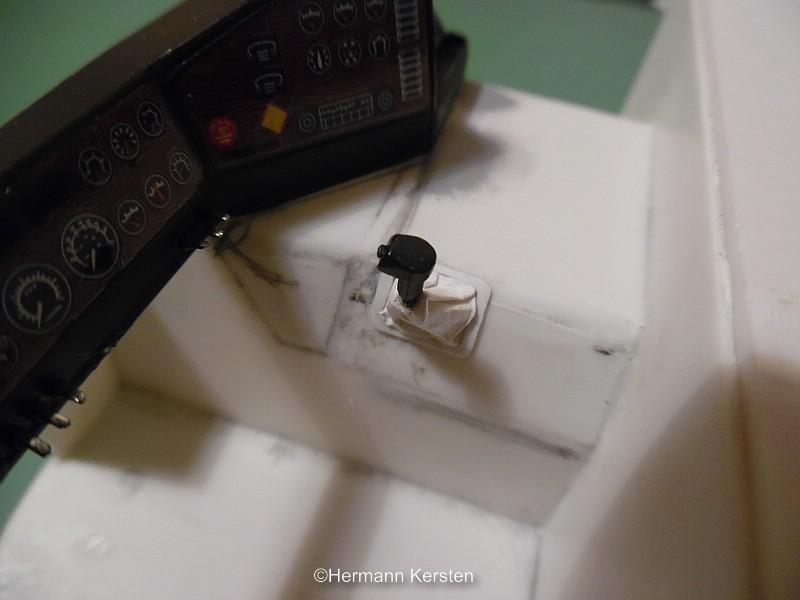
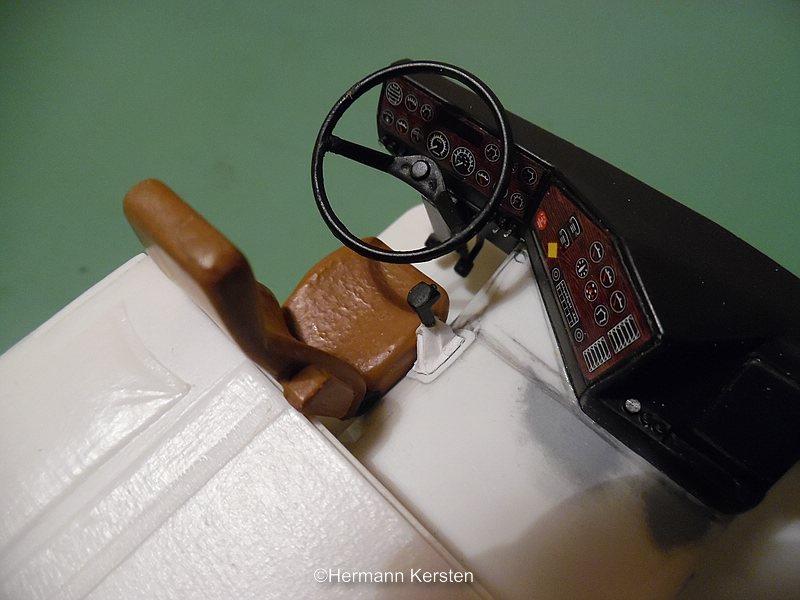
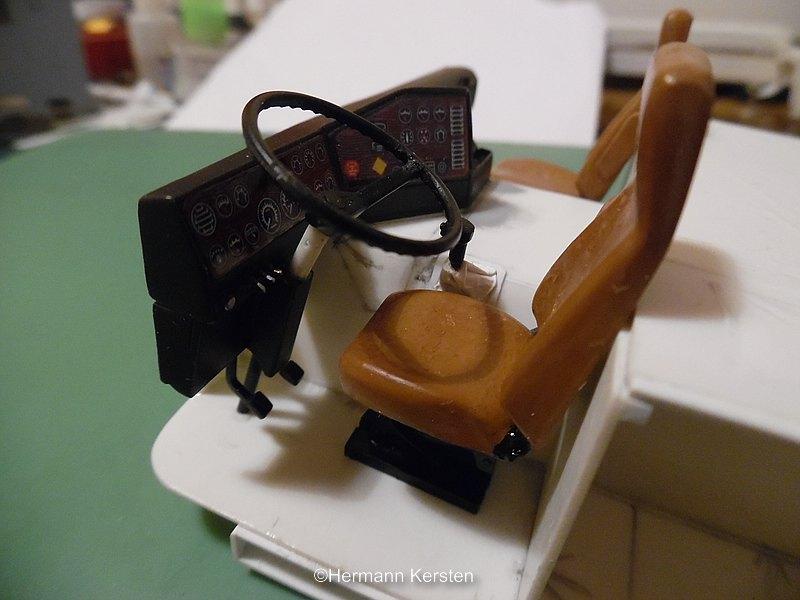
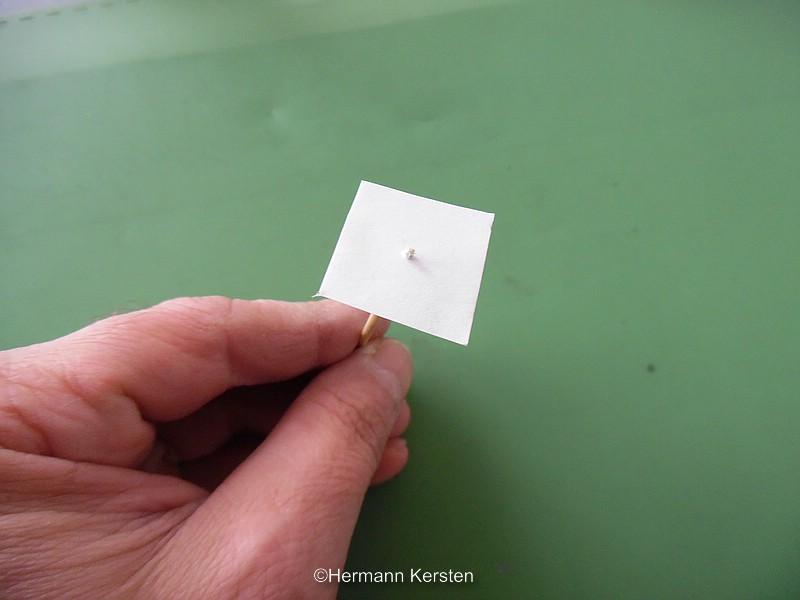
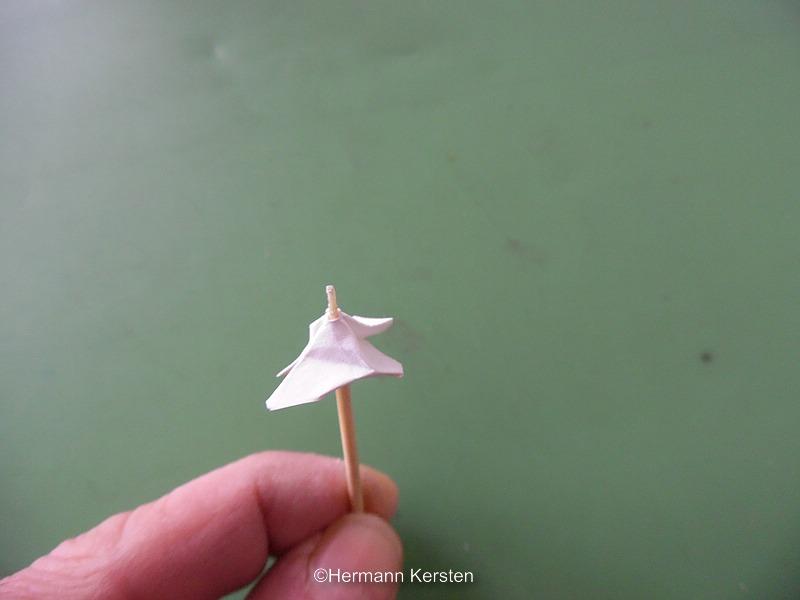
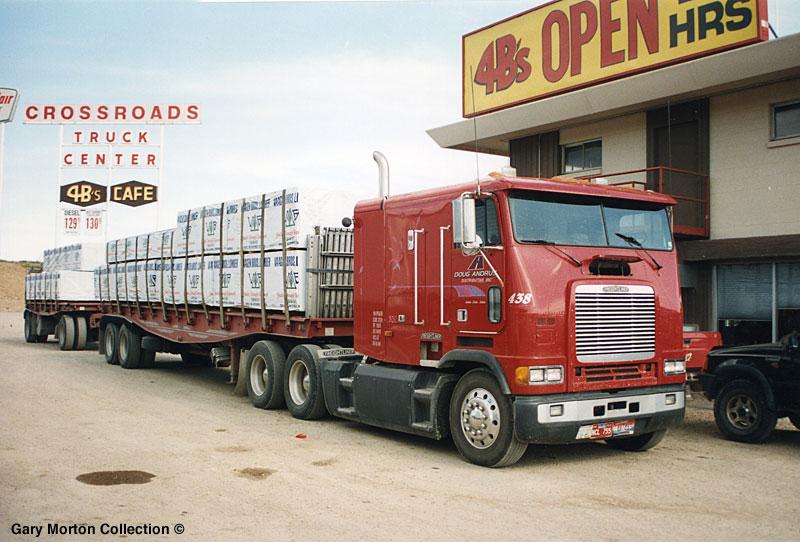
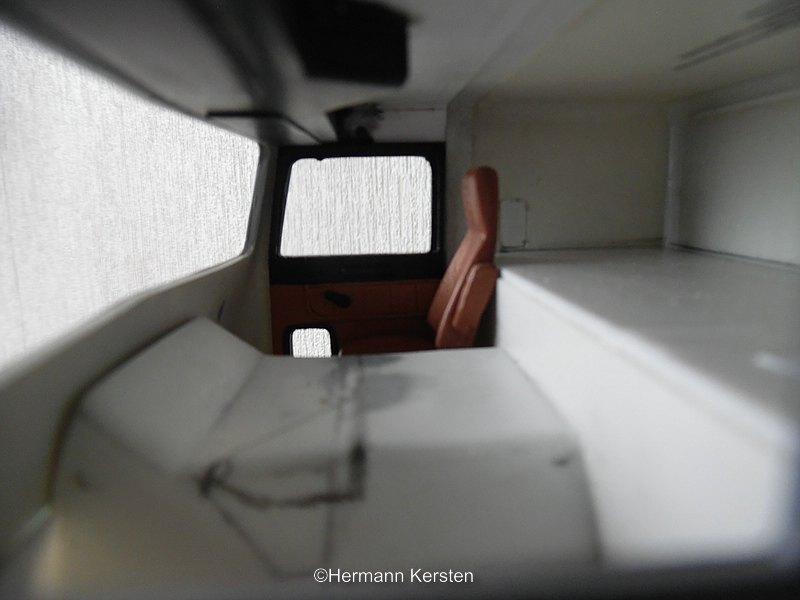
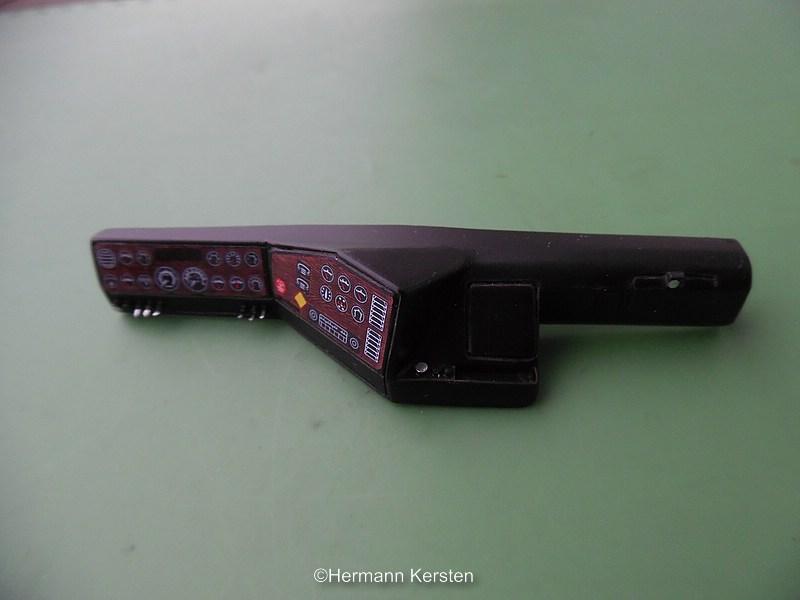
Yes Richard, I'm not so familiar with resin despite the fact that I have various resin cabins in stock. With styrene I have more freedom in terms of details and you can work thinner with the result that the cabin is also lighter in weight. And of course, for me it is also more pleasant to build in this way Thank you Brian. Ok guys, today a small update about the interior. This time the lower parts of the dash are done and I'm still have to work out 2 small details at the steering wheel. First i start to show the gear stick, with this Freightliner this stick is completely different then the older versions. With paper i made a rubber cuff, the next pictures i show you all how to make it out of ordinary paper. I started to cut out a piece of paper and drill a hole in the middle. Then put the tip of a cocktail stick in the center...... Then fold it carefully around the stick.... At the end you put it on the table and fold the lower section flat. Then you cut the base into the right size.... And as last, you attach it with ordinary hobby glue to the engine tunnel. And a dry-fit with the lower part of the dash with steering wheel and the chairs. I hope this is an interesting update, and see you next round. May bye somebody can help me out...Dash Decals. Hermann.
-
A NEW PROJECT FOR 2020
Hermann Kersten replied to Chariots of Fire's topic in WIP: Model Trucks: Big Rigs and Heavy Equipment
Great project and the engine looks awesome, very beautiful details.? Hermann. -
Thank Sergey, The bumper will be the same as the one on the FLA set back, this time i don't have to build the steps attached to the bumper, but just the shorter version like in the picture below. During the construction of the FLA I already cut the strips for this bumper to the right size, so if i forget the right sizes, I don't have to measure again. Source: Hank Truck Pictures by Gary Morton And then there is some color! The upper dash is done, and now i have to do both sides of the lower parts. After some thinking, i realized that i still have the decals of the FLD kit in the box. Now i have to see if i can get another set of these dash decals for the FLA conversion that i will make on later term. Here the pictures so far. The door panels are done, and they have received their first colors and i attached the clear parts on these panels. Later i have to glue the small window frame on the inside and outside of these clear parts. So far so good, see you next round! Hermann.