Hermann Kersten
-
Posts
595 -
Joined
-
Last visited
Content Type
Profiles
Forums
Events
Gallery
Everything posted by Hermann Kersten
-
KW W900 Day cab
Hermann Kersten replied to Oldmopars's topic in Model Trucks: Big Rigs and Heavy Equipment
Great and clean model and i really love the color scheme.? Hermann. -
Thank you for the nice comment Pat. Then you can give me some lessons for how to make a dio.? Hermann.
-
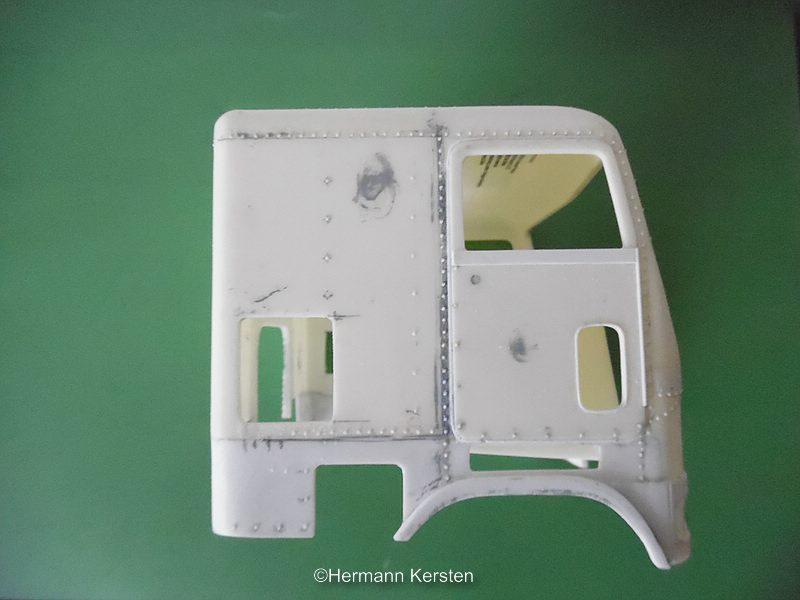
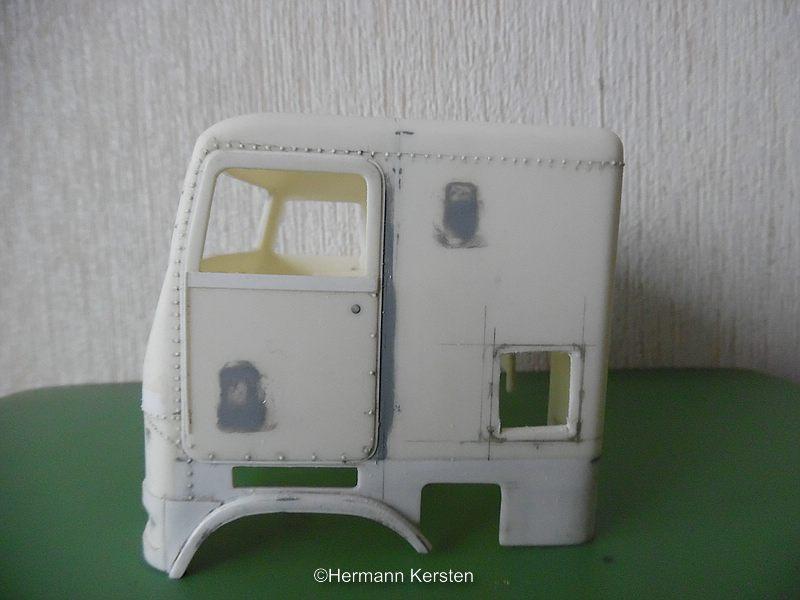
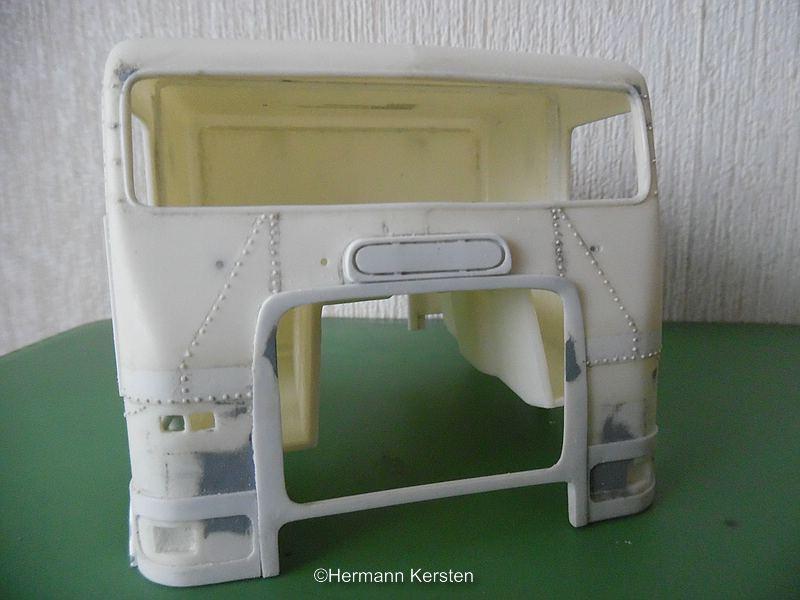
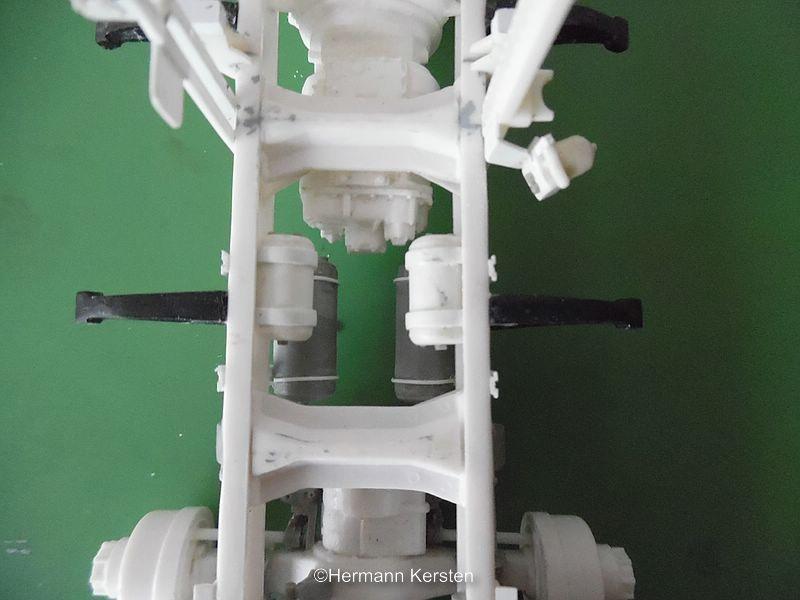
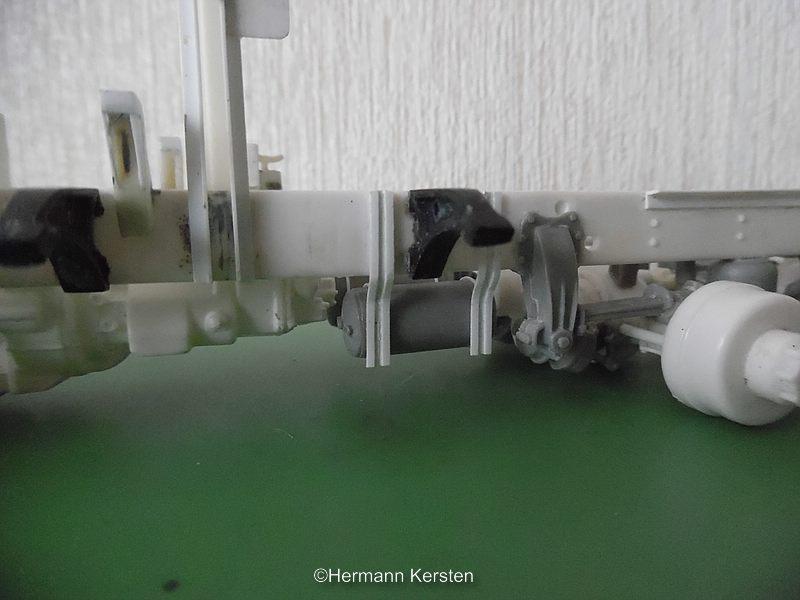
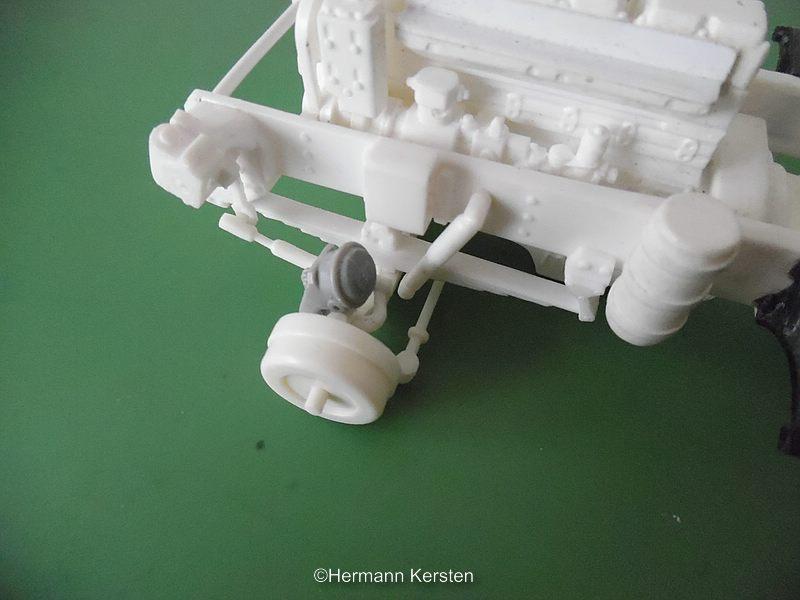
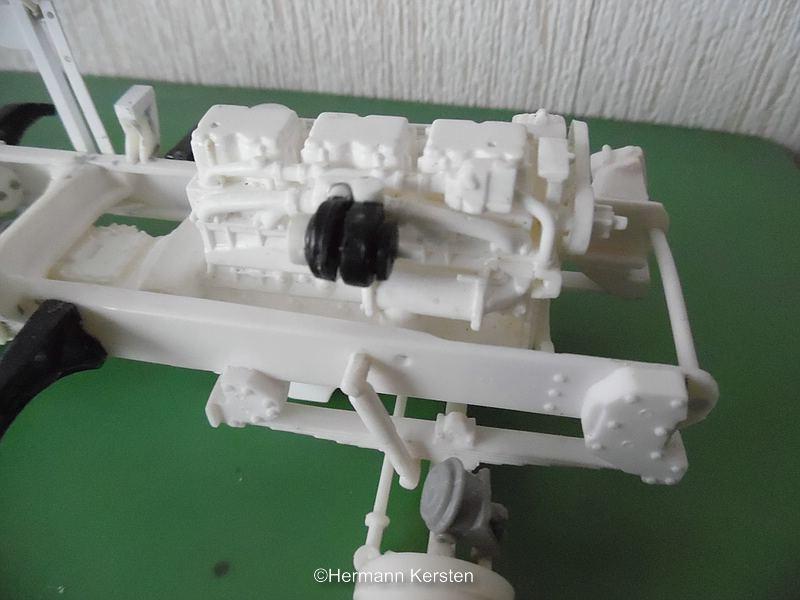
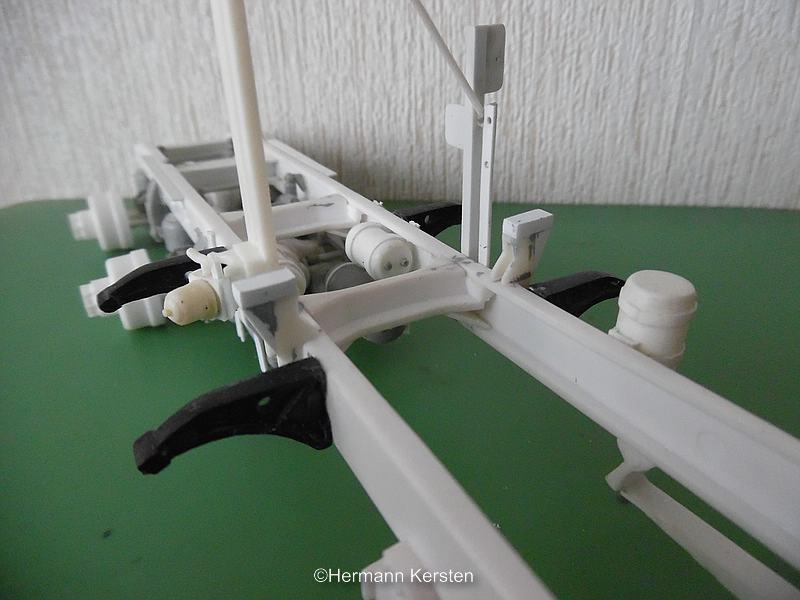
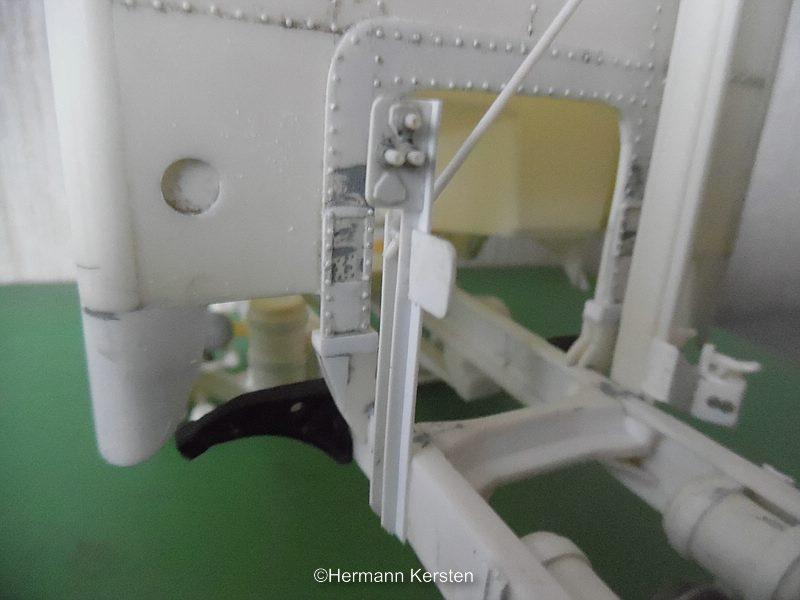
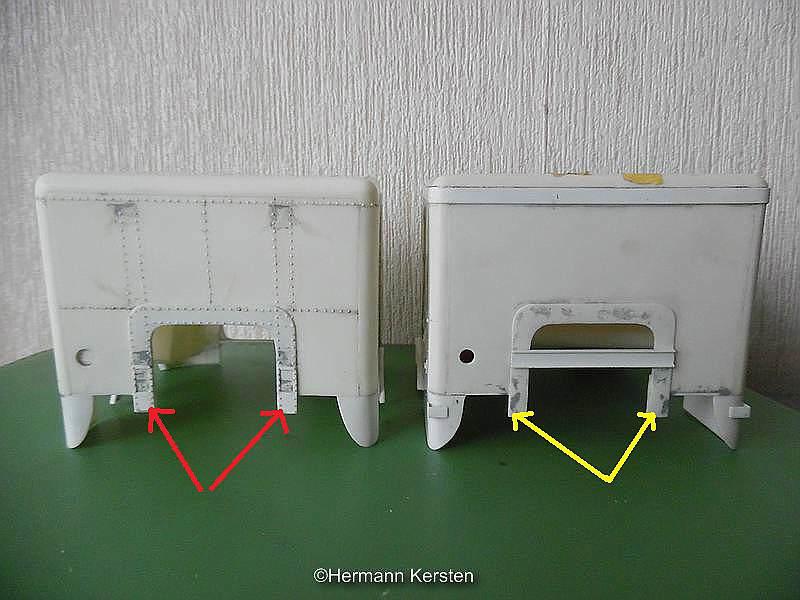
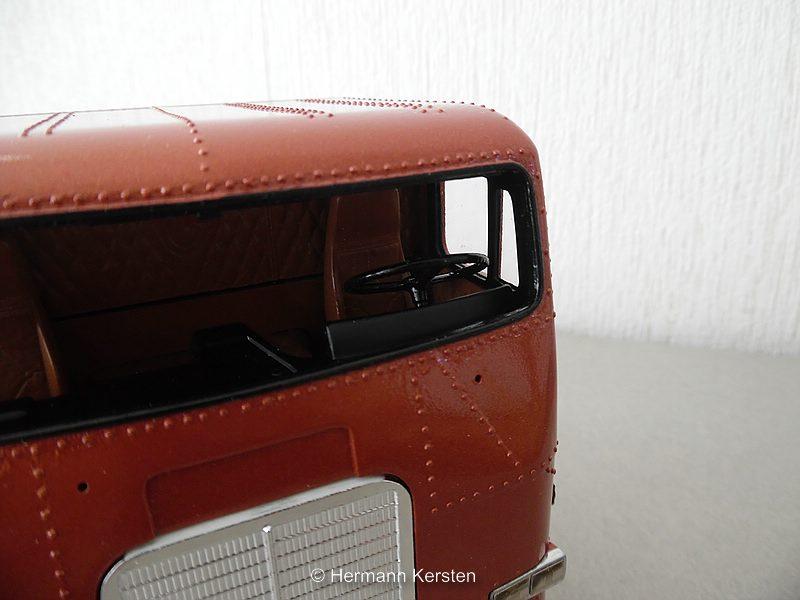
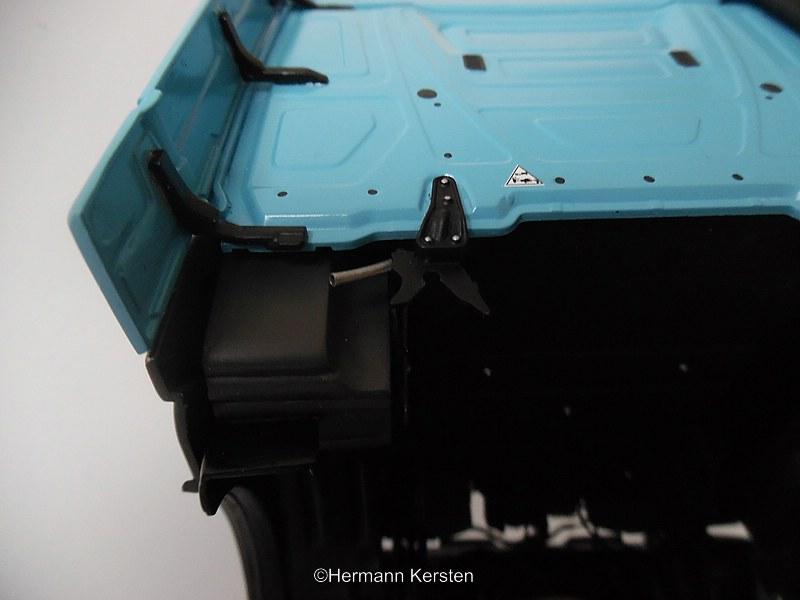
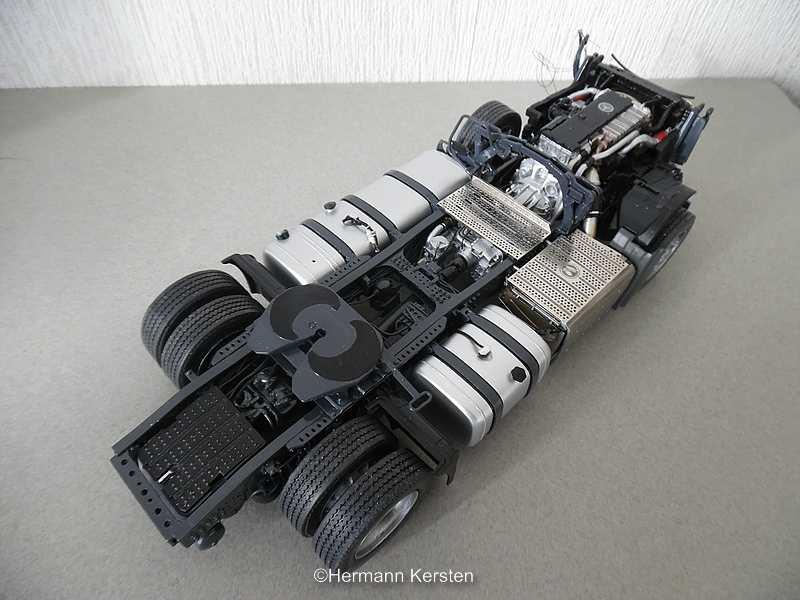
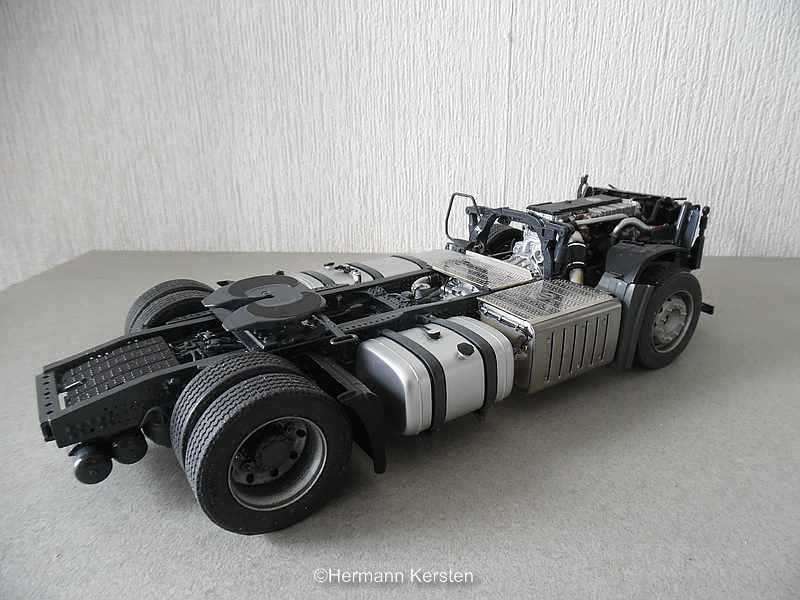
Hello everyone, Thanks for the nice comments guys! Yep, today another progress and a few new insights regarding certain details. Fisrt of all, i renewed the sbrackets of the the air tanks, and attach the grey air tanks. After this job i modified the cabine supports what is attached to the chassis. With some detail pictures from Purple Wave Auctions, I had a clear view of what these supports looked like. These supports are 2 mm higher, which means that 2 mm must be removed from the cabin. The red arrows are from the FLB and the yellow are the from another FLA conversion. Here you can see the difference in height. The front axle is now also attached and i used the brake drums from the Revell Marmon kit, what is actually a Peterbilt. I also use the engine from this kit, and modifie this one into a newer version of the Cummins for the FLB. The new insight with regard to the FLA FSBA is that this time I cut the storage compartments out of the side walls. The doors of the storage compartments are at the same level as the door frame around the doors. With these photos you can also see that the rivet work is in full swing. Later I will glue the door frames with 1mm x 0.5 mm styrene strips into the cutted holes. And the rivetting on the front, here I just have to attach the rivets on the top and bottom of the windshield and then the front is done. Then a handy tip, at the doors it was not completely smooth, with the closing of the seam. Now that the rivets are done, sanding is a difficult job .......or not? I glued a piece of a waterproof sandpaper on a 1mm thick styrene piece, let it hardened and made a mini sanding pad in this way. In this way, you can make any shape you want and with the 1mm thickness you dont have to worry for bending the piece. If you want to really be sure, you can make it 2mm thick.? Now it was a easy job to sand the part what was filled with Tamiya putty, without damaging the rivets and an even surface. The result.......absolutely smooth! Ok guys, that was it for today and see you next time. Hermann.

-
Thank you Chris! Hermann.
-
AMT/Italeri reefer trailer
Hermann Kersten replied to KJ790's topic in WIP: Model Trucks: Big Rigs and Heavy Equipment
Very nice project, and i like the modifications and details. Hermann. -
A few new Round 2 kit coming out ......
Hermann Kersten replied to Mr mopar's topic in Truck Kit News & Reviews
You may be right, I am not sure exactly how the situation was at that time. Indeed, and often the decals at Revell are more extensive and, in my opinion, also nicer. In some cases the Revell kits are also priced more competitively than those from Italeri, at least in our region . Hermann. -
A few new Round 2 kit coming out ......
Hermann Kersten replied to Mr mopar's topic in Truck Kit News & Reviews
In my opinion, I find it unbelievable that this old Revell trailer fom the 80's has been re-released. Source What I also find a bit strange is that this trailer was originally a 1/25 scale, and now with this re-issue, as a 1/24 get sold. This scale 1/25 was intended for the 1/25 European trucks, like the Revell Volvo Globetrotter and the Mercedes Benz 1628, both also from the 80's. Anyway, the modified examples that I see here in this topic look a lot better than the old-fashioned axle spread, which we no longer have here in Europe for ages. Hermann.
-
AMT Kenworth T600A Canepa
Hermann Kersten replied to iamsuperdan's topic in Model Trucks: Big Rigs and Heavy Equipment
Despite the setbacks and in my opinion, not the most beautiful KW, you show us here a very well built model. Hermann. -
James, DJ, Andre and Geoffrey, thanks for the nice compliments and liking this euro truck. Hermann.
-
Freightliner FLA FSBA 1/25
Hermann Kersten replied to Hermann Kersten's topic in Model Trucks: Big Rigs and Heavy Equipment
Tom and Chris, thanks for the nice comments and liking this model. Hermann. -
Freightliner FLA FSBA 1/25
Hermann Kersten replied to Hermann Kersten's topic in Model Trucks: Big Rigs and Heavy Equipment
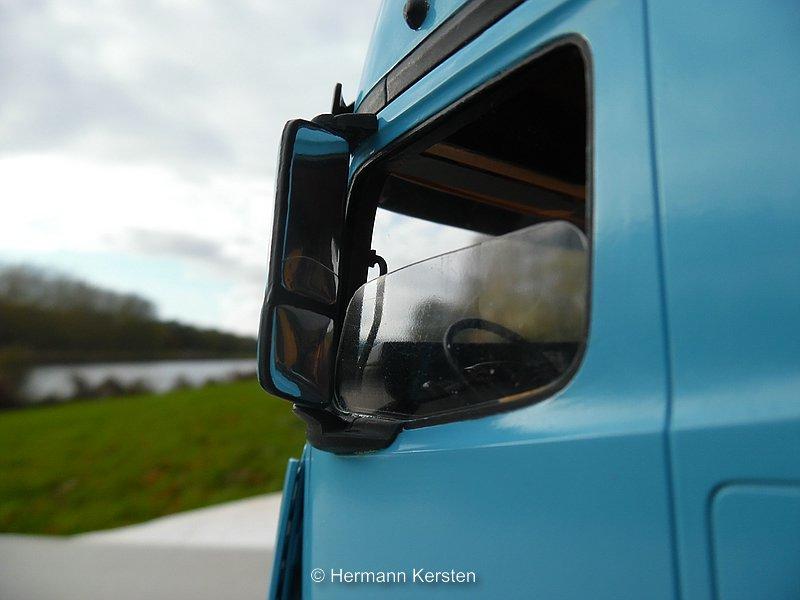
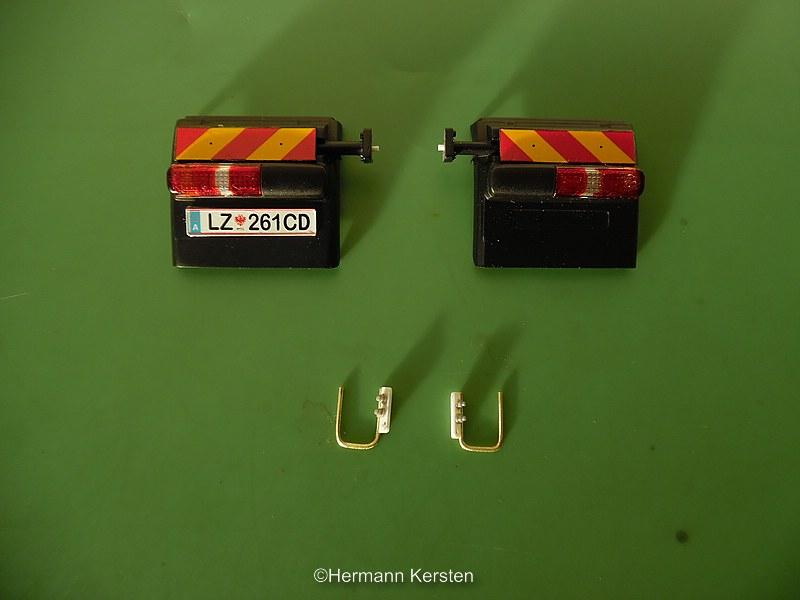
Sorry for the late replay Pat, but the rain cover is from the CTM Freightliner PE set. Hermann. -
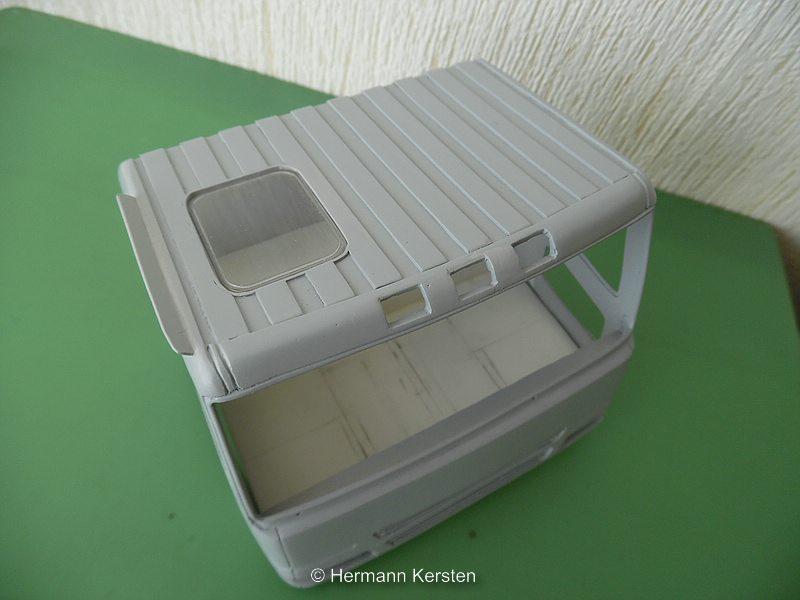
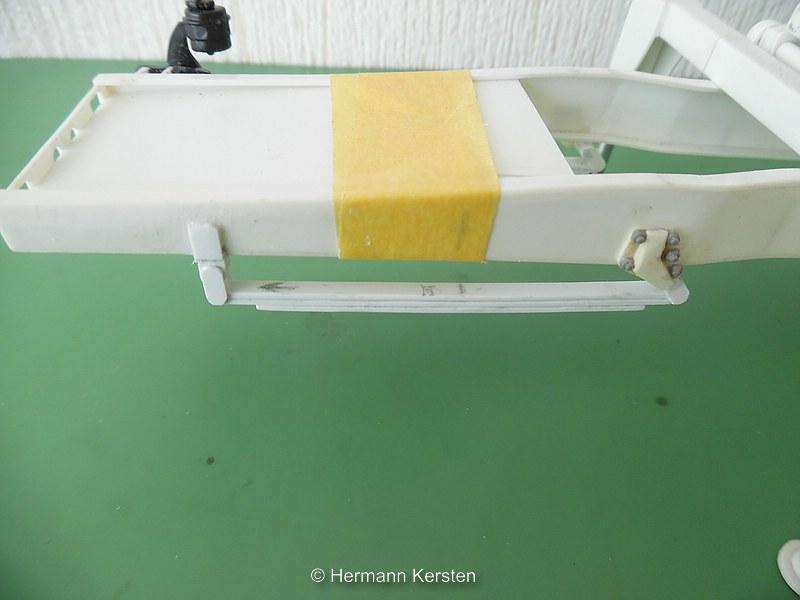
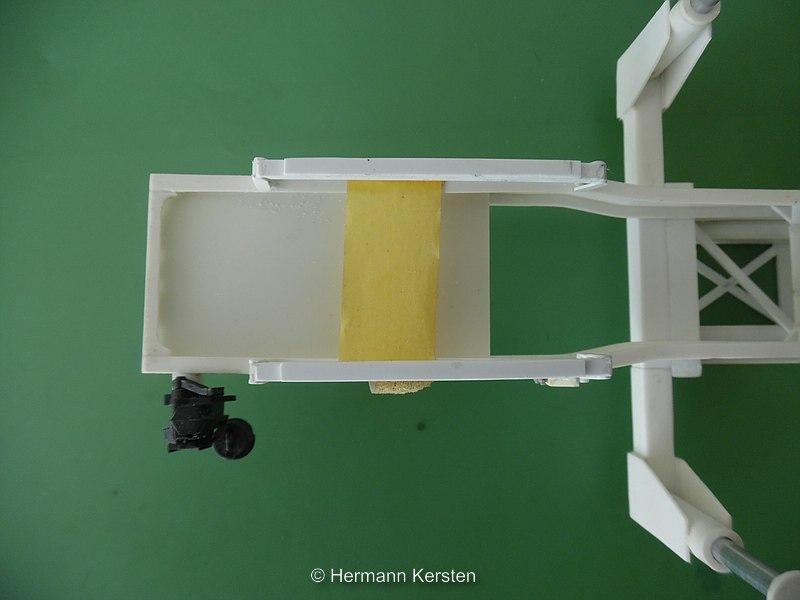
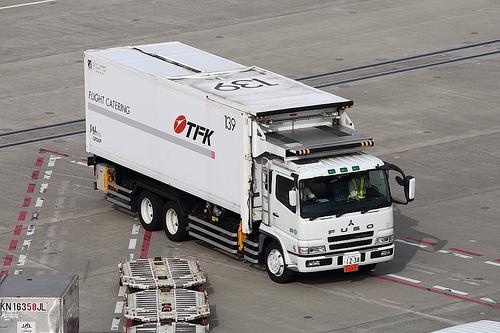
Hello everyone, Now the Lowliner is finished, it's time to continue with the other projects. Today i kick off with this one! Since the cabin was made a few years ago, and I didn't know at that time it would be a cairport catering truck, I now had to revise the roof a bit. This means that i had to cut a hole in the roof and make a roofwindow above the driverseat. This window is for the driver to see, if he dont touch the cateringbox to the fusalage of the airplane. The transparent part is from a roof hatch out of an Actros MP1, MP2 or a MP3 kit. And a strip on the side of the roof, I'm not really sure what this strip is for, but later there must be a ladder attached on the driver side of the cabin, so I think this is for standing. And the start of the front leaf springs of the front axle, the steering pump is from a Actros kit. To be continued. Hermann
-
Brockway Wrecker
Hermann Kersten replied to Warren D's topic in Model Trucks: Big Rigs and Heavy Equipment
The first thing that came to mind was, WOW! Hermann. -
Ford race hauler
Hermann Kersten replied to tbill's topic in Model Trucks: Big Rigs and Heavy Equipment
Nice prologue to a nice photo reportage of a successful model! Hermann. -
Thank you Kevin!? Thanks a lot for the nice compliment Brian!! Thank you Tom, i did really my best to achive that.? Thank you Håkan. Thanks for the compliment Larry! Hermann.
-
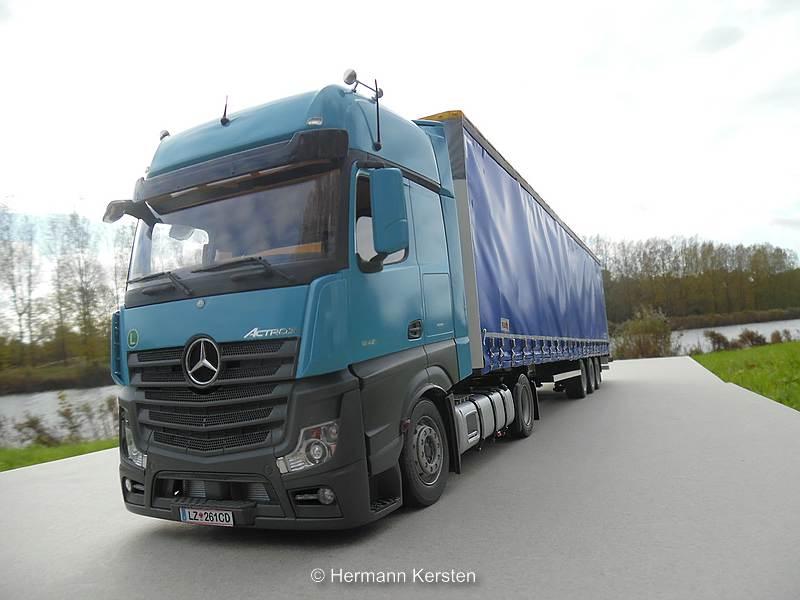
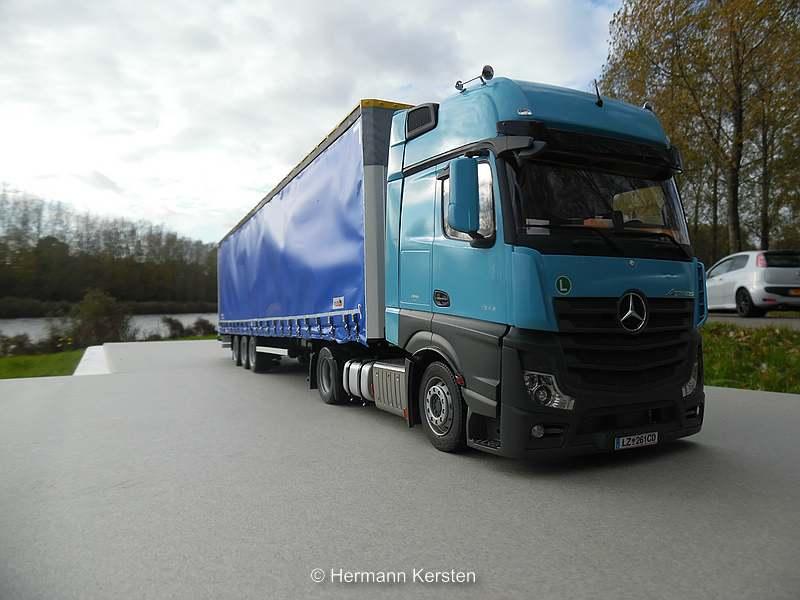
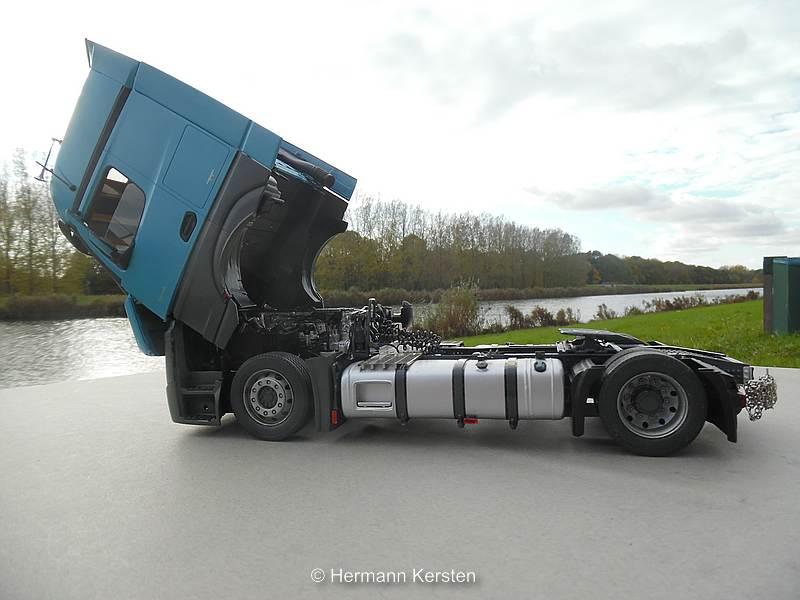
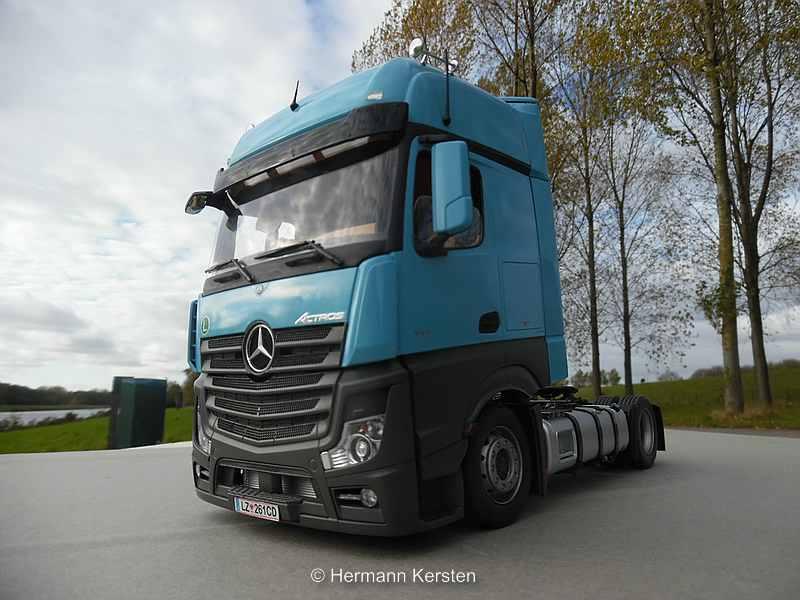
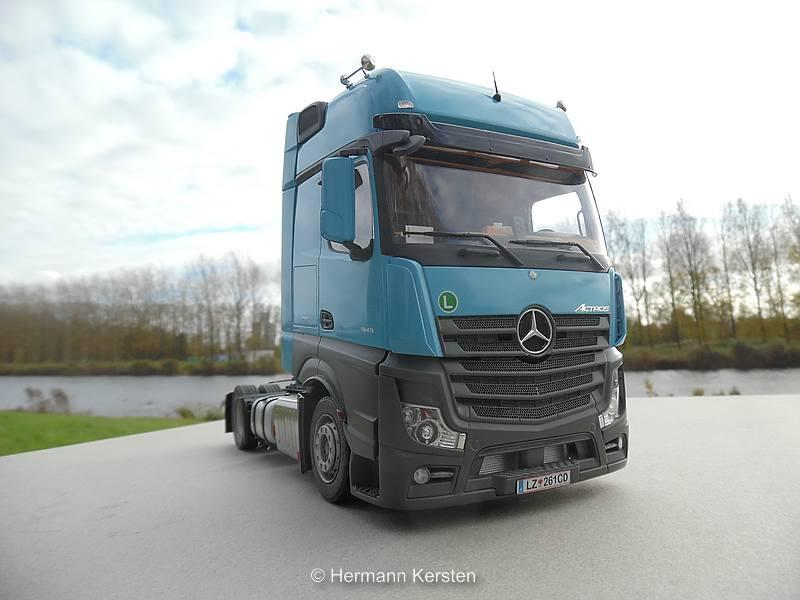
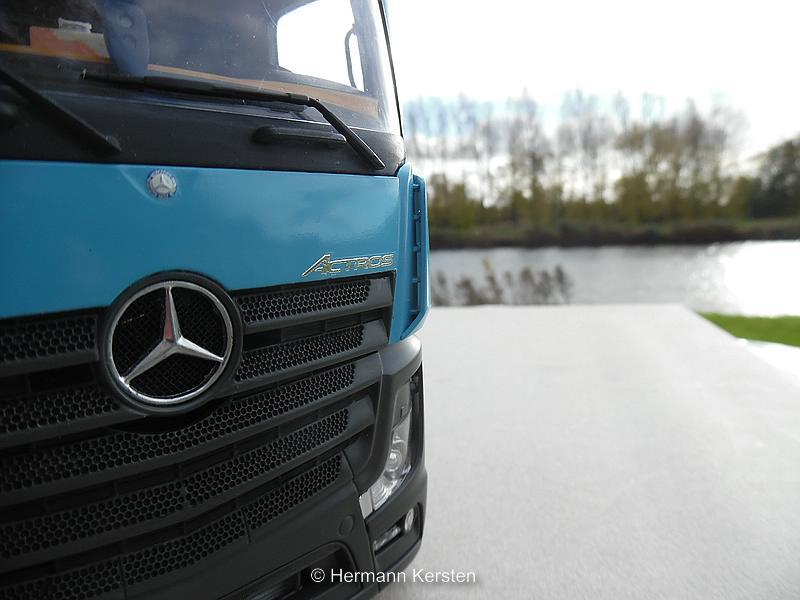
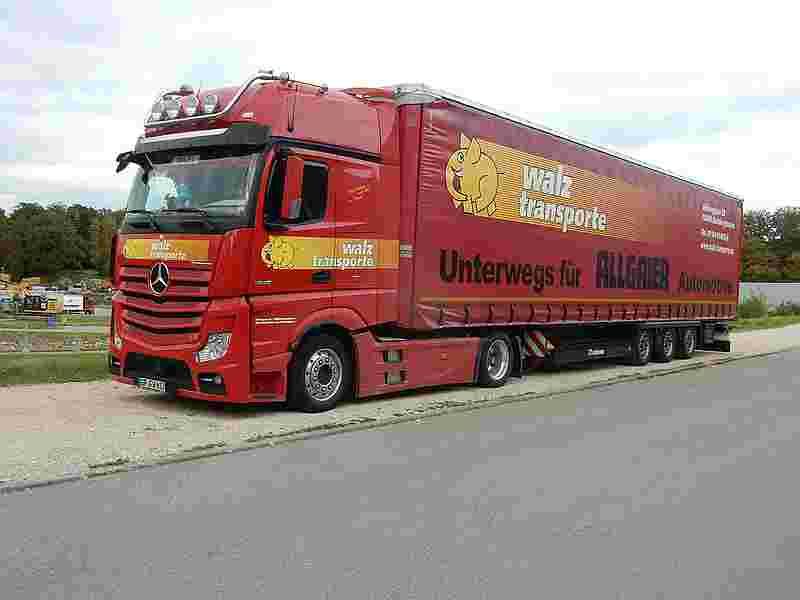
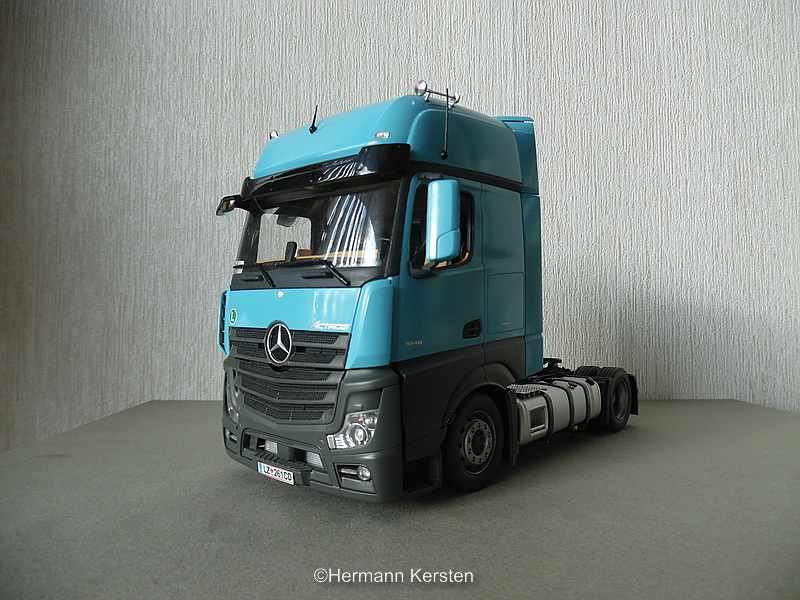
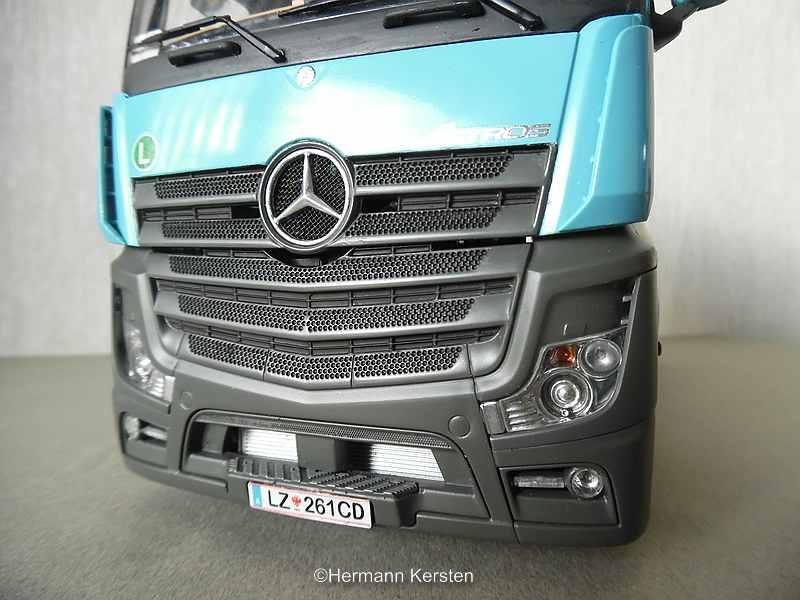
Hello everyone. Today i show you the final pictures of the New Actros Lowliner- Solostar. It was a pretty extensive project with a lot of detailing, and hope you all find this an interesting one. For those who want to see the build, here is the link: New Actros TopicTopic Have fun watching. Then the 4 generations of the Actros Lowliner in row.... And under Glass! Hermann.
-
MB New Actros Lowliner
Hermann Kersten replied to Hermann Kersten's topic in WIP: Model Trucks: Big Rigs and Heavy Equipment
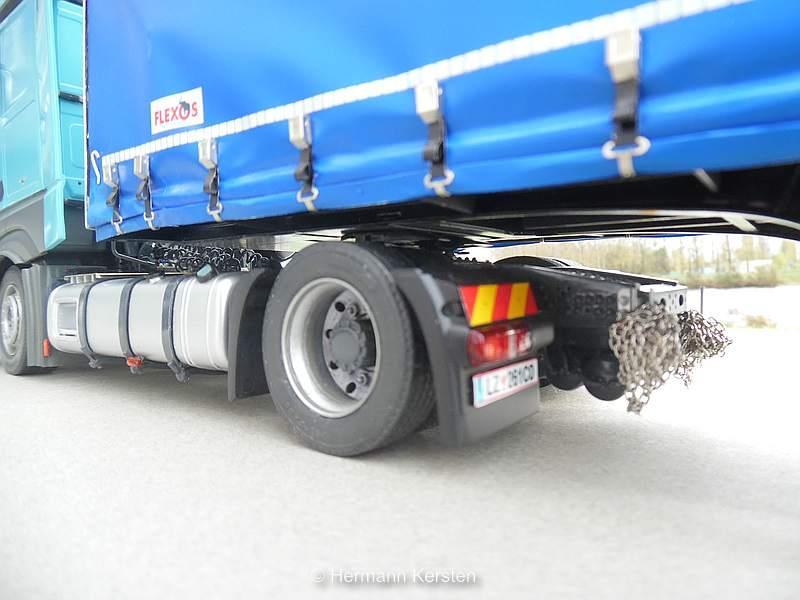
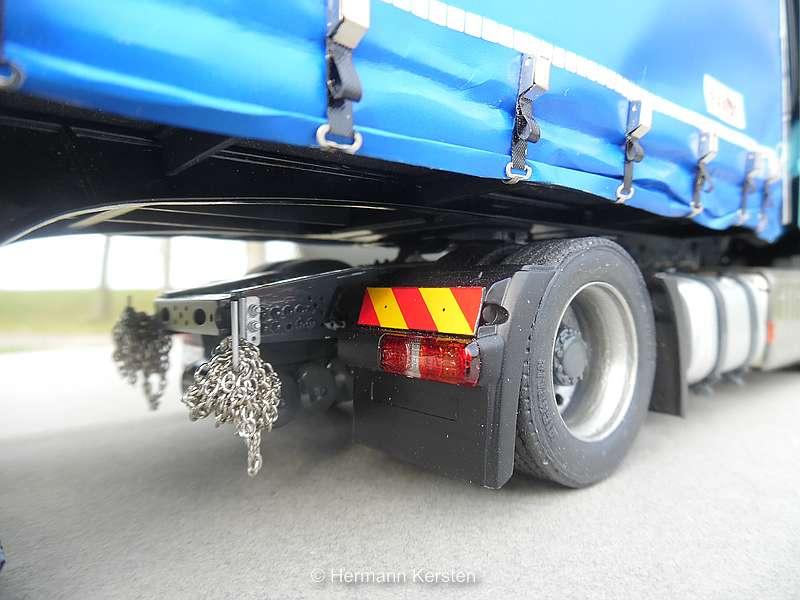
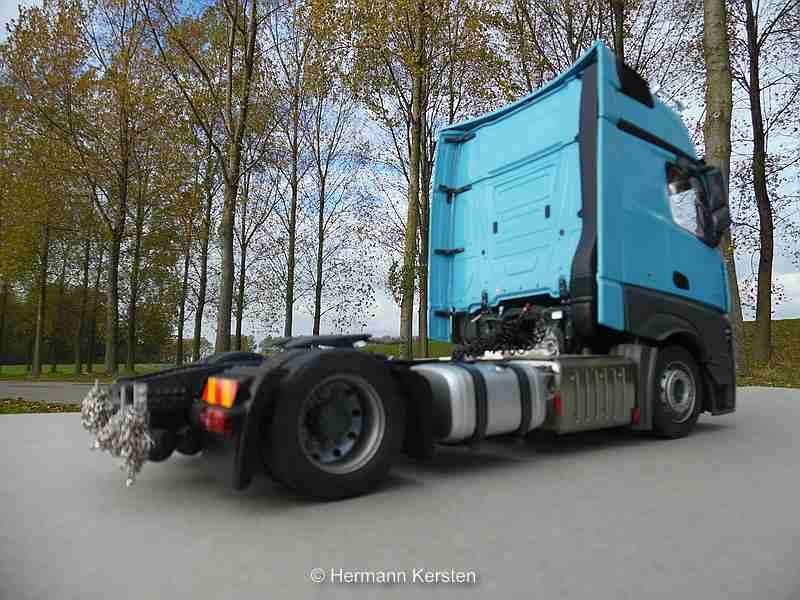
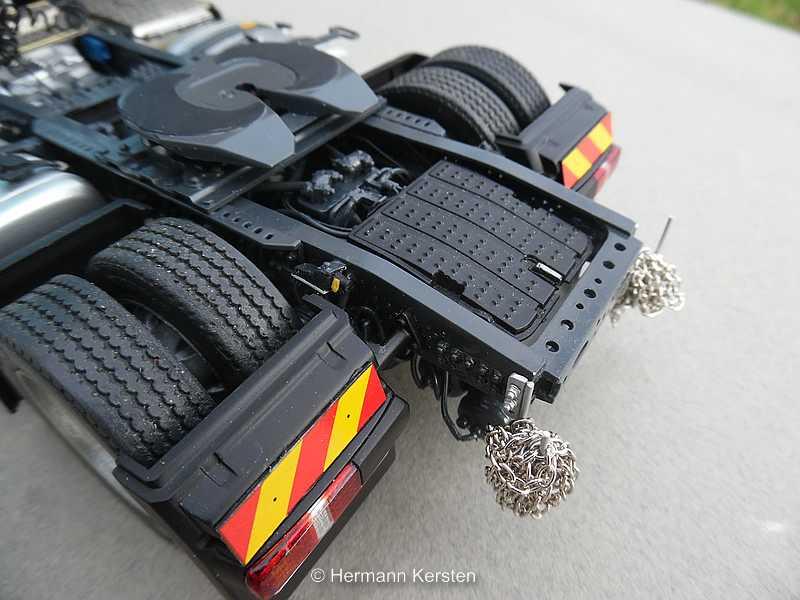
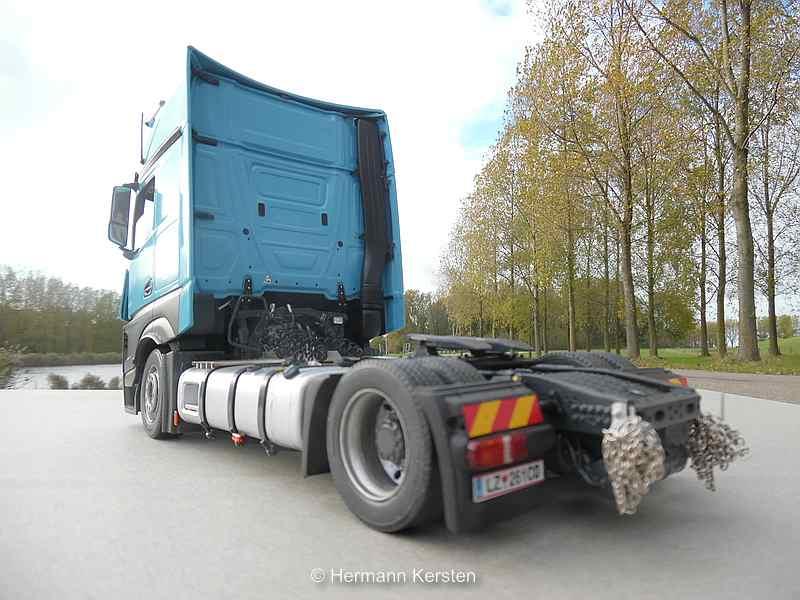
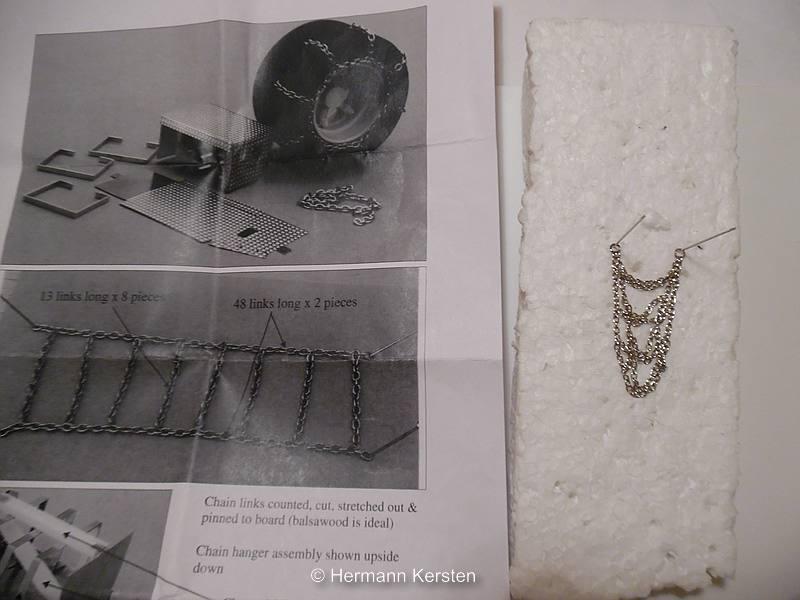
Hi everyone, Chukky and Vince, thanks for the replay and today i show the final! The snow-chains are arrived, and i made them right away, not the easiest job, but it is part of the job anyway. Just follow the KFS instruction carefully, and it will be fine. And with this last job, it is the last update. The rest of the pictures will be shown in the " Under Glass" section. I want to thank everyone for their interest, comments, constructive criticism and praise! Hermann.
-
Ford race hauler
Hermann Kersten replied to tbill's topic in WIP: Model Trucks: Big Rigs and Heavy Equipment
Very nice and distinctive. I really like it. Hermann. -
MB New Actros Lowliner
Hermann Kersten replied to Hermann Kersten's topic in WIP: Model Trucks: Big Rigs and Heavy Equipment
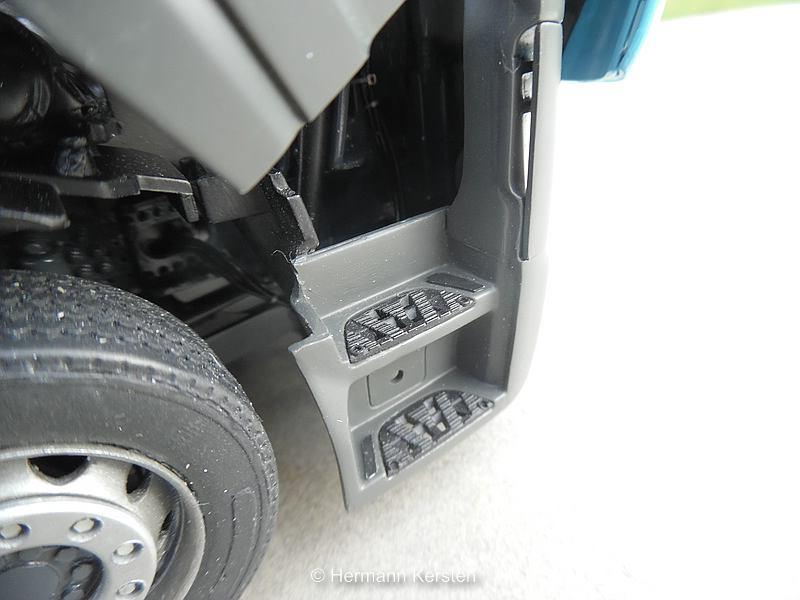
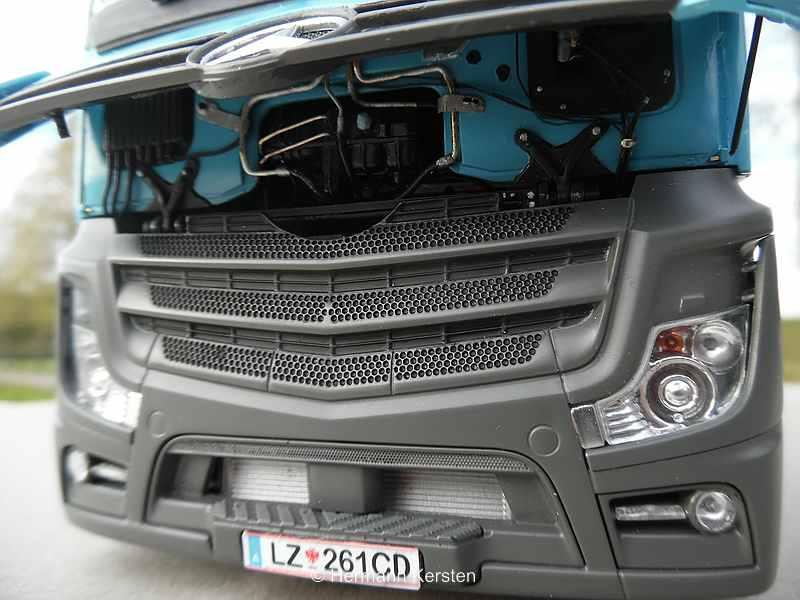
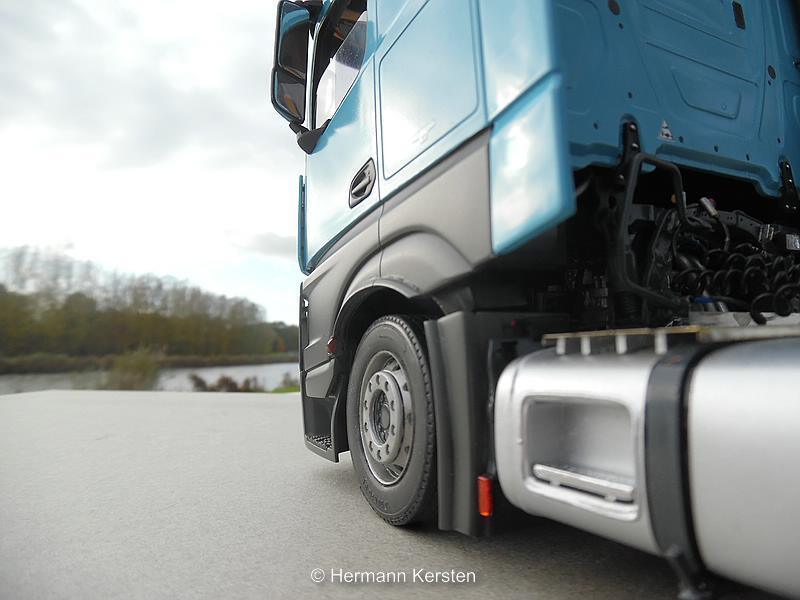
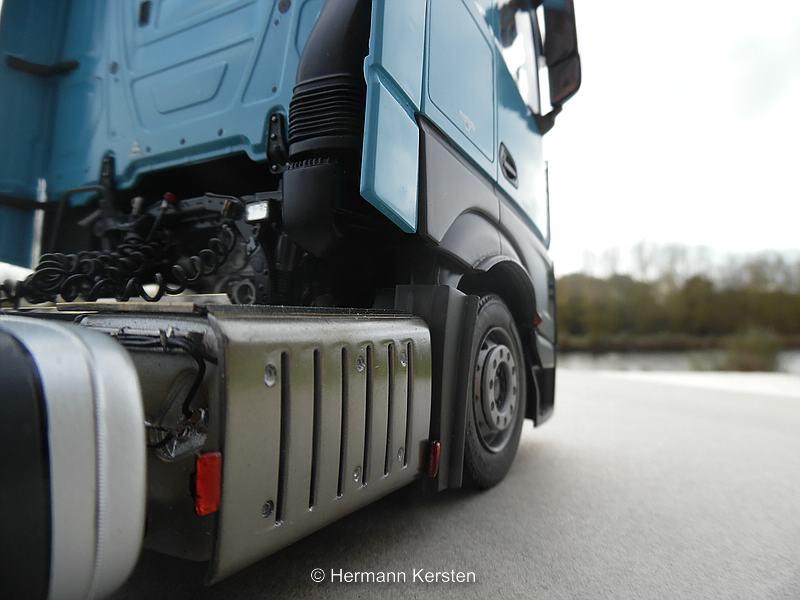
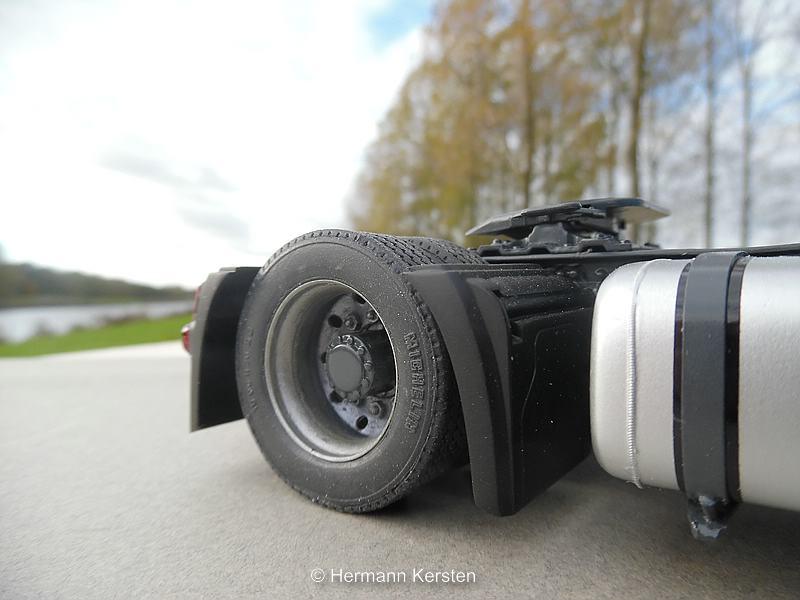
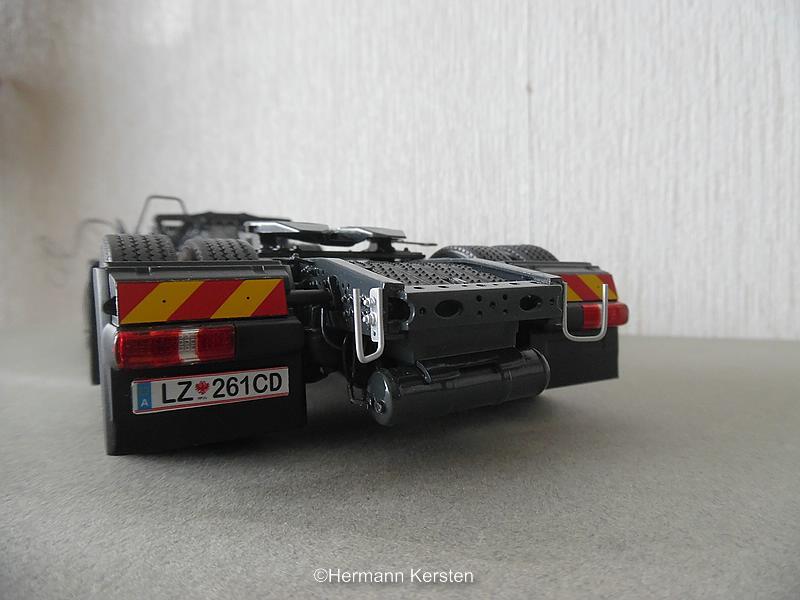
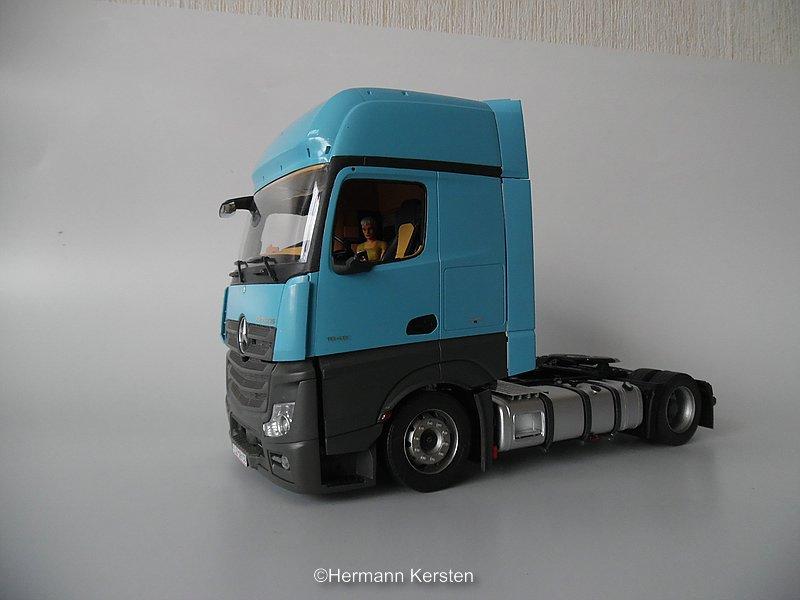
Hello everyone, Thank you Dan! Yes gentlemen, today is the last update because the build is done. I attached the last details and I have ordered the snow chains from Howard. Now i'm just waiting for that order so that i can place them on the hooks on the rear of the chassis. There were still some small things that still had to be completed, and of course also the front hubs, which are selfmade. The marker lights on the right side ... And to be sure, spray the top of the mudguards and put them on top. It looks like the reference photos, but I think it looks better without it. The modules for the airsuspension on both sides of the chassis. And then the front, the thin intermediate grilles just painted black, as it should be, and the small holes are painted with a coctail stick and black Vallejo paint. The excess paint i swept away with a damp cotton swab to keep the grid on the surface grey . It sounds like a very intensive job, but at the end it's not. Ok guys, the next round are the final pictures of the details and the whole truck with trailer. See you later! Source Hermann.
-
Very nice build. Together with the 2 trailers, makes it all complete. Hermann.
-
Freightliner FLA FSBA 1/25
Hermann Kersten replied to Hermann Kersten's topic in Model Trucks: Big Rigs and Heavy Equipment
Koos, Dennis, Richard, Tony and Pat, Thanks for your nice compliments, following this build and liking this model, I really appreciate this. Hermann. -
Movin’ On Kenworth Resto
Hermann Kersten replied to Plashdaddy's topic in Model Trucks: Big Rigs and Heavy Equipment
Wonderful rescue, as we can see, with some effort it is possible to make from a glue bomb into a nice model again. This posting proves that again. Hermann. -
Tips needed
Hermann Kersten replied to JerseeJerry55's topic in WIP: Model Trucks: Big Rigs and Heavy Equipment
Hello Jerry, I did this in the exact same way as Scott did, i used 0,4mm x 4mm styrene strips. If you glue the curtain in, you will not see these strips. Make sure, that you grind and sand the cabin surfaces well and straight. And with the curtain... Good luck with your cabin. Hermann.
-
MB New Actros Lowliner
Hermann Kersten replied to Hermann Kersten's topic in WIP: Model Trucks: Big Rigs and Heavy Equipment
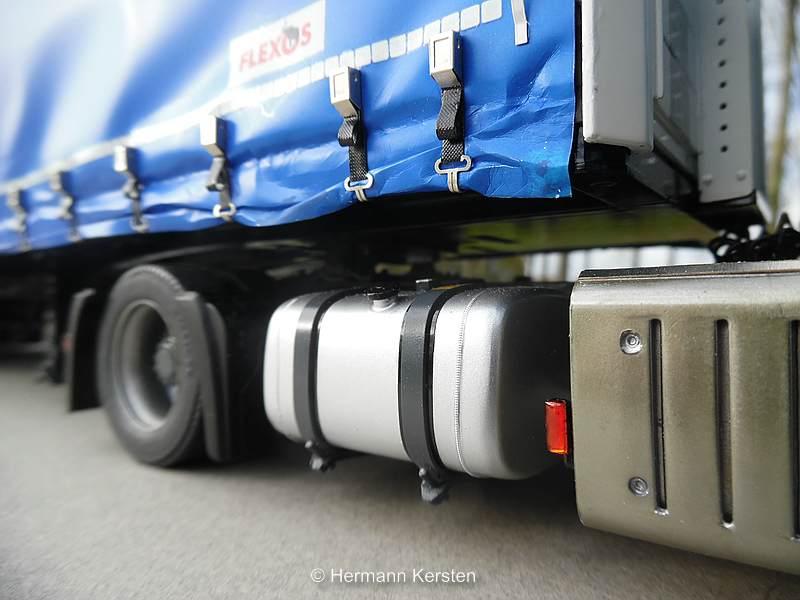
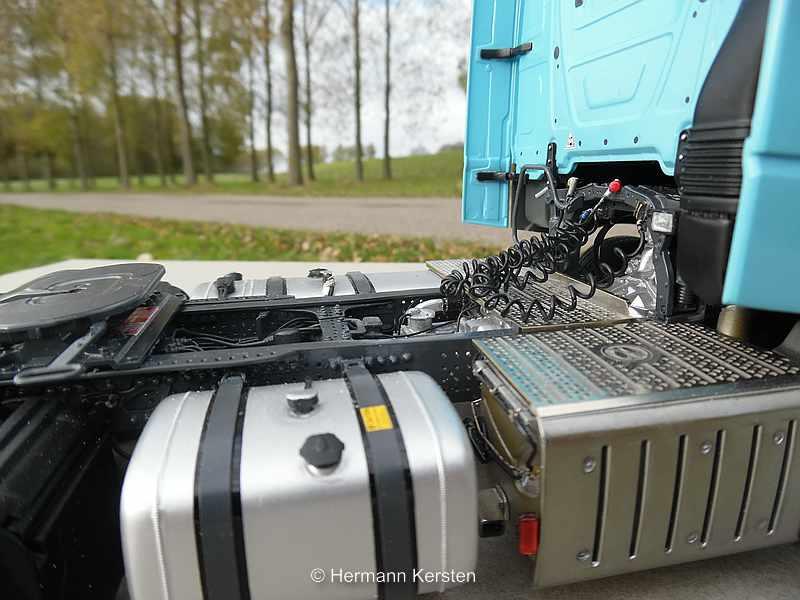
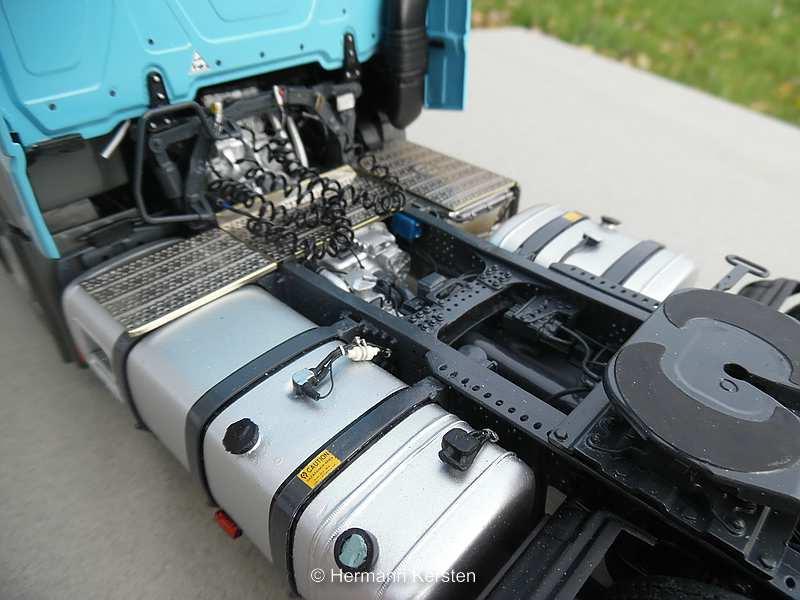
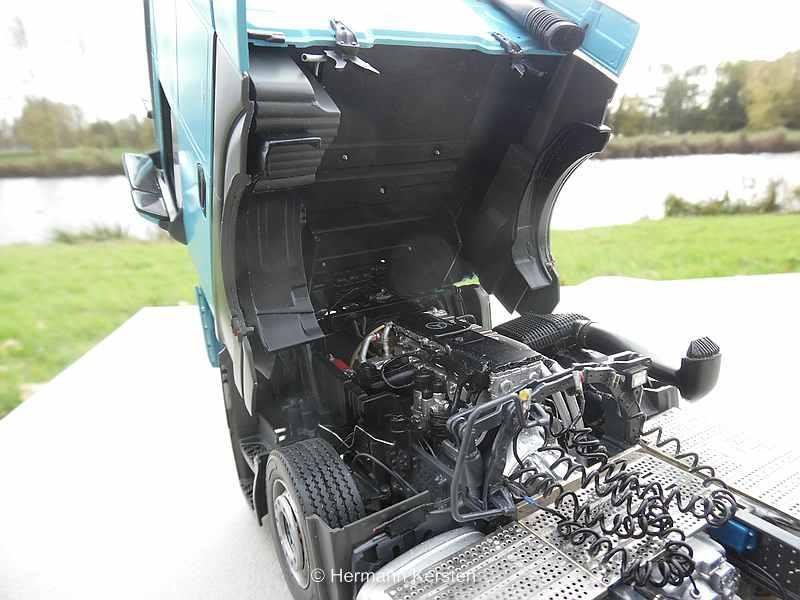
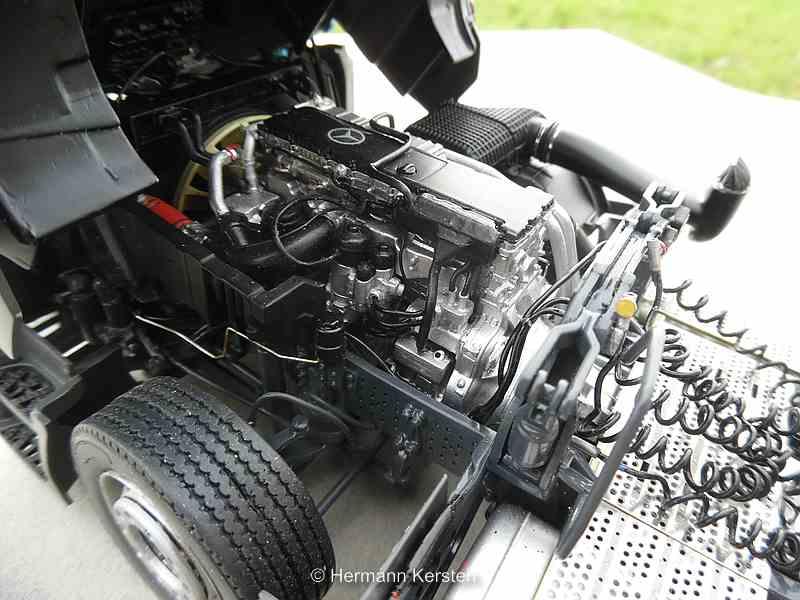
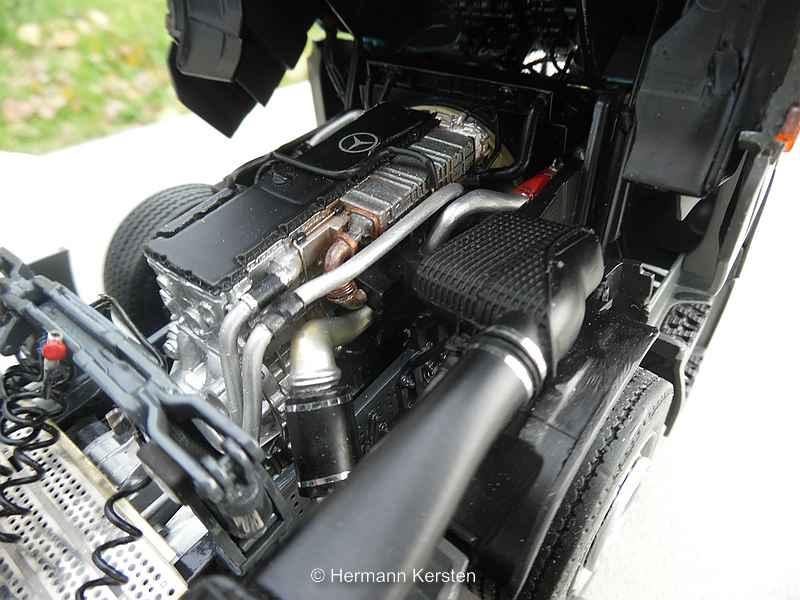
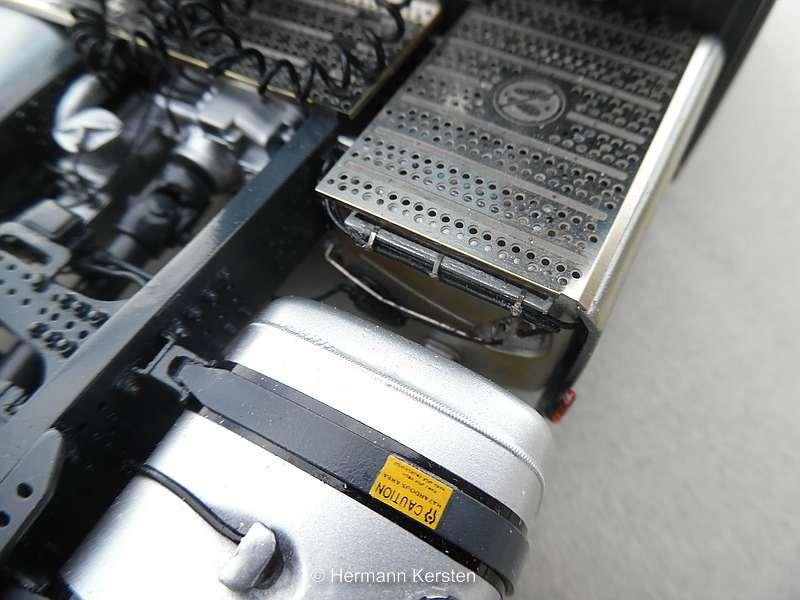
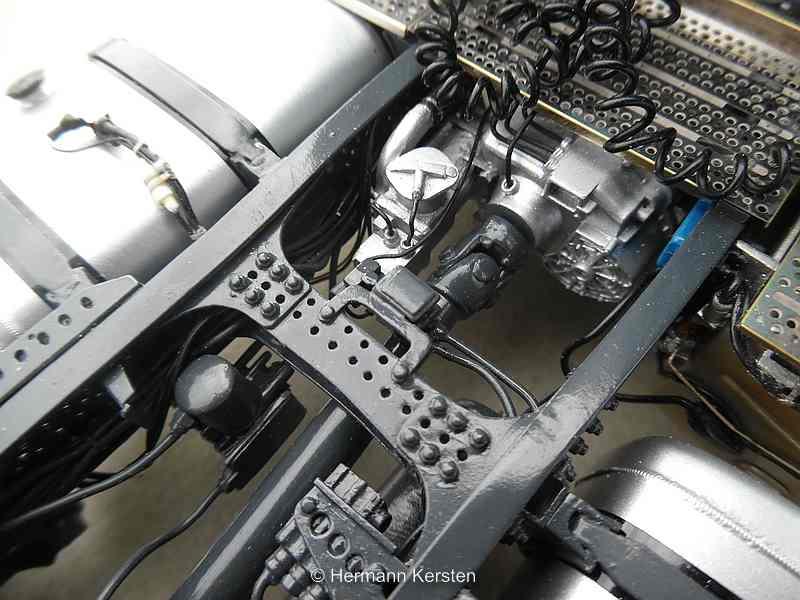
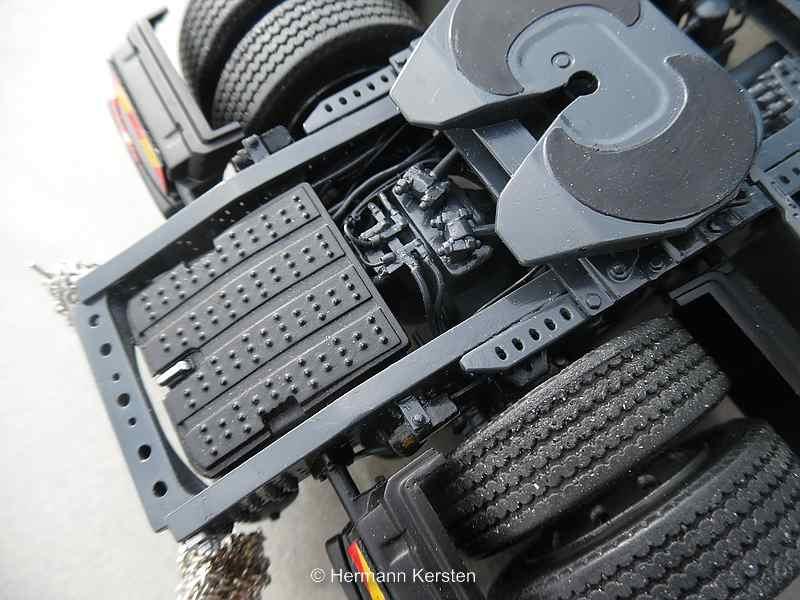
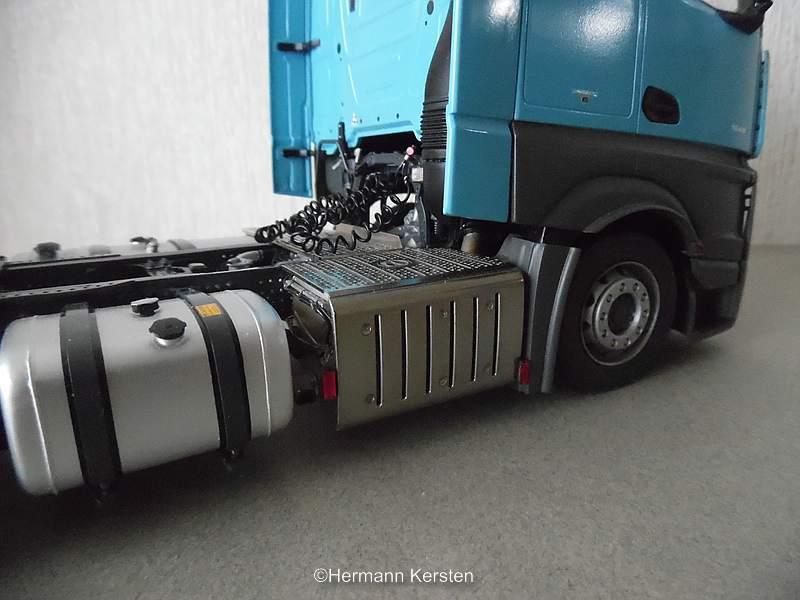
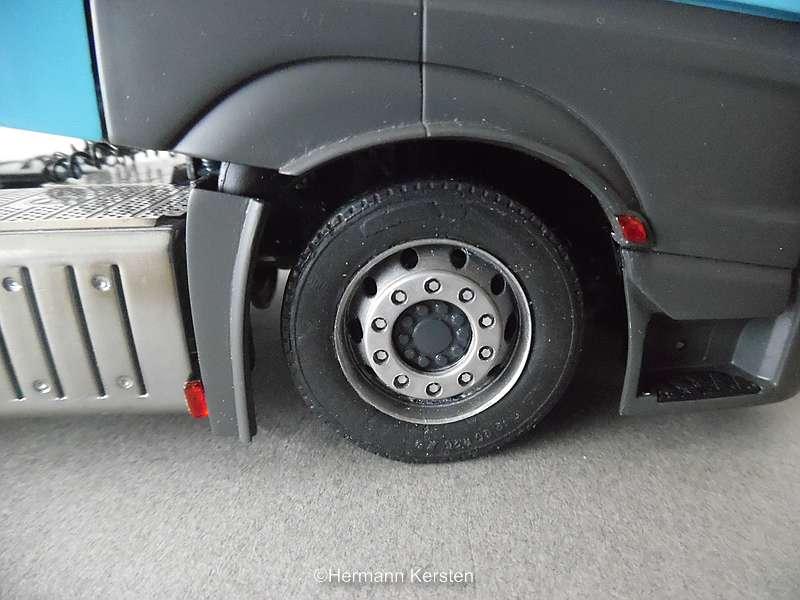
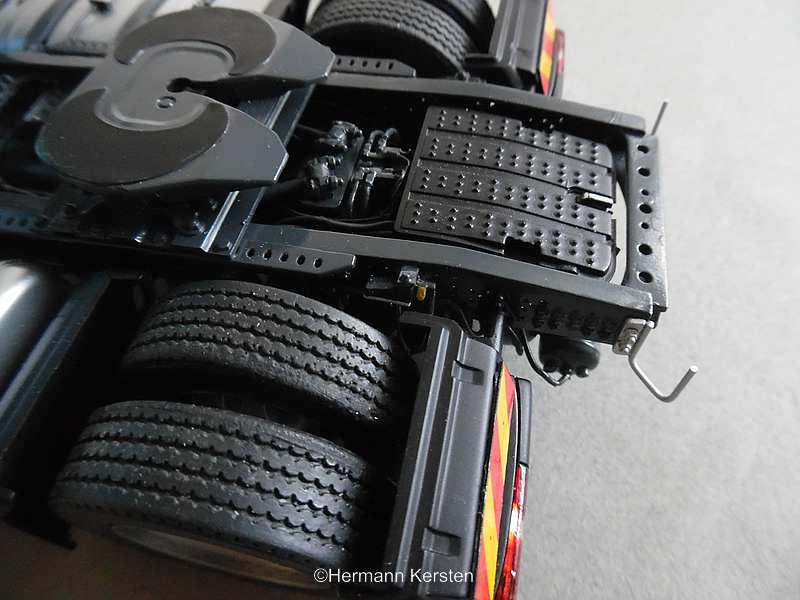
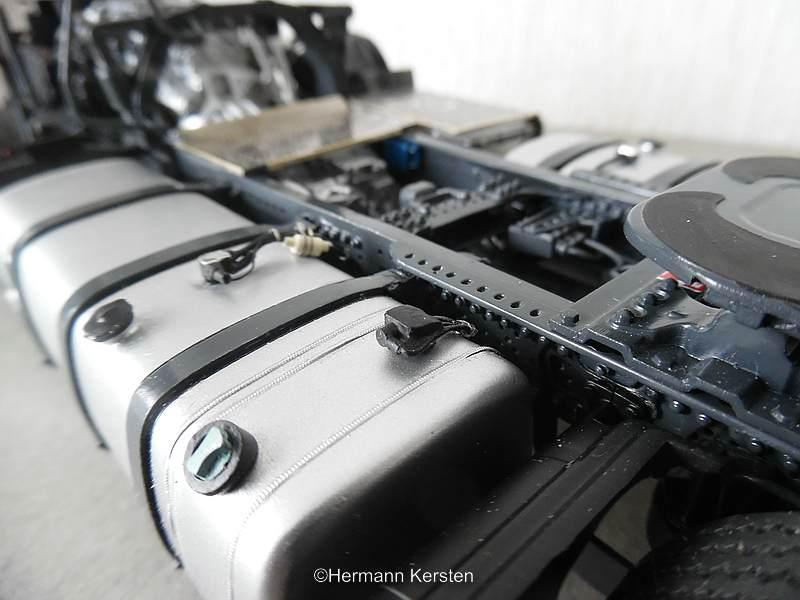
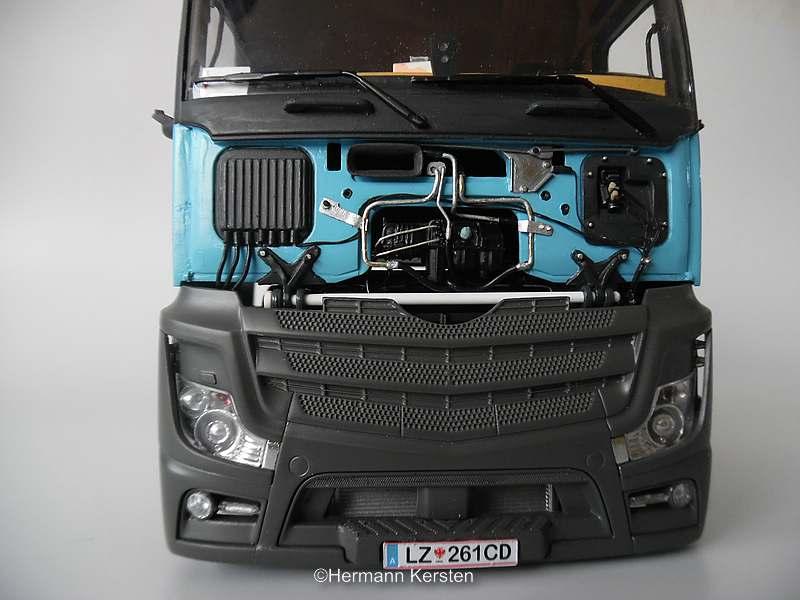
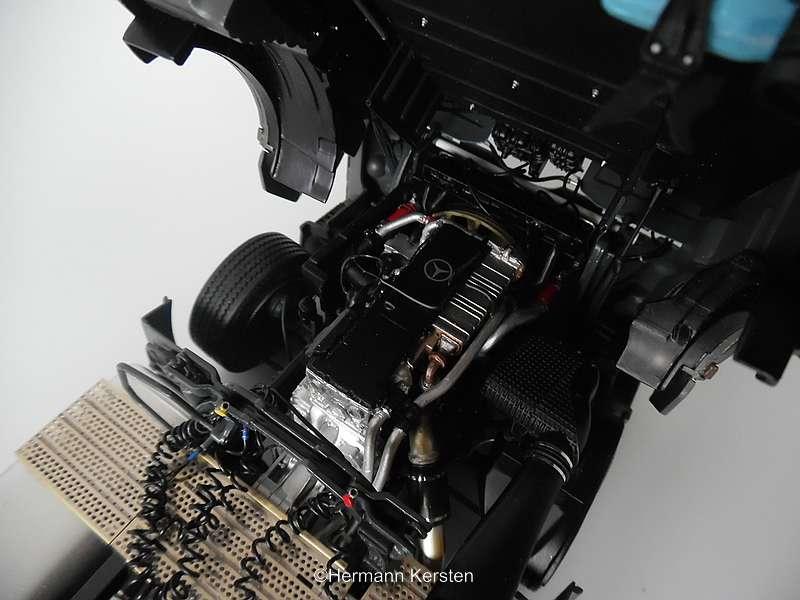
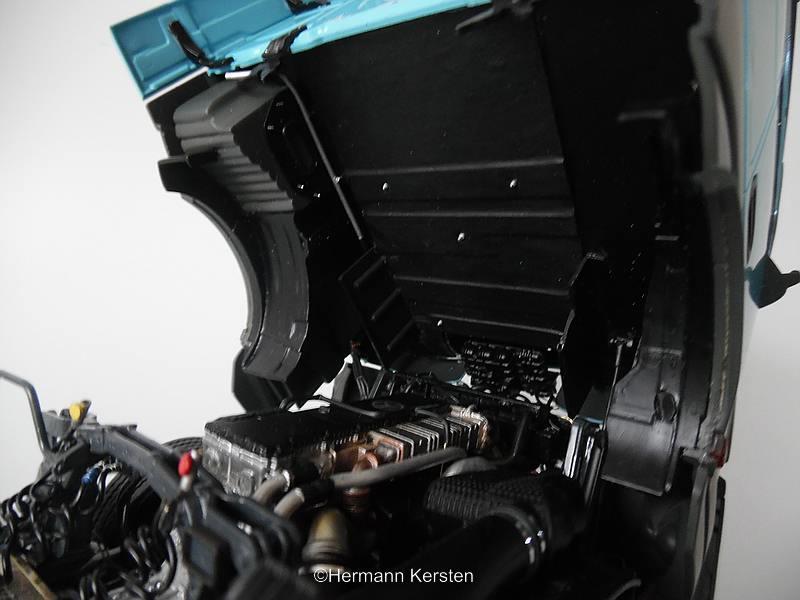
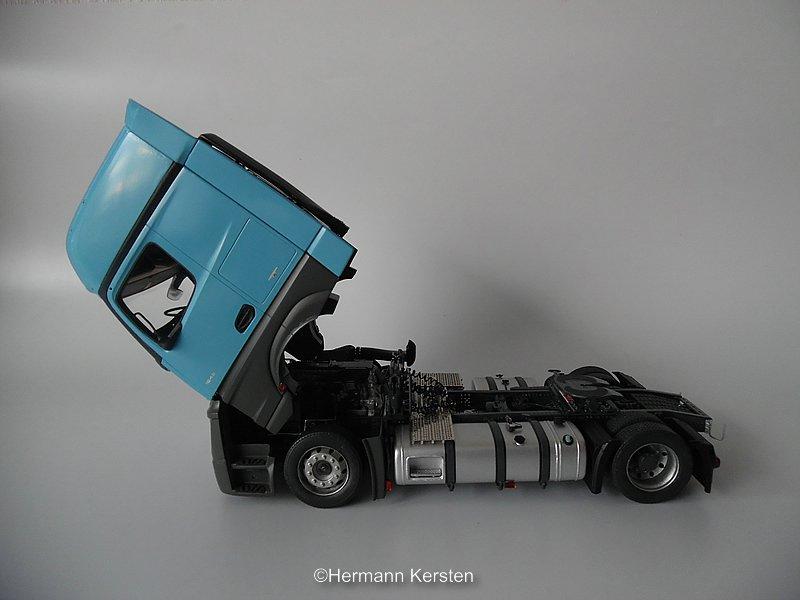
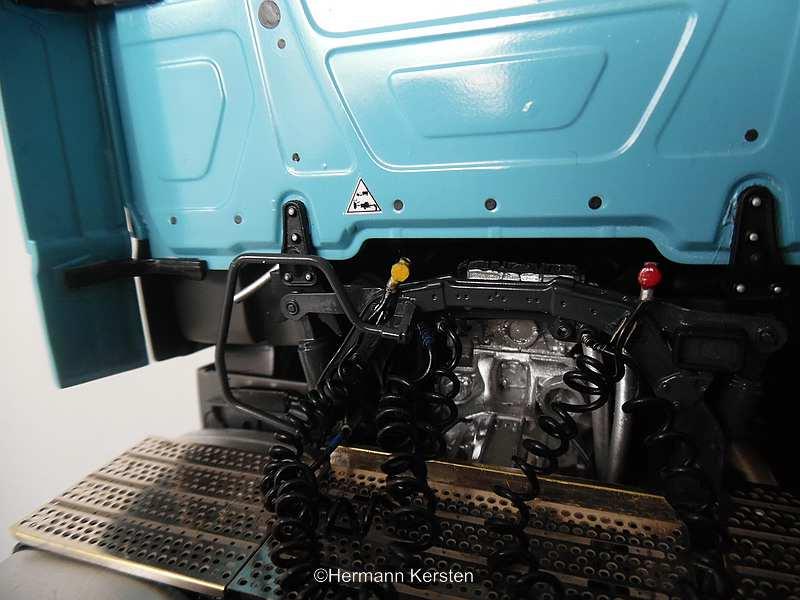
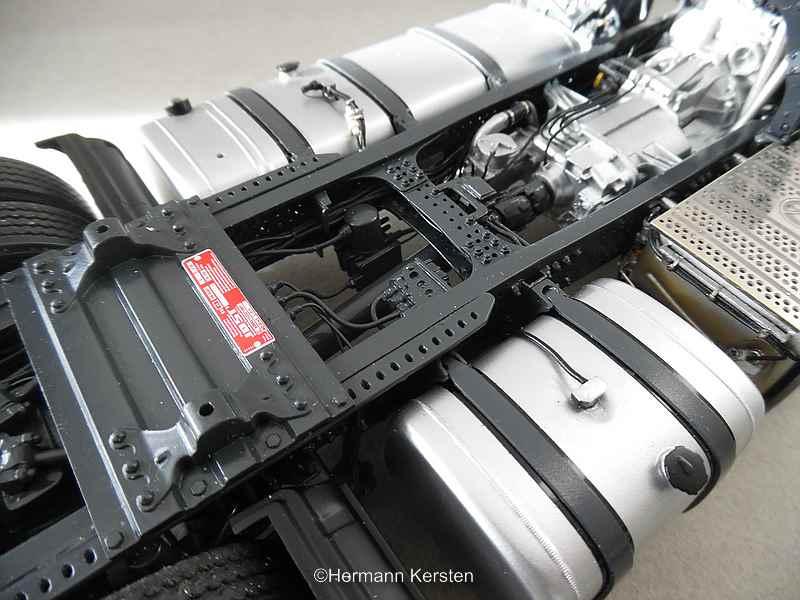
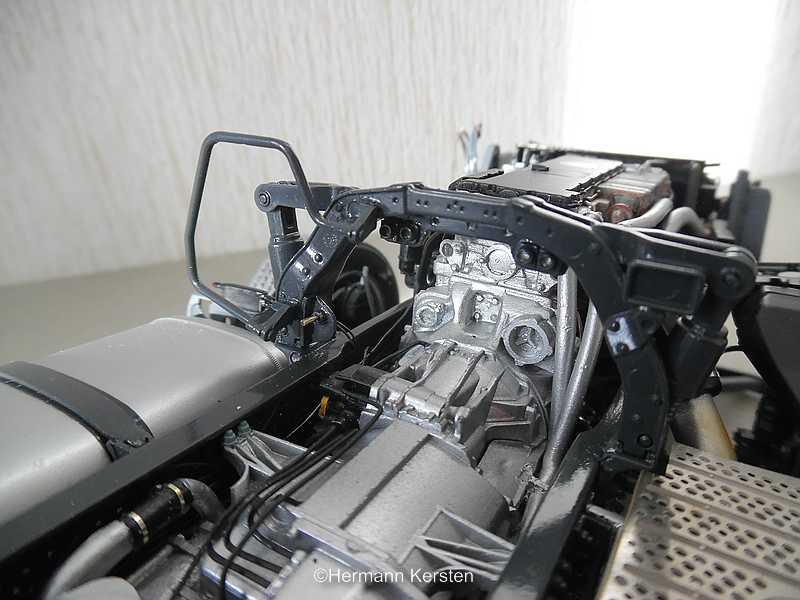
Hello everyone, And we are a bit closer to the finish line. The last connector, for the Add-blue tank, is now also ready and placed. Since there is a cover around the connector from the factory, I wanted to approach this as much as possible. A cable runs at the front of this connector, which goes into the sleeve and runs away at the rear with the 2 other cables or lines to the chassis. After some thinkin, I came to the decal-sol method. With 3 Russian license plate decals and a little sol, this should be sufficient. I think it will work also with other kind of license plates. Then the brackets for the snow chains... In order to subsequently have the cabin take place at the "marriage" between cabin and chassis. To my great joy, this cabin slid nicely over everything and fitted like a sword in a sheath! Now connect the cabling to the front and see if everything stays properly free of the front cover, and it does. The cabin pin still needs to get a color, but after a fit with the front cover, it fits nicely. Now the lighting cables are also connected to the trailer cables and have done a test right away. And indeed, the lighting works exactly as I had expected, I will take photos later, because it must be a bit dark for this. Well, then the trailer cables that are hung on the cab support in exactly the same way as with the real one. If you look closely, you see the aluminum pipe on the left, which I think is the air-conditioner overflow. This also runs to the front and comes out again at the front in the piping system that I made. Then the pipe that runs at the top of the engine to the air inlet, that is a self made one. In the Italeri kit, these are 2 parts, and I used a 0.5 mm brass wire and an insulation tube for this, so that it is 1 part and also looks a bit more robust and realistic. After everything was bent correctly, I applied this last part of the engine. Then apply the 5 silver-gray clips of the protective cover and take a picture. And a picture to show that the cab tilts nicely over the bumper, and that the rear axle also remains on the ground due to the fish lead in the battery box, despite the fact that the cab has now become a little bit heavier. Then the footboard that I made myself, edit with chrome marker and install it in the niche of the dieseltank, mount the flashing light in the front fender and install the 2 marking lights on the fender and tank. Then edit the headlights with chrome marker, the turn signals with tamiya clear and a cocktail stick, then place the clear parts and the rest of the final parts. And just a picture of the whole so far. That was it for today, and until next round. Hermann.
-
MB New Actros Lowliner
Hermann Kersten replied to Hermann Kersten's topic in WIP: Model Trucks: Big Rigs and Heavy Equipment
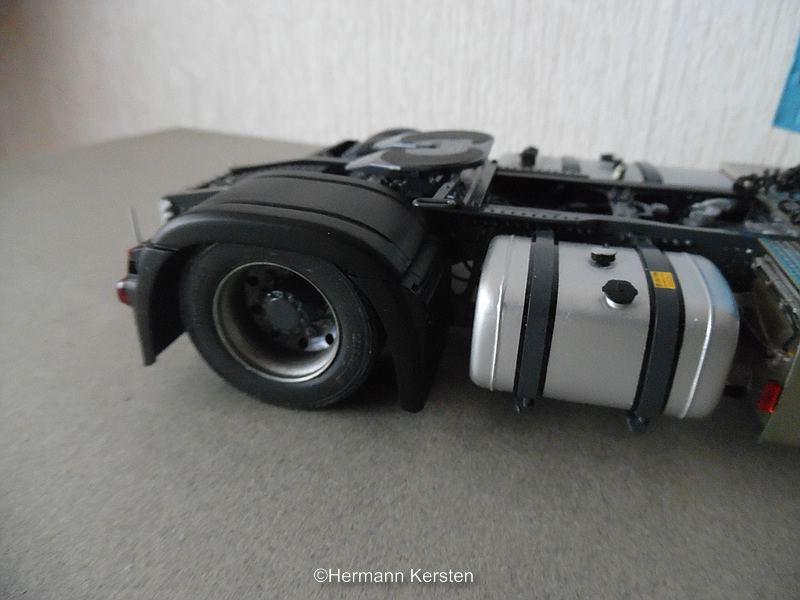
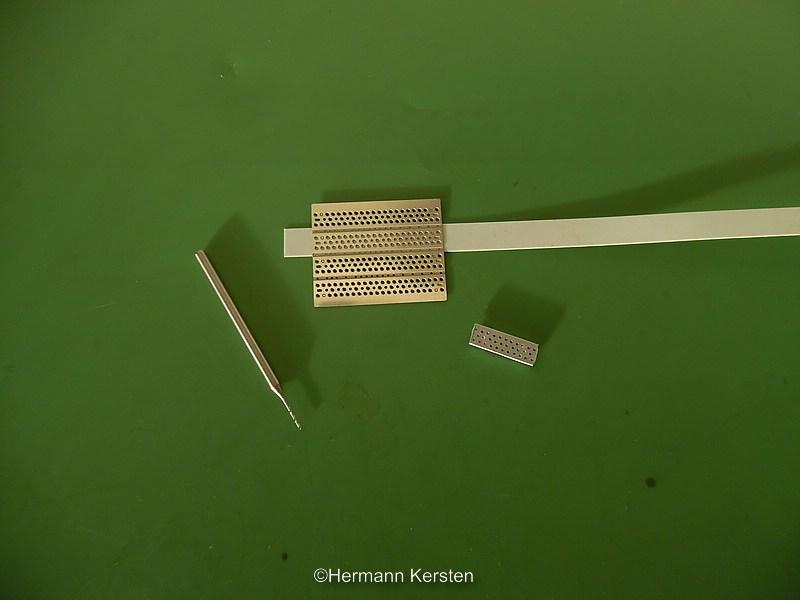
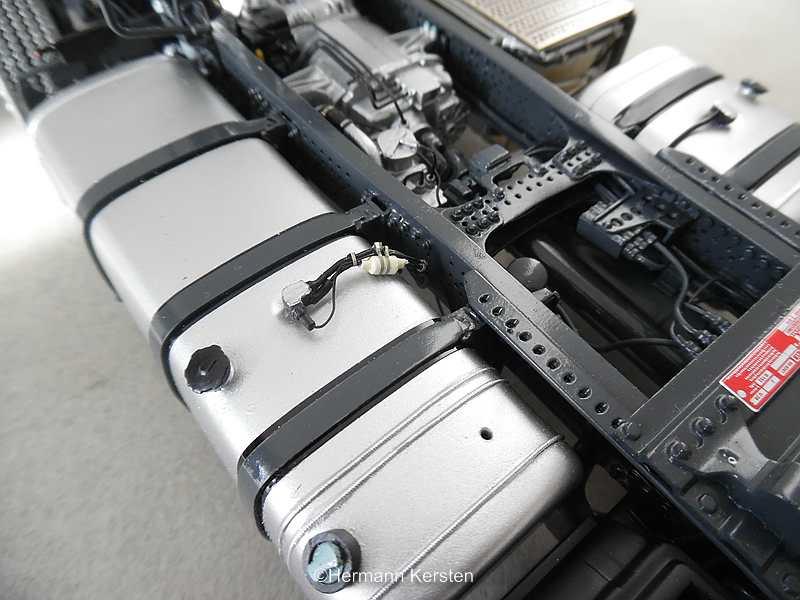
Hello everyone. Yes gentlemen, fiddling and fiddling .... The wiring of the chassis is almost done, and then it's time for some extra details. This time this lowliner gets 2 chain hooks on the rear of the chassis for the snow chains. I had seen this at an Austrian Actros Lowliner and actually i thought it will be a cool detail to do this on this Lowliner. So this will ultimately also be an Austrian Lowliner. In terms of cabin color it is also correct because this color was also ordered and sold in Austria. These chain hooks are placed at the very rear of the chassis. On the photo below you can see what this looks like. Next job, attach the bottom plate of the fifth wheel and put a decal on it, attach the battery box in the chassis frame, and connect the 2 main power lines to the battery box. You can also see here how tight it is with the wiring of the brake lines on the rear axle, costing a bit of tinkering, but it at the end, all got a good but tight fit, Then a step for the inside of the niche of the large fuel tank. This is done with styrene, and a catwalk part of the CTM-set, what i used as a drilling template. The hole pattern must have the same pattern as the catwalk and the pattern that comes back on the chassis. Then the bracket for the trailer cables, which is made separately, and later glued to the cabin support. At the bottom left there is a pin to which an (electrical) trailer cable will be connected later if there is no trailer, no idea why and if it is a an electrical trailer cable. This cable has a blue cuff on both ends. Then the attachment of the fuel lines and some electrical lines on the tanks. Italeri supplied these connectors on the tank with this Actros kit, which in itself is very good of course, but in my case, unfortunately not good enough, because the shapes on the New Actros are somewhat different. I can use those connectors again for an MP2 or 3 kit, because these connectors are correct there. Well, that means very small work again, and for this Actros i had to make a small separate diesel filter that is attached to the cable bundle wich is mounted with 2 cable ties, exectly as on the real one. This detail comes from one of the many reference photos of a German model colleague, who sent me these photos, and who works at the factory in Wörth where these lowliners are built in 1/1. Now i have to complete the connector on the adblue tank and then the chassis wiring is done. Then just a total picture so far. That was it for today! Hermann.