Rich Chernosky
-
Posts
2,123 -
Joined
-
Last visited
Content Type
Profiles
Forums
Events
Gallery
Everything posted by Rich Chernosky
-
1988 Mclaren MP4/4 F-1.
Rich Chernosky posted a topic in Other Racing: Road Racing, Salt Flat Racers
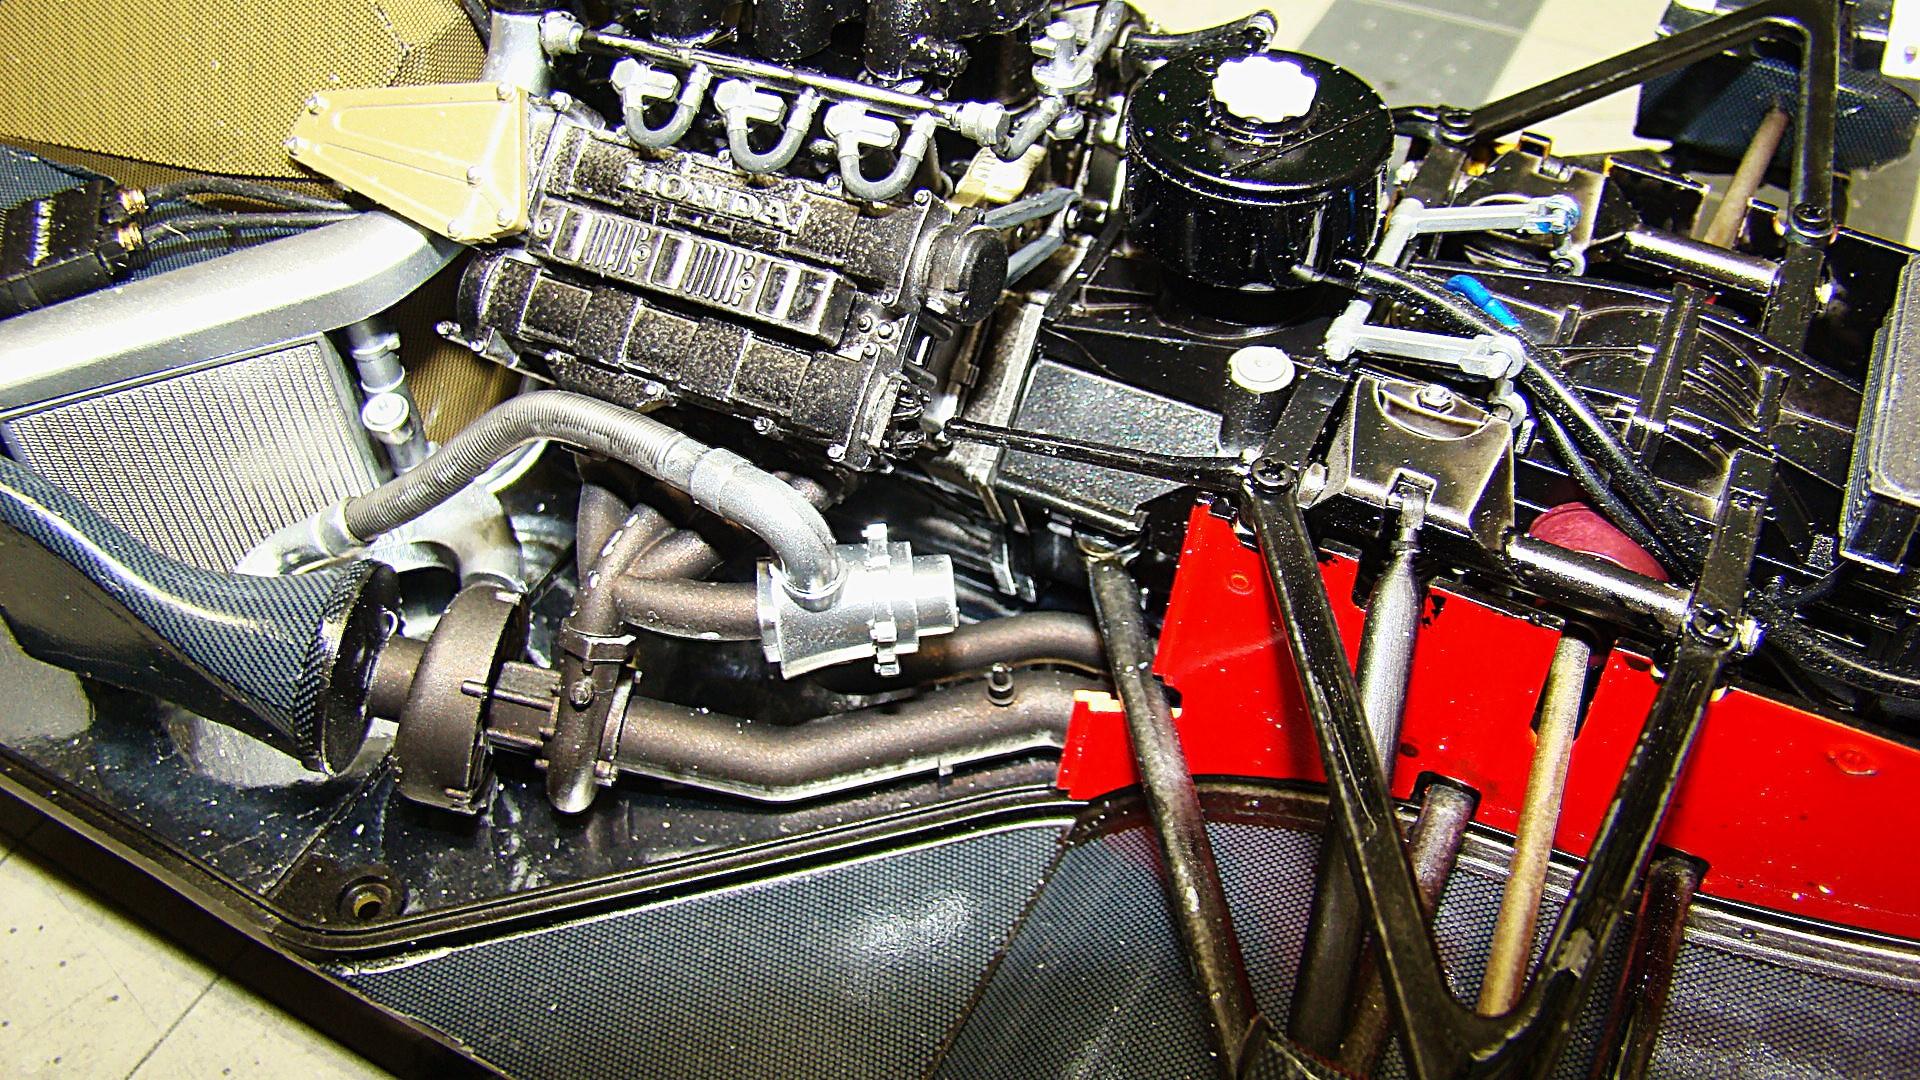
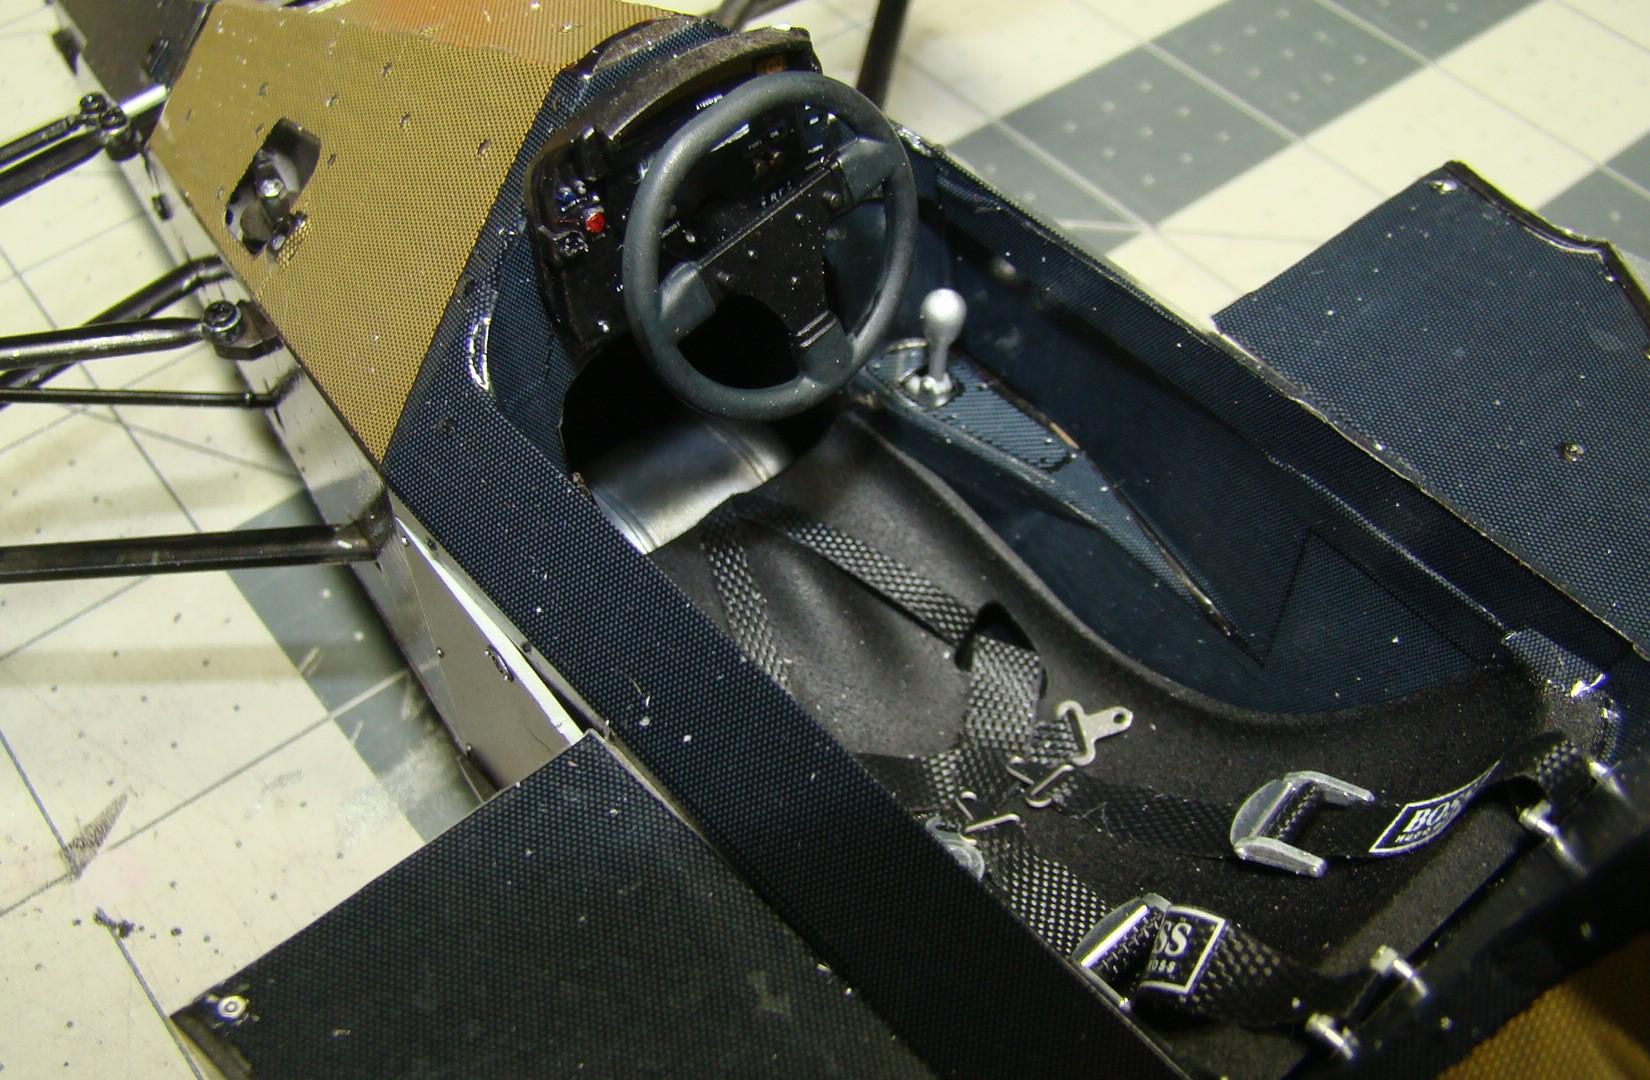
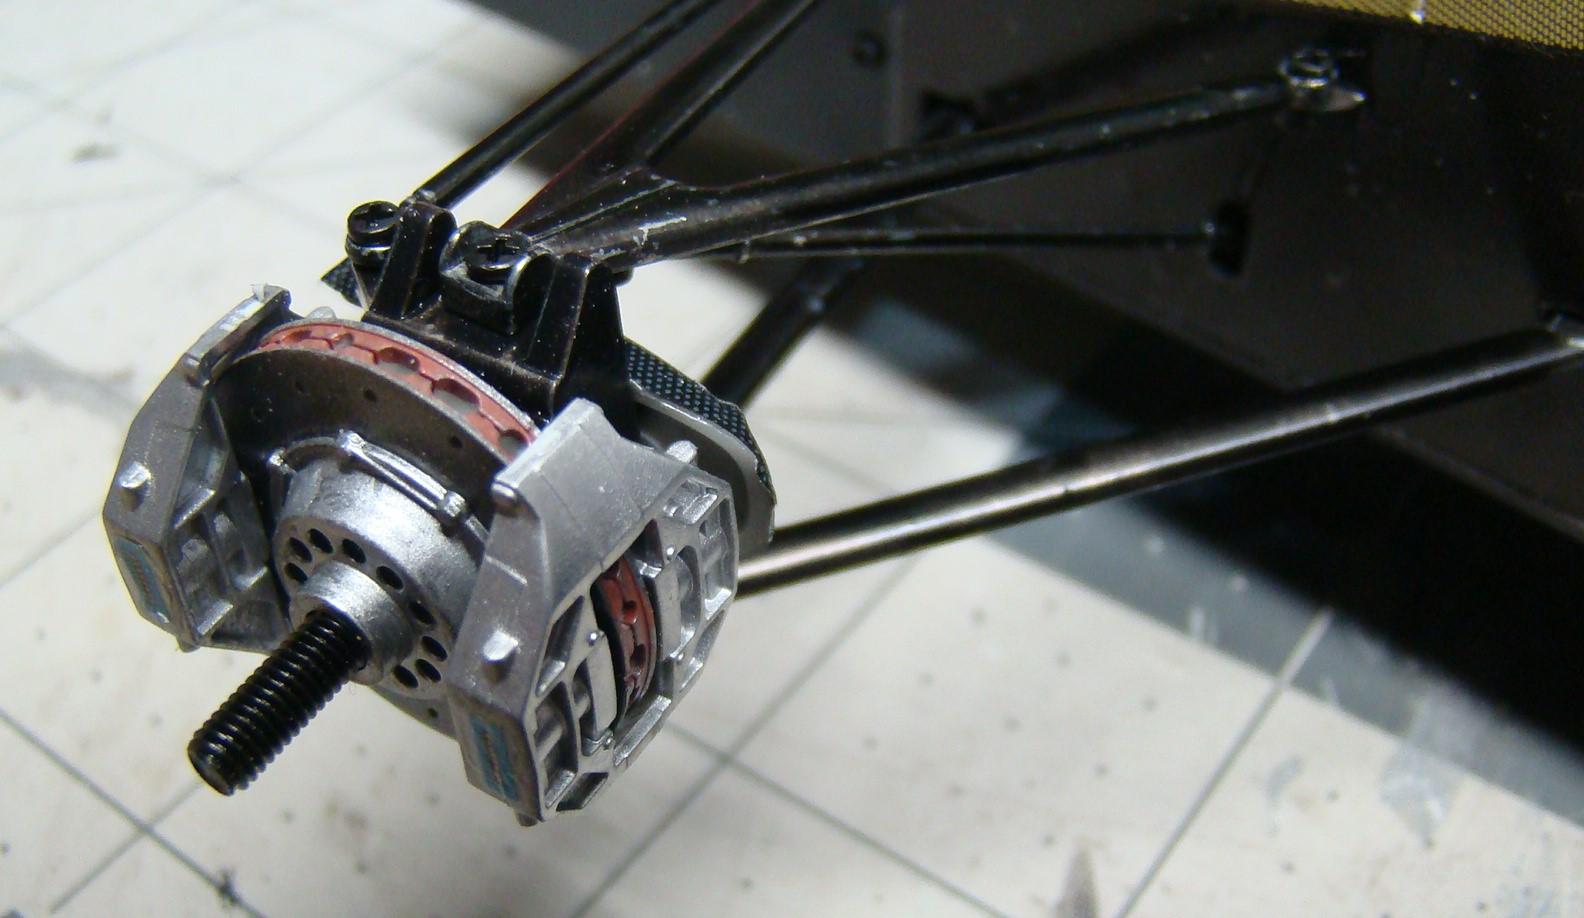
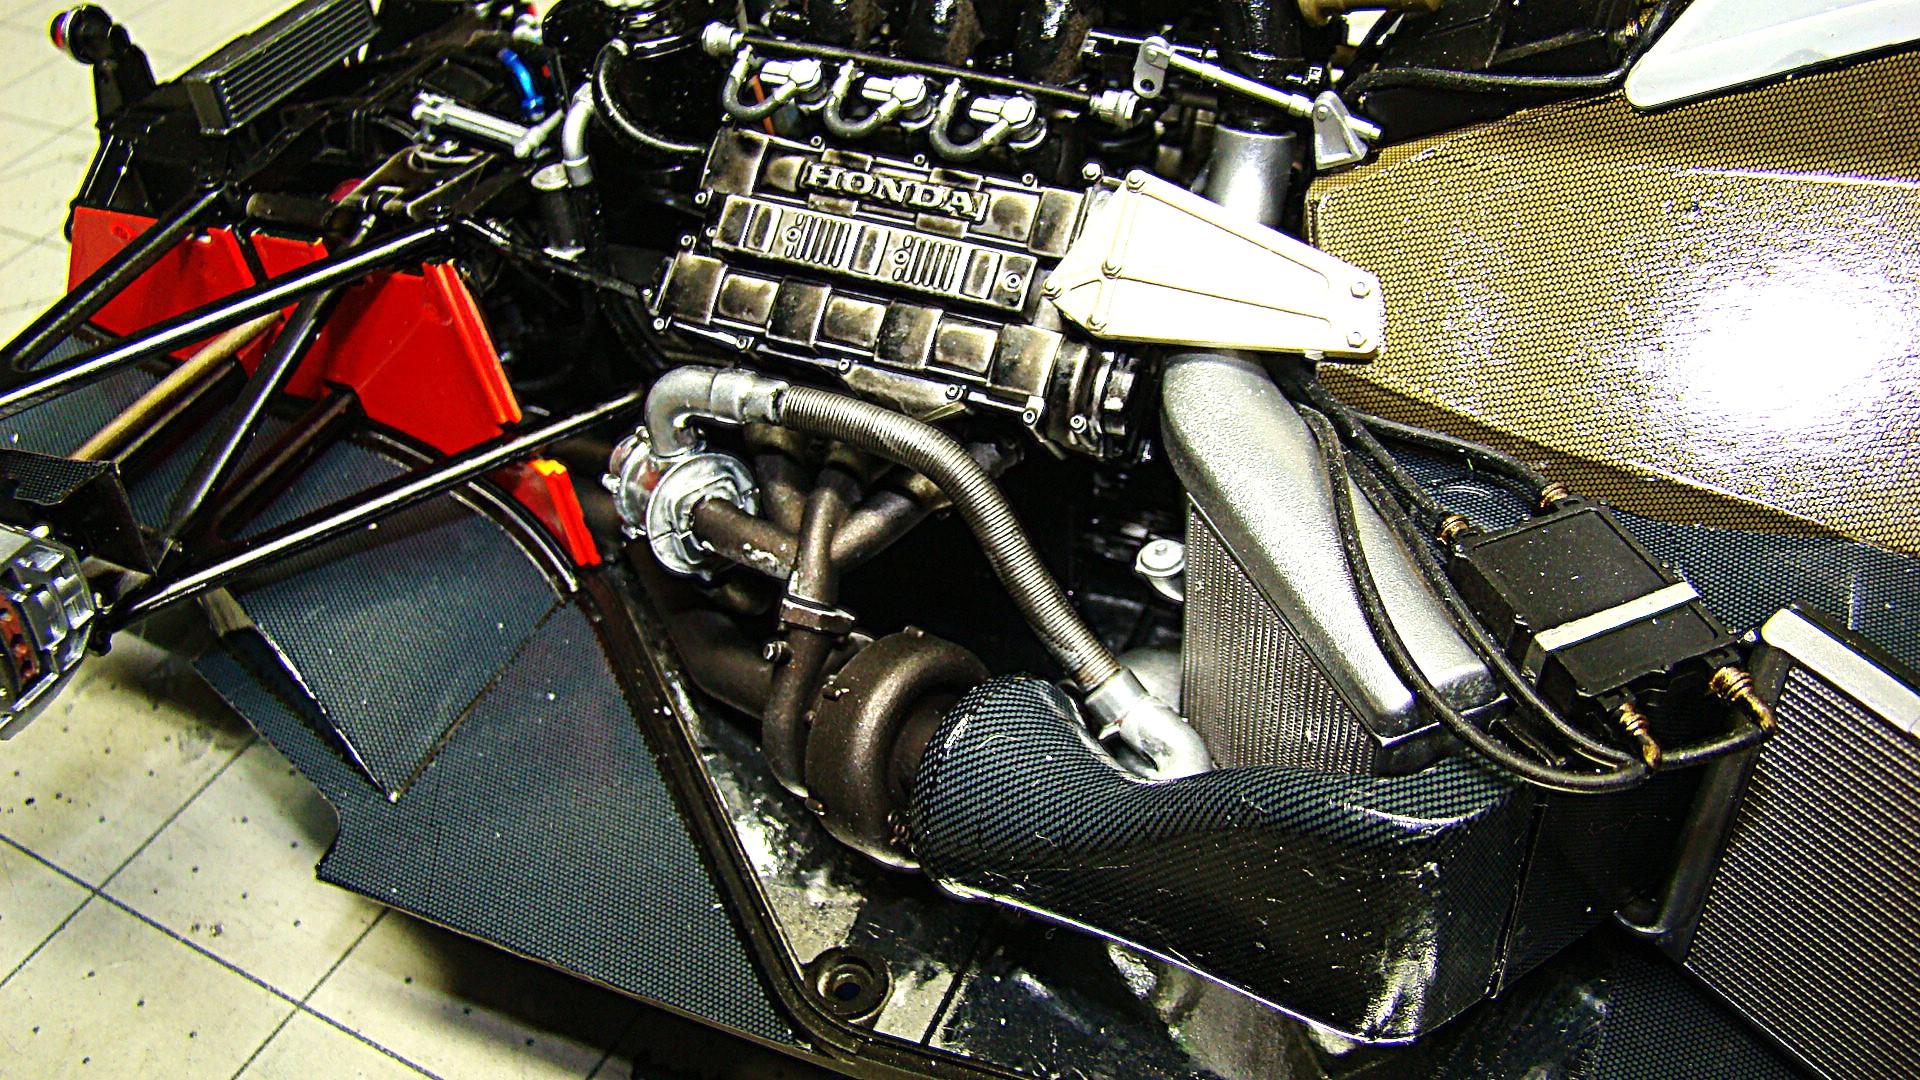
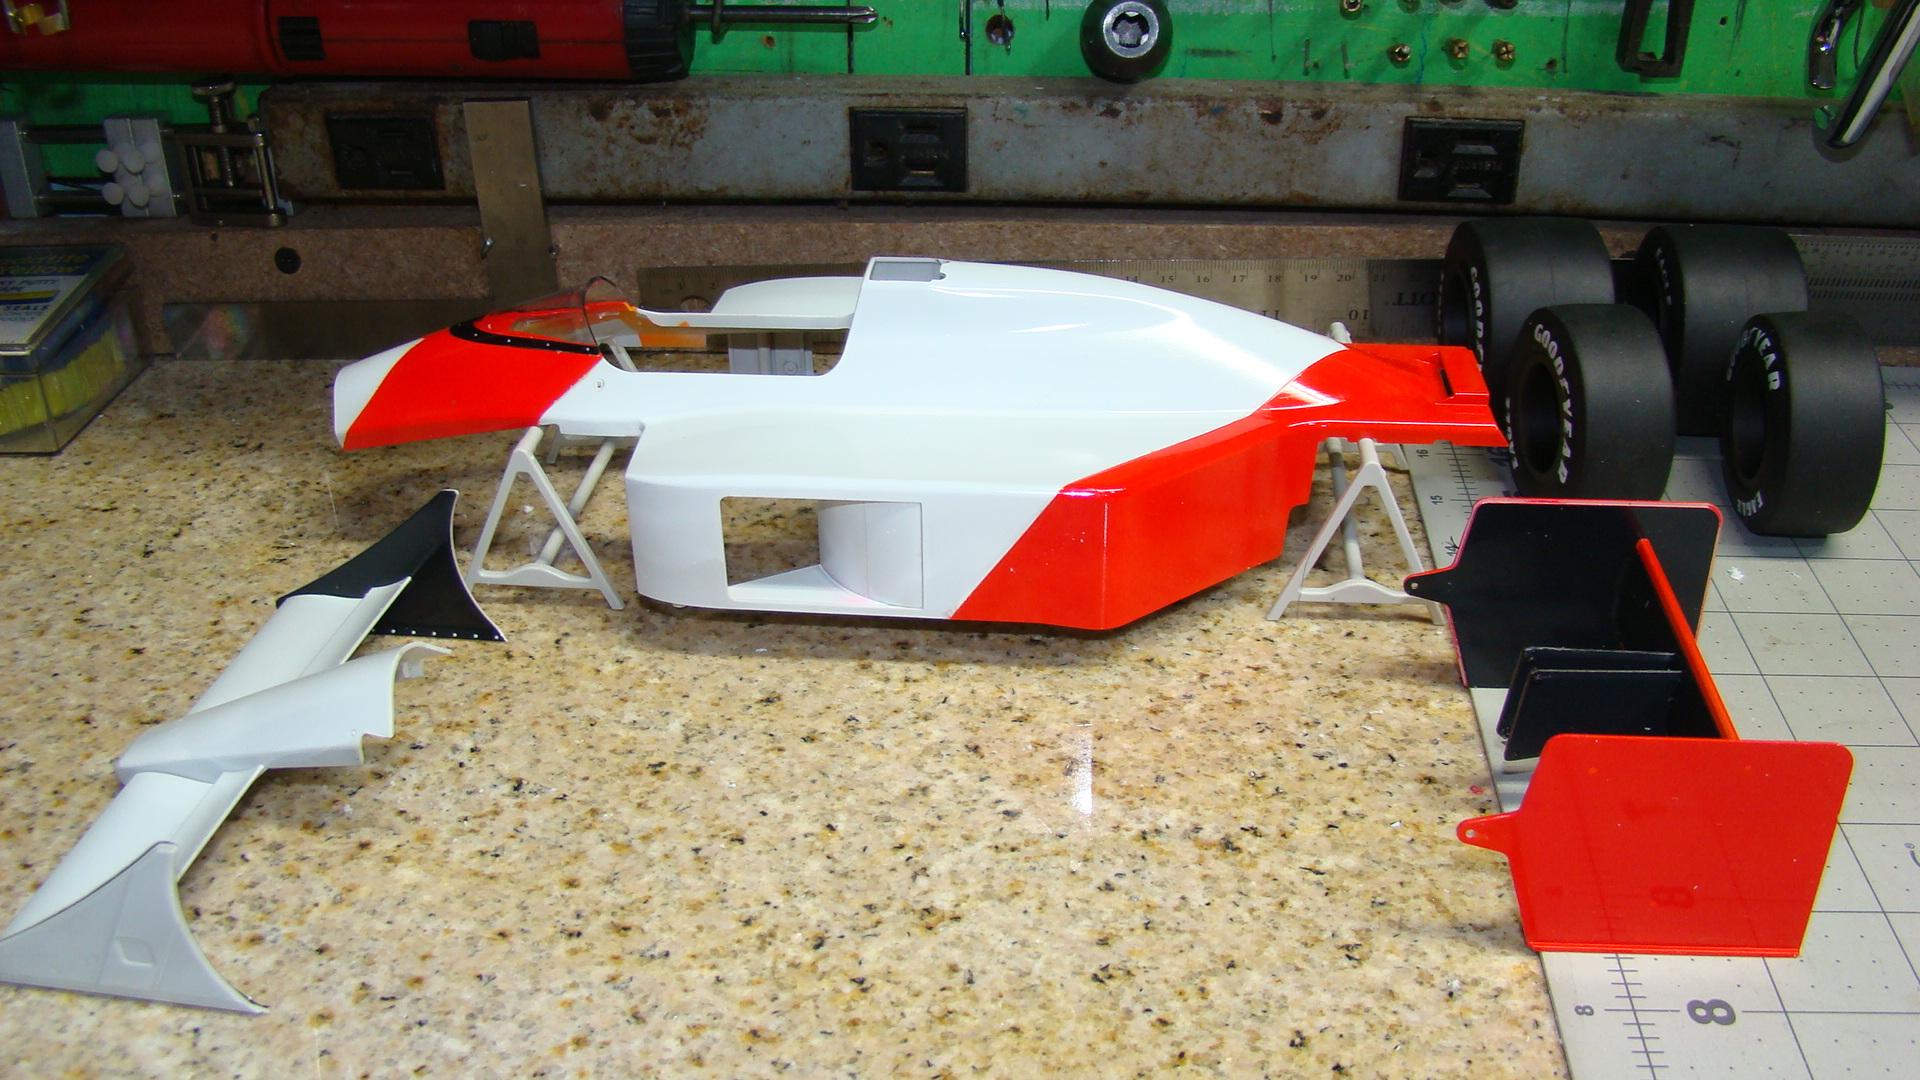
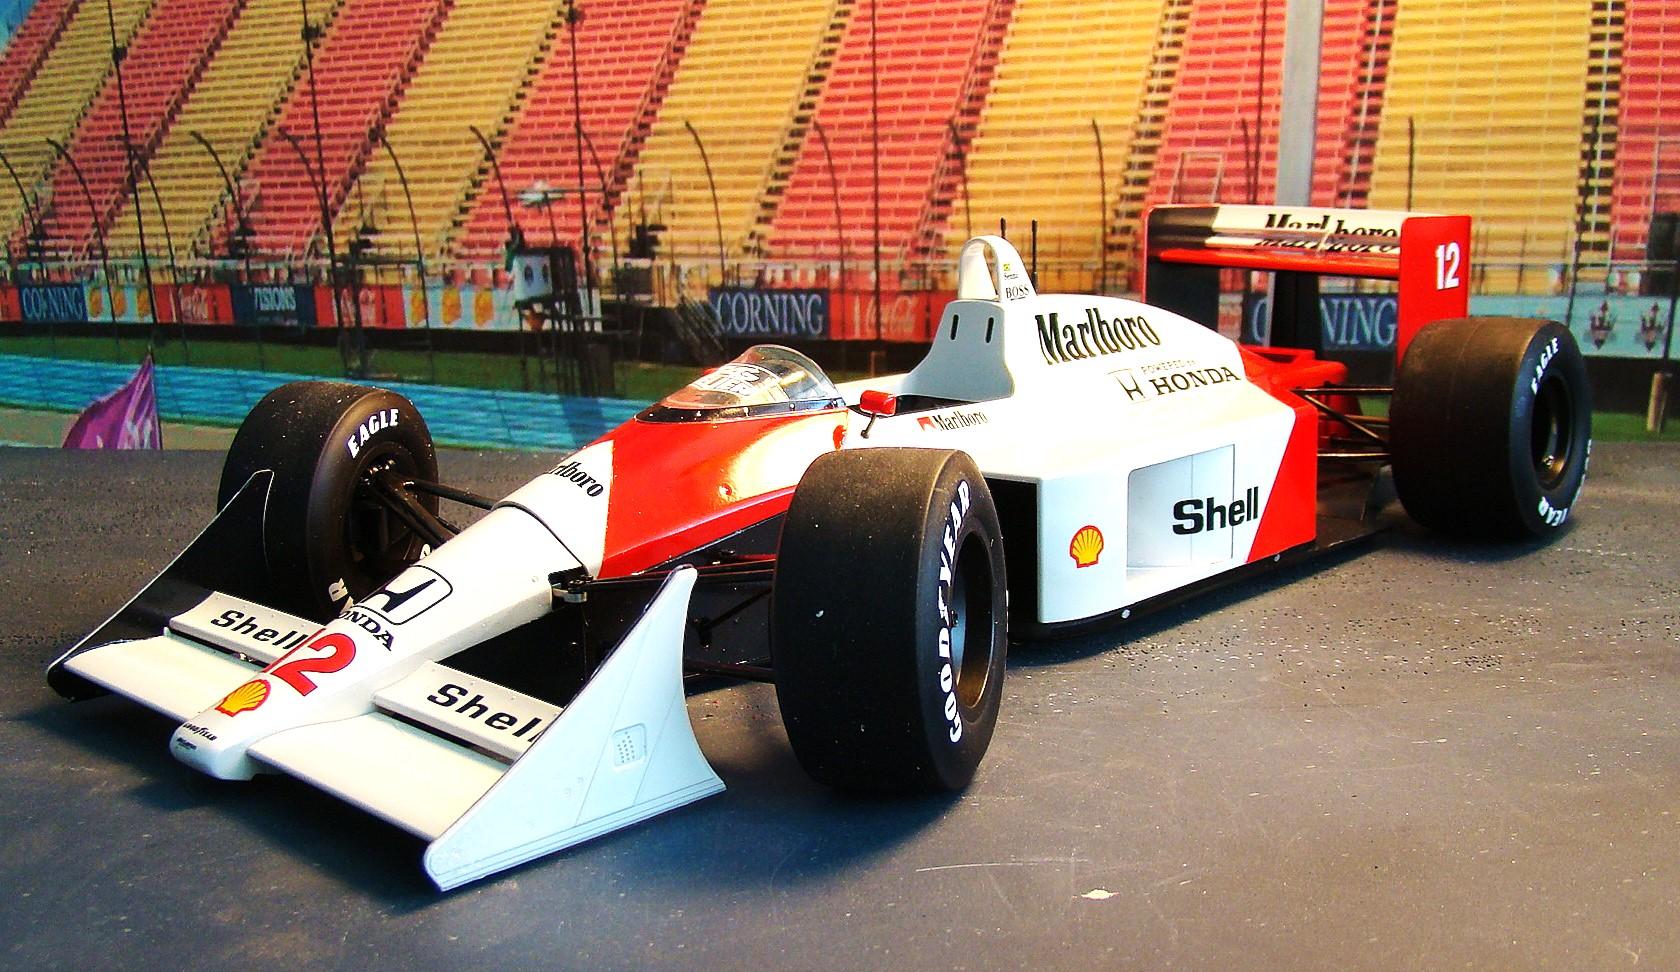
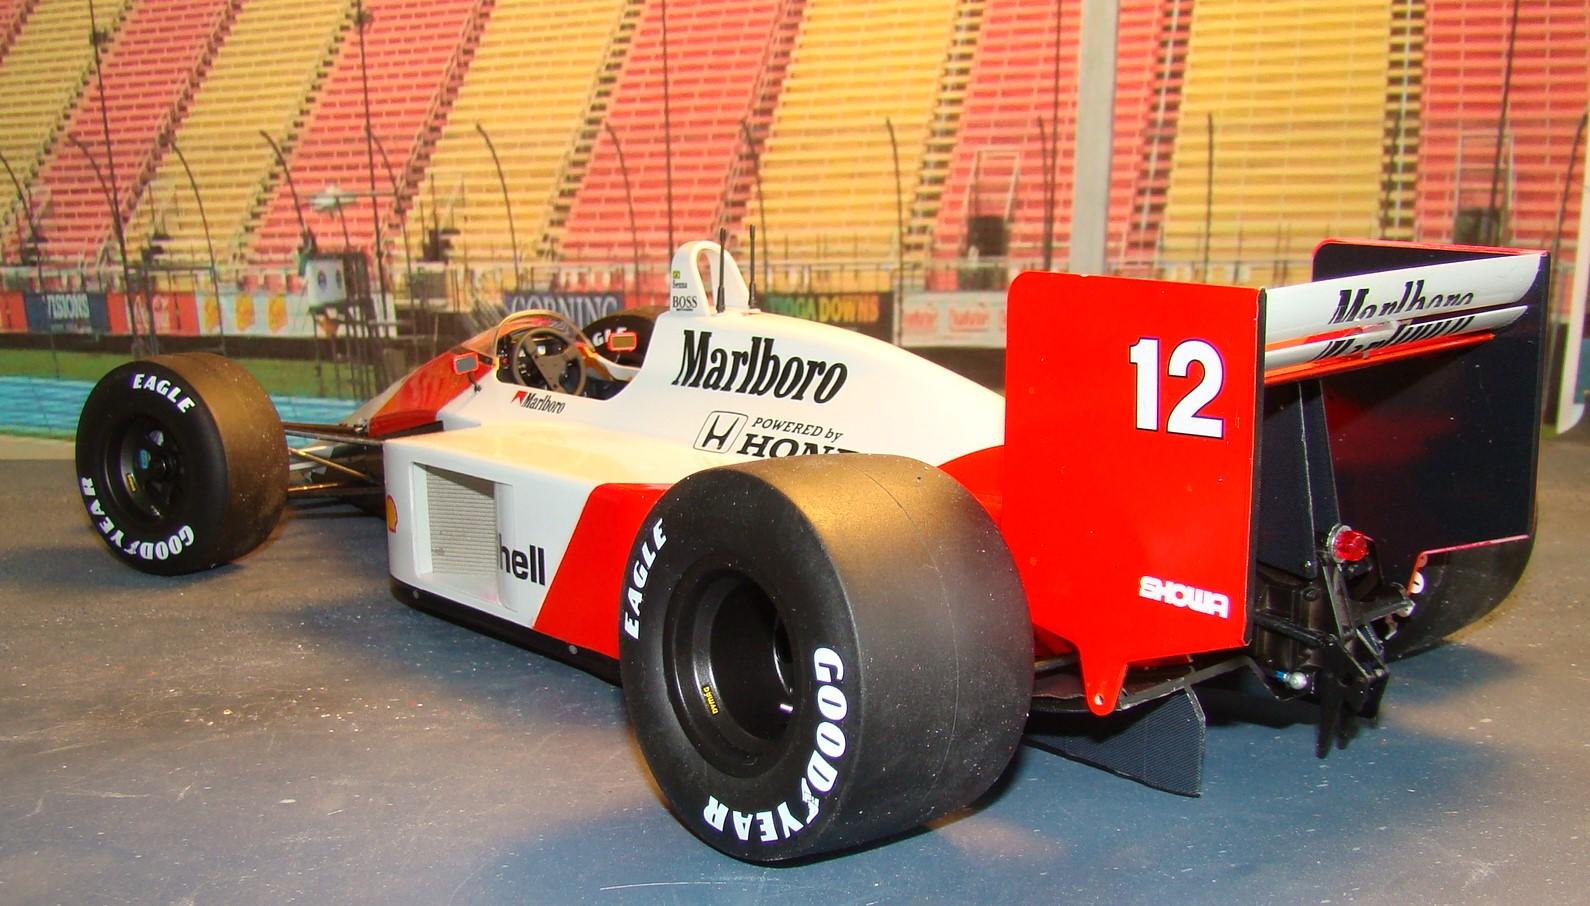
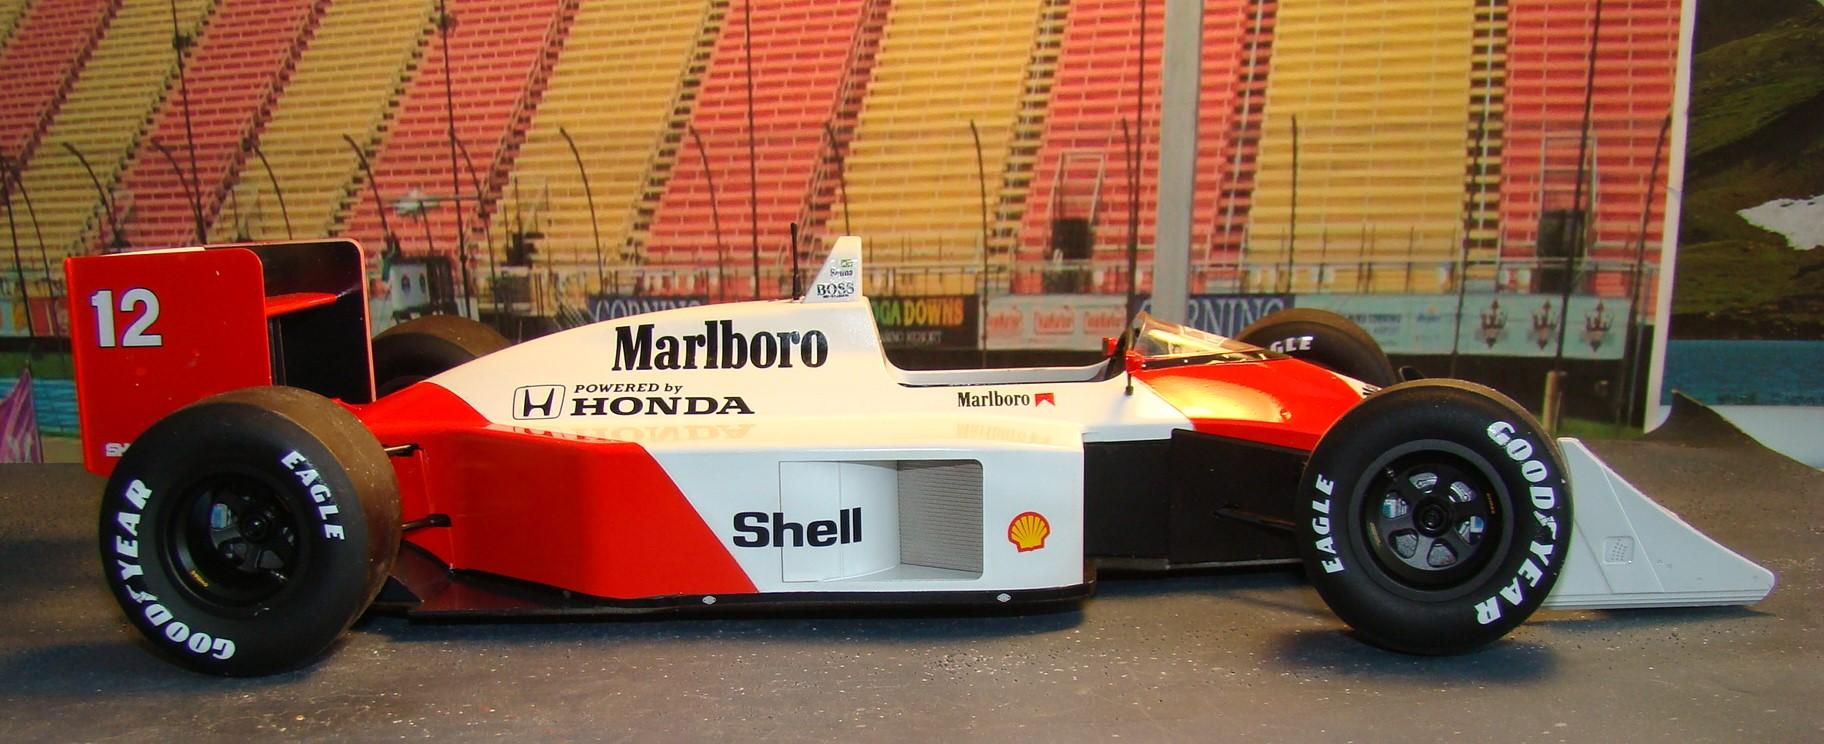
My local hobby shop is doing a big scale challenge. 1/16 or larger and due by Mar 6. With the time constraint I needed to pick something I had already started and could possibly (a challenge for 1/12 scale) not take up too much time. I chose this Meng kit that I had started and sprayed most of the parts before I moved in 2023. This kit proved to be the right choice as it practically flew together. Much of it was screw or press fit construction and everything fit together the first time. Very impressed with this kit. Actual finish time less than a week, some sort of record for me in 1/12 scale. Below the pictures are some of the build details. The only sacrifice was I would have to forego the super detailing like I did on my last F-1 project. So this kit is mostly box stock. Left side of the v-6 turbo charged engine. Only thing here to do was all the paint detailing and carbon fibre decals. all was supplied in the kit. The fit on the turbo and echaust was amazing. Cockpit was very well detailed. realistic seatbelts, PE fasteners and even the labeling for all the switches on the dash. Steering workd right through the steering wheel and was a half turn lock to lock. Just like the real car. Front suspension detail. Brakes turned easily through the calipers and the wheels fastened on securely. Right side of the engine and more detail. All the lines and hoses were supplied in the kit and the instructrion were crystal clear. Bodywork ready to go on the chassis. All this was painted back in November of 2023. Four screws hold the main bodywork in position and it fit way easier than I thouigh it would. Only exception to this were the rear panels that covered the suspension. In retrospect I should not have glued them on the engine and left them loose. Would have been a lot easier to adjust. Finished car on its wheels. All four tires touch, another credit to this kit. Rear veiw. The wing attached securely and at the right angle. A usual sticking point for later F-1 kits. Lots of detail back here as well. Side veiw shows how well the body fit. the only real addition to this kit were the Marlboro decals which came out of the archives. This was one of the most successful F-1 engine and chassis combinations. Pilots Ayrton Senna and Alain Prost won 15 of the 16 races in the 1988 season. Quite the achievement. This car represents Senna's ride.
-
1928-31 Mercedes Benz SSK
Rich Chernosky replied to Pierre Rivard's topic in Other Racing: Road Racing, Salt Flat Racers
Pierre...this has to be your crowning achievment. Very impressed with your scratchbuilding and painting skills. Great work. -
How the heck are ya?
Rich Chernosky replied to SpeedAndViolence's topic in Welcome! Introduce Yourself
Welcome aboard Scot. You will have no problem making friends here. Just reach out. As far as a paint line goes take a good hard look at Tamiya. Their TS line of spray cans are pretty much idiot proof. Many users here on this forum. I've been using them going on 30yrs now and no complaints. -
Stuart...not the first time that has happened but always a joy when it does. I have had to fabricate a lot of lost parts only to find them months later either on the floor or stuck to something else. I'm sure there is a Murphy's law for this.
-
-
Bob..as an additional note...I do have the roadster kit built. Same nice kit but a lot harder to find.
-
-
-
Alfa 33 TT12
Rich Chernosky replied to Dave B's topic in WIP: Other Racing: Road Racing, Land Speed Racers
Starting to really shape up Dave. Look forward to seeing this complete. You always do such cool subjects no else covers. -
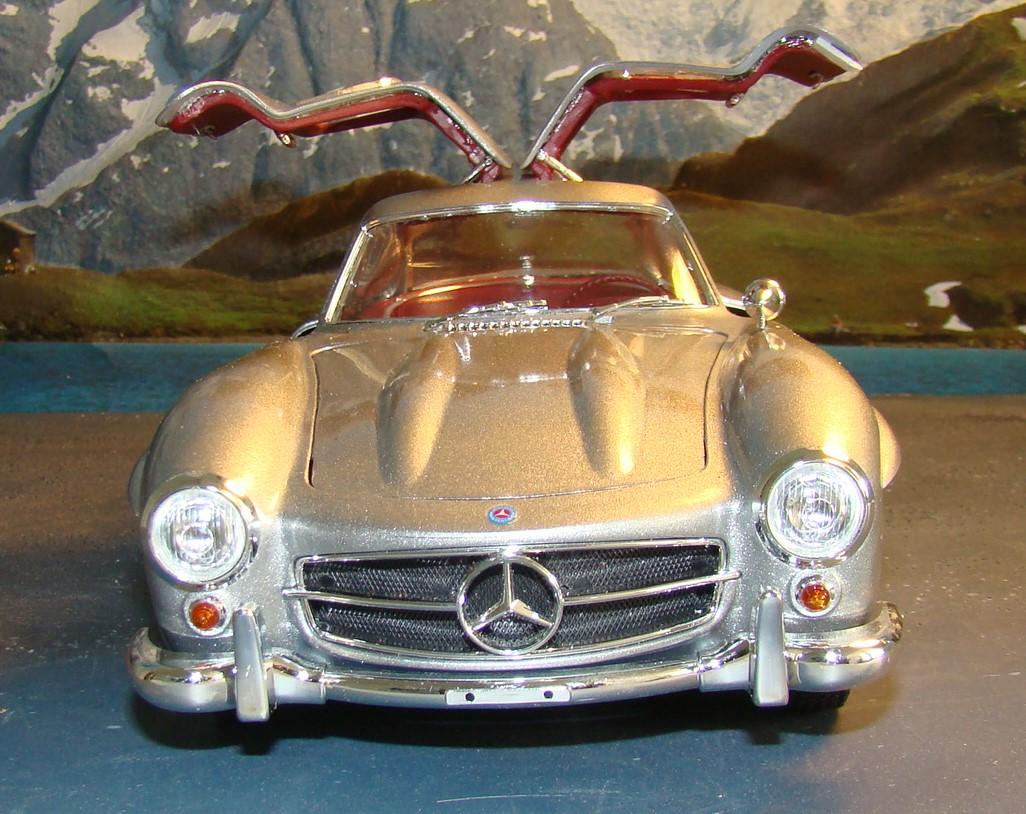
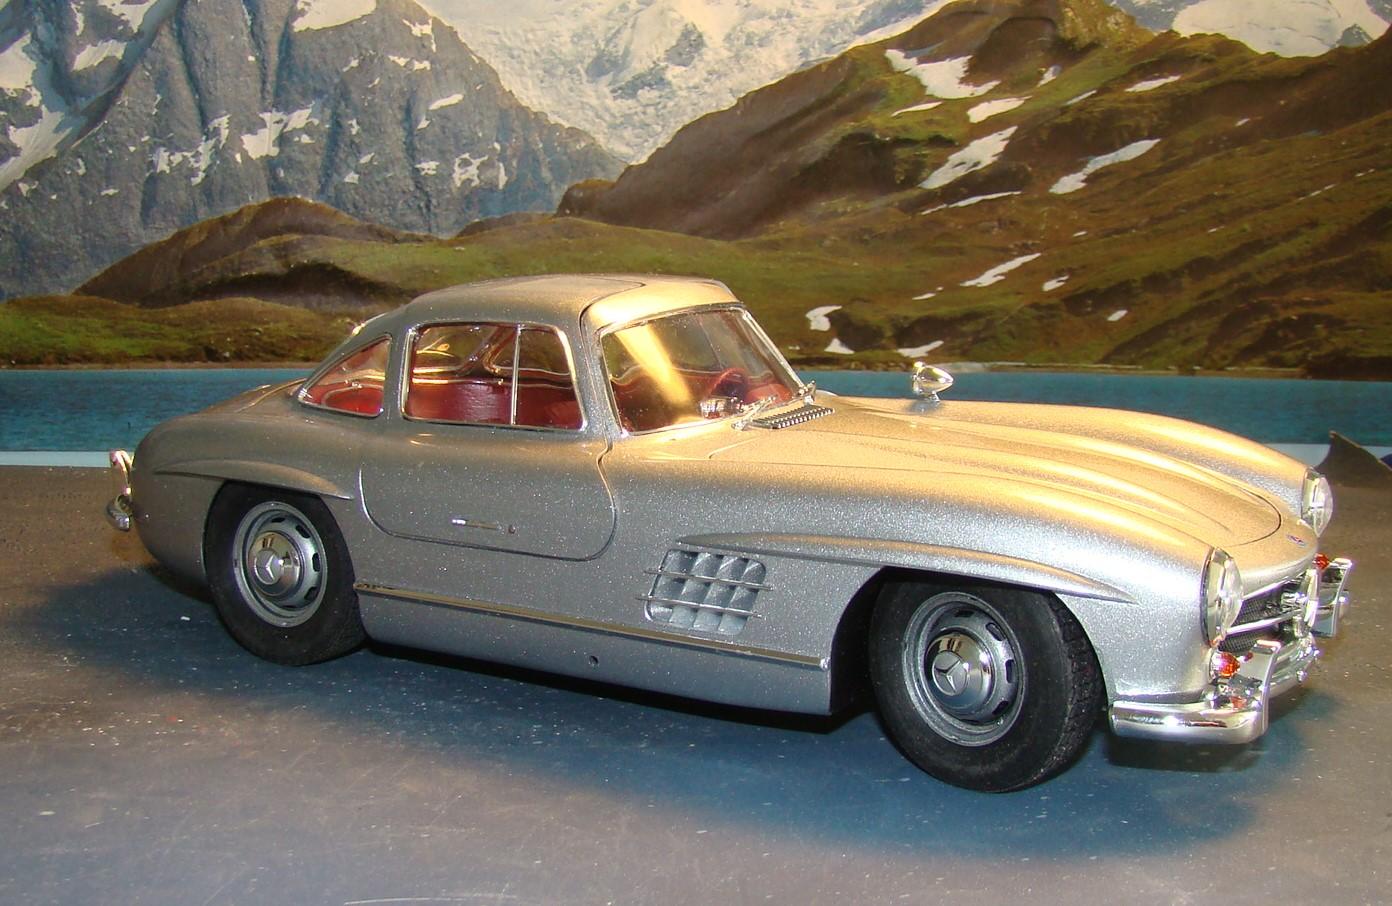
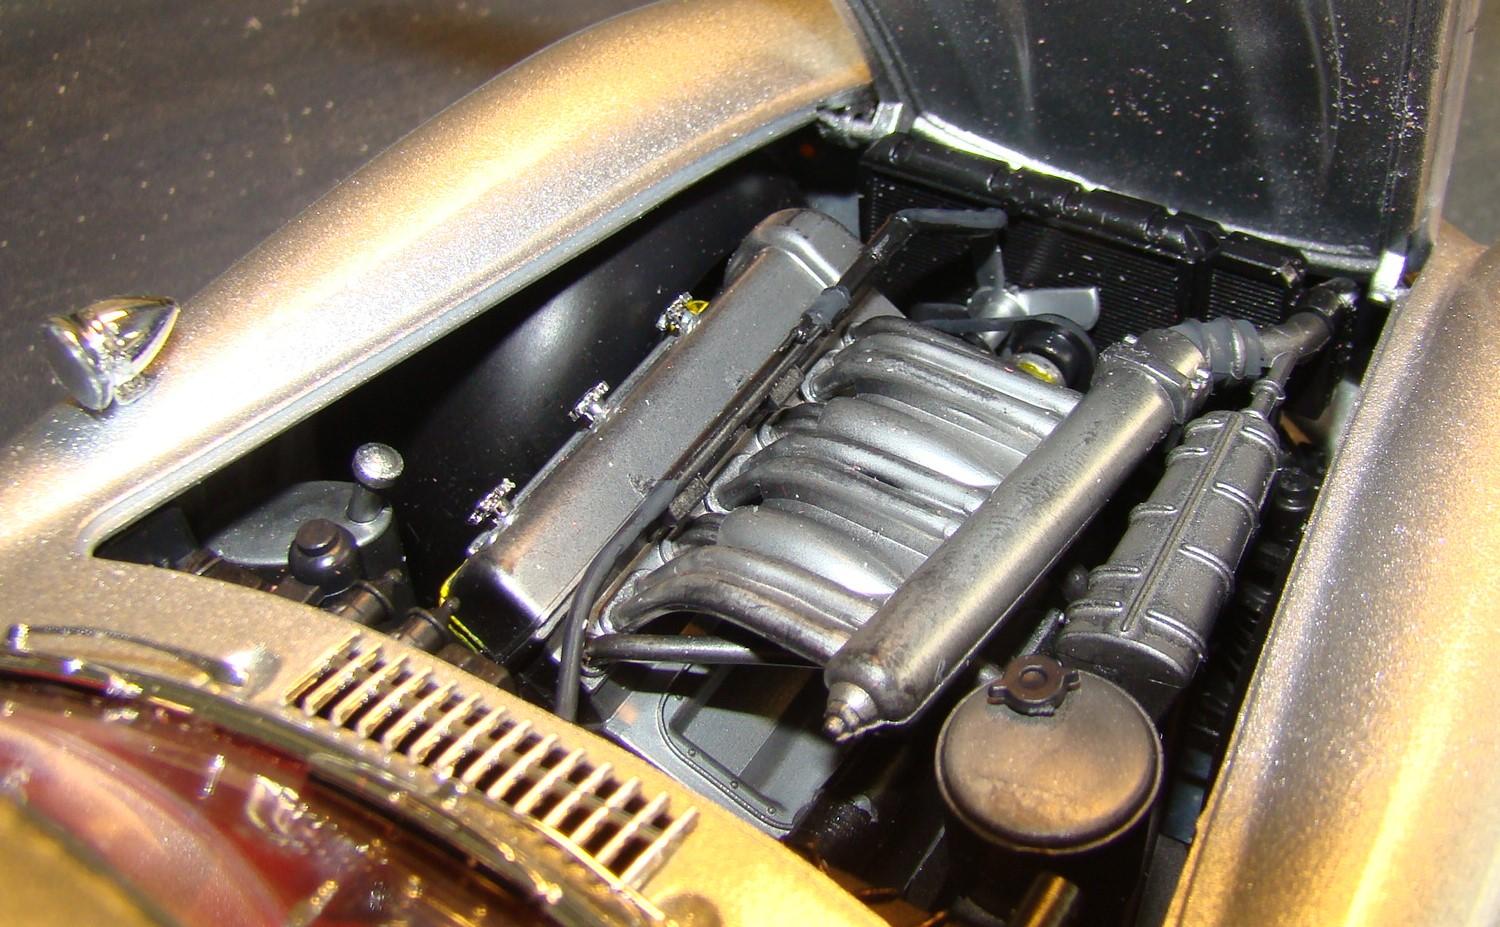
This is a kit that almost didn't get built. While rummaging through my stash I accidentally leaned on top of this box and crushed the roof in on the painted and polished body. I had been excited to finish this kit but not so much now. Months later I decided to attempt a repair. After much careful gluing, filling, sanding and repainting I was successful. I recently polished the roof out and decided it was time to finish this. Color is Testor One Coat Laquer #1803 Diamond Mist. Can't say this was exactly a joy to build as it is an early Italeri. almost all of the alignment holes had to be enlarged and there were many fit issues. But the kit has its good points too. In particular the glass and chrome surrounds worked very well. Below are comments below the pictures for the rest of the details on this build. Thanks for looking and comments welcome. Wouldn't be a Mercedes Gullwing with out this shot. This particular car has to be the most modeled subject. I have this car in several scales from 1/87 to 1/12. Its a cool collection. Interior with drivers door open. I chose a darker red than normal and like the regal look it affords. I also had a flocking to match. Interior was very well appointed with all the approprioated chrome doo-dads. Dash was chrome but painted to match the exterior which is common to this car. Finished car on its wheels. Hood, trunk, and doors all open. Wheels steer through the steering wheel. Chrome trim fit was excellent and most enjoyable part of this build. Rear veiw has some good detail. That 300SL chrome logo has an interesting story. I used Micro Liquitape to apply these and left this logo on my bench to dry. Later when i went to attach it , it had magically disappeared. What had happened it is it had attached itself to my sleeve (its a contact cement) and I had gone upstairs to take a nap. Several hours later and just before going to bed I discovered the logo in the blanket. I rushed downstairs and attached it. You just don't usually get this kind of lucky. Side veiw shows the nioce fit of the window trim and glass. The chrome surrounds were seperate pieces and I worried that it would be a problem. Not so. The doors on ths other had, consumed a lot of time to get working properly. Italeri included the hydraulic struts to keep them open and eventually this all worked out. The true test of a Mrecedes Gullwing kit is how the doors fit. During mock-up they fit great but when the glass was installed not so much. This side looks good, the other is marginal. Italeri did a nice job on the fuel injected six. The engine is laid over at a 45 deg angle. The nice detail on the injector and distributor is hidden. The hood fit down nicely. Thanks for looking
-
Another home run for you Thomas. Your modeling skills and attention to detail set the bar for the rest of us. Always a pleasure to see your work.
-
Tamiya Sauber Mercedes C9
Rich Chernosky replied to galaxyg's topic in Other Racing: Road Racing, Salt Flat Racers
Really nice build of this kit Michael. All the extra work you put into this really shows...especially in the engine department. And inspiring others (myself included) to build this kit....that's priceless. Great job. -
Really sharp build of an iconic car. Is it the most beautiful car ever made ?? If you have ever seen one in person you would be hard pressed to disagree.
-
Do you like to shake paint bottles?
Rich Chernosky replied to khier's topic in Tips, Tricks, and Tutorials
I have to agree with Steven on this one. Stirring is the best way to " thouroughly " mix bottle paints. Hobby paints have pigments (the solid part of the paint) that are very finely gound. They sit like heavy mud on the bottom of the jar after a period of time. No amount of shaking will mix all of this with the liquid. I have some of Tamiya's metal stir sticks and they work just fine. One swipe through a paper towel and they are clean as a whistle. The biggest problem with shaking, however is it gets paint up into the cap where it dries and breaks the seal. This shortens the life of the paint very quickly. -
Nice kit Justin. Built one. You will enjoy it. Looks like you are off to a great start.
-
Just bought this kit. Will be following to see how it goes. Thanks for putting this up.
-
Porsche 910
Rich Chernosky replied to Rich Chernosky's topic in Other Racing: Road Racing, Salt Flat Racers
-
Another Randy Ayers refugee....
Rich Chernosky replied to Spooker's topic in Welcome! Introduce Yourself
Don't feel bad Brian. As you know I have most of them anyway. 60yrs of collecting will do that. And besides..we F-1 and Exotics builders are in the the vast minority . Just look at this forum. The muscle car and hotrodders are much more active and numerous here. Not complaining. All modellers here have something to contribute and I talk to everybody. It just that is the way it is. But don't give up hope. I know of quite a few modellers who will tackle an F-1 kit just to see if they can do it. So...keep bringing em. See ya at the next one. -
Thanks David...couldn't resist adding some extra detail to that engine. Humbrol airtbrushes very nice with the right thinner.
-
-
Another Randy Ayers refugee....
Rich Chernosky replied to Spooker's topic in Welcome! Introduce Yourself
Now that is a real coincidence. Last kit I finished had your name and address on the bottom of it. Must have done it at a swap meet. Haven't seen you for a l-o-n-g time. But...glad to see you on this forum. Don't be shy...put some more stuff up. We always appreciate anything anybody wants to share. -
This Gunze kit is getting rarer and rarer. You were wise to restore it and bring it up to specs. Looks real good now. Thanks for sharing.
-
Mario...doesn't seem to matter what you build...it is always spectacular. And the photography is always over the top. Congrats on a job very well done.
-
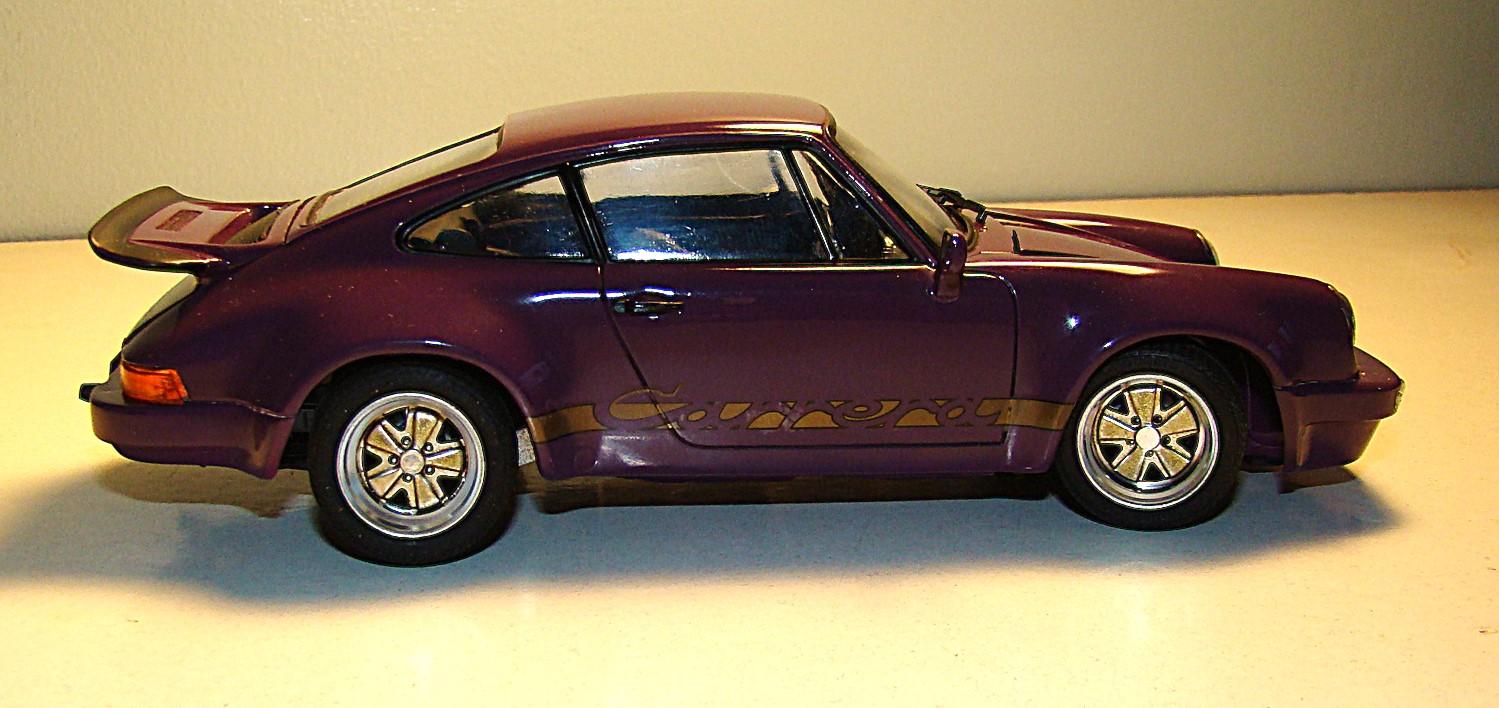
Found this one in the stash while looking to complete my 911th model. Gotta luv the Fujimi Enthusiast Series. So much detail. This one was sprayed Humbrol Purple way back in 2000. Clear coated with Testors Model Master then decalled and polished to a high shine. Don't know why I waited so long to finish this but I have a lot of kits like this and they kinda get lost in the stash. Not much to modify but I did add some extra detail I thought was worthy. Specific details are in the picture captions. Thanks for looking and comments welcome. The engine in these kits is a model all by itself. Careful painting with a variety of metallics and blacks really makes this shiine. This is Porsches 3.0 litre flat six with fuel injection. Engine stand came with the kit. Another veiw of the engine showing off the drilled distributor and plug wirres. Fuel lines are the twisted wire centers stripped out of some very fine wire. Coil eventually had to be moved to allow the engine cover to fit. Instructions were not very specific about the location of the coil. Finished car on its wheels. Decals were buried under clear and the wheels painted to match. The tail light lense was accidentally dropped on the floor and stepped on a long time ago. A few coats of clear red and orange (both sides) filled in most of the scratches and gluing the two pieces in place was the rest of the cure. Can't tell now. License plate is out of the stash and is from Washington DC. Looks like some politician owns this car but don't know what party he is affiliated with. I really like the Enthusiast series but these kits are not for the faint of heart. They DO go together and look well. Two points of contention on this are the way the wheels attach (which is not very secure) and getting the body to snap in place. There were other fit problems but most were easily overcome. Thanks for looking.
-
Helmut....I have a lot of these early Japanese kits and most of mine were built way back when and completely box stock. Information on these cars is hard to come by and you did well finding way more than I did. Don't know if I have this one (probably) so I will be following along. Thanks for posting and good luck with the project. Too bad Toyota didn't participate in the 1970 Can-Am. With all that horsepower they might have been a contender.