Rich Chernosky
-
Posts
2,123 -
Joined
-
Last visited
Content Type
Profiles
Forums
Events
Gallery
Everything posted by Rich Chernosky
-
John...from the looks of it this Fujimi it seems very similar to the Aoshima I just completed. Its turning out very well. Even on this end of the computer that white looks pretty brite. I am, always looking for the brightest white. I have some Gravity colors I have used. May have to order some of this. Thanks for posting.
-
1997 Mclaren F1 GTR
Rich Chernosky replied to Rich Chernosky's topic in Other Racing: Road Racing, Salt Flat Racers
-
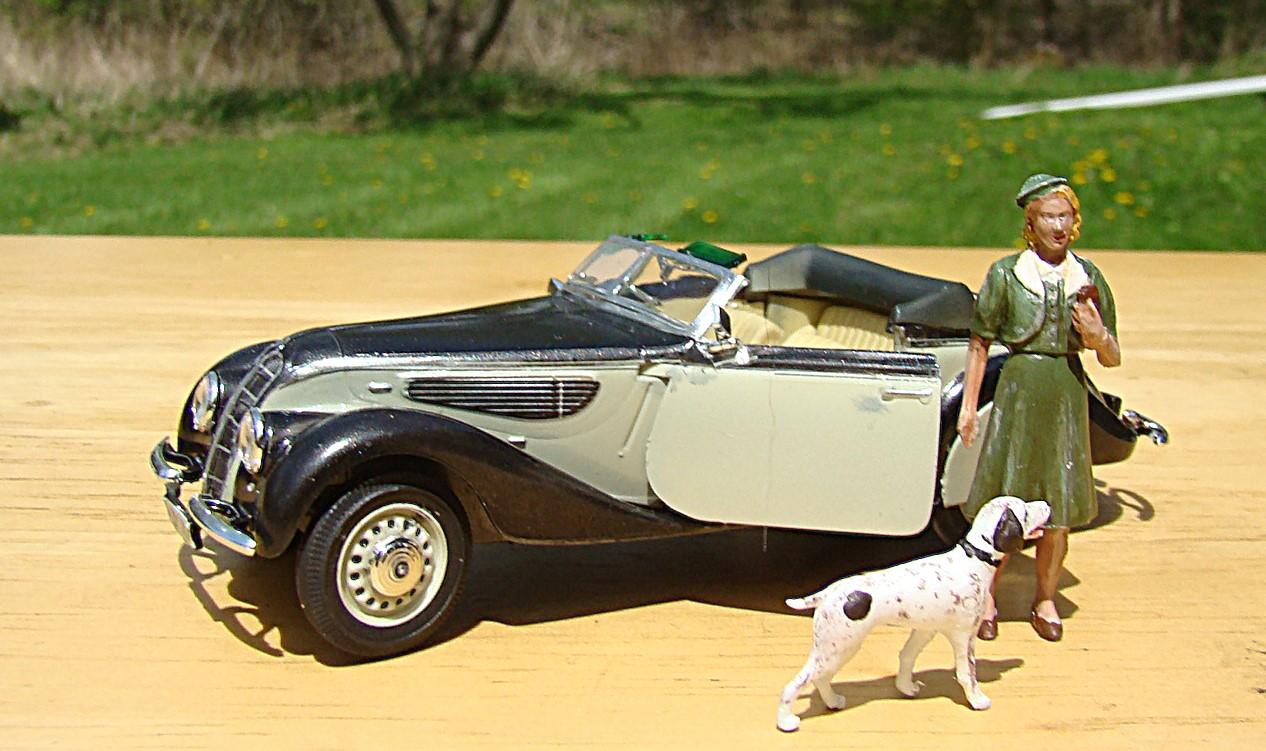
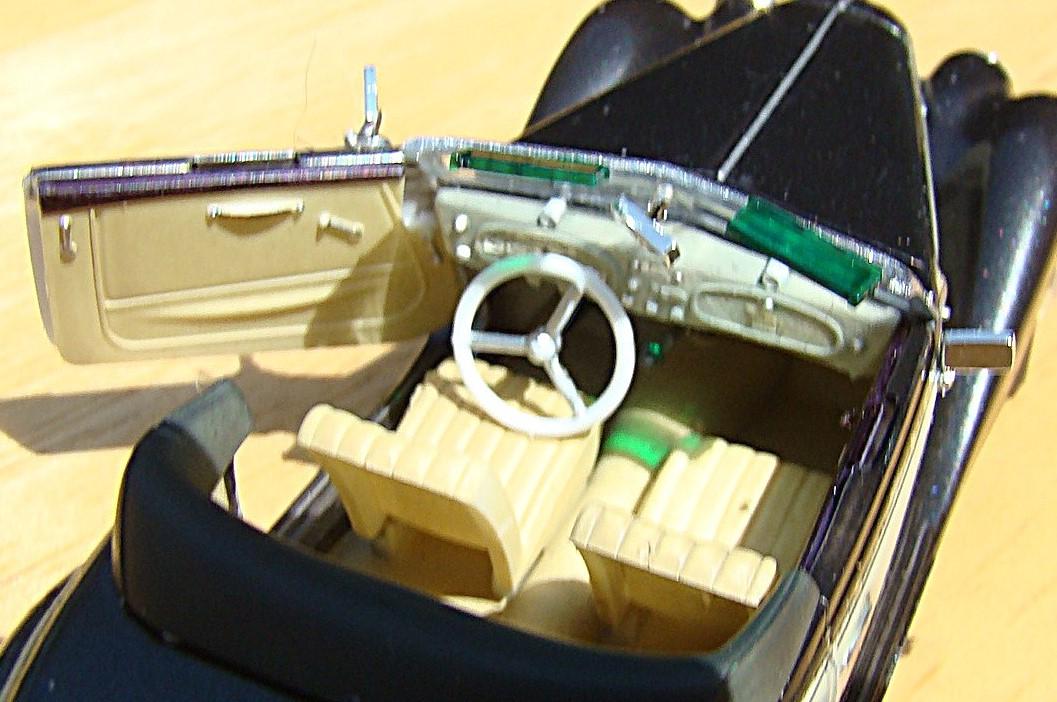
This is my final entry inot my local hobby shops small scale challenge. Once again this was a kit I would not have gone out of my way to buy. It was gifted to me and rather than sell it, why not build it and add to the collection as was originally intended. As it turns out it was a fun project and happened rather quickly. Color on this is Tamiya LP48 Metallic black and Lp-33 gray green for the accent color. Interior was Tamiya XF-60 dark yellow. More comments below the picture captions.\ Finished car on its wheels. This photo wqas taken out side and the wind kept blowing the figures over. Had to break out my figure paint skills and paints of this one. The dog is a German short haired pionter BTW. Rear veiw had lots of detail. I accidentally three the sprue containing the gas cap in the garbage. I found the sprue but when I went to retrieve it the cap fell off. It and a lot of these pieces are incredibly tiny. Its a miracle it made it on the model. If you have ever had to scrounge through the garbage for a lost part...you just might be a modeler. Interior had lots of detail and put my fine painting skills to the test. dash is painted the accent color of the car. Sun shades are clear green and are what is casting that green spot of the drive train hump. It was a nice sunny day. Kit had several options for the top and doors. This is the door closed with the top up. there was also an option for a folding top (non working ) This side veiw. Photographs don't show the actual size of the car but 1/48 scale is small and this car is only 4 1/2 long. But it came in a box 25 times the size of the car. It was cute and will slide in nicely in my BMW section.

-
1/25 Chevy Nova Salt Rat
Rich Chernosky replied to Pierre Rivard's topic in Other Racing: Road Racing, Salt Flat Racers
Not your basic average Pierrre Rivard build but very cool none the less. You have considerable talent and this is a fine example of your out of the box thinking. Keep up the great work. -
Harry, don't know why you beat yourself up so badly because if the pictures are any indication this is one outstanding model. The interior shot with the door open just blew me away. Having just recently completed the Mercedes 300SL in several scales I can appreciate your struggles. But the pictures simply don't show it. Great job and thanks for sharing.
-
1/32 Tyrrell P34 six wheeler
Rich Chernosky replied to Rich Chernosky's topic in Other Racing: Road Racing, Salt Flat Racers
-
Something different for me. After doing a bunch of large scale models, this is quite a change. This kit was a gift as I don't normally do 1/32 or 1/43. Not that small scale bothers me as I do a lot of 1/64 slot cars. So after the big scale challenge my local shop did they decided to do a small scale challenge. I painted this and decalled it quite a while back just for fun. So it was the perfect pick for the challenge. Color on this is Tamiya TS-51 blue and TS26 white. More details in the picture captions. All the pieces ready for final assembly. I was surprised at how complex this kit was which is probably why I avoided it for so long. Nothing like a challenge for incentive to finish something. Engine had a surprising amount of detail for this sale. Everything fit though. Finished car on its wheels Final assembly went quicker than I thouight it would . Body slipped over the chassis easily and is removable. Rear end detail. Had to wait for the glue to set on the wing. it attached nicely. Decals were old even back when I did it and there is some yellowing. There was no fixing getting all the wheels to touch. It is what it is.
-
Back to the Hobby 55 years later....Great Forum!
Rich Chernosky replied to gcthree's topic in Welcome! Introduce Yourself
Bob...you and I have a similar beginning. Those IMC kits were my inspiration to get into the hobby also. However, we differ in the fact that I never quit and now , 61yrs later I am still at it. Yes, I still have those kits and have even re-visited a couple. They still can make a decent model. You will be on a steep learning curve but will enjoy every minute of it. Welcome to the forum, there is plenty of company here. -
Tamiya Motul Pitwork Nissan Z
Rich Chernosky replied to galaxyg's topic in Other Racing: Road Racing, Salt Flat Racers
That's some serious paint and decal work there Michael. Came out great. Congrats. -
Meng Audi R8 LMS GT3 EVA R
Rich Chernosky replied to Funkychiken's topic in WIP: Other Racing: Road Racing, Land Speed Racers
Atin....I have now done several Meng kits and must say the quality is right up there almost as good as Tamiya...my other favorite brand. That looks like a great kit and I am sure you will do a killer job on it. Can't wait to see it finished . Good luck. -
David...your display area is very cool. Your display is as unique to you as your building style. Its a worthy share. One word of advice on lighting. Avoid incandescent and flourescent lighting. They generate heat and worse will fade paint and decals. Especially flourescent and very bright colors. I have switched to LED's in all my cases and am pleased with the look. Really like the Batmobiles by the way.
-
1997 Mclaren F1 GTR
Rich Chernosky replied to Rich Chernosky's topic in Other Racing: Road Racing, Salt Flat Racers
-
1997 Mclaren F1 GTR
Rich Chernosky replied to Rich Chernosky's topic in Other Racing: Road Racing, Salt Flat Racers
-
McLarem M8B
Rich Chernosky replied to Mark W's topic in WIP: Other Racing: Road Racing, Land Speed Racers
Mark..had to re-take these photos as "somehow" most of my earlier phots are missing. All three of these kits were completed in August of 2008 and all on the same day. Yes I am a glutton for punishment. Most of the tips and pictures you have gotten are great. Best advice I can give is to follow the instructions to the letter. They are very good. Colors on mine are a custom mix laquer that a friend gave me that was matched off a piece of the real car for the orange M8B. Mr color Character Yellow will do in this case. Motschenbacher's car is Tamiya clear red over gold. Oscars car is Tamiya TS12 orange, TS26 white and TS14 black. The blue streak Goodyears were done with vinyl tape cut down real thin then varnished in place when done. Just flow some white paint into the recesses and wipe smooth for the lettering. The rear radiator will have to be lowered for the rear deck to fit down. I did not use the kit supplied hinges for the doors. In retrospect I would only use the supplied hoses as patterns and make new ones out of aftermarket parts. The seam lines on the vinyl are way to hard to clean up and none of them fit all that well anyway. I had more extensive notes on one of my instructions but unfortunaterly gave them to another modeler. I also have another kit of Mclarens version (still sealed) that I have no idea what to do with. May do another livery if I can find decals and re-visit this kit. I may have learned a few things in the 17yrs since I first built these. Hope all this helps.
-
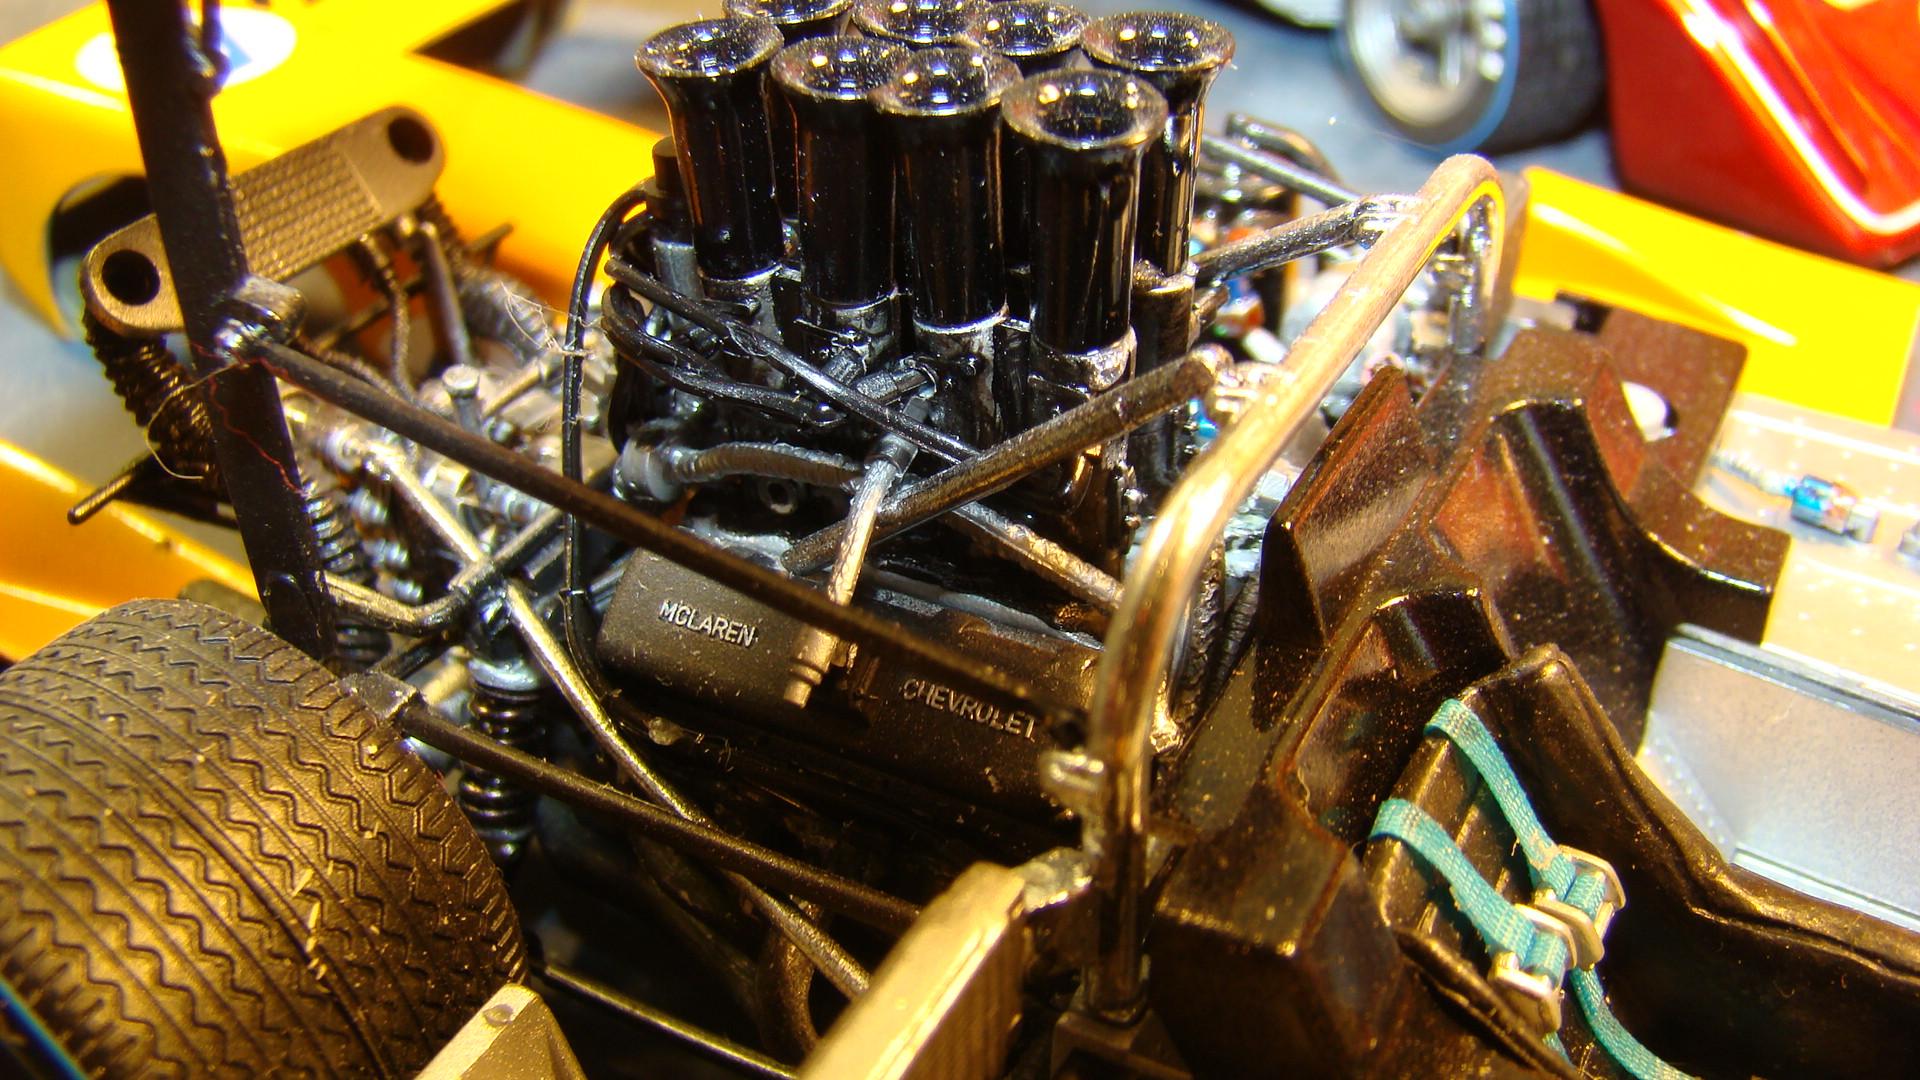
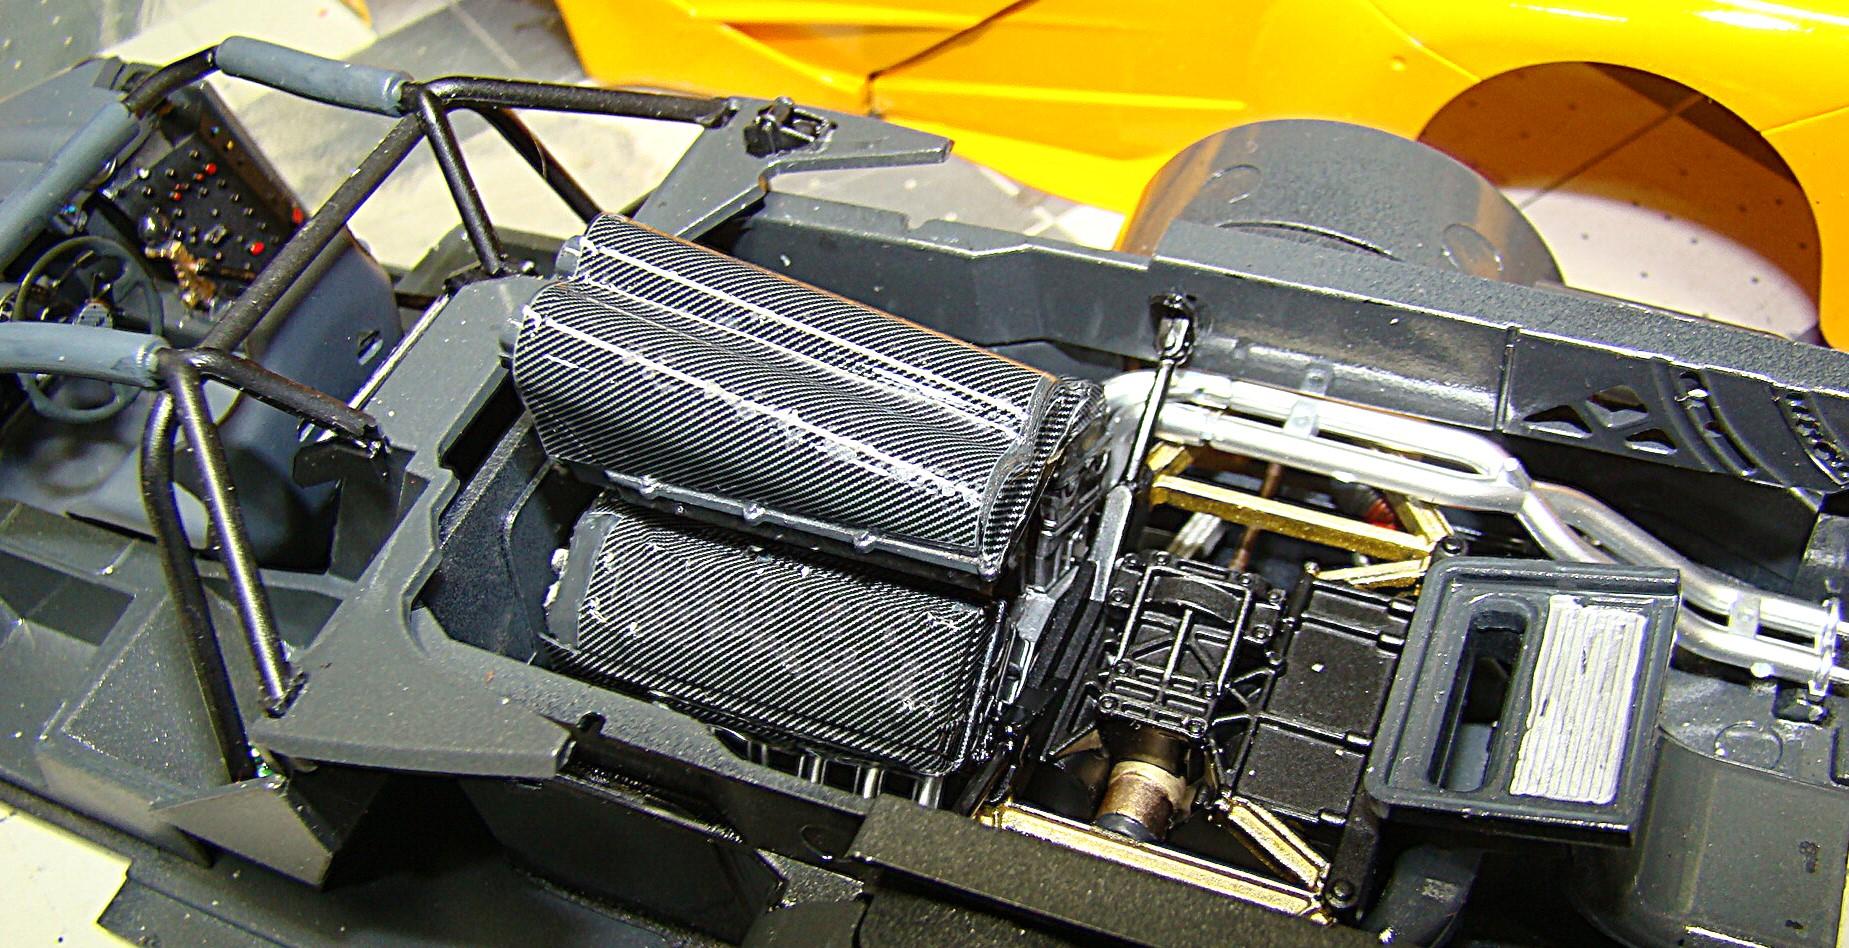
Still looking to finish projects started long ago. This one was sprayed in December of 2017. Color is Mr Color 109 Character Yellow. This paint comes very close to to the original shade of orange used by the early Mclaren team. The car represents the pre-season testing version of the race car. A wonderful kit loaded with lots of detail and a fun build. More details in the picture captions. Thanks for looking and comments welcome. Chassis and body ready to be mated. Body snapped quite easily over the front and rear tabs. Lots of detail of the 6litre v-12 engine used in this car. Carbon fibre decals were included in the kit but not mentioned on the instructions. Everything fit quite nicely. Interior was well detailed as well and probably could have used more. The Mclaren is a 3 seater and the middle position is where the driver sits. Finished car on its wheels. The Character Yellow sprayed on nicely but it is a semi-gloss so Tamiya TS-13 clear was used. Rear end has some nice detail. Wing went on nicely and all the exhaust pieces met up well. Really like the stance of this kit. It all says "racecar". Body panels all come off and the door' despite their complexity fit well and snapped in place.
-
-
McLarem M8B
Rich Chernosky replied to Mark W's topic in WIP: Other Racing: Road Racing, Land Speed Racers
Mark...I have built all three versions of this kit. Think I did it at the same time. I only saved one instruction sheet and will check it for notes if that will help. One thing in particular I remember is the front wheels stick out just a little too much. You will have to grind off some of the hubs and some of the wheels. They are great kits and I enjoyed them a lot. -
Wintersteen Grand Sport Corvette
Rich Chernosky replied to Mark W's topic in Other Racing: Road Racing, Salt Flat Racers
Mark...what an awesome conversion. Followed your WIP . Can fully appreciate all the time and work you put into this. I have the conversion kit plus a lot of extra parts from two more AM kits. This is the incentive I need to dig into this project. -
Nova Salt Flat Racer
Rich Chernosky replied to Pierre Rivard's topic in WIP: Other Racing: Road Racing, Land Speed Racers
Interesting project Pierre. Shows your versatility. I am sure your creativity and talents will give us a worthy model to admire. Good luck with this. You are off to a great start. -
Vince....1/12 scale is the perfect genre for us "visually challenged" modelers. Old age is great...eh!.
-
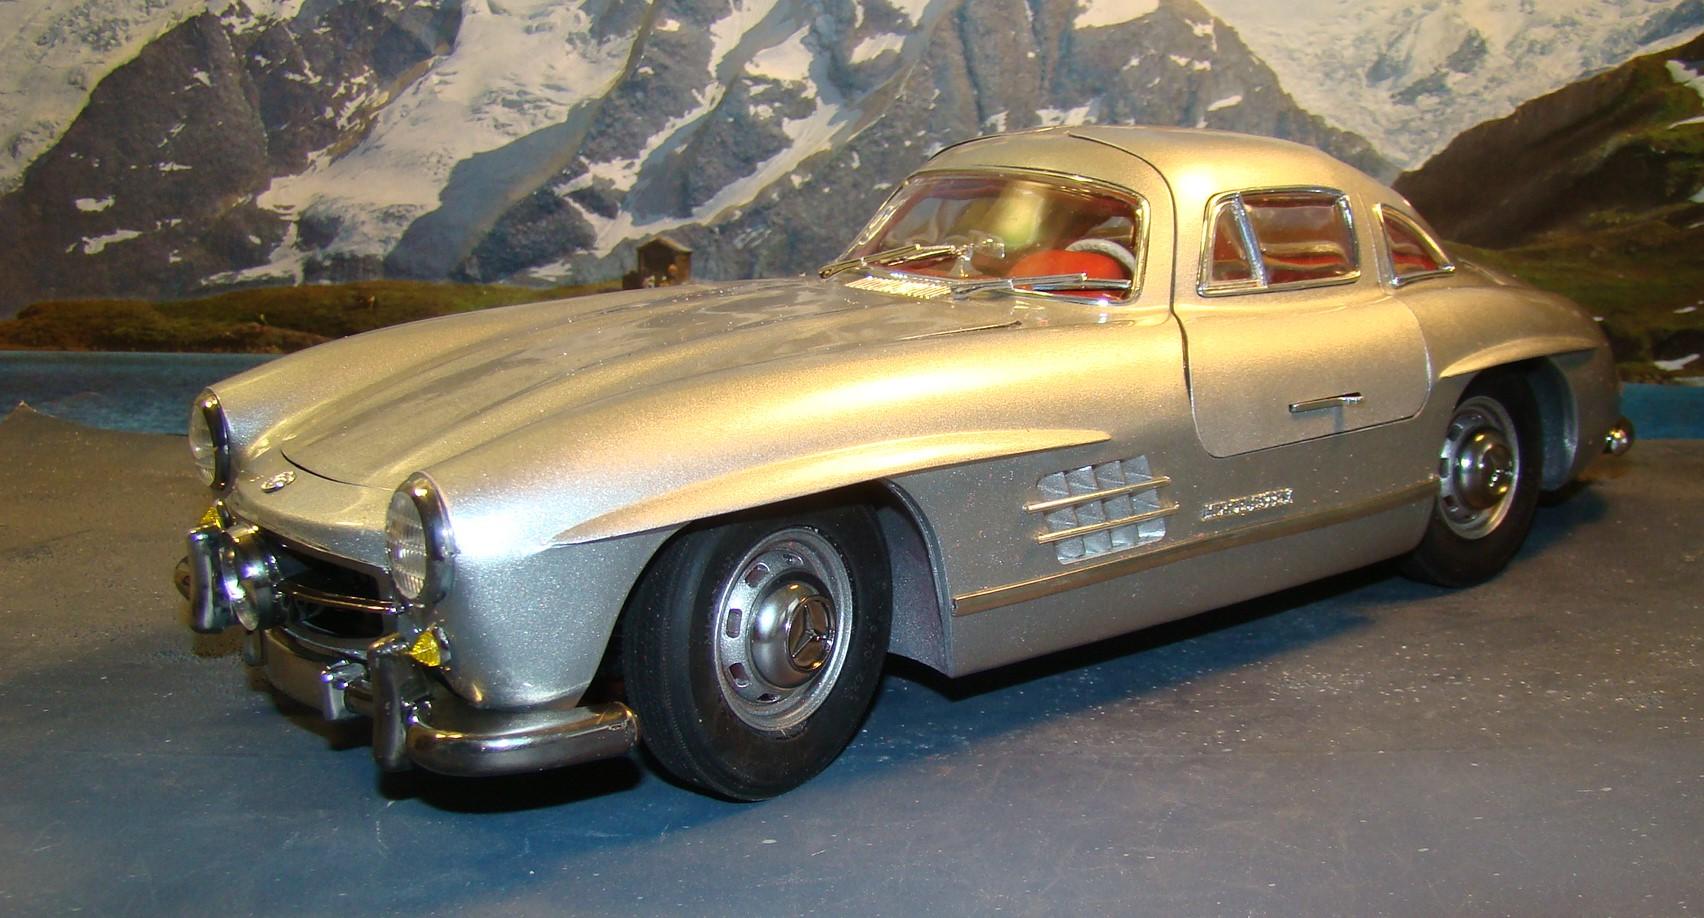
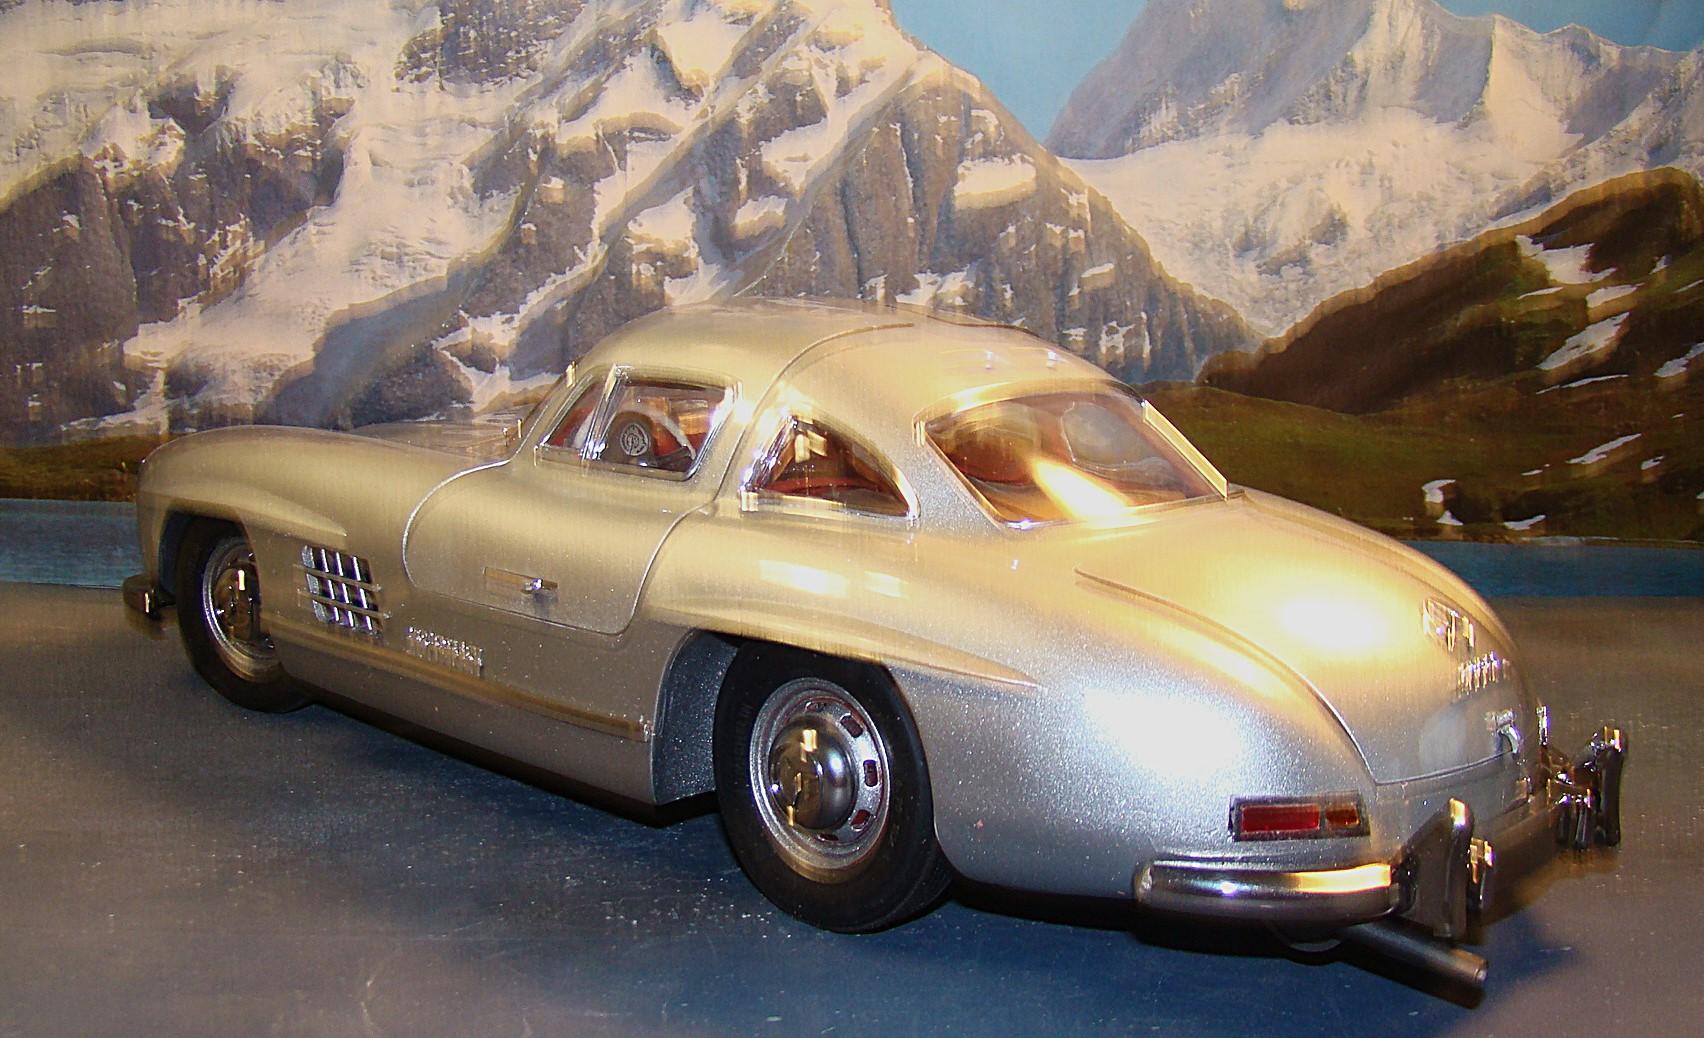
Cpontinuing my series of 1/12 kits. I dug this one out of the stash and was pleasantly surprised to see everything painted . Looked like and easy finish project. Well thqat is just the wrong thing to think because it rarely turns out that way and this project was no exception. For starters this whole kit had to be re-engineered as the body was an upper and lower half. I cut the bottom chassis plate away from the lower body and then glued that to the upper half so I could fill in the seam that ran through the middle of the car. That was done a long time ago and I had to remember how to install everything once done. No notes either. At least the hard part was done and it had a real nice finish. Color was 1830 Testors laquer Diamond Dust with their Wet-Look clear. More information in the picture captions. Thanks for looking and comments welcome. . Finished car on its wheels. Some thing fit well, like bumpers and window surrounds and others had to be massaged into place. This kit was originally produced by Renwal in the 60's. Revell aquired the molds and changed nothing except the box and instructions. It showed. rear veiw. Trunk opens and there is a spare tire inside. Had to make new tail lights and a trucnk latch as they somehow disappeared over the years. I am bot usually critical of the proportions of a model but this one is just plain off. The green house and the windows are just way too small. I suppose this was done to compensate for the working gullwing doors but it really shows. Since this was painted over 30 years ago I wouldn't have thought to try and fix this. It would have been more work than I bargained for anyway. So I just finished it the way it was. Not the worst but not the best either. This particular car has been made by many manufacturers and I have it in several scales. I recently posted a 1/16 version. The Tamiya 1/24 is the best example in my opine. Aaahh those working door struts. One of my favorite features of this kit. But if you knew how much trouble it was to get here. Lots of engineering here mostly with the hinges but in the end the doors fit fairly well and operated to spec. Even the door latches work and hold the doors closed. I(nterioor of the car was nice and had all the details including the special luggage. I add carpet and dash decals. Paint isd Testors flat red. Engine was painted various shades of Testors metalizers. There was lots of chrome in this kit and most of it was sprayed with Tamiya Smoke to tone it down slightly.
-
You go John,,,I'm sure you will knock this one out of the park.
-
-
Thanks Trevor. The body sat in the back of the Ferrari case for many years. Eventually it will come out and get its own case. It takes up the room of 5 1/24 cars. My displays are constantly being re-arranged.
-