Rich Chernosky
-
Posts
2,123 -
Joined
-
Last visited
Content Type
Profiles
Forums
Events
Gallery
Everything posted by Rich Chernosky
-
We need more F1 fans so you are most welcome to this forum.
-
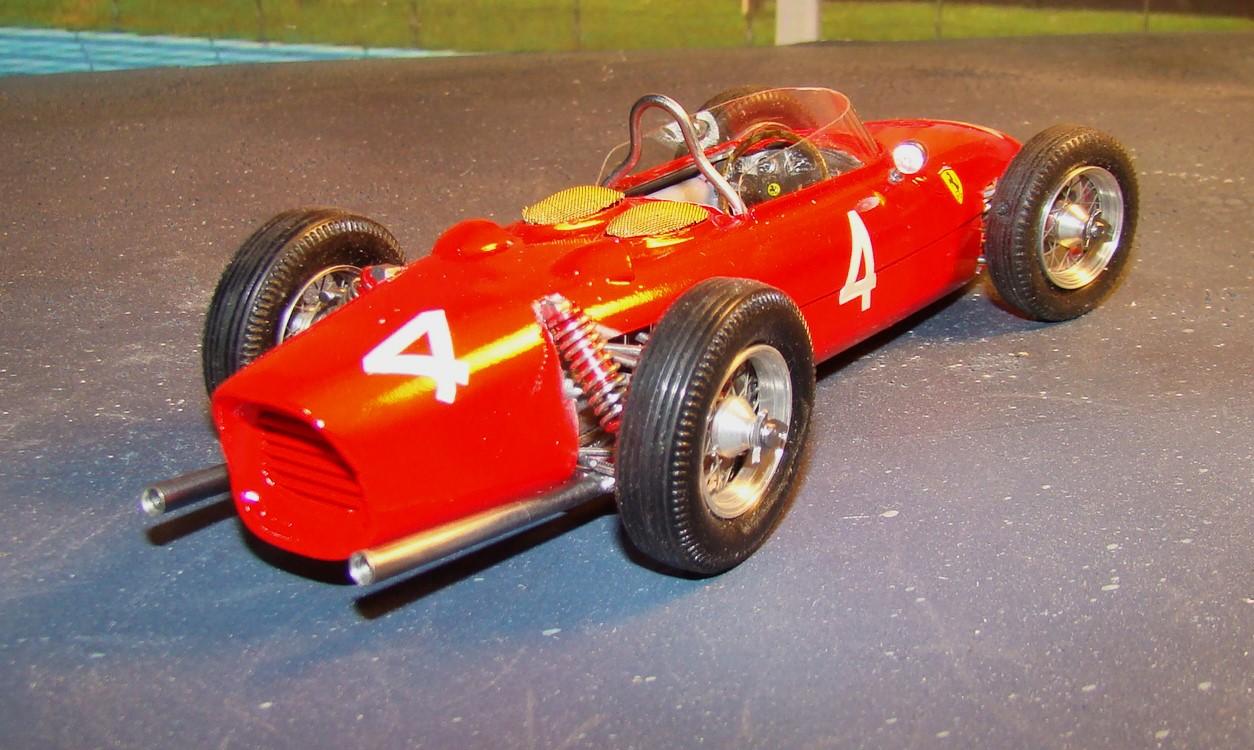
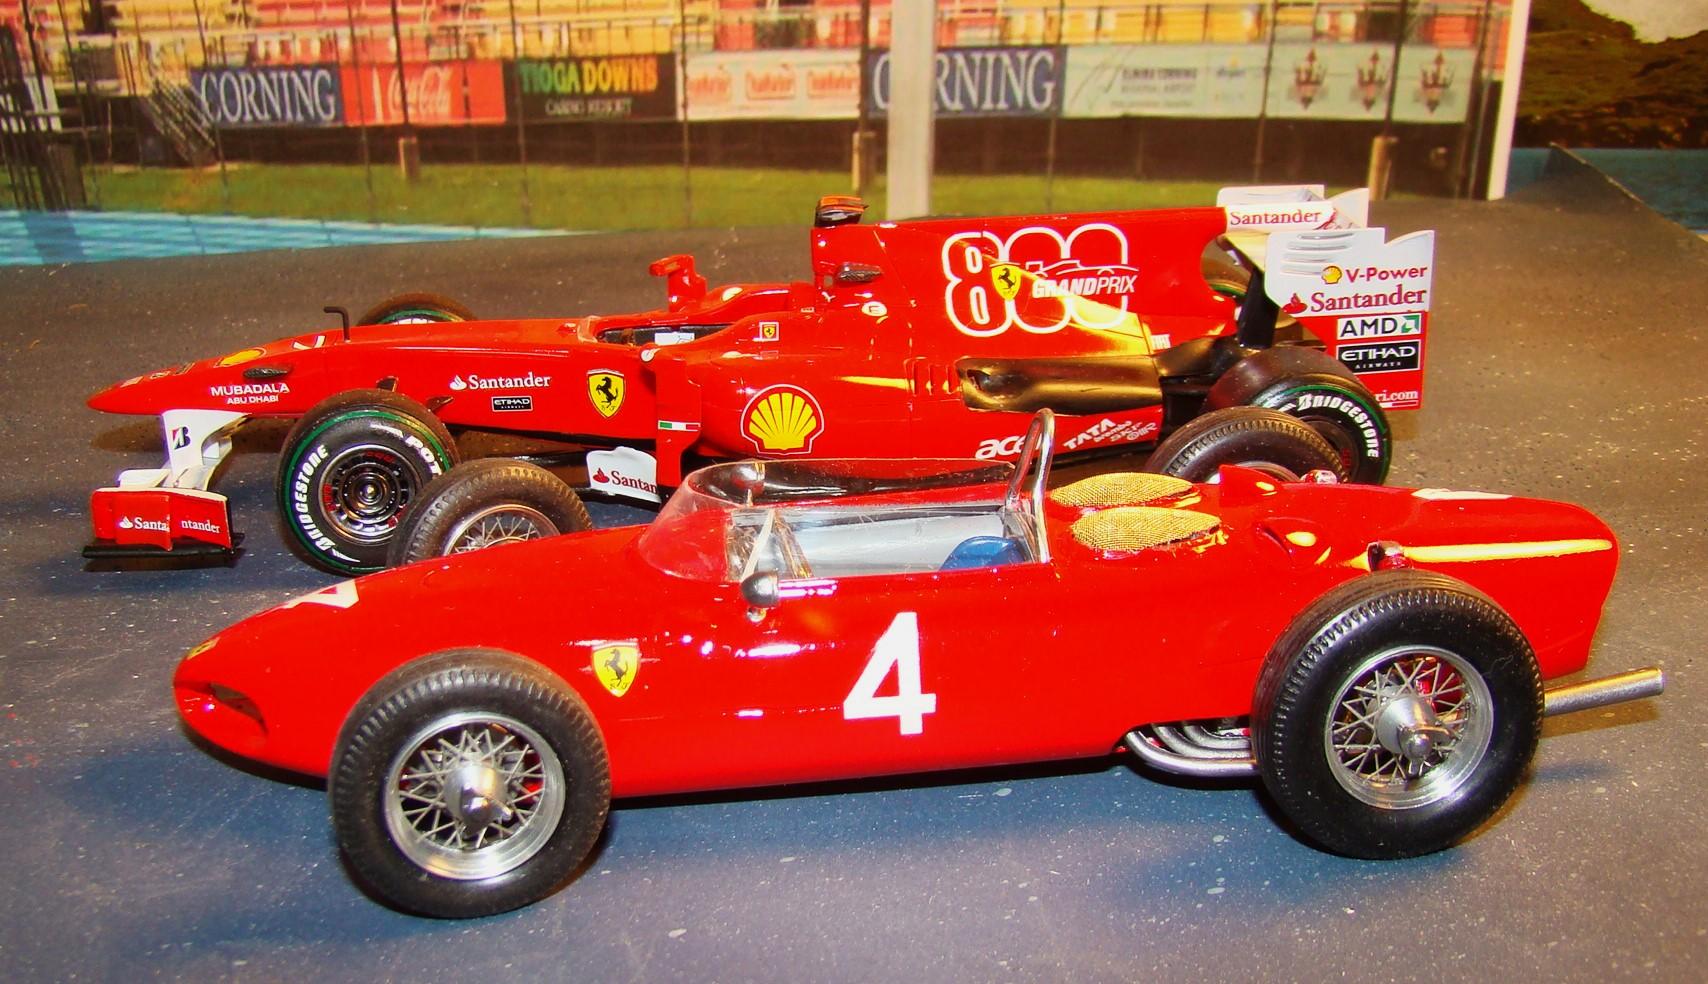
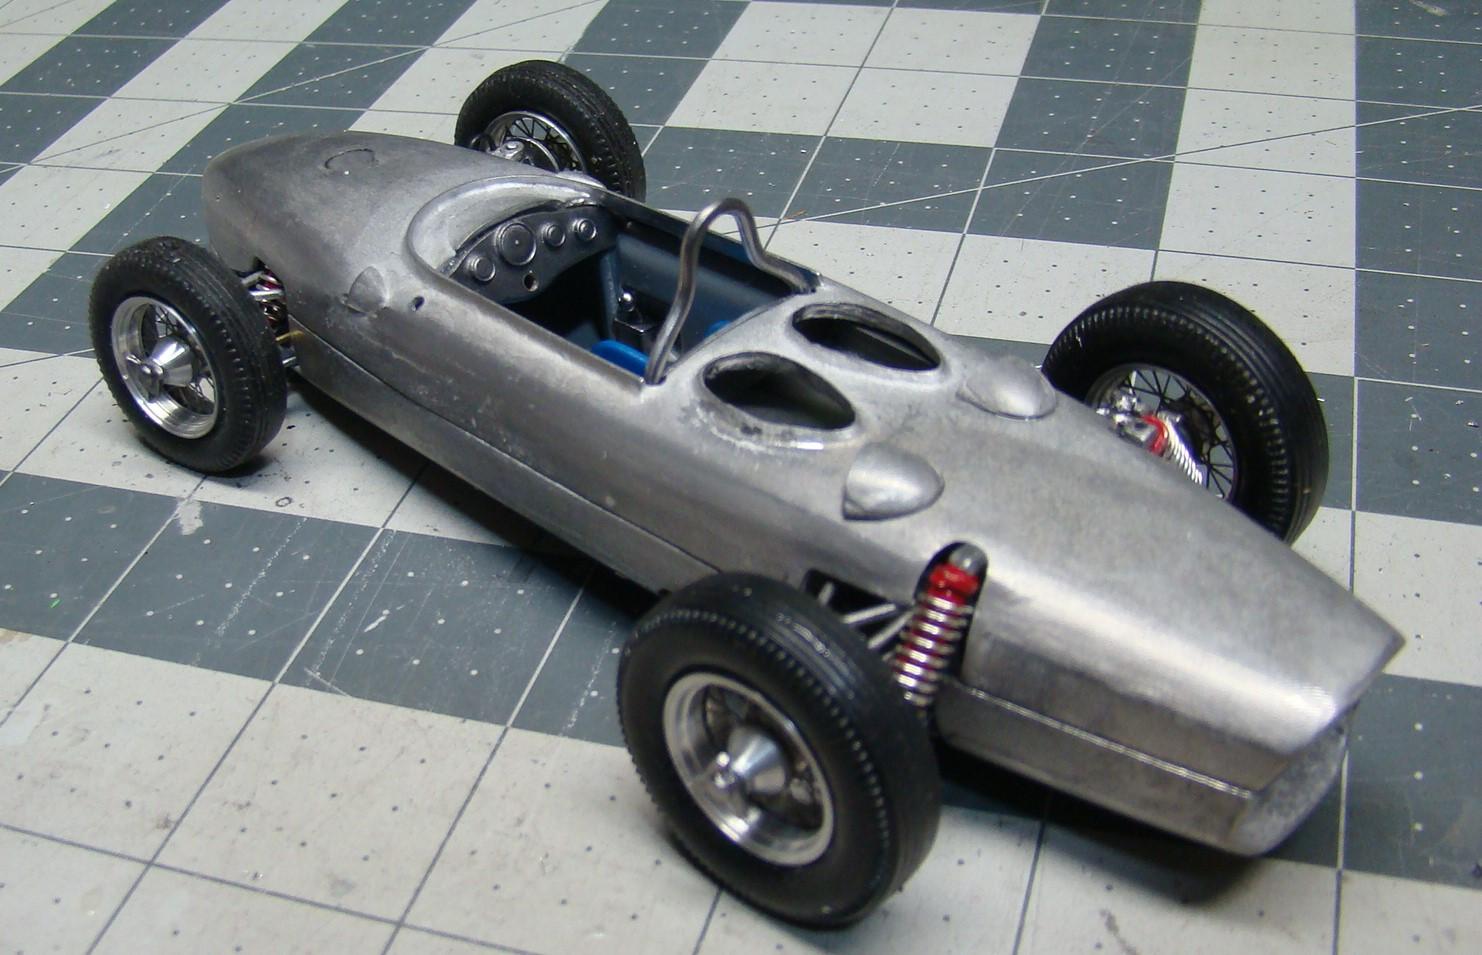
A recent completion as featured in the WIP started by my friend Andrew Sapiro. Link to the WIP here: white metal Ferrari Sharknose and white metal Lotus 25 - Spy vs Spy ... - WIP: Other Racing: Road Racing, Land Speed Racers - Model Cars Magazine Forum. This is my first Autokit completion. It is an all metal kit and had its challenges. Most of the pieces like suspension, interior, and bracing fit very well. the body however required quite a bit of work to get it to look right. Luckily the metal (which is pewter I think) was very soft and could be carved with a knife. This made some of the alterations I made a lot easier. thgose included, new coil/shock units, working steering, aftermarket wire wheels and the engine cover screens. Color on this is Tamiya TS-49 over their pink primer. More details in the picture captions. Finished model on its wheels. Had to cut the windscreen from a piece of acetate and pattern supplied in the kit. Had my doubts but it fit easily and looked good. rear veiw of the exhaust and suspension. Made new springs and shocks but retained the kit ends. Much better. The exhaust on each side was one piece and looked like it would be a problem but careful fitting and it went on easily. I drilled out the ends too. Side by side comparison of this kit and a 1/24 more current Fevell F-1. My how things have changed. The 156 Sharknose is tiny by comparison. Veiw of the interior. Pretty stark but correct. I added gauge decals form spares. Those and none of the logos were included in the kit. Note the handmade screens over the carb inlets. I made a press mold out of epoxy from the kit screens which were cut away from the body. Also note the chrome tape for the mirrors. These details make a real difference in my opinion. All three of my Ferrari 156 Sharknoses. The 1/20 is a Revival (also metal) and the 1/64 is a Hot Wheels. The Revival has full chassis and engine detail and was featured in the WIP.. Check it out.

-
Noel...I have had a similar experience with the Watkins Glen Motoracing Research center. It is basically a museum located in the village of Watkins Glen. I have exibited my work there on several occassions and even helped them when they took over my own exibit at the Watkins Glen Historics events. They are very nice people and generous with their space and time. They also have a permanent display of a few models. I know of a few modelers who have donated their collections of built and unbuilt kits to them. They sold most of that on Ebay and I know because I bought some of them. When you donate something to an organization such as this its "theirs" to do with as they please. In this case they sold it to generate income to run the library. Nothing illegal about it but tacky just the same. When asked if I would ever donate my collection to them the answer is a polite no. In the case of Gerald Wingroves stuff its a real shame. He created some truly museum masterpieces. The only way anyone will ever see them is if they know who bought the pieces and get a special invite which is rather unlikely for most of us. Its sad.
-
Last update. Out of the paint booth after much sanding, three coats of primer and 4 coats of TS49 Red. All the masking removed. Ready for final assembly and decals. Still have a little paint touch-up to do as well. Next post will be in Under Glass.
-
Phil...I think you had a great year. Some really outstanding models. But why stop there. Go for 15 for 2025.
-
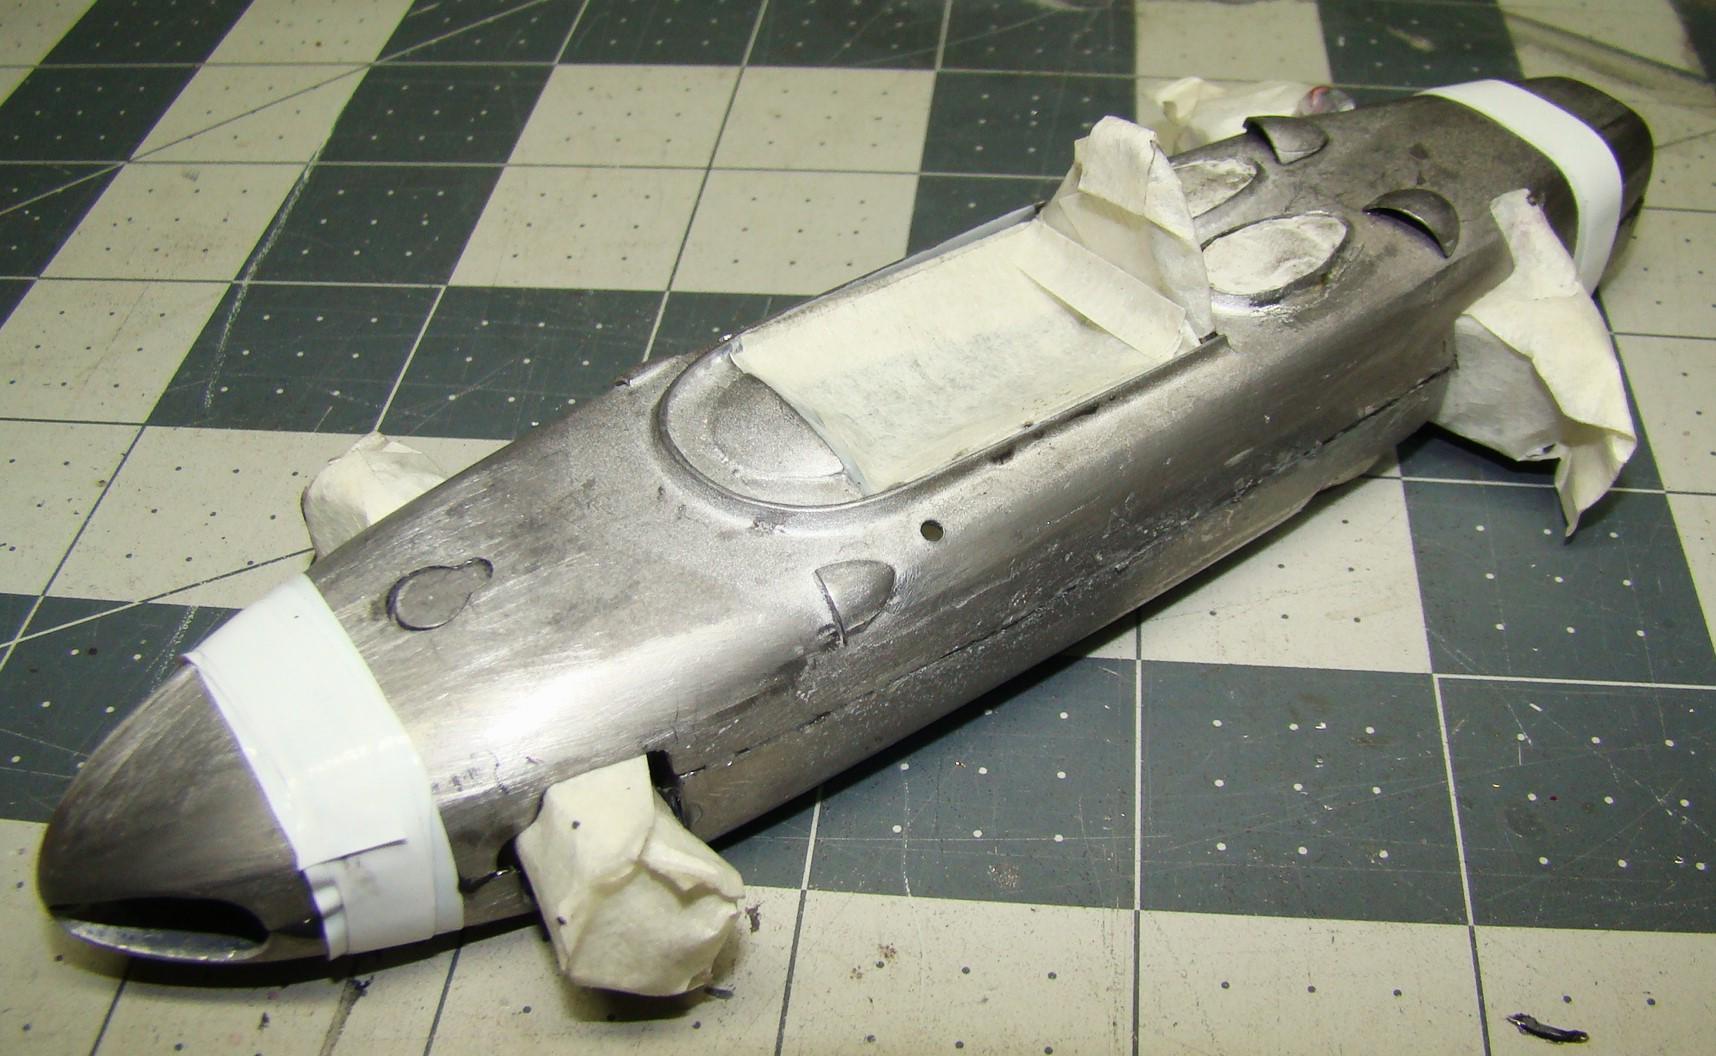
Update on the Ferrari. Body halve are glued together. JB Weld Quik is great and can be handled and worked right away. I will trim some of the excess but will wait til tomorrow to do and serious sanding and filling. JB Weld achieves maximun strength in 24hrs. Some of the masking techniques are in the picture captions. Here it is all glued and masked. The white tape (front and rear) is bottle sealing tape. The forst layer is put on like regular tape but the next layers are stretched (almost double) I usually do 3 layers. As the stretched tape shrinks it clamps the two halves together. Kinda like electrical tape but much stronger. Great fro clamping irregular surfaces. The suspension is coated with Parafilm then covered in masking tape. Parafilm can get gooey if too much paint (solvent type) is applied. I will be decanting and airbrushing the primers to also help avoid this. Poster tack is used in the other openings. The interior has masking tape reversed to stick to the interior then more stuck on top of that. The dash had to be masked with craft glue. Hopefully tomorrow primer will hit metal.
-
That's mighty ambitious Andy. That reference picture is outstanding and I can see why you would want to do this. We differ on this project as i have had this so long I just want to see it finished and in its place in my 1/24 Ferrari F-1 case. I applaud your efforts however and I am sure this will be a great model for you. I am glad to be part of it. I remember being at the Glen for the first race on the new track. That was 1962 and I was 14 at the time. There was almost no security and we were allowed to go everywhere. We were in the pits about 45 min before the start of the race. I got up close and personal with all the Lotus, BRM and Ferrari's. I was a little disappointed. I thought these would be made like airplanes. Instead they had tube frames, beat up bodywork, tool marks everywhere and interiors that wouldn't get the good housekeeping seal of approval. What a piece of junk I thought to myself. You would have to be crazy to drive one of these things at speed. I got to talk to some of the mechanics and a couple of the drivers....and yah...they were crazy. Afterwards we walked right across the track into the concrete grandstands. The cars started and did a few laps then stopped right in front of us. Some guy in a white suit and cowboy hat came out , jumped up in the air waving a green flag and the race started. The noise, the smell, and the tires screaming was something I will never forget. I was hooked. The next year all the cars had changed and I got a look at the new Lotus. Now...that was a work of art and definetly worthy of your attention.
-
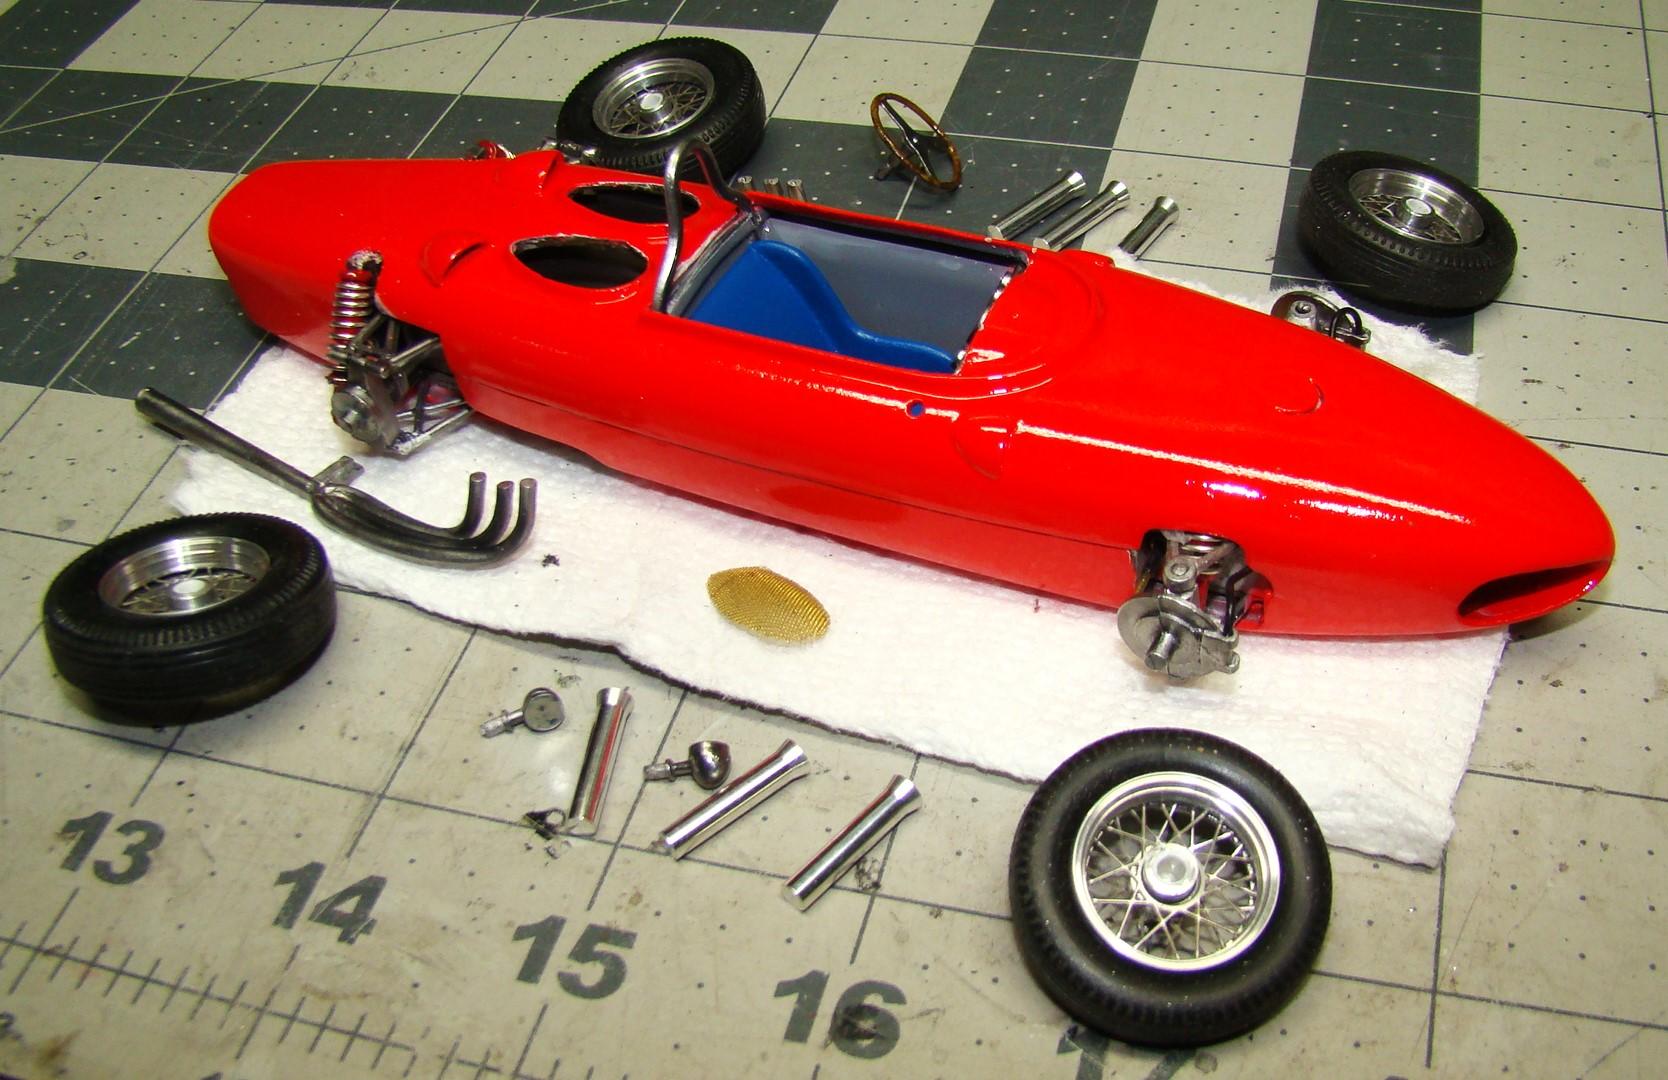
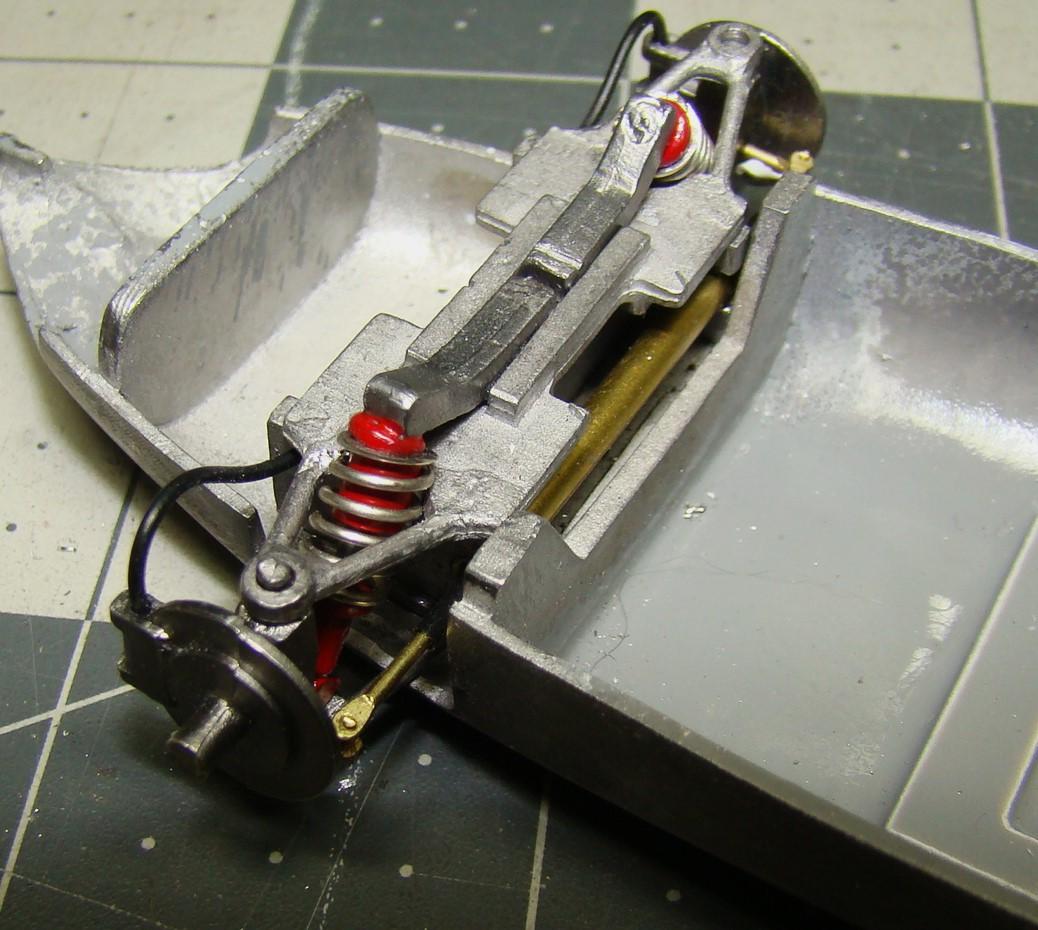
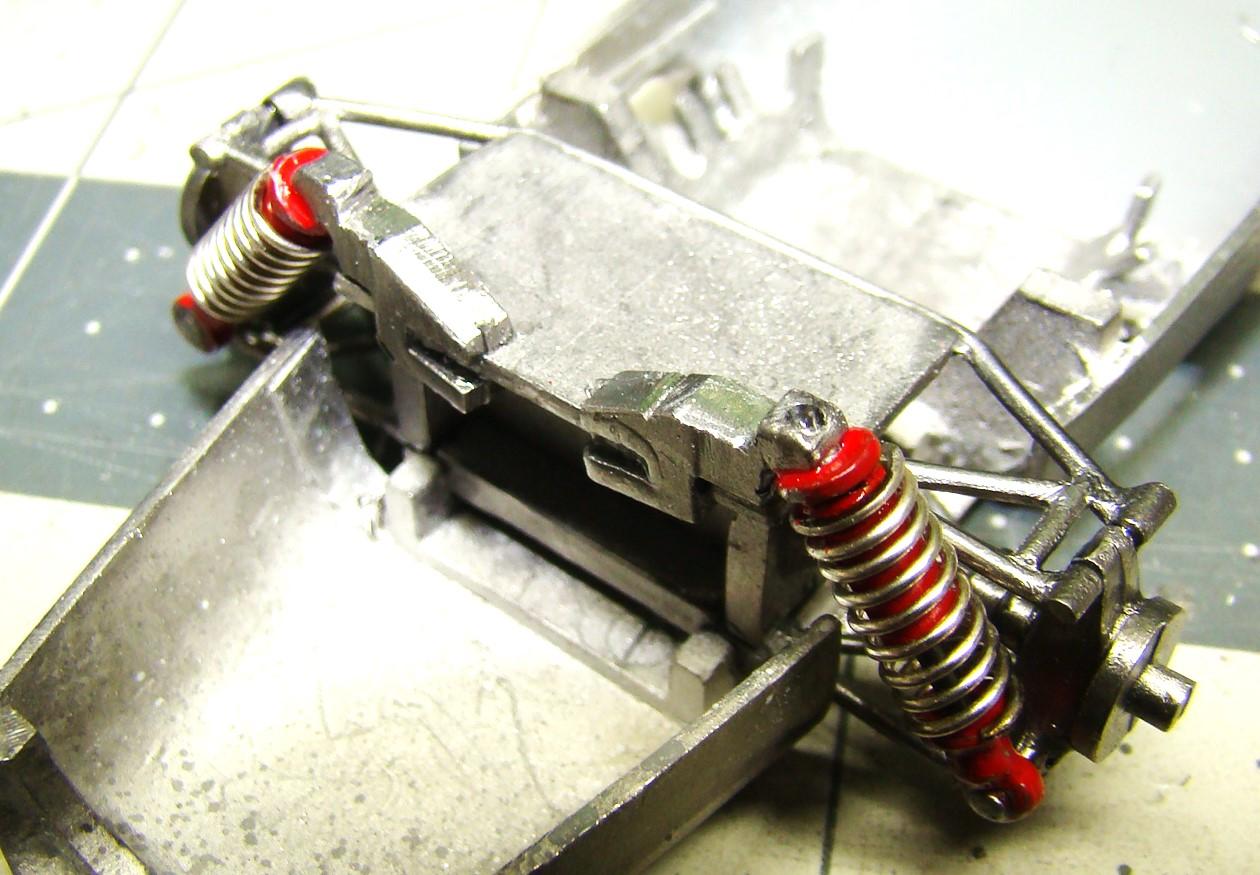
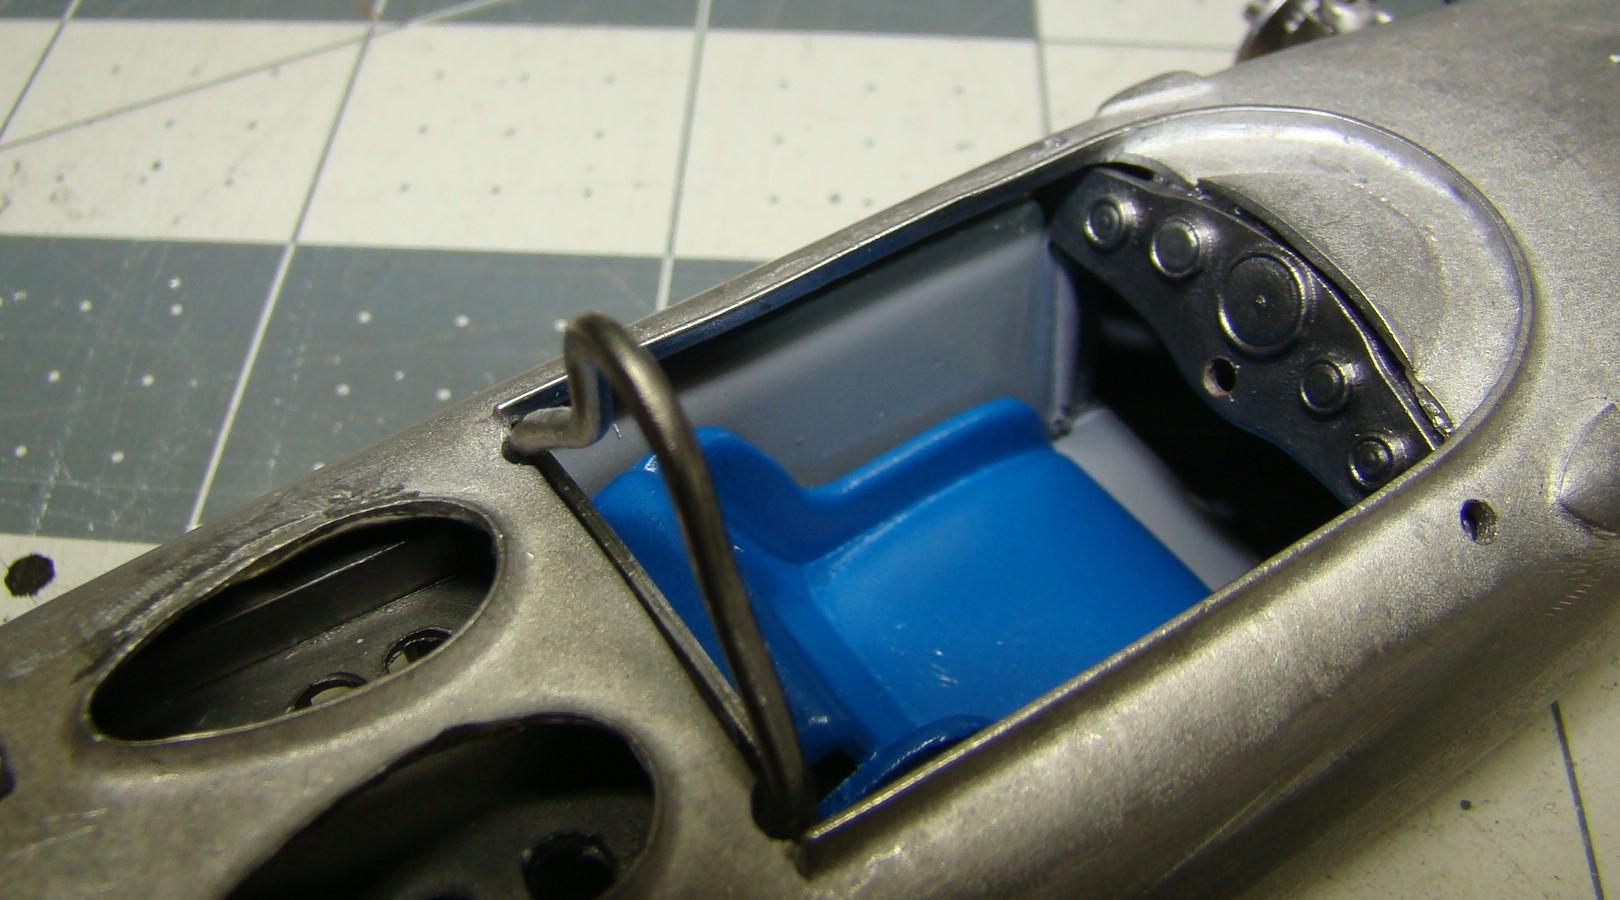
Some major progress on this project. Front and rear suspension all installed, interiort panels fitted, body halves fitted, wheels ready to go. Now i just have to do saome more sanfding to getrid of some file marks, give the body a good brass wire brushing, then prime it with some Plasti-cote white sandable primer. More sanding and if that's OK I plan on using Tamiya Pink fine finish primer. After that a couple good coats of Tamiya TS49. Can see the light at the end of the tunnel here. More comments below. Front suspension all installed. The spindels already turned in the a-arms so why not add a tie rod. Some .032 brass rod, some tubing and wire insulation and it worked quite nicely. I always enjoy doing this . Most of the suspension fit easily including my re-worked coil over shocks. Rear suspension was a little more problematic. Re-worked shocks were just a tad bit bigger and did fit in exactly. Upper body had to be carved a little bit to clear them. Other that it was a good solid assembly. There are 4 interior panels, two sices, the dash and the rear bulkhead. They fit together to form a square and as expected did not allow the upper body to mate up with the bottom,. Some bending, cutting, curse words and filing eventually solved the problem. The metal on this kit works easily so I did not need as many curse words as usual. The seat and dash detailing will be added later. Also note the top of the engine and six holes for some aluminium intake trumpets I found in the stash. Wire mesh over these has been fabricated and fit. I wanted to see what this would look like on its wheels. Was not disappointed. They sit nice and flat. Note how the body halves fit together. This was no easy trick but I am quite pleased with myself for pulling this off. I am now all ready to glue this assembly together. Everything that will finish this kit has either been fabricated or painted and fitted. The front and rear seams will be filled in and sanded smooth. JB Weld will be my weapon of choice. It trims and sands smooth. The side seam (between the wheels) will stay as this is on the real car. Some interesting masking is ahead.
-
F1 Renault R23
Rich Chernosky replied to bbowser's topic in Other Racing: Road Racing, Salt Flat Racers
Nice clean work Bruce. Two tone paint and decals are real sharp. Good job. -
2024 builds
Rich Chernosky replied to Pierre Rivard's topic in Other Racing: Road Racing, Salt Flat Racers
Pierre...excellent models all of them. I have also enjoyed the exchanges and feel I have benefited greatly. Heres hoping you have some great holidays and i think next year you should shoot for 8....<G> -
Thanls Pierre. They were not as hard to do as I thought they would be. Yes, they are exposed which is why I went the extra yard to make them look good. There are a few other details that will get this kind of attention.
-
Helmut...some people really go nuts over famous peoples signatures. I guess its proof that they met them or maybe they think its valuable. I owned a collectibles store for almost 30yrs and most of my customers were under the impression that a signed collectible was worth more. Fact was, they were not. As a matter of fact, signed collectibles were difficult to sell. Most people did not want to pay extra for the autograph because it was more than likely done for free or it was possibly a forgery. I actually met Clay Reggazoni at a Watkins Glen gran prix. His English was about as good as my Italian but it was nice that he took the time to try and talk to a fan. That alone is a treasured memory. I realize that those books are treasures to you and\ you probably have no intention of ever getting rid of them. The signatures just add to the memory for you so this is no criticism on my part. I feel the same way about this model. Thanks for sharing.
-
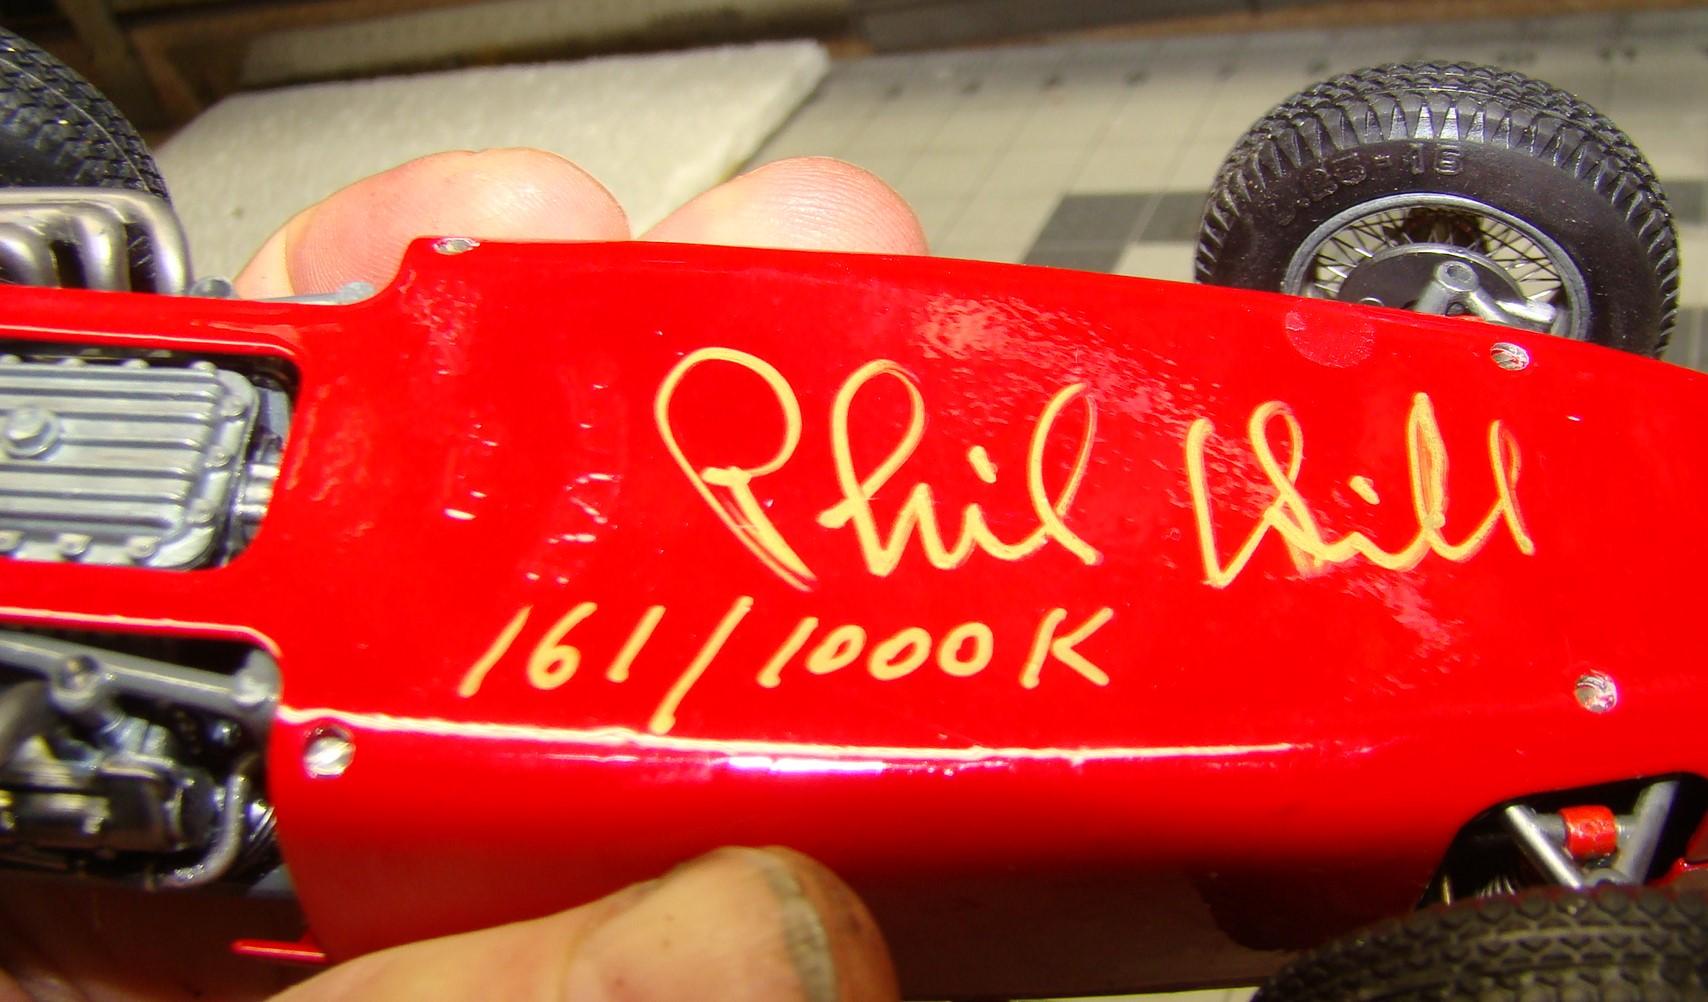
I see Andy will probably go full detail on the chassis of his Lotus. That is his style. Andy takes some of the best detail shots of racecars I have seen anywhere. With that kind of reference, I say why not go full kamakazi. I choose not to because I already have a full detail Ferrari 156 in my collection. This is a 1/20 Revival that I did some time ago. It already had a full chassis and interior. i still added some extra details but was very satisfied with the result. An interesting story behind the aquisition of this kit. About the only place i could find it was Ebay. Going rate at the time was around $120-130. Had it in my email search and whenever one came up I was notified. No matter what I did, I always seemed to get out bid. This happened over 25 times. One Christmas I decided I was going to get one these no matter what. I put in a bid of $225, almost twice the going rate. That oughta fix em. I got out bid by over $20. A few months after the Christmas debacle, another one came up and the bidding started out at $49.95. At this point I didn't really care so I only went as high as $90. I wound up getting it for $82. Go figure !!! When the kit arrived I discovered it one of the ones Phil Hill signed. Either the seller didn't know or didn't care. It was a bonus and I'll take after all the suffering I did. It is the only signed piece in my collection. Pays to wait sometimes.
-
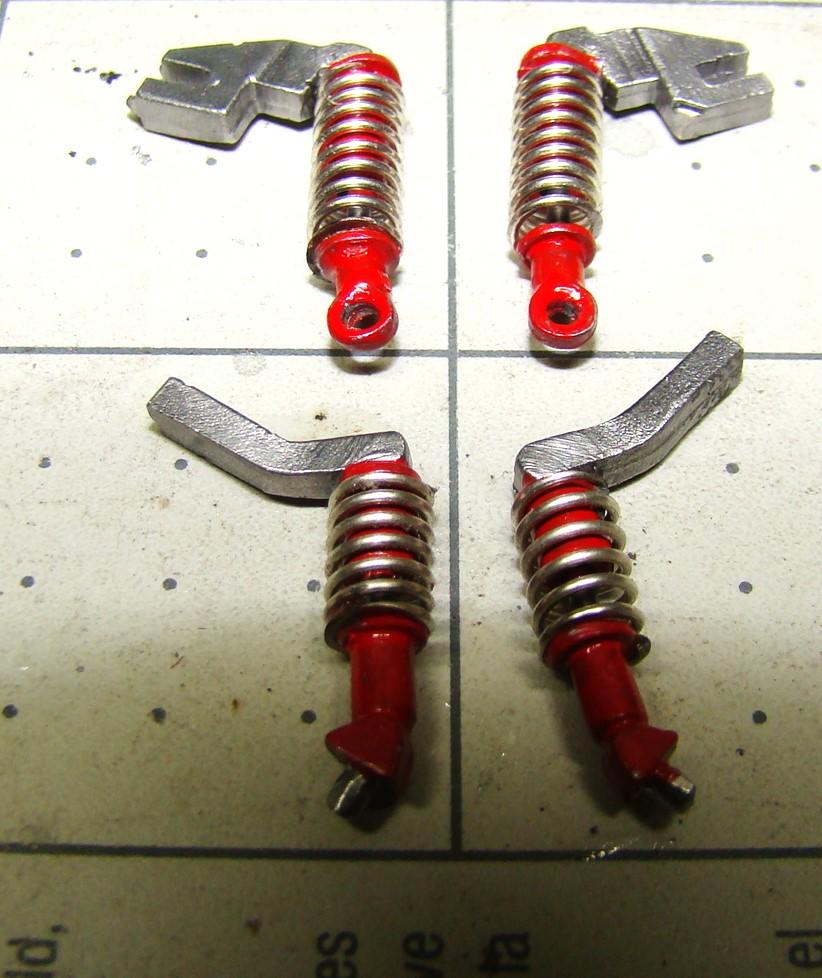
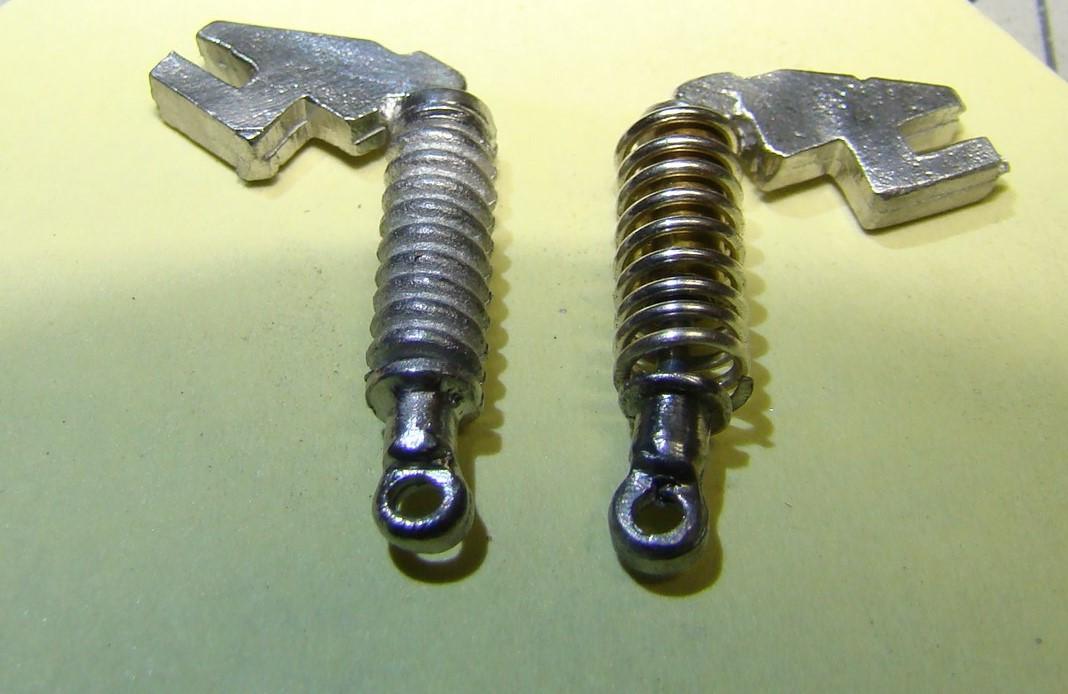
Coil over shock units all assembled and painted. Special care had to be take to ensure these were the same size as the originals. I traced an outline of both units front and rear, on a piece of paper when they were uncut. Then lined them up when glued. Hopefully this will work. I canstill bend tyhem a little if they are off slightly.
-
Aaaahh much better. Wound some springs from craft wire around a 3mm rod. Cur apart the kit unit with a razor blade. Cut some brass tubing and piano rod for the shock. More explanation below. Parts still need to be assembled. This is just a test for the correct size. Once sprayed with semi-gloss clear the upper and lower shock parts will be painted Mr color #3 red. But I'm on my way now/.
-
1/24 Ferrari 333SP
Rich Chernosky replied to Rich Chernosky's topic in Other Racing: Road Racing, Salt Flat Racers
Thanks for the vote of confidence Pierre. But its not really a race to see who gets it done first. Its to show everybody two different takes on modeling and hopefully they gain something from both builds. While Andy and I are interested in basically the same cars our approach to building them will more than likely be a little different. -
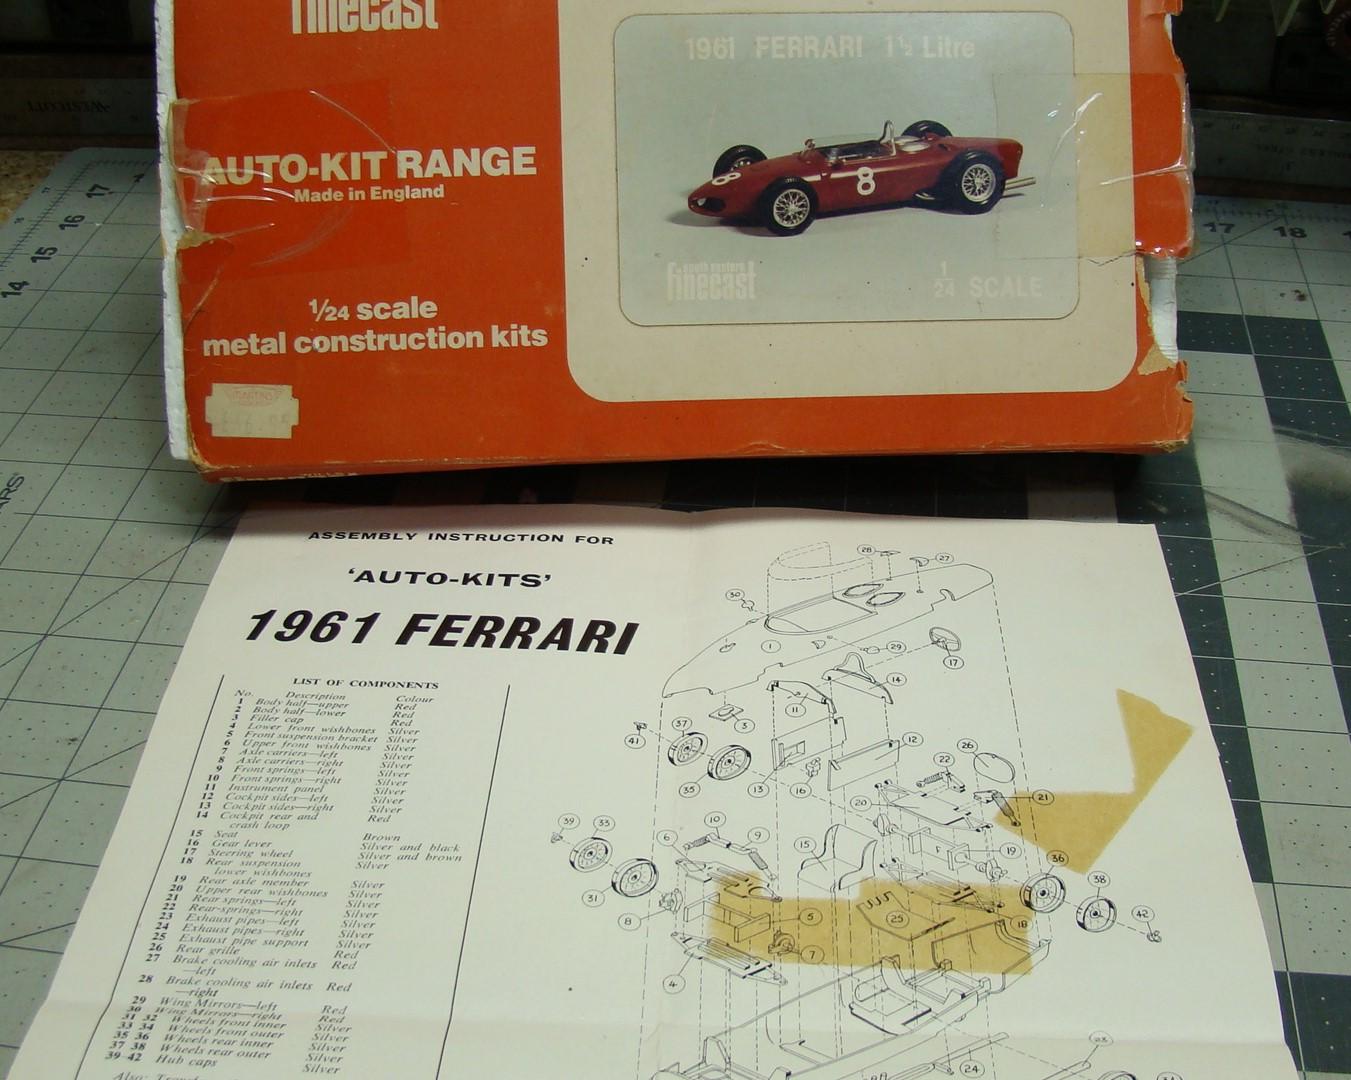
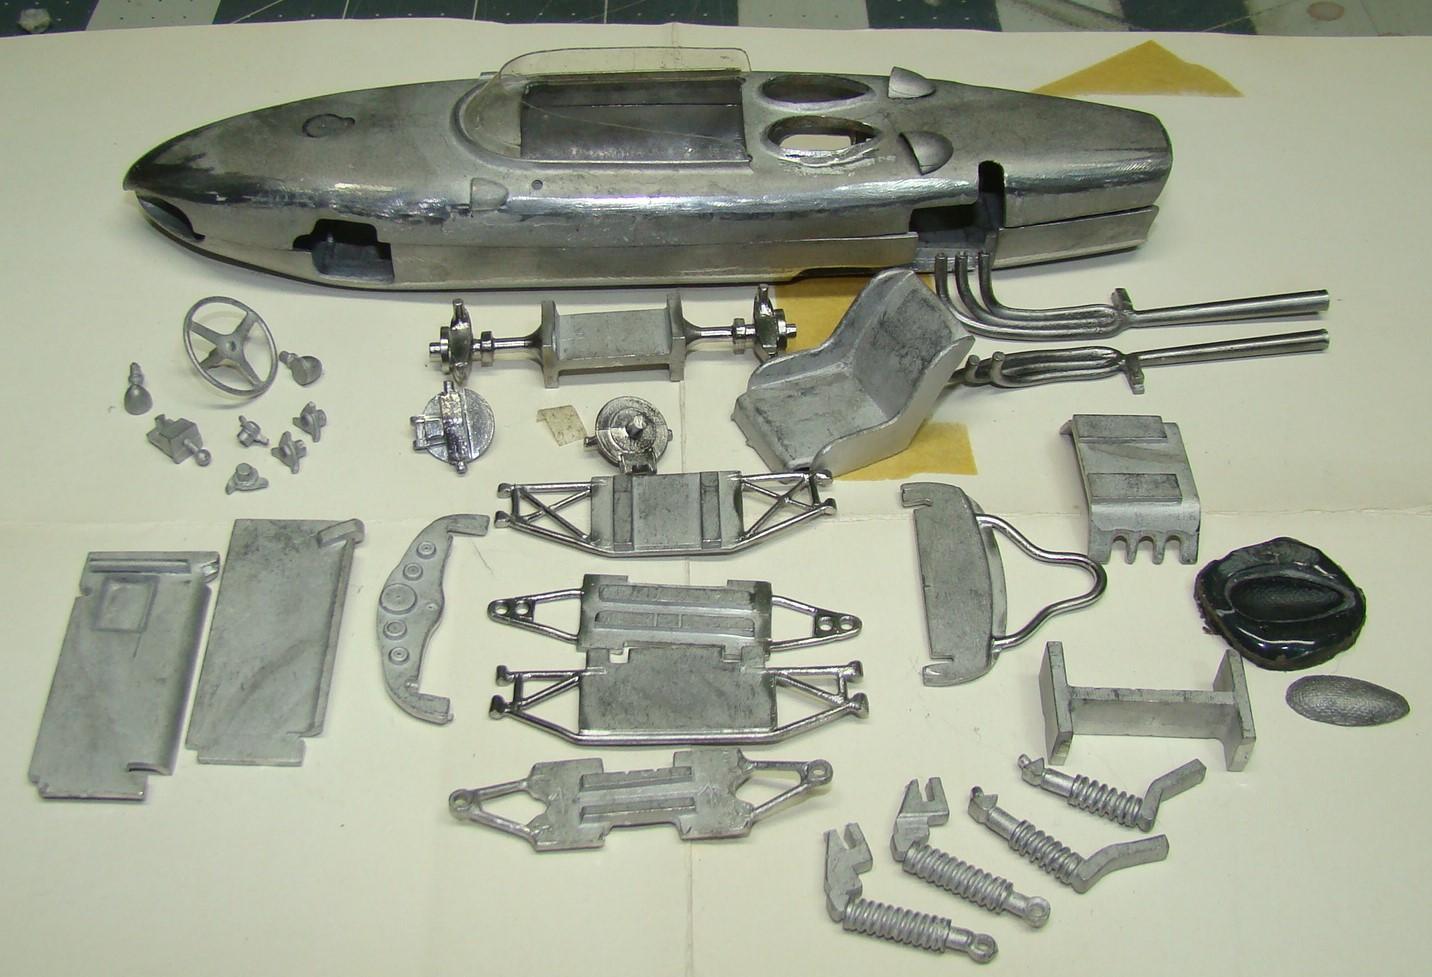
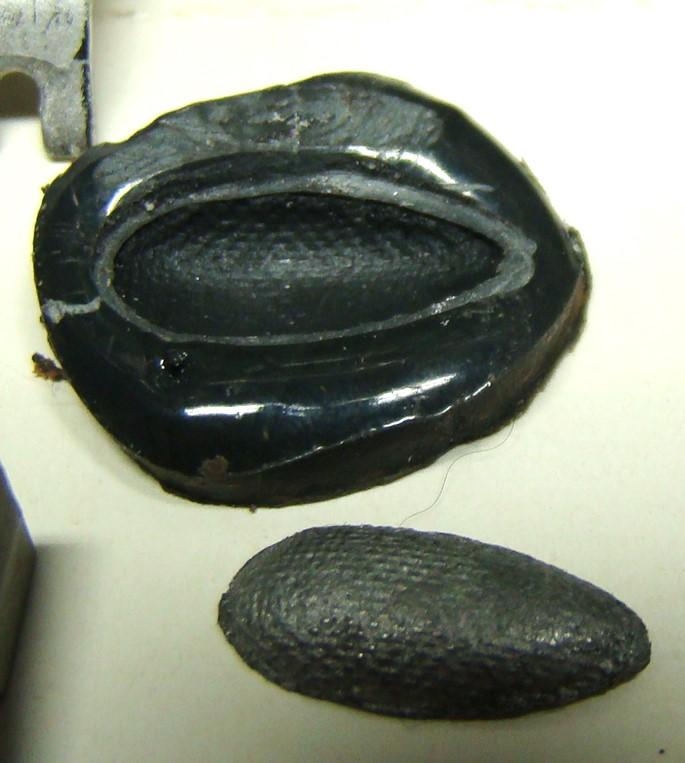
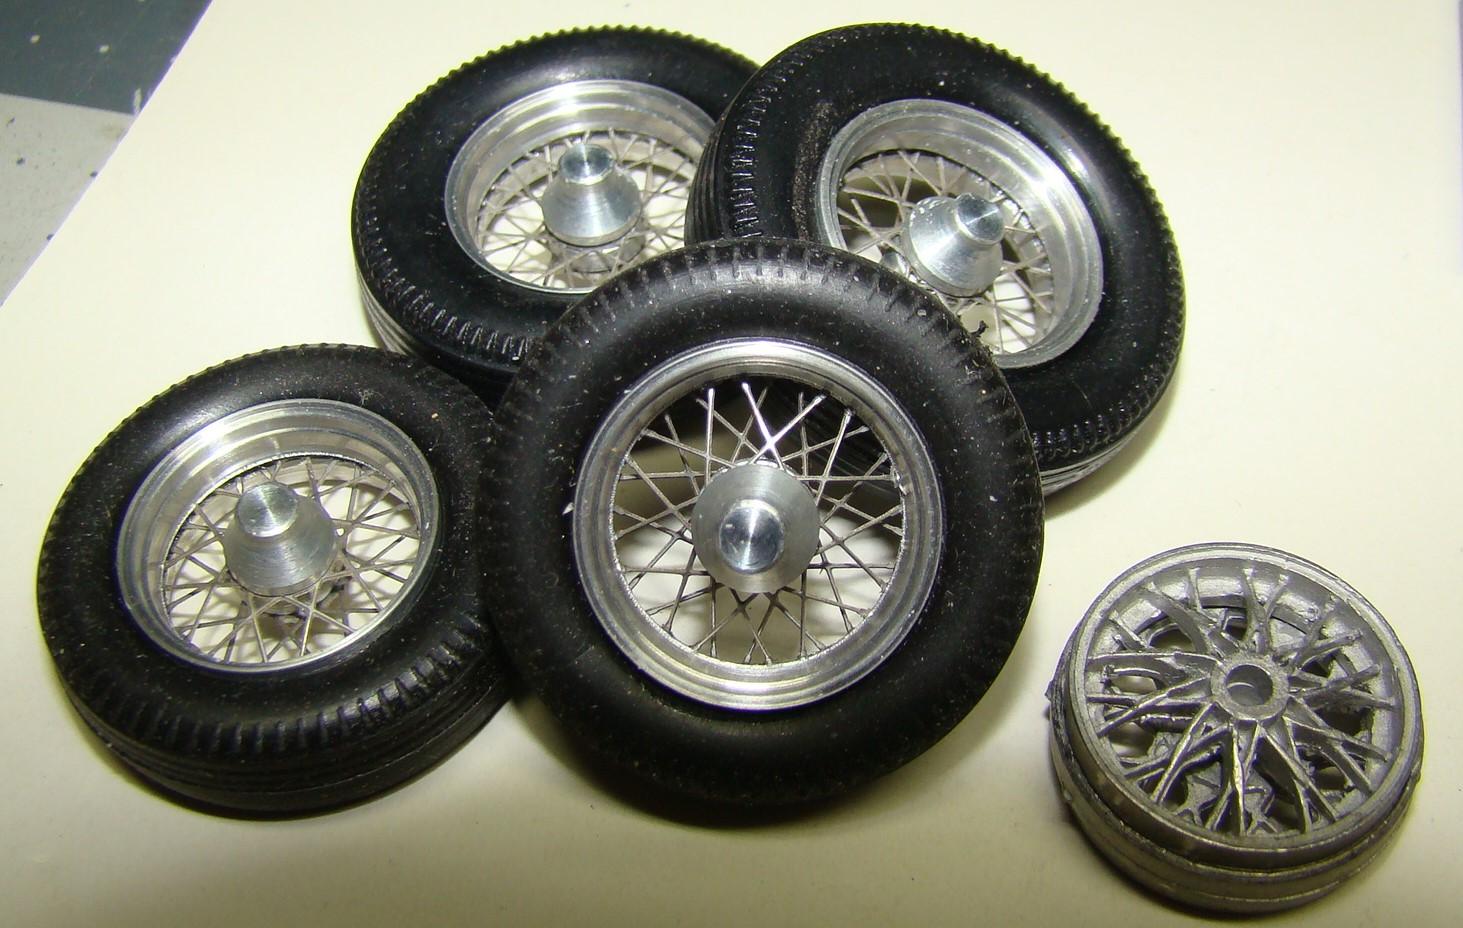
A long time ago (maybe 20yrs) , on another forum I met Andy Sapiro. One day the discussion was about these kits. I mentioned that I had several including the Lotus 25. Andy, a bit time Lotus fan, just had to have it. In the ensuing dialog he offered to trade his Ferrari 156 for it, even up. As a big time Ferrari fan, I just had to have it. It was a done deal. In a few short days the Ferrari arrived and Andy got his Lotus. Over the years and lately on this forum mention of the two kits came up. Andy suggested we do a WIP at the same time and as I was just finishing up my Ferrari 333SP I agreed. Thanks Andy for starting this post . Now here is my contribution. Whenever we modellers get a new kit the first thing we do is give it a good grok. Look over the parts and plans, maybe even make notes. We have every intention of making this our greatest project, but then we aquire other kits or life just happens and it gets put on the back burner. Although it is never forgotten. As a result,over the years this kit has made it to the bench and little bits and pieces of work are done. I even ordered new wheels from a company called Machined Aluminium Specialtys. Now gone I think. This week it has made it to the bench for good and with the incentive ( or was that nagging) from Andy it will be completed. Below the pictures are some of the work that has been done and plans for more. As an aside note: This forum has been great. The other forums I have been on were also helpful. I have made some great friends (Andy among them) and those people have enhanced my enjoyment of this hobby. We share a deep passion for modeling and things automotive. And that makes us brothers in arms. The friends I have made here and other places, are life long. I urge others to comment and leave other bits of information. This is how friendships start. And good friends that last a lifetime are priceless. Here is the kit with its long yellowed instructions. Not that many pieces but pretty straightforward. Very similar to Andy's. Mine even has the original price of $36.95 which is what i think I paid for the Lotus. Fair trade, I'd say. Here are all the pieces laid out and you can see some of the work done here. Parts all cleaned up and some areas shined up with a brass brush. Those areas will be clear coated with semi gloss clear. The steel brush left marks. The metyal is very soft. Coil over units wiill be replaced with real springs and shocks but the end fittings will be retained. Most of the interior will be light gloss grey. Note the windscreen has been cut out and fitted. Easier than I thought. I made this press mold from JB Weld (my go to epoxy) I used the cast in screen, which I cut out some years back, as the master. The srcreens covering the engine intakes will be made from brass screen using these two pieces. Later cars used a clear cover over the intakes but this will be an early version. The machined and photo etch wheels. Kit tires were resonably accurate. The difference between thes and the stock wheel on the right should be obvious. Thanks for looking. More updates to come.
-
1/24 Ferrari 333SP
Rich Chernosky replied to Rich Chernosky's topic in Other Racing: Road Racing, Salt Flat Racers
On my way..... -
1/24 Ferrari 333SP
Rich Chernosky replied to Rich Chernosky's topic in Other Racing: Road Racing, Salt Flat Racers
-
2 American prewar classics: 1/24 Monogram Cord and Lincoln
Rich Chernosky replied to 1959scudetto's topic in Model Cars
I wish some of my 40yr old builds looked as good as these two. Nice pair Helmut. -
This kit holds some great memories for me. It was the very first resin kit I purchased. It was at NNL East from a vendor I knew from a forum. I also got to watch this car win the 1998 Watkins Glen 6 hours. I ran into my friend Oscar Koveleski. He was there promoting something but was finished. We watched the race from several locations but decided to watch the last 15 laps at the start/finish line. We were also directly behind the Ferrari pits. We talked to the owners of the team , who were just on the other side of the fence, but only briefly. Reason being...the Ferrari and the Dyson Ford had been running nose to tail for the last 25 laps and they didn't want to be bothered. And the race finished that way with the Ferrari beating the Ford by only a car length. We saw the chequered flag, and the team celebrating. It was just one of those memorable moments. Oscar was great fun to watch the race with as he explained a lot of things I didn't know. He's gone now and I miss him. Don't know why I waited so long to do this kit. It was fairly complicated for a resin kit as it included full suspension, interior and some engine detail. I had fiddled with it over the years. Cleaned some parts, did the really cool wheels and tires and some fitting. But now it was time for paint to hit resin. Color is Tamiya TS8 Italian red. I added some extra features like steering wheels and seatbelts and a few other details. There are more details below the pictures. Thanks for looking and comments welcome. Detail of the working steering. Had to drill out the steering rack and fabricate the 5 piece tie rod. The boots (wire insulation) helped me adjust the track. The brake assembly and upright also had to be modified. It all worked very well in the end. The two holes through the bottom chassis pan were for screws to attach this to the body. Took 5 screws and mounting posts as none were provided in the kit. Interior was fairly well detailed. Seat material is silk thread and decals from the spares. Hardware from the kit. The black looking cowl is actually a vacuum form piece that was tinted on the inside with clear green, smoke and a little semi black. Mirrors are pinned on. Finished car on its wheels. Despite the many piece suspension parts all four wheels sat flat. Those decals over the hood louvers took some cutting and solvent. Rear end detail and not my best photo. Lots of detail here but most of it hidden by the body. The wing, although delicate looking ,fit well and adjusted easily. Still had to be careful. Side veiw. Not sure I used the right decals for the Momo. My research showed they changed the decals from race to race so it could be right. Those wheels and tires were 5 pieces each and nothing beats the look of turned aluminium and photo etch. I made new center lugs and threaded them into the uprights. Way better than the resin thingies that came with the kit. A few other pieces were made as well. Decals were by UMI and fit well and went on easily. Had to take this picture of the whole tribe. 1/18 diecast is a Hot Wheels item and it came un-decorated. I sprayed the wheels and added after market decals. 1/43 dicast is of unknown origin and the 1/64 is also a Hot Wheels.
-
Steve...now that is about as cool a project as I have ever seen. And the background story just added to it. The model is great and the creativity that went into it. Can't tell you how many times I thought about doing just what you did but never had the resources. Really enjoyed this post and the great story.
-
Lancia Stratos (rebound build)
Rich Chernosky replied to Pierre Rivard's topic in Other Racing: Road Racing, Salt Flat Racers
Pierre...what a great way to make a recovery. And it turned out so nice. You and I are a lot alike in this respect. After spending more than a month of steady work on my 1/12 Ferrari 641/2 I needed something to keep my creativity up or I was going to face burnout. A Hasegawa 1/24 Datsun 2000 convertible was just the ticket. -
Alfa 33 Stradale restoration
Rich Chernosky replied to Dave B's topic in WIP: Other Racing: Road Racing, Land Speed Racers
Dave...good luck on this restoration. Those new wheels look great. If you need anything don't hesitate to ask. -
What a paint job, what a car, nice carbon fibre work. This turned out to be a real beauty Mathias. Great job.