Rich Chernosky
-
Posts
2,123 -
Joined
-
Last visited
Content Type
Profiles
Forums
Events
Gallery
Everything posted by Rich Chernosky
-
Alfa 33 Stradale' restored
Rich Chernosky replied to Dave B's topic in Other Racing: Road Racing, Salt Flat Racers
Dave..great job bringing this one back to life. Know this kit well so I can appreciate your work which is always outstanding. Now...to machine new wheels for mine....! -
Big fan of the Nissan Skyline..gotta a bunch of em in my collection. You do nice work and the attention to detail is remarkable. Will follow.
-
Doug..my LHS has that kit and I have been salivating over it. If I didn't already have a NItto version of this car in 1/12, it would be a done deal. Mine is started. Can't wait to see your talents added to that kit. Italeri has really stepped up to the plate with their 1/12 offerings so you will enjoy the build.
-
Doug, having recently completed two rally cars. one in 1/12 ands 1/24, I can readily appreciate the attention to detail required. Thank you for the comment BTW. And this one is a stunner. You really scored here. The extra engine and all the decal work are amazing. Congrats on a job very well done. Now ...go find something easier. You deserve a break.
-
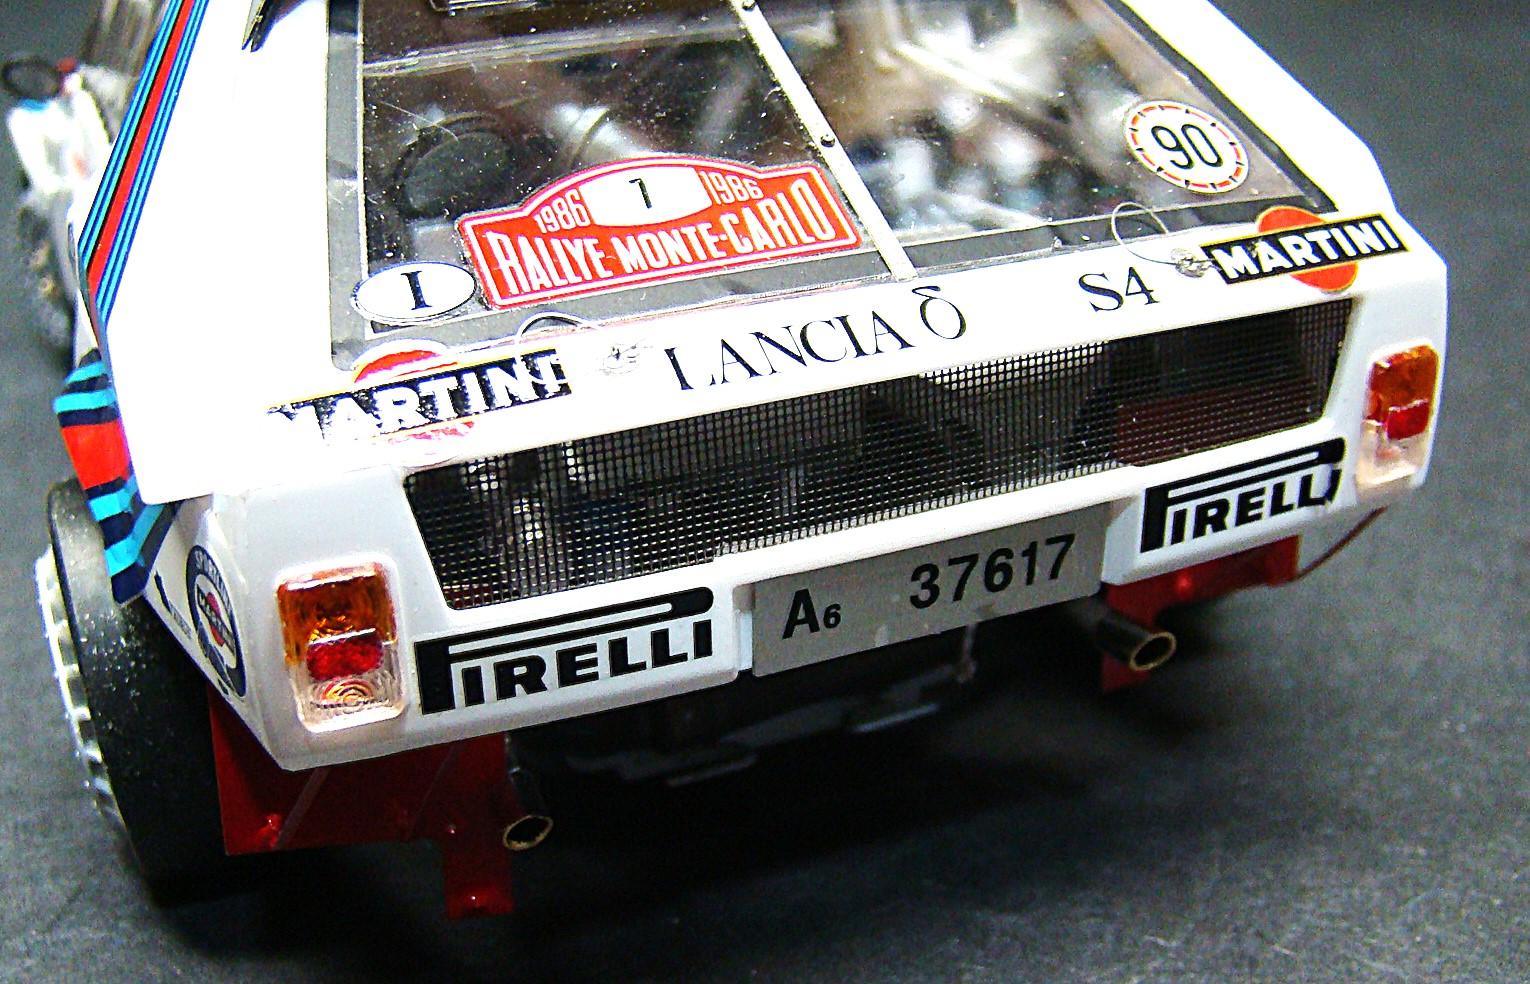
Been itching to dig into this kit ever since I aquired it. After finishing a 1/24 Lancia in the same livery it was just my incentive to do this one. Cars were in no way similar as the 1/12 was 4 wheel drive front and the 1/24 was mid-engine 2 wheel drive. This was a big kit with lots of parts, a PE sheet and two big sheets of decals. So it took awhile. Italeri did not disappoint as many details were included. Assembly went well except for some details which I will explain below the pictures. Color on this is Tamiya TS-26 white and LP5 Pure red. Many metallics and different blacks were also used. Thanks for looking and comments welcome. Engine nearing completion. Several different shades of Testors buffing metalizer, blacks, carbon fibre and silvers give this some character. Missing PE on the air filter was eventually replaced Interior nearing completion. Those decals on the dash were very fussy, especially the ones that slid over the PE. Much care has to be taken to gently slide them off the paper into place. they are v-e-r-y thin and fold easily. Bottom of the engine complete before the skid plate is attached. Lots of tiny fiddly details. the steering rack had to be replaced with brass rod as it was way too flimsy to work properly. Suspension works both front and rear. Wheels attach with screws and I added washers to stop some breakage. Rear suspension also complete. Its held together with some very tiny nuts and bolts. The rear strut plungers also had to be replaced with brass when both of them broke while I was showing someone how nicely the suspension worked. They didn't know it but I did. Finished car in all its glory. Hood, rear hatch and doors all opened and fit with no problems. Da engine all stuffed into the front. Lancia did some very interesting engineering to make this car 4wd. All hoses and lines came with the kit and were very easy to work with. Gotta luv silicone tubing. Finished interior in all its glory. Seatbelts and PE were included and there was just enough to complete. Instructions, as good as they were , were very vague on the lengths. Anybody that has this kit is better off doing their own measuring. Seatbelt material had to be varnished to avoid fraying and cut down to fit. None of this was mentioned. Finished car on its wheels. Body fit over the chassis quite easily although the front clip had to be added last. Decals in this kit were, for the most part, amazing. I absolutly luv this livery and have many models (over 50) in this. Rear veiw and lots to see here. Those PE mud flaps were a pain to paint and attach but I managed. This car depicts the Monte Carlo winner driven by Didier Auriol/ Ocello. Lancia had a great amount of success and the late 70's and early 80s and this was one of their most succesful models.

-
NIce collection of cars. Excellent workmanship. Really like your window trim. Hand painted or airbrush?
-
Welcome to the forum Kaci. Many of those 1/12 Porsches have been built so there is plenty of good information here. Really like your builds by the way.
-
Pretty cool. Real nice conversion. I always considered the T-70 to be the sexiest Can-Am car.
-
The Tamiya LP and TS lines are NOT compatible. I mixed the two of them and found the resulting gelatinous goo totally un-useable. I de-cant a lot of my Tamiya TS paints and they spray quite nicely thinned with MR Color leveling thinner. The LP sprays just as nice and in particular the clear comes up nice and shiny when sprayed and tinned correctly. Just wish some of those paints (clear, white, blacks and silvers) came in larger jars and were more economical.
-
Great tip Greg. I have 2 Paasche H airbrushes (1 med, 1 heavy tip) That I use on a daily basis. They have been my "go to" for many years now.
-
Belkits Skoda Completed
Rich Chernosky replied to dougwintz's topic in Other Racing: Road Racing, Salt Flat Racers
Gotta luv rally cars. They are so loaded with detail. I can well apreciate all the work you put into this having just completed one and working on another. Thanks for all the great pictures of the detail. You knocked this one outta da park, Doug. -
Interesting project and comparison. Sooooo...you are a fan of the prancing horse.......me too.
-
Alfa 33TT12 Chassis AR11512-010
Rich Chernosky replied to Dave B's topic in Other Racing: Road Racing, Salt Flat Racers
Dave,,,you have knocked another one out of the park. That is simply gorgous. Followed your WIP as well and thanks for doing that too. -
John...I can certainly identify with working with tiny pieces of photo etch having just completed a project with 100's of tiny pieces. One tip I can give you if you aren't already doing it. To get those attachment points on PE I use the cut-off wheel to the moto-tool. Chuck the wheel into a battery operated unit on at the lowest possible speed. Hold the piece tightly with a good pair of pliers and gently move the piece up against the spinning wheel. Hold the piece on its edge and make sure you use the side spinning away from you. That little attachment piece will disappear very quickly. I work on a full sheet of black construction paper and keep it completely clear of tools and parts. The parts will fly ( and some will fer sure) but they show up on black easily. A magnet sometimes helps too. You are doing a fabulous job on this project. That dash is killer.
-
Brian...I started racing slot cars (HO first) and building models around 1963-4. That's 62yrs ago. And I have been doing it continuosly ever since. In that kind of time you can accumulate a LOT. I bought things when they came out, persued collections, went to shows. It has never been a hobby to me. More like an obsession. Call me a sick pup.. you're probably right. But on the bright side I am willing to share. Anything I know is yours just for the asking. Now...about that Batmobile ????
-
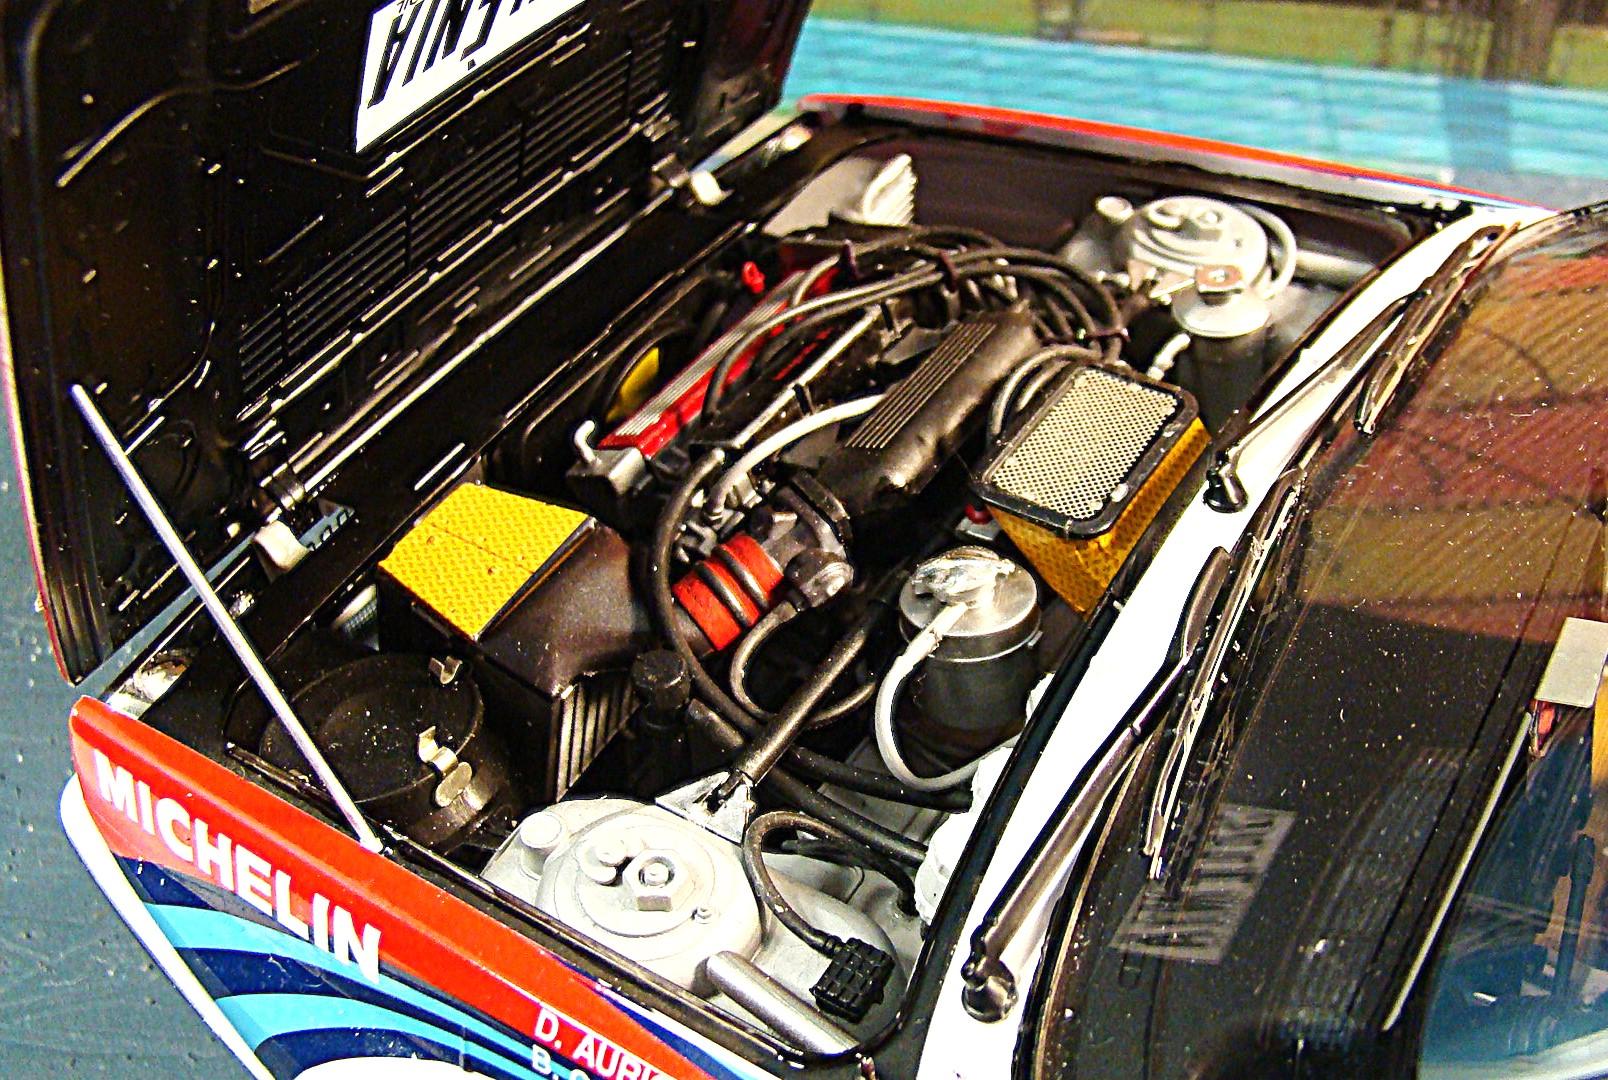
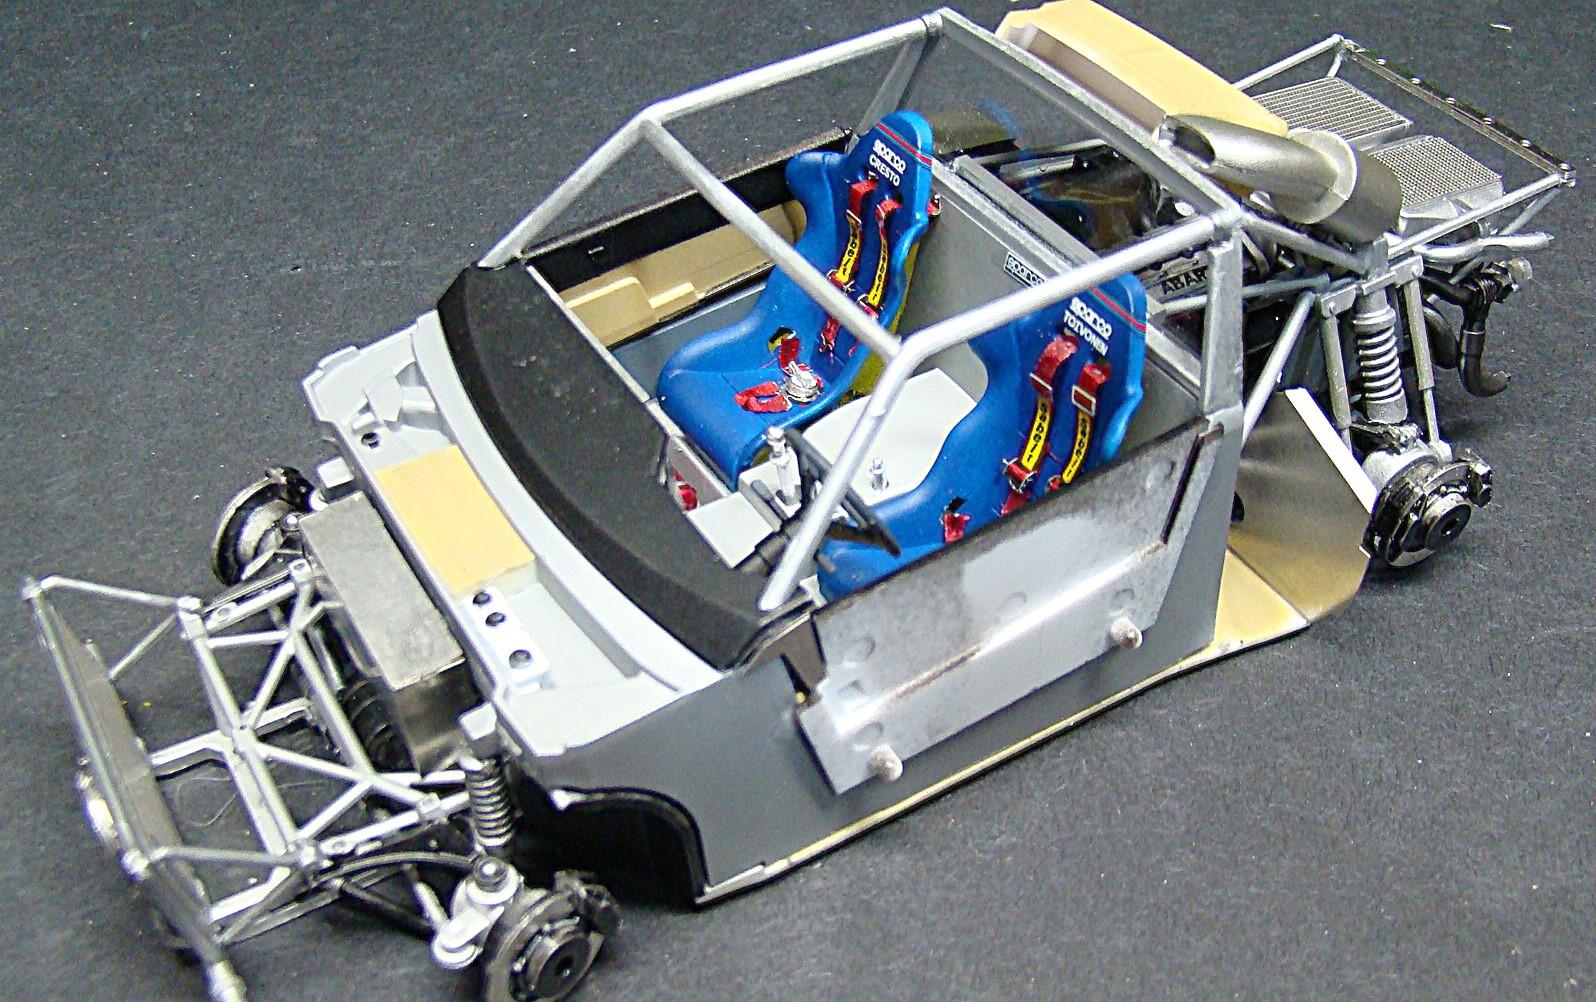
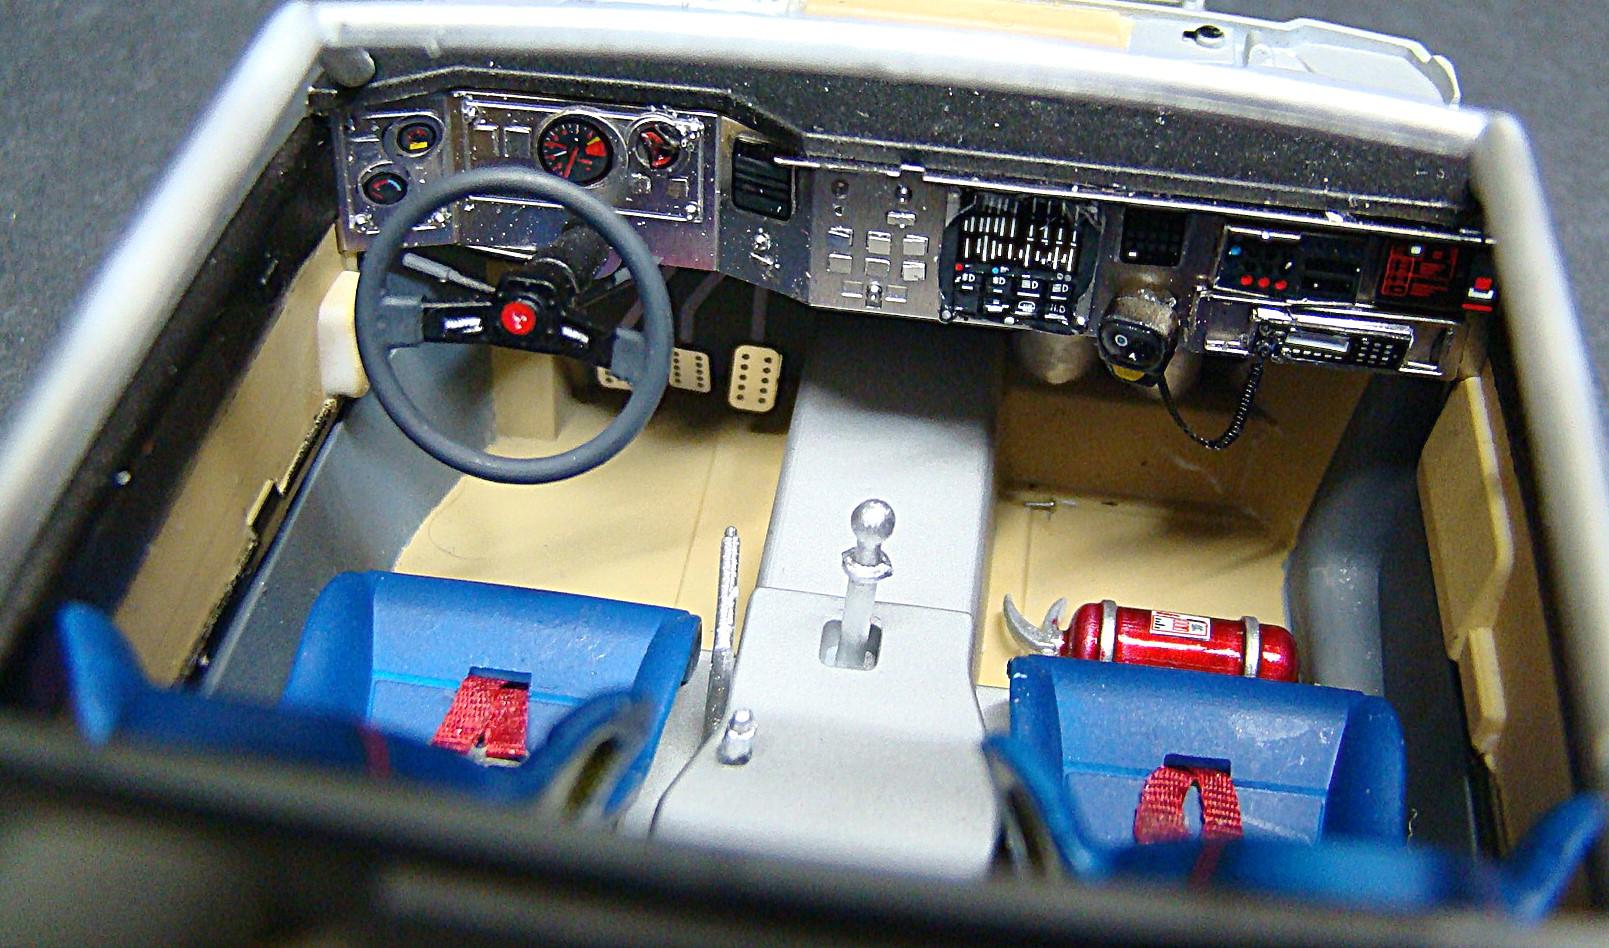
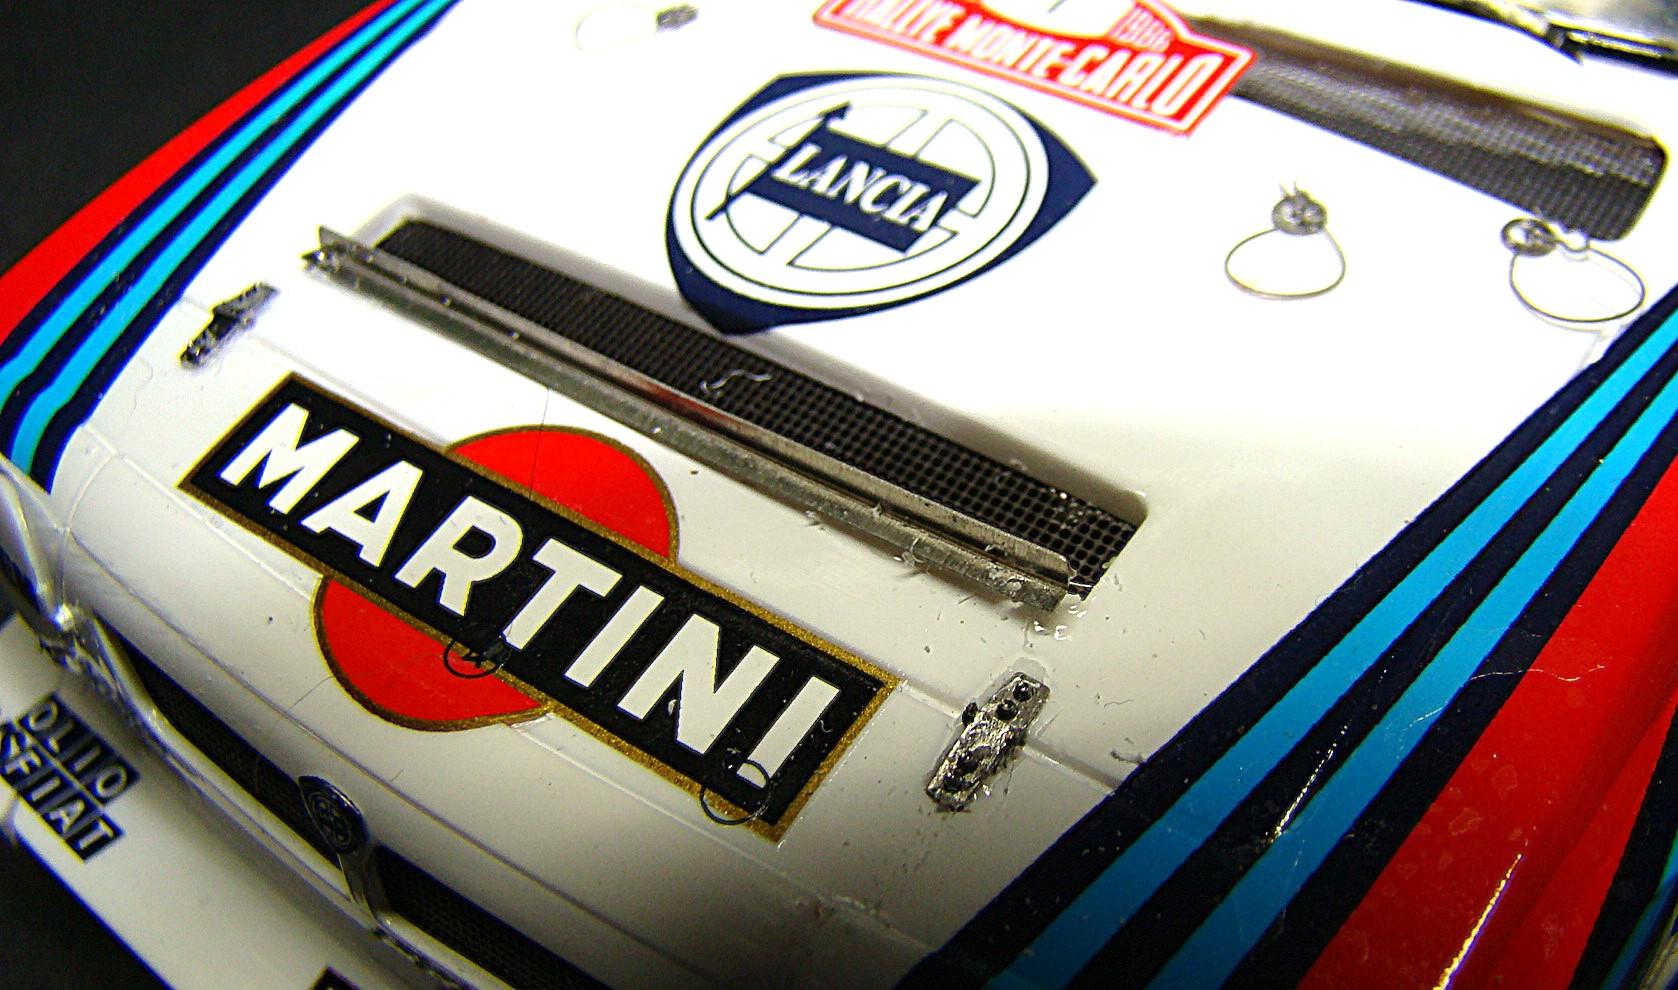
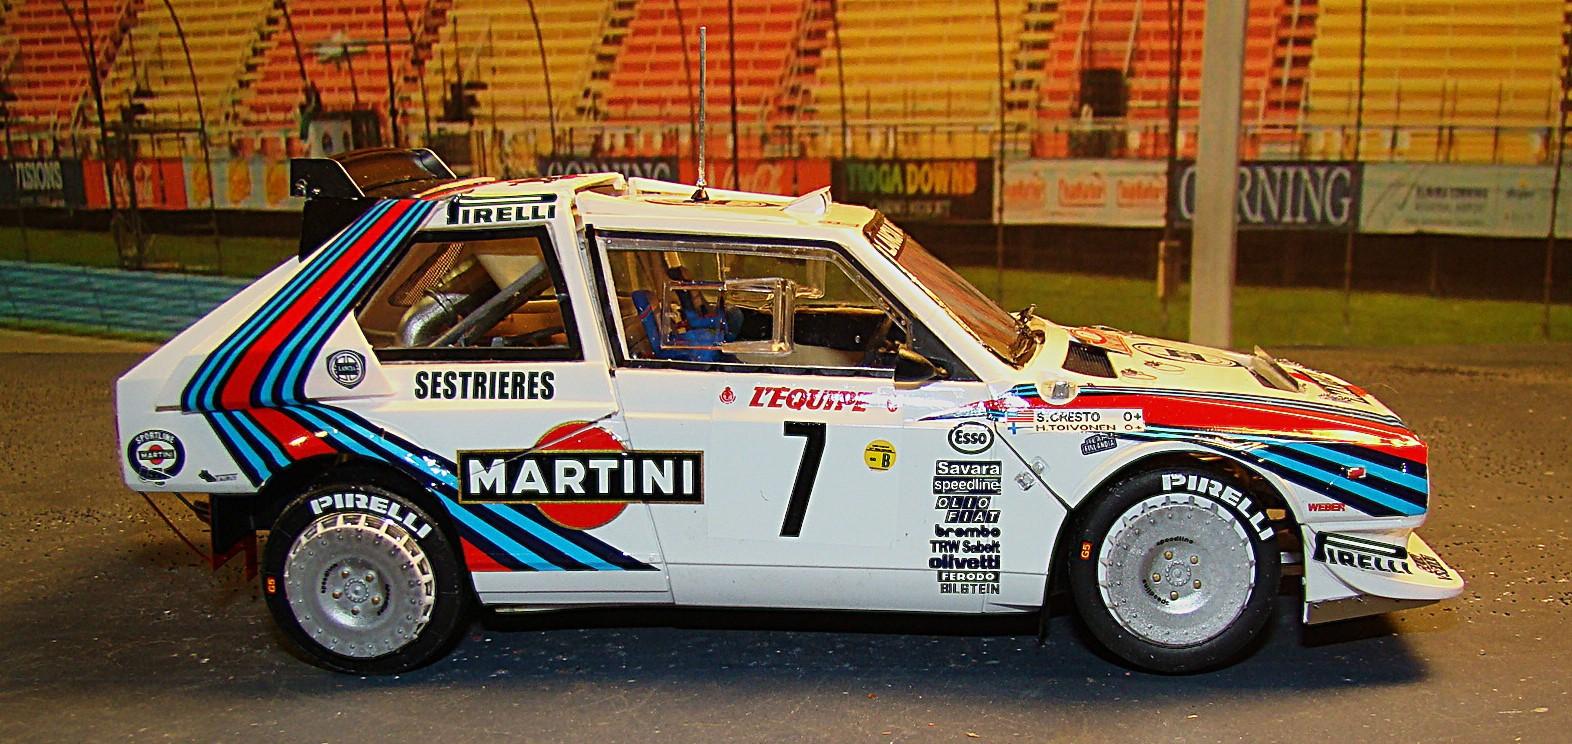
Always luv a good rally car. They have so much detail. And this one especially since it fits right in with my extensive Martini collection. Kit was very well engineered with lots of detail but I went the extra step and added the Hiroboy detail up set. Color on this project is Tamiya TS26 white. Mr Color #3 was used for accents. Many more details under the pictures. The chassis on this beast mostly complete. These cars are built like a tank and Aoshima represented this very well. Lots of photo etch was added and I left most of it bare for effect. Hiroboy added material for the seatbelts but I rejected it as it was too stiff. Instead I used silk thread cut down to 2mm. The hardware was nice. The rear engine Abarth tuned and turbo-charged 4 cyl is nestled in there somewhere under all those pipes and radiators. The incredible photo etch dash. This was over 80 of the smallest pieces of PE I have ever attempted. 80+ pieces. Took tyhe better part of 3days to complete but worth it in my opine. Some of the detail in PE on the hood. Thiose hinges comprised of 6 pieces and actually would have worked if I had decided to open this section. Camera never lies and the Martini decal picked up some of the number identification off the sheet. Not really visible to the naked eye. Haven't decided how to correct this . More photo etch detail back here. I lost the exhaust tips from the kit but was going to replace them with antenna tubing anyway. Finished car on its wheels Whew!...what a job to get to here. Body fit well and both the front and rear clip open as well as the wheels steer Rear veiw. Those PE mud flaps were a real treat to build and install. Front flaps wound up being black vinyl tape as the PE ones were never going to fit no matter how much bending it took. This car represents the one Henri Tiovonen / Cresto won the Monte Carlo rally in 1985. Next up on the bench is the 1/12 version of this car. Should be a little easier on these ancient eyes...he says jokingly.
- 12 replies
-
- 13
-

-
- 1/24 aoshima
- beemax
- (and 1 more)
-
Show Us Your Work Bench
Rich Chernosky replied to Bruce Poage's topic in General Automotive Talk (Trucks and Cars)
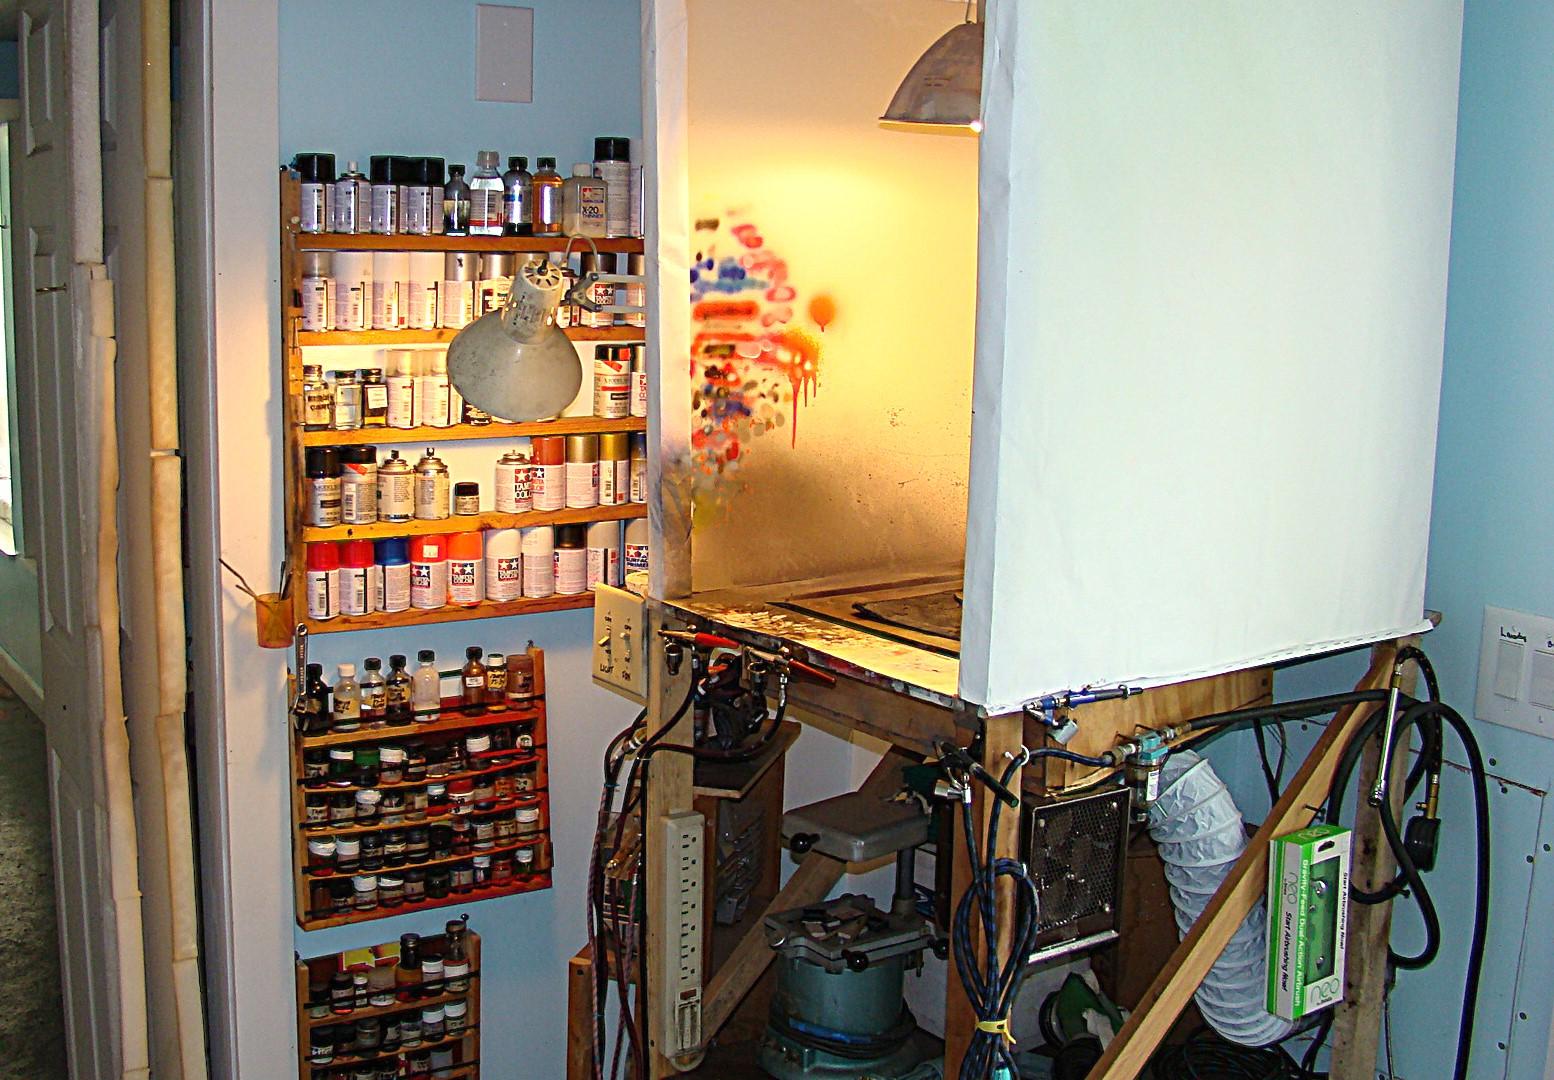
Tghis is a great thread. Really enjoyed seeing the area that some of you create your masterpieces. Some of my fellow modellers have asked me how I produce so much work. well this is the answer. A well lit, organized and comfortable work area. This is the result of many years of resets. I have all the tools and paints I use the most in the center. Everytrhing has its own spot so clean-up and work is quick and easy. Yes...it usually looks this way. A few more details under the pictures. Counter top is granite. A razor blade clean everything off including any type of glue. The two racks in the center hold all the knives, pliers, tweezers and some of the frequent ly used paint brushes. Moto tools and bits are in the slide out drawers (made of plexiglas) under the orange drawers. Most of the decals and other scratchbuilding supplies are in the many drawers. Most of this was hand or custom made over many years. Around the corner form the model room is the paint booth and several racks of sprays. The paint booth is custom made and is of the down draft type. The center section lifts up to expose the exhaust that has a filter over it. The filter is a cheap scrubby pad btw. It exhausts through the wall by the dryer hose. The blower/suction fan is mounted to the outside of the house. It has a 145cfm capacity . I have used this design for more than 30yrs now and never had a problem with fumes or over spray. Keeping it clean however.......<G> Compressors are mounted on seperate stands to eliminate vibration.
-
Real cool collection of Batmobiles, Brian. Who makes the 1950's version. First time I have ever seen it. I have a huge HO collection of Batmobiles but not this one...soooo I'm jealous.
-
McLarem M8B
Rich Chernosky replied to Mark W's topic in WIP: Other Racing: Road Racing, Land Speed Racers
Mark, compared to the vinyl fittings , the new ones are way better. Wish that stuff was available when i built mine. Some of those lines and hoses, particularly the ones on top of the engine may also interfere with body fit. The new ones are smaller and more accurate so this should eliminate that problem. Your progress looks very good and I can identify with your enthusiasm. -
Real sharp build there Ken. That engine compartment looks all business. Followed your WIP and thanks for that too.
-
Italeri 1/24 Ferrari 250GT California Spyder
Rich Chernosky replied to Justin Porter's topic in Model Cars
Very nice Ferrari California Spyder Justin. Followed your WIP. That came out great. Thank you for your efforts.